Transcripts
1. 1 Introduction: welcome to my family portrait photography Masterclass This class is for all the people they're trying to get into shooting family portrait or currently shooting family portrait and are struggling and want to get better. No matter. Just picked up your camera today could be shooting for the last 25 years. I promise you, there's gonna be something in this course is gonna help. And this course we're gonna be talking about posing. And I'm gonna show you through all these different examples how to pose in many different variations. Whether you're having the whole family or Justin kids, we're gonna talk about it off. We're all gonna be talking about lighting and all the things you need to focus on whether you're shooting with natural light or using external lighting. We're also talking about on location and how to shoot your best images. Anywhere you go, all the things you need to do with shooting on location. We're also gonna be talking about Pinterest and setting up move boards and working with clients on with using Pinterest. And this course includes a Pinterest board that I created with over 100 examples that all categorized that will help you when you shoot with your next client. This course has a little bit of everything, and it's really gonna help you take your portrait photography to the next level, whether you should have families, kids, couples and so on. My name is Angel, and I've been doing photography for the last six years. I specialize in fashion, beauty, kids, families and events. I've been shooting with hundreds of clients, and I've talked all these different courses on photography through this platform. So if you're ready to take your photography to the next level, sign up for this course today and I'll see you there.
2. 2 About Family Photography: in this section, we talk a little bit more about family portrait photography. In my opinion, family portrait photography is one of the styles photography that has the highest demand. The reason I believe that is because any time you go into a family's house the only pictures we really see in the walls in the tables and such are pictures off fam off their family portrait, it's whether they take them professionally or not. Professionally. Family portrait are something that every family silt tries to get because it gives the memories off their family through the ages. It takes them with them as their family. Is it growing up and and to show off his share, do things like invitations and gatherings. So family portrait are very sad out over any other stuff. Weddings are once in a lifetime. Birthday parties are are like only shot, rarely in certain milestones. But family portrait it's are the ones that people print and put in their walls and carry with them in their office. And those are the ones that everybody wants. So with that, I also feel like that's a supply, for it is very little. Many photographers are out there trying to pursue Wedding Photographer, your fashion and shooting with all these different styles that have hard to get clients and little demand versus what I feel like family portrait it's bring. And because of that, there's a great opportunity for you. If you get really good at doing Family Portrait, it's to make a lot of money and be able to make a living off off family portrait. It's family portrait. It's lead to things like maternity shoots, newborns, kids, couples. Once you do family portrait, it's kind of like an umbrella towards all these different categories of photography. If you get good at Family Portrait, it will lead to other works, including event photography and certain fashion shoots that will lead to just like Senior Portrait's, um, and and others, um, types of photography there, just like individual based because you did such a good job with their family pictures. Another great thing about the family portrait is that leads to a lot of repeat business. When a family you take a picture of them, they come to you almost on a years and basis. I've had this family. I've shot four years in a row already and it's great, because by being a family photographer, they come to you year after year. So it is something really great to do now. The problem I see with Family Portrait. Besides that, there's not a big supply of it is that is one of the hardest types of photography's to master. There's two reasons I feel family photography is one of the hardest to master. The 1st 1 is that this very little education in it, if you go on this platform, you'll see that there's less than a handful. Of course, is there actually teaching how to shoot with families versus any other category of photography? There is accomplice courses on this, even myself. When I was trying to learn, they were almost anything out there available, and everything out there was very basic and limited, and I hope that this course gives you the most that you will get out off learning how to shoot families. The other reason I feel like is the hardest is because very little opportunity to practise shooting with families because there's not enough like practice out there like people don't shoot like their own families enough, and it seems to be like easier to practice with other styles versus families. And the other thing that I see a lot with family photography is that with the lack of education, there is a lack off, like people seem to get stuck doing the same things. There's a lack of experimentation when it comes to family photography. I see a lot of people that shoot family photography's get in front of a family, get nervous and do the same poses same style every single time. And hopefully a course like this will help you break out of that and try some new things to helpfully like developing grow your your photography and your portfolio. There's never really been like seven rules to follow. Phew, phew, phew! Instructors out there have tried to create some rules to follow When shooting with families , I'm gonna break many of them to you, so hopefully this can help you take the your photography to the next level by having some things in the back of the mind to look for in your images to make them better. So I'm excited. This isn't create course. There's so much information in here, so tune in for the rest of the course, and I know I'm gonna move on to the next section
3. 3 Making Lists: in this section. I'm gonna be talking about making a list One of the things that I've made a mistake doing and I'm sure you have. And many of you have made a mistake doing what shooting families is missing. Certain variations of the family members and the final images. So what I mean is, unless you have a family of five, there's countless variations and wish you compare them in images. It won't just be all five of them. It could be a mom and that mom and all the kids, that and all the kids that would each kid mom would each kid, all the women, all the boys. Um, if there's a newborn, each member holding the newborn, there's so many variations that you can do and the lack of making a list and planning all the variations that you want to do, you will most likely miss some of the important ones. And then people are gonna ask later, we should have done this. We should have done that. And I remember I made that mistake. I would just come in, start shooting off the top of my head and then regret not having a picture of mom and her daughters, and it's things like that that's very, very important. So the first thing and this court's I want to talk about is make that list with the parents . What I recommend is make the list with Tell them this is the list that we're gonna do. We're gonna do together one like this one like that one wit. All boys are girls, Mom and the kids moment. Each kid, however you want it, make sure they see them list, and they approve the list, and it's almost like they're making the list themselves. You give your insight in all the different ways that you could think of to work with them, because that's really gonna help you. Just going through the list will give you enough to deliver to feel like you've done your job. Then it just comes to like trying a few poses a trying few spots within a location. But most of your job is fulfilling the list. When you can fulfill the list and get at least one good image of each thing in the list, you're good for the most part. When being hired to take family portrait. It's so make that list and I don't know which you Oh, you did everything on the list were good. They don't know that you have other plans in mind, which we'll talk about in this course for certain images. But at least if you get to do these and you do these rights, then you can. I know that you got your job done right, so my recommendations make that list. The other thing about this lessons, too, says you're obviously going to take multiple pictures off certain variations. Let's say grew photos or like Mom with the kids. Are dad with the kids or whatever variation you pick? Note that some are more important than others and talk to the parents about. Tell them which ones are most important to you, right? Let's say you have 10 variations. Tell them whether the three or four their most important, these are the ones that I might do multiple off while the other ones that might just do one , maybe two off. But I'm gonna focus more on the other ones by knowing that whenever you're moving around from spot spot, go to do the main ones there and then choose whether or not to do the other ones, but do the main once. So figure out which variations are the most important. Get all of them first, get him out as a way to get a good even if its basic image of all the variations and then focus on the rest of the shoot, making the main one stand out and get some great images with those. So that's it when it comes to making lists. Have that from the beginning. I recommend on paper rather than on your phone. That way you can just have it, See it and like, right on it and stuff like that before finishing the photo shoot looked at all your images and make sure you've got everything. You got everything. You're good. You can finish your photo shoot. Okay, let's say when it comes to making a list and now we're gonna move on to the next section
4. 4 Landscape Images: in this section, I'm gonna be talking about the landscape image or the grand image. This is an image that is a really big image, usually showing a landscape if you go somewhere. And there's all these trees, this nice view or this landmark in the background or whatever you're showing in the background. If you get a big image with the family, I love the smaller if not soon, then all the way to the family. But it's a little bit smaller, maybe at the beach, them walking that you could see the whole ocean. Whatever it is. This large landscape image is the image that families are more likely to print and is the one that there you can recommend them use on Facebook as their cover image. The cover image is his long image that goes on top on their Facebook profile, and if you get at least one really good image, there's a landscape image. Then it's something that they can share on Facebook that they might print that is a little bit different than all your regular tight posed pictures, so really like. Think of ideas from like looking on Pinterest and the boredom will provide. And when you're on location having the back of your mind, what's a nice big image I can create here with this photo shoot session so that I can provide that as well to add more value to your shoot and the images that you provide? There's just one of the ideas that I tried to incorporate in all my photo shoots. If you don't get it, that's fine. It's not a deal breaker, but if you can get, is gonna make and grow the value off the work that you're providing. So that's a when it comes to this last game image, and now we're gonna move on to the next section.
5. 5 Time Lapse Images: and this. Actually, we're gonna talk about time, lapsed moments. And what I mean by that is these are the images that show the kids in the current age and stage of their life that there. So, for example, this could be an image with a baby wearing diapers. You know, to show that they're being to remember them when they're older, are doing something goofy showing that they were a little kid, something playful that kid could do. Another thing is you can show height in these images by having parents standing with the kids all the way. I like knee level or very short. Images like that are great keepsakes because it shows the kids when they were little. So when they look back, they go, Wow, I can't believe this kid was once this little. These are great images who have If you pose them all at same height, by having them care each other or like city, then you're kind of hiding the age or the height of the kid that they had at certain moments in their lives. And you want to be able to show that at least in one image, you can get one good image. This shows that stage of that kid's life that's gonna be something great that they might want to redo and show a different stage and a future photo shoot. They might come back to your year later saying, Look, the kids grew through inches. Let's take a another image to show how much they grow. I had a family that I shot that wanted to shoot their boy. They had three kids on. One of the boys was a little kid, and they wanted to show this kid years later growing up. So a year later they would shoot them again. They asked me, Oh, the kid has grown. I want to take more pictures of him And then the next year I want to take more pictures to show he's grown some more. But by not having time lapse images than what happens is that those images in three years could look like the kid hasn't changed. You really want to be able to find a way to show change in the kid Throughout the years, kids grow fast. They grow on, make drastic changes in their appearance over time, try to find a way to show that so that's when it comes to time lapse images does a great for to add to your family portrait sessions, and now we're gonna move on to the next section.
6. 6 Photojournalism: photo journalistic images. Now this is a style of photography for photojournalism, where you're taking candidates off the family doing whatever action that they might be doing, and it's not posed that might not even be looking at the camera. A lot of the times there, smiling or serious or whatever you're showing emotion. You're telling the story. These might not be like the main photos people are looking for, but if you're the type of photographer who likes capturing moments rather than creating them, that this could be something that you can add to your portfolio and add to your style of photography. I'm not saying make the whole photo shoot before the journalistic. I'm just saying My recommendation is, if you like that, added, on top of everything else, one way to do that is throughout the whole photo shoot. As you're moving around as you're doing things as you have, the kids playing in the playground take pictures of them, Um, when? When everything they're doing and see if you capture a great image, did you can add to the final images that you deliver? Um, another good way to practices is to just take a camera what? You everywhere you go family gathering birthday parties, whatever and start taking pictures of people to get a practice. The photo journalistic. I I'm not gonna be teaching 40 journalism in this course. Discourse are gonna be things that are more like things that you put together and oppose and you've created rather than just catching things in the moment. But I do want to talk about this because it's something that a lot off family photographers are doing nowadays. And it's something that I want you to be aware that it exists. Practice it, see if it works, which your style And if you like doing it, added to your photo session. So you have a couple more images that you can deliver that were caught in the spur of the moment that are candidates of people just being themselves. Maybe you catch a great moment of, uh, mom tickling her her daughter, or that throwing a kid up in the air, whatever it is, if it wasn't planned and they're just playing around, you might get get a great image off of that. So that's it when it comes to photo journalistic images and it's something great to add to your family photo session. If that's your style of photography and now we're gonna move on to the next section.
7. 7 Outfits: in this section, we're gonna be talking about outfits. One of the things that almost every family I've ever shall with us asked me is wish everywhere, and there's no real good answer for this. Everybody is different, so there's no rule that fits everybody. The only thing I reckon I can recommend is to tell people to bring several outfits. You can't go wrong with them bringing extra clothes because what had happened is a now if it's just not working and they didn't bring another outfit and we're stuck with an outfit that doesn't look it or an outfit got dirty. And now the rest of the images are dirty, and I even had to photo shop it off where they have to deal with it. Having extra outfits really, really helps. Another thing that I can recommend it is make sure that the whole family matches. It kind of looks weird. One person stress completely different than everybody else, so make sure that they match one way or another. The next advice is make sure that people are dressed appropriately for what you're where you shooting. If you shouldn't have to be to make sure they're wearing beach wear and we're shooting in a field. Make sure that they have the appropriate shoes to walk in the grass that they don't have. A long dress is gonna get dirty and the dirt. Make sure that the outfit matches where you're going. If it's when buildings, maybe they look a little more professional that they have jackets on if it's cold out. Another advice I can give you guys is hat. Use Pinterest to your vanish to help people pick their outfits. Now it's not like the biggest advice and 90% of time I'm not gonna do it. You really start. Somebody's really asking, watching, aware, wishing where when we talk about pictures, we'll talk about that later on and they're looking at images. I sometimes tell them. What are they wearing? See, that helps you decide what you that should wear for this location. If we don't go to the park. Si with the people in the pictures images are wearing at the park on things like that will really help people out because they can see and be like, Oh, I have something that looks like this in my wardrobe. You don't know what people own, so recommend recommending stuff has always been a downfall for me. Like I tried in the beginning my career to tell people a bring enough. It looks like this and bring enough. It looks like this and people don't have it. I've seen people go overboard and go to every story to find something that matches what I told them to wear. And I think that's too much. Shouldn't be like that. Just give them that for them to look at and they can see for themselves works and just tell them. Bring extra clothes. You know, they can change their. And then, you know, we could talk together in person about what you should wear and everything. But bring the clothes that my number one advice haven't bring extra clothes if they're debating between three or four outfits, haven't bring all four outfits and they can change their. So that's my number. One advice for outfits. That's it when it comes to outfits and now we're gonna move on to the next section
8. 8 Time: in this section, we would be talking about time. I want to talk about the length of a photo shoot and things you need to focus on when it comes to time. When doing a family portrait. Now most family portrait are shot between 1 to 2 hours. Now some could go longer. Chances are we'll be less than that. But knowing that you should be able to plan well, your shoot to accommodate for that 1 to 2 hours they're gonna be shooting USIA. In most cases be shooting at one location. Some people shoot multiple locations, but knowing they're gonna be shooting one of two hours at it is probably gonna be in one location. There's certain things you can do. The first thing is make sure that the time is good for lighting. Take account for weather lighting. So what I mean by that is if you have a chance to control the day like lets you today will figure out the time specific, and you see the certain times of the day is gonna be more cloudy than others. Then shoot for that when we talk about lighting again and realising that plotted clouds are better than when there's no clouds in the sky. Um, so if you know that there's gonna be certain clouds, shoot for that. If you know it's gonna rain, just knowing you need two hours. So if it's going to rain a certain time and you have to move the shoot movie shoot so that you have two hours at most off uninterrupted. No ring. You can shoot after a ring, but it's better to shoot before because after a rain, obviously, things are wet. Also, another tip when it comes to rain. Uh, a lot of times when it says it's going to rain, it's gonna rain for a small period of time, like 15 minutes 10 minutes, five minutes with that don't castle issue because of rain. Um, if I live in Chicago known as the Windy City, it says it's going to rain a lot. And if I were to castle my shoes every time it was gonna rain would miss. I would have half the experience I have today. Every time it says it's gonna rain, I still say, Okay, let's play by ear that day because it says it's going to rain. So, for example, you have a shoot plan for April 15. Okay, then that week of April 15 you can see if it's gonna rain or not. It was gonna rain. You still don't castle you to shoot. You tell the customer we're gonna play my ear that day on the time we're going to shoot because of the ring. Now, if they tell them, you know, trying to be open the whole day in case we have to shoot in the morning, middle today or afternoon, then the day off or the night before You can see the hourly, like what times is going to rain. And if you notice in the rain in the middle of the day or afternoon, you complain to shoot for the morning if it's gonna rain in the morning, maybe later in the day, things dry up and stuff. So things like data system you really need to focus on as a family portrait photographer so that you don't castle shoot and miss out on opportunities. The other thing, when it comes time, is if you go in certain places, make sure that it's open. Something's closed. Parks close early. Make sure you know the hours off the place, you're going to make sure that if you could take into account how many people are there, One of my top recommendation is shooting at Sun Rice really early before everybody's weight . You don't want people in the background when we talk about all location photography, you know, like the strengthening elements. But if you can shoot early early in the day before everybody's up, you're gonna get some awesome images. Is, um, awesome locations when there's nobody there, which is beautiful? Something My Met best works were done, a son writes. Now it is really early, and it might be struggled for families. But tell them that has worked in because you gonna get some better images if we can wake up early. So that's my advice when it comes to time, and now we're gonna move on to the next section
9. 9 Props: in this section. I'm gonna be talking about props when it comes to props. The number one props you can bring to a family portrait session is seats. And I'm not talking about just chairs, but anything you can see them to sit on. You can have a crate. You can have a chair, anything that people can sit on because a lot of times you're gonna have sitting poses mixed in with, um, the other types opposes standing on so so bringing something for them to sit on, especially. There's a lot of family members and you want to have somebody said it in a chair, and everybody around them would really help you when shooting on location. So bring something for them to sit on a chair. Whatever. People don't really judge the quality of the chair on family portrait. It's there just looking at everything else. So don't really worry that much. If the chair doesn't look that night, you can get really nice chair. That's good. Other props you can bring are like toys for kids, teddy bears, balls, stuff like that, and you're doing sport concept. Any sports gear just really look at images that you see on Pinterest, they're a little more creative. And if they brought any extra props, just start making a list of things that people maybe would bring. Recommend them, have them said tell him A. There's any props that you want to bring that will be significant to you. I've had a couple that I was expecting bring like baby shoes and things for the baby because she was expecting That's something that you could bring. So there's endless amount of things you can bring balloons That's a popular one. So just really think about like, could I bring props besides the seat? Most of these props should be brought by the customer, not you. So don't worry about owning props for photo shoots unless they're paying you a lot of money you want to purchase. If you think that the dollar store, you know, go ahead but for the most part brings stuff, it's really gonna take your photography to be a little bit more creative and will help you out. So that's it. When it comes to props on, Dow would move on to the next section
10. 10 Intro to how to Shoot: in this section right here. We're gonna be talking about how to shoot your images. We're gonna be talking about your settings, your gear and things to note with your camera and how you should be shooting family portrait. It's so in the next few lectures, we're gonna be talking about all those different topics. So stay tuned for that. As you learn now, you could be shooting with any type of camera. Okay, this is not limited to DSL. Ours, this is. You could also learn and use some of these techniques. If you're shooting with a mobile phone and just want to get better at shooting Portrait's with a mobile phone, maybe you just want to, like, take pictures of your own family. Or you just want to know how to use your camera better and how you should be shooting family portrait regardless of the camera you shoot with. So this is not camera specific. This is universal. Some things are camera specific, but most of these aren't so. Stay tuned for that as we talk about all these different tips for abusing your camera and how to shoot and several gear as well to shooting family portraits
11. 11 Shooting Fast: in this section will be talking about shooting fast and family photography versus any other style of photography. You want to shoot a little bit faster than you used to and almost any other style of photography. You can take your time, plan your shot and take a great image. When you're doing family portrait. It's since there's so many members, usually in the image, you could miss a great moment, a great expression by taking your time. You can't just be doing the whole 123 cheese anymore. You have to just capture the moment and take burst shots off certain moments in the hopes that you can avoid the moment. With somebody blinks, you can avoid the moment somebody's looking away and having moments where everybody's looking at the camera, everybody smiling. Everybody has a great expression. You can't really capture that if you're taking your time. So my recommendation is to shoot fast now certain things that will limit you from shooting fast. The 1st 1 is external lighting. If you use an external lighting, chances are you can shoot us fast because the external lighting of you using speed lights or strobes need to recycle when you're taking images spiel, I specifically need to After a while, slow down because the flash won't go office fast so you can take, like, five pictures in one second with a speed like the speed light. Can't shoot that fast. You have to take your time with speed lights, so you kind of have to make a decision. Whether you're gonna use that or not, we'll talk about that more when we get to Lady. The other thing that my limit you is shooting and rock shooting and raw will limit you because raw files take a little bit longer to save into your camera and raw files take up space and you might not have appropriate memory card to store that many images. If you're taking that many images because you're shooting really fast, uh, so those are some things that might limit you. Three. Other thing ISS. We'll talk about settings. Is your shutter speed If you're shooting fast, make sure you have a good shutter speed. We'll talk about that in a little bit, too, so just be sure you're shooting faster. Captured never moment and you're moving around. Don't just stick to one angle you never know when. If you move a little bit and you should have like this, it's gonna look good. You move like this looks good. Kids tend to move around a lot and change direction of their face trying to follow them on . Make sure that you can see their face in the images. So that's that when it comes to shooting fast and now we're gonna move on to the next section.
12. 12 Raw vs Jpeg: And this actually going to be talking about robberies is Jay Pek. Now, this is for all the people that have a camera that shoots in raw as well as Jay Peak. If your camera this is shooting rock, don't worry about this section right here. If your camera shoots in raw, let's talk about it. When it comes to family portrait, its chances are you're gonna take a lot of images and you gonna shoot pretty quickly as we talked about before that something that's really gonna help you miss a moment. But if you're shooting and Rob, if we take a lot of images, take up a lot of space and it's gonna take a little while to save in your camera and then your camel might not take the next picture because it hasn't saved the last seven that you've taken really quickly. So that's something he had to be aware of. The other problem with wrong is if you Onley shooting rock but is on leave. The shooter on Lee Rock is that is really hard to really look at images the way that you want to see them, because when you shoot rather computer takes away a lot of the information, and until you edited, you can see the final image. So previewing images on your computer will be very limiting if you Onley shouldn't wrong. And delivering images is gonna be really hard if you shot in rock. It's absurd. Images look really good straight out of camera, but you have to do all these raw edits to deliver it to your customer. It all depends on what you're delivering to customers. Another thing about shooting would raw images is that it takes a lot of space when it comes to rob images. I remember used to only shoot and raw plus J Peg in the beginning and I wish you a lot of images. And then my computer filled up after like 15 20 photo shoots, and I just didn't know what to do with Healthy Ralph. Files. It's written is really bad. These memory cards get filled up really quick. Quick memory card. Very expensive. So my recommendation with all these issues with raw files is shoot the image, look at the image and see how good the image looks. If you're white balance and your exposure is right, shooting J pack if your exposure and white balance is off, add raw and to switch to raw plus jpg but always have J pegs. And then when you get to the computer, um, look at that J pegs of all the images that you like, make a list of them and then erase all the raw files off all the ones you don't like to clear up space. But I mainly shoot in J peg like 90% of the time on Lee when my white balance is looking off and my exposures looking off. So I add wrong because we're raw files. You can change your exposure a little bit more because Rob keeps more of that information and you can change your white powders toe whatever you want. Later, when you're editing and you can't do that in JP when you change it a. J peg. It doesn't have all the information from all these different colors from white balance, but with raw. It saves all the information, and you can pick the white balance as if you were taking the picture. So raw gives you more information to use when editing, but it limits you with space on speed and shooting and meaning. Would a preview the image or deliver images? You can't deliver raw files to people, so that's it. When it comes to Robertson's J Pack, my recommendation is shooting J. Peg and only shouldn't rob. You need to, and now we're gonna move on to the next section.
13. 13 Reviewing Your Images: and this actually will be talking about reviewing your images, many photographers to shoot, shoot, shoot and don't look at the images that they're taking. I'm the opposite. I shouldn't look. Should look shooting. Look, I take my time family portrait. I'm trying to, like, shoot more, to shoot faster and then find gaps to look at all my images and find ways to look through the faster whatever way you do it. Make sure you review your images. Many photographers are skipping the step and thinking they got a good image when in fact, none other images were good. People could have had their eyes closed. Be looking away. They could have missed a shot. It could have been out of focus. There's so many things that could go wrong in the image. And if you don't review your images, you can just and correct the things that were wrong. You don't want to move on from one thing. Your sequence, the list that we talked about earlier and you never got a good image one of the things in your list. So make sure you review your images and move on from the things in your list until you know , you have a good image. Now here's something else I recommend. Is picking a designated person the least just mental? The person you bond with Usually the person is paying you to help you with the review of the images. I show at least one person the images that I'm taking to make sure that they're happy to wiser vendors of one. They can point out something that you might be missing when you're in the in the moment, they can say, Look, you know, her hair was in her face or Hey, look, you know, way looked weird. Our posture was weird or his eyes were closed. The extra person could really help. If you have an assistant, that's what the assistance for to help you review images that make sure that everything looks good. But at reviewing images to your process of taking pictures. Okay, you want to look through your images, make sure you're doing a good job before moving on, because at the end of the day you do it too quickly. You don't look at your images. You could end up realizing that half of the images are bad and you are only delivering half and if you're delivering everything in delivering really bad and majestic customers, so reveal review review and another advice. Little big technical is If you haven't done this already by the fault, your camera attempts to not rotate your images on your LCD screen. If you have a DSLR camera, what I mean is this. If you shoot the picture and less cape, the image is going to show up on the screen and landscape. If you turn your camera and shoot in, Portrait is gonna show up in your camera in Portrait. A 10 image and what you want is for it to rotate to fill the whole screen so you can see the full image without any black bars on the left and right side of your image. In your settings. In your camera, you can have a rotate on camera, but not in your computer. What that means is that your camera will know that you're rotated and what is the orientation? Turn it to fit the screen on your camera, but have it the right orientation on your computer. So that's something that you want to change the setting off in your camera every cameras different. I wish I could express how to do it with your specific camera. Maybe research in your manual. How to rotate images if the image is not filling in the whole screen when you shoot in portrait mode. So that's it when it comes to review and images. Oh, in the last thing would it comes. Review and images is zoom in the certain moments when you're shooting from really far away or you're not sure something's and focus. Uh, you want to zoom in and look at people's reactions, So sometimes I'm shooting like five people, and on my screen it looks like everybody looks good. I zoom in to everybody's face and I scroll, and I make sure that everybody has a good expression. Then I know I got a good image. So zoom in on your camera to the image so you could see their expression so you can see the important thing. See if they're focused. You have good expressions. So that's and when it comes to reviewing your images while taking pictures. And now we're gonna move on to the next section
14. 14 Tethering: in this section, we're gonna be talking about gathering your camera to review images on another device. Um, most yes. Alors. Certain cameras can send images to a laptop or an iPad aren't tablet wirelessly or wired very complicated to set up. But look to see if your camera can do that. If you're camera could do that, figure out how to do it and that. See if that works with your family portrait. It's sometimes you can have a set up. So as you're taking pictures on the iPad, the images show up. And being able to review images on a bigger screen is always better showing the family, he said. The images we just took on the iPad, it's an amazing way to make everybody happy. They could see the images, although they weren't happy. Let's do it again. So that's something that's gonna be really useful If your camera can do that. I think like it's only a small percentage of cameras can do that. But if your camera has WiFi than it could definitely do that. My cameras both have WiFi, so I've been able to set them up with my iPad, and when I taken images shows up there now. The downfall of tethering and that is like having the images show up in another device is that it does little down a year in taking images like the image is, take a while to transfer and show up on the iPad. So I don't do it all the time. And, you know, having extra year is like, it's a lot of work. Almost nobody does this. But I found that the few times I did it, I had a good experience. So I just want you to know that this is something that exists, that you could possibly do it and might help you with your photography. So try it out. If your cameras compatible with the ability to tether and transfer stuff, if it has WiFi and such, and play with it to see if you can use it in your next photo session. So that's it when it comes to tethering, and now we're gonna move on to the next section
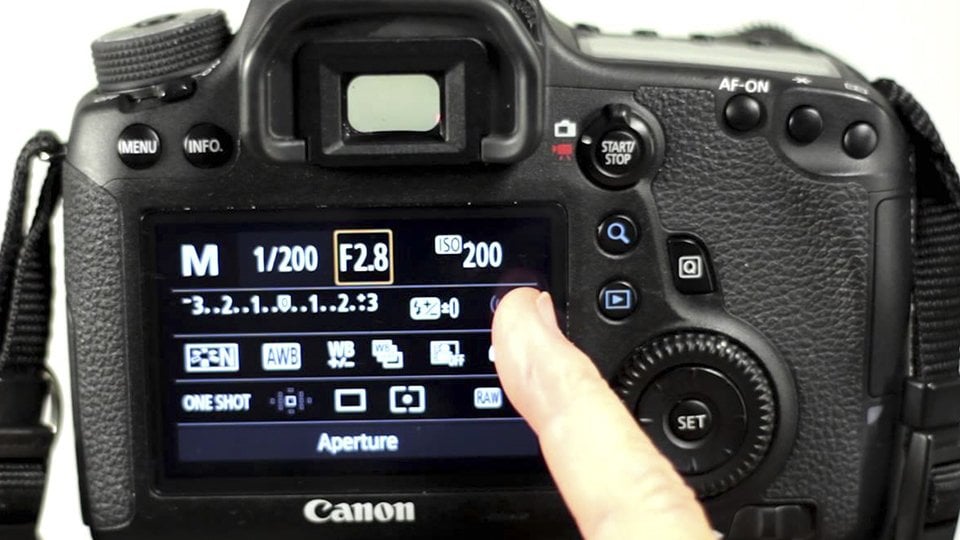
15. 15 Camera Settings: in this section. I'm gonna be talking about your camera settings. This is a big one that a lot of people have been looking for when it comes to shooting images. What? You're my cameras that it be if I'm shooting in manual mode and taking pictures Portrait of people. Now, all this varies if you're shooting, would external lighting if you're shooting outside or indoors. But I'm gonna give you some brief overview of things that you need to have overall, regardless of which one you use. No first thing ISS shutter speed. When it comes to shutter speed, make sure that you have a good enough shutter speed so that you think your images are sharp . My recommendation is anywhere around 200 of a second or faster would be good enough 200 to 58 400 so on. Now you shooting would external lighting. Sometimes you can go past 200 or sometimes got to be a little bit slower than that for the flash to go off with the camera. So I recommend just the fastest, and you could make it. You don't have to go past 200 if you don't need to, based on the exposure of the image by raising your shutter speed to shoot faster than images gonna get darker. So if you're shooting outside, you might be able to shoot in the thousands of a second to get image to be dark enough for it to be exposed correctly. The next setting is aperture. When it comes to Aperture says, you're shooting multiple people. My recommendation is trying not to go under four point. Oh, Um, in most cases, you're not focused on having blurry backgrounds When shooting portrait's of people. Your focus is just making sure that everybody is in focused and sharp. If they're not completely and focus on The Apprentice image is, you're really gonna be able to tell the people that were out of focus. So priority number one would aperture when shooting family portrait is everybody's and focus. When you're shooting individual people, you can have really shallow that the field and not have to worry because you have one focal point. Well, with multiple people, you have many things. You have to have a focus, so make sure that you shoot four point no or um at a higher setting, so that everybody's in focus. 5.6 is good 7.1. Numbers like that are good off aperture settings to shoot when shooting outside or anything higher so that everybody's in focus. Now, if you are going to go with shallow that the field and you are gonna be using a prevalence that really make sure that everybody's and focused and you're not shooting more than like two people if you're shooting two people on their the same focal plane and we'll talk about that next your fight. But in most cases, you just want to try to avoid getting a shallow depth of field, and you can still get it. You know, four point. No. Things in the background do look blurry. So don't worry so much about that. Just make sure that everybody's and focus next one we're gonna be talking about. I s So what? I s so the only really think you need to focus on it. Make sure you don't raise your eyes so really high. You should never be shooting anywhere. You need to raise your eyes so really high. You should always be shooting somewhere where there's enough light so that you can shoot at 100 eyes so are really close to that 400 eyes. So that's fine. 800 to 1600. You're kind of getting in. The danger zone is still OK to pull off if they're not printing images, you're fine and you're not blowing it up. You're fine to worry about grain 3200 and higher is a dangerous zone. You don't want to be there and your eyes so settings because you're gonna get green and your image the quality that this won't look good. So the lower the number and I s so the higher the quality of the image is going to be when it comes to grain in your image. But the higher the highest number, the more like you have. So you really gotta play with it shooting outside in broad daylight. You don't have to worry. There's enough light out there to be able to shoot at 100 eyes up. So those are some settings I want you to focus on. Just make sure that the main thing your focus on is that your subjects are exposed correctly. Don't worry about your background, that worry about anything else. Make sure that your subjects are exposed correctly. You can be a little under exposed and fix it and Photoshopped. But to have the best images on camera, you want everybody to be exposed correctly. So play with your three settings to make sure that the subject is exposed, the best that they exposed correctly in the image. And then the rest of the image will just look fine for the most part of your subjects exposed. Correct. Now I'm gonna be talking about white balance when it comes to white balance. If you're shooting and rock, it doesn't matter, because raw lets you pick whatever white balance you want later on. If you're not shooting and rob when it comes the white balance, What I recommend is look at your images when you're reviewing them and make sure that in the color of the image fits the dean and the location that you're shooting it. You're shooting outside the middle summer. Make sure it's a little bit warmer. If you're shooting and winter and they're wearing jackets, make sure the images a little bit cooler in most cases, just to be safe, make it as neutral as you can and then change the mood. The white balance and post production to a little bit warmer, a little bit cooler. But make sure you got it right by playing with things like shooting an auto. See if auto looks good. Shooting in daylight shooting and cloudy on shooting in shape. Use those settings in your white balance settings in your camera. Your camera. Don't have all those settings ignored it. But if your camera does have those settings, play with them and look at each one and see which one looks the best for that setting. And make sure to change it as you move around to different spots in a location. Because the color changes in your camera based on different set locations, whether you're in a shame, you're not in the shade and so on. So that's it when it comes to your settings in your camera, and now we're gonna move on to the next section
16. 16 Focal Plane: and this. Actually, we were talking about your focal plane. One of the most important things when shooting families is make sure that everybody is in the same focal plane or as close to the same focal plane as possible. And what I mean by that is your camera focus is kind of like in a rope wall. Off focus is what it will focus on so it can focus here, and everything in front of this and behind this will be blurry. And because of that, you got to make sure that everybody is standing imposing within the same line from your camera. Because if they're not whatever it's not in that line is gonna be out of focus, and you want to make sure everybody's in focus. So there's there, imposes that you might see on line where the person is behind the other person. That person is out of focus. I don't care what aperture setting you have. They're gonna be slightly out of focus Now. The more shallow depth to feel you have in your image, the aperture of using a prime lens and you're shooting a 1.8, that person is really gonna be out of focus. But in most cases, even if you're shooting at 5.67 or whatever, a person behind or in front is gonna be out of focus, so make sure always, always, always have everybody in the same focal plane. Now I know when you have families, you might have to create two rows of people, maybe even three. That's fine as long as people are kind of like scooting back and forth and you're shooting far enough that that role is actually bigger. If you're too close to those three rows, that light becomes smaller, in which the things are focused. If you're further away, that line becomes bigger and more people can fit in the light off. Focus the focal plane. So if you have rules of people shoot from further back and then people are more likely to be in focus, you can shoot closer. But if you shoot close to make sure that they're all in the same row, so that's that when it comes to focal plane and is very, very important. A lot of people shooting with people in other rose and they're blurry. So that's it when it comes to focal plane, and now we're gonna move on to the next section
17. 17 Distortion: in this section, we will be talking about compression. Compression is this concept in which, when you shoot with certain lenses at certain focal lengths, certain parts of the image are distorted, so they're distortion on. The image looks really bad, so it will occur and make things look weird and out of shape. So the best advice is as much as you can shoot as zoomed out as you assumed then as you can . So let's say you have in 18 55 shoot as close to 55 as possible. If you have a 24 to 70 shoot as close to 70 as possible, try to avoid the 18 24 the wide angle Onley shooting the white angle when you're trying to get a big landscape image or a lot of people in the image. But as best as you can, try to zoom in it as much as you can, because when you zoom in, there's less distortion. Now there's all this math and science. Behind was the best focal length, but the rules always been suman as much as you can. So no matter what, let's you use, make sure your resume, then try to avoid the 35 millimeter trying to avoid the Whiting Walesa's fisheye. That's the worst. Just zoom in and everybody's gonna look normal, and it's gonna look fine. So especially with women, if you're shooting women, you don't want to have their bodies look weird, make them look fatter or are out of shape or whatever. Just make sure that you're shooting zoom then so that their face and their body looks, uh, what? I'm normal. So that's it when it comes to distortion, and now we're gonna move on to the next section.
18. 18 Angles: okay, in this section, we wouldn't be talking about angles. Now most people don't struggle with this, but I just really want to address everything. When it comes to the Anglo wish, you're shooting subjects. The best rule to follow is imagine that when you're shooting that image there was like a plane. I learned this from another instructor that was flying out of your lettuce with this long wings and going towards the subject. Whatever the plane hits first, so imagine it's just a long plane. Whatever that plane hits first is the focus of the image, and that should always be the face. So what I mean by that is, if somebody's sitting and their knees air sticking out and you shoot it from a low angle, that plane will hit the knees before will hit the face. And essentially you're taking an image off the knees, not the face. It is a bad angle. You're gonna have many poses in which other things are in front of the face, and the best solution to get a good angle is to make sure that you angle it in a way where the face is the closest thing to the camera than the other body parts. So when it comes to angles you issue straight on as long as there's nothing in front of it , um, you can shoot higher up. You should lower down. The rest of the body is closer than the face. You want to make sure that the faces closer so straight on or higher up is always best on advice for that. If you're not that tall is bring the stool or something you could stand on to all your photo shoots. If you're not that tall, you're struggling with these higher angles. Bring a stool, a step stool that you could take with you and stand on top off. There's many, many, many photographers out there. They're standing on top of things when they're photographing. So break something to stand on to get that good angle higher up or straight on, try to avoid lower angles and trying to avoid things in the way off the face. Make sure that the faces of first thing it touches. If you were like there was something imaginary coming out that it will hit the face before . I'm not saying that the faces center in the image. It could be on top, but just that is closer than the rest of the body. Not at a weird angle. You don't not want to shoot straight down at somebody, and they're all looking up. That's a bad angle. Make sure that they kind of look normal, but that the faces first, which is usually straight on, is fine if it hits the face and the rest of the body at the same time, that is fine, as long as it doesn't hit the body before the face. So that's it when it comes to angles, and now we're gonna move on to the next section.
19. 19 Lenses: and this actually will be talking about lenses. When you're shooting family portrait, it's There's really three types of lenses that you can use. You can use your standard soon Linz that comes with your camera or a nicer semblance than that. You can use your telephoto lense that lets you zoom in really far and your prime lens, which left you get really shallow that field. Now, for 80 or 90% of these shoots you're gonna be using your zoom lets some people like to use a telephoto lens. But you being really far away from the subjects are really going to affect you, which your photography you don't want to be that far away from your subjects. I know it looks nice sometimes, but you're gonna miss emotions. You're gonna miss actions and directions if you're too far away from your subject. So nice zoom lens, like a 24 to 7 year 18 55 is good enough for your family portrait photography. Now, when it comes to using prime lenses, my recommendation is something like an 85 50 millimeter. Try to avoid the 35. You don't need to have a low aperture setting and be shooting white. You really want it when you're zoomed in a lot. So something like an 85 millimeter prime lens. I think it's perfect because you can capture 3/4 bodies. Even full bodies have you step back and close ups with a nice, blurry background at that with that focal linked. So there's a good recommendation once, when it comes to telephoto lenses, the reason you're really using it is too mess with out of background looks from the subject . So whenever you zoom in, a lot of background gets closer and gets brought into the image, so you might want to use that. And that might be the only reason you use a telephoto lens in a family portrait session. And for that reason is one lens I recommend you purchase last. If you're just starting out, you just starting out. Don't worry about your telephoto lens. Focus on getting your just using the zoom lets then trying to prime let's and then last telephoto lens. Some people only shooting telephoto lens, they say, is distortion. There's really no distortion at 70 millimeters or 55 in a crop sensor camera. So, like there's really no reason why you need a telephoto lense. You don't want it. You don't need to be far away from your subjects when shooting families. So that's it when it comes to less is hopefully this help you guys out? Also, you don't really need those expensive zoom lenses or telephoto lenses. They shoot at 2.8 because chances are you're not gonna shoot 2.8 when you're shooting family portrait photography because of what I talked about. Focal planes and people out of focus. So that's what it comes to lenses. And now we're gonna move on to the next section.
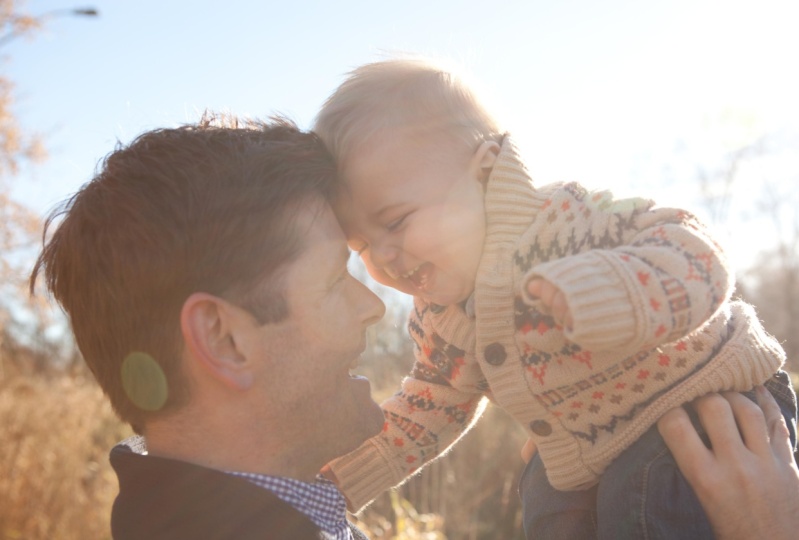
20. 20 Natural Self Poses: and this action would be talking about Posey. This isn't the first lecture off this section of posing. And this is one of the biggest sections in this whole course because posing once you figure this out, the other stuff like you can get better win over time, but posing one of the hardest things when it comes to family portrait photography and is one of the most sat out things to learn in family portrait photography. Everybody wants to learn how to oppose families. So hopefully everything and teach you in the section will help you guys out with posing the family in your next session in the first lecture, I want to talk about natural self poses, these air poses that these families are gonna create themselves. When you place them in a spot, you're gonna tell them, OK, now I'm gonna take a picture in this bench here. You guys sit together and get comfortable, and I'm gonna take a picture of you guys and then I'm gonna pulls your legs. That initial self poses they're gonna make could end up being a really good one. And then you can grow from there. Some people are very comfortable in certain ways and like to pull certain ways and whatever gets a very comfortable and natural could lead to a really good expression and the picture looking very natural. If you pull them too much, you can lose in the expression you can lose and how natural that image looks. So letting them kind of take control in the beginning when you're in a new spot and you have a new variation of members in the family that will take a picture together could really help you and getting some more natural looking images. So whenever you're doing any variation, a new spot have imposed themselves and see what happens, you never know when you can get a great image off of it. I think maybe 20 or 30% of the great images that I had taken a family portrait session come from these natural self poses that these members did themselves. So don't go and say I'm gonna take control over everything. I'm gonna pose everybody, and when I would choose everything, because it's very stressful, very hard and you could be missing out some great poses, so have them pose themselves naturally and see what happens. That's the first tipped as the first lecture in this section, and now we're gonna move on to the next section.
21. 21 Toddler Tips: in this section, I'm going to give you some toddler tips. These are all for all those uncontrollable toddlers that you can get to cooperate with you when you're taking pictures. Now the first tip is take this image is quick. Focus more on just grabbing a good expression than oppose. Don't focus too much imposing toddlers. It is almost impossible to get them to cooperate and do what you tell him to do. So the advice is make sure that you get a good expression with these toddlers than the Post . That's what parents are for. When you using parents, you want to help have them help you get a good expression from them. You're either gonna have two types of images. Either there's gonna be a parent holding a tumbler or the parents are not gonna be in the image. And it's just gonna be up the kids and the toddler's. If the parents are not in the image, the top recommendation is to have the parents be right next to you on the left and right side, right in front of the camp, right next to the camera. So when the toddler is looking at the parents they could end up looking at the camera, and you could get an image of them looking at the camera. You don't want the parent too far to the right, too far to the left, because the kids are looking over there and the parents they know look over there. But that's not a toddler's work. They look out wherever the parents that so I will be right next to you or your down low haven't be right above you. But make sure that they're as close to the cameras possible. Isn't tip number one in the calling? Not the kid as much as possible and trying to get a good expression off with them. If they're in the frame, make sure that they're holding the toddler in a way that it creates a pose. It looks good. So they're holding the kid up them, hugging the the kid is really gonna make for the, um, for the good image with the toddler, and they just focused. I'm taking many images until you give one with a good expression from that kid. Another advice is to take these images quick and get past the taller parts as fast as you can toddlers have short attention bands on, get frustrated easily and will quickly turn into a crying toddler. If you're taking too long to take their pictures, take a few pictures and stop, and they try and later take a few more pictures and stop. Don't put them in front of the camera for too long because they will get frustrated and they will lose out of control. And then, if you just ruin the whole big chunk of time of your photo shoot, trying to calm their kid out. So my recommendation is if there's gonna be Tyler in front of camera work, quick, trying to get everything that assesses, you can't and as soon as you see any sign of frustration for the taller, I let them go. Let them go play. Let's go do something else. So make sure that parents are aware that there's gonna be a little bit of difficulty with toddlers and that their expectations are low and they try to surpass that. Um, make sure that they know that you know they're not gonna be asked Posey. It's gonna be hard to get them to look at the camera, because if you set expectations too high with parents of toddlers, then you're just gonna disappoint them because it's really hard. There's almost a hit and miss. Sometimes with toddler. So little things that you could do will help. Another thing you can do with toddlers as How long doing action, having play with something having played game, do peekaboo have run around in circles around the parents? I've had kids run back and forth, and I will take an image when they stopped at the front. So tell it over there and come back and run as fast as you can hear when they stop there and take a picture of of them having so much fun. Um, remember, toddlers are drawn to things and noises, so you can have like a toy that they like or make a specific noise, or something that makes a noise to get their attention. To look at the camera. I've heard of other photographers doing things like half bubbles like a bubble gun and bubbles flying from the front of the camera, and then the kid will look at the bubbles and and then stare at the camera, and their face of amazement is what causes a great expression, or you could have the bubbles appear in the image. That's another cool thing you could do so anything that makes interesting noise, just like go to your local dollar store, go to the kids section, see things that are interesting. And bring that or tell the parents to bring the kids favorite toys or something that will get their attention so that they look at the camera or they have a great expression, so you could take a great image of dollars. So those are some tips for shooting with toddlers, and now we're gonna move on to the next section.
22. 22 Off Set Heads: in this section, we're gonna be talking about the rule of the offset heads. I learned this from this other photographer. You make great points. It's a rule that you can kind of follow, but break when it's on purpose and like ages, you couldn't follow the rule for a specific pose. But the way that this rule works is that if you have multiple members 345 people and you get all really close together to fill a frame and you're playing with angles. So you have like the daughter here, the mom here, the other kid here would you want to do is looking at their nose in the picture. Make sure that from left to right or up and down, no other knows meats. So if you have Mom right here, her nose would be like, let's say right here. My nose is here. It doesn't mean what heard left to right. It doesn't mean what her up now and then my other kids knows could be right here and my other kids knows, could be up here are up here as long as none of these noses touch left on right or up and down it's gonna look better than if to are right above each other. And the other ones are off and different areas. So if tour right next to each other to a right above each other is gonna look weird versus if they're all off from each other, So that's something you can apply to your work. Look at your works. He if that's ever happened, when you're posing people, look at the image, follow the noses sea of anywhere in the same plane, left it right up now and then just move them a little and you're going to see that it's gonna look a little more natural a little bit better. There's no rule about positioning where the heads should be, but there is a kind of like this rule about where they shouldn't be, which is, like right next to each other or right above each other, unless you're doing it on purpose. You could break this rule a lot if you put them all in a row. You kind of look good, But if somewhere off make sure that they're all off, so that's it when it comes to this rule of the offset heads. And now we're gonna move on to the next section
23. 23 Rule of 2: in this section, we wouldn't be talking about the rule off to when it comes to on individual pose. So when you're posing an individual and they're certain body parts of there's tools, there's two shoulders. There's two arms. There's two hands. There's two sides to the hips. There's two legs. There's two feet. The rule is that all of these things that have to make sure that they're not in the same level, meaning that like my shoulders, they're not straight lined that they're slightly over that if you put your hands on your waist that once higher than the other. Um, and if you're putting, if you're resting your weight on one hip, it naturally brings one side a little bit higher than the other. You can lift one leg up by putting a lifting your knee up. That will make the levels change and your hands aren't together like this. There could be like this, like if you have a jacket, you will put one hand up one hand down, or you could have one hand up, one hand down, one hand up, one hand down, elbows up, down, up, down. Whatever you're doing, it's they're like one is higher than the other. That will look better. And you're trying to do that throughout the whole body, and you're going to see that the pose is gonna look better than if they're in the same level. So that's just the rule of to just trying to make sure that two things that are the same aren't in the same level. And you're gonna create better poses trying to do that more when individuals and with families all together is really hard with families. But if you're in a situation where opposing one person, that's a rule to follow, and it's more for women than for men. So that's another thing you can try with men. But focus more on doing that with women. So that's a rule of two. And now we're gonna move on to the next section
24. 24 Kisses: this actually wouldn't be talking about kisses. Now, Um, a lot off people do Family portrait. It's and have a couple and kids will go and say, OK, now you guys kiss and then mom and that will kiss. And then the kids are just there, and that's just like a signature pose to try out, and that's it. What people don't understand and forget sometimes is that there's more complexity to kissing. They just kissing on the lips. There is different types of kisses you can do. You can kiss on the cheek, even kiss on the forehead. You can kiss on the top of the head, and then you can kiss on the lips and the ones they're not kissing on the lips. You could do with any other family member. So, for example, you can have two parents kiss their single, their one child on the cheek on both sides, thinking kiss the kid on the forehead in the back of the head to you know, you can have two people kissing one person. There's so many things you can do, what kisses and when you realize that and acknowledged that and play with that, you end up realizing that you could do so many different poses by just adding kisses and just changing where you kiss. This also goes with direction or where you're looking, which we'll talk about next, but with kisses, you have different options of kisses. Also, when you're kissing, this should be obvious. Prefer. Tell us the dough nowhere. Forget or don't even pay attention. Make sure the person's eyes air close. Whenever you kiss somebody, your eyes close. That's it. Hello, Kiss with your eyes open, it looks weird. So that's it when it comes to kissing is gonna be, uh, part of your posing training, knowing that there's different types of kisses, practicing all of them and playing with them when you're posing families, that's it with the section. Now we're gonna move on to the next section.
25. 25 Where to Look: and this. Actually, we'll be talking about where to look. Um, people ask, Where do I look when when you're taking my picture and the answer is that they can change it up. Okay, you can have a nice post. They can change up where they look. The choices air. This, they can look at the camera. They can look down is usually better than looking up because looking up is weird. What are they looking up to? Looking down? It's kind of like it creates a nice mood. Or they can look at the light source wherever the light is coming from and it brightens up their face. They can look over there. It makes them look nice so they can look towards the light. They can look at the camera or they can look down usually like kids are down there. They look down at the kids, so that looks good. Now when it comes to looking, there some things to take into account. Since there's a lot of members that you will be taking pictures off, trying to be consistent and where everybody's looking, make sure that everybody is looking in the same direction. The other thing is, if they're not gonna look in the same direction, try not to make the directions any more than two they can look at. Some people can look at the camera on, some could look down, some can look away, and some could look at the camera. But make sure that is not three directions so they won't look left right. And at the camera, that will look weird unless you're doing a playful and on purpose. But in most cases, try not to make make sure that they don't all look in different directions. No more than two directions. But if preferably, they all look in the same direction. So that's really it when it comes to where to look. Another thing is, have you Mama? That or any couples in when they're posing some, um, ideas in the past has been on a good look. Waas for them to look straight at each other. Okay, is kind of weird for people to look straight at each other. I bought eyeball, especially if it is within their personal space. Their personal space is right around them. If they're this close to you, it is weird to be looking. I nobody does that. It is weird. When they can do is one person looks in, the other person looks away. That's normal. Um, it's almost like they're telling them something in their ear. But two people looking straight at each other is something that you don't want to do. If they have two kids in between them and they're holding hands with the kids and they're looking at each other, that's fine. But if there, right in front of each other looking at each other, is not normal, okay, they can look at a person. But both eyeball should not be, like, connected to each other. That does not look like a good post. Okay, those tips I have when it comes to looking for posing now we're gonna move on to the next section.
26. 26 Posing Parent with Kids: in this section, I'm gonna be talking about posing your family images. Now, in order to do this posing section, I'm gonna break it down into three categories. A parent with kids. The next category is gonna be just the kids, and the next category is gonna be group photos. And throughout, as I'm teaching you using these examples on Pinterest, I'm gonna break down things that are working in the post things that are now working in the pose so that you can keep that in mind. And it will help you when you're posing for your own family portrait session. So in this first category, we're gonna talk about just a parent and their kids. Now, a lot of these images here are very fun and creative. So I'm not really gonna explain posing using these creative images like this one. Where that that has the kid here that could here, holding the kid up like this, I'm going to go over the other ones, they're more posed, and I'm going to really break down the pose and explain it to you as best as they can. OK, so first, let's start with this image right here when it comes to posing men. One of the things they're really helps is the positioning of the hand. When it comes to the hand, a really good position is either on the knee. That's why lifting your leg up and giving a position for your knees for both the kid arresting this arm here and him resting this hand here, um, it is helpful him having a time means that he could put his hand on his tie as well. But another go to place for hand placement for men is in their pocket. You can have the thumb in or your whole hand end. I personally think that the whole hand in looks better. But if the whole hand in makes his arm, um, get close to the body like it doesn't show this gap here, then on the thumb, and it's better. So I want the arm out not resting against the body, cause I want to show the shape of the body. So having it here creates this curved and the arm, which shows, um, kind of like the width of his body doesn't make him look bigger. Um, so that's how I would place it. But um I don't really like how the hands look. I think crawling hands like this isn't Look is good. So hands in the pockets are better. This kid could put his hands in his pockets, or he can put his hands on his vest. So those were something like, um, points I want to mention when it comes to, um, hands and arms. Um, lifting a leg really helps out here. It gives a placement for the boy to rest on. So he's between the legs. And like I said, ah, place for the arms to be at, um So that's it. When it comes to this pose, I'm gonna move onto the next boats and really break it down some more. Here. When we're talking about the heads like this, it's really good if the heads are not in a rope. So the fact that her had us a little bit lower and if his head was a little bit higher, that's a little bit better. Like we talked about the offset head rule, um, having the nose align, the fact that these tour line and she isn't looks a little weird. So if hiss was a little bit lower. Hers was a little bit higher and then hurt her. The daughters was at the bottom or something where they not aligned, It will look a little better. Um, besides that, one of the great ways to pose for close ups is all these heads close together. You don't wanna have any gaps between the heads. You don't want to heads together and him and her to have a gap. So this is, ah, signature pose where you put all their heads together. Um, and the point of this pose is that there isn't a gap. So, um, like here, you don't see a gap here. Here, you see a little gap between the heads. So it doesn't look as good as this one where you don't see any gaps. So placing somebody behind and in front eliminates gap rather than being shoulder to shoulder, which creates a gap in the head. So, uh, doing something like this over the shoulder and in front of the shoulder eliminates those gaps. And in this image right here, shoulder just shoulder, you created a gap. So that's something that take into account when creating a pose like this one. Now, let's talk about this one right here when it comes to this one. Um, what's good about this is the hugging. So, um, we're creating ah, hug of one kid and then the daughter hugging the month. So hugs are very big. Went with family portrait. It's, um, if you want a posed with several members, two or three members, or even four, if you can find a way where everybody's hugging each other. So Mom hugs the kid and the daughter hugs the mom or that hugs the kid and mom hugs the dad or Mom hugs the kid, and that hugs the mom. Creating this like chain of hugs is really good for like, three person imposed, sometimes for but the chain of hugs is a really great pose. In this case, they're doing this sitting down in order for the daughter to be able to hug the month. So if you're gonna do the chain of hugs and you have kids than having, um, the parents sit down and having everybody be kind of like at the same level allows people to create this chain of hugs. So, um, the main thing I want to talk about here is the introduction to the chain of hugs as a pose that you can do with families. Now let's go to this one real quick. Um, sitting poses are a really great pose to do whenever you and on location. Finding a place to sit is really great. They really took advantage of this garage that was hanging up in the air for the mom to sit in and then have the kids sit facing the mumps. So this is a really great sitting pose where everybody sitting. The other good thing is that the heads are kind of like diagonal, so once higher than the other rather than them two together and her higher up, it just looks a little better that the heights of the heads are different. But besides that, just sitting poses are very, very strong with family Portrait's. So whenever you're on location and you can find a place to sit, you can have the kids sit on your lap or in your legs like this. You're going to create a really great pose. So the main thing I want to point out in this post is the sitting element of it, creating a sitting a strong sitting posts. Here's kind of the same thing. Sitting, sitting and this kid just falling over. That's fun. But it's all with the same idea of creating a strong sitting pose. Here's another strong sitting pose. Um, this is kind of like a photo journalistic image where you're just catching them. Interacting with each other is not really posed, But the idea is the same that, you know, they're both sitting and the kids facing the mom, which is cool. If they were both facing the camera, that would be another strong pose. Here's another great sitting pose. This is where I talked about bringing up propped us a seat. Since we have a toddler, this box became a seat for the toddler to sit in, and then the dad, um, crouched down on one knee behind the kid. Hey, could have hugged the kid to create a little bit more emotion. He could have got down a little bit more. Um, just the fact that he's resting his hand here and putting this hand on him, his arms, a great place placement and having the kid play with a branch gave his hands something that do this was not by accident. They told a kid grab onto a branch so that his hands had something to do, and then it really gave hand something to do. So you got to think about like, What are the hands doing? Are there resting on something? Can you give a kid a proper for them to do something with their hands? Uh, let's go here. This is a great hugging close up, and what I want to mention here is the direction in which they're staring like we talked about before it would staring. You can stare at the camera. You could stare at the lighter you can stare down. She's staring down to create an emotion that comes with the outfit and the fact that mom and daughter hugging and they love each other. Um, looking down creates a sense of love. Um, especially when there's a kid in the image. So her kind of looking down, even though she's not looking at the kid but she's just looking down, creates his mood that she's in love. She loves her daughter, Um, and then the daughter, looking at the camera or kind of looking away. It's great, um, putting the arm there in the face is a great position for the hand there rather than hiding her hand and then just ah, hugging pose. Um, another thing that's important here is that she has her back straight. So you can see that you have great posture here. You never want to slouch. You just wanna lean your head forward and have a straight spine that's very important. Imposing. There's so much to talk about something. Try to get through everything here as we talked about, Um, you can rest your head on the person we have. This is kind of the same idea of kissing. You're really close. If you're this close or you're kissing with the baby, make sure the eyes air close. Um, so, like we said, if you're kissing the eyes that closed, this is a great post over the shoulder, baby. Looking back, this is two directions again. Mom is looking in that direction or with the eyes closed and the baby's looking in this direction, two directions is fine. Um, here's a great lane pose. Um, if you ever get a chance to and you have an interesting ground, it could be grass. It could be this would it could be a black it that you sat down in the ground. It could be anything that's interesting in the ground. Try to recreate something like this. This whole backwards, um, pose where one person is facing one way and the other person's facing the other way is very interesting. You could do this with three members and have the other person in there as well, or four members just laying down and looking straight up and you getting up as high as you can and just pointing down and taking an image like this. It's a very interesting pose, an image to recreate. Um, here's another idea of the hugging chain where Mom is hugging one kid and the other kid is hugging the mom. This is, Ah, chain of hugs that we were talking about before we have the kiss with the eyes closed. Everybody is looking in this direction except one kid. This looking towards us. So two directions. Not more than that, we don't have her looking 1/3 direction. It's good that two of them are looking in one of the other ones looking back at us. Here's another example of that that is looking in one direction and the kids looking at us , they don't always have to all be looking in the same direction. So the fact that he's looking in one direction she's looking at us is great. It creates a really nice emotional image. You don't even have to have smiles or anything. Just a simple reaction like this is fine. Here's the kiss. Kiss on the cheek, one of the many places you can kiss, Um, and then the kid looking at us and doing ah, hug and the kid playing with flowers again. Adding some a prop for the hands of the kit. Grating that smile and capturing that moment only comes from, um, shooting quickly. Here we have a walking pose. You can have them walking tours. Here. You can have them walking away. This is another great post to do. Um, one on one. Here's a Siris of holding a kid up, both looking in the same direction, face to face a kiss. This is a forehead to forehead, um, kind of like forehead to forehead, forehead to forehead. Um, is like Mom could kiss, and that should do foreheads. Eskimo kisses nose to nose. Um, so that's something that you can consider doing. No, like, who cares that are has air doing this weird thing? You know, the DeSanto Those are like that. The emotion in the image overcome the how the hands are placed. Here's another great pose resting on the shoulder, resting on the shoulder with that, looking away with both of them looking really play with the direction of where people are looking at both of them looking at the camera, both of them looking away is one looking away, one looking at the camera one, um, pressing on the toddler and the toddlers looking at the camera, either both looking at each other, those air things to think about when it comes to posing. And there's the next section. We're gonna talk about kids, and then we're gonna talk about the group photo with everybody in it. So that's it when it comes to single parents and kids and I opposes for opposing them, and now we're gonna move on to the next section
27. 27 Posing Kids: in this section, we will be talking about posing kids. So this category, it's gonna be just siblings on the kids together. My first piece of advice is that focused more on the expression rather in the post, especially if you have toddlers. You're not gonna be able to really get them to pose and follow direction. So a bunch of the rules that you might have about posing and ham plate man than and hips and this and that you just, um, kind of try it. But in most cases, just focus on the expression when people are looking at pictures of kids, what determines a good picture off a kid? It's not really the pose, but how is the expression? How is the rest of the composition, the image, the editing? Don't worry so much about poses, but hopefully, throughout this section you can get some ideas of how to pose kids, where it's more really about the expression and not really about the post. So, for example, let's talk about this one. Um, here, you know, obviously is very easy to get two boys to sit down with a girl sitting down like this. This is a great idea. When you have a little kid to have the older brothers and sisters kind of like, get close to the kid and have the kids sit. Um, in this case, you would have, like, a kid like holding, um, the baby from the back and get the parents to, like, stand next to the camera. You can tell that the baby is kind of looking at Mom or Dad, and the goal is to just keep taking images until you get a good expression and tell the other kids to keep smiling and looking at the camera. That's a great laying down pose. Um, standing together. A good idea is you know, when you have kids of different heights to create a triangle, Um, here you have an opposite triangle. So, um, you have it's this triangular shape here where the height is, um, the small ones in the bottom and the the middle ones on the left, the tall ones on the right. That's great for the idea of the offset heads, like none of the heads are aligned or anything. You don't want her right on top of her or, um, any two kids in the same height. Um, so it's great to create like, um uh, triangle where, like, lines aren't straight. Um, so that looks a little more interesting than if she were to crouch down and get to her level. So it creates interest in this image because they're all different heights. Um, another variation for this is to put her a little bit to the right and her in the center. But they did a great job here. When you have little kids, you always want to put the the smallest one in front. Um, and then put the other two behind. Um, so this is ah, great idea for the post on the direction. Obviously, here was hands on the waists. So it's kind. It works. Except for this little girl here, like two hands in the waste. You know, now, like I said, it doesn't. It doesn't have to be technical. Obviously, this is a great post because they've got a great expression expression. Everybody's looking at the image. It looks cute. This is done on purpose. So because it's done on purpose and everybody's doing the same action, it looks good. We were just focused on her, and you were to eliminate Thies to this wouldn't be that good of opposed. Um, something that would have been better is to, like, tell her to, like, either play with her hair, play with her dress or play with this little string here, Um, something else that she could do with her hands while having one on the on the hip, But because they're all doing that, it's on purpose. So it looks good in this pose. Um, here's another great idea for posing putting their heads together. Um, whenever you create hugs, its mushing, all the hands, heads together looks really good. Um, the only problem I have here is, um I don't know what this thing here is. Um, I guess this was part of a necklace or a bracelet or something. It's just hanging there. Whatever her slouching forward, she could slouch back. Um, you know, if I had the choice to come in and just push her shoulder back so it doesn't look like she slouched. Um, and that's another great thing. And then not putting the hand in like this. So basically, hance, um, you see how this hand here, um, is hidden and this hand here is hidden. If she would have put her hand like right here by this elbow, and and then the older one would have put her hand over here, and the younger one would have closed open her fist from closed fist to open all the hands would have shown, and it would have made a more beautiful image. Right now, the hands look really bad this close fist. And these two, um, hands that are hiding. So, um, putting the shoulder back in opening the hands would have made this post a little bit stronger. That's really the main things I got to say about this. Um, the next one is Let's talk about this one right here. So right here to, um, she's kind of slouching here on the best way to go. Would have been too made sure that she had a straight spine and she was kind of like sitting up more. And then to get her in like this, it would have lifted her up. So the one in the middle would have stood up straight, and then she could still rest on the shoulder, and it would have pushed her up, and it would have looked nice. And then maybe with this hand, she could have wrapped them around, Um, her over here and, uh, yeah, and then, uh, I really don't wanna talk that punch about these legs, but just this slouching here, um, you know, posture is very important. What? Posing. And they got a good expression here, like we talked about. So it doesn't really matter that they're slouching, but un opposing stand. Her slouching could have been fixed and got in a slightly better image. You know, she's old enough to get follow directions. You can still, like direct at that age. Um, let's talk about this one right here. This is a great idea for a pose. We talked about it earlier, having everybody laid down and look up. They did a really great job here. There's not much bad you can say about this, You know, um, it doesn't matter that the hands look a little weird because they're little kids, you know, as long as everybody's looking at the camera, which they capture and everybody's happy. That's an amazing image. That's what you got to really think about when posing kids, you know, is everybody looking for everybody happy? Um, the other great thing about this image is that, um the positions of the heads, you know, um, they're perfectly even. I would say they're not that far apart. Another thing you got to think about when it comes to heads is, you know, are like, if these two were any closer and he would have been all the way over here, it would have looked weird. So you almost got a, like, push people to create even distance between the heads. So as long as it has feel like they're even distance, it looks better than if one was further apart than the other ones. Um, the next thing is, look at this one right here. This is a great ah. Oppose, um, hand up behind the head. It looks interesting. It looks great. That's an amazing This other hand here is resting around the baby, and then he's using this hand to hold onto his hand. So whoever supposing here did an excellent job. This is everything you want emulate. Um, somebody else could have just said, you know, put your hands on your site. But the fact that they lifted their arms makes this post look very well made. So this is a great, great job imposing here. Same thing here. She wrapped her arm here, and instead of just putting this hand down by her lifting her hand, this looks like a professional posts. Um, so when it comes to this girl here, she's posed perfectly. Everybody's looking at the camera. Everybody's smiling, Everybody's happy. He's have great posture here. He had his shoulder back. Nobody looks like they're slouching. Everything is just perfect here. It looks a little off, like you know what's going on with, like, um, hit this arm here being back and stuff. Maybe he could have brought his left arm forward so it doesn't look like it's cut off. But besides that, it looks perfect. Their kids, um you know, when I give when I talk about these poses, I'm not trying to, like say, you know, they did a bad job or anything like this. I'm just giving you things that if you if they were a few years older, if this kid was 12 years old and you could tell him what to do, I wouldn't put the hand back. I would put it forward. So That's how I really want you to look at it when I'm talking about these images. Even though a lot of these air toddlers imagine there were older and what you would have done to make it better the arm back hiding like this. You don't want to hide limbs. That's very important. Whenever you can show limbs like you don't wanna have an arm in the back like this, you wanna expose the arm like here, you can see his arms. He's hiding both his arms. So by him showing his arms, it would have looked better. I'm in an image. Um, Now let's talk about and this one we're gonna talk about this one. So this looks like a great image and his poets well and everything. Things you could have done a little different is, um when it comes to her, If she was slightly playing with her hair with one hand, so one hand down, one hand up and he would have had hit one of his hands on his shirt here by the buttons here, one hand up, one hand down that could have looked a little bit better. Besides that, there's not much to say about this? Um, the fact that they're looking opposite direction looks a little weird. If they were both looking in the same direction or at the camera, it would have looked better. Besides, as they're not much to say about this, um, another thing I would have personally done is I would have pulled this hair back on her right side When I did my posing models course, I usually put ah, one hair forward, one hair back to show more of the neck. It would have brought a little bit more exposure to the face and to the neck. Um, so showing the neck looks really good. I'm just throwing a bunch of little tips that you guys to hopefully help you guys with posing. So the goal is, you know, find a place to sit together, sit in the ground, laid out in the ground forward, like in this image here, get really close and tight where everybody's hugging each other. Um, do laying down poses where you're looking straight up, hugging, hugging, sitting and you would get a great images. You could include an action like this one, where they're holding hands and walking, but in most cases. This is a universal set for opposes for kids, you know, creating the chain of hugs where everybody is hugging each other. They're all sitting next to each other. They're laying forward with the heads up like this. They're laying down, looking up. They're standing shoulder to shoulder next to each other. Um, this is really how you pose kids and siblings together. There's not much to it. Just focus on getting a good expression, and that's 80% of the job. Then if you can focus on little things that you look at when you review your images that look out of place and try to fix it, that's it. When it comes, supposing kids, and now we're gonna move on to the next section.
28. 28 Posing Groups: in this section, we will be talking about group photos and what I mean by group photos that is taking images of the whole family. Now it's very simple. In most cases, when you're doing the whole family, you're doing one of two types of poses. You're either standing or sitting down. Um, and you really want to bounce back between both of them because they both create great images. So let's talk about some sitting ones like this one right here. Whenever you do sitting poses, Usually what looks better is for the girls to be closer to the ground and the guys to be higher up. It's kind of like the guys air protecting over the girls in the image. That's something that I've learned from looking at a lot of, um, group photos, that it looks better when the guys are behind and the girls are in the front when it comes to ah sitting poses that you can do if you're closer to the ground. The legs on the side like this looks really good the way you do. This is, uh, you create great posture. So you're sitting up. You have one arm straight down on the ground, separated from the side here. And then you have one arm resting by the need. And that is really how you create this sideways sitting pose. She did it here to, um so both of them are doing that. She could have put her arm by her knee to create, like, this nice, relaxed arm rather than this one by the foot. Um, also another thing, Um, I noticed here is her sweater kind of creates of baggy nous, and you don't see separation between her right arm over here and her side. Here, you see? Nice separation. So that would look better if you could see separation, either by closing the sweater or taking the sweater off. Um, here, Thea other one is the sideways one that she's created. Still standing up straight, Um, bending a knee. You don't really want to put your hand like this on the knee because justice hand sticking out like this looks a little weird. You want to show the rest of the arm, so if she would have put her arm. So what I mean is, um you don't have a hand sticking out of a body part like this. You want to show the rest of the arm, you can do it like she did here with her left arm. She showed the whole left arm and put it over her knee. She could have stretched out her arm and shown it and put it over the knee. Here, he's stretching out his arm and putting it over the knee. So that's really what you want to do. You really want to show arms, um, all the way and not just have a hand sticking out. So, for example, you see this kid in the back? If he would have put his elbow straight down behind that and just have the hand sticking out, it would have looked weird. But by lifting his elbow and showing the rest of the Army looks better, So that's kind of what you want to do. You don't want to just have a crawling hand sticking out. Um, so that's just some advice. Um, right here, they're obviously have people at different heights on top. One way to make this image a little bit better. If we push that a little to the to hiss right are left, which would make them separate from being on top of each other. So if he's a little bit to the right, like we talked about offset heads, Um, those knows connect that, um, up and down. You want his nose to be a little bit to the right so they don't connect, and then it would have looked a little bit better. Um, so you kind of have one rule here. One row here, Dad. Here, Mom Here, kid here. Her here. So up and down, nobody intersex. Um and, you know, creating kind of like a try and go when you put this as a whole. So it goes up, and then down it kind of creates a triangle. So they did a good job here. They could have put this kid a little bit lower, and that would have worked to to create, like, a pyramid. But, uh, this triangle also works. It's just a great image. Um, you see sitting poses, um, mom doing the signature on the side that doing the knee up with the arm over. That's how you do it. She she rest her arm on the side. Here. He's rest its arms over the need. You could see both arms and hands, and you have the kids budged in together in there. There's nothing really bad to say about this one. Um, women like I talked about with kids. One of the posing tricks I do is I put the hair back to show more of the neck that would meet the hair look a little bit better. Um, that's it. With this on, let's talk about this one. See, we can find anything. Um, this is great. Everybody has a great, big, cheesy smile. Um, that's great for this. Um, you know, shirt looks a little weird, but this is not a fashion course. Um, the thing that would have made this a little bit better is, um you see how these two heads are in the same line? Hers is higher. Um, daughter is lower. Mom is higher when it comes to up and down. Everybody's good. She's on the right side. He's next to it. Daughters next. And then, um, the boy is to the left. When it comes to up and down, nobody's intersecting. But when it comes to left and right, dad and son are intersected. So if the boy would have been a little bit lower, um, to fill, like this space right here, Dan. It would have looked better because right now what's happening is that, um, all of them are like in the second floor, and she's all the way in the bottom floor by herself. So by luring the boy down a little, you create kind of like levels like this is first floor. The boys in the second floor that that's in the third floor, the moms in the four to floor. If you kind of want to see it like that would levels. So having him a little bit lower would have been good. Um, this hand here is a little weird. If she could have, like, lifted her arm to show the rest of the arm, that would have been a little bit better. Um, I mean, there's not much to say about this. This is a great sitting post, Um, having, um, everybody close to the same plane as you can tell here. Nobody's too far forward. Nobody's too far back. So they did a good job there with that. This is like as good as it gets, you know, this is everybody's hugging There's no gaps between the heads. Really? Um, no nose is touching with the lines. So, um, up and down, up and down, up and down. They're all, like next to each other, but not above each other. And they're not next to each other. So he's on the top, she's in the middle and he's in the bottom. This is as good as it gets when it comes to Ah, Family Post, Dem two. Could have been in the same level if they wanted to. She could have lifted her head up, but it wouldn't have looked as good as if he was hired that she waas. So this is what you want to create? You want to tell the clients? You know, Mom pushed her head down a little, dad pushed her head up a little, Have the kid in the bottom creating that, um Sepp separate separation is really good. What? Posing. So here we go again. Ah, bunch ahead. Everybody really close together. The did a great job. Um, if mom would off just pushed herself a little bit over, um, she wouldn't be like almost in the same level as the daughter. Um, but keeping that height is important. You don't want Mom to crouch down and have these two heads together. Um, do you guys might pose a family like this, see this image, pose them together, and then have that in mom right next to each other? Had to head, Um, the kids are one lord than the other one. That has to be the same one lower than mom. So since the kids are doing the same thing that the parents are doing, it looks great. Boy is a little bit lower than than the sister that's a little bit lower than the mom. That's really what you want to create. The did a really great job here. Oh, another day would've mentioned about this if you get a chair, you have usually like the dad sitting it mom behind and that holding the kids as a signature pose with a group photo with two kids, um, or one kid, um, just dad sitting and everybody kind of wrapped around that. That's a really good, um, posed that you do with groups. Um, here is kind of the same idea, but, like, um, so let's see, here we have one had here one head up here that's had here and this had here they did a good job. Um, with the levels. The only problem now is that that's little bit talk. So when you see here, um, kind of like these, you almost have to visually see this. Like, if I go down here, this looks like a great image. And then that sticking out too much, you kind of want to push that a little. And you kind of just have to visually see this. You're not measuring anything. You just feel like he's a little bit off. That's all I can really say about this. Make sure that you don't have a member like sticking out too much. Um, what were we doing? Sitting poses? Let's just do only sitting ones. For now, there's another great sitting pose leaning up against a wall. Whenever you find a great wall that you can shoot at an angle like this, Um, sit them back like this. You don't want to. People resting on the back, having one rest and the other one move forward kind of makes everybody be shown in the image. Um, they did, Ah, good job. And, um in the sitting like he looks like he's sitting naturally, the daughter standing up so that her head is not too far off anywhere. Um, this is great post there filling the composition. Well, since you're showing the rest of the body, you don't want to squeeze the little girl here, um, and then not have too much on the right side pushing the daughter forward a little, Really, Like helped with this post This. Okay, so this is the chain of hugs that we talked about that holds baby. Mom hugs, um, bad. So that hugs, baby. Mom hugs that and all the heads right next to each other. This is the hugging chain that we talked about, what we did. The single parent section. Here's another great family photo that's creating a nice pyramid. So you create a nice big triangle pyramid, and then if you have extra members, you stick them in the middle. So they did a really great job here, um, of, like, here to think, um, because the heads aren't that close together. Your focus on this pyramid, it doesn't matter that they're in line here and there line here because that's on purpose. um there's too many members. Um, and you're not really creating that many levels. If it was, like, three or four people and they're all really close, and it's a tight shot, you really want to focus on level. So they're now in the same line. When you're talking about big roof photo like this, you can create kind of like this pyramid. He's on top. There, too, are in the same level. They are in the same level, and then she's on the one level on their own. So that's a really great job here in creating this pyramid. Um, and yes. So that's that with this picture? Um, here we are with the heads again. Okay, so let's figure this out. Um, when it comes to them for right here. This is great. You have 1234 when it comes to heights, uh, left and right there in different levels and then up and down, they're separated. Daughter number. Um, person number five years. Little daughter is in the same level as this one. And if it was just these four, this was perfect. She's over here trying her best not to ruin the picture. Um They did a great job. Another place I could have put her waas. Maybe, um, I would have pushed maybe the image a little bit to the left and placed there, like, right over here, a little bit to the right of her or to the left, right here, around where this arm is. That that seems like the best position for this head right here. Um, yeah, that's the only place left. It's kind of like everything is pushing to the left. And then instead of going left diagonally to the left, it went straight down. So if we would have pushed her had over here, that could have looked a little better. But, you know, there's no really good way for them to do that naturally. So they did their best. You break these rules all the time, and that's fine. I'm just giving you advice when you can, um, stick to like these rules. This is a great image sticking all the heads together. Tell them hey, everybody connect heads and look straight at the camera and smile. Let's put all our heads together, okay? These two heads are in the same level. Can you push yourself up. But can you put yourself down? That's what you do when you do something like this. Um, sitting back to back. Great idea. Both parents holding a kid. Great idea. Um, sitting together with the kid in the middle. I mean, this is universal sitting poses. There's not much to say about that. I think we cover it sitting. Um, really? Well, you can do the laying down with the heads up like this. That's a great idea for a pose. Um, when it comes to families, you can have the kids in the center or the parents in the center, um, and then going down to the smallest kid. Okay, so now let's talk O. Here we have bringing seats into play. We have two chairs and some little box thing or whatever they're using here. For another seat, they dressed a little formal, said, I don't want to sit them in the ground. That's why you bring seats as props. We talked about this, Um, if you bring a seat when there's a lot of members, you can have people sitting down. Um, people might think is cheating, but I think it's just a great idea for posing families to bring a seat in the park or whatever. Nobody cares as long as everybody's posed and, um, there together, and it looks good. So, um, she's sitting down and that sideways, um, legs position? Um, yeah. Everybody just looks great in this image. She could have put her hair back a little. She could have stretched her arms out. She could have, uh, put, uh, one arm, um, on the knee and the other arm up. But besides that, like, this is great. Um, it just they're creating, like levels. Um, from up and down, you almost have triangles here. Triangle here. Triangle there. So it looks great. Um, now, let's talk about some of these standing ones. Um, this is something. I see it a lot in these images and Pinterest, um, having a kid up. If you have a dad, they can pull this off and have a kid up in his shoulders. That's always Ah, great pose that I see time and time again. Um, let's talk about this one, um, eyes closed, showing emotion, everybody doing it together. That's a really great 80. Everybody hugging each other. Let's see. This is great. Everybody standing there. Um, I try to avoid something like this unless I have Ah, a reason to like it kind of goes with them. Um, well, but in most cases is one of the most boring poses. Everybody just standing together. Unless you have a nice scenery, you have a nice pat wear scenery. You can do something like this. But in most cases, just standing next to each other holding hands, it's now one of the poses. I tend to go for, um, something closer like this where, um, everybody's holding each other and hugging looks better than, um, this where they're standing next to each other. So, uh, every holding each other close like this looks better. What else could talk about from these? And here's a nice use of the environment. Um, using tree branches, um, tree trunks to sit on and lean back on, creating seats with the environment. You know, you want to get everybody closer together when you spread amount and having hold hands, it doesn't look as good when you get everybody as close together as possible, and then you're creating levels here. So it goes from up, down, down, down. It just looks great. You don't want it to look like, um, telephone bars, you know, like a tower. So you wouldn't put him her, him and then him to the next next to him. And then this little one to the right, You want it to, like, kind of all go together, fill in space, would heads. So you have this year, and then this gap on this left side fill it with their heads. Um, so here works because you have a pathway. Um, So whenever you have a a pathway, so, um, kind of, like sidewalk or a street or anything That is, like, this is where people will walk on you can do like, this whole holding hands and walking posts. They're standing still, but crazy idea that they were walking there, so that's always a great pose. Um, you see, they did it here to in this pathway. Um, so if you have a path, it creates a natural frame. Then you can do, like, this whole holding hands. Think so. Based on location. Really? I think for these holding hand pictures. Um, Let's see. I think we covered everything. Um, I want to talk about this one did a good job here on purpose. They put her on top him, her and him on the bottom on a kind of shows, different levels, so different levels looks really good rather than anybody being in the same level. And that covers everything when it comes to posing. Really? My main advice is, you know, try sitting and standing poses. Okay? Get a really close images with heads close together for some, um, hugging and everybody wrapped around, um, like everybody holding hands. Everybody, um, close to each other looks better than a part like this. And if you find a nice pathway, then try to do like a, uh, holding hands and then creating levels. If you have a lot of family members creating pyramids like this one, the kids just focus on the expression, and then you can try some fun ones like this one and this one. So that's a when it comes to posing families, there's no, like some big science and many rules and many tricks to this is just know the types opposes available. Sit them down, stand them up, create triangles, levels offset heads, and you would be fine. That said, when it comes to posing families and now we're gonna move on to the next section
29. 29 Pinterest: and this I shouldn't be talking about Pinterest and all the reasons why every family portrait photographer should be using Pinterest if you don't know what Pinterest's is. Pinterest is a website that has all these images uploaded by users and you all categorize by keywords. You search certain keywords on the search far and all these images air very professional, usually taken by professional photographers will pop up and then you can pin them. Which is why it's called Pinterest, which means just save them into was called a mood board. Aboard is kind of like a folder, and you have all these folders in your account that you create, and you could have all these boards or folders with all these images that you used to help you create was called a Mood Board of Mood Board is a set of images that used to help you with a certain project and photography of Mood board is all these images that will help with the inspiration for certain project or photo shoot. So the reason why you need Pinterest is because you want to start creating boards off to inspire a session. Let's say you have a photo session that involves parents and one daughter. You could create a board with all these images that involved a parent and one daughter, and that would be the board for that photo session. And you have another families that has three kids. Then you create a board for pictures of families with three kids, and then you use these boards to help you with your photo sessions. Use them to help with how to oppose them in a certain location. What spots to shoot in a location, how the lighting looks and what the mood looked like in the location where the sun was hitting and stuff, outfits, props, creative ideas like everything comes from these boards and Pinterest. And when I started using Pinterest for my photography, took my photography to the next level because I could just simply go off of Pinterest and just use these ideas for my couples for the people I was photographing. Now, yes, it's good to know what you're doing, but at the top of your head when you're starting out, you're very limited to like what knowledge you have, what experience you have So using Pinterest and all these experts at all this experience from all these different people could help you create some amazing images. So use Pinterest, create an account, create boards, start practicing using it. And in the next few lectures we're gonna go over the pinchers board. This linked with this course and all these different images in there that I've categorized now in the next lecture is gonna be a way for you to go to the Pinterest board that I've created for you. So basically, when you click on that, you can save that board and then into your account. Every time you log into your account, there's mobile Absa, like you can download the Pinterest app on your phone and see your boards. You can see the board that I've created with all these images and then use these images with your next family portrait session and then create new boards just specific to that family on and then have other customers create pincher sports. My top recommendation is don't just do it yourself. Have the families do it themselves to Whenever you have a client, tell them Do you have Pinterest? If you don't have Pinterest, go on Petrus, search family pictures and save or screenshot all the pictures do you like from there? So we can recreate them in your photo shoot? People will come with me with a long list of images. We will recreate them inch by inch and try to do that same image. And we get all these great images. Thanks to Pinterest, it's not cheating by doing this. If the way that we do things in photography today, we create and recreate. So it's fine to use Pinterest is too, uh, control your photo shoot. You going to incorporate some of the stuff you learn here to do some poses? But my top recommendation is just use Pinterest, save a lot of images and recreate those in your family portrait. It's it does look professional to do that. I don't think that it doesn't look professional if you just recreating images. Don't worry about that. As long as you get something amazing images, that's all that matters. So that's it. When it comes to Pinterest, I'm gonna show you a few more lectures on that, um, on the computer. And then when we went to the next section
30. 30 Using Pinterest: in this section. I want to show you guys what Pinterest looks like, how to create boards and more about using Pinterest. So this is what Pinterest looks like when you go to the website on your computer. Um, you have here kind of like a news feed of pictures that Pinterest thinks you might like Based on my recent search of family image is a lot of family images are showing up. This is my account in the media. I can create pence, which means I can upload images to Pinterest. I never really do that. I don't use Pinterest to upload images. I use Pinterest to find images to create mood boards. When you click on home, I'll take you to this news feed. When you click on your profile, this is what it looks like on the top. They have the statement showing, like recent things that you've pinned. These are all part of the family portrait photography, masterclass, pence of images they're going to see when I mean by pins. I mean images that I've saved to one of my boards. So those air called pins. These are the latest pins, which means images I've saved to a board. When you click here with says boards, you can see different boards that I've created. Ah, these will be the board. So you've created you can press on the plus side next to your counting, right Recess, create pit. But before all that, you have to log in. He created accounting. Here. You can, uh, and once you log in, you can start using Pinterest on your phone or on the computer. Then what you would do is press where it says create, um pin add. You don't want to do that. So you go Teoh your account here where says boards and create a board. So let's say, for example, I'm taking, um, pictures of this family of three. It's just Mom, that and a kid. So, um, I'm gonna say family off three. Um, or I would name the name of the family. Um, so let's say it was Ah ah Johnson's family. I would write the Johnson's family. I will create this board, and then I will later share it with them so they can see the board that I've created for them so they could see images to inspire their photo shoot. I would press create, and then I have here a family of three. Pinterest is smart enough because real family of three to give me all these images of family of three, which is crazy. How smart Pinterest cysts. But assuming Pinterest didn't give you any suggestions, let me show you how to find these images. I can try. I can type in family photography on this search bar just to start off with, and it's gonna give me all these family images Now. A lot of these might not have families of three. This one does, so I'm going to click Save It's safe to Family Mood Board because that's the last board that I was playing with. So if I click at it board and then family off three, that's where I want to save it. Click safe. Okay, so I scrolled down and I looked for a family of three. Here's a family of three. Make sure that it's saving too family off. Three. Now it's saved to family of three. Here's another one. It's a family of three. Here's another one family of three is another one family of three. Another one, and this is what I will do. I will keep looking for images. Now, listen, you're not finding many images that match. Um, you're What's it called? Um, combination that you're trying to get? I mean, I'm finding a lot. Usually in family photography. You'll find a little bit of everything. But let's say I really wanted to find a family of three. I could put a family of three and then you're gonna see images with three members, which is really cool. You could do that. Let's a family of five. There you go. Pictures with five members. That is a really cool trick you could do. Um, let's they use one pictures off siblings. You can put siblings, photography and here's pictures of kids together these air just siblings. So let's go to family. Uh three. Okay, here's averages. The great family of three family of three family of three family of three family of three. And you just keep repeating this process. Teoh, I don't know. You have 100 images. There's something crazy I don't know. Just so you feel like you have enough, then what you do is you click on your profile, you click on boards and you find the board you've created. And then here's all the images. Now, if you liken image and you want similar images like, let's say I really like this image, you can click on it squirrel down and similar images will show up. Oh, I like this one. I'm gonna add that to family of three. Okay. I can't go back to the board. Now. I have MAWR images here, and the whole purpose of this is for you or your clients to create boards of images that you can recreate. So now let's say you're at a park and you have your family of three. It's, ah, mom and Dad in a toddler. And you tell them, Okay, lets recreate this. Um, you're gonna kind of, like, hold each other and have the kid in the middle with the head, um, right in the middle. And then you find a scenery that similar to this, and you think an image that looks like this Everybody smile looking me. Okay, now we're gonna recreate this picture. Let's hold a kid up. Great. We got that image. Now that's gonna hold the kid and mom and that are gonna hold hands. Ah, Now I'm gonna hold them and the dad's gonna hold a kid and Mom's gonna hold that and we're all gonna smile. Uh, now the kids going to run and the dad and mom were gonna be in the background And that's really the best way to use Pinterest. Recreate images on the go. Use your phone, Open up your app, see your board and recreate us many images. And that is going to take your photography so far because it's one of the easiest, easiest ways to create photos or recreate photos for family portrait. It's so that's it to on how to create a board out of Penn images and how to use Pinterest. And now we're gonna move on to the next section.
31. 31 32 Using Pinterest Board Provided: in this section, I'm gonna be talking about the family portrait photography masterclass board that I've created on Pinterest for you guys. It has over 100 images and is categorized into different sections. So when you click on the link that's provided with you with this course you're gonna be is going to take you straight here. You can see it on your phone, on your computer, on the app, whatever. Once you get here, what you want to do, it saved his board to your account. If you don't have a board that saved the link and save it on your phone so that you can come back to this and you don't have to create an account to access this, but it's better to create a Pinterest. Accounts of you haven't create one is gonna be a lot easier now. I'm going to quickly give you an overview of each one of these categories. So you see what I've created for you guys. The first category is called landscape photos like that I talked about in the course last keep images are this big image that shows the landscape is this big image that they can use usually for, like, Facebook cover images. So the image that they use on top of their Facebook profile or the big image that they might print and put in their wall. You don't want to just create a lot of images there. Close ups of the family. You want to create at least one good landscape image when you do a photo session. That's my recommendation to get ideas of landscape images I've looked and found some here, so you can see here some images like this, one of them running in the beach. Oh, are this one of of them that plane with a kid and the mom holding the other kid, Um, or this one has this great landscape view off where they live, whatever you choose here, some silhouettes that I found. Whatever you choose, hopefully this will give me some ideas of what you can do it. I see a lot of people holding hands jumping, hugging while showing the view of the landscape. So that's, um, this one that is the landscape category. The next category I have here is single parents and kids, So these are the images that involved just one parent and either one kid or multiple kids. So we have mom with the daughter here we have Dad and, um, a kid in the shoot, um, standing on his feet. Here we have was called a handstand. Uh, the girl standing in the hand reading to the daughter, um, the daughters flying professional, that and kids having fun with the kids, all the faces together and so many other ideas that you could recreate when you're getting to the variation where you have a single parent and the kid. So that's what this kid categories about. There's so many images in here. Looked through them, um, and use the D's in your photo shoot to recreate. There's a little bit of every age here I believe so you should be able to get something here to recreate next. We're gonna move on to just kids. This is when you're gonna be shooting. Ah, the siblings together, um, and certain ideas that you can recreate for sibling pictures. So all boys are girls standing on something, laying down, plane kissing, hugging, standing together in a background, crouching down, using a frame, all these heads, a bunch of ideas that you can use to recreate. So, um, that's that category for just two kids. Next is a group photos. This is where you have the whole family together and some ideas that you can recreate. So, Mom, in that with the kid, mom and dad with the kids up, kids up holding the kids, um, sitting poses standing poses with a chair like we talked about in the cores. You could bring a chair if there's a lot of family members, um, standing leaning up against the wall, sitting together, creating this big triangle. There's all these ideas. There's probably over 50 images injustice group section. So look through them. Find one that fits the number of family members or create your own board. And use that in your next photo session. This board here would over 100 examples was created to help you guys get a head start. So if you don't have the time to create a board, I already did it for you. Guys. Use these boards, recreate them not just for the poses but for lake composition. Um, figuring out like in parks what some great images you can do. You can use his images for outfits. See what people are wearing in these images and try to kind of get similar outfits that helped them to for props. Um, like, here you have this watermelon props, the hats, Um, the book eso different props that you can use for some creative family portrait. It's so hopefully, um, this board will help you guys out. You have over 100 examples that you can go over a juice for your next photo shoot session. That's a when it comes to interest. And now we're gonna move on to the next section.
32. 33 Natural Light Photography: in this section, we're gonna be talking about lightning. This is all about lighting and lighting is very important to get your images to pop. To get your subject to stand out in your images and lighting is one of the things a lot of people struggle with universally and every type of photography we already talked about posing. Now we'll be talking about lighting in. The first lecture I want to talk about is Were you doing family portrait? Get really good and focus and try your best to stick to natural life photography. Try to avoid using external lighting. The reason for that is because you're gonna be taking a lot of images quickly. And you wanted to look very natural to family portrait with external lightings that could look a little fake. And the other thing is that the set up off natural of external lights will get in the weight off getting good images. So you want to just be it would just set him up in a place and just taken image. And to do that, really, you really gotta be good at seen light and figuring out what's good on location. And that's what we talk about the next lecture, but my top recommendation and I see it and almost every photographer is to shoot with natural light Pinterest. And everywhere you look at, you see the most family portrait photographers. The professionals are shooting with just natural light. When you could get to the level where you don't have to rely on external lighting, then you're going to see that you're gonna be able to take more images and better images. Now, I'm not saying never use external lighting. There's many instances where external ideas could come into play and will be better. My top recommendation is only used external lighting if you have an assistant or somebody else there that can help you if you're all by yourself trying to avoid external lighting at all cost. So that's it when it comes to using natural light and the intro to the lightning section. Now we're gonna move on to the next section
33. 34 Soft Light: in this section, we're gonna be talking about how to find a good light on location when you're somewhere out in about, um, good light is what I consider soft light jer ggl is to find soft light for your subjects when it's soft. Light is is any light that's diffused and is a big light source. Now the sun is not a big light source, okay, it is big and it doesn't produce a lot of light. But what I mean by a big life source is that the source of the light fills a large area, and when you look at the sun and wish you shouldn't look at the sun. But if you were to look at the sun, you will see that the sun is is little speck in the sky, which means it's a small light source. Now something like a window. The whole window is a big light source if the windows really big because the lights coming from the whole window almost evenly and it is a big lie source. Soft boxes and Octa boxes and all these big light modifiers are big light sources because the source of the lights is this whole area, and that's a big light source. And one of the biggest light sources that you'll ever find is clouds. When the cloud is covering the sun, it creates like a soft box in the sky, and now the whole cloud is a light source, and the cloud is huge. You can cover the whole sky, and it creates a big life source in the sky, and that is the softest light you'll ever get. The reason you want saw flight is because soft light gives you the least among the shadows . So this beautiful light that you see on subjects and professional photography all came from soft light. You rarely see beautiful light on the subject that came from direct sudden light or a direct flash without any light modifier. You need a big life source to get the light to be very self. Now what happens if there's no clouds in the sky, then your next next thing is to look for the shade in the shade. You have light bouncing from many different directions, and it's creating soft light. That shade area is usually all soft light but less light than outside of the shed. Now whether you're using the clouds or the shape, there is a direction of the sun that you need to take into account, even if there's clouds in the sky and the sun is over there. But it's covered by the clouds. It's gonna be brighter on this site than on that site. So if I face a lot on this site, even those all clouds and soft light, they won't be as bright in their face as if they face on this site. And that's important because later we're gonna talk about the subject being the brightest part of the image. You want a bright face on for it to look good in the image. So to have the brightness face, you need to know where the sun iss. So even if you're in the shade or whatever, whatever the Russian, the sadness that's usually where you want to face, you'll get the most late from there. Another thing to note is that you can give reflection from buildings, trucks, anything this white or close to white. The sun can bounce off for that and hit the subject and create soft, lightest well. So whenever you find anything that the sun is reflecting awful Gonna create soft light things like the sidewalk the the cemented sidewalk If it's all white, will bounce the light down and up and fill in shadows underneath. So things like that and things you need, Teoh, take into account and look at when photographing people you want soft light. You want the least among the shadows so that it creates these beautiful light that makes these people pop in the image. So that's it when it comes to on location and soft light, and now we're gonna move on to the next section.
34. 35 Brightness: in this section, we talked about a rule and to make a new image look better. When you're doing portrait photography, you want to make sure that your subject in this case, the family is a brightest part of the image. Now, if they're not in the background, is very braked. As long as a background is this sky, you're fine. If it's not a sky, you want to make sure that the subject is brighter. The sky is the only exception in which that could be the brightest part of the image. Besides the sky, you don't have the sky in the image or any other part of the image does not this guy. If that part is brighter than the image, then I will naturally go to that part of the image. You don't want that to distract people from the subject, and you can't overcome this all the time, and that is fine. And you might use external lighting to make your subject brighter to compete with the background. And that is fine, too. But what you want to do is practice on location, moving your subject around different angles, different directions, different backgrounds and finding a way. Where can you shoot them? Where the subject is brighter than the background. So once you get this right, you're gonna see that your subject pops. And they looked beautiful. So to get this beautiful look to the subject that pops, make sure that the brain is part of the image. Practice this. Go on location, um, and just stand people places and look and see if they're brighter than the background practices everywhere you go and you will see that you're gonna get better images so and comes to lighting. One of the rules is make sure that your family, your your subjects are brighter than the background. Unless the backgrounds the sky so that's it when it comes to that. And now we move on to the next section.
35. 36 Sun and the Golden Hour: in this section. We were talking about the son and the golden hour. When it comes to the sun, what you want to know is like we talked about before. You want to avoid direct sunlight. Okay, When you're planning your day and you're planning your shoot, go for the days where there's clouds in the sky versus times when the sun is indirect. Sunlight. If you have to shoot a direct sunlight, does a few things you can do. The main thing is, make sure that the sun does not show up in your picture. You don't want the sun right here because there's any creative big glare in the image that's gonna look really bad. So you got a position. That angle in which you shoot the image for some of the sun is here. The sun is up here, away from the front. That's the first thing also again lens hoods and things to avoid the sun hitting the image to you. Avoid glare. If you see any glaring, the image is probably coming from the sun. I've used hoods in my lenses or my hand or other like my wallet to cover the sun, create a shade where I'm taking an image. And then I know that that glare one appear and then my subjects going to stand out more when there's glare. Your subjects did not stand out so trying to avoid glare by putting your lens in the shade , creating a shade for yourself, having the sun not appear in the image. The other thing is you can hide the sun behind your subjects. The sun could be behind. So the sun is right here. And then you put the subject in front of the sun and that creates his globe, like around the subject. And it looks beautiful. Now, I never have the sun hit the subjects directly with direct sunlight that's gonna create some of the worst light you'll ever see is gonna create hard shadows in the face is going to create squinting eyes. Your subjects are gonna be struggling to look at the camera and look in that direction because the Sinus sending them in the face all those squints is now work the image with good lighting, so just go somewhere else, just at all costs. Avoid the sun being in front of the subject. Make sure the sun is behind the subject, and if they're on the angle from the subject, make sure doesn't spill over and hits the front of the face. Just look at your images and what likeness hitting the face and make sure that it doesn't look back. You can determine that yourself, Um, but I don't best have the sun behind the subject. No, another thing is the golden hour. The golden hour is the first hour in the last hour of the day, where the sun is still out. So when the sun is rising and the sun is setting, you have this beautiful light that is, looks the color orange or golden, and it creates for beautiful images. People sound out to shoot during the golden hour that beginning of the day. In the end of the day, you can set your photo shoot around the golden hour. It is better at sun set because you can shoot before and shoot some special images at the end. If it's in the beginning of the day, you chances are you're not. We prepare for it, you're gonna miss it. But if that's the best time to shoot for the family, shoot that If not, plan your shoot for like a little bit before the golden hour and then shoot for the golden hour. Now the best way to find out when the golden hour is is to just open your weather app on your phone or look it up online when it's sunrise. When a sunset that time when the sun is rising and the sun is setting for when the sun is rising. It's that time up to an hour and when the sun is setting is that time at up to an hour before So the sun is setting as six dirty is from 5 30 to 6 30 The sun is rising at 5 30 is from 5 30 to 6 30 So that's the golden hour. My top recommendation for beautiful family portrait is to shoot in the golden hour. A lot of people trying to do that, and you're gonna get great results. Then, as long as the son is showing in the background and someone that sunlight is hitting your subjects. So if you're shooting at a park at the beach or whatever, you're outside trying to use the golden hour to your advantage to get the beautiful glow of like hitting the back of the subjects. And remember that son has to be behind the subjects, hitting them from behind. So that's it when it comes to the son and the golden hour. Now we're gonna move on to the next section.
36. 37 Reflectors: in this section, we could be talking about reflectors if you're using reflectors to help you with your subjects, my recommendation is using for fill light and use it to block the sun and at most cases, don't use them at all. You don't want to be using them in every single image. Trying to avoid it is a hassle to use reflectors. Using them in stance don't really work because they never get toe a good position. And the wind tends to not them now because the reflector is like this big thing that gets held by the wind with easily and knocks out any stand only use reflectors. If you have somebody assisting you, don't try to hold a reflector and take a picture of yourself. You don't have anybody to assist you don't use any reflectors. You're using reflectors and you have heart light. Direct sunlight. Use a reflector to bounce some light towards wherever the shadow is at. So if you see shadows on the left side of the subject, have the like bounce and hit that side. Try to avoid using the golden part of the reflector. Now you could try it. But in most cases is gonna look really bad that golden light. Just use a regular white side or the silver if you're not getting enough light. Another thing is my best. Best best used for reflector is blocking the sun. If I have a hard light and I'm in a spot that I have a great picture, what I do is I put all the people together, its schools that they can, and I have somebody hold a reflector to block the sun and create a shade area for all the people or as many of the people as they can. That shade is because the sun still kind of goes through the reflector. It's soft light, and that soft light will look beautiful on the subject. I've used this and I got some of the best light. When there's no clouds in the sky, so have a reflector, of which you and if you have somebody to hold it, have hold it to create a shadow for your family or the two members or the three members or the individual that you're taking a picture off, have them created shadow, Um, and you will get amazing picture and the best way to create a shadow is to have the subjects sitting down in the ground, because then you can have more space to create a shadow than if they're standing. So that's it when it comes to reflectors. Another thing I forgot to point out is, if you have too many family members, you cannot use a reflector to add light you might be able to do to create a shadow. Maybe, but to add like you can't really do it if there's too many members with a reflector. And the reason is because the reflector will bounce and hit, usually one spot, and you want the light to be even with everybody. So maybe the person in the centre has the most light, and everybody else is darker. Reflectors on do a good job, spreading light evenly. So if there's too many members ditched the Reflector. If there's a few members and their close together, then you can use a reflector to hit that general area. So that's it when it comes to the reflectors, and now we're gonna move on to the next section
37. 38 Speedlights: and this action will be talking about using speed lights. Where you doing? Family portrait. My top recommendation is never used more than once. Be let avoid having to use one for red light or fill light. Use the sun for that. Use a natural light to be your feel like to be your room, like the light behind the subject that's creating a glow around them and make your speed light. Be the main light or make your speed. Like be, um, the feel like Now my top recommendation is one speed life and my other recommendation is trying to avoid the speed like being on top of your flesh. Get, uh, trigger system for your speed lights so that you contributors to be like after camera and almost anywhere away from your camera is gonna be a better angle for the light that straight on is going to create depth in your image. And it's gonna look better than when you shoot straight on. Now, if you don't have that system, you want to shoot straight on. Make sure that most of the life is filled in by your natural light and you're only adding a little bit of pop feel like on your subject so that they pop a little bit more. Don't make it be too bright on. Then. Just gonna look really bad in a natural. Make sure that taken image without the flash, it looks good. If their face looks a little dark. Put the flash on top of your camera low settee and have just bright up the face just a little bit so that their brainard in the background don't make it be a lot of light. So another tip when using speed lights is make sure somebody can hold the life for you. We have trigger system. Make sure somebody can move around with the light and put it wherever you want. Try one spot. If it's creating a bad shadow, tell to move over. You don't really want to be the one holding the light, and having a stand with all these members is really a lot of work, and we'll hold you back with taking images so you really wanna have somebody help you when you're using a speed limit? Also note when you're using a speed like you can't take that many pictures that quickly, so I only really use it when you have a few members there are controlled. So you have people that are older know toddlers trying to avoid it with toddlers because they're moving too much to take pictures ready, quick and the flash cannot take pictures that quick. Yeah. Be careful burning out your batteries, Bernie. Not your flash. Just take them and nice pace a little bit slower. You should know by now how your speed light works. Um, so that's really it. When it comes to using speed lights, there's no really complicated light setups that you really need to know. When it comes to shooting families, you're really just pointing straight on at the family and making sure that everybody gets light and that's it. The next section would talk about light modifiers that will help you as well. With that
38. 39 Light Modifiers: in this section, we're gonna be talking about some light modifiers that you can add to your speed lights to help the light look a little bit softer. Speed lights are hard life sources, like we talked about before. You want avoid hard life sources because increased shadows and it makes people. Now look, it's good. So what you could do with three lights is at a light modifier to make it so that the light softer. I like my fire. It will be like something like a soft box or a flash bender, something that will make the life source bigger than just the size of your flesh. Whatever you use to make sure that is portable, it doesn't require a stand. So if you're using a soft box to make sure that is, like 24 inches by 24 or smaller something that you somebody can carry by holding up and they move around with and change directions whenever you're using a light, make sure is always pointing at the nose. So if the face is right here, make sure that the light is pointing in this direction. If the face is this, we make sure it's pointed in this direction. The faces pointing in this direction Don't have the leg point over here. Make sure the lights playing over here. That's a rule of lighting that you should know using a soft blocks. Have somebody help you. Hold the soft buff and follow the faces. Make sure that they follow the faces. Wasn't using just a speed, like without the soft box or a little soft books talking about little something that can hold on and you can help it Withstand soft box. Just look for small soft boxes for speed lights on Amazon and you gonna find a bunch. Ah, flash Bender is one that I really like The Roque Flash Bender attaches to your speed light , and it creates like a little soft box that you can use. You could use that on top of your camera and create a software light than direct flesh. And the last thing I want to talk about when it comes to light modifiers is you can bounce the flash off pigs if there's a wall and the wall is not a particular color, like is a white wall or whatever close to white, you can bounce the light off the wall and then it will hit the subjects. And it will create this nice soft light because the light sources now not the lights the size of the flash, but the size of the wall and the wall is really big, so that creates beautiful light, so windows are very nice for them. You composite off a window. Window light is very soft because big light source. We talked about that, too. Live the last few things I wanted to mention. When it comes to light and the bigger the light source, the better. So Valentin light will also help. You can bounce light off the floor if it's nice cement, so you don't always have to point the flesh at the subjects you composite off or something . Another thing you get busted up off is a reflector. If somehow you could manage somebody holding the reflector and you hitting the light to the reflector bouncing, it's gonna create a softer light than if you point the flash directly at the the tricks like that you can play with on location to get beautiful soft light on your subjects. That's it when it comes to lighting, and now we're gonna move on to the next section
39. 40 Location Scouting: in this section we're gonna be talking about on location, how to take great images everywhere you go and how to find great spots to shoot it. So in this first lecture in this section, I'm gonna be talking about locations Scaly. If you lived in descending the whole your whole life or you're new to the city or you're just missing you should always no your area and do some location scouting, which means kind of like look around and find good spots to shoot it. One of the best ways to do it is through Google Google Maps. You can look around and actually see stuff how it looks, it in person. I'm sure you in the next section sample from my other courts on location photography. How I use Google to look around and finding this spot. What you're looking for is places on your map that are green or blue. Green signifies grass and parks and trees. Blue signifies bodies of water green and blue in the background of images create great scenery. So when they're any good park, any body of water is a good place to maybe check out to try to do a photo shoot, the bigger the area of the better. If the park is very small, you might want to avoid. They're shooting their You want a big area so you could walk around and find the spots to shoot it. Another thing to do is to ask your who you're shooting. If they know nice parts or bodies of water are areas that they like to shoot it. The size parts and bodies of waters, artsy neighborhoods or a downtown area with a lot of buildings is a good spot to We'll talk about how to find what to look for in a location to shoot it in the next few sections. So certain rt neighborhoods with lots of arts in them downtown areas with landmarks and buildings looks nice parks, beaches, forest things with green. Those are good locations to use. Also, another thing you can do is look up photographers in your area, look at their work and then ask them Where is the spot that you shot this image in? If they've got some great backgrounds in their image, So that's it when it comes to location scouting, first lecture and this look on location section, and now we're gonna move on to the next section
40. 41 Using Google Maps: in this section right here. I'm gonna be playing with my map to find locations for images. Sometimes when im really stuck or I'm somewhere new, a new city or whatever. I go to Google Maps, and I scroll around to look for a good spot to take images that, um when I opened my map, it looks like this And what I'm looking for is usually the greens and the blues. The greens and the blues are great spots for me to take images at, um because greens look really good. Blues looked really good. So I look as a man, I see these parts. Rivers keep scrolling. I see here in my beaches, this is the sad. This is one of the beaches I normally go to. So let's say I wanted to shoot right here. Look, there's a water right here. This is a nice a big park, and I want to see Well, how would this look like? Well, you could do is when you zoom in, grab your little person right here. It says browed street view images. Click on this. Drag this and places somewhere. You can place it on any of these street lines or in any of these circles. So if I click on this circle here, this opens up, and now I can actually see the location. So I'm looking here in this location and go, OK, this is kind of interesting. I have this pathway here with this tree. They can stand right here, and I could take a picture of them. The lines from this pathway and the shade will look nice. I can shoot. Ah, like right here. Like a person can sit down right here. I can have this green be in the background and the water be in the background. Things like that. I think about when, um shooting. Then I click here and I go back and I could move somewhere else. I can go to mantra of beach. The satellite view. Here's the beach. Usually shoot at if I drag and drop my person right here. Bam! I can see everything here. Okay, I can go here and take some pictures there. Have them sitting here and show this thing in the background. Um okay, this looks ugly from the background, so I won't sit somebody there and just shoot there. But these buildings look nice. Maybe like sitting here with these buildings in the background. Let's see, What else can we drop? Our little person? And then, um, drop this person out here that takes me their God. Okay. More buildings. You can even do this in, um, map view. You could dio straight in downtown, so I'm here. Here's a planetarium drag. Ah, I don't know. I want to say right here. Whoa. I could see everything. This is the amazing part of of Ah, this map on Google maps you can really like. Just see how everything looks like and figure out if you want to go. He's my decide. Ah. Want to go here? Oh, great. Look at all these people. But I really want to fight with all these people to get a good image of the bean. Or do I just still go here and, like, Look, I can stand them right here and have these big buildings being the background or all this green here, like I didn't know these trees were here, but thanks to Google maps and street view, I can see everything I know that they can lean upon this. Um, I can have this in the background and you can move around. So my recommendation is here Some steps. I like stairs. So my recommendation is, uh, if you have a chance, play with ST play with Google Maps, get into street view, drag this little person into areas and see what it looks like. That way you don't really have to drive around and explore. You can kind of do it from here to get an idea if you want to go somewhere to get some images before you go there. So that's that when it comes to using maps to help you find a good location and now we're gonna move on to the next section.
41. 42 Good Spots in a Location: now, once you pick the location that you're going to shoot it, you always want to scan the location and find some good spots to shoot it. My recommendation is to arrive to the location early and walk around and find these spots. When you find these spots, always write down or make a mental list off the spots, you're going to shoot it. You can say I'm gonna shoot here, here, here and here and here and then go through those spots one in a row. A good number of spots to shoot. It is between 3 to 5 spots within a location. Try not to have too many spots because with all the variations that you can shoot with a family is just gonna be too much. I think you know just one family portrait session. But you can have extras in case once now working and then you move onto the next one. Things I look for and ah, location is I'm looking for stairs. Any stairs. I've always been able to set families up together sitting or standing and look good. You can play with heights and if people are taller than others, the shorter one stand in a higher step. So Stairs is really good all anywhere you can sit on, it doesn't have to be an actual chair. It could be doing a rock or something that people can sit on. He was a nice spot in the brown that they could sit up. These are my sitting poses. Look for those throughout your location. Look for backgrounds so you can stand the family with a background. So nice wall offends any texture. Background, mural, any graffiti, anything artistic. Anything that could be rectangular background that you can shoot in front off have that as one of your spots is of this. But any natural frames. If you see buildings or pathways or trees, the create kind of like a frame, and you can put your family in the middle of that. That is a good spot to shoot it. Another thing that you want to look for is great scenery. Look for things that can create that great landscape image that we talked about in the beginning of this course. So so, like great view of the ocean are a big fountain in the background or all these buildings, whatever you can create a great big image with your whole family. Maybe all these trees in the background, whatever will look really big when you zoom out. Look for that to and then set that up with one of your spots to shoot it. So all those little things that I talked about will really help you. So that's it when it comes to spots to look for within a location to shoot it. And now we're gonna move on to the next section.
42. 43 A Good Location: in this section. I'm gonna be talking about a good location. To me, a good location has a lot of these spots that I talked about. It has a lot of stairs, a lot of places to sit on, a lot of things with great scenery, a lot of backgrounds, a lot of a lot. If you go toe a location and you can only find like one or two good spots to shoot and probably doesn't the location, you want to shoot it. That's why arriving early and really scouting the location will help with that. Now, when you're doing Family portrait, it's My recommendation is sticking to the locations that work. Don't try new locations just for the heck of it. If people are paying you, you want to deliver and you want to stick to the locations. You know if you do some other type of photography fashion, you know you want to shoot your own family and France. Anything else that you can practice on, try different locations or scout different locations on your own before shooting a family. But if you're being hired, my recommendation is always go to your best, but go to the spot that you know you can deliver a lot of different spots in. There's this one part that I've shot in time and time again with so many different people, because I had a good is evil that I could sit people in, like the tables there it had upon with a font and shooting up that created a nice background. There was vengeance I could sit people on. Throughout the park, there was a little bridge they created, kind of like a frame and nice scenery towards found the pond in the background. It had railroad tracks that I could sit people on and create a nice scenery image and to this part, has so much to offer that it became my go to my favorite spot to shoot it. Look for your favorite spot. Find one and trying to use that assed much as you can, and then just try to grow in it and find new spots. There's countless a spot. You really look for them within a location that you can shoot it also, when it comes to a good location, the number of spots when you're shooting with families, the lesson number of members, the more spots within location. You can shoot more family members that they have, the less pots. You can shoot it because of the very Asian within the family that you have to shoot it. If it's just a family and one kid, you can probably pull off more spots. So really think about that when scouting for your spot of your location. How many members are you shooting? Okay, I only need three or four. If I'm shooting less people, I probably need 5 10 So that's it when it comes to how many spots in your good location, and now we're gonna move on to the next section.
43. 44 Pricing: in this lecture. I'm gonna talk about pricing. This is gonna be a little extra. I want to add to this course There's not gonna be much of it. I'm just talked very little about it because I feel like I've taught you a lot about shooting Great family Portrait. And this is just something extra for the business off being a family portrait photographer . My recommendation would pricing your work as a family portrait photographer. My number one tip That's always been no matter what type of photography you do is to have packages. Don't just think toe flat rate for everybody have different packages that start at the lawyer woman toe work for up to something like five or 10 times that price. And what you can offer is things like different locations, different outfits, the amount of edited images you're gonna deliver. Thea amount of members you can have in the family. So shooting three versus 45 could be different prices. You want out of custody, you want ad and grandma, you can charge different packages for that, but just keep raising it up because make sure that the basic one fits everybody. Maybe it's a simple one hour shooting, one location with I don't know, five edited images or 10 evident in images, and then you can work your way up to more work. As a photographer, you're really not working that much. Most of your work comes and finding clients on charging the most you can. That's the most work. So whenever you can charge more for a single client by adding a higher package, you can make the most and get reached the point where you're a full time photographer by having this whole package system. So hopefully does help you guys out. When it comes to pricing, I'm not going to see how much you should charge. You should do a research of what other people are charging to kind of get an idea of a good range of what your package of package prices should be. Um, and that's it. This is my whole course. Thank you guys for watching my family portrait photography masterclass. Check out my other courses. I have so many courses on photography on this platform. Um, thank you guys so much. See you guys. Hopefully in another course
 Angel David Weatherston, Helping Artists Grow