Transcripts
1. Intro / Basic Dyeing Skill for Japanese Kimono & Fashion / How to make 地入れ液 Jiire-Eki: Hi, I'm Yuki. A Japanese dyer and dressmaker. I create artworks on the theme of LUCENT LIFE with my Japanese traditional Kimono dyeing techniques. Here, I'll show you how to make 地入れ液 / Jiire-Eki. 地 means 'Ground' and also 'Fabric'. 入れる means 'Put in'. 液 means 'Solution'. 地入れ液 is a pretreatment solution that is applied to fabrics before dyeing. Firstly, prepare soy flour and stir it with water. Secondly, dissolve a piece of glue plant in a hot water on cooktop. Thirdly, strain the glue plant through a piece of cloth, and stir both together. Once, 地入れ液 is applied to fabrics, we can start dyeing process using dyes. This is a beginner class to learn basic techniques. Let's take a first step into a dyeing world!
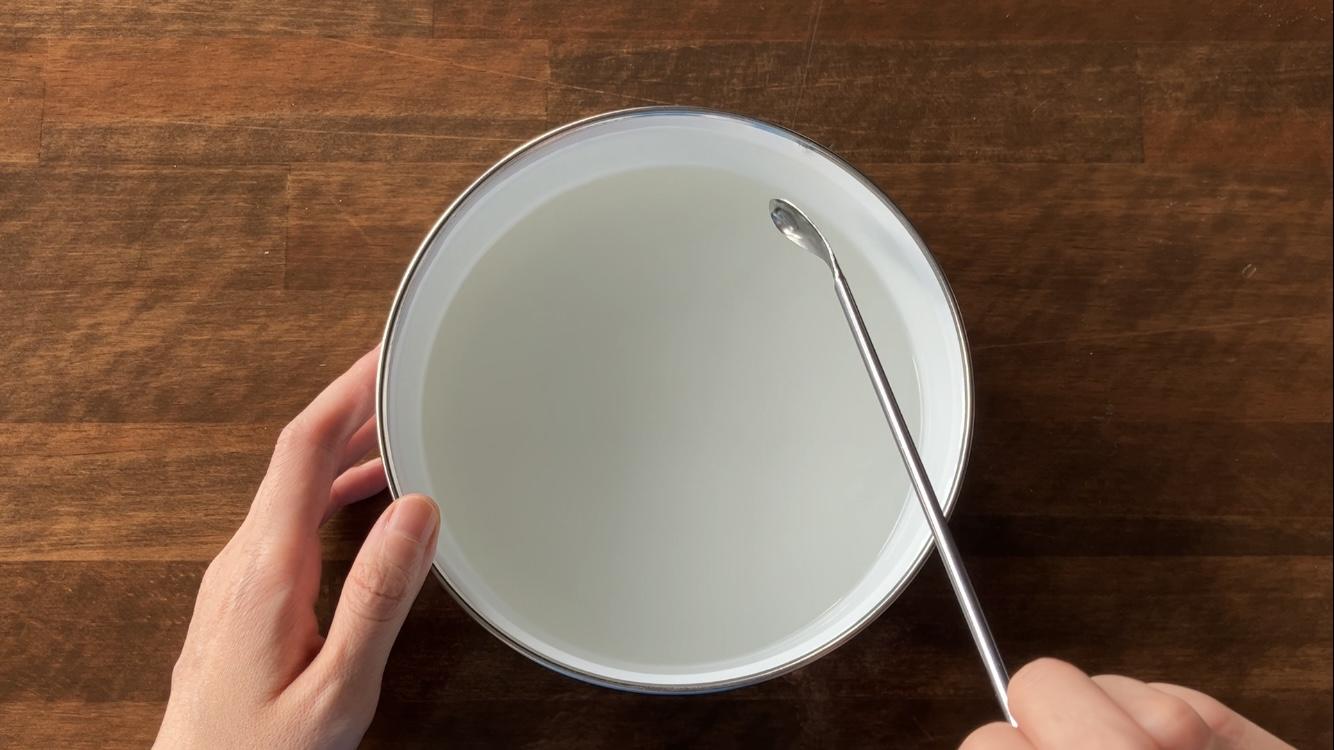
2. Jiire-Eki / Pretreatment Solution: 地入れ液 / Jiire-eki, Pretreatment solution Before the dyeing process begins, by using soybean flour and glue plant, generally, traditional Kimono dyers make a pretreatment solution called 地入れ液. A process of soaking 地入れ液 into fabrics with a brush is called 地入れ. It prevents excessive dye penetration into fabrics and helps to dye evenly. After 地入れ液 has dried, Usually, traditional Kimono dyeing process begins using dyes. In 友禅染め / Yuzen-dyeing where patterns are drawn with thread-thin Yuzen-glue, applying 地入れ液 makes it easier for thread-thin Yuzen glue to hold dyes in place and prevent dyes runoff. In a technique called 蒔糊 / Maki-nori, in which dried glutinous rice flour paste is crushed into small pieces, and sprinkled to create patterns, dried glutinous rice flour paste is adhered to fabrics by 地入れ液. However, applying 地入れ液 makes softness of fabrics a little harder. For this reason, I sometimes dye soft fabrics without using 地入れ液. By mixing certain products, patterns can also be dyed without applying 地入れ液. Depending on dyeing methods, fabric types, and what will be created with dyed fabrics, we can decide whether or not to use 地入れ液. So, keeping in mind that dyeing can be done without 地入れ液, I'd love to teach you how to make it since it is a basic technique. For this class, please upload a photo or video to our Project Gallery from while you are making 地入れ液. Now, let's get started.
3. Ingredients & Equipment: Ingredients & Equipment First of all, let me introduce these ingredients and equipment to make 地入れ液. Soybean flour, we call 大豆粉 / Daizu-ko in Japanese. 布海苔 / Funori, glue plant is a natural glue made from dried seaweeds of the genus Gloiopeltis. Please prepare a saucepan dedicated for dyeing, not the one you are using for cooking. A lidded container. I think it is better if it is large enough to soak big brushes. And another container, which is one side larger than the previous one. A thin, somewhat coarsely woven cotton cloth is used to strain water stirred with soybean flour or glue plant. A heat resistant long stir stick or a spoon. A measuring spoon for 1 gram, is useful for measuring a moderate amount. A container to store soybean flour separatory from the original package. A kitchen towel to wipe containers, table, etc. It's also nice to have wet wipes. With the ingredients and equipment, we are now ready to begin making 地入れ液.
4. 大豆粉 / Soybean flour: 大豆粉 / Daizu-ko, Soybean flour In this lesson, I'm going to show you a series of steps for the first ingredient, soybean flour called Daizu-ko. I replace the soybean flour from the package into the container because it is easier to scoop with a measuring spoon. Also, the separate container is convenient for the next time when I make 地入れ液. Fold the cut end of the package and close it with masking tape. This soybean flour package for dyeing is filled with powder, so I clip it to keep it from spilling out. I'm using a measuring spoon for 1 gram. I put approximately 2 grams in the larger container. Well, it is not a precise measurement, but rather a rough approximation. In other words, it's alright if we use more or less soybean flour, fabrics will usually be dyed without problems. It's okay to say, 'About this much'. I'm renting a kitchen for this class, so using a small container, but if you make it at home, a larger container would be nice. The amount of soybean flour is adjusted according to fabric lengths and thicknesses. You will get a feel for it gradually. Next, pour water from the faucet. We can add water in approximate amount because the concentration of 地入れ液 will be adjusted later by adding water when we use 地入れ液. Then, stir well using a stir stick. Generally, 10 to 30 grams of soybean flour is added per liter when dyeing long fabrics for kimono such as 13 meters. If you dye 1 to 3 meters of fabrics, a small amount of 地入れ液 is sufficient. Please stir the soybean flour evenly and thoroughly. Next, prepare another smaller container. Then, spread the thin cotton cloth and place it over the rim of the container. It can catch the grains of soybean flour without letting them run out through the gaps in the weave. And strain the water stirred with soybean flour through the cotton cloth into the container. Pinch the four corners of the cloth and squeeze it. The water contains the components of soybean flour grains, so it's good to stir the water well in the previous process. I use a wet wipe to remove the soybean flour grains from the cloth. Please wash the cloth well, because we will also use the same cloth to strain Funori, glue plant in the next lesson. If you like, it's also okay to use two pieces of cloth instead of the same cloth. Then, I wring out the cloth and place it spread out on the table to dry it. Wash the larger container and wipe it with a kitchen towel. Now, I finished to make soybean flour water, it's easy, just stir and strain it.
5. 布海苔 / Glue Plant: 布海苔 / Funori, Glue plant In this lesson, let me introduce a process for the second ingredient, glue plant called 布海苔. First, tear the glue plant into small pieces. This small size on my fingers is enough for 1 to 3 meters fabrics. Next, place the pieces of glue plant in the saucepan. Then pour some water. Well, I don't measure the amount. Because we can add more water before using it to adjust the concentration. It's like pouring roughly 200 milliliters into a saucepan about 16 centimeters in diameter. Depending on types of fabrics and dyeing techniques, we can adjust the concentration of glue plant. Now, turn on the induction cooktop and start heating. Stir the glue plant well with a stir stick. It takes about 20 minutes to dissolve it. We can use an induction cooktop or stovetop, or any other appliance that can heat the mixture. We can only keep 地入れ液 in a refrigerator for 2 or 3 days. So I recommend you to make the amount of 地入れ液 you plan to use each time. Lower the temperature when it begins to boil. This is because boiling reduces the amount of water by evaporating as steam. However, if you feel that you need a little more, you can add some water during the stirring process. By actually applying 地入れ液 to fabrics, we can check the dye penetration, the softness of fabrics, then adjust the amount of ingredients next time. Please use a saucepan dedicated for dyeing purpose, not one for cooking. This manufacturer's glue plant that I use is just dried natural seaweed. The manufacturer said that it may not be a problem if we washed it well, but the glue plant is not edible and in case other artificial things might get into the package unintentionally, so please use a dedicated saucepan. Now, the solid pieces of the glue plant were barely visible and dissolved well. Turn off the induction cooktop. Leave the saucepan to cool for a while, a few minutes, until the glue plant is somewhat warm. The glue plant turned into a thick liquid form. Then take the saucepan off from the induction cooktop. Okay, we are ready for soybean flour and glue plant. From now on, we will mix both together. Let's move on to the next lesson!
6. Mixing Ingredients: Mixing Ingredients Finally, we are going to mix soybean flour and glue plant to make 地入れ液. All right, let's begin! First, cover the cotton cloth over the rim of the container of soybean flour water. Make a slight indentation in the middle of the cloth and pour the dissolved warm glue plant from the saucepan. Next, pinch the four corners of the cotton cloth and wring out the cloth. Holding the center of the cloth, containing the glue plant with my left fingers, and wring out the cloth upward with my right fingers. The degree of force of my fingertips is like wringing out tightly to get the liquid out as much as possible, while leaving the semi-solid portion of the glue plant inside and not pushing the semi-solid out of the weave of the cloth. Afterward, open the cotton cloth and wipe off the remaining semi-solid portion of the glue plant inside with a wet wipe. As I told you, this glue plant is natural seaweed, however, it is sticky so I wipe it off to avoid clogging the sink and I recommend you do the same. Personally, I wash the cloth in tap water then put it in the washing machine and wash it again. Well, it's up to you. At the end, stir well the soybean flour water and the dissolved glue plant together. Now we have finally made 地入れ液! Thank you for watching my lessons so far. You may use 地入れ液 today, or you can store it in a refrigerator and use it at a later date, within a few days. The lidded container can be placed in the larger container to prevent leakage. It's also easy to carry to the workshop. This time, I store it in the refrigerator. Congratulations on the completion of 地入れ液.
7. Outro / Project & Conclusion: Project & Conclusion I hope you enjoyed our class today. After you've made 地入れ液, please upload a photo or video to our Project Gallery. I'd be happy if you would write me a review message. Also, I'd be very grateful if you could watch my other classes. And if you enjoy my creative world, I'd be delighted. In the next class, I'd love to show you how to actually apply 地入れ液 to fabrics. I hope you will also follow my account so that you don't miss my new classes. Let's have fun together creating artworks with dyeing. Thank you for attending our class. I appreciate you very much. In closing, I pray that your newfound joy will blossom and light up your future creation.
 LUCENT LIFE - Yuki Hemmi, Japanese Dyeing Artworks