Transcripts
1. Art Class Introduction: Hello, hello, ruin,
and welcome back to My Skillshare Channel and for today's video and
for today's class, I'm super excited because
I'm a huge fan of Halloween, and one of the things
that I like to do is teach through the
world of pop culture. And what better way than using a tiny sketchbook
and sketching out an iconic horror
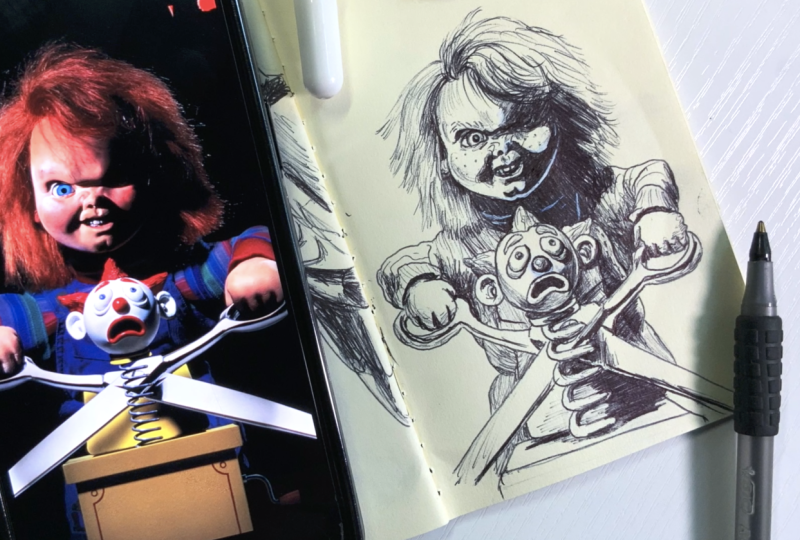
movie villain like the Chucky Doll from the
famous series Child's Play. Now, this is a short
exercise where we're going to learn how shadow works using ballpoint pen only
and the importance on how to achieve that using different
techniques like hatching, scribbling, and even using the tone of the paper to help us with those nice silhouettes
and deep shadows. Now, we're going to
go super detailed, but because this is
a small sketchbook, it's not going to
take very long. And if you didn't
already know, my name is Ivan Florentino Ramirez. I'm a traditional artist that has experience in life drawing, live painting, and both acrylic, oil and water color. I also do digital
illustration, painting, and lots of portrait art and mainly learning through
the world of pop culture. And this is how a lot of
my classes are formed. And all you need
are two materials, any small size sketchbook and all point pens. That is all. This class is perfect
for beginners, and if you're looking to
fill up some pages in your sketchbook and you're
a fan of Halloween, this is a perfect class to take. So grab all your materials, and let's get started.
2. Ballpoint pen sketch outline: So we're going to start
off with step number one. Now, I decided to
skip showing you guys how I drew my Chucky Doll. I started by using
a drafting pencil, but you can use any
light pencil without putting so much pressure on
for your initial drawing. For this class,
we're just focusing on using ballpoint pens to create those
realistic shadows and details for this reference
photo that we're using. And as always, when I'm drawing a subject that has to do
with the human anatomy, I want to start off
by drawing the head and working my way either
through the eyes, inside out. But I do want to
outline the face, since a lot of it is
covered in shadow. You can see in the reference
photo how his neck and the right side is all
black silhouette shadow. So this is one reason
to pay attention to your reference photo and see
where you want to begin. So instead, I started with
a outline from the left, curving my lines and working
my way all the way down to the neck area and then working
my way into that hair. And this is the important part. I'm deliberately leaving
that black shadow part of the paper because we are going to fill that in later on. So in this case, the
parts of the hair that you can visibly see because of the lighting
is the top part, and I'm just using
small sketchy strokes. Curving as I go,
making thin lines, straight lines, and curve
lines where they need to be. And notice that when
it comes to hair, I want the entire shape to be visible first before
going into so much detail. Again, we're not drawing
individual strands of hair just yet, but we do want to make sure we have that outer shape first. So Chucky has an iconic
look where it's disheveled, but also he does have some waves in his hair,
and it's very distinct. So as you can see, I made
an entire shape first. I feathered some of the hair out because later on we will
be doing those details. Now, you can only see
the left eye of Chucky. It's a really huge eye, a doll's eye, and
it's colored in blue. Also with that
distinct angry look with this brow that's
very pronounced. So I started on the left Again, not putting so much pressure but outlining the brow, the eyelids, and also distinguishing where that heavy shadow is going
to go on the right side, covering his complete
eye on the right, and leaving some of
the cheek exposed. Now I'm working in the nostrils. He does have that
scrunched up nose, almost like a cabbage
patch doll look. Again, just outlining, deliberately leaving
some of that paper white because we will be filling that in with pen for
our heavy shadows. Now, for those teeth, we are leaving those exposed, outlining them in
rounded squares. Even outlining a little bit of that dimple chin that
he has, as well. And what makes it easy with your initial pencil
drawing that you did, just following the
guide where I knew that I was going to have
everything shaded in, it's shaded in with my pencil. So keep that in mind when
you're doing your drawing. And again, you can start
this by using just pen only, but it is a little
bit more difficult. But notice how I outline
the cheek area on the right because that's where I
know the outer parts will be all in deep shadow. And same thing with the ear from the left, it is
covered with hair. And then also just take
your time making sure that the anatomy feels correct
Chucky does have a huge head, the big eye that is
exposed, and huge cheeks. And we really want
those to be distinct and be pronounced when we
are doing things in shadow. Because I know that everything
so far looks proportional, I can start shadowing things in as you see that
I'm doing now. I'm just scribbling
left and right, and I'm going to be layering
everything and make sure to zoom in and out of your reference photo
to make things easier. And now I'm just adding a bit more details and adding strands of hair
because in the next step, this is where we're going
to start going in for the body and working our way down, which
I'm doing right now. So I'm working my way
down the neck area, and another important
part of this poster is that cool looking and
creepy looking jack in the box that's
about to be cut up with some large scissors. So again, I'm
outlining that head, the hair because it is a clown. And luckily, most of that head is going
to be paper white, and we're going to
leave those shadows in the hair and
the bottom right. Because if you notice,
our light source is coming from the top left
at a diagonal angle. So as long as I outline
the shape of the head, I can move on to the body. And I'm starting
from the right side of his body and his arm. I'm working into
that long sleeve, his chubby arms, not putting
so much pressure just yet, and also doing a light sketch of those stripes in his shirt and
working in those overalls, as well, and then
working my way left. And same thing with the
scissors and anything metallic, there is going to
be some reflection. But for the most part, I
outlined those large scissors, his overalls and pants,
and just outlining it, you can at least know where you have the basic shape
of those items. We can eventually create those reflections having a reflective metal
surface needs. And same thing with the
left arm, his chubby arms. There is going to
be some shadows where he's gripping
the scissors. I'm for the most part,
using one stroke, not going into detail just
yet to get that overall, the long sleeve, to get
that basic shape in. And now I'm going to
do the final part of the jack in the box
head are the eyes, the nose, the mouth, the ears, and a little
bit of the hair. And I'm just taking my time
since this is a small sketch, we are drawing
smaller than normal. And here is step number one, doing the basic outline of Chucky and that
jack in the box.
3. Hatching with pen to create shadows: The important step
with the details and all the heavy shadowing
for the chucky doll. So right now I'm working
on his neck behind the ears and towards the right side of his
entire hair and face. So to fill in the shadows
with the ballpoint pen, I'm starting off very
light and slowly building up the layers of ink using multidirectional
strokes, you guys. This is the area where you
do want to follow the form so you can make things
feel rounded and not flat. And this is important
because ballpoint pen ink cannot be easily erased. So gradual layering is
essential for smooth depth. So as you can see
here, as I'm layering, you can see that it is gradual, but it can get darker and darker as you add
on more layers. So it's a great idea to start off light and see
if it's looking correct. And then you can push further if that silhouette shape is
what you're looking for. So you can see how I traced out the cheek area right underneath this heavy brow like we did
earlier in step number one. And because I know everything is looking just
like I wanted to, and we mapped out
the shadow area, I can start filling in that
hair and those heavy shadows. So here are a few shading
techniques that will help, depending on the texture you want and how smooth you want it. So one example is the scribble technique or
the arching technique. Now, this is the main
one that I'm using. Now, this is where you
make small, controlled, wispy or even circular
scribbles just to really fill in that shadow where you don't really need
to see any other strokes. It's gonna be just
heavy black shading. So as long as you do little
scribbles back and forth, as I'm doing right
now with my pen, you can easily fill in
the area like I did with the neck and the mouth
and the cheek area. Now, as for the hair, I kind of went in
a little bit soft, a little bit light because I do want several of
the hair strands to show out to be prominent and have some of those be
some of the highlights. You can also use the cross hatching and hatching technique, which is also another
great idea to use, because all you do is draw parallel lines close to another, depending if something is
horizontal or vertical. So I'm going back and forth and heavily outlining
things like a sweater, the jack in the box mouth. And then, like I
mentioned earlier, those scissors are going to have heavy outlines in some areas
because metal is reflective. And I'm going back in the jack
in the box nose, the hair, adding a few details and leaving the paper color for most of the clothing and
besides the shadows. And a lot of the
heavy lifting I will be leaving to the paper itself, because in this exercise, the important thing are
the shadows and detailing things with the pen to
get those medium tones. So I'm also getting those
coils in there as well, because they do have a lot of reflective shadows,
and it is metal. And once again, I'm layering gradually because
I am building up the shadows in
multiple passes rather than trying to get the final
dark value all at once. I'm zooming in and out
of the reference photo, working back and
forth just to see if things do match
nicely to another. That's why I'm
moving from the head to the body and maybe
jack in the box. And I didn't want to go too
crazy with the other details, but I did work in a little
bit of the clothing, a little bit of the
details with his overalls, sweater and the stitching. And what really makes this
dramatic is those shadows. This is a very spooky
Halloween drawing, and it's a perfect exercise to see the importance of
shadow when it comes to your drawing or sketching and using ballpoint pen
to achieve that effect. And for the last step, here I'm using my jelly roll
pen to correct some mistakes and
sharpen some areas that I might have
gone a little bit too much of with a pen. Pen. Use your artistic eye and see how much hair
strands you want to apply, how dark you want to go and see how much you want
to push this sketch. But as you can see, I'm
going back and forth. I did a little bit of detail with rounding things
out like that toy, the jack in the box toy and
not making it look so flat, using my ballpoint pen with those parallel hatching lines, putting somewhat light pressure and not going too
heavy where it doesn't belong and going super dark to really emphasize the lighting
in this reference photo. And there you have it, you guys. This is the final sketch
of the Chucky Doll using ballpoint pen and heavily emphasizing
the shadow effect. Thank you so much for
watching and do not forget to upload your project in the
project section of this class. Please leave a comment below, and I'm looking
forward to all of your projects. See
you on the next one. Bye bye.
 IVAN RAMIREZ, Artist, Painter & Youtuber