Transcripts
1. Introduction: Hello, and welcome to new
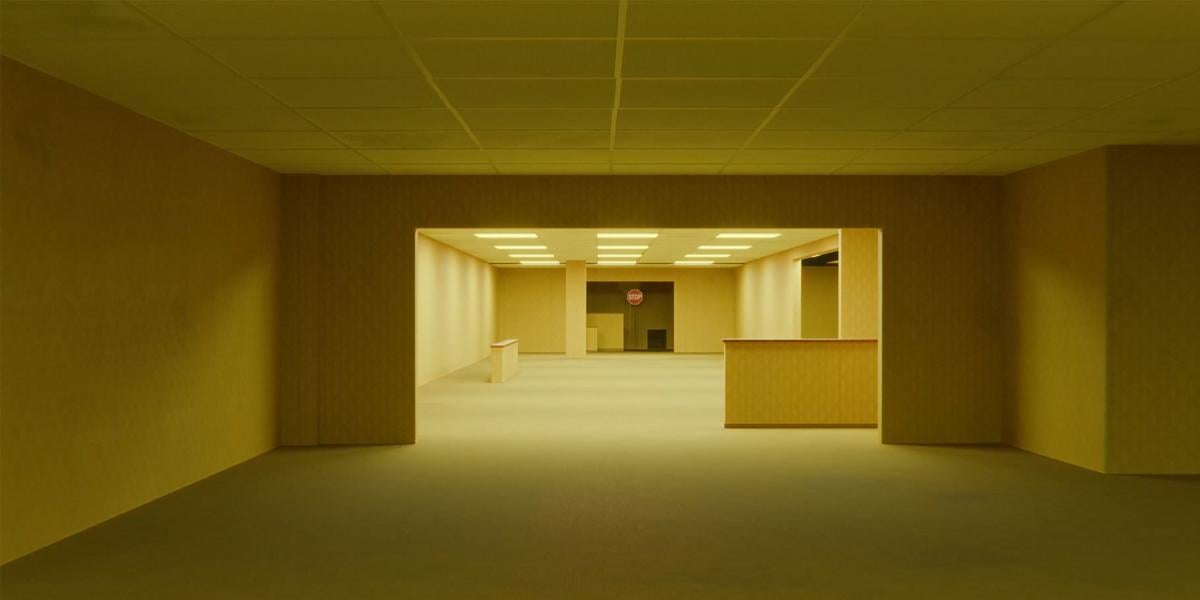
step by step tutorial. This video you have just watched was created entirely in Blender, almost completely using the procedural backroom generator. It is a geometry node modifier
setup that I created. But while I was thinking
about this tutorial, I had one dilemma to make a
tutorial on how I created the modifier setup or about
how I created the animation. A tutorial about
the modifier setup would mainly focus
on geometry nodes, which wouldn't be suitable for beginners or users with
less Blender experience. But the thing is that it
is not necessary to know geometry nodes or to be advanced Blender user
to create good renders. You can let someone else to do the hard work
for you and create tools like this
one we will use in this tutorial that
speed up your workflow. In fact, that's the
essence of Blender using tools to work smarter
and faster, not harder. But even with ready made
tools like this one, it is still important to
understand the basic of Blender. So you can later avoid
potential issues or customize and adjust certain
things to your liking or an to create an animation
like this one from introduction because the tool creates a scene but
not an animation. That's why I decided to keep
this tutorial simplified, with the help of the generator. We will create the
scene and lighting. Later, we will animate camera, the paper doll, and
the leaking effect. And the plan is to put
everything together at the end into final animation
with sound effects.
2. Start with Blender: Now start actually with
project first thing, I usually do when I
start with project, I like to create folder in which I will put
all these things so you can create background
StorialFolder or something anywhere
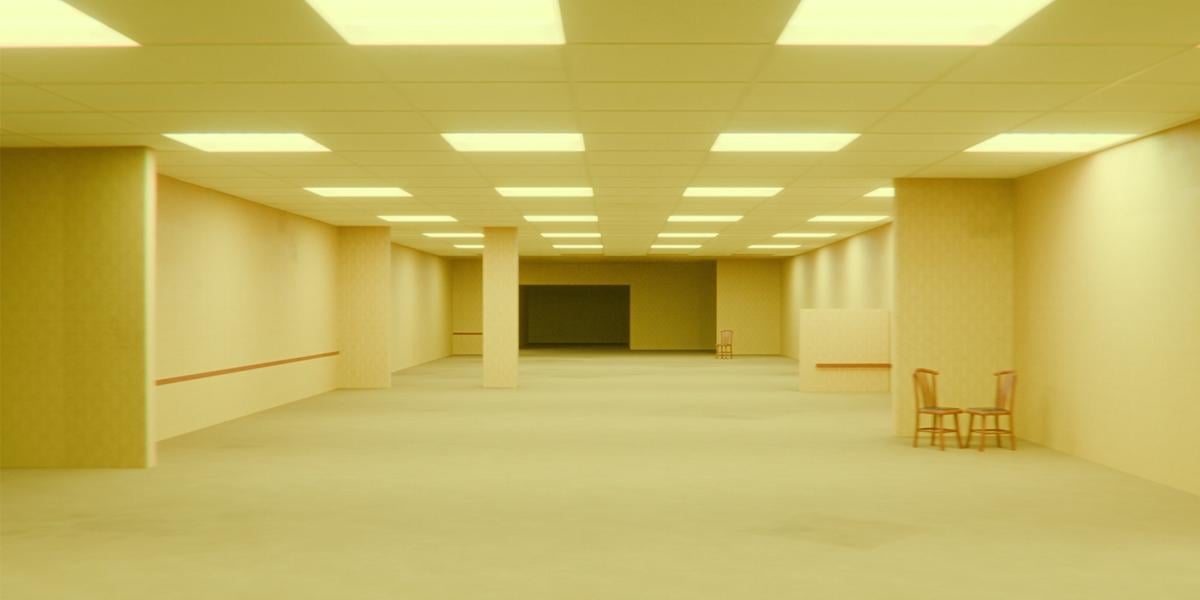
on your computer. And here we have references. These are just stills
from upcoming movie, and I use this for reference for my theser which I will
also share with you. So you have this video in four K. You also on my YouTube channel, you
can see how this look. And if you now go to
these references, you can recognize, for
example. This space here. They are almost identical and
I have intention to create similar spaces from
this official teaser, and we will also try do
this in this tutorial. Actually, we will try to create similar animation
in this tutorial. So this is this
first scene here. But the main tool I
will share with you is this background generator. If you download this before
my recommendation is to delete that file and re download this because
I have few fixes, not too big things, but
this is my recommendation. And of course, if
you are new here, I will share link with you where you can
download this file. And when you download this, you will get this Zip file. And inside this Zip file, you will get this vendor file
and instructional video. My recommendation is to watch
this instructional video. It is about 14 minutes long, but you can set speed to two if you don't
have too much time, but you will understand
better how this work. So what is next you need or I need to copy
this with Control C, and we have this bottom
tutorial folder. I will paste this here. And I will call this maybe scene two or something because
I already made scene one, but you can call
this, for example, bottoms, animation or HVO. We can now jump inside Blender. When you open Blender,
you should get something like this
or exactly this. I already prepared
these workspaces. You can customize
your Blender spaces. For example, if I go with
Tri click horizontal split, I can make another one here. I will close this now. This is how I like
to customize this. Of course, you can change this, but this is how I set up this. I like to have render preview, so I can in anytime
preview what I'm working. And here I have actually
three workspace, three D viewport, and here
I have this asset browser. We can maybe close this because we have all these assets here. I think it is same if
I just drag this here or if I do this but for now, I can keep this how it is. If you need these tools here, you can press T or you
can just click here. We can also maybe hide
this if I click here, so we have even more
clean this left side. But sometimes I just want this in out or
move with this tool. This button here
is for overlays. If you turn on this, you
can see all these slides. And for example, if
you select this, you can also see selection here. I think I don't need this. And I also set all
these render settings. For example, if you go here, you can see that I
switched to cycles. We have this port render. To see this, we need Okay, we need, I think,
enable this overlays. Every time you
move this on left, you will see that this
actually renders to this value here. I
think this is too much. If I sell this to 100,
it will be enough. So we can save some
computer resources if we sell the tolower number. So this 300 this final render, which is what we get
when we press F 12. But one thing you need to know. I'm not sure if I have some
things inside compositor. Yes, I have, but I'm not sure if this is live preview here. Yes, it is. So if I will
disable first this overlays. So because this
is set to always, Blender will also calculate all these things which I put
inside compositing tab here. If I disable this, you can see that this look
a little different, so it is not so big difference. I put some glove lens distortion and some color adjustment here. So this is actually
before and this is after. Just to know this can
affect your performance. This compositor is sometimes
little heavy for calculate. So if you don't have
strong enough computer, you can just click disable and you will get small
difference here. Okay, I will press T
to remove this tab. And let's see what
I do last time. One thing I want to
do here is I want to have these references
inside my Blender file. You can use programs
like PureRef. I have this here. And for example,
you can put I will put this first reference
because you will now start with this scene.
Here is my PUF. You can, for example,
put this here. Every time I want to
see this reference, I need to click on this PUref. I think we can recite this, yes. And I think there is also option to stick this over this window. So when we click to bender, it will also stay here. But I'm not sure how to do this because I usually like to
put this inside bender. And to put this inside Blender, you need make one
workspace here. So I will go with Try click. And I will put this here and
I need image editor here. You can click here open or
you can just drag and drop this inside Blender, like this. And now we always have this reference in
this corner here. Here, you have this
instructional video link. If you stuck in some moment, you can also watch this video, but I don't need
this window here, so I will okay, what I do. Join up and join up. So we have here layer. Let's see what is next. We have reference image here, and we can now start
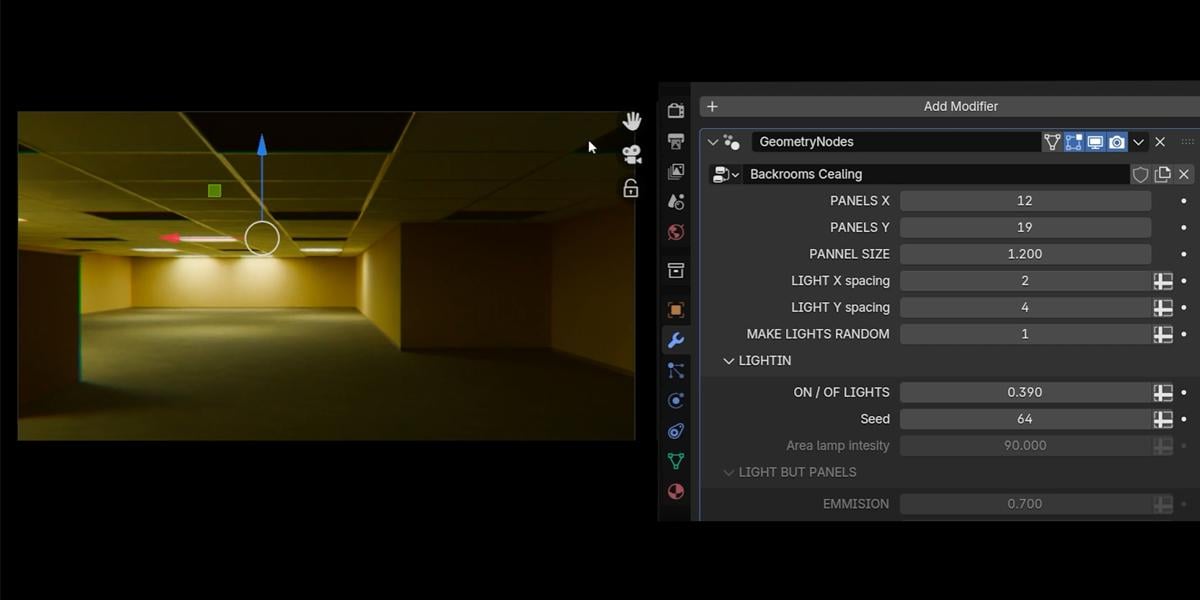
building this space here. But first, you can know that we have five main objects here. So these first three are
actually generators. So if you select
this one, let's, for example, select
this ceiling, you can see that you
can adjust this. So these three are
actually adjustable. So for example, volickness
if you move this, you can see that
we increase this voliness these three are
actually just static objects. For example, this column, if we need one column here, we can just put
this column here. Actually, it is not so static. We have also this dirt
option and leaking option, and also we can change color of this and shader with this option here,
this will not work. To make this work,
we actually need select these backroom walls, but we will talk
about this later. For example, I will
just show you. If I move this, it will also
affect this object here. But if I select this and move
this, it will not affect. So we will talk
about this later. This is not so important. For now, I will
set this to zero, and I will delete this object. This on life should be
viewport, TD viewport. And let's now start with
creating this first scene.
3. Camera animation: Because this will be animation. I don't want now manually
place this camera, I will for now quickly
create this animation. We actually just
have sliding camera from left to right.
This is how this look. And we can create this
with a few clicks. So for this, I need
timeline here. So I will set timeline here. I will go to frame zero. And now I will move
camera to left. I will press N, I
here and I here. Now we put one key
frame and we can now go to last frame and I. No. Before I press I, I just want to move camera. On right. You can press
and to remove this tab. We don't have too
much space here, so we need sometimes
remove these tabs. We can just move this with grabbing this tool here
or you can just press G, X. Move this here. It is not important
where for now, because we can adjust
this later and now I will press I I. So we are srame and if you
now press space, we get this. We get camera moving. This is now too fast and
how we can slow this. Last time I go
with 1,000 frames, but this is maybe too much
for this because this take over 1 minute and it is a lot of
frames to render later. So for example, I will for now, set this to 500. But you can later if you
want this even slower, we can see how this look. Now it is double slower. But if you want,
even more slower, you can set this to 700 later
and just slow down this. Why I said this because when we will start
creating these rooms, one room will be here,
and I will draft this. So we have one room here, another will be here. Third one will be here, and later we can
just move camera here and start working
with third one. I think I build maybe
five or six these rooms. And if you use this annotation, you can just click to view and you can find this
annotation tab and remove this. Okay, for now, I want
stick to frame zero. There is also one thing
you need to know. You can see that we have
this slow start and then this slow start and
then camera speed up. That's because we have
this interpolation. If you set T to get these
interpolation types, we have this by
default, this busier. You can play with this if
you go to graph Editor. We should select this x axis. And if you press
full stop on Numpad, you can just isolate this, I think, and we can
click normalize too. I think this is maybe better. What is important
here, for example, if you want change this
interpolation type, for example, if you select
this keyframe here, and if you press
you can set this, for example, to linear. Now we get constant speed. If you like this,
you can change this, but I don't like, so
you can press T easier. And if you want this
transition to be faster, you can just maybe
drag this handle here. If you go up, you will
get this effect that camera go on this side and then so you don't want to go up. But if you want to
make this more fast, you can move this here. Or if you want to make this
slower, let's see what Ifi. Move this left handle to here. I didn't use this
last time because I like these default settings. It is good enough,
but just to know. So let's now just bring
this timeline here. I just want to see
these two keyframes, and that's all I
need from this tab. Actually, this tab, I think
it is not useful for now, so I can bring this down. And let's now start with
creating these walls.
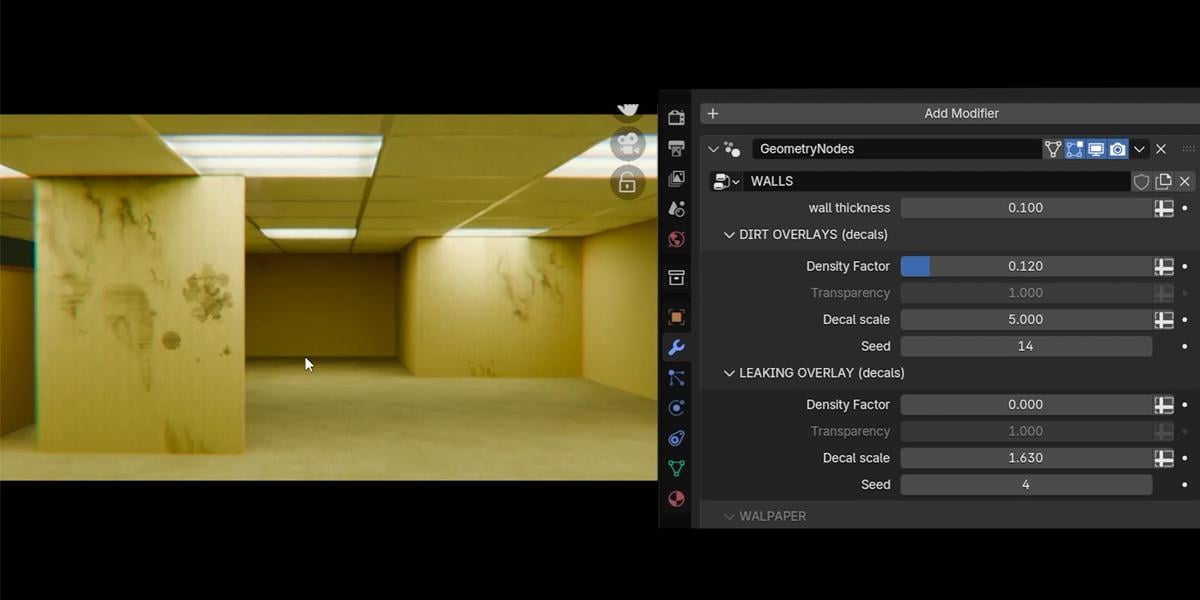
4. More about scene: Backroom walls is
actually main tool here. If I select this,
you get this shape, which is just for preview. It is not important for us, and now I will delete
everything except one wall here because we
will start from scratch. So I can keep maybe this wall. And when I select this, you can see that we cannot
see the face is selected. That's because we select
this face inside. And the reason for
this is because we have this wall
thickness here. But you can also know
that everything is little slower that's because we have a lot of things
with the geometry nodes, modifier do and to speed up and simplify all the.This
my recommendation. Just disable this in Viewport. To show you what I'm thinking, we don't have the
dirt overlays here. But for example, if
I increase this, you can see that we get
all these dirt overlays. But, of course, now
it's much harder to work this is much slower and these green things
are a little annoying, but we don't need this
for now because we now focus only on
creating these arts and we can always later
click here and see how this look when this is final result. So disable this for now because we want to focus
only on these ors. One thing I will also do
this ceiling generator, I will also hide this for now, you can press age
just to hide this. You activate this button here. So this is now hided in ePort but not in render.
You can see this. If you press F 12, this is still visible in render. I actually want that, so I don't need this for now. One thing you also
need to know we have here some volumetric cube, which is this one. And you can see this we're lighting this from
this volumetric cube. I think I didn't use a
principle volume or something. I just used this emission
node and this actually create you can note some
small yellowish haze here. So it is not too much, but I think it is
better than nothing. So without this,
this part will be a little more black and
little more crisp, but not so important to
note that this is here. So this is before you can maybe note here before and after. Not too much, you can disable
this enable or you can even play with principal
volume here to get a little better
volume effect. But principal volume will slow
down the scene even more. Not so important, but just to
know why this cube is here, you cannot select this because
I disable this selectb. Now you can Okay,
not so important. But one thing which is important now without this lighting, it is very hard to
see these rooms. So because I want to keep this disabled because this
here is annoying. We need, go inside to
see what happened here. So I want to disable this. But I will now increase
this word lighting. Now, this is by default, this is almost too black. So this is almost not visible. We still see something because
of this volumetric cube, but now we don't see
anything so what I will do, I will for now, increase
the lighting so we can see better what
we are doing on left.
5. Creating a maze: Now we can actually start
shaping these walls. So I need this
reference, bigger. Let's see how we
can create this. First, I will select
only these phases, control I delete pass. So we have only one phase
which is enough for start, and we can now move
this about here. We have very long
this room here, so I will move this
to about here, EX to extra this on X axis. And now we can go with EY. You can switch between a vertex edge and phase selection
with one, two or three. So if I press one, two, three, you can see
that we switch here. So I will use this shortcut, so three is for phase selection and we can move this here. Okay. I actually want to
make this corner here. So I will move to about here. Let's actually move this
even to about here. Maybe to here and now EX. And now we get this
corner with three, maybe I will go
closer to camera. Okay, we get similar
things like we have here, and I want to
create these doors. This is something like
doors. Let's see. Control R one edge
here to about here. And now I will go with Ex about here and
what we can do here. We can try cut here and try match same position because
they are in same position. But what we can also do, we can go with Shift D, Shift D and then X, move one here, and now EX. We will get this intersection, but this will not be
visible inside camera. And even if it is visible, it will just create
some imperfection which are always good. We will get maybe
some S or something. Let's see what next
control are one edge here. Now we can grab this edge E x. I don't want to intersect too much here because we get this
weird shading, but it is okay if you just
stick this somewhere here. Small imperfection
is always good. We have one room
behind this door. So what we can do, select this pace EY to
create this room, but I will delete this ceiling
deletes deletorT part, and let's see what
we can do here. Maybe with He select. I think I will connect this with F. So we get this
wall here. Let's see. Control R. And if
you scroll mouse up, you get two loop cuts. That's actually what we
need to create this door. And let's go with K
here, and control R. And if you go with
escape after Control R, you need to go with G twice. G G to slide this
now, delete phases. Yes, we have this phase here. We get actually what we want. Okay, now you know that
we're missing this carpet. If you want sit this
viewport little more, you can disable this, but I
think this is not important. We have some particles
here or dirt. I will now just go to Edit mode, select this carpet object
or this floor object, move this until the end. We will need more space here so you can also move this on X. This is actually what
this small wall here, we actually need this. We have one here. So I will not delete this. I will just move this one here. We also have this
molding here which you can create if I add this option. If you just increase this, you get this molding. Okay, this go down, so we
can just bring this up. I will show you
here how this look. So we have this molding and you can also play
with thickness. I think this is enough. This wooden part here,
you can note here. I didn't create this procedural, but we can just
manually add this. You can pick this from here. For example, you
can just place this here or you can from set
browser, bring this here. It is actually same. So let's quickly create this. For this, I will just
go to edit mode. Okay, I need I go with Ex night to rotate
this in another direction. And I like to do
this in edit mode. If you go to material preview, you can know that this is unwrap properly because unwrap
is object based. So we have this empty object, which actually
control this unwrap. So if you just be sure
to do this in edit mode. So everything you do in
edit mode will be Correct. For example, if I rotate this, that's actually what I do. I rotate this in object mode. So I need apply rotation so you can see that this
rotation is not zero. Control A, apply rotation. Now we fix this envelop here. Let me show you
here. For example, if I go in object
mode with x 90, I now mess this envelop here. So I need now apply rotation. So just be sure to do everything in edit mode
then you are safe. So what I need to do here, I need to go to Edit mode. I will just grab this
GI to put this here, and I think this is okay. Now I can go with GI
and place this here. We have one here. Let's see what we can do. Shift Y Z 90. Let's see what we do now. Control A, apply rotation. Now we fix this unwrap
apply rotation. Place this here
and in edit mode, I will just grab this edge. This is edge, we cannot set these faces because
if you remember this, we have this wall thickness. And now I can just grab this
edge, make this bigger. And let's see I want
also make this bigger. Okay. Let's now
place this in place. So we have this more wall here, which would be
somewhere about here. And we have one column here. So I will grab this one, and this should go
to about here. Okay. And I have one extra object which I will just mon outside.
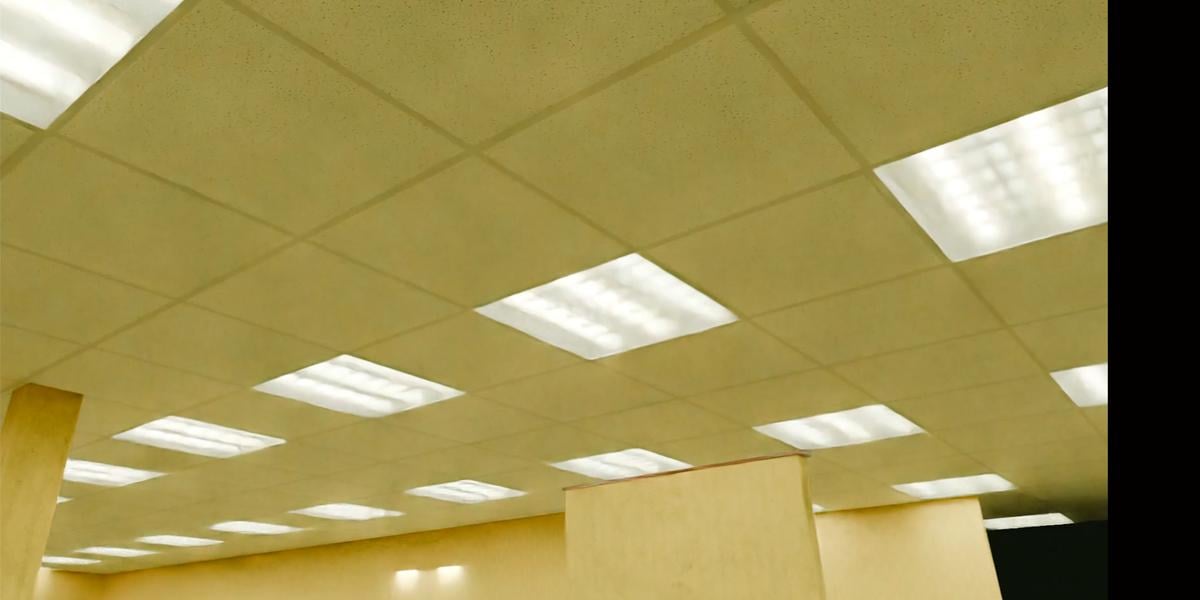
6. Ceiling: Next is ceiling. We hide this
and let's now unhide this. We have here panel on X axis, which is this panel on Y axis. We need more panels on Y axis, and I will place this here. You can note on
this reference that this part is without
these lights. We will play with this later. I just want now fix this
part or fill this part. So this should go to about here. And if you want follow
this reference, precisely, you can count these
like numbers, so one, two, three,
four, five, six. So we have one, two, three, four, five, six, seven, eight. So this hallway is too big, so I will not this
one, this one. One, two, three, four,
five, six, seven. So we need remove one more, one, two, three,
four, five, six. So this hallway should
go to This door, actually, should stop here. We can select this object. It number seven, we can go to top orthographic view or up top. Now what I will do, I will
go to edit mode and we can now we should be in X ray mode. For example, if you
are not in Xray mode, you can get this problem. You can think, Okay,
I select everything, but you just select this top
and you get this problem. Number seven, Xray mode, or you can just press
Z and switch two. No Xray R mode. Now we can select
this and we can just move to this edge here. Okay. And we have this word
lighting set to white. That's the reason why
we see everything here. But if you said this to black, we will actually get closer
to this reference image. Okay? But I don't want
to put this empty. I need one light panel also
here, but without light. So I will go we can go
with Shiv D or Alt D. I think in this case, it's same, so I will go with D
to create instance of this because even
this is instance, we can geometry node works in a way that each of these are independent with
another object. I will now play
with these values. You can know that we have lights inside here, which
we don't want. Okay. And I will turn
off lights for this. So we have lighting
light on and light off. I will send this
light on all to zero. So you can see when I move this, we actually randomly remove
some of these lighting, so I will set all to zero. So we have these panels inside, but just we don't have any light here. Let's see what is next. So we miss this part. This is actually a little
tricky because you can note that we have these panels, but without these slides. And if I, for example, select this, you
might think, Okay, I can just set this
light off to zero. But this work a
little different. We actually have
these lights here, light panels, but light just don't work, which is
not the case here. We don't have any light panels. We just have these normal
panels and how we can do this. So I will set this all to zero. What I will do here, I
will duplicate this. Okay, this should go or to here. I will just increase
this a little. I think this is
not so important. Okay. What I will do, I will go with Shiv D Y, and I don't need so many
rows here, maybe just five. I said that this cannot
go lower than five. If you want to change
this, you can, for example, go to
geometry nodes Editor. And if you press and,
you can, for example, select this setting which is PanelX which is this one here, and you can find this minimum. You can, for example,
set this to two and then you are able
to set this to two. But when I create this, I think five is minimum
you want, but I was wrong. In some cases, I will need
this set lower than five. So for now, I set this to two, and I need maybe
five or six this. So how we can remove these lights and just
put these panels. Because I didn't create
this by default, so I didn't create
another variation on this ceiling, we
will create this now. So I will call this
ceiling generator with with no lights. With no lights and
what I will do now, I will copy this and I
will make duplication of this geometry node setup because I don't want
to affect this object. So I will click here. So this will be version with no lights. And if you know just a little of geometry nodes,
you can do theses. So we have instances, and I have one instances
which is panel with lights. I will show you here. So I go to material preview. No, actually, I want to show you this one for all these three. So we have just panel, we have panel with light on
and panel which don't work. So if you go to render preview, this one don't work,
this one work. This one is just panel. And what I need to do now, I will go with Napk
select this object. So we have panel without lights. And we have here,
this is just panels. So I will just move this up. I will plug this instead
of this panel with lights, I will plug this here. And now you can see what we get, we actually replace these
lights with this panel. So we have another
geometri no setup, which we modify a little. And you can also know that we still have
these lights here. So that's the reason why this is too bright because
this now cast light, but we can just set this
one of lights to zero. And you can see that
actually with this, we remove these
lights from here. Okay, now we have same as
in this reference here. And you can also note
the chrome metal parts. I actually add this here. So to change this, we need to select main
ceiling generator, which is this one. W ASL browser, then
we can play with this This whole of
settings are actually drivers which are connected
to this shade the editor, if I go to shade the editor
and if I select this, I need this material here. You can see that
these are drivers, and we can drive these drivers only when we select main object,
which is this one. Here, this is not so important
for you, but just to know. So now we have
these metal frames. And if I now set this one, now this become metal. If I set this roughness to zero, it will be more shiny. In this reference, I
don't think they're too shiny and I don't think
they're even metal, maybe they're plastic
or something. But I think we can maybe
say this 2.3 and the rogerence to maybe 0.6 or 0.5. Okay, this is not so important. Let's now just dig this here. Okay, we need one more. So I will play with this seven or eight, something like this. And it should now get
similar from this reference. Okay, there is one thing we have these lights breathing on
this wall. So let's see. We have one which is very close to this wall,
something like this. Actually, I will
try get similar. If I add one, I get
something similar, like I have here and
we have here one, two, three, so one, two, three. Now we can just adjust
this word here. If I go to Edit mode, just be sure to select
everything here. So this one, this one, withholding sheet, this one. Now we can adjust this a little. So we have we actually
need more space here. Okay. Now this is pretty
similar like here. And now we need to select,
again, main object, which is this ceiling generator with this asset browser icon, and we can play with lighting. So we have here are ANPtnsity
which is if I set this, for example, to ten, we will
almost lose all lights, but there is one thing
you need to know. So we have this emission planes, which is this value here. So if I set this to zero, we get we don't see anything
here, and we can now. We don't want this
to zero because then this doesn't look like light. So we just want this to
look normal in camera. For example, Okay, this
is not too bright. So if you go crazy with this, no, this is wrong value. If we said this here 20, we will get a lot of fireflies, which are not so visible now, but because we have the noiser but you can see that
this rash our render. This is very heavy to calculate. So we just want these emission planes to
look right in camera. But we want to keep
this value low, maybe three or
five or something. Five is okay, but I want to
go lower with this value. And now we can set lighting
with these area lamps, which actually speed
up our render. Because when we
have more lights, we get less fireflies. This area lamps actually
help to optimize our scene. But I want to bring this
intensity maybe to. If you said this 50,
this is not enough. You can see that we have
a lot of brightness here. So I will go with maybe 100, I think we can go
with even more. So if you said this 200, maybe this is too much. So maybe 150, not 1050, 150 is maybe right value for this maybe too much, maybe 120. I think if we move camera
a little to see this wall, this wall here, I think we
have more lighting here. Probably they have something
behind this or on set, they have some lighting on
this area or behind this. What we can do, we
can just go with Shield D Y and I will
move this all down. And now we can with this light
or off choose how much we want this light behind here to try and get similar
look like we have here. You can even move these two because this is
things they do inset. They play with lighting until
they are happy with result. So maybe just one or two lights here, and we can move this. So if I delete this, this
is before, this is after. I think this is closer to
this reference image here. Okay, we are almost done
with this first scene. We have these two walls here, which we can very easily
put here if we go inside. Okay, this column should
go here somewhere here. You can put this in middle. If you go with number seven, you can put this in
middle of this panel. I think this have more sense. Okay, not here. Maybe
this panel here. Okay, let's now just place this small walls
here, one go here, this is good enough G Y, GX, OT or Shift D. I will go it Shiv D. This is
not heavy objects, so I can go it Shiv D Y. Just use don't do
anything in object mode. My recommendation is to go to Edit mode and just
play with this. Okay. I think we need
bigger doors here. So that's where easy just
select this object Edit mode. Select this and we also need. We don't want
stretch this shift, select this and we can
now create bigger walls. Or we can maybe select
this wall and do this. Okay. Now we have something very similar
to this render here, and we can even render this with bigger sample
values with hew.
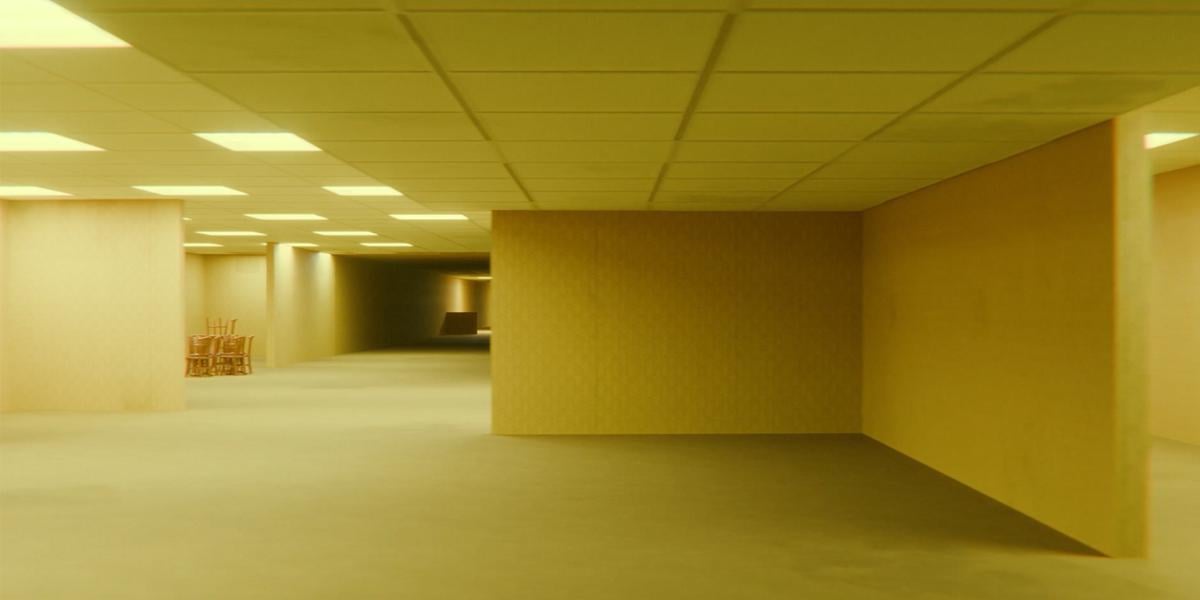
7. Creating other rooms: Hello, it is another
day here and this should be part
sixth of Tutorial. We will now build
the second room. So this should be first room and next will be second room. And let's see I will now
find another reference here. I think we can maybe build
this one and we can also take maybe this part
here which I like. So we will start with this one. I will select these walls, and we can go to Edit mode. You can also press Tab on
your keyboard to switch to edit mode and two to grab
this edge selection. So tab and two is shortcut. Now I can grab this edge here, but first I will move
camera to about here, so this wall is too big. I will now go with E Y. To extrude this on Y axis, let's move camera about here. And now we can build this
room somewhere here. So EX and EY again. Now we have space for
rooms. And let's see. So we have these
two walls or three. Actually, I think I
will make hallway here. It is not so visible, but let's go with Control R, and we can go with EY, but I want to delete this
ceiling and the bar down. Okay. We can go again with tab, select this carpet, tab again, two for edge selection
and move this about here. Okay, now we can continue
with these balls. I will move this wall. So three phase selection, I will move this
wall to about here. Or we can grab all of this. No. Maybe select this phase, Control Lampex plus
to expand selection, and we can maybe
put this in middle. Let's see what is next. We can build these walls. Here, I will go with Control R, maybe two cuts you
can go with EX. Now we have the walls, but what make this more visible, you can increase
brightness here. I will move this wall to
about here so we can see the second one and
maybe one here, EX. We can build this small
wall or we can just, ok this is only supported
in object mode so tab and we can bring
this from As browser. We can place one
small wall here. With tab, we can
make this bigger. And if you want to
put this wooden part, we can just grab this. And we can place this here I 90. Control A, apply rotation. Every time when you change
rotation and object mode, just be sure to apply
this. Let's see. With holding shift, we can be more precise and
we can move this until this intersect
tab to go edit mode, control R, you can basically
just put this edge here, select this face and EY. No EX. But because I already press E I can now
just go with X. Okay, so this
should be something similar like in this part here, we can maybe move this
to C or this part, or we can make
this wall smaller. So tab. Okay, what we can do? Next, we can go to
this reference image. Ten. And we can build
this part which I like. So we can just do this
if we go with Control R. Okay, this control R in
this part will not work. This sometimes happen,
and what I usually do in this case is I can just go
with tab which is edit mode. Now. We are in edit mode, so that means that we
can use K fork knife. I will go with K here and I
will just stick this here. And you can know that this
is not straight line. Now I can grab this and, zero. Now, this is perfectly straight, and I can now go with
double tap G. G twice, G G, and I can slide
this about here. Three on keyboard and
we can now go with EX. Extra this on XX is about here. We can go with two, maybe
move this little out. Now we get this space here, and here we can place this ceiling without
lights, which is this one. But let's first add normal
ceiling with lights. So all DX or shift DX in
this case is, I think same. Let's place this in middle
and now we need more of this. But we can also
count this one, two, three, four, maybe
five of these slides. Here we have four, so
we can go with five. Let's increase this panel on X axis. Let's go with one more. And we also increase this on
Y axis to cover all these. So we need even more here. And let's see this
intersection I don't like, so I will grab this
tab three to face selection and let's just
move this about here. You can look on this area here, so I don't want this light
which intersect with wall. Let's move about here. Okay, so we have this
very bright and big room. Let's see. I mess
something here. That's because I didn't
select both faces. I just select one and
let's see how I can fix this For now, we can just move this on X axis. I make little mess here, but now this is not
important because we can just go with EX. Okay. We can now go
delete the low edges. Okay, I will go with Napa K because I think I
make a big mess here. What is easier thing you
can do in these cases? We can just grab this. I think we don't need this. I'm not sure what
delete vertices. Delete vertices numbed
seven Xray mode, and Xray mode, numbed seven, select everything Y zero. Now this should be
perfectly line up. NumpdKT back to our scene. And I will just grab this
ceiling without light, Shi the x or the X. And let's now just
place this here. I will go with H
to hide this so I can focus only on
this small part. A little more on Y axis. This part behind
will not be visible. So I just need cover
this edge here. And now we move this down. So GZ, let's move this down. Until we start these panels. Okay? And to unhide this, you can click here or old cage, which is shortcut
and we have this. What I do last time I
bring these chairs here, and these are not same, but they are similar,
like chairs, I model in the
oldest view project. I have the oldest view assets. You can find this on my stores. I think I will share
this chair with you, so I have the stores assets. So this is everything I model. For this project, I will just
show quickly these stores we have here a lot of
these stores 28, I think. So if you are interested, you can take a look on this, and I will just quickly
show you this wall. So I build completely this mole, so we have this more,
but we need ceiling. Okay, this is how this look, and we have a whole more from
the oldest with animation. So if you need these
project files, you can find this on my stores. But let's now open
this assets rest. And here we have a
chair, which I model. Somewhere here. Okay,
I think this one. And I also record tutorial how I modeled this chat if you want, you can find also that Tutorial, let's now go with paste here. Okay. And you can know that we have a lot of
chairs on ceiling. This is one of
most common errors which you can get when
you work with this asset. What now happened, we
put this chain in okay, we have something selected here, and when we go with triclPaste, we actually put new object
in this collection. But this collection
scatter objects on ceiling and we scatter
this chain on ceiling. So what you need to
do you can set this to thin collection or you can create new collection,
for example, other. In this collection, we will put all things we import
in this project. So just put this here
and you are safe. Now we have this
other collection. Okay, this is marked as assets. So I will just click asset. Okay, and where is
this chair. Here. Okay, it is here. Now we can just place
this had in a few places. On X axis is on
zero, which is good, so we just need care about
YN O Z axis is good, so we just need
care on YN X axis. So it is about here. We can maybe change
little color of this. We need more brownish
or reddish color. So I will go with Shade editor. Let's see which materials. We have this oak
and black leather. We obviously play with
this oak material. I will try to make this more reddish with just hue
saturation value node. If we hold sheet, we can move this precisely. We obviously want to
go on left little. I think this value is good. We can also bring
saturation to make this little more red. Mm.
8. Playing with settings - Ceiling: In this part, maybe
we can play with these settings which we have with these walls,
ceiling and floor. Okay. Let's start with one
which don't have too much, so we have this carpet. We have this density factor, which is, I will bring
this viewport here. So with this, we just
scatter more of this dirt. This transparency is actually
how this is visible. So if we go to zero, this is completely transparent. If you go to one, this is
visible and we have this scale. So you can see that we
make this dirt bigger. And what we actually scatter, we scatter something which is in this you know,
carpet dirt folder. So if I select this, we actually have this overlays,
which look like this. I didn't use any noise
texture or mass grave texture to make this computer
generated dirt. I actually try find what dirt can go to carpet and I
make this image overlays. If you want to make
this more visible, you can select
individual piece of this and you can then
go to shade the editor, and you can play with
this color ramp. So if you increase
these white colors, this should be
even more visible. You can see that this tar
become even more visible. I will try to disable
this compositor for now so we can see
this even better. Okay, we can clearly now see this overlay here and
let's select this now. So to make this more visible, you can just increase
this contrast. You can now clearly
see this dirt here. But if you want to make
this more transparent, we can just move this
closer to black. Okay. Just to know
how this works, if you want, of course, you can in this in
backrooms movie, we have this formula here. So we have one light and then three panels,
which is not light. So maybe we don't
see these lines, but we have one, two, three of, and then again light. And on XX we have every other one light,
one panel, one light. You can change this
here. This is X axis. If we set this to one, each of these will
be light panel, but if we set this to two, we get what we have here. If we set this to three, we will get two empty and one light. So two is what we want. But you can also play with this. If we set now these 23, we will get two
panels and one light, light, two panels light. To get same in movie, we need to set this to two by
four, which is by default. Okay, we talk about this
panel sex panel cycle. I try to measure this and I
think they use 1.2 by 1.2. This looks stretch, but it is not just because
camera perspective. We can see here that they
are same on X and Y axis. But you can change
scale of this. So if you want bigger, you can just or smaller, you can play with
this light random. So we use this formula, and if you set this to one, it will follow this formula. But if you change value
here, it will go randomly. So now this also affect here. For example, if you
said this to three, we will have more lights. But with this, we also
get random value here. But I don't want this, so I will set to one, and this is four. On our flights, we talked
about this before. With this, you can get this
nice type of animation. So if you just do this,
you can, of course, put keyframes here
if I press I here, I can put keyframe, and then you can move
on timeline and put another keyframe and
get this animation. So this is this effect
and seed, of course, you can play also with seed, but I will say this to one. Area and pitasity we
talk about this before. If you said this to 30, we will not have too
much light here. But this is important. I talked about this before. So if you change this value
and nothing happened, that's because when you see this gray or half transparent
values which are all these, this means that
these are drivers. Drivers are always connected
with main objects. For example, we can
duplicate this ceiling, but they are always
connected with main object. Example, if I change this value, nothing happened, that means that we need select main object. So first one, which is this
one with asset briser icon. Select this one, and now
if we change this to 30, we will affect whole this space. And of course,
there is timeline. This will also affect
this part here. So I will break
the 220 emission. So this is the
emission objects here. If you said this to zero, it will become black
glass transparency. So we have here this
glass but with this, we can choose how much this
glass will be transparent. So if you set this to one, it will be completely
transparent. If you set this to zero, we will get this glass. We now have this
glass roughness. If you send the glass
roughness to zero, you actually see just this bump. So this is not roughness, but we can also play
with roughness here. Basically, you can choose
look you like here. And emission contrast, I'm not sure if this is
so important for you. If you increase this, you actually make this light with these tubes more bright, but this part
between less bright. You actually get
more contrast here. You can just like this
and choose look you like. These metal frames, we talk about this before
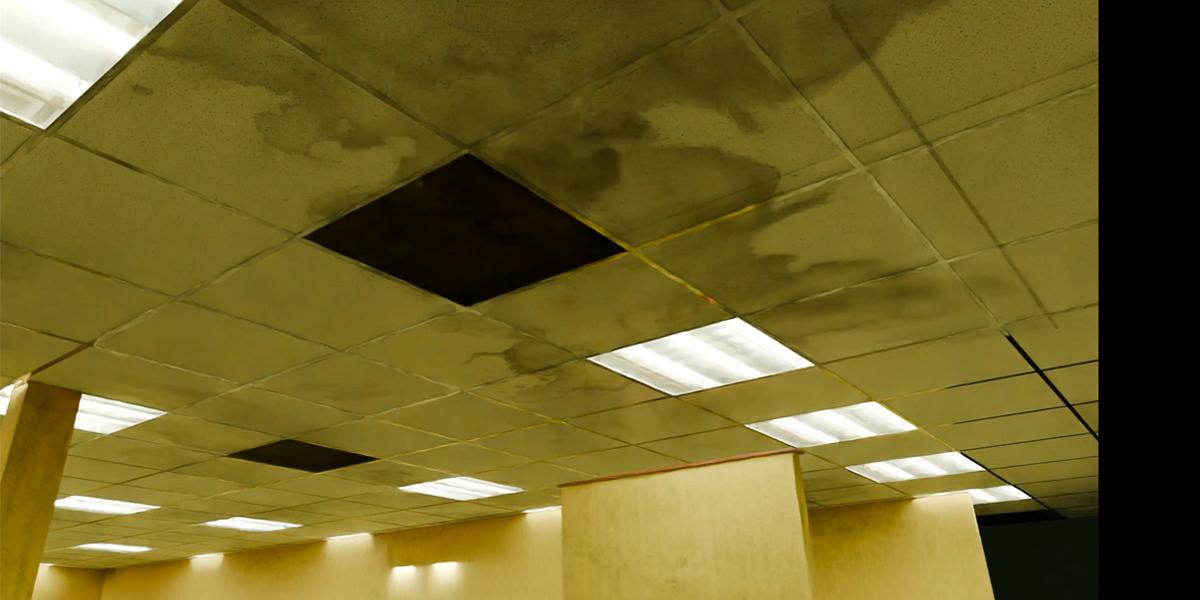
ceiling stain dirt. So this is same on carpet, but I just found
different overlays. So we mostly have this
water stain or something. And we can increase this. And now, you need to be careful. This object is not hollow, so we have these white numbers. So that means that when
you select object, we change, which is this one. Object we want to change. Before we have selected this ceiling here,
which is this one, and we add here this
stains but now I want, this one is actually
object we want change. So just be sure you don't
have selected this one, this main object you need
now, select this one. And now we can add these dirts. We can also play
here with scale, but this one is whole also. We need to select this main. Let's crease these 21 and let's now play
with these options. So we can make maybe this
bigger to get this effect, of course, you can
play with seed. This is how much of
this we will get. And if we look this
in solid preview, you can actually see what we do. Okay, but in normal cases, you don't want to make
this visible maybe 0.3 or something just to
make this effect sutter.
9. Playing with settings - Wall: We are done with ceiling and
we have backroom boards. All this is just one object. So we don't care about
what we are selecting and what we are doing because everything is just one object. Voltickness is, but don't forget this is disabled in Vwport we don't see anything
what we do here. We now enable this
voltiness is this. Basically, volickness you can hold shift to move
this slightly. Dirt over this is Okay, this object is very big. Everything here is this object. And when we scatter this, we actually scatter
thousands of these objects, but it is same on
ceiling and floor. So their overlay, we can, of course, play with scale. You can maybe just
type here some value. It will be a little faster. We get this effect, seed, so we can changed. Leaking. I will now
say this to zero. Leaking are things which
go from ceiling to down. So if I increase this leaking, we actually add on
this part only, and we have different overlays, which look like this one. We can make maybe this
less intense 0.3, we get this subtle effect. The scale. So if you want, make this bigger or smaller, you can change this value
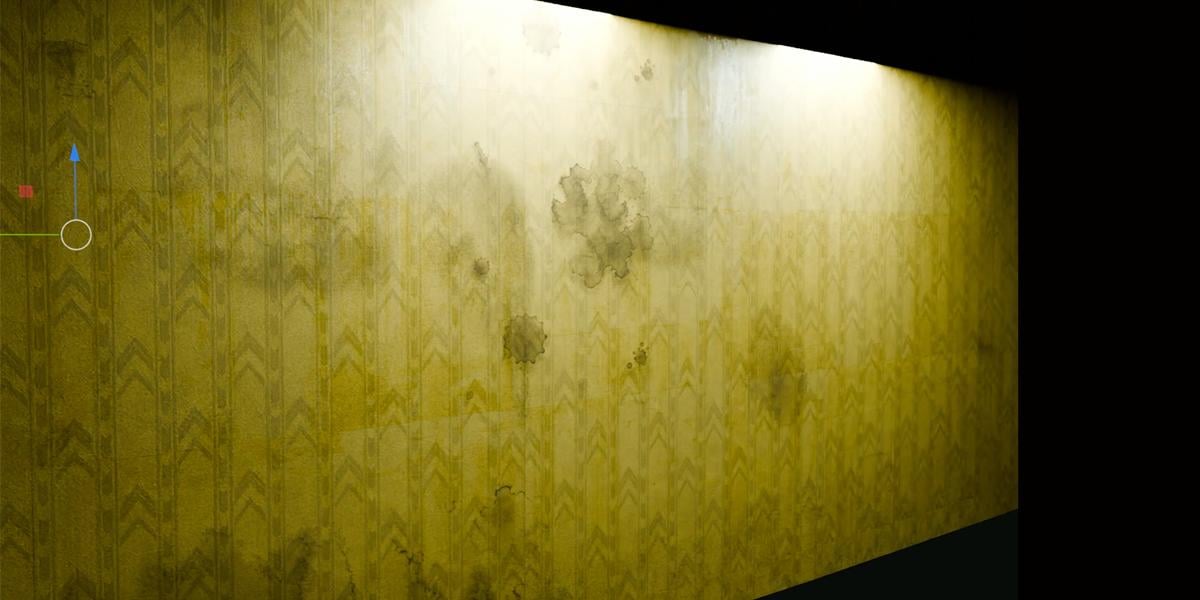
and, of course, seed. Okay, let's now jump
to this wall paper. I will make this to zero. So this wall paper is this first option
is backroom spatter. If you sent this to
one, you will clearly see this backroom patter here. But if you keep
this all to zero, we still have these
backroom patters, but they are actually how
they should be very subtle. But if you want to increase this and make this
little more visible, you can set maybe
0.3 or something. Brightness. So this is how
this wall is bright or dark. I think 1.8 is
actually value I like. If you want to make this
little more bright, you can play with this
value saturation. So if you increase these to one, they will be more yellowish. You can know that there are now a little more yellowish
bump backroom spatter. So this will be bump. I will say this one bump based
on the backroom spatter. You can now see this bump here. Maybe normal values
0.2 or something. Bump seam. This is this seam. So every two or 3 meters, I'm not sure what I said, you can actually control with this word paper
scale controller. This is empty object, and if you now scale this, you can see that we
actually change this UV. I think we also change this SM. I will select this,
this is bum SM. If I set this to zero, we will actually remove
these lines here. But I like this bomb scene because when they put
this paper on word, you should see some of the sem, maybe pointt or something. Okay? And we can
clearly see a few of these sems maybe even
more in material preview. Yes, we have a few
of these sems here. And let's see what is
concrete glossiness. If we sent this to one, we actually increase
roughness closer to zero. So this should be more shiny, but this is also based
on concrete texturing. And last one is concrete dirt. So if you sent this to one, you should get the same
dirt we have on this floor, which I showed you before. This is not so visible, but you can clearly see
some of these dirt. See some of these imperfections
on my four K video. So let's stop somewhere here. You can clearly see this
concrete glossiness. I think I said this maybe 2.2. We can also see this seam here. We can see this dirt. But I just keep this subtle. You can also see on
ceiling, this dirt. So this is pretty subtle, but you also can note a lot
of these imperfections. You can see these dirts here, this concrete glossiness
and these seams. We have one seam here. And we have one seam
here, another here. And I also increase this bump
this bacumpattern a little, maybe just 0.2 or 0.1. We have this ceiling.
10. Lighting: When I work on this teaser, I try to get closer
as much I can to reference images or
references from film. I see one problem in film, we have these lights which
are completely flat, so we don't see any details, but we can see the office
light panels here clearly, especially if we remove this, I will select this
ceiling generator and if I increase this
glass transparency, we can see that I model
these office lights. And I think this is
much closer to reality. This is how these
lights actually look. But because this is film, I think they use something
like soft diffuse or something to get better
and more soft lights. You can also see on these
words that we don't see enough details like we
can see in our renders. For example, here, we can
clearly see these lights, which is actually
more realistic, but for film purpose, they use the soft box. So this is not what you
will find in offices. How I can achieve
this because we are trying to get closer to
this reference image here. These objects here, actually
this panel light on. So we have this object. We clearly need
edit this object. So if I go to edit mode, I will go with old Hage. You will see this, but
for now hide not hide. I will actually duplicate this SDZ I will say what
they do in reality. I will press Hage. So
now we have this object. Basically, they
put something like light diffuser on top to
make these slides off. So we can try do this
new material here. I will call this fake
lives or something. And I will now go to
shade the editor, and we need to assign this. Now, you see what we get. We actually get this material, but I want to go with emission. Emission and transparent because I want control
transparency of this. Now, if we block this
here to surface. So if you set this or to zero, we get this emission. If we set this or right, we get what we have before. I will now see which
values I used last time. I use this yellowish color and strength to 40
and this 2.9. Okay. I don't have time
to mess with this, why we just copy these values. Now, if we move this, we actually get something
similar which they do. We can maybe try
sample this tint here. This look like little reddish. I think they have this halation
effect on these edges, but we will do
maybe this impose. So because I want affect color, I will increase
saturation to here. But I also want to keep some of these details
because this is realistic and let's go last
time I go with value of 0.9. This is actually how I
achieve this effect. Now you have just
one more controller. So if you want this
look or this one, you can play with this slider. This also effect.
If we said this, for example, to ten,
we get this effect, let's see, 100, this effect, but this is what
I used last time. Okay. And you can also affect this affect lighting
in our scene, which is what we should expect because we add this
emission with this value, and of course, this will
affect lighting also here. And of course, if you
change this color, this will also affect this tin one thing which
is very important here, I mess this default value. So if you go to render preview, and if you go down, you can see that this
is AGx by default, you have this standard, which
is completely different. I also play with
this wide balance. So this is what you
will get by default. But if you lick here and enable this to get these
values which I put. So if you want change
this temperature, you can maybe change
these numbers. If I go with higher number, I should get more warm tones. And this tint, if
you go to left, you always get this
greenish tint. If I go to right, I get
more this reddish tint. These values, I think, look
similar, like this reference, but of course, you can play with this and also this effect a lot.
11. Combining with SuperScatterOnSurface: Now recommend you
one of my add-ons, which I do before a few months, which is super
scatter on surface, just to show you
that you can combine this background generator
with any other assets. So we can maybe
have fun with this. I will not share this with you, but I think if you follow me, you already have this
super scatter on surface. If you don't have, you can find this on my network and download, but I think it will not
be included in this pack. So you can just
take rest a little and watch what I'm doing if
you don't have these assets. I have instructional video how to use the super
scatter on surface, so I will not now explain
each of these steps, but I will scatter on
this ceiling down. So this is actually
asset browser objects, so I will go to super
scatter surface. And we have this plane
scatter and curve scatter. We should know that this
plane is actually very big. We can split this. I will for now disable this. Here, we can split this in few smaller pieces because
if I apply this scutter now, we will scatter a lot of objects because
this object is big. I want maybe make this smaller, so it will be less intense for my computer p separate
by selection. So now nothing happened. We just have two
of these objects. And if I now import
this planes cutter, I need to be sure, again, that this is in other folder. Now, actually, nothing happened, but visually, but something
happened in background. This is not for you, but
if you go to Brander file, you can see that we actually import some of
these assets here. You can take a look
that we actually installed this scatter now. And what happened now if
I now select this object, this scutter is actually
geometry node modifier. Another modifier like backrooms, like this carpet modifier or this ceiling and
this walls modifier. So I will select this. I will make this smaller and I will go
with another modifier. I think I can just search
for scatter on surface. No, I think I need to
go with geometry nodes. And now I can select this
super scatter on surface. You can see what happened here, we scatter something
on the surface. And what we scatter, we actually scatter
the soil things here. I will close this down. Why we scatter this because we have this asset
value set to zero. So we basically scatter this. If we set this high Q, we actually scatter
this high Q object, but by default, we scatter
this one, low poly. I will keep for
now this low poly. And we have here, I think, 75 or something, 79 objects. We can scatter
here. You can take look all these objects
that we have from nature to trash or to
trees, rocks, dirt. For example, if you want to scatter this McDonald's trash, we can type here 44. So asset 44. And you can see that
we actually scatter millions of these
density is too big. So let's say this ten. If we go to material preview, all these are high
quality photo scans. You can see how this look and all these should
be real world scale, but this is not so good example. Let's go with maybe
grasses 4-14 or something. So if I said here four, we get the grass. Okay? This is very massive room, so we can maybe increase scale. Okay, scale somewhere
down. Here is scale. I will say this to 1.6 to
make this little bigger, but we need a lot of
particles to see this. If I said this to 100, this can become very heavy for my computer because we have
millions of these particles, but there is also two ways we can scatter this
with brush or curve. I will talk about this later. Let's see. So this
is Asset four. Let's go with asset five. And of course, we can
combine these assets. So I will set this density. This is what I will do for now. I will disable this. I
will make this smaller. So tab to edit mode, Control R. Let's scatter for now,
just on this area. Be separated by selection. Okay. This should be
disabled for now. Let's just enable this here. Now, this should be
much more faster. And let's now. So this will be grass one. Duplicate. When you
duplicate this, you want change seed
because you don't want scatter in the same
position, which is this. So just change seed, and now we can change
at maybe seven. We have this type of grass, maybe this old
grass, which is 15. So offset 50 and we get this. Now we can make
one test render to see how this looking
with more samples. We get this nice render.
I will show one thing. So if I set this to two
and if I enable this high Q. I basically
make two version. One is more low polymsh, another one have more mesh, but mesh is not only difference, I also improve shader. So I add something like transmission subsurface
scattering and all these things will look
a little more realistic. So I want also high Q here. Now we can compare. This
is before, this is after. We have a little No, this is before, this is after. We have a little better
reaction to light. Maybe this one is
not a good example. I will say this to five. We can maybe no, these 25, but we can maybe
duplicate this one more time. So we have here asset five. Let's add asset seven. So all this is still grass. You can increase
this maybe to 70. This is a low poly version
of this new grass, and this is more like
high quality version. For example, if we
said this to 40, we get this. This look nice. But when we have the assets
which should be same size, we can just go to advance
options and scale. I will set scale to one, and we also have
here scale offset. So I will take this value here, but it will also add
randomization here. So if I set this to zero, I will increase density here, maybe just a few of these. And let's duplicate
this one more time. Maybe these big bags here, 54, maybe this Bruish one. Okay, we have a lot of this. Maybe we need say this
value 2.2 or something. Maybe the trash can. Few of these so 58. You can also note
small rotation here. That's because I
said this rotation on X and Y to 50 degrees, we can line up this perfectly. We can clearly see
this green reflection we get on ceiling,
which is very nice. This is another test, and
I feel that we have a lot of the chromatic
aberration glow effects. Maybe we can reduce this side composite so
E to zoom this scene, just move this little more. This should go maybe 0.005.
Something like this. I now show you how
we can scatter this. But if we want paint
this specific areas. I will go to layout and
for now remove all this. Let's just keep this
grass number seven. Let's see what we can do. I will select only
these objects, so I can work with this object, and let's go to render preview. I can paint this in two ways. First one is masking. If I go here, I can create new
and I can call this grass. Okay, now, I need to go to
let's see texture paint. I think now we
should select here, we have selected material,
which is not what we want. We want single image. And we should find
this grass image, and now we can paint here. Okay? But we paint with black. We actually Black
is value of zero. We want paint with value of
one or something between. So we can now paint
with this tool. If you said this
to one, you will paint with 100% density. Which also affect
this value here. So if I said this to 100, it will be more dense, but now we can reduce this here. Okay. Now, because I before have 100 and
now it is about 50. I actually remove this. So if you said this to black, you will actually remove this. But there is another
way we can paint this. Actually, in part of this super scatter on surface
are this curve scatter. Maybe you like curve
scattering more than this with this brush here. So I will show you
how this work. I will actually replace this. No, I will remove
this geometric nodes. I will go with geometric nodes and I will find curve scatter. We don't have curve scatter
here because I didn't import. This is only in my Asset browser or another location
on my computer, so just drag this here. Again, O. Now we import this
and we can start working. Now we should find
this curve scatter. Okay, but this is not good. Because this is curve scatter, we need curve object. So I will remove this shift click Shift
A any curve object. So for example, busier. This object look
like it is selected, but it is not just clear here. It must be yellowish. So we have this
curve properties. Now we know that we select this object geometry
nodes, curve scatter. And now we have the grass, which is somewhere here. Now, you can play
with this curve. This is not what I recommend. What I recommend is to go to edit mode, A, delete vertices. Now, we delete this curve, but we are still in curve
properties. You can see here. What we can do
now, we can select this draft tool and
we can draft this. Okay. But you can know that this is in three D perspective. So we need go to Control Z. We need drop this on surface. So now we can just drap this and we have here some of this
option, almost same before. Why I drove this here? Because I think this curve is
in the ceiling collection. And we can now continue
driving this like this one. This is density. This
is offset from curve. If you set this to zero, we get these straight lines, but we want offset here. Offset from surface. If you go with positive value, will go up and if you want to merge this better with ground, you can go to negative values, but zero is by
default scale max. So if you want scale this grass, you will get this effect, which is actually a nice effect, and we can drag this part here. Let's go to our
scene to see what we are doing and what
we can do if we want. Now combine this
with other assets, so I will click IQ, so we get a high quality grass. We have all these things
you can play with, but I explain everything
in instructional Video. So this is not
instructional Video, can call this grass
one duplicate seed, always change seed, and we
can play with another assets. And if you want new
curve to control this, it go to new object. For example, you can go shift a another busier
curve and then you can go with geometric nos
and add these curve scatter. Now we have new curve. We can go again with
delete vertices, set this to surface and we can
scatter these things here, which should be
something different. Let's say I IVs. Let's try this pin cones. So 28. Now we can
scatter these things. Here. Let's make
also this bigger. And let's now combine these pine cones with Okay. Again, I placed this on
ceiling collection and other This is result we get, and this will be end of this part of tutorial with
super scattern surface. So if you like this modified or actually this
is modifier setup, you can find this. You can search on
superscatron surface and you can find this
it is not so expensive.
12. Cardboard doll: This part of Tutorial,
we will model this or I think better
word cut this paper door. You can see this in M. You can see this in
official movie Teaser, but you can also
see this M Taser. And this will be very easy
to model and also animate. So let's see how we can do this. I will for now close
this Blender file. If you want to save this
mask with cutter here, you can just click Save
or you can unsave this. I will click save here. And now I will go with new
Blender this will be easy. I will delete all this
Numpad one to go to front orthographic I will
copy address of this folder and image. Let's see. Mesh plane. You can go with reference,
but I will go with mesh play. This is front. This should x 90, we can go to material preview, and what I do last
time, I just go with K, and now we can just
start cutting this you can zoom this closer and
you can be more precise, but this is not so
important for me. So I will just cut this quickly. Okay, Enter. Now I can select this control
I delete phases. If you want, you
can go to edit mode and you can just grab this. Okay, we can enable this
correct phase attribute, so we don't affect UV and
you can be more precise. What you can do, you can maybe subdivide this to
get a double of these vertices and you
can just slide this. You want cut this part,
something like this. Delete phases. We can now start fixing this. You can also use C for brush
to select, for example, all this and G. Let's see
how we can create texture. For this, we can go
to shade the editor. So we can start from scratch. Cardboard. We have
this cardboard, texture and we can plug
this to base color. Maybe we can just go with Q projection or
project from you, let's open here.
You'll be editor. And let's reproject this. Maybe we can select this
top face and go down, make this bigger and now Okay, we are in X ray mode, so that's the reason why
this is not easy to select. Okay. And we can now go with EYE do this on Yaxs here
we want unwrap this. I think if you just add few SMs, markZN maybe one
here, you mark Z. Let's see what happened now. I go with art unwrap. Okay, this work, there's It, we can now project this to
this part of texture here. And we get this, which will not be visible in our render, but just to know. Okay, let's go with maybe bomb plug this to height because I don't
want this to non color, I can go with color RM let's plug this to normal and
increase this value here. So we have some bump. Roughness should
be closer to one. And basically, that's it. Now we can build this
part which go down. Let's go with image reference. And let's see just
how this look. Basically, we have we
just need one cube here. Cube a Z, and maybe on Y axis, as Z, we can apply scale. Go with tab to edit
mode, a selection, and we can select these edges. Not this one and Control B. We can just go with another
cube. Scale this down. Scale this on Z, axis Y, X. And if you just bring this
up and select this S Y. Basically, that's
all we can do here, S D, Z, night. And now we can just assign
same material here, cardboard, UQ projection, and we can grab this part and
project this down. And if you now go with, we have also this part here, which I want to avoid. Let's also project this here. Z net. Okay,
something like this, this should be scaled. Ax to scale this and maybe
also this one S. Okay, this is how I create
this door Control J. Now we can join
this to one object, and we have this door here. We should maybe bring this down. And we can save this door. Now we can just import this
in our Blender project. Let's see dimensions of this. So this should be much bigger. This should be
something like this 1.7 A real world K. Copy object and we can now I will disable the curve
objects in render and viewport. And we have another one, which is this one. Disable this. And we can now pay this doll here and of course,
M O collection. We can call this door. We have this doll, but we
need one room for this doll. So we'll go to timeline, and let's move camera to about here so we
can make room for doll let's see I need to
select both of these. I will go with
Control Z because I want disable these modifiers. This now becomes a little slow. Just disable this and we
can go ran that preview. We have this white color here. Select this object EY. Ex and I will go with EY again. We need to select this carpet. Now we have two
carpets actually, but not so important. This is too much space. So Object mode, select this, and now in edit mode, we need to select
both of these faces. And with two edge select and now I will just move this
outside of camera view. We can maybe move this little inside this closer to here
and this should go here. Okay. Now I will back to asset
browser to current file. Current file is file in
which we are working now. So this file and
inside this file, we have these assets here. So we basically get
these assets here. We want to place this here, there's Zenity apply rotation. And we can put this wall here
similar in our reference, but we bring this scale. Why I put this
texture too intense. Not sure, but we can say
this 2.1 or something. Okay, and we need
door for our doll. So maybe somewhere here, Control B and maybe
we can delete faces. Now we can just put our door
which is somewhere here. Z and what I do last time. So we have 700. I will now set this to 900. So our camera stop here, move this wall a
little after camera, stop in frame 700, we can animate this door. So I will first set eye on location and rotation
and to remove this tab, and then we can start
animating this door, we can you can actually I actually want
to go to this keyframe, RZ night I want to rotate. In this direction,
now I need update this few key frames
later or frames later, I can press N. I
can again, hi I, and now I can few frames
later go with RZ 90 and Ii. We get actually this animation. And of course,
everything is too fast, so we can we need
more frames here. So we just need bigger offset
here and it will be slower. To get this jump scare effect, which you can see here. This effect, you can
just later press. For example, I here, and then maybe just two
or three frames later, you can move this
closer to camera. I will also move this
on Xx somewhere here. And if I now press I, you actually get this effect. Okay, now we just need
play with lighting. Now, we just need
play with lighting, so I will go with Shiv D
X place few lights here, but I will turn off
all these lights, and I will go with shift the Y. And I will turn on some
of these lights here. Now, let's see where so door. Basically, when we have these
lights which don't work, I'm not sure if I delete
all these lighting. It looks like I delete
some of these lightings. So I will go for this case, duplicate this to
close these holes. Actually, I will bring this to break, something like this. Okay, not so important. To get this effect,
we actually want to turn on these lights
in background, something like this,
and then we can see clearly this
silhouette heat. Okay. But you also need some of these
lightings in this area, Shield X because now
everything is too dark. You want to see something
here, Shad the X. You also want some
lights here maybe. Okay, so this is effect I get. And now we can animate
these values, for example, if I set keyframe here with
I if I move one frame later, if I do this and I, you can even, like,
animate seed. If I change seed here, we get this blinking effect. And you can, of course,
animate these lights. For example, if I press
I here and then turn on some of these lights
we get this effect. I think this is from my
superscatur on surface. I will disable this. And we have this animation. We miss some lights here. Not sure in which
point I remove this, but let's go with Shi DX. GZ. Okay. If I press play, we actually have this
type of animation. We miss this ceiling
panels here. If I want make this
scatters here, I can enable this. So we have, another one. And let's try
preview this again. So this is in cycles, and you can see that we can get live preview
even in cycles. FPS is almost like almost 24, which is what we set. Of course, vendor
quality is very bad, but And now our doll should appear. We can see our doll here. And now we should get this
light blinking effect. That's basically almost
everything I do last time. And last time I render
with open XR file. But I think in this
case, you don't need. Why? Because when I put this in after effects to
make compositing things, I didn't do too much. Basically, I didn't use
any of these light passes. You can use Miss pass to
add more atmosphere here, but I didn't use this last time. I didn't I tried with ambient occlusion,
glossy direction, but I didn't get
any better result. So basically, I didn't
use anything here. And because we don't use this, we don't need open
XR multi layer. File format, you can
basically render this us PNG or even JPEG. And one thing which
is important, so we have this
four K resolution, but because I said this to half, this is only ten ATP
or one K resolution. If you want full render quality, you can set this to 100 and you will get
much crisper result. I think this is all
for this tutorial. I think we go through
all main things. And I mentioned that we
will go inside Primer Pro, but I cannot find all
the primary profile. But basically, when we do
everything is si render. So if I render all these
thousand and 200 frames, we can basically
get final result.
13. Final part: And one thing I
also forget which I mentioned is this leaking
effect. This is very easy. Actually, what I do,
I select this wall, and I basically duplicate this Blender file because I don't want mess in
same Blender file, so you can make
backrooms animation, leaking effect, Blender file. Then you can what you can do, you can select this
wall and you can just animate this
leaking overlay effect. So if you press I to
here and if you increase this and press I
here and enable, of course, you get
this animation. Okay, I enable this
super scatteron surface, which slowed down a lot, so I will disable this in Luport and we get this
type of animation. Let's select this fall and
increase density here. Okay, so this is before. No, I forget to animate. So I set this to zero. Let's move this here to make this lower jump
to this keyframe, I, here, and I here. Now, go to last frame, going four or something. I here and I here. And I also animate
this transparency. So if I go to this keyframe, set this to zero, I
and go to last frame. Send this to one. Okay. No, this is
leaking overlay. I want this dirt overlay, but it is same, so I will send this to zero. I, Lasky frame one, I, and you get this
type of animation. You can watch here. What I do, I also animate scale. I first add this to
zero and then to 12. Then you get this growing
effect from smaller to bigger. This thing is now
a little too slow, but you can see, I think I will speed up this
so you can see this effect. So this is effect we get. And what I do in private pro, I just animate this text which I also grab from movie Teaser, which I download for YouTube, and I put that as
overlay and I also add this music is
also from YouTube. You can find nor Came
Pixels, YouTube channel, which is second channel of Came Parsons there
I found this music, and I put this, and I also try like match
this text that music. And basically, that's all. And this effect, I also download from official Ts and all
these sound effects. So I think this is all for these tutorial
thanks for watching and using my products and
see you in next file. A
 šime Bugarija