Transcripts
1. Welcome: Well, hey, everyone.
Welcome into my art studio. My name is Carrie Sanders, and I'm an artist,
a teacher and a creative here in
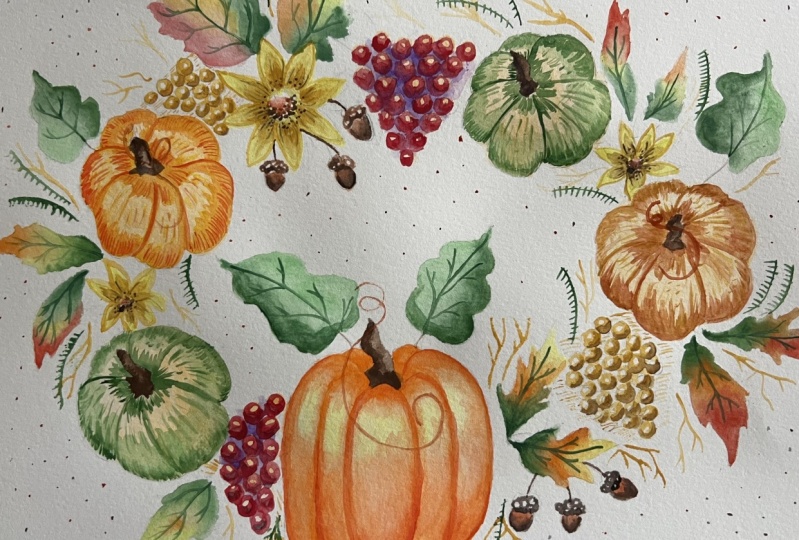
Farmington, Utah. And today, I have for you a beautiful and fun Fall wreath. This is something that
we can do together, either keeping it
pure watercolor, or if you want to take
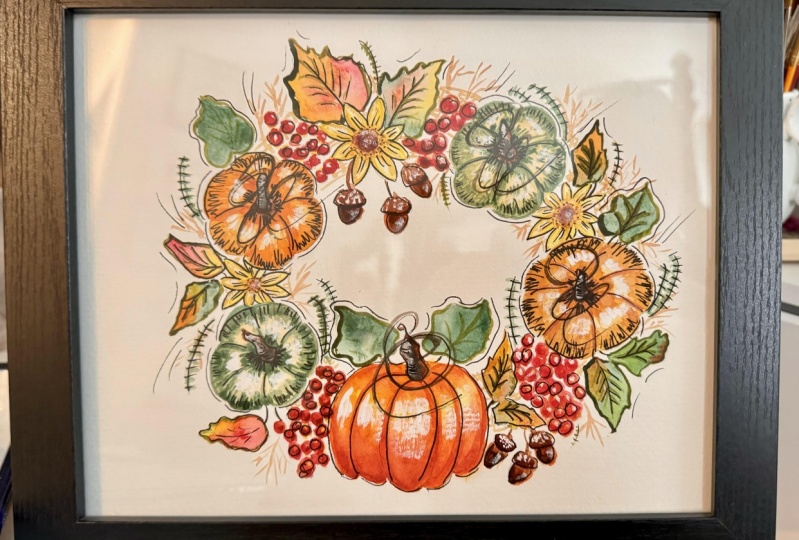
it one step further, you can add the inking as I have provided in
the sample here. There's something
here for everyone. We are going to cover some really important
watercolor techniques that are great for
everyone of all abilities. We'll be doing a lot of wet on wet, blazing, highlighting, shading, and we'll be
doing a little bit of color mixing as well
as some splattering. So if this is of
interest to you, I would love to have
you come and join me. I have some other classes posted here just to
tease you a little bit. These are classes
that are already available here on skill share. All you need to do is go to the search bar and
type in my name, Carrie Sanders, and
all the classes that I have here that are
already available to you. You can take a look at and see if something's
of interest to you. Also, if you wouldn't mind clicking that little
follow button, then you'll get a ping every
time I reduce the new class, and I would love
to have you join me in any of my classes. You know, I have been teaching
for many, many years, and I was lucky enough to be picked up by a big
box store and have my pattern book published
and sent across the nation along with
pattern packets. And I've been fortunate to have won many awards in art shows. And I only shared this
with you so that you understand that I have
such a love for art. It's been part of
my life forever. And I have realized over time that the most
important thing that I can offer back is to instill in others the love of
art. And it takes time. It takes practice.
And it takes fun. We need to enjoy and relax and have fun through
the process. And so that's what I like to
do as I teach my classes. That's my goal for you, and I would really love to
have you join me. If you would like to do this
fun fall wreath with me, then let's pop into the next video and
we'll review supplies, and then we'll get
going together.
2. Class Project: Okay, my friends and art lovers, your class project
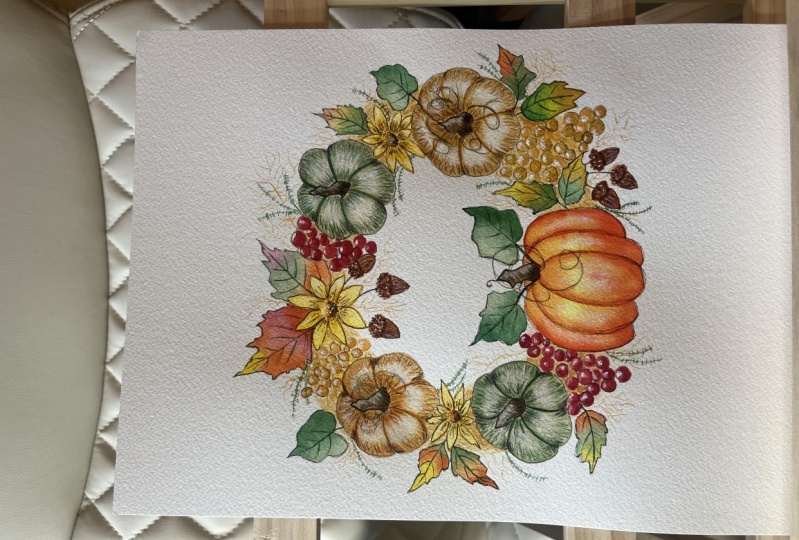
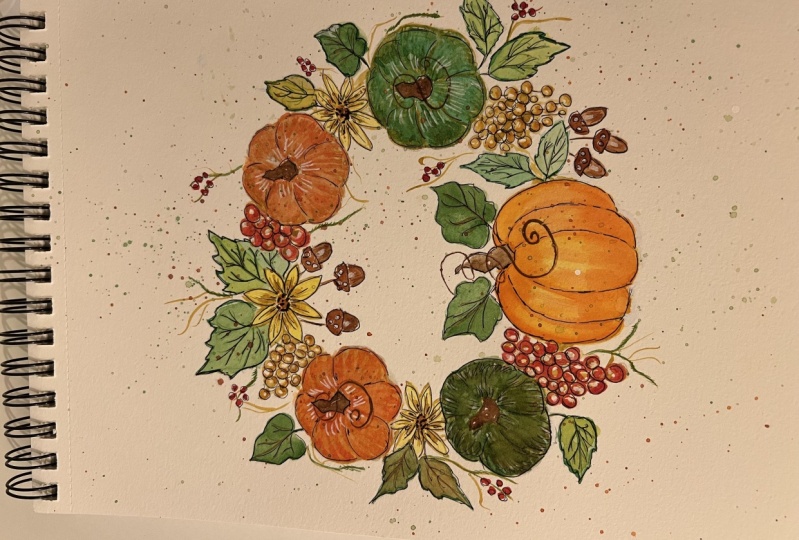
is to complete one beautiful ball breath. And when you've completed that, if you could please
take a moment to snap a pick and upload it
into our class gallery, look for this button that's
on this page Steel share. And that will allow me to make comments and
interact with you there. It's such a great platform
for us to talk to each other. Plus, isn't it fun for us to see what each other
has accomplished? You know, I always say
it's kind of like giving everyone a recipe for
a cake or a casserole. And they all turn out just
a little bit different, even though we have
the same recipe. And that's because
each of us is unique. You are unique as an artist. You are talented and wonderful
in your own special way. And I would love to see the
work that you have done. So please take a moment to
share a picture of your work. Nothing but love, guys, no judgment here, just love. Alright. I would love
to have you join me. And this is our class project, and I'll see you
in the next video.
3. Supplies: Welcome, Ming, guys. We are going to go ahead
and get started with our beautiful fall
Reath project. And I will provide the
color copy of this for you. You can print it out
and refer to it, but I also will have it on screen every step of the way so that you can refer
to it easily while you're watching and
painting along. So don't worry about not
having access to that. Also, I will provide
the pattern for you. It's a PDF on the main page
of this lesson in Skillshare. You can print that out,
and then you're going to want to put it on
some tracing paper, just a regular pad
of tracing paper, just trace that on so that you can then apply
it to your paper. Of course, you're
always welcome to just sketch that onto your
watercolor paper. That would be awesome. But if you would like
to apply that to your watercolor paper using some graphite paper
or a light box, you can do that, and I will show you how to do it
with graphite paper, and we'll do that step
in just a moment. You are definitely
going to want to be using watercolor paper. I'm going to be using hot press. It just has a little
smoother surface. And since I'm going to
be inking this piece, I like to have a little
smoother surface. But no matter what type of
watercolor paper you choose, whether it's cold
press or hot press. I highly recommend
that you always use 140 pound watercolor or better watercolor paper
or better because it's going to expand and contract and work well
with your brushes, your paint, your water, and you'll have a
better outcome. So treat yourself to some
good watercolor paper. Also, as far as brushes go, let me give you a
white background here. We aren't going to need a
lot of brushes honestly. I'll be using the stylist
to apply the pattern with, and I'll show you
that in a little bit. Just a variety of
rounds will be great. This is a number one scroller
brush for fine lines. This is a number six. And this is my handy dandy number
four. You know me. It's my very favorite brush, and we'll be doing quite a
bit with a number four round. But use what you
have. We'll also be using a couple of flats, just a medium size. I
think this is a six. Yeah. And this is a tiny little flat for our smallest berries.
This is a number two. And then this is just a little
tiny, fine detail brush. This is a 20 ought. And I always have
a pencil handy. This is my favorite pencil. Ever it's a black wing palomino. Fabulous pencil, if
you ever want to spoil yourself and have
a really great pencil. Try a black wing. They are so great. Alright, I will go
over our palette, and then we can go
ahead and get started. Let's do a quick review
of our palette for today. And you can always
substitute paints, guys, I am not a stickler
on using specific colors. I encourage you to use
what you have at home. I'll be teaching you how to
mix a few colors using these. And I want you to experiment and learn and grow and have
fun with this, no stress. Okay? But the
palette that I will be working with
is buff titanium, Yellow Ochre,
gamboge, burnt umber, Burnt Sienna, Hooker's green. Era verte, Cadello medium,
lemon yellow, orange. Transparent orange. You can see it has
a little more red, a little more depth to
it, and quinacin red. Then we will be using white. You can use white quash, but I highly recommend doctor Phil Martin's
bleed proof white. It's more opaque and you have a better outcome with
it's my favorite by far. So if you haven't treated yourself to a
little jar of this, it lasts for a long time. I highly recommend that. Of course, you'll
need some palette to put your paint on and to
work that into your brush. The spray bottle to keep
your paints wet and moist and a cloth and a
big basin for your water. I highly recommend
having a scrap of watercolor paper handy so you can test out your color values. I usually use old pieces that I just cut up
and keep handy. And then for our inking, if you choose to ink, so you can do this with ink or without. If you choose to do the
last step of inking, just make sure that
what you choose is waterproof. That's
the most important. I'm going to be
using a Mogi MUJI. It's just a fine
point ballpoint pen, but it is completely waterproof. So just test whatever you use, make sure it's waterproof,
and it will be just fine. And then, of course,
my favorite tool ever our handy Dandy tissue. We're going to do a lot of wet on wet technique
with this piece, so we will be using
a lot of tissue, and you want to
have that close by. Go ahead and gather
all your supplies, guys, and in the next
video, we'll get started.
4. Pattern Application: Once you have printed
out the pattern, then you can just trace that onto a piece of tracing paper, and then I have centered it on my watercolor paper and secured it with a
little piece of tape. I'm going to slide my graphite paper with
the dull side down, make sure that you have
the right side down so that When you make your imprint, it goes onto your paper. I'm just going to center that. And I will be using a
stylist to apply this. You can use a pencil or pen, but I like to use a stylist, so it doesn't ruin the
integrity of my pattern, and I can use my pattern over and over again without
having to remake it. So I'm going to
go ahead and just speed up the camera while
I apply the pattern, and you can apply
your pattern as well, and then we will go ahead
and get started painting. So it's okay to
stop and check and make sure that it's
working and you got all the spots
that you wanted to. But I also wanted to
point out that I did not put in every single detail
of the pattern here. For example, I did dotted
lines around the leaves, and I only did the tip and
the base of the petals, and same with the pumpkins,
I did the outside, but just an indicator of
where the sections are. In and same with the grapes, I only did a few grapes just to remind me of
the placement and the size of the grapes because you want to
have some flexibility. You don't want to
have a line, every single place that
you're going to paint. And it's kind of hard
to get the graphite off your watercolor paper if you don't end up painting
exactly where it is. So, although, those of
you that will be inking, you'll have some forgiveness
there because you can ink over some of
those graphite lines. But anyway, just a caution there before you
apply your pattern, so go ahead and add
that pattern in, and let's go ahead and
get started painting.
5. Large Pumpkin: Okay, I have taken
my needed eraser. This is a soft eraser that
you use a lot for sketching, and I didn't use a
hard rubber eraser. I use a soft needed
one, and just gently went over to lighten up
some of the graphite. I didn't want it to
be super strong. And you're welcome to do that, or you don't have to do that. I'm just pointing it out.
On my palette right now, I have titanium buf. I have lemon yellow, yellow medium, orange,
and transparent orange. And we are ready to
roll. Here we go. And I like to start with the biggest items
on a wreath first. And then I fill in later with the smaller items like
leaves and berries. Those are our fillers.
So, the first thing we want to do is start with big. Let's just start right
off with our big, wonderful pumpkin
right in the middle. And we're going to
just add some water. We're going to do wet
on wet technique here. Avoid that stem.
And just go ahead. I'm using my number four, and just giving that paper
some water to start absorbing. I'm staying in my lines. Oh. Always remember, this is a great tip that paint flows where the water goes. Wherever you're putting
water now is where your paint is going to
flow when you touch that, which is super fun, by the way. That's why we like wet on wet. So be careful where you're
putting it. It nice and round. Okay, we're going to start
with our lemon yellow. Nice, bright yellow. And this is going to be
our highlighted area. So kind of long the crest
of that round area. Great. And now we're going to add just a
little bit of orange. So this is watered down. Troughout the lesson, I'll give you ratios of water to paint. So this is probably a 9010 mix, 90% water, 10% orange. And we're just going to float that in above and
below our yellow. But we want those to have a nice soft blend
where they touch. And that's why we put
the water down first. Now, look at it. Use a water bruh,
water on my brush, touching my tissue,
and where those touch, we'll just help that blend a
little bit if it needs it. Looks like it did a pretty
good job all by itself. Just gently help it there. Same at the top,
bringing it down. Nice. Great. How'd you
do? How do you do? Now, I am going to
come down the crease. Oh. This is more like an 85%, 85 15, ale bit darker. We don't want to
lose our yellow, but we're just going to start to emphasize that little crease. And because our page is still
wet, it's going to soften. Beautiful. More water here. Oh Now, behind the stem, these two little bumps
here, there in the shadow, so we're going to make
those a little bit darker. Again, we're avoiding the stem. And then around the bottom. We're just going to
add a little more. Just gently pull that up. If your paper is too dry, go ahead and use
water on your brush. To encourage that to
go up a little bit. I'm just using water now. We could have used
a bigger round because this pumpkins so big. I could have gone to a six. I'm using a four. But
it's my favorite brush. I don't want to lose that
beautiful yellow highlight. I using loner on my brush here. Great. Okay, we're going to add
a little more lending, sticking with our orange, back to that 85 15. I go to add a little
more color at the top. This is going to make it look to bring it down again. We just gently add layers. Okay. Now I'm going to neutle
it a little with some of this water on my brush. I'm just going to soften that. Now, if you have brought
it down too far, and you feel like you've lost some of that yellow highlight, all you have to do
is use water on your brush and touch it with your tissue and it'll lift off and you can add a
little more yellow. Don't panic. It's okay. Oh. Wait. All right. I'm feeling
good about that. I'm going to let that sit for a minute before we
add any more to it. While we are, let's clean
our brush really good and just do a wash of buff titanium. This will be an 80
20 maybe 85 15. This is our other little
orange pumpkin up here. Stay away from the stem, and we're just going
to wash this in. So we're just using all one
value over the whole thing. And then we'll let it dry. This will be our base coat. And again, we're avoiding
that stem. Let go. Great. And while we
have our buff out, let's go ahead and
just keep going because all of these are
going to require a buff base. So let's just keep it going. About 85 15 ratio
and all one value. It's a good time to shape it. If you win a little wonky with
your pattern, that's okay. This is the time to get it in the roundness that you want. If you prefer to
use a flat brush, you could do that here. Good. I'm just smoothing
with a little water. Make sure I've got
all one value. All right. And on to the next. If you haven't used
buff very much, it's a great color, great value to make your new best friend
because it is so versatile. I use it all the time as a
neutral, as we're doing now. I use it as a base coat
as we're doing now. But oh, if you like to
do like boho colors, those vintage colors, this is the one you
want to mix with. Mix it with violet, mix it with any of your
pinks, your yellows, and it just softens
them beautifully, and it adds that total to it, that total quality to it. It's just a wonderful
color to mix with. Great for florals. Notice I keep dipping in water because you
want to keep it the same consistency,
the same value. Or you could mix it in your
well here. I live in Utah. It's a desert state.
It's really dry, and if I mix a big well
here, it just dries up. And so I prefer to
just mix on my brush. But if you live in an area, the humidity in the air
lets you have a nice well. Y, go for it. Mm. I mean, obviously, if I were mixing a huge
well, that that would work. But just doing this little bit. I would dry up very fast here. Great. Alright. How to do, guys? Look how much we've done
already. I'm so proud of you.
6. Smaller Pumpkins: All right, now the fun part. We are going to dive into
this transparent orange. This is going to be
more of a 9010 mix. It's quite strong, meaning it
has a lot of pigment in it. And I highly recommend
actually that if you haven't used
this color much, make sure you test it out. You can see this is a 9010, and you can see how
strong that is. So you might want to start
even with a 55 until you're comfortable with it
because you can always add another layer on It's
difficult to take off. Now, we are just
going to be doing the outer edge and
towards the bottom. Look at that beautiful wash. See how it makes it just pop. And we're going to be doing
towards the bottom here. Now, before we get too far, I'm going to add water
and soften that edge. It's not like the regular orange where we can wait and come back. It'll be too strong of an edge. So we're going to soften that edge while
it's nice and wet. Love it. And I don't want
to go into my yellow, like I just did, so I'm
going to touch that. Yeah, let's come down. Beautiful. Hey. Sin. Right? Hey, next one. Notice I touch my paper, my tissue, before I
come down to my paper, that's to control the
amount of water on my brush so that I don't
get a big glove of water. Great. Hey, and last edge. Hey, let's let that dry
and see how it goes. Okay, while this is drying, let's come up to our
other orange one. And we want this to be soft
and subtle and gentle, if you look at the finished
piece that I have for you. So we're going to start by
taking some of this orange and actually mixing
a little bit of this buff with it,
just to soften it. And this is going to be
about a 910 mixture. I just real soft. You can't see how that
softens it there. And then we're going to just gently pull up from the bottom. We'll start with
kind of the seam. I don't know what
else to call it. The crevice, the seam. We'll start in the back here. And going to gently pull
up little curved lines. And then we can pull
some down from the top. But I'm not necessarily having
them meet at this point. I'm just going to start
with a soft indicator. Don't be afraid to turn
your board if you need to. I'm lifting my hands, so I'm not smearing my pumpkins. I'll be aware of your beautiful
pumpkin you just painted. We're just starting
to shape this, and we'll add some
more value to it. O O Okay, we're going to let that
dry and while it's drying. Let's come down, and this
should be ready for us. I want to just increase that transparent ox orange
just a little bit more. You decide how dark
you want yours to be. So this is a moment
where you get to choose, of course, your taste, your style, I want
this to be your piece. I want it to be just a
little bit more potent. I'm going to add a
little more glazing. Glazing is when
you put a value on top of another
value that is dry. You can see how it
adds that intensity. What it does is it makes
the high light pop. Anytime you want something
light to stand out, then put something
dark behind it. And I want that high
light to shine. Good. All right. Well, this one finishes drying, before we can put another layer on there. Let's move over. Let's go ahead and add our yellow ocher to
this one over here. And we're going to do follow the same method that we
did with our orange. So this is gonna be
about a ten ratio. C. There. This is a little strong for me, so I'm gonna soften that. Maybe I'll go more of a 955. I like the first layer to go in gently and then build
up on top of that. So that feels better. O Hey, last one. Right. Okay.
7. Smaller Pumpkins Part 2: Now, while this dries,
let's come back to our soft orange. This time, we'll just go
into straight orange, no buff needed, and we'll add a little bit of
shaving on top of that. This is going to be a 9010. Still using my
number four round. S. We don't want it to
be as dark as this. We won't use the transparent. We want it to be kind of a soft. This is why we have the buff. But again, it's going
to be up to you, how much orange
you want in here. It's going to enhance the
bottom edge and the top edge, leaving that buff in the middle. Yeah. How I'm putting a lot of orange around the base of that stem. Do you want it to
look sunken in? So it's gonna be more
shaded. It's gonna be dar. Oh. Oh. All right. Let's let that dry, and then if you want to go
back in and add more orange, you can, or if it's fine, we'll know that when it dries. Remember, watercolor
dries one value lighter than when it's wet. So we always have to
let it dry before we can determine if it's right
where we want it to be. Okay, before we move on
to our yellow ochre, you might have noticed that
I touched a drop of water, and I had orange on my tissue, and guess what it
transferred to my paper. That is why we use
a lot of tissue. I always have it handy
here, so I'm ready to go. I don't really care about
that because I'm going to add a multicolred leaf
there, so it's totally fine. I'm just telling you that
in case it happens to you. You know, watercolor is Some people find it kind of nerve racking for
that very reason. And really, you can
fix most anything. So please relax and enjoy
and just go with the flow. Literally, go with the flow. And watercolor is so beautiful. It's such a great
medium to work with. And I love it. And I want
you to love it, too. So don't worry about
little boo boos like that. It just doesn't even matter. It's okay. So we're back
to our yellow ochre. I'm using a 9010 mixture. O Hey, t section. Then we're gonna
let it dry. Good. Okay, let's start up here, and I'm picking up some
of this terra verte. I do a 955, probably. It's quite opaque. Y 955. Okay. And same thing, guys. We're gonna start
with our first layer L et me angle here. Econ Okay. And let's go ahead and
do this one down here. Oh. This first step can feel ale monotonous. It's a little quiet here. Sorry. But we're
almost through it. And then it's going to
take on a home new life. Gonna be great. We need to take a little break. Walk away for a
minute. That's fine. Hey. Let's let that dry. I'm to come back up here. We're gonna use a little
bit of this poker screen. You can see that it has a lot more vibrance to it, a lot more. Darker. So go gently. Gona go with a 955 on this. Again, it's gonna be up to
you how much you want to use. How green you want
your squash to be. A Oh, more. Second coat goes a lot faster, doesn't it? Thank goodness. Great. Let's let those dry. Clean out your
breast really good.
8. Flowers & Leaves: Picking up burnt umber and
just a very light wash. This is going to be
our base on our stem. 955 super light because we'll come back in with
just more burnt umber later on and darken them up. Let's go ahead and
wash in these stems. Remember they're going to
dry one value lighter. Okay. We're going to
add our pumpkin leaves. They're the ones
that are here green, two different colors
of green combined. We're going to use our
wet on wet technique. So go ahead and just use a water brush and base
that in with water. And then we'll
start by picking up our terra. Touching that water. Mine's a little dry, so
I'm helping it along. But it's still wet enough. Hey, we're just being
careful of the shape. Great. Now, we're
going to pick up a little bit of
this poker green. And I'm going to use this
side since it's darker, but choose a side that
you want to be darker. Since this was darker anyway,
I'll just go with that. And I'm just using an
up and down motion. I'm just gently
tapping in some color. And I'm going to let
the water take it. And it'll blend nicely. I'm just going to add a little water because mine's kind of d. Nice. Let's do it again. Again, I'm just doing this
on the pumpkin leaves, not the big colorful leaves yet. Oh, this is another
pumpkin leave. Add a little more water this
time and see if I can get it to move a bit. I have these hot
lights shining down, and so rise it up a
little bit faster. Right. Okay. Once you have the
shape that you want. And go ahead and
add your erg green. One side. Then if you need to neutle it a little bit
with water brush, go for it. Great. Okay, now we've warmed up
on the smaller leaves. Let's do our large
pumpkin leaves. They have sp Great. Okay. Last one. It's the biggest one. We should
be all warmed up by now. Hey. Great. Now, our hookers green. Notice I'm putting the dark
on the bottom sides here. It doesn't matter so much
on these 'cause it's gonna be filled in with a
lot of stuff around it. Oh. The water on my brush now. Beautiful. How to do. Let's pick up some of
our cad yellow medium. This is a 955. Cad Yellow medium surprisingly for yellow is quite opaque. It's prey strong. I need
a clean tissue here. We're going to do
our sunflowers. And we are just going to follow
the shape of the petals. Really straightforward.
All one value. Easiest to start at the tip and pull up towards the center, and then you can feel it in. You leave that center area. Great. Let's let that
fry a little bit. I'm going to switch to
my number six round. It's a bigger round
than the number four, and we're going to do our
other some flower petals, but I want to do them
more in one stroke. What we're going to
do, load our brush, and we're going to
to, press, and lit. You can do these curve. Pedal stroke, comma stroke, whatever you want to call them. These marks are made
with one stroke. And that's why I'm using
a bigger brush this time. And that's also why
I wanted to have the freedom with my pattern to I didn't want to be
locked in too much. So I just didn't indicator of where I
wanted the pedal to be, and that was it. Going over a couple
of them going over them a couple of times
to get that darker. Look. Hey, we got one
more to L uti over here. Great. Okay. And while that is
drying, let's go ahead. Should we do some
of our colorful? Let's do. Let's have fun with that. These are going to be. Let's start with some of the smaller ones
over here before we hit our big ones just
to get comfortable. So we're going to fill
it in with water. Lots of wet on wet in
this pieces in there. Now, the bottom portion, just pick one of your greens. I'm going to start with Hooker's green and just touch the bottom. And you can see how
it's going to grow. That's what we want
it to do. In the top, I'm going to go with this
beautiful yellow medium. And in the middle, I think I'll go with orange. Water there. There. Now, I'm going
to let those kind of mix a little bit
and see what they do. I'm going to pull this green up. So here's where
you can noodle it a little bit, but you
got to be careful. Otherwise, you're going
to end up with mud. So we want to keep the integrity
of our beautiful colors. I just wanted to pull
that green up a touch. Hey. Gorgeous. Hey, let's
do another one. Now, you don't want
these to touch, or they will blend together
'cause they're very wet. Make sure if they're
close together that you keep them separate. Green. And some orange. Ooh, so pretty. The yellow. He's the lemon yellow, too. But the cad yellow has
a lot of pigment in it. I think it gives nice. It blends well, it
has nice coverage. Beautiful.
9. Colorful Leaves & Flower Details: Oh. Okay, let's come over
and do a couple more. I'll go with a lighter
green this time. Verte. Orange. And then I did get out some
of the quinacridone red, which we will be
using on our berries, but I thought it'd be fun to start adding
it to our leaves, so Do you do you. Do what makes you happy. What colors make you happy? Some of you folks that
live in the Northeast have the most amazing
colors ever in your leaves. I'm so jealous. And so do what colors in your
area that make you. Hey, this is Tera Verte again. And I think I'm
gonna stick with. The orange. I the orange
on the tip this time. A touch to the red. I'm going to add a
little more orange here. Disappeared more than I wanted. Okay, let's come over
to these little guys. Isn't this fun? I hope
you're having fun. These leaves are the best. I'm gonna use some
hookers green. Hey. I go to go with. I think I'm going to
bring this red up here. Trying to always keep in mind the consistency of your
piece and to find balance. Now, there's too much water. I feel like this
is too much water. Just touch it with your tissue. And your tissue will
soak it right up. No, I'm just drip. There. It helping those
blend a little bit. Spots. Come up. I'm going around
that flower petal. And since I have a yellow daisy, I'm not going to use
yellow in this flower. I'm going to the orange. Tiniest amount of red on the tip Oh. Hey. Great. Now, I think we can come up. All right, I'm being careful
to go my little pedals here. Oh. Go in real careful. That's beautiful.
All right. One more. Oh. Okay. Oh, those are pretty. How are yours turning out? I hope you guys will
post your pictures. I can't wait to see how
beautiful your wreaths are. Great. Hey, let's let those dry. I've picked up my
number one liner brush, and I'm coming
into yellow Ochre. This is a 9010 mixture. And we're going to
add some detail work to our sun flowers. They should be
completely dry by now. If yours are not dry, don't do this yet
or go and dry them, and then do this, but we're just going to add
just some contour lines. Making different
lengths and curl them, follow the contour
of that petal. And always start towards the center point and pull
out because your line, this is a good example here. Your line is heavier where you
touch it, and then as you, you kind of automatically
lift up a little bit, and you want it to be a
nice, fine, beautiful line. It's okay to just turn
your board, your paper. But because of the camera,
and this is so big, I'm not turning
mine, so I'm kind of got my hand in the camera. Sorry. Okay. See how nice
that looks that added a nice to it and some depth. Let's go ahead and do our
other two little c here. I feel like you have to
spend a lot of time on maze. Remember, we're just filling in. These are all fillers, and in the big scheme of things, you don't need to
get carried away in the fine details of this reth. Especially if you're going to do the final step of inking, your inking is
going to take care of a lot of those details. This is just adding depth and dimension. Beautiful.
10. Yellow Berries & Acorns: I've switched to my
number two flat. And staying with
the yellow ochre. We're going to add these
yellow ocher berries. These are our smaller berries. The reddish ones, are going
to be a little bit larger. And an easy way to do berries, guys is to just touch
poll, touch pool. And it's nice to leave a
little white highlight. You don't have to. We're gonna come in with some
white and emphasize that. So again, don't get
caught up in spending a lot of time on the details. And go ahead and make these, you know, a variety of sizes. But again, we're trying to keep these on the smaller size. This is our base coat.
We're gonna come and glaze these with our gamboge. So don't feel like
you have to get these really dark
right off the bat. Alright. That's about
all I want there. And we're gonna come and
do this down here as well. This is why I just put a few
indicators of the berry. Helps me remember
where I want them, but also what size I want them. And yet now you can
see why it's okay to not put the pattern on
every single one of them. Now you have the freedom to just throw them in there
where you want to. And we're going to have some of them look like
they're overlapping. But we can add that those underneath ones a
little bit later, so don't feel like you have
to do it right now. Okay. Now, as I get
towards the bottom, I did the same up here, I do
them a little more loosely. I'm not quite touching, and just a few, not as many. A picture a bunch
of grapes hanging, and they get fewer and fewer
down towards the bottom. And that's okay. You want it to look a little more
free and natural? Great. Okay, have to do. Alright, sticking with
my number two flap and picking up some Burcena. I'm gonna water this down, take it to a 9010. Oh, such a beautiful color. It's this brownish, reddish. I use this a lot for
outdoor scenes for rocks, and cliffs, barns and
tree trunks, dirt. And now we're going
to use it for acorns. We're going to just
wash in our acorns. I'd like to start with the base. And since we're using
a 9010 mixture, that will allow us to come
in and do our shadows on it. So we're just going to come
in and do the bottom portion. And I'll show you why
in just a moment. So let's get these
six acorns in. Three more down here.
That was a little dark. If it goes in a little dark, just touch it with
your tissue, you can see it pulls it right up. This means my paint was drying. I needed to add more water. Great. Alright, now I'm going to switch to
my number four. And I'm going to
wash in the cap. But what we're going to do
is keep some of that white. So if you lose it, that's okay. But try to keep some of it. So just kind of wiggle.
That's a technical. Wiggle Wiggle. So wiggle
wiggle like that, and then same on the inside. And then we'll fill
in a little more on the outside and see how we end up with some
white on the inside. Because we are
going to come back with another layer of this, we'll glaze over it, and even possibly some burnt umber when
we do the bottom portion. We don't want to lose
that white highlight. So, yes, you can always add
white highlights after, but it's a good practice.
With water color. The best way is to try and
leave white highlights on your with the paper showing
through when possible. So that's what we're
gonna strive for here. Just kind of let
that hand wiggle. Color here. I love
the paint acorns. They're so fun and cute. Okay, we need to let those dry. While those are drying, and we have our number
four out or a small round, whatever you're using, Let's
come into our yellow ochre. And let's just do a
little bit of glazing. I'm going to use a 955, guys. So it's pretty thin
down, very, very light. Let's test it on
some paper here. Dark. Let's go lighter. This is why I always
try to test it. Better. And I just want to
add some depth right around where we're coming into
the center of this flower. We're going to add
that center now. And pull out just a touch, so it doesn't look funny.
There. I like that. And let's quickly just
add that on these others. Now, you determine if you want
this or if it needs this. You don't want to
lose that beautiful yellow of the sunflower. But these are kind
of tucked down in. They're underneath
these big pumpkins, so they're going to be
a little bit shaded. Now, we're going to
come in and pick up a little bit of this burnt
sienna while we've got it. This is going to be a 955.
We're going to wash in. Some of the center. And we want a lumpy
bumpy texture. So that's how we put it in, kind of an up and down motion. And I'm leaving the top
portion for a highlight. I'm coming with some yellow, and I'm leaving the bottom
portion for burnt umber. So kind of that mid section. And same here, let's
do our others. You don't have to
be careful or slow. In fact, Better if you're not because then it
looks a little more natural. Now, let's go ahead and
pick up some bird umber. This is gonna be a 9010 mixture. And I'm gonna go around butter. There we go. And leave
it kind of dotted. Picking up my 20 t. So
any fine liner that you have will be great coming
back into the Burn Sienna. A more of a 9010
mixture at this point. And we're going to add some
dimension to our acorns. I'm going to start
with an outline. It was a great time to make sure it's the shape that
you would like it to be. So basically, I outlined it. Now I'm going to add
some curved lines. I like that. No, I keep
going into that fern number. All right. And same
for the others. Now, when I say,
clean up your shape, this one's a great example. You can see how the body is too small for this big
old cap I put on it. So I'm going to bring
it out. I'm just going to make it bigger,
and that's okay. Here we go. To make that one a
little more round. This is the fun of watercolors, like I said before, there aren't too many mistakes
that you can't fix. So don't be afraid
of watercolor, enjoy it, enjoy the
process, and just relax. Everything's gonna be right. Hey, look good. We are gonna come in
and do a shadow there, so I'm just kind of not worrying about muddying
that up right now. Oh. Great. Okay. Now, let's come
into our boat umber. Sticking with a 20 aught. And this is a 9010 mixture. And let's add some shading. You don't want to lose that nice highlight that we've given it. Beautiful. Okay. And we
can go ahead and add a little bit shading
underneath that cap. Beautiful. Oh. Well, those look
great, don't they? Okay, let's go ahead and stem. On more. These acorns. When
you were a kid, did you take the calf off these acorns and use
them as a whistle? Put it between your
thumbs and whistle? Oh, I sure did. Great. Let's add the stems. No, off too much pain. Not much of a stem there,
but that's okay. O
11. Pumpkin Stems & Flower Details: A sticking with our 20 ought or fine liner and
our burnt number at 9010. Let's go ahead and make
sure those are dry, but let's go ahead and add
our detailing on the stem. Basically start with
kind of an outline. Make sure it's kind
of lumpy, bumpy. You don't want a straight line. And then pull up
some curved lines, almost cono line drawing
with your liner. Over to the other one. Again, this is a great time to make sure it's the
shape that you want. Pull up some of
those contour lines. Making it der
towards the bottom, where it would be more
invented and deeper. Great. O. Hey. Yeah, one more. Good. Hey, in our main stem. Oh Here we go. Now, notice I pulled up this
little tear drop right here. We are going to
switch to our liner, our one, and do some work. And I highly suggest
you practice this if you haven't
done them for a while, or if you've never done them. So we're going to use a ten And notice as I
pull up in my palette, I'm rolling between my fingers and pulling up to a fine tip. Pull through and lift, gives you a nice fine tip. And then use anchoring
with my finger as I paint, and we're just going to
do some scroll work. And you want it to look nice
and loose and comfortable. And so I would really recommend that you
practice that a few times. Before you start on your piece, but we are going to
just add a little bit, and I want it to
kind of be around this stem. There we go. And the key to those
is to not stop. Like, once you start, Oh, baby, keep
going. Don't stop. If you stop, you'll get
kind of a jerky feel to it. And you can do as many
or as few as you want. I'm just going to add probably
on these lighter pumpkins. And not on the green ones. So I'm going to leave that. Go for it. Oh. Deep breath. If you were holding your breath, take a deep breath. I know I was. That's okay. All right. Let's let those dry. I'm coming back to my 20 aught, and our flowers
should be dry now, but we need to take care of
the rest of that center. And I would like that to be a little mixture
of yellow and orange. This is a 9010, and obviously, we don't want it to just blend
right in with our flower, but this is going to
help our orange blend. So I'm just going to
put a few dots up on that highlighted area and
pick up a little orange. While that's still wet? Yes. See how that
blends together? A little wet on wet. Just
a little pop of color. These are background flowers. We don't want them to
make a huge statement. That one could make a statement, and that's obviously fine, but these little guys are just tucked in to fill in space. Now, we're going to pick
up some burn number. And we're going to
just add a few dots. These are tiny dots. You. Hey, let's do it again. Great. That looks great. Now,
it would be okay. I'm going to do
it here and there on these darker flowers that are tucked in to just pick up a little
bit of the yellow ochre. And I'm just going to add a
little more of an outline. You see how that just emphasizes the shading on the flower? You don't have to,
but I like it. There. So you can see the
difference between the two. So I'm going to go ahead and
add it on this one as well. If you do it, I recommend pulling from the center
of the flower out. As we discussed before, you'll have a nice finer tip because you press
harder when you first touch your lift as you pull out. A nice. Gorgeous. I goes on a little dark like that
one touch it with tissue. It's not a problem, no
stress, no worries. Nice. You know, I
like that so much. I think I'm gonna do
it on the big one. So it's up to you, what you
would like to do with yours. But I think I'm gonna go for it. God, I just like that.'s a little dark. I'm gonna touch it de lighting. Yep. 'Cause I need
more water over here. Just like that hint.
And remember that it's going to dry one value lighter. On more. Sorry, my
hands in the way. H. H to do.
12. Glazing Berries: Okay. Alright, I have picked up my number four
round and some gamboge. And this is going to
be Oh, a 9010 mixture. And gambos is crazy. It is very transparent, as you can see on
my palette here, and it looks quite
yellow on the palette. But when you glaze, it's really great for a glaze. You glaze over another color. It adds so much richness. So this is what we're going
to use to add depth to our berries that we've
done in the yellow ochre. And you can see how it adds
such a nice depth to them. Now, I am I don't know if
you can see this on camera. I hope you can. I'm only
doing three fourth the berry. So I'm leaving the top
portion yellow ochre. Because when it dries, it's going to look like
a little highlight. And that's why I like to use my number four round to do this. I have control over
where I can leave that versus a flat where it would be a
little bit trickier. Gorgeous. Hey, let's do these. Now, we will come back and fill in some of these white spaces. So it looks like it's
a bundle of berries. Is it a bundle? Bunch a
full bunch of berries. Very good. Okay, it's time for us to go ahead and
base in our red berries, and we are actually gonna base those in with yellow ochre. So we're gonna pick up But
these are larger berries. So this is still wet, so I'm gonna start over here. And again, I'm going to
start with my pattern ones, so I get a feel for the size. And I can just start
filling in. Oh. That Now, they come down to the bottom, I will be a little more sparse. I'm going to kind of
curve them a little bit. I have over there. Okay, great. Now, I think I can come up here. And now I'm gonna fill
in just a little more. Because these
berries are bigger, they definitely overlap, which is awesome. It
looks really great. Okay. Good. Let's let those dry. I'm going to stick with
my number to pick up some of this beautiful
QinQ in red, which looks fairly pink, but when you put it on top of the yellow ochre, it's
going to be great. This is the 9010. And we're also going to do a
glaze on top of it. So now, I don't want to cover
all of the yellow ochre. I'm going to leave a
little spot on top. And while that's still wet, I'm gonna come back
in with a wet brush. I just smooth that a little bit. This water on my brush. This softening that edge. And but I didn't lose my yellow
ocher highlight there. So Don't get discouraged, guys. We're at the messy middle. You hear artists talk about that all the time. The messy middle. It's to the point
where it's like, Oh, kind of doesn't look so great, but it's a necessary point
to get where we want to go. So hang in there. May not look like
a berry right now. Trust the process.
Trust the process. I'm gonna get you
there, I promise. This is the point where if you need to stand up and
walk away for a minute. That's okay. Go go grab a cold drink for a minute
and take a deep breath. And you come back with
a fresh perspective, or even just standing
back six feet and looking at it from
a different distance can make all the
difference in the world. So pse don't be discouraged. This is normal. We're at
the messy middle. Okay. Great. Okay. Let's go up
into our upper winds. Water. Just to soften that. Oh. Super. Now, I'm going to come in
with my number four, and we're going to
glaze on another layer. Now that this is dry. Make
sure you're just dry. Here's where we
get to shape them. Pretty them up. Let's make.
Leaving a little highlight, giving them some shape. Let them overlap each
other if they do. Now, we're not trying to
make perfect circles, guys. Oh. I'm just making a few
darker than others. It's for a low variety. Okay, great. Let's do the same thing for
our upper berries. If you're not dry, then go
dry them and wait a minute. Oh. Soft in this t. Oh. Here. Hey, how to go? I decided you might
have noticed. I decided to make
feel mint bit bigger. They were feeling a
little too small. I wanted these to be bigger than the yellow ones that
we did over here. Great. Okay, we're
gonna let those. O
13. Leaf Details: I'm switching to my
number one liner brush, and we're going to do
the veins on our leaves. And so I'm using
my hookers green, and this is a 9010 mixture. And we're just going to go Let's go ahead and
start at the top so we don't put our
fingers in anything, but we're just gonna go ahead
and pull from the bottom up and then pull out some veins. We don't have to pull very many. Just that indication is. Es I roll between my fingers and pull
that up to a fine tip. Ring at the bottom. Those of you that
are going to ink. We're going to go over
these with our ink. If you're not going to ink, then you might want to
use a little more being a little more intentional with
the value of your paint. Okay. So on the pumpkin
leaves that are green, you do want to have something
a little bit darker. We're doing green on green. A little less water. No. It goes so darker than you like, just touch it with a tissue. Go ahead. So it's a great
opportunity to add a little stem to these
floating leaves. And these main ones, I'm going to have come all
the way to the Pumpkin stem. Oh, I missed a
couple right here. Great. Okay. Now we can come back and just give
them a gentle outline. I'll tell you guys, on
one of the versions, when I paint these classes, I paint four versions, usually. And one of the
versions, I actually outlined them with
metallic paint, and it was so pretty. I did some gold metallics, some green metallic, some orange metallic
around the pumpkins. It was really fun to have
that little touch of blitz. Super fun. So something to
consider if you want to. Now, I'm doing this in a 955. So super ware down
because all I'm really doing is giving a
little bit of shape. And since I'm going
to be inking, it's going to mostly be covered. But for those of you that
are not going to ink, you're really going
to want to give some shape to your leaves. And so this could be
a fun step for you. And you don't have to be, like, exact on
your painted line. It's okay to add a couple of pointed tips on your leaves because we're definitely going
to do that with the ink, and it's okay to do it
with the paint as well. Don't feel like you have to stick to every
single outline. Let's just keep going and's stand a little bit
darker, there we go. Especially these
colorful leaves, they need to have a little
bit of a jagged edge. The pumpkin leaves, if
you've ever really looked at a pumpkin leaf,
it's quite smooth. This is a good time
to fill in any marks needed between your paint
and your pencil line. See how I added the jagged edge, and it goes outside of
the paint. That's okay. Oh. Well, how did I miss this little guy? You guys were probably on it
and telling me I missed it. Oh. Very good. Have to do. Okay. I think
we can come back in now and deepen our berries and add
some depth behind them. I'm going to use my 20 aught. Come back in with this gamboge, and I'm just going to add
a little more shading. Where it makes sense
where the berries are touching down
towards the bottom. Y. Okay. That's fast and easy and makes a big difference
when we glaze like that. We're gonna add
one more layer. A
14. Wicker and Twigs: We're going to add one more
layer on our red berries. I have taken Burnt Sienna
and our quinocritin red, a 50 50 mixture, 50% burnt sienna, 50% QR, and mix those together and then using a 9010
ratio with water. And that's going to give us
a nice deep shading color. You see how much
deeper that goes on? And we're going to
do what we just did with our gold berries and just add a little extra
mph where it makes sense. Oh. Beautiful. Hey,
let's keep going. Some of these are
a little small, go a little bigger. Great. How'd you do? I'm
taking my number four round and picking up some
yellow ochre at 9010. We're going to put in some little indicators
of the wreath, the actual wicker
wreath underneath. And you might wonder, gosh, why didn't we do
this to begin with? It's because this
is just a filler, and we didn't want to have
to paint on top of it. So we're just going
to in bare spots. That's too dark. Just lightly, put some wiggly squiggly
lines that just indicate a wreath. Going in a circle. And we are going to come
and do a wash on top of it. So if it looks kind of sparse, don't worry. It's okay. First, let's start
with these lines and let them dry because that way when we do our wash on top of them, they'll
show through. Trust the process. Remember
to keep them rounded. We're making that wreath. Wait, I'm just
adding a few more. A Good. Now, we're going
to let that dry. I'm switching to my
number one coming back into the yellow
ocher at a 9010 mixture. We're going to just add
some twigs that come out. And the best way
is to treat these like tree branches if
you've painted trees, and you're going to just
I'm holding the brush at the tip the end of the brush so that you
have a nice loose stroke, and you're just
going to flick it. We're just going to
add some little straws that are coming out
on this wreath. It's up to you how far you
want them to poke out. I'm going to again, I'm holding
it back at the tip here. You can decide how
many you want. I would say err on the side of caution
and start with a few, add more if you want more. These are just meant to fill in, make it look nice and full. It goes on dark. Touch it with your tissue
to lighten it up. Take a deep breath, if
you're holding your breath. Now, for the most part,
you can see that I kept them going in
this direction. The exception is
this one right here. I'm just keeping with what we're doing with a V shape here. And here at the top, just bringing some out to add some fess right here.
That looks great. Now, if you wanted
to, you can even add a b or two on some of those. I'm not going to, but I'm just letting you know that is
something you could do.
15. Adding Vines and Contrast: All right. Now, I'm staying
with my number one, going to pick up some
of the darker green, the hookers green and 9010, actually a 95 a 95 over here. And I'm just going to do
kind of a fake eucalyptus. I'm just going to
bring a vine down. And touch, touch, touch, touch. I like that. And you could use either green if
you want it to be lighter. Show it to be lighter in case
that's what you want to do. So, here's our terra verte. I test it out on your
paper, see what you like. Now, these, again, I would keep the motion of your wreath, like things going in
the same direction. Oh, I like to start on
the inside with these. And once you start
pulling, don't stop. You want a nice
smooth looking ne. There you come. You can make them as long or as short
as you would like. And I'm just going
to do a few on the inside. Of you
on the outside. On the outside, I will
probably do some devils. Two. There's a lot going
on down here. I think I'm actually
just gonna pull one up this direction.
That went on too late. And I don't want to
be Matchi Matchi, but Maybe I'll do two over here. Yeah. It's a great spot.
Here. This is one of my favorite things to do this adding leaves little fillers. It gives it such personality, and it really draws
it all together. I hope you're enjoying
it as much as I am. I'm gonna do too right there. And I love it because there's
no pattern for this part. It's just you're free. Do it. Feels good. Feels
right in a moment. I don't think I'm gonna
do well. You know. Yeah. That feels great.
Hey, how'd you do, guys? That was fun. I want to do more. Okay. We're going to
take our number four, pick up some of
this yellow ocher, and we're going to
water it down to a 955. And now we're gonna come over
this wicker that we put in. And just gently. You don't want to do away with all the marks
that you made, but just gently go over them with a glaze and in
between these berries, so that you see now, like compare it to
this, you see now that it's a wicker base. So this is where your wreath
really becomes significant. It takes shape. It gives
it a solid foundation. And yet, it's going to
stay in the background. So you want to be very
aware of keeping it round and uniform in thickness? Not much room here on these
red berries, which is fine. Notice I'm not
touching the berries 'cause I don't want the red
to come out onto that licker. So be really careful. I'm looking. Let's let that dry. Okay, guys, we are almost done
with our painting, and we're at the point where I highly recommend
that you step back a good six feet and take a
look at it and see if there's anything you want to add
or change or enhance, squint your eyes,
see if you have a good contrast between
your lights and your darks. And as I have done that, I don't have enough contrast
here or on my greens. And so I'm going to take
just a moment quickly and add a little bit of
glazing on my pumpkins. I'll leave that on the camera here so that you
can watch me do it. If you don't need to
do it, don't do it. If you would like to do it
with me, great, do it with me. But step back and see
what your piece needs. Now, I'm not going to do all the little strokes because
this is a light glaze, and all those strokes will
already show through. I'm just enhancing the value, the color value of that orange. I just want it to pop
a little bit more. I'm using a 955 mixture on this. Keeping in mind it's going
to dry one value lighter. Yeah, I like that better. It's great. We are going to come in and
add some highlights. Okay. And then same
thing on the green. I'm just going to pick up a 955. I'm using our Hookers green. Oh, yeah, I like that. Is going to make that pop a little bit. E, great. That feels better. Let it on the other one. Or you could have a dark
one and a light one. On the street line.
There are you? I'm just gonna go ahead
and enhance this. Oh, my. Right? I like that better.
16. White Highlights: Alright, we have let
this dry completely. And before we can ink, we need to add our highlighting. I'm going to be using doctor
Martin's bleed proof white. And if you haven't
used this before, it is white ink, but it's a paint
like consistency. And this jar will last
you probably a year. And throughout over time, it's going to thicken
up, and that's okay. I just add a few drops
of water and use me in my brush and stir it up real
good. And we'll get you go. You can thin it on your paint
brush using some water, or you can keep it
thick like this. And you can see just from my sample paper here,
it's very opaque. You can't see what I have
painted underneath through it, and I love using it
for that purpose. Now, if you don't have
this, you can use white gh. That would be fine. You're just not going to get
as strong of a highlight. So this is what I'm
going to be using, and I always put it on a piece of paper
rather than my palette. Mostly because I like to keep it really close to what
I'm painting on. It's just handy. Make sure
you have a clean tissue. Now, we're going to be doing dry brushing if you've
never dry brushed before, I'm wiping off everything. That is picking up pure paint
without water on my brush. Is picking up paint, and then you're actually
wiping most of it off till your brush is pretty
dry, and it goes on. Let me see if I put
on something dark. Can you see that? So
it looks almost like a whitewashed side of
a barn or a fence. You get that grainy
look through it. It looks very dry. It's
called dry brushing. So that's what we're going to
do is some dried brushing. And let's start with
something. You know me. I like to start in
something that's easy until you adjust to
it and get used to it. So I am using my number two lat. And I'm just emphasizing the highlight on some
of these berries. Not all of them,
but some of them. And you can see it just
gives it a nice little pop. And let's pick up again
and wipe off, wipe off. And you can add some to
the petals on your flower. You can add it pretty
much anywhere you want. I'm not going to add
it to my leaves. But I will be adding
it here and there. Now, I'm turning
notice my brush. I'm not using the
flat edge here. I'm using a chiseled
edge on the side. That's why I love flats. They are very versatile. You can use all different
techniques with them, but I want more of a
streaky look here. And I now I'm going
to use the tip, just the corner,
and I'm going to add a few dots on the center. Do that. Three different strokes with one cute little brush. Okay. And same
thing on our acorn. I'm going to do dry brushing, using the flat in the middle. Not too much. You don't want
to get too carried away. Now, if you lost your
white spots in the cap, this is a good time to go
ahead and put them in. I'm okay with M. I'm going to leave
them the way they are. I don't want too
many white spots. So now I'm just going to add
a few highlights in there. Okay. Okay, moving down the
line here to our squash. Obviously, we have this ring that is kind of our highlight. I'm coming up to
a chiseled edge, and I'll do a little combination
of chiseled and flat. But we want to try and
keep that cono look, and we're just emphasizing
where the light might hit it. I come over here. Lady. H on. We're halfway there already. Highlighting is fun. Add a load of character and
life to your key. And this white, adding
it as dry brush like this is going to dry
a little bit lighter. So if you want to
come back and re emphasize something,
you definitely can. If your local hobby lobby or
craft store doesn't carry, doctor Martin, you can
definitely get it on Amazon. That's where I usually get it. Econ. All right. I would say, step
back, take a look, see if you have the strength
of highlights that you want. If not, add anything else in. And before we move on
and take that next step. Oh
17. Inking Part One: I have stepped back six feet
and taken a close look. And the only thing
that I changed, just so that you're
aware is I added a little bit more burnt umber
to the base of my stems, just to darken
those a little bit. And I added a little
bit more burnt umber to the bottom side of the
center of my flowers. So everything else
you saw me do, and I hope that
you took a look at yours and decided what
you wanted to do as well. So now I have pulled
out my ballpoint pen. It's a Muji fine tip pen MU JI. You can order these on Amazon if you can't get them
locally at your store. But basically, any fine
tip pen is going to work. There's a lot of markers
that work as well. The key is guys to make
sure it is waterproof. So literally, I want
you to test it out, do a sample on your paper, let the ink dry completely, and then come back with a brush and paint on top of it and make
sure it doesn't smear. And you might be
like, Well, Care, I'm done painting.
Why does it matter? Well, it doesn't, if you're
sure you're done painting, but let's say you ink it, and then you live with it for a day or two,
and you're like, Oh, I just want to add a little
bit of highlight there or a little an extra
berry or something. If you have ink on that's
not waterproof, guys, it's going to go, ph, and it's going to ruin your
beautiful artwork, and I would feel so sad. So please make sure
that your ink is waterproof right from the get go and you'll avoid any problems. Now, I am going to I do a
very loose style of inking. And I don't even attempt to stay on my painted
lines for the Vose part, just so you know,
I like that style. I feel like, and I'm not going to do every
single vein either. I'll just do the main
one in the middle, and then an offshoot,
and that's it. Because we've already
painted it in, and I don't want it to
look too cluttered, but I like that loose
style of inking. That is my personal preference. You guys do what you like to do. If you're very refined
and you want it to be exactly where you painted
your lines. Great. Do that. You know, Do what
makes you happy. And feel good about
what you're doing. So I want you to be free to do whatever
feels good for you. That's all I'm going to do
for a pedal just so you know. Make sure that you're
curving your lines. I loved inc. You can see how that makes it
stand out and pop. And you have the freedom to make little changes or additions
or whatever you want to do. Now, for the pumpkin leaves, same thing, I'm going
to go up the vine, and then just two and your
paintings to the rest. O. Just like that. Okay? Now, for the berries, I typically do a let me
find that, I can do this. I typically do one
or a double circle. Do what you like, test
it out on your paper. God, one and some of these that only half,
and just do a half. And you don't have
to do every berry. In fact, if you do
every single berry, it's going to be too. So just get the ones that are kind of high points for you. That's probably all
I'm going to do on that whole section right there. Okay. Now on the squash, we need to be a
little more careful as far as our shading. I like to start with the stem. I stay a little more
tight with this one because the contour lines
are pretty important. And then from the outside in to make sure I remember
where all of our creases are. That's going to help
keep me in line. And then from the base, I'm going to curve, see how I've made a little
curve this way. I'm going to curve those lines up and then straighten them out. And then from over here, I'm going to curve
them up the other way. This is really
important guys to do contour lining to
bring those curves up. I'm going to turn my paper. Same thing here and here. You do that right
from the beginning. It's going to help you
remember. Brings up straight. Then you can fill in more
or keep it really loose and just have a few here. I like to have more on
the curved portion, where it would be a little more shaded and fewer in
the center area, where it would be
more highlighted, the sun would hit it more. Great. Now, once we have the outline for the base or
the shading from the base, then it from the top. I don't bring the line
all the way down. I keep where it's highlighted. I keep it disconnected. Just a little indicator. It's going to help me with
my lines that I put in. But again, you can see
how these are going to be c. Just turn your
board as you need to. Great. Now, we have
a great start there. Now, for the outside, I'm not going to go
loop de loop de loop. I'm going to kind of soften that invent. Can you see that? Definitely going in. I'm just softening
that a little bit. There we go. All right. Now, that's one line. I like to do two,
sometimes even three, because I like that look on
these. They're broken lines. They're fairly close
together, though. There. Now we can look at it
and say, Okay, well, Care, you made those all the same
lengths because I was so focused on just getting
them in the right spot. Now I can come in and just add one or two
that are longer. Let see how that breaks it up
a little bit. Play with it. A longer on the outer edge. Good. Okay. Now, if you're
happy with that style, that's what you can
do on the others. If that's too much, then don't do as many
lines. It's up to you. And for the stem, I'm just going to follow the painted lines that we put in, just kind of wrap those
up a little indicator, and down here where it's darker, I'm going to put more
lines closer together. L. A. Let's move on. Now, on these, we can
be very forgiving. F. A ready. Here we go. Oh. Oh This green obviously is darker than the
last one we did, so I'm not using quite as many ink lines
if you haven't noticed. 'cause I don't want it too dark. Great.
18. Inking Final Phase: I forgot to do the little vine, the little spy thing, so I'm
gonna go ahead and add that. Man, I love these red berries. When we mix them with
that burnt sienna. That just really makes
them rich and deep. Now, please don't get hung
up on making him perfectly. It will be distracting.
It's impossible. We're not perfect. And art is not meant to be
perfect like that. It's meant to be artistic, so just go for it. And if you have one, like this one's pretty misshapen, so you know what I'm gonna do? I'm going to just
give it a couple of worlds and same with the ones around them,
so it doesn't look off. And that's okay. There. Alright. Here we go. As. Ooh. That was fun. The scroll, same with the
pen as as when we painted. What just start? Don't stop.
Just keep on and going. Don't forget these two
little bumps in the back. Otherwise, your pumpkin
will look flat. Oh. Oh Cute. Cute, cute, guys. I'm coming up to the
top and I'm acorns. And I'm not even doing a
total outline on those, just hitting a few of the
bumps at the high points. Same at the low points. And
nothing in the middle there. Doing a broken line there, and then just a bit of lining down at the
point where it condenses. These are so fun. I have
a really fun acorn p ice. If you like doing acorns, it has acorns and maple leaves that are really colorful.
So fun with you. It's here on Steel
share. Here we go. Done with those. That's it. He? Well, let's do
these, while we're down. While we're in the acorn mood. 00 Alright, let's come do some
more red berries. Now, because I did
double circles on these, I'm going to do the
same up here so that it matches. Besides it's fun. Anything fun, we have
to do more than once. That's a rule. Okay. Let's come up and do this.
Let's slash here. And help me stay straight here. Oh. Oh. Oh. Last pumpkin. Oh. Katy. We're almost done, guys. Oh Oh O O. T. I'm going to do there.
Keep that trail going. Okay. Go ahead and step back six feet and see if there's anywhere else you
want to add inking. Well, I step back six feet,
and guess what I saw. Two little leaves right
here that needed. Oh, this is why it's
always good to step back and observe your
work from a distance. There we go.
Alright. Well, guys, thank you so much for
taking this class with me. I know your time is valuable, and I really appreciate you
showing interest in my class, and I hope that it was
fun and enjoyable and that you learned something or sharpen the skills
that you already have. Let's sign our name. Always claim your artwork. Be proud of what you've
done and sign your name, saying, Yes, I did this. Always remember that
you have a talent, you are gifted, and most people don't know how
to do this kind of thing. And so keep cultivating it. I'm super proud of you, and I will see you
in the next video.
19. Fall Wreath Congrats & Bloopers: Well, congratulations, guys. I'm so excited for you and so proud that you
finished your project and walked away with a beautiful fall wreath
to display in your home. You know, you could also reduce
this size and use it for some fall cards or use just a pumpkin or just a
portion of the wreath, the top part, and put it on some table placements
for your holiday tables. There's lots of things
that you can do with this. You can pull it apart and use just little pieces of it.
So I hope you enjoyed it. You know, if you felt
like this class was a benefit for you and you know someone else
that might enjoy it. All you need to do is look for this link that's on this
page of Skillshare, and you can send your friend
or family member this link, and there will be a benefit
for both you and that person. That's pretty cool
from Skillshare. Also, if you would like to
take another class from me, you just need to go
to the search bar and type Carrie Sanders and all the classes that
I have will populate, and I'll tell you, I've got
a lot of fun holiday classes that are all ready for
you and more on the way. I'd love to have you join me for another class. Thank you. Also, if you and mind just clicking this little follow
button, then that way, you'll get a little
key in your e mail box whenever I publish a new class, and you can see if that's
of interest to you. And it would be fun for to
take the class together. Lastly, if you would like to see what I have going in
my personal art life, then you're welcome to
take a look at my website, which is Carrie Sanders art.com. And also on Insteel, which is at Carrie Sanders Art. And I would love to be able to communicate with
you back and forth. And honestly, the best place to communicate is right
here on Skillshare. All you need to do is snap a pick of your work and look for this button on this
page of Skillshare and upload it into
the class gallery, and I get a notification
right in my box, and I always respond. And I would love to
talk to you there. I would love to
tell you how great your artwork is or answer
any questions that you have, and we can communicate freely
right here on Skillshare. All right, guys, thank you so
much for taking this class. And until the next time, I guess it's time for bloopers. All right. Take
care of everyone. See you later. I'm not on. I need to turn it on, turn it on, turn it on. Okay. Breathe. Here we
go. I'm proud of you. You have finished your project, and you've walked away with a
beautiful fall a beautiful. Oh, you're a clut
sometimes, girl. Put it together. Don't ever put a little kid at heart
in a rolling chair. Come push me. I do
someone to push me. Oh, my gosh. I'm so
silly sometimes. Don't worry, my
grandkids love me.
 Kerrie Sanders, Artist, Teacher, Creator.