Transcripts
1. Welcome: Well, hey, everyone.
Welcome to my studio. My name is Carrie Sanders,
and I'm an artist, a teacher and a creative here in beautiful Farmington, Utah. It's getting chilly outside. It's that Chris
Harvest time of year, and so I have
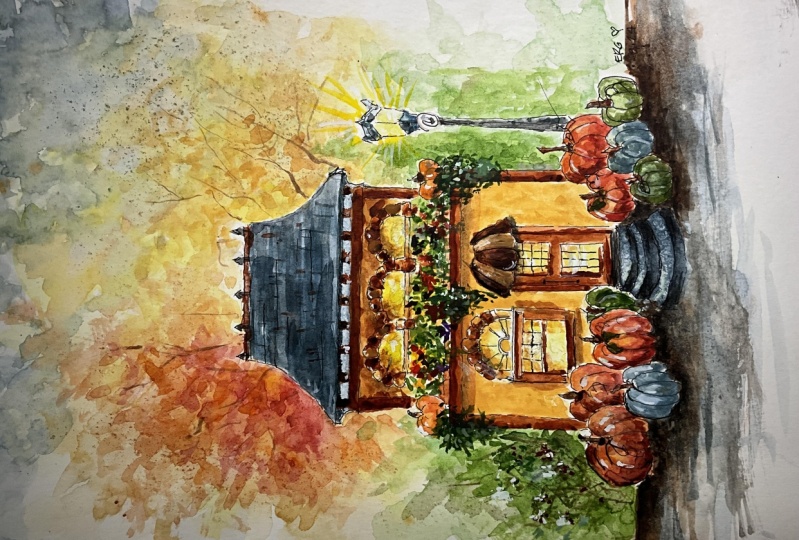
created a beautiful, vibrant, colorful pumpkin house. And this is done with
inking and then watercolor, and then a little inking
of the details afterwards. Guys, this is a piece for
everyone of all ability. If you've never painted before, you're still going to have a great outcome with this piece, so it's great for beginners. If you're great at painting, you're going to relax and enjoy the process and have a
beautiful outcome as well. I would love to have you
join me with this piece. We'll be doing
washing and glazing, a little bit of wet on wet. So splattering. You know
me. I love the splatter. And, of course, the inking
is the bulk of this piece, which is really fun and
relaxing as we do it together. That's the thing about
my classes, guys. I film them in real time, which allows you
to be in control. You can speed up the videos. You can slow them down. You can stop and start them as needed. I want you to have the best
experience possible for you. You know, I've been teaching
for many, many years. I've had lots of
students over the years, and I know that it's
really important for you to be able to relax and enjoy and have fun
during the learning process. I was fortunate enough to be picked up by a Big
Box store and have my pattern book published
and sent across the nation along with
some pattern packets. And I've also entered art contests over the years
and won awards for my art. I only share that
with you so that you understand my deep love of art and my deep love of
sharing it with others. I truly enjoy being a teacher here on
skill sharing and it's such a privilege
for me to be able to share these classes with you. I've put a few of my classes
up here on the board to kind of tease you a little bit
since it's holiday season. And all you need to do to find me here is go to the search bar, type in my name, Cary Sanders, and all the classes that
I have here on Skillshare will populate and you can see if something is
interesting to you. And of course, more
classes to come. If you wouldn't mind clicking
the little follow button, then you'll get a little
king whenever I pop out a new class and you
can see if that looks fun for you
to take as well. All right, guys, I am really anxious to get started
with this class with you. So if you would like to join me, then let's hop into
the next video where we look at the project, and we'll take a
look at supplies.
2. Class Project: All right, my fellow
friends and artists, Your class project
is to complete one beautiful autumn
pumpkin house. And you can do that by following
my videos, step by step. Remember that you have the
ability to stop and start. You can speed up,
you can slow down, whatever you need
to do with those videos to make it the best, most comfortable
experience for you. Each of you is unique
and you're going to be able to tailor
that just for you. When you have finished, if you could take a moment and snap a picture and upload that into our class gallery by
looking for this button. Then that will allow you and I to communicate
easily together. I get a notification when you do that, and I
can go right in. I can also make
comments on your piece. No judgment here,
nothing but love, but I'd love to be able to comment on your finished pieces. And it's so fun for us as students to see
each other's work. You know, it's kind of
like giving each other a cake or a casserole recipe, and they all turn out different even though we use
the same recipe. It's because we're unique. It's because you're talented. You have your own
special abilities, and I'm dying to see
your finished pieces. So please take a
moment to share. I'd love to see them.
All right, everyone. I will see you in
the next video, where we look at our supplies and our pattern application, and we dive right in.
3. Supplies & Palette: Let's give a quick
review of our supplies before we get started on
this beautiful piece. First of all, you're
going to want to print out the pattern that's on
this page of skill share. And once you do that, you're going to need to trace that onto some tracing paper, and you'll want a piece of graphite paper handy so
that we can apply that, or you can use a
lightbox if you prefer. And I'm going to be using hot press watercolor
paper for this. You can also use cold
press. It doesn't matter. Hot Press just has a
little smoother surface. The most important thing is
you're going to want to use 140 pound watercolor
paper or better quality. You want to use a really good quality watercolor paper so that it can handle the expansion and contraction of
the watercolor. It works well with your brushes and the water and the
paint and everything. So you want to have the
best outcome that you can. And watercolor paper is more important than your
paints or your brushes. So really treat yourself to
some good watercolor paper. As far as brushes go, let me give you a white
background so you can see these. You're just going to
want a nice variety, whatever you're
comfortable working with. I'm going to be using a
couple of flats today, a medium flat, a couple
of medium flats, actually, and a smaller
flat for those tiny areas, those leaves, and whatnot. And then I'll also be using a wide variety of rounds, a six. Of course, my number four. You know that's my favorite. And then you're going to
want a few liner brushes. This is a number one.
I'll be using this a lot. And these are just tiny, fine line detail brushes. So again, I don't want to tell you to go out and buy
a bunch of brushes. I want you to use whatever
you're comfortable with, and that will be just fine. And so just pull out that. And then for inking today, I'm going to be using an 03, so a fairly fine line. The most important thing for your inking tool today is to
make sure it's waterproof. I want you to
literally test it out. Go ahead and make
some inking lines, paint over it after it's
dried and see if it held fast for you or if it
bled a little bit or smeared, then you need to find
a different tool. So make sure that you do that. And, of course, my favorite tool always our handy andy tissue. We'll be using a lot of fat, and you'll need a
palette and something to hold your water and
some shop towels. Now, let's go ahead and
review our palette. Alright, let's go ahead
and review our palette, and then we can start painting. I know we're anxious.
I'm actually using a few more color
values than I usually do. And you can choose
to do that or not. So I'll review what
I actually used and feel free to substitute anything
that you have at home, I don't want you to feel
like you have to go home, go out and buy a bunch of
paints. And so here we go. I'm going to be
using buff titanium, Naples Yellow, lemon yellow, pad yellow medium, gamboge, yellow ocher, orange, Cad
red light, brown matter, Burnt Sienna, Burnt
umber and erraerte, Hookers green, cobalt
blue, and Indigo. And then, of course,
I'm going to be using the blue proof white. So go ahead and gather
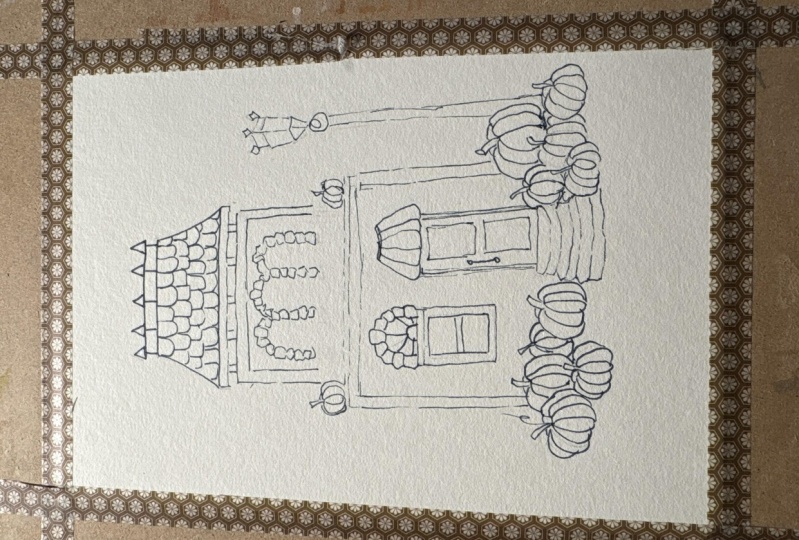
your supplies, guys. And in the next video, we will apply our pattern.
4. Pattern Application: I'm going to go ahead and show you how to apply the pattern. If you already know how, you can just fast
forward through this, just click that little button on the bottom left hand of
your screen and you can fast forward or even just
skip to the next video. I have printed out the PDF that I have provided for you on
this page of skill share. And then I traced it onto
a piece of tracing paper. And I wanted to show you the finished piece compared
to the pattern I've provided. And this is so that we can
just free hand some of these loose areas that you don't want to put
the pattern in for. It will be really stilted
and be very difficult. And that includes this line here that we will fill in with some pretty
flowers and leaves. We want to be able to
free hand those in. So don't worry when
you see that it's not exactly like the finished
piece. That's on purpose. I've taped it down in two spots. I mentioned that because I
don't want it to wiggle at all because we have a lot of straight lines we're putting in. Normally, I just use
one piece of tape. I'm going to use graphite paper. You can also use a light
box if you prefer. Graphite has two sides. So make sure that you
have the correct side facing down and just lay that under your tracing paper
and you're good to go. I'll be using a
styles and that is so I can protect the
integrity of my pattern and we use it over and over and I don't ever
have to trace it again because tracing it is kind of a pain,
isn't it, guys? So I'm going to go ahead
and speed up the camera now and we'll go ahead
and apply our pattern. I'll see you in just a moment. Once you're sure you have everything the way you
would like it to be, go ahead and remove
your pattern, and I will see you in
the next video where we are going to dive
right into. Oh.
5. Inking: Who's excited to
start inking? Me? This is such a fun
relaxing piece, and I hope you
enjoy this process. There's nothing to stress over. I am going to be using a
fine point permanent marker. This is a three t, and three. So I want it to be not super super fine lines,
but fairly fine. And I think the important thing, guys is to make
sure that you have something that's
completely waterproof. So whatever you use, I mean, you can use a ballpoint pen. That's totally fine. But we are definitely going
to be doing a lot of watercolor work on top of our marker since
we're inking first, and so please please. Test out whatever tool
you decide to use, and make sure that you're safe. I would be so sad if you did
all this beautiful inking, and then you put some
watercolor on top of it and it just went and ruined all
of your beautiful work. So please test that out. Okay. Thank you, Mom. We end up said, as
my kids would say. Thank you, Mom. I'll leave it
alone, and I'll trust you. Now, a great way to ink these is you can see I'm
doing a lot of broken lines. If you try to do just perfectly
straight smooth lines, it's going to look like you tried to do
straight smooth lines. Does that make sense? You want it to look hand drawn. You want it to look like art. Not like some perfectly
measured piece of architecture. There's a place for
that, of course. I'm not very good at
that, I will be safe. I do house portraits, but I also hand draw him. So anyway, I find it best to use do a lot
of broken lines, even little ones like
that, and then a long one. Oh, see, I've got
caught on something. My marker caught on something, and it went a little
Kitty wampus. And because we're
doing it, right there, because we're doing it as a
hand drawn piece, it's okay. It doesn't matter. Who cares? Now, if I'd have been
trying to do it, like, perfect, and then I have
whoop, this little whoopie do. That would have been a problem. So one of the reasons that I really like just
doing it and wrong, it's not to say that I'm
not being really careful. I'm trying to stay on my lines, and I'm trying to do a good job of keeping my lines straight. Okay, let's take a deep
breath. Ooh. Okay. Be careful to breathe and
enjoy the process. No stress. Now, where we're
running into down at the bottom of the
side edge of the house, we're going to run into
bushes and pumpkins. Just be careful where you end. You can always come
back again and add a little bit more
to the bottom edge, but we top to hide it
because you go too far. We always look
where you're going. All right. And we
are going to curve slightly curve the
edge of these bricks. I'm actually gonna bring
these lines down first. That makes it easier to match
them up on the bottom side. You know what I mean? Oh,
it's getting cute already. I notice I'm not putting
the bottom on there. It's gonna run
into some flowers. Oh. And do a very broken
line along here, because this will have
a lot of flowers on it. This is barely gonna show. Oh. I actually created this pattern from
a house that has a historical home in the mountains where I went
and took an art class, and it's such a cute house
that they've converted into this art studio
and art gallery. I'll have to show you a picture. I'll have to dig up the picture, and then I just changed
it quite a bit. But it's good to show you how you can get
inspiration from actual things that you see on your vacations or the experiences
that you have in life, and turn them into some fun
art projects for yourself. Oh. Yeah, these lines here, if by chance you put
them in kind of crooked, fix it before you like
this one is crooked. And you want it to be nice
looking for your windows. So make sure you
ink it correctly. Sometimes, no matter how hard we try with the pattern
when we're applying it, it just goes in a mp. Windows, you kind of want
them to look the right way. Now, notice I didn't put the grid in that goes
on the window pane. It's because it's
too hard to paint around those little grids. We'll paint the window first, and then we'll come back and in some of those fine details in. Same for the grid that's on
this window here on the door. You wouldn't want
to try and hang around all those little panes, those little window panes. I'll see how my pattern,
I did it crooked. So I'm gonna fix that right now. Ooh. Take a deep breath there. I was definitely holding
my breath there. I wanted to make sure. I'm gonna bring my
pattern over to make sure 'cause some of these go straight down and some go out, right? Wh the stairs. I want to mess that up. It's gonna go down. Out out. Down, down. It'll make more sense
once we start painting, and we can add that shading in. There we go. Ooh.
How'd you do there? Oh. Who said tracing was easy? I don't think so. I think free handing can be a
lot easier sometimes. Now, this is gonna be
covered with flowers. So I'm just gonna do kind of
a dotted line on this pole. We're just gonna let it show
through here and there. But we don't want to make
a big statement with that. Hey, it's pumpkin
time. Here we go. Now, be careful which
pumpkins on top of which, so make sure you're
stopping your line. It might be better. Let's start with the front ones actually. That way, we don't have to
worry so much about it. I'm going to come down
to the front here. See how that line needs to go. This needs to be in
front of that one, and that's why I stop
that line there. Oh, all the things
we have to think of. Once we get these front
ones in, we're good to go. Oh. Not going to ink in the leaves
and the scrollies. Those things come in
a little bit later. We have one more. Hey. Other side. Let's start in the front. Great. Kind of wiggle those fingers, and we're gonna go ahead and get started painting next. Oh.
6. Background Trees: Okay, guys, here we go. I have on my palette,
Indigo blue, cad red light, cad
yellow medium, orange and yellow ochre. And so that means
we're going to do our background first and
work our way forward. I also have handy
tissue that's already broken into a couple of squares
folded over, ready to go. I always have it in my hand because we're going
to be using it a. Now, we are not going to do wet on wet for
the background, as you might have thought, but we're going to do glazing. Glazing is when you layer a
value on top of a dry value, which creates a new color. So we're going to start
with Cadello medium. We're going to
throughout this class, I'm going to give you
ratios of paint to water. And so I'll say, Hey, this is a 9010 mix. That's 90% water, 10% paint. And so we're going to start with a 9010 mixture of
the Cadilla medium. And we're going to now, we're going to have a
little bit of a tree here, so start about there
and just pull it up, be careful not to
get it on the house. Okay. While, it's still wet. Just pick up some water,
just water on my brush, and I'm just going to
jog it out a little bit. Make sure we don't have
a hard edge there. Great. Now, notice I'm holding it at the
back end of my brush. Let's so we have a
nice, loose movement, and we're going to start softening as we move out
away from the house. I just keep picking up water. I'm not picking up
any more paint. And we want it to start looking a little
bit more like a tree. So be aware of your shape, so tall at the top, have it come in, make
it go out again. Maybe there's a
tree branch there. And a little bit
lower to the ground. It's not going to be
quite so far out. And then down here
at the bottom, I'm going to soften
that completely. I'm gonna touch it
with my tissue, just blot because I want it to blend in when we
come in with that tree. I'm softening it some
more with some water. Nice. Now we're warmed up. We're going to come
and do the same thing with yellow ochre. I'm going to use
that 9010 mixture. And if you look at
the finished picture, we have this greenery
that comes here. So let's start it up
a little bit higher. Maybe up here. Pull it
down a bit, being careful. And we're going to leave some
room for that indigo blue. So we don't want to come
up super duper high. But again, we want to kind of
be aware of tree branches. Just hold it at the end. Softening that edge out edge. And I'm going to lighten it up. Lighten it up by touching
it with your tissue. I want my lantern to
glow a little bit later. We'll do that. So I'm just
going to touch it with tissue. Lighten it up right there a bit. I'm going to add a
little more here. Now, I want to add
a little shape. Hey, we're going to leave
space for our greenery there. Good. Okay. Now, we can take a little bit
just at This is probably 955 little touching here of some leaves that are just
going to be floating. And if they go on a little d, just gently touch them with
your tissue to lighten up. Good. And let's come over and do that with our
cad yellow medium as well. When you see me touch my tissue, I'm just pulling a little bit
of that water off my brush. Oh, yeah, I like
that. That's funny. So I'm just kind of
bouncing my brush. I'm just adding a few
of those little leaves. Just gently lifting off, touch of that pigment. Nice. Hey, let's let that dry. For those of you that have
never painted before, I should have mentioned
this earlier, you're going to want to tape your paper to some
kind of board, any kind of board that
will hold it flat. Because as you add
water to your paper, your watercolor paper does
what it's supposed to do, and it absorbs that water. It's going to make your paper kind of ripple a little bit, and you want it to stay
as flat as possible. And as it dries, it will flatten out again. But tape it down to
something as you're working. Okay. We are completely dry, and just as a matter of info, I dried mine with a hair dryer. You can dry it with a heat tool, or you can just let it air dry. But I was anxious to get going. I just want to keep
going, so Alright, let's pick up some orange, and this is going to be a 9010 mixture using my
number six brush again. And we're going to do a glaze. Again, a glaze is putting a layer of paint on
top of a dry layer, which creates a new value. And so wait till you see what happens when you put
orange on top of yellow. It's so beautiful. Now, from here on,
I'm going to be picking up water on my brush, holding it the top again, doing the little wiggle wiggle, just to get out and blend it in. And keep in mind, we're
trying to make trees here, so we don't want it to look like a fire. Which can happen. Oh. When I'm preparing for a class and
designing something, I literally paint it
you know, three, four, five times, and I'll admit to having a few
fires behind the house. So learn from my mistakes, and let's aim for a tree. Ohh Once it dries? Remember, especially
for your new folks. Watercolor dries one value
lighter than when it's wet. So if it dries and
you're like, Oh, I wish it were a little
bit more yellow or a little bit more orange.
Then that's fine. Glaze another layer
on and get it to the value that you want it to be before you take
the next step. Now, having said
that, let's remember we're going to add
red on top of this. So keep that in mind. Now, I do want to add just a few of those floating leaves. So we're back to the 955, go to wipe most of it off. I am going to add just a few This is so fun. This is what I mean, guys. By everyone's unique. They're gonna come out
with something different. I hope you share
your piece with me. I'd really love to see it. Genuinely would love to see it. I don't like what
happened right there, so I'm gonna If you
don't like a spot, just touch it with water. Don't get stressed about it. There. That's a little
more treesque to me. Great. Okay. Let's get
ready with our indigo blue. Make sure you take a peek
at the finished piece that I have a the
corner of the window here before you do your blue. This is just a
shadow to indicate some trees in the
way back somewhere. And I'm using a 955. Indigo has a lot
of pigment in it. It's gonna go on dark. So go gingerly, go gently. And I'm gonna start
actually on some of the white paper and kind of
get some of my shape going. Before I head down
into my yellow ochre. Once I hit my yellow ochre, I'm going to have a lot
of water on my brush and be very careful how much I wiggle my brush into
that yellow ochre. What happens when you
mix blue and yellow? You get green, and
we're doing trees, so that's okay if you
end up with some green. But I'm trying to pat
up and down mostly and not end up with
a green value. I just want it to be
kind of an indicator of shadow in the background. That's about all I'm
going to do there, so I'm going to just use water. If you want to add just a couple of little floating leaves. Now, this is a good time
if you feel like you want to strengthen some
of that yellow ochre, which I'm going to do
right next to the house. Make sure you rinse your
brush out really good and get that blue out before
you touch your yellow. It's gonna strengthen
right here near the house. Oh. So, I wanted to strengthen the
yellow ochre so that it wasn't a stark blend
with that dark blue. Oh, that's pretty. Alright. And while we're here, let's pick up some of
our cad yellow medium and just go ahead and
go around that lantern. We're gonna add more to this, but let's go ahead and just start getting some of that glow. Let's let this dry. We'll
start with our cad red light. O.
7. Roof & Foreground: I stood back six feet
and decided to add one more layer of orange glaze on top,
and I like it better. So I highly recommend you
step back frequently and take a look at your piece from a distance because when
we have our nose to it, we see it a little too closely, and I want you to be
happy with your piece. So if you need to add a
little more orange glaze, do that and let it dry before
we take this next step. So now we are moving
into our red light. This is a very strongly
pigmented color. We're going to go in
with a 955 I would say, go sparingly and
always add more. I'm going to go
much more sparingly than I did with my orange. And see how strong that goes on, how beautiful it is on
top of the orange ugh. I love it so. I'm going straight
into just water. Softening that edge,
pulling it out. I'm holding my brush
at the back end. I'm not holding
it like a pencil. Okay, I just keep going
into water, guys. I'm not dipping into paint. 'Cause I want to focus
for a minute on shape. This is just going to emphasize the dark values
of a tree, right? So you don't want it
to go everywhere. This is where you can really
start having, like a fire. Let's be careful. It is going to dry one value lighter. Now, I'm starting to make it
a little more tree branchy. And some of those
floating leaves. Oh. Oh, it looks great. Hey, how did you
do? Alright, when I stood back and looked at it, I realized I went out,
but I haven't gone up with my little
tree branches and a, so I'm gonna add a few there. I'm start down here, so it doesn't just look funny. Great. Hey. All right. I've picked up my
number ten flat and working with our indigo since we've got it
out on our palette, it's going to be a 9010. We're going to wash wash meaning all one value roof. O. All right. And now I'm gonna
pick up a smaller flat, the number two flat. Coming back to our 9010. I go to do this top. Circle. And I'm not going to
do the post just yet. Now, I am gonna come down and I'm going to go
to a medium flat. This is a number six. I'm sticking with our 9010. I'm going to do the stairs. This is just a
wash. A one value. Oh Wait. And now I'm going to come
back to my larger flat. Same mixture. And I'm going to wash in just around
the base of the pumpkins. I'm not going to go up onto the pumpkins. I'm being careful. Okay, and I'm going to a
bit, stop right there. I'm just going to pull in fast, just go to pull lines. Don't go up too far. We don't want to go up past the house. I go to be our ground line there. Let's do the other side. We're going to put
more layers on there, so don't be nervous about it. Here. Notice I'm on
the edge of my brush. I turn it as I need to. Still wet. Down ale bit. H, H. H. Jase to use
a light touch. H. Bring it down a little bit until you get kind of dry brush your strokes there.
Let let that dry.
8. Greenery & Walls: Okay, I've added terra
bert to my palette. Now, I'm using
Chlebin terra verte, which is different than some of the other brands of terra verte. So that's why I bring
it to your attention. I'm going to use this is about a 955 because it has a
lot of pigment to it. We're just going to
put in a nice wash. And we're going to place that here next to the house
behind the pumpkins. And now I'm going to
blend that edges. I'm going to blend it out. Water and blend it up
into our yellow tree. Down to our ground line. And it's okay to have a little branchy
things sticking up. Adding a little texture look to it with a little
more pigment. And we can add a few and stick it out like
we did with our tree. It goes on strong, touch it. Nice. All right, let's do the same thing
on the other side. Isn't that fun how
fast this goes? The inking is what takes
so long on this one. Okay, I'm not going
on that lamppost. We're just kind of leaving
that be for a minute. So this bush is in
the background. It's going to be k
t point like that. And then again, it's
in the background, so I'm just going to kind
of let that taper down. I kind of fade out. Great. While we're working
with our terra verte, let's go ahead and just base our couple of green pumpkins. Let that be drying. You, of course, don't have to
do these exactly like I am. You can choose however
many green pumpkins you want or no green pumpkins.
It's your piece. Feel free to make it yours. I'm just giving you a sample. I did one of my versions, I did all orange pumpkins, and it was cute, but I love
colored pumpkins so much. I had to just switch
it up a little bit. Okay. We're going to let
that be drying. You can see I went
in there dark. This was a 9010 mixture. Great. Now, your bushes should be dry if they need a
little extra oomph. This is a good time
to add to that. I might add a little more
down towards the bottom. And up against the house.
Letting that fade out. I like that. Same here. I had that had just a
little bit more here. A touch more here. I lift out a little bit there. Great. Let's let that dry. All right, I am using my number six flat, and I'm going to come
into lemon yellow. I put lemon yellow and maples
yellow on my palette now, and I'm going to
use a 9010 mixture. I'm going to paint
in the windows. Now, yes, we're just
going to go right over that area, and it's okay. Now, I'm going to soften
that bottom edge. It's going to meat right
into our flowers and leaves, and I don't want it to be a hard edge. I'm
going to soften that. Great. Okay. And then
same thing here. Birth. B. F birth five birth five birth. Okay. Now, let's do our lantern. I'm going to do the whole
center of that lantern. Oh, missed the spot
with my indigo blue. It's okay. We'll come
back to it. That's funny. Great. Now, with this I'm going to switch to my,
number four round. And with this lemon yellow, we're going to add the highlight
to our orange pumpkins. So I'm going to go ahead and just kind of right
here where the pumpkins crest that roundness, that round that U shape. Now, we'll be letting now. I'm
going to do this one blue. This one is going
to be yellow, One. And this one. This one. Man, I love doing
pumpkins. They're so fun. I can't wait to
start shading them. Okay. So I'm going to
do blue and blue there. Switching to my number six flat and coming into my
Naples yellow now. This is going to be a
9010. I love this color. I use this color
for so many washes and basing in and glazing. I use it for rocks, cliffs, mountains, sandy beaches, and now we're going to
use it for this building. It's such a versatile
neutral color. So I hope you learn to
love it as much as I do. Anyway, we're going to
just build this in. We're going to come right
over these little bricks. And don't worry
about it if you go onto the trim. That's okay. So we're doing a wash. Remember, a wash
is all one value. And again, we're just
going to kind of let that fade into nothingness. Right there? Oh, I forgot
to put the highlight on those two pumpkins. All right. More to do, more to do. And let's do our
house down here. So the trick to avoiding
brush strokes when you're putting on a wash is to work fast and have enough
water on your brush that the water color just blends together with
the previous stroke. And then, like I said, work fast enough that it just
blends together. I'm just going to go right
over that pumpkin stem. It's okay. I'm right over it there as well. Beautiful. Okay, using my smallest flat and add a little highlight on
these little cues up here. That went on a little bit d.
There we go. That's better. And I'm going to
pick up a little indigo blue and do what I
should have done before. Wow. Alrighty.
9. Pumpkins & House Trim: I'm using my number four round, and I've added cobalt blue
and buff to my palette, and I'm just going
to mix the two. Get this soft blue. I use buff to mix
lots of colors, violets, reds, pinks,
greens, blues. And you can see it
gives you a nice, soft, almost a boho type feel. And then I'm going
to water this down, actually, to a 9010. Yeah, that's better.
I want to make sure we can see our
inking through. Isn't that a gorgeous color? If you're doing any,
Boho type painting, or you just want that
softer, you know, romantic feel, Victorian
fil. Add some buff. If you don't have Buff
in your tools yet, I highly recommend Buff
become one of your favorites. So gorgeous. Great. Let's pick up some cena. And I'm going to
use a small flat. Water this down to 19010. Let's go ahead and out in
this little trim up here. I'm not pressing
down on my brush. I'm pulling across, letting
my wrist carry me across without and that helps me
keep a nice straight edge. So it doesn't go wide, thin, wide, and thin. Hey, let's continue on
with our burnt sienna. And I'm not gonna do this
upper ledge just yet. I'll do the lower one,
the one underneath. The upper one's gonna have
a lot of greenery on it. Oh. Let's do we need to do just
a wash over the whole door, a wash, meaning all
one value, right? So let's go ahead and do that. We are going to come in
with brown matter and add some total quit all of this
over the burnt sienna. Oh. Okay, Let's come up to
the top and we want to. This is where you're
going to want to be a little bit careful, guys. So I like to start. The center of all of these is going to remain
the yellow ocher. And then next to it will
be the umber Sienna. It's more like an 85 15
here. Ale bit darker. Next to that. And then the center one
that connects them all. It's going to be the
bird Sienna as well. U, u down to the bottom. Same thing when our center
one is gonna be yellow ocher. And let's do the
trim on this window. I'm not gonna do that
centerpiece just yet, or the centerpiece is there
because we're gonna come in and add more to the window. But we can go ahead and
do our awning here. O. Now, we can come in on our
other pieces here and add that Naples yellow that
we hadn't added yet. We're going to come in with yellow poker and
add value to those. D. Okay. Almost completely based
in, which is awesome. It's time for us to add some
orange on our pumpkins. To switch to my ground. Now, I don't want
to lose the yellow. But I don't want it to look like a piece of candy corn, either. So let's take our water brush and a clean piece
of tissue here. And I'm just going to
soften that a little bit. No candy corn pumpkins. Alright, I'm going to add
a little in those creases. This with the tip of my brush. Ho on the bottom. Great. We're going to make some darker with
the brown matter. I'm gonna do one lighter. We're gonna mix it with buff. I was getting the
orange on there. Now, just water on my brush. Oh. Good. Okay, this front one. I'm gonna make some buff. Sure, you don't have
blue like I do. So I'm gonna pick up some
clean buff underneath here. Is it with the orange? Yes. Nice creamy color. Does it look nice
with our creamy blue? It with some water here? We're back to our
stronger orange. And you can do that again
over here if you want. It's up to you guys
do whatever you want. Okay, the last one in the back, that one's gonna be
fairly dark for me. So big. It's in the back. Shade. Shadows. Let's let those
dry for a minute. Oh, no, we've got
two more up here. I just keep wanting to forget those cute little
pumpkins up there. Now, we'll let that dry. While that's drying, actually, let's come into
our Burnt Sienna. And this is a 955. So super light. And I'm just going
to quickly use my number four and add
just a very light amount. Remember we're going to have
a lot of greenery on top of this. We don't want it dark. Coming back over it with water. Yeah.
10. Shading & Adding Tree Branches: Let's go ahead and take
some of our yellow ochre. And this is a 955, and just put in a
little bit of glowy. Is that a technical term glowy? We just want it to look a
little glowy around the window. Just up under the bricks. We don't want to
lose that bright lemon yellow we
put in the middle. If you lose your
yellow a little bit, just touch it with your tissue. Whenever you're
working with yellow, make sure you have
a clean tissue because sometimes it
transfers when you touch, and we don't want to get
orange or some other color in the middle of our
beautiful yellow windows. Okay, so I'm coming back
to this 955 yellow ochre. And we're going to a little
shadow underneath the bricks. But we're not going to lose that beautiful glow of our window. And same here, it's a little
bit up under the top. Maybe a little on the side. We're going to add those
window panes later. Not right now. H. In here. Now notice I'm
not putting it in smooth. I'm dabbing it because there's things inside the house, right? Then they're casting shadows. And so it's okay for it not
to be like some smooth look. I want it to look like there's stuff going on inside there. Great. And so I'm picking
up Cadello medium, and I'm just going to put
some little streaks out. So little glow
streaks. Literally. Streaking out. And they're
going to be pretty subtle, but you can barely see them, and that's just enough. Great. Okay. I think we need
to add another layer. Go ahead and add a
layer to our roof now, back in to our indigo. A 9010. I'm using
my number six flat. And we're just going to start. We don't want these
to look exact guys. Once you start making
roofs look exact, you have to make them exact. Does that make sense? So we don't want to be worried
about that too much. I'm just going to pull
here and there. There. Start them, stop them
in different areas. We're going to do
this several times. This is just the first of a number of times
that we'll do that. We're just going to
start that look of Hey, we've got shingles on our roof. Okay. Now, we can add a
little bit a layer of shadow. This is going to be
a little bit darker. I'm using just the
chiseled edge, and I'm just kind of hitting
the bottom edge of that lip, this little trim on the roof. Leaving that top half lighter. If you want something to
look highlighted and light, put something dark behind it. So it kind of automatically gives us a nice
highlight right there. And let's come in and
do the same thing. 955 notice I'm I'm using
the corner of the brush. It's such a tight little
spot right there. And I'm just going to
add a little shadow now underneath that trim. Nice. And while
we're in our indigo, I'm going to add a
touch of a shadow. You can do this
or choose not to. But I'm going to just
barely touch one edge. Boom Boom. I literally just set the
brush down and lifted it up, just to give it a little shadow. And I'm going to use the
corner of the brush just to darken that right there
a little bit. Good. Okay. Let's come in with
our burnt sienna. Let's set this up, make
sure you can see it well. Let's go with a 955 And I'm going to just
add a light shadow, and I'm going to go right over that trim at the same time. So I'm using a number
six brush. Watch me. I'm going to go over
the trim and create a shadow under it
with one stroke. Okay. R. And I'm going to do the
same thing down here. Right over it. Is
creating a little shadow. Do the same thing coming down. And the same thing
coming down over here. Now, I don't want it
to look criss grossy, so I'm going to soften
that with water. Good. All right. Now, I'm going to switch
to a smaller brush, and I'm going to come up and add a little shadow
around those bricks. And around these bricks
around my window. Around the awning. Take
it down around the door. And over here, under the window. Great. Okay. Very good. Now, let's take some
yellow ochre over here. Oh my number two. It's about a 9010 mixture. Let's get a clean tissue. And we're going to add
a little shading on the lower side these bricks. Just going to touch them. Because they're so small, and this is an inked piece, we're just touching it. We're not really doing a
special shading type stroke. It's going to be
okay. Nice. Let's do the same thing down here. Good. Alright. And let's take
care of this awning, too. So, this awning, I'm going
to just do the bottom. I'm coming. I'm on
this chiseled edge. Pulling it up, see how I get
it kind of a streaky look. He. Nice. Using my number one liner brush, and I pulled out burnt umber, and I'm using a 955 mix. When I'm in my palette, I'm rolling this and pulling
it to a fine tip like this. That gives you a really fine
tip that you can work with. We're going to flick
out some branches, and I say flick because
when you're doing tree branches, you really
just kind of flick it. You have to hold your
brush at the back end, and I want you to
practice a little bit, but just start flicking them. Like that. Now, we're not
going to do very many. That being said, we're going
to do very few because we want to just give a
slight indicator of, hey, this is a tree
with tree branches. Hey. If yours go on too dark, then touch them with a
tissue while they're still and then water it down more in your
palette for the next round. Okay, that's all I'm
gonna do on that side. So very few. No stress,
take a deep breath. It's gonna be okay. Now, that's a little dark. I'm
going to touch it. Lightens right up. On
your yellow ochre side. If that makes you nervous, if you're a brand new
beginner, you know what? You can do it with yellow Ochre, or you can use yellow
ochre and just mix the slightest amount of your burnt umber with
the yellow ochre, which will lighten it
up, and that's okay. I want you to be happy with it, but see how light you can make
it with just burnt umber. So don't be afraid to try. It's going to be okay. Now, I'm not coming
down into my lamppost. But I am going to go out into the blue. There. Leaving it. Okay, good. All right. Let's do our branches
for our bushes. Sticking with burnt number.
This is more like a 9010 because this is darker
than what we've done there. But we are going to want
to use the same method. Notice I'm holding it at
the back end of my brush. I'm going to pull
up from the bottom and do random branches. We're going to put
berries on those. And you can do extra branches. We're not going to do berries
on each particular branch. So don't feel like it has
to be something like that. Now, I am going to put a few, right onto the
front of the house. I want some berries
in front like that. Okay, great. How to do. How to do. While we have
our burnt number out, let's go ahead and apply
our stems on the pumpkins. We're just going
to wash those in. I'm using one of my
tiny, fine brushes. It's just a detail brush, and we're just going
to wash it in. Shouldn't take long. Okay. Oh. Guys, I need a sign
that flashes in neon. Don't forget the
pumpkins at the top. Oh, my goodness.
11. Ground and Pumpkin Shading: While we have our
burn number out, I'm switching to my
number six round, and I have a 99010 mixture. And I'm going to go
ahead and add in a little shading
down here. Round. Same thing, kind of. Yeah. Now, what I did was
I touched my tissue, which kind of
flared out the tip. And then, as I
pulled, I lifted up, and that gives you kind
of that dry brushed look. Like that. That's more over here. Now, if you don't want it
to look shaded with brown, you can come back in with the indigo that we used
and do it with that. It's not like we're going for some creepy Halloween kind of look for this piece, per se, but I just wanted
it to look birthy and this brown kind
of grounds it for me, especially on top of the indigo. Oh, I love it. Yeah, I'm just
gonna put some out front. Going for that wispy
look, dry brush look. Yes. Great. Coming back
with my number four. And I am gonna come
into this indigo. Let's get some clean tissue. Whenever I switch colors, I try to switch tissues to make sure I don't make a mess
of things somewhere. Now, I am going to
just deepen this. I go to be p dark
tucked in here. And this just really
grounds our pumpkins. Right? It just
sets them in deep. Hey. I'm just going
to soften that edge. Just adding water on my brush. Just water. Wait. The water just brings
it down a little bit further. W. That's him back here. Yep. Water on my brush. Good. A little more over here. And a little back here.
See how white that is? That needed to disappear. Hey. A little strong for me right there.
I don't want that. Just softening
this. Right there. Good. Okay. Now, let's just add a little
shading on the steps. A little bit over here. That's what's Right. I'm gonna come back in
with a little water on my brush and around it a touch. First, I wanted
to just place it. Now I want to around
it a little bit. Since we have rounds
staairs, right? Good. And on the other side, I'm going to focus
mainly on the top step, not the flat side, but the side that comes down
that would be shaded. Just to give it a
little more emphasis. A little more dimension. Good. Okay, we can also
use this color to gently had our blue
pumpkin while we're here. E. Beautiful. Yeah, one more. O rate, how'd you do, guys? Oh, that's looking good.
Coming right along. Now we are going to come
in and add highlights. So if you were like, Oh, this is getting dark, don't be worried. It's gonna be okay. If you haven't used
brown matter before, it is a beautiful, reddish brown, but
different than Birt Cana. It's more red. As you can see, that's why I'm placing
them side by side, so you can really
see the difference. I use brown matter a lot
in portrait painting, actually, and also in florals. So while we're down here on
Pumpkins, let's go ahead. Why not? And starting
with a 9010. Oh. Now, if you didn't
have the brown matter, you could use red light
that we used up here. But you can see this is a
much deeper red than that. This has the brown in
it. But that's okay. You're beginner, I
didn't want you to have to go out and buy a
whole bunch of paint. But this is a good one
to have in your toolbox. Now, I'm getting close to losing my highlight right there. Hey. This one, I'm gonna
leave a little bit lighter. I come over two. Now, the two that we did are buff mi I'm not going to
use the brown matter on. We'll come back in
with more orange, just pure orange to do that. O Okay. Now, I feel like adding just
a little bit of orange. This is the time to play with these and get them just
how you want them. Yes. There's what I wanted. Wanted to just have a
little more orange. Oh, I love that.
That's powerful. We have lunch here. And here. Okay, so the two that we
did the buff mix with, I'm just going to
come in with orange now. And same thing. This water on my brush hair. Oh. I'm just gonna add a
little on that crease. Cute. Are you guys doing? A little
more down at the bottom. Good. Ah. You probably thought
I was gonna forget those again. Okay, I almost did. Let's let those dry.
12. Shading the House: Using my number six
flat and coming in D Indigo at a 9010 mix. It's time to just
add another layer. And I am not trying to go over the exact
places that I went before. Okay. Right. Now, I'm gonna start at the top and just
kind of work my way down. And I think we can go ahead
while we're in our indigo. I'm just gonna use
my fine line brush. And fill in these
little triangles. And I need to add
some over here. Add a little bit of shading. Soften that just a tab. I know we added
our shading here. We touched it, but I
didn't do it up there. Okay. Great. Now, let's come into our brown matter
that we have gotten out. I love this color. And I'm gonna stick
with my number four round 9010 mixture. And I'm just going
to touch up under the e on this burnt sienna. Just give it a little shadow. And then the same
thing it's going to lightly a shadow on the trim. Sticking with our
brown matter and a 90 t. It's going to add a little bit of shading on this inside edge basically
putting a line down. Mm hm. So I think we're
going to emphasize the shading that we did here. Some brown matter along
this edge of the trim. S with the inside edge here. A the inside edge
of the trim here. I'll do right along this
line between the two trims. I'll be kind of indented there. If you're more comfortable, you can use your liner brush there. But my number four comes to a nice point, so I'm
sticking with it. Come along the inside edge here. Keep going along here. Edge. The bottom. O the door. And I'm gonna go around.
It's just where, you know, maybe
some trim would be. Yeah. Okay. Sticking with the brown matter
and 9010 mixture. And my number four. Let's add some shading on the awning that we
have our burnt sienna. And we want to really deepen
this down at the bottom. I'm just going to gently
pull up from the bottom. I'm gonna bring it quite a
ways up on that outer edge. Oh. Great. That's looking good. Let's go ahead and dip into our burnt umber and add
some shading to our stems. We're just fine tuning, guys, and then we're going
to start adding some flowers and leaves. So I'm just going to add some brown towards the
bottom of the stem. Okay. I think I just
need to switch brushes. I was fighting it and it just wasn't working. Great. Okay. L et's go ahead and
pick up some of our boots sienna and put in
the trim on the windows. Y. That looks great. Is a Okay. I just a little using
this Burt Pumber or Burnt Sienna.'s gonna make this centerpiece a little
bit darker here. Also, I want to add miss to
spot when you're shading. Just want to have
a little shading behind this pumpkin. O. I like that better.
13. Greenery: Going to use a five ought and picking up
this terra verte, a 9010 mixture. Clean tissue. It's going to go ahead
and add some leaves now. And we'll start at the top
and work our way down so we don't have to worry about putting our hand in wet paint. And there's no pattern, guys. We're just going to put an
indicator of some leaves. So just kind of randomly. Oh. And then we're going to have some hanging, some
dropping vines. So I like to start by just
kind of placing in how far down I want them to go
and maybe kind of a shape, how far out, and then
you can fill in a bit. And we'll bring our other green in pretty quick here a bit. Make sure you're
leaving space between. And if you want
some to drop down here and this middle area,
I'm going to do that. We run about same
distance. Don't that out. Now, while those dry,
let's come down to kins. And we're just going to
put in a few leaves, and we'll do some of these
with the other colors too. So if you haven't done leaves
before, guys, super easy. Bring it out, bring. Hey. I kind of want to keep
them up near the stem. I go every different direction. We will come in and ink these so that they
match everything else. And, you know, do two on, one on some, three on some. In other words, don't
make them all match you, match. Oh. Mm hm. And we haven't shaded
these green pumpkins yet. I realize that.
We're gonna pull out our darker green
right after this. All right, so miss
Hooker's green. Has a lot of pigment
into it in it, and it's a lot darker
than our terra vert. So if you want, you can mix the two kind of on the
side. Blend the two. So it's not quite so strong. And come in on some
of these leaves, mostly on the darker pumpkins that might need a
second coat. O. And I'm going to use my number four round to come
in and shade these pumpkins. It's a 955 mixture. This is the hookers green. Les the little guys
tuck back here deep. Which means he's going
to get a lot of shading. It's just water on my
brush now. It's softening. We didn't need to
add yellow on these because we're just letting
that green that lighter green. We are gonna come in with some white to add the highlight. L et's go ahead and
add some der Lu. It's very few. They
can take over. And we want to make sure that
we leave room for flowers. I'm going to start over here on the vine that
kind of hangs down. H Make sure you're leaving some white spots
for your orange flowers. Because they shine best
when they're on white? It you cleaned out
your brush really. And this is gonna be strong. This will be more like an 85 new color, new tissue, right? Okay. Now, I'm making these a little different shape than the leaves, and I'm kind of
touching and pulling. It's not like I'm trying
to make a flower shape. I just want it to be
distinctive compared to relief. There we go. Pretty.
How'd you do? Is there anywhere else that
you need to add orange? Step back, six seed. Take a look, see if
you need to add any more orange to your
pumpkins while we're here. If not, we can go ahead and add some orange over here
on our lamp post. I guess we could have
done our leaves as well. Here we are, so let's do it. I'm coming back to my Pivot. I'm coming back to
that hookers green, but I'm going to mix in
some of the terra verte. Just a little spot
on my palette here. This is more like an 85 15 now. It's more opaque. You
can't see through it. And I'm just going to punch up some of this.
Can you see that? How it's stronger now. Not every, but And it kind of gets smaller
as we hang down. Apart. There we go.
The other side. One more in the middle here. H. Nice. Okay. Now, I am
going to add a few more Now, let's come into
our flicker screen and add a little kick
to our pumpkin leaves. If you have any that
are still see through, this is where you want to
give them a little touch. Oh.
14. Berries & Splatter: Let's come over to our
Berry bush over here. We're going to use
the brown matter. You could use your
cat red light. I'm going to stick
with my five ought. And this is going to be
dark, probably 85 15. Hey, we're just going to touch in some berries. Oh. And how many you put
in is up to you? And you notice I'm not
really trying to stay on any bush in particular,
any branch. I mean, a little
indicator, I guess, but not every branch and
not in particular, really. I'm going to bring some over on the house. Because I like him. We're making sure that
some are really small, so they kind of fade. And some are bigger like this that are more
in the forefront. Now, we really have to
make sure those dry. They're easy to smear, and I don't want you to
ruin your piece. Okay, I used my dryer. I wanted to make
sure you can tell they're dry when they're
a total mat finish. If there's any shine to
them at all, Don't touch. Don't do it. Alright,
I'm going to come over to the lamppost now, and let's add some
greenery over there. I'm going to start with T ten, and just add some
of those leaves. Pretty much filling
in quite a bit there. Now, let's see what
we have left, guys. I think we need to do a little more shading on this indigo, blue, on the step. We are just making
preparations for our highlighting and once
we put our highlights in, we don't want to add any pate. It's going to round
out a little bit. Sweater on my brush. A
little bit across that. Great. Last step
is we want to add just a touch more
shading on our roof, and we can go ahead. With our final and
our highlighting. So I'm just going to add a bit that kind of goes
down the side here. And then I'm going to pull
it out out Here we go. I'm not covering up
everything that we did, but I'm making it darker on
this side than on that side. Hey, it's time to splatter.
My favorite thing. Okay, guys, we are
going to splatter. I'm taking terra verte. Green Hookers green. Water this down to a 955. When I splatter, I'm covering
the house in the sky. I don't want it up there. But I always tap a couple of times on my palette first before I come over here because that takes
off a lot of the paint. I mostly want it
in the plant area, obviously the green plant area. Now, if it goes on
stronger than you like, you just have to
lightly touch it. I like a mixture of
strong and light, and you just decide
how much you want, tap tap over on the palette. We have all these
red berries already, so I'm going to be not as heavy over here,
pretty much like that. Couple little darker
than I like. Okay. Now, we're going to do Well, we need to let that dry
so we don't smear it. Can you see how that just
adds a nice texture, gives a little more dimension. Let that dry, and then we're
going to do the fore ground, but we can be mixing our well. So let's take our I to go. We're going to want a 955. Now, obviously, we can't, you know, cover
all the pumpkins. 'cause they're right
there, but I can kind of go like this. I
can kind of guide it. So. Yeah. I like that. I'm going to do this half first, and then I'll do the other half. Now, while those are still wet, I'm going to calm
some of them down. Gently touching. See how that makes
some of those fade. Keep some of them dark. Yes. I love to splatter. Oh, it makes me feel
like a little kid. A bunch in the middle. Good. I didn't get any right there, so I'm going to aim as best I can without getting all these
pumpkins terribly blue. There we go. Up there. Yep, like that better. And now for the left side, a top. Cover up. I like tapping with my finger
versus using two brushes against each other
because I feel like I have more control
over the direction. That's my personal preference. Tara. Oh, I love this splatter. Doesn't that add a lot to it? It just makes a big
difference. Sorry, guys. I was almost off the screen
with that last shot, but all the splattering
did make it on screen. If you didn't see what my finger was doing when I was tapping, I was just tapping like this. So, I apologize. That's a good thing. I
had to double check. One last thing that I
want to do before we move on to the next step is I'm coming in with my
number one liner, and I'm going to pick up some of this beautiful indigo blue. And we're just going to add some random lines to the roof. And this is going to
set us up beautifully for our highlighting
and our final inking. We are so close to being done. So I'm going to now that
this is all dry, right? We're just going
to come in and add some random lines just lightly. This is a 9010 mixture. I mean, obviously, we want to try and make them
fairly straight. They don't have
to go all the way across. They can be broken. It's just going to be kind
of an indicator of, Hey, this is a shingle That
one's a little dark. Just touch it if it
goes on too dark. Remember it's going to
dry one value lighter, so don't stress over it. But you can see how that
just adds a little hint. And it's amazing what
the brain fills in. You don't have to
worry about it. I'm just going to add some a
few of these vertical lines. Just randomly. I'm not even trying to make them make sense. And we'll let those dry. And I think everything
else is complete. So we can go ahead
once this is dry, we can go ahead and
pull out our whites. But that being said, If it bothers you to have
white spaces here, then I would suggest you
either do a light wash of terra verte over it or a
light wash of the yellow. And that's probably what I'm going to do is a
super light wash, maybe a 955 of cave
yellow medium that we did the windows with so that it's just kind of a
reflection of light. And I'm not going to I'm
not making a stroke, a mark because that
will smear everything. But I'm just going to
lightly touch up and down here and there. So I I have a lot
of white showing. There, that tones it down. We're going to let this
dry and while it's drying, we can go ahead and pull
out our bleed proof white. Okay, I want to show this to you in case you haven't
worked with it before, this bleed proof
white comes in a jar, and it looks like this, and it is completely
water soluble. It will thicken up over time. This jar will last
you a year probably. I've opened a jar before, and it's been as thick as jello. But never fear, it's not lost. Just add a few drops of water. I use the end of
a brush and just stir it up good, and
you're good to go. So I highly recommend that you treat yourself to this if
you haven't used it before, it's such a great medium, and it's highly opaque, as you can see,
you can't even see the black of my
brush through it. It's very opaque and
does such a great job. So that's what I'm
going to be using. You can use white wash, if you would like, and
that would be just fine. All right, I have
put a little blob here of the bleed proof white. I like to put on
a thick piece of watercolor paper so that I
have it right here handy, and I'm not going so far
back and forth to a palette. I'm going to use my
number one liner, and I put a little
water on my brush. Now, guys, this is going to be the opposite ratio
that we've been using. If I say 9010, it's 90% bleed proof
white, 10% water. So we want to keep
it nice and opaque. And that's probably
what I got here. Maybe an 80 20, 80% bled
proof, 20% water. And We're going to add a
few lines on the roof. I'm rolling it. Notice
I'm rolling it, pulling it to a fine tip. Nice. Okay, so we're just going to, again, we're just going
to kind of place them. Here and there. Nice. See how you don't have to follow
a specific pattern. It's okay. Don't stress. Don't stress over this.
This is the fun part. This is where it
all comes together. We're to the final stage. Moving down, we're going to add a little highlight on
this upper piece of trim. Remember how we put the shadow
on the bottom side of it. Now we're going to
come along. Just do a highlight on the top edge. You know, if you have
a white gel pen, you could do it right there if you want if you're
more comfortable. If you have a posca white
pen, those work really well. I prefer to use paint
most of the time. That's just my
personal preference. I'm going to add a
little highlight here on this outer edge. I'm
going to break it up. B on the pumpkin. Oh Maybe I will add it just a
couple just a little bit. Okay? Now, coming over
here, definitely. These are just fun sparkles. Who doesn't love a sparkle? Okay. The fine lines. This is where we can come up. We can add a few
on our pumpkins. We are going to do
some dry brushing. And don't worry
if you don't know what that is. I will help you. And over here, yes to
some bright shiny rays. Make them different lengths, long, have them kind of arch.
15. Highlights: I cleaned out my brush. Don't be afraid to clean out your brush frequently when
you're using this 'cause it gets kind of dry on your brush, and
then it gums it up. Yes, I'm going right
over this bush because the lamp is in
front of it, right? And I'm going to do
some concentrated ones. Right in the middle. Where
the light bulb would be. Sorry if my hands in the way. Okay? We are going to do some dry rushing in
there in just a moment. I'm can add a few Oh. Now, if you want, you can do a highlighted in your berries. Not very may, as if some
light worth catching them. Alright. Let's switch
to dry brushing. Let me show you what
that is real quick. If you haven't done it before. Dry brush is exactly
what it sounds. You're going to paint
with a dry brush. So I'm taking my number two. I'm picking up some paint, and I did not dip it
into water first. I'm going to wipe off most of the paint till the
brush is fairly dry. And let me put it over this
orange so you can see, and you get a dry effect. It's almost like an old barn
or old weathered fence. Lo. So you just get
those dry bristles. Put on a touch of paint, and that's what we're going for. So go ahead and practice that a little
bit if you need to. And I like to keep a
little tissue handy, 'cause sometimes I want
to wipe it off fast. Alright, so a little bit, I'm just going to do a
touch of highlight on the bottom edge. It's
a little strong. There we go. Ooh. Can you see how it just makes those pop? It's awesome. I tell you have to reload frequently
with dry brushing, it dries out really fast. Right. Okay, I love to add dry
brushing on pumpkins. Right on that ridge that
is the highlighted area. Let it over here, too. Don't worry about going
over your inked line. We're going to come in
and do touch up inking and add a little bit of
inking on the leaves. Okay. And in the middle here, dry brush, I'm pulling out. We're just enhancing
that bright light. Isn't that great?
And if you want, you can even add
some out here where it's strongest like
right around the lamp. On these yellow ocher bricks. I'm going to add a
little highlight just at the very top edge. Can you see how that just
made them look round? It's like, Tata. I'm
so proud of you. Are you so proud of yourself? Look how good you are. When you put the shading underneath it, and you've got the highlight
on top that beautiful. Hey, last one. No, let's not forget these little
guys right there. Good. Okay. And let's
come down here. I can stay on that
top edge. Hey, see. Oh. Oh. Okay, let's move over to our awning. I'm going to start with
these yellow ocher ones, but I usually put it on
the red ones as well. Love it. You really see the
dry brush strokes there. Had such a nice texture. Now, I'm going to go
ahead and add that. Yes. Oh, I love that. My paint's drying out. I need to get some more pain out here. Oh, yeah. There we go. And the one in the middle. So you can make these as
highlighted or not as you want. Beautiful. Okay. Now we
need to do the windows. And I'm going to avoid
that center row, right? That center strip. And let's just I just want it to
look like a little burst, so I'm having it go
kind of all directions. Oh Now, I'm gonna have to
go down as well. Now, if you accidentally touch
your inking, that's okay. Don't worry about
it. We can fix it. We'll just come back and put a little inking on top
of it. No big deal. Nobody's perfect. Oh, can
you see that dimension? It just looks bright and
warm and cozy inside. Okay, let's move to
the next window. Guys, we're almost
ten. It's crazy. We're going to add a lot
of inking on this window. We're going to put all those
cute little window panes in. O you can leave it the way
it is. It's your choice. Same over here,
we're going to add a bunch of little window
panes on this door, which adds so much character. Nice and warm and cozy. Okay, now, here's where I'm going to be a little
more careful. But like I said, if you get it on your ink lines, that's okay. We'll. But I'm using this
number two f. It's te, tiny. It's very friendly. You could also use just
a small liner brush. Gorgeous. Okay. Let's move
down to the pumpkins. And these little guys I'm sticking to the area
that we did in yellow. And you can do some,
and not others. Don't feel like you
have to do all of them. Just whatever you
want to do, fine. Oh. Ooh. Notice I'm going with the, the shape of the pumpkin. Something to always keep in mind. Make sure you're curving. Oh. Cute. Hey, wrapping up this. I think we can grab our markers
and finalize our inking. Oh, no, we got a little
bit more to do on the port. Almost missed it. Okay, so Let go straight
across the top. I want that to look flat. Okay? Following the steps down, I'm curving, following
the contour of my object. Okay? Now, I want that
to continue down. It's kind of like a
highlighted welcome. Come on into my house. Feeling, you know? I'm
going to bring that down. And straightening it
out as I go down. Alright, guys, step
back six feet, take a good look and
grab your markers.
16. Final Inking & Signature: Now it's time to just put
the final touches on with our marker or pen or whatever
it is you were using. And I'm just going to fill in these little spikes
on the top of the roof. And I might put just a
few lines on the roof. Once again, o. I'm basically going top
to bottom just to see if something kind of disappeared or doesn't stand
out enough for you. Just go over it. That's okay. We put a lot of layers of paint down or if you painted outside the line
so far that you're like, this ink it. That's okay. Now, what I was getting
to is this line of trim has a little bit
of embellishment on it. And I can just add
that in right now. We're not going to paint it, and I didn't want a pattern for it. Hey. Make sure that we're good
add in mas down far enough. Can you see how this goes? Just add things
that need adding. Now, as far as the flowers go. So I want them to be kind of in keeping with
everything else. So I'm just going to outline maybe a couple of little
leaves, very few. And then a couple in So you can see just a few
lines here and there. Nothing solid. Same here. I'm just going to a couple of wiggly
lines here in there. Technical term wiggly lines. But when everything else
is anchored with ink, you don't want to
have something that floating by itself.
Does that make sense? It needs to be anchored as well to be in keeping
with the rest of your piece that continuity
and consistency. Okay. Over here, I think I'm going to add just
a touch of lines, just a few straight lines here. And I need to outline these that we painted
these in afterwards. I can cons. Okay. Same thing with these. I'm just a few of these leaves are going
to be identified. And then just a little
line here and there. And I think that's all there. Okay. So moving down
a little further. Strength that line. And
I did the dry brushing, I just kind of hid that line
a bit bringing that out. Okay. Good. Okay. Who's
ready for windows? Now, if you need to, you
can go over your lines. Again. All right, we need
to add our lines here. What I felt helped me was putting the one
down the middle first. Looks like I need to help. So looking for the middle and then the middle
and the middle. And then I'm going to go
through the middle this way. Sometimes it helps
for a little dot. There you go. Now,
could you use a ruler? Yes. However, like
I said earlier, if you start using a ruler, it just makes it look, you know, architectural, which is not
really what we're doing here. I'm just going to add
a few contour lines, just a few vertical, horizontal on the corners. Just to give it a I
know kick, ale depth, same thing down here at
the bottom of the door. Okay. I'm going to add a few. These are curved to
emphasize the shadow here. Hey, and a few on
the other side. He. Yeah, think of this
all the way across. I mean. Okay. Alright, let's add our windows on this side. And same thing. To go from
top to bottom, in the middle. Again. Great. And then across. Oh. Good. Okay. And you can put some down lower, but
I'm not going to. I feel like it's
plenty busy up top, so I'm good with
it the way it is. All right. Moving down. In this shadow area, I'm going to do some
cross hatching, so your lines go one direction. And then the opposite direction. Just to add depth to
that area. Shadow. And if you need to add your lines back in here and there on your
pumpkin, this is a good time. I got a couple of
places where I need to. I want to add some scroll
work to the pumpkins and just looks like little vines that are going
to be coming off the top. So once you start, don't stop. That's the best way to
have a nice even line, and they're going to
kind of come from the stem. S like that. And you can make them go
different directions. They're just kind of fun. And
then we're going to outline those leaves as well.
Let that go up. All right. Then let's
outline these leaves. Oh. Put the vein down
the middle, if you want. You need to add this
same trim down here. Now, if you have some
gold metallic paint, that would be really
cute on these. Here we go. I didn't do
anything over here on the bush. It's kind of like with the
trees. It's in the background. I want it to step back. Okay, let's step back
and take a good look. One last long look, see if there's anything
else you need to add. Well, guys, I think
we have finished, and that means it's time
for us to sign our name. Always claim your artwork. Always sign your name and be
proud of what you've done. You have a special talent. You are unique. Not
everyone can do this. And so sign your name, saying, Yes, I did it. Here we go. Let's sign our name. I'm super proud of you. Thanks for taking
this class with me. I'll see you in the next video.
17. Congratulations & Bloopers: Well, congratulations,
guys. You did it. You have finished your
fall Pumpkin House. I hope it was a
good experience for you and that you had
fun along the way. I really enjoyed having you in my class, and I
appreciate your time. I know it's valuable, and you could have been with a
lot of other people. So thank you so much for
being with me today. If you enjoyed this class
and feel like it was a benefit to you and you know someone else
that might enjoy it, could you take a look
at this link that's on this page of Skillshare
and send them this link, and both you and
your friend will benefit from Skillshare,
which is great. Also, again, if you could just
snap a pick of your piece and look for this
button to submit it on our class gallery
here on Skillshare, then I will get a notification, and I can make comments
and nothing but love. I want to see what
you've done and enjoy your piece and
enjoy that time with you. Also, if you would like to take another one of my classes, here's a sneak peek
and more to come, then all you need to do is go to the search bar and type in
my name, Carrie Sanders, and all the classes that I have here on Skillshare
will populate, and you can look and see if something is interesting to you, and I would love to spend
more time with you. If you would like to get a notification when I
send out a new class, all you need to do is
click this follow button, and you'll get a little ping
when I pop out a new class. If you'd like to see what's happening in my
personal art life, then you can take a
look at my website, which is Carrie Sanders art.com, or at Insta, which is
Carrie Sanders Art. But the best place
to communicate with me is right
here on Skillshare, and that's done through
uploading a piece of art. And then we can talk
back and forth, and I can answer any questions
that you might have. All right, guys, thanks
again for joining me. I so appreciate your time, and I look forward to seeing you again until the next time, I guess it's time for Blueper. Hey, everyone. Every time I film the lawn, more guys outside
mowing the lawn. He must set his clock
by Carrie filming time. Come on. Oh, my gosh. Dude, I love you. Here in beautiful
Farmington, Utah. And today, I have for
you I covered my face. Blue burs, blue burs. Can't get your blue burs.
 Kerrie Sanders, Artist, Teacher, Creator.