Transcripts
1. Presentation: my name is ready. Paramo. I worked with a company called City H. We work in naked picture gaming. In Created the same. I will be the one in charge of the course. Within this course, you will be learning how to use rev it to the fullest. We're going to be using Rabbit 2000 and 19 and as well, rev in 2000 and 20 since it's already available. But as well, you can go ahead and use other Persian off rev it, since Rev. It updates feet, options, tools or settings every year. Which means that everything that we're going to do with revenue 2000 and 19 can be done with other version of revenue. Just that with a few differences, they, Francis, that you will be able to overcome with the basic knowledge that you can get from this course maybe at least a very powerful tool that comes with a lot of complex options, which are nothing more than the sum of basic options. So in order to make sure we are able to use the user interface the rabbit has in order to create a project or family, we're going to start with the basic tools they used to build a project. Richard Tools do you use in earthy crate wounds, floors, roofs and such, which are the tools that you can use Great, very simple project using wolves, groups, floors, misters and such. With this in mind, many tools. The rebel has also comes with a few advanced options, and we are also going to cover these advance options once we get into a more advanced section of the curse. With this in mind, I hope you enjoyed the course and everything that we're going to see during the creation of this project. With everything that you see such at the families, the floor plans, the sections, elevations and everything that you can use in order to get this project ready for construction.
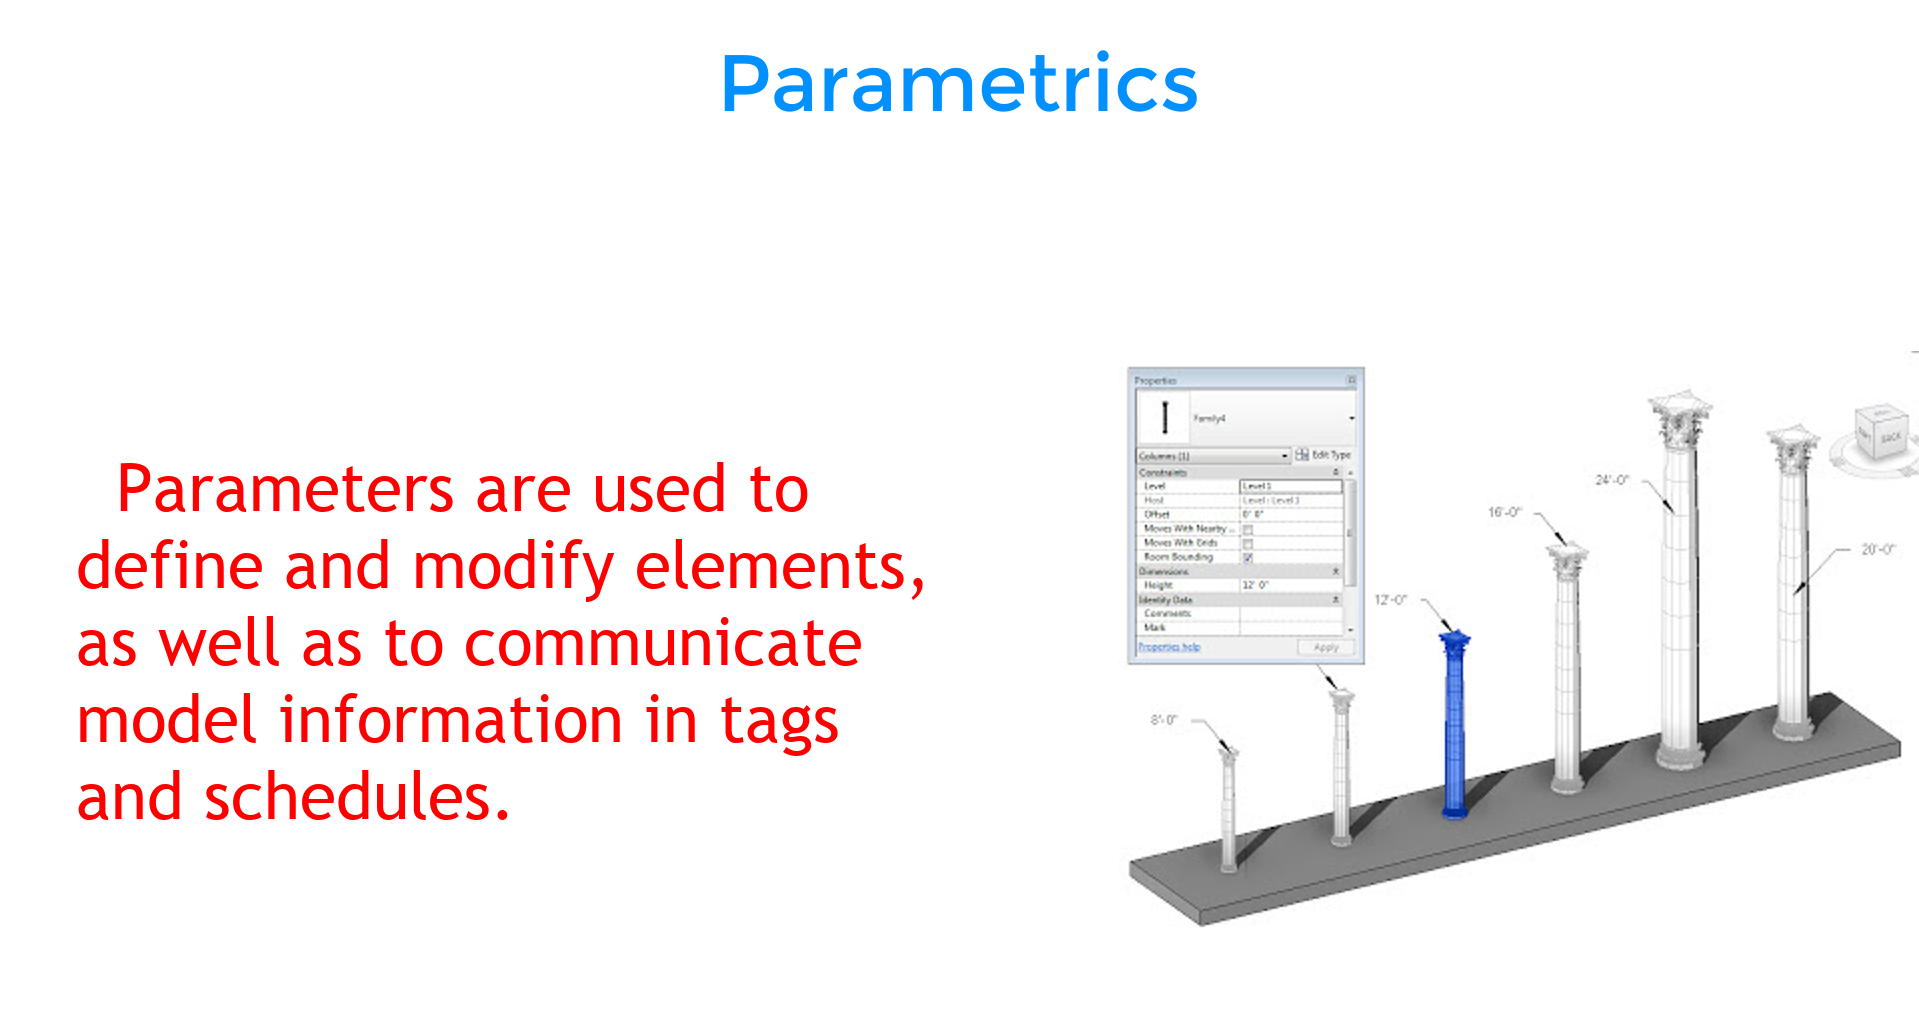
2. Introduction to the Course: welcome to rev it 2019 years in also rev in 2000 and 20. The course is the sign for students and professionals the want to store using or just want to go a little bit deeper on the use of this up work created by out of this they support aims to help you into the sign and construction off a building with rev it. You will be able to have access not only to the tools that you need in order to the sign a project, but also to the information the you need in order to build the project. Like, for example, when you already have a building the same Dr it will allow you to get the information the you need in order to make calculations for the structure and this base in the will need for the furniture as well the area information that you will use, you know, that calculate the elimination for your project and for system the same searches, the air conditioning and at the same time, rev it this storage the information such as the dimension and the barley off elements that you're going to use in order to build your project so you can quantify how much you're going to spend. In order to construct of this sign the you created, you send rabbit, and among the events options that you have restructured. The same is the creation of structural analysis that you can use to determine if your project is working properly. And this means that gravity is a very powerful toe. The you can use not only to create pontifications or three D and to the the size but us well, you can use to verify how valuable is your project. So as you noticed, Rev, it is a very powerful toe the you can use in order to create the sign in a bottle you like . You're a project. So for this, we're going to be using the most recent versions that we have for rev it, which are 2000 in 19 in 2000 and 20 to see how would you use revenue in order to have access to old information that you're going to use even before the construction off your project or, in the case of a student, 2% your project, we call the information your name, so in the first part of the course, we're going to cover the basic knowledge that you will need in order. Tea is rabbit, such as the user interface or the truant tools that you can use in order to draw the elements on it to the representation and the difference with other suffers. That is something very similar, as well as Thea passions that you have united the person lies, how to use rabbit at any given time, along with addition on settings there were going to use. We're creating our first project, which in this case is going to be up to a storehouse. There is going to be created by using the system families. Now you have available in rabbit such as the walls and the floors, and we're going to create a swell family so you can use for any project the families that we're going to great for. The project will allow you to know how to create the family, how to use the template. Yes, well, how to create parameters and how to modify the parameters for the family from the moment they're creating the family onto the point in which you use the family within a project. Once you know how to create a basic family, we're going to see how we create the environment for your project, which in dr it is called. With this, you will be able to create a site floor plan. And also you will be able to use the top surface in order to analyze how you modified it to rain before and after you place the project. We just you know, the site work is one of the early stages off the construction. In order to calculate, how much are you going to be removing and how much are you going to be adding? And at the end, we're going to create the sheets and abuse they're going to use in order to percent your project as well. We're going to go back to the family creation process so we can get into advance parliamentary and family creation that we can use to define how you're going to use a family within another family and as well how you're going to set up the visual settings and elements to personalize the look off your family within any project. Once we move along, we're going to see us. Well, how we create details and also how we can change the Bischel settings that we're going to have for project well taken into account their structure. There's going to justify the project as well as Theis specialties that we're going to be using from the options of rabbit, which are used for elimination and also for the plumbing, the sign off your project. And before we complete the project, we're going to create these schedules they were going to use in order to make the calculations and gratifications of the project. And on the last part of the course, we're going to get into how we can create masses, the adoptive families that you have available in rabbit close the use of Steinem and the latest features that you have in gravity 2000 in 19 and ready 2000 and 20 for all these pressure. Taste there are available within the project, so I really hope that you enjoy the course and are the options that we're going to see for out of this rabbit. 2000 in 19 in 2000 and 20
3. Introduction to Materials: Now in this part of the course, I'm going to show you how you call a mature syndrome, but also how you use them. Now the first thing that you will need to know is what exactly some material. So material is pretty much a Finnish or a representation of different elements. So in another words, if your grade up table or you send our software such as breve, you will be creating a physical representation of an object that actually exist. However, the materials that you assign to the object, or in this case, the table, will be the visual representation of the object that you created. So the materials will allow you to make an object seem real. Now the material depends on the software you're using is going to be created in a few different ways. However, regardless of the software that you're using, which in this case this rabbit, we are going to see that the material is sexually the cell of textures that are assigned to a material that's softwares are called texture maps. So if you are coming from a different software, you might notice they're referred to in different names. So for example, the main texture or in another words, that lecture that provides the main appearance for the material in other softwares is called a better while in others is called the base color. And if you are using any engine, so just one real, we are going to be able to see they are able to create basically base materials, or in another words, PBR materials. Now these are very close to what you can create and rabbit, because these materials are physically based materials as well as rabbit. Or what do they intention? It's a little bit different. So this means that we are going to be able to use different valleys properties, such as close in its reflectivity, transparency, refraction, and roughness. And this will list values that will go from 0 to a value determined by the property. So in case that you have actually used a different rendering software, you're going to be able to see that in the case of PBR materials, that value is usually go from 0 to one. So that is set difference between where most of the other softwares, but at the same time, you will be able to use the texture maps in order to assign this palace where material. So this will recognize the values that we will go from 0 to one within the texture. So for example, in texture maps, you will have some textures and there will be black and white, like being 0, while the color white is going to be one. Every color in between black and white will represent a value between 01. However, in Revit, you're also going to find that you have some properties that actually uses that value plus the texture. So the value will determine how much of the texture you're going to be using, or in another words, how surrounding, but so the texture is going to be on the property. And among these properties, we are going to find that corrodes and the bumps. So these ones will leave some Valley as well as the texture. And this will actually create similar effects for the property, at least have the PBR materials, which include the reflectivity, that transparency, that refraction, and the roughness now the band on the software. And then they might be a little bit different because one of these properties might include options for more than one property. However, with all this in mind, the materials and where they are actually very different because as I mentioned before, there are also based on physical attributes. Or in another words, they have physical properties. So in wherever you're going to find that you will have proper piece based on the structure as well as pay some general information. So as an example, you can have a concrete material. You will be able to see that you will have the information of the PSI. Or in another words, you will have the structure information of the material, but also you will be able to edit the information based on whether the material is represented. So in another words, they're, my peers are going to be very different because of the fact that they carry information throughout the project based on a real material. So in another words, they also use that building information. With all this in mind, I'm going to actually show you how you can create and modify your materials. Now as you remember, when you select some of the elements that you have in rabid, you are going to be able to change the materials that are assigned to list the elements in order to change the appearance of the elements that you select. Now one of these elements is the walls. So after selecting the wall, you're able to use the properties or more specifically, that type properties window. However, if the type properties when there is the stable yet able to collect recess properties in order to open the diaper police window. Or you can just simply use the shark, which is ps and Peter, BS and Peter. So you can actually use that divert this window in order to change the material that you're using for the layers of the wall. Suddenly you can do by using the ID, the assembly window Howard using case law, you're not actually able to use my properties pallet in order to open the diaper, but it's also able to open the diaper plus window by clicking on the second. And then you will be able to open once again, the material browser by Sunday I did assembly window. So with this assumption is we are going to be able to be changed the material elements such as the walls, but also in some families that are greater within, you are going to be able to have access to properties such as the materials by sending material browser, which is sending there is going to depend on the way that the family was graded. Depending on the family or element that you are selecting. We are going to be able to open the material browser in different ways in order to change the material. However, there isn't a specific way in order for you to open the material browser, which is based on the Manage tab. And then by clicking away says materials. So with this, we are going to be able to open the material browser after clicking on the second. And this will allow you to open your browser window in order to change the material. Now within this window, we are going to have the option in order to search for the material and this textbox. So based on what you write, you're going to get different results. But also you're able to click on dx in order to cancel the search. Now once you find the material they are looking for, you're able to sell in order to get information of the material. Now if I cancel the search, you're going to see that the material is still selected. So you are going to be able to appreciate the information may have other material, federalism in case that you need to search, miss materials by category. And you can filter the project materials based on different categories. Or base 10, which is the default option. So with this in mind, you're going to be able to search the materials in different ways. However, these weights are always going to be based on the name of the material as well as the category Teresa ciphertext materials. And also you're going to find when the material browser window that you have a library panel that you can use in order to find the library that is installed with grabbing. Now you can hide the library, may send this option once again. And something as well for you to see is they are able to change the appearance of the materials that you are searching for. So you're able to use that document materials in order to filter it on the materials that are being used or unused. But at the same time, you can show all. Now the same time, you can change the value of the materials. While at the same time, you can also organize materials by name, but also by the column, the material. Now last but not least, you're able to change the size of the building, which will allow you to change how big pectoral nerve is going to be in order to represent the material. So with this in mind, we are going to be able to earn high anytime the library penalty you have and the material browser, we can assume nobody's pick up previously you have a 100 library has very similar to the ones they have, whether project materials. However, within the library, is where you're going to be able to find the favorites. So this means that if we use direct labor while whoring or while selecting a material, we are going to be able to call where it says add two, which will allow you to select the favorites. Or in another words, you will be able to add this material for your favorites. And at the same time, if you do this with our material and that is within the Favorites folder you can find within the library. You're going to be able to see that by using once again the right leg. We'll have the option of add to that. And this case it's going to say document materials. Now since in this case, the material very select this already under document materials, they're going to have this window which is going to say replace hipbone per napkin bone is very useful to you in case the 1-item at the temperature of the material for the Arab and the other one, network ligand on casts are going to show you that besides the optional reading, you can also delete a material from the favorites. Now at the same time, we are going to have a few icons and the library, such as, for example, the icon for home, followed by an arrow, which will allow you to select between the favorites and the AC materials. Now the favorites are the ones that I show you just a moment ago. While the AC materials, it's pretty much a library that is sister would read it. So in this case, since I use and the favorites, I can click the icon for home, which will allow me to sell like once again, between the favorites and the AC materials, whether it's based in the library tree or the right of the panel as well. Since you have a library tree, you can actually select this option in order to show or hide the family tree. And at the same time, you are able to use deception in order to select which library that you want to open. The same time you can use the other options, such as the beam type, the source, and the tunnel size. And as well when selecting a material, you're going to be able to see the information of the material underway of the material browser, which is going to have tabs with all the information that you have, but also the you're going to need for this material. However, you're able to high, high and this side of the material browser. Now with all this in mind, you're going to be able to search for the material they are looking for by just simply using the scroll bar. And with this, you're going to notice that the navigation and the material browser window, it's actually very standard, even though it has different ways in order to find the same material. And every time the user, like a different material, you're going to see different information depending on the material. So each material is going to show you something different depending on the properties of the material, or in another words, and the characteristics of the material that you're selecting. Nashville sound important for you to know when creating or editing materials is the option that disco, use render appearance. Now when you use render appearance while you're actually building gravity, is that you want to use the base color of the material is the color, but you can see below, and this color is the one that is going to be used when you change the new style to a style very subtle shading. So there were at least is going to use the material that you select while the shading is going to use the render appearance in order to use the base color of the material when using shaded. So this is very important when you want to use realistic because of the resources that you want to get an idea of the binary log poverty project that you're working on. Because you can also create a render in order to see the materials mark the urban 1 second the material browser, I'm going to be able to show you that you can select this option with any material. Now once you use this option, will actually determine the base color. Very serious for the base material. However, if you select this option, rabbit will allow you to actually select the color, but you want to use instead of the render appearance or in another words, the base color of the material. So you're able to select the color into different ways. And if you want to see a little bit better, what are the base color of the material actually construct? You can click where it says appearance in order to see the texture of the material.
4. Changing the basic Representation of the Material: Now what more dense the material browser, they're going to be able to change the appearance of the material by the way that the material is represented within the project. So in order to do this, you actually use this surface and cut patterns. Now when you change this patterns, we are going to be able to change maybe in certain material while we're getting the project. And also as the name implies, the surface is 600, the element while Becker this one you can see when you cut the element now surface pattern, you will be able to edit the foreground as well as the background. Now the foreground is the main one, while the background is the one that is used as the background. Now when I click on the foreground, or more specifically, right next to where it says pattern. I'm going to be able to use their field parents window in order to sell like a pattern. And in this case the pattern that I'm going to select Xcode a solid fill. So in this case, the parameter going to select the cytosolic film and after base I'm going to click on Apply and OK, and then OK once again, so I can close the editor assembly window. And last panelists, I'm going to click on Apply and then okay, 100 type properties window. And after close and the type properties window. And just going to make sure that you can appreciate every single data within this floor plan. So this means that I'm going to change the detail level and then I'm also going to zoom in. So you can see if there's now you can also change the properties and the properties palette. So you can see if there is going to be a change and the representation of the world on this floor plan. Now you can also change the color of the material in order to see this a little bit better. Now in this case, you're not going to see that much of a change regardless of the changes that you do to the pattern. Now what I'm doing is actually showing you the different things for different changes that you might want to do in order to show the surface pattern on the floor plan, just to make sure that you're able to save a little bit of time trying to do the same. And this is actually because in the foreground is going to be based on the size of the wall, but it's not going to be based more on the top and the bottom of the wall, which is something that normally is not important because in most cases either actually need to see that top of the wall. However, this doesn't mean that you won't be able to see like changes three, you're doing reflecting another abuse for the project. Somebody 3D view. You're going to be able to see the changes to YouTube, to the elements of your project. So I'm going to take advantage of this in order to show you how changing these patterns is going to change the representation of the material where the new project. So as you notice, you're going to have the foreground and the size of the wall, but not on the top. So if I still have one secondary settlement, in either case, the type properties window, so I can actually open the material browser. You're going to see that if I change the background, Let's say why to the foreground, even if he changed the new style, the result will remain the same. And this is because there are two patterns that are using for the base material, actually solid. Now what I'm going to actually change by using the material browser is actually the current balance. So I'm going to sell, let's say way, but maybe with a foreground, which also implies that are going to sell it once again, So Little Pill. And once they are malleable, they're going to say the one on the walls actually changes while the other ones haven't changed. So I'm going to open whenever section views so you can see the patterns. And where you're going to see is that within this section, we are going to be able to appreciate the foreground, the surface patterns and patterns. So I'm going to take advantage of this in order to show you how changing these patterns is going to change the representation of the material within your project. So by changing the four grand pattern and by also adding the background pattern, you're going to be able to see how the representation of the material actually changes. But more importantly, you are able to see how easy it is to change the representation of these materials. So I'm going to continue changing both other patterns for you. This is the difference. And as a quick reminder that in order to see that foreground and the background the same time, whenever params cannot be a solid pattern, especially on the foreground because it's the main pattern. Or in another words, if you have layers, the foreground will be the main layer, while the background will be the secondary layer, which means that the background is the layer that is below the foreground. And that is the reason why they are called foreground and background. So after making the following changes, you're going to be able to see how the patterns actually affect the material. However, as I mentioned before, changing the patterns will actually not change the fact they are not equal to C for surface pattern on the top face or the wall. So what I'm going to do is actually show you how you can change the appearance for the material on a different level of people. So what I'm going to do is actually select the wall in order to open the type properties window. And then I'm going to go below two ways since graphics, in order to change the graphics, or in another words, that reacts with the material humbled lowest deeper level. So as you notice, we are going to be able to change the pattern as well as the color after a presentation on the wall. But you want to use in order to represent the wall and the snippet level. And in order to see this, you actually need to change the detail level to the lowest level and will be sent mine. You're going to be able to see that change on the appearance of the wall. But more specifically, undercut pattern on the wall, which is something that you can reverse way using control C. And I'm going to change once again, but the intent level in order to show you not only how you can change the material that you have assigned for the wall, but also in order to show you the difference between the current representation and the other representations that are already created personal materials you have within rabbit. I'm also going to show you that other materials within the material browser already have the Surface Pattern, pattern already assigned to them. So you can save a little bit of time migrating any project. And after changing the material, you're going to be able to see the result under different views of the project. So I'm going to use once again, the properties palette. In order to open the type properties window, I can open the material browser and with the sand mine. So by using this section view and also based on the 3D view, and we'll be able to show you the result of changing an appearance. Now this is something that you can easily reverse by using control C In order to electro material for the representation of the material based on the material browser.
5. Editing the Representation of the Material: Now in private, when you added the materials, we are going to find a few options in order to edit a pattern. And one of them is the alignment. And this means they are able to change that text alignment by just clicking on this option. Now once you do this, we are going to be able to change heparins based on the surface pattern by us and be aligned when their parents surface to surface pattern window. So with this in mind, we are going to be able to change that texture based under surface pattern. So this means that if you have any specific surface pattern, you are going to be able to change the alignment of that texture based on that pattern. And inevitabilities just need to click on the arrows until you see a change. Now in this case, I won't change this because I like going to create a render. Or in this case I'm going to use an option that is going to create an immediate change under surface patterns. And that is actually changing the pattern, but also using options in order to modify or edit the patterns. So by selecting the pattern for the foreground, I will be able to open the field parents window in order to change the patterns, but also in order to change the type of pattern. So in this case, I will click where it says Model in order for you to see parents very specific in order to represent a specific materials. So this means that you can select among patterns that are meant to represent the soil, but also patterns that are meant to represent the bricks. So in this case, I will select the following pattern in order for you to see the change. Now as a quick reminder, you can use the preview and we added assembly window in order for you to see the changes without clothes on the type properties window. And also as you remember, you can use to use in order to see the change while it's in the preview. But at the same time, you can use the steering wheel and the zoom options in order to see the changes. And as you remember, we are going to be able to change how you look at the war by you send a preview depending on your use and the preview into the Orient treaty, which is suddenly you can change at any point. So you're going to be able to proceed the wall while you Sandia bit assembly window or in another words, before confirming the changes. And then I'm going to click Apply and Okay, 1 second in order to show you the changes within the project. And then after base, I'm going to open once again by properties window. So I can use the live assembly window in order to open the material browser. Now as a quick side note, remember you can always stop and the material browser based on the Manage tab. However, in this case, the material browser is going to open while select endometrium of the war. And then after opening once again, that will patterns. You can actually see the difference between the model patterns and the traffic patterns. And at the same time, you can see that you have a search box in order to search for the parents that you want to use. So with this in mind, they're going to be able to search by center scroll, which is the same thing as you spin the wheel on the mouse. But also you can just simply type the name of the parent they are looking for. And at the same time you're going to find out the options that you can use in order to work with the parents, which are the options to edit to field pattern. The option to create an infill pattern, the option to delete a field pattern, and the option to duplicate half-filled pattern. So once you click on Erin, you will be able to edit the field pattern by using the pattern properties graphing window. So by using this window, you will be able to change the pattern name, but also you will be able to change it from basic to custom. We use custom. You're going to see now you will have an option to search, but also you will have a few other options, such as prowess and import scale. Night I start with a basic. We are going to see where you're able to sell like parallel lines, which is going to let stable the line spacing to and the crosshatch, which will allow you to use the line angle and the line spacing one and the line spacing to. So as you notice, you will be able to select among having just parallel lines are having the cross hatch in bulk to them will allow you to change the line, spacing one and at the same time, folk to them will also allow you to change the line angle. However, if you use a cross edge, you will have once again the option to change the line spacing to. Now when you use this Parent Center for you to know is that you won't be able to select the orientation that you want to use. So you're able to select oriental view, which means that the pattern will actually react based on the position of the camera let us use in order to display the project or in another words. And depending on the position the camera let us use on the people based on the camera that you're using. But also you have an option that is called Kb readable. Now as you remember, this option when it comes to the text, allows you to keep the texts without any changes regardless of how you render view or in another words, regardless of how you reach them, maybe vertebrae are using within the layoffs, which also applies to the patterns. So this means that keep readable will actually stop the pattern and rotating or changing based on the BYU. And we'll actually keep it the same way regardless of the camera. And last but not least, you have an option risk or align with elements, which is a little bit more complex because it will align the pattern actually based on the picture. So the picture will determine how the pattern is going to look. But at the same time, every element has a normal. So the material's actually take into account then normal so the elements, so in another words, the pattern will also take into account then normally be elements. Now these options are little bit different, one from the other. So it might take a little bit of practice in order for you to see that difference between one and the other. But also in order for you to see which one is better for you based on the project we are creating. However, in this case, I'm going to show you the second option that you have with the bank. If I click where it says Custom, you're going to see once again that search box and the option to browse. So if I click on Browse and we'll be able to sell like a hatch pattern where can use, which has a quick sino, you can actually import hatch parents for adequate. So in another words, this is the option that you will use if you want to import a hedge that you have inadequate or in another software that actually uses hatches what the following extension, which is actually bs and Peer, ASN, Apple DSM domain. So with this in mind, you're able to look patterns, but also you're able to change the input scale of these patterns, which will allow you to change the scale of the pattern that you sell like 16 important. However, some important for you to keep in mind is that the parents also take into account the scale, which by default is one-to-one, which is the one that you can change our NPV of the project. So as you notice, if you change the input scale, you will be changing the size of the pattern, but at the same time, depending on the scale of the BYU. Let's take so the pattern calls for change. Now as a quick sign sent in, they are able to do is actually open the files and then you can import your revenue or in another words, the files that I use and the extension ps and Peter, ASN, Apple and DS information by just simply use an opiate. Now in this case, as you notice, I didn't edit most of these options because these are options that are going to be based on your project. So once they are injured project or ones that you find files that you want to import the revenue. You will be able to test them based on the project that you're using.
6. Renders Part 1: Let's remember, when you go to the Bischel Styles, we're going to find a Bischel star on the treaty abuse that is called retracing. But then, as well, you actually have in option on to be controlled. But in order to greater render based on the beauty air, using as well under property, spell it. You have to render settings that are used in a return greater render these air actually based almost of the settings that you have within the mainland the window. So what we're going to do first is to placate the tree debut, and then I'm going to rename the tree debut the vendor. And once I have validated change and going to open the rendering window and under rendering window, you're going to notice that first you have the ocean for region, followed by the quality of the render in which we're going to find the setting options for draft medium hi best custom, which is based on the view and also the sanctuary. And next, you're going to have the output settings or, more specifically, the resolution, the wheat and the size ending here. You're going to be able to decide if you're going to be is in the screen resolution, which is based on the actual resolution of this screen For the result. In short, for the printer. No, it's you notice the higher this size or higher the resolution, the figure the image is going to become as well. This will affect the actual size of the image. So I'm just going to be is in the resolution for a screen. And then you're going to have the lining in which are going to be able to sit like this scheme based on exterior settings and into your settings, as well as to use of the sun and the artificial lining as well. We have the sun settings, which are based on the sun's 30 that we're going to see later on, and then as well, you will be able to personalize the background when it comes to wearing a sky color image for transparent as well as the option to adjust this picture, among others, they're disable until the moment of your great Orender. So once we Colligan render, they're going to see a window with the rendering progress in which are going to get the percentage the artificial lines, the elapsed time and the level completed, and by default, you're going to have a check. Races close Tyler when render is completed, as well as the option to stop the render. And once the renders completed, you're going to have the other options the world disable before such a safe to project, which will allow you to say this image within the project browser. That's where less the option to export in which are going to be able to this I which type of image cloudy when I use as well, less lending, and the directory in which you want to say the found as well. You have the option to show Morrow in order to go back to the model and as well, the option to show rendering in order to show the render once again. Now, if we close the rendering window, we're going to be able to go to the project. Prosser In other Project Prosser, we're going to find the render that we just greater among renderings which will allow us to open the render there were already created. Now there are two ways to refer you to control what you can see under rendered. You're creating one of them is by using the crop options that we have for any beauty which will allow you to use the cross region, he noted. To determine what part of the treaty Morrow is available in order to create Orender. So if we use deceptions and then we opened the rendering window one more time, he noted, a great Orender. You're going to see the ones the render is complete and you're going to give have rendered based on the crop region that we selected. But then as well, we can use the second option, which is available just by clicking with this region. So with this, we're going to have a window with the same controls that you have for the crop region in order to determine which every other treaty beer you wanna render without use in the region . So we do this. We're going to be able to click on Render one more time 100 rendering window, and it's a quick signer on a smaller region increases thespian, in which we're going to be able to create a render and after the runners completed, you're going to notice that the only thing that will render its the region that we selected and as any other render, were able to say this render within the project by using the option saved the project. And with this, we're going to find the render within the project Prosser as well. You will be able to use the options to show, model or show the rendering. Now, in order to creative render, you will need a treaty beauty Any noted great or open a treaty beauty. You have the option to use the beauty shop in order to go to the presentation panel and up in the soup mania for treaty view, which will allow you to open that the four treaty view or create a treaty beauty. But then as well you have the option, He noted. The greater camera, my use in the mouse, which is also the same option that you have. Humber Quick Access Tober. So we click deception for camera. We're going to be able to select the position for the camera by using the mouse and then select. How far you gonna go? My use in the mouse once again, when it comes to the left click Or, in other words, by clicking ones that left click on the mouth in order to sell like a position, and then you send them out once again in order to say, like how far you want to see. And this will automatically open the tree debut based on the way they use the mouse in Once on the treaty BUE, you're going to notice that you're able to select the crop region for the particular treat EBU, in order to sell, like What do you want to see? And if you want to modify what you can see within the treaty beauty, you're going to be able to use the steering wheels in order to do so by using the same options that we have available on the default treaty. Beauty, such as the option to orbit to wait wing too soon to pan to center toe work, and it's a quick parentheses. The option to work will be available because baby, for the treaty abuse that are created by you send a camera are already in perspective as well. You have the option to look and also the up and down. So with this, we're going to be able to modify what you can see within the treaty beauty. However, some of these properties will be available within the properties. Polyp such us The option for high elevation which very much is the same thing as and then but with an additional control. Their is target elevation. So we target elevation and I elevation. You're going to be able to control how you can see the tree debut based on the people or center, and, of course, the position of the camera. And also, as you notice by before the treaty, beauty is going to be over in perspective so you can change to build the camera torta graphic in back to perspective and within the property. Spell it. You will also find the standard options that you have for any other beauty, such as the option to change thinning and also the options to use the corrupt region within the property. Spell it, such as the probe you, the cross region visible, the far clip upset and the body for the far clip upset in case the U check races for clip upset. - So with this, we're going to be able to modify what you can see within this really BUE. But as well, you can modify the level of detail and also the official style. We just remember you're going to have among deceptions the option for Ray tracing. So if we change the quality to draft and then we click on render in order to have a faster render, you're going to be able to see the riso for this tree debut. And this is something that we can repeat as many times as we went by actually create and the review of the project. And while you're doing this, we're going to have a few options on the absence more such as the type of you which my Defoe is going to be based on perspective. And if this option is in check, you're going to have a treaty. Be directly cartographic. And if you're in check this option, you're going to have the scale available now. Swear less the upset value from the level that you select on the trip. Then do you have on the right it was. They have done this automatically wherever it's going to open the tree debut based on the default values they have on the options part and based on deceptions, rev it will automatically open a treaty beauty that you can use in a little great Orender. And once on the treaty BUE, you're going to be able to use once again disturbed will, he noted, to place the camera in the position that you went, and with this we're going to be able to try different options for rendering. So we make sure that this scene is the next year, son, only you're going to be able to create a render Onley based on the Sunday you have on the exterior. - However , if you use interiors on, only you're going to have a render based on the sun but on the highest palace, when it comes to the intensity of the sun, the highlights, the sun like race, the record by the sun and also the highlights. Now, if we take this and a step forward, we're going to be able to actually see the difference between the use of the sun and the use of the artificial life by Yucel Assistant up and the Sailing Plan for Floor one in order to add on a standard official light to the project. And once we have this artificial light, we're going to be able to open once again the rendering window in order to select interior certain an artificial in one's Republican render. You're going to see the way, says artificial lights and stare off zero. You're going to have the number one, and once the render is completed, you're going to notice that pulled the sunlight and they're deficient. Light are included on the render. So if we change the option to interior artificial on Lee, they're going to see that the only light that is included on the render is there official light that we included on the project. And this means that you're going to get a render very will look like we're creating Orender at the middle of the night and wants to render is complete. We can go once again to the rendering window in order to change the lining for exterior son in artificial. And if we do this, we're going to get a vendor that is going to include both the sun and the artificial life. However, it's going to look a little bit different then interior lining. So this is just for you to see that in your abuse are actually better within their settings when it comes to the lining. And if you want to control the lights to you, great, you can do it by clicking where, he says. Artificial lights underwent a window, and just for you to see how you're able to use the assumptions were going to great. Two more artificial lines by you. Send them other finals so we can go once again to the rendering window. Inevitably, worry, says artificial life. Any here, you're going to see their artificial lights for tree debut to which is the one that were currently using. And you're going to notice the columns with their checkbooks, which works in order for you to the site which one is on or off, as well as the main column. With that value from 0 to 1 and on the right, you will have the fixture options and also the group options. And if you can resist new, you're going to be able to create and you go for the lights to you have on the view, and with this we're going to be able to select an artificial life in the rhythm of this line to a particular group. But also it will be able to add an additional group in order to move the remaining lines to the new group. And once you said like the group, you're going to notice that pulled allies there within the group, happier selected. And if you click on any of this legs automatically, you're going to see that life selector, undertreated view and within the options for the group. You're also going to have the options to rename the group. But then that's well, you're going to have a nuptial to edit the group, which means that you're going to be able to remove an artificial lying from the group. But as well you're going to be able to wear it once again. No, with a lead, the group al dramatically, or the lights that were assigned to a group are going to be within their own group lights that you have within this window. And if we uncheck recesses on group lights and then we click on OK and then render, you're going to see that the render doesn't have been much of a difference. However, this is because the type of line in the were selecting so we choose into your artificial only, and they were rendered this one more time. You're going to see that you have the material projecting life. In other words, it has an amazing value. However, if you look into the shadows, you're going to see only the shadow created based on the line that we're dealing unchecked . And then if we go to artificial lights one more time, he noted, to turn on the lights that were already in check. We're going to be able to be in the lights based on the values to you see right now, which are still from 0 to 1. And if we rendered this image one more thing, you're going to see that the shadows are going to change based on the intensity of the slights, which is from right to left 10.5 and then Syria 0.25 And by changing the quality, you're going to be able to appreciate this a little bit more. - And with this in mind, we can also go back to the tree to be one in order to play a little bit with deceptions for lining. But as well we're going to change this guy, do no clouds, so you can see the full impact of the cities they were selecting for the life. So we're going to play mostly with the artificial light served. They're using some Onley. We're going to use a steer artificial line, artificial on Lee. And with this we're going to see that the only lights that affect the project are the artificial ones that you have insight. So as I mentioned before, this type of lining is mainly use for render sterile mental resemble how the project would look like at the middle of the night. And it doesn't matter if you have more clothes or not, because they're not going to appear on the render. However, their waste Teoh a night sky to the render, which is something that we're going to see later on. So the last option that we're going to see with the artificial lights and the sun it's going to be exterior son in artificial, so you can see the highlights operated by the artificial lights as well as the sun on the treaty beauty
7. Renders Part 2: and I went great into render you have options in order to change the background unless you notice among deceptions, we have the absence to add clouds or removed the clothes. However, we have another option in order to change the back room to a single color. And once you select this option, you're going to have the color window in order to decide which calorie when I use. And this is sexually very useful in case the use border ship in order to curator vendor, which means that you're able to create a background when in a specific color. You know that you said it's a mess, so this means study. For example, you remove the trees and use this option in order to great immense you will be able to use for a ship in order. Decorator render with the assets and the resource is, but you have info to ship as well. You're able to use a transparent background which will allow you to completely remove this guy in order to add it later on, in order to have the main focus on the building and on top of this ableto at your own background as an image. So, for example, if we click, deception were able to sell like the image that we want to use a background and then we'll be able to modify the scale and the upset, which means the absurd, the image based on the original position. So with this, we're going to be able to change the position, place on the weight and also in the height of the image. And as you noticed so far, everything that you create a major change under render you will have a message on top of the image in order to tell you that the render needs to be redone once again as well, you will be able to choose between original size, a stretch with and height, which is nothing more than the options in order to scale the image, to be adjusted, to be known, adjusted, adjusted in both sides, but just that just in the wit and adjusted when it comes to the height. So if we leave the options by default and then you Gilligan render, the result is going to be a render based on the image we were imported in basing this render, we're going to be able to adjust exposure things in the image or render that we just created. Now. These options are actually based on your own personal tastes or the intended use for this render because as, for example, the exposure pallium, as you notice allows you to change how much the sun is going to affect the image, and every time that you change, one of these policies are going to be able to apply it in real time as well. You will have another options in order to change the high lace as well as the intensity for the shadows when it comes to how darker or lighter they're going to be under. Render the work rating. - That's where that's the separation based on any scale from great intense and also the wife going from cooler toe warmer. Now all these values can be appreciated on the fields that you have next to the name off the paramour or property they were changing, so you're able toe input the value manually. Within this feels any for any reason you don't like the balance that you're using, your able to use the option to reset in order to reset this palace to the fore and the palace they apply or change within the exposure are going to remain as the four values every time they went to Great Orender. Based on this view, until the moment that you changed once again or you use the option to reset and one of the last things that we're going to see are going to be the custom options that are based specifically on the view. So once they select this option, you will also need quickly edit in order to customize the way that you want to create the render. And this will allow you to have a window for render quality settings in which are going to have the quality setting for custom. You specific. Which means that with this, you're going to be able to decide how you want to pray the render based on the render engine that you have within river and on this windows. The major options. They're going to find its life in McTeer accuracy, which it comes down to simplify as an approximate materials in shadows in advance in advance as precise material in shadows, which only means that you're able to select the level accuracy when it comes to the rendering engine or process they're going to be using. That's where less surrender duration, which might be for, is going to be by level from 0 to 40. So it will start with this option and will live into would simplify approximate materials and shadows and their weekly can. Okay, we're going to have a render in which we're going to see the two levels represented. We need the Progress Park as well as you noticed. This is fairly similar to the rendering quality for draft, but then as well, if you want in a specific rendering option, you're able to select it within, disrupt them in West. They have done this. We're going to see the basic options. And as you notice automatically, you're going to have great out both the options that you have for this particular quality setting, which he said bands and rendered by Level 20. Any future STI option off copy to Clipper going to be able to apply the same settings that you have on this rendering option as custom abuse specific and this is so so a way for you to see where the severance the river uses for the quality setting searches high and also the quality settings there are used for a meeting, and as you notice, you're going to be using the simplified option with a render level only a five. And on the option we're going to have the minimum settings in a little operator render. So if we choose to change the settings to advance and then as well rendered by time, you're going to have a render that is going to be based on time instead of the levels. So the levels that river is going to be using narrative creative render depends on the time of the render. So in the elapsed time, the render is going to be completed once it gets to the time that you decided. So if we choose to change this one more thing, the way says under satisfactory, you're going to create a render that is not going to have a limit when it comes to the time and the levels so you can have as many levels as you want. And this means that you will need to click races stop in order to complete the render, and every time they live on the stuff you're going to get this window in order to confirm that you want to cancel this process. And once do you do this, you're going to get They're going to get a render based always don't have for you allow it to go at this Listen, have anything to do with it I per offender that you're creating. So this means that this applies to any of the rendering settings that you're using and we keep having the same options to export of image as we're less the option to say the image on the project. So every time that you choose costume be a specific, they're going to be able to change the settings as many times as you want. And every time the you choose custom, you specific you're going to be telling gravity greater render based on the settings that you have on this window. Remember that when he goes to the group region for this beer you have the same options as with the elevation or this section. However, as you notice these air going to be a little bit different when it comes to a treaty of you , because you only have with and high but as well. We were able to change the field of view over base in this skill, which are the boxes, please. And this mainly applies to the photographic beer. So if we choose to change this options, you're going to notice that the field abuse going to change based on this Bali's now this Bali's can be applying based on the resolution, the when I use for the image. So this means that with this, you're going to be able to change the crop region based on the resolution that you wanna use, you know, that decorate the render such as K for K A. K and so one with a table that we have been using and this palace that you can notice, You know, that change the resolution for the image by using the camera and s a quick reminder. Remember, the you can use the steering wheel in order to change what you want to see within the image . Now, if we use contro, see, we're going to be a literacy the option in order to export or save an image based on a treaty BUE without any operating a rendering first. So in order to do this we click on deception, which we haven't felt up once we hope we were, he says. Export. And then we also Khobar, where he says, images and animations in one simply recess image. You are going to have the export window and specifically for the images and within here you will be able to choose the export type of fatherly. When I use the father, you want to use this settings that you want to use, he noted to export of the image as the four month for share abuse and not sure abuse, which is based on the options for collaboration that you have within rebel, which is based on the settings that you have for shade abuse and no change his views that you have within the image, which is based on the settings that you have under control. But when it comes to the styles, unless remember, some of these options are mainly used in so four sisters photo ship daringly quickly going okay with a settings. They're going to have the resolve of this image save on your computer. Based on the properties that we select as well, we can re export the image one more time in order to change the settings they were going to be using, he noted, to improve the quality or resolution of the image. Mason the option for a much science. So with this, we're going to be able to change the maximum amount of pictures that you're going to have based on either a particle direction or in a recent of direction. And beneath this, you're going to have also the ocean off soon, too, which we're not going to be using because, let's remember, you're able to use the prop region in order to this site when you want to see before exporting the image so we can eat. Okay, one more time and we override the existent foul. We're going to notice that image going toe up day based on the size that we selected. Now we do this one more time. But instead of overriding the image, we actually changed the name and then we change in option in export range from car imbue the official portion of the Caribbean you're going to notice. Then, instead of exporting an image based on the cross region, you're going to export an image based on everything that you have available within the joint area. So when you're using this option, you can actually take advantage off this room option. Now you have on the right now this option per fishable portion of the Caribbean A So so based on the limits, they have whatever solution. And as you notice, this options are actually based on the Bischel styles that you're using within this view. So if we change any of these styles that we have on this current view, we're going to be able to see these changes reflected once we export of the image. So if we do this and then we override the existent image, you're going to notice that the images going to update mason, the style that you selected And if you want to make sure off the settings that we just select it, you're going to be able to use the right click on the mouse. You know, they do open this up mania so you can click races, properties, any here. You're going to find the properties of the image when it comes to the pixels in the bit that this size and so one, and as you notice the values that you have for the pixels when it comes to the direction every Cento, as I mentioned before, out of the same way as they have for the win, unless penalties as his mentioned on the website or in some 1000 you're going to see in the resource is you have a few options in order to render within rev it, but as well you have a few options united to render on the cloud. So if we go to the beauty shop, you're going to find the other option in order to open the rendering window as we're less the shirk which is our Sandra over Paris and rubber, as well as the option to rendering clothes with the shirker power soon rubber nds and David which will allow you to sign into the out of this account in order to have access to this feature. Yes, well, that's the option for render Gallery with this record are assumed river NTS in George, which will also ask you to access to your other this account in order to see the rendering gallery. But you have on the cloud. But then I swell. You can actually sign into you out of this account by using the user interface where it says sign in on the in for center So with these were going to be able to optimise Metiers in a little greater renders. But unless well, you will be able to export images based on the abuse and as we're going to see later on, based also on the sheets in order to present to a customer or to your teacher.
8. Walkthroughs: In Revit, If you want to showcase your project, but you just need to present it to somebody else. You can go ahead and do so by using the upshot, the watcher, which you can find under Quick Access Toolbar and also on the Build tab. And once you select the option for the word true, you will need to select a bad. May you send their left-click on the mouse in order to represent the precision of each gamma, the U12, to the watcher. So this means that every time that you click on the mouse, you will be adding one camera in the position where the mouse is. After finishing with the true, you will need to go to the ribbon, click on the green check in order to validate the water. And once the water is created, it's also going to abuse selected. So you can edit the walk-through and also so you can delete it. Now if we then lead it, we can create a new one where you send the BWT that ns you notice you're able to create a walkthrough on a treaty BYU and also on a bland beer. Once the water is graded, once again, it will be also selected. But aswell, if we select the water, you can go to the Project Browser and you're going to find the truth I and this area. And this will allow you to rename the walk-through so you can use the properties palette in order to change the properties for the watcher as well, you can open the water from the project browser. Under water, you will be able to use the tabs in order to go back and forth within the abuse, the IUCN, and the walk-through. And once you open the walkthrough, you will notice that you have a crop region as you are creating a render. Which means that from the Properties palette, you're going to get the same properties as you were modifying a treaty BYU. However, if you click says at the walkthrough, you will have on the options bar effect controls the UK and US in order to actually modify the walkthrough. Like for example, the option to select the frame in which you want to focus the camera. And with this, you will be able to manually modify the elements the yuan to see within the camera may use in the steering wheel as well. Within this controls, you will be able to go back and forth between the frames by selecting next frame, which is the next frame that you have on the walk-through or the previous frame with since you back one frame or the watcher. But then as well, you're able to select next keyframe, which is nothing more than the camera precision, the US selective they use in their mouse when you're graded the walk-through. So on, depending on how many clicks with the mouse, actually grading one key frame for the walk through. So you're able to use these controls to go back and forth within the frames and the keyframes. Now I edit them the walk-through. If you don't like the position of the camera, you can always reset the position of the camera too high. Whereas at the beginning, and if we want to edit the water as search, Neumann need to go to a plan view by three dB in order to go back to the gamma positions that you have on the word true. Or in other words, in order to edit the frames are the key frames that you have for the walkthrough as well, while loosing a plan view or our 3D view. Now able to actually added the batter the word true when it comes to the controls. And as you notice, you actually have four controls at the camera. And the Add keyframe, REML keyframe. And if you use the camera, you will be able to modify the camera for the entire walkthrough may use in this controls. And this also means. If you select any of these red points, which are actually the keyframes there you selected when you created the walkthrough, you will be able to modify each gamma position and based on this particular controls. However, every time that you added the extent of the field of view, you will be added in the field of view for the entire watcher, not just for the position of the scammer. So the one thing that you change with this control is where you want the camera to look. And then if we click on up and work through, man going to go to the keyframe in which we are. And as well, you're going to give you some of the options that you have under revision in order to navigate through the watcher. Or just simply go from keyframe to keyframe by using the mouse NS. You notice on the Options bar you get the frames, but as well, the total frames that you have for this watcher. As you notice the fact look upset is very shirt on this particular walkthrough. So we can edit them by simple properties that we serve and we weren't gradient renders in order to extend the frankly upset. However, as you notice, all of the controls and available, which means that you can go frame-by-frame or keyframe by keyframe when editing the gamma positions and wants to work through is open. You're able to use this option in order to play the word true as we have it so far as well, you can cancel the walk-through Escape on the keyboard. And once they have done this, you will go back to the frame from which started the watcher. Now this also applies to the SRO styles do you have on the control bar? So this means that you're able to change the b Show style of the cameras that you're using in order to grade the water. So you can actually get our walkthrough based on this particular styles. And as you notice, the ray tracing option is also available. However, I recommend you use in this because you actually have an option in order to create a rendering walk-through. However, this is the one option that consumes the most research says out of your computer. And also you can finish the work through May you send the Escape on the keyboard. And as you notice, every time that you believe outside of the watcher, you're going to get this window that says B12, quick edit in the watcher. So with this, you will be able to stop the addition after watcher anytime they want. So if we change the Bistro style, once again, you're going to notice that you again change or modify same options that we have with any 3D view. In order to change out the camera, the water is going to look based on the resolutions that you want to use, whether it's for the k, for k, k, and so on. And you can give you spin the wheel on the mouse in order to modify by u1, the camera at BC. However, I don't recommend you doing this because this can drastically modify the field of view of the camera. So within the walkthrough, I actually recommend you use in as far as two k by using this options for properties for the crop region. And these options for risk solutions actually modify in the field of view that you have with the camera. So in another words, it can actually be better if you modify the resolution of the render as therapy, adding high Bailey's to the width or the height of the graph region as well on the options bar able to modify, let back of the camera. As well. You have another option right next to where he says Size crop, which allows you to reset the target of the camera based on the changes that you do to the graph region as well. While the water is still selected, you can go to a floor plan for a 3D view in order to change the controls for the work term. And with this, we are going to be able to modify that bad. But as well able to go to the active camera controls in noted to readjust the position of the camera. And this controls can be also seen while using an elevation or a section of the project. So if we open an elevation view, we are going to be able to adjust the height of the keyframes by you send that Batman trolls as well. You can keep using the same options that you have on the ribbon in order to navigate throughout the phrase Steve, have for the water. Now once we finish anything, the positions of the cameras, we're going to open the walk through one more time so we can see the result of the changes that we did with the water. And if we go to the Options bar and homework and number of phrase that we have for this lecture, you will be able to notice that this is reflected as the total number of frames that we have for the watcher. And if we use the last controls that we have in order to modify the water, such as the option to add keyframe. And you will be able to see that one soup ligand and the bad that we just created automatically annual keyframe, it's going to be graded based on the position that you selected within the bat. So this means that now you won't be able to modify the camera. And also these new pattern. And this also means that sense you have the option to add keyframes. You also have the option to remove the keyframes. So if we remove the keyframes and then we click on play, and you're also going to be able to see all the procedures are changes within the camera in it to the BYU or in a 3D view without actually opening the walk-through. Now you can create actually as many walkthroughs as U1 at any point while creating your project. By these also means they are able to change the options that you have on the options bar, white gradient, the washroom. Such as the option to change the view from perspective to our topographic myosin, this checkbox, which will allow you to change this scale. But also you can keep changing the level that you're using as a reference, as well as the offset from that level, which means how high you want the camera to be taken as several reference the level of the US select them. And if we, for example, this walk-through, based on the assumptions, we are going to notice that you give having the same total body when it goes to the keyframes. But also you have the same options are controls that you had before in order to navigate throughout the water as well. You can see the change in between perspective and orthographic when it goes to grade and work trues. And as you notice, all the walk-throughs also share the same settings and options, such as changing the Bistro spouse and so on. Now if we go to Select and you will be noticing that the camera is very different from the camera that you have created new center perspective option. This means that you have to be more precise. Because as you notice, this box will actually represent what you can see within the water. So V1, I use orthographic, recommend you that you've placed the bat as far away as possible from the project that you want to showcase. So if we modify the walkthrough just a little bit and we click Play, you can notice the have a better view, are better representation of the project. And also you can keep US and the project browser in order to open the Watchers. But as far in order to change the name for every watering so you can open the water may use in the project browser or make lick your waist says Of by watcher and the raven. And once we finished the playback of this walk-through, we're going to open the additional settings that we have in order to control how many frames or in another words, out of the water is going to be by selecting the walk-through and clicking where it says 300. And once you click, reassess 300 and you're going to have the walk-through frame window. And in here you're going to be able to select the total number of frames as well as the frames per second. So by changing this values, we are going to be able to change the total time of the watcher by, for example, changing 15 for 30, you're going to get a total time of 10 seconds. And if we double the total frames from 300 to 600, there are going to have 20 seconds with a better resolution. And as well, you're able to modify the speed options between keyframes. Ion check and waste says uniform speed. So every time you change one of these values for the accelerator in any of the keyframes. The other ones were ledgers in order to give the total frames, or in another words, the total time of the word true. But then as well, you are able to change in the speed from one keyframe to another buyer just then the column where it says accelerator. However, the accelerator is now going to change the total frames. So this means that the other speeds will let just based on how you modify one of the accelerators. So it would change this value back to interference B. And going then be able to check recess indicators in order to get an indicator for a certain number of key frames. And you will be able to customize are many key frames, U1 within one indicator and the other. Now, we've exported the walkthrough. The only thing that we need to do is make sure that the EU or underwater first or otherwise you're going to get our message. We're trying to go to the File tab and then you send the option to export image and bank powering where he says images, and then click on where it says water. So if we open the watcher and then we use the option to export images and animations are going to be able to have this window in order to assign their land and the format for the watcher in adult to export it. So in this window, you will be able to select all the frames or a particular frame range based on their star frame and then frame. And also you will be able to change once again, the frames per second, as well as the visual style that you can use in order to export the animation of the walk-through. And this will include even the option to export the animation as surrendering. Which means that every frame at the walkthrough will be exported as surrender, which is the heaviest option they're going to have within the visual styles when it goes to the time that is going to take to explore the media. And from q, you are going to be able to change the dimensions, may send the size of resolution that you want to achieve and also assume based on the center of the region. However, if you already know what you want within the graph region, that you don't actually need to use this option to Zoom. And last but not least, you're able to include that at time. And they stamp, which will allow you to know that time. And they in which asserted the watcher, as you will see once we check this option. So we're going to check this option. So you can see how this stem is going to look. Now after you make sure that you have all the settings sudden everything they were looking for, You just have to click on, Okay, and then you're going to have an extended window in order to choose the directory in which you want to save the worksheet as well, you're able to change the name. Also, if we want to explore all the frames as someone single video file in average format. Or if you want to explore every frame as a single image, Mason JPEG, or even a PNG file as well. You're able to click on the options in order to change the options. You already saw. And in this case, I will be used in AVI files in order to create a video. And after you click on Save, you will be able to choose the video compression from other codecs that you have available. And this got x are actually video encodings that you can use in order to encode a video for many of them actually installed on your computer may have particular video software, or just by default, open in its system. So in this case, I will use the option for a full frames uncompressed. And then after you click on Okay, you are going to see the watcher lay back on your computer one more time in order to show you the progress of the export. And once this is finished, to just need to open the watcher under directory or carpet in which you chose to save the water. So you can see the result, animation or work through that, we export it. And as soon notice on this stamp, you aren't going to get the actual frame count that you have when the media so that time and they stamp for the doctor is sexually the frame counter represents the progress of the media when it comes to our work trip. So with this, you are going to be able to present an animation based on the project that you're working in.
9. The Solar Study: work aerating your project in Grab it. We're going to notice that you're able to percent your project, but also able to great analysis the venues in order to get more information out of your project. One of the types of informations that you can actually get is based on the position that your use it in a little prayer. Your project and this one is called the solar study. And in order, the greatest only study we're going to duplicate on existent really view that we have been using so far, which is the treaty view that we use in a retrograde the waters which will automatically open you the copy that we just creative. And then we're going to rename this view solar study. And once we created the solar study, we're going to need to use the shadows so we can see the result of the solar study. So in order to do this, we're going to click on the icon for Shadows and the Stars for and then we're also going to click the icon for the Sun. And then we're going to click races, son. And with this, we're going to have this in that window in which we're going to be able to select between using the specific project location with a date and the time step for we're going to be able to continue with the current settings now in this case and going to be used in the first option so we can use the information that we already have for the project, meaning that we're going to be able to use the information that we have been using so far in order to create a project. And thats well, you're going to be able to notice in the Treaty of you a few elements that we haven't seen so far, meaning that we haven't used them at any point were bringing the project now in order to appreciate them a little bit better able to use the crop region, there were allows to edit where we can see a literal area so we can extend the preacher but as well if you don't want ad it across Reacher, you're also able to use the option for tonight the crop so we can remove the crop creature which will allow us to see all the elements that we use in our little weather, the solar study and as well as we remember, if we use double click on the will of the mouth, were able to apply this an extent so you can see the treaty of you at the same time. Now the elements that you're going to have in the solar study are going to be based on the type of silly story that you're going to great. However, many of these actually applied for the solar studies at the same time, So the basic elements they're going to see are the time controls, Richard the blue letters that you have with the time now. This time it's actually the time other they were using us a reference that's well, you had a really bad, which is The blue line represents the path of the sun and as well. You also have the sous fear, which represents the sun. Now the dilemma represents the position of the sun in the sky at the same time every day over the course of the year. So in this case, the dilemma is represented this way because the position of the sun is pretty worthless thing when they were selecting for creating this type of solar study. Number of other things we're going to see is the grand compass they have on the bottom, which plans descent that in shows the projects orientation relative to the true north that they urine using in order to create this sort of study bridges, space and blue notice as well, and the lettuce lee having color orange, which represents the sun rays in the sunset. So as you notice up to this point, the idea of the solar study is that you're able to see the impact of the sun on the project at any point. But it's in the sense sphere the represents the sun as well. Let's the shadows they're creating by using the sun. But this also means that since we select the first option that takes into account the position of the project, we're going to be able to go to the manage tapped. And by using the product location panel, you can click on location in order to get the location, whether inside window so you can actually change the location of the project without changing the additional information that you have based on the location. Let's remember the cordoning system also takes into account the location, meaning that when it comes to the site, you will be actually using the current information. We have one in the project. So in this case, and they're going to change the coordinates because we're actually using the coordinates based on the floor plan the way using a retrograde it up surface. So we're going to live the location that we have a baby for with a project which, in a really Essen area should be the same. Location the use in auditorium and create your project. Now it's a quick signing when you're not over in the cellar study or, in other words, the study area. You're going to see this path in color orange, and this is because on this type of study in the bed that they lived at and the story area are also the same ones they have for the 11. So once it's changed information that we have in this perimeter and you click on Enter born in space under during area, they're going to notice that these were the represents. The sun is going to move to the position unless that the value exceeds the value of you for the sun rays and the sensor, unless that that I were exceeds Thea or do you have for the sun rays for the sunset? Now, if you don't want to change reseller study by using this graphic pedometers, you can also go to this terrace bar frankly, once again in the 80% so you can click races, sound settings, and with these we're going to have best censoring swindle now. Within this window, you were going to have the type of solar study. That's where less the prices well, you have available for that type of study, the settings of the solar study, which are going to include the location that they at the time that's where listeners checkbooks, very says. You sure it's settings? No, we're not going to use deception because it's a different type of work that we're going to see later on. No one of the settings that we're going to be using that can actually affect the look of your project is the one that issues in order to change the level that is uses of reference . So we use this rather than that we have on ground planes that level you're going to see that the elements that make the solar study actually change based on their level and these settings takes into account both the levels that we have on the project. However, if you inject the settings, you're going to notice that the elements that are used, you know, to represent the seller study actually moved to the base of the project. And this can be appreciated a little bit more by using an elevation. So we open this elevation and then we used the options that we have on this story is part in order not to crowd the innovation, but as well. The option percent done automatically after weekly going use this best. If I project location, they end time. Instead, we're going to have a sudden study represented the elevation and with these were going to get an idea where this son studies actually located based on the project. Now, remember any blue letter that you haven't read? It can be a written by first selecting it by using the mouse and then by using the options we have within this field. So this Texas actually dynamic parameter, you can add it in order to get an effect in real time. Now we can also colonel in the shadows in order to see the effect of the solar study on the innovation. Now, even though that relieve you and know there will be a little bit difficult to see when the seller story actually is. However, if you pay close attention to the cross here, the represents the projects orientation, you can see that the solar starting this actually below the project, meaning that the seller study sexually place on the bottom of the project. - Now we move on to the other types of similar studies that we have available work rate in the project. We're going to be able to go once again to this son settings window by using. The stories were so we can actually change the salads Study to a single day's really starting. And when sick, Lavery says, Single day, you're going to see the settings have changed. No, I'm on this new settings. We're going to see that now. The time is not based on one single Bali for the hour, but actually to which means that the time is now based on a range. Even in this path, they're going to have the study area, which is represented by the section of the pet that has this blue. That's now in this type of solar study, the scent but in the study area are going to be the same and then as well, you have the option for certain ways to sense it as their checkbooks. So if you click on this cheque books, we're going to see the way since friends, you have the number well, and this is sexually based on the time terrible that you have been loved. So since the timing Terrible. It's one hour and in theory you have what I was peeping sundress distance that the body for the friends going to be 12. So if you change the time interval, for example 15 you're going to have the frames Bassem four frames per hour or, in this case, 47 claims total because in this case it eliminates the last train. So if you could weaken okay, you're going to notice that it's a love story has changed a little bit, which is sending the weekend see, starting first by the fact that you actually have now two parameters in order to change the look of the solar story. And as I remember, the look of the solar story is meant to represent what the service story is taken into account. So in this case, we're able to separate that they looked at from the story area by changing this values, which is also something that is going to change their parents of the dilemma. And it's a quick Steiner, remember, you can change its values by your so using the same settings window. And this is something that we can do by only changing one of the parameters or by changing both of these parameters within the seller study. Now this bodies can actually be changed once again. So we opened the sun settings window one more time. You're going to notice that we says time, you're going to have the same values or hours you have under dynamic parameters. And if we click on OK, we can also see how you can also change that they So we go back. We're still days, so let's study. You can notice that you're able to change the day by using this field for the selection box in Rio time. At any point were great in the project but as well you go back to a single day, they're also going to be able to change the date the same way. And as you noticed, this will also be reflected on the graphic representation of the solar study within the euro area. So you can change the date on a single day. So started, but also only still solid study. And just to clarify, both of the days are actually independent one from the other, meaning that the studies that you have within each type of solar study actually independent from each other. So if we move along to the market, they sort of starting, you're going to notice they have the same feels that you have on the single based on the study, however, something is going to change when it comes to the day, not only on the fact that the day is different from the one that we selected for the single day and they still day so the study. But now you have a range. When it comes to that, they meaning that you have in a starting day in and then they. So this means that now you have more balance that you can change within the seller study, so we play a little with with this parleys were going to be able to see the results in real time, as well as the restrictions that you have bring rating a multi based on the study such as, for example, then limit when it comes to the hour that you have available. So we start changing this policy. We're going to notice that it's solar study actually buries the premiere of the values that you can sell it. Now you have to be careful how the valleys can change this other study such as, for example, that checkbooks off son race to censor that it's a still available now. The motivation of study is the one that was separate from the an element from the story area, and at the same thing will greatly is your representation that is called Doris an area. So with this in mind, I'm going to play a little bit more. But the multi they saw the study when it comes to the range for the time and the range they have for today, which is something that we can always change by you sanderson settings window or by using directly the Solis study that we have under during area Now by using the stars bar or, more specifically, the ideal for person, you're also going to have an additional option that you can use in a record previous, less solar study. So this means that we're going to be able to review the multi vessel is studying the single day solar study as well. That's this still sort of study. So in order to appreciate this a little bit better, I go and could change a little bit. The settings that we have for the solar studies but as well I'm going to be changing the base, your style, to hear the length. So with these were going to be able to appreciate a little bit better that changes that we do for use in the Previa. Now the mama directly from previous surveys study. We're going to notice that on the options for you have the frames the day that time in a player very spring. What's the same one that we have for the water? So if we start playing with the frames, you're going to notice that the position of the sun and, in consequence, the precision of the shutters based on that for you. And if we open the same settings window, you're going to notice that they're saying values that we have in this psalm settings with her out of the same ones that we have on the options for when it comes to the date and the time various represented within the brain, which is between the sunrise and the sunset. And since we're not a brain one, you can actually use this controls, you know. They moved to a previous keeping a previous praying, the next frame for the next different. That's where less the place and let's remember the key friends are based on key positions at the camera, which in this case are at the beginning and the end of the premium so we can cycle through the prints that we have in the solar study. And that's where we can always change. The number, keep rings based on the time intervals that you still like various interest in settings so we can always go back and forth between the cape rings. But that's where we can always use play in order to play the entire solar study. Now, this is something that we can do even of the treaty abuse, meaning that after turning and listen and the shadows, we can appreciate the effect that the sun has in the project by using this solar study and also we can use the same settings window in order to change the settings that we have on this sort of study. - Yes , well, we can't even review this other study the same way that we they use in the Treaty of you. So everything is bring much the same across old abuse they have on the project. And this also applies to the still solar study. So once again, you can always go back in court. But doing this still Solis study and the single day sort of study now by using the project process, but can also looking for that really abuse that you want open. And you can always play with this sentence. They have a missile settings window. You know, that changed the number of trains that you want the Caribbean and always in northern Europe , like changes and ready You sleep with a gun, apply and then OK, and then by using previous solar study, you're going to be able to see all the options that you have available in order to pretty the solar Senate. You're going to be able to see the same control. So you have integrated previously sort of study so you can actually change the frames as well. You can always just click and play. So once you're finished modifying the studies, you only need to believe in apply and then OK, in order to see the results in real time. But as well as you notice the solar studies and specific your baby that you're using, so it's not going to be showing as an independent view absolutely with the watchers. Now let's recommend using lying in order to see the full effect of it shatters. So by using here in length and also, by using the multi days on the story, we're going to be able to taste a few of the settings that you have on the sun settings window such a sunrise, this sense that when it comes to the time that time in terrible's as well yesterday no, we actually open another treaty of you were going to be able to follow the same process, step by step so we can see how the solar study affects the project. And in this case and the sun settings way you're always going to have. And as you notice Anderson settings, women were always going toe to sort of study types and always will be able to change the type of solar study in real time as well as the studies that you're going to be using for this particular study study. And, he noted, Grew up like this settings realistically, unemployment. Okay, so once we change the studies for the motive a soulless study, we just click on a plane. And okay, so we can use the option once again in a little previous on this study and with these we're going to see. But you can use the same controls, you know, the previous summer study as well in order to complete the seller study. So it was in real time Bradley was going to show you the effect of the sun considered that you actually using the project location, they anything that you want to use, as well as the cordoning systems based on your project. But what happens when you click some fun in the nuclear races continue with the current settings. Well, the first thing that you're going to notice is the ones that you turned in the shadows. We're not going to have any significant change from any of the buttes, however, weren't see open the sun setting swindle. We're going to notice that on the type of solar study you're going tohave selected. That one there is go lining and under studies were going to be able to select the assembled and the altitude. No, you're not familiar with this values. We can always research them, but in essence they are similar. And the Ardito are based on the position of the sun related to the project or, more specifically, relative to the center of the project. Now, the center of the project is going to be based on the cross here that you have in this sort of study. No better way to appreciate these experiment. Check away says rightly to be. Now, once you're inject reception, you're going to see that you have been like entering on one specific cultic. Now, in this case, the arbiter Storify the grace, where the angle Ferguson is located. It's 100. Verify the greats so quickly gonna play and then we activate once again. Paralytic. Toby, you're going to notice that the sense actually changed and this is speakers. Now, this police are actually based on the position of the camera. So listen, actually, please based on the camera. So we changed the altitude 45 degrees. You're going to see that the light enters a little bit differently and if we change the assembled, you're going to see that now the sun is in an angle in relationship to the camera. Now, if you want to look at it, If there was a court innings the S and will be space on the way and the ex access well, they are little is bracing to see access thinking and go account the origin as the camera for us, the original the project. So you know, they don't look this a little bit better. We're just going to click on OK, so we can open the view that we created for the seller study. We can open once again the some settings in order to change the solar story type lining and one So you have done this. You just have to apply the same valleys they have in the treaty of you. And then we just have to uncheck related to be so you can see the same result that you haven't been treating you the way he was before. So here you're going to notice how this pilots actually change the position of the shadow. That's while you're going to notice the official change in the cellar study, meaning that you're going to see a difference when it comes to the sun and the ground compass. - No , we change system settings once again by checking way says related to be in their weekly can apply. And then, OK, we're going to see the body repairing the project. You're actually going the greater change on the way that this son impacts the project. So in order to prevent this, just have to uncheck once again where he says, related to be so you can choose either of those two options depending on where you want to achieve with your service study. No, you don't want to modify. Were nowhere again. This study is that you have for us with the study you can actually save your settings as a preset. In another words, from the censoring swimmer, you can click races, studies, and once you have done this, you just have to select the name for the settings that you want to say. So once you selected the name, you just have to click on OK, and this one will appears on the text they have for the presets. There will be able to copy the recent renamed The Preset. Yes, well, it's still in the precinct, so typically going carping, they will be able to copy the priests of the selection minutes. Well, it will be able to rename that precept, and that's always we will be able to delete the presets. Now, if you don't leave the presets, you can always go to a different type of slowly study. You know, they change the settings so you can repeat the same process, and you can see in real time how the setting sexually changed depend on the person of your selected. So when it's Republican applying, we're going to see the studying supply on the solar study. Now, by the light of the recent that I just created, you will notice that you're also able to sell like the places they have by the for with rabbit, meaning that you can choose between all this presets. They're created for a particular type of sort of study. In order for you to see how this plays, it's actually change the appearance of the project based on the scent. Bring, in other words, how this presets affect the seller study, but as well, you will be able to Brady that places that you select them by your sin distance settings, window number rivers and the changes that we have done so far are also able to change the seller's story by you. Send the right click on the maps so we still like this. Certainly study, and then we use the right click on the mouse. They're going to be able to see the options they have available within this menu. So just the objective changed the type of study and swell us the option to your friend the Son Settings window. But also you are going to have the standard options for this particular view. No one selected the solar study. You can also change this and that size by using the properties really So if you change this valley and then you're really gonna play, you're going to see the change in the size in real time. Now the value by therefore it's always going to be 150 to make sure that the project is sexually a smaller than this. Really study in a sec quicksand. Remember that if you have any issues when selecting the seller study, you can always you step on the key word in order to cycle to the elements direct close to each other. And the last thing that we're going to see is how you're able to export this. So let's study on different form. It's one of the apartments that we're going to see is this thing when it's the Watcher, meaning they were able to export their work to rest obedient. So if we go to the photo and Caligari since export, we're going to be able to explore the summer study after you click Gray Cecil the study. Now with these, we're going to have the length and format window which were allowed to sell like the frames bring, in other words, the length of the video. Isolate all the frames for the frame range as well, unless the friends for sex Now I'm going to click. Races include time and they stand so you can see how this relates to the solar study. That's well within the visual styles. We're going to have the same stuff that you normally have by using the status bar, except for the one very school shaded with edges. As for less realistic with ages Now, in this case and just going to use it in line, maybe for exporting the video. Remember that you're gonna, with change the number of frames that you're going to be using within the solar study by you send the same settings. So we changed the settings for this sort of study Before we export. We're going to be able to see a difference once that we go back to the felt up, you know that you use the option for export images and animation. So let's study now. It's a quick Steiner able to export this sort of study by you simply option for rendering. That's where less realistic with ages. However, as we remember the option for rendering a sexual the heaviest one that you have within old official styles after selecting here in line and just going to click once again, include time and they stand and after pleading okay, we're going to have the export any made it. So the study window. Think here to just have a select that before matter you when I use in order to export this only study, which in this case and going to be using on every fell in another words, the extension point. There's an apple, the same victor eyes, and so after you select where you want to say the foul, you can always click on the options. You know that could change their settings that you want to use in order to export the 1,000,000,000. And once the you click on OK, you can click on state in order to select the video compression that you want to use in order to expertise media in this case and just going to leave it by default and then after clicking on OK, you're going to have the progress of the expert been represented the same way as you use the option for previous on this study, and this includes the visual style that we select that now, this process might take a little while, but once the process completes, you're going to go back to the Treaty of you. They're used in order to export the seller study and then automatically you're going to see the play about that video that you exported based on the solar study now on display. But you're going to notice that you have the Frankel that they on the time. And this is because I still like the way says include time and they stand So within this field of study is where you're actually going to see disruption relates Do a baby that you export from you saying ready and the other option we have for export this by exporting any much by using the same process. So you need to make sure the year within the treaty of you that you when I use an article, export of image and then by going to the foul tap once again, you just have over the option for export images in navigation and frankly, police this image Any here, you're going to have the same options spending the weekend selected name. Yes, well, it's the output directory, Lee, when I use, You know, to say the amount which is sending the you can change my click away says change right next to link the image size by changing the amount of pixels is going to that base in the direction they happy love, which in this case is going to be re cental, you know, sort of formally when I used to be in which there you're going to export. So in this case and going to bitch is gonna be injured, former and once the right click on OK really is going to take a moment, you know that Do it for the image base of the sun settings that would have with the street view. And after that you just have to open the eventually exported based on the location where you said like that on the output said icily study actually offers your lower options that you can use your idiocy. Are you product release descent, but at the same thing. How you're able to present this to others by their use in a video or an image. And then you can even use the right click on the mouse in order to see the properties of the image
10. Introduction (Sheets): So in order to percent your project, you will need to create a ship. So in order to do this, we go to the beauty and under BEAUTIF, we'll look for the great panel. And so, like the option for sheets. This allows us to create a page for documents that a serious mentioned to the Scripture once weekly, very such sheep were going to get the new shaped window in here. We're going to be able to select the title blocks that we have available in order to create a ship so badly. For with the template, you're going to have the A one metric and then if we go ahead and say, look okay, we're going to load the selected title block on an independent sheet and as well we will be used in the title blood in order to create a ship. What are we actually doing right now? What is the title? Blood on what he sexually the sheep? Well, the title black is the family that we have right now on the ship and this one issues in order to organize or the people's or abuse that we have available within the project. So we can organize the information within the ship in order to bring the information on a cohesive way, which isn't in their issues across all the special tastes for construction, engineering and architecture. So this means the since the title blood allows to determine the boundaries that we're going to use in order to play in the Documenta work rating and also the basic information that you're going to have, such as the company logo for the day or the name of the project. And this relates to the function of the ship. In the case of Rabbit, that shell is what you see on the project browser NSC will see throughout. This lessens the sheets, allows you to organize the content the you insert or use within the sheets. They will have their own name, and also they can share the same Tyra Block as well as they can have any number an entire block for each of them. As you notice at the moment that we were creating the ship. So this is boredom for you to know because the sheet and the title block are something very different. The title block issues to organize information they're going to print what the shape is what allows it organized the information within the rabbit project, including the title blood they are going to be using. And you can see this reflected at the moment that you go once again to the great panel in Click once again the sheets toe or common. And once you have done this, you're going to get a new sheets window Any here you can see that you can also select ways a state of blocks, none. So we click. OK, we're going to have a ship without a title blood. So now that we have established what a title block is, we're going to see what properties we have available for any title blood. But you insert on a ship. So in order to do this, we just need to sit like the ship and then on the property spell. If you're able to see what properties or in this case, which information we can change on the title blood and the information that you're going to have on the default title blood that you get from this template are going to be she its name sheets number she time they she issue things check my the signed by and approved by all this basis of information are available within the title block that you get from the template and something that is for pointing out is that when you sound like the title block , you're also going to get the height and the width of the title blood based on the units that you're using within your project. However, if you and check the title block, you're going to have the same pieces of information within the properties palette. And as you notice you're going to get the same fields and values for most of the elements that you have within the title blood Berus. Well, you're going to have a few ones. Search disappears on sheet lease, which is something very standard because it applies toward the sheets or the project so badly, for you're going to have this with a check mark and as well. You have revisions and shape, and this is because the ship is going to get the same valleys or fields they have within the title. So that way you can change the information directly from the properties that you have on this ship or by selecting a title blood, and in both of these cases, you can type in the information directly from the property, spell it or by importing the information within the title blood. Now, if you think about it, what recent could you have in Rebel in order to justify having the same fields within the title block as you have within the ship? When the reason for this it's because you can have two title blocks loaded within the same project, and this means that they can be loaded within the same sheep. So that way you don't have to change the information every time that you load a title blood . So in order to see this, we're going to select the title blood, and then we're going to click on the option for a family. And once within the family, we're going to click on the file top so we can save this family with a different name. And once we selected the name and then click the option for Safe were over, also going to go to the Creator Family Editor panel, and then we're going to select load into project in close. Once we have done this, the family that we just say it's going to close. And then if we go once again to the view top, create panel and click away says ship, we're going to see on the new sheets window the option for a one metric number two, which is the name that I selective. So once you click on OK, you're going to see that the title block is going to inherit the same information that you have on the property spell. If that's more specifically the information that you have on the property, spell it for the sheets. So this means that the new she is going to provide information for the title block when it comes to the project name without affecting the sheep that we already created. So we go back to the family editor. You can see that also, the family is completely independent from the title blood that we already loaded. So as you notice, you can change the information from the properties my left and also directly from the ship unless, well, the information or feels that you get within the sheets are loaded based on the title blood Lee you're using within the ship. So the information that your input on the property spell it. When it comes to the sheets, it also can change the information that you get within the title blood.
11. Changing the Values for the Sheets within the Project: So as you remember, you can change the information that is going to show on the title block from the property. Spell it bias and the properties of the sheep, or by selecting the title block and then change in the Bally's by using the title block for the properties per left. And in the case of some values, you can even add to Bally's at the same time, like in the case of the ship name. So as you notice, if you change the name of the sheet, more of them one time are some doing right now by adding main one and also named to you can see that you have access to a drop down. So this means that these fields are Bali's can have more than one option or more than one option for you to sell it at the same thing. However, in rebel, there is a free Bally's or properties in which you have one unique value, such as the case of the project number. So while having the title blocks elected, we're going to change the value for project number and then we're going to go to the beauty shop great panel. Think like once again the tool or command for ship. And once you have done this on the new ship window, we're going to click a one metric and then after clicking, OK, you can see the value for Project number is the same one as the one that we have on the other ship. And if we used the new sheep united to change the project number, we're going to be able to go to the other shape. And on the other ship, you're going to have the same value for the project number. So the question becomes what this body is actually coming from because it's not a body that you can actually change. So in order to find this Polly, we're going to go to the managed top setting spinal and under Settings panel. We're going to select project information and on the Project Information window, we're going to be able to see all the information that you have for the project. So if we go once again to the ship and then click where he says project information, you're going to see that the same number that you have for the project is going to be reflected within the information for the project. And that's why within this window you can see the project issue they the project status McCleon name the project name and as, well, the project number. So if within this feels we change the project name, you're going to see an instant change on the title blood, and it's a quick sina within the Project Information window. You're going to have additional information that is not reflected on the title blood, such as the organization, name, organization, description, building name Powter and also the energy settings. However, this is also information that can be used within the title block if you so desire, which is something that we're going to see when we get to the creation of the title block. So for the time being, we're going to change the project number so you can see how this effect the title look one more time
12. Basic Elements within the Title Block: So by now we have seen that we can change the information within the fields, whether by use and the title block for the properties for left. Well, the origin of these fields can only be seen directly within the family. So in order to see them, we're going to select the title block and then we're going to click, Berry says at the family. And once we open the family, you can see they have the default values off the title blood. And if you said, like with the mouse where he says Flying name, you can see in the ribbon that you haven't option that ISCO edit label. And this is because the actual feel they're selecting is considered a label as well as the project name and also the sheet name. And if you Hoover, we know where he says Ship name, you can see that you're able to set like the project name. However, if you use the tap on the keyboard, you will be able to send like the label that it's right next to where he says Project name and as well. If it clicked for example, Way says State, you're going to get on the property, spell it a few properties and specifically for text. And if you look a little bit more closely on the properties filter, you're going to see the recess text notes. However, by definition attacks, Esther's a text. So this means that you're only able to change the text within the family and within the project. Where you're going to see is the text that you selected for the text that you write within the family. However, the other bodies are, consider label, and the labels are a type of element that you can change within the family in order to associate information within the project toe the title block, such as the project name or the name of the ship. So this means that you get two different elements that can be used within this family. And this is something very important in case that you want to have a specific information that you can only change within the family, such as the location of the project for something my specific that you don't want to change or working on your project
13. Using the Lines within the Title Block: So while you send the beauty that you're able to go to the create panel and click way says Sheets, and as you remember, this will allow you to load up tighter bloc to the project. However, in order to create a title, Block will need to go ahead in dissent and different the same way that you load a family to the project. So in order to do this, we're going to go to the file top. And while hovering over the option for new, we're going to click the right ever right next to a system you and then we're going to select the option for a family. We're going to be able to find the directory or carpet for title blocks Inning here. We're going to have the family templates available. When it comes to this, Ice is more specifically decisis that you can use in order to Craig Attire, a block and a quick signer within the templates are going to have a syrah. 81 82 83 a. Four A new sites mentoring. So in this case, we're going to select one of the most common once, which is a one metre so Once we select a one metric, we're going to click races open, and this will allow you to have the family editor in order to operate a title blood. And as you notice within the family editor, you can see the actual size of the title. And more importantly, you can see the extra stent of the title blood. So everything outside of this rectangle will, after the tour away, poor, poor to Tora, high off the title block within the project and also, by using the measurements to you're able to see the actual size of the title black when it comes to the width and the height. And if you want to remember that you can use two dimensions in order for you to see, the actual bodies were creating your title block and the rest well, if you drew a line, maybe for the type of Landrieu will be using, it's going to be called title blocks in the 1st 2 things that you can notice. Weap aerating. Your title block is that in order for you to see, you will need to always un selecting lines. So we said like the length we're going to be able to compare the type of lines that we have available. We're creating the type blood, and as you notice, the median lines are actually a little bit thicker, that the line type Briscoe title blocks and at the same time that I glanced. Eriko Terra blocks are thicker than the lines, and obviously the white lines are thicker than all the other lines that we have selected so far. And that's in any other family. You're also able to use the modifying tools in order to create your title block, such as I'm doing right now. However, remember that you can also use the up transport while using the drawing tools in order to create different shapes. So if we used in this example, you can create an exterior upset for the title block just to add a little bit extra when it comes to the design of your title block. No, the actual the sign of the title block will depend on your country of region. How, in my case, as you notice, I haven't changed the units they were going to be using in order to the same the title blood. The reason for that is because it's a little bit easier to draw the title block in centimeters because it's actually the signing centimeters. So most policies are going to be placed based on most cases, with multiples off one centimeter. And when it comes to the distance, remember, they're able to use the automatically mentions just to make it easier for you when you want to change the values as underwear right now. So the actual weight that I going to have in order to separate the information from the data block from the actual abuse that we're going to add with ambition it's going to be 10 centimeters and minutes were are going to be adding an additional upset with the belly of see your 0.25 centimeters, which pretty much is 1/4 of a centimeter. So once I have done this and going to create the space for the bill logo and those who the space for the shape number and as well, a few of their spaces that are going to be the same perp alleys so just that they order the scale as well, I will be adding a person on MySpace for then notes of the project and as well another space that we can use in order to have the location of the project always represented on the sheets. And as I mentioned before, this is something that you can change the bandage on your country of region and as well the penalty, the same that you want to use. - And as your notice. I will be adding a few personal touches through the space for the bill logo, this base for the notes and the rest of the terrible, with a few rent ages that we can create by using the Philip and one, sir said, if they were your creation, we're going to select old the lines that we just created, and we're going to change them from title blocks two million lines. This is just in order for you to see a little bit more thickness. When it comes to the lines that you have on the title blood, however, you can leave them by the four. If you like the lines, do you already have within the family editor Our In my case, I just want a little bit more emphasis when it comes to the lines they were going to be using for the title block and therefore the sheets. So last but not least, we're going to say this family by using the same Aiken on the quick access toolbar as well . Remember that you can use the felt that, in order to use this a option or the same as option. However, since we haven't say the family, we're going to get this safe as window and under safe as window. We're going to select the director or carpet that we want to use. And after that we're going to say, like my name and the last thing that we're going to the ISS to click on the options so we can change the number of backups and then we're going to clear where he says, safe in order to say that title blood their work rating.
14. Using the Text within the Title Block: So now that we have finished with the lights that were going to be using for the title block, we're going to start adding the text they were going to be using for the title. So in order to do this, we're going to go to the Creator text panel and we're going to use the option for the text . So if you notice the title block that we can already low to the project, we can see there in this terrible of Theresa. Very text included within this family searches the project number that they drawn by and check by. So as you notice that Texas very much the one that we use a noted to have notes for information to a specific style of black families or project. So we're going to go one second to the family and then on the greater tax panel. We're going to click the option for next. So once you click on the mouse, you're going to be able to use the keyboard in order to write the information that you went out to the title. In this case, we're going to create a text for the signer, which you can also be the signed by architect or, in other words, your actual position. Or so we're creating the project. So once you created the fix, we can see that we have a few controls that we can use in order to mother fight attacks. You have the others the you can use in order to track the text. However, let's remember, you can also use the arrows to move the text. That's where unless the mother find tools and the last control that you have the scenery to rotate the text without using the modifying tools the Boeing controls. There are both ends of the text that we can use since you remember to extend the text on both directions, and if you go to the property, spell it. What? Selecting the text, you can see that you have a few properties that you can use, such as the recent L A lineman, the particular line that keep readable am visible. So if you still like the recent other linemen, you can see that you have center and right, which is pretty standard when it comes to the use of the text. However, in gravity, there is going to be a slight different when it, when it comes to the use of the recent are linemen. Because in revenue very center, Lyman is going to change the way that a point controls affect the text. So as you notice, if you haven't left, the controls are going to extend with their effect in the alignment. If you use under left and if you use the center, both of the controls are going to address the text while keeping the same distance between the text and about other point controls. And if you use the right alignment, it's going to be pretty much the same. Asked the lace alignment, however, on the opposite direction. And the same thing can be a play for the political alignment, the options They're going to have our top, middle and bottom, which means that if you used up by default everything that you're going to write, we'll start from the top. And if you used the middle, everything that you're right now, it's going to be a just down in the center, and if you use the bottle, everything will be interested. Based on the last line, do you have on the content and as well a few plays close attention, you're going to have the same out transfer alignment within the Raven as well as a few the options as Jake a spelling and find and replace and below the alignments you're going to have the options off keep readable. And basically both of these options are very familiar and the sense that they allows to display the information that we have available within the title blood. So, for example, we don't check the option for visible. We're going to get a different more so than the one that we have for the title block that we already created. So the one thing that we're going to the issue sti option to load into project so you can see that text that we selected. It's no longer baseball within the project. So now we're going to reverse the change by going once again to the family editor so we can check once again the option for baseball. And once you have done this, we're going to click once again, the option for loading the project, and we're going to overwrite the existent family. Once you have done this, you're going to see that if we change the terrible upto the one that we just created my use in the property. Spell it. That text will appear once again so we can use the property spelling in order to sell, like the title block that we just created as well we'll have in the text selected. We can go to the property, spell it, then click on any type so we can have the type properties window, another type properties window. You're going to get the additional properties that you have for the sticks, Richard going doing blue lying weight, which is the thickness of the text and also the color of the text. So, for example, we change this color to red and then click OK on the color window so we can click, apply on the type properties window and then okay, you're going to be able to see that the color of the text is not ready, and this is something that we can change as many times as we want. So from the type of police window, we can also change the color black and now you're going to have the option for the background which can be a pig and transparent fake would allow you to have a background off color weight. We're back on transparent. Would I love you too? Have a transparent background in order for you to see what is behind the text. And if you want to see the border of this text or this text block, we can click where it says show Porter on the type prosperous window and then apply, followed by okay. And on the family aerator, we're going to see the text now has the border with the same color of the text which in this case is black as well. You have in option. They're not able to verify the moment which is leader border upset. This one is meant in order to create an upset between the text and the border. The text. So we changed this Bali. We're going to be able to see that the controls are now closer to the text based on the border, the text and as well as in other suffers you're able to change the text phone we're going to be using for the text. In this case, we can go ahead and try the frame funds that we can use. But the one that are going to be used in at the end. It's going to be monster, right? And once elected the fund, we're also going to be able to change the text size and also that that size, the top size is a little bit different and leader for upset because this one refers to the vertical height of the text. So this is the actual height there is taken into account for the birthday girl. I'm out the text. So when you select mirror, the mirror is going to be based on the top sites that you have under type properties Window and the other options are fairly standard. Pull Italy, and underlying this one's are in order for you to change this tale of the text. So we're going to select italic underline, and that's what we're going to be able to change the white factor of the text least when is in order for you to extend or compress the text based on 100% value. So Sierra 0.90 it's going to be 90% of the entire distance that you gave between the beginning of the text and the end of the text and if we change the value to see your 0.95 this is also going to be 94% off that same value. And last but not least, I will and check the option to show border anyway. Click on the text in order to edit the text. You're also going to see some of the options that you have on the type of police window. So just ball, if only under length in a few of the options you know they do. Analytics as close as possible issue would do in a suffer. So just the note back or any other separately, you use a noted to write down a text. So now we're going to start adding the remaining text off the state of blood, such as the date. So in order to do this, we're going to go once again to the family editor and by selecting the text that were really creative and the modifying tools in order took up in this text the following way, we're going to be able to create in a specific test based on this one by selecting all the text that we already have and then go into the property. Spell it in order to select at the type and then you send the option to rename so we can rename this text to custom text and once there we can look. OK, we're going to click OK, one more time so we can start changing the Bally's for the names that we already at it today and the other one to a different value than the one that we have from the default title block, which is going to be engineer. And then we're going to make any small adjustment into the positions of this text in the following way because in my country, a region, we can also add the signature of the engineer and the architect right next to the name. So he noted, to do this and going to 1/2 centimeter when it comes to this pacing for these fields. So as you notice and just using the modifying pools and the selection options in order to create a separation for the fields that I'm using and as well since there it's more than one additional specialty that I can at the title block are going to add an additional space with an additional text so I can use it for the plumbing. And this is mainly the same in which are able to have their specialties through all the shades they're going to use for your project. - And after these were going to be at in when additional text that we're going to be using for the scale of the sheet. So in order to do this and going to copy this text, I'm just going to adjust the position of this text and change the content of the text to a scale, or in this case, yes, see, And once the system we're going to create and a special text just for this particular field or any other field with the same properties, my going once again to the property, spell it. And after clicking on the type, we're going to use the option to duplicate, and we're going to change the name, the custom text and then as well we're going to in play that this is for the scale. It was Republican. Okay, we're going to be changing a fear, the parameters that we have for the scale, such as the text size and also the with factor and once that we have done this red just going to adjust a little bit of text in order to create in a specific appearance and by using the type properties window once again, we can change a few other values, such as the underlying, in order to change a little bit more the properties that were going to be using for this text, which includes, for example, removing the tally and also the bold factor. But as well, we can go ahead and change one second the properties of the text and once we tested for so we can use once again the type properties window. And if you're okay with the result, we can start the process of creating the additional text that we're going to be using for the state of blood search. It will be the case for the text that we're going to be using for the notes. So in this case, we're going to copy this text and we're going to move it to this place that we created for the notes. And once we have done this, we're going to be using a recent on a line center. And with this we can make sure that the placement of the text based on the recent of Center for the Space that we created for the notes And once we changed the signer two notes We can go once again to the properties palette in order to use the type properties window so we can duplicate this text in order to have at the friend text specifically for the notes. And then we're going to be changing the text size and also the type of presentation of the text the following way. And after we click OK, we're going to be able to see their soul, and the last thing that we're going to the is took up it. It takes the week greater for the scale so we can move it to this space that we created for the notes and once replaced this text the following way, we're going to use once again that the purpose window, in order to duplicate this text to create text for the notes in a few things that were going to change within this text is the size of the text, the presentation and also the wheat factor. Furthermore, we're also going to select the notes and by using the type or police window. We're going to change the line, wait for this text to to and after clicking, Okay, we're going to be able to see the result of the changes that we have done so far to the title blood.
15. Using the Labels within the Title Block: So now we're going to add an additional element of the title block, which is the one that you see on the default title block that we have loaded within the project. So in order to do this, we're going to go once again to the family the were creating. And then within the family, we're going to be out in the labels by going to the great up and then on the text panel, we're going to select the option for label. And as you notice in the text, the labels are the ones that we used in order to acquire certain information within your project so it can be used within the title blood so we can modify this label within the project. And once weekly racist label, we're going to be able to select where we want to place the label by using the mouse. And once you selected the place in which you're going to place this label, you can use the left click on the mouth, and after doing that, you will be getting the edit label win the ending here, you're going to be able to sell like the label that you wanna place within the title block . By using this problem that we have on the left side and a secret Sino within the balance for this column, we're going to have joined by assembly coat outer a scale shape, main sheet number answer one. And then, by using the left click on the mouth, we're going to be able to make a selection. And after that, we're going to click this green arrow. There is no longer great out. And once you have done this, you will have the label parameters. And on this label parameters, you will have the parameter name, the spaces, the perfect, the sample Bali. There, Sue, fix annals of the break. And as you notice within this columns, you will be able to add the body. So you decide when it comes to the label like for example, the perfect which can be, for example, the perfect for architect and the suffix which it can be a barley. That is not going to change how, in this case we're not going to change any of the bodies for the columns and then we're just going to click on OK, so we can validate the label that we just created. And as you notice at the moment that you place the label, you're also able to change the alignment without selecting the label. Now, once you have placed the label, you're going to see that, as with the text, you have a few controls. The U K news in a richer modify the text like, for example, the point controls and also the rotation control and as well as any other element in rabbit . You can move the label bias in the errors on the keyboard, and also you can edit the label mates and the properties palette and as well. Since this is a label, you're also able to add parameters by using the associate family parameter option available for some properties on the properties palette and continuing with the similarities that you're going to have with the text. You're also able to change the recent L. A line and the birth Coraline. However, the biggest similarity that you're going to have with the text you can see it once you click on it, type on the property, spell it and then the type properties window. You can see they are able to sell it pretty much the same options that you have with a text searches the color and the text size as well. You can verify the family but you're using and also the type of family that you're using. And as any other family that you can use in driving, you're able to duplicate the family or, in this case, renamed the Family in order to create or modify a new one. And once that we have done this, I would just do a few changes on this family in order to change the appearance of the label , I started by the later border upset and as well I'm going to change the land, wait the top size, the with factor and also the style of the phone. - And as well. You can even change the text phone that we're going to be using. Do any of these styles that we have available and once you make the following changes, we're just going to go ahead and click on OK and then by using the copy to, we're going to be able to copy the label on the following positions so we can go ahead and change the labels based on the values that we want to assign without having to make the changes on the text once again. So in order to do this, we're going to click recess at it and then 100. It'd label window. We're going to sell like the label parameter that we want to use so we can go ahead and add it to their label parameters that we can edit. And it's a quick Silom. Once you have to label selected, you're going to see that this basis column. It's no longer greater, so you can see the reason what it exists, which is nothing more that the simplified the option to have more than one time the same parameter. And once they have done this, we're going to click on a play and the gun, okay, and the result is going to be there. You're going to have to labels working at the same time. So we click once again where he says, Harry, we're going to be able to unsettle like one of the labels that we're not going to use so we can have just the label for cheap issue date. So once weekly gonna play him and okay, you're going to be able to see that you have only one label parameter selected. So once we said like the following parameter, we're going to be able to change the label parameter for something else that we can use for engineer. However, since one of these labels is going to remain the same, we can just go ahead and simply change the label for the signers step. So in the label for the signer, we're going to select the signed by and the sample value that I going to use for the signed by is going to be the SG and as well we're going to remove the label parameter for drum by once they we have done this, we're just going to click on a play and then Okay, so before we make any further changes, we're also going to go ahead and change the label parameters for the plumbing. So in this case, from the list that we have on the left, we're going to select the one that is called checked by. And then we're going to write the sample barley or for choosing in this case, I would just be using the 1st 4 letters for the word plumbing and then I'm just going to a click on apply. And okay, In order to Bali, they change. And the last label that we're going to personalize its the one for engineer. So once you selected the label and then, in this case, we're only going to change the sample Bali, which in my case, and just going to use the 1st 4 letters with the war engineer we're just going to copy one of the labels so we can go to the property, spell it. And then after clicking where he says any type, we're going to use the type of priest window in order to rename this type so we can go ahead and modify this label based on the scale. So once that we have done this by you said that they properties window, we're going to change a few properties that we have for this custom label in order to modify the text so you can match the same when they were used for the scale. And once that we have done this, we're going to click where it says Harris, so we can go ahead and change the label parameter to the scale parameter. And as well, we're going to change the sample value to another body based in your country region. And once you click on, apply and then OK, we're going to be able to add additional labels there were going to use for the title Black . But first we're going to modify the title blood so we can add a few labels such as the sheet number. So once you added a few lines the following way for additional lines, the pain, another title block, you're the signing. We're going to have any label that we can use that is going to be a specifically for the project name and no So we're going to modify a few bodies for the parameters that is going to be called Project Name, which is going to have the label perimeter as project name and at the same time with the sample Bwalya as project name. And once we have placed the label, we can go ahead and change a couple of things like, for example, the type of label that we just created so we can go ahead and change the type of label to the second title, Recaredo, which in my case is called Kirsten label seven millimeter. And after making sure that their Lehman stays correct, or at least close to where we want to place the label based on the title block, we're going to go ahead and click on a big type in order to change a few bodies for this label. But also we're going to modify the position of the label by creating a few lines that we can use of reference in the rhythm of the label. So once we have placed the label, we're also going to mother find the alignment. And after we correctly placed the labor, we're going to go ahead and making us one of the few changes you know that the personalize the title block even more so once that we have done this changes, we're going to the one final label that is going to be used for the sheep main. It was that we go ahead and created the label. Are you sending my case that I very score costume label seven millimeter and then just to personalize the label even more? I'm just going to use the controls in order to extend the label, and also I going to move the label to make sure that is placed on the right position. And after that buy you send the type prosperous window. I will create a new label type just for the sheep number. We're going to rename the type so we can personalize it even more. Which means that are going to change the text size in order to increase decisive the label and then with the label selector, are going to use that the type properties window in order to change a few Bilis that we have for the properties of the label. But before this, we're going to reading the label based on the text size that we're going to be using. And then I'm going to be testing had text size in order to see if that is the one that I want to use. And once you decide that excites, we're going to go ahead and said like the following labels, just so we can go ahead and make sure that they're going to be a little bit different than the labour that we're just reading. So in order to do this and just going to use the option to duplicate and then I'm going to change the name to seven millimeter when it comes to the value that we have for the text size within the name of the type. And then we're going to change the text size on the properties that we have for the label. It was weekly going okay, we can see that the balance for the label has been changed. We can see that our little labels that we were going to create, already created within the title Blood and I should remember with the families we can change the order in which we use the duplicate option and the rename option A noted a great many families and last Panelist. We're going to create a copy of the project named Label on the following position of the title Blood, - and then we're just going to modify the Tyra Block just one more time so we can place the label for project name in the following position. And as you remember, if you have any issues you can use of reference in order to help you with the placement of the label, which is something that you can do by using, for example, the lines and last but not least we're going to sell, like this label that we have right here and then we're going to go to the properties palette so we can click where it says that it. And after that, under the label window, we're going to change the label parameter to ship name and after weekly gonna play. And then, okay, we're going to see how the terrible look looks like. And just in my case, I will be adding one additional label, one additional text that it's a specific for the client name. This is something that you don't have to dio. Ressam mentioned the paneer, your country of region. You're going to change the sign of the title block based on where you need to include within your title. And once you're finished with a terrible place, remember to say before you continue
16. Using the Images within the Title Block: So now we're going to add an additional element of the title blood. As you see under the full title blood, you have a logo for an image. The represents the company. There is the sign of the project. So in order to an image, we're going to go to retire a block that we're working on and then we're going to go to the Answer tap import panel and in here, we're going to be able to trust the option for image. Once they have done this, you will have the carpet of directory in which you have the image and as well, you're going to have a filter which allows you to sound like the type of image do you want to import and as well, you can use the file name in order to make it easier for you. The search for the image in case you have any images on the same carpet or directory and with the much selector we're going to click on open and then we're going to be able to place the image and the position that with a sir, once they have placed the image, you're going to be able to see on the property. Spell it the properties that you have for the image, which will include the with the hide, the recent or scale. The birth occurs skill and also keep proportions as well as the drawer layer. So if in this case we said like the way we're going to be able to change the with off the image and this will automatically change the height on the image based on the proportion of the image. And it's a quick Sino, remember that the bodies for the units are millimeters, so the actual thickness of the image is going to be 10 centimeters. That's where less the height. However, if you can check the option to look proportions, you're going to be able to see that if you change, for example, the hide of the image, you're not going to be changing the body for the week. And if we use control, see, we're going to be able to try the option for Joe Layer. Now, if you notice in this case will use in the drone layer, we're not going to see a particular change when it comes to the text and the lines that we already have within the family. However, this is something very important for you to know. Engage the U at additional images. So now we're going to position the image on this part of the title block. And as you notice, you do have controls that you can use in order to resize the image. They don't have a particular control when it comes to the placement of the image. So with this in mind, we're just going to great. A few lines has undergone minor in order to correctly place the image in this position. And this will remember, you can create a parameter that you can use to modify the title blood once it's loaded to the project. So if we do this with this image by adding a parameter for the week with this particular name and then click and racist okay, we're going to be able to choose the option that we have on the Family Ritter panel in order to load this family into the project. And was pictures the option to override the existent version, you're going to be able to use the type selector in order to change the default title belong to retire a block that we're designing, and while the title of it is still selected, we're going to be able to click, Re says. Any type and on the type of Greece window, we're going to get the parameter for the week. And if we go once again to the family editor and we open the insert tab in order to select the option for manage images, you're going to be able to have a window. There is very similar to the manage brings windows, and here you're going to have a column for Rester image, which is the tuna off the image that we imported and as well. You have the name of the image, the amount of times that we have loaded the image and also the bad for the image. And from here we're going to be able to add an additional image, and that's what we're going to be able to the leader and us with the manage links window. We're also going to be able to use the option to relook from and as well as with a managed links window. You're going to get a window, he noted, to browse for the image on your computer and as well. You're also going to have the basic option to real and once you click on OK, you're going to have the basic difference between managing images and managing the links. The you low to a project, which is that you're not going to be able to find the images on the project browser.
17. Adding the Views: And now we're going to see how you're able to greater shape for the project. So in order to do this, we just have to go to the big data and we just have to click researcher. Once there we haven't done this, we're going to get the nutrient windows. And then new ship Windham, you're going to be able to select the default tiger blood, none. But also you will be able to look at title block. You're re-creating whatever you have available for the project. And once you click on OK, we're going to have a new shape with a data block, the one selected. Now on this new shape, we are going to be able to even load an entire block. But also you're going to be able to use the modifying tools in order to monitor ownership. Meaning that we are able to remove the Date of law in order to add another one. Now, two things for you to notice is that you're able to place the title blood wherever you want before selecting a place prototype of luck came after. However you might have notice you don't have a center for the chip. So automatically when you create an issue, they're going to notice that the thought of love has been automatically place. Now this placement is sexually based on this center when you are not able to see on the sheet. Now V-shaped essentially use in order for you to present the project. So because the police were able to map yields and that we can use in order to present the budget. So after you click on view, we are going to be able to use the abuse window in order for you to select which view D19. And once you have done this, you are going to preview view selector based on all the options b equal to b, which is something we are going to notice under properties per lead, meaning we will be responding to the same scale on the same name. So after police and would be able to move the view by dragging the view or by using the modifying tools, which is actually fairly standard. And as well, since this is actually the same view that we actually have in the project, where able to select the beam. And this will allow you to modify the view within the shape as well. Were able to select the view. I go into recess pupils and venues and that drop them as well. You can use the mouse and in order to double click on the view, and then click once again outside of the beam in order to select the viewport. Now this view or viewport can actually be edited for them the shape, because it's pretty much a reference to reveal the real recreating embellish the reason what is also called viewport, inevitably corrupt region based on the needs that you have for the machine. But also you can go to the beam in order to understand changes. And also you might have noticed also going to get this title and specifically for the viewport. Now this title can actually be more and the same diamonds that view. But also you can move it independently. I select them at battle, which means that you can modify the appearance of the title, but only few selected view. However, here going to be able to modify the precision of the title block independently from the view. We're also going to see this reflect on the title. And this also applies for instead of using a, we actually use unlabeled scale just by changing the scale of the view. Now since we can change that, I'm just going to modify that I'm using in order to surface as well. I'm just going to keep adding a few other shifts that are going to use for abuse or the project searches in this case, I will add another sheet, and specifically for the floodplain. Now when I'm doing this, we are going to notice a few things. One of them is that a number of issues is going to be based on the previous sheet. And better also, instead, the abuse can actually be beliefs outside of that data block. Now this is something that is not going to be relevant, weren't working under sheets. However, once you get to the point in which you need to physically for sender shifts, meaning that you actually need to print this project or you wouldn't need to deliver. For shapes basically to another person. You're going to notice wherever it will actually be able to bring everything that is available in the view. So the full expand out the view is going to be friendly, which means that the federal block or uses of reference in order to determine whether you want to print and what do you want to see. Now, this will depend on the options that you select will bring them the file. Howard, we do something for you to keep in mind when working on the project. I'm just going to replace by finishing renaming the floor plan for the project. I'm going to modify that based on what I'm looking for. An obvious will depend on you. And I'm also going to be adding a liberation, my Going once again. So I can show you how you can also change the name of the Project Browser. So after clicking ok and the shape data window and just going to rename the other sheets in order to more land and other options that you can available 1% thing actually, you know something as well, but you may notice he's 33 years to re-label under title block. And this will also be reflected from them mainly at sort of a cheap meaning really being unused that red label or you use affects the name of the shape is going to be different from the name Mendelian calendar data block. If you wanna keep bolder than separating regions, have to use something different than a nuisance. Or you can simply use the effects within the family Tiberius and for them available.
18. New in Revit 2023 Views on The Project Browser: Man revenue 202330, separate symbol libraries for update on the project browser. And this one is
the icon that you have right next to the name of abuse or my specificly on the left of the
name of the beer. This is because the cycle
will actually change depending if the view is actually being used
within the shape. And this is only
going to affect maybe is there are removed
from the sheets. So if the view is placed
within the shape, the square that is within the icon may fail in light blue, which is something that
is going to update in real time every time that
you remove from my shape, but also every time you
add a b to a shape.
19. Editing the Lines: Now we're upgrading a project and you're going to find out that you have different options in order to improve the appearance of the project. So there weren't working on the shape. I'm going to show you how you can improve the appearance of a project by just simply open the lines. So in order to do this and going to the recruitment minor on how you can create length. Now in this case, the lines that we use on the ship out of elite, their lines, because they are the ones that appear only on the view in which you use them. And now we go to another beer and we opened the modifying that we're able to select an option that is called language with a shortcut and lesson Larry and Ws and water. And after you click on the assumption, we are going to have the same drop-down you have before joining a line. So we select the invisible lines that are going to be able to hide the lines that you don't need while representing the project, when creating or representing the project. And this is something that you can keep using until your cellular, analytical or command where you click escape on the keyboard. The limitations, as you'll notice, because we're now able to select the clip surface, because it will allow you to modify. Now if we go to the elevation, however, you will not be able to select certain elements. Well, when it comes to a few elements, but in a few elements, wherever it will actually change the appearance of the element, such as in this case. So this is something that you may use my law in order to tie lines or in order to change the representation of a line.
20. Using the Text: And we're also going to be able to use the use. And also as you can use in another view, which means that you're able to place effects. We can place the same thing or another. And this will imply that you normally would when you select the properties window as well. Whether modifying finances. And as well something for you to know is that these works the same way when it comes to the family. By using rename. And also you will now have the options, but as well as the underlined upper-case. Now these options are fairly similar to the options that you will have in another software that is used in order to write a document. However, a couple of things that you will find that a little bit different kind of eruptions decline in Ripley's, which allows you to open that find and replace window with a few options in order to find that thirds and replace it with another. Within the current view, the entire project, and also the results and the match. And as well as the option to check the spelling base under dictionary. I'm getting subway, you know, based on the language. Everything a little bit more. On another view. Now that has a few different options where you can perceive a little bit better. And I'm elevation or a section of the project. And you're going to notice that we have the same controls. We are going to see a few options that you can use with effects. One of them is the option to keep degradable, or in another words readable regardless. In order to modify milliliters, Lee you have available with effects. Can be actually adding, modifying. Do you have with a plus sign? Now I know if you remove a leader, we just have to click on the icon that has a minus. And now you can have a different RD leaders may actually clicking on the third floor leader. And you have been loved the wonder we just select it. And then also we can go back and forth between those leaders. Might just simply selecting the X and then check and uncheck away. So sad leaders. Now the procession of the leaders are going to be based on the icons that you have on the right to be a gun that has the minus. Now, this will not change the appearance of the effects at first glance unless you actually start modifying the content that you have under flexbox, thicken things defects. Now you can also modify by leaders and by using the proper spelling. For instance, left attachment. Anyway, attachment, which is the same thing we've had available. And the icons that are right next to the icon that has the minus. And that's why we can also change the alignment. Alignment.
21. Using the Keynotes: You actually have a special annotation that works very similar to the effects. However, asexually greater in order to save you the time. Actually writing the same information more than once based on parametric values, they're already within the project. So we go to Vienna thick tab and then you click on the drop-down for keynote, you're going to find the different type of k-means. We have a really wanting revenue. Now the first time we use the claimant can actually be a little bit confusing because there will require from you the selection of a family for family system we already had on the project. And once you have done this, we are going to have the keynotes window, which will allow you to select between the keynotes. Do you have available by default? Now this keynotes do you have available by default, will allow you to replicate the same information more than once by just simply select in the same family. These ones are very similar in the sense that you have a leader. Are you able to be the same? Now when looking only selected or by selecting your friend that type properties window and are going to see the options that you have available in order to modify MacKinnon searches, the chemo fix number, if we wanted to show the box or not, and the option to modify the leader. Now this will allow you to select among older leaders that you have available until you're able to choose the one that you like. And as you notice, we're able to use the same leader that we have with effects. Something that's well for you to keep in mind is that we came up with the host. Now if you're actually wondering how in the keynotes actually relates to the family when this is actually something that you can see on the display while using the Cayman or placing the chemo. But also you can do by selecting the element that has the information that they came at least using, meaning the rephrase and like the window. And then I used to buy properties pilot and going to be able to find a field and the identity veterans section and that is called keener. You rank information on this particular area and the keynote will actually change. Now another way for you to use is actually by using the keynote settings. And that's why we're able to use the keynotes window. Again right next to the value that you want to use. However, this is actually not the right way to use that. In this case, we haven't really spoken of asexually grayed out and business unbelievably keep police in the kingdom. So if we place another Kino with that random value and can actually similar pick enough. And based on the fact properties window, you will be able to select between this, blame their number, what are the effects? And this is because the keynote value, even though he sexually editable, he's not actually used for Aquino. Ready sexually use in order to determine which information you actually one display. So that value is sexually or reference Many zoos in order to get the keynote text run at that profile. And that is used in order to create the rabbit keynotes, such as the one that we have by default. Now this keynotes material, as you might have noticed, which means that we're able to use the keynotes section on the right way to use the keynote. And also you can create the print keynotes as you do with effects by using the options for the plugin and winning. However, the right thing to do is actually create a file such as this one. So if you create any particular genome, instead of just modifying the chemo, you can always go ahead and select the option or user keynote, which at first time we'll go ahead and open the keynote settings. So in the keynote settings, who will be able to select the path for the file that you want to use in order to Graver keynotes, which can be absolute or relative, and the numbering method, which can be vague enough for friendship now by default, is actually base by Kino, which is sexually better known by before you're going to get by Canaan, which is the same type of cloud that we're actually using by default. If you click on browse, they're going to be able to find or create another file and you want to use a cell reference for the keynotes. And now in this case, I'm actually creating these basic file by just simply use a notebook. Now the file extension is so simple tags that you can actually write our idiom anyway you want. So if I select the values on the right, they are not actually going to see. And the reason is because revenue is actually recognizing the value. The one thing that I recommend you doing this is thorough going back and forth. That will actually create a distance theta1, unquote can recognize as two values, meaning that the value on the left and the value on the right will be recognized very similar to a table with two columns and three rows. So if we do this and then we'll load the file, they're going to be able to use the number on the key value in order to determine the text. As we are able to see once you input the value on the die properties Berlin. And with this, we are going to be able to use the keynotes window. So you need to select the chemo and lengthy agree says to the family. Now this will allow you to edit the chemo, but also the label so you want to use with Aquino. Now with this, you're also going to be able to check the way that somebody else is using the Kenyans personally. And I've seen people that actually use the keynote schema, ferments Spinner actually use them to keep values in our file just for the keynotes. However, this is actually the right way to use the chemo, even though it might be a little bit confusing the first time.
22. Editing the Annotations: When working with abuse, at any point work or any new project, you're going to find out that you can actually edit the family companies use in order to represent that view. There was graded whether there is a section for an elevation, surface notation for the restriction, we are going to be able to see the elements that make reason notation. And if we open the file, we are going to be able to see what is actually one of the family, which allows you to know how the family functions. Now we can continue doing this with what we already know we already have. But also, we can actually select another notation, such as innovation for the liberation. And once you select the notation for the liberation, and you're going to see that you have a few checkboxes that allows you to crave additional innovations using the same mutation. And the celebration would have some name and it will be actually independent from the other elevations of the project. And also we can actually believe this deliberation might just uncheck the checkbox. Last we have seen so far rob region and the segmentation of the beam. However, there is an additional option for function that is available when placed in or near notation, which is this one very strong reference on the beef. So if we create another view by using this section to recommend you are going to have the option to celebrity says reference on a B0. And this will allow you to reference another view by using the same annotation for the resection. And once you have done this, we are going to have a section that disabled to reference another. So under section is selective. You're still able to select another reference. But as well, when you click a lead pipe under properties pedaling and are going to see what the options that you have in the pipe properties window, actually more limited. Now, this doesn't actually affect what you can do with their notation, which means that you're going to say representation that you have on the other sections. However, if you go to the view, you're going to see that would be the one that you are referencing. And this is something that you can keep applying water grading your project regardless of the view, photo can shift. So this is actually a pretty useful when do I use based on this representation.
23. Using the Tags: Now in Ruby, besides the chemo lateral inhibition are lesions that you can use in order to do something very similar to a game of witching, rarely particle effects. So that works very similar to the Kingdom. However, you're able to create effect for a specific elements. May have women your project, cyclic ligand racist backed by category or after using the shortcut, using tomato, NGOs and George are going to be able to select an element and rabbit will recognize the cafe real BA, element. And it will place a fact based on Becker. And now you're going to have different tags for the different categories. And you can go ahead and give you some fat by configuring in order to affect other categories such as the door. And I soon notice this fact will not share the presence of the fact that you use the windows because they're different families. Now before selecting the element to which one to apply attack by configuring, they're going to be able to see a few options on the Options bar. And in this case, I'm going to be selected on the window in order to modify that back in the similar way. So at least means that you're able to change some properties on. While you're able to change a free properties properties window. Now one of the things to keep in mind when it comes to the fact is that you have a label that displays the information based on the family. We're going to be able to see which part is using, which is the same directory. So we're actually going to find after selecting the element. Now if you don't want to apply at back by category to every element of the same configure do you have on the project? You're able to place it back for the elements that you have on the project under the same category. As long as you have that family and loaded on the project. And after you have done this, you're going to have that back home, not back window. And in here you're going to have two options, which are all objects in VR and view, and also only selected objects, incorrect view, and leave that option greyed out in order to live the first option by default. And as well, you will be able to find two columns. One for the week of February. They are the one we're going to load effects for a particular category. So if you don't find a good player, if you're looking for is because we haven't loaded the fact that you need to use for the vector February. And we know you're going to find pretty much the same options where you have on the Europeans were. In fact by determining. So after selecting this option, you just need to click on apply a monarchy. And the bank is going to be a polite based on the properties that you have selected, honored by properties window. Or in another words, based on the way that you want to present the start. Now you're going to see that because you can have different elements under the same category, you're going to have a different result and the family on the amount of elements that you have under the same category. So if you go to the family and then edit the label, you will be able to have different value for the label. And depending on which data do you want to show you this thing? And this is a process that you had on the project. However, you have another configuring many sexual debris useful up to a point where you actually have other Boltzmann commands that you can use in order to apply the star, which are the good facts for the rooms. So in order to use the facts, you actually need to grade the rooms we're going to be using on the project. And now the rooms are actually very similar to the scene on Mars, specifically for the animated ceilings. And this means that you actually need a boundary in order to create a room. At the same time, we are creating a rule back on placement, which is sexually selected by people. Because within this time, the rules that aren't going to be as important. And if you don't have any walls that allow you to separate the different rooms, you're going to be able to create a separator by clicking where he says, well, I'm not able to apply the room separated to in order to separate one from the other. And with this, we are going to be able to use the drawing tools in order to draw the rooms operators, the union, in order to separate 11 from the other. And once they lose, there are going to see that each row is going to be delimited by pilgrims sufferings. However, we would also try to give the room within an area for these graded by the room, separators would actually contains the biggest percentage of area. One of the biggest amount of area becomes two to the room and rabid, we'll go ahead and let you know. Give me you need to move the room for different areas where you're really creative with their own separators and case report forms, the greater the overlapping one on top of the other. Now you can actually hide any other line, like ligand required or by using the fact that I'm not already. So this was actually a very convenient in order to apply this. Now the backend search can actually be written as We can never be artifacts. You can police on the project. So this means that you can enable for use under proper place pedaling. But also by reading the family. However, the room has different properties, are the properties that you have with the fact. So after selecting money, they're going to be able to see the properties that you have available. Now some of these properties can actually be seen a little bit better by using w Searches section. So in from your finance section or just simply purine another shape. But either way we weren't going to pay in order to place a section B. We're going to be able to use this section view so you can see how some of these properties you have on the Properties panel actually use within the project. Now there are other properties that you can actually change when it comes to the rooms where you're actually clicking research room, an area. I mean, here you are going to be able to customize the area and volume computation. So within the area and volume computations window and are going to be able to see what options you can use. Which means that the room can actually go ahead and display this information by the sender one, which means that the wrong facts, I'm actually display this information by using the right labels, which are the volume number and the area. Now, we didn't always go highlight boundaries in order for you to highlight, in order to have the first level. And I'm actually using the other views of the project. Now you can always determine the boundary of the room, but also how high it goes. So if we expand the height of this room, revenue would grow him and recognize this room in any other filler plan. But God's judgment, which in this case, the room proteins will also appear on floor to floor one, or in this case, the fluid flow. Now there's an additional factor. We think they're words pretty much as a substitute. So if we use this current view, you're going to see later. And once we have that you want to use based on them with a report on that later in order to see how this family and the first thing that you're going to notice is the label for this family uses, which in this case is description. Now senselessness plays on the main theorem. They're not going to save that value for the big fat until you actually open the material browser in order to find the material in which your glided back. So you can change the description for the waste material. You're going to notice that the information that is displayed, but in fact is the same one that you have in the material. And that is because the labor we are using productive family is the labeling scope description, which displays information that you have in the description of the material. So if you use McKean them, you're going to see for the information that you have with the fact is not the same one. Or you can use with a given. And remember that you can use the Kingdom sodiums in order to serve information where you want to explain. So with this, we are going to be able to choose between the governments and the facts. However, we payments are actually the sine with a more generic for my specific report, generic information we are going to be using throughout all the abuse of the project and upon people, elements of the same propellant or even beggars.
24. New in Revit 2022 Changing the Orientation of the Tags: Now in this version of revenue, you're going to see
that you will have an option in order
to rotate it back. So this means we are not only going to be able to
have the leaders, but also we are going
to be able to rotate the time regardless if you
are using the leader or not. Now in order to change the
rotation or in another words, the orientation just need
to select the tag and then just need to change the orientation by using
the properties palette. So you can select among
horizontal, vertical, or horizontal and vertical
are going to be very simple. However, the one that is
called model will actually allow you to change the angle
to anybody that you want. So this means that if you change the orientation
of attack, a value that is now 90 or 0, automatically the orientation is going to be switched tomorrow. So you can even use the
orientation in order to modify the leader before
you send the leader, without actually changing how the leader is going to function. And also, you're going
to be able to change the orientation of
many other tags where you can place
in your project. You can do it with
the text for the tag, for the doors, and
as a quick sign on, the orientation of
the tag by default, will not affect the
leader unless that the orientation of the tag
on a different quadrant, or in another words, it's
bigger than 45 degrees. A quick sign or you're
going to see that many of the annotations that you
can place on your project, I'm not going to
have the property that is called orientation. Which means that this
option will be pretty useful in projects
in which you're placing a lot of
elements that are not just horizontal or vertical.
25. New in Revit 2023 The Multi-leader Tags Enhancements: Now this pressure prevalence, you're able to use these tags with a leader
as you normally would. But also, we are going
to be able to use this sex and every tag
that has three option or to recommend the risk
score at or remove hose with multiple families
have the same category, but more specifically, of multiple families
have the same type, which means families have the same category or you
send the same family type. So when you do this,
we're going to be able to see they are
going to be able to sell the families in which you want to
use the same tag. So you're going to
notice that there are going to be connected
by the liters. And since these families are connected by using the same tag, we're going to be able to
remove any unnecessary tag, but also you're going to be
able to use the controls. They have a milliliters in order to change the
appearance of the stack, which means you're going to
be able to use the apple, so the leaders as well
as move in the back. Now the same time you're going to see there
if we multitask, you're also going to be modifying their
brains of the leader. Nonsense. We're able to add other elements of the
same family type, also going to be
able to remove them. Now this is actually
very different theories and select pose
McKesson like hose, will actually be used on the
families instead of attack. So this is an option that is
actually specific to attack. A quick signer who are
going to be able to use big new host or click
Escape on the keyboard. So if you pick New Hope's, we're going to be able to place
all the families that are used and they start to another host without
removing the tag. However, not all the
leaders might be connected to the same family
die and a cyclic signer, Ramallah, but you can use
Control Z to undo the changes. So with this in mind,
instead of using some of the options that
you have been using before because they are
related to the family. We're going to see now
under Windows Text tab, you're going to have a panel
that is called liters. And on this panel you
will be able to sell. And if you want to
show all the leaders, or if you want to
show only one liter. So these options are
going to be able to go back and forth on the way that you want
to show the leaders. We are going to be able to
even high or the liters, which is the same
thing that you can do on the Properties palette by checking on checking the option that is called leader line. Well, at the same time, you can simply
select the leaders. May want to show this, we are going to be able
to select all which is the same thing that you
can do by using liters. Or you can select
None. How are they? Assumptions are actually used in order to make the
selection easier? And once they finish, they are going to be able to see that the leaders
the worst selected, or they only wants to
remain the same time. You are going to be able
to merge all the leaders. So you can have all the liter is connected on one single elbow. So instead of moving the tag, you will only need to
move the elbow. Vento. The idea of using
this tag is they are able to use
the same time with multiple families
that are used in the same family type or in
another words, families. So the same time, you're also going to be able to
see that you can actually use in other families that are not used in
the same family type. So if you do this, you're going to see that
will let you know that you have various values being selected by you
send the same tag. Now let's spinalis, since
these are little lines, you are going to be able to use the options for Leader type, meaning that you can use free n or attach n using the liters, which also means
that you can use the type properties window in edited change the
leader arrowhead. So you can even change their
parents or their leader, but also the way that the
leader is going to be used place and about batteries
Berlin and the leader's panel. So this is an
improvement that is going to be very useful when you want to represent
your project in a different way away. You don't have enough space in order to represent
your project, which is also going to
be based on the way they represent your project
in your country or region.
26. Placing other Types of Views on the Sheets: Nine revenue. You're also
able to place a treaty abuse, as well as the renders
within the sheets. So this means that you will
be able to create sheets that can be used for the
presentation of your project. Or in another words,
that she is 0, Y shape that is used as a cover when presenting
your project. Now in this case,
I'm just going to create a shape
with the number 0, which is meant to represent
that is the first sheet, but also that this shape is the presentation
of the project. Now as a quick side note,
you're also able to create a specific shape that can be used as a cover
for your projects. Now, once I created the shades, you're going to see that you can select the views that you
can place on the sheet. And I'm going to start by
adding the solar study. And once I added
the solid study, you're going to notice that
you can select the view in order to modify the
properties of the beer. But also you can use
the double-click on the mouse with this view. So you can edit the view
within the ship and you can click outside of the view so you can stop
editing the beer, but also you can move the view. And once again, remember
that you can use the properties palette in
order to edit the view. Now, a quick side note,
if you select the view, you're going to be able to move the view by pressing
and dragging or by just simply using crypto
circumstance where you can find under Modify
panel as well, you can use the arrows on the
keyboard in order to move the pupil within the shape based on the direction
of the arrows. So you can use this as an alternative for
the price and drag, as well as an
alternative to the tool circumvents that you have
on the modify panel. Now as well, you can
use double-click on the viewport in order
to, for example, the crop region and in order
to edit the title of the EU, or in another words,
annotation of the paper. You will need to select
the view until you see the control for
the extension line. Once they either this, you will be able to move
the extension line. But also since this annotation represents the
name of the pupil, you can change the
name of the view by you send the
properties palette. Now after finishing
with this view and go into select another
view in order to show you that you can delete any of the abuse than this case. I'm going to add
a different view so you can see within the ship. So instead of using the 3D view that I use in order
to create the render, I'm going to actually
place the render. Now you can edit the render
pretty much the same way that you edit a view
of the solar study. However, since why you have is the render options that you have are going to be
slightly different. Or in another words,
they're going to have less options are properties. And the properties palette. We're working with the
annotations for their papers. You're going to see that
on this annotation, you have the same detail number that you have on the
Properties palette, which is ten number that you
have inside of the circle. Nasa quick sign-on.
Remember that you can create your own scale by
clicking where it says custom. And also we are going to be
able to change this scale. But also you send the
properties palette as well. You can use the properties
palette in order to change what is
called petal number. Now you actually do
this in order to keep track of the number of details that you have
within your project. And at the same time, if you
double-click within the BU, are going to be able to edit the extent of the view
without changing the scale. Now when placing
the render you're going to see and
you can even change the rotation because there is a property that is called
rotation and ****, as well as the recent property that is called title and sheep. So you can use data
on shape in order to change the title
of the paper, or in another words, the
name of the bill Johnson, the shade, my incentives property under
Properties palette. And after the changes, I'm going to modify
it once again, a title of the bill and the position of the
view within the shape. And as a quick side
note, so you notice also going to see within
the properties and the properties pallet, the name of the view,
NSA quick sign-on. You're also going to see when
it happened to be within this shape that Amanda properties and the
properties palette, we are going to be able to
find the rotation on shape, but also the name of the view. And also you have something
option of a you can do, which is changing the name of
the view within the sheet. So you will be able to do this by writing the name that you want to use right next to where it says spiral-like shape. So you can have the name of the view just for
your personal use. Or are several reference
where the people that you're working on
the same project, while that iron shape
is the one they use in order to present a
view within the sheets. Now in this case and go into
the lithosphere in Freiburg, final will be nine, just going to keep editing
and adding the views, then going to be using
within the sheets. But at the same time, I'm going to use the
properties palette in order to edit the
properties within this view, as well as the use
of the double-click in order to do the same. Now cyclic cyano, if
you have any tau of Y, you can do with
any of the peers. You can scroll on the
Properties palette in order to see all the
properties that you can change for the abuse. Because as you notice, all the views have a standard properties that you can change, such as the rotation and ****. However, some other properties are going to change
based on history. Our 3D views to the views
are images and renders. So you will also
have to keep in mind how different the P
is can be one from the other while
deciding how you're going to present a BUS
be dangerous sheet, whether it is by using the
properties pallet or by using a paper as an active view in order to edit the
properties of the view, as well as the graphic options, lesson settings, and so on. So I'm going to keep
adding an edit in this views so I can place
these views, widen the sheets. And while doing this, we're
going to say how we say it is placing views they
are going to be using in order to
present your project. Because you're going to be
able to create multiple pages within your project that
you can use as a reference, but also that you can use in order to present your
project to others.
27. Changing The Graphic Display Options for any view: Now, remember, you're
able to change the sun settings in order to modify any solid study
that you created, but also in order to modify their parents or your project. Make us the sun
settings will allow you to determine how the shadows are going to be graded based on the position of the sun
layer is on your project, as well as the location
of your project. So you can always swap thing, my location of your project depending on your
country, region. So with this in mind,
I'm just going to make a few changes and
the solar study so that the shadows
not get too much in the way when making other
changes to this project. Because when I'm going to
show you will also allow you to change how the
shadows are displayed. How I know that modify the
display of your project. You need to use the drop-down
they use in order to change the abuse style and then click racist graphic display options. And after you do
this, you will have a window in which
you are going to be able to change the visual style as you do by using
the drop-down, which means that you
will be able to select among wireframe airline shaded, consistent color and realistic. However, you're not going to see the option that is
called ray trace. And below this tau, you have
a check whereby you can use in order to show
or hide the edges, which as the name implies, you will be able to
show or hide the h's. Now the same time,
you're able to smooth the lines by
using anti-aliasing, which is sending the UK mix
the option of sharp edges. Now the same time,
you're able to change the transparency by
using the text box or by using this control shadows, you will be able to disable the option that is
called cast shadows, which means that the
objects that you have created now going to
guess any shadows, or in another words, they won't be able to create any shadows. Petros in order to
show ambient shadows, which will allow you to Shadows based on the
position of the sun. And that's why you
have another section which is called sketchy lines. And below you have another
section that is called the QM. Now bolted, these ones
are disabled by default. So I'm just going to move on to this section so you
can use while you Senator 3D view or starting first with aligning
the underlining, you're going to see the
pretty much the same thing by using the render window, but also by using
the sun settings. So you will be able to
change the line and you can change based on
the render window when it comes to the sun, but also the sun settings. And below this, you
will be able to modify the artificial lights if you have any. As well. You're able to modify the
intensity of the sun, the ambient light, and also
the strain or the shadows. So this means that
based on these values, they are going to be able to increase the effect of the sun, the ambient light and shadows when presenting
your project. Now when changing these values here are going to nowadays, you can input the values are
that you can use the slider, but also there by default, the value for the ambient
lines is actually 0. So you can increase the
intensity of the sun. So you can increase the
strain or the shadows, which will work hand in
hand with the options for the shelves they have
on the Shadows section, especially the one
that is score, show ambient shadows
because this value and make the shadows looks
softer or less intense. Now they're going to be a few
resources you can also use, such as, for example, the photographic
exposure, which is sand. And that will allow
you to modify the exposure based
on these values. But also if you use manual, you're going to see that
you will be able to input an image that you can use
in order to do the same. Now this is not as
powerful as it is in an HDRI or in another words,
act customers poacher. Now you can add another suffers. And below this option, you're able to modify
the background, which is sending
very similar to what you can do under render window. How are you going
to be able to see that this will
affect the 3D view? Now when they send mine,
you're also able to change the background color
in case you want to use this image as a base image
that you've been using Photoshop for juicing case that you want to defer
periods for your model. Now we descend mine.
They're also able to click races safe
as we assembling. However, this is a little
bit more complicated. So I'm going to show me
this option later on throughout the lessons of this course, including this one. Once I click on Okay, I'm just going to show you
the result within the shape. Now when you use the background, we're going to be able
to see net revenue, essentially the background all the time within the viewport. Because of the type of data
you're using matters in order to save a little bit of resources when you
send the background, while at the same time, you
can use the word play or active view in order to change the graphic options for
the BU within the shape. And after this, I'm going
to revert the changes. And as a quick reminder, you can hide files
that you import it to the project,
such as this one. As a quick side note,
remember that you can hide unnecessary objects
within a bill in order to polish the
appearance or the beer. And also on the solar studies, you can use the
right-click on a mouse in order to modify the solo study, as well as the properties
palette in order to resize, let's unpack Mason a percentage. After doing this, I'm going to modify a little bit
more the parents of the 3D view in
order to make sure that it fits a little bit
better when in the sheet. Which means that I'm going to modify just a little bit less. I love studying, but
also the scale of the V. So I'm going to use the properties palette
in order to do this. So I can later on, I'll
show you once again the options that you have on the graphic display
options window. Now the render views, you are now going to be able to change like graphic options, even if they're able to change the position on the render, on the shade, as well as
the size of the Render. So in order to do this, I
will select a different view. So I can show you other options
medical century before, such as the fact that
on this view you can actually enable these
sketching lines. So I'm going to show
you what happens if you enable this option, but also I'm going to
modify the values. So you can see what happens
when I change these values. However, you're
going to notice that there are going to
be other options. There are still not available, such as the ones that are under section that
is called that going how are you going to still modify the lining
specifically for this view? And that's why you're
going to notice that there is another section
that is not available, which is the one that is
called photographic exposure. And as well, you
can still change the background by
using this window. So you can improve
the appearance of the beer without using a render, but also without using
other softwares. Now when it comes
to the templates, this is why for you to use
them is by making the changes, whether it's on the
graphic options, on the Properties palette. And then you cited changes
by clicking on Okay. And after right, and
then the name mine just going to click on again. In order to open the
template winter and dispute and play window will allow you to make
further changes, but also it will allow you to change his theory
already done. And once you click on Okay, let be a template can be used. So what this means is that now you can assign that
view template. So after closing the graphic
display options window and just going to use
the properties palette in editor click right
next to where it says view template under section
that is called Identity data. So once that I have done this, I just need to select a template that I want
to apply to the beam. Non-cyclic cyano. This can actually
be done regardless of the way in which
you open the template. However, if you use the graphic
display options window, you will need to
create a new template before opening the
Templates window, but also by its other
properties palette, you can use the View
Templates window in order to assign the template, but also in order to use
the options that you have in this window in
order to even crane. Or there'll be templates, which means that you can
delete the existing ones. Nasa break sino, they're
already viewed templates like rated by default based on the template that we're
using in the project. In the last panel is, I'm going to show you the
other sections that I didn't show you before
because of the coin. In other words,
I'm going to open, I differentiate into
different view. In order to open once again, the graphic display options
window for this view. As I mentioned before, depending on the
beer you're using, you're going to find the
sum options are enabled or disabled under Graphic
Display Options window. So by opening a section view, I'm going to be able
to show you later on the graphic display
options window. You're going to see
that now you're able to modify the options
under that section. So when they send mine,
I'm just going to modify the values for you to see
the result within this view. This will allow you to see
whether B is going to improve when it comes to the order of the elements
that you can see. Or in another words, is going
to be a little bit more precise when it comes to how
you present your project. And also you will
need to keep in mind that these values are actually based on the position of the objects
Mason the section. So you can play with
these values based on the last element may want
to display in this section. So you can see what
all these pallets are going to do depending
on how you change them. So as you notice all
these options and very useful when it comes
to present and abuse, but also on the quality of the representation of the views, especially when it
comes to the sections. Because under Sections, you're going to see them
in other softwares. You have more control. However, it also gives you a lot of control on how
you display this section. So the assumptions
are pretty useful. And remember that if you
don't want to repeat the same changes
are multiple views. You can always save the template so you can apply
it to an overview. How are you're going to
see that we're working with the option that you have in order to save the template is actually pretty useful
because it will save you a lot of time if you have multiple views in which you want to apply the same changes. Nasa quick center, Let's sections or more
specifically the options. So you're going to find on the graphic display
options window are going to depend on the
bill that you're using. So you're going to notice this somewhat abuse then allow
you to use a few options. But at the same time, some of these options are now going to be available
in all the abuse.
28. Using The Duplicates of the Views: Now we're working with abuse. They are going to be using in order to work
in your project. You're going to notice
that instead of placing one of abuse,
they are very creative. You can actually use those pills in order
to create others. So instead of placing one other views that
are already created, I'm just going to go to the Project Browser in order
to cover this floodplain. And by doing this, I will be able to use
the right-click on a mouse in order to quote
where he says replica abuse. And in here you're going to
see that you can duplicate, duplicate with detailing and
duplicate as a dependent. So if you use the option
that is called duplicate, you're going to
see that you have a duplicate of the floor
plan that I selected. But also you're going to see
that the annotations are used on the original floor plan or not on a duplicate as well. You're going to see the
name of the floodplain. Let's see. No. Not only that the
floodplains a copy, but also it's going to let you know the number of the copy, as well as the floor plan, but it was used in
order to create a copy. In another words, the duplicate. Now with this being said, when you use the
right-click on the mouse, they're able to also
duplicate the view detailing. So if you select
the option that is called duplicate with detailing, you are going to
create an exact copy of the original floor plan, which means that everything
is going to remain the same because now the
annotations are also graded. Our Sunday for you to notice
is that you have here another option that is called
duplicate as dependent. If you use this option, it will be able to create
a copy or to replicate. There is going to be independent of the original floor plan, which is something that
you can nowadays by the naming convention
on the project browser. But also because
I see nowadays in terms of location is going to be below the floor plan that reverses in order to
create a duplicate, while at the same time, it's going to be a
little bit on the right. And you will see lines
that will let you know that this one
is that children are the first floor while the first
floor he said Children of the floor plans and the
floodplains are children's abuse. So with this being said,
you're able to create a duplicate that is
completely independent, even without annotations, an exact copy, but
also sad dependent. So you can use the
original bill in order to either dependent while he
is independent of the rest, going to show the information
a little bit differently. So you can change, for example, the region of the dependent without affecting
the original bill. So this means that the original
BU will remain the same. While the dependent
is just willing to change how much of the
information you're going to see. So in this case, this
will be very useful in order to focus
just on the project. While another view can actually focus on everything within the boundary lines
of the surface that is being used in order
to place your project. And also cyclic sign-on to dependent is a copy
of the original. The original is not a
copy of their dependent. So there are other things
besides the crop region. They are not going to
propagate that the original. And this is something
that you can see once you start making
changes interdependent. So this means that
if you start making any changes to the proper place holder,
to the beer surge, they're going to be able to see that in the case
of the one varies depending on the changes are now going to propagate
to the parent. However, the changes
for you to do, the parent will actually
change the children. So a dependent is actually
used when you want to visualize differently
the original floor plan. Or in another words,
when you went to the crop region and such. So they use, It's
actually a little bit different compared to
the other options. Now what this means for
the new views that are actually created can actually
be placed on the shelf. They are copies or not. So with this in mind, you can create a specific copies where you can actually use for
specific purposes on the sheets. Now the same time, since
you can create copies, you can also delete them. So in this case,
what I'm going to do instead are actually
going to show you some other benefits of creating a copy by actually creating
a copy of the floodplain. So I'm going to place this copy, the shape, but also and go into edit mode you can see
within the shape. So in another words, I'm
actually going to use this period as a representation
of the entire project. So this is going to take my
little bit of time as well, since the dependent is
another BUT already graded, you're going to be able to
use it as you normally would. Now once the place to be you, you can always change
the position of the beam as well as the position of
the annotation for the view. So you can hide what you're now going to need within the beam. And as a quick side note, even though this is a duplicate, you can still edit the
project. Why isn't this views? Because you can still select
the elements of the view. Instance revenue is parametric. Once you've either one of
the elements of the project, we are going to change the element in other
views of the project. Once this is done, you're
going to be able to make changes on the graphic
display options. But also you will be able to even assign, there'll
be a template. So you're going to
be able to make changes throughout the
options that you can modify. We're working in your project, and then you will
be able to save those changes as a template. Now what this means,
since this is a copy, you will be able to change the graphic display options independently from
the original beer, which also implies they
are going to be able to see where you have
different options. They might not be able to
change on other views. We can create what
working on your projects. So this means that on a 3D view, you might not be able to
see a few of these options. So this means that on
another type of view, it might not be able
to see a few of the options that you can see
right now in this window. So I'm just going to make
a few changes in order for you to see the result of the
changes that are undoing. But also you're going to notice how easily you can actually, not only the appearance, but also the smoothness
of the drawing. Which means that
you are able to see this lines already hidden
within the project. Or in another
words, have you can actually load a little bit more on the presentation side than on the construction site. Now we're editing this video. I'm going to also raise
any unnecessary lines. Now with all this mean Save and just going to
show you a little bit more of why you can do
by using these options. But also, I'm going
to hide the lines by using these two are command
under Modify panel. So what this means, so I'm
just going to quickly at it baselines in order to show
you how you can do this. Now the same time, something for you to note is that this might actually
take a little bit of time. So you might not want to
do this your projects. So I'm going to show you
a few things that you can do in order to do this a
little bit differently. But also, as you
might have noticed, changing the graphic
display options can actually help you editing how you want the
project to look. Nasa sign-on. They can
also duplicate and active view pace and a Beta
because on the Build tab, you will find that duplicate bill or command in order
to replicate the beer, as well as duplicate with detailing and replicate
as a dependent. Now as you can see
on this lesson, there are different
ways in order to change the appearance
of the project, but also you have different ways in order to improve their
brains of the project. Or in another words, in order to clean the project a little bit. Now this is a little
bit more complicated in elements that are using
a complex surfaces. However, in the other lessons, I'm going to show
you different ways in which you can do this
a little bit easier by using a few other tools
or commands that are intended in order to add a little bit more
detail to your project. But also that they can
be used in order to high where you don't want
to show in your project.
29. Changing The Starting View of the project: When I started your project, there is a few things that
you can do in order to determine or personalize how
you work in your project. And one of them can be
found on the Manage tab. So by using the Manage tab, you will be able
to use an option to recommend that
is called History. And when you click where
it says starting view, you're going to get this
window that will allow you to determine they be they want to see when you start your project. Now by default, remedy
uses the less people that it was open at the moment
that you close your project. If you have a view that is less demanding that you want to see at the moment that
you start your project, it will be able to
use this option or to recommend somebody is in, for example, my sample project. I'm going to be able to
show you how to do this. Nasa quick sign-on when you use this drop-down on
this turning view, you will be able to see that B is the already
created a new project, as well as the shifts that happen grading
within the project. And within this
project we're going to see that by default, the B there is open, is the title ship,
the starting view mass actually use in order
to set the starting view. And also, if I then
select the project, you are now going to see a
change on the starting value. Now the most important
thing for you to know is that when
you use this option, you will need to actually
save your project. So if you change
the starting view, you will need to
save your project at the moment that you
close your project. So what this means,
so I'm going to save this project
after selecting the view that I want to use every time that
I open this project. A quick side note.
While doing this, you're going to see
that you will be able to change the options in order to use this starting value has to be the riskiest
for the thumbnail. So you can see this
starting view when opening the file that you have another specific directory. And also you can check the
option that allows you to generate the abuse and the sheets if they
are not up-to-date. And once they've saved the file, we're going to say
that if you close the project and then
you open the project. Now the project
will open based on the bill that you selected
on the starting window. So as you notice, this is pretty useful in specific cases, but more importantly,
it's pretty easy to use. So you can even use this in
order to show a specific view or shape to the next person that is going to be
working on the project. Or in another words,
the next person that is going to
open the project. Once you say the project, after changing their
starting view.
30. Creating The Revision Clouds: When creating your
project in revenue, we are going to
see that you have different notations that you can use for different purposes. Now, one of these annotations is called the
provisioning cloud. Now you're going to be able to find the remission cloud on the annotate tab for my
specifically on the data panel. And once they cover
the revision clouds, you will be able
to get an idea on how to provision cloud. So once that I click on the
icon for their racial Cloud, we are going to see the
modifying term that is used in electric ray
variation Cloud. But more specifically, you're
going to see that tools that I use in order to draw
the rubbish junk level. So if you use the default to order determine which
is the rectangle, you are going to see that
you will be able to draw a revision clouds the same way that you draw the rectangle. And in order to finish, just have to click
on the green check. Now with this being said, you can actually draw the revision clouds in
many different ways. And this is because you will have different tools
that you can use. But also because
as you remember, every two are commonly happen, the drop panel will also
have options so you can use, while you send this tool
circumvents as well, you can use that tool
circumvents that you can find on the draw panel in
order to create multiple boundaries when
trying to provision cloud, which means that you can create a provision cloud that has multiple boundaries
for multiple elements that require the
same prohibition. Now the same time, it
will be able to add it at drawing while
they're joining selected. Or in another words,
you will be able to flag where it says
edit the sketch. Now in this case, I'm
just going to draw another revision clouds on
another view of the project. So I'm going to
open another view in order to show you that you cannot draw if you change the view after you send
the revision clouds. So this means that W determines where you're going to draw
the innovation cloud. So this means that I'm
going to draw once again the revision clouds may
center line to our command. Once that I've
finished, I'm just going to click on
the green check. Now the reason why I also
have done this is NOT to show you that if you edit
the sketch revision clouds, they're going to be able to edit the Drawing, the gradient, which also means you
can delete segments of the revision clouds as well
as you can create new ones. But at the same time as we
remember, you can change. How can you use to circumstance
such as the heart, which means that
you will be able to change the orientation, the direction of the art, while also showing the arc. So this is something
for you to keep in mind when it comes to the use of the tools or commands
that you find on the draw panel when
trying to restrain Cloud. And at the same time Center
for you to notice is that regardless of the shape
of the provisional glow, while you draw, will still have the same controls that are created when you use the tool circumvents on the draw panel. Now with this being said,
once you are ready, draw their rubbish junk. Hello, it will be able
to see how sexual lives. So the first thing
that you're going to notice is that on
the properties, we will be able to
find the rubbish on Cloud or more specifically
a revision clouds, but you're actually using. So in another words,
you will need to determine how reuse the
revision clouds now by using the properties
palette and also on the options bar mechano
elicit information. So in order to change the inflammation or
in another words, in order to enter
the revision clouds, you will actually need
to go to the Manage tab. And then under Manage tab, use the drop-down for
additional settings. And then click where it says
Shape, issues and revisions. And in here, you will have these columns in
order to let you know how you can change
or revision clouds. So by using these columns, you will be able to change this sequence, the
revision number, which is determined by
the numbering that day, the description, issue,
issue to issue Pi and show. So for example, and
then numbering, you can change for
numeric or alphanumeric, while at the same time
it will be able to add further revision clouds they are going to be using
on the project. And with this, you
will be able to actually change the
revision clouds. There is going to be
assigned to the drawings. So in another words, the
revision clouds are you draw a certainly a representation the actual information of the revision clouds
sexually under Window, menu, open price
and the manage tab. So this means that if you
open that window once again, you will be able to change the information of
the revision clouds. So you can change,
for example, the day. Nasa quick Sina, the format today is going to be based
on your country or region. So depending on your
country or region, you will need to make sure that you're using
the right format. And at the same time, you can use just numbers, are just letters, and
you can use both. Once you do this, you're
going to be able to see that this information is updated
on the Properties palette. So you will be able to see the revision number
that revision day, as well as other
information that you can change by using the window, the European front
of Manage tab. Continue with the
changes that you can do. You can, for example, change if the sheets have been issues. So you can, for example, use that checkbox on the
column that is called issue. Which is centered once again, it's going to be updated
on the Properties palette. Nasa quick signer, if
you delete a revision, you're also going to tell
lien provision cloud. Or in another words, they're trying to reach you
assign the revision, the, the leader and the intention
of the prohibition clouds. What more can you project? May say no to let somebody know that there is
something that needs a revision or something that
is going to be updated more important on the
project or throughout the process of deconstruction. So because of this, you have the issue too. Then you should by now the same time you can also
use issued to an issue by, so you can change these values
depending on your project. While at the same
time you can see that this information gets updated
on the Properties palette. Now with this being
said, actually able to add a description
to the revision. And as you might have noticed, that revelation is also what it appears on the name
of the revision. So this is a way for you to make sure that you're selecting the revision that
you want to use in order to assign
it to the drawings. Now, also these provisions will actually have its
own annotation. So you are going to
be able to change the default annotations
that you can use in order to avoid showing the annotation where in
order to show attack. And you can even show
the Cloud and attack. So with this in mind, you
are going to be able to hide their provision
cloud where then the project without actually
erasing the revision Cloud. While at the same time, we
are going to be able to place an annotation for
the revision club based on the annotate tab. So you can choose that by
category in order to add a tie that is going to be used
with the revision clouds. So you can even add a tag, which also means that you can personalize that tag.
My specific length. We can personalize the family that is used in a retrograde is tagged as well. You're going to be able to
find the revisionary flow on the View tab hormone specifically undershoots
composition panel. So we call this being said, you will be able to
see different options that you can actually
change or use. One of these options is
going to allow you to change the numbering from
per project to proceed. Which means that you can
change the numbering based on the entire project or just based on the ones that
are used on a ship. So if you do this,
you're going to see now you don't
have the column, the risk score revision number. So with this in mind,
you're going to notice that the provisions are actually going to be based on the shape
in which are used, which actually means that the
numbering will be received. Every shape, every shape. We're going to start
once again from one, which is pretty much
based on the annotation. However, this doesn't mean
that you cannot determine the radiation that is assigned
to each of the drawings. Nicer quick sign-on,
since we can add the revision clouds and
abuse of the project, we will place the region clouds
on sections and details. So because of this, the revision clouds by default are organized for
the entire project. Now there are other
things that you can do by using the window
that you can open. My center managed type, such as, for example, move
down or merge down. Now, Mitch town will
actually allow you to merge one revision
with another hour. This actually means that the provision that will
remain is the one that is below deprivation the selected before
using this option. While at the same time. And you can move
the revision clouds as well as you can merge up, which is also going
to determine if you're going to merge
down or merge up. Now another option that you can change how the
numbering options, which will allow
you to determine how you're going to
start the sequence. But also if you want to add additional characters
going to be displayed with each
value of the sequence. So you will be able to change
the prefix and the suffix. Now with this being
said, you can easily change this options at
any point by just simply opening once again the
following window in order to select the numbering
options may want to change. Now the same time,
since you are able to change the numeric options, you're also going to be able to change the alphanumeric options. However, so it's pretty
much the same because you can select the
prefix and the suffix. Now the same time disruptions will not apply if
you don't select the alphanumeric numbering by using disruptor enlistment lists, you're actually able to
determine the arc length that you want to use for the representation of
the revision clouds. So you can customize
even the appearance of the revision Cloud
by using this window. Now the same time, this
representation is going to be awesome modify based on
the scale that we're using. So depending on the
scale that you're using, you might want to use
different values. Now with all this being said, you're going to be able to place revision clouds in every
beat of the project. But at the same time you're
going to see that you don't actually need to place the
revision clouds within a BYU. So this means that you can place the revision clouds on top of the views or more
specifically within the sheets. So you can do this in case that this is more
convenient for you. Or in cases in which a revision clouds may actually be confusing whether
in your project. So all this means liver patients are
actually very useful. Not only whiteboard
in your project, but also under construction, because you will be able to use the abbreviations
in order to work on corrections when you
might need to do while the project is
under construction.
31. Using The Scope Box: Now in that, okay,
you're going to find that there is a
way in which you can limit what you can see within a bill without creating
a copy of the beer. And this one is
called scope box. Now the scope box
actually creates a box that will allow you to determine the limit of the view, or in another words, the
limit of the crop region. Sir going to be able to
use this one in a way that will allow you to
change what you can see depending on the beer. The scope box will
allow you to control the visibility of elements such as liquids and the levels. Now, once they use
these to recommend, you're going to see that
you will need to draw the boundary of the scope
box on the project. And once it is created and
are going to be able to use these controls in
order to edit its box. Now the same time, you're able to control the visibility of this box and the families or the project. So this is something
that you will have to use on every p or the project. Or in another words, it doesn't have to appear in every build the project because
you're not going to be using it on every
build the project. A, quick sign up on
the scope box B. And specifically, you're
going to find that there are some views which is called
box some baseball by default, which means that the only choice you have in order to overwrite the visibility is visible while on the other
ones is invisible. Now if you hover
on the properties pallet of some other
views of the project, you're going to
see that there is a property that is
called scope box. And then this option,
you're going to see these copepods based on
their name was assigned. So you will be able to change the name by selecting the box. But more importantly,
you're going to be able to assign these
parts to the beer. So with this in
mind, you're going to say that the crop region, now it's actually based
on the scope box, right at the same time you're
going to see that you are going to be able to
edit this crop region. Now there are few
limitations when it comes to using the scope box
because one see the cycle, the scope box, like crop
region will not reset, which is something
that we want change even if you delete
the scope box. However, if you
delete the scope box, you're going to be able to liquid region has
seen normally would. Now if you choose an
option that allows you to, not to crop the crop region, are going to be able to see
that you can actually enter the boundary of the crop region without using the scope box. So you send this box is
actually pretty easy. Money some cases you might
read it, duplicate the view, may not integrate
an independent view because it has a little
bit more freedom, but also because you can
duplicate and said abandon. Just remember, it
will allow you to create a view that is
based on another one. So in another words,
you might want to add these boxes for the
different areas within a hospital so that way you can organize
WE is a little bit better. Now at the same time, when
you draw one of these box, you actually need to
make sure that you are within the boundaries
of the crop region. Or otherwise,
you're not going to be able to see the
box within the view. However, you will be able to use this box in order to
edit the crop region. Now with this being said,
you won't be able to add the boundary of the crop
by itself controls. However, he was still have the controls that will allow
you to break the view. So you can use this in order
to break the boundary, or you can simply
use the controls on the scope box
in a retrovirus, the boundary of this glove box, which also means that
you can even delete it. While at the same time. Now we're going to be able
to add a panic system box. Many sexually use
another view in order to edit the boundary of the
region within the BU, that is use him
in the scalp box. Now even though no change
in the boundary of the region by using
the scope box. You can also change then a
visual graph in order to determine annotations to you when I see where
then the B as well, since they are able to
delete any scope box, you're also going to be able
to use Control C in order to undo the changes that is called parks does to the beer, which also means that
you can undo place and the scope box in order to use the controls once again,
as you normally would. Now, a quick center, you can actually hide this
box within a beer, which means that you will
be able to unhide the bugs, but also revealed
the box along with the other elements that
you've had within a beer, which is actually different. Like going to the properties palette and click where it says, set it right next to where
it says b is baseball. Thurman in which views
they want to see this box. So as you notice, this
box is pretty useful, but it will also depend
on what you want to do. Whiteboard, can you project? Now even though you can control the visibility of the scope box, you can also determine
the reach of the scope box before
placing the scope box, which means that you can use the Options bar in
a rapid change. A few properties, such as,
for example, the name. But more importantly, you're
going to be able to change the height of the scope
box based on their level. Or in another words,
the scope box. It's actually two-dimensional, which means there is
place based on the host, which in this case is level one. And the height will
actually determine how far off this box
is going to reach. So another way in
order for you to appreciate this
box is by actually looking at this box has a
cube and the cube will be appreciated if they are within the visibility
of those views. So in the case of
the floor plans, asexually means that
while in this section, we'll have to do with how
far you want to say on this section view or in another words, the
forklift upset.
32. Printing The Project (using a pdf printer): Now at some point while
working on your project, you might need to present your
project to somebody else. Or in another words,
you might need to bring your file in order to
show it to other people. And in rabbit, you
can actually bring your file almost the
same way as you do it. In other words,
from out of this. So if you've ever
used other supports that are graded by adding this, this will be pretty similar,
but at the same time, something that might help
you understanding how you bring your file is
actually the use of printers that are
able to bring in formats such as a 0 or a one. So with this in mind,
I'm going to show you how to do this and this
pressure advocate. And while doing this, you're
going to see that you have to recommend they use in order to bring your file on the quick access toolbar as
well as on the File tab. And also, as you
might have noticed, there is a shortcut that
you can actually use. Now use this to organ, which is Control
plus P as in Peter. So if you use this shortcut, you will have the
following window. Now if you've never used and other software out of
this suggests that okay, or even war in order
to find your file. This might be a
little bit confusing. However, since printer is
pretty much by some practice, the purpose of this lesson, you will be actually showing you the most important things
for you to keep in mind. So just for example, the printer that you are going to be using, the printer is going to
determine not only the format, but also the size
and the options where you can change on
the bottom of the window. So for example, the PDF
will have its own options. While at the same time, a physical printer will
have some options. So you will have a
Properties window in order to see those options. So depending on the
printer that you're using, this properties window
is going to change. Now by default in revenue, you don't have a printer with a lot of options
that you can use. However, if you download
another software or add-on that will allow
you to bring your file. You're going to be able to see that that is going
to change because their printers
that allows you to change the color has
standards for imaging. And also I will allow you
to change the paper size. So what this means, you
will need to keep in mind the size of the paper
they are going to use. Now, there is no
way for you to see the actual paper size if you're using a standard size on Leslie, your research
waste, for example, he saw a one. How are going to leave
you with a few standards? Or more specifically,
with a few standards that may apply on
your country region. Now, this is very important as well because of the sheets. So you'll need to make
sure that the shapes also fail in order for you
to use the same scale. Now you can also determine where you're going
to save your file. If I don't make
any more changes, you are going to say that
before clicking on Okay, unable to open a preview of this file before
being printed. Now the same time in
many other printers, you're actually able to
create a custom size in case you want to make sure
they're using the paper size. Now you have available
1 in your files. So it's also very
important for you to know what is the size of the paper
that you have access to. So what this means is that
you will need to ask, what is the paper size that is used in order to
print your file? If you're doing physically or if you are going to send out a PDF to make sure that
is print properly. So in many cases, is the person printing your file and doesn't really
know these standards, it might be able to tell
you the size of the paper that is personally sexually purchasing or in another words, that this person has access to. So you can use any specific
paper size as a reference. And when they send mine will let you know how about
this shade abuse? Because rabbit has a
few limitations when it comes to shading
shadows and such. Now this only means
that rabbit will use restaurant printer in order to print images that are shaded. So this is going
to be a little bit different than if
you were printing, for example, for
our blend without having an image on
the title block. And this is very important
for you to keep in mind because if you add an
image to the title block, all the sheets are
going to be printed. You send restaurant printing. Now the standard printer is
based on vectors as well. When you playing,
you send revenue. Also able to
determine if you are going to print the
current window or if you're going to see only the visible portion of the window. Now, this is important
for you to keep in mind because revenue will change the scale of what you're printing based on
these two options. Which means that it
will try to adjust the shape to the paper
based on the assumptions. So the best option for you to actually use in
order to print on a specific scale
is the one that is called select the
abuse and sheets. So when they send mine,
you will be able to select the bills or the sheets. Now if you select the views, only going to be able to see the abuse went
great and the set, which means that if you want to see what you are going
to present to others, what you actually
use this the sheets. Now the options that you have on this window that is called view. She said, I ingest in order to determine what you're
going to see on this list, as well as options in
order to select the abuse. While at the same time
you will be able to create a set or sheets or abuse. Now you can actually
print right away. So instead of using in insertion
and you will be able to see when a mother cell right
next to where it says name. So you can just simply print
they settle sheets or abuse. So you don't have
to make a selection every time that you print
on a specific file. At the same time,
even if the printer has some properties
regarding to be able to change the properties or
the shifts that you're going to print directly by
clicking where it says setup. Now this is very
important for you to know because this window
that is called Point setup will actually allow you to make all the
changes that you need to actually send the
properties of the printer. And also you are going to be
able to see that this is a little bit more complex because you will be able
to see the printer, the name of the setup
that you are using. When another words, the
name of the set of play you can create like Ligon
where it says Save As, as well as other options
and information such as, for example, the
vector processing, which is the default
way in which revenue processes the file when you don't have any
images on the file, as well as the rest are
processing the colors and so on. So with this in mind,
and just going to do a basic printing without
changing many of these options. So in another words,
and just going to continue by just simply
print and this sheets, whether I'm making
too many changes. Now something as
well for you to know is that this is a process
that you can cancel. My click away says Cancel
next to the progress bar. Now this progress bar, it just in order to show you that the sheets
are being printed. So if you bring many sheets, that progress might take
a little bit longer. Now once they have done this, the only thing that
you will need to select is where you're
going to say these vowels. Now since in this case I can actually show you how
physical printing, I'm just going to
show you the result, but you send a PDF printer. So what you see right
now is the result for printing your file,
whether default options. So the one thing that
you're going to notice is that everything
fits then the window. But also you're going to see the basic quality that
you can be like change in many other settings
and options that we're going to cover throughout
the remainder of the course. And as well, when
you bring your file, you will be able to
see a little bit better that changes things, might have turned
to the settings. You are going to be
able to perceive a little bit better on the changes you are
going to be able to do throughout these lessons. Now if you're not able to find a PDF printer or
a PDF extension, you can actually
go to this website in order to find a
printer that you can use, such as, for example,
like cute PDF. We are going to be able to
use this website in order to download a free version that you can actually
use with revenue. Now the PDF is not the
only one that you can use, but it's one of the ones
I can create a PDF, but it's actually going to use many of the features of the PDF, such as, for example, combining multiple files
into a single one. So when you use this pointer, you are going to be
able to have access not only to the properties
better the point set up. Now the one thing that
I recommend you using is the print setup instead
of the properties. And this is because
you are going to be able to have options, not only in order to change
the paper size or the source, which is only used when
you have a printer, that you can actually use
paper from different sources. And the next sample, this
isn't a standard printer. They might actually
have to trace in which you can place the paper
they used for printing. Now the same time,
you can't even determine not only the color, but also the restaurant quality. So every time they use
this raster processing can actually have
a better quality, such as, for
example, the images. Now as a quick sign or you are going to see on this window basic options such as
orientation and such. But also if you have options
where you want to keep using while presenting your
projects, you can save it. So you can just select that every time that you
print your files. Now as a quick side note,
when you send the cube PDF, you may actually need to open this window for the
cube PDF writer, which means that this window might not happen automatically. So with this in mind, just
going to say this file once again and just go into print this file with
all the sheets. Now as a quick side note,
if you print a safe, they're going to be printing all the shades that
are selected will intercept to a PDF file
to a physical printer. Which means that you
will be able to print all the sheets with
a single order. So this is very
important for you to know because
you might want to print just one shape in order to see how it's
going to look like. Now as you notice as well, you can actually overwrite
the file if you want to. So in this case, I'm going to overwrite the previous file, the righteous same enolate to share with the
difference between different options
for settings that you can change on
the printing setup. But more specifically,
the difference between using color like
lines and gray scale. Now as a quick side note, if you haven't saved the
settings, right, we will go ahead and let
you know and give you the option to say the settings. So these are going to
save a little bit of time every time you
bring your file. But more importantly,
you will know that what you're printing is already using the same set of the already
graded further abuse or sheets that you might
have already printed. Now once that I created
all these files, you're going to be able
to see a few things. One of them might not be so easily appreciated
because this is a video you might not be able to see so clearly the
difference between color, black lines and gray scale. However, you're going to
notice that the second thing is that the shape doesn't
fail within the paper size. So this is something
that you can change by changing
the paper size. However, something
that you might have noticed is since there are now using fifth to page and
a few other options, that shade is going to remain outside of the
boundary of the paper. And this actually
allows you to bring your file or you send
the scale of the ship. Or in another words,
your shape will be printed by you send
a real paper size. Now sensor able to use other printers besides
the queue PDF, you will need to make sure that whichever printer you're
using is compatible with the features that
you have in the PDF because the video is not
graded by additives. And also that the features are supported by a physical printer. Because if the printer
you're using can only print in black and white,
there is no point. I'm bringing your
file with color. Not a perfect size file. You have a few options. One of them is actually changing the paper size to another one that is
bigger than the shape, but also you can
actually edit the shape. So depending on your
country or region, you might actually need
to do one or the other. And as you notice, when
changing the settings, you're able to use
the paper size and the paper placement in order to help you with this scale and the precision of the
presentation of your project. So in another words,
in most cases, and he is soon with a
different percentage, you're not going to
get the right scale, which is the same thing that
happens if you use v2 page. Now in this case,
what I'm going to do is actually add a shape, my editing first
the title block, and then changing the
abuse within the shape. Or in another words, Lebbeus
within the title blocks. Now I'm some other papers
or in some other shades, I might not need
to do any changes. However, in some, I might
have to do a few changes. So I'm just going to make
a few changes, NFA things. Now as a quick side
note, I have here the changes we are going to
cover throughout the course, such as, for example, the line
wave and the line styles. So I'm just going to show you really quickly how you can use this minaret omega-3 corrections within the abuse of the project. Nasa quick Signer, I'll
notice adjustments are going to be useful in other
lessons of the course. But also, this is a
little bit of a practice of body has already been
covered within this course, while also showing
you a little bit of what you will be
able to do while you send revenue and the rest of the lessons and the
remaining lessons. Now once they're finished
with all the changes, I'm going to go ahead and
print the file once again. But this time I'm going to
change the vector processing to raster processing because there is an image
within the shape. So I'm just going to follow
this process once again. And once they're
finished the process and just going to overwrite the existing file in
order for you to see that difference where the
changes that I have made. So as you might have noticed, this is mainly and showcase
of many of the options that you will need to take into account when printing your file. So as a quick summary, the most important things
that you need to keep in mind when printing your file out of the printer that prints setup the properties
of the printer in case there's a specific
properties that are only available with
a physical printer, as well as the beers per
set that you went to print. In case you want to print with a little bit more control on
what you're going to see, as well as the Print Setup and the changes that you can do, the quality and assume
the position of the abuse or shades they
want to bring in as well. Something for you to know. Is there going to be a
few additional options that you might want to try
when it comes to the printer, but also when it comes
to the Prints setup, because you can
change, for example, the order as well as other options as high as scope boxes, hi Rob boundaries, high ref
and board planes, and so on. So all these options
will allow you to modify and improve their parents or the file they are
going to print. So what I'm going to
show you next is how you can actually modify the
appearance of your project. But also how you
can actually add details in order to add
more depth to your project. So with this in mind,
what you are going to be able to show at the
end of the course, we'll have better
quality when it comes to how you're going to present
your project to others. Because you will be able
to add the line weights, the line weights, as well as the line styles and a
few other elements. As well as you won't be able to add depth to your
project by adding details as well as
the elements that you use in order to improve the
appearance or the details.
33. New in Revit 2022 The Pdf Printer in Revit: Now from this
pressure of revenue, you're actually going to be
able to export your peers or sheets by using an export
that is already available. In another words, there
is already a printer available by default
in this Persia rabbit. So you will be able to use
the tool or a command that is called PDF Internet to
open that PDF export. Which also means that
you will be able to use the File tab in order to
hold where it says export. So you can also use
this to recommend. And even though the window
looks slightly different, or the options that
you can find on the PDF export options they are going to find
when you print your file. So for example, we are
going to be able to select a set that you want to use
when printing new file, which is the same set that
you can find or Cray may send it to recommend that is called print or more specifically, by it's under Window. So what they said mine,
you will no longer have to install API the printer. Now you can use in order to
export your files as a PDF. So with this in mind,
you're going to have an access to all
the same options, which are going to include
the export setup, filename. If you want to combine
or the abuse and the sheets into a
single PDF file. Or in another words, if
you want to merge into a single PDF file as well as the size may soon
the paper placement, the orientation,
and their parents, and even the options
that you have when you send a
frame to recommend. So with this in mind, you're
going to be able to see that everything is pretty
much the same as using the brain
to or command, which also means that
every additional option you might not be
able to see by default, it's actually under
settings or more specifically under
Prints setup window. Now the PDF has poor dialog box. You can actually use
the shape size in order to avoid cutting and
combining several PDF's. This means that you can
use and then shade size in order to have several sizes
for then the same file. And as well, there
is an option that is cold beer link Symbaloo, which will actually
allow you to enable the links of the
file on the PDF. So you can still use them
as a reference on the PDF. And when you print your
shapes with color, the color of the references
is going to be blue. So what this means is that
this printer is actually compatible with a
hyperlink feature, a PDF. So all this being said, I'm going to export
these projects PDF. So you can see we're
going to have as well, they actually in order to save the settings layer using
in order to export a PDF. And as a quick side note, when you send a PDF to argument, you're going to see that
the file is going to be process based on if
you have images, which means there
is going to change the processing from
vector processing to raster processing if you're
using images and with this file you're going to see that the result is
pretty much the same. So there is now going to be a difference between
using the PDF to recommend or using other
software has been installed. So you can export a PDF. Now as well. You can
create new onsets, but also you are going to
be able to see a premium when using this cell
mucin sheets window. Somebody said mine, you're
going to be able to see a preview before exploring
that we use in the sheets. While at the same time, you are going to
be able to create your own sets by also
using this window. Which means that
you will be able to uncheck the cheats that
you have within a cell. But also you will be able to select between all the abuse and the sheets that you have in your project when you're
creating any set. A quick signer, if you
choose to separate the PDFs, you're going to be able to
use some menu in order to customize My name is going to be used or in another
words on each file. So with this in mind,
you're going to be able to change the name of
the ship Pharaohs. We're going to be able to
add a prefix or suffix and separators in order to customize
the name for each PDF. So as you notice, the PDF export is pretty familiar because it's pretty much the same
thing as you send a frame to or command the rehab. Our few things are going to
be in a different position. So that might be the only thing that can be a little
bit confusing. But more importantly,
with a PDF export it, you won't have to worry
about finding a way in order to export a PDF that you might need to present
to somebody else.
34. New in Revit 2023 The Order of the Elements on the sets: Now in this version of revenue, there is going to be an
improvement on exporting a PDF, which means that if
you use the Option or to recommend that is called pdf, they're going to be able
to select that said, however, if you
are at this step, you are going to
be able to select the shapes and views
that you want to export. But also you will
have the option in order to at
that point border. So this means that
you will be able to select the order of the sheets, or in another words, the
order of the sheets for the abuse they are going
to explore on the PDF. Now you will have a
few options in order to do this one or
this is manual, while the other one is
shaped number ascending. But also, you will be able to even use browser organization, which is going to be
more useful when you have a large number of sheets
or you want to export. However, you will also
be able to organize large number of views
by using the job done, the risk for abuse or buying. So you are going to be
able to store the sheets for the abuse and even
bold at the same time. So when you have
a large project, we're going to be able to use this option are for
example, money or order. When you don't have to organize. Many views, shades
resembled at the same time. So what this means,
so now you will have an easier time organizing
your project for printing. And more specifically,
because you will have an additional option that
compliments the sets.
35. Introduction to The Line Styles: Now in this part of the course, I'm going to talk about
the lines that you can create new project. Now I have used the lines
already throughout the course. However, there are
few things that you can do when the lines
have been showing you. When it comes to
drawing the lines, you are going to be able
to see where you have the motor lines and
also the data lines. Now the detailed
lines can actually be found on a different app. So by using the annotation tab, you are going to be able to find that data lines parallel. So why is that these
lines have been drawn? You're going to see that
if you open another view, such as for example, a 3D view, the only line they will be
able to see a stem or online. And this is because
the detailed line is a line that is used
for annotations, which means that
the line is only visible on the view
in which a graded. However, you will
be able to convert our moral line to
a detailed line. While at the same time, you're able to convert at the
deadline to our model line. Now at first glance, you might not be able to see that type of line
that you're using. However, you can always change
the view in order for you to see if the line is
feasible on a different view. So if the line is based upon a different view,
is a moral line. And if the line is not
visible on another bill, then it's going to
be at it align. Now with all this being said, panels are going to show
you that the front lines, but you can actually draw
for my specific link, the different motor lines, but you can draw will
work in your project. So by using the
Architecture tab for my specifically the model panel, I'm going to be able to use
the modelling to recommend by just simply clicking
on this icon or by just simply
using the shortcut, which is ls and Larry
hires and India. Why is that? I have done this. I'm just going to
draw a moral line, but also I'm going to draw the next slides by changing
the style of the line. So I'm going to use the line style panel in order to select the type of
line to the next one. So as you can see, you will have four basic lines while
join on the project. So you can use that
the fault lines, that the lines, the median
lines and the white lines. Nasa quick sign-on.
If you want to change the line style
that you're using, just need to use the strap them before you send the
two sarcomeres. They haven't the drop panel. Hi, In order to see the result of using each of these lines, I'm just going to remove
the option for the lines, which is a two or command
that you can actually use by using the shortcut
P a centimeter or less. And Larry, and after using
this tool or command, you will be able to see the actual thickness of these lines, or in another words,
that thickness that you said by
default, styles. So with this in mind
and grow into crave more copies of these lines in order to use
the other styles, they are loaded by default. Now as far as something
for you to notice while working with the Moro lines
and where the data lines is that the options
that you have in the modify panel by selecting
the moral lines are the data lines are
going to change because the moral lines
will allow you to use the word plate panel. Well, the detail lines will not allow you to use the
word plane panel. And I step will allow you
to use the arrange panel. Now. So quick side note, when
you are ready credit lines, you can also use the
trap them in order to change the line style after
line that is selected. So after creating several
copies of the same line, I'm just going to use my liner style panel in order to change the style for
each of these lines. And the idea with this is they are going to be able to see that thickness as well as the appearance of
each of these styles. So you can see the line styles that you can use right away. Now as well Sunday for
you to notice is that some other line styles look actually very similar
one to the other. And this is because
the line styles or is in line patterns that are
actually very similar, but are actually very similar. Now the same time, the
appearance of these lines is not necessarily affected
by the detail level. However, this lines has many of the other objects can be actually determined
by the detail level, which is one of those
things that you can notice when working
with the families. So this is something that I can also show you
throughout the course. Now the same time,
you can always high Farenheit lines that you can create while
working you project. This means that you
can use the two recommend that is
called High Elements, whether it is by using this icon or by just simply
using the shortcut, which is CSN Edward HSM hotel. This also means that you can hide the objects by category. Now since you're able
to hide this objects, or more specifically
these lines, you're also going to be
able to see the lines if you use this status bar
from my specifically, if you reveal heating
elements and as a quick reminder
that you can use Control Z to undo any changes. I see notice how the
line styles that you have by default are
actually pretty useful. My work in your projects, especially when it comes
to the representation.
36. Changing The Line Weight use on the Styles: Now when creating
lines are elegant, lines were working
in your project, you are going to be able
to use that line styles, but also you will be able to change the actual
way of the lines. So if you go to the Manage tab in order
to use this drop-down, they're going to be able
to see that you can actually change
the line weights, but also you can even
change the line patterns. So with this in mind, if you just want to
add a line weights, just need to click where
it says line weights. And then you will have
a window in order to change the way of the lines. Now the way that this works
is they are going to be able to change the
model line weights, the perspective line weights, and the annotation line weights. So with this in mind, we're
going to be able to change the way of the lines
depending on the users. However, the way they either this is going to be the same, which means that
on the one hand, we are going to have this scale. And on the other one, the value is there going to be assigned. So each column is going
to have different values. They are going to
start with one. So the number one
is going to have a value for the weight
on each of these scales. While then number
two is going to have other values on
each of these scales. Now this value is can
even be the same. However, the idea
is that number two is going to have a higher
value than number one. Now another way to look at it, it's the one you draw by hand. You're going to be
able to draw with different instruments
from different brands. But all of them will
have a 0.1.2 and so on. So this means that
one can be considered 0.1 while it can
be 0.2 and so on. So in another
words, when you try to emulate how you draw by hand. Now cyclohexanone,
you're able to see that difference
between the thickness if you are not using thin lines. Or in another words, if you have this table that the lines, depending on the
values that you add, you are going to be able
to see that difference underlies the grave while
working on your project. Now this is something that you will need to try it by yourself. Because depending on how you want to present
your project, you might want to use some
values more than others. But more importantly,
you might want to crave a specific values. They are going to be a standard, whether it's an
educational project or a professional project, which is remember the
different ways in which you can actually use
the project standards, such as, for example,
the template. And I let, this will
become very handy when you are presenting
your project, right? In other words, when
you're going to present your project to others. And more importantly, you might want to
create a standards. Furthermore, lines,
the perspective lines have further annotations.
37. Editing The Line Styles: To the manage tab, you're
going to be able to use the settings panel or
more specifically, you are going to be
able to use this, drop them in order to
click races line patterns. And after you have done this regulated have this window with a line patterns that are already loaded within this template. But also once you have the parents that you
want to use for, once they either side, which
parents do you want to use? You will need to
go once again to the manage tab in order to click where it says line
styles and underlying styles, you're actually going
to be able to create another style that
you can actually use, base underlying patterns, the line color and
the line weight. So in another words,
this will make use of three different properties
in a retrograde P star. So it's very
important for you to know these three properties because the lifestyles will use a lightweight they've
already decided, as well as a color that
is going to represent the line as well as the line pattern that is going
to be used for lifestyle. While at the same time, you
are going to be able to see that you can edit
lifestyles have already graded. So with this in mind, you
can see in real-time, they changes to
either the one or the lifestyles that
I'm already using. But also, as I mentioned before, this line styles are actually going to be based on
other properties. So this means that
you can still edit the independent
properties they are actually using for a line style. Now we'll use in this window, we are going to be able to
say that every time you make changes to the way
for the line pattern, you can see the change right away once you click on Apply. So if for example, you're actually change the
line weight for this scale. For my specifically, you change the line weight very sexually being used
on the line style, you're actually going to see
a change in their lifestyle. So keeping track of the
independent properties that I use with a line style,
actually very important. So every time they make changes, so the properties that are
being used on the line style, you're going to see a change right away whether
in your project. So you will need to keep
in mind that changes the Ito and how you use them while working
on the line styles. Well, something for you to notice is that you will be able to change or the lifestyles
at the same time. However, you will be
actually changing all these styles to have
one other properties. But let's say one
for the line styles, which is something I sort
of defeats the purpose. So what this means, say,
we're going to change the line weights
in order to make sure that when you
crave line style, you're going to be able to
have a result that you need. Now as a quick side note, you can always use
Control C when you don't have a window open in order
to reverse the changes. Now the same time if you
notice the line styles, consider all the lines as
parallel single category. At the same time, you're able to use options for selection, such as select poll, select none, or invert, which means that you
can select one of the lifestyles and then using in order to select
all these tails except for the one that
you selected our first. Now the same time, you can
actually create your own so category in order to
have your own style. So with this, we are
going to be able to determine the tree properties
that you want to use. A gray urine style. So you can determine the
line way that you want to use that color and
also the line pattern. Nice, a quick sign up.
You will also find options on the style
is still selected. I will allow you to delete
or rename the lifestyle. So why is your greatest style? You're going to be able
to close this window in order for you to select a
line. They will equate it. So you can just simply
change the line style, why it's underlined style panel. But at the same
time, once again, you can still edit the values
that I use for this style, which means they are able to
change the line weight they are going to be using
for one of these scales. Now cyclic cyano, if
you want to see how this scale actually
changes the lifestyle, to just have to
change the scale. And you are using on any of
the basis of your project. Which also means that if
you change this scale, their parents or their line
is also going to change. So one thing that
you can actually do is actually given by the standards that you want to use for your projects
at the same time. So you can actually just work on a standard values
that you are going to be using your projects. Which is suddenly you
can do by yourself, for example, a templates. Now I'm just going
to open once again, the line Status window to show you a few basic options
that you can use. White or gray
number line styles. When you send the line styles, you can actually create a style. But at the same time, he will be able to personalize this tau, which means they will be
able to change the name. So depending on what
you want it to, be able to change the values
we're using for this style. But also, you will be able
to even delete this tile.
38. Changing The Line Pattern use on the Styles: Now we're working
with a line styles. As you have noticed, you
will actually need to know how do I create
the line patterns. So if you use, once
again, the manage tab, it will be able to click
recessed light patterns in order to have this window. And within this window
you will be able to create that line patterns. So in order to create
a new line pattern, you will need to click
where it says new. Then you will have
this window that will allow you to
first select the name. But also they will
try to give you the idea of what you're
going to be doing. So what this means, it
will be able to select the type that you want to use
and then the value for it. So you can choose between dash and then a value
of your choosing. Now this value is actually
going to be in millimeters. So this means that the value of one is going to be
one millimeter. Now, so quick center,
this value is going to be affected by the scale
that you're using right now. In other words, the
scale is going to affect the representation
of this value. Now after you use the dash, you will be able to add a space before adding the next shape. And as you might have noticed, you're also going to be able to select that value for the space. In other words, how value
for the separation. But also sending
for you to notice is that if you select that type, has thought and disrupt
them, or in another words, that dot segment tight, you're going to get an error
message if you are a value. So in another words,
you can actually select a value for the
dash and the space. But more importantly, if
you keep adding values, we're going to see that this space is actually
need a value. So you will not
be able to create a line pattern unless you
are a value for the space. And after clicking on Okay, we're going to be
able to sit over so I'm underlying patterns. So once you click on Okay, we are going to be able to use this line pattern
within the styles. You will be able to
use his 30s already created or you can use simply
use it in your own style. So by using once again, the manage tab or my specifically their
lifestyles window, I can just simply
assign this line parallel to any style
that is already created. But also, I will
be able to create my own style in order to
use this line pattern. But more importantly,
you're going to be able to affect their parents of this tau by changing
the line weight. Because as you remember,
the line way they use takes into
account the value, but also the scale that is assigned to the value
that you change. So because of this, you have the columns for these scales, while the rows are
the values that I use within a specific row. So what you actually change
under lifestyle by using the drop-down for the long way is the row that you want to use, which in turn is going
to change the value of the line way. Now as well. So the important for you
to know is that when a line patterns already created,
you can always edit it. So you can keep everything in line style in order
to change the values. So you're able to change
the values on those types, then allow you to change it. But also you're even
able to change the time. Now you want to use how are these spaces when need to
remain under position. So the spaces are used, as the name implies, which means that these
are spaces between the elements take place
underlying pattern. Or in another words, these
spaces have to be between. The dashes are both dependent on the line
pattern that you're grading. So this means you can add inline style in order to
get a different result. Which also means
that if you want to, you can just simply
delete the line parents. Now the lead underlying
patterns doesn't actually remove the line patterns
from the line styles. Which means that if
the line pattern is actually being used on
one other line styles, that line pattern still
remain on the project. And a cyclic center, if
you use the same name, now you use with a line pattern
that is already deleted, it will be able to see that this style is
actually being used. So this means that you
cannot actually replace underlying pattern
because the line pattern already exist within memory. Or in another words, it's
already saved within the file. Now throughout this course, it might have seen
when you can actually erase where you are now
using within your project. In other words, how can you put what you don't want to use? So you can use the porch to recommend in order to
remove the line pattern. However, the length
pattern may want to remove cannot be used on
the line styles or otherwise to our command window now be able to remove the line
pattern from the project. Now what this means say, you can always add it once again, the line styles, in order
to include my line parents, they agree with this in mind. You're able to select your
online weights, line patterns, and the colors that you want
to use while working with this tells heterocyclic center, once you've already
deleted online pattern and also removing the line styles, we're going to be able to rename this style where you send
the name they use before. So a lot of this is
actually pretty useful. Embracing my suit. Get used to reading
your own styles are ones that you want to take
the time in order to do so.
39. Changing The Line Weights in other Elements and Views of a project: Now as I mentioned,
when this lesson's, you're actually able to change the light wave for
the perspectives, but also for the annotations. So in order to show
you how to do this, I'm just going to create a
few walls that I can use. Analytic way, a
perspective in which I can show you how you can
change the line weight. By none other words,
their parents or their lines within this view. So after creating the file and view and just going to
make a few adjustments. So you can see this objects
that are already placed. Now once that I make
a few minor changes on the crop region and
just going to go to the Manage tab in order to use this drop-down and
editor click where it says line weights and
where they send mine, just have to click where it says perspective line
weights in order for you to change
the values that are going to be used within
the perspective. If I use once again, large values or in another
words, bigger values, then normals, you are
going to be able to see how these values
are going to change. Their parents have
the perspective. So you're going to
be able to make adjustments that you
can actually use, not only on the floor
plans for elevations, but also on the perspectives
that you can create within your project in order to
present your project to others. How is a quick sign? Or you're going to see that the values actually go from the
smallest to the largest. So you are able to
reverse this depending on how you represent your projects
and your country region. So you can change at any point. The way is that
you are using for any other points are rows they are using
within your project. As well as epic sign something
for you that nowadays, when changing the line
weights for the perspectives, is the event change that line
weight based on the scale. Now with this in
mind, you're able to do the same thing,
whether dimensions. So if I create a few dimensions
and the model space, I'm going to be able to
show you how you can change the line weights
just further dimensions. I'm just going to
create a few dimensions such as linear and align. A quick sign up for a marble. You can use type on the
keyboard in order to change the reference that
you're going to be using in order to
create the dimension. And that includes the points are perfect sense
within the elements that you can place
on the model space. Now so quick sign, you can use any dimension
that you want. So this means that you can
use the angular, the radio, the diameter depending on the project that
you're working on, because the notation log weights affects the family type layer, you sound the dimensions. Now once the dimensions
have been created, I just need to use once again, the manage tab, or
more specifically, they struck down in order to click where it says
light weights. And with this, we're
going to actually change the values they use and the dimensions are
sending similar between the line weights
for the annotations. And the line weights
may use NMR or lines, is that you're only going to be able to see the changes on these values once you change
the style of the dimension. So this means that you
can use the same row for more than one family type in cases some familiarity between different types of dimensions. Which in this case, this tau
is actually the family type. So if we modify their family
type for the dimensions, you are going to be able
to change the line wave. If you change the family
type for the dimensions, you're going to be able to find the line weights and that
tick mark lightweight. So with this in mind,
we are going to be able to change the line
weight they are using, which in return is going
to change the value. Or more specifically, is
going to use the value that you assign when you use
the line weights window, and more specifically,
the annotation line weights based on the
row that you're selecting. So this is easier to
appreciate once you open the type properties window for the family type,
you select them. So once again, the
number that you see on the left will represent
the number of the row, but also will
represent the value that you want to use every
time they use sunlight, then number that
you want to use. So with this being said,
you will need to keep in mind based one as
the other ones is actually more useful
if you organize the values from low to
high or from high to low. Depending on how you
want to organize these values are depending
on your country or region. So as you notice, all of this is pretty useful when
creating projects. For more importantly,
when deciding how you want to represent or
present your project.
40. Editing an example Project: Now this part of the course, I'm going to create
an asthma-like sample in which I'm going to apply a line styles
or more specifically, the properties that
you can change, what the lines, such
as the lightweight. So with this in mind, my goal is to create some memory space. But I'm also going to draw a few words that can
actually be used in order to serve you
the changes that you can do under Manage tab. After grading this elements
within the project. And also going to add a section
that I can use in order to show you the changes that aren't going
to do the project. So once that I finished, I'm also going to be
using this in order to change the graphic
display options. So you can actually
see how you can use some other properties or values that you can change
by using this window. Or in another words,
I'm going to show you what can you change by using this star and location
and frayed limit percentage. So I'm going to be changing
these values in order for you to see the result
based on this example. Hello the same time. I'm also going to show you
what happens when you use the manage tab where my specifically when you
modify the line weight, the lines that
aren't going to be using when I'm in
a specific scale. Now. So remember, you can change the line weight for any of these scales that
you want to use. More importantly,
whether it will actually assign
the rows that are going to be used in order to represent the elements
automatically, which means the revenue uses the values that are being
used for the depth cue in, in order to assign these values. That also is going to
use the forklift pop. So in order to
hide the elements, they're now going to show. So this means that when
the elements closer to the risk-weighted better section lines are going to be thicker. Everything that is further away from the car
will be thinner. With this in mind,
you're going to see how these values and properties are going to modify their parents or your
project on the sections, as well as the floor plans. But also so you
can get an idea of what values can use when
working on projects. Now the same thing
that applies to this section can also
apply to the floor plan, but also can be changed
by using the floor plans. So this means that you can
use the floor plans in order to visualize the
language a little bit better. But also you can even change the height of the walls,
or in another words, these elements in
order to change how the lines are going to be
represented on the floor plan. As a quick side note, remember that you can always
use thin lines in order to see all the
lines has thin lines. Or in another words, the default thin lines
that are used in revenue. Now I'm just going to
continue changing a few of these values
and properties. So you can actually see even more that changes
thing you can do. Once again, if you change the light wave and you're
using for any of these scales, you will need to keep in mind that if you change the scale, you will also remove what you have done by your
center line weights. From the beginning, you
will need to keep in mind this girl's that you want to use while working on your project. Now it's a quick
sign on grammar, but you can also edit the values or the light weights
or the other. Perhaps you won't be able to personalize the memorial how
your project is presented. Hello, This will become very handy when you're
presenting your project. Or in another words,
when you are going to present your
project to others.
41. Using The Model Text tool or command: Now in revenue, I see nowadays
you can create more lines, but also you can
create model texts. Neither moral tax is
nothing more than a text. Marriage graded
with an extrusion, which means that it can be
considered at 3D effects. And once they use
these to recommend, you're going to
have a window that is going to allow
you to write them. The texts porosity will
allow you to edit it. Now right in the
text is a little bit simpler because you
don't have any options. So this means that YOU enter on this window depends
on the keyword. And in order to
finish, the taxpayers have to click on okay. And once you finish the text, you're going to be able to place the text within your project, which means they are going
to place the text like it was another family that you can place our work
in your project. Just for example, the furniture. At the same time. This is going to be affected by the lines. Or in another words, you can use thin lines in order to change the appearance
of the model texts. Now with this being said,
you can open the 3D view in order to see how the 3D
effects actually works. So this means that
you're going to notice that this
text has a height. So if you start using
the properties palette, you're going to be able
to see that you can edit the text by
clicking on this icon, which will allow you
to open once again, the window that is
call edit texts, which I'm going to use in order to show you
that you can even add a space is migrating
these texts as well. While the model texts
is still selected, you can click where it says, you can click where
it says the tax. So with this in mind,
you can edit texts. But also since this is attacks, you will have at the very least, basic options on the
Properties palette. In order to edit the text, we are going to
be able to change the horizontal alignment as you do with any standard text. But also, since this has a
height, or in another words, since this is a 3D effects, you are going to be able
to change the material. But more importantly, since
the model texts has a high, you will also be able to change
the value for the height. So you're going to
be able to change the model texts in a
few different ways. However, compared to the texts, there are many
options that you can change while the model
tax is selected. One of the things that
you can change on the Properties palette is the subcategory of
tomorrow texts, as well as the information
that you can add under section that is
called Identity Data. And at the same time, the morrow tax is the only text that you can see while
you send a 3D view. Because the texts
to recommend ECUs in order to add information,
more importantly, is part of the annotations, which means that
it's only possible under view in which
it was created. So I say an hour
is tomorrow tags, we'll have a few advantages
over the text to our command. Now with this in mind, since this is a 3D effects, you're going to see
the options that I use in order to place an
element by using a host. So you're going to
be able to place a tags in, for example, a wall. Which also means that while
the text is selected, you can pick any host based on the face or by using
the word plane window. So with this in mind, you're going to see
whether treat apex, which is pretty useful when
you want to create a text, you can actually see the
abuse of your project, but also in order to create effects that is actually
part of your project. So if, for example, you are
designing a restaurant, the restaurant may
actually have, their name, has something
similar as tomorrow tax. So this is a way in order
for you to represent it. As a quick side note, remember
that you can also edit the work plane based on the work plane window when the
object has the assumption. Now, so gouache
center, since this is a family system that you
can place on a monospace, you can use the
modifying tools not only in order to move
the model texts, but also in order to rotate the mono tags where
the new project. So this means that
you can also use the other two circumstance that you haven't modified panel. So you are going to be
able to use this option or two or command when
working with a model effects. But also you can
click Reset show in order to see the word
plane that is being used. Now with all this means save, you can also change tomorrow
texts in a different way. So this means that you can select the model texts in order to use the properties pallet
or more specifically, in order to click
where it says at the time in order to open
the type properties window. And this is because
the morrow texts is actually a family
that you can edit. We are going to
be able to change the properties by using the
type properties window, or more specifically,
you can change the text font as well
as the text size. We are going to
be able to change these properties in a rapid change their
brains so that X, but what are your options? Which means they
are not able to add liters total mono tax. But also it will be able to
even determine if you want the text to be ball Italian
or both at the same time. Now since we are using the
type properties window, you're going to be able to also duplicate the family type, which also means that you can
even rename my family type. This will allow you
to actually have different family types
or in another words, different model texts
that actually uses different family types in order to have a
different result. So every family tie, the Ukraine can be used in different places, but also it can have a different appearance what
working on your project. So for example, in this case, one model tags can be
used for a title while the other one can be used for
everything below the title. So as you notice,
the model texts is actually pretty simple, but also very useful
in some cases.
42. Showing Hidden Lines by Elements: Now we're going to
see that there is a two recommend here is actually pretty useful in
some specific cases. And this one allows you to show an element that is
behind another element. And more specifically, this
one allows you to show the power of an element that is behind another element
in hidden lines. So you can see the
element represent error times w, So the project. So you can find this
option on the Build tab, but more specifically
under Graphics panel. So by using the graphics panel, you are going to be able to use the option that is called
Show Hidden Lines. Once they use this option, you will need to select first the element that
you want to use as a reference in order to show the other element by
using hidden lines. Which means that then
you will need to select the object that you want to show why you send the hidden lines. So with this in mind, you're
going to see that now the part of the element that is
behind this other element, it appears in hidden lines. Because you have an
option for two men. In order to show
the hidden lines, you will also have the option in order to remove
the hidden lines. This one will allow
you to select first the element
that is in front of it for the use as a reference when using Show Hidden Lines. And then the element in which you want to remove
the hidden lines. As I click sign-on, you can use this in other families
that you can add to the project as long as
those families have not created for
annotations, right? In other words,
that these families have not created by using any other family
templates that you have a retrograde annotations. As you notice, you can use this to determine at any point. But also you will be able to use these two quirky man with many different objects
within your project. This one is pretty useful
in specific cases. So something for you
to notice is that this option or to vitamin a. So some modified by the
scale for my specifically, the hidden lines are going to change based on the
scale that you're using. Now as well. Some important
for you to know, it's there. You're going to be
able to overwrite the lines that you are
using as a representation, which is also going to
override the hidden lines. So you are going to be able
to do this in case they want to change this tau
that is shown by default. Because as you remember,
this line styles can be edited by just simply using this to Pergamon on the View tab of
the Modify panel, whether you are
selecting an object, the modal space or not, you can edit the
settings at any point. In another words, y is
on the line weights, my line parents and the color. So you can change underlying
style that you're using. So this is one of the cases in which is underlying styles. It comes very handy. Now this means
that you can apply the overwrite graphics in view in order to
change the graphics, just follow the lines
of these elements. How are the changes
to either heart based on the elements? Which means that you
won't be able to apply overwrites their specific
for just the view and the sense that the
overwrites actually override the proper place
for values of the elements. So this is an important
distinction because this option actually
turns the line of the element into hidden
lines when they are behind of the object that
you select as a reference. So all this means
you're going to be able to visualize three elements within the abuse other projects. But also if you want to, you can simply remove the
hidden lines at any point.
43. Using The Underlay and The Halftone on a Project: Now when presenting
your project and you're able to use different
options in order to present your
project or in order to work with your project
a little bit easier. And one of these
is the underlay. So you're going to be able to design the base range level, that range top level and
the underlying orientation. So this tree will
actually allow you to determine how the underlay
is going to work. So when they send mine,
they're going to be able to see a few objects that
you couldn't see before. But also it will be able to use these objects in a
retrograde representations. So with this in mind, you're going to be able to even save a little bit of time
when it comes to representing objects
within the abuse. So if you said like
look up, look down, you're going to be able to see the roof has an underlying
way then this view. So you won't be able to do this a little bit easier in case you need some of these
representations and your country or region. Now once the you use
the underlay as well as two arguments such as the
detail line or the mono line. You're going to see
that you're able to create a representation
that it can be seen in multiple views by using the mono lines as well
as you will be able to create a representation
that it can be used in only one view by your
standard data lines as well. Since we're working with
data lines and mono lines, they're going to
be able to compare the needle lines tomorrow lines, as well as you can combine the moral lines to
data lines by just simply using the convert lines to recommend minus
a quick center, you can see which type of line you selected by just simply looking at the
options right next to the number line argument, because the moral lines will use the word play piano
and as a quick center, remember you can
change the style so this lines by using
the line style. So you'll be able to use the lines in order to
create a representation. But also you will be able
to determine the line style that you want to use in order to get an a specific appearance. Because you can create a
representation that it can be used not only were
working within your project, but also one per cent
that you project. Also because you can actually
use that thin lines to our command in order to display the project a little
bit differently. Now the same time it's something
for you to nowadays is that there is an option in
these stories for that excuse, the underlay, which will
actually allow you to disable or enable the
selection of the objects. There are tests play.
So with this in mind, we won't be able to enable
or disable the selection of the subjects that only appear
when you use the underline. So you can actually work with more than one view
at the same time. So this is another way in which they underline
because useful. So as you nowadays, you
can do a few things in order to improve how
you work on your project, but also how you
represent your project. Now as a quick side
note, remember that when you work
with the dimensions, you're able to click
where it says equal. And this will force
the dimensions to actually use the same value. Which will also mean that every time that
you're referencing, you send the
dimensions for loss or change in order to also
have an equal value. So this is actually
pretty useful when placing elements
within the project, but also when I'm
working on the families. So we are going to be using
this quite a lot when you want to center elements
on tomorrow space, but also when you want equal
values within the families, such as, for example, and columns, windows and doors. So as you notice, the
underlay is actually pretty useful because we were
sending hen parameter, let me see is what grading
your projects in revenue. So in another words,
if you add it, when are the elements that you
can see on the underlying, you're also going
to be greater than the element in the
entire project without actually open the view in which you can
find the element. Now another use for the underlying is the fact that
you can use the underlay in order to draw the
projection lines where you use for the roof mass. A quick side note. If you have any issues selecting a
reference or an element, you can use type on
the keyboard until you select the reference or
element of your choosing. So what this means, you will
be able to draw the lines or you won't be able to use PICC lines in order
to project the roof. But at the same time, since we are using the lines, it will be able to
use once again, the lifestyles in
electric change the style for the lines. But at the same time,
you're able to determine if we want to use a moral
line or the line. So in case of the projection
lines for the roof, you might want these lines to be projected in more
than one floor plan. At the same time where
there's been said, you will be able to
undo the underling. Or in another words, he will
be able to select None on the range base level may not have to eliminate
the underlying, how are the lines that you
created are going to remain. So this line is will become very handy when working in different
views of the project. Because as you notice, you can actually select a level that you want to use
for the underlying. So if you have an office
building with many levels. You will be able to
select the level they want in order to draw or place. And then they are going to
be using on that level. From that level they are working because it might be the same, because it's going to
be represented up to that level are
also on the level. Which also means
that you can't even work on different levels, whether actually
opening the view that correspond to their level, as well as the quick center. Remember the moral lines can be seen on different
views of the project, but also that the moral
lines are going to be placed based on the hierarchy
level that you're using. So no 3D view. Some objects might be on a higher elevation than the motto lines that are
placed in the model space. So they send mine and they will be able to display
the moral lines on different levels without actually affecting the 3D views, perspective or other floodplains
in which is feasible. The object that is
several tomorrow lines, which for example, in this
case is the topography. So in many cases you are
going to have elements on top of others while
working on the project, especially when it comes to the homeowner lines because
they don't have any height. Now with all this being said, you can actually
control the underlay. So you send the manage tab. So if you use the drop-down
for additional settings, you will be able to find
the halftone under length. And if you click on
this option here, are going to be able to change the appearance of the underlain
by using this window. And once they have done this, it will be able to use
this window in order to edit out the underlying
is going to work. So you will be able
to determine first the underlain by selecting
the way that parents, which even includes
an option in order to apply, apply the halftone. If you're disabled assumption, everything will appear
with that our halftone. Or in another words, like it was graded on the same level. And at the same time,
you will be able to even control the
value of the half-term. So if we use the half tone, you will be able to modify the halftone based
on the brightness. So with this in mind,
you won't be able to determine how the
underlays going to work, but also have the halftone is going to be
used. Now as well. Something for you to notice
is that the Halftone actually applies to all the objects
were actually use it. And the underlay is going to apply once you
enabled the underlay. So when the underlays enable, you are going to be able to see the changes that you can
do by using this window. So as you notice,
this options are basically the options that
you have when you override, like graphics or
basically lineage of an element because you can
change the line weight, but also the patterns, which means that you can even
create a new line pattern. So the only thing
that you won't be able to change the color of the elements they are representing by
essentially underlay. So with this in mind, you
will have a lot of freedom when it comes to the
representation of the elements. You can see what working
with the underlay. Now I'm just going to remove the underlain by going once
again the properties pallet. Or in another words, I'm going to change the values factor deform in order to remove the changes on the
Properties palette. Which also means that you can do the same thing under half
turn on the layer window. You can open the
manage tab for my specifically by
using the drop-down of the additional settings. So I'm just going to remove the overwrites before
closing this window. Nasa quake center, you can
click where it says recent in order to reset the changes back to default
before clicking on. Okay. So if I click on Okay, I'm just going to make sure that everything
is back to default, but also changing the
range based level to none. So when you see this properties or values and the
properties pallet, the underlay, sexually disable, the moral lines will
remain on the project. So with this in mind, the underlying sexually
pretty useful, I'm working in your
projects because you're able to visualize
different views of the project while taking
full advantage of what you can do when working
in a project in revenue.
44. Placing Callouts: Now, when you present your
projects to somebody else, you may actually need a few
details of your project. So in order to atos need to
go to the tap and on the tap, use the color to cen. And once you have
used this two cen, you need to draw the boundary of the detail or the color
on the model space. As a quick so, you can create this color in the same way
that you draw a rectangle. After creating the call, you're going to notice that there are a few similarities between
creating details sections, or elevations, because
you're going to be able to use the modified
tab for the views. So if you use the crop, you will be able to
have this window in order to change
the crop region. So with this in mind, you
will be able to change the values in order to
make them more specific, in another word,
you will be able to change the width and the depth, as well as the position
of the cold on the. But also, you will
be able to change the annotation crop upset. Now, when it comes
to opening the view, you will actually
have a few options that you can use depending
on the video you're using. So for example, you're using the view in which you
place the annotation, you can actually use the
right leg on the mouse over the notation in
order to open this menu, so you can click where
it says, go to view. And once you have done this, you're going to
see that on the V, now it is going to appear
the name of the colon. So you're going
to notice that on the menu browser that
this view is selected, or in another word is active. As a quick so, you're also going to be able to
see the notation crop. As well, you're going
to notice that you can change the
appearance of the tto by either using these
controls or by just simply using the notation
that was created, which also means that
you will be able to use the modified tab just for the use in order to
addit the crop region. So you can use this
window once again, or you can just simply use another option for
two or command. That is called drop. Now, if you use this,
you're going to be able to use the
tools or commands that you have on the
modified tab or more specifically on the
modify edit profile tab. So if you use the tools or
commands under this tab, you're going to be able to draw the profile that
you want to use. So with this in mind,
you can customize the crop region in order to make sure that you will only
show what you want to show. And while doing this,
we're going to note that the use of the tools remains
pretty much the same, which means you can create
the poando if they call as you would create the
poandoies on your project. But at the same time, you're going to see that
you have controls in order to it the crop
region that has been edited. Well, at the same time, you
can just simply reverse the changes by editing the profile or by just
simply using controls. This pander is still
going to determine how the annotation of upset is going to determine the
appearance of the call. However, if you select the call, you're going to notice that
you use this option for two. A few of the pales
on this window are going to be grayed out, which means that you
won't be able to change the pales unless they are using the same shape that is used when creating
an standard cal. Now, with this being said, the controls that you can use will actually allow you to do several things because they will be related to the
profile that is created. So you can simply
use the controls. But also if you want
to, you can addit the profile in order
to use constraints. So this means that if
you use the constraints, you are going to be able to use a specific reference
that is already created in order to determine the change
on the crop region. But at the same time, you
will need to make sure that the reference can
actually create the change. So depending on the
reference that you're using, you are going to get a resolve that will adjust to your needs. However, this is not going to change if you add
this settlement, by using the properties. So this means that
these constraints are only useful when
drawing the boundary, which means that you won't
be able to add the boundary, by using this constraints. So you can actually create a
specific references that you can use for some specific
cases such as this one, or you can actually create constraints within the project. Now, with this being said,
the controls are very simple. But also, they will have a
few options that you can use. So for example, the
fact that you can break the crop region
based on this control. So when you do
this, you will have a crop region that will actually be separated
in two sections. Now this is actually going to change the crop region as such. However, it's actually going to change the crop region
is represented. But you can edit the crop region as well as
you can use the option, that is called reset crop Now, if you use reset crop, everything will be reset
it, but at the same time, some important for
you to notice is depending on the
orientation of the control, the crop is going to change. But also, it's going to change the resolve
of using the crop. So with this in mind, you
will have an alternative to the option or two
or command that you can use in order to
add the crop region. Now as a quick syn, you're
going to be able to heal the crop region by just simply connecting the
boundaries together. And this also implies that if you connect the
boundaries together, you are going to be able to
restore the crop region. Something for you to notice is that if you actually
use the option, in order to dit the crop region, you are not going to be able
to use the same controls. So with this in mine, you will have to make sure that
when you use one, you actually don't
need the other option. Especially because
the profile of this annotation needs to be
one single continuous line. Or in another word,
you cannot have two separate shapes or two separate profiles before
clicking on the green check. Now, with this in mind, even
if you added a corp region, you're going to notice they are actually not changing
anything on the project. So the only thing that you change is how you
represent the project. So this is very
important for you to know in cases in which you actually need to represent one object in a different way, even if they are
the same object, which is something
that might need to happen if you're
using a reference. So if you need to create a
reference within your project, the only thing that
you need to do is actually use the
view tap once again, or more specifically,
the call to recommend in order to click where it says reference or view. When you do this,
you will be able to reference a view that
is already created, and this is something
that you can easily see because
on the annotation, you will actually
have a text that will let you know that
this is a reference. I suppose something for
you to know this notation, so you can actually
add the boundary of the notation as
you normally would, however, added in
the boundary of the notation is not going to actually change in
the boundary of the or in another words. Since this boundary is
not the boundary of the call that determines the appearance of the.
Then this boundary. Independently. Whose
means they will need to adjust the position
of this notation in the pend which is something that you
can verify if you actually the band of the notation that actually determines
the band of the call. However, this nation will still allow you to open the gal. So as we can notice, the view and the annotations
are relatable in each other. However, the reference
is only meant to be used as a representation
of the original allo. So all of that is
being said creating a Cal actually very easy
and also very convenient, not only when creating
your projects, but also adding information
to the views and sheets.
45. Editing Callouts: Now, every time that you create a detail based
on your project, you're going to be able to see that on the project browser, what you're actually
creating is a view. So this means that
you're actually going to be able to add this
views to a sheet. So with this on
mine. I'm just going to create a sheet
just for the details. So once that I have done this, I'm just going to start
adding the views, or in an other words, the detailed views that
are already created. So once you add a detailed view, you are going to be
able to see that you will have a view or
in another word, the viewport as well as the title that is used for the view, which is pdfo the
name of the view. Now, something as well
for you to notice, is that the view
is going to have its own properties,
including the scale. So in another word, you're going to be able to change
the properties, but you simply using
the properties palette. Now what is being
said, you will be able to also see that
on the annotation, you will actually have
the detailed number as well as the sheet number, which is the information that you get with this annotation. And as well, this is something
that you can change. Ow, on this case, I just want to show you is that the
number of the sheet that you assign to each of the sheets is going to
appear on the notation. So one of the things
that you can do is actually change the
number on the sheet. As well, you can also
change the name of the view in order for you to assign a
name that you want to use. So with this being said, you're going to see
that the name of the view that you write
on the property is palette is going to be assigned not only on the
property is Palette, but also on the sheet. So with this in mind.
You're going to be able to add not only what
you can see on the view, but also how the view is
presented or represented among other views and sheets, As well. There is another option
that you can use, not only in order to
create a in order to decide the bounder of the
call and this one is sketch. So I'm just going to go
once again to the tab, in order to use this drop them, so I can click
race as sketch and this one will allow me to addit the profile before
creating the annotation. Or in another word, you're
going to be able to use the tools or commands
they have on the draw panel, in order to draw the profile of the or Tito from the beginning. So with this in mind, remember
that you will need to use a single continuous line before you click on
the green check. At the same time.
You're still going to be able to use the
options or to circumans that you have on the
modifying tab for the e. So you're going to be able
to crop the region size, by using this window, but also, you're going to be
able to click says reset crop in order to turn
this sketch into a rectangle. Now this in mine. You can always set at the
crop once again, by clicking way
says at the crop. But also, you can use control C, in order to undo the changes. As well as you can use the
click on the color of head, in order to open the view. And when you open this view, you're going to see once again that the scale is going to be different Perroso that you can change properties as
the detail level, which is something that you
can also do by selecting the Veperre using the
sheet or in another word. While the Vapor is selected, you can just simply
use the properties palette in order to
change the detail level. Now what is being said, since you are creating another view, you can also place this
view on the sheet. Now, you might have notice. All of this is pretty
useful because you're going to be
able to actually create this views
while working on your project in order to
create a specific details. So all of this is being said, you are going to notice that
you can edit the appearance of the s of the view pors that are created by the
lots so you will be able to decide what kind of information do you
want on the sheets, how you want to present
this information.
46. Placing a Detail Section: Now, when you're
creating details, you're also going to
see that there is another way in which you
can create the details or more specifically in
which you can add a detail to your project
that is going to look or have an appearance more suited within certain
part of the projects. And this one is actually
very similar to the sections that you can create while working your project. So if you go to the tab, and then you use the section to recommend that
you can also find. On the quick access tool board, you're going to be able
to change the type of section that you're using to
the one that is called to. So with this in mine, you're
going to be able to add a section that is going to be used in order to create a to. So this one is actually going to function the same
way as the section, even though the notation is going to be a
little bit different. So this implies that
you can actually decide how far you want to see when it comes
to the section, but also the fact
that you can change the crap region by
clicking way it says size crap you will be able to use
this window, but also, you will be able
to use the option that is called a split segment, so you can split the
representation of this tto, the same way to do
it with the section. And a lot of this
is because you're actually creating a section. What is really going to change is the appearance
of the section. However everything else is
going to remain the same. And as a quick signo, this also means you are going to be able to modify the
direction of the section, by using the controls. And with this pen
set, you are able to open the section
or more specifically, the tto by using double click
on the herald notation. And once you open the view, you're going to see
that the result is very similar to
the other details, meaning that you're
going to have a different scale that is
actually assigned by DP. Pros, they are
going to be able to change the properties on
the properties palette, which means that you can change the detail level and so on. And as well, the controls
are going to function pretty much the same way as the
controls and the clots. And this is because of
the views are using the crop region and
the annotation crop to determine what you
can see on the view. Meaning that you
will be able to also break the crop region
in order to change the appearance of
this deto and you are going to be able to do this
horizontally and partly. And this also implies that if you connect the
boundaries together, you are going to be able to
restore the crop region. Now, since you're able
to create these details, you're also going to be
able to delete them. However, depending on
your country or region, this representation might be used a little bit differently. So, for example, you may
actually want to use this representation within another detail, or
in another word, you want to represent the
detail that you're creating in order to be more specific about a segment of the project
that you're working on. So this means that you
might want to add this a notation within
another detail view, Peso, that you might
want to create a detail for something specific
within your project. So with this in mind, you might want to do
something like this. In order for you to
have another poor, that you can add to the sheet, how these detail
views can actually be improved when it comes
to the representation, which is something
that we're also going to cover
throughout the course, And now, I'm just
going to adjust the we already equator before
adding this e to the shift. So I'm just going to use
some extent on this views. And then I'm just going to go to the t tab in order to add
this view on this window, and that's a quick signal. Something else that
you're going to notice is that you
can type the name of the bill that you want to search partially or completely
in order to find it. So if I add this
view to the sheet, you are going to be able to see. You are going to have
a detail that is going to have other
details in order to specify even more how an object is actually going to be
created or in an other words, how you're going to build, what you're representing
with your project. And as a quick signer, everything remains the same, once it's placed on the view, which means that
you will be able to change the name, and so on, by your simply use
and the properties, while at the same time, you're able to design, how you're going to represent
the viewpo on the sheet. So, with all this in mind, these dates are really useful,
creating your projects.
47. Placing a Drafting View: Now, something else that you
can do in order to create details where working in your project is the use
of the drafting views. Now the drafting views are an alternative to the callouts. However, they actually
work a little bit similar. Now the drafting views are going to be found
on the view tab. And once they use the
drafting view to recommend, you're going to have
a window in order to select the name of
the drafting view, as well as the scale
that you want to use. And knows, we'll let you know the value of the scale
or in another words, the equivalent of one unit
that you draw compare to the amount of units that is going to represent in reality. So in this case,
you can actually determine a different scale, but also a different name. And once you determine
these values or properties, you just have to click on a K in order to create
a drafting view. Now, something for you to notice is the ones that you
open the drafting view, the drafting view is going
to be completely blank. How this doesn't mean that this doesn't have a server zero because you can see
the scroll bars on the bottom and on the right. Now, with all this being said, the drafting view is actually created in
order for you to create a detail or a detailed element that can be added
to your project. So this means that the
drafting view cannot be empty. So in order to place
the drafting view, you actually need
to draw something. So if you don't draw anything
on the drafting view, you are going to get
the following window. Now in this case,
I'm going to draw on the drafting view,
by using the tab, which is the only one that will have lines that you
can actually use, so you won't be able to draw
by using the model lines. And this is because
the drafting view is a detail or in another
verse is a view that is meant to be created
only for drawing the detail or data element
that you want to add. So what has been said, if
you join the drafting view, you're going to be able to place the drafting view
within a sheet. And once you place
the drafting view, you're going to
have an annotation already equated
for this viewport. While at the same time.
The viewport will have properties just like the others that have place on the sheet. But at the same time,
you're going to see that you can double click on the viewport in order to edit the drafting view
within the sheet. So with this in mind, you will be able to it the drafting view, in order to create a
detailed element that can be placed even on top
of another detail. However, as I mentioned before, this drafting view is actually intended in order for
you to draw the detail. So this is actually very
similar to using dq. So just, for example, how you draw the detail lines, by using the draw panel, as well as how you
dit these lines, by using the tools recommends
on a modified panel. So with this in mine
you're going to see, you're able to use these
lines as a reference when placing or editing other lines that you
already created. Okay. So in case that you
have used oct before, you're going to see the sum of the functionality
that you have in act, you're going to have it while creating or editing
a drafting view. Now at the same time,
since you're able to edit the drafting
view within the sheet, you can also exit
the drafting view as you normally would
in the other viewports. However, there are
a few things that we're going to cover
throughout the course, that will make this even
more similar to oct. So I'm going to draw a
few other objects within the drafting view in order
to make this a little bit more complex that this
object on a door can be used for a small window or it can
be used for ventilation. So this means that you can
draw so that you can add dimensions like you normally
would when using roc, which means that these
tools will recognize the lines as references
for the dimensions. Well, at the same
time, the scale is still going to the difference
at the dimensions. A at the same time,
since this is a por, you're also going to be
able to use the properties pallet in order to change
the properties of the port. So you're going to
be able to change the scale as well as
the detail level. So with all these being said, you are going to be able to use that drafting view in
many different ways, while at the same time, you will need to remember since
you are using lines. You will be able to edit
the lines that you're using as you normally would
with any other lines. So this means that you can
select a different line style for the different lines that you can draw on a drafting view. And as a quick sign, remember
that you can use ten lines in order to see the result
of changing the line style. So with all this pen set, you will be able to have
another alternative when creating details
for your project, but also, you will be able
to add at different level of complexity and importance to the use of elements,
such as the lines. But also the text,
because as you can see, you are even able to add
text to a drafting view. So this means that you
are going to be able to add different annotations to a drafting view as you normally would to different
views of the project, such as, for example, the calls. So once that I cover
a few more objects or elements that can be
added to your details, you're going to be able
to see that you can add even more detail
to a drafting view. So you may have noticed
that drafting view is the closest thing that
Rabbit has to using Act. And this is important for you to know because of
the fact that you can import fs creating que
while at the same time, you can also export
pales to Act.
48. The Filled Region: Now, while working
on the details, you might need to
add a few elements just for representation. So if you already use
another software for rots, such as oct, you might be familiar with the
hatch to comment. I Revit, there is a tool can that actually
does something very similar up to the
point in which is comparable with the patterns
that are used on the hatch. And this to can is
called fill region. In order to show you
how to use this tool, I'm just going to hide a few elements that are not
going to be using before using the ant ta or more specifically
the fill region to argument on the detail panel. Now, on the view, I'm going to use the
Philip region to recommend and once
that I have done this, you are going to see that you will be able to use once again, the two circuns that you
can find on the trow panel. So with this in mind.
You will need to draw the boundary of
the Philip region. Now, this case I will be
creating the following region. Now in this case, I'm
going to be creating a filled region on
this part of the view. In order to represent
the element that already hide on this
view or no other words. I'm going to create a boundary that is more similar
to the video. Now, once you finish
the boundary, the only thing that you
need to do is click on the green check in order
to finish the boundary. And once you have done this, you are going to be able
to notice a few things. One of them is the pattern that is used on the flit region. Another one are the
controls that you can actually use in order
to add the flit region. Now, at the same time, if you want to add the Philip region, you just need to select
the filled region and click races added boundary. And with this in mind, you will be able to add the filt region. So, you will be able
to make sure that the Philip region has the measurements that
you're looking for. Now, since the filet region is created based on a boundary, you're also going to be able
to use the constraints, which means that with
the constraints, you're going to be able to continue working in your project without having to worry about the changes on the filet region. Now, the fat region will also allow you to
change the pattern Dana if you click at a type, on the fat region is selected, you're going to be able to
use the type propers window, in order to change the pattern. So you can use the
field patterns, in order to change
the pattern a use. Now, this will work
the same way as it works on the walls
and on the floors, meaning that you will be able
to select the pattern type, so you can use
drafting or model. So this is being said, the field patterns is going
to work the same way. Now once they select, the pattern Dana just
have to click on k and then apply in
order to see the change. So depending on the pattern
that you want to use, you are going to be able
to have a specific result. But more importantly,
you're able to change the pattern as
many times as you want, while at the same time,
you will be able to use control C in order
to undo the changes. In since you're using a pattern, you're also going to be able to change the color
of the pattern. So this is pretty much the same functionality that you
have on the walls, which means that you
will be able to add even a background field pattern. So with all this being said, you can actually change how the field pattern is
going to look like. And as well, something for
you to take into account, is the fact that
the field patterns take into account the
scale that you're using. So you're going to
see a difference on the pattern
based on the scale. But more importantly,
the field pattern. It is also going to
take into account other properties that we have covered
throughout the course. So you don't only
have to take into account the pattern
and the color, which means they will be able
to change other properties, such as the line
weight, And last penis, you are going to
see that there is a check where it says masking. And the dsption on the
type properties window actually allows you to disable the masking
of the pattern, which means that the pattern
will no longer cover or hide everything that
is behind the pattern. So you can enable or
disable dumption depending on the result that
you want to get Now, what is being said, something
else for you to know, is that the pattern is
not the only thing that gets affected by properties such as the line weight because the boundary is actually
created by data lines. So this means that the line
weight they're using for your project is going to affect
also the field patterns, while at the same time, if you just want to
see the pattern, you can use the line style that allows you to
hide the boundary. However, something for
you to notice is that the boundary will still cover the objects
that are behind it. So if you don't want
to remove the masking, something that you
can actually do. I just hide the lines. They are not going
to be displayed. Now, one advice that I can
give you is actually use a line style based on the line weight of the elements already
placed on the project, or in another words, the same
type of lines that aren't being used in order to represent the elements
within the view, which is something
that is going to help you with the
representation. And after editing
the field region, I'm just going to add
this view to the sheet. So I'm going to go once again to the view tap in
order to select recess view and then look for the view that I'm
going to add to the sheet. So if you want to create
an additional detail, you can actually go
ahead and do this by creating another
Philip region. So this means that
you can create different objects that you don't want to create on
the model space. So in this case, I can avoid creating a bin by using
the Philip region. So this is something
that you can do. If you don't want to
create this structure, we grab it because
you can actually create the structure for your project on this
version of rabbit. So with this being said,
a can affiliate region, in order to create a flip
region that looks like a being. But also, once this
philip region is created, you're also going
to see that you can change the properties on
the type properties window, which also means that
you will be able to create a new style if you want
a different philip region. Now, when creating this
other fill of region, you will need to make
sure that you are not using the same fill of region,
you've already created. So you can use another fill of region or you can just simply create another fill of region by using the type
properties window, which means that you are able to select another fill
of region and then just use the type
properties window in order to duplicate
the family type. And after creating
a new family type, I'm going to a properties of this family type in
order to make sure that the appearance is
actually based on the material that will be used on this part
of the structure. And after doing this, I'm going to create
another field region, that is going to represent the weavers or
more specifically, one of the elements that is used as the reinforcement
of this bin. So I'm going to create several boundaries
that are meant to represent the several elements
that reinforce the bin. And as a quick sign on
this filled region, you can actually see
that you're able to create multiple boundaries
at the same time. So in this case,
what I'm going to create or more specifically, what I'm going to represent
are the rivers that you can use as a
reinforcement on the bin. So what has been said, I'm going to add
justice elements in order to show you once again, how you can use the
type properties window in order to make sure that the filled region is independent from the others. We are going to see not
only that you can use the filet region on many of the views that you can
create within your project, but also that the tools
or commands that you have on the drop panel will
keep their functionality, which means that you can use the type properties window
in order to create, but also added the
drafting views that you want to place
on your project. So all these being said, the filet regions
are actually pretty useful when adding additional
detail to your project. And while creating the boundary, you are going to notice
that you can use as a reference elements really
created on the project. Well, at the same time, you can change the family type
of the field region, while creating the field region after creating the field region. And as I mentioned before, you can addit the field region basing the type
properties window. However, if you want
to avoid making any changes on an
existing family type, the best thing that you can
do is actually duplicate an existing family type before making any changes
on the properties. Now, when working with
the filled regions, you are going to be able
to see that you can even use them on
a drafting view, which means that you can
create a filled region that is meant to add even more detail
to the drafting views. And once the Philip
regions are created, I'm just going to show you
how you can use the options that you have in order to
organize the Philip regions. So I'm just going
to show you how the options of send
Back and send Backward are going to affect the
Philipp regions as well as the option of b to
front and forward. And as a quick so, mar that you can also change the visual styles in order to visualize objects that
are on top of others. Our something for you to know is that when it comes to
the filet regions, the filled regions are
actually masking each other, which means that the Philip
regions work the same way. Even when you use
the word frame, And also something
important for you to know how the field
regions is that the pattern type
will also determine which tools can be used
on the field region, which means that if you use one of the field
patterns that you can select when you choose
mot as the parent type, you are going to be able to use a line in order to align the pattern to an
existing reference. And this is because the align to argument and it can be
used with the patterns. So all of this being said, you are going to notice
that the field regions are actually pretty useful when creating the details
for your projects. But also, when you decide to add more information to the
different views they are using.
49. Related Tags: Now, when using
the filet regions, you're going to see as well, that you can even add a tag, which means that you
can place a tag, and specifically for
the filet region. However on this template, this tag is not
loaded by default. So I'm going to show you where you can actually find this tag, but I'm also going to leave the default location
within this video. Now, once that I find the carpet that is
used for the tag, going to select it in
order for you to see where the tag for the
filet region actually is. Now once that you find it, you just need to select it
and then click races open. So once you have done this, you're going to
see that there is a tag connected to
the filet region, which was selected at
the moment that I use the two organ that is
call type by category. Now, since this is attack, you're going to be able to edit attack as you
normally would, which means that instead
of using a text, in order to write a text
that you want to use, you are going to be able to avoid writing down
the saying text, by just simply
editing the family, or in an other words,
editing attack. And as you remember,
when editing attack, you're able to click
where it says edit. You're able to
click where it says edit on the property is palette, in order to edit the label. But more specifically, in order for you to
make sure that you can even use the text that
you want with an attack, However, depending on which
one do you want to use, you might not even be able to see the information displayed. And this is because
as you remember, the labels that you use
can actually be accessed by using the type
properties window and the properties palette. So some of the labels can be edited by using the
properties palette, while others can only be changed by using the
type properties window. While at the same time, some of the labels might not
be visible by default. So this means that you will
need to dit the family, depending on the label, but also depending on how you
want to use the family, which also implies that you will be able to
say the tag or in another words the
family in case that you want to use it
in other projects. And as a quick signum
when you use the labels, they are able to use more than one label
at the same time. So if you actually
need one piece of information that is going to be the same regardless
of the object, or that is going to be based
on a specific family type, you are going to be able to use either the type
mark or the mark, and then combine it
with the comments. However this is something
that is going to be used based on the case or in another word, based
on the project. And what anything the tag
you're also going to see. You are going to see
how the changes on the tag determine what
information is displayed on the tag we tag is using one
or multiple label parameters. While at the same time, you can notice that these
changes doesn't actually affect the rest of the family or in another word. It doesn't change the lines that are already
within the family. So you will need to consider how you're going
to present the tag as well as the information
on the tag However, the one thing that
I recommend you using instead of the tach mark, and something like the
mark are the commons. Not only because you are able
to write different commons, but also because you will
be able to select among different commons from a drop
down once they are created. So with this being
said, you're able to use the labels in a
very specific way. But more importantly, you will be able to use the label without having to be confined to a unique value, such
as, for example, the mark or another one that is a little
bit easier to use, such as the tight mark, so it makes sense for you to use commons when adding a tag
to the filled regions. So everything that I'm editing with this label is
in order for me to show you the difference
between using the type mark, the mark, and the commons. So you can get an idea of which one will work
better for you. So you can try editing these
labels, by using the tree, basic parameters in order to see which one
works better for you. Now, what has been said,
since this tag is a family, remember that you
will be able to dit the family that is already created in order to use the
tag, based on your project. So as you notice
the tax makes us in the filed regions
a little bit easier, especially on the details, because you will
be able to change the values that you want to use, but also because you
will be able to reuse these values based
on the parameters that you assigned to the tax
50. The Masking Region: Nine vet, you can add details
by using the field region. However, there is
an alternative to the field region that
doesn't have any patterns, and this one is called
masking region. So by going once again to the annotate tab or more specifically to
the detail panel, you can use the strobm in order to use the masking region. As you can notice on the
video, the masking region, it just simply going to crave a region that is going to mask, everything that is behind it. So once they use
these two command, they're going to be able to
follow the same process that you use when you on the
Philip region to command, which also means
that you can use the tool commands that you
have on the draw panel. So this means that
you will be able to draw not only one boundary, but multiple boundaries
at the same time. So you can easily create
a masking region that can be used in the same
way as the Philip region. However, there are going to
be a few slight differences. So just for example,
the fact that the masculine region
doesn't allow you to open the type
properties window, which means that you don't
actually create family types, or in an other words, there
is only one family type. So because of this, there is no need to use the type
properties window, but also because the function of the masculine region
is actually masculine. So the appearance
and the function will always remain the same. That's a quick sono, the masking region is
something that you can use in order to hide unnecessary lines
within your project, which means that you can
use it, for example, the side, in order to hide all the lines that
you are not going to need. So this is one of the
alternatives that can be used in order to improve the
appearance of your project, without having to change the graphic options that you
are using within the use So you are going
to be able to use the masculine regions
pretty much the same way as to use
the Philip regions. However, the
masculine regions are actually less demanding
than the Philip regions, because the Philip regions
has properties that kinda, which are going to
include the patterns. So the Philip
regions are actually more taxing to the harbor
that you're using. However, at the
same time, you can also add a tag to the
masculine regions. And this tag is going to be the same one that is used
with the Philip regions, which means that
you can keep using the labels that were being
used with the Philip region. Now, with this being said, you're going to
be able to create details pretty easily, but also, you're going to be able to add additional elements that you can use in order to improve the appearance
of the details.
51. Introduction to the Structural Design: Now in this part of the course, I'm going to start showing you how you can create a structure within rabbit. And more specifically in this case, I'm going to show you how to create a structure based on steel. And in order to do this, have already have up and the structure template that already comes by default with a roof installation. Now within rabbit and you actually have a pet that is used specifically for a structure. Now, this instructor tab, we're going to find the tools they are going to be using in order to create the structure. Now the basics first structure pretty much the same regardless of the type of structure they are going to use, whether it's steel or concrete or precast. However, by the phone, this template and their structure families they're already loaded are for a structure that is based on still. So if we click the icon for the columns tool or a command, you're going to have a few options on the modifying tab, but also we are going to have a few options and the options par as more or less the properties that you have available with a column. Now by default with the options, you are going to have that the Haskell as the height. So we select both of these options will place into columns. You're going to see the difference between the sender and the height. So in another words, means that the column is going to be placed on top of the level by using the level acid-base constraint. While the depth is going to place the column by using the level as a pub constraint. However, if we start using the options that we have on the mother, nine tab, switches direction for a slanted column in order to be able to create a column with the slope by drying the column as you would do with a line. And as well when the column is selected, we are able to change the properties of the column myosin, the properties pallet. And every time you create a new column, you're able to select between both options. So if we choose the particle column and then we use an additional option that is call at grids. You are going to be able to select the grids to which you want to add a column. And once you click on the green check, rabbit will automatically add a column to other grids that you selected. But more importantly, you will add the columns and specifically to the intersection between two grids. And the last option that we have an a modifying tab is at columns. Now this one will allow you to place on a structural column within an architectural column. So in order to do this, I'm going to click on the X in order to cancel this option. And then I'm going to load an architectural column to this project. So we can actually use the option to add columns. So after selecting the column, I'm just going to place the column marrow. So I'm going to change the diameter of the column. And once that I have done this, I'm going to click on the columns once again. And then I'm going to select the option for add columns. And after base, if you select the column, you are going to find that there is a column within another one. Now in order to see this under treaty beer and going to show the heating elements. And with this you're going to see under 3D view one column within another one. Nsa quick sign-on API, not able to see the beings that columns or any other structural element on attribute or add to the beer. Please go to the detailed level, meaner represented like a different detail level such as median are fine. And the location of the libraries pretty much the same way regardless of the Persian revenue year, using the name of the carpet is going to be named based on the version, which means to remind because RPT 2018, RPT 2020 and so on. However, the carpet within the folder will be named Years metric. And within this carpet, you are going to find the columns. And in some cases you will actually need to Lora family in order to see in which carpet revenue store the Family Library. And the next tool or command is going to allow us to create and structure of being within the project. So in order to create the beam, we just have to click on the tool or command or use the shortcut reassembly. And as a memory, you're going to see under modifying tab, similar options to the ones that you have with the columns. However, in this case, they're going to be a little bit more complex. So they are going to be a few options. They're not going to be exactly the same. So if we start playing with the options for the geometric precision, such as the sea justification, which is the political justification of the BGN. And you're going to see how these subjects under properties pallet affect the placement of the beam. As well. You're able to see how they upset also relates to the justification. Now if we create another beam, you are going to see how easy it is to create them. But also how the options on the properties PER LAP actually affects the placement of the beam. Versus in this case, when we created the beam, you are going to say that the justification is on the top of the beam when it comes to the sea justification. In another words, the particle justification. Now by selecting all the beings at the same time, you can change the properties where you can also copy them. So that way you don't have to create one at a time as well. If you create a bean and an elevation, you are going to see that the process is a little bit different. And I guess we are now going to select the level meson, the default view that you're using, Purana defined below. Because of this, you're going to have the work plane window in order to select the reference thereafter plays in the beam, we are going to find a few controls and icons that you can even use interrater modify the beans. And as Monsanto for you to notice is that places them in between the columns. So the beam actually person extend by default inside the columns. And now we're just going to copy the beings and the other grids that are in this case, I'm going to be the recenter grids based on their position and the orientation of floor plan. And if you open the 3d view, we are going to be able to see the beans in full detail. Now within the bin has with the columns, you actually have a few options and the modifying tab in a retrograde beans, such as, for example, the drawing tools that you can use in order to create the beans. So we're destroying tools. You are going to be able to create the frame beans based on the options that you have for this running tools such as the line, the arcs, and the spline. We are going to be able to just simply send my PICC lines in order to create a bean. So this means that you are going to be able to select lines where you might be using as a reference material. So you are going to be able to select the grids. Now if I believe of the Minister of visible within this beer, you're also going to be able to use the same option that you have with the columns in order to place the bins based on the intersections are created by the grid. As long as you have columns as structural walls or beings that can confine her contain the means. Now, this is because the beans are parody structure framing, which means that they complement columns and structural walls and also other beans. Now continuing with the same process and also going to be creating another element by Sandy structured path. Now these elements cooperates after clicking the structural frame brace to our command or by using the shortcut PSM boy, RS and Ramya. And going to be able to create a brace which is placed very much the same way as you place the bean. However, if you look a little bit closely, the brace is a slightly different to the beans when it comes to the controls. But also when it comes to the way that they interact with other braces and also the columns and the beans are already placed on this project. Now the placement of the mean, as you may notice, is based on the arrow controls that you have at the end. However, the point is the one that determines whether they've been actually begins and ends. When it comes to adjust tender brace to the rest of the structure, there is already under project. So in the price is actually a little bit easier to use. Hen answer every time that you need to know which type of family you're using, are going to be able to hold the element in order to see the name of the family. Now something interesting for you to notice is that the name of the family appears as a structural framing. And this is because even though this is actually a place and its name independently from the beans and the columns in this particular type of family is part of the families and the US in order to create the structure framing of any project. So now I'm just going to have embraces to this project. Just to practice a little bit. A few of the other options that are available on the properties per level, but also in order to show you how you can use the tool circumvents in order to place these elements, which include options such as star Jain cup, which is pretty much the same thing as using the arrow controls they have at the end of the brace. However, by default, you're going to see that there is a valley Murray is already a sign, not only to the grace, but also to the mean in order to avoid these elements. Because in most cases in a structure based on a steel, you will have elements in the columns and braces to connect one with the other.
52. Structural Design Basics (The Beam System): And under structured, right next to the brace, we have what is called a bin system. Now the beans system will allow you to create multiple beings within an area. So if you click the bin system to recommend or you use the shortcut BS and boy, SSN, Sam and I are going to be able to create a main system based on an automatic placement or a sketch. Now the automatic is very similar to when you create the ceiling, meaning they will automatically place the bin system based on a boundary. Now this boundary is actually going to be the other beans they're already creating. And once they have done this, you're going to notice that the BGN system is called Being system because of the fact that it's a system made of bins. Once the bin system has been creating, your able to select the bin system by Synth tab on the keyboard. Just as you would do when select that girdling wall that might be too close to other elements in order to use an a standard selection, meaning that you will not be able to select them as you normally would. So after we select the bean system and are going to notice that properties they have for the system and the properties per lip. But as far you are going to be able to see an icon that only appears when an element is bound by a work plane. So this means that if we go to where he says big new within the mother fainter, you are going to be able to select a different wordplay based on their face, but also in anymore plane. Now if you did this automatically Revit model recognize and then level that you're using. But as well as with the curtain wall, you're able to select elements within the curtain wall. And every time that you select a bean, you're also going to see the properties that you have available on the properties per lead as well. When you select a bean system, you are going to keep noticing and the properties that you can use with the bin system. So if we actually start modifying the properties that we have on the bean system, such as the justification, you are going to be able to see how these properties affect the placement and the beans. Now one thing for you to notice is that this doesn't change the boundary with the bean system. However, the direction of the beans will actually base on this bond direction that you have within the boundaries, which is the same line that represents this one direction on the floors. So we continue changing. We're just defecation, but also the spacing which is related to the layer here going to be able to see how the system actually changes in real time. And as a quick tip, you can always use the aromatic measurements and also the measurements to, in order to verify the spacing or measurements they have within the system. Now I've been System can be kept as any other element, can also be copy, which means that you can use the magnifying tools on a bin system. Now if you ever want to create an automatic Min system, you can also sketch the bin system, which will allow you to have access to the boundary line and the beam direction, which is pretty much the same line where you have on the floors. Meaning that the beam direction behaves the same way or has the same franchise respond directions of loss. So I'm going to first create a boundary, and after creating the boundary and going to use the beam direction in order to determine the direction of the beans. And as you notice, the orientation of the beans is going to change based on the beam direction. Which doesn't mean that you cannot just simply use PICC lines in order to select one of the boundaries. Has there been direction? I am going to complete this means system and I'm going to add another beam system right next to it. And also our grain in the system. You are going to notice that by default, rabbit will actually add it back to the main center within the system, which is something that you can also do the automatic system at the moment that you agree the system by clicking resets back on placement. So in this actually reinforced the fact that all the bins have placed within the boundaries of the system, but they still remain within this system, independent one from the other. Now we can select multiple bins systems in order to modify the properties of more than one bin system at a time. Now since the main system is actually based on the boundary, we can modify the boundaries of the bean system in order to modify how the bin system is going to behave. The main system is already creative. Modify the beans. How our business, I mean, that the BGN system has not been modified when it comes to the boundaries. Now again, while using the bean system, are also going to notice that there is another option. That is actually call remote being System. And this one, as the name implies, will allow you to remove the mean system. But this one will not actually believe the elements that make the beam system, which means that the bin system will no longer be, there, might be elements within the pin system will remain under project independently. So the bean systems actually intended to make easier and faster to placement and multiple beans within a project. So we create another beam system, basin boundaries. We are going to see that if you select an eccentric boundary and the beginning, and you're going to save it once you click on the green check, the bean system is going to be created based on the boundary. Now this might happen to you because the actual beans are functioning based on the means that we are connected to. So if you need to modify individual elements instead of the boundary, we can go ahead and do a tab on the queue in order to sell one of the pins independently. And then you're going to be able to modify the extension of the beam independently from the main system. You're going to always place a bin system on top of another hour. Keep in mind that when that means system recognizes other beans as boundaries, will automatically connect to the beans. Pedometer or boundaries. So the beam system. Now the system is in a structural system, which means that if we copy this system, you're going to see that this system, along with the beans term within this system, are going to be copy as well. Now there are few limitations with the bin system. One of them is they are not able to use certain openings such as the shaft. However, you are going to find some other openings are available, such as the opening by phase, which can be used from different views because this one actually is a sensor reference for closest phase. And then you have to the boundary of the opening and the moment that you choose to create the opening by phase.
53. Structural Design Basics (The Truss): Now the next tool or command is actually very similar to the bin system. Now this one, if no, trust. Now this one will create very much urbane system that is meant to be a sporadically, but more importantly, let is meant to support the roof. Or in another words, this is your structural elements and they are going to have before the roof, regardless of the type of roof they are going to be using. And as a quick sino, this system is actually curated by using a structure of framing elements that we have been using so far. Now this one will also allow you to change properties and the properties per lead searches, the panel width, which is the maximum distance, you're going to have people in the particle beans, which are the ones that are placed pretty much as the columns, as well as the trust high, which allows you to determine the height of the entire system. Now if you select this system, you're also going to have a few options. Just for example, receptor, which allows you to reset that trust, remote trust system, which will allow you to remove this system in order to make all the elements that make this system independent one from the other. Now as well, you're able to use the option for a deep refer in additivity that picture of the system. So you can have a different appearance for the trust, which means that you can also modify the baton shirt. But as well, if now you select the system, you are able to reset the profile. But more importantly, if you want to know how the system works, you just have to select the system and then click recessive did family. Now within here you're going to see the properties they have and the type replicas window. And at the same time, we are going to be able to see that top shirt and the boron shirt as well. You're going to be able to get an idea on how to create a family such as this. Because in here you're going to notice how your Gray, the tree elements that you have within the Trust system that perhaps shown in the bottom shirt, as well as the web. And with this, you're going to notice that you are able to use the drawing tools in order to upgrade this elements, which makes American meaning decoration or trust systems that you can use embarrass specific places are for very specific purposes.
54. Structural Design Basics (The Connections): So continuing with the basics are structural design within rabid. We're also going to take a closer look to an element they are going to be using for structural steel, which are going to be the connections. So in this structure that we can use the connection tool or command. And once they're used the connections and going to make sure to change the deeper level define just so you can see the connection. Now 1 second nature has been created, are going to have these icons there are going to represent the connection. And when LIGO nation is still selected, we are going to see what options and part of this you have available. And their basic properties can be seen under properties per lead and the options and the mother fame that nav we click on Customize. We're going to have the caret custom connection window, which allows you to select a name for the connection in order for you to select the elements that you want to use in order to create the connection. Now edit member connection or well select and the connection. You will also have a type properties window. Now Augustan connection is actually login action the upgrade yourself. However, in most cases you will be able to use a connection that is already within the connections or come by default Word wherever. So if you click on the diagonal arrow in an envelope and the many African nations, you are going to have this structure connection settings. And under structural connections settings, you will be able to simulate which connections you want to use within your project. And once you load the connections, we will be able to use that type selector in order to select the connection that you want to use. And once you have done this, you just need to select the element that you want to use for a connection. And then may you send the right leg on the mouse? You can click where it says finish selection, or just simply use Enter or Space on the keyboard. And then we'll go ahead and create that connection that you selected. Now once they have done this, you will be able to edit the connection based on the parameters that you have available within the collection they selected. So in Epidamnus window that is assigned to this connection and disconnection that are using actually has a lot of parameters that can be changed. So I'm just going to show you how these parameters affect the connection. And also in order for you to see what are the different elements that are normally used in order to create these connections, such as the balls, no walls, then reinforcement or reinforcing their holes, and so on. Now all of these elements will have their own parameters in order to determine how they are going to function. That also in Aleppo and allow you to create and structure of the same and can be used for analytics. Now you can notice that these connections can actually be used for the analysis of the structural design of your project. Because of the lines that are created with the structural elements may have been added to the project. Now this lines are incur orange. And now the connection or the area in which one element is connected to the other is in color green, while the column is in color blue. And the connection of the column to the level, again as a reference in the base constraint, which is the beginning of the column, is in color green. So this means that you can create an instructor of the sine. But also you're going to create an analysis for the structure that you went through the sign to make sure that there is actually functional. Or in another words, that you can actually calculate. And also as a quick reminder, in order to get information of the element and as well. And that will allow you to see the connections, which is going to be fine. Now these connections can actually be changed depending on the function and the placement even after they have been graded. Metrosexual Lee is here to determine which connection you are going to be using before selecting the elements you're going to connect. And this is something that also applies to the beans. So a gray in this new connection, mason, this type, you're going to be able to see once I, you center and the keyword, the result in real time. But also you can always modify the parameters of the connection by clicking where it says modified parameters. We are going to see the changes to the connection bus to the other elements has to remain. So by using a different we're going to be able to change the deeper level. So you can see the connections.
55. Structural Design Basics (The Structural Fundations): Now one last thing that I wanna show you when it comes to a basic structure is that you are able to place foundations for us still columns, such as you would do for any structure made of concrete. So by using these assumptions, we are going to be able to add an a structure foundation there by default is isolated and a structural formulation. And that is four walls. And also the slabs where there isn't a structural foundation slab or floor slab H. So if we first select the isolator, you're going to see the ones that you place the foundation among the columns and are going to be able to have a few options and the modifying tab now pretty much the same ones they have with the columns, such as the add columns and add grit. And something for you to notice is that rabbit will also recognizes there is placing a foundation. We need a column because in structural foundation has been placed beneath the column. Now since opening and any walls and going to go straight forward to use in this lab. Now by using the default slab, which is a structural foundation slab, rabbit will let you know that you need to select a warping. So you're able to select between the grids and the levels without actually used him in the options such as picker plane, began line, and use the wordplay. He was a sketching. So my selected level one and just going to need to select a boundary. And by using the modifying tools without actually having too much concern for the span direction, you are going to see that the slabs have apps to the foundations. They're already created. So this means that wherever you cannot have concrete with steel, and this is something that we're going to see in a little bit more once we add a structure based on concrete. But also once we start adding is still to our existing structure. Elements such as this one.
56. Concrete Structure (Introduction): Within the structural design, he also destructions may have concrete. So in order to grade this structure, I'm going to be opening a new project by using a different template from the one that is selected by default, which is the four matrix. And this template is going to be a structural analysis before metric. Now as you open that template, you're going to notice that they interface is pretty much the same. However, if you start going through the families and disruptor tab, you're going to notice that by using the structural column where there is, by clicking the icon for this tool for Kamen, or by using the shortcut Susan, Charlie analyse and Larry, I'm going to be able to select Herman different type of garlands. And just to recap a little bit, you're able to place the columns by using the options on the modifying tab, but also the options and the options bar. So just for example, the option to rotate after placement, as well as the option to change the height, which is remember, will allow you to change the placement of the column by using as a reference and the base constraint or the top constraint, depending if you selected. Now you can select any of these any point in order to change the properties that you have on the Properties palette. And among these properties, we are going to have an analytical model, which will allow you to include the analytical model in the element for our structure analysis. Now with this in mind, we can also create a wall that by default is going to be a structural wall. However, remember, you can always check or uncheck races or structure in order to change the structure or to a simple architectural wall which is centered. They are not able to do with the columns because this column is already created as an unstructured column. Now I'm going to create agree based on the first column. So I can show you how the green can affect the column by, for example, making sure that moves with grids is selected. So this means that if I select agree and then I just decide to actually move the grid. Also the column is going to be moving based on the murmur the grip has 11 are the properties that you have available with the column is a structural material, which is centrally you can change by using the material browser window. But also you can associate a global parameter and specifically for the column. And as you remember, this will allow you to create a global parameter. And then you can change in order to change multiple elements that are used in the same load parameter at the same time as well. You can make this column as lambda in order for you to change the slope of the column, either by using the controls that you have on both ends of the column, or by using values and the properties palette. Now the columns can be a slender and you send the angle and driven, which is pretty much a default one that uses this law. But also you can do it by selecting endpoint driven, which is going to be based on the points they are selecting. Now I'm going to use Control C, m by just simply changing the cross section rotation. You're going to notice that you're able to rotate the column horizontally. And this is something that you can use with both a slanted options. And the result is going to be apparent in any of the abuse. Regardless if you're using the angle or the option for the endpoints. As well. You're able to change options under where it says contraction in order to change the base extension, the tax cuts and the top extension. Like for example, changing either the assumptions and the base cut style in order for you to see the result on this view. So if we play a little wet, but this options in the base as well as in the top, you're going to be able to see the result in this view as well as a treasury bill. So I'm going to reverse the changes. So I can show you something a little bit different. I use on the beans. Beans will behave pretty much the same in concrete. Still, however, within this family, we're going to have our concrete being already available. So you can see how the options affect the appearance of this beam. And as with the columns, you're able to assumptions and the Modify tab as well as in the Options bar. So it will change the level on the Options bar that is used in order to draw the bean. You're going to notice on the treaty beer that the mean has been placed on the level and was elected. And now switch on the app transport, you click on disruptor many. You are going to notice that in here you're going to be able to see actual users. They are available for the beam before you actually create, such as horizontal bracing choice among others. And this is because the mean is part of the destructor framing or your project. And also a few other properties that you have on the options bar are available on the Properties palette, such as the level. So if I draw a few that beans by changing the level back to level one. And I also said like the treaty snapping before I draw the beans, you're going to notice that if you select treaties snapping, they're going to be able to snap when beam to the other. Whereas while if you select the option to change, the derivative snapping will be greater. And that is because it's going to be selected by default. So this means you are going to be able to draw the means when chain to the other. At the moment they are drawing the beans. While at the same time, we are going to be able to use the treaty snapping in order to snap. And you mean to an already existing one. And as you can do with the columns, you're able to select the beam in order to select a material for the BGN or in order to change the material for the beam by using the properties per lead and the material browser. So I'm going to reset the options and the options bar in order to draw the mean, but also a few grids then I'm going to use in order to show you the other options do we have on the options bar? Now as you notice, if you try to use the option for Add grades, you're going to see a message, then no beans were added to the document during this operation. And if I try to do this once again, just when one group, you're going to notice that the same message will show up again, even if I select all of the grades available. Now this doesn't mean that I cannot create the means based on the grids. What it means is that the grades actually need another element besides the grids. In this case, it can be a column and a structural wall or another bean. And this also applies to a structures made of steel. So if I create the columns first, my use an algorithm. I'm going to be able to create the beans by also use an upgrade. So once I click on the green check the means will appear on the project.
57. Using The Structural Floors: And now continue with the structure that you can create in rabbit. Or my specifically in this case, this structure made of concrete. I'm going to start by creating a mini-project that can be used in order for you to see how a structural elements interact with each other. So in order to do this, I'm going to create a couple of grids that can be used as a reference when placed in a structure elements. Now the first element that I'm going to create is this structural wall. Now this structure work and actually be created by using the Architecture tab, but also it can be creating my JSON disruptor that we're going to agree there was the following way. However, now on I will be using this structure tab so you can see the difference between one type and the other. Now the reality is Mr. whoever has a lot of tools or commands, they are repeated undefined steps. Because at some point out of those actually created different versions of rabbit or different specialties. And nowadays, dispersion of Rabbit actually has all this pressure of these other disciplines within the same interface. However, since this is a structural part of the course, we're going to focus on this relative path as well, also going to gray and a structural floor molecule again on the icon. Or you can also use SSM, SEM, NBS, and boy directly on the keyboard. Now, going to create a structural floor by using the following boundary without thinking too much into account the span direction. And once the flow has been created and also going to create an additional structural element that is available by using the drop-down for floor. And this is called the slab edge. Now in order to create in a slab H and the only thing that you need to do is select the boundary of the Florida you wanna use in order to create this lab h. Now you may get a Warner and ladies, in order to let you know that one element is within the other. Now you're going to notice and the modifying that and a small icon that says restart a slab edge in order to restore the slab edge there has been created. And by actually open a different view, such as an elevation, you are going to be able to see the result. Now the placement of the slab edge is very similar to the placement soon architectural elements and the roof, which means that you can change the upset. And you can also add and remove segments, which means that you can restart the slab age. And you can add and remove segments, which is something that you can do once you select the slab edge. And after changing a few properties from the slab edge, I'm going to show you how the malleus can affect the appearance of the slab edge, such as the recenter prefer upset, but also the angle. Now if you open the type properties window, we are going to be able to change other properties are parameters such as the profile. But also you will be able to sell or modify the material that you want to use for this element. Which means that this element can be created with this. Some properties are parameters. But as well, it can be quantify independently from the rest of the elements within the project, because this is an individual family. As you can notice, by the fact that a family is great independently. So this means that even if the slab edge is created by USA nasa reference the boundary so the floor, you're not able to join this left edge to the floor because both elements are actually independent. And more importantly, because in this case, I actually place the slab edge, meaning the floor.
58. Using The Structural Foundations: Now I'm going to continue by adding elements to this project. Now the elements that are going to add are going to be the columns. However, I'm going to be actually loading columns may not concrete. So I'm going to search within the rabid library for the columns made of concrete. So in this case, I'm just going to select the concrete rectangular column. Nasa quick signer. This template actually already has the family. However, just in case they actually have the family and are going to be able to load the family within the template that you're using by searching for the column within this folder. Once the color has been selected loader and going to place the column. And as you might have noticed, before placing the column, you actually have a few options. And the options bar might also the same options that you have on the options bar are available on the Properties palette. So you can change the placement of the column before and after you place the column. And now what I'm going to do is actually joined the columns to the ones. However, in order for you to do this, you actually need to make sure that you can join them. Because in this case, the walls are not on the same height as the columns. Now distress in order to show you where you can actually join the columns and the ones in case there are no joint automatically had the moment you place them. Now this join is also going to depend on the extent of the walls, and it's also going to depend on the order you select. When joined in the colon to the wall, horrible wars to the column. I'm just going to start adding also the foundations to this project. My select and instructor tab, the structural foundation isolated. Now this will allow you to place a foundation whatever you want. However, if you place this foundation where you have a column, the foundation is going to be placed in automatically, but need the column. Now if you want to know where you can actually find these foundations, you can load the family has run normally would. Or you can go to the Insert tab in order to click where it says Load Family. And within here you're going to find the folder in which you have this structural foundations in case you need to load it because of the template that you're using. And once I added the structural foundation and also going to add another structural foundation has specifically for the wall. Now, this one will be placed at a medically below the world that you selected. So this will allow you to place on a structural foundation and in the walls. Now so you have an actual level from foundations and going to create another level that I can actually use in order to control the foundations. And since I also added columns and going to make sure that I can control that Carlos and the foundations separate one from the other. Now once I added the levels, I'm just going to change a few properties. Not only forbidden levels, but also follow the elements that I want to adjust to the level strategies created. Which also means that I'm going to make sure that I can identify these levels within the project. So I'm going to rename this levels to make sure that I can find the levels on the project browser, but also that I can know which one I want to use one place in other levels. And as well as another signer. If you are not able to see the elements within this structure, remember, you can change the detail level to at least medium where it's actually recommend if you're going to work with a structure to actually use fine. I'm just going to be changing the detail level of the abuse that I'm going to be using. But also, as you might have noticed, if you go to this lab to our command in order to subtract Now, we are going to find the floor slab edge, and also we are going to find this lab. Now this lab is pretty much a floor pre-created specific leaf or a structure, which means that this is a foundation floor. There is greater for the project. So this is going to become foundation slab as thorough foundation floor. Recommend you using this in order to differentiate different elements within your project. So you can use the foundation slab Instead of the structural floor in projects which are going to need to differentiate one from the other as office buildings and such are in a particular construction in which you're actually creating an S LAB instead of a floor. However, if you have any issues visualizing an element, remember that you can always change the style to another ones such as wireframe.
59. Placing The Rebars: And by continuing with this structure, we can just simply move beyond the basics in order to start adding a few elements that are a little bit more complex but equally necessary. One of these elements going to be the structure of rebar, which is pretty much Miss Richard reinforcement may you can add to the concrete. Now once that we do this, you are going to have this window that will allow you to know that the reverb shake definitions will include hooks and we'll ignore any treatments and then a few other things. So after actually going okay, we're going to have the readership browser and the right, and that you're going to have the modifying that are specifically for our place in the river. And up transport a specific good for the reverse. And the properties of the rebar on the Properties palette. By any chance you don't have this rebars already selected with this template or any other template, you can always click where it says load shapes in order to find the carpet in which you had the reverse. Now here you're going to see, although we were still you have available and if you don't have the reverse, we will need to download the library and be out of this website. And after clicking on cancel, I will restart the process once again so I can actually place everywhere. Now the rebar shape browser can actually be close. So you can actually use the Options bar in order to select the river if you already know which one you're going to be using, or you can use the Europeans partly not a pool open once again, that reward shape browser. Now in the properties pallet you against the live among the types that you have available by using the type selector. Or you can just simply place the river. Now the placement of the reverse order, the reinforcement for the concrete can actually be done by you send the options that we have on the Modify tab when it comes to the placement. Now by default, the placement is going to be in the current workplace. Now the current war plane is going to be based on the war play or the b, which in this case is going to be level one. And up next we have place only a couple of reference. Now this one will go ahead and place the weaver on the closest color reference plane parallel to the b. Now if you don't know whether caries, peccaries, the distance between the reinforcement, the concrete. Now this applies to the far corner of reference. So if I choose a structural plan Level 1 instead of a structure weaver, you're going to see the ones that we click on the view range, you're going to get a plane that is associated to the level. So based on this curved plane, you're going to get the near covered reference and the reference. Now in this case the FARC, our reference is going to be on the top of the column instead of the bottom of the column, which is the case or the near global reference. Now when it goes to the placement, we also get the orientation. Now the default orientation is going to be parallel to the workplace, while the second one is going to be parallel to the cover. And last but not least, we are going to be able to select perpendicular cover. And as you notice, each one of those is going to change your inpatient and the river. Now in this case, I'm going to be choosing parallel to cover. And after placing the first reward, you're going to notice that you're able to change the type so you can use so the friend river, but also ones that we were hace Min place. The Modify tab is going to change in order to add different options. And the first option is going to be related to the placement, or more specifically, the layout of the river that is already police. And by using the drop-down, you are going to see the different layers that you have, which include single, fixed number, maximum spacing number with the spacing and minimal career spacing. Now single is the one that has been used. So if we use fixed number, you're going to see they're able to select the quantity of rivers based on the placement. So in this case, you're also going to notice that the reverse actually adjust to the course that you have on the column as well. You're able to get the river outside of the car, but also you're able to copy the river. And as a quick Signer, as you notice, we are able to use the selection tools as any other element within rabbit. Now as well, since we're able to move them reverse, you're also going to be able to see that you're able to modify their position on the reverse based on the automatic measurements, but also on the dimensions, which means that you are going to be able to even use parameters when the rivers. And as well, you're able to modify the amino group diversity you have. Now next to the layer, which is part of the river said, you also have the presentation. And under presentation you have by default show all. But also if I use controls here, we'll be able to use show first and last, which is going to be a little bit different. And as well we are going to be able to use show the mirror. Now if you don't want to use this basic options, you can also select which we were, the ones that show or do you want a high my use and the standards selection options that we have been using so far as well. You can always use that like all or select none in order to help you with your selection. And once you click on Finish, you will be able to see the result. Now by using control C, you're going to notice that this option show up based on the number we were still you have. Now I'm going to copy the column. So you can see that if you copy the column, reinforcement are going to be copied along with them. And next I'm going to use a different type of river so we can explore the different options when it comes to the placement and the editor and the rivers are going to be used in the rebar shape browser in order to select a different river. But also I'm going to be adjusting the placement the river based on how he's going to be used. So in this case, how will we select this river shape? And it's called M, DSM tomato one. Now once that I have done this, you're going to notice that Revit will actually adjust the re-watch the workplace before within the boundaries of the reward that I just place. And this is because the reward that I just place, he sexually the sign in order to be a reinforcement when it's going to work, in order to assemble the other reinforcement and already place. Now this one will be slightly different. So I'm going to be able to show you a few options that we have on the manufacturing, such as the option for this constraint, which will allow you to see the constraints are curated by default with this template. Now these constraints are actually based on the boundaries of the column. So you can check or uncheck this box that you have right here in order to manually change the boundaries of the river based on the border of the column. So by using control C or malignant cancer, you can avoid doing this. And this is something that you can do as many times as you want. Now once the, you already have done this, we are going to see the where it says River constraints. You are going to be able to see an option, the risk of constraint a placement. Now this one will allow you to constrain the river based on a host. So this one will allow you to pretty much constrain the movement of the rivers based on the host, while the other one will allow you to add the constraints. So if we try to use this and the rivers, they are really creative and they will try to move the reverse to other hosts. You're going to see a message to the reverse outside the original host. And this is something that you can also see at the moment. They are placed in the river, not only because of the placement, but also where it says We were constraints. So rarely will we allow to automatically constraints the rivers within the host that you are selecting one place and the river.
60. Using The Varying Rebar Set: Now when it comes to the reverse, we are also going to have something very similar to the billing system. Now in order to show you how this works, I'm going to change the boundary of the wall without taking too much into account a particular sign. Once I click on the green check, I'm going to click on the river to recommend. And then I'm going to click on the cycle in order to create a reversible. Now this one will allow you to select the world that you want to use in order to create a reverse base on the river there was elected, but also making sure that the replacement fits your needs. And as a quick signer mucosa, the placement you need to make sure they are essentially view in which you want to place this reinforcement. And once the replace the river are going to use once again, the south elevation view. So I can change the number of waivers are going to be added to the layer. And as you'll notice, we can play with your inpatient. But also we can change the layout the river at any point. So by selecting the placement, the reverted following way, y is a number with a space and we are going to notice that the river is going to adapt to the wall. So this is actually pretty useful in order to avoid modifying one river. And as well as you notice, able to move the rivers, have any point. However, if you move the reverse side, you're going to notice that the reverse can be outside the host. But this also means that if you modify one river, the rest of the rivers will adjust accordingly. And this is something that you can repeat in any structure one. And as a quick side note, if you need to know the shapes to the project, you will always be able to go to the Structure tab. Click there we were to or Command. And then click Rey says low shapes in order to load the family that you want to use within this project.
61. Sketch a Rebar: And if we're creating the rivers, you don't find a reverb, it fits your needs. You can also create a river. So if we go once again to the Structure tab and click the river to determine, are going to be able to click recess sketch River. And this will allow you to use the drawing tools in order to draw a river. And as you notice, the drawing tools will have most of the options that you have when drawing the lines. So this will allow you to create the reverse with more freedom because you will be able to use the aromatic measurements. But also as you notice, rabbit will make it easier for you when it comes to the constraints within the lines, which also means that these lines actually create a path for the river. So once you click on the green check, we are going to notice that where you have the lines, now you have a river. But more importantly, by the thickness of the river actually determines the shape of the river based on the length. Now these lines will actually create a BAM. So this means that declaration, the reverse is pretty similar to a three. So this will be the path when the profit would be a circle and the radius of the circle will be the thickness, which are properties that you can change as you normally would place on the type properties window while creating the river or after creating the river. Now in most cases you're going to find sketch the Ukraine. It's already available for you within the river shapes. So this means that within the river shapes are going to be able to find most of the shapes they are going to need while reinforcements to this structure as well, the shapes are created and a little bit different, but the ones that you can create. So if you select the river and then you click on Edit Sketch, you are going to be able to modify the sketch of the river. And automatically the river's going to adjust to the changes on the pad while trying to maintain their original shape.
62. Using The Free Form Rebar: Now by reversing the change, we can also use another option that is on the placement methods that is called freeform river. Now the freeform rebar is a little bit different because we can create a river where free-form geometry. And this means that now the rewards are going to take into account the surface of the host for you are selecting. And more specifically, the phases of the host that you need to select in order to create this reverse. And as you might have noticed, this is actually something very similar to the sweep blend. So this means that you have a surface and an n surface. Now Robert will also go ahead and let you know which surface can you select based on the host. And as well, you can change the layout, the rivers before finishing the selection. Now we'll use in the assumptions in order to make it less confusion, I recommend that you select only the star's surface and the surface. Because he can actually be more confusing if you start selecting multiple phases at the same time as you might have noticed when I use the green check. And if I try this one more time, you can see the errors that you can get by using this options. So what I'm going to do this time is just focused on the star's surface. And then I'm just going to select the host surface. And after this, you're going to see that a river has been created. Now you might have noticed as well, when you see multiple, you are going to see a change when it comes to the number of the rivers, but also the placement of the rivers as well. You're going to notice with the host phase determines the placement. The reverse may also taken into account with a cover that is already assigned within the properties of this structure elements. So this means that the reverser place parallel to the host surface without dismissing the properties of the element, which in this case is the floor slab edge. Now if I remove this river by the linen, the river, or just by simply clicking Control C. We can repeat this process one more time, but this time I'm just simply going to change the order or the faces that I'm going to be using. So with this, you are going to be able to see that difference based on the faces that you cellulite while using this tool or command after clicking on the green check. And as you notice, you're always able to select the river in alopecia is the layer. So this is a very simple tool or a command, but you can use when creating rivers. But it might take a little bit of practice in order to make sure that they are able to use it correctly. And no matter what happens, remember guys, if you want to change the rivers, you can always select the river in order to use the properties palette, but also you can use the type properties window.
63. Creating the an Electrical Project: Now these protocols and go into cover how you can create the electrical systems that you can add to your project. So in order to show you this, and I'm going to open a new project by the center template telescope electrical before matrix. And once that I have done this, you're going to see what you get with this template. So you're going to have the notation for the four elevations, but also you're going to see in the properties pallet abuse that you have by default when you some template, nasa quick silence when Nobel understand blame, they're also going to be able to see that the floor plan that you're using has some specific message omitting once you place elements such as the walls. So the settings on this floor plan are actually different from the seventh day you get with an a standard floodplain and an architecture for a structural template. And Ansar going backward and a small project that can be used in order to add the electrical systems and as well, something for you to notice is that this small project is only going to have one floor plane. So we'll be adding agree, but also will be adding the walls. Now, all of this is not meant to be an, a specific design non-growing phase. This template, also because of the families that are already loaded for this template when also you're going to notice have different appearance of the plot line. So one of the things that are going to do is actually go to the Properties palette in order to change the discipline from electrical to architectural MSE. Notice this will actually change the appearance of the Florida using. So by doing this, I'm going to be able to modify the project as you normally would when you send an architectural template. So I'm just going to create a few rooms based on where I'm going to place panels, but also the rest of the elements that can be added to an electrical system. So I'm going to do this for a little while in order to have different rooms can be used in order to place different elements. Hello. So in order to make decisions to appreciate and also going to be adding families that are going to be used in order to determine where going to place the elements for the electrical system. And this means that are going to add families such as the doors and sends this family's home and actually loaded by default, I'm going to load the family's from the library that you have put wherever. So I can just place them later on within this project. So after loading this families and just fall into place this families throughout this project. Now the same time since these families are loaded for specific purposes and also going to place the families on a specific physician that also in a specific orientation which is going to replace well, but I'm going to use the type properties window in order to modify the properties of these families. Now as you remember from placing families on a project such as clipboards, we are going to be able to select the family in order to enter the properties and the properties palette that I published. And at the same time as you remember, you will have the controls in order to flip the direction of the board. And as always, you are going to be able to use the arithmetic dimensions in order to help him credit placement with family. And last but not least, I'm also going to modify the rest of the areas that are going to be using in order to place the electrical system. We are going to be able to use the controls in order to make this a little bit easier, which means their mind to be able to use. But also something that we're going to do as well after finishing this small project is actually go to the Project Browser in order to search for the floor plan that I'm using. And then after selecting the floor plan, I'm just going to use the properties palette in order to change the discipline to electrical. And this is in order to show you how you can create electrical floor plans. Because as soon as it is, once that I have done this, this floodplains going to move from an architectural floor plan to an electrical floor plan. So in another words, the Project Browser organizer support plan based on this discipline. And this is something that you can change back and forth as many times as you want. So for the time being hanged, going to mute this floodplain has an electrical cord length.
64. Placing the Lighting Fixtures: Now Wednesday you append the project for once, the greater the project, the most important thing they are going to be using in order to create a crypto system within private school systems. So once they open, they're going to be able to have access to everything very slowly with this template, starting first with the families with minute this means we are going to be able to use the families direct grade for this purpose, which will allow you to create systems a little bit easier. So we'll be some minor going to use the option meniscal lightning feature, which is going to allow me to actually place the families that I used for the lining. Now once use this family's, you're going to notice that you need to make sure they are actually able to place them within the project. Now one of these stains that you can do, inadequate place these families is sexually you some elements may you can use as follows. And also willing the options that you have in order to place this family, you have an option better score place on work plane. So this one will allow you to place the family based on the levels. And because we actually place the family based on the levels, you won't be able to see the placement of family within a floor blank if it is outside of the B range, but at the same time, you can use an elevation in order to see the family man is placed by US on the level. And at the same time, you can click where it says big new in order to use that face, but also in order to change the placement of his family to a different level, which is something that will allow you to place the family within a floor plan anyway you want. So in this case, I'm going to be used in level 2 in order to place these families. And ones that are placed the family are going to be able to see the wealthier families are still selected. You can modify the properties and the properties palette in order to modify the relationship of this family. But the level that it's been used as host, but also on the Properties palette, you're going to see grayed out the host and also the elevation relative to the host. But more importantly, since level two is the Coase, once you modify the height of the host, you're also going to modify the height of the family and as far as on the projector, keep in mind is that if you modify how you can be this floodplain, we are going to say Salamanca elements, but also we are now going to be able to say other elements. So by using the architectural discipline, we're not going to be able to see the family that I just cited or by using the electrical discipline, we are going to be able to see the walls with a halftone, while this family has completely abysmal heterocyclic xylem. Remember, the elevations are related to the floor planks, which means very few brain and elevation after bringing the floodplain, elevation is going to have the same discipline has the Parkland. So in this case the elevations are going to be using the electrical discipline. So with this online, I'm going to load more families to this project in order to place them within this project. But also in order to show you the options that you have when placed in these families. Now what based on the families? Remember that you will be able to use once again, the option to place this family based on the face, but also you will be able to select a word length. So I'm going to click on the option Briscoe place on workplace instead of the eruption placement phase. And once that I have done this, you are going to be able to see that I can use the word plane window in order to change the placement with family to a gray values and elevation. So in this case, I'm going to select Grade 1. So I can use, in order to place this family something very similar to the option Briscoe play some phase, however, you want, actually have the option on the options bar, Periscope placement blank, which also allows you to use the word playing window. Our cyclic Simon pick a plane also allows you to select the face once it's highlighted, pink color blue. So you can actually do the same thing by someplace on plane, but also by using place on wordplay. And while doing this, you're also going to notice whether on the Options bar, you will have a drop-down depending on the placement of your choosing. So you can select a vendor level and the placement blame, but also by using the word plane window, we are going to be able to select a line and then you can create on the model space and a cyclic sign. If you are going to sell online, you need to make sure that this is some water line because as you remember, pneumonia lines are actually equator, has three lines that you can see in every view of the project. So I'm going to use consciously, inevitably will do the changes, but also in order to show you the options that you have, transfer one place in these families, non-members of the options, you have an option that is called rotate after placement. So this will allow you to repay the family after placing the family. So you can check or uncheck this option depending how you want to place the family. That also is a quick asylum reception in the previous option is not available Mm-hm. Place and the family by its floodplain. And this is because the way that a family was created. So this will actually depend on the family you're using because you will find some other families, such as, for example, the furniture will actually have the option of rotating after placement. So at the same time, we are going to be able to use this options one place in the family. Maybe other options that you have on the options bar are actually for the mutations. So the assumptions are pretty much in a red line and Beta family, one place and family. However, you're going to see that these options are grayed out. This speakers and not actually placing at the same time that I'm placing the family man just going to use once again, the west elevation. So you can see the host. There is menus for each of these families. And at the same time, the properties that you have a 100 properties pallet subnet Korean going to do is sexually the Linda families that I've just placed in order to place them once again. But this time I'm going to use the option very scope place on vertical phase, which is available with this family bias on the floor plan view. And our therapists and going to modify the placement by using the dimensions. So by using the dimensions hungering to be able to use the option telescope equal, which is going to make the spacing between the elements in which I use the notation equal between each other and the lunches going to delete the annotation. Now when suddenly denotation where we will let you know that the sanitation may actually be important within your project. So I'm just going to click on Okay, in order to validate the change. And then I'm going to modify the properties and the properties palette. But more importantly, I'm going to be an amine adaptation for this family. Now with this adaptation and going to be able to greater labor or in another words, have been habitable, you can actually use arrow times. So in this case and go into greater parameter has specifically protocol height of this family that I can actually use with other families within the project. So we're going to be using this parameter for the other family encourages place by just simply using the properties pallet non-cyclic xylem. Remember back when you create a parameter within your project where you're actually creating Hiseq global parameter. A global parameter can actually be used with all the elements within your project. But also for the property, say you have 100 families they load to the project. And once again, you will be able to use the type properties window in order to change the height of the family. But also you will be able to associate a global parameter. There already has been created. Now in gray, the reason where you actually place these families is because we are going to use them for something more than representation. So this means they are going to be used in these families in order to use the properties they have on the Properties palette where it says electrical. So this means they are going to be able to assumptions such as the one that is called calculate coefficient of utilisation, where there is based on the checkbox for biocentric global parameter. And as you notice, if you don't check the checkbox, we're going to be able to buy them the value that you want to use instead of use and the value that is set on the family. So with this in mind, we're going to be able to use those families, how a symptom of women grab him. Now after this, I'm going to go once again to the system step in order to place other families within the project. And I go into places, families from different areas of the project. But also I'm going to be some measurements based on degree, but also based on the parameter string or integrate one working on these lessons. Now within this license, we are going to notice that the families therapy in place bottom-up like them too much into account. The areas protocol distribution has specific to the area management during use. Now the speakers, this is mainly normally be showing you how to place these families, but also in order for you to say has many families as possible, which also is going to imply they are going to be able to save willingness personal, or the systems that you can have biosynthesis step. However, the placemark more status families is now going to be the same colonial project. Because on a real project and you actually take into account the area that they assign Henle, so the compliance with the regulations they are going to have in your country region. So the electrical systems are actually more complex than what you're going to see women these lessons, however, you're going to be able to solve this with any project that uses an electrical system. And after base, what I'm going to do is actually create a cylinder. I can use, I suppose, photo-based families. So in order to do this, I will create an automatic ceiling, but also we'll be using the properties palette in order to assign high but also a level to the automatic ceiling. Because as you can see, since I'm not grading walls on level two, I will not be able to create a ceiling based on the Bureau range. So I've done by default is now going to legislate the ceiling in our source. Another quick sign, remember that probably is going to let you know if you have two elements are in this case to ceilings under same place. So now I'm just going to use Control C in order to replace the seemingly recreated under same place as the first one. And also for gradient the ceilings, I'm going to use the ceiling plan for the electric optic sibling in order to see the result pentacyclic Simon, you can use 1 second and the properties palette in order to change the discipline that has been used for the acylium blame. But at the same time, you can duplicate this floor plan in order to have a silane plan just for architecture and another one just for electrical, which is something that I recommend you doing if you're going to be working and the architecture and the electricity at the same time. And I'm just going to use this in electromagnet by the placement of the family place on the beginning. So I'm going to be part of this family. But also I'm going to modify the value of p under Properties palette in a cyclic cycle, you have this control which will allow you to flip the direction of this family based on the host and dynein just going to go 1 second to the ceiling plan in order to change the position of this family, which is something that you can do based on the aromatic dimensions, but also by US under two circumstances where you can find on the Modify tab something as well. But I'm going to do is actually work Davis family, which is something very resourceful, going to change how it's going to eliminate this area, which is something that you have to keep in mind one place and the families that are used in electron illuminated project. So after rotating the family and also with the families are still selected. I'm going to use the capital recommend in order to create a copy of this family. And after creating a copy, I'm just going to use the dimensions and say did before in order to change the placement with families. Remember the ones that you then leave these annotations. They're gonna get a message letting you know that these dimensions might be important when a new project, or in another words, this dimensions and the position of elements may have within your project.
65. Creating the Switch Systems: And on this part of the course, what I'm going to do is actually create the systems. But I'm going to create for this project by using the families that are already placed on the project. So in Annapolis, I will play sedation of families that are going to be needed in order to create the system. So the families that are going to add switches. Now you can find the switches and the system tabs, but more specifically and the truck number, you can use the lower access device. Now once you click where it says lining, you will be able to place the switch, but also you will be able to load a family. You can use photos, same purpose. Now, a quick signer from Moldova, you can find the families that are installed by default would grab him by searching a 100 different folder unless you actually choose a different folder for the families. So in my case, I'm keeping the families and the default directory in which rabid installer the library. Now in this case, I actually want to show you where you can find these families, but also what feminists we have available. So we're going to search within the families. And then you're going to see where you can find the family that you have by default and effect closing well-off family window. I'm going to place the default family Columba project. But more importantly, I'm going to show you how you're able to place these families. And by changing the placement, you are going to see that you will be able to modify options from the Options bar, such as the placement blame. So I'm going to show you the different options that you have. One place in these families, which are shown nowadays, are pretty much the same options that you have when placed under lining features. However, they are going to be a few key differences when it comes to the properties for parameters of these families. And at the same time, you're able to place these families and the families of the project, which means they are able to use other means in order to place these families. Hello, In this case, I will be using the floor plan in order to do this because we are able to use the remaining dimensions in order to move the elements on the floor plans. But awesome views such as the elevations. But more importantly, because by using the properties and the properties palette, you're able to modify the height of these families. Now, so cyclic saner, remember the sensor able to use the properties palette in electromagnetics families, these families can also use met by properties window. Now in this case, I'm not going to use the Play Properties window in order to avoid making this more confusing. And I follow this implies that you won't be able to query parameters in order to modify properties such as the high based on a binomial. So in this case, I will be grading a pedometer that I can use all these families, which means that I will be able to modify the height of these families by just modifying the parameter which actually makes element is families a little bit more than minimum. And once these families had been placed and once replaces families and going to be able to change once again, Hi Rhoda family biosensors, nanowires. And we'll be able to associate a global parameter to the families that I just place. My place and these families and growing them equating the first system at the project by selecting the family when I place for them aligning. And meanwhile this family selected, I'm going to go to the manufacturing tab, but more specifically to the credit system spinal, in which you're going to find the option for power and switch. Now in this case I'm going to be selecting the switch and then on the same modifying tab. But in this case, my in-sample system both spinal and when be select the option that is for added switch system meant this one will allow me to other families to the system, but also you will allow me to select the switch. Now the same time, since you are able to address system, you will be able to also remove families of the system. And once the LMS system and going to click where it says Finish Editing System. And Wednesday you do this, you're going to see very few satellite, one of his family's. You're going to have two times the standard modifying therapy, amen number, Cisco switch systems. And within this step, we are going to have once again, the system tools panel, which will allow you to edit the system in different ways, such as, for example, the fact that you can add a switch system, but also the fact that you will have a few options, such as the one that you can use in order to disconnect this range, as well as the option that you have in order to connect the switch. And every time you make changes to the system, remember that we are going to be able to believe any changes by clicking away says finish typing system. Now you can do this by also edited the system for my specifically my takeaway says select syringe. And once again, you will be able to enter the system by using the assumptions Maxwell, as you notice, this is somebody you can repeat multiple times, inadequate systems. So what I'm going to do is actually create other systems. Or more specifically, I'm going to occur a more switch systems in order to show you once again how you can create the system. We'll be creating a system just for the sterile lining, nasa quick sign-on. Normally you will have both systems connected to the same family or in another words. And you won't have one switch for the main theorem and another switch for the next theorem within the same family. Now in this case, I'm just storing this in order to illustrate a little bit better how you create the systems. We just recently I mentioned before that you will need to apply a specific regulations depending on your country or region. So in this case, I'm going to finish the system in order to create another system. And also to remember, once you finish a dependent system, you are going to be able to save the changes by just clicking where it says finished, Hadoop and system. Now when you edit them, the systems is very important for you to know which family the U1 within every system, because rabbit will let you know if you're select bene family within another system, even though it's going to change the family for the other system. But also remember, you can revert the changes that you do by just simply using Control-C and less panellists. I'm going to create a better system just for the switches. So as you know the spacing creating an electron systems within Revit, famous study options that you have while grading, but also what added in the system. Now when your gradient the system, something that you wouldn't notice since they are able to edit the system anyway they want, which means that you can change the switch from one system to the other. And also something important for you to know this history fingers tap on the gamer and you won't be able to cycle through the families, but also you will be able to select the entire system without selecting on the families at the same time. Now this is something that you can do for every family but you can create, but also in order for you to cycle among the different options that you have when selecting this family's photosystems. This is suddenly will be able to do not just with the electrical systems, but also remember, you can do this with the walls that are chained together. And also you will be able to do this with other systems are elements that are joined together, such as the plumbing and the conduit among others. And something as well for you to notice is that when you though is we are going to be able to see the same main part of the system may have ended drop them right below where it says system selection. So this is very useful while working on your project. Now something is standard, but you can do when I'm working on the systems is the fact that you can change the family time by assembled type selector. So something that I wanted to do is actually place other families within the same project. So this means that I will be placed in the rest of the families that are going to use in order to grade the remaining systems that are going to be using whenever this particular project. Now in order to do this, I would like to replace all the families that I use in order to create this type of system. Or in another words, or the families that are used to create a switch system. Now what I'm doing is going to take a little bit of time because of the amount of families, but also because I want to use later on in the annotations and also the modifying tools to adjust the placement of these families. However, once again, and not focusing so much on the placement of families when it comes to how they are going to eliminate the project. Replacement the families that I use in order to illuminate the project. Or in another words, the families that I use. I'm also going to be placed on the switches that are going to be used in other b-bbar on and off the lights. Now, a quick side note, while placing these families, we are going to see that there is an adaptation as specifically for these families. Now this adaptation is not baseball. When the electrical floor plan, there is greater underlining. A special thing that is called lining power is actually visible within the electrical floor plan that is created for the sailing, but it's actually visible on the electrical ceiling planks that you have on the project browser. So this means that these annotations are placed within the family. However, because of the type copy of a year using the center, patients will maybe suitable for hitting away. So last but not least, I will create the switch systems by extended family strangers place. And I'm also going to make sure that the switches are using the same parameter, but the other switches are using. Now, a quick signer, remarkable, you can place these families by a 100 pulsar commands, but you have an unmodified tab for my specifically metal circumstance that you have on the modified panel. But at the same time, you can use paramedic dimensions in order to help you with the placement of these families. And now I'm just going to continue as sine inverse switches to the respective families. And at the same time I'm going to make sure that all the families that I just placed how you send a single parameter. So with this switch systems.
 C. Thi Team, Work hard for what you Want!