Transcripts
1. Introduction to the Spanish Omelette: Hello, I'm Kara. My life has been in the kitchen. I really like it. I have
done it with vocation. Today, we are going to make
the typical Spanish omelet, which I have very good
memories of this dish. It is the food of our ancestors, our great grandparents, that they had nothing
more than potatoes. And luckily, maybe they
had better oil than now, because they had olives and
the oil cost them less. So let's make the typical
Spanish omelette dish, which consists of eggs, potatoes, oil, and onion. I hope you like it
and see you in class.
2. Required Ingredients and Utensils: Let's make a Spanish omelette. This has a very long tradition because it is a very old thing. The essence of the flavor of
the omelette is the point of frying the potatoes and the potatoes that
are used for frying. We have to use potatoes that
are suitable for frying. The best onion to use is the red one for
frying and for stews. Then we have the eggs. They must be fresh and good. I use two, a clove of garlic, but it can be made
without garlic. There are individuals who do not like it with
garlic or onion. The onion is used to
make the omelet juicier. This is a pan that we are
going to use for the potatoes. Then we use either this spoon, which is good for stirring
the potatoes, or this one. Depending on personal
preference, both are valuable. The oil, it doesn't need to
be extra virgin olive oil. Even regular olive
oil is acceptable. In the upcoming lesson, we will begin with the
preparation of the potatoes.
3. Preparation of the Potatoes: To initiate the process, we will start by cutting the
potatoes and feeling them. It is crucial to ensure
that the potatoes are cut in a proper manner so
that they can be fried. Well, we already have the
prepared potatoes here, which are approximately
sufficient for making an omelet with
about five or six eggs. If you decide to add
an additional egg, it will not have
any adverse effect on the final outcome
of the omelet. Now let's proceed to the next step of
cutting the potatoes. It is important to note
that the potatoes should not be sliced too
thinly or too thickly. However, if some of them
are slightly thicker, it is acceptable as
they will even out. During the frying process, we have the potatoes
cut and ready, and now we can move on to the subsequent step
of cutting the onion. For this particular recipe, we will be using a whole onion. If you like, that
onion is abundant. You can even make the
omelette with just onion. There are individuals
who make omelette with onion, omelette
with peppers, omelette with eggplants, omelette with vegetables,
omelette with tuna. Here we are going to make
the normal, traditional one, as always, with onion
and with potato. And now a secret that I have
always added a little bit of garlic because it gives a small touch to
the fried potatoes. The garlic should be
chopped, but not very fine. It should be finely chopped, but not excessively,
so very fine. Very fine, because the
garlic burns quickly. So we have the
garlic on one side, the onion on the other, and we leave everything
prepared for. When we have the oil ready, we go to the pan with it cover the bottom of the pan
because the fry potatoes, it has to have
quite a bit of oil. So that's how the bottom of
the pan is covered well. And the oil is ready.
The oil is ready. Then we will put it on the heat and we will add
everything together, the onion, the garlic,
and the potato. We will add everything
at the same time, onion, garlic, and
potato, all at once. This ensures that all
the flavors are well combined and the dish turns
out delicious and flavorful. The careful arrangement of the ingredients and the
proper heating of the oil are crucial for achieving the desired taste and texture
of the fried potatoes. Garlic, and we will
add a pinch of salt, approximately the
amount of salt that is already in each one
according to what they like. While the potato is being fried, it should be mashed a little
to achieve a finer texture. After that, it is moved
and mashed Again, a trick to make the
potato even softer before frying is to
place a lid on the pan, allowing the steam
that rises from frying to further
soften the potato. This makes it easier to mash. Then at the last moment, when the potato
is already fried, to give it a golden color, it is given a little more
heat and turned a few times. This ensures that the potato gets that perfect
point of browning, which adds a lot of
flavor to the omelet. It is important
to make sure that if the potato sticks to the pan, it is moved much more often
to prevent it from sticking. Taking these steps will result in a
deliciously crispy and flavorful potato omelet that is sure to impress
your taste buds. It is nearly there. But prior to the potato fries completely, you must remove the lid
in order to prevent the potato from being
consumed there any longer. And allow the potato to begin turning golden and
frying for real. At that point, we will
have the fried potato, and we will already be able to see small golden
potatoes on top, which is what imparts flavor and adds a touch
to the tortilla. Therefore, since we already
have the potato prepared, let us strain a little
bit of the potato that appears golden and
prepared in this strainer, just so it can drain
and release the oil. Finally, we can enjoy the deliciously crispy
and golden fried potato. This oil that we
have left over from the potato is good for making
the omelette set in a pan. And this oil is
good for all sows. In the next lesson, we are going to move on from
beating the eggs, the mixture of potato and
the curd of the omelet.
4. Mixture and Cooking of the Spanish Omelette: To begin, we start
by beating the eggs. We are going to add a
total of five eggs. Additionally, we will add
a little bit of salt. After adding the salt, we beat the eggs until
they are well mixed. Once the eggs are ready, proceed to mixing the potatoes. It is important to
note the amount of oil that drains
from the potatoes. This drained oil will be
mixed with the egg mixture. The aroma of the mixture is delightful and it is a
satisfying experience. We make sure to mix the
potato well with the eggs. While mixing, we
add a small amount of oil that was used
to fry the potatoes. This oil helps in cooking the omelet and prevents it
from sticking to the pan. In total, we have added approximately three
teaspoonful of oil to ensure the pan is well coated and to avoid
any sticking issues. This ensures that the
omelet turns out perfectly cooked and has a delicious taste that everyone will enjoy. We put it on the fire and
the pan has to be quite hot. I'm going to give it like this
so it doesn't stick to me. And at least until I give it the first turn and the egg
has sealed the tortilla, it has to be firm, then you can start
lowering it so that the tortilla is cooked
through and not raw inside. That's the mystery of the
setting of the tortilla. I'm going to try to
give it the first turn. The egg has already sealed. And look, it has even taken
a little golden color. Let's add a little
more oil to make the second lower heat. Now for review, next lesson, omelet appearance
and presentation of the finished omelet will be
observed to see how it looks.
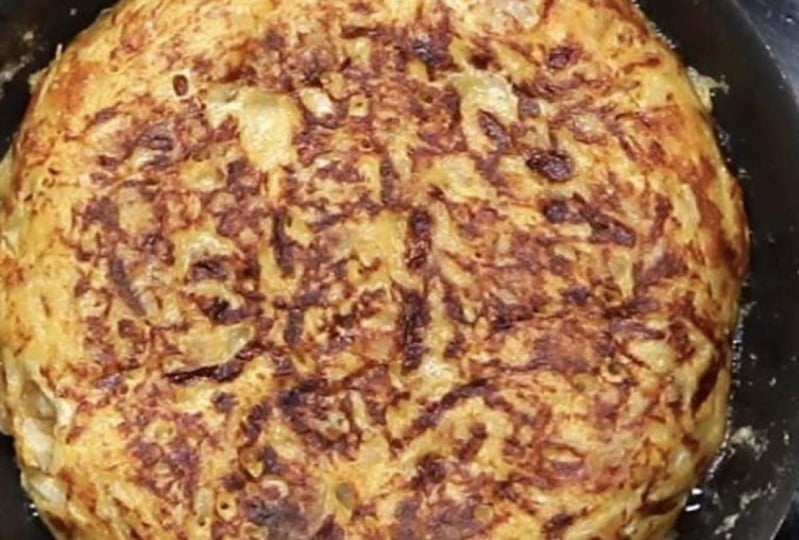
5. Presentation and Tasting: We already possess
the set tortilla. To determine if the
tortilla is set in the center and the
egg is not raw, we puncture it with a fork in the center just a little bit. And we make contact
with it to ensure that the potato is touched with the fork that does
not have raw egg. So it is acceptable, we simply need to brown it a little on the outside slowly, and the tortilla is prepared. Possess the completed tortilla, we are going to extract
it from the pan. We have completed the process and now we have the
finished tortilla, which we will take
out of the pan. This is the classic and
authentic Spanish omelette. If you take it out now and
don't eat the tortilla, it will be a little harder
tomorrow as the flavors will have further developed and the texture will have
slightly changed. But it has its fix, because it has another fix. You can reheat it with
a sauce that you make. If you make a sautee
of garlic, onion, a bay leaf with a
little paprika, a drop of flour, and when
everything is fried, you add a little
water, let it cook, and when it is cooking, add the leftover omelette
in small pieces, squares. It is important to ensure that the omelet is thoroughly
cooked and heated through. Before serving, you allow it to cook for a short time with the squares and
then pour it into a dish placing the sauce on top. Place the squares and
pour the sauce on top. Then also, now you can
consume it with mayonnaise, with cheese with tomato,
that will be your choice. But the tortilla,
truly how you capture the flavor of the tortilla
is how it has come out. Now.
6. Additional Tips and Tricks: We have the tortilla
finished and it has come out and it has come out very good If you put the potato with the
egg in the pan, and suddenly it has
stuck a lot in the pan. Take it out immediately
on a plate. Wash the pan again, and heat it up again with a little oil. When it is very hot, beat an egg and pour it
in and mix it again. That's the fix for when
the tortilla has stuck. And as soon as you pour
it, the omelet like this, so it doesn't stick to the pan on the first
turn on both sides, the pan must be very hot. When the egg has
already been sealed, there is less danger
of its sticking. And you can lower
the heat because the omelet will slowly
cook better on the inside. The height of the
omelet for it to be juicy should be
approximately this height, because if you make it lower, it will become drier
on the inside. If you make it higher, you will have more problems setting it because it will take a long time and it will
burn on the outside, or it will remain
raw on the inside. Now we are going to cut it so you can see the texture inside. Look at what texture it has. It's perfect because it's set. It doesn't have egg inside. In the final project, I would like to know if you have made it at home and upload a photo in the comments to see how it turned out and
I hope you liked it.
7. BONUS TRACK MIGAS MANCHEGAS: Hello, I'm Karna. I'm a cook and
today I'm going to make you a typical
dish from La Mancha. Migas manchegas. The most essential thing that this dish requires is bread. Because not any bread is suitable for making
these breadcrumbs. It is a special bread from the
ones that were made before people when they didn't have money and there was leftover
bread in the villages. Resorted to making
this dish because you don't have to rush to the
store to buy what it takes, but you start cutting the next bread that was
left over yesterday, They would take a piece of pork, and with these crumbs, they would make a dish of gas, manchegas what was a lot of
running well for breakfast. For lunch. And you can
mix it with many things. You can eat bread
crumbs with milk. You can eat bread
crumbs with whey. And you can eat Manchego
breadcrumbs alone, like the ones we
are going to make. I hope you like it
and see you in class.
8. INGREDIENT PREPARATION: I am going to provide
an explanation about the ingredients
present in this dish. It is a dish that consists
of a few key elements. Yet it is a dish that offers
a substantial amount of food reminiscent of the
dishes prepared in the past. The bread used in this dish
must be village bread, the type that was traditionally
made and known as gas. These breads were round in shape as they were meant
to have a higher crumb to crust ratio with a generous amount of crumb
and a thinner crust. Next, we will proceed to
fry the meat and chorizo, which are the essential
components of the migas manchegas dish. The meat, bread, and garlic are combined to create
this flavorful dish. Finally, once the
dish is complete, we will begin cutting the bread, allowing for flexibility in the shape and size of the cuts. This step adds a final
touch to the dish, as the bread can be
cut in various ways, such as long or round, depending
on personal preference. But most importantly, ensure that the bread crumbs
are of fine texture. Most importantly, they
must not be large, but rather small in order to enhance the absorption
of flavor by the crumb. And when it comes to eating
it, it is more delicious. In the next lesson, we will
see the step by step process.
9. STEP BY STEP INSTRUCTIONS: I've already cut the bread. I taught you to cut it often so that the crumb
comes out better. I'm going to soak them a little. Now, a few drops
are poured over it. This is crucial
because the bread is from the previous
day and it's hard. So you don't need to use
excessive water for soaking, as it would result in
poorly textured crumbs. Second step, try the
garlic approximately, We are going to put
these two short garlics and then another smaller one. They do not break small, they break big because then
if there is someone who does not like garlic as it
is cut, they can remove it. Let us prepare some peppers, then we cut the pepper. And we have everything ready. Let us start making
the bread crumbs. First we are going to put
a pan with a little oil, and we are going to start
frying the peppers, which we will then put in
the decoration of the dish. Finally, we can proceed to
serve the dish and enjoy the delicious flavor the peppers for decorating the
breadcrumbs more effectively. Being better, they do not
need to be excessively fried, they need to remain
somewhat green. Next, we add a pinch
of salt to the pepper. Then we carefully
place another pan on the stove to heat
it up before cooking. When the oil is hot, we will start by frying
the garlic first. As garlic fries rapidly, when slightly golden, we remove them from the
pan onto the plate. I remember that
when I was younger, my father would cut
the breadcrumbs and prepare them
for the next day. As a general guideline, when a new day dawns, he would pour the water. The mother commenced
the process of making the breadcrumbs well, the garlic is already a
beautiful golden color. Currently, we have the pan
all set to add the meat. We are in the process of
making bacon and an port, which is the perfect
complement to this dish. Meanwhile, as it's cooking, we're carefully turning
the small peppers. Take a look at the peppers. They're already fried
and completely finished. We've already completed the crying process for the pepper, and they are now ready to aroma. Almost time to enjoy our
del, time to enjoy our. We already left these here
for the final plating. The meat is already fried. We add the chorizo. For the bread crumbs, it
has to be the tender orsa. We are going to add a pinch of salt and now we add the
garlic that we have browned. After browning the meat with
Orso until golden brown, we'll sprinkle in a
teaspoon of sweet paprika followed by a small amount of water, and the sliced bread. Mixing everything
together, we must work quickly to ensure even
distribution and thorough soaking. This dish is characterized by its simplicity with
just a few ingredients, yet it is incredibly
nutritious and satisfying. The addition of brown garlic
enhances the flavor profile, while the combination
of meat, torito, paprika, and bread creates a
hearty and delicious meal. Enjoy the rich and comforting flavors of this nourishing dish. The trick is not to pour
too much water on them, and if you have put too little, then in the sauce you
add a little more. I'm going to add
a pinch of salt. In the next lesson,
we are going to do the plating and presentation.
10. PRESENTATION AND SIDE DISHES: We have everything finished now and we are going to
plate the breadcrumbs. In case you eat bread crumbs that day and they don't
have ingredients, you can take advantage
of those breadcrumbs. You can eat them with milk, you can eat them with cheese. But there was a specific
person that I knew, my mother, who liked
them a lot with coffee. Well, that's a matter of taste. But for a second day use
and what was left over, they would apply it like this. We have one plate and we are going to place
another small one. We are going to leave
this one empty, so just like that. And the other one,
we are going to decorate with
grapes and peppers. And now we are going
to finish decorating a little bit here on this
small plate like this. Here you work with
your hand because your hand is 100% clean. Well, the dish is
already finished. As a final project, you enjoy
the dish as much as I do. Let me know if you
have any questions or if there's anything else
I can assist you with. Have a wonderful day. Please don't hesitate to
reach out if you need any further assistance or if there's anything else
I can do for you. Thank you for your support
and have a great day. Your satisfaction is important to us and we value your opinion. We look forward to hearing from you and seeing your
completed dish. Enjoy. Thank you.
 Encarna Castro