Transcripts
1. Class Introduction: When it comes to
recording audio, there are three
crucial questions you need to ask yourself. Number one, what
type of microphone should I use for
this specific job? Number two, how can I
adjust the environment and microphone placement
to produce the best sound? Finally, number
three, what type of audio recorder is the
best for my situation? In this course, we're
going to cover each of these questions
so that you can ensure that you're recording
the cleanest audio possible. My name is Scott and I'm a
video creator on YouTube. I've done voice-overs
for over four years now, recorded vocalists
for cover songs, and I've worked on recording audio for film projects before. I've also reviewed various types of microphones on YouTube. But I'm here now to consolidate everything
I've learned over the past four years
into about an hour. If you're new to the audio world and want the upgrade
your audio game, this class is perfect for you. If you have limited
knowledge about microphones and want to learn more about
all the different types, this class is also for you. In this class, I'll be tackling the three crucial
questions in order. First, by covering the different types of
microphones that are out there, then I'll give you tips
on how to properly apply sound treatment
to your space, and finally, we'll go over
what the different types of audio recorders are and the different situations
they shine best in. For the class project, come up with answers for the three crucial questions
for your specific situation. You'll want to do this
towards the end of the class after
you've learned about the best and different use cases for the different types of
microphones and recorders. Be sure to download the
class project worksheet to have all the
choices organized for you so all you'll need to do is circle your
choices at the end. As a final step for
this class project, record a before and after with the microphone
that you have right now and then after applying at the answers for the
three crucial questions. With all that said, let's jump into the world of microphones.
2. Choosing the Right Microphone: What type of microphone
should you use for your specific
type of situation? The next few lessons will
be dedicated to answering this question that might seem trickier than
you first imagine. If you're a beginner you
might think I'll just buy an extremely
high-quality microphone and use it for everything. While you can indeed fit a good microphone into a lot
of different situations, you might find that
certain microphone's are just better suited
to certain tasks. The types of microphones
that I'll be covering are mainly
used for dialogue. They have one purpose and
that's to capture the voice. Let's start by listing out the microphone categories
and at their best use cases. Firstly, we have dynamic microphones which
are best suited for podcasts and voiceovers in situations where you don't
have room treatment. Next, we have the large
diaphragm condenser mic. Their specialty is mainly capturing high
detailed voiceovers, vocals, and can be
great for ASMR. We then have boom microphones, which are best suited to talking head videos or for recording
dialogue from actors. After that, we'll talk about
camera mounted microphones, which are the best for vlogging. Then we have lavalier
microphones, otherwise called the lapel mics. These microphones
are versatile and great when you need to be
far away from a camera. Lastly, there will be
a special category of microphones that don't
really fall into any of the previously
mentioned ones and may have more non dialogue
applications. Now that we have an overview of all the different
types of microphones, in the next lessons I'll go over one type at a time
and talk about their best use cases and
also how best to use that specific microphone with proper
microphone technique. Also covered the microphone I personally use for each type and recommend specific mics
at different price points. Also, don't forget to
download the worksheets for this class to get an organized view of the class structure, reminders of each
lessons biggest points and the recommendations for
each type of microphone. Let's kick things off with the microphone type
that's best for podcasts.
3. The Dynamic Microphone: Dynamic microphones, a
podcaster's best friend. Before I talk about why I
love this microphone so much, let's outline how this
lesson is going to go. First, you'll learn about the unique qualities
of dynamic mics, then I'll go over
the best use cases in terms of functionality. After that, I'll give
you my recommendations. Lastly, I'll show you how to use proper microphone technique
for this type of mic. What is a dynamic microphone
and what makes it different? Before we can answer
that question, you have to know what
a microphone is. To put it simply, every microphone converts
sound waves into voltage, which is then sent
to a preamp that boost the signal
to what we hear. Dynamic microphones perform this energy conversion through electromagnetism while condenser microphones use
variable capacitance. This basically means two things. Firstly, that dynamic mics do not need a phantom
power or voltage to operate and that
most condenser mics will require some
voltage to operate. Pretty much every
microphone after this lesson will fall under the category of
condenser microphones. Secondly, it means that
dynamic mics can take a lot of signal due to their
low sensitivity and higher gain threshold. Basically, there are a lot less sensitive compared
to condenser mics. This brings us to one of the best use cases for
dynamic mics podcasts. Thanks to the lower sensitivity, dynamic mics are able to reject unwanted
sounds better than most other microphones hence
why I'm using one right now. It's perfect for podcasts with multiple people
in the same room. I've tried using
dedicated condenser mics to record for people for a podcast before and the mic bleed is just
way too overpowering. What is microphone bleed? Let me explain by
using a demonstration. Basically mic bleed
or crosstalk is when a microphone is picking up sound from an unintended source. If I was recording a podcast and that microphone was
dedicated to a guest, I would be an unintended source. Right now you should be
hearing what that sounds like having both microphones
picking up one source. To further elaborate, imagine four different microphones
with four different people. As I speak, my
voice is picked up by not only my dedicated mic, but by three others as well. This means for every
speaker you'll have four different audio
files of the same speech, one that we want and three with mic bleed
that we don't want. The primary reason
that this happens is because of something
called phasing. Due to the different distances that my voice is
being picked up at. It's very hard to
synchronize them completely together and
make them sound good. That was the explanation.
Thank you microphone. The more sensitive
the microphone, the more unwanted sounds
it's going to pick up, and the harder it is for the person who's going to
edit these audio files. But because of dynamic mic is a lot better at rejecting
unwanted sounds, which includes other speakers, this issue will be a lot
less severe and even nonexistent depending on the specific dynamic
mic you have. This property also makes dynamic mics great
for streaming. At this point, you might
be wondering why not use a dynamic mic
for everything then? That brings us to a
weakness of dynamic mics. That same quality that makes it great comes with a trade-off. A dynamic mic will not pick up as much detail as
a condenser mic. That's why most professional
voice-overs and voice actors use
condenser mics to record. The only times I would
use a dynamic mic over a condenser mic
specifically for voice-over is if I have an
untreated space that I can't do anything about
or for convenience. Otherwise, if you do have a treated space or you
can treat your space, I would pick a condenser mic to record vocals and voice-overs. But there are exceptions
to everything. People have used dynamic
mics like this one to record vocals and voice-over
with great results. It's simply a matter of knowing the specific microphone and also knowing the type of sound that
you want for your project. This brings me to
recommendations. Meet my favorite dynamic
mic, the Shure SM7B. It's an industry
standard and is by far the most popular microphone
amongst podcasters. The sound from
this microphone is warm, soothing, and clear. The only downside is that it costs a fair amount
as of this moment, and requires an audio interface that can provide clean gain. The recommended amount is
60 decibels of gain and most cheaper audio
interfaces can only reach 52-55 decibels. I'll get into that more when
we hit question number 3. But for now, just know that
almost all dynamic mics require an audio
recording device like an audio interface to work. The Shure MV7 is an exception to this rule because it can
also connect via USB. It's the only exception
I've seen so far, probably because it's a
more modern dynamic mic. I personally like the
sound of the Shure MV7. It's like a budget version
of the short SM7B. If you're looking for
an even cheaper mic, you can check out
the Shure SM58. I've used the SM57 before based on recommendations
of various YouTubers. But I found that
using mics made for instruments tend to
not sound as good. I'm also not a huge
fan of my own voice on the Heil PR40 and
road protester, both of which plenty of
other podcasters and even my friends have
used with great results. Just keep in mind that these
recommendations are based on my own personal
experience and most likely my own voice
on that microphone. Your results may
vary quite a bit. Next, let's talk
about mic technique.
4. Dynamic Mic Technique: Mic technique for dynamic mics. Firstly, please understand
that mic technique varies from microphone to microphone
even of the same type. For instance, most
microphones have something called the
proximity effect. Basically, the closer you
get to the microphone, the more bass frequencies that the microphone is going to
pick up from your voice. However, the Electro Voice
RE20 has a unique attribute, where the proximity
effect is minimized. So you can talk super closely
into that dynamic mic without worrying about
the bass frequencies becoming too present. Another example would
be the Heil PR 40. You have to talk extremely
close to this microphone because the noise rejection
on it is pretty darn strong. But if you use the same type of technique for the
Rode Procaster, you experience some pretty bad
sounding proximity effect. These examples are to
remind you that even as I'm about to give you some general
rules about mic technique, the best rule to
follow is to try out your specific microphone at different distances and see which one you prefer the most. What you like and
don't like will probably change in the future as your ear is able to develop and pick up more
nuances of sound. With that said, let's talk
about mic techniques. For podcasts, the
general rule of thumb is to be as close as to your mic as possible without triggering any nasty
proximity effects. This usually means about a fist size away
from the microphone. The reason being is
that you want to minimize mic bleed
as much as possible. The louder the intended sources, the easier it is to clean
up mic bleed later in post. As long as it's pointed
towards your mouth, you should get
some good results. In terms of angle and direction, you can try to point
the microphone away from unwanted sources, or just point them directly at the intended sources mouth. For dynamic mics, make sure
that you're talking to the top of the microphone and not the side
of the microphone. Take note that some dynamic
mics need pop filters. Luckily, the Shure SM7B's
foam screen acts as a pretty good pop filter
already, so it's not needed. But the Shure MV7, Heil PR40, Shure SM57 and especially the Rode Procaster
require a pop filter. You can try to bypass this issue by angling
the microphone so that the air of the B's and P's don't hit the microphone. But unless you're working
with practice guests, I find that it doesn't
really produce the best sound that way,
but it's an option. So that is the rundown
on dynamic microphones. It's a hefty subject
that is also highly dependent on
the specific mic. But you should now have a
greater insight to whether or not this is the type of
mic for your situation. Let's move on to the best type of microphones for voice-over.
5. The Large Diaphragm Condenser: The large diaphragm
condenser microphone. It's the mic you'll usually
see in music production, voice acting booths,
and vocal recordings. Large diaphragm condenser mics have this unique ability to not only pick up sound with
extreme clarity and detail, but to also shape it in a way
that makes it feel bigger, warmer, and grand. The large diaphragm comes from the physical attribute
of the capsule being one inch in
diameter or larger. It's responsible for
this unique sound. However, as mentioned before, if you don't have a
well-treated room, these microphones
can end up capturing unwanted sounds that are even hard to detect with your ears. Planes, the AC, the refrigerator, a fan
in the different rooms, someone cooking upstairs, someone opening a
door in the house, this thing literally
picks up everything. Because these microphones
are so sensitive, they are also more
susceptible to reverb. Reverb is essentially the
microphone picking up reflections from the surfaces
of your environment, have a wall next to you? That's going to cause reverb, got a window nearby? That's an even greater
source of reverb. What about the ground you
stand on if it's not carpet, well, that's probably
going to make your audio sound
pretty terrible, as you can tell by now, this microphone
requires a lot of extra attention when it comes to the environment
you're recording in. I cover how to treat your
space in a later lesson. But for now, let's assume that
you have a treated space. What are the best use cases
for these microphones? As mentioned before,
they are voiceovers, vocal recordings, meaning
singing, voice acting. They're also great for ASMR
and recording instruments. You technically can use them for podcasts if you're
planning on just making it a remote podcasts
where you're alone and talking to
your guests online. But again, if you're going to be recording with other people, this microphone
will be capturing a whole lot of bleed
from other speakers. As for my recommendations, I'll start off with the
microphone that I own, which is the audio
technical AT 4040. This microphone is one of the
best for its price range, but will require
an audio interface that can provide
a phantom power. I'll only recommend
interfaces with phantom power when we
get to that lesson. You don't have to
worry about that. The audio technical
AT line is generally a great place to start if you're getting into this
type of microphone. Another very popular microphone is the Blue Yeti microphone. It's the microphone that I
started out with and provides good sound as long as you
have a decently treated room. I personally have also tried out the Blue Yeti Snowball and
the Blue Yeti Snowball ICE. There are okay microphones
if you're just starting out. However, if you can save up for the Blue Yeti or audio
technical microphone's, those would be better in terms of higher-end
microphone's, the Neumann TLM 102, 103, and U87, by the top of the line, large diaphragm
condenser mics that the pros use in the
recording studios. As for my technique, pretty much all large
diaphragm condenser mics require a pop filter. This is to protect from plosives due to the
high sensitivity. Meaning the B's and P's sounds. A good company that sells
pop filters is RYCOTE. Simply place it in front
of the microphone with enough distance to diffuse
those B's and P's. From there a lot of people just sing straight into
their microphone. However, if the
pop filter is not stopping the B's and
P's and the plosives; you could angle yourself or just turn the microphone
and angle that instead. Also, make sure to
talk at the front of the microphone where the
capsules surface is pointing. I've seen people
talk at the top of the mic like how you
would for a dynamic mic. It hurts my soul to see that. Large diaphragm condensers,
talk at the front. Dynamic mics, talk at the top. Be sure to remember that. In terms of distance from
your mouth to the microphone, it really depends on
what you're going for. If you want to
warm up your voice and make it sound basi, then you can take advantage
of the proximity effect by going as close as to the
pop filter as possible. However, for me I prefer
a more natural sounds, so I tend to talk about 6-8 inches away from the microphone, which is still pretty
close to the pop filter. But the distance
that you talk away from the microphone
is really up to you depending on what you hear
and what your tastes are. As an extra tip, don't
forget to try to keep your volume as
consistent as possible. That's the rundown for large
diaphragm condenser mics. They're extremely versatile
and great sounding mics, but they do require that extra attention for
them to really shine.
6. Boom Microphones: [MUSIC] Boom microphones, we'll be talking
about two types, shotgun mics, and small
diaphragm condenser mics. Boom mics are the movie
industries' bread and butter when it comes to
dialogue. Why exactly? Primarily because of their
unique quality of rejecting sounds where they
are not pointing. This brings us to a new
concept, polar patterns. Every microphone has a
polar pattern and they're usually similar for the
same type of microphones. For instance, most
dynamic mics are usually the cardioid
polar pattern, which looks like this. Basically, this image
represents the angles at which the capsule of the microphone
picks up the most sound. For a cardioid polar pattern, which is heart-shaped,
the mic will pickup the most sound
from zero degrees, which is the direction that
the capsule is facing, and as you start to angle
away from the capsule, less and less sound
will be picked up. Most large diaphragm
condenser mics will also have a cardioid pickup pattern. The Blue Yeti microphone can actually change its
polar pattern from cardioid to a
bidirectional pattern where it picks up
the backend front, and it can also change
to omnidirectional, where it picks up sound
equally from every direction. Most lavalier microphones
are omnidirectional. As for boom microphones, they usually have
a super-cardioid or hyper-cardioid polar pattern, which rejects more sounds on the sides compared to the
cardioid polar pattern. Most shotgun mics will also have interference
tubes at the side, which creates the shock
and polar pattern. What this means is
that a boom mic can be a distance away
out of the frame of the shot and still
capture dialogue clearly achieving a good
signal to noise ratio. In the end, that is
usually the goal, to make sure the voice
is clearly heard, which is the signal, and to minimize the amount of unwanted sound,
which is the noise. If you're in a situation
where you don't want any microphones to be seen, then a boom mic might
be the mic for you. However, that's not
the only good use case of these microphones, these mics can be
good voice over my x2 since they're meant
for picking up natural sound for dialogue. Until this point,
I've been talking about boom mics generally, but now let's talk about the specific differences
between the two types. Firstly, shotgun mics, most shotgun mics have
a pickup pattern that's more directional than small
diaphragm condensers. They're primarily
used for outdoor booming and are built
to be more robust. However, a lot of
people have used shotgun microphone's
indoors with great results. As long as you treat
your space properly and have good mic technique, you'll produce good results. It's just harder to
have good mic technique for faraway shotgun microphones, on the other hand, small
diaphragm condenser mics are usually more forgiving when
you're slightly off angle. These are used
more so for indoor booming and are particularly great at picking up sounds in a very accurate and natural way. This is a distinctive
difference to large diaphragm condenser mics, that add that warmness and lushness at the low frequencies. Small diaphragm
condensers are also really great instrument
microphones. But I'll primarily
recommend the ones that are best suited to dialogue
since that's our focus. If your objective is to achieve the most natural sound possible, then a small diaphragm condensers are what,
you're looking for. In terms of recommendations, I personally owned the
Sennheiser MKH 50, which is primarily
for indoor booming. In terms of the shotgun
mic or the outdoor boom, I would recommend the Rode NTG3, which is an
industry-standard that has been used by
many indie films. Here are some of the other ones in different price ranges, but generally, Rode, and Sennheiser boom mics
will offer great sound. Let's move on to Mic technique. For indoor use, I primarily
use a basic microphone stand. Be sure to buy the
correct thread size or thread adapters, and then secure
the microphone on a shock mount or normal mounts. Most microphones come with it. Next, it's best practice
to points the head of the microphone downwards
and towards the chest area. Assuming you have
a treated floor, putting it downwards will
allow the ground to absorb most of the sound and
reverb will be reduced. While you're testing the mic, ask your talents to sit as back and comfortably
as possible, and then point the mic
towards their chest area. By doing this, you give room
for the talent to shift slightly forward or downward as the recording
process continues. Depending on the speaker,
a lot of the sound can come from the
chest voice area. When it comes to
shooting outdoors, make sure you're
using a shock mount instead of a normal mount. The shock mount will absorb any vibrations from the
ground if you're using a stand and also absorb any shaking from you if you're
operating a boom pole. You'll also need a
blimp wind cover or dead cat to block out wind. It's pretty much necessary
if you're going to shoot outdoors unless you get really lucky and there's
just no wind at all. In general, indoors or outdoors, the best distance to
place the microphone is as closest to the subject as possible while
still being out of frame, that offer the greatest
signal-to-noise ratio. That covers shotgun mics, and small diaphragm condensers.
7. Camera Mounted Mics: [MUSIC] Camera microphones, these microphones are
mounted right on top of your camera and pretty much live there for the rest
of their lives. Camera mounted
microphones are unique in that they are extremely
simple to use and its purpose is to replace
your in-camera microphone, so that you don't have
to sync audio to video in posts or deal with
two audio files. They also have a unique quality of moving with the camera, pointing at whatever your
camera is pointing out. You can think of them as boom microphones that point
towards you instead of down, since they have the same
polar patterns that are usually the super cardioid
or shotgun pattern. Again, this basically means that the pickup of
the microphone, will change according to the
angle it's pointing out. From the side, you'll
probably hear me as well and then from the back, you might hear me a little bit better and then
again from the side, you probably won't
hear me as well. The best use case for
these microphones is pretty obvious, vlogs. Most camera mounted microphones have a shock mount
that will absorb any vibrations while you walk and talk to the
camera at the same time. It also works very well
for talking head videos where your lens allows you to be pretty close
to the camera. If you want, you can buy
an extension cord for the TRS connector and treat it exactly like
a boom microphone. That is what I did for a lot of my talking head videos
while starting off. Before you buy an
extension, though, you need to learn
about wire types. This is the first
microphone that I've mentioned that uses a TRS or TRRS connector to connect
directly to the camera. Every microphone types so far
primarily used XLR wires. The primary differences between these two wires is that
XLR wires are balanced, while most TRS and TRRS
wires are unbalanced. To put it simply, a
balanced connection will stop self noise
caused by the wire, while an unbalanced connection
will introduce noise depending on the quality
and length of the wire. To clarify, the Blue
Yeti microphone and the microphone that
connects using USB will be unbalanced. This is pretty important because if you're
recording professionally, the basic rule is to have the cleanest signal and the
most silent noise possible, that's why most professional
audio gear will always have balanced wires, in most cases, XLR wires. That is something to keep
in mind as you're deciding which microphone fits
your situation the best. Moving on to my recommendations, the two camera mikes that I
have the most experience with are the Rode VideoMic Pro
and the Deity V3 Pro. As a more budget option, the Rode VideoMic also
provides pretty good sound, although not as good as the
previous two I mentioned. But most cameras microphones
will sound worlds better than the camera microphone that comes with
the camera itself. It's for my technique, the general rule of
thumb is to face the camera and also try to have the microphone as close
to you as possible. The farther you get, the worse it's going to sound, primarily because more
reverb is introduced. You might also want to buy a windscreen if you're
going to take it outside because the foam usually doesn't do quite
enough on a windy day. For the Deity V3 Pro
and Rode VideoMic Pro, if you want to
absolutely optimize the audio quality of
these microphones, you can adjust the settings of your camera's audio level
to be the lowest it can be. In my case, that's one, and then increase the gain of your camera microphone
to the highest level. The reason that this increases the quality of your
audio is because the camera's
preamplifier is worse than the microphone
preamplifier. The preamp is
essentially what turns the super quiet electrical
signal into what you hear. If you have a
low-quality preamp, what's going to happen
is more noise is introduced as you increase
the audio signal. I will say that I
don't always follow this optimization technique just because I've had audio
clip on me before, which means that
basically goes above zero decibels and
sounds very distorted. It really depends
on how controlled your environment is and
your specific situation. There's the rundown on
camera mounted microphones, just one more type
of microphone to go.
8. Lavalier/Lapel Microphones: Lavalier microphones,
also called lapel mics. They are the backup microphones to other microphones,
but not always, the unique quality of lav
mics is that there are truly set it and forget
it type of microphone. I've actually had two
occurrences where someone almost left the set with their microphone still
attached to them. Luckily, once they
touch their pockets, they realized that there's
a lav unit in there. Lav mics are
extremely versatile, they can be invisible
if you want them to be, or just hang off people's
shirts in a low-key manner. They're also quick
and easy to set up. But the greatest
unique quality that lav mics have is that you can basically have
consistent and clean audio in an outer frame, anywhere in frame, and it'll still be the same type of audio,
which is pretty cool. There's pretty much no
other microphone that does this or has all these
qualities in combination. Unfortunately, because
of their size, they often don't produce
the absolute best sound compared to the rest of the microphones
mentioned before, and that is why they're usually the backup of microphones. However, getting
into use cases now, they are good enough
audio when it comes to vlogs and videos for YouTube, they're great for
the tutorial type of videos where you're
demonstrating things from a distance, and because of their size, they're very easy to
travel with and can be far more low-key than
other microphones. Another great use case for them are group action settings. Videos where you'll
have multiple people interacting with each
other in a non-static way. Those situations can
benefit from using lav. That way you don't have
to dedicate people to following around subjects
with boom poles. They're also useful for
talking head videos when you want the
mic to be invisible. However, boom mics are generally better for
that and that's why these are the backups for boom
mics in those situations. However, if the boom
mic ever fails, the lav mic is there
to save the day. Despite all I'm saying here, I do want to make
it clear that with the right editing skills and a good enough lav
unit and lav mic, you can achieve a
similar or better sound than a good boom mic. However, I do think that a good boom mic
will always produce better sound than a good lav mic before any
post-production happens. That said, here are
some recommendations. Let's start off with
the sennheiser M82. It's an omnidirectional lav mic that a lot of YouTubers use. I think it works great with
deeper and base your voices. I also really like the part of Weiss lav mic that
are pretty cheap. As for the super high-end, I own the Shure TwinPlex TL 47. But I'm going to be
honest with you guys, the price difference is not
worth the quality difference. I'd stick to buying the power to Weiss or
sennheiser lav mic and saving that money to buy a really good lav unit,
and in my opinion, one of the best level
we're recording units is the Tentacle Sync E. It comes with a lav mic that's
pretty good overall, but the best part is that the device can record
in 32-bit float, which means your audio
cannot clip at all. Let me explain.
Most recorders are limited to recording
in 24 or 16 bits. The number indicates what the
bit depth of the file is, which is essentially
another way of saying how much information can
be stored in the file. The higher the number,
the greater the amount of information can be
stored in the file. But that also means that the file size will
increase as well. Normally, if audio were to go above zero decibels while
it's being recorded, that audio will
become distorted and the information is gone. 24-bit or below, just can't store
clipped information. But recording in 32-bit float expands what can be
kept as information. So there's just no such
thing as clipping. I can adjust the game
as much as I want to, and I can see the
levels right now, it's hitting between
negative 12 and 6. Now I'm going to increase
the recording gain, and you're going to hear
what clipping sounds like. I'm sorry for what
you're about to hear, but generally, this is not a
very good sound, obviously. That's what clipping is. Now I'm going to change
it back to 32-bit float. Now when we record, it really doesn't
matter if we clip, the audio is going to be okay. You're not going
to get any sort of warning. It doesn't
really matter. It can be at the lowest
setting as well, and 32-bit float will
make it recoverable. That is the power of
32-bit float devices. They're pretty rare and pricey, but they're great to have. For the Tentacles Sync E, you can use their app to set up the 32-bit float option
as I demonstrate it. It's seriously awesome. Also note that the
Tentacle Sync E has a maximum
voltage of 5 volts, while all the other
lav units that I'm recommending only
have 2.5 volts. This is not really a big deal unless you're using
something like the Shure Twinplex or
the higher-end lav mics, which require or are
optimized with five volts. Most other lav mics
that I mentioned only required 2.5 volts. Just make sure you check
your recommended levels when buying your lav mic. My next recorder
recommendation is the Zoom F2. This device is also 32-bit
float and comes with an app. But the app is a lot
clunkier and the lav mic that comes with it isn't as good as the rest I've mentioned. Finally, if the above
options were too expensive, you can check out
the Tascam DR-10L. It's not 32-bit float but has a great setting
where you can record a backup file that's six or 12 decibels lower just in
case you end up clipping. I also want to note that these lav recorders,
as I'm calling them, are basically just
audio recorders that can record
anything that has a TRS connector and that includes camera
mounts and microphones. Basically, that means
these types of microphones also have access
to 32-bit float. All right, moving on
to mic technique. Most lav mics come with a clip, and the general rule
still stays the same. Basically, you want to clip
it to a place where it's closest to your subject's
mouth as possible. How you place your
mic is also highly dependent on whether or not
you want it to be visible. If you're trying
to hide the mic, try to place it around at their upper chest
area, under a shirt, jacket, in between buttons, or anything that's close to their mouth that won't be seen. Sometimes when you hide it, you might notice
a scratchy sound when your subject moves. You can avoid this by
using safe adhesives to hold and prevent the mic from
rubbing against clothing. If you don't care if
your lav mic is shown, then you can hang
it at the collar of your shirt or whatever is the outermost
layer of clothing. All right. That's the
rundown for lav mics. Next, we'll be talking about some special types
of microphones that don't really fall into the categories we've
mentioned so far.
9. Special Types of Microphones: Now that we've talked
about all the main mics that are used for dialogue, let's talk about some
microphones that are used for more special cases. At first, is the boundary mic. Boundary mics are
condensers that are used to record multiple people
sitting in the same space. Its foreign factor
is flat so that it blends into the
tables or surfaces and they normally have the cardioid or
omnidirectional polar pattern. If you happen to have a lot of people surrounding,
around table, like a conference meeting
or a board game session, this microphone might suit
your needs pretty well. The main benefit from
this is that you can use one microphone to record multiple subjects
but the downside is that this microphone by itself tends not to sound as good compared to
dedicated microphones. Next, we have the
stereo microphone. So far every mic
we've covered are mono or dual mono
recording microphones. What this means is that when
you playback a mono file, the audio sounds
like it's coming directly from the sensor. That's usually what we want
for dialogue in regards to voice-over podcasts and
interviews and so on. Then what dual-mono
does is that it takes a mono file
and duplicates it, outputting the same signal to the left and right
of the speakers. But what if you want
the sound to represent the location in which your
subject is occupying? That's when you would go stereo. This is a more immersive
way of capturing sound that can really bring
to life outdoor settings, recording of live bands, and shots where you're really trying to capture
the soundscape. The reason I place this in the special microphone category is that most dialog audio is going to be recorded in mono. Stereo mics are more so for capturing the soundscape
of the environment. Next, we have
interview microphones. These are essentially
dynamic mics that are designed specifically
to be handheld. I personally don't own
this type of microphone, but I wanted to
mention it just in case it fits your situation, the electro voice R
U5 and the sanitizer MD 46 are safe recommendations. Lastly, we have
mobile microphones. These are microphones
that are essentially designed to attach
straight to your phone, whether it's Apple or Android. I've tried using
lavalier microphones with my old iPhone before, but I found that the
convenience did not outweigh the fact that
it was lower quality. Most phones have a
pretty bad preamp. Quality control
can be a nightmare if you're planning
on using multiple. Of course, there are some
good ones I've heard of like the Shure Motiv and the
Rode Video Mic ME-L. But before you go and buy one, know that there are ways to make USB mics like the Blue Yeti mic, connect to your phone as well. You just need the right adapter depending on what
phone you have. That was the rundown on extra
types of microphones that may fit your situation better than the more conventional ones.
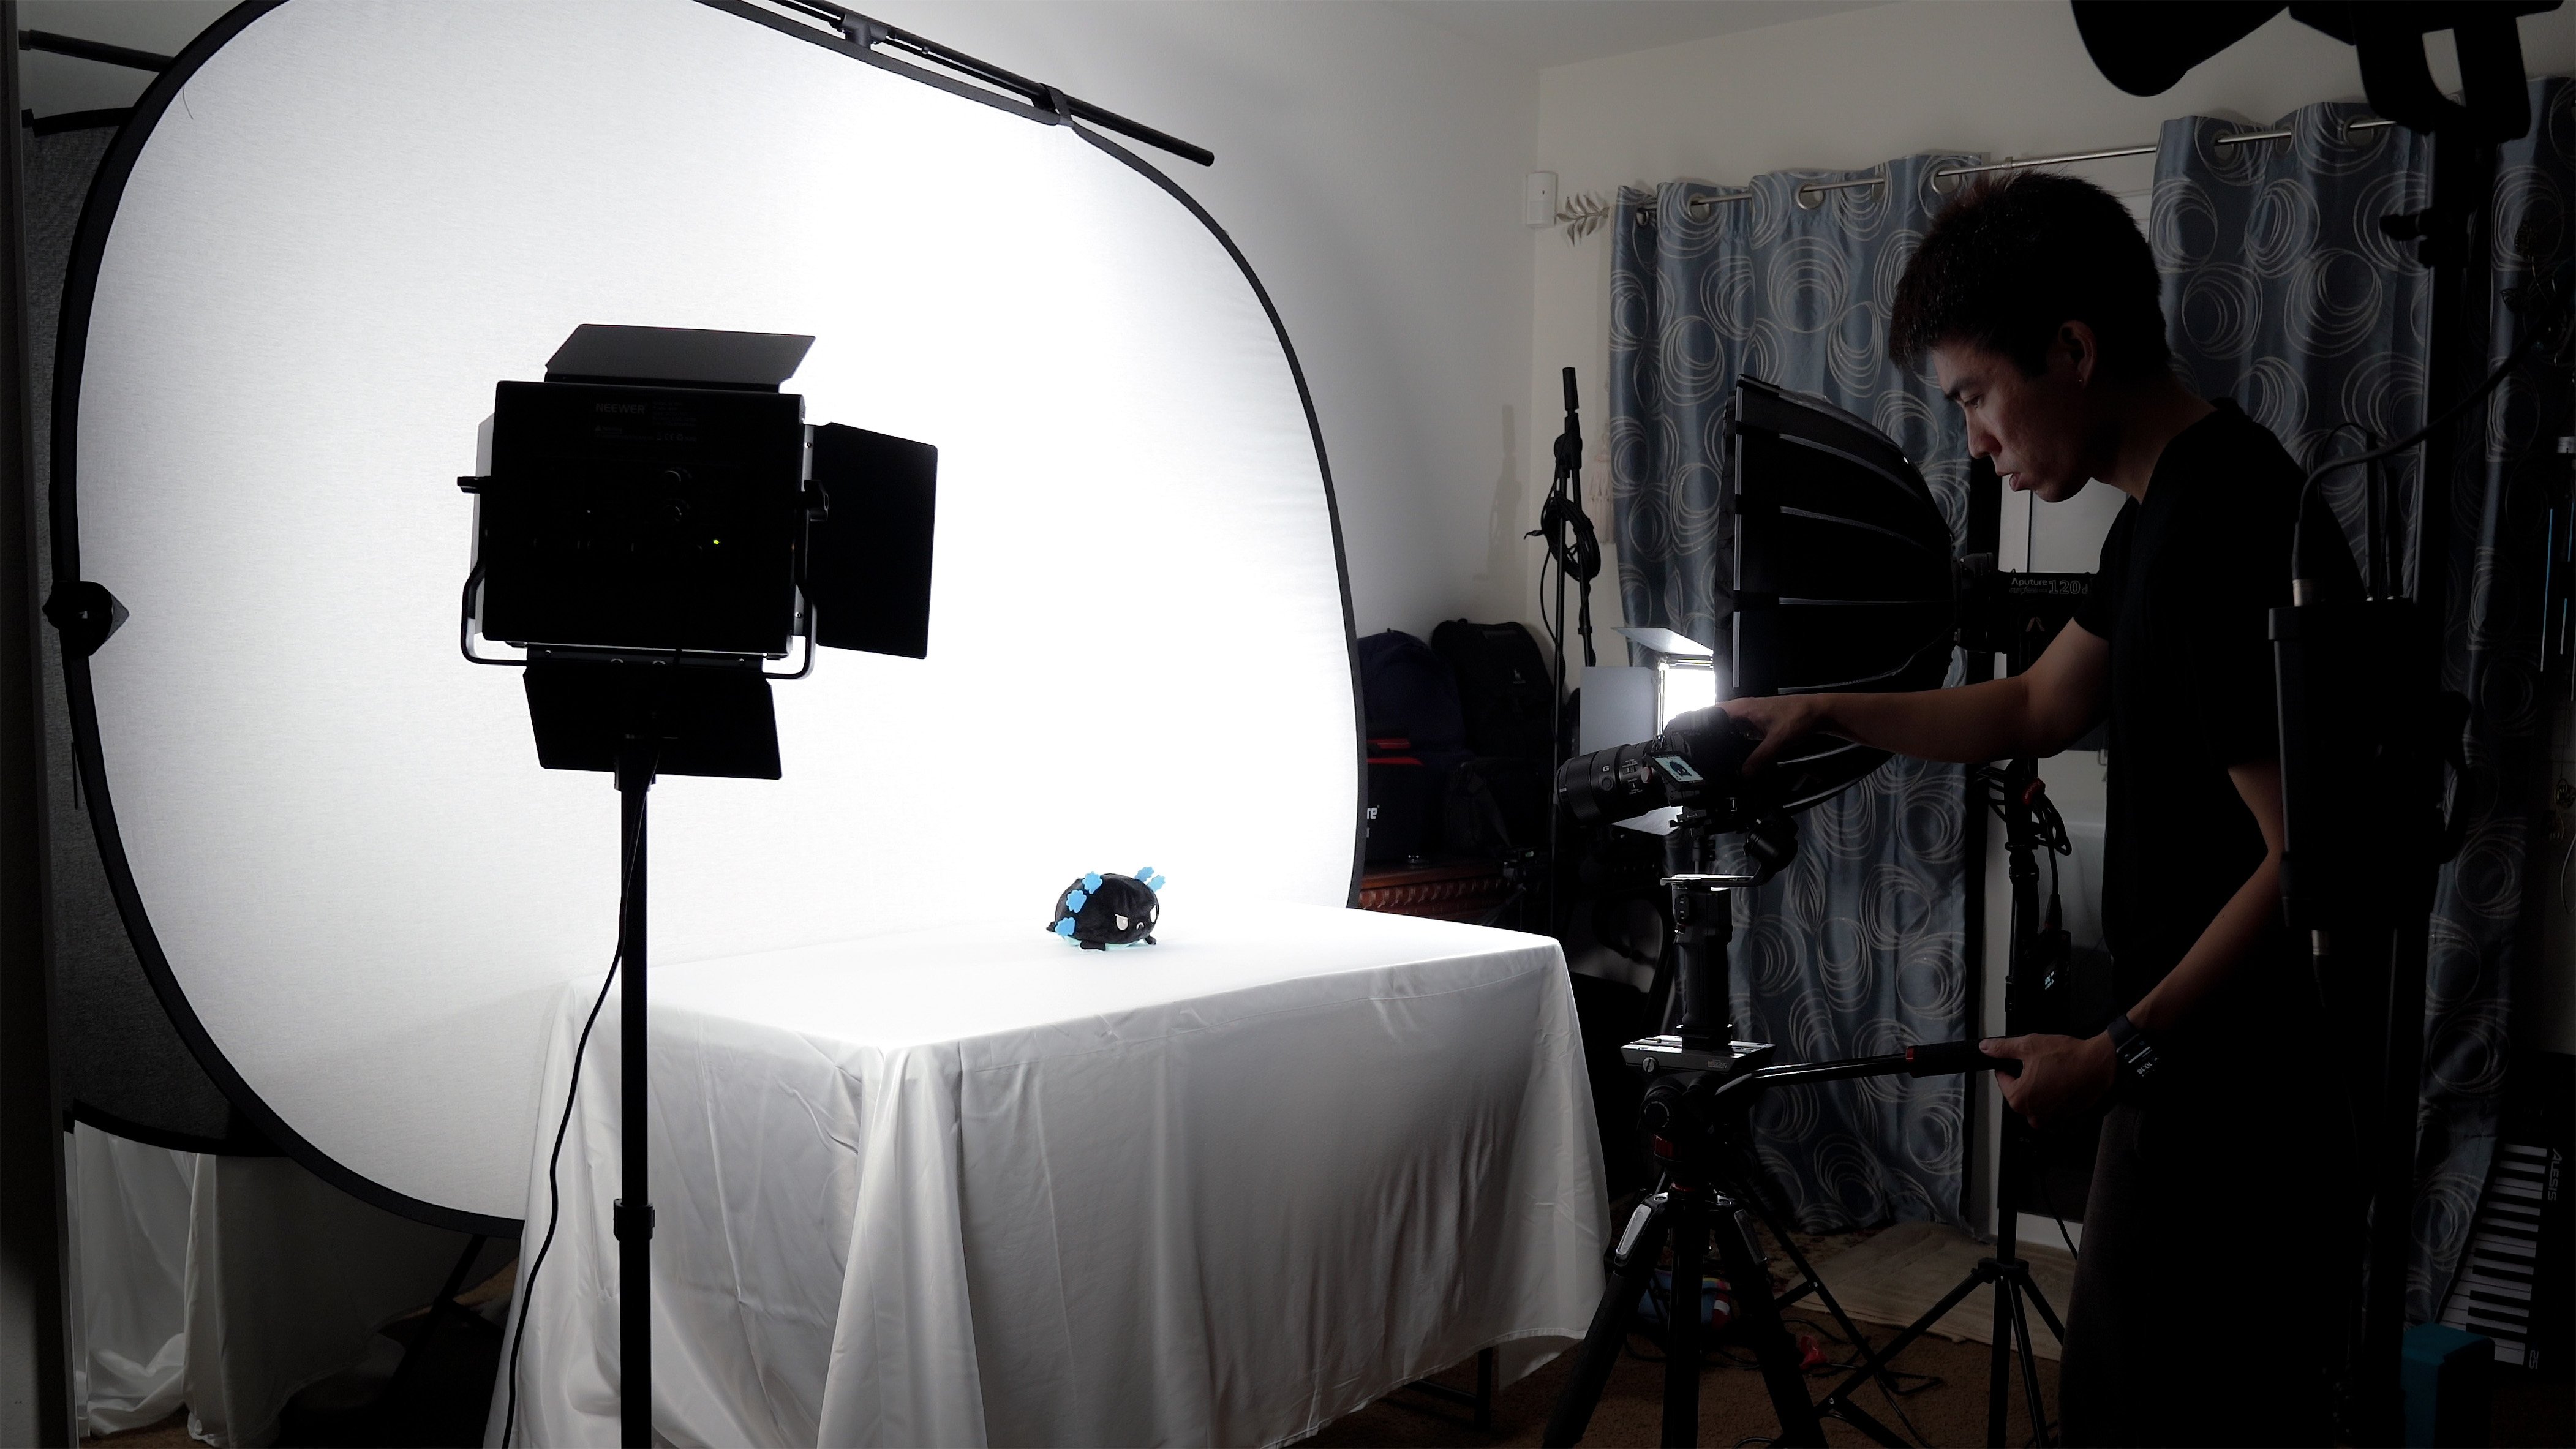
10. How to Approach Sound Treatment: [MUSIC] Sound treatment. We've now reached the
second crucial question. How should you adjust
your environment to get the best out
of your microphone? No matter what kind of
microphone you're using, a treated space will always
make it sound better. The question is, how
do you get started? Well, first, it's best that
you understand how and why an untreated space makes
your audio sound worse. Take this room that
I'm in as an example. Firstly, the walls, ground, and ceiling are all made of hard material which strongly
reflect sound waves. Secondly, there's nothing
around me that can stop the sound I generate from
creating standing waves. Standing waves are
created when you have parallel surfaces
facing each other. This allows sound waves to continuously bounce
from one surface to the other and then back and forth until the energy dissipates. Lastly, the room that I'm in is actually an open space
that's rather large. Larger rooms basically mean longer wait times
before the sound reflects off the
furthest surface and then comes back
to the microphone, hence all the reverb. So the goal of sound treatment
is to essentially control and manage the energy
of sound and reverb. But don't be mistaken. The mission of sound
treatment is not to eliminate reverb completely. That would be a very
difficult and expensive task. A small amount of reverb is
necessary for natural sound because we experience
real life with sounds that practically
always have reverb. The priority is to
understand how it works and learn how to adjust it
according to your tastes. So how can you manage reverb? Firstly, you need to
understand what kind of surfaces are most susceptible
to strong reflections. The general rule is hard
surfaces such as metal, glass, and wood will reflect
sound strongly, and soft surfaces
such as clothing, carpet, and towels absorb sound. Secondly, you want to eliminate the possibility
of standing waves occurring by creating
angled and uneven surfaces. That's why having a good
amount of furniture or stuff in your space can actually
help with reverb. That's also why you
see these foam squares with these ridges here. They create uneven surfaces on the wall to stop
the standing waves. Finally, the size of
the room also matters. If you have a larger room, you have more surfaces in that room that can
reflect sound. It'll also takes longer for
the sound to bounce off the furthest surface and
then back to the microphone. If the space is large enough, you can essentially
create an echo. The difference
between echoes and reverb is that echoes have a distinct separation
and are heard as two instances of the same sound. Reverb is more of a
continuous sound. So unless you have a
whole lot of money to spend on treating
a very big room, it'll be a lot easier to
work with a smaller one. Keep these three things
in mind when you're inspecting places to record in. There's also a pretty cool
online tool that tells you how many square feet of surfaces you should treat based
on your room size. An easy way to apply this treatment is
to use foam covers. You'll want to get a variety of sizes for it to
work well, however, there's a great solution
that I personally prefer that can help simplify
a lot of the issues, and that's to use sound blankets or just regular blankets. There are different
ways of setting them up depending on your
recording situation. But for me, when I'm
doing voice overs, I surround myself
with these blankets. This essentially
provides the same amount of damping as treating a room depending on how thick your blankets are and of
course, the thicker the better. In other cases where
you're recording a talking head video, or a scene for a short film, you can place the
blankets as close as possible before it
reaches in frame. That should help dampen the
sound by a lot as well. Some other extra tools
that you might find helpful are reflection filters. They won't save your audio
if you're in a bad room, but they can help dampen the reflections coming from
the back of the microphone. If you really want to get
the best possible treatment without putting
anything on your walls, then a portable vocal booth might be the best fit for you, although the best kinds
are extremely expensive. The cheapest ones
are essentially just preconstructed
sound blankets, while the pricier ones
are literal booths. Blankets are my
personal favorite way of treating a space
for recording. That is pretty much
the rundown on how to get started with
treating your space. All the equipment I use will be listed in the
class worksheets, so don't forget to
check that out. Also, don't forget that it takes both good sound treatment and good mic technique to
achieve the optimal sound.
11. Choosing a Recording Device: [MUSIC] Before we get started if you already decided
that your microphone of choice is a Lavalier mic
or camera mountain mic, then these devices right now that I'm about to mention are not going to be
necessary for you. The devices I'll be
covering are primarily for microphones that use
an XLR connection. We've reached the final
piece of the puzzle. The third crucial question, what type of audio
recording device should I use for my situation? There's a lot of
different types of audio recording
devices out there, but the relevant ones we'll
look at are field recorders, mixers, and audio interfaces. Let's start with the
differences between these. First up, audio interfaces. These devices serve as an intermediary between your
computer and microphone. Audio interfaces
contain a preamp, which, as mentioned before, is used to turn the silent
electrical signal into what you hear on your
computer or monitor speakers. A bad preamp can cause a lot
of noise in the final output so just be wary of very
cheap audio interfaces. This matter is quite
a lot more when you have a gain
hungry microphone, like the Shure SM7B. But I'll mention my
recommendations later. Moving along, a mixer is essentially the same thing
as an audio interface but with a lot more onboard
controls that can help you adjust and answer
the audio in real time. They're usually used
for broadcasting live. Most of the time there's
a dedicated person handling it while the
recording is happening. I personally find
audio interfaces more appealing just because of
the smaller form factor, and you can technically do
what a mixture does using a mixing software or a
digital control panel. The downsides of this is that it can be a burden
on your computer. If you're streaming
at the same time and you don't have a
strong computer, a mixer may potentially be
a better option for you. Next, we have my personal
favorite, field recorders. These are very similar
to audio interfaces and can even act as
audio interfaces, but they have the
option to record on their own without the
need of a computer. This allows for
greater flexibility in where you want to record, and it's the device that most boom operators
carry while they record, thanks to the small form factor. Which one should you buy? It's basically up
to you what suits your needs the most and
what budget you have. For live podcasts and streams, a mixer might be
the right choice. But you can make
an audio interface and field recorder
work quite well. If you're mostly using audio for shoots where you're
operating a boom microphone, you most likely want to
go for a field recorder. If you're mainly
recording voice-overs, you pretty much only need
a regular audio interface. With that said, let's
take a look at how to operate these devices
in the next lesson. That may also help inform you
which one is right for you.
12. Using Your Recording Device: The regardless of what type of recording device you're using, the principles and
steps to recording good audio and optimizing the settings are
mostly the same. Let me first mention the outlier , 32-bit float recorders. As I mentioned before in the
level ear microphone lesson, there are recording
devices that will capture audio without
ever clipping. I personally own one
of these devices and it's called the Zoom F6. It's an amazing device
that allows you to have peace of
mind while capturing audio from multiple sources
from people that may vary their speech volume by
a ton during a conversation. It means all the bursts
of laughters and over-excited speech
won't ever clip again. Unfortunately, the 32-bit flow only works as an end
device recording. Basically, if you're using the Zoom F6 as an audio interface
connected to your computer, it can't record in 32-bit float. You can still of course
record in 24 and then record 32-bit float on the Zoom F6
at the same time as a backup. That's still pretty awesome. Another great thing about
the Zoom F6 is that it has enough gain to work with the short SM7B without
the need of anything like a cloud lifter
or extra pre-amp. I'll include a slot in my worksheets that
indicates whether or not the auto interface I recommend has enough gain for
the short SM7B. I just wanted to highlight
this outlier before beginning because it might be the device
that you're looking for. When operating any
type of recorder, the first thing I do is to check what kind of microphone
you're using. If you're using a condenser mic, then you'll want to
make sure that you're recording device supports
48 votes offensive power, most condenser mics require
phantom power to work. If you're using a dynamic mic, then make sure to turn off the phantom power for
it to work properly. Most audio interfaces
and field recorders have phantom power available
to you quite readily. Once you have your audio
interface or device with you, plug in the XLR wires to the microphone and to any of
the channels in your device. If it requires phantom power, turn it on on that channel. Next, you want to
increase the gain or trim of that particular channel. Depending on what type of
microphone you're using, the amount of gain or
trim you need will vary. The best way to know
that you're recording at a good level is it
perform a mic check. For field recorders,
you should be able to see the levels on a screen. You want the highest
point or the peak of the audio to hit no higher
than negative 12 decibels. However, if you're streaming, you might want to go for
negative six decibels instead. Otherwise, negative 12 decibels
is a safe upper limit. If you're using an
audio interface, you'll need to open a
digital audio workstation like Adobe Audition or Audacity and make
sure that the input is set to your audio
interface in the settings. Once you connect it, you
should be able to record and look at the levels
on a meter and adjust the gain so that
the peaks are in-between negative 18 and
negative 12 decibels. Also, be sure to move
any devices with radio waves like your phone away from the audio interface. If placed too closely, it will cause RF interference and you'll get some BP noises. You can also buy
higher-quality XLR cables in order to minimize
RF interference. However, as long as you're
careful with your devices, normal cables should be fine. From there, you're pretty
much ready to record voice-overs or solo recordings. However, if you're recording multiple people with
dedicated mics, then you'll want to connect each microphone to an input in the audio interface and
make sure to turn on or off phantom power in
each of those channels, depending on the microphone. Then you'll want to
make sure to adjust the gain for each
person's Mike as well. I find that doing
a mic check for each individual
person while everyone else is quiet is
the best method. In Adobe Audition,
you can record multiple people by
arming each track and then changing
the inputs to match the individual mics and
then just hit record. Otherwise, if you're using
a field recorder or you can just simply hit the
record button right away. That's pretty much
all there is to it. In terms of recommendations
for audio interfaces, I personally own
the scarlet focus for a good while and it's
produced good results. It's not quite
enough gain to use cleanly with the shore SM7B, but for most other
microphones, it works fine. If you're looking for
the gold standard for Apple devices, then the Apollo Twin x is
a great audio interface. For field recorders, the
Zoom H6 has served me very well in the past and can definitely do
the same for you. Unfortunately, it
doesn't quite have enough gain for the shore SM7B, however, I have used it
with the shore SM7B. As long as you know how
to apply noise reduction, honestly, you'll still get good results with
the shore SM7B. In the Zoom F6 is the newest one I use with the 32-bit float, and it's a pretty big upgrade
compared to the Zoom H6. As for mixers, I've
heard good things about the Zoom live track. Honestly, if I already
just go back and just choose one of
these interfaces, I would go with the Zoom F6. Mainly because of
the 32-bit flow. I've heard recordings go south
when I started out because the mic check passed
before we started recording and during
the recording, a talent shifted a lot closer to the microphone and
their audio file ended up being mostly clipped. Clipped audio can
be pretty hard to salvage depending
on how bad it is. That wouldn't have happened if I had this 32-bit float recorder. Of course, in the end,
it's up to you to decide what fits your needs and
what your budget is.
13. Zoom F6 Rundown: I've talked a lot
about to the Zoom F6 and I recommended it as the recording
device that I would get if I only had to pick one. With the same thing like
that I feel like I have to give you guys a quick
rundown on this device. If you don't plan on getting
or have the Zoom F6, you might still find this
lesson useful in improving your intuition with navigating
other field recorders, since many of them have similar settings
that you can change. Let's start off talking
about power sources. The Zoom F6 can run off of
three different sources, and they are AC power
using the USB-C port, the backside L battery, and the bottom
slot that contains a four double A batteries. The order that I just
listed them in is the priority order in which
the device uses power. If you have power connected
to the USB-C port, through an outlet or
a computer you can see that at the top
right-hand corner, the battery indicates that
this is the power source. If you were to
unplug the USB cord and you have an L battery
connected to the back, you can see that
the power source, which is to that battery, spelling out EXT, that
stands for external battery. Finally, if you remove that, it'll switch to the four
double A batteries. Most field recorders
also operate under similar principles with the
USB power and batteries. I mentioned power sources first because it's pretty
important to make sure that you don't
accidentally run out of power made recording. It's happened to me
twice before and it's not a good experience. Now I'm extremely prepared with all three types of power
sources ready to go. Let's move on to how
to operate the device. After you turn on the Zoom F6, you can follow this standard
steps of plugging in your microphone into
whichever input you want, and then arming that
particular track by turning the fader knob, it will light up red
to let you know that it's been armed and
ready to record. You also only see
levels being displayed on that track if
that track is armed, since we're recording in
32-bit float at the moment, you don't actually need to worry about setting gain or trim. However, for the fader knob, you can increase it until
you reach peaks around 12. From there, you can record
by pressing the button with the red dot and
stop the recording by using the square
button on the left. Now let's talk about how you can change the settings to make sure that you're recording
in 32-bit float. Click on the button with
three lines on the top-left, that'll bring you to the menu. From there, use the arrow
buttons to navigate to REC and click the
check mark button. From there, you'll see mode, which I currently have
set to 32-bit float. Click into that and you'll find different bit rates at
which you can record in. As mentioned before,
the normal bit rate for most recorders is 24-bit. The cool thing about this device is that you can
actually record in 32-bit float as well as
24-bit at the same time. Why would you want to do this? Well, it's the only way
that you can record a 32-bit float into
your Zoom F6 device while also using it as
an audio interface for your computer and recording in something like
Adobe Audition. Let me clarify by showing you, I'll choose dual mode, 24 and 32-bit float recording. I click on float and then navigate to system and then USB. From there, I choose
AIF with record, which means audio
interface with recording. When you set this to on, you'll notice that
a fair amount of options become grayed out. This mode can sometimes
be a little limiting, but the great thing about it is that you can now
connect your Zoom F6 to the computer and you'll see the F-Series as a
hardware option. Be sure to change the mapping
to the correct track number as well if you're recording
a mono track like I'm. For me, it's track number 4. From here I can record onto
the Zoom F6 by pressing the Record button and then
pressing record on addition. Normally for the Zoom F6, all I did was use
it as an interface. But it gives me a lot
of peace of mind to know that the F6 is recording a 32-bit float version
of my audio in case something goes wrong in Adobe Audition on my computer. Let's actually turn off AIF with record and go to
audio interface. From here you can either
select stereo mix, which mixes all the channels
into one stereo file, or a multi-track, which
you'd want to use for recording each individual input
as a separate audio file. I usually choose stereo
mix if I'm just recording by myself or just
recording one person. Then I use multi-track when I record a podcast session
with my friends. You can tell that it's
different now because it has a different name
of H and F series. This method is the way that most other field recorders
enter audio interface mode. But just note that this
audio interface mode can only record 24-bit
into your computer. In other words, you can only
record in 32-bit float into the SD card of the Zoom
F6 and not your computer. Hopefully that was all clear. But while we're in the 24-bit
mode or the dual mode, you need to set trim levels, which is another word for gain. To do this, press the check mark button to
navigate between tracks. Let's navigate down
to source with the arrow buttons and select it with the
check mark button. The top option means
it's a mic input and that it has no
fans and power. If you're using a dynamic mic, this is the option
you would choose. The mic with the PH in
parentheses means phantom power. You will select this
if your microphone requires phantom power, you can go back by pressing
the three lines button, and then you can
adjust the trim. As mentioned before,
the Shure SM7B requires about 60 decibels
of gain or trim. The Zoom F6 device
can reach this. However right now I'm
using the Shure MV7. I'm going to adjust for that
microphone and try to get the peaks around
negative 12-18 decibels. You can also set up
a high-pass filter and limiter if you want to. But I generally do those
steps in the editing phase. Let's go back to
the monitor view. The fader knobs
in this case only affect the final stereo output. Because I left it at
above zero decibels, you can see that the levels
of the stereo output are higher than the single
mono channel on Track 4. But if I return it
to zero decibels, it'll match Track
4 's input level. Each tracks input is
determined by its trim or gain in these modes and
not the fader knob. Make sure you understand
that distinction between these modes and
the 32-bit float mode. Basically, the 32-bit
float mode doesn't require you to set the
trim or gain at all. This mode does. That is pretty much all you
need to know to get started with recording
using the Zoom F6. Let's exit audio
interface mode now and talk about one
final important step. Assuming that you're
recording into the device and not just using
it as an audio interface, you will need to format
your SD card eventually. After importing your
audio files and making sure they're all good, you can format the card
after inserting it back into the Zoom F6 and then hitting the button
with the three lines, navigating to system, SD card, format
and then execute. Just know that because
you're deleting the audio files in the SD
card on your computer, the storage that the
audio files took up is still being occupied. To free it up, you have
to format your card. It's important to do this so
that your card doesn't fill up midway through a
recording session. There's a lot more
to the Zoom F6, but this lesson should
help you get started using it for the
purposes of recording dialog audio and give you
a more intuitive feel on how to navigate a
recording device in general.
14. My Recording Set Up: Now that you understand
the different types of microphones and audio recorders, I'll cover my personal setup for a large majority
of my recordings, which is right
here at this desk. Let's start with everything
essential to recording first, and then I'll cover pretty much everything else that
I find helpful. First off, the microphone. I use the Shure SM7B as my
primary microphone these days. As I mentioned before, it's a solid and very
popular dynamic mic, and I've chosen
specifically a dynamic mic because of a couple of reasons. Firstly, I live with other people and a
dynamic mic makes it a lot easier to reject unwanted sounds that they're
making in the house. Secondly, the space that I'm in is actually a living room. There's a lot of hard surfaces around me and it's
pretty spacious, so it's not the best
place to be recording a sensitive microphone like
a large diaphragm condenser. That's another reason I've
chosen a dynamic mic. Lastly, I simply just like my voice with the Shure SM7B, and I think that the Shure
SM7B looks pretty good. You can see that the microphone
is mounted to a boom arm, which is called the Rode PSA1. This arm is sturdy, flexible and much better than the cheaper ones on
Amazon in my opinion. There's basically two
units that come with it, the desk mountain base, and then the arm itself. The base will require
a flat surface at the top and the
bottom of the desk, from there, you need to tighten the bottom plate by spinning
it until it's secure. Then you just slot
in the arm and mount your microphone at the
very end of the arm. The XLR wire travels nicely
on top of the boom arm and the Velcro straps that
come with it help keep them in place,
keeping things neat. That is the Rode PSA1
with the Shure SM7B. Next is the audio interface. The one that I use is
the Apollo Twin X DUO. This audio interface is known to have really clean preamps and enough gain for the Shure SM7B without needing something
like a cloudlifter. After downloading
all the software for the Apollo device, to use it, just plug-in the XLR cable into the
first microphone input. Connect the correct
wire to the computer, which in my case, that's a thunderbolt
three cable. Unfortunately, a regular
USB-C cable doesn't work. Finally, change the gain
of your microphone. As an extra step, if
you're talking to others in Zoom or doing
screen recordings, it's very important
that you open up the console and mute
your input channel. In my case, that's analog 1. If you don't do this, you'll basically be sending
two instances of your input signal to the
people you're talking to on the Zoom
meeting or QuickTime, if your screen recording
and your audio will basically sound
like it's been hit with a big dose of phasing, and it sounds very
similar to mic lead, which really doesn't sound good. It was a headache to
figure this out when I first got the Apollo Twin, so be sure to keep it in mind if you're planning on
using this device. I do want to mention
that I previously used the Zoom F6 as an audio
interface for awhile, and before that, it
was the Zoom H6. Both of these devices served my purposes well at the time. If your purpose is
just to record audio, then I highly recommend them. However, my needs
have gone beyond just recording audio and have been heading towards the music world, and that's why I wanted an interface that can both
handle the Shure SM7B, while also being able to
output two monitor speakers. The Zoom H6 and
F6 don't actually have a left-right
monitor output, although you can
technically connect a left-right monitor output by getting a splitter
and some adapters, but I personally like
a cleaner system that's designed to
do what I want, that's why I went
with the Apollo Twin. Let's go ahead and move
on to other equipment on my desk that supplements the audio recording
and editing process. Starting with what I just
mentioned, monitor speakers, I personally have a
pair of Yamaha HS8s, one black and one white, that's just for personal
aesthetic purposes, and I chose these
specific monitors because my friend who is a producer recommended
them and they have a very neutral output. To explain, normally, cheaper monitor speakers and cheaper headphones tend to color the audio of
whatever you're playing. This means that if
you're listening on those cheaper devices, you won't get an
authentic representation of how the audio
actually sounds. But with the Yamaha HS8s, that's not an issue, and
that's why I chose them. In terms of the setup, I
have some RA foam pads that are underneath the speakers to absorb the vibrations. Without them, the
speakers would be causing my desk to vibrate. Then underneath the foam pads, I have the Gator
framework desk mounts. I decided on these desk
mounts because it was the easiest way to set up these speakers with a standing
desk that changes height. Fortunately everything
combined places the studio monitors at
a good height for me. Next, I'll talk about the
standing desk that I use, which is from Uplift. I chose to buy the
smallest size, which is 42 inches horizontally and then 30 inches in depth. However, I think it would have been more helpful to have gotten a slightly bigger desk at
48 inches by 30 inches. Since ideally, your
studio monitors form an equilateral triangle
with your head, that's about three
feet each side. However, it's not
exactly a hard set rule and will be highly dependent on the space that you're in, so at the moment, 2.5
feet works okay for me. Still, I didn't
exactly by this desk with the studio
monitors in mind, so the extra space is definitely something
that I could have used. With the setup, I have a
system where I can use the studio monitors
whenever I'm using logic or whenever
I'm producing music. It helps with listening to all the low and high
frequencies very clearly, so the studio monitors can also be used for editing
dialogue audio. However, you can also
achieve something similar with a good
pair of headphones. I personally owned the
Audio-Technica ATH-M50Xs. They come in handy one, I can't listen on my speakers
for whatever reason, but I personally prefer monitor
speakers over headphones. Finally, the computer I use is a 16-inch MacBook Pro from 2019. It's the base model
and has worked well enough for me for
these past years. I also have a computer stand
that's wide enough to fit the Apollo Twin underneath
it to save space on my desk. I also have a Bluetooth
keyboard and mouse to make this whole recording
experience more streamlined. It's also a lot better
for your posture and your neck to look at a screen
that's straight ahead. Pretty much when I want
to record something, all I do is turn
on my Apollo Twin, which is already
connected to my laptop, and then I adjust
the Shure SM7B, and then open Adobe Audition. From there, you
can basically just follow the steps I outlined in my Adobe Audition
class on Skillshare. Be sure to check
out that class if you want to learn how to record an enhanced dialog audio
using Adobe Audition. Also as a bonus, I can also record at my desk while
standing like this, which is pretty awesome. That's all the
equipment on my desk, essential and supplementary. I hope this can give
you some ideas of the possibilities of how you'd
like to set up your space.
15. iPhone or iPad Recording: Use Any Microphone: Let's cover the question, how do I record
high-quality audio directly into my iPhone or iPad? There's a couple ways
that you can do this. First off, if you have a USB microphone like the
Blue Yeti or Shure MV7, you can buy an Apple USB
to lightning adapter, to connect it to your iPhone
or older generation iPad. However, I want to
cover how you can use any professional XLR
microphone to record high-quality audio into your
iPhone or iPad directly. For this, we'll still
need the adapter, but we'll also need a
compatible audio interface. I'm specifically going to
show you guys how to use the Zoom H6 and the
Zoom F6 to do this. They'll have slightly
different setups. Also, note that all
the equipment that I mentioned in this lesson will
be in the class worksheet. Before we begin, why would
you want to do this? Well, for me, I've been getting into recording
my piano playing and uploading it onto
TikTok or YouTube Shorts, so it's more convenient
for me to just record good quality audio
directly into my phone, rather than recording
it on the Zoom H6 or F6 itself and then
syncing it later in post. Basically, the simple
answer for me is, it's for the convenience. However, there are situations
where you might want to record high-quality audio
directly into your iPhone, for instance, streaming and
whenever you're traveling. Whatever the reason is,
here's how you do it. Right now I have my iPhone on a monopod which is pretty useful since it doesn't take up
too much space and you can easily attach a phone
mount to hold your phone. With these two
pieces, I can adjust my phone to record at
different heights and angles, and it's easy to insert
the lightning adapter. For the first setup,
I'll use the Zoom H6, which is currently connected to the stereo mic
attachment on the top, and it's held by a different,
more stable monopod. The first step is to plug
in the micro USB wire into the Zoom H6 and then
attach it to the adapter, which then connects
to the iPhone. At this stage, I
open the camera app on my iPhone and set
it to video mode. Only after it's in
the camera mode, do I turn on the Zoom H6. A prompt will come up if all the connections
are working correctly. If it doesn't pop up, make sure that you check that
nothing is loose. A weird trick that I
find also works for me is flipping the side of the lightning connector
when it doesn't work. Then after that, I
reset the camera app. Once you do have it connected correctly and the Zoom H6
is on with the prompt, I select Audio Interface mode and then select Stereo Mix, and then I select iPad. From here, I make sure that I do the usual routine
of checking levels, arming the right
tracks, and so on. After that, it's pretty
much ready to go. You can record on your iPhone and if you did it correctly, you'll hear nothing
on playback from your iPhone because
it's currently connected to the Zoom H6
as an audio interface. It's actually being played
through the Zoom H6. In order to hear it better, I connected a speaker to it, but just be careful of
feedback where the speaker generates sound that's being picked up by the Zoom H6 itself, which then plays the sound, and the process loops to create a screechy sound that
grows louder and louder. You can avoid this by disarming the track before listening back and turning off the speaker after
listening to the playback. Just make sure to arm the
track again before you record. It's a bit of a juggle, but it's not too hard once
you get used to it. Note that you can basically use any microphone that you want and place them wherever you want depending on the length
of your XLR wires. I'm just keeping things
simple and sticking with the base kit of the
Zoom H6 for now. If you're going to
use a USB microphone, all you have to do is
connect the microphone to the Apple adapter and then
connect it to your phone. Now, you'll be recording
using the USB mic. In order to confirm
this 100 percent, all you got to do is tap on the microphone and
tap on the iPhone. Stop the recording, and
then watch the playback. You'll be able to tell which microphone that you're using, the USB mic or the iPhone mic, depending on which
tap is louder. Let's move on to
talking about the iPad. If you have an older
generation iPad that uses a lightning connector, just follow the same
steps as you did for the iPhone, and
it should work. Otherwise, if you have a
newer generation iPad, like the iPad Pro with
a USB-C connector, then all you need
is a wire that has a micro USB connection on one end and a USB-C
on the other. You could also use a converter
with the other wire, but I prefer having
a single wire because the more
adapters you introduce, the greater the
chances something will be loose or end up failing. But from there, you just
follow the steps as you did with recording on your iPhone, and
you're good to go. Also note that once you
turn off the Zoom H6 or disconnect the wire which
automatically turns it off, make sure that you close your camera app before
you record again. If you don't and record
right after that, you'll find that there are
issues with the audio. Your audio is going
to sound like this. Now, let's talk
about the Zoom F6. The Zoom F6 is different in that it doesn't
automatically prompt you to go into the audio interface mode when you have it
connected to your phone. Instead, turn on the Zoom F6, go into Audio Interface mode, hit the same Stereo
Mix with iPad option, and then connect it to
your phone afterwards. It's a different
order of operation. In order to know that
you did it correctly, you'll need to do
a recording test. If you are recording
video on your phone, you can do a tap
test with the phone, and then another tap test with the mic connected
to the Zoom F6, and then watch the playback. If audio is playing
through your phone, then you know that you did
something wrong because it should be playing through
the Zoom F6 instead. Again, you'll need to connect
a speaker to hear it. If the tap test is
successful and you can hear the taps from the
microphone that you want, then you know
everything is working. Another difference is
that each input in the Zoom F6 will naturally
be set to mono channels. This was different
from the Zoom H6 where channels 1 and 2 were actually acting as a
left-right channel mix, while three and four were mono. If you want to
record in stereo for the Zoom F6, which in my case, I do since it's for piano, then you want to create a
left-right stereo link. To do this, press the
three-line button, navigate to input,
hit the check mark, then navigate to link settings. Hit the check mark again, and then again to
enter input link. From here, you'll see that everything is
currently set to mono. But what I'm going to do
is turn channels 3 and 4 into a left-right stereo link. It'll go blue and from
there it's ready to go. Now if you arm
channel 4 by itself, by turning up the fader,
nothing will happen. You have to arm channel 3 instead to activate
both of them. By doing a tap test, you can tell that input 3 is the left and input 4 is
the right channel. Finally, to record into a
new generation iPad Pro, all you need to do is
make sure you're in the same audio interface mode, and then just connect
the USB-C ports. That is pretty much
how you record professional audio into your iPhone or iPad with
the Zoom F6 or Zoom H6. My main reason for
doing this is to record short videos for TikTok
or YouTube Shorts, but this method can be generalized
to a lot of use cases. Hopefully, you find
this method useful.
16. Conclusion & Summary: Congratulations to making it
to the end of this class. Here's a summary of everything
that you've learned. Firstly, I introduce the three crucial
questions you need to ask yourself to optimize
your audio recordings. Number 1, what type of microphone should I use
for this specific job? Number 2, how can I
adjust the environment and microphone placement
to produce the best sound? Finally, number 3, do I have my audio recorder
of choice optimized? For the first question,
the choices I covered were dynamic mics, large
diaphragm condensers, boom microphones, which basically
contains two categories of shotgun microphones and small diaphragm condenser mics. Then we talked about camera
mounted microphones, lavaliere microphones, boundary microphone, stereo mix, handheld mics, and mobile mics. That's a lot of types
of microphones. For the second question, I
went over the principles behind reverb and how you can treat your
room to manage it. I also went over
microphone technique for each microphone type when
they were introduced. For the last
question, I went over the different types
of audio recorders, audio interfaces, mixers
and field recorders. I went over why you might
pick one over the other? Finally, I want to thank you for making it to the
end of this course. It's been fun
getting to nerd out about the world of
microphone's with you. If you learn something
or enjoyed the class, I'd really appreciate it
if you gave this course a review and also consider
following me on Skillshare. I'm looking forward to
making more classes and I hope you guys
can be a part of it. Until then, I hope you
were able to finish the class project of answering the three
crucial questions, as well as recording
a before and after. Don't forget that
audio editing is also an important part of the process to achieving great
sounding audio. I have classes on Skillshare, on audio editing, if you
want to check them out. Best of luck with your projects, I'll see you guys
in the next one.