Transcripts
1. Introduction: Hi, I'm Elizabeth,
and welcome to my Vasily Kandinsky
inspired Artist class. We are looking to the
work of Kandinsky, who had a long career
exploring many, many different things along the way as he became
interested in different topics
and influenced by world events and other
artists and art movements. We are going to
be looking at two elements of Kandinsky's work. So we're going to
kind of look towards more of the geometric elements, where he was very much
inspired by sound and color. He had synesthesia. So when he looked at color, he could hear sound. And when he heard sound, he could see color in his mind. So music was a very
important part of Kandinsky's art journey. And we can kind of consider the different colors that
might come to mind as we hear different sounds and
kind of try to tune into that overlapping element of visual sensory and
auditory sensory. How do we represent sound
through mark making? Many of his pieces he called compositions because
he truly was trying to achieve what a
composer of music was achieving. How do you layer different
elements together to create a certain feeling that
sound and music gives you. So that is one
section of his work. The other section, he
got very interested in science and kind of at the microscopic level and organic beings and
those different kind of organic shapes that kind of along with that
element of science. And that became biomorphism. So he was really looking
at how do you abstractly, through these inspirations,
kind of represent biomorphic shapes and
marks in your artwork. So he's got these
biomorphic pieces too. They're also really
fun to explore. We have these two elements of Kandinsky that we're
going to be looking at. For this one, I was looking at the compositions
and the work that Kandinski did surrounding music. So I was really kind of
playing with fluid lines and different marks that kind of reminded me of how music
sounds and feels to me. This one is kind of
leading more into the organic shapes and kind
of playing around with that and some variety and really
kind of mirring some of the imagery shape wise
that Kandinsky used. And then this one also
was kind of a nod back to more of the composition
type pieces. So when we start
working on our project, the first step is going to
be using permanent marker, so waterproof ink to create different sorts
of marks on the page. This can be lines,
it can be shapes, did a little bit of wax
resist with cray to have a couple of different elements that we're going to
resist the watercolor. And then I went in
with some really loose watercolor and let that kind of lead from one
to the next as I went along. We can really get into some interesting
compositional things and really have some fun playing around with mark making and the interaction
of the art materials. I hope you'll consider
joining me in class as we get excited about the
work of VasiKandnski.
2. Class Project: For our class project, we
have two different ways that we are going
to be exploring the work of Vasilly Kindinski. We have the elements of his
work that are inspired by music and sound and how that can then be translated into
mark making and color. And then we have an
exploration into the biomorph side of
his art making process. You can choose to do either
project or both projects. I highly encourage
you to do both I started by going down the more traditional work
that we think of Kandiski and his compositions that
we're kind of looking at how we translate what we
hear into what we might see. And you could even
put some music on and kind of do some mark
making that comes to mind. I have a really fun class that focuses on this where we get inspired in more art exercise and kind of creative
warm up play, where we listen to
different music and then do the marks that come to mind
and get inspired by that. This is taking that idea and really kind of refining
it a little bit as we look at an artist's very specific and intentional
use of that in his not just as a creative exercise, but as an artistic
exploration toward creating and kind of revolutionizing the work that
he was doing at the time. So the relationships of
color to sound and marks to sound and really kind of crafting these
beautiful compositions, there's a lot of different
ways that you can explore it with art media. We are going to be
looking at doing permanent marker and
watercolor to create Rs. We can even do a little bit
of wax resist if we want to have some of the white marks instead of
the black marks, but it's going to
be a really fun art project that
focuses on that. We're going to take those
same materials to explore the different organic
shapes and ways that we can represent organic life forms on the paper and how
we can get inspired by the shapes of biology to create artwork much like
VasiliKintinski was doing. We have some geometric, more
structured pattern oriented, but also loose expressive
kind of floating marks, and then we have kind of some
very organized and ordered yet organic and kind of rounded life form sort
of approaches, too. You want to make
sure that you pop on over to the projects and resources section to do an even deeper dive
into the work life of Vasilly Kandinsky
and kind of see the trajectory of his journey
and how he started and how he like the different
pieces as he navigated these different influences
and artistic approaches and his own sensibilities
as he grew as an artist and kind of
the trajectory that his career took as we consider how we want to explore this in our own art
wking practice. Welcome to use any
additional materials that you like or explore this in an art medium that is more in line with your
personal preferences, whether that be
traditional or digital. You could explore these concepts anyway that you'd like to. But I'm going to be focusing on ink and watercolor
as the foundation, and then I'm going to kind
of build on from there. So let's run it over
to the next lesson to talk about the materials that you're going to
want to consider having on hand for class.
See you there.
3. Materials: So for our Kandinsky project, this one is going to
be incredibly simple. I bet you have all the supplies
on hand that you need. I'm going to be working
on mixed media paper, but watercolor paper
is also totally great. We're going to be combining wax resistant watercolor
techniques and Sharpie. So it's going to be a mixed
media piece in the end. Mixed media or watercolor paper, a sharpie to draw our
Kandinsky details or any other permanent marker that you have will be great. If you want to have a
variety of different lines, thicknesses naturally within
the tip of the marker, you might want to do a
fine liner of some kind. But I'm going to play
with just the sharpie to get the thick and
thin and thicken up the lines as I want to. For the wax resist, I'm going to be using crayons because that's an easy
thing that I have in hand. I have these really
fun unicorn pack ones that have silver and gold
in them and I just can't resist a chance to use
silver and gold crayons because it brings out my
happy inner child artist. But you could also do this
with a heavy application of colored pencils or you could
do it with oil pastels. You can absolutely test this ahead of time if you
wanted to and see how the different wax resist works with each of
the different media. It is a little bit different
for each, but crayons, waxy colored pencils
or oil pastels will achieve that same effect. Then normally I would get out
my big sets of watercolors. I usually work with tubes and I squeeze them
into the tray. But when I taught this to a
class in person recently, we used watercolor
paints that you would normally use
if you're a kiddo, taking an art class at school, and they worked great. So any kind of watercolor paints that you have on
hand are awesome. I'm going to use these ones
just because I have them out because I have not put away supplies from a recent
class that I taught yet, and I really liked the
way that they worked. I was really happy with
what I got out of them, and they were perfect
for this project. And then you'll need
a cup of water, and you'll also need a
cloth so that you can kind of clean off your
brush between colors depending on how much mixing
you're going to be doing. That's all we need
for our project. Super simple, straightforward, and we're going to
have a lot of fun getting inspired by the marks
and the colors and the play of composition that Kandinsky used in some of his pieces
throughout his career. So maybe in the next lesson, or we are going to do
the marker drawing part of our mixed media artwork. Son.
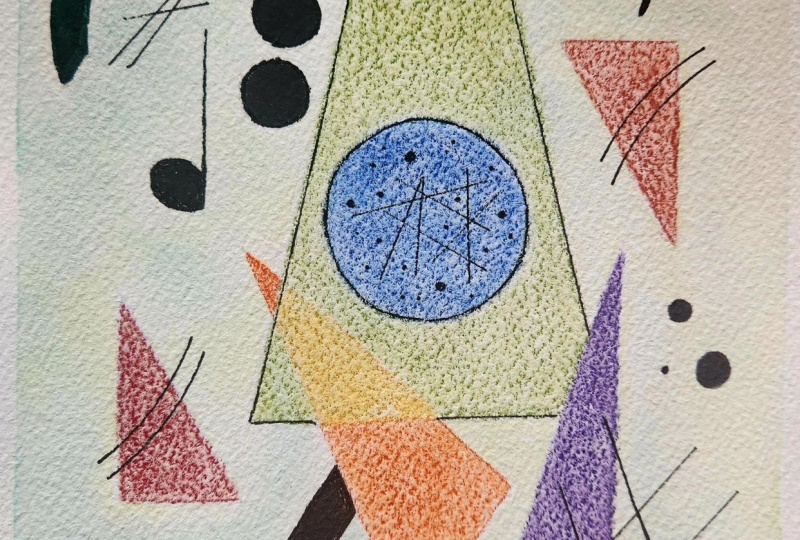
4. About: So now we're going
to get inspired by some of the ways that
Kandinsky approached his. So let's take a look at some of the other ones
that I've created. So Kandinsky, for
much of his life, was very inspired by music and really wanted to compose on the canvas as a musician would be composing music
to be performed. So it was very much
about, how do I put the pieces
together to kind of get a certain feeling and kind of express
that in his artwork. He is also thought to
have been a cynicist. His senses interacted
with each other. So when he saw color, he heard music and when he
heard music, he saw color. So he's been said to be
able to hear his paintings, which I think that is
just a beautiful idea. We can think about that too. What are the colors and the marks and the
lines expressing? This one is one that I did where the first steps of the
project are the Sharpie, then crayon, then watercolor. You can then work back
into it some more with colored pencil or any other
details that you want to, but that was the steps that
I took to make this one. This one is work in progress. So I started with the Sharpies and then I'm going back in with the crayon and then I will paint back into it and then I'll
kind of decide from there. This is very
different from this. So for this one, I was looking at a period of art where
Kandinsky was really, truly looking at music
as an inspiration and getting inspired
by the marks on the page and how
that would make you feel and it was very tuned
into a certain kind of vibe. For the later period of
Kandinsky's life, not the latest, but the later period, he was really interested
in biomorphic art. So looking at the the shapes and the lines and the structure
of organic living things. So really into biology and
organisms and human elements. So really science plays a big part in this
period of his life. So I wanted to see what that did and how I could
interpret that myself. This is an incomplete
one, but again, marker crayon, and then the watercolor will come into play when I'm ready
for that one. These are some of
the pieces, well, this is kind of like this is going more into
the biomorphic. So this is really
kind of zooming in on a microscopic level and
kind of cell like almost. This is kind of a merged between different
parts of his life. But really for this one, I was really looking at some of the shapes both geometric
and organic that Kandinsky tended to lean towards in some of the ways that
he played with setting up his composition and
trying to use those to make something that
was really interesting to me personally and
playing with that. The process was the same though. This does not have
any crayon on it. This is just the sharpie and then watercolor, just
the two mediums. But I may go back into this
with colored pencil later on. I haven't quite
decided if I want to resolve this further
or if it's done. This one has the Sharpie and then the crayon and then
the watercolor again. This is very much what we think of when we think
of Kandinsky's work, even though he created
a wide body of work I really wanted to play with the different ways that the crayons did wax resist
depending on the color. We have the
traditional wax resist that we can think of
when we use white. But then it's really fun to see what the
different colors do. All of the crayon was laid
down before painting, and then I painted back into it and playing around with
different patterns, different shapes,
repetition, and then the play of line
versus you know, circles and all that fun stuff. So there's a lot of different
ways to approach this. I'm just going to
kind of I want to do something more along the
lines of this one, I think, that's kind of where
I was at when I was at a point where I wanted to keep going, but
we'll see what happens. I'm just going to kind of
start drawing in and kind of letting it intuitively
kind of evolve and we'll see. This one I did use a Sharpie and then also a skinnier sharpie, which I might grab that too. We'll see. We'll see how inspired I get by the
straight up sharpie.
5. Drawing: We can do it horizontally, we can do it vertically
and then eventually, I'm going to add in the
cray for the wax resist. One of the nice ways to
do this is to just create an initial line that
breaks at the page because that's just a
nice way to go about it. You can do whatever
line inspires you. I can see my Sharpie
is running out. I keep grabbing a sharpie that doesn't have a lot left in it. I'm going to go back
over that line. But I also want to thicken
up some sections of it too. That gives me a nice
opportunity for doing that. So I'm going to
crispen up my line. And then I really
like to kind of take advantage of that of
where it kind of goes off to help me determine where
I want to thicken it up. So I'm just gonna kind of clean up and thicken up my line. This phase of Arkandnski
Inspired project is really doodling and you can make it
as Kandinsky as you like. You can make it as true
to you as you like. As long as you're having fun and experimenting and exploring, then we're in a
really good place for approaching Arkandnski class as part of the artist
inspired series. And I think you'll just
kind of figure out as you go what you want to
do with the piece. It was really
interesting because when I taught this class in person, it was fun because we
had a wide range of art experiences coming as far as the students
that took the class. The adults that
were in the class, some of them, they chose different
aspects of Kandinsky that they gravitated towards. Some were playing with
more biomorphic ideas, some were playing with more of the composition oriented ones, the musical lyrical ones, and even noticing
that unintentionally, they were putting in
some music symbolism, especially the folks that
had a music background. And then there were even
some that were just recreating some of Canons
aspects of CandonsKePece, or a miniature version of one. The great thing about that is that you can take from the class what you
want to get out of it. Sometimes you just
want the experience of trying what another artist does or you're just not sure what to do so that you can take
advantage of the time to create. You're just creating something without having to
put the thought into something original, which is really exciting. You can decide how
much out of this, how much you want
to get out of it. You can absolutely
plan this out more. I just prefer to work more intuitively in
my own art practice, so it's a way to do what
feels comfortable to me but still getting out of my comfort by playing
with marks that aren't necessarily ones
that I would choose. Okay. And I do also notice that in
a lot of Kandinsky's pieces, the marks tend to
stay in the middle. They don't go off the edge. That's definitely something
that I was mindful of doing in my own piece with the exception of the
biomorphic ones. Some of those where
they really there's a big focus on cell structure
vibes, they'll go off. But also make sure
to turn your page, really play with what happens
when you rotate your paper. What new things do you consider and how does that change how you perceive it and what you want
to put into it? Also feel like
there's a fair amount of repetition that happens. There's variety, lots of
variety in Kens's pieces, but there is also
this repetition in a lot of them so
you can play with that and have some ideas, having this here and
I repeat that there, but maybe this stays
its own standalone. It's funny this reminds me of when I was
stamping paper clips. That's why I really like that. I very much like
circles in my own work, and that's something
that Kandinsky worked into his own
pieces quite a bit. And you can also start thinking
about where are you going to put in the crayon if
you decide to do that. You don't have to. It's
completely optional, but it's a fun
element to play with. So it might be one that
you want to explore. I want to keep this
kind of simple. I don't want to
fill it too much, but I do feel like it needs a little bit All right. I think that's good. I'm going to stop
there with the shop. So let's head over
to the next lesson, and I'm going to start exploring different
ways that I can add cran to start building
up my wax resist. So I will see you
in the next lesson.
6. Wax Resist: Now we're going
to work back into Kandinsky drawings with crayons, color pencils or oil pastels. And you can absolutely
skip this step. So if you're unsure if you
want to do the wax resist, maybe experiment with
it on a test paper or watch the video and kind
of see what it's all about, and then you can see how in the next in the
watercolor lesson, you can see how play of wax
resistant watercolor works, especially if that's something
that's newer to you. I found that I liked
my Kandinsky pieces more when I was really minimal with the amount
of colors that I used. But I also found that the
colors were surprising. I, I really liked
how the pink looked. I guess I'm going to use
gold and silver and pink. To get the wax resist to work, it is really important that you push hard with your crayons. That's a big part of it. Whatever wax medium you're using for this
portion of the class, pressure is important,
I need to build up that waxiness so that
when we paint it, it really shows up
through the watercolor. I'll show up through,
but you really need some significant
pressure to make an impact. Some of this, I just
want to keep it simple. I'm going back and forth over quite a bit and I really
liked what happened when I was adding some line detail
mirred the sharpie line. Because it's going to look different when I paint over it, so it's a nice play of that. I'm going to take
advantage of using the crayon to do
some repeated marks. I echo what's going on with
the Sharpie marks too. Adding the half circles here,
it looks the same thing. I've got half
circles over there. I've got some other
half circles there. I can always jump back and forth between different colors. I'm going to make
some of these pink. So it wax resist the center. Then just marks there
to break it up, marks that go the
other direction from my shrapies. It doesn't
have to be a lot. Just a little bit goes a long way when you're
putting in a wax. But I do want there
to be some unity. If I have gold in one section, I want to have gold
in another section. Same goes for the pink
and for the silver. There's a little
bit of balance too. So try to cut yourself off
before you go too far. I'm going to stop
there. Let's head on over to the next lesson and we will start painting into our artworks. See you soon.
7. Watercolor: So now I'm ready to paint back
into my Kintanski drawing. I found that less is more when it comes to
what colors I'm using. So think about that. Right now, I have
black and white, and I have pink and I have
gold, and I have silver. So I think I'm just going
to kind of lay down some swashes of color
and just keep it really simple because I have a lot going on with the marks. I could absolutely do more with different
painting sections. I could get different
thicknesses, different sizes to my
brush tip and I could really go to town making this
a very intricate painting, and that would be very
true to Kandinsky's work. But I want to keep
this just a little more loose because that
was what I was really enjoying as I continued to experiment with different
Kandinsky styles. I also really liked
what happened with playing with the value, having sections
where I was applying a lot more pigment and then ones where it was
thinning out a bit. I liked putting in some
boldness of color and then using the water to let it fade out and do
more of a gradient effect. I think that's pretty cool. I'm just having some
ghost of color. Now, the mixed media
paper that I'm using is Canton
mixed media paper, which is my favorite, but it does buckle
when it gets wet. I probably should
have taped this down. But that's okay. This
is just super quick. Spend some time exploring Kintinski's world and
how he applied color. Now, if you're going to have
colors go into other colors, you want to think about how they're going
to blend together. If I was with the purple, I would avoid yellow and because
that would make a brown. If you wanted to go for
that neutral, that's great. Go for it. But some
basic understanding of what bleeds into
other colors is helpful when you're doing a really minimalistic loose
watercolor application. I'll make sure I include some color theory basics in the projects and resources
section so you have a little bit of guidance when
you go into painting this if you're newer to watercolor and color mixing
and color theory. I love color theory and I
love the play of colors. So chance to blend them and play around with what the different
combinations make, I will never, ever pass that up. Color is my happy place. Just and then you can
always incorporate a lot of other different
watercolor techniques into this. There's a lot of different
ways to add texture. Kandinsky actually later
in his life would mix sand into his oil paints
to give it the grittiness. He really liked the texture that it created on the canvas. Add sprinkling salt
into this to get that watercolor effect or any other ways that
you know of where you can play with how you can create effects with your paint would be a great
idea to explore. I want to keep the
painting part of this purist and just
minimal, like I said. I'm not going to go
down that route. Absolutely go for it. If that intrigues you at all. Now I will say the red
with the pink crayon, it's not showing up as much as the pink does over
here with the purple. But there are parts
where the crayon isn't resisting as much as
I would expect it to. I have some spots. Well, maybe it's some
of the big deal. I can always work back into
this too with the crayon, with colored pencil, oil
pestle, two more inkwork. But I really just want to
keep it very minimal as far as much thought I'm
putting into it because I just want it to be a fun
quick thing for this one. I think that's good. These watercolors, much
like any watercolor. It's got some areas
where it's making lines and it's just a
matter of how much paint. How much water is there creates these
different separations. You can just keep
going back over it to get it cleaned up
if you want to. You don't have to. But it is absolutely an option to get as refined with
this as you'd like. I think that is
looking pretty great. I'm really happy with that. Super minimal colors
that make me happy, not a lot of work going into it, but this is really fun. I had a really enjoyable
time creating it. It didn't take a long
time, which is awesome. I can do a lot more of
them if I want to or explore these ideas in my artistic practice
in other ways. Let's send it over to the last lesson to
wrap up the class. See you soon. A
8. Final Thoughts: Name. Thank you so much for joining me in class and exploring the life and art of Vasili Kindinski and two of the ways that he explored art in his own
creative practice. I hope you had fun
getting inspired by sounds and how we
can take music and kind of find ways to make that into marks and
colors on the page. But he was working during a
very specific time period and listening to certain music. So the interesting
thing will be to see what types of music the students who take
this class listen to. And I hope that in
addition to sharing your artwork over on the student gallery
on the projects and resources section of class, that you'll also
tell us what kind of music you got inspired by, and maybe you'll try a couple of different genres of music
to kind of see how that influences the way that your marks and your colors
make their way onto the page. And if you get inspired and do the biomorphic element of class, I would love to hear more about maybe additional
research you did and different life forms you
might have been looking to, whether it was like molecular, cellular, you know, organic. There's so many different
ways we can get into the biomorphic elements
for this piece. And science has made such big
advances since the time of Kandinsky that we have access to a lot more
than he did back then. In addition to
sharing your project, I hope you'll take the
time to leave review, sharing your thoughts and
experience taking the class, maybe the different
materials you worked with, how you thought it could
be used in the future, different ideas you have
for revisiting this, and just sharing your experience
with myself and others. I appreciate it as I consider and craft new
classes for the future, and it's great for
students who are considering taking the
class down the road. I'd love to stay connected
here on Skillshare, so be sure to click the
follow button so you get notified of future
classes that I create. I'd love to also stay connected
on YouTube and Instagram. You can pop over to
my YouTube channel to get different videos
about art adventures, art explorations I'm doing, ways I'm applying for
ideas from class in my own artistic
practice continual and anything art related
that comes up along the way. Over on Instagram,
I share photos related to my in person
and online classes. I share the artworks
that I'm creating, the processes I'm exploring, things I'm getting
excited about, artists that I'm checking out, and just kind of documenting my artistic journey and
all things that get me excited about
art in the world. I really appreciate you
joining me in class. I hope to see you in another one real soon till next time.
 Elisabeth Wellfare, Artist, Art Educator