Transcripts
1. Introduction and Supplies You Will Need: Hi, friends. How are you? I hope you're having
a great day today. I'm excited about sharing
this project with you. This is a drawing and
watercolor painting project that I designed,
especially for kids. Students do not need to have any drawing or
painting experience at all to be successful
with this project. I will guide students step by step through all the steps
that they need to take. Today, we are going to be
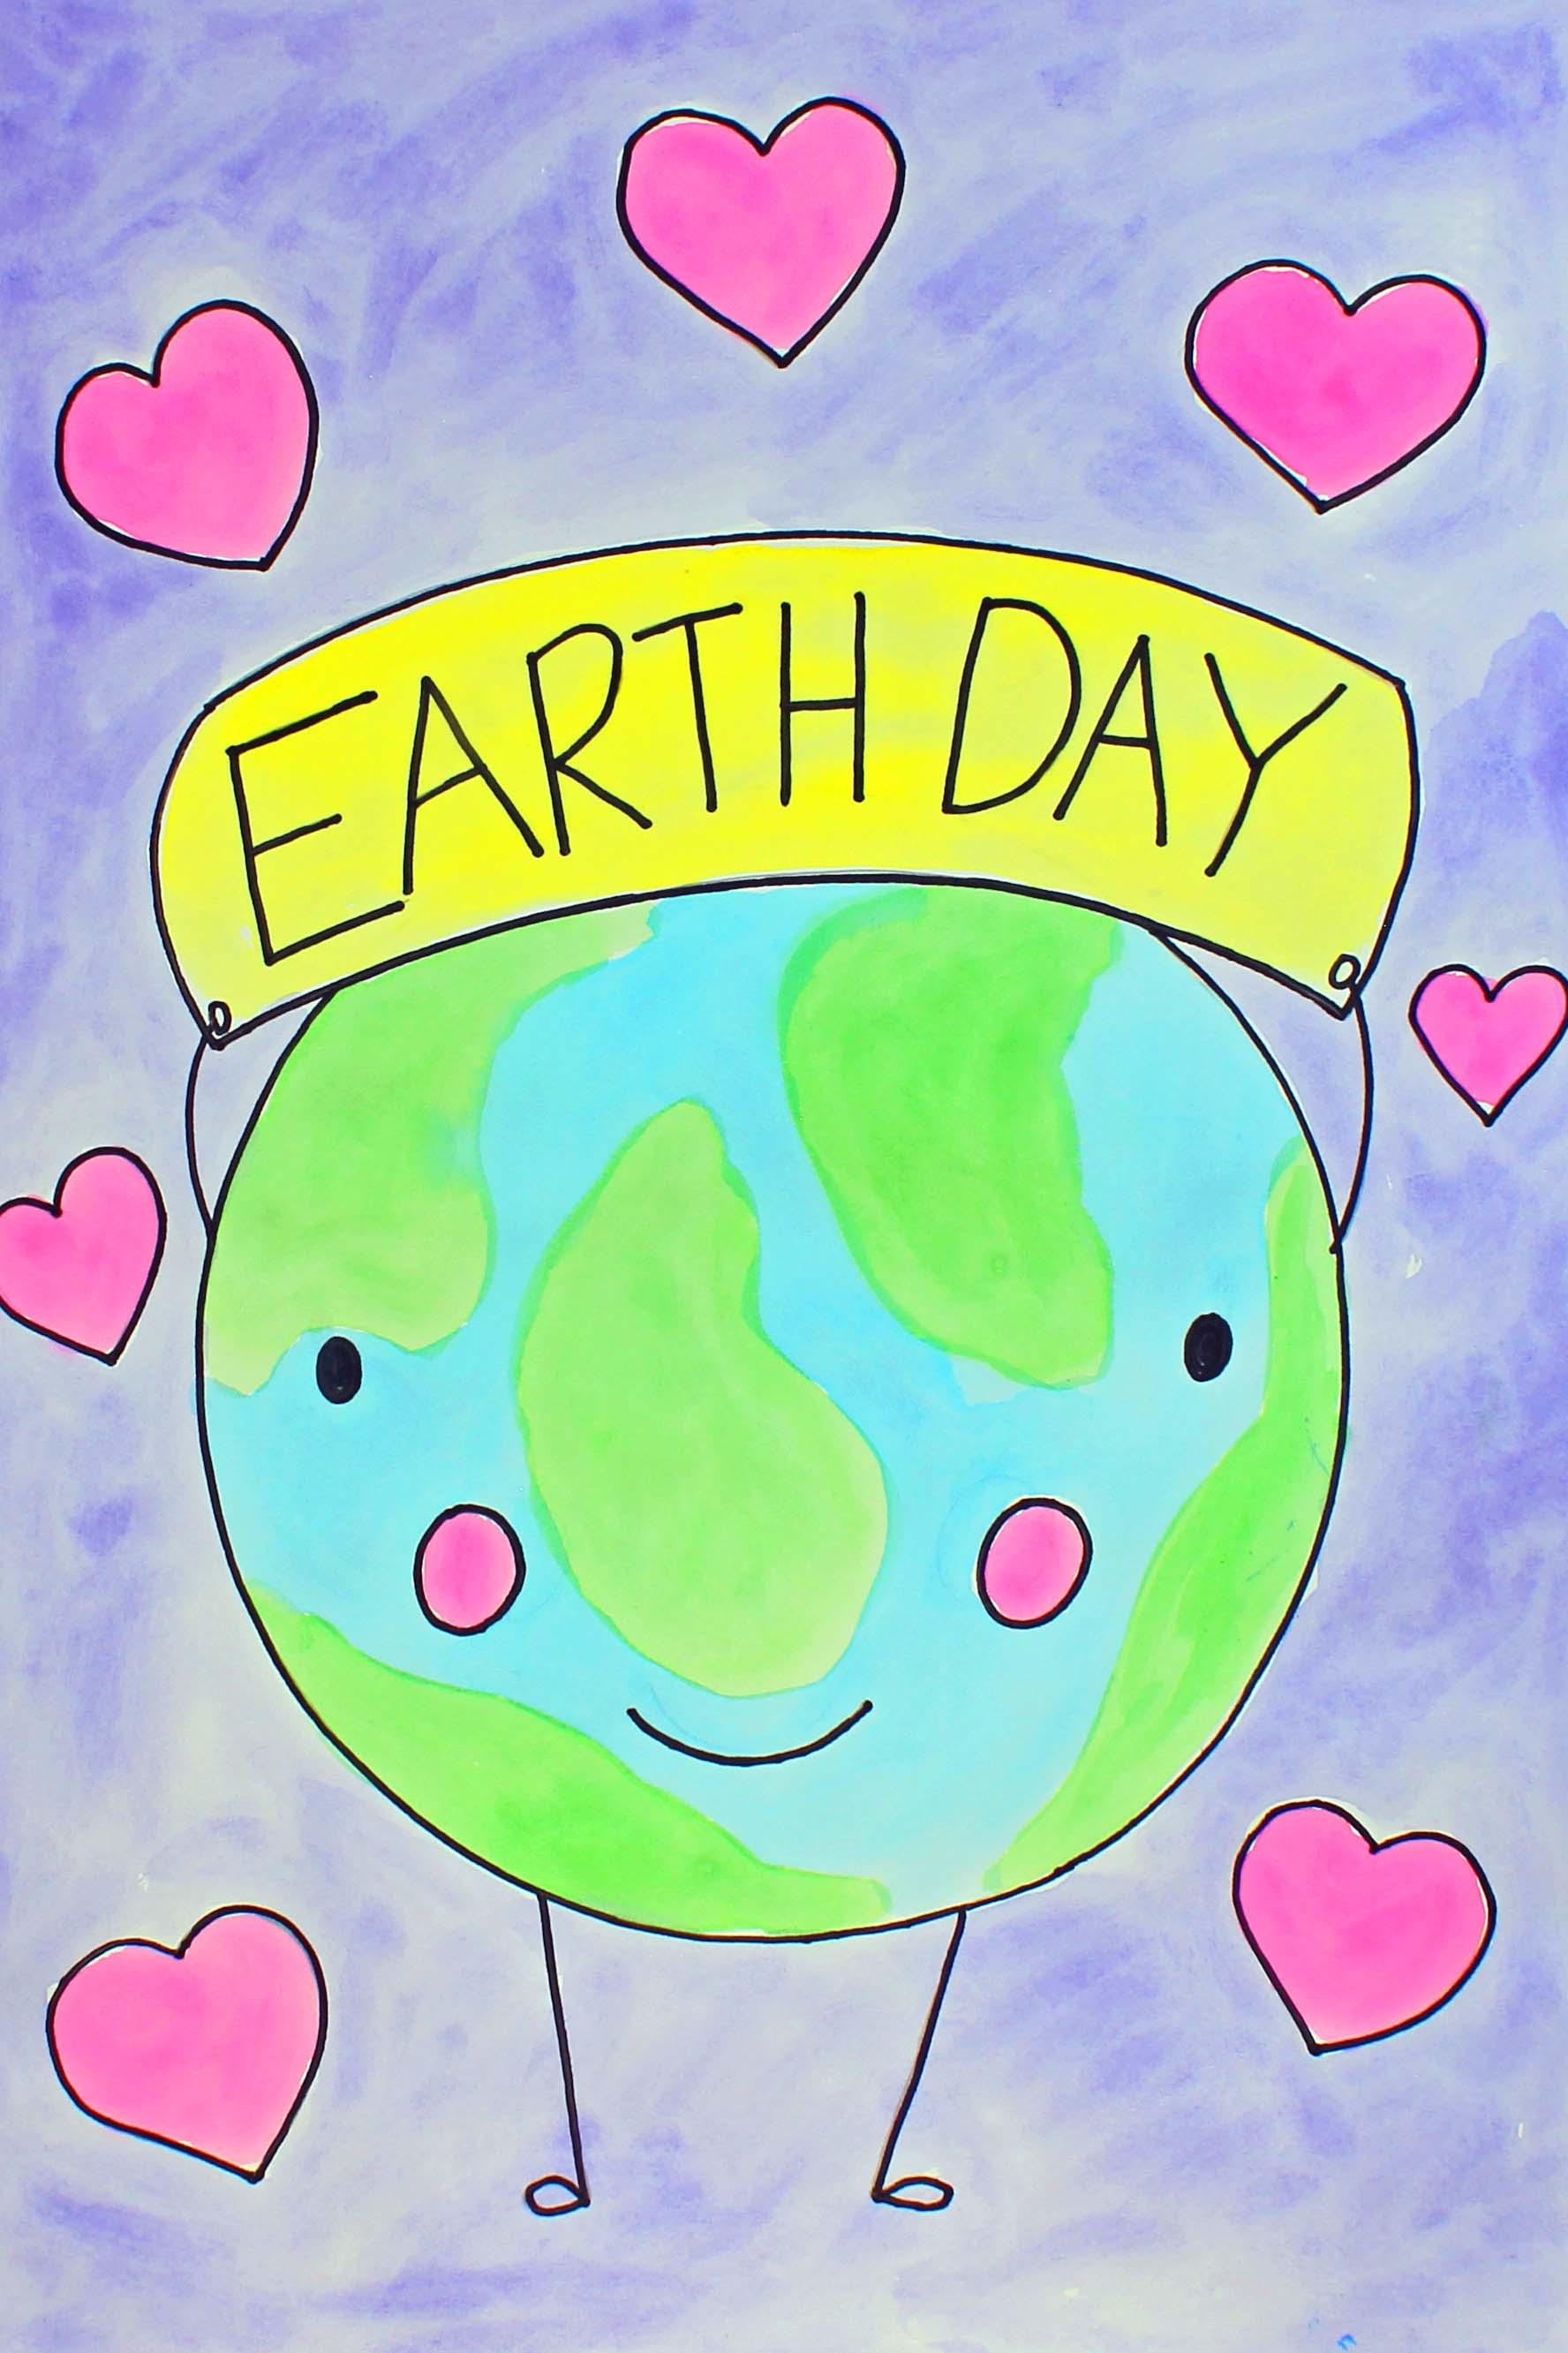
creating this Earth Day design. I hope that you have a lot
of fun with this project. Let's get started. Let's talk about
the supplies and the materials that you will
need for this project. The first thing
that you'll need is a sheet of watercolor paper. You will need a set of watercolor paints
and a paintbrush. I'm going to use a paint
brush that is this size, but just use what you
have available to you. I also have this size in my cup, but I'm not going to be using it for this particular project. You will need a cup or a
bowl with clean water. You will need a pencil
with an eraser. You will need a
permanent marker. Permanent means that the
ink will not smear and smudge around on your piece of paper when you add
your watercolor paint. You will also need a paper
towel and a circle template. I'm going to be using a plate, but you can use any
type of a template to help you draw a really
nice round circle. So go ahead and gather all of those supplies
and materials, and I'll see you back
here in the next video.
2. Step 1: Draw an Earth Day Design: In this step, we are going to
draw our Earth Day design. So let's get started. So what we're going to do
first is we are going to take our circle template and yours might look
different from mine. We are going to place it in the center of our
piece of paper. Make sure that these spaces right here are roughly the same. And then once we get our circle
template into the center, we're going to move it down a bit because we want the space at the bottom to be a little bit smaller than
the space at the top. This is where the Earth is going to go right here in the center, and then we're going
to have a sign that says Earth Day
here at the top. And then here at the bottom, we're just going to
have some little legs and feet for our Earth. Remember, this is a cartoon, so it is not realistic. Right, go ahead and
pick up your pencil. And what we're going
to do is we're going to draw with this hand,
your writing hand. So if you're right handed, then you use your
right hand to draw. And if you're left
handed, then you use your left hand
to draw, okay? I'm right handed, so I'm going to use my
right hand to draw. Then with my left hand, I'm going to hold down
my circle template so it doesn't scooch around
on my piece of paper, because as I'm pressing down, I'm going to be pressing in to my circle template to
make a line, okay? So I need to hold
down with this hand. So I'm going to go ahead
and travel along like this. Pushing against the edge. You don't need to press
very hard with your pencil, but you do need to press hard enough so that you
can see your line, okay? After you're finished
drawing your circle, go ahead and pick
up your template, and then you can
place it to the side, and you will see that you have a nice round circle
for the Earth. Alright? So what we're going
to do next is we're going to draw our sign right
here at the top. Let me show you how to do that. We're going to start
about right here on the left hand
side of our Earth, and we're going to make
a curve line going to about the same place
on the right side. Okay? Let me show
you what I mean. So we're going to start
about right here. We're going to go through our circle and then
stop about right there. It doesn't have to be perfect. Now, what we're
going to do is we're going to make a curved line coming up and a curve
line coming up. And then we're going
to close this shape by making another curved
line like this. And then end up
about right there, so we close up our space. Alright? This is
going to be the area where our sign is
that says Earth Day. Alright? So let's go ahead and erase this line right here that's going
into our sign, okay? Because we want our sign to
be in front of our circle, our Earth, just for this part. Can you see how that
looks now? There we go. Alright. The next step is
we're going to write the words Earth Day right here
inside this sign. And we're going to write
those letters, nice and big. And we are going to use
the capital letters, okay? So I'm going to
start about right here because I want to make sure that all of my
letters are going to fit inside of this space. So I'm going to write the words Earth to about right
here and then Day. Alright? So let's start
about right here. Remember, nice and big, go slowly and carefully
so you do your best work. E, A R T H. Remember, your letters don't
have to be perfect. Just do your best.
Little bit of a space, a A y there we go. So we have Earth Day. If you'd like to include
an exclamation mark, you can go ahead and
do that, but I'm going to keep mine as is. Okay? Alright, the next
step is going to be to make some hands and
some feet for our Earth. Now, remember this is more
of a cartoon project, so it's not going
to be realistic. I'm going to make my
arms coming out from here like this and then
make a small circle here. And it looks kind of like my
Earth is holding the sign. Alrighty. So now we have our Earth Day sign.
We have our Earth. We have our hands and our arms. Let's go down here
and make some legs. So I'm going to make two legs and then you can make your
legs anyway that you want. And I'm going to make
some small feet. All right? Remember,
this is a cartoon, so it's not realistic. Now what we're going to
do is come up here into this space where
we're going to make a face for our Earth. So I'm just going to make some circles and fill
those in a little bit. For the eyes, I
like wide set eyes. And then I'm going to make
a small smile down here. And I'm also going
to make some cheeks because I like the cheeks. And if you do not want to
make the cheeks, that's okay. Alright? So there we go. We have our smiling Earth. Now what we're going to do
is we are going to create something along the outside
of our Earth, okay? You can choose anything
that you like that has to do with the
Earth or with nature. Anything like that,
you can choose different shapes or
different designs. You can choose flowers or
hearts or butterflies, something like this.
It's up to you. I think I'm going to make some large hearts because
I love the Earth so much. So I'm going to go
ahead and do that. I might even make a few right here that are a
little bit smaller. Maybe just two, one, two. Alright, so now I have my hearts for the
background design, and then I have my actual Earth Day design
finished, as well. If there's anything
that you need to erase at this point,
you can do that. Make sure that you
do a good job with your erasing so that we can't see it when we apply
our watercolor paints. Alright, in the next step, what we're going to do is we
are going to cover all of our pencil lines with
a sharpie marker. So I will see you back
here in the next video.
3. Step 2: Outline the Design: In this step, we
are going to apply some permanent marker
to our pencil lines. Make sure that your marker is permanent so that
when we apply the watercolor paints
that the colors don't run around and
the marker smears. Okay? So I'm just going to start at the top of
my piece of paper, work my way down, and cover all of
my pencil lines. If I go a little bit
off of the pencil line, that's okay because
we can come back and erase any lines
that are showing. Okay. So take the cap
off of your marker, put it onto the back of your marker so it
doesn't get lost. And you can go ahead and just
start covering your lines, your pencil lines
with your marker. Alrighty friends, I'm
finished covering my pencil lines with
my permanent marker, so I'm going to put
the cap back on very tightly so the
ink doesn't dry out. And I do see that there are some pencil lines that
are still showing. I'm not quite sure
if you can see them on the video,
but I can see them. So what I'm going to do
is I'm going to take a moment to look at my
whole piece of art. And if I see any pencil lines, any pencil lines at all, I'm going to erase
those with my eraser. Alright, friends,
I'm finished erasing my pencil lines that are
peeking through my marker. And when we come back
in the next step, we are going to start
painting our design.
4. Step 3: Paint the Earth Green : In this step, we are going to
start painting our design. So let's get started. The first thing
that we're going to do is we are going to add one or two drops of water into
each of our pans of paint. And what this will do is it will soften up our
paint a little bit so that it is
easier for us to use. So I do encourage my students to take this step because
it really does help. Alright. Now that our
paints are softening up, let's turn our attention
to our design. So here we have our Earth, and we have our Earth holding
a sign that says Earth Day. And we have some hearts or whatever you chose to make in the background you
could have chosen. Some flowers or something
from nature, okay? I chose hearts. So what we're
going to focus on right now is we're just going to focus
on painting the Earth. We're going to paint
the color green. The green is going to represent
the land on the Earth, and we're not going to
paint the ocean quite yet. We're going to wait on that. So we're just going to be
using our green right now. So this is what
we're going to do. We're going to take a
little bit of green paint. I'm going to choose this green. And I'm just going to start
making some little blobs of green paint on my Earth. And I get to decide
how light or how dark, I want those little
blobs of paint to be. And they're just going
to be organic shapes. They're not going to be circles
or squares or triangles. They're just going to
be free flowing shapes that I'm going to create on my piece of paper for my Earth. And remember, it doesn't have to look like the real Earth. They're just going
to be little blobs of paint. All right? If you want your color, your green color darker, then you will use more
paint and less water. And if you like your grain
to be a little bit lighter, then you will use more
water and less paint. So I'm going to go
ahead and do this. Alright, so now I'm finished painting my Earth
with my green paint. And remember, the green
paint represents the land, and we are going to paint the
blue water in a little bit. We're going to allow
this paint to dry for just a few minutes and
move on to do something else while this paint
is drying a little bit. Otherwise, the green and the blue will blend
together and mix together. If it does add a little
bit, that's fine, but we want this to
dry just a little bit. Okay. So what we're going to do in the next step
is we will start painting our sign and
our background shapes, and maybe even the cheeks. So I will see you
in the next video.
5. Step 4: Paint the Sign and Details: In this step, we are going
to paint our sign and our background shapes and maybe
even these little cheeks. Okay? So I think I'm going
to paint my sign yellow. I want to use a lighter
color because I really want those letters to stand out the sign that
says Earth Day. So I'm going to choose a
lighter color like yellow. You can also choose a color
like orange, a light orange. You can add a lot
of water to it. So it's pretty light. You can choose maybe
a light purple. Or even like a pink
if you have it. Not all paint sets have
pink, but you can try that. If you'd like. It's
completely up to you. Just make sure that your paint is light enough so that you can see those letters. Alrighty. Now I'm going to paint the
cheeks and the hearts pink. So I'm going to put some pink
paint into one of my wells, and then I'm going
to start painting the hearts and then
also the cheeks. Alright, there we go.
In the next step, what we're going to do is we are going to start painting
the background. So I will see you back
here in the next video.
6. Step 5: Paint the Background: Oh In this step, we are going to paint
the background. So let's get started. You get to choose
the color that you'd like to paint for
your background. I'm going to choose
the color purple, but I'm going to make my color
purple, very, very light. I'm going to show you how
to make light purple. Now, we add quite a bit of
water into one of our wells. So I'm going to add
several drops of water because I want my
paint to be pretty light. So there's some water.
Now I'm going to add a little bit
of purple paint. Oh, look at how nice that is. And then I'm just
going to start at the top of my piece of paper, and I'm going to start painting. Now, I'm going to
try to stay outside the lines of the hearts
and the Earth and the sin because I'm going to try to not let my pink
colors blend together. Alrighty friends, I'm finished
painting the background. In the next step,
we are going to use our blue paint to paint
the ocean on our Earth. So I will see you back
here in the next video.
7. Step 6: Paint the Earth Blue: In this step, we
are going to use our blue paint to paint
the ocean on our Earth. So let's get started. So I'm going to put
a little bit of water into one of my wells, and I'm going to make
some blue paint, some light blue paint. I'm going to use
this shade of blue. Oh, look at how
gorgeous that is. And I'm just going to paint everywhere that I see a space, a white space where I
don't see the green paint. Tuck it in there. And if I go on the green paint a
little bit, that's okay. It's dry enough where it
won't blend a lot together. Alright, friends, I'm finished
painting my ocean blue. I hope that you had a lot
of fun with this project. I will see you next time.
 Em Winn, Teacher, Art Instructor, Artist