Transcripts
1. Introduction and Supplies You Will Need: Hi, friends. How are you? I hope you're having
a great day today. I'm excited about sharing
this project with you. This is a drawing and
watercolor painting project that I designed,
especially for kids. Students do not need to have any drawing or
painting experience at all to be successful
with this project. I will guide students step by step through the entire
creative process. Today, we are going to
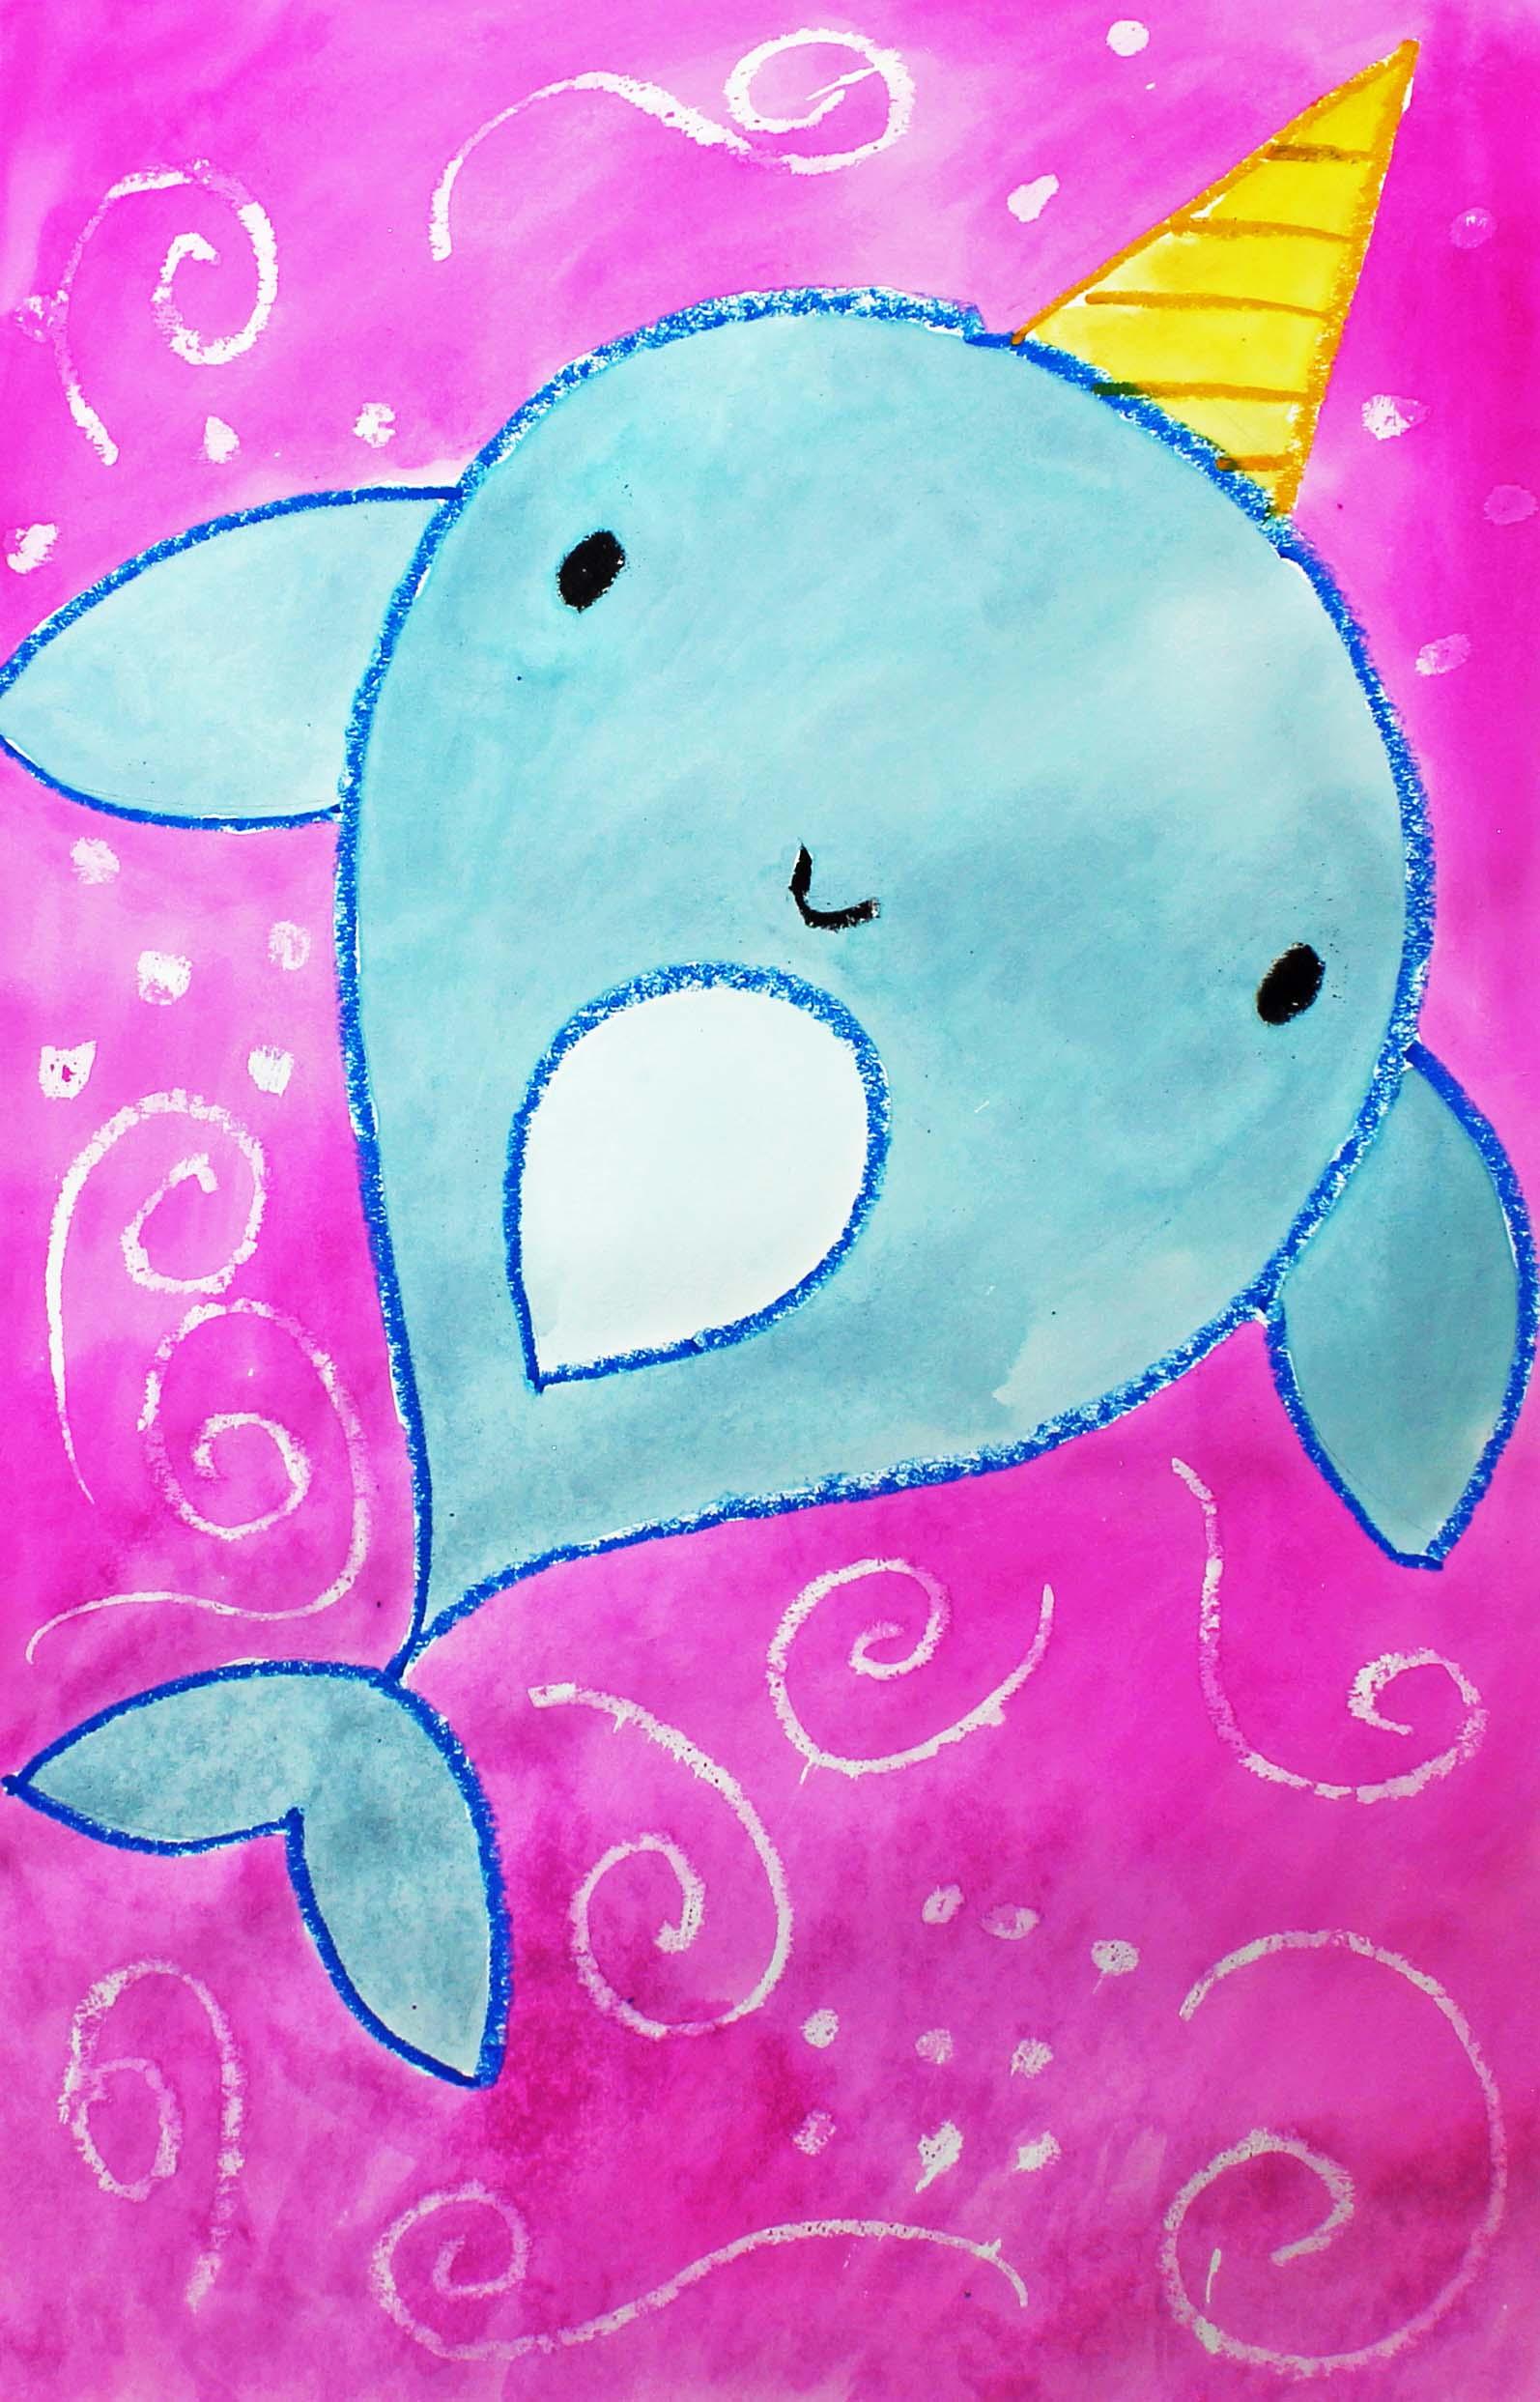
be creating this cute narwhal Let's talk about the supplies and the materials that you will need
for this project. The first thing
that you'll need is a sheet of watercolor paper. You will need a set of watercolor painting
and a paintbrush. You will also need a cup or
a bowl with clean water, a set of oil pastels or crayons, and a paper towel. So go ahead and gather all of those supplies and materials, and I'll see you back
here in the next video.
2. Step 1: Draw a Narwhal Design: In this step, we are
going to draw our design. So let's get started. The number one thing that I'd
like you to remember about this project is that we are going to make our
gar wall really, really big on our
piece of paper, okay? Tiny Gawalls are so
cute, aren't they? The little ones that
are about this size. But they're really small, and you can't see them
from across the room. So we want our
narwal to be really, really big on our
piece of paper. Sound good? Alright, go
ahead and grab a color blue. It can be any shade of blue. I'm going to choose
this shade right here. And what we're going to do is find the middle of
our piece of paper. And then from the
middle, we're going to come down just a little bit, and we're going to
make a small dot. So here's the middle of my
piece of paper right here. We're going to the left side, going in a little bit, and we're going to make a dot. This is going to be the
body of our Narwal up here, and this is going to
be the tail down here. Alright? So watch the
shape that I make. It's kind of a tricky shape. I would say it's a tear
drop or a raindrop shape. Watch what I do. I
start at this dot. I come up. I come around. I notice how slowly
and carefully I'm moving because I want to
do a really good job. I come around, and
then I come down, and then I stop right at
the place where I started. Now that we have our upside
down teardrop shape, what we're going to do is make a tail down here at the bottom. Let me show you how
we're going to do that. We're going to make a curve line starting almost to the edge
of our piece of paper. We're going to come up,
touch that teardrop shape, and then come down. Now what we're going to do is we are going to come
down from the center, place a small dot like that. I don't know if you can
see that on the video. Let me make it a
little bit darker. And then we're going
to make a curve line going from the edge of that
first line to the dot, and then another curve
line going to the dot. That's going to be our
tail of our narwal. Now, let's make some
fins on the side here. So we're going to make some
curve lines one going down, and then coming back in. And then the same
thing on this side, one coming down and
then curving back in. Now, what we're going to
do is we are going to make a little design inside
the Nawa on the tummy, and that's going to be
another teardrop shape that's the same shape as
this, but a lot smaller. Let me show you what I mean. So I'm going to make my dot. I'm going to come around. Slowly and carefully, so I do a really good job and
then stop right there. This is just going to be a
little bit of decoration in detail for the tummy
of our narwal. Now that we have the main
shape of our Narwas body, let's go ahead and
make the Narwals tusk up here at the top
of our piece of paper. So I'm going to choose
the color orange, but you can choose
whatever color you'd like. And this tusk is
just going to be a large letter V coming
out from the top. And then if you like, you
can add some detail to that. I'm just going to add some
diagonal lines like this. Just adds a little
bit more detail. Now what we're going to
do is we are going to add some eyes and a mouth. So I'm going to choose
my color black, and I'm going to just make
some oval shaped eyes. I'm going to try to make them approximately
the same size, but sometimes that can
get a little bit tricky. So I'm just going to do my best. Actually, I think that
looks really good. Alright, now I'm going to
make a little smiling mouth. If there's a different
type of eye or mouth that you'd
like to make for your Nawa, go ahead and do that. Actually, looking at this, I think I'd like my eyes to be a little bit bigger. Here we go. Alright. So the next thing that we're going to do, by the way, if you have some black oil
pastels on your fingers, you can go ahead
and wipe those off because the black oil pastels, if you're using the oil pastels, they can get a little bit messy. Now let's put some water type
designs around thenar wall. So I'm going to choose
the color white, or if you don't have
white, that's okay. Use yellow. So what I'm going
to do is make some swirls, make some curly lines. I'm going to make some dots
all around the nar wall. So when we paint, what will happen is those
shapes will pop out. They will resist the paint, and you'll be able to see
those watery type designs. They look like currents. Okay? So I'm going
to make those now. You're not going to be able
to see them very well. On my piece of paper because
the piece of paper is white, and my oil pastel is white. But I'm just making dots. I'm making swirls. I'm making lines. It might even be pretty much a surprise when I
start painting. Just want to have a
combination of those things. I'm making dots right
now, large swirl. I can't even see what I'm doing. But that's okay. It's
going to be a surprise. Alrighty. So I
think I'm finished. If there's anything
else that you'd like to add to your design, you can go ahead and
do that at this time. When we come back
in the next video, we will start
painting our design.
3. Step 2: Paint the Design: In this step, we are going
to paint our design. So let's get started. The first thing that
we're going to do is we are going to add a drop or two of water into
each pan of paint. And what this will do
is it will soften up our paints so that they
are easier for us to use. So I really encourage my
students to take that step. Alright, while our
paints are softening up, let's turn our attention
to our design. So let's think about the
colors of the Nar wa. It's a lightish,
bluish grayish color, so maybe we'll mix some paint and make a bluish grayish color. I'm going to keep the tummy a really light gray
or a light blue. I'll show you how to
make that really light. And then for the tusk, we can make those any
colors that you like, okay? If you want to make a rainbow
tusk or a yellow tusk, or a green tusk, it's up to you. I haven't decided yet on
the color of my tusk. So let's go ahead and make some paint for
this tummy area. So I'm going to put some
water onto my palette, and I'm going to add just
a very tiny amount of blue because I want this
to be pretty light. Perfect. Okay, great. Now what I'm going
to do is add a little bit more of that water
into that puddle. And I'm going to add
some more blue to that. This is for the actual Nawa. And then what I'm going to do
is I'm going to add a very, very tiny bit of black. And this bit of black
is going to be so tiny that you can't
even believe it. But it will change the
color of that blue. See how that changed the color? If you put too much
black in there, then it will just turn black. But if you put a tiny
bit of black in there, then it'll turn just a
different shade of blue. Oh, I like that a lot. I think I might add a
little bit more black. Looks pretty black
on here, right? But it is more of a grayish, bluish color. That's perfect. Alright, so what I'm
going to do now is I am going to paint my
nar wal this color. And then I'm going
to make a decision on the collar that I'm
going to paint the tusk. I'm painting slowly
and carefully, so I do my best work. But what I am going to do
is speed up the video. It will look like I'm
painting very quickly, but please know that
I am taking my time. Alrighty friends, I'm back, and I'm finished
painting my narwhal. I have my Norwal itself, and then I also have the tusk. When we come back, we will
start painting the background.
4. Step 3: Paint the Background: In this step, we are going
to paint our background. So let's get started. As you can see, we have our little Nar wall
here in the center, and we have the tusk at the
top of the Narwa's head. You get to choose
the color that you would like to paint
your background. If you'd like to use more than one color,
go ahead and do that. This is your artwork, so you get to paint the colors
or color that you like. I'm going to paint
with the color pink. Now, I know that the ocean
is usually not pink, but I just think
that pink would look really nice with this artwork. So that's what I'm going to do. I always try to follow my heart when I am doing my artwork. So my heart is telling
me to use pink. So that's the color
that I'm going to use, even though it doesn't
really make sense. The first thing that
I'm going to do is add a little bit of water
into one of my wells, and then I am going to
add some pink paint. Oh, look at how beautiful
that pink looks. I love pink. Mix
it up very well, and then you can get started. Now, remember if there's another color that
you'd like to add, as well, you can go
ahead and do that. What I'm going to do is I'm
going to just start painting, and then I'm going to keep
painting until I'm finished, going to try my best, and I am going to speed up this video so that
you can watch me. And then I will see you
back here in just a minute. Alright, friends, I'm
finished painting my design. I really like how it turned out. I love the pink, and, of course, I love
this little Narwal. I hope that you had a lot
of fun with this project. I will see you next time.
 Em Winn, Teacher, Art Instructor, Artist