Transcripts
1. Introduction and Supplies You Will Need: Hi, friends. How are you? I hope you're having a great day today. I'm excited about sharing
this project with you. This is a chalk pastel project that I designed,
especially for kids. You do not need any chalk pastel experience to
be successful with this project because
I will take you step by step through all the
steps that you need to take. Let's talk about
the supplies and the materials that you will
need for this project. The first thing
that you'll need is a piece of black paper. I'm using construction paper here, black construction paper. You will need a set
of chalk pastels. I have a set here that has
several different colors, and your set might look
a little bit different, but just use what you
have available to you. You will also need a
pencil with an eraser. You will need a paper towel
and some liquid glue. I'm going to be using
a chalk pastel, but you do not need that. All right, so go ahead and gather all of those
supplies and materials, and I will see you back
here in the next video.
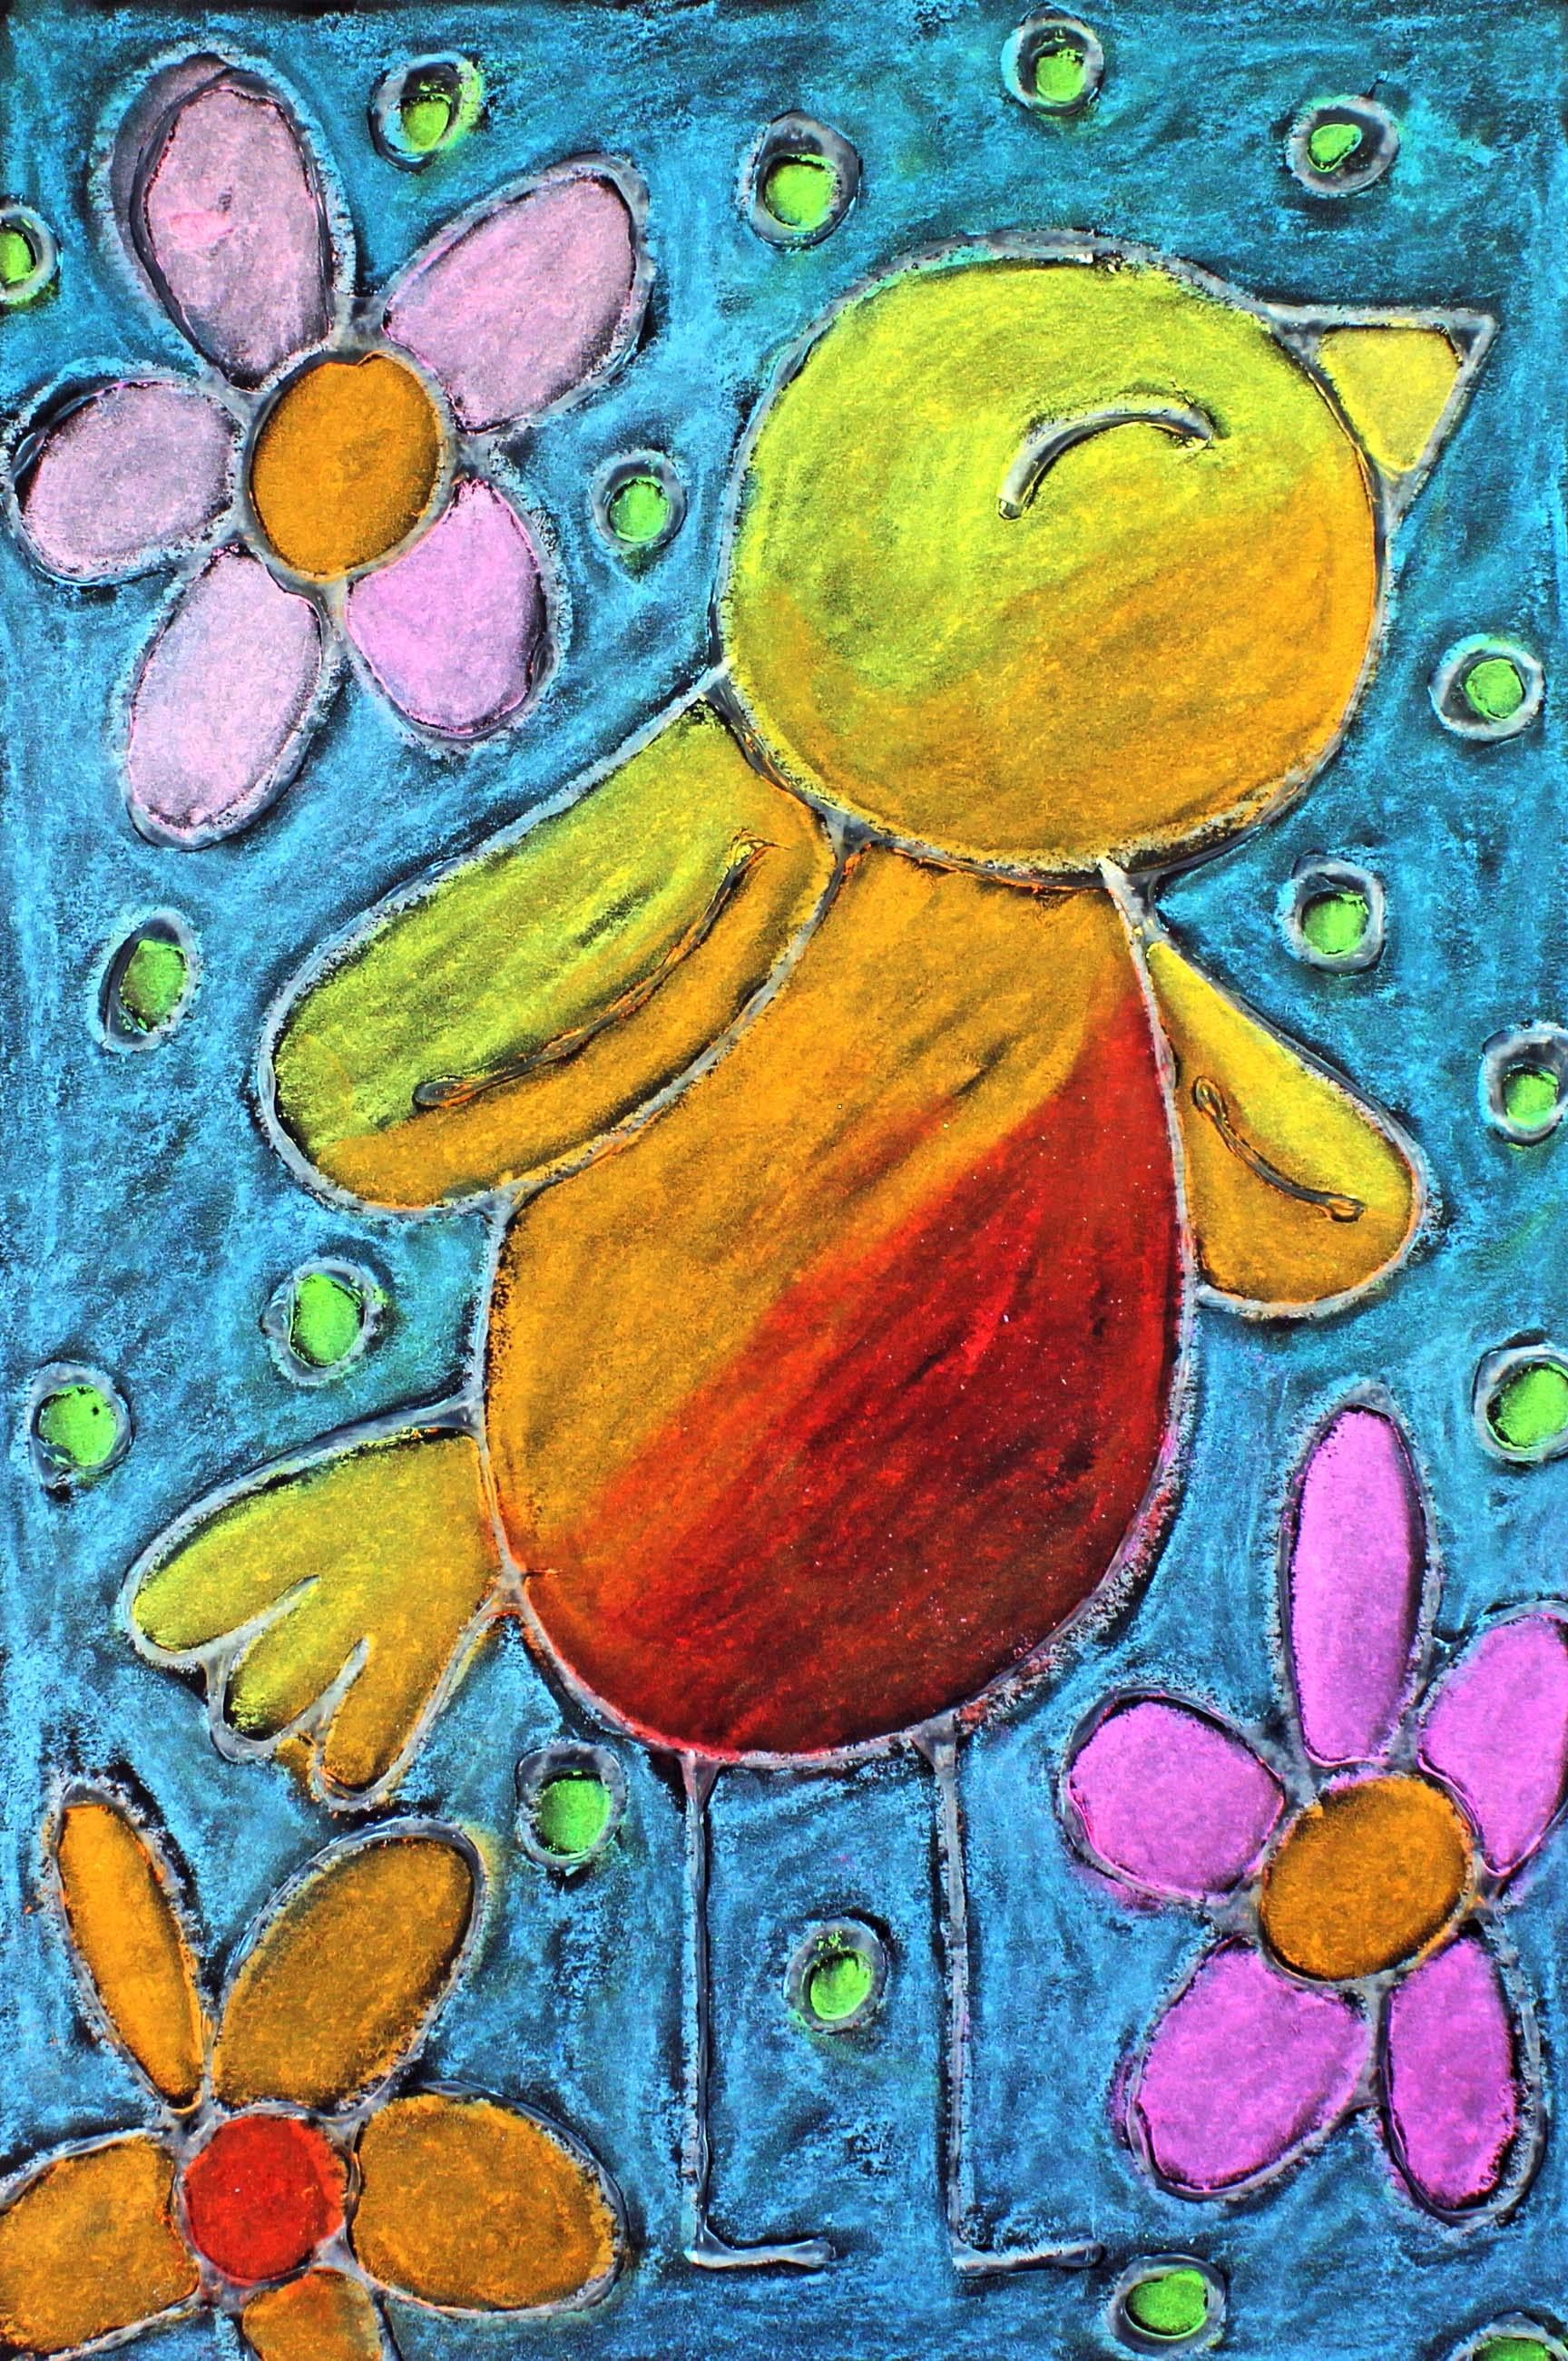
2. Step 1: Draw a Bird & Flower Design: In this step, we are
going to draw our design, so let's get started. The first thing
that we're going to do is pick up our pencil, and I'm going to pick
up my oil pastel so that you can see my drawing. And we're going to go towards the top of our piece of paper, not all the way to the top, but pretty close to the top
on the right hand side. And I'm going to make
a pretty large circle. Now, from this circle, I'm going to make a
triangle for the beak, and it's going to be closer to the top of my piece of paper. And then I'm going
to make an eye, and my eye is going to be closed almost like a smiley eye. But you can make whatever type of an eye that you'd
like for your bird. Now we're going
to come down here and make the wing and the body. So what I'm going to do for
the wing is to come out, curve around, and come back up. If your wing turns out differently than
mine, that's okay. This is your artwork, so you get to do what you'd like to do. Now that we have our top wing, let's go down and make our body. So I'm going to start my
body about right here, and this is just going
to be a curve line. So come down, curve
around, and come back up. And now we're going to
make another curve line right here for his other wing. So come down and then curve
up almost like he's walking. And then what I'm
going to do is I'm going to make his tail
feathers right here. So I'm going to
come down, curve, curve, and curve.
Just like that. Now, I'm going to have some space down
here at the bottom. You might have more or
less space than I have, but we're just going to work with the space
that you have. So for my space, I'm
just going to make some straight lines coming
down and then some toes. You can make one or
two or three toes. It's up to you. I'm
choosing just to make one. I don't I think you can see
that on the video, I hope. Alright? They're just
giant letter Ls. Now, as you can see, we
have a really a lot of space here that we can fill up with some different designs. So when we think about birds, we think about them
being outside, right? So let's add some flowers
to the background. So I think what I'm going
to do is I'm going to add a very large
flower right here, and daisies are my
favorite flower, so I'm going to add a daisy. If there's a different
type of a flower that you like, go
ahead and add it. So find the biggest
spaces on your piece of paper and add some flowers. Now that we have some flowers
on our piece of paper, we can fill in the other
spaces with other designs. You can make some leaves. You can make some circles. You can make some
squiggly lines. It's completely up to you as
to what you'd like to make. I think I'm just going
to start filling my space with circles, and I might add some different
types of lines as well. What I'm going to do is I'm
just going to listen to myself and then do what
I feel like doing. So I think that I am just going to take a
moment to do that. Alright, friends. So now
I have my background. I have my flowers, and then I have
some circles that I filled up the
other space with. I'm going to make sure that
I don't get too busy with my piece of paper because I
am going to add some glue. And sometimes if you make
your designs too small, then what happens is the
glue kind of runs together. So we want to make sure that our designs are not too busy. Alright? So when we come back, we will start adding our glue.
3. Step 2: Apply Glue to the Design: In this step, we are going to add some glue to our design. So what we're going
to want to do first is we are going to want to open our glue bottle,
open it all the way. If there's a little bit of glue at the top, you
can take that off. And then we're going to tilt
our glue bottle upside down, and you might need
to use two hands. You need to use only one hand. You might have to grip your
glue bottle like this, or you might hold it like this. It just depends on the strength of your
muscles in your hand. Sometimes my hand gets really tired when
I do this project, so you will see me using two
hands at certain points. It does take a lot
of muscle strength. I'm going to start at the
top of my piece of paper, and I'm just going to
start applying glue. And I'm going to make sure that I don't touch my piece of paper. In other words,
I'm going to hold my glue bottle
straight up and down, and I'm going to hover
right over my design, and I'm going to place glue everywhere that
I see my lines. All right? And I'm
going to be very careful that I don't set my hand down on my piece of paper because I could
smear my glue around. And I've done that before, so that's a tip from experience. So I'm just going to
go all the way around. I'm trying my best. If I go a
little bit off of my lines, I'm not going to worry
about it too much. I'm just going to try my best. Alrighty friends,
I'm finished and my hand got really
tired during that. And as you can see, I
went a little bit off the line here and
here, and that's okay. It's not going to make
a difference once I start adding my chalk pastels. So I'm going to want to
make sure that I close up my glue bottle so my
glue doesn't dry out. And what we're going to do
now is we are going to allow our drawing to dry completely
for at least a day. And then when we come back
and it's completely dry, then we can start adding
our chalk pastels. So go ahead and let that dry, and when we come back, we
will add our chalk pastels.
4. Step 3: Apply Chalk Pastels to the Design: In this step, we
are going to apply some chalk pastele
to our design. So let's get started. So this is where we can have
a lot of fun with color. You get to choose the
colors that you would like to put onto
your piece of paper. There are a couple of tips
that I will share with you, and so you can watch me, and then you can just
go for it and start applying the colors to
your piece of paper. So let me show you
a couple of things. I'm going to choose
this color pink. And I'm going to fill in my petals here with
this pink chalk pastel. And as you can see, there's going to be an area on my piece of paper where
there is dry glue. So my chalk pastel will not be able to get color
onto the piece of paper because the glue is blocking the chalk from going
onto the piece of paper. So we're going to just fill
that space in with a color. Now, after we're all completely
filled up with color, then what you're going to do is you are going
to start blending, and you'll see me do this
on the video after I'm finished filling in
all of my color. But for this step, we
are just going to be applying color to
our piece of paper. We're not going to be
blending it at this moment. So what I'm going to do
is I'm just going to continue on and I'm going to and I'm going to press
pretty firmly with my chalk pastele and I'm going to fill up my whole
entire space. Alrighty friends,
I'm finished filling in my spaces with
my chalk pastel. If you do have a little bit of chalk pastel on your hands, you can just wipe it off with your handy
dandy paper towel. As you notice, I didn't fill in every single little
space on my piece of paper because it's really
great with chalk pastel. You can blend it around
and fill in those spaces. So when we come back
in the next video, that's what we will be doing. I'll see you back here
in the next video.
5. Step 4: Blend the Chalk Pastels: A In this step, we will blend our chalk pastels, so let's get started. As you can see, I filled in my entire space with
the chalk pastels. There are some
areas, for example, right here, where I didn't
cover the paper completely, and that's Aok because when I start blending
with my finger, the spaces will get filled in. You will see what I mean. The biggest thing
that I can tell you is to use your paper
towel when you need to. Between colors, you can use your paper towel to
clean off your finger. And it will help to not mix in colors where you
don't want them to be. Okay? Let me give
you an example. So I'm going to
start with my bird, and I'm going to just take
one or two of my fingers, and I'm just going to start rubbing those colors
with my finger, and I'll rub them
together a little bit. So they blend it almost It's like almost like a
dreamy type look. So I did that, and I'm
just going to keep going using one or two or
three fingers, if you like. G to blend all these
colors together. And then when I
want to switch to another part of my artwork, I'll want to wipe my finger off. Because I don't
want these colors right here on the bird to get, let's say, on the
background, okay? So I will want to wipe
some of those colors off. If all of the color
does not come off of your finger or
fingers, that's okay. It's not going to hurt anything. So just get as much
off as you can and then move on to the next color. So I think I will rub in my chalk pastels here on this flower and this
pink flower up here. And then when I'm
finished doing that, I am going to wipe
off my finger again. Okay, so I have that that
I'm going to wipe off. Now I'm going to move to
the next one and so on. So I'm going to take
a moment to blend in my chalk pastels, and
you can watch me. I'll speed up the video, and then I'll be back to
see you in just a minute. Alrighty friends, I'm finished blending my chalk
pastels into my paper. I think that my
artwork looks awesome. I really hope that you
enjoyed this project. I really enjoy
teaching it to you. I will see you next time.
 Em Winn, Teacher, Art Instructor, Artist