Transcripts
1. Introduction and Supplies You Will Need: Hi friends, how are you? I hope you're having
a great day today. I'm excited about sharing
this project with you. This is a drawing and
watercolor painting project that I designed
especially for kids. Students do not need to have any drawing or
painting experience at all to be successful
with this project. I will guide students step by step through all the steps
that they need to take. Today, we are going
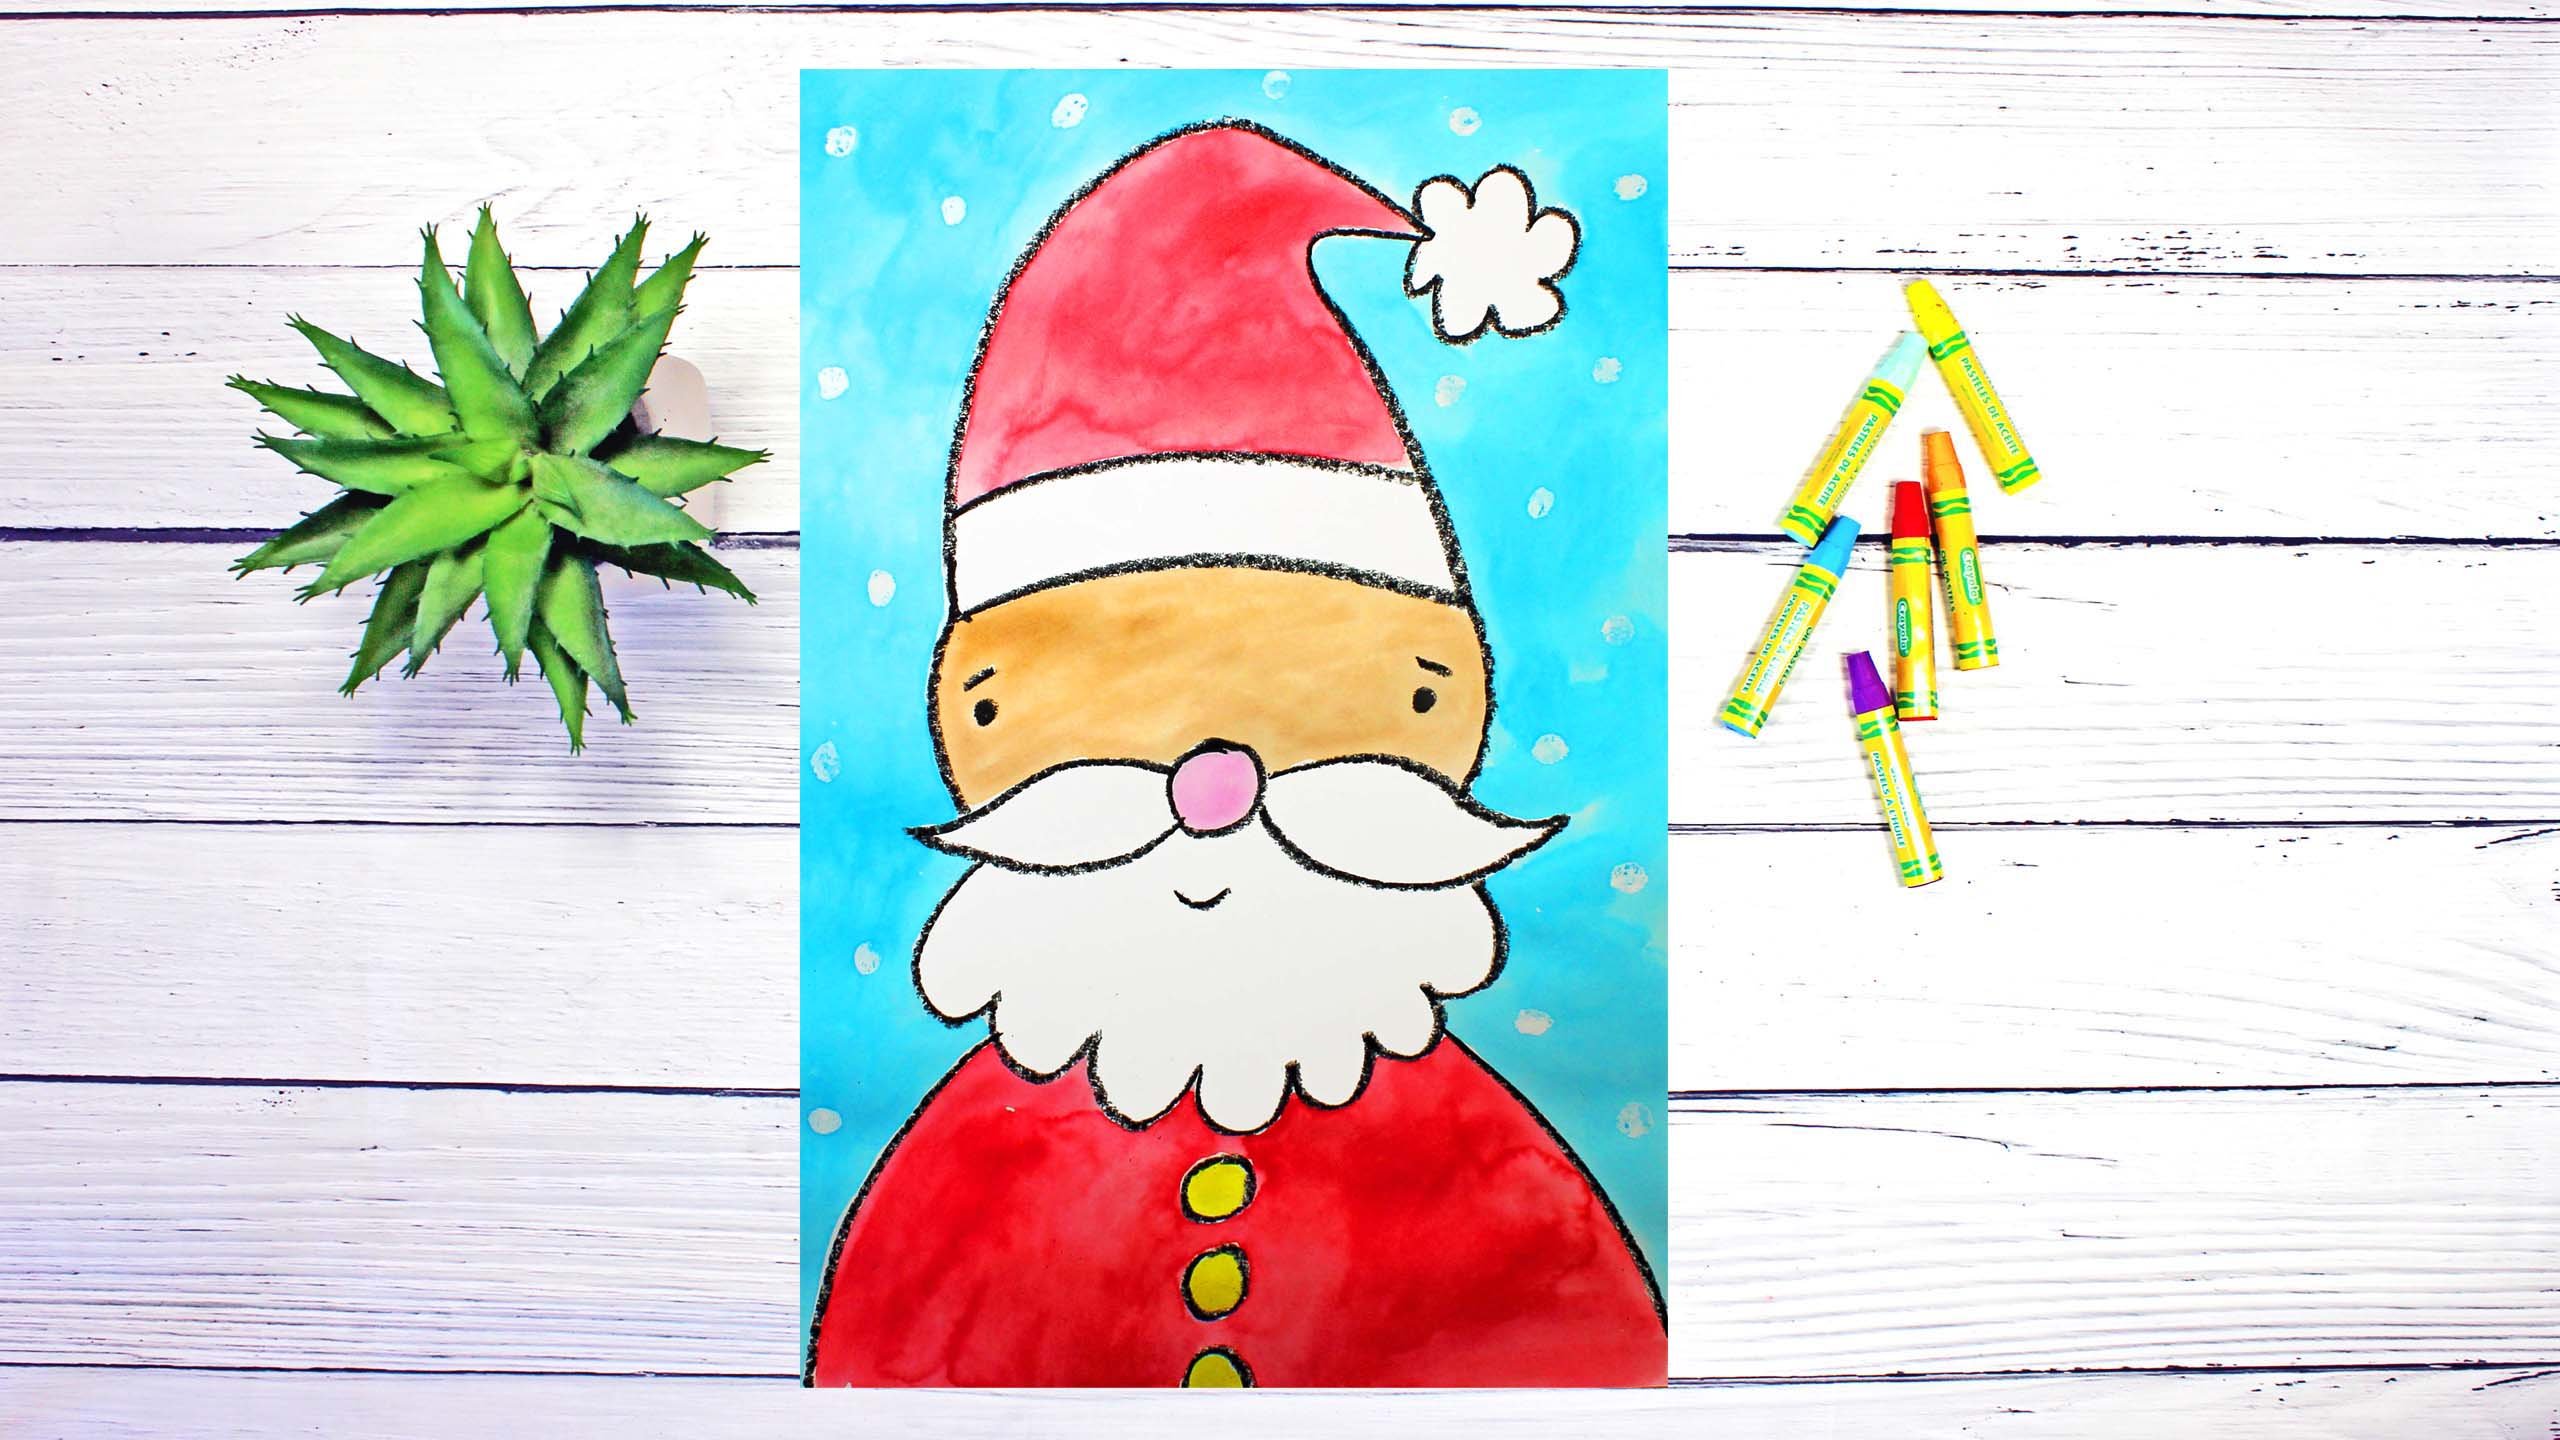
to be creating this fun and festive
Christmas tree. Let's talk about
the supplies and the materials that you will
need for this project. The first thing
that you'll need is a sheet of watercolor paper. You will need a set of watercolor paints and a bowl
or a cup with clean water. You will need two different
sized paint brushes. You will need a
larger paint brush for the larger spaces that
we're going to paint, like the background, and a smaller paint brush for
those little tiny ornaments. You will also need a black
oil pastel or crayon and a white oil pastel or
crayon and a paper towel. So go ahead and gather all of those supplies
and materials, and I'll see you back
here in the next video.
2. Step 1: Draw a Christmas Tree: In this step, we're
going to draw our Christmas tree design. Let's get started. The first thing that we're
going to do is pick up our black oil pastel or crayon. We're going to go into the
middle of our sheet of paper, almost to the top, but not quite to the top. You want to leave
a little bit of space at the top of
your piece of paper, because you want
to be able to put something at the top
like a star or an angel. Let's start here at the middle
of our piece of paper and we're going to make
a nice big triangle. This doesn't have to be
exactly the same on all sides. Okay, so that's the top
part of my Christmas tree. Now we're going to go in just a little bit and we're going to make another slanted line, and then we're going to do
the same thing on this side. And then we're going to close
that shape right there. Now we're going to
add another layer. We're going to go in a
little bit from this line, come down with a slanted line, and then the same on this side. And then we're going to
close up that space. Then it looks like
to me I'll be able to fit one more of these shapes. I'm going to make another, another line and then close up. Then at the very bottom, down here I'm going to make two lines and those are
going to be for my trunk. All right. I'm not sure if you
can see that on the video. I think you can at
least see part of it. There's the trunk to my Christmas tree and I
have some different layers. What we're going to
do is we are going to decorate our Christmas
tree design. All right, so let's
start here at the top. And I'm going to put a star at the top of
my Christmas tree. I like to make a star like this. It's two lines, two
lines coming out, coming in like that. And then it's going to be
attached to the Christmas tree. That's how I like
to make a star. If there's a different way that you'd like to make a star, you can go ahead and make
it any way that you'd like. If you'd like to make something else at the top of
your Christmas tree, you can do that as well. You can make a small
angel or a heart, or candy cane, anything
that you'd like. Now that we have our
Christmas tree with the trunk and the
star or the topper, let's decorate the inside
of our Christmas tree. I think I'm just
going to start with some different
types of ornaments. Okay, I'm going to start with
a couple of little bells. This is how I make
a bell curve line. Close that up, and then I put the little bell
at the bottom. I think I'll make
another one over here, curve line and see how it slanted to the side. Here we go. Now I'm going to make maybe a
little stalking right here. I'm going to make a rectangle. Then I'm going to make this part of the
stalking, the boot part. Now I'm going to make
some candy canes. This is how I make a candy cane. I make a very short
line and then attached to that line
I make a curve line. Another curve line that follows
that initial curve line. And then I close it
up at the bottom. And then I remember to put
those small stripes in there. I'll make another
one right here, little curve line coming down another curve line and then close up and then
add those stripes. Now I think I'll add some
different types of bows. I'm going to make a bow here. There's an oval,
another oval attached. And then I'm going to make smaller ovals inside those oval. Then the little ribbon
part that comes down. How cute is that?
That's really cute. Okay, I'm going to make
another one down here. Oval, little, little oval
and ribbons coming down. All right, let me think. I think I'm going to make some different
types of ornaments. So I'm going to make
this type right here. There's a rectangle and then
it goes out and comes in, goes out and comes in like that. All right, and then maybe I will make another
one of those right here, rectangle goes out and comes in, goes out and comes in. Now let me think.
I think I'm going to make some packages. I'll make some squares, add some ribbon and a
little bow at the top. That's always cute. I actually might add
some packages down here. I will just keep that one package there
on the tree as well. Let me I'm trying to think of some other things that
I'd like to make. How about a little
snowman right here? I'm going to make, oh, it's
going to be tiny, right? It's not going to have a
lot of details in there. Two circles, two eyes, two buttons, and maybe a
little hat that's very small. Maybe I'll put some
little arms on there too. Perfect. All right, I think I might have room for
some more ornaments. What I'm going to do is
I'm going to just fill in the rest of the space
with small ornaments. They might be little hearts or they might be regular
circle ornaments. Any time that I see
a little space, I'm going to put
a small ornament. It's just going to be a circle
with at square at the top. All right friends, that
is pretty full, right? So what we're going to
do now is we're going to add a little bit of
detail to the background. And like I said before, I'm just going to put some packages down
here at the bottom, so I'm going to make
a little ground for the tree to be sitting on. I hope that you can see
that line on the video. And then down here
I'm just going to put some small packages, maybe two or three maybe. I'll put one over
here. Just look at your own artwork and decide if you'd like to add something. You don't have to, but
if you want to, you can. All right, the last thing
that we're going to do is we're going to add some
snowflakes to the background. What I'm going to do is
I am going to just put some dots and these are
going to be snowflakes. I'm going to push hard
with my oil pastel. You can make any type of
snowflake that you like. I'm just making dots. What's going to happen when
we add watercolor paint to this part of our artwork Is these snowflakes are
really going to stand out. They are going to
resist that paint. All right, friends. So I'm
finished adding some of this white oil pastel to the background to create
those snowflakes. You can't see them right
now, but they are there. I can't see them either. It's going to be a little bit
of a surprise when I add my watercolor paints
to the background and those snowflakes
will show themselves. Okay, What we're going
to do in the next step is we are going to start
painting our design.
3. Step 2: Paint the Christmas Tree: In this step, we
are going to paint our Christmas tree.
Let's get started. All right, the first
thing that we're going to do is we are going to add a drop or two of water into each of
our pans of paint. What this will do is it will soften up our
paint a little. It is easier for us to, I do encourage my
students to take the time to do this step
because it really does help. All right, now that our
paints are softening up, let's turn our attention
to our design. In this step, what we're going
to do is we are going to paint the star and the tree and all the ornaments and
these packages down here at the bottom of
our piece of paper. All the rest of the areas like the ground and the sky
behind the Christmas tree. We're going to save painting that for the next
step. All right. Go ahead and take a
look at your design. What we're going to
do is we're going to start by painting
the actual tree. Usually trees are green. I'm going to take my
smaller paint brush and I'm going to start
painting my tree green. I'm going to try to not touch those ornaments or
allow the paint to get into the ornaments
on the tree. It might be a little bit
challenging and some of the paint might go
onto the ornaments. If it does, don't worry
about it. Too much. Watercolor paints, they
love to spread around, and they love to go
where they want to go. Sometimes they have
a mind of their own, you just have to accept that. See, I got a little
bit in that ornament, but I'm just going to say, oh, that's okay, makes
a neat design. I'm going to go ahead and I'm going to
speed up this video. You can watch me paint
my Christmas tree. And then when I
finish that part, I'm going to come
back and talk to you about painting those ornaments. All right friends, I'm finished painting the actual
Christmas tree. That took me a while
because I went slowly and carefully so
I could do my best work. Now I'm going to go ahead
and I'm going to paint the ornaments and also the
star at the top of the tree. And the tree trunk,
I'm going to start with the tree trunk down
here at the bottom. Then I'm going to go
ahead and rinse my brush, and then I will start with
the rest of those ornaments. I will start right here
at the top with my star. And then I will just start
painting the ornaments. So you can go ahead
and watch me. And I will speed up the video because I'm going
to be taking my time. It's going to look like
I'm painting pretty quickly, but I'm really not. I'm taking my time. All right. Friends.
That took me a bit of time because I wanted to make sure that I did a
really good job. When we come back, we will
start painting the background.
4. Step 3: Paint the Background: In this step, we are going
to paint the background. Let's get started. All righty, I've
already decided that I'm going to paint
my background blue. The background is
this area right here. I'm going to leave
this bottom area white because I'm going to
pretend like that snow. But you can certainly
paint it if you'd like. I'm going to use the color
blue to paint my background. And I'm going to add quite a bit of water to the blue paint because I want to make sure that it's a
little bit lighter. If you want a paint
color to be lighter, then you'll add more water. If you want a stronger, darker color, then
you'll use more paint. I'm going to use my
larger paint brush because this is a larger space, I want to be able to cover my space a little bit more
quickly as I'm painting. You will be able to
see that there are some snowflakes that pop out
and that show themselves. Those are just the
little snowflakes that I made with the oil pastels. All righty friends, I'm finished
painting the background. As you can see, we can see some little tiny snowflakes all around the Christmas tree. I had a lot of fun
teaching you this project. I hope that you had a
lot of fun learning. I will see you next time.
 Em Winn, Teacher, Art Instructor, Artist