Transcripts
1. Introduction and Supplies You Will Need: Hi, friends. How are you? I hope you're having
a great day today. I'm excited about sharing
this project with you. This is a drawing and
watercolor painting project that I designed,
especially for kids. Students do not need to have any drawing or
painting experience at all to be successful
with this project. I will guide students step by step through all the steps
that they need to take. Today, we are going to be
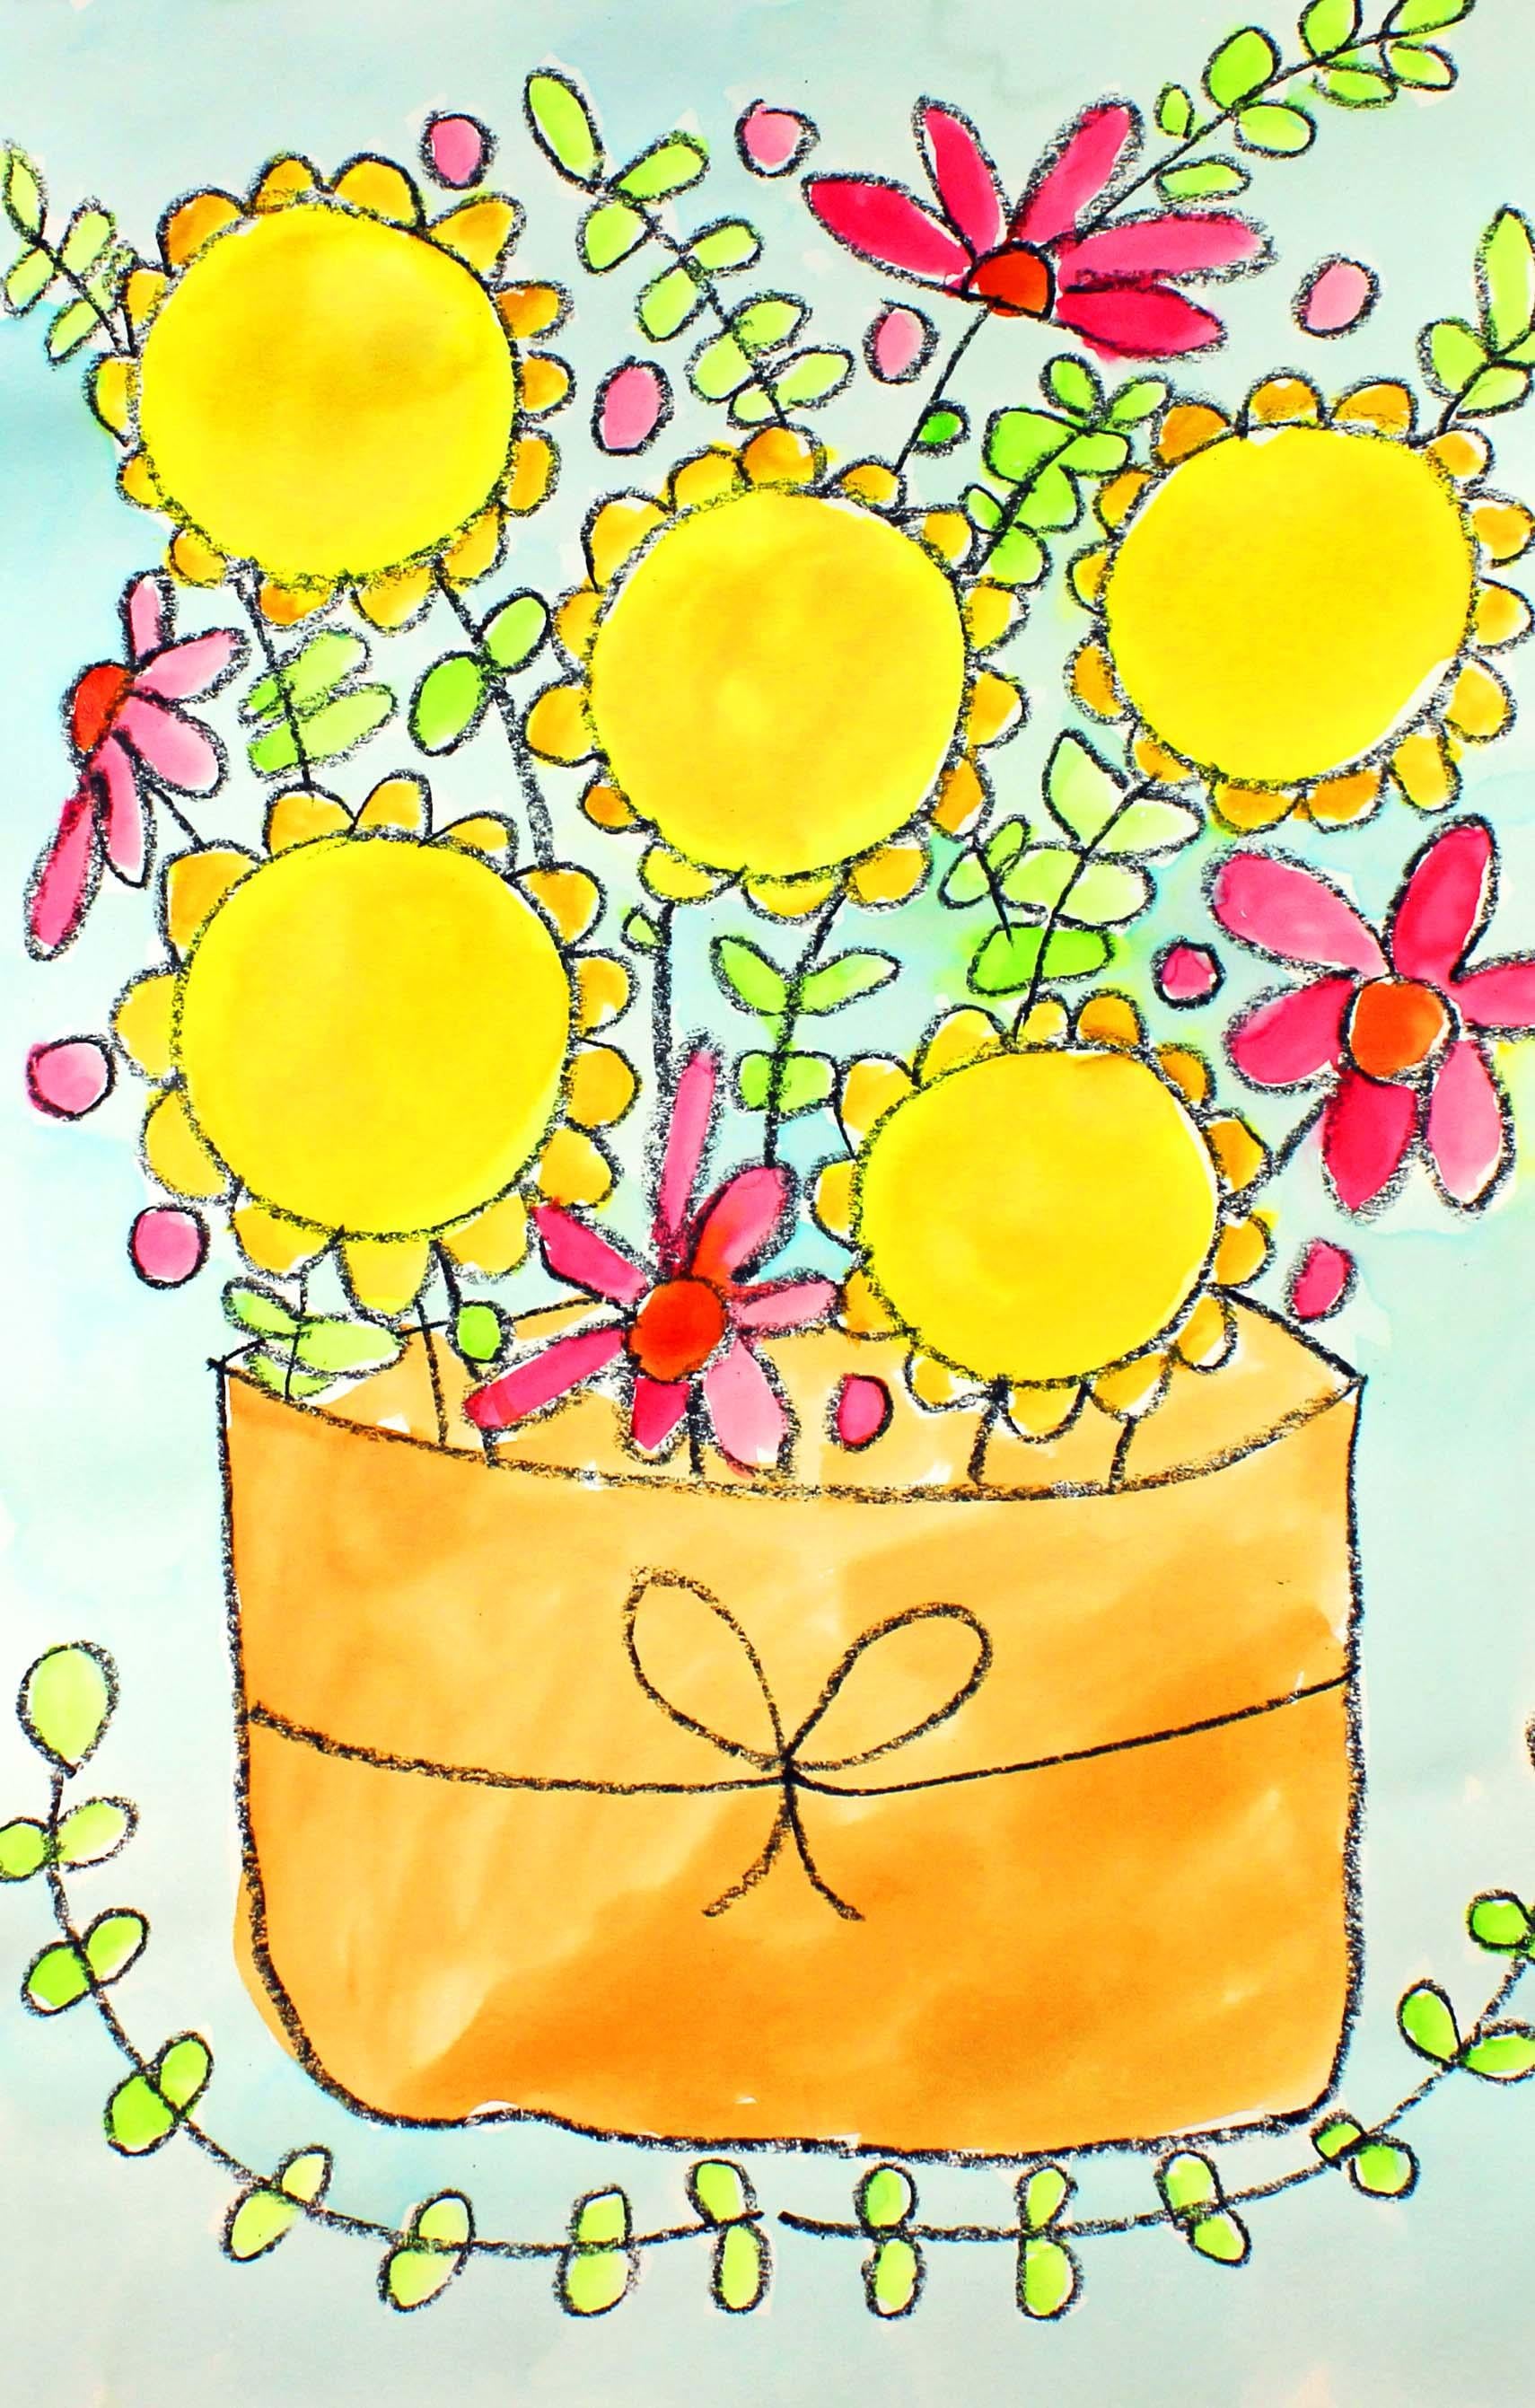
creating this fall bouquet. Let's talk about
the supplies and the materials that you will
need for this project. The first thing
that you'll need is a piece of watercolor paper. You will need a set of watercolor painting and
one or two paint brushes. I like to use a larger
one and a smaller one, but just use what you
have available to you. You will also need a black
crayon and a paper towel. So go ahead and gather all of those supplies and materials, and I'll see you back
here in the next video.
2. Step 1: Draw a Sunflower Bouquet: In this step, we are
going to draw our design. So let's get started. The first thing that
we're going to do is pick up our black crayon, find the center of
your piece of paper, and we're going to move
down just a little bit. Then what we're
going to do is we're going to make a curve line, and it doesn't have to be perfect from a couple
inches in here, a couple inches in here. That would maybe be
about 3 centimeters. Now what we're going
to do is from here, we're going to make
our flowers up here in our little sack that's going to be holding the flowers down
here at the bottom. We're going to start with the
flowers up here at the top. So what we're going
to do first is we're going to focus on
the sunflowers. So you're going to
make four or five. It's your choice. Four
or five large circles. So I'm going to
make a circle here. Look at how large it is.
Maybe one here. That's two. They don't have to be perfect. Three, four, five. I've had a lot of experience creating circles,
drawing circles. So if your circles don't look like my circles, that's okay. We want your circles to
look like your circles. Now, around each one
of these circles, we're going to make
some small petals. So small petals. Those are going to just be the
letter U going all the way around connected to
that initial circle all the way around. So I'm going to
take a moment to do that around each
one of my circles. There we go. Now
what we're going to do is we're going to
fill in the rest of the spaces with
different types of flowers and different
types of leaves. Okay? So that's what
we're going to do next, and that's even before we put the stems on our sunflowers. So I'm going to make
a flower up here. It's going to be a flower
that looks like this. There's a semicircle, and then it has some longer petals
coming out like this. And then maybe I'll make
another maybe a daisy over here on this side. If your crayon goes off of your sheet of
paper, that's okay. And let's see. I'm
trying to think of some other types of flowers. Maybe I'll put this
type of a flower, but the other way upside down. All right. And then maybe I'll put another daisy right
here. I like daisies. They're my favorite. That's why I like to draw them a lot. Alright, now that we have our
area filled with flowers, let's add some leaves. You can add any type of leaf. So you can either make
just random leaves around or you can make a set of leaves with
a stem on it like this. See how I'm adding
these leaves on here. Maybe I'll make one
coming up this way. This almost reminds you of me of a eucalyptus type of a leaf. Just think of the leaves that
you've seen out in nature, and then you can go ahead and
make those types of leaves. All right. Now I'd
like you to take a look at the top
part of your artwork. If there's anything else
that you'd like to add, go ahead and add something. For example, if you see a
space like this space and you want to add an extra
leaf or even a circle, go ahead and just add something there so that your artwork
is pretty filled up. It's pretty busy. Just
going to add some circles. I like to do that sometimes when I want to fill
up some space. Put another circle
up here and up here. Alright, now that we have all of our leaves and our flowers, if there are any
stems that you'd like to put on your flowers,
go ahead and do that. And we're just going
to come down to this line right here. So just come down to the line. If you need to jump over the circles or the
petals or the leaves, go ahead and do that
jumping with your stems. So let's see. This
guy needs a stem. Maybe a stem right here. And oh, this one needs a
stem coming down here. So just make sure that all
of your flowers have stems. And then if you have room, you can even add some
leaves onto those stems. Put a circle here. So just take a look at your artwork and then if there's
anything else that you'd like to add to the top of your artwork where the flowers
and the leaves are, go ahead and add
that at this time. If you feel like
you're finished, what we're going to
do is we are going to close up our little sac. And the way that we're
going to do that is we're going to make a line
coming this way. But the trick is, we're not going
to go through any of these leaves or flowers.
Let me show you what I mean. So we're going to start
here on this end, and then once you run
into a leaf or a flower, you're going to jump over
that leaf or flower. And then you're just going
to keep going until you hit the other side
of this curve line. So when you look
at your artwork, it looks like this is a little sack that these
flowers are sitting inside of. Alrighty. Now that we have
our flowers, our leaves, and the top part of our sack, we're going to make the
bottom part of our sack. So we don't want it to be
perfect because it's a sack. It's like a fabric sack. So we're just going
to come down. It's not going to be perfect, a little bit slouchy, and then close up at the bottom. And then if you'd like
to add some sort of a little bow in the
center or on the side, you can go ahead and do that. I'm just going to add
this type of a shape. It's like a teardrop shape, and then I'm going to add
two little curve lines, and then it's going to
come over like this, and that's going to be a
little bow on my sack. Now, underneath here, I am going to add a little
bit more detail, a little bit more detail. I'm going to make some
curve lines coming up and then I am going to add some
more leaves onto those lines. If you want to do this
part, you can do this part. If you don't want to do
this part, that's okay. Just adds a little
bit more detail. I hope you can see
this on the video. There we go. Now, if
there's anything else that you'd like to
add to your artwork, go ahead and do that at this time before we start
adding our watercolor painting. In the next step, we will be adding our
watercolor painting, so I'll see you in
the next video.
3. Step 2: Paint the Design: In this step, we
are going to add some watercolor
painting to our design. So let's get started. The first thing that
we're going to do is we are going to add a drop or two of water into each
of our pans of paint. And what that will do is it will soften up our
paint a little bit, so it is much easier
for us to use. So I do encourage
my students to take a moment to take this step
because it really does help. Now that our paints
are softening up, let's turn our attention
to our design. So here we have a bouquet
with fall flowers, and we have a little sack that
the flowers are inside of. So when we think about fall, we think about browns and
yellows, oranges, some reds. Those are the fall colors. If you'd like to add other colors as well,
go ahead and do that. That would be a nice
touch, as well. What we're going to focus
on for this part of our project is just
painting the flowers and the leaves and the
sac that the leaves and the flowers are inside of and these leaves down
here at the bottom. We're not going to be painting the background in
this step, okay? So keep your focus
on the flowers, the leaves, the sac, and these leaves down
here at the bottom. Alright, so I'm going to start with my
larger paint brush, and I'm going to paint
the sunflowers first, and then I'm going to move on with my smaller paint brush, and I'm going to paint the
smaller areas with that brush. If you only have one
size paint brush, go ahead and use that
paint brush that you have. So I'm going to try to
stay inside the lines, but I am also going to
understand watercolor painting, they love to spread around. So I am going to not get too upset if the paints start to run around
into each other. So I'm going to start
with some yellow here, and then I'm going to
add a little bit of brown on top of that yellow, and that will create
a little bit of a mix on our sunflowers. So let me go ahead and
do that and show you how I'm going to mix that
brown with that yellow. So I'm going to take a
small amount of brown, and then I'm just going
to mix it in like this. Alright, what I'm going to
do now is I'm going to go ahead and speed up the
video, and you can watch me. It will only take
a minute or so, but I'm going to
really in real life, I'm going to be
painting slowly and carefully. So here we go. Alright, friends, I'm
finished painting my design. I'm really happy with it. I'm glad that I used
those fall colors. When we come back, we will
be painting the background.
4. Step 3: Paint the Background: Okay. In this step, we are going to paint
the background. So let's get started. What we're going to do
is we're going to paint a very light light color
for the background. The color is going to be soft. And the way that we're
going to be able to create that color is to add just a little bit
of paint to one of our wells and then
a lot of water, and that will create a
really soft color of paint. Let me show you what I mean. So what you're going
to do is you're going to choose the
color that you like. You can choose any color
from your palette, and you're going to add some water from
your cup of water, you're just going to
add some drops of water with your
larger paintbrush. Get some water into that well, and then you're going
to choose your color, and you're going to put just a little bit of
paint on choosing blue. Into that well and going
to mix it really well. And you're going to
do a little test on your piece of paper and make
sure that it's really light. If your color is
not super light, go ahead and add some
more water to it. So we're just going
to go around all of our leaves and our flowers. And if you don't get every single bit of paper
painted on, that's okay. Because we're just going to do a quick paint job
with our paint. You might not even be able to see my blue paint very well. I can see it a little bit, but it's a very soft color. And this looks really
nice with my artwork. Just going to get in
those little spaces. If you would feel
more comfortable using your smaller paint brush, you can go ahead and do that. But I'm comfortable with this because I know that
I'm probably not going to get every single tiny, little space, and that's okay. I don't have to paint
every little tiny space. Right, so what I'm going
to do is I am just going to continue on until
I feel like I'm finished. Alrighty friends, I'm finished adding my really
light blue paint. Take a look at your design, see if there's any
other space that you need to fill in with your paint. I see a space right
here that I forgot. Remember, you don't have to
fill in every little space, but if you want to, you can. So what we're going
to do now is we are going to take a look
at our artwork. S to yourself, great job. And I hope that you had a lot
of fun with this project. I will see you next time. O.
 Em Winn, Teacher, Art Instructor, Artist