Transcripts
1. Introduction and Supplies You Will Need: A Hi, friends. How are you? I hope you're having
a great day today. I'm excited about sharing
this project with you. This is a drawing and
watercolor painting project that I designed,
especially for kids. You do not need to have any drawing or painting experience at all to be successful
with this project. I will guide you step by step through all the steps
that you need to take, so you will feel
comfortable at all times. Today, we are going to
create this cute ama. Et's talk about the supplies and the materials that you will
need for this project. The first thing
that you'll need is a piece of watercolor paper. You will need a set of watercolor paints and a bowl
or a cup with clean water. You will need a pencil with an eraser and a small
paint brush for these black lines and a larger paint brush for
your watercolor paints. You will also need some
black acrylic paint. Black acrylic paint
is nice to use when you are outlining
a project like this. So when you add
watercolor paints to it. It doesn't smudge
and smear around. You will also need a palette to put your acrylic paint onto. I just like to use a
small paper plate. So go ahead and gather all of those supplies
and materials, and I'll see you back
here in the next video.
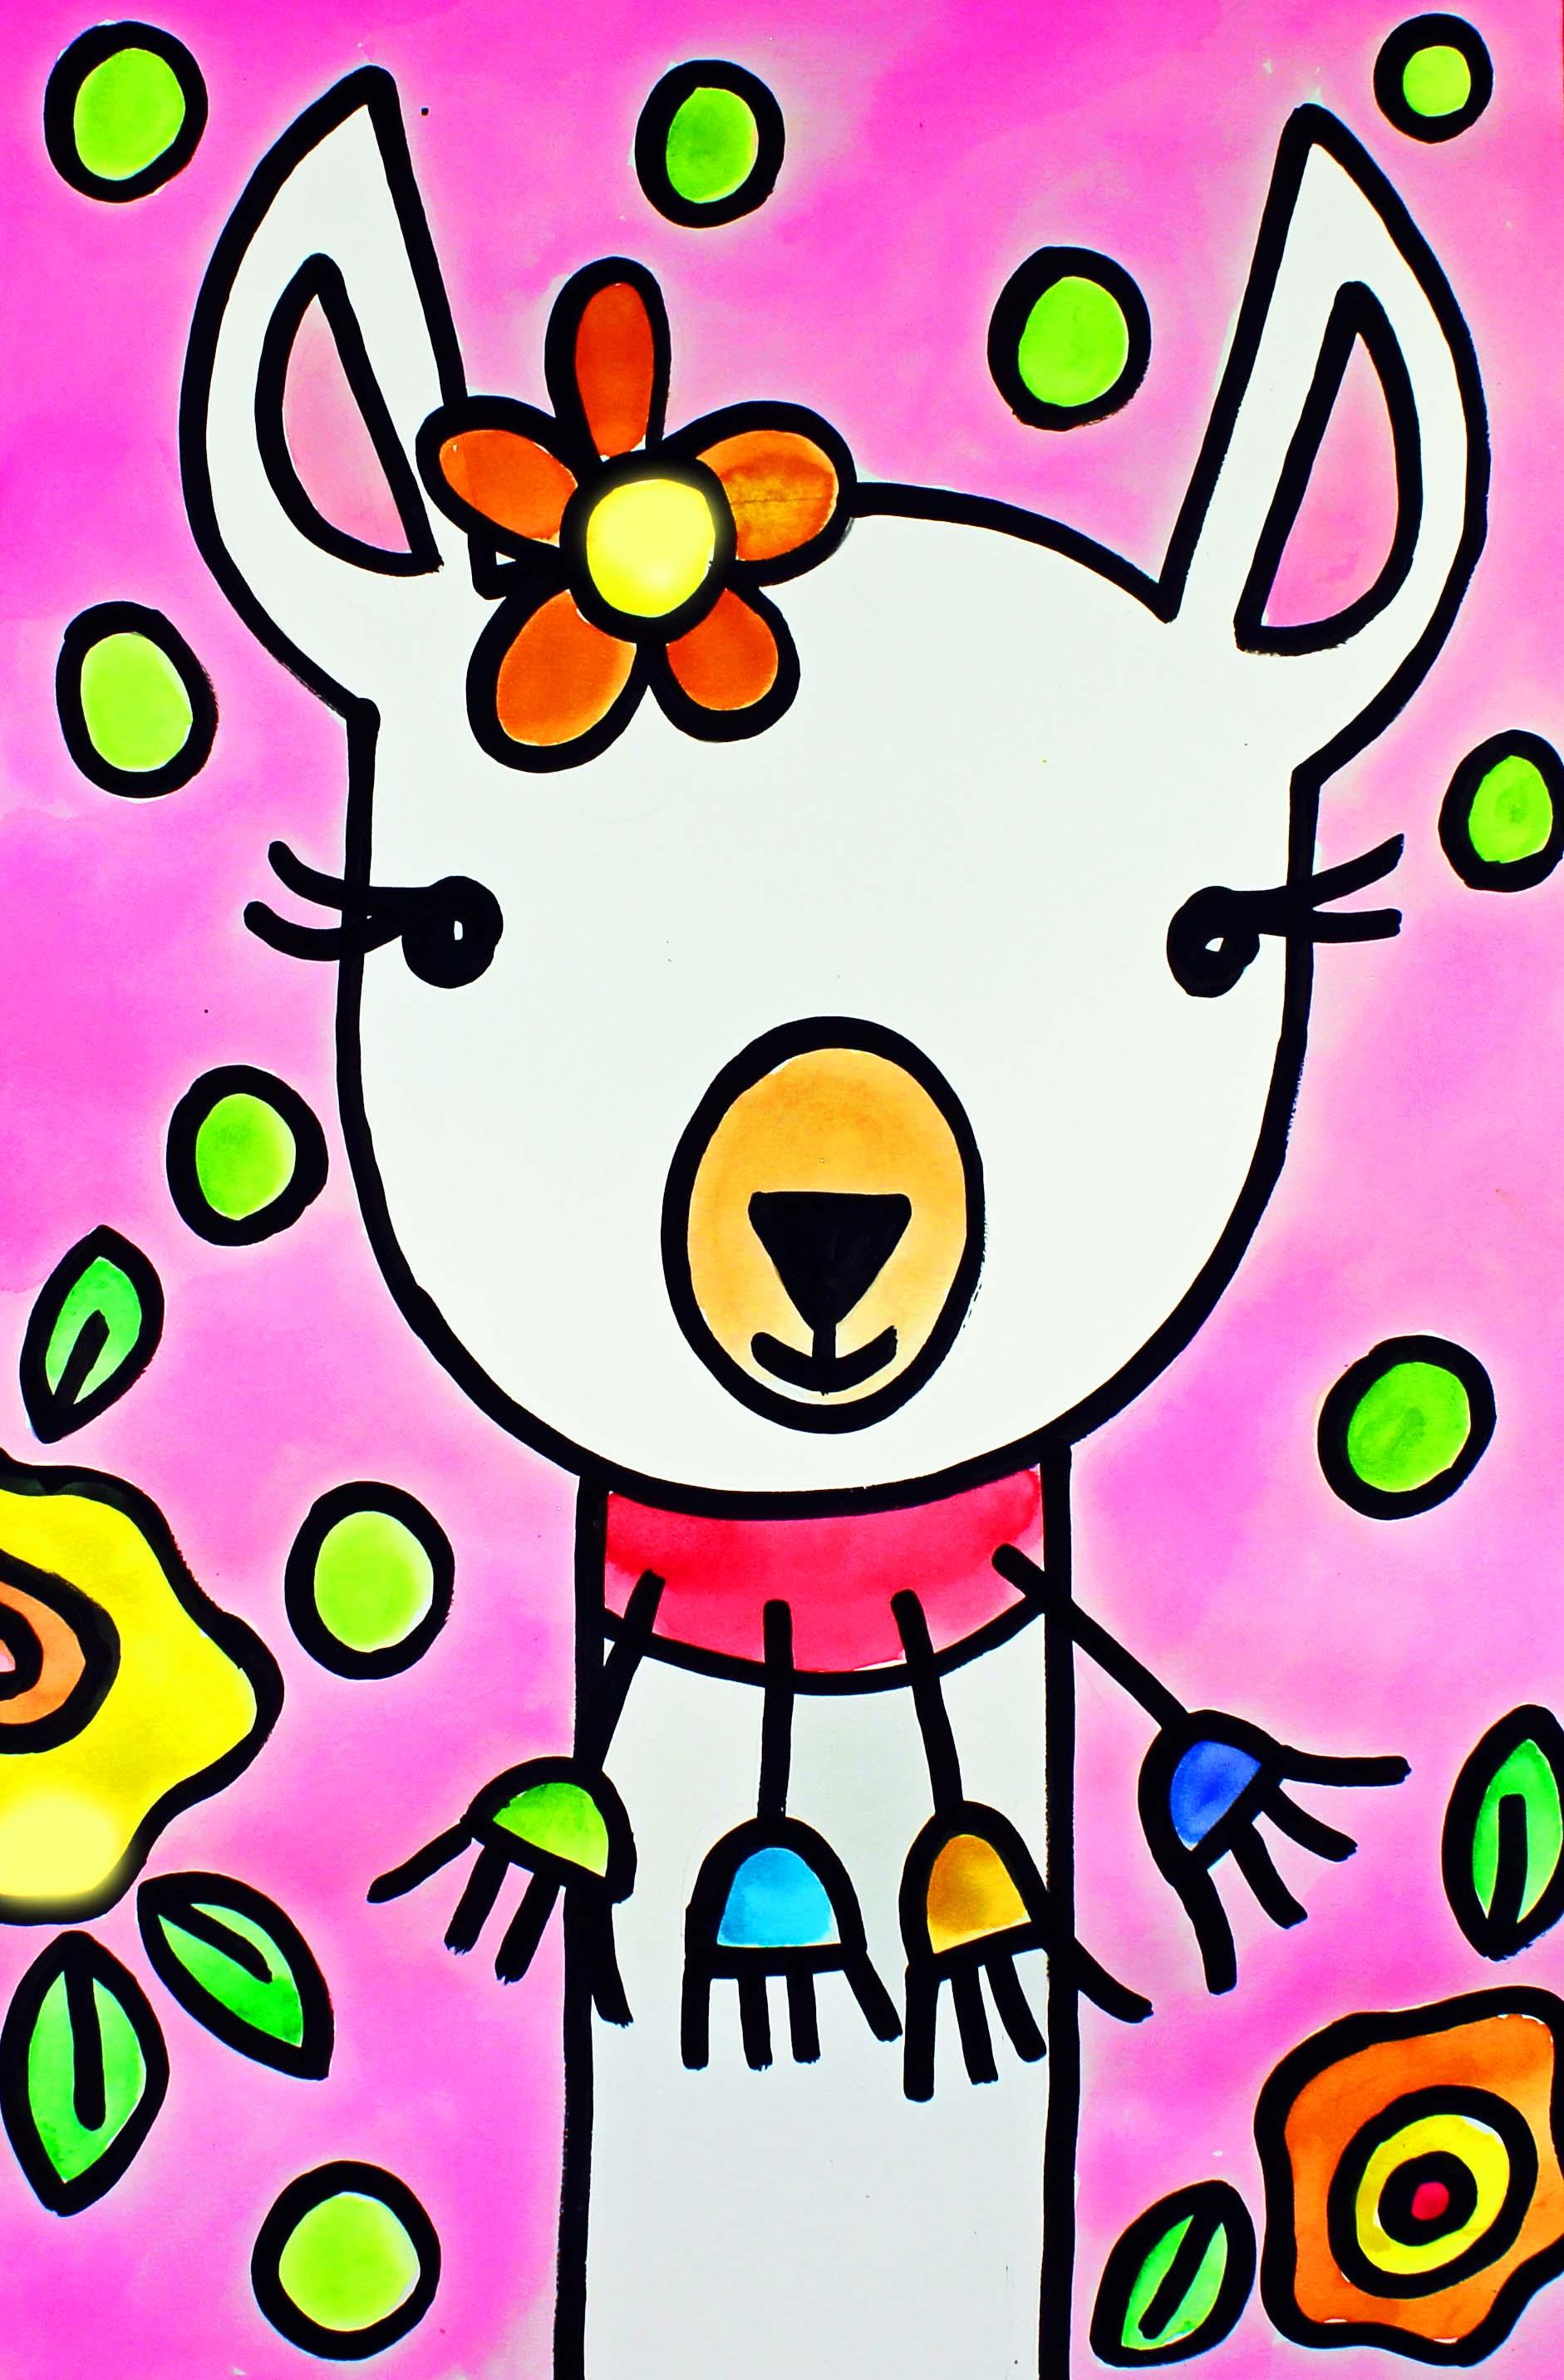
2. Step 1: Draw a Cute Llama: In this step, we
are going to draw our ama design with our pencil. So let's get started. We're going to go close to
the top of our piece of paper and come down about five or 6 ". That would be about
nine or 10 centimeters. We're going to start more on the left hand side of
our piece of paper, and we're going to
make a curved line. You do not need to press
really hard with your pencil, I'm pressing pretty hard so that you can see
it on the video. After we have our curve line from the ends of
our curve lines, we're going to make some
slightly slanted lines going up towards the top
of our piece of paper. Those are going to
be the inside part of our llama's ears. Then we're going to make a
curve line coming down about right there on both
sides. There we go. So now we have the ears and the top of the
head of our llama, and we're going to
make the bottom part of our llama's head, and that's just going
to be a U shape. So we come down Grove around, and then we come back up and we close at the bottom of this ear. So we start at the
bottom of this ear, and then we close at
the bottom of this ear. Notice how large the
face is on my ama, I want it to be nice and large. If your shape of your head is different from
mine, that's okay. That's normal, and that's
how we like it to be. We want your artwork to
look like your artwork. Now, let's put a little bit of detail on the
inside of our ears. So straight line and then curve line straight line
and then curve line. And now let's move to
the face of our llama, and let's make two circles, and they're going to
be pretty far set. They're going to be pretty
wide on our piece of paper. And mas do have some
big, long eyelashes. So let's make sure that we
give them some long eyelashes. Now, down here, we're going to make the nose
area. That's an oval. That's at the bottom
of our shape. And now we're going to put the actual nose on the
inside so straight line. And it's like a V, but almost like a U
and then a line coming down from the bottom
and a small smile. There we go. Now, if you'd like to add anything
here at the top, like a flower or a cap or anything like that,
you can do that, as well. I'm going to add a flower. So I'm going right
over that line, and then I'm just going
to make some petals. I'm going right over the lines. There we go. I'm going to erase
these a little bit later. Okay, the next thing
that I'm going to do is I'm going to come down here
to the neck of my ama, and I'm going to make
some straight lines coming down all the way to my bottom of
my piece of paper. And then we're going
to come pretty close to the bottom of the face of our llama
and make a curve line. And then this is going
to be the collar, and then we're going to
make some decorations coming off of the collar. I'm going to make a
line coming down, and then a small tassel, and then I'll make another one. If you'd like to make something different, go ahead and do that. This is your artwork, so you
get to draw what you like. I think I'll make three
or four of these. I'll just see how many will fit. I think one more over here coming off the side
would look nice. So that's basically a
line coming out from the collar with a U upside down U at the end with
some lines coming out. Those are your little tassels. Okay, now, at this point, if there's anything else
that you'd like to add, you can go ahead and add
it to the background. And I think what I'm
going to do is I'm going to make a small
flower down here. So I'm going to make a circle. And an organic line, maybe a smaller circle inside. Maybe I'll add some leaves here. You can make any type of
design that you like. If you'd like to
add some flowers, you can go ahead and do that. I think I might add
another flower over here because I have a
pretty large space. Here we go. Maybe some leaves. Give you one more here. Now, I'm just looking
at my artwork, and I think that
there's something more that I'd like to add. I think that I'd like
to add something on the background in
addition to my flowers. I think I'd like to
add some circles, so I'm just going to
make some circles. And if there's something different that
you'd like to make, you can go ahead and do that. You can make some hearts, can make stars, flowers, more flowers if you'd
like. It's up to you. Or if you do not want to make anything in
the background, that's okay. M Alrighty. I think I'm finished. Now what I'm going to do is
I'm going to take a moment to do some erasing.
See right here. This line is going
through my tassel, so I want to erase that. It is important to erase because sometimes you get
confused as you're painting. If you forget to
erase certain lines, then you'll go over
them with your paint. So we want to make sure that
we get those lines erased. I'm not I don't have that many. There we go. I think that's it. Redraw that line. Alrighty. I think I'm finished. So I'm going to put
my pencil down, and in the next step, we will cover our pencil
lines with some black paint. So I'll see you back
here in the next video.
3. Step 2: Outline the Design with Black Paint: I In this step, we are going to apply
some black acrylic paint to our pencil lines. So let's get started. As you can see, I've already put some black acrylic
paint onto my palette, and I'm going to add a
couple of drops of water. And what this will do is it
will make the paint easier for us to use when we are applying it to
our piece of paper. So I like to just
add a few drops of water and then mix up that
paint and water together. So that the paint flows a
little bit more easily. And then I'm going to
try to get some of that paint off on my paper towel because we want to make sure
that it doesn't harden on our paint brush. So I'm going to use a small
paint brush for this part, and I'm going to just load my paint brush with
someblack acrylic paint. I'm going to start at the
top of my piece of paper, and I'm going to work my
way down my piece of paper. I'm going to hold
my paint brush. Pretty vertically, that
means straight up and down. That way my line will be
a little bit thinner. Because this paint
brush is so small, I will have to reload this brush quite a few
times with my black paint. I'm going to go
slowly and carefully. So I do my best work
on this project, and I'll speed up this video. So that you can watch me. Alrighty friends, I'm
finished covering my pencil lines with my
black acrylic paint. Now what I'm going to do
is I'm going to wipe off the excess paint
onto my paper towel, and I'm actually going to rinse out this paint brush
with my water, and this paint brush, this is the one that
I used for mixing. Go to rinse those out
because I want to make sure they're really,
really clean because, as I said before, if you leave acrylic
paints on a paint brush, the bristles will stiffen and the paint brush
will be ruined. So you want to make sure
that that gets cleaned out. That acrylic paint
gets cleaned out. Now that we've covered our
design with our black paint, we're going to make
sure that we allow our paint enough time to dry. It's really, really
important that the paint is dry before we start adding our
watercolor painting. So let's go ahead and allow
our paintings to dry, and I will see you back here in the next video after our
paintings are completely dry.
4. Step 3: Paint the Details: A In this step, we are going to apply some watercolor painting
to our design. So let's get started. The first thing that
we're going to do is we are going to add a drop or two of water into
each of our pans of paint. And what this will do
is it will soften up our paints so they are
easier for us to use. So I always encourage
my students to just take the time
to add a drop or two of water into each pan
of paint because it will make your painting
experience a lot easier. So while these paints
are softening up, let's turn our attention
to our design. Because this is your artwork, you get to use the
colors that you would like to use
for your artwork, and I will use the colors
that I would like to use. I am going to leave
my llama white. You can certainly paint your llama a different
color if you'd like. This is more of a cartoon ama, so feel free to use any
colors that you like. I'm going to paint this area, this nose area, a light brown, maybe some pink for the ears, and for the flowers, maybe orange and yellow,
green for the leaves. And I'm not quite sure about this color and these
little tassels. I'm not quite sure what I'm
going to paint those yet. So what I'm going to
do in this step is I'm going to paint everything
except for the background. The background is
this area right here, all around the circles, all around the llama, and all around the flowers.
That's the background. We're going to save that
area to paint last, okay? So I'm just going to start with the flowers, the nose area, the ears, the collar, the tassels, and the
flower and leaves. So I think what I'm
going to do because I know that this is going
to be a light brown. I'm going to make some of
that light brown right now. It's going to be pretty light, so I added a little bit of
water and a little bit of brown paint to one of my wells
on my palette right here. And I'm just going to carefully take my time and paint
that a light brown. Now I think I'm going to move to a pink color for the ears, a very light pink. And then I think what I'll do
for the rest of the design is I will speed up this
video so you can watch me. I'll see you back here
in just a minute. Alrighty friends, I'm finished
painting the details. When we come back, we will
start painting our background.
5. Step 4: Paint the Background: In this step, we are going
to paint the background. So let's get started. As I mentioned earlier, you get to choose the
colors that you'd like. I'm going to choose a light
pink for my background, but you can certainly choose
whatever color you'd like. I'm going to prepare my pink paint because I
want it to be pretty light. I'm going to put quite a bit
of water in one of my wells, and then I will add a
little bit of pink, and then I'll test it out on my piece of paper to
see if I like it. Well, I like it a lot.
First try. I got it. Alright, so what I'm going
to do is I'm just going to carefully paint
my background. If I feel like I like
to switch colors, I'm just going to switch. Sometimes you will find that
you think that something will look great in your
artwork and just go for it. That's what art
creating art is about. It's about experimentation
and having fun. Alrighty friends, I'm finished
painting my background. I hope that you had a lot
of fun with this project. I will see you next time.
 Em Winn, Teacher, Art Instructor, Artist