Transcripts
1. Introduction and Supplies You Will Need: Hi, friends. How are you? I hope you're having
a great day today. I'm excited about sharing
this project with you. This is a drawing and
watercolor painting project that I designed,
especially for kids. You do not need to have any drawing or painting experience at all to be successful
with this project. I will guide you step by step through all
the steps that you need to take so you will feel
comfortable at all times. Today, we are going
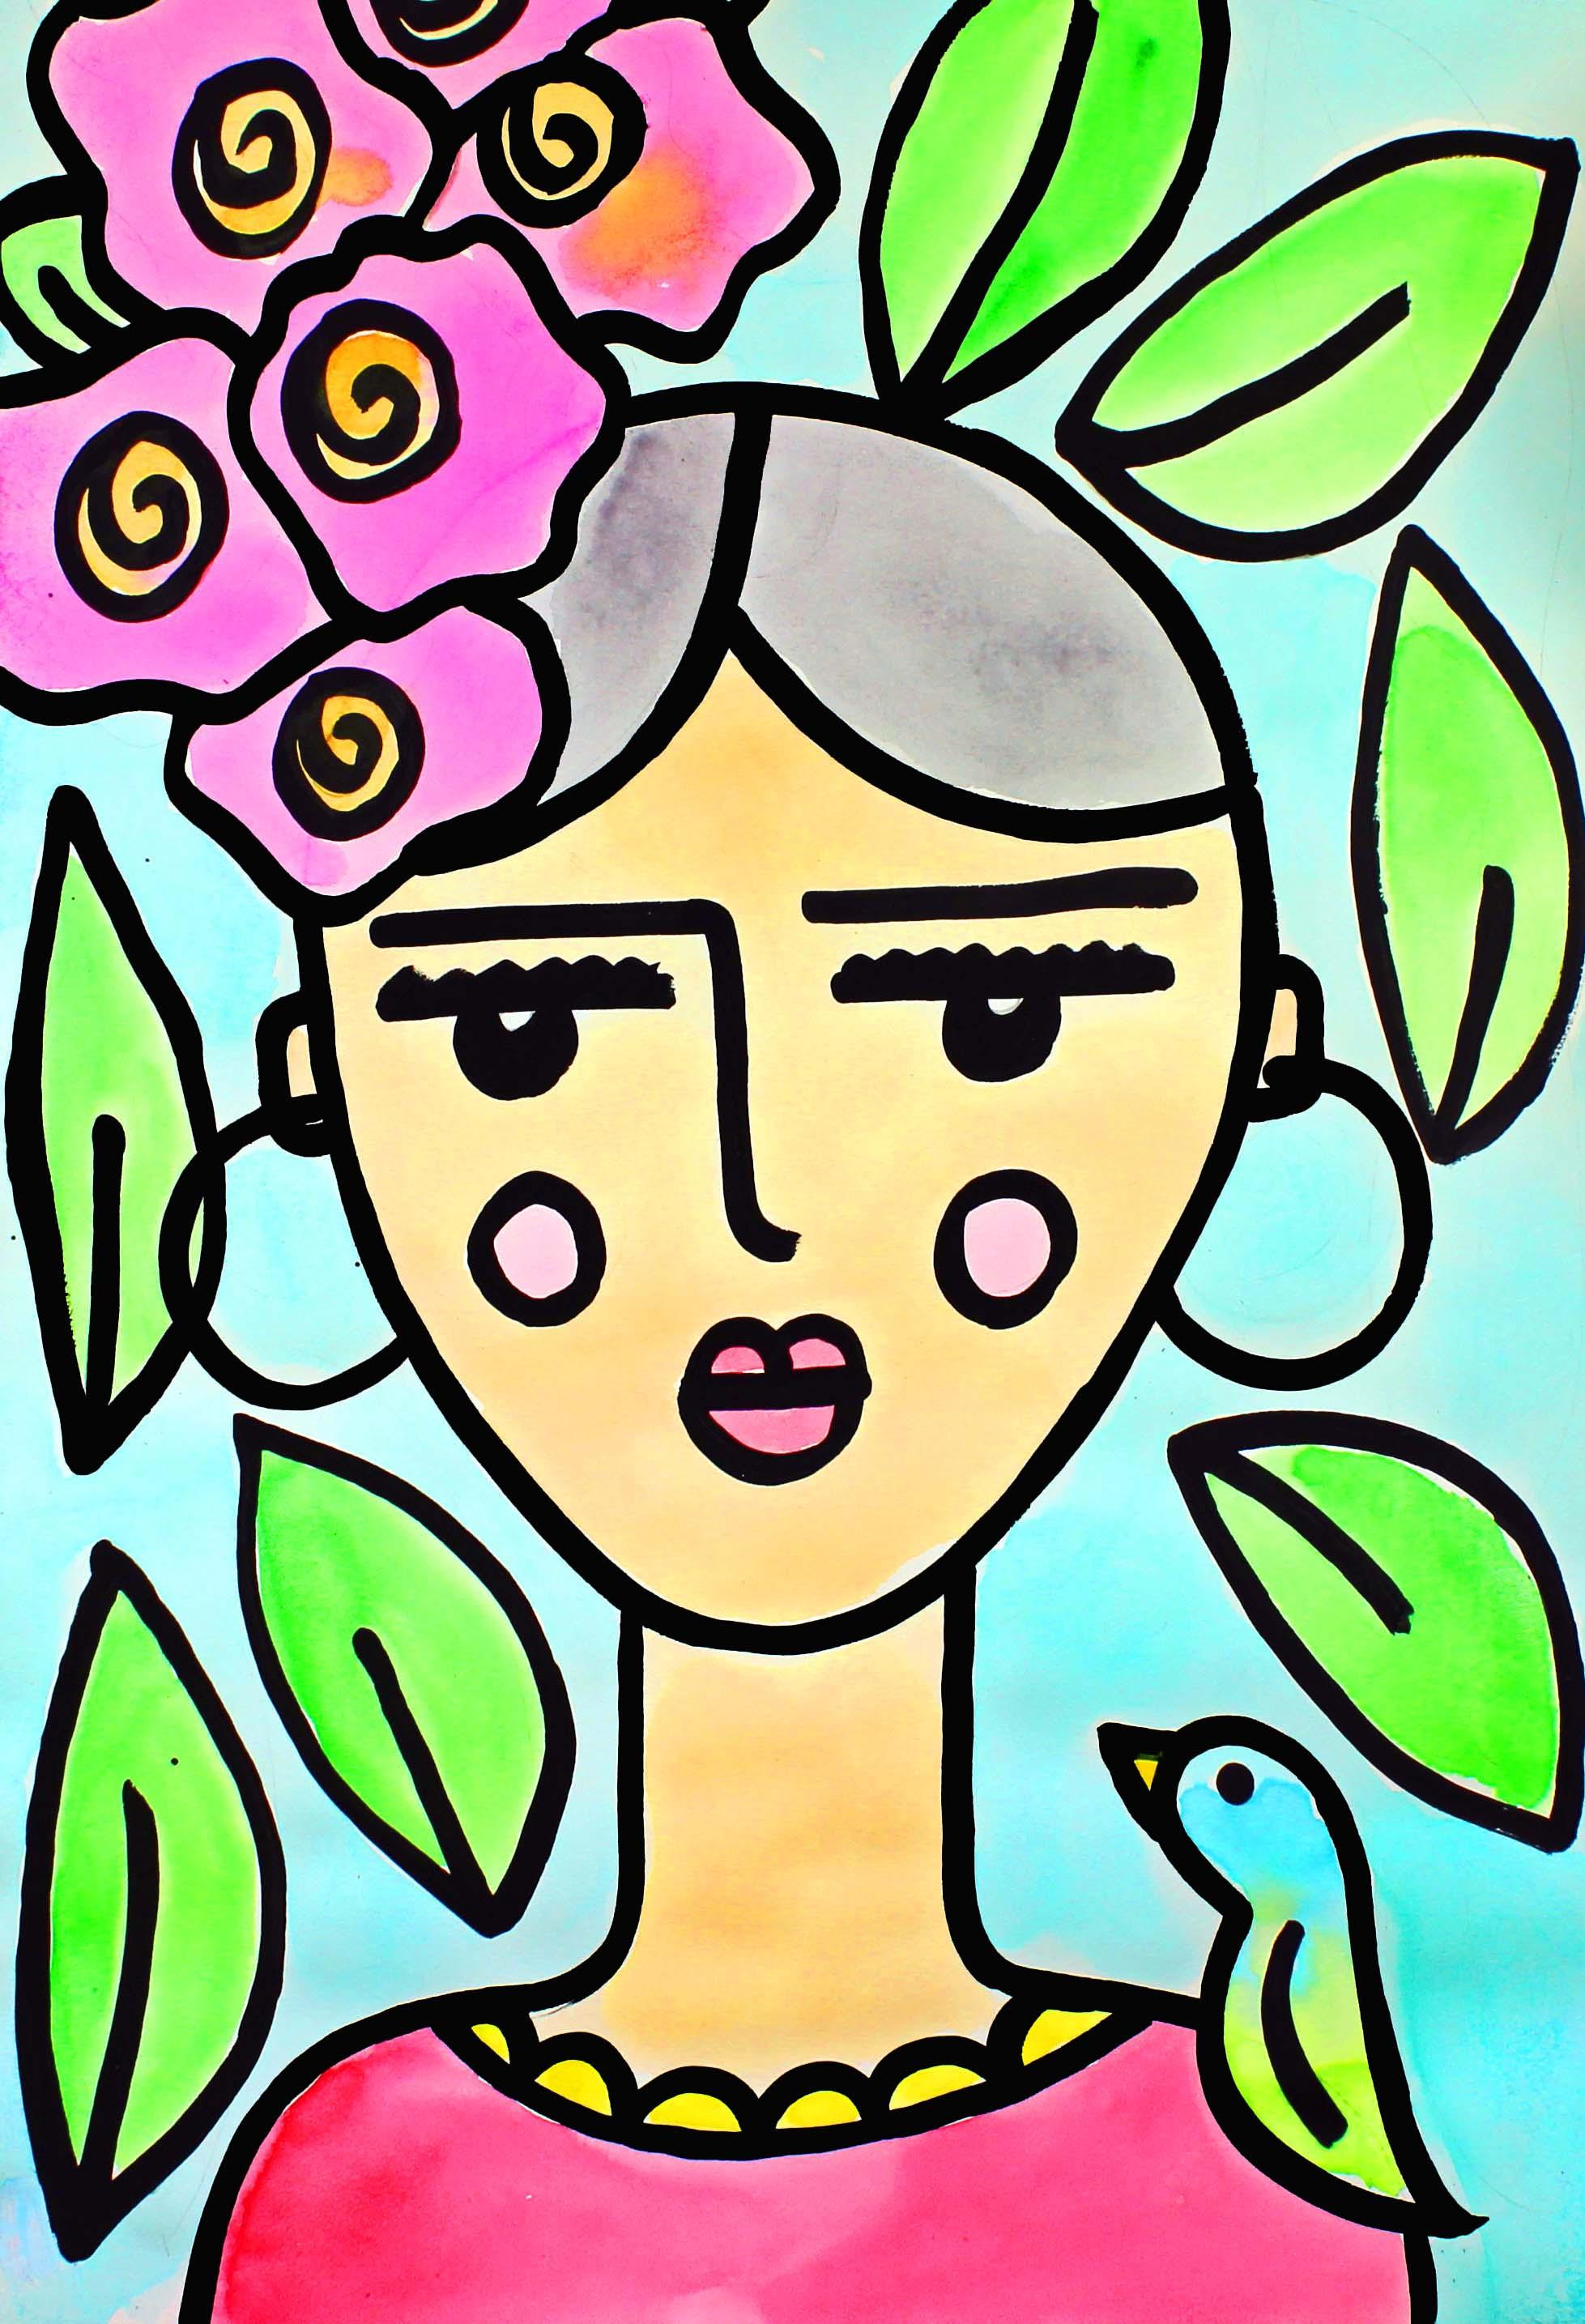
to be creating a portrait of Frida Carlo. Frida Colo loved to create her own portraits,
her self portraits. So that's what we're
going to do today. We are going to create a drawing and painting
of Frida Colo. I hope that you have
a lot of fun with this project. Let's get started. Et's talk about the supplies and the materials that you will
need for this project. The first thing
that you'll need is a piece of watercolor paper. You will need a set of watercolor painting and a bowl
or a cup with clean water. You will need two different
size paint brushes. You will need a
smaller paint brush for the lines that we
are going to create, and then you will need a
larger paint brush for when we start using our watercolor
painting to paint. You will also need a
pencil with an eraser. And you will need a paper towel, and you will need some paint. You will need some
black acrylic paint. Acrylic paint is a type
of a paint that will not spread around when you add water to it or
watercolor painting. So I like to use this
black acrylic paint, and you will need
something to put your acrylic paint onto. So you'll need some
sort of a palette. I just like to use a
small paper plate. So go ahead and gather all of those supplies
and materials, and let's get started
in the next video.
2. Step 1: Draw a Portrait of Frida Kahlo: In this step, we are going to draw our Frida cool portrait. So let's get started. We're going to go to the
middle of our piece of paper, and the one thing
that I'd like you to keep in mind is this portrait is going to fill up almost the entire space
on our piece of paper. We're not going to make
a little tiny portrait, a little tiny face. Our Frida face is going to be large on our piece of paper. So keep that in mind as you're
working on your artwork. Go ahead and pick
up your pencil. We're going to go about five or 6 " from the top of
our sheet of paper. That would be about
eight or 9 centimeters, and we're going to
make an oval shape. The oval shape will be a little bit more
narrow at the bottom. Let me show you what I mean. So I'm going to
start about right here. I'm going to come down. I'm going to go a little bit
more narrow at the bottom of my oval and then come
back up like this. It almost looks like
an upside down egg. If you feel like you need to erase a little bit,
go ahead and do that. This is not the easiest shape to create, so take your time. And like I said, if you
need to erase some, that's okay. You can do that. Once you're happy with your
shape, we can move on. Alright, we're going
to go to about right here in the
middle of our oval, and we're going to
make two lines. And these are going
to be the eyebrows. So I'm going to
make a line here, not going quite to the
middle of our oval. We're going to stop
about right there, and then same thing
on the other side. Like that. All right. Now on this left hand eyebrow, we're going to bring a
small nose coming down, so we'll curve around, and then we'll make a
little curve at the bottom. All right, it's very subtle. So again, we start
at the left eyebrow. We come down, and then we make a small
curve at the bottom. These are going to be our
eyebrows and our nose. Now let's go to the eye area and make some straight lines. So one straight line here and one straight line here
underneath the eyebrows. And then we're going to make some zigzag lines on top of those lines
that you just created, these are going to
be the eyelashes. This is not a
realistic portrait, so it's going to be a
little bit more abstract. Underneath these zig zag lines, we're going to make some circles pretty
much in the middle. And then inside those circles, you're going to make one more
smaller circle at the top. There we go. So these are Frida's eyebrows, nose, eyelashes, and eyes. Now let's come
straight down from the nose about right here and we're going to make
a small straight line. And then on top of this line
right here at the very end, you're going to make two
upside down Us two here, and then one U here. These are going to be
Frida's lips. Okay. All right. Then
we're going to make some cheeks and
those are going to be in the cheek area and those are going
to be some circles. Now that we have our
facial features, we're going to move to
the side of the head, and we're going to
create some small ears. So right here at this spot
where we see our eyelashes, you're just going
to come out with some small ears on either side. You can make those round or a little bit more square.
It's up to you. And then underneath each ear, we're going to make a
large hoop earring. Alrighty. So we have some
ears and some hoop earrings. Let's go back up to the
top of Frida's head. And what we're going to do is we're going to make some hair. So she's going to have her
hair up in a little bun. So we're going to have a
curve line about right here. And then another curve
line coming down from this initial curve
line down this way. So these are the
features for our Frida. Now let's go ahead and
make Frida's neck, and we're going to come
down on either side. She had a very slim neck. So we're going to
start about right here and we're
going to come down, curve around, and
then come down. So we have her long neck, and then we curve around, and those are her
shoulders right there. So same thing on this side. And then let's make a neck line for her clothes right here. So we're going to
make a curve line. And then you can add something
down here if you'd like. I'm just going to add some
curve lines that are connected together for a little scallop
decoration on her dress. Alright, there we go. So we have Frida's face and features. We have her hair. We have
her neck and her clothing. Now let's go back up to the top of this face
right here on the left, and we're going to make
some flowers in her hair. Frida loved to wear
flowers in her hair, so let's give her some flowers. So I'm just going to make some
flowers that are going up and pretty much touching the top of my piece of
paper and the side. So just a big bunch of flowers. You get to decide
what kind of flowers you would like to have
on your Frida portrait. If you'd like to have the same
kind of flowers that I do, you can go ahead and be
inspired by my flowers. I'm just going to
make a curve line with a small swirl inside, and I'm going to make
several of those. So circle with a swirl inside, and then I'll add the
petals in just a moment. And remember, if there's
another type of flower that you'd like to create,
that's absolutely fine. I'll make another one up here. There we go. I might add another one up here.
I'm not sure yet. So after I have the center
parts of my flowers, what I'm going to do is start
with this one right here, the one that's
closest to her head, and I'm just going to make an organic shape
that goes around. I like this type of a flower. And then I'm going to go to
the next closest circle, and I'm going to make
another organic shape. Look, I went off of
the piece of paper. That's okay. Happens
to me all the time. Come around and close up here. This flower is going to be
behind this front flower, so I want to make sure that the line doesn't
go through this flower. Same on this flower right here. So organic shape. There we go. I think I might add one
more flower right here, and it looks like I'm going onto Frida's head,
and that's okay. Whoops. I forgot
to add the swirl. This This flower right
here will just show that the flowers are a little bit
more attached to her head. There we go. Perfect. Alright, as you can see, we have a little
bit of pencil line going through these
flowers, and that's okay. What we'll do is we will come back after we're finished
with our drawing portion, and we will erase those lines. Okay? So it looks like the flowers are in
front of Frida's head. Alright. Now I'd like to add some things to the background, some details to the background. So I'm going to add first, a very small bird on
Frida's shoulder. And what I'm going to do is I'm going to put
it about right here. I want it to be on this side because I already have
the flowers on this side, so I'd like it to my bird to
be on the right hand side. So it's going to
be a small bird, so I'm going to make
a curve line and then I'm going to make
another curve line and then a curve line
that comes down. It's almost like a little dove. If there's a different type of a bird that you'd like to
make, go ahead and do that. So I'm going to
make a little beak and an eye and a
line for the wing. And as you can see, Frida's shoulder comes
through the bird, so I'm going to erase that
in the next step, as well. Alrighty friends. So now we
have our Frida portrait. We have our bird and our
flowers in Frida's hair. Let's add some more
details to the background. Frida loved details
in her background, so let's add some leaves, maybe a couple of flowers. It's up to you as to what
you would like to add. I'm going to go ahead and add some really giant leaves
to fill up that space. So I'm going to just make
this type of a leaf. You see that? So
they're very simple. But it will fill up some space. If I don't have a lot of
space in a certain area, like, right here, I'll
just make a smaller leaf. Alrighty friends, so
I'm finished filling in my background
space with my leaves. I added quite a bit of detail. When we come back
in the next step, we will be doing some erasing. So I will see you back
here in the next video.
3. Step 2: Erase the Pencil Lines: In this step, we are going
to be doing some erasing. So let's get started. As I mentioned before,
you might have some lines that
you'd like to erase. I know that I do, and so we're going to be working
on that in this step. So if you take a
look at my artwork, you will see right here
in this flower area, there are some lines
that I need to erase, so I don't make a mistake
when I'm painting and paint over those lines because they're going
right through the flowers. So I want it to look
like the flowers are on top and in front
of Frida's head. So I want to make sure
that I erase those. And then if I erase
a line by accident, I'm just going to redraw it. Okay? So that's that. Let me take a look.
I'm just trying to look very, very carefully. Here's one right here
that I need to erase. And your lines, of course, are going to be
different from mine. So everybody's going to be
erasing different things, and that's how it's
supposed to be. This line that's going
through my earring, I'm going to keep that one
because this hoop is very, very thin, so I'm going
to keep that line. But I see another
line down here. See on the bird. I
am going to erase that because I want to be
able to see Frida's shoulder. So I'm going to erase that. And I think that's it for me. So go ahead and take your time in figuring out the lines
that you'd like to erase. And when we come back
in the next step, we will be adding some
black paint to our design.
4. Step 3: Outline the Design with Black Paint: Oh In this step, we are going to cover up our pencil lines with
our black acrylic paint. So let's get started. The first thing that
we're going to do is pour a little bit of black
paint onto our palette, and we need to make this black paint a
little bit thinner, so we are going to add
some water to that paint, and that will make it easier
for us to use because the paint will flow a little bit better on a piece of paper. So I put a few water drops, maybe about five or
six water drops. Onto my paint, and I'm
going to mix it very, very well because I want
it to be consistent. I don't want there
to be big huge globs of paint in certain areas, and then I don't want it to be really thin
in other areas. So I'm mixing that really
well. There we go. Now what I'm going to do is I'm going to clean off
this paint brush with my handy dandy paper towel because there was a big
glob of paint on there. So I want to make sure that it mostly comes
off, not all of it. Alright. Yeah, I'm going to use one of my
smaller paint brushes. I'm going to use this one. But I have another
size paint brush right here that I could use, but it's a little bit bigger. I think I'm going to
use the smaller one. So we're going to take
our time on this, go slowly and carefully
so you do your best work. And if you do happen to go off of one of the
lines, that's okay. Don't worry too much about it. I do that all the
time. And I just say, Oh, well, it still looks great. What we're going to do
last is we are going to use the back of
our paint brush, dip it into the paint, and then cover our bird's eye. That will make a
nice round circle. All right, friends, what
we're going to do now is allow our black paint
to dry completely. If we do not let our black
paint dry completely, what will happen when we add our watercolor painting is the black will spread
around into the paint. So it's really, really important that we allow this paint to dry. After our paint dries, we will move on
to the next step, and that will be applying
some watercolor painting.
5. Step 4: Paint the Design: In this step, we
are going to apply some watercolor
painting to our design. So let's get started. The first thing that we're
going to do is we're going to take our
larger paint brush, and we are going to
dip it into our water, and then we are going to add one or two drops of water
to each pan of paint. And what this will do is it will soften our paint
up a little bit, so it makes it much
easier for us to use. So I do encourage my students to take this
step because it makes things a lot easier when you're trying to get the
paint out of your paint pan. There we go. Alright, let's turn our attention now to our
design. Here we have Frida. She has her bird. She has
her flowers in her hair, and she is surrounded by leaves. And what we're going
to do is we are going to start by
painting Frida, her face and her
neck and her ears. So that's the first step. Then we are going to move on to the flowers and the
bird and her clothing. And then we will save the leaves and the
background for last. Sound good? All right, so we're going to start out
with the face in the neck. Like I said, we're going
to create a skin color by mixing a few colors
from our pans of paint, and your color might be a
little bit different from mine. That's okay. That's actually
a really good thing. And we're going to be doing some color mixing on our
little palette right here. If you have one of
these, that's great. If not, what you can do is you can use this palette over here, and you can test some
different colors out on this palette if
it's a piece of paper. So feel free to do
that if you'd like. So what I'm going
to do is I'm just going to put a few drops of water inside one of my
wells on my palette. And then I'm going to add
a small amount of brown, just a very, very
small amount of brown. And then I'm going to add
a small amount of orange. And I'm going to see what
color I come up with here. Oh, that looks nice. I'm
very happy with that color. So I'm going to go
ahead and paint my Frida's skin on her
face and neck, this color. There we go. I'm really
happy with that color. Now what we're going to do is we are going to move along to the bird and the clothing
and the flowers. I think I will move
to the flowers next. I'm going to use pink
for the flowers, so I'm going to drop
a few drops of water into one of my wells and
add a little bit of pink. And then I'm going to make the outside of the flower right here a little bit lighter. And then this spiral
on the inside, I'm not sure I might
make that pink or I might make it a different
color. I'm not sure yet. So I'm going to go ahead
and paint these flowers. Then I'm going to move along, and I'm going to paint the
inside of the flowers. Then I'm going to
move to her clothing, and I'll speed up the
video so you can watch me. Alright, friends, I'm finished painting my face and
my neck on my Frida, her clothing, the
bird, and the flowers. As you can see, there's a little bit of blending
with the flowers. There's a little bit of mixing,
and I like it that way. I think it looks
really, really great. So when we come back, we are going to paint
the background, which includes the leaves
and this background part. And then the very last
thing that we're going to do is paint Frida's hair black. So I will see you back
here in the next video.
6. Step 5: Paint the Background: In this step, we are going
to paint the background. So let's get started. I already know that I'd like
to paint my leaves green, and I think with my background, I'm either going to choose a blue or this
turquoise right here. So I'm going to start out
with the green because I know that I want my
leaves to be green, and then I will move on to the background after all of
my leaves are painted green. So you can go ahead
and watch me. I'm going to try to be really, really careful so I can
stay inside of those lines. Alright, friends, I'm finished
painting the background. I decided that I'd like to paint the background
a light blue. I started out with this
turquoise color down here, and then I changed my mind. And I just wanted to let
you know that that's okay. When you are creating art, you can change your mind.
And so that's what I did. I changed my mind, and I went with just the
regular light blue, and I think it looks fantastic. The last thing that
we're going to do is we are going to
paint Frida's hair, and she had really dark
hair. She had black hair. So we're going to
put a little bit of black paint inside of our palette inside
one of the wells, and I'm not going to make her
hair really, really dark. Going to go with more of a gray. But to make a gray, you need to use your black
with quite a bit of water. That's how I am going
to make her hair color. Finish that and there we go. There's our Frida C. I really hope that you
enjoyed this project. I will see you next time.
 Em Winn, Teacher, Art Instructor, Artist