Transcripts
1. IsomeTRICK Moves: I've been teaching
on Skillshare for about four years producing many classes in Illustration
and graphic design. Some of the most
enjoyable things in the class creation process are the short title sequences
I get to create. Through these sequences, I'm able to add a little
bit of animation. Though they are
only a few seconds, they have a big impact. Hey, guys, my name
is Kyler and Parson, and I am not a motion
graphics expert. Wait. Should I tell you that? Hey, guys, my name
is KylernParson. I am a graphic
designer, illustrator, and top teacher
here on Skillshare, and I am not a motion
graphics expert. Hey, but I use After
Effects all the time, and that means you can, too, even though
you're not an expert. I come from an
illustration background. After Effects is
a powerhouse tool with so many tools and features, and at time, it can
feel overwhelming. And, trust me, I've been there. I was scared to
open the program, but when I learned
some of the basics, it was really fun. In this class, I will try
to remove the curtain and share with you how
anyone can animate. I will start out small and
show you the interface, focusing on key areas you
should know to get started, gradually building up
your understanding to animate simple
transformation properties. We will learn simple ways to mask objects using track mats, parenting different layers, and learn some basic expressions. This will be an introductory
course into after effects. That will take you from I'm a bit scared to open
the program too. Hey, I am a master
motion graphic designer that can animate anything. Maybe not that, but at least by the end of this
class, you'll animate a thing. Through our journey
into After Effects, I will help explain some of the key tools to add motion to illustrations from
the file set up in Adobe Illustrator to importing and animating key properties. There will be side lessons to
help you understand what's going on and why we're using
the tools that we're using. You don't have to be an
expert to make fun stuff. You don't need a
ten hour course. All you need is a little bit of time and after effects, I guess. Yeah, you probably need
after effects to learn it. So make sure you have that. So if you're ready to get
moving, I'll see you in class.
2. Welcome To Class!: He Hey, guys, welcome to class. For this class, we'll create
a simple animated gift, as well as a quick
and punchy six second real All using the
same animation. For this class, you will need Adobe Illustrator
and after effects, as well as Adobe Media
Encoder for the final export. We will have a customizable
Illustrator file so you can add some
personal touches to your class project. So a basic understanding of Adobe Illustrator is
definitely helpful. I will give you a brief
introduction to after effects, showing you the interface and some of the key
windows we will use. Throughout our journey in
learning after effects, there will be many
lessons to help you understand the tools
we will use to create our class
project and gain some basic understanding
of how things are working. All the files as well as
the class project files, and my final Adobe
After Effects file will be available to download
in the class resources. So you can reference
and learn from. I would highly recommend
downloading and printing out the isometric moves keyboard
shortcut, cheat sheet. So you can reference it as
we go through the class. Getting familiar with the
keyboard shortcuts will help you navigate and speed up your
workflow in after effects. Having the reference
sheet available will help you to start
build up the habit, and it will save
you loads of time as you progress
in after effects. This class will touch
a lot of parts of after effects in a relatively
short period of time. Although it may feel
overwhelming at times, feel free to pause or rewatch a lesson to fully take
it in before moving on. Or you can watch through the whole class and get
a big picture of what we will do in the class
and then go back and reference the sections that
you still need help with. After watching the class, if there are still parts
that are difficult for you, feel free to post in the discussion panel so we
can all learn together. So if you're ready to get
moving in after effects, go download the
project resources, and I will see you in class.
3. Setting Up After Effects: Hey, guys, in this class, we'll just jump into after effects. We'll poke around at some of the windows and see what
we need for this class. Okay? There's so many
windows in after effects, and it can be overwhelming. So in this class, I'm
just going to get rid of all the windows and just
talk about the necessities. There's three windows
that we're going to use the project panel, the composition window,
and the timeline. For this class, these are the only three windows
that you will need. If you want to explore and see what's in the other
windows, go right ahead. But for this class,
we're going to just bring it right down
to the bare essentials so that we're not getting
too overwhelmed with everything that After Effects offers because
there is a lot, but we're going to just
look at what we need to get started in Adobe After Effects and start animating something. Alright, that's champ in. So if you have Adobe
Creative Cloud, you can open up the window
and just double click on after effects. I'll open up. After Adobe After Effects
opens up, you can select, create a new project, and it might look
something like this. This is the default window here. After opening After Effects, you can see that it gives
you an untitled project. It doesn't save automatically, so a good practice is
to save your file. So let's just go Control
Shift S, save your file. After opening up after effects, you'll be presented with
all these windows here. You got your project
window, your composition. You got effects controls. You got all these
different panels here. You've got the
timeline down here, and you can actually
change it up here. These are some default
window settings. So default gives you
all these options. Learn, you'll actually be able
to access some tutorials. Produced by Adobe to help
learn after effects. So if you want to
jump into those, you can learn there as well. You can go to Standard and
just see what panels are open. But for us today, we're just going to
get rid of everything and go through the
bare essentials. So the three essential panels that we need is the
timeline down here, the project window, and
our composition window. So everything else,
you can just go up and you can close those panels. So just go into the Top Burger menu
and close every panel. Now, doesn't after effects
look a little more manageable? Absolutely. All right. So we have three windows here. Now, if you wanted to create a new composition where
you would create a video, you can go down here,
create a new composition. Click there. I'll open up
the composition settings. You can name your comp Practice. And then you can set
up custom presets. There's also pre made presets. So let's say you wanted an HD video at 24
frames per second, that's here, and it'll give
you those perspectives. If you wanted to
change any of these, you can just click on Custom
and you can change it to anything you want
like 13 50 or sorry, 1080 by 13 50, and that'll give
you the dimensions for an Instagram video. All right. We'll hit Okay. Before we do that,
you can change the duration of how long it is. So it goes here milliseconds,
seconds, minutes, hours. So you will rarely touch hours, maybe minutes and
definitely seconds. So we're going to just change
this to 6 seconds and zero, zero, based on 24 frames per
second, full resolution. It's good 24 frames. Square pixels, that's fine. And background can be white. There we go. We
got a composition. As you can see in
our project panel, it created a new composition. This is where all our
media will be stored in. And then down here, you can see the practice composition has been brought up in the timeline, and this is where we're going
to do all our animation. We're going to add
in our layers. We're going to move
some properties around, and we're going to have
some fun in after effects. In the next class, I'll
just go over how to set up an Adobe Illustrator file for animation in after
effects. Let's jump in.
4. Set Up Illustrator File for Animation: Hey, guys, in this class, we're going to go
over how to set up an Adobe Illustrator file to prepare it for animation
in after effects. So let's jump right into it. So I have open up here
an Illustrator file that contains an
illustration that I created in one of
my other classes. Now, what I want
to do is I want to actually animate
this illustration. But in after effects, you're going to have to
separate everything that you want animated on
separate layers. When something's in one layer, all the properties
will, you know, be connected to
everything in that layer. So we want to separate what will be animated. So how
can we do that? So in Adobe Illustrator, we can find the things that
can be grouped together that will remain together in
Adobe After Effects, and then we'll
separate the things that need to be separated. If you see here in
my layers panel, I have a group that is the mug. I have the actual artwork that's on the mug and a shadow
and highlight layer here. All those can stick together, so I'm going to just select them all and I'm going
to group them up. So you can see my layers panel got a little smaller,
which is great. I want to keep the shadow separate so that
I can animate it separately or move it
or remove it as needed. All right? Now I have
this heart layer. And as you can see, this
heart layer, actually, it has a pattern
swash attached to it that allows me to
move it up and down, and the swatch, the reflection swatch
actually doesn't move at all. So it it gives this
effect that it's, like, moving, which
is really cool. And that's what I want
in after effects. But to set it up for
animation in After effect, we got to set it up
a little differently using something
called a track mat. So we're going to have to
set up a few more layers to make it work
in after effects. So the first thing
that I'm going to do is I'm going to jump
into my heart layer, and you can see that
I have my main heart, and then I also
have a layer with a pattern swatch attached to it. I'm going to cut
the pattern swatch, and I'm going to paste it in
place outside that group. So now I have two
different groups, the heart and the heart mask. So I'm going to give
this a color just so I can differentiate it. I want to have the
reflection basically stay stationary throughout the entire illustration
and animation, but I want this mask to move. So I'm going to have
to actually make another layer just
containing the reflection. So I'm going to hit
M on my keyboard. I'm going to make a box over my whole composition
or my whole artboard, and I'm going to give
it my pattern swatch, which was right there. Now I have different
groups in my one layer, but I don't want just one layer. I need to separated
into multiple layers. So how can I do that? I
could click on Layer one. I can go up to the
burger menu and say release layers to sequence. And now you can see
that all those groups, they were actually
converted into layers, layer two, three,
four, five, six, and now I'm going to drag
them out of layer one, plop. And I'm going to
delete layer one because we don't
need that anymore. Now, what I'm going
to do is I'm going to actually name my layers here so that it'll be easily
transferable into after effects. So the reflection,
I'm just going to double click and
name reflection. And I'm going to do the
rest of the layers as well. Alright, so now after
you name your layers, we are all ready
for after effects. Now, just one thing to
note is the reason why I separated the reflection mat
from the heart is because I only want the reflection
to be contained within this section of the heart and not the entirety
of the heart. If I wanted to use the
entirety of the heart, I can keep it as one layer, but I only want the
front of the heart to be the side that actually has
that animated reflection. So that's why I separated that specific section
of the heart. So now that you
know how to set up your Adobe Illustrator
file for After Effects, I'm going to give you a little bonus Illustrator
file that will allow you to customize
your class project however you want.
I'll see you there.
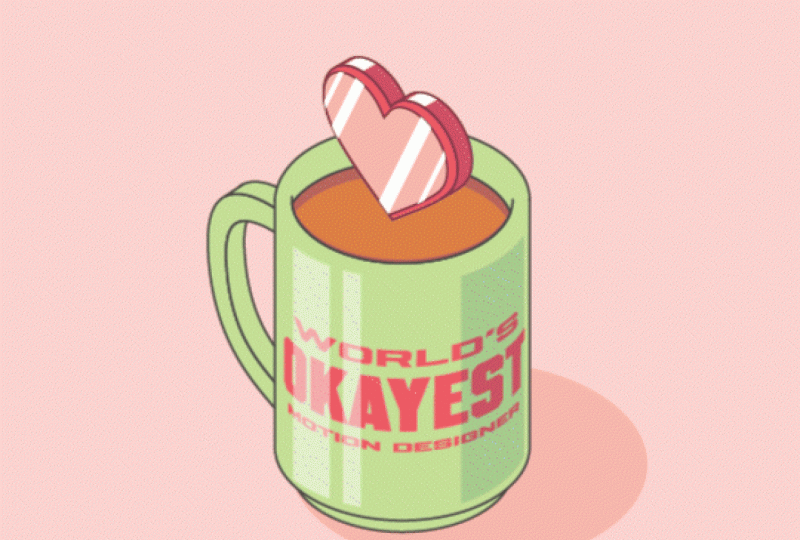
5. Customizing Your Illustration: Alright, so now that you
learn how we can set up an Adobe Illustrator file for animation and After Effects, I want to give you a little bonus Illustrator
file that you can customize and make
your animation a little more personal to you. Alright, let's see
how we can do that. So I have the file open
here, Mug Illustration, and now you can see that there are different sections
in this illustration. I have a reflection mask, reflection, object,
mug, and shadow layer. What I set up in this file is that in the actual mug
illustration here, I'm just going to turn
off the reflection for now so you can see it. You can see that I
have actually provided different icons that you
can apply to your mug. So if I turn off the
isometric logo here, you can actually turn
on a different one. Oh, hot cup of coffee. Hop, hot cup of awesome.
Yeah, that's even better. I love coffee. Number
one, motion designer. That's you. Love you. Very cute. World's
greatest boss. It's not me. World's
oest motion designer. Hey. That's my cup of tea. World's okaest motion
designer right here. All right. So yeah, if you want that,
you can change that. Also, if you hit Y
on your keyboard, you can select the mug. You can give it a different
color, whatever you want. You can select your icon
there, change that. Now we have it little
different. That's not all. Let's jump into the other thing. So you can customize the
graphic I'm just going to lock the muggler and I'm going to open up the object
and the reflection mask. These are two connected. So if I unlock both of them, you can see what's happening. I have my heart in
my object selected, but I can turn
that off and I can turn off my heart mask as well. Now I could turn on
some other object, lightning bolt maybe
and lightning mask. Now you're going to have a lightning bolt
over your coffee. That's awesome. Very cool. What about, I want to
have a conversation. Bubble mask, bubble. All right. Oh, you're excited
about coffee? Me too. Exclamation mark over
top of your coffee. And what we're gonna
do is we're gonna animate this top section. So maybe there's a location. World's Okiest Motion designer? Right here. That's this guy. So what we're going to do is we're going to animate
this up and down. We're going to make some
movement into here. And so customize your Illustrator
file however you want, and make sure whatever
you want visible in your animation is visible
in your Illustrator file. Whatever's not visible in
your Illustrator file will not be transferred over
to Adobe After efects. Make sure you turn back on your reflection layer because we want that to be seen
in our animation, and then we're going
to you know, close it. You can lock the
layers as if you don't want to touch
anything else. In the next class,
we'll jump into Adobe After Effects where
we will learn how to set up our project for animation and start animating.
Let's get into it.
6. Getting Started in After Effects: In this class, we'll import
your illustration into after effects so that we can start animating it. Let's
jump right in. So I have opened my after
effects file, class example, and now over in the
project panel here, I'm going to Right click and
I'm going to go to Import. I'm going to import file. I'm going to find
my mug illustration that I want to use
for my animation. And I'm going to make
sure the import option is set as footage and
create composition. I'm going to hit Okay.
And now, import kind, composition and your
footage dimensions, you want to retain layer sizes, and I'm going to hit Okay. So now you can see here we
got two compositions set up. One is the composition with all your Adobe Illustrator
layers within it, and the second one
is a composition. Yeah, it's just a composition with that composition inside it. And after effects you're going to have
compositions within compositions within
composition sometimes. And we'll see how
we can use that to our benefit when we create
our final class project. First of all, we have
mug Illustration one, this has our layers inside
and Mug illustration two. We're going to go into
Mug illustration one, and this is where we
can start animated. As you can see, all the
layers that we created in Adobe illustrator are now set as layers in Adobe aftereffex. The next thing that we
want to do is we want to parent objects that are going
to move together together. Now, what we want
to do is we want to parent our reflection
to our heart layer. Our reflection right now, it'll move separately from the heart layer. Just
going to undo that. Now, what we want to do is when our object, our heart moves, we want the reflection layer, the reflexion mat to go with it. So how can we do that?
Over here in our timeline, you can see that there's
parent and link. So what that allows us to do is parent our object
from one to another. So we want the object to be the parent layer because
that's what we're going to animate and we want
the reflection mask to follow it wherever it goes. So I'm going to just click
on the dropdown menu and I'm going to select
object as my parent. Now, if I were to click on the
object and move it around, I can move it around, and the reflection
mask will go with it. Now, what I want to
do is I want to make sure that the
reflection that I see everywhere around here is only seen through the
reflection mask. And we're going to use something called a track mat for that. So what is a track mat, you ask? Let's learn about it quickly.
7. Track Matte, What is That?: Alright, I have a file
open called AE Examples, and you have access to these. You can open them if you want
to play around with them. Feel free to check this out. But just to show you what's
some of the things that we're going to be using
in the animation, I'll show you here. Alright, I got the Track
Mat example open here. And as you can see, we have
this cool little park scene, isometric park scene
that looks really cool. And basically what
a track mat is, it's like a window to view your illustration or
to view your image. You can use different objects
or shapes to do that. So in Illustrator, we made a track mat with the
shape of our object. So as you can see here,
they're not in view, but you can see that
if I turn them on, there's waves,
there's some stripes. There's a star, and
there's a window. So there's your image
and then your track mat. You always want to
track mat the image to whatever layer you want
it to be contained in. So in this case, I'm going to find the
track mat options. If you can't see it,
you might have to do the toggle switch
mode down here, and then find Track Mat. Go to your layer Park, and it says no Mat right now, and then I'm going
to find window. Now, what that does is it
turns off the window layer, so it's no longer visible, but it uses the shape of that layer as a
window for the park. Now, if I click on the window, I can move it independently
from the park and you can see how you can only view the park through
this shape here. And that's going
to be very cool. And we're going to be able
to use this for track matting our reflection
in our animation. So you can go through and
you can use different ones. So change the track
mat to stripes. And now you can click
on the stripes layer, and they're like
blinds going down. So there's a lot of cool
uses for track mats, and you can use any shapes. We can change it to the
star and see the star. Now that we've learned
about a track mat, let's just apply it
to our animation. If I click on my track mat reflection mask, you
can see that that's here. I want to use the
reflection mask as a window to see the reflection. I don't want to see the
reflection everywhere just through the heart
reflection mask. So how I'm going to
do that is I'm just going to find the
track mat window here. I'm going to go
to my reflection. I'm going to sit here and I'm going to do reflection mask. Now, as you can see here,
the reflection layer is only visible through the
reflection mask layer. Now, if I move the object, you can see that the reflection
doesn't move anywhere, and we can only view
it through that. So if I animate it up and down, boom, you can see that it
will animate just like that.
8. Getting Moving with Key Frames: Alright, in this class,
we'll learn how to animate. All right. So let's jump in
here. We have our file open. We have our layers parented. We have our reflexion mask set, and now we want to animate our heart to move up
and down like this. To do that, we have to open
up the position property. And to do that, we hit
P on our keyboard. And this is where we're
going to do our animation. Now, we're going to set
something called keyframes. So let me explain
quickly what keyframes are and how you can apply
them to create animations. Key frames are essentially
bookmarks that store information of a
specific property in your timeline
or on your layer. So if we go into our layer, let's go to the
position one here. That's this little
ball over here. Let's just zoom
in. Let's go fit. Now we can see it. Okay?
That's this ball here, and we're going to just
drop down this menu. We'll go to transform options, and you can see there's a
few different options here. There's the anchor
point, position, scale, rotation, opacity. Those are the five properties that you can adjust to animate your objects or animate your graphics in
Adobe After effects. So we're going to look
at each one quickly and just see what you can do and you can play
around with them. So here we have the position. So the position right now
is currently at 328.2. Anyways, it's in this
vicinity on the screen, and this is the property values. If we hit the stopwatch, it'll create a keyframe
in our timeline. Now, what that keyframe is, it is a bookmark that stores this property
information right here. Now, if we drag our cursor or our playhead further down
in the timeline and we move it somewhere else, now it has different
information, and that information is
stored in this keyframe. Now, what Adobe
After Effects will do we interpolate one keyframe, one bookmark, to
another bookmark. Just as if you have a book, you know, you have one bookmark
and a second bookmark. There's 100 there's pages in
between those two bookmarks. And in order to go from
one bookmark to another, you have to pass through
all those pages. It's the same in after effects. You're going to have one set of properties and one keyframe, another set in another keyframe, and then Adobe After effects, it'll interpolate the stuff in between for you
automatically. So we can see that
happening here. So if I go back to the start
and I hit the space bar, it'll play the animation. There we go. So that
looks pretty cool. So if we extend it out a bit, we can just see the path that it takes from one
keyframe to another, one bookmark to another. What you can do is
you can actually use keyboard shortcuts to activate
or find your properties. So let's go down to the
scale property here. This is the bottom one. You
hit S on your keyboard. I'll bring up the
scale function here, and now you can actually
click on a keyframe and then bring it over more
and you can scale it up. As you can see, it's
getting bigger. And now you can say that's the bookmark of 177 and
the bookmark of 47, and it's going to interpolate between those two keyframes. Then we can go to rotation, hit R on our keyboard up here as the star. We can
go to the beginning. We're going to set a
keyframe, hit the stopwatch, go further in the timeline, and then we're going
to rotate it around. 360 degrees, and then that's one
rotation plus 13 degrees. Then if we go, Wow. Ooh. There you go. You got a spinning star there. Then finally, we have opacity. Opacity is T on our keyboard, and that'll change the opacity. It'll disappear. So
let's hit it at 100. Opacity can only go from 0%, no opacity, completely
clear or 100%. So those are the range of
values you can work with. So I'm just going to
bring it down to zero. And now you can see
what's happening. Yeah. Now you're seeing
how we can create some animation in Adobe After effects by setting
our key frames. Now, one last thing that affects your animation is
your anchor point. This one is more apparent when
you use scale or rotation, and we'll see how that works. So let's just go on rotation. So rotation right now, you can see that it's
the spinning star. But if I hit Y on my keyboard, it brings the pan behind tool, and that's the
anchor point tool. So now I can click
this little button in the middle of my star. That's the anchor
point, and that's where my transformation
will originate from. So right now it's spinning around this anchor
point around this dot. But if I move this
anchor point maybe down to this point
at the bottom here, now let's see how it
changes the animation. There you go. I made it quite a bit different
than it was before. It spins around that anchor
point. Let's go back in. Let's hit Y on our keyboard. Let's change it
down here and hit. Now you can see it's rotating around that point over there. Pretty cool. With scale, it's going to do a
similar feature. Let's click on Scale,
hit Y on our keyboard, and then just
change the endpoint to maybe this corner
and it scales up. Let's hit space bar to
start the animation. And you can see how
the scale sort of changes and it pushes
out from that area. Alright, so that's
simply how we can use keyframes and anchor points
to start our animations, and we're going to use them in our animation to make things move. Let's see
how we can do that.
9. Animate Your Illustration: Now that we know
about keyframes, let's start animating our heart. Okay, so what we're
going to do is we're going to click
on our object layer. We can see that it's
here and we're going to position it where we want
to start our animation. We want to start it
maybe down here so it's at the bottom near the mug. In our object layer, you can see that the position
property is open. Now, if you click the stopwatch
off to the side here, it'll set a keyframe
in your timeline. Now, the keyframe, like you saw is sort of
like a bookmark. It's going to hold the
information of these property. So this position values, they are contained
within this keyframe. Now, if I move in my timeline to 1 second and I
adjust the position, actually, this one will
contain a different bookmark, a different set of properties. Now, what Adobe After
Effects will do, it'll look at this bookmark
and look at this bookmark, and it'll find all the pages in between and
animate it like that. So now, if I hit play or hit
space on my keyboard once, you can see that it moves from
one bookmark to the other, one keyframe to another. Very cool. And because
we set up our parents, the reflection mask
moves with it, and the mat only contains
the reflection inside. So that's really cool.
I'm going to drag my timeline indicator over
to the two second mark. And what I'm going to do is
I could try and move it back down and try to position it
where the exact position was, or I can click on my keyframe. And I can copy it and paste it. And now, what you can see
is it goes up and down. That's how we can start
animating our illustrations, is we can use the position
properties, set keyframes, set one keyframe, one
bookmark at one position, move through the timeline, a second later, move it
to a different area. Adobe After effects will fill in the blank pages and animate
from one to the other. Okay? So we want to give a little more life
to this animation. So what we're going to do is we're going to use
something called ease. So in the next class, we'll
learn how to add some life, some character to our
animation with ease.
10. Make Smooth Animations with Ease: Alright, guys, in this section, I'm just going to quickly go
over how to apply ease to your animations to
make them feel a little more natural.
Okay, let's jump into it. So this is our Ease
example composition here, and in this, you can
see that there are four lines with four dots. Let's just see what they are. So there's four dots, and they have nothing
applied to it. They just have a static motion going from one side to another. So if we animate this, it
just it's pretty boring. Nothing too exciting happening. But ease allows the animation to feel a little more
natural, a little more fluid. It starts off at zero and then it slowly
builds up to full speed, and then before it
gets to the end, it starts to slow down, and that makes it feel
a little more natural. So how can we apply this? So in our second ball
here, E's in and out, we're going to
select our keyframes and to automatically input E's, we're going to hit F nine on
our keyboard, function nine. Now, what that does is it makes the animation
start out slow. As you can see, all
the other ones, the already ahead of the first ball because it's
easing into the animation. It's slowly entering
the animation. But as it goes to the
middle, it speeds up, and then eventually it
starts to slow down. And the animation ends at the
same spot at the same time. It's just what happens
in between that changes. It starts off slow and then speeds up and
then slows down. As you can see, it feels
a little more natural. What that's doing,
I'm going to show you the animation in something
called the speed graph. Now the speed graph or
the graph editor is here. It's a little wave or
a little S curve here. You just click on that.
You'll see the speed graph. We're just going to
click this button here and it shows you. The first animation,
this is the speed of it. It's completely constant at
668.48 pixels per second. It's completely
constant, no change. Now, let's go back and select the keyframes
of our Easy Ease. We're going to go to
the graph editor, fill the view, and this
is what's happening. It starts off at zero
and then it builds up and peaks in the middle and
then it comes back down. To zero. That's exactly
what's happening. It's easing in really fast
and then slowing back down. Let's go out of
our graph editor, and we're going to try
to apply the EZ Es in or out of our keyframe. We're going to just right click going to go keyframe
assistant and we're going to find EZ Es out or control
or command Shift F nine. That'll started off really slow. And then push to the end fast, there will be no
ease into the end, so it'll just stop abruptly. But that ease out is much
more apparent there. Now we'll try the opposite case, we'll hit the last key frame of our last one and easy ease in and let's see what happens. It starts really fast, but then it really slows down as it goes into
that last keyframe. So this is how we can apply
ease to our animations, give it a little
makes it a little smoother and gives it
a little more life. And yeah, so we'll try to
apply that to our animation. Okay, so now that we understand what ease is in
Adobe After Effects, let's apply it to our animation. So what we're going
to do is we're going to select our keyframes. We're going to just click and drag over all our keyframes. We're going to hit F nine. That's just going to
apply an easy ease on every keyframe. It's going to apply as an ease in and out of every keyframe. Now if I hit play
on my illustration, that looks a lot better. Very cool, very fun, very easy. Now, what I could do is I can just go to the
three second mark. I can copy and paste. My second keyframe and then
to the four second mark, and I'll take my
last two keyframes and I'll copy and paste. And now we have sort of
a looping animation. That's really cool,
really fun. Really easy. Now, what I want to show
you is how to actually automate this looping process with something called
an expression. Expressions are a
line of code given to the animated
property that allows them to automate
certain processes. We're going to learn
one expression in this class today
that allow you to loop animations so that you don't have to keyframe
every single insistence. Let's learn about that
in the next class.
11. Understanding the Loop Out Expression: In this class, we're going
to touch a little bit into expressions in
Adobe After effects to automate some of the
animation properties so that we don't have to work as hard because who wants
to work hard, you know? Let's jump right into it.
Alright, so jumping into it, I have my loop out
expression file open here, and you can see that there
are some bouncing balls. So they bounce over
and bounce back. This is just a position property animated with two keyframes. But when we put a
expression on it, you can see something happens. Now, to activate an expression, we're just going to delete
this expression here. Control click on the stopwatch that will remove the expression. To add an expression, we have our keyframe
set already, so they go from one
keyframe to the another. Now to add an expression, just go to the stopwatch,
alter option, click on it, and this will open
up our property here, our expression property. Now, if you wanted to,
you can search for expressions in the panel here, this little arrow
with the.in here, and here is where
you can enter it. We're just going to
do one expression today and it's the loop
out expression and it automates your
animation after the first two keyframes to
repeat over and over again. Now, there's four different
loop out expressions that you can try out
to see what you like, and we'll just cover
what they do in this class very quickly so
that we can understand it. Yeah, let's jump into it. So the first one we're
going to try is loop out. So it's LOOP and then O. And you can see that autofill
is for you really easy. So you can make sure you click on one of these
autofills LoopOut. Now I'll put it in
quotation marks, and this will give me four
different properties or four different types of loop out expressions that I can choose from Continue cycle, offset, and ping pong. They all work a
little differently, and we'll look at
them right now. So the first one is cycle. By default, if you put
in no quotation marks, it'll just automatically
go to cycle. So you don't have to
do it with anything. If you want cycle,
just loop out and the brackets and
that'll give you the cycle loop out effect. But if you want a different
one, you'll have to change the property with
the quotation marks. We'll just hit cycle for
now and we'll hit Okay. I'm just going to turn
off the other ones for now and just
see what loop out. These are our keyframes. We
only have two keyframes, but what happens after
these two keyframes run? It starts over. Cycle, it takes
the two keyframes. It basically starts
it again from the first keyframe and again. And again, just like that.
So it's pretty simple. Cycle. It cycle through
the two keyframes. It's cycle through the motions. If you have three Kframes as
a start from the beginning and cycle through all three and then repeat at the
beginning again. Frames as a start from
the beginning and cycle through all three and then repeat at the beginning again. Now, the next one is ping pong. Ping pong works a little
bit differently and I really like ping
pong because it can save you a lot of time to if you're going back
to the same position, it'll bounce back
automatically for you. So it'll go through
the first motion. But instead of going
to the first keyframe, it goes through the motions in reverse to get back
to the first key. Serve serve It goes through the motions in reverse to get back to the
first keyframe. I'll go from the last keyframe, back to the first keyframe, and then it'll
start again there. So it bounces back and forth. This one makes a really cool, smooth continuation
of your effect. Let's just play that through
and see how that works. Boom boom boom
boom. Really cool. Offset is a really cool one because it takes your animation, ends at the last keyframe and starts all the animation again, starting from that as
the first keyframe, ends at the last keyframe and starts all the animation again, starting from that as
the first keyframe, ends at the last keyframe and starts all the animation again, starting from that as
the first keyframe. So let's see how that
works. So it'll loop. And then it starts from here and does the
animation again, but starting from that point. And then it sort of does like a jump off the screen, leapfrog. Boom, boom, boom, boom. Very cool. Now, continue. I never use continue. So yeah. But here's what
it does. It takes the last speed and direction of your last keyframe
and it continues on with that motion
infinitely after. Okay? Now, let's see
how it works here. If I turn it on, if I
hit okay. It stops. The reason why it stops is because I have an Es attached to this keyframe and
the final speed of my keyframe here
is actually zero, so it won't move
anywhere because the last keyframe has a speed of zero and zero repeated is zero. Let's remove this keyframe. Let's change this back
to a regular keyframe. Okay, if we change it
to a regular keyframe, it'll actually speed up
into it and stop abruptly. And actually, that last keyframe would have had some
speed coming into it. So boom. And as you see, it sort of went off screen. But I'll just pull both
of those back. Oh, sorry. V. And here, I'll pull it over here and
you'll see what happens. She so just continues that speed and direction
after the animation ends. Yeah. There you go. So you can play around with this example worksheet if you'd like. You can go into the After FX
file, play around with it, try out all the different
types of loop out expressions, and then we can see how we can
apply it to our animation. So let's jump back into it.
12. Automate Your Animation with Expressions: In this class, we'll go through adding expressions
to our animation to sort of automate the
process a little bit. Stem in. So you can see here that
I have my animation, and I have keyframed
it back and forth, so I created a looping
animation like that. So if I wanted to automate the process even a
little bit more, I could use something
called expressions. So how do we add an expression? For an example, I'm just
going to duplicate my object, Control D, and now I'm
going to I have two layers. One, I'm going to keep as a
regular keyframe property, and then the other one I'm
going to add an expression to. So I'm going to delete all the extra keyframes and
just have my single loop. So as you can see here, now I have three
keyframes and at the start, it looks
like the same. But then after this keyframe
ends, it doesn't continue. But I want it to continue
repeating just like it is, but I don't want to have to animate every single keyframe. So what I can do
is I can go over here is I can hit
all on my keyboard. Click on the stopwatch, Alter
option on your keyboard. I'll bring up the
expressions window, and then you can enter
in an expression. If you want to look
at expressions, what After Effects offers, you can click on this
button here and it has all the different
expressions that you can use. All right? The one we're going to use
today is called LoopOut. Loop then out. And as you can see, when
I start typing it in, it already gives me
options to pick from. I loop in loop in
duration, loop out, loop out duration,
we're going to use loopOut After I hit loop out, I'm going to hit the
quotation signs, and that'll give me a few
different options of the type of loop out I want to
apply to my keetframes. So for this case, I want to use cycle because the beginning
frame and the last frame, they actually are the same, and I can cycle through it
really easily just like this. So I hit cycle, and
let's see what happens. Now when I play
back the animation, both the keyframe property
and the expression property move at the exact same rate at the exact same time. It's
the exact same thing. You're just having
an expression do the work for you instead of
keyframing every single time. Now, why is this beneficial? Well, let us just go up to
our composition window. Composition settings and
then go to the duration. I'm going to increase the
duration to 15 seconds. Now, if I hit the 15
seconds and extend, you can see sort of
what's happening. I'm just going to
drag to the end, select all my frames, and I'm going to hit Alter
option right square bracket. That'll extend all my layers to where I place the playhead. So now you can see
what's happening here. Now, the key frame property it goes up into
the last keyframe. But what about the
expression property? It continues even after that. And we can see this
happening in something called the post
expression graph. So if we were to open up
the post expression graph, you can see it right here, right beside this equal sign
that says Enable expression. We can highlight
all our keyframes, go into the graph window. Now you can see what's
happening here. These are the
keyframe properties that are in a solid line. But after that, that is the properties that are
continuing within expression. The keyframe properties
stop at this point, but the expression
properties continue. Well, infinitely. So if you just want to animate something
in a psycho loop, you can use the loop
out expression, and it'll continue infinitely. So if you extend your
composition longer duration, you don't have to re
keyframe everything. So that's one way it
can help you out in your illustration workflow or your motion graphic workflow. Exit the graph editor because we're not going to really
go into it in this class. It's just a basic
class, but this just visually shows you what's
sort of happening. I'm going to delete
the expression layer, go back to my properties. I'm going to get rid of all these keyframes
and I'm going to apply a different keyframe. Now I just have
the two keyframes going from the
bottom to the top. But now I want to
use an expression to loop that back and forth. I want to go from bottom
to top and top to bottom. Well, there's an
expression we can use. Let's alter option, click
on the Stopwatch Loop. Out, quotation marks,
we can use ping pong. Ping pong goes back
and forth between the two keyframes,
looping the cycle, and now we've got a cool, animated heart floating
over top of a mug. Awesome. Very cool. Very easy. Now, you don't have to know
all the expressions. Just know that
they're available. And if you want to
key framate yourself, just key frame it yourself. You don't have to use expressions
if you don't want to. If you think it's easier
to use the keyframes, just animate with key frames. If you want to try
out the expressions, this is a couple
that you can try out and play around with
and see what you can do. Alright. In the next class, we'll take our cool
little motion graphic and we'll composite it
into a new composition, and we will create a cool six
second reel, really punchy, really fast, and I'll
show you how to use markers and how to set
up different layers. And, yeah, have
some fun with it. I
13. Syncing Animation with Music Using Markers: Three. Hey, guys, in this class, we're going to create a
quick motion graphics reel using the
animation we created, and we're going to duplicate this animation multiple times in various ways on our timeline, so it'll create
some cool effects. Let's see how we can do
that. So the first thing we want to do is we want to
create a new composition. So we can right click
and hit New composition, and we're going to create
it, you know, MoGraph. Reel, something like that,
whatever you want to call it. We're going to set
it to the width of 1080 by 13 50 for Instagram, I will set it to 24
frames per second, and we're going to hit Okay. I'm just going to
set it to 6 seconds. So it's not too long, easy to work with. Have
some fun with it. And you can see that
motion graphic reel. It appeared here. Now, I'm going to
add in some music. So I'm going to right
click Import File, and I'm going to find my music. I have stomping Intro
short version here, and you don't need to create
a composition from it. I'm just going to import it. And that'll be fine. All right. So we already made
the composition. We're going to drag our
music into the composition, and now you can see
we have some music. Now what we want to do is we
want to set up some markers to signify where we
want to make good cuts. So how we can do that
in after effects, we can go to the drop down menu here and we can go to audio. Now we can go down to this one and we can click waveforms. Now we can actually see
the waveforms here. If we want to zoom
in, we can zoom in closer and get a better picture of what
we're dealing with. Now we want to decide where we want to make
our cuts or make our animations and sort
of composite everything according to the sound bites. Now we can add our markers. So how we add our markers, we just find the point where
we want to add our marker, maybe at the where it
kicks, boom, boom. Move on to add some
markers because those are good points where you could
transition to something else. You can go up to layer markers
and add marker like that, and you can see it adds a
little marker right there. It signifies where
the cut can be made, and it allows you to line up
your layers a little better. The shortcut for that is on your number pad,
the asterisk sign. When you play back, You can find spots where you
might want to add a marker and just
hit and add marker. And I think at the peaks, add marker. Quick cut. Yeah. Yeah. Let's make one
at the end and then one at the peak again. We're going to have it really
fast pace, really fun. A lot of cuts. And then maybe then here, we'll just make a couple
cuts at the peaks. And I really want to
hit that. This one. So I'll leave it till there, and that'll be a
bigger transition. Boom. And then I
think at these peaks, something's gonna happen here. We'll figure that out,
and then not until there. Boom, boom, boom, boom. But I'm just listening,
playing it back, and I'm just marking it, and it doesn't have to
be exact right now, but it's just a good
guide that we can use. Let's just listen to that. Uh, Yep, let's just
move that one over. And then one here and
one final one here, and this will be
like our ending. Boom. And then we'll just
keep it constant there. And that's setting up our
markers in our composition. This is going to allow us to
easily set up our animation, our reel really quickly. And in our next
class, we're going to bring in our animation, and we're going to composite it into a fast paced,
fun little reel. Alright. I'll see you
in the next class.
14. Creating Your Motion Graphics Reel: Hey, guys, in this class, we're going to take
our simple animation, and we're going to make a mocha graphics reel out
of it in after effects. We're going to composite it. We're going to make
multiple layers. We're going to cut it, slice it, and make it a little more
dynamic and interesting. So let's see how we can do that. And now, what you
can see is we set up our markers with that,
according to the beats. So what we're going
to do on top of this, we're going to add
in our animation. So we have our original comp here and we have the
mug illustration two. In the Mugulillustration two, it actually has the
composition and I'm going to make a
background for this. How I can do that is
I'm going to go to Nu right click Nu and I'm
going to make a solid. When I make a new solid, it'll automatically make it to the
scale of my composition. 1080 by 13 50, and then I can pick a color. I'm going to color drop this one and then I'm
going to make it a little lighter than that just because that's the shadow.
I'm going to hit Okay. And there we go.
Now I'm going to bring it underneath
my mug illustration. Now I have a composition
with a colored background, but I also have my
original composition here that has no background at all, a transparent
background. So I'm going to use those two
in my motion graphic reel. So going back to
my MgraphRel here, now we can bring in our
animations and we can cut them and make it
more interesting. So let's bring in
our first animation. So all I'm going
to do is I'm going to bring in my first animation. I'm going to drag my
mug illustration too, and I'll bring it
into my timeline. So now I have my
mug illustration too, and what do I want to do? I want to figure out how do
I want to go with the beat? So there's multiple
ways you can do this. There's no one right
way or wrong way. Just have fun with it, play
around, see what you can do. What I want to do is I want
to cut it, make a cut here, or make a transition, some sort of make it dynamic
at these points. So what I'm thinking is maybe
I can do something with the scale is if I mark the
scale at zero or at 100% here, and I go to the next marker, maybe I can bring it
up a bit like that. And then at the third marker, maybe I can bring
it up even larger. Okay. And then finally, at this point, I'm going
to cut it to a new scene. So how I can cut it or trim a layer is I can hit Alt
and right square bracket. That will trim the layer
to where my marker is or where my playhead
head is in the timeline. So you can see that now if I scroll past
it, it disappeared. It doesn't mean the
animation's gone. It just means it's trimmed. You can also drag the animation
like this from both ends. So you can see when you hover over the double arrows appears, you can trim it like this. So then it'll only appear
where the trim section is. The animation flows
as it normally would, but you're just
trimming the layer. We can see this
animation coming in. Now, I don't want it to
smoothly transition like this. I sort of want to do
it sort of jump from this scale to this scale to
this scale at the markers. So how I do that is
I have to change my keyframe to something
called the keyframe hold. So I'll right click. I'll
go to Toggle Keyframe hold. And what that does, it holds this information until
the next keyframe. So it won't fill in the
pages, as we said before. So if I scroll, you can see no transition
until boom that keyframe hits. Now I can do the same
thing here, keyframe hold. And no animation until boom. So now if I play it back, you can see that it jumps
at those markers, and now I want to cut it here. So Alt or option
right square bracket. And it's gone. All right, so now I want to add
a new composition. What I'm going to bring
in is I'm going to bring in my mug
Illustration one. I'm going to pull
it down, and I want to start it at this marker here. So to start it, all I
have to do instead of, you know, I can
click and drag and pull it over here. That's good. Or if I want to make it
more easy for myself, I can just put my play
head where I want it, make sure the layer selected, and hit left square
bracket just by itself, and this is where the
animation will start. My layer will start
at that point. Okay, or I can drag it wherever I want to go, but
I want it there. One thing you can see is that this one is transparent, so
there's no background to it. But in this composition, I'm going to build up layers and layers and make my video. I'm going to right click
into this empty area, select new solid, and I'm
going to bring a new color in. I'm going to make a turquoise
green sort of feel, and I'm going to hit Okay. Now, I want to bring this
underneath that layer so I can just drag it down by
clicking in this area. Or if I don't want to do that, I can hit Control and left
square bracket to bring it down in my layers panel or Control or command right
square bracket to bring it up. Now it's right underneath and
I want it to start there. Left square bracket brings
a front to my playhead, and there we go. Now
it looks like this. Okay. Now, what's great about this one is I can actually duplicate
this one on top of itself. So to duplicate a layer, you hit Controller Command D, and now it made two
instances of this animation. And now I can drag this
animation somewhere else. So maybe I want to
make a couple of them. So maybe I want to make
them pop in one by one, one here, one here, one here and one here at
each of these markers. So I'm going to try that. So I'm going to make
my duplication. I'm going to bring my
playhead to the next marker. I'm going to hit
left square bracket. Now, actually, no, I'm not
going to left square bracket. I want the animation
to stay the same. I'm going to hit Alt left square bracket
and that'll trim my layer. The animation will
still be the same. They'll be in sync
the whole time. It'll just appear at that time. Now I'll go to my next playhead. I'm going to duplicate it again, Control D, and now I
have a second layer. I'm going to move it
into the position. I want it right here. And then I'm going to hit Alt, left square bracket, cut it. And now you can see
what's happening. Okay. I got another one here. Next marker, Control D
to duplicate that layer. Now I'm going to
move it into place. Maybe I want this one to appear back here, just like that. Now you can see that it's
over top of everything, but now I can drop down so I can hit Control left square bracket, bring it down in my layers
panel behind everything else. And I also want to cut
it to right there. So all to left square bracket. That'll trim it to that
time. So let's put that. Cool. And one more at
this playhead here. I'm going to duplicate it.
I'm going to bring it over. If you don't have
your control handles, hit V on your keyboard, that'll bring up
the selection tool, then you can drag it. Make sure the layer
you want is selected, I'm going to alt left
square bracket to trim the layer to this
point, and there we go. So let's play back.
Cool. All right. Now I want some sort
of transition here. Maybe I want these two in the front to disappear and
then at the next marker, the two in the back disappear. So I'm going to click on
the two in the front. I can find them in
my layers panel. And if I control or hit Alt, right square bracket, it's going to trim them to
this point in time, and now you can see
after they disappear. Then the next one, I'm going to click on the bottom layers, Alt left square bracket, and it trims them at that
point. Now they disappear. So let's watch it back.
Yeah. Cool. All right. Now we want to do something
at this point in time. Maybe I want to change
the color again. I'm going to get my color layer or I'm going to just trim it to this point. And now nothing's there, and then I'm going to
make a new color layer. Let's new solid.
Let's pick a color. Let's do a purple like that, it okay. All right,
got a purple. Now I want to trim
it or start it at this point, boom, boom. Okay. Then maybe I just want to change
the color twice here. At this point and this point, I'll do something different. Let's cut this layer, and let's make a new solid. I'm going to pick the yellow. We're just going to make
it the same as the mug. Just like that, and I'm
going to start it there, just square bracket to bring
it to the front like that. Then at the next marker, I'm going to trim it like that. There we go. That
looks pretty cool. Maybe I'll hold this yellow
until the next marker. I'll just drag it out and pull it to the next
marker right there. Now this is where
I'm going to do something new. We
have to fill in this. Maybe I want to duplicate
that green again, Control D, duplicate it, bring it up to where I want it. The left square bracket brings
the point to the playhead, and now we got this color back. Now what I want to do is I
want to maybe do some motion. Just like I did with my scale,
I want to cut, cut, cut. Maybe I want it to start
at the top and then boom, boom, boom, boom down. Let's see how we can
do that. I'm going to just duplicate it. I start with a new one
and I'm going to cut that one there. All right. Then I'm going to
cut this one here. Now I'm going to bring
this one up to the top. Maybe I have to pull
that one back one frame. Like this, I'm going
to start here, and then I'm going to hit my P on my keyboard to
get the position. I'm going to go to
my next marker. I'm going to pull it down.
Next marker, pull it down. Next marker, pull it down, and next marker, pull it down. Then my final one, I'll cut it there and I'll bring back my main composition. Now you can see what's
happening here. It doesn't look the best
because it's smooth. I'm going to highlight them all and go toggle hold keyframe. Now let's watch it through. Okay, let's do that big smack at the end with my main
mug illustration two. And I'll start it. Move the endpoint to there. Boom. There we go. So, there we go. We made a
cool motion graphics reel. It looks really
awesome, really fun. In the next class, we're
going to learn how to export our animation
as a animated gift, as well as an MP four file, video file that we can share on social media. I'll
see you there.
15. Exporting Your Animation: 33 Alright, guy.
So in this class, we're going to
learn how to export our illustration as
an animated gift, as well as a video file that we can share
on social media. Let's jump into it. Okay, so
we have our file open here. Now, we have our timeline here, and the first thing that
we're going to do is we're going to go back to our
Mug Illustration one, our main illustration, where we have our animated comp here. We're just going to
cut the animation to let's just find
where it loops. We're going to find the
starting point of the loop. So it loops at 1 second, so at it goes back at 2 seconds. We're just going to maybe
4 seconds would be fine. We're going to put our
play head at 4 seconds. We're going to pull down
the work space to there. This is our work area.
When we play back, it'll just play back
through this section. We can see here. Let's
see if it loops properly. Yeah, it looks pretty good. All right. Now what we're going to do is we're
going to go to File. We're going to export, add to Media Encoder Q. This will open up
Adobe Media Encoder, make sure you have that
installed in your computer, and then we'll be able to export this as an animated gift. Once Media Encoder is open
and your file has been there, you can click on the output file and you can click where
you want it to be saved. And then you can double
click on this h264. This will bring up the menu, and this will allow
us to change a lot of the options of our animation. So here, we want to
change the format from h264 and we want to
find animated gift. This will allow us to create an animated gift from
our illustration. As you can see here, it actually says source range, work area. We set it to only a few seconds, and that's where
it'll export four. So it's only going to export
4 seconds of animation, which is perfect for an
animated gift. It's good. Now, we're going to go down here and we're going
to just change some of the settings a
little bit to reduce the file size of our gift. The first thing that
you might want to change is you can keep it at 25 frames per second, but
we're going to change that. We're just going to
reduce it to maybe 12.5. I'll give it a little
more jumpy feel and it'll also reduce the
size of your file. So when you're loading gifts on the Internet,
they'll load faster. The second thing you want
to do is you might want to change the resolution
of your animated gift. We're going to just
unclick this checkmark, and now we're going to go into this and we're just
going to divide by two. We're going to
divide by two that just cuts the resolution in half and it just reduces
the file size quite a bit. If you want to keep it as the full resolution,
that's perfectly fine. It'll just increase
your file size, but, you know, your call. Anyways, I'm going to
reduce it, and there we go. So all we have to
do is hit Okay, and now it is ready, so
you can click on it. We can hit Play and
it'll run through it and you'll have
your cool animation. We can find the spot
where it exported, and there we go. We got a cool animated
gift right there, and it has a transparent
background and everything. It's awesome. The next thing we want to do is
export our video. So let's jump back
into the video. Let's go to our MgraphRel and this one we want the workspace
to be the full range. M. Very cool. And we're going to go to File, Export, add to media encoder Q. All right. In this one, we don't want it to
be an animated gift. Let's just click
into that again. We're going to reset that
to h264 or whatever file type you want and it'll export as an MP four
here if you want to dot MOV, you're an Apple user, you can do that,
anything like that. You can keep the resolution at full because we're
going to post this maybe on social media
and we want it to look really nice and make sure
the work area is set fully, and all you got to
do is hit Okay. And we'll hit Play and it'll export your video as an MP four. If we find it in our files. Open it up. Alright,
there we go. We exported our illustration
or animation as a gift, as well as an Npour file that you can post
on social media. Make sure if you
post on Instagram, just take me at l
dot an dot art. I would love to see
what you guys create.
16. Thank You! You Rock!: Hey, guys, I just want to thank you so much for
taking the class. It's been a journey to learn after effects,
and it's been really fun. I hope it wasn't too overwhelming
for you or too simple. I hope that you were able to take something from
this class and apply it to your own workflow and your own
illustration process. And after effects is
such an amazing tool, and it's really fun
to play around with. Once you know a
little bit about it, you can start doing more things. You can play with the
position, rotation, scale, opacity and animate
all those things using keyframes or try that
loop out expression to, you know, just make a
continuous flowy animation. It's really fun. I really want to see what
you guys create. So make sure you export
your animation as an animated gift and post
it in the project panel, as well as anything else. If you posted on social media, take me at kyle dot an dot q. If you have any questions about what we covered
in the class, feel free to post in
the discussion panel, and I'll get back to
you as soon as I can. If you enjoyed the class
and you learned something, please consider
leaving a positive review on Skillshare so that more students like you
can come learn together. If you want to continue
learning with me, follow me here on Skillshare so you'll be notified when
new class is launched. As well as you can
check on my profile for a library of other classes. I have classes on Illustration
and graphic design, and now I have more
on motion graphics, so we can continue
this journey together. Thank you so much for
taking the class, and I wish you all the best
on your creative journey. I'll see you next time. Hey, I am a master motion
graphic designer that can animate anything. Wha
17. Bonus Lesson: Bet You Thought We Were Done: Hey, guys. Welcome back. I bet you thought
the class was over. Well, this is a bonus lesson. If you want to change your
animation in any way, I want to show you
how you can easily edit the Adobe Illustrator file, and it'll automatically update in After efects.
Let's jump right in. So we finished our animation,
and it looks pretty good. But what if we wanted
to change the logo or the colors of the
mug or the heart? We want to change that
to something else. Well, what we can do if we go back into our main
mug illustration, you can see that these
are all AI files. You can see that the icon is
an Adobe Illustrator file. It's because they're linked to the Adobe Illustrator file. So if we update the Adobe
Illustrator file, guess what? Your animation will also
update in after effects. So let's jump over to the Adobe Illustrator
file that's connected. And you can see here we
have our different layers. I'm going to turn off
the reflection for now, and now I'm going to
make some adjustments. So instead of the heart, I'm going to hide the heart. Let's just unlock our layers
and then hide the heart. And maybe I want
a lightning bolt. I think I want the lightning
bolt. That'd be cool. So I turn on the lightning layer and
the lightning mask later, and I can relock
those and like that. And now I don't want to
say isometrics anymore, so I'm going to I'm going
to unlock my mug layer, and then I'm going to turn
off the isometrics logo, and I'm going to turn
into something else. Maybe I want to put, you know, hot cup of awesome.
That looks pretty cool. And now if I want to
change the color, I'll hit Y on my
keyboard, select the mug, and then I could
double click and I can change the color to Let's see. What kind of color
goes good with this? Obviously, the yellow is
probably pretty good, but let's change the color
pretty dramatically just so we get a better
picture. Maybe a blue. And we'll change the color
of the writing as well. Maybe we'll do a darker blue, and then we'll have the writing. We'll hit Y on our keyboard, select the writing, and then we're going to
change that as well. Let's change that
to a bright yellow. Or red? No, yellow
looks pretty good. Hot cup of awesome.
That's awesome. Alright. So we changed our illustration in
Adobe Illustrator. Now we're going to go
back into after effects. So make sure we close
our layers, lock them, hit Save, control S, and you can see that it's
saving in the corner. Now let's go back
to after effects. And as you can see, it
automatically adjusted for us. So if we go back to our
comp, our MoGraph reel, you can see that
since we only had the one composition,
it automatically td. Now, there's one thing that's a little funny about this is that the lining doesn't match up
entirely with the reflection, so we have to go back
into our main comp and we have to just adjust that. So we double click
into our main comp, and this is what we have here. Now, if we zoom in, I just use my scroll
wheel to zoom in. Or you can go to 100%
here and find that. Now, we want to get the
reflection mask layer. That's the one that
contains our reflection, and that's the one
we want to move. So we're going to click on that layer and this one is
parented to the object. But we can also move it independently from
the object as well. So I'm going to move it independently from
the object and I'm going to find the place where
it needs to be. All right. Now you can see here. But
one thing you can see is that where it starts is not really the place that
I want it to start. So in order to move
the entire thing, if I hover over my keyframes
and I just move this, it'll only adjust that
specific keyframe. So now it'll sort of
go sideways like that. But what if I wanted to
move the entire animation? I can hover over one
of the key frames, select all of them. And now when I move it, both keyframes
will move with it. So now I can put it into the
place where I want to start it and it animates perfectly. So all you have to
do is you've got to, change your Adobe
Illustrator file, then you have to save it. I'll update in after effects. You have to move your
reflection mask layer. To where you want it
to sit on your object. And then you just have to move the position properties of your animation to
where they are. Just make sure when you move
the position properties, your playhead is over one of the keyframes and all
keyframes are selected, and then they will
all move together. If your playhead is somewhere different than the keyframes, it'll actually add a new
keyframe right there. And you don't want
that, it'll sort of look a little strange. Okay? So that's how you do that. And now let's see our
animation, our MgraphRel. Let's just go to hunt
to 100% and start again. That's really cool. Okay, one last thing I want
to show you how to do in after effects is if we go
back to our Mug illustration. And what if we wanted
to change the color of the shadow without going into the actual Adobe
Illustrator file? What we can do is we
find a shadow here. And one thing that we can
do is we can adjust it. We can move it. And now, since it's adjusted
in this layer, it affects every case that
this composition is used. And that means it's
in this one here. I changed and also
in your Mgrapho. So it changed everywhere. Now, let's say we want
to change the color. So we can't directly change
it from here, this layer. But what you can do is you
can right click on it. You can go to create and create
shapes from vector layer. So right now it's
a vector layer, and it's connected to the
Adobe illustrator file. But once you create
vector shapes or shapes from the vector layer, it becomes independent from
the Adobe illustrator file. So you can change the
color however you want in after effects and won't change the actual illustration. So we change that. Now you can
see it created two layers. It turned off the original
shadow layer and it created a shape layer over top
with that property. And if we go up to the top here, you can see that it has a fill, and you can actually change the fill to whatever
color you want. Maybe the shadow wants to
be a orange like that. So now I changed my shadow
layer to an orange, go back to my MgraphRel and
it changed automatically. Okay? Now, if I wanted to change the background of my
main composition, I go back to my mug
illustration too, and you know that we
have a background. We could just select new solid and change it to
something different. So I'm just going to select the color, make it
a lighter yellow, and hit Okay, and move it
above my previous one. And yeah, let's see. Alright, so we just updated
our animation very quickly, very easily, updated the
Illustrator file, saved it. I updated automatically
in after effects, and we created an
entirely different reel in just a matter of minutes.
So that's pretty cool. If you created a reel and
you posted on Instagram, please, I would love to see it. So just take me at
kyle dot n dot q. I can't wait to see what
you guys create. O
 Kyle Aaron Parson, Graphic Designer and Illustrator