Transcripts
1. Introduction: Do you love the style
of 3D characters with animated drawn on faces and wish you can make your own. Michael clarity. I trained as a 2D animator, but then a whole of life got
in the way of my career. And today I find myself working as a teaching assistant in
a special needs school, but still animating
in my spare time. In recent years, I've been focusing more on
video game animation, learning to work in 3D, in Blender, encoding,
in unity and Godot. And that's what led me to
want to make this class. See. I love the early 3D style of having faces be
animated textures. When I came to make my own, couldn't find any tutorials for it and had to figure
it out for myself. Use this technique
in my first game, naughty teddy is
invade the museum. And I'm using it in my
as-yet unannounced next. But I thought I'd
take a little time out and coding to share
my techniques with you. In this class. I'm going to focus on the basics of drawing a texture sheet or
facial expressions, and how to use that in your job as animation frames for
a 3D characters face. You don't really need any prior knowledge
to take this class. But I am going to assume
you've used a computer before and have some interest
in Godot and drawing. I'm providing a simple
zombie shooter game with a rigged animated
zombie enemy. And you are going to make its
face react to the player. By the end of this class, you'll know how to
use this technique in your own game
engine projects. Sound exciting to you. I'm excited to see
what you make. So let's get started.
2. Class Project: Your class project, you're
going to draw a grid of all the different expressions your character will have. Then you will take the
image into Godot and use an animation player
node to match the expression to the
appropriate animation. When you play the game, you will see your drawings in action. Take some screenshots of
your zombies and Game and upload them to the
project gallery along with your
finished extra sheets. This project, you get
to your end results quickly without worrying about
finicky technical aspects. So you can just have
fun with it and decide if you want to go
deeper into the subject. To get started. Download the
project from the project and resources tab and unzip it wherever you
stole your projects. Then open that folder, open the Skillshare folder, and open zombie face texture dot PNG in your preferred
artist software. And important zombie
face UV layout dot PNG into the same file
as a layer above. I'll see you in the next lesson.
3. Sketching Ideas: Now, while you certainly could go straight into
drawing your final faces, It's always a good idea to
sketch things out first. So that's what I'm going to do. Normally, I would
sketch on paper. I find it more freeing, but I figure it's easier for
you to watch me sketching if I do it in greeter
and record my screen. For inspiration and reference, you could pull faces in the mirror or using the
selfie camera on your phone. Or you could go online
for zombie reference. But however you do
it, we're going to need facial expressions
when zombie is idle for when it has senior and distance and assembling
towards you for a closer look. When zombie is close and
starts rushing towards you, then a face, one is attacking. Finally, we need faces for when you shoot it, when it dies. Okay, Let's draw. So start with the face. I think I want something which
is quite slack, unfocused. Just a zombie hanging out, waiting for stuff to happen. Some bags under the eyes? Yes. Get some like cheekbones,
forehead, wrinkles. Skin itself is a bit slack. Seasons ICU, this is your first peak to the
zombies curiosity. Something over there and they
want to know what it is. They're going to start
moving towards it. From thinking a
bit more focused, but not too intense, just a bit of curiosity
going on. Closing in. He's got very close. And I didn't notice that there is a human there
for them to eat. So now it's getting
really intense. Suddenly just ramped
up the intensity. Attack. Here, the zombie, it's called unit's gonna
do like a pig scratch. We'll focus on anger. Be furious that you're
still alive in its belly. Going to do something
about that. I think wide eyes, small, irises, good snow, scrunch
up that nose, brow. Hit reaction. This when
you're shopping, zombie. Reacting to being heard. First one is a bit
too unfocused. Gonna go like eyes shut
tight in pain, grimacing. And then it's really
just about Brower for Brown. Now zombie instead. First one. And then I spent too much
life in that for me. Like this, a bit more, eyes
rolled all the way back. The jaw slack. Wonder if the tool
could be slacker. Something in that direction. Sketches done, we can start
drawing them for real. You in the next lesson.
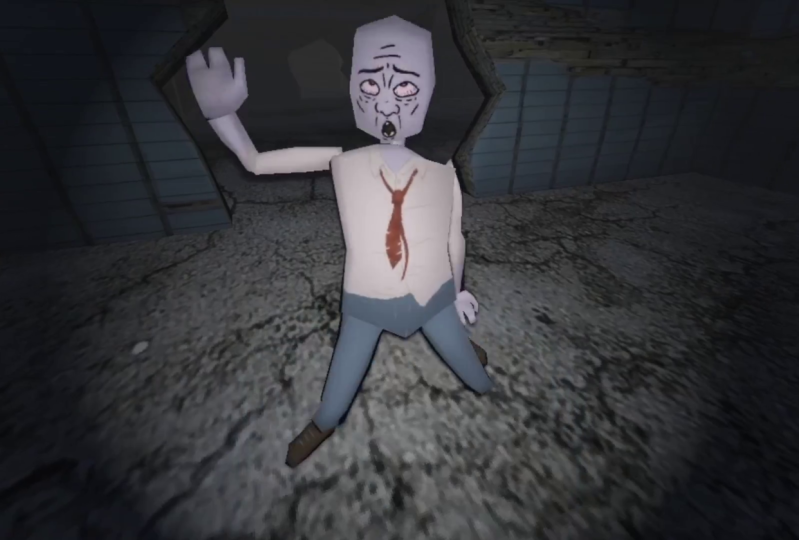
4. Drawing the Idle Face: In this lesson,
we're going to draw the idol phase for
our zombie character. This is the face
it will wear when it's not really doing much. So as you can see, I've
got it creates open with the zombie face texture
and zombie face UV layout, as discussed in
the project video. I'm going to lock the UV layouts so I don't accidentally draw on it and bring the opacity
almost all the way down. So it's nice and faint. Uv layout is a guide layer. It's telling you that
anything you draw outside of these lines is
going to be cut off. So make sure you're
inside these lines. And the zombie face
texture layer is just to give you a rough guide of where you should
draw the eyes, nose. And now I'm going to make a new layer on
top of that to paint on. Then I'm going to zoom in
and draw my idol phase. I want him to have just
kinda dull on focused eyes. Going to try and
keep my lines quite bold so that they show up. I think about it.
The player isn't going to be zoomed in like this. They're going to be seeing
characters at a distance, probably moving quite fast. So while fine details
of fun to draw, they're probably
going to get lost. Sheep bones in the goal. Draw really slept
with cricket teeth. Put some bags under the eyes. That's the idle face drawn. Just going to hide
this layer for a moment so I don't
paint over it. I'll duplicate this
in case we ever want to come back to
that guide layer. I'm also going to press F to get the fill tool hold control and click to
sample that color, change the tool options to fill everything, then
fill everything. Again. There's our first
face. I'm going to save that. In the next lesson. We
will use these drawings to make a grid to line up
all our other faces. You in the next lesson.
5. Making the Grid: Now that we have our first base, we're going to make a grid that all our other drawings have that first face drawing
as a guide rather than the simple one I gave
you to get started. Do that. Let's show the zombie
face UV layout and turn the opacity down on
our face drawing as well. Just for a moment. Let's name this idle so we don't lose
track of what's on that layer. Now we want to press
Control R to draw a rectangle selection around
the face and the UV layout. We want to copy merged
Control Shift C. That will copy
everything visible, not just what's on
the selected layer. So let's make a new layer. Call it guidelines. Then got to set up the
grids and guides Docker. So go to Settings
Docker's grid and guides. This image is a
512 pixels square. We're going to cut it
into a four-by-four grid. So we want our grid
spacing to be 128 pixels. Click Show grid
so we can see it. Then get the transform tool. I'm going to press Control V to paste what we copied before
setting up the grid. Just going to pull this out so we can see it a bit better. And look at tool options with the transform
tool selected, I'm gonna change the
move shortcut unit two pixels and change
the amount to 128. That means whenever we move something with the arrow keys, it will move by 128 pixels. So with that one selected, I'm going to tap right. And there it is. Then use Control R to draw a
rectangle around them both. Copy, merged, paste t to
get the transform tool, and then push right
twice to move them over by 256 pixels. Control R again to
select them all. Copy, merged, and paste. T for transform tool. Move that down one with
the arrow keys and one more time Control R to make a rectangle select
Control Shift C to copy merged Control V to paste T for transform
and push down twice. Now we have a grid
of all our faces. Before we get to
the next lesson, let's tidy up these layers. Use Control Shift a to
deselect everything. Now with this one selected press Control E to merge it
down with the layer below. Keep pressing Control
E to merge the layers down until they merge into
the guidelines layer. Now, let's bring our idle face back and put the opacity
all the way back up. Move guidelines below idle, and we can hide the UV layout. In the next lesson, we're
going to draw the rest of the faces. In the next lesson.
6. Drawing the Rest of the Faces: In this lesson, we're going to draw the rest of the faces. Let me lock every layer
I don't want to draw. We've done Idle. Now. We need the ICU face. Make a new layer, double-click to name it ICU. Which one do I like? I think I like this one
where it's a bit confused, not really sure what's going on, but it's curious and
wants to find out. It's curious. So I should be a bit wider to tap each
switch into eraser. Fix this a little bit. Then E again, switch
back to the brush. The nose should be
pretty much the same. Next is closing in. Think I'm good to go wild. So let's flare the nostrils. Make one bigger than the other. Let's make these
eyes very tight. Quite wide mouth. Carving out the shape I
want to get the teeth in. Lips pull tight. I think I actually
want to boil this one. That means is I'm going to make two frames that
are very similar, but not exactly, and play
them in a little loop. It'll make muscles in its face seem to be trembling with rage. Do that. I'll press Control
and our robots around at all. It's T for transform. Still good at set
to move 128 pixels. So when I copy and paste, then tap the right arrow,
it will move right there. Control Shift a to
deselect everything. Just renaming this
layer so that I remember to delete
it and not use it. That's the way down and hide that guideline so I can see
what I'm actually doing. Nostrils slightly
wider and like I said, tracing but not exactly just making it
slightly different. This I slightly out
this one slightly. I'll make this a bit more
closed and this one a bit wider open with the mouth that should be enough to
just give it a rough trace. There we go. Let's hide that and drop it
down with the guidelines. I forgot to make a new layer
for the closing and face. I realized doesn't
really matter. All these can just be
on the same layer. I'm going to press
Control E to merge that down and rename this blinds. What's next? It's
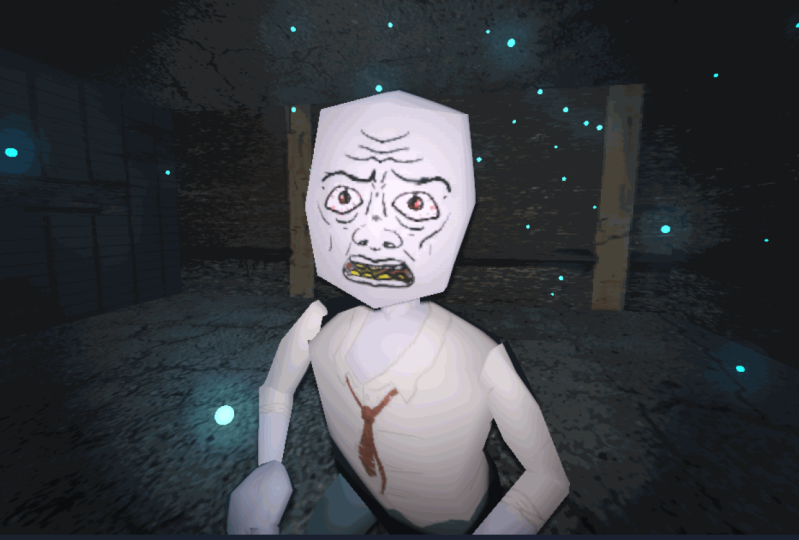
the attack phase. This one is going to follow on from the closing and expression. Its crew CAN pupils
close together. So you're trying to focus
on something close to him, scrunch up his nose a bit more. I'm going to bring the
snow and a bit more. Next one is hit reaction
baseballs when you shouldn't. Trying to decide between
browse down browser, both things you do in pain. I think I have a
lot of browse down drawings and I want to hit
reaction to stand out. So I'm going to make a browser. Browser. Nice closed. It's
close, his eyes tight. It's another squirt,
Juno's expression. Just moving everything
up and out. I just leaves the
debt, like the eyes. Roll it all the way back
so you can hardly see the Oliphant, the top eyelid. Minutes out makes it
a bit more slack. What's going on with the nose? Again, raised brows but
not quite so much tension. Really slack jaw. Right time to turn off the guidelines and
look at them all. Make sure I didn't miss
anything to the left bit. See, I forgot the
bags under this. I it's pushing up these
eyebrows a little bit. Let's put some color it in another layer underneath
lines and call it fills. Don't see the grading
guides or brush presets. So I'll just close those, get more screen real estate for the things we actually
do want to see. A very dark brown for
inside the mouth. I'm going to regret
drawing the lines in blue. So let's go to Filter, adjust, HSV adjustments with the
lines layer selected. And we'll take a saturation and lightness down as
far as they'll go. Like on the fields layer, I'm going to color these
mountains in brown. I want a bright
yellow from the teeth because all these aren't really known for their dental hygiene. I'm going to make the white
citizen is a pale pink. Again, it's not a healthy color. Or eyeballs to be red for some blood veins. Think I'm also going to
cover the pupils in red. More worked up somebody gets, the more his eyes
can be bloodshot. We get to the rest of the face. In the next lesson, we'll see how to export this into Godot. See you in the next lesson.
7. Exporting to Godot: In this lesson, we are
going to look at how we export our texture
image into Godot. To do that, we need to know
where you're exporting it to. I made a folder called
my awesome projects, which is where I
ends it this into. If we go into that folder, go into assets, will see
zombie face texture. And that's what we're
going to overwrite. So I can create a file, export. Navigate to my awesome projects, open the main folder than assets under zombie
face texture. Concede the one I did
when I was practicing, which I'm now about
to overwrite. Click Save. It already exists. You want to replace it? Yes. This texture, it doesn't
need an alpha channel, so we might as well save a tiny bit of memory
and not store it. Okay, Now let's
open that project in the ghetto Project Manager. Click on Import, then browse. Find where you put the download. It's the textures
on 3D characters. Double-click the
project, not good oval. Important at it. If you're looking at
assets, there it is. You reopen the zombie seen. It's now got when you
face drawing on it. In the next lesson,
we're going to add an animation player
node so that we can access these different
drawings for different expressions.
You in the next lesson.
8. Adding the Facial Animations in Godot: In this lesson, we're going
to open a zombie seen, add an animation player and rename it the facial
animation player. We're going to create
a new animation. Each expression
that we've drawn. And we're going to set the interpolation mode for each of those animations to discrete. So when you open
the dough, you'll have the screen in front of you. I think something
worth mentioning. I've made this low poly, like, I don't have a particularly
fast computer. So the performance should be
pretty good on any system. But if you need to
improve performance, click on the sub viewport
container and change this value here,
stretch, shrink. And what that will do is reduce
the rendering resolution. I'll show you. If you change one to two, it's now rendering
at half resolution. If I change it to five, you can see it's gone
very pixelated, blocky. So having this set to one will make it render whatever
your screen resolution is. Increasing this
number will lower the resolution and therefore
make your game run faster. Hopefully you won't need that. But just in case
that's how you do it. Okay, Let's open that zombie
seen in source folder. And the zombie seen
double-click it. There it is, with the
idle face on already. Now, click the root node, go to plus animation player. We just type in the search
bar, narrow it down. That's the animation player. And then we're going
to double-click on the node and rename it
facial animation player. I'm just going to move
this up here with the other animation notes.
You don't need to do that. It's just I like to group
things and keep them together. Doesn't change the
way it functions. Okay, let's make
some animations. We click on animation, you give it a name. I'm going to pull this idle. Then should say now, there are some things
you need to set up before you can do this
in your own projects. I will show you those
in a later video. But for right now, let's just get on with doing it as if we're
already setup, because we are already setup. Double-click on the zombie mesh. That's going to bring us here. Go to surface material,
override material, one. Click on that because
that's the faces. Then you want to come down
here and find you V1. And click here to put a key
on the offsets. Click Create. We don't want Bezier curves. Now, this animation doesn't
need to be whole second long. It can literally be like
a tenth of a second at 0.1 and change the
update mode to discrete. That means that it will jump straight to this offset rather than animating between whatever
frame it's coming from. And this one. As that might not be
particularly clear. I'm just going to mess around now and show you what I mean. I'll put the link
back to 1 s. I'll put another keyframe here where
the different offset. I'll explain these
offsets when we get to the next animation. You can see I've
changed the expression. If the update mode is continuous,
which is the default, then as you can see, the drawings will slide around. This is not really the effect
that we wanted, is it? Yeah, it's not how
we want to get from one phase to the other. So if we change that to discrete
and play the animation, it will stay on the first frame until it
hits this next frame, and then the expression
will change. So we keep update mode
on discrete because we don't want to see the texture
slide all over the place. Let's delete that keyframe, but this back down to 0.1. That's the idle animation done. Let's make new animation. I see you just, you know, it's fine to have spaces
in the animation names. But as a coder, spaces
make me nervous. So I prefer to use underscores. But these animations
are string referenced, so spaces would be fine. Then we do the same thing again, double-click the zombie mesh. I said I would explain
offsets in this one didn't. So let's pull open critter and use that grid
to help explain it. You can see my grid lines
here that mark each frame. So UV is how texture
space is mapped. Think of it as like the x-axis
and the y-axis with zeros, zero in the top left corner. Except because X and Y
are used in 3D space, they needed to use different letters for the
2D space of textures. So we have u as the
horizontal axis, and v as the vertical axis, 00 in the top left corner and 11 in the bottom
right corner. Which means halfway across. X is 0.5 and y is zero. And the center point
is x is 0.5, y is 0.5. What that means is the UV offset coordinates for this drawing are zeros, zero. And this one is
0.25, 00.500, 0.750. Then on the next row down, x is zero, the y non-zero, 0.25, then 0.25 to the x
and 0.25 on the y, 0.50, 0.25, and so on. In all my examples, we've been using
increments of 0.25 because our grid of drawings
is a four-by-four grid. And one, which is the
length of a UV access divided by four cells of
the grid equals 0.25. You can offset by
any number 0-1. You can even go above one, but it just wraps around As
if you'd gone back to zero. So if you find yourself
using a different size grid, such as four by 88 by 816, by 16, or whatever. The increments you
want to offset by, will be one divided by however many cells in your
grid in that direction. To make it abundantly
clear what is happening when we change
the UV offsetting. Good job. I'm going to open Blender
and offset the UV map. Select that. Let's see here. That's the UV shell that
we drew over. And Krita. If I grab it and
start to move it, you can see the texture on the model appear to slide
in the opposite direction. This is what is happening when we change the UV
offset in Godot. If I go past the edge or an
offset greater than zero, you can see the texture
wraps around again. Now that you know what is
happening behind the scenes, Let's get back to making the animations with the
animation tab selected. Click the zombie mesh, then change the offset to 0.25, and click the key to
make a keyframe of that. Again, only needs
to be 0.1 s long. But the update mode does
need to be discrete. Making new animation,
collect, closing in. Set the length to 0.1, change the X offset to 0.5. This is the one I did
a boy, four, isn't it? So let's create that. But we actually want this to be 0.2 to make space for
the second frame. Click here on the timeline, 0.1. And then we'll add another
keyframe with the x set to 0.75 and click Loop. Watch that and all
the excitement. I forgot to select
discrete mode. So let's change
that to discrete. We go when he's getting close, his face would do this. Did I forget to
color in the eyes? Yes, I did. How embarrassing. Yet, I can use it as
a teachable moment to show you how easy it
is to fix your mistakes. Let's reopen this and Krita luminaire still
got my red paint. And when the fills layer, so I'll just color them in, save it, and export it just like we did in
the previous lesson. So find the assets folder, change files of
type to PNG image. Then double-click on the zombie face texture to overwrite it. Click yes and okay, let me go back into Godot. We can see it's
automatically updated. So what's next? This is attack. So making new animation,
call it attack. Change the length to 0.1, set the X offset to zero, and the Y offset to 0.25. At the keyframe. Oops, that's the wrong place. So I'll just click it and
drag to move it back. And don't forget to
make it discrete. New animation. This one is the
reaction to being hit. So I'll call it reaction hits. The timeline to the beginning, change the duration to 0.1, can come zombie mesh to
bring the inspector back, change the X and Y offsets
to both to be 0.25. And click the key
to create a key. Make sure it's discreet. Another new animation. The last one is for when
the zombie is debt. So we'll change the
X offset to 0.5. Create the key. Change the duration down to 0.1 and the update
mood to discrete. So in the next lesson,
we are going to link these animations to the
body's animation player. I'll see you in the next lesson.
9. Linking Facial Animations to Body Animations: In this lesson,
we're going to look at the animation player that was created automatically to hold all the animations from Blender. One, this is going to be
measured, was imported. And we're going
to use it to call the facial animation player
that we've made from each of these body animations so that the face updates with the
movement of the body. Let's get started. Click on the Animation player. This shows all the
animations that were imported when I
made this in Blender. To be able to see
what we're doing, we're going to have to turn off the animation tree as well. It is active. It
will take control of the animation player and prevent us from seeing what
changes we're making. So de-select active here. Let's start with idle. This already has the
idle face on it. But once a different animation
has changed the face, it would not change back when the body is idle
animation plays. That's why we need to explicitly
set it here. At track. Animation playback drug can select the facial
animation player. The new track will be at
the bottom of the list. So scroll down to the
bottom to find it. So here on the first frame, we need to right-click
and insert a key. Click on the key. Up
in the inspector, you see a box that, That's
because what animation we want to play, find idle. And there we have it. Now it might as well do
these in alphabetical order. I go to the attack animation, added track, animation
playback track. Select the facial
animation player, scroll down to find it. There it is. Click up here and scrub
through the animation, see at which point you
want the face to change. I think I'm gonna
change it here. So right-click and insert a key. Click on the key,
and then click that. The animation we want is attack. When I switch to
the next animation, you'll see the face
doesn't change. And that's what would happen with the idle animation if we hadn't added that idle
animation face keyframe. The next animation
to change is deaf. At track, animation playback track facial animation player. Let's scroll down to find them. In certain key there is
that the animation is dead. Or you did the idle. So next one is
reaction hits a track. Animation play backtrack,
which will animation player. I don't want face to change
right from the start. So right-click to insert a key. Change the animation
to reaction. Here we go. Then r1. R1 is the animation that the zombie plays
when they're closing in, when they're close to the
player and closing into attack. So do the same thing again. And this time the
facial animation we want it's closing in, which just leaves
walk at a track. And then this is the ICU face. Now that's all done. Switch the animation
tree back to active. And when we play the game, can see the faces we
drew on the zombies. There is Chamberlain. Now he's closing in. Takin reactant to be in here. And there's this dead face. Alright, And now we haven't got your drawings in
a little video game. I hope you've
enjoyed making this. I would love to see
what you've done. You can take some screenshots and post them in the
project gallery. I'll put the screenshot
shortcuts on the screen for you. In the next lesson, I'll take you through
things you need to know to be able to incorporate
this in your own projects.
10. Technical Things You Need to Know: In this lesson,
we're going to look at some of the
things you need to know to be able to incorporate what you've learned
into your own projects. Snap is the material setup in Blender or whichever
3D software you use. You can see here in Blender, the character has two materials. A main material,
which if I select it, you'll see that it's assigned to all the polygons which
just turned orange. And a face material which is
only assigned to the face. In the UV Editing Tab C with
the base polygon selected. It's showing that
part of the UV map. That's where I got
that guide image from UV and export UV layout. You can Save PNG file, which is the one you imported into your art package
in the first lesson. Any part of your model
that you want to be able to animate
the textures of needs to have a separate material. Because we were just
doing the face. We only made one extra material. But say you wanted things
to be crawling up the arm. You can make another material
just on these faces. Then use the same techniques
to animate that separately. The next thing you need
to know is when you first import your model. All of your animations that the animation player
need to have saved, file enabled and keep
custom tracks on. You need to go through
each of these. Enable that cute custom
tracks on and then re-import. Next, you need to know
about overriding materials. The materials that
get imported with your zombie mesh
will be on here, be the surface one
and surface zero. But these cannot be messed with. So those aren't there. You have to make materials on the surface,
material override. These are the ones
that we are editing. If I just clear this. So this is how it
looked when it was imported because I didn't bother importing materials
because I knew I was going to do surface material override. You would just click on the
empty new standard material. Then open up the material, get onto albedo and
drag the texture. The texture slot. Then again for override. Click on empty new
standard material. Click on it to open it up. Albedo, get the face texture on. Once you override the materials, you are able to mess
with these ones at runtime and do your UV offset animations or anything else you
want to do with them. One last thing is this material, the face one or any other
that you are animating? The resource needs to be set. Local cuisine can see
by default it's not. And what that means is that every instance of the zombie which share the
exact same resource, which is great for memory
efficiency and performance. However, it means that when
one material is animated, every zombie will have
their animation updated. Let me show you play the game. I kill this first zombie. He's dead. But his
face keeps changing. And that's because every
other Zombie in the game, when they're animations change, they're affecting this one. Let's close that. Let's make that resource
or local scene. Run it again. Now, when I kill the
zombie, base stays dead. That should be everything
you need to know. As a little bonus is something
you might like to know. We have two materials
with two texture maps. If you wanted to edit the texture on the
rest of the zombie, you could right-click on
this showing file manager. Now, if you edit this file in your art package and save over it with the exact same name
and in the same place. That would update. And you'd be able to
make your own texture. You can make them more
gritty, grubby zombie. You could make acute zombie could do what you like with it. If you do, change
the main texture, be sure to upload that to the project gallery along
with screenshots of inaction. If you're feeling extra, wanted to push your
project further. You may have noticed
that there are nine empty spaces on
the face texture grid, which you could use
to change some of your expressions into
multi-frame animations. In the next lesson, we'll wrap everything up. In the next lesson.
11. Conclusion: Wow, that was fun, right? Thank you for sticking
with me till the end. I'd love to see what you make. So please post screenshots
in the project gallery. If you are interested in
learning more about this topic, be sure to follow
me on Skillshare as I'm planning to
fill more classes to get more in depth on how this is done and how these
ideas can be expanded. Free to ask questions both
within the scope of this class and in the wider topic of setting up models before
UV offset animation. As those out of scope questions may influence
which aspects I cover. Next, be sure to leave a review. Why no, why did well
and what I can improve. And so other students
know what to expect. You might also want
to check my website, idle talent dot me, my game site, hydro
talent dot h dot io. And maybe catch me
on that student. Macedon dark game dev dot slash. That's vital talented. Thank you again for learning with me. And maybe I'll see you in
another class. Bye for now.
 Michael Flaherty