Transcripts
1. Introduction: Hello everyone and
welcome to Art. I'm your host. And in this small session, we will be learning
how to animate different kinds of
psi phi vector arts. Now for this example, I have already made
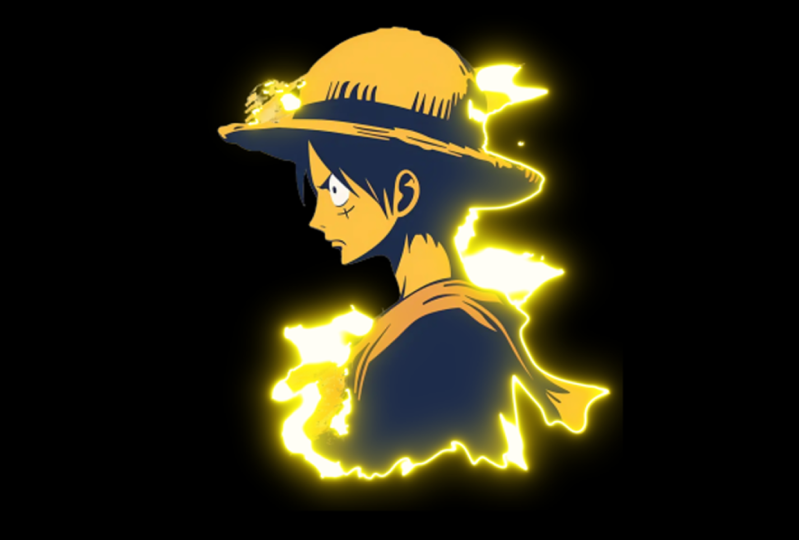
a sci-fi vector dot with a purple color scheme. And we will be animating that. As an example throughout
this learning session, the prerequisites for the
course is you must need to know the basics of Adobe After
Effects and Illustrator, of course, if you want
to make a vector art. So you just need to have a
vector art before the scores. And you can just jump
into After Effects. And one thing that you must
have is a plugin called SABR, so you can get that
on web for free. So without any further
ado, let's get started.
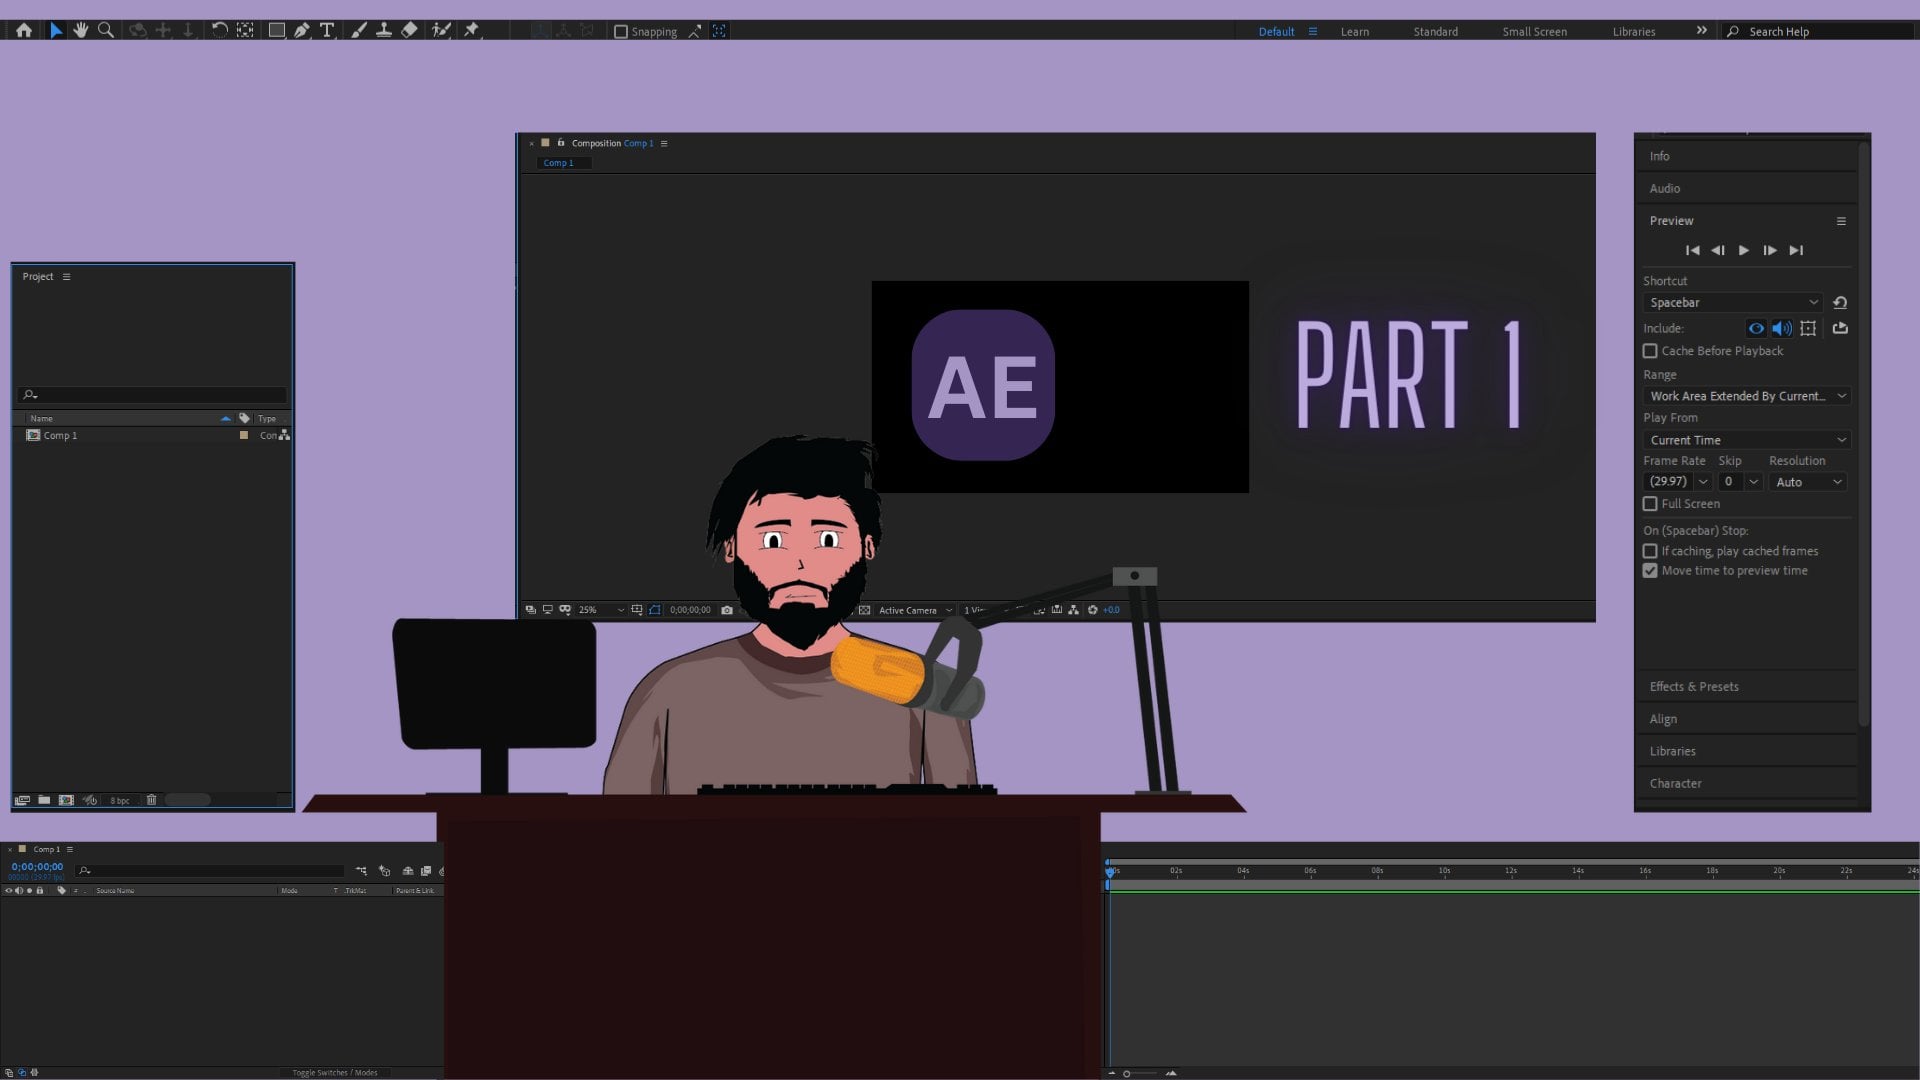
2. Importing Files in After Effects: So before animating your sci-fi
vector art, first of all, you need to have that inside
your Adobe After Effects. So here we are inside
our Adobe After Effects. And this is going to be
the default interface that you will be seeing whenever
you open Adobe After Effects. Now, if your interface
does not look mine, you can go here on your right side and click
on the default button. And if still your interface
is not looking like mine, you can click on
Window and go to Workspace and select reset, default to save layout. And when you click on this, everything will be reset
to the default one. And now your interface
will be same as mine. Actually the interface
is always same. Just a few of the dog panels are turned off or turned on when
you change these workspaces. So first of all,
I'm presuming that you know the basics of
Adobe After Effects. If you don't know
that don't vary, I will soon be making a detailed class on
Adobe After Effects. So to import as
sci-fi vector art, you can go to the project panel. If you don't see that, you
can always go to Window and turn on the project fund. Here you can see this is, and then you can just
double-click it or right-click, go to Import and
important files. Now for the input, you can actually import a PNG file or the
Illustrator file. I will just
double-click and drag my PNG files and then
I will import them. So I'll just double-click. And here I just
imported my PNG file, and this is my PNG file. Now first of all, I would just right-click and create
a new composition. My compositions width
and height will be 1920 by 1080 with the
10-second duration. Now here you can always modify the duration or the dimensions. I will be making this animation
for the landscape mode. That is why I'm
using 1920 by 1080. If you want to make it in
the mobile standard one, you can go with 1080 by 19. Or I'll just also make this
in the mobile standards. So let's go with 1080 by 1920. This is the proper, at least you can see the
YouTube shorts format. So we have this composition. Now. What we can do is left-click and just hold and drag it into
our composition. And we can see this
is the vector art. Now you can see
it's a bit blurry. That is because the
resolution is set to quarter, you can always
change that to fall. And you will see that. It looks great. So we are again at
the quarter one, and then we can just adjust it like where we want it to be, or go to the size and increase
its dimensions a bit. And maybe this is
going to look good. Something like this. So we have placed our imported character or imported vector art
on our composition, or you can say newly
made composition. And we have properly placed it. And again, I forgot to
tell you for the position. You can press P on keyboard and you can position it
or you can just hold your left mouse
button to position and press S for scale
and modified scale. Actually, I skipped that part
because I presume that you already know this class is going to be for the
intermediate level. This was all for this lecture.
3. Subject Animation : Moving towards
subject animation. Now for the moment, because we are going to
animate the sci-fi vector art. This is going to be our subject for the subject and emission, but we will be using is the seabed plugin that
comes for absolutely free. You can search on Google,
download the saber, and then install
according to your version of Adobe After
Effects minus 2020. And when you have placed
your character in the perfect position
where you want it to be, you can precompose this, and we have to
precompose this just because let's just turn back
to full for the moment. As you can see, at the moment, our character or our subject
layer is showing this box. This box actually tells us that these are the limits
that are subject layer has and if we will apply any of the effects on this layer
with these dimensions, all of the activities will
occur only inside this box. But if we will pre-compose
this layer, it will turn. Its dimensions are size to
the original composition, and then we can have that effect applied on the whole of
the composition size. So first of all, you have to adjust the position that we did earlier
in the lecture. And now we will just right-click
and go to pre-compose. And here we can select, Move all attributes and
we will name it subject. We have decomposed
Subject layer. And now you can see this box is properly extended towards the
size of whole composition. And I asked you to change the position earlier just because if you will
change the position now, this box will move and that
is going to cause problem. So for the subject and emission, as we talked earlier, we will be using Sabre. So let's just go to effects and presets and search for sable. Or you can see here we have
with your copilot and saber. So just double-click it or hold your left mouse button and
drop it here or on the layer. But if you will drop it now, you can see everything
will turn like this because we have to apply the C but on a mask and we don't have
that at the moment. That is, let's just
delete this hybrid. And first of all, auto
trace our subject. So far the auto trace, you have to select
this object layer by your left mouse button
and then go to layer. And here you can see the second last
option is auto trace. You can just click on it. If you turn on the
preview button, you can see that the
head is a mask that covers all of our subject and this is actually
what we want. So just click, Okay. And your layer will
get auto tourist. Nothing will happen. But if you click on the layer, you can see there is a mask. And if you press M
on your keyboard, you can see there are
different mask paths. And these are the chili, the past that will be used
when you are say bird, neon lights or the thunderstorm, etc, will be emerging. So now we have auto
crazed our layer. We can drop the saber effect. And you see still
everything goes like that. But now we can actually modify that because
we have the mask. So we have to go
into customize code. The code is actually
the basic line or the basic energy emitting
beam that we have in cyber. And after going into
customized code, you can go to Code type
and select Layer Mask. And when you select Layer Mask, you see everything turns into the mask that we created by
using the auto trace button. And after this, you can go to Render Settings and more of it a bit and change
it to transparent, and everything will
look like this. Now one more thing here is that your subject is not visible just because everything
turned into mask and everything like the
Sabbath took it off. So for that, you can just
left-click the layer, press Control D on your keyboard to
duplicate the subject. You can right-click on the
bottom layer and change its two subject, Siebel. And for the upper Subject layer, you can just delete the Sabbath. And now you can see we have our subject and we also have
the seabed plug-in applied. Now you can just log the top layer and then go
to the bottom subject. And this time we will
select a preset. So let's select a
preset which matches the energy vibe of the subject. So maybe we can go with
something like ghost buster. Let's change this to quarter
to make it render faster. Or maybe kryptonite,
narrow, bright. Let's just hide
this for some time. Or simple orange. You actually have to
take your time and make something like begun
radially that stands out. So we're going with the
deselect and then you can modify its color to purple. Here it is. So we have deselect here. You can increase the
blowing density like this. And if you increase
the glow spread, it will actually go
towards the edges. You can increase the globe biased to make it
more standing out. And you can increase
the core size to make more areas that have
the absolute blue. This is about the
basic Glue options. Then you have to
animate this glue. Now for animating this glow, you can go to end offset
and start offset. So far the end offset, you can see it has
100 per cent for now. You can click on it
and turn it to 0. You can add a keyframe and
move a few frames forward, maybe two seconds, and
then turn it to 100. And then you will ram preview this by pressing
numpad 0 on your keyboard. Your subject will be made
from the desert act. And if you turn on your
subject now, it looks great. So similarly, you can
go towards the n, Maybe the second, add a key
frame for start offset, move it to the end
and turn it to 0. And now the end will vanish. See, this covers up
our subject first, it keeps on flickering. And after some time it goes out. Oh, I guess I didn't
change the value here. You can change it to 500. So now it will go out, actually. See it keeps flickering
and then it goes out. We animated this mask
using start offset. And the offset. Even if you still don't like the vibe of the code or
everything like that, you can always change
this to protocol. You can change this to heart, you can change this to Petronas. You can change this to Beulah. Everything. All of the choices and
all of the stuff lies inside you and your views
and your art activities, et cetera, et cetera, et cetera. So you can do anything
that you like. So for the moment we will be just going back to what
we created earlier. Maybe we can just go
to Control Z is easy and hit Deselect again. This is what we
created so far using just the saber on our subject and we just
animated the mask. It's actually quite big in size. We can modify that. Be like this. Yes, this is good. Let's just make it like this. So we have this and no need to change the
settings are detectable, keep on the motion blurred. And also from the lower layer by clicking on this
toggle switch right then. And there you can see this is motion blur and you
can turn this on. So this was all about
the subject animation. For the moment.
4. Background and Foreground: We have completed the
subject animations. Now it is time for
the background. So at the moment you can see our background is
like a gray color. You can modify that by going into Composition Settings and then changing it to
something a bit darker. This. So we have this now. And then when it comes
for the background, you can just click on your
layer again and duplicate it. When you duplicate that, you can move that
below. This time. You will rename that layer
to subject background. And we did that because we
actually want the background to be must do something and we will use the same mask again. This time you can just turn off the offset keyframes by clicking the stopwatch
icon obviously. Then we will trim this layer to the point
where our emerging appears. For example, you can
see up to this point the emerging of
the waves appear. So we can create a
card at this point. And you can create a cut by Control Shift D. And
this is the cart. Can delete this and
again go to this and Control Shift D. We actually
selected the double part, Control Shift D and we
don't need the last one. This is what we want. Now for this part, we don't have the
emerging animation, it's just this part. We will go for
something like fusion, maybe change the color
or something like that. And then we will
increase that glows spread to like the
whole background. So this will go like this. And then the whole background. For the background part, you have to select
something which has the more blue spread that actually goes towards
the whole part. You can again change
that to blue. I mean, the purple actually. Let's go like this. Okay, so we have this. We can increase the
spread a bit more. You can increase the glow. And you can make it like
this when it goes this. Okay, So we have something
in the background that is animated and
everything like that. This is good. The next thing that you can do is obviously composite settings
to transplant. We have Chile have that already. So this is our background
for the moment. I'm happy with this. You
can turn this to fall. Wait for them to
view to complete. It's actually going
to take a bit longer. Let's just go with the half. Or maybe third. This is actually
quite hectic task for the computer to perform. And this is good. I'm happy with this
at the moment. The main purpose is
just to show you what you can do using all of these options and all of these available functions
and the basic plug-ins, etc. Next thing is the
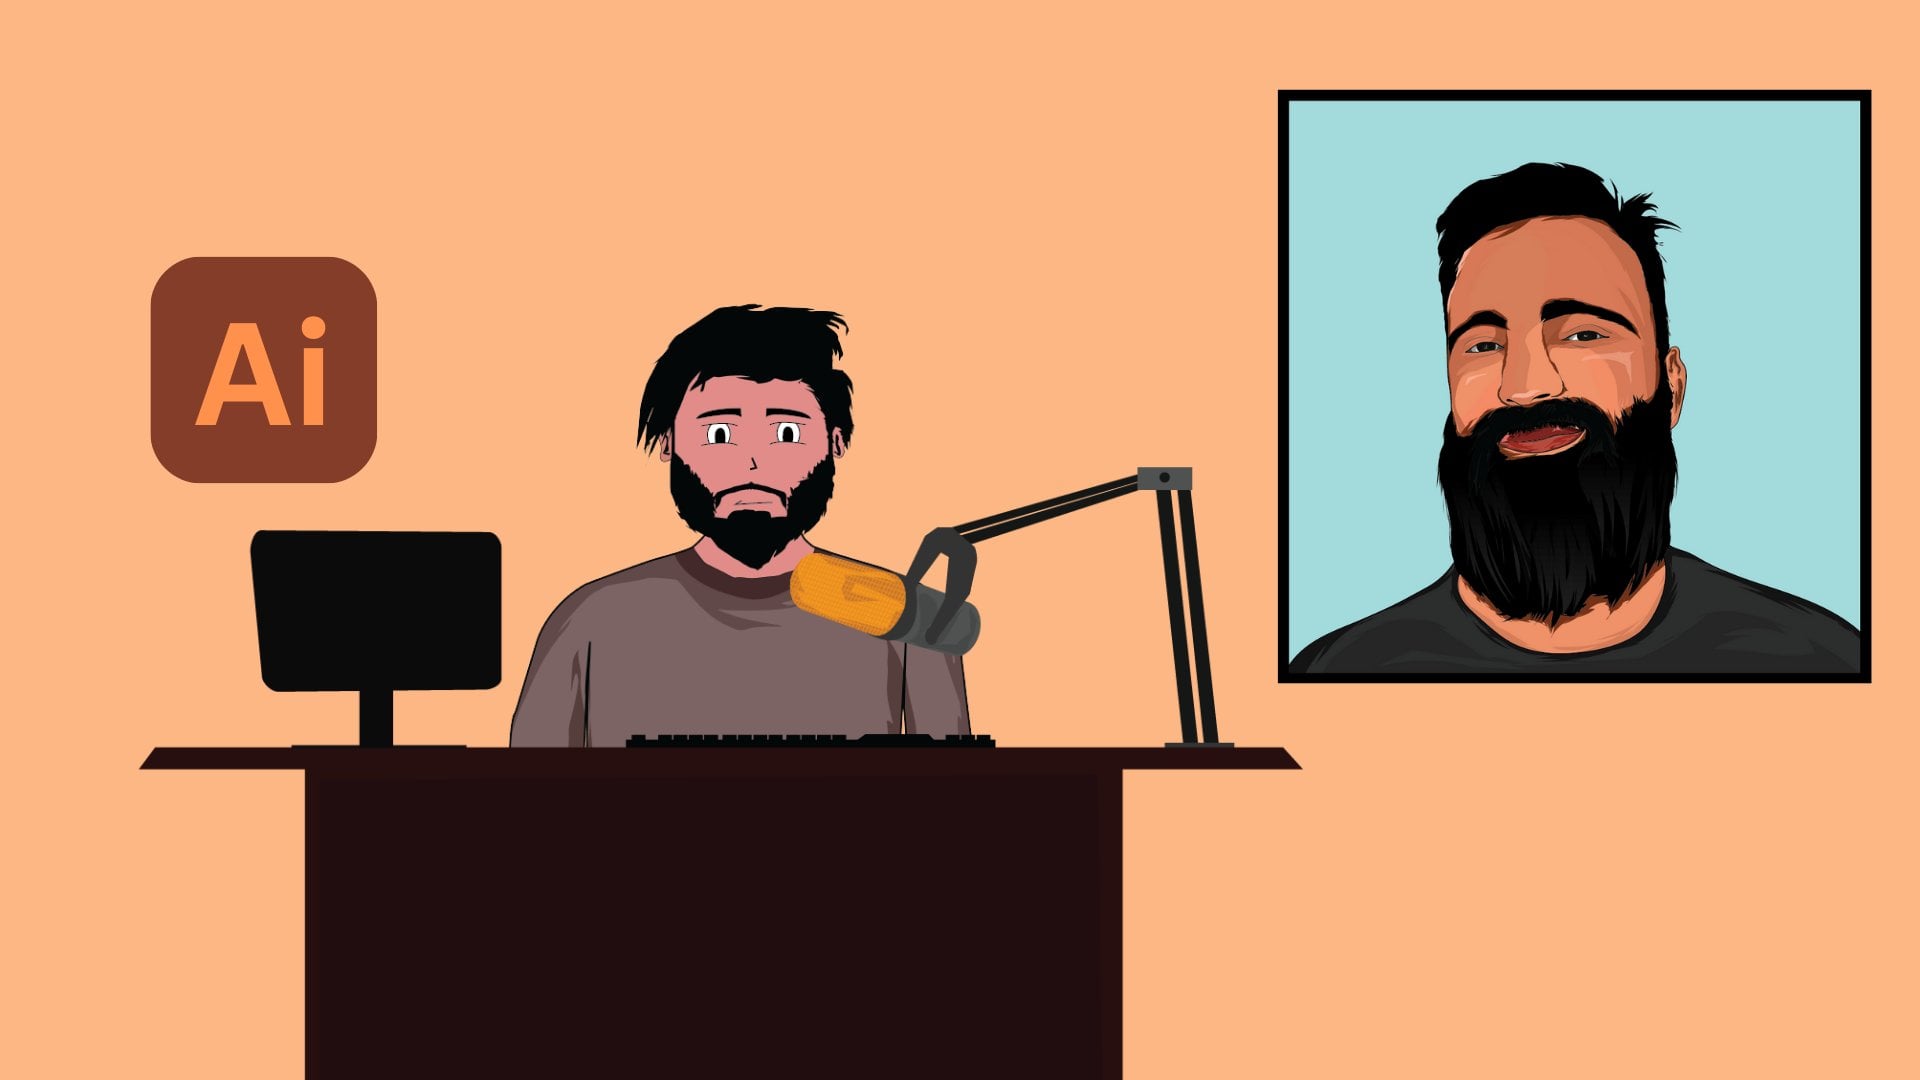
foreground element. For the foreground element, I actually have the
logo of this mask. So I can just import
that again by double-click the project window. And here we have the logo. We'll just drop it. As it is a foreground element. We will drop it
towards the front. And after dropping this, I can just increase its scale value and press
R to change its rotation. Like this. Okay? So increase the scale a bit. Again, D rotation value. And here it is. This will look okay. We'll just right-click
pre-compose as we did earlier. And then we will go to
Layer and auto craze. And we have this again. Again, we will drop the table and we will go to
Customize code. We will go to Layer Mask. And this is like this. This time again, they're
intersecting background going to be transparent. And then we will
change the preset to something like this. Chances to quarter. One more thing that we can do is toggle switches and change
this mode to add to. It will also blend perfectly. Let's just change
this to something. Okay, So this is looking good. So we'll go with again
the mask options. Like have we have the
customized school again. And then we will go towards the end offset where
we'll turn it to 0, will go to two seconds and then increase
the offset to 100. So it's going to be like this. And at the point when
everything appears, we can add a duct here. And similarly, just delete
the remaining part. So this will go like the
logo will appear out of nowhere and everything
will go like this. Indian just
background diminishes and everything goes out. This is going to
be a perfect loop. This was about the
background and foreground. You can always modify
the logo values. You can increase its blue. You can change the code size. You can increase the spread. This is how you
animate using Seaborn. For the sci-fi animation
of a vector art.
5. Eyes: Now we almost have
completed everything. We have the foreground element, we have the background element, we have the subject animation. The only thing that
we can do to enhance everything is add
some flicker effect, etcetera to the eyes
and divorce, et cetera. And for that, you can
just create a new layer, new solid, and
change its color to maybe something like
the same as the guys. So we have the same color. Then you can just press T for opacity and decrease
the opacity. This time, you will just go towards the eyes and make
a mask around the eye. With the layer selected. Select this pen to draw
roughly around the eye. We have a solid now
around this eye. And then you can
just duplicate this, press M for mask, delete the previous mask. Again with the layer selected a new mass for the second die. Now you can just press T on
keyboard for opacity or both. And turn both the
one hundred percent. One hundred and one hundred. Now the both eyes have a solid on them but the same league
with the same color. Then you can go to effects and add the glow effect
on both layers. With the glow effect, you can select the color
channels to be alpha channels. Or maybe just electric. We collect channels we
can go with on top for the composite original colors. Then you will just select Gallery and color
B to be the same color. And you can increase the
values that you can see here. You can increase
the glow radius. Let's keep this to something that actually does
not leave the eye. Then you can increase
the glow intensity and change that low threshold. This is our glow that we added. If we change it
to Alpha channel, that actually gives
you better look. And this is good. We can just copy this and paste it here by
Control C and Control V. Obviously. Now you can see
everything is good, but the eyes are very static. So to make that eye
movement animated, you can select the layer. First of all, we
can go with this I Zomato numbered to glow intensity and hold Alt on your keyboard and click
the stopwatch icon here you get to
add an expression. We will add wiggle and
select a value, for example, three and then n. And if we play it back now
it actually is a lot bigger than you expected. So we will go with 3000. Okay, So it's good, but let's go with 200. I'm still not
getting the results. I want it looks
okay, it looks fine. It looks good. And then we can just
copy this expression, go to the other solid
layer and add again. Now both layers will have the same expression and
will have the same Flickr. And then we can
just select both, go to opacity and
decrease the opacity. Now we have the
decreased opacity, so everything will
be looking good. Everything will look
perfectly blend. And then we can also add
the mode to soft light. Then we can change
the mode to overlay. And you see that there
is a slight flicker. And this looks fine to me. Let's just increase
the opacity values are bit to something like 25. Okay, So this is good. So
now we have dy Flickr, we have the background,
we have the foreground, and we also have this
object animations. This was all for this lecture.
6. Finalizing the Video + Tips: So actually now we have
all of the animation. Now it comes to finalizing
and exporting this animation. You can play it back
again and again to check where you can
modify something. If you want the foreground
element to be modified, you can go to that layer. If you want to change the eyes, you can go to those layers. If you want to change
the background, you can go to the
background layer. And when you are happy
with everything, you are good to go
for the export. Now before going to the export, remember one thing
when you are using the glow effects and
flames and etc like this, it is better to prefer
better bits per channel. And you can modify that
by just clicking on this button and changing
the depth to 32 bits or 16. But I will suggest 16 bits. Actually that is not
quite extensive, but it's actually
pretty good results. So you can go with
16, but per second. I mean 16 bits per channel. And then just, you can click on File Export and go to
Adobe Media Encoder Queue. If you have that, I'll go to
Add to Render Queue simply. I will be going with
Adobe Media Encoder. And let's just read that
the software loads up. And when it loads. You will see your
project here at an object after some
basic processing. And let's just wait until
the project pops up. Here it is. You can see it's
basically set to ten ADP. This is going to be the encoded and it's set to the default. So you can just click on
this button, Start q, and it will render your
video and export it. So let's just read
until it exports. And it's going good. It's going to take
some 15 seconds just because reactivity gene is, it's a 16-bit by channel. So I'll just meet you with
the end result is now, this was all for this class.
7. Class Project: Congratulations, you have
completed the class. Any meeting sci-fi vector x. So now at the moment
you know how to animate a vector art inside
Adobe After Effects, using Sabre, using glow effect, and using different
kinds of expressions. So enough of the knowledge was submerged into
the shot glass. I guess you guys
have learned a lot, but I cannot confirm that until
you guys provide a solid, nice, real review and discuss. So I will get to know
where my drawbacks are, my points, et cetera, which I can continue to provide an upcoming classes
or I can improve. So just drop an honest review and follow me on Skillshare. Also, I would be happy if you guys make a vector
art of your own. If you guys don't know
how to make a vector art, I will upload one of
my own vector dogs which I made previously. And then you can just download that from the class
project description. And then you will
have to animate that after the animation, export that as an MP4 file, as an MOV file or
anything that you'd like. It all depends on you. You have the creative freedom to do everything and then just upload that as gas project
here on Skillshare. So new students coming can
see what you guys learned. And I will also be happy
to see what I taught you. So this was all for
this small session. I will be back with
the new classes soon. David bit different kinds of classes in which you will
learn how to make vector art, how to use DSLR camera, how to go from
manual photography, It's sector, a lot
of stuff is coming. So do follow me
and stay updated. Keep creating, stay happy, Bye.
 Art Hub, All Arts at one Place