Transcripts
1. Class Intro: In this course, I'm going to
show you how to combine two of the most epic creative
apps to explore, iterate on and create
animations really quickly. We'll use Procreate
to create textured, illustrated assets
ready for animation, and we'll use Adobe
After Effects to rapidly explore,
experiment, and play. All following your curiosity. I'll show you how to
iterate on animations, how to reuse elements, and how to update your
existing animations with new or updated assets. This course, we go on
an animation journey. We follow our curiosity, we explore, we iterate quickly. We make a lot of animations, and I make mistakes.
I forget things. I come up with new ideas mid lesson and I
encounter problems, and then I show you
how I get out of them. My name is Rich Armstrong, and I've been using
After Effects since 2007 and Procreate since 2016. I've taught thousands
of students how to make cool stuff using both apps,
and for the first time, I'm showing you how to
combine Procreate with After Effects and also the process of how I come up with my
animation concepts. This course is a real look. Into how I animate by
following my curiosity. So if you want to learn
how to animate in an explorative way using
Procreate and After Effects, then come take this course. All you'll need is an iPad with Procreate and a computer
with After Effects. Alright. I'll see you in class.
2. What To Expect: Okay. Welcome to this class. I'm pumped that you're
here primarily because I love Procreate and
animating in Procreate, and I love After Effects. And so when I combine them
together, it's like, Wow. Happy place for Rich, happy place for me
who loves texture, handmade stuff and animation. And so I want to take you
on an animation journey, how to use Procreate to create these textured hand drawn
frame by frame assets, and then how to bring
them into After Effects. But here's the thing. There are tons of illustration styles, tons of ways to draw, tons of ways to use
Procreate and man. When you come into
After Effects, there are bigillions of
ways to do the same thing. So I'm not going to show you every single thing,
every single way. But what we are going to is create something and then
follow our curiosity. It's going to be a
simple something, and then we're going to go
on a journey to be like, What if we do this? What if we do this?
How about we try that? And as we go through the course, through the class, we'll
start adding more things, start animating some
stuff in Procreate, bringing that into
After Effects, it's going to be explorative. We're going to be led
by our curiosity. So in the next lesson, we're going to start by creating our assets inside of Procreate. They're going to
be static assets. We're going to start
simply. We're going to bring them into
After Effects. We're going to start
simply there too, and then we're going to iterate. Right, I'm pumped your here. I'm looking forward to it. I'll see you in the next lesson.
3. Creating Assets in Procreate: If you haven't got Procreate
open, it's time to open it. We're going to start
here. And the first thing that we're going to do
is create a document. So I'm going to go
for an ultra HD size. This means that I
can scale it down quite easily to an HD size, and this should give
me enough space, enough size to create things
quite comfortably at. What's really important to know here is that it's
easier to make things smaller rather than drawing them small and then trying
to make them bigger later. So rather go biggers you can and then make them smaller
later when you need to. Okay, so if you don't have
an ultra HD size Canvas, let's create a new one. And it is 384 oh by 216 oh. You could flip that
to be portrait, but it's quite easy to make it portrait once we get into it. DPI 372 doesn't really matter. Color profile, definitely RGB. I like this first
SRGB color profile. And, yeah, that's really great. Okay, Untitled Canvas. Let's call this UHD, ultra HD. But bang. Okay, so I could go for a
horizontal or a portrait. I'm going to go for a portrait, so that means it works
really well for socials. And what I'm going to do
is go for a black color. You can go for whatever
color you like. I'm going to keep
my illustration and animation really
simple in terms of color, in terms of layers, all
that kind of stuff. But you can go as wild as complex as you like.
You can use your style. Or what you can do is keep
it simple in the beginning, and then as you
explore more and more, make it more complicated,
make it more complex, and bring in your own
style. Okay, so Black. And then as a pencil, if you don't see this, I'm going to go for the
Procreate library. Maybe you have classic
library as well, but I'm just going to go
for Procreate library. I want to use something
that's quite textured, so these charcoals
are really nice. The pencils are really nice. If there's something that
you like to use, use that. I'm going to go for
this Swansea pencil. It's fairly textured, but it's also fairly easy to use as a planning pencil or
something like that. Okay, so a nice rough
textured kind of pencil, not too textured, not too
crazy, and it's black. So what I first
like to do is just do a little bit of
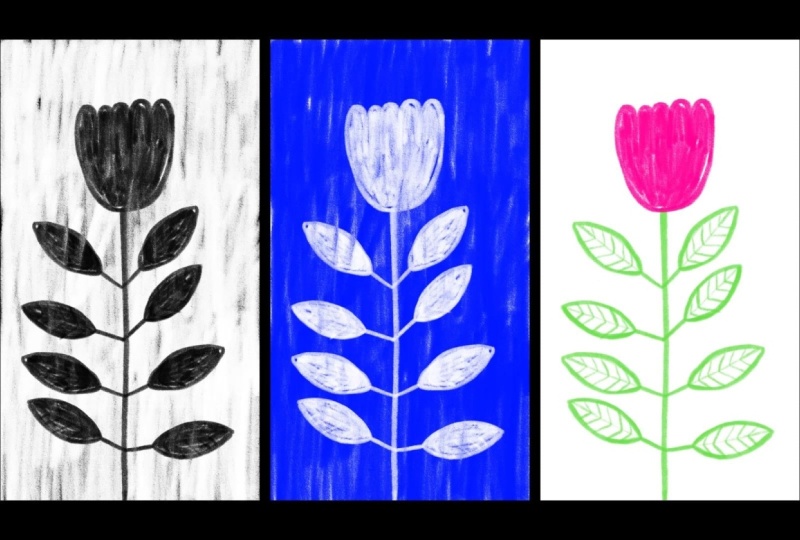
planning or sketching. So what I have in
mind here is a flour, maybe with, like, deeper
petals or something. It has a stem like that. And then it has some
flowers or leaves, rather, something like that, maybe bringing a bit of
quirkiness, their eyeball leaves. But also, maybe I
can just keep them as normal leaves. Alright. So this is just planning.
It's kind of, you know, how this might look in its final form or if it
was an illustration. So what I imagine is going to work in balloon now
so that you can see. So this would, like, shoot up. Then this flower would
kind of just, like, maybe grow from
over here upwards, and then the leaves
would also pop out. That could be one way to do it. That's the way that I'm
going to show you how in the next couple of lessons.
So yeah, that looks good. I'm going to drop the
opacity and then create the elements each on a
separate layer. Okay. I'm going to go
back to black and create my flour,
create a new layer. Okay, that's really cool.
It is black on white, but it is still
transparent fill. So what I'm going to do is
put a white fill in it now. And this is for two reasons. One, so that if later I want
to change this color, I can. And it also means
I can show you how groups come through
in After Effects. So the reason why I'm
not using, you know, just like popping in
a fill color like that is because I still
like this texture, kind of like see
through in places. It looks like I've
actually hand drawn it, which you're not going
to get in After Effects. You can only get it
here in Procreate. Okay, so I'm going to
group these two layers. One, I'm going to
rename as outline, the other as fill. Now, you don't have
to name your groups. You don't have to
name your layers, especially if you've
only got three layers. But later on, things might
get a little bit more complicated and naming is
going to help you a lot. So you can name
your layers here. You can name them in Photoshop, and you can name them
in After Effects. If possible, name them here. It just means that there's less confusion in
the next steps. And this group, I'm going
to rename as flour. On some of the layers,
I won't name them, and then I'll show you how
to name them in later steps. Okay, so we've got our flour. What I'm going to
do now is the stem. And remember, I'm just
creating elements, so I don't think I don't need them to be like
lined up exactly. So I'm going to create
a stem like that. I don't want it to
go all the way off the artboard because
then if I move it, you'll see that
then it's cropped. I don't want that to be cropped. I just want it to be like that. Okay, so we can move this
up a little bit more if we want to create some more
like stem up there, and then later on, we
can reposition it. Okay, I'm going to
leave that unnamed, and then I'm going to
create just one leaf for now and reuse that leaf. And then later on,
if we want to, we can create more
leaves to then replace the duplicates
of that one leaf. It's one of the big things that I like about After
Effects is that you can duplicate an animation
or an object, and then as you update it, it updates all the other ones. Okay, so I'm going to
draw this quite simply. I'm going to draw
this little part of the plant or the leaf. I think it's called a petiole, and then I'm going to
create the leaf. Like so. Okay. And then I'll do the
veins and press quite lightly. Okay. And then underneath here, I'll create the
full for the leaf. Okay. That looks great. Now, if you use groups or if you use clipping
masks or masks, all of these things
will then end up as compositions inside
of After Effects. I'm going to show you
what that looks like, and I'm going to show you how to check it out when we get there. But you can use groups,
you can use masks. You can use clipping
masks if you want. If you want to keep things
as simple as possible, you can just merges these layers into one
kind of leaf object. You can then merge all of that into one flower
object if you want. But let's just
keep it like soap. I'm going to group these guys. Or maybe, maybe I'll keep
them ungrouped and unnamed, and I'll show you how to process them when we get
into later steps. Okay, I'm gonna rename
this one just to be stem. And then we've got our
leaf layers up above. Okay, I'm gonna hide
this planning layer. I'll rename this planning. That will come through into Photoshop and into
After Effects, but we don't really
need to see it. So I've got my elements here. That is fantastic. They're textured.
There's a group. There's some unnamed elements. Now I need to send this to my computer because that's
where After Effects is. You should do this in a way that you're most comfortable
with for me. I just press on this Cg icon, go to the share tab group here, and then I'm going to
share it as a PSD. Now, you could share it
as PNG files as layers, but that just means
there's more files inside of our main
project folder. PSD makes it really easy to
get it into After Effects. It also makes it easy to
edit inside of Photoshop, and there's going to
be one more issue that I'll talk about in
the next lesson. So let's go for PSD or
a Photoshop document, and then I'm going to air
drop it to my McBookP. You could use Dropbox, any other Cloud service, or however you're
used to getting your files from your iPad
to your computer. Okay. There we go. Alright.
And the next lesson, I'm going to take you into
After Effects and show you one issue, which we'll fix. And then in the
lesson after that, we'll actually start animating these elements inside of After Effects. I'll
see you there.
4. Please Trim Your Layers: Alright, in the previous lesson, what we did was created our assets inside
of Procreate and then exported that document as a Photoshop document and
sent it to our computer. But the problem with
this is that Procreate does some weird
stuff with the layer sizes that it exports inside
of Photoshop document. So we need to fix that. And I want to show you
why we need to fix that. So let's open up
Adobe After Effects. And I'm going to
create a new project. And in future videos, I'm going to show
you exactly what's possible and where everything
is in After Effects. Right now, I just want
to show you the problem. So, it's got to find out
dragon untitled artwork. Okay, let's go for composition
retain layer sizes, editable layer styles. Okay. I'm going to double tap
on that, go to composition, composition settings, change my background
color to white. Okay. Now, if I want
to select the flower, I'm going to then select the
flour and try and move it, but it's selected the leaf. Okay, I want to select stem, but it's selected the leaf. And the problem with
this is that this layer seven is actually the size
of the whole document. It's not the size of its
contents. Okay, problem. So we can select layer
eight over here and move it around or flour and
move it around. We can select it on
the layers panel, but we can't select it visually, which is frustrating, right. So I'm going to delete
that wrong button, delete that Okay, let's
go back to Finder. I'm going to name untitled
artwork as not Stem, plant. Okay, there are two
ways to fix this issue. The first way is
inside a Photoshop. So if you've got Photoshop, if you use it, this is
really easy, really handy. So let's open that up there. All right, let's
close the libraries. Okay, you can see
here if I press Command yeah, it's
really, really big. The size of the layer is the document size rather
than the layer contents. Okay, so I'm going to undo that. If you've got Show
Transform controls checked, uncheck it for now. Then select all of your layers, press Command T or
edit free transform, and then just move your
layers a little bit. There we go. Now
everything will be the size of its contents. Which is fantastic. You
can then save this. You can also rename and
organize your layers here, which is what I like doing
because it's easier to type on my computer and use
Photoshop for this rather than my finger and trying
to type on an iPad. So this is where I normally do all of my naming and organizing, but we're going to leave it
for now and do it in After Effects so I can show you
what's possible there. Okay, I'm not going
to save this. I'm impressed Command W. Don't save. Because if you don't have a
Photoshop, what do you do? Well, I made a little tool for you. It's got
to Google Chrome. Go to rich.net slash PSD TIMER. And I built this with AI, and what it does is
exactly the same. It converts your
layers which are the size of the document into
the size of their contents. Okay. So let's drag
and drop here. Ta da, download a
PSD, all the layers. But for our case, let's go for Download PSD. And if you want to
do another, you just tap on process another. Okay. So plant trimmed. We can open this
up in Photoshop, and yep, it did the job. Okay, so I'm going to
delete plant dot PSD. And I'm going to rename plant
Trim into plant dot PSD. Then let's go to After Effects
and pop this in there. Okay. Double tap on
that composition, composition settings,
background color is white. Just makes it a lot easier
to see what's going on. And now we can
very easily select the different layers,
which is fantastic. It makes our lives inside of After Effects so much easier. In the next lesson,
we're going to jump back into After Effects.
Do some animating. I'm not going to show
you what's possible, not going to show you all
the different things. You can follow along with me, create an animation,
and then after that, I'll start to explain
what's possible once you've seen a little bit and experienced a little bit
of what it's capable of. Alright, so in the next lesson, we're going to get
our hands dirty. We're going to start animating. We're going to start
having some fun. I'll see you there.
5. The First Animation: Okay, in this lesson, we're
going to get into animating. So if you haven't opened up
After Effects, open it up. Might need to find it
inside your apps folder, so like applications,
Adobe After Effects. And then it is not
the render engine. It's Adobe After Effects. 2026 is what I'm using. Maybe you have a
later version because when I recorded this and when you're watching this
is at different times, maybe you have an older version
and you haven't updated. That's okay. Just open the
one that's on your computer. Okay, so you should see
something like this. If you don't go to File, well, File New and new project or
Tap over here, new project. Okay. I'm going to double tap here or go file import file. This is your project panel. And I'm going to go
for plant or PSD, Import as composition
retain layer sizes. If you just drag it into here, you don't have to do
this. Press Okay. So if you drag it in,
you'll see this composition retain layer sizes,
editable layer styles. Okay. There we go. Now, we need to save this. So file. I'm going to say save or save us. So I'm
going to just save. I'm going to create a new
folder called After Effects. And the reason I
do this is because it creates extra
files and stuff here, and I just want to keep
things nice and simple visually in the root
of my Download folder. You can create a project
folder if you want, but I'm going to be working in the download folder.
So there we go. I'm going to be calling it
Clant animation dot AEP After Effects Project. Okay. We've got our plant composition, so I'm going to
double tap on that. Going to go to composition
or composition settings. You could press
Command K here or Control K if you're on Windows and change the
background color to white. The frame rate is 10 seconds. The duration is 30 seconds. So these last two
numbers are your frames, and these are seconds. 30 seconds is great for now. If you want, you could
change that to ten or something a bit smaller. Okay. Now, because of
the previous lesson, all of these layers and
compositions are trimmed. It's great. It's fantastic. Okay, so let's begin
setting things up here. We've got a layer seven, which is I'm going to rename
this by pressing return. So outline, we've
then got this one. So I'm going to
press this button here, Toggle Transparency Grid. Okay, so this is our fill. And this is our
petiole. Is it called? Can't remember now. Okay, so these need to be put into
a group called leaf. You'll see there's a
group called flour, and a group here is called
a composition or a comp. So if we double tap on flour, you'll see it has an
outline and a fill. But you might be like, Yo, but look, it's huge. It's taking up the
whole document again. Yes, that's okay. Because when you go back
to this plant composition, we've got this little
thing checked here. So if we take that off, it's then going to take over the whole composition
or document again. So we've done a good
thing, but now we still use this little sun
icon over here. If this still bothers you, what you can do
is you can select outline and fill inside
of this document, go to composition,
and then crop comp to selected layers bounds. And there we go. It'll
make it really small, so then we go back to our plant. And then we can rearrange
things at will. Okay, so things are
looking good here. Now, what I want to do is just rearrange these a little bit. So I'm going to put
this at the bottom. Going to turn my
transparency grid off, so it shows the
background color. Okay. So this goes off the
screen, which is great. But you'll see here if I do
a little bit of rotating, I'm just going to drill down to here to rotate
and just do that. I don't want it to rotate
from the middle of the stem. I want it to rotate
from the bottom. So to press Command
Z or Command Z. I'm then going to press
this pan behind or anchor point tool or just
press Y on my keyboard, and then I'm going
to drag the anchor point down over here. That means when I
do some rotating, it then rotates from that point. Which is far more
natural in terms of, I don't know, like, if it
was blowing in the wind, that's where it
would rotate from. It wouldn't rotate from,
like, the middle of the stem. That would just be super
weird. Okay. I want to do the same thing
for this flower. So I can select things
quite easily here, then I'll move it over there. If you want to rotate
something without drilling down to the
transform properties, just press on this rotation tool or press W on your keyboard. Yeah, that looks pretty cool. And then I'll press V again to get to my move tool
or selection tool, and I'll put that
on top of the stem. Now if you're like, Yeah, but the stem is
still on top, well, what you can do is
move the flower up above the stem
above everything, or you can press Command or
Control and right brace or left brace to go up or
down in your layers panel. Okay, that looks great. Then a leaf, which is not connected to anything
at the moment. So what we're going
to do is go outline, fill Petal selecto using the command key or
the Control key, or if you go for outline, you can press Shift,
hold that down, and it selects all
the layers between what you first selected and
what you last selected. Okay, now that we've got
those three layers selected, I'm going to right click
and go to pre compose. This puts it in its
own composition. Let's go for precompose. We'll call this leaf. And we'll call it
leaf number one. And I want to move all
attributes into new composition and adjust composition duration to the time span or
the selected layers. Okay. And let's open
new composition. And you'll be like,
Yeah, but now it's still the size of the whole
composition. That's okay. So again, if we go
to plant over here, we'll just tap on this
little sun icon, boop, and it will then become the size of the contents of
that composition. I'm going to press Y and move this anchor point to
the petiole over there, and then rotate
this a little bit, press V. Okay, that
looks pretty good. Maybe we need this to be
a little bit smaller. So I'm going to go for
scale and then reduce that. And you can see it scales to that point to
that anchor point. Okay, that looks great. Now, I want to move it
slightly to the left, so I could select this one, move it to left, select
this one, select this one, move it to the left, or I could select them all and move
it to the left like that, using shift or command
to select them all. Or what I could do
is use parenting, which is just amazing. Alright. So let's select
flower over here, and then you go to
parent and Link. If you don't see that, tap this toggle switches mode here. You might then see it. So parent and Link, tap on that, and I'm going to go for STEM. And then tap on leaf
one, go for stem. Now, if I move my stem, along comes this flower and along comes this
leaf. Fantastic. All right. It also means
that if I rotate this, so I'm just press
W on my keyboard, they come along too, right? Or I'm going to change that back to zero
or if I change the scale, Hey, they scale along
too, which is fantastic. It makes animating so, much quicker, so much easier. Okay. So I'm gonna
press Command Z. This is what it's
going to start at. Maybe let's move it a
little bit to the left. I just press Shift and
right on my keyboard. Okay. I'm going to
press Command minus, just to zoom out a little bit. Yeah, that looks good. Okay,
now we can begin animating. This will be like the final
stage of the animation. So I'm going to
start with my stem. I'm going to scale up the scale. I'm going to change the scale
or animate the scale 0-100. So I'm going to press
Plus on my keyboard, and at about 2 seconds, I'm going to add a new keyframe. So these little diamonds
are key frames. And then I'm going to
change this to zero. Whoop. And I'm going to press
Space bar, and there we go. It grows in quite nicely, and you might be
like, Whoa, yeah. I just animated something. Yeah, hold on. We're
not done here. We're still going to do a
little bit more animation, but this is really
looking really cool. And the reason I'm going for ten frames per second is because I really like this hand made
kind of animation style. I don't like things
to be super smooth. You can, of course,
choose 25, 30, 60 frames per second, and using keyframes makes it really easy to animate
between two points. But for me, I love this, like, jerky, handmade stop
motion kind of effect. It also makes things
quite visible when I start showing you
things in later lessons. Okay. So this one, when it gets to the end here, I want it to slow down a little bit as it gets
to the final point. So I'm going to
select the keyframe. It's got this little
blue highlight around it, right, click on it. Go to keyframe assistant, and then eases in. All right, it's easing into it. Like that. You can use
EZ Es if you're like, I can't remember
easy E's in or out. Just use EZ Es. And now you see how it gently comes
into the final point. Lovely. Fantastic. Okay,
so as this is going up, I want the flower to also
do something similar. So I'm going to just
press S on my keyboard, and it just shows that property. Okay? So let's go
pop a keyframe here, and then as it finishes, let's go for a few more
keyframes, add a new keyframe. Okay, so right now, it's not animating. It's the same size. But here we're going
to start at yeah, let's go for 28 or maybe 30. So. Okay, so let's have a look
at what this looks like. Shop. Okay, that looks pretty cool. Maybe let's drop
it a little bit. Can't really see
that zoom in here. Change the position slightly. Just pressing Command and
minus and plus on my keyboard. Okay, so it kind of looks cool. And then I just press along this timeline at the top
and then press space. Whoop. Okay. That looks good.
Again, I'm going to right click here
keyframe assistant, Easy Ease in or maybe what I do is Command
Z. I go for Easy Ease, and this will be Easy E's in
and out, so it gets to here, and then a few frames
on it actually then settles at a
slightly smaller size. So let's go for 11 Oh, maybe 11 instead of 111. So something like this.
Whoop. Which is great. I like that. Okay. So Oop. But it starts out at, like, a weird color, and
really small here. So what I want to
do is actually make this whole thing black. And what's great
about this is that we have that fill inside
of our flower layer. Okay? So we've got this fill. Okay, so what we can do
is we can add an effect. So let's go for effect, go down to color correction,
and you'll be like, Wow, there's just so many here. Oh, my goodness.
Yeah, there is a lot. So I'm going to go for hue and saturation because I
know what I want to do. I'm going to check on colorize, and then colorization
saturation saturatin. Okay, so nothing should
change, S at the moment. What I want to do is I want
to and I make this lightness. Okay, so under effects
here, if you don't see it, just tap on this arrow again, then you'll see it all,
colorize lightness. So when it gets to about here, I want the lightness
to be as it is. And then before that, I
want it to be super dark. So black. So it's coming up black the whole time
and then sheep. Just like that.
Okay, that's great. Maybe I want to change this
to be a little bit quicker. So I select the keyframes,
move them to the left. Okay. Shop. Maybe like that. Maybe a little bit quicker. And you can see how I'm just
tweaking things, you know? It's not like an exact sign, so you just got to feel for it, and I keep on pressing play. Keep on having a look
at what it looks like. So it's already moving because
of the stem moving up. Then Whoop. There we go. So I like
that. Remember to save. So Command S for me, or we could go file and save. So there looks good, Ls good. Let's go for A leaf now. Okay. So as it's coming up, maybe it starts to
scale in over here, so I'm going to press on this little stopwatch
to say, Hey, let's do some key framing.
Move that keyframe. Okay. And then we go for
Let's go for nothing. So it goes from shop like that. Okay, maybe a little bit slower, maybe a little bit faster. Okay, then right click
Keyframe Assistant. I'm gonna go for
Easy Ease in Okay, but it looks a
little bit boring. So what I want to do is
do some rotation as well. So let's do some rotation, put that at the end,
create a new keyframe. And right now, I can't see it because the scale
is really low. So we're actually going
to do the animation for rotation over here like this. And I'm going to rotate
it like from here, outwards, maybe go a
little bit further. So I'm going to do
some manual rotation here and then back like that. And I'll change these keyframes
into es Es keyframes. Yeah, that looks pretty cool. Okay, so just select these
keyframes, move them back. Okay, so maybe I'll change the position
of these keyframes. Okay, that looks good. So. And maybe I want to do that effect with the
black in the color too. So effect. Let's go
to color correction, hue saturation, colorize, drop the saturation,
colorize the lightness. Okay. Let's go on here. Colrize the lightness. So from here, let's drop the lightness to
100 and you can see how, like, nice and textured that is because we didn't use
Procreate, like fill. We just colored it in with
our hands with a brush. Okay, so that looks great. I think in the
beginning the rotation could be just like that. Yeah. So whoo. Okay, space bar and drag around
on this composition view. Okay, that looks really good. What I want to do now
before we end this off is to show you something
really, really powerful. Okay, so we've got this leaf. I'm going to select all just by pressing one of
the layers and then going Command A and then pressing
the little drill down arrow. Then everything
pops in over here. I'm going to take out planning, gona take out background. Don't need that. Okay, now
we've got this leaf, okay? And wow, when we drill down, there's a whole bunch of stuff. So I could just press U, and it shows me all the things
that I've been animating, which just makes it
a lot easier to see. Okay. So from here, what I want to do
is I want to take this leaf one with all
of its animations, and I want to create
a new composition from that so that I can reuse it over and over so that I don't need to keep on
animating new leaves. And I want to put a bunch
of leaves onto this plant. So what I do is right
click, Tap on precompose. I'm going to call it leaf
one, ni Animation one. I don't want to leave all
the attributes in plants. I want to move all attributes
into the new composition. Adjust composition duration to timespan of selected
layers. Yes. Open your composition.
Yeah, that's fine. Okay, then you might be
like, but where is Leaf one? And what is happening over here? It is up here because
it was parented. So we might need to tweak
some things in a bit. Yes, we do. So then we tap on this little sun icon for
Leaf one num one, like that. And then we move it anchor
point again, like that. And then we move
it wrong button. Okay. So that looks great. And you can see how
powerful this little button is what it is, collapse
transformations. Okay? Doesn't really make sense, but that's what it does. Now we've got leaf one, anum one I just takes up
that amount of space, and over here, it's in
a very weird position. We could change the position here to be more
in the middle and then change it back in
the plant composition. So it's go to plant. Put it over here and change
our anchor point again. Okay. So let's have a look. Okay, not quite right. I'm gonna just zoom in a bit. Let's change this. Okay. How does this look? Okay, fantastic. That means the animation
exists within this instance. So it's inside of a composition. And inside your project panel, you'll now see
Leaf one Anim one. Fantastic. I like it. Okay. So now what we
can do is we can tap on Leaf one Anim one
and press Command D or edit and duplicate. Okay, I'll duplicate
it right on top. I'll name it the same
thing, which I really like. I don't like copies being
appended to my names. But maybe you'd be like,
Okay, leaf one, num one, and we call it number two, and we'll call this
one number one. Okay. Then we move it
down a little bit, and tada we now have two leaves. Okay, this one's number
one. This one's number two. But this one actually comes
first, so maybe let's oh, I pressed into there. Let's close that. Close that, close that. I'm going to press Enter
here again and just rename this as number one and
this one is number two. Okay, so number one is up here, comes in at this time. So maybe for leaf number two, I'll make you come
in slightly later. So I just drag the layer
slightly to the right. Ooh. And that looks great. Okay. Now, I want to
create one more duplicate, and you can create
as many as you like. But for me, I'm just going to
create one more duplicate. So I'm gonna press
Command D. And because we've named things
with ones and twos, it then renames us as number
three, which is great. I'm going to press command
and left bracket or brace, and instead of moving it down, what I want to do is flip it. So I'm going to go down
into transform into scale. I'm going to check or uncheck this little lock icon
and then on my X scale, change it to -100 and
then lock it up again. Put that over there. So maybe we move that. Or, let's just have a look
at what it looks like. Okay, that looks
really, really nice. So we could change these
around a little bit. Okay. Da da, da, da, da, da. Something like that. Alright. This looks amazing, and you can see how powerful
re using compositions, re using animations is. Yeah, we've got three leaves, and we really only needed to use one leaf or
animate one leaf. In the next lesson,
I'm going to give you an overview of where everything
is in After Effects, how to animate things, what can be animated, what file formats,
After Effects. So ports, if you already
know After Effects, you can skip this and get on to further animating in
the lesson after that. But if you're like,
Wow, this is all alike. There's a lot of
stuff happening. Yeah, stick around, and I'll show you where everything is. I'll see you in the next lesson.
6. How to Animate in After Effects: In this lesson, I'm going
to go over a few things. The first is an After Effects orientation so that when you come in
and you're like, Oh, my goodness, this feels
like an airplane cockpit. Where is everything, what
everything is, blah blah blah? I'm just going to make it
really simple for you. Then I'm going to
cover what kind of files and file formats
After Effects supports. I'm going to cover how to stay organized because it's really
important in After Effects, and then what can be animated and how to actually animate. Alright, let's jump into it. We're going to do
the overview first. Inside of After Effects, you've got your project
panel at the top left. If you don't see it,
let's go to window, scroll down, and you've
got Project panel. You can hide them and you
can show them really easily. Alright? You can then rearrange the different tabs in the panel by dragging them left
or dragging them right. If you double tap onto a composition within
your project panel, it'll open up its own timeline
in the timeline panel. You can then open and close your different tabs in your timeline
panel really easily. If you close them all, you'll be left with your
render Q panel, and this is the ability to turn your composition into
an animation file that you can find
in your finder, something like an MP four or a dot MOV or an animated
Jif file that you can then, share to other places
that you want to. So let's go for leaf number one. Inside of each composition, each layer has a
bunch of properties. All right? You tap on this
little drop down arrow, you drill down to transform. You can then set anchor point position scale rotation opacity, and you can animate
those properties. When you start adding effects, or for specific kind of layers, there'll be different
kind of properties. Besides these
transform properties, you'll start to see
even more properties that you can animate. If you then select a layer, you may also see a properties
panel at the top right. It's a fairly new addition. So let's go over properties, and it'll appear at
the bottom here. If you want to drag it
to the top, you can. There we go. All right. So here you can change the
rotation just by scrubbing. You can change the
opacity by scrubbing, or you can just enter it in. Because it's a new edition, I'm not that used to using it, but it might be like,
Yes, I love that, and you use it all the time. But for me, not so much. So I'm going to
close that panel, and I prefer to do all
of my adjustments over here inside the layers panel
or the timeline panel. And I also like to use
these tools at the top. There's a lot of tools here.
Most of them you won't use. In this class, you'll probably use this tool,
your selection tool. You'll use your
rotation tool and your anchor point tool
or your pan behind tool. All right, so just three tools. Most of the time I use
keyboard shortcuts. So this is V, this
is W, this is Y. In terms of project
organization, I like to make
things as organized as possible from the start
so that I don't like, accidentally delete things or edit the wrong compositions. So inside here, I've got plant layers, and
I've got plant. So what I'm going
to do is to create a new folder called
compositions, or maybe I'll just call
it comps, like that. I'll put in leaf one, and plants I could put in there, or maybe we create a new one, a new folder called elements. And because leaf one isn't
really an animation, we can put it into elements. You could also call this pre Cumps or something like that, and Leaf one nim. Let's put that into
a folder like that, and we call it
elements animated. Animated Tis, press return if
you want to then rename it. And so, yeah, we've
got leaf one, which isn't animated,
but then we've got leaf one animated,
which is animated. Okay, and then plant layers. I'm going to drag
that into a folder and call this imports. Okay, so you got
comps, you got plant. Maybe we can call
this plant one. Which didn't make sense there. All right, you got
elements, leaf one. You might be like, Yeah,
but is it just leaf? What about the flower?
Where is that? Yeah, inside of here, we've got plant layers,
we've got flower, so we could choose to
leave it in there, or we could then bring it up
and put it into elements. We can then rename
that flower one. Okay? And, hey, it could
be animated in the future. So we might end up
with a flower one animated one because
there could be different types of
animation for each element. Okay. That's great. And now, if we go to plant one again, we've also got a stem here. I want to precompose this or
create an element from it, because if we animate
it in the future, then it's really easy to just swap out a composition
for another. So I'm gonna right click
on Stem and precompose. Or what I can do is
go Command Shift C, and that does the same thing. I'm gonna say Stem one. Move all attributes
into new composition. That could be then an animation. So I'm going to
actually just say leave all attributes
in plant one. Okay. There we go. That's Stem one.
Perfect. And then here, if we tap on layer name, you can see it says Stem one, and that's a source name,
and now this says Stem, so let's change to Stem one. Or if we want to make it
the same as a source name, just leave it blank,
press return. Okay, so sometimes it's
really nice to be like, What actually is
this composition? What does it look like or what is it named inside
my project panel? Okay. And then this should now be Stem
one inside of comps. Okay, that is fantastic. So that's how we stay
organized or how I like to stay organized inside
of After Effects. Now, in terms of what
After Effects and file formats it can
use almost everything. Like, if it moves,
you can bring it in. If it's an MP four, MOV, animated Jif, Photoshop
files, Illustrator files. It doesn't do Procreate files, but Procreate does export PSD
files or Photoshop files. You can bring in images. You can create image sequences. It's really powerful. You can add audio
inside of aftereffects. You can also create
your own shape layers, which are vector layers, very similar to an
Illustrator file or illustrator layer,
piece of artwork. You can create solids, you
can create adjustment layers. There's a lot of different
things that you can do. So almost the sky is your limit. There are so many
different options. In this class, we're going to be focusing on Photoshop documents. That have been exported
from Procreate. That's it. We're not going to be exporting animated MP four
files or MOV files. We're just going to
be concentrating on photoshop files and then turning them
into compositions inside of After Effects. Now, what can you
actually animate? Okay, so let's check this out. This is our flower one. So we've got
elements, flower one. Let's create a new composition. We'll call it flower test. The size, width, and height is going to be
the same as what we have, which is ultra HD, and it's going to be
in a portrait format. Ten frames per second, white background.
Okay, flower test. Let's go and put that
inside of comps, and then we'll add a
flower one in here. Okay. So what can we do here? Let's go to transform the
anchor point we can change, the position we can change. So as I'm moving this around, you're seeing that
the position values for X and Y are changing. The scale, if I change this, you can see
that they change. If I hold down
shift, they're going to then change proportionately. Your rotation can go round
and round and round. If I go more than once,
you can see it says two X or one X plus 73 degrees. Sometimes that can get
a little bit confusing, and then your opacity. Okay, we've talked about
your anchor point. So here, if you change
your anchor point, it's really awkward and slow. So that's why I like to
use my anchor point tool, so just drag it over there. And once you've got
an anchor point, it then scales and
rotates from that point. So let's scale from that point. Let's rotate from that point. Okay, so those are
the things that you can change. These
are properties. Nothing is animated yet. This is much the
same as Photoshop or Procreate,
Illustrator, whatever. You're just saying,
Hey, move a chair, change the opacity, change
this setting for this layer. Thank you. But now
with After Effects, you can animate
between two values of a property using keyframes. So let's go for position first. I'm going to go back to my
selection tool or move tool. And I'm going to tap
on this stopwatch, which means I want
to animate it. It creates a keyframe, which is this little
diamond thing. Let's go to let's go 4 seconds, move our tool, move our
rows or our flower. We can also then
change the X and Y with this tool here
or enter it manually. So just go for 100. There we go. I want it to be
up there. Then we go back to the
start, press play. And it moves to the new
position, and it stops. And then I want to add a
new keyframe over here, and you can see the little
dots on these lines. It indicates how quickly
it's going to be moving. So Bow There we go. We can then also change
the opacity as it's going. Like so. So slowly, it's then getting
less and less opaque. And we can also then
change the rotation over here to something like that. You can see how quick it is
to animate in After Effects. Okay, so that's a
really slow animation. But I'm showing you
what's possible. And then for our position, what I've showed you earlier is this keyframe assistant,
you can change the easing. So let's go for
easy ease, like so. So it's going to
get up there and then slowly go back down. Okay, but here I also want
this to easy ease in. So it gets slower
as it comes in. And then it kind
of looks like it falls over, which is great. But for my rotation, I
want to say easy ease out, and then easy ease Okay, which just makes it feel
a lot more natural. You know, things don't just,
like, stop in real life. They kind of stop slowly. Okay. I guess the final
thing that I want to show you here is the effect
controls for a layer. So here, if we wanted
to add an effect, you could see them here and
change the properties here. So yeah, maybe we
go for something like hue and saturation. You can either pop it on
there or pop it over here. Maybe even over
there. Yep, you can. There are so many
different ways to do things in After Effects. And here, we can
go for colorize. Let's turn the opacity up. Okay, saturation,
let's turn this up. Lightness. Let's turn this up. Okay, so now it's red,
which is fantastic. And then we can also then
change the hue over time. So under effects now, the hue now has a keyframe, so maybe we then
change this from purple and then over
time, it becomes red. Okay. So now there's a whole bunch more
properties that we can set and animate
under effects, which visually, you
can see up here. Okay, in the next
lesson, we're going to cover our second animation, which hopefully
will begin to make a lot more sense now that you've had an After Effects
orientation. You know where things are. You know what's possible. I will take you step by
step through things, especially if I haven't
addressed them here, especially if they're new or if it's a new kind of effect. So don't worry, take things
slow, explore, experiment. If you're confused,
if you want to try something out
as you're going, just pause the video, pause
the course, and try it out. Experiment, create a duplicate
of your composition. Try it there, come
back to the original, and then compare
with what I'm doing. All right. I'll see
you in the next video for a new animation.
7. How To Iterate: What I'm going to show
you in this lesson is how to quickly create a new version of
our existing animation, and we're going to do
this by duplicating it and then changing
a few things. This way, we're able to
create iterations and variations really
quickly without altering the original animation. It's like, Oh, yeah,
I have an idea. Let me quickly try something
in a new composition or a duplicate of that
composition as a starting point. So let's jump into
After Effects. I got this flower
test composition that we made in the last video. I also think that Stem one needs to go into
elements and comps. That was a mistake. This
is where it should be. And then we've got plant one, which is our main
composition from earlier, and it's something like this. Great. So what I'm going to
do is right click on it and either duplicate it there
or go edit, duplicate here. Or just tap on it
and press Command D, which I'm really used to. So plant two, thanks for
renaming that for me. That's exactly what I want, and let's double tap into that. Go to close flower test and
plant one, open up plant two. Thanks. There we go. Okay. So what I
want to do now is instead of having three leaves, I want four leaves on each side. Okay? So I've got one leaf
up here, one leaf up here. So I'm gonna delete
this, delete this. I'm going to duplicate this one. And this is number one. I'll call it right
I'll call it one. Write one. And this one, I'll call Left one. I'm then going to
press S for scale, unlock this, say, negative 100, and it does an exact turnabout. So let's see what happens here. Ooh, very nice. Okay. So we've got
left one, right one. I'm then going to
press Command D to duplicate and then command right brace to go up and
left brace to go back down. Now, these are all
the same color, so I'm going to change
the label color to whatever, just not sandstone. So maybe go for Cyan. Okay, command D again, and then up and down. Let's go for orange. Command D again, up and down, and let's go for green. So now I can kind of
see the different ones. Okay, so let's go four. I'm just going to select
them both and hold down shift and press the up
arrow on my keyboard. Okay? These ones I'm going
to move down a little bit. These ones are move
down a little bit, and these ones I should
move all the way down. Okay, so it makes sense in the timeline as
well as visually. Okay. Yeah, I think
that looks good. Perhaps we can say fit. Yeah. So right now, if this plays, all of these should come in at
exactly the right time. So when they come in, the top
ones come in, not so good. And the flower, perhaps we can move this
all the way down. So command shift left brace, it goes all the
way to the bottom. It's much like Photoshop. Okay, it's above the stem, but behind the leaves. So We. So let's do this. I'll take all of these a few notches down. There we go. Okay, so that
could be a variation, right? If we had a client and they
asked us for a couple of different variations with
this flower and leaves, and they kind of like the first illustration
that we've done, can be like, Okay, let's
send them three, four, five quick animations to see which one they like
before we proceed and make it more detailed and start
swapping out elements and making it more handmade.
Do you like this one client? They're like, Yeah, I love it. Okay, so this could be
our first variation. Great. Maybe we just drag all these layers
to the start again, so the leaves come in
a little bit sooner. Cool. That's great. What I have noticed here, too, is that the parent
and the links or the parents are no
longer attached. So I'm going to say, be
parented to Stem one. So that means that
if we move stem one, they all move again. Okay. So this looks great. This is one alternative or variation
that we've created. It's different from plant one. But now I'm going to select
plant two, press Command D, or edit and duplicate again
and go for plant three. And then each
successive one here, maybe I can change this to aqua or pink. That's the flour. Maybe I can do the same here. Tu or fu chizia Here we go. And then we'll move these. I'll just zoom in a little bit. Zoom in out. Okay,
let's go here. We're at 5 seconds. So I'll do that. Let's have a look at what that looks like. So whoop whoop. Okay. So let's change
that to 1 second, and this one to 5 seconds again. So the gap between
each one coming in is 0.5 seconds or half a second. Yeah, that looks pretty cool. I think it could be snappier. So the difference between
them is one, two, three, so three frames each,
one, two, three. And when you're working
at ten frames per second, it's a lot easier to
move things three frames than if you're
working at 60 to be like, I just want to move
things three frames. It's really difficult or tricky. It's one of the benefits. Okay, so that looks really nice. Shop, Jp, chop. Really nice. I like it a lot. Now, plant three. I'm
going to duplicate that. I have another idea,
so plant four. What I'm going to do here
is go all the way up, and then the plant or the flower is only
going to come in here. So I'm going to
select flower one, press to see all of its
animated properties, and then select them all
and drag them over here. So it comes up. Okay,
that looks really nice. But maybe we can animate
these leaves in a bit sooner. So I'm going to
select them all, drag them back by half a second. Okay, so that's really nice. And then here we can select the keyframes and have a look
at what that looks like. So it kind of feels like
this last leaf just, like, pushes out
poop, like that. And I think the scale,
it also could be an easy ease out.
Let's have a look. Sh. Yeah, that's looking great. Okay, so you can see
how I'm beginning to iterate on this animation. We've got four versions now, and we haven't created
any more elements, any more animated elements. We're simply re using. And this could be for
multiple reasons. We're wanting to
iterate prototype and animation really quickly. Maybe this is exactly
what we want to do. We've got all the
elements that we want. And now we're just
trying to find the exact right version that we're happy with that
we're happy with that we want to send
to the clients or just coming up with a bunch
of different options that we can then go back into Procreate to create more
hand drawn elements, more frame by frame elements. Take the whole thing back
into Procreate and hand draw the whole thing based on
this After Effects render. And the next lesson, what I'm
going to take you through is creating a variation of the leaf animation
and then replacing some of the leaf animations
with this new leaf animation. It's pretty much what
we've been doing here, but now we're starting to
iterate on the elements and not just the main composition
itself. I'll see there.
8. How To Replace Elements: Alright. In this lesson, what I'm going to do
is I'm going to create a new leaf animation based
on our old animation and then start to replace some of our existing leaf animations with this new leaf
animation. Alright. So I've got elements
animated folder, leaf one, anim one. I'm going to press Command D to duplicate that.
Let's go in here. Now, we don't really
know how this looks like on the actual stem. So I'm going to add a
stem in here temporarily, just to have something
to work with. I'm going to lock Stem one. Okay. And now, this
animates in, like, Whoop. Pop. Okay, so let's try something maybe a little
bit different here. So it goes jup and maybe it
goes all the way down here. So I'm gonna press U. So does the hue saturation
scale and rotation. So scale. That's great. Maybe I zoom in
here a little bit. You can scale to 120 and
then settle down to 100. Maybe there's no
rotation at all. So let's just tap on this. Stopwatch, removes it all. So just who or maybe it comes back
over here to, like, 90. And then it goes to 100. So it's like he. Oh. This is actually 82,
so 90 wouldn't work. So let's go for 70. So it's a nice little bounce. Like a op. Okay, maybe, maybe we can
add some rotation again. Let's start off it down here. So it goes hoop and then
comes up like this. So So as it does that, it can then ease in. Okay, so that's quite a
nice little animation. Whoop. So I'm going to save. Okay, now, plant four.
What have we got here? Okay, so I'm going to then
duplicate plant four. Let's go to plant five, and then I'm going to select all of these leaf Animation ones, and then replace it with
leaf Animation two. So with all of these
layers selected, I'm going to press
Option or Alt and then drag leaf one anim
two onto them. Poop. Okay. Now there's a
weird stem over there. That's because we still got
this stem inside this comp, so I could delete it or
just hide it. There we go. Okay. Shui. Okay, so that's, like,
really interesting. Shui kind of feels like a
butterfly. And this is good. It's like, Okay, does this work? Does it not? Maybe it makes
us think of something else. Maybe the leaves could flap. And then, you know, the
plant could take off. Maybe it's a butterfly plant. Again, we're just iterating, we're exploring, we're playing. It's like, oh, I have an idea. And that is exactly what I'm going to get onto
in the next lesson, how to think about
iterating, exploring, playing, and how to, you know, kind of decide
what to spend your time on. So I'll see you in
the next lesson.
9. Deciding What’s Next: Okay, once you begin playing
around in After Effects, you begin to notice like, Oh, this is interesting. And you begin to
ask questions like, What if I and you
fill in the gaps. Like, What if I tried
more leaves this way? What if I try to make it
look like a butterfly? What if so what I want
you to start doing is start to give into
those curiosities, try things out, explore, experiment, play, see what
works, see what you like. And as you go down one way, more what ifs will arise. You may begin to be like,
Okay, I got so many options. I don't know which one to try. Try the one that has the biggest difference,
the biggest influence, the biggest variety
first to be like, Oh, like, which
direction should I go? Should I go in this big
direction or this direction? Or which one is going to
add the most interest? Which one is going
to be or bring about more variety, more flexibility. So let's have a look right
now at what I've got, and I'll tell you
what I'm thinking. So I've got plant number one, and this is a really nice
animation with three leaves. It's great. It's simple. I've got plant two.
Which is cool. It's very, like, synchronized swimming kind of vibes.
Plant number three. Which is really
nice. And I think plant four is probably, like, the culmination of all of that, and it works really,
really nicely and, like, pushes the flower out. So what I'm thinking
about right now is what if each of these elements
was frame by frame animated. So each one had five frames. And so just like kind
of had this, like, wiggly handmade kind of
feel the whole time. Another what if is
what if the flower, the stem and the leaves
instead of being, you know, scaled in or the scale
being animated in, what if I actually drew
that frame by frame from nothing to flower and
leaf and stem coming up. We don't have to do this
all at the same time, but maybe just the
flower to begin with. That would be pretty
cool. Another what if is what if it's windy? Like, could this thing
bend and sway in the wind? And what about the leaves? Like, would they not like,
jiggle a little bit. So, I would like to try
all of these things or some of the big ones
like the bend in the wind. This is one over here, a bend in the wind. That would be cool. I
would like to go back into Procreate and at least do five frames for
each of the elements, the leaf, the stem, and the flower, and then
animate the flower from nothing in so I don't have
to use scale to actually do the
animation from nothing. To flower. And so maybe here
with an animated flower in, I could frame by frame
animated flower in, I could move the stem
with position up. The leaves could
do the scale in or perhaps I could animate
the leaves as well. And then the flower would
sit on top and just go, and then sit there with
a five frame loop. So what I'm going to try
first is I'm going to try the five frame loop for all
of the three elements and then a 02 fully formed
flour in Procreate, and then export all of
those things as PSDs or Photoshop files and then bring
them into After Effects. So that's what I'm going
to do in the next lesson. I will see you there and I'm going to be working
in Procreate again.
10. Frame by Frame Assets in Procreate: This lesson, I'm going
to animate each one of our elements and give
it a five frame loop. In addition to that, my flower, I'm going to animate
from nothing into something and then
give it a five frame loop. So this is our
original document. You'll see that I've
got my leaf layers, I got my stem, and
my flower layers. We've done some naming
in some other documents, either in Photoshop
or in After Effects. And what I'd like to do here
instead of trying to animate everything inside of
one document is to focus on one element
per document. I'm going to go to my gallery, swipe this and just
duplicate this. I'm going to rename this flower. Then I'll duplicate it again. I'll rename this one leaf and then duplicate it once more, rename this one stem. Okay. So let's go for the stem first. What I'll do is I'll just whack everything that
doesn't need to be there. So delete that change to black. I think I still have
the same pencil, the same brush, which is great. Then I'm going to
go to my settings or wrench icon over here. I'm going to go to Canvas, turn on Animation
assist, go to settings. That's great frames per second. I'll change that to ten
because we're working on ten frames per second
in After Effects. Onion skins, I'm just
going to go for one, and that should be good. Right. I'll add a frame. And
I'm trying to be, you know, exact here. But the thing is, I don't want
to be exact exact because I want it to feel like
a hand drawn animation, like frame by frame by frame. So it needs to be a little
bit unexact inaccurate, textured, handmade,
but at the same time, I don't want it to be like, What the heck is going on here? Needs to look like I've tried. So we're just going to go
for a five frame loop. If you're lazy, you can go
for a three frame loop, but five frames I
found is really nice. It's like half a second for a ten frame per
second animation. And what's nice
about this inside of Procreate is that we
can actually preview this. So one, two, three.
Okay, we got five. Perfect. Let's play this. Okay, so there's a little bit
of a jump, which is okay. We could also change it to
ping pong. See how that looks. Yeah, I mean, I
think that's great. Ping pong might be
the way forward. Okay, so we've got our
stem animation here. This is now an animated asset. We can then put this
into aftereffects, replace our stem, our static
stem and After Effects, and voila, it will be
then an animated stem. But we'll do that
later. Right now, I want to go to my leaf. And later on, maybe I want to do the same for the leaf
as I will for the flower. But for now, we're just
going to make it into a fire frame loop. Okay. So stem flour planning. Let's delete these guys. Okay. So this will
be like frame one. And here, we've got the Pepsico. Do it call that
Pepsico. A petiole. I think it's called a
petiole, not a flour person. And we've got the fill
behind it over here. So we need to
remember to do that. So what I'm going
to do here is 12, three, three layers per frame, and then I'll group it. Okay, I'm going to
fast forward here. Then let's go to
animation assist. Let's turn that on settings, onion skins down to one, frames per second, ten. Okay, great. Then I'm going to focus on
just doing the outlines first, then the petiole and
then the white fill. So here might be like,
Oh, what's going on here? Well, that's because
our fill is there, so I'll just turn
that off for now. Okay, so if you've
got a group selected, you'll tap here and then choose which layer
you want to draw on. So I'll always go for the
top layer for this leaf. I don't know if you guys
draw with sound effects, but it's a lot funner than not drawing
with sound effects. If you wanted to put the veins on a separate layer,
you could also do that. Alright, let's play that. Okay, so beyond the petiole, I think it looks pretty cool. Okay, I'll do the petiole. We'll do that on
the middle layer. Okay, I'm gonna fuss
forward here again. Okay, here, we can have a good look at what
it looks like. See how it's jumping
around quite a bit, but I think that's
great. It's perfect. Okay, I'm going to take off
the background layer so I can focus on doing the fills. So here, I can perhaps
just move this one up. Okay. Let's go for white. And I'll change the
onion skins to none just so I can see
exactly what's going on. Remember, I don't want to,
like, fill this completely. I want it to feel
still textured and, like, I've actually
drawn the background in. Okay. And if we need to, we can also use ping pong, so we can just change
it to ping pong. And that works quite nicely. It also kind of looks like it's swaying in the
wind a little bit, so that might just, you know, play out really well for us. Okay, so we've got two
of our assets here. We've got our stem and our leaf. Perhaps for this one, I can also just turn
off the background. And then our flour is next. Okay, let's delete all of
these, delete the planning. Okay, we'll go to the
animation assist, change the settings
to ten frames, onion skins to one. Okay, I'm going to do
the outlines first. So I'm going to do five sets of outlines to do the
five frame loop, and then I'll actually
animate this in, but I'll do it backwards so that I can keep on adding frames. And then After Effects,
we'll just flip that around. Okay. So we'll go and add a frame here,
just turn off the fill. Okay, not trying
to be exact exact, exact, but being pretty close. If that happens to you, it's
just because you double tap and you just got to double tap to
get back to your brush. It switches between
the eraser or the last used tool
and your brush. Really handy when you
know what's going on, when you don't know
what's going on, man, it's like, What is it? This is crazy. Okay, some
lovely texture in there. Okay, let's play that. It's a little bit of a shift. But again, if we
go for ping pong, yeah, I think that's great. So ping pong might be like, our saving grace
here to, you know, instead of it being that, like, that big like up, that jump. Okay, so we've got
our five frames. From here, what I want to do
is start animating it down. And what we don't
need to worry about Procreate is moving
this flower at all, because it's going to stay in the same position,
and in After Effects, we're going to move it around,
put it in the right place, or parent it to the stem,
something like that. Okay, so it's going
to end up down here. Perhaps what we can do
here is just not raise. We'll just maybe do, like,
the last frame here. Something like that, or
maybe it's like that. And then tap on this and
set it as the foreground. And then we'll just
drop the opacity. And this makes it easy to
know where we're going. Okay, so let's add a frame. And we're not raising again. If we need to, we can always add a frame in
between two frames, if it looks weird or something, or if it animates too fast. Okay, let's play that. So maybe here we're
gonna add another frame. In between those two frames. Okay, then maybe in between
these two frames, too. Or here to there. Let's see how that looks. Yeah, that's lovely.
Okay, this final one. We can just say, you're not
the foreground anymore. Sorry, and we'll pull
up the opacity again. Alright, maybe we can do a ping pong just to have a look at what it looks
like if it's growing. Yeah, it looks great. Okay. So now you might be like,
Yeah, let's go for it, but what we still got
to do is we got to make sure that each one of
these has a background, which can be a little
bit frustrating. So there's no real
quick way to do this. Besides, we're doing things
frame by frame, handmade. So we need to put in a little
bit of effort, you know. Again, sound effects
make everything better. Boo Boo Boo Boo Boo pop. We're coming until the end. Okay. Fantastic. Now,
let's go for white. And hope, deep. I think this one's done right. Yeah, it is. Okay, so
we're going for this one, I'm going to change the
onion skins to zero. And I just got to remember
not to press too hard. Otherwise, the texture
doesn't really come through. And it's one of the reasons
I'm using Procreate is to get this textured illustration
style inside of my animations. Okay, one thing that is good
here is that the amount of white area that I need to fill gets smaller and
smaller as I'm going. Nice benefit of
working backwards. ADHD brains like. Okay,
this is taking forever. Can we do something else? Okay. So we've got all
of the frames here. Now, honestly, to, like,
rename all of these on my iPad, mission. So I might rename
all of these layers inside of Photoshop or just deal with the ramifications of importing it into
After Effects with a whole bunch of unnamed layers and compositions and groups. So at this stage,
I've got my flower, which has a five
second loop and a complete zero to hero
kind of animation. I've got my five second
loop, not five second loop, my five frame loop for
my leaf and my stem, and a five frame loop plus a zero to hero animation
for my flower. Okay, so at this point, I think I can export from here. So share PSD. That's great. Ta ta ta, Rich's MacBook Pro, cool. And can I do both
at the same time? Yes, I can. Okay. Alright, now I'm on my
computer in my finder, and I've got flower,
leaf, and stem. They're extra assets, and
it's different because they're not all inside
of a plant or PSD. They're separate files because
they have these frames, because we're going
to take them into their own separate elements
as f frame looping animation. It's gonna be epic, but we
need to prepare them before we take them into After
Effects. We need to trim them. So let's use PSD trimmer. I'm going to say hey
rich.net slash PSD TrimR and I'm going to
do my flower first. Download PSD. I'll then
do my leaf second. Let's go process another. Whoop. Download PSD,
process another and stem. Okay. Download PSD. Okay, fantastic. Let's go into Finder. I'm going to delete Stem, leaf and flour and then
rename this to flour, rename this one to leaf
rename this one to STEM. And maybe I can just say five F for five frames. Okay. The thing that I like
to do is name all of my layers as much as possible before I come
into After Effects. So you can do that
inside of Procreate. I just find it so tiring, so time consuming, trying
to type on my iPad. So if you have a
keyboard attached to your iPad, fantastic. Still, I find it
way easier to do this inside of Photoshop
or After Effects. But if you do it inside of After Effects you're not actually
changing the layer names. You're just changing
the instance names. So I love to do this
inside of Photoshop. So that's what I'm going
to do. Now I'm going to set up all my groups
and layer names. If you're like, Okay, I don't want to do this,
you don't have to, but you then have to
deal with the problem of unnamed layers and files if you encounter a
problem later on. Not saying you will, but,
man, if you do and things are unnamed and you've got frame
ones and threes and sevens, it's like, super nasty. So that's what I'm
going to do now. So let's go for
flower five F first. Okay. And I'm going to go all
the way down to the bottom. I'm going to do outline first. Okay, I'm going to fast
forward here again, too. Okay, we've done the outlines. Now let's do the
fools and again. Okay. That's fantastic. I'm gonna collapse all of these. I know how to do this, like, really quickly in After Effects, but this is not After Effects. This is Photoshop. Okay, delete the background. We now got flower one or
flower dash one. That's great. Flower dash two, flow dash
three, four and five. So these are the
five looping frames. And then this is the flower in and maybe we can do this
from the top flower in. Copy that one, two, three, four, five, six, seven,
eight, nine, ten. 11, 12 and 13. And so the way that
we're setting this up here, number 14, makes it a lot easier in After Effects because then
we're just like, Okay, at this point, we
can start looping it. And from here to frame 14, this is where the flower is
going from zero to hero. Okay, that is fantastic. The fact that there's
a whole bunch of space around here, that's fine. The fact that it's the same size as our other
compositions is great, but if you do want
to crop it, you can. It's really easy to go to image, um trim, and then based on
transparent pixels and you go, Boop, and it crops it. But I'm going to
leave it as the size of the composition settings. There's no real reason for this. Just in case you do, I'll show you how it works
in After Effects. Okay. Save this, close. Flour is done.
Let's go for leaf. Okay, let's fast forward again. Okay, let's save that
and we can close. Then we not gonna do plant
that is our original asset. Then stem. This could be even easier. So just Stem one, two, three, four and five. Delete the background, save. Okay, in the next lesson, we're going to take
these assets that we've just trimmed
and named inside a photoshop into our After
Effects and start creating compositions and animations
that are full of movement and wiggles and stuff
like that. I'll see there.
11. Frame by Frame in After Effects: Alright, now we're
going to take our five frame assets that we've trimmed and named inside a
photoshop into After Effects, set them up in After Effects
so we can begin replacing our static assets with these five frame wiggly
wobbly handmade assets. It's going to be
epic. It's going to be quite a lot of setup time, but the benefits far outweigh how long it takes and how complicated
it might seem. But let's go step by step
through the process. Okay, Inside of After Effects. I'm going to just close
down our comps folder for now and our
elements animated. Let's close down that
for now imports. Let's start importing these. Okay, so we've got our stem, so I'm going to pop
it into imports. The import kind, composition
retain layer sizes. Okay. And then let's go for
leaf five F. Same thing, and then flower F. Imports. Okay, fantastic. I'm gonna start with Stem five
F. But before we do that, let's move all of
these into elements. And I'm saying elements because they're not quite animated in except
for the flower, which we'll deal with
in just a moment. So let's start with Stem
five F, composition, composition settings,
ten frames per second, great, background
color white. Okay. How long was our composition? 5 seconds. That's fine. For now. We really needed
to be quite short. So what I want to
do is I want to make each of these
layers just one frame. And at the moment, they're
just sitting on top of each other, doesn't look
like they're moving. So what I want you to do
is select all your layers, so Command A and
then either drag them and zoom in and drag them and zoom in all the way down to just one frame or if they're
not quite one frame, just yet, go to
frame number zero, hold down option and press
your right brace or bracket. And then I'll make
it just one frame. Then we're going to put each of these on their
own frame like that. I'm going to press space
just so you can see, gives a bit of a wiggle, but then it's like, Okay,
there is nothing now. Then I want to
make my work area, stop over here so I
can either zoom out, ij chit, and drag my work
area all the way there, and then zoom in
again, which is great. I can press space now, and it gives me a nice preview
of what this looks like. Or if this is all
the way down there, I can go to frame four, press N, and then it will bring my work area into this
five frame work area. Okay, I'm going to
press space looks nice, but I think that a ping pong
effect could be better. So the way that I'm
going to do that is just increase my work
area a little bit more. I'm going to select my three middle layers, press Command D, and then command
and right brace, and then put these onto
their own frames again. So basically just duplicating
the middle frames here. So as it goes back here, the next frame
would be frame one, and then two, three, four, five, four, three, two,
and then back to one. Okay, so I'm going to go
to frame number seven, press N, press space. Et's have a look at this
ping pong animation. It looks fantastic. Okay, so
once you're happy with that, composition, trim
comp to work area. So now the composition
length is eight frames. Which was great.
Fantastic. Looks great. Then we can't add a five or eight frame loop
to an animation just yet. So if we have to look at this, let's go to our comps. I think that plant
four was our best one. Okay, so let's duplicate this. Command D, supplant six. Let's open this up.
Let's go down to stem. And this might get a little bit messy, but let's check it out. So we've got our
STEM five frame. It's now actually eight frames. So let's hold down Alt or option and just
pop it onto Stem one. Okay. And you'll see that. Hm. Now, the length of it doesn't quite work because
it's not even 5 seconds. It's like eight frames. Okay, so I'm going to undo this just so that we
still got Stem one. And then what I'll
do here is put Stem five F into a new
composition and call this one, Stem 30 frame, loop, and then STEM, call
this an eight frame. Loop Okay, so Stem
30 frame loop, what we've got here, composition,
composition settings. Let's turn this into 30 seconds. That looks good, and then we
zoom out a little bit, yeah. And yeah, we need to fill
up this space. Okay? So how do we do this? There are some more complicated ways, but the easiest way to do this, the most, you know,
stock standard, reliable way to do this is
to duplicate this layer. And then move it to the right so that
when this layer ends, the one above it begins, and you do this again
and again and again. There is an easier way to
do this and an even easier, but it gets more and
more complicated. So I'm not going to get
onto complicated stuff, but I can show you a little bit of an easier way to do this. So I'm going to select
all the layers, hold down or just press
on my left brace, which means hate or come to the point where
my playhead is, so I can move my playhead, select my left brace, and
I'll move them there. So once I've got some layers, I'm going to hold down or
just select the top layer, and then hold down my command
key and then D, press D, D, D. I still got my command layer selected
or my command key. And then just keep
on duplicating until I have like
50 layers or so, going to scroll down.
Comeand Dee, deed. I got 43. Yeah, there we go. About 50. So, there is a
lot of them. All right. Then I'm going to
hold down either the top one or the
bottom one and then select with shift being
held down the bottom layer, then go to Animation, keyframe assist, and
sequence layers. Make sure that overlap is not
checked, then press Okay. And what it does is it
sequences our layers for us. So I'm going to
press space here, and here we have a
looping animation. And it loops for 30 seconds. I don't think I'm going to need 30 seconds of looping animation, but it's here if we need it. Okay, which is great. So we've got our
STEM 30 frame loop. Now let's go back to our
plan six composition. We've now got Stem
one, which is still a static asset, right? It grows in fantastic. Now we're going to
replace it with a stem, 30 frame loop or maybe we call that a 32nd
loop. There we go. Hold down option and then
pop it onto Stem one. Okay, that looks great, except for the fact
that it's not align. So quickly, I'm going to select
the rest of these layers, parents none, and then I'll move them
again, zoom in here. Move these around,
zoom out a little bit. Okay. Once I'm happy with that, I'll then re parent
it to stem 32nd loop. Okay? And then I 32nd loop, we can then also change
the anchor point. Okay, and then move
it down here again. Okay, let's play this Okay,
so it looks pretty cool. Some of these things
are a little bit misaligned, but we can fix that. So I'm going to
select all of these, zoom in again, and maybe we
move it just a few frames. Okay, so that works
out pretty well. Maybe the flour can
come down a little bit, but we're still
going to update our flower animation in just a bit. Okay, so let's do our leaves
next or our leaf animation. So we've got our
leaf five frames. It's probably going
to be eight frames again, but let's open it up. Composition,
composition settings. Background color
should be white, and duration 5 seconds
and nine frames is fine. Select all of our layers. Hold down option, press right
brace, and then Zoomin. They're going to
be one frame each, and then just space
these out quite nicely. Select our middle
frames, Command D, then move them to the top and then put them on
their own frames again. On frame number seven, press N, which then creates
our work area, composition, trim
come to work area. Okay. That looks quite nice. I matches what we
had in Procreate. Fantastic. G to
rename Leaf five F to eight F and then drag
this onto a new composition. We'll then rename this one leaf 32nd loop and leaf eight. Whoop. Eight loop,
eight frame loop. Okay, so inside of
leaf 32nd loop, I'm going to say composition, composition settings,
change this to 30 seconds. Okay. Then duplicate
this a lot of time. So a quick way to do this
would be to get to five, and then select them all. Command D. Now you've got ten, select all Command D, Command D, Command D, got 40 and then you've
got 50 here. Okay. Then I'm going to
select all of these. Maybe I'll select from the top, top to the bottom, Effects, keyframe assistant, sequence layers, no overlap, o. Then scroll to the
top and zoom out, and they are all
nicely sequenced all the way past 30 seconds. The fact that I've
got a couple extra here doesn't really matter. Okay, so press play
here. Really nice loop. Okay. Then inside of, I'll plant six Animation. All of my leaves now, I can then replace with
my leaf 32nd loop. Or actually that won't work because these
are all animated in. So if we try this,
let's have a look Yep. It looks very weird. So what we need to
do is we need to go down to our elements
animated folder. We've got our leaf one Anim one. I'm going to duplicate
this Command D. I'm going to say leaf one, Loop. Num one. Okay,
let's open that up. We've got leaf one in here. We're then going to replace
leaf one with leaf 32nd loop. We could call this leaf one, 32nd loop. All
right. There we go. I'll close this, close
Leaf 32nd loop, loop, close the eight frame loop, close the stem loop. Okay, back to plant six. Got all of my leaf animation
composition selected. I'm then going to
replace them all with leaf one loop anim one like that just by
dropping it on that. And now it doesn't look like
we need to do any changes. We have this beautiful leaf animation for
all of our leaves, and now they're all
wiggly, the stem's wiggly. It looks really, really good. Hmm. So you can just
see how quick that is. It took quite a while
to set everything up. But once everything is set up, it's just like, bam, like, replace all of those leaves that we've already done earlier
with the static leaves. Perfect. Now, it's time
for our flower animation. So we've got a lot more
than five frames here. So I'm going to go into the five frame flower composition, change the background
color to white. Okay. And now what
I'm going to do is just make sure that all
of these are one frame. I'm then going to
duplicate this. So command D. One is going
to be called the five frame, one is going to be called
the the anim in, okay? So let's go for the
five frame first. And then you'll see
I've got flower one, two, three, four, five. So I'm going to
select the rest of the layers and delete them. And then with these, I'm going to do the
same thing that I've done with the previous
five frame loops, select the middle layers, duplicate them, put them on top, and then Move them about. Press in here, have a
look if that looks good. Looks perfect. It's a really
nice ping pong effect. If you didn't want the ping
pong effect, remember, you don't have to then
duplicate the middle layers. Okay, composition, trim
comp to work area. So this will be very nice
if I just wanted to replace our current flour with
this five frame flour. We can now call it eight frame. Loop. There we go. And then I've got
my flour anim in. So let's double tap on this. I'll delete my flour
one, two, five. Okay. And then what I'll do is I'll go from flower
one, select that first, and then hold down Shift and
select 14 last Animation, Keyframe assist sequence layers, make sure that overlap
is not checked. And we've got this flour that animates in, which is fantastic. Shop. Okay, so I want
to press N here. It's the last frame
and then composition, trim com to work area. So this works really nicely. And then it will flow onto that eight frame loop that
we created over here. Okay. This is looking
really, really good. So inside of plant six, I'm going to go
down to my flower. Gonna press to see what effects and things
that we've changed. This hue saturation,
it goes from black into, you
know, kind of white. So I'm going to take that off. Boop. And the scale, I also don't want it to scale, and I want it to animate it. So I'm going to remove that. Okay, so it does do some scaling because it's
parented to the stem. So maybe over here, I'm going
to put my flower anim in. So I'm gonna replace
flower one with flower anim in. Boop. And then just move
this along here. Okay, flower I'm
in. Where are you? It's up here. And
because it's got this transform or collapse
transformations, there we go. It's up here. Okay, so
let's zoom in a little bit. Okay, that's great. It
looks really, really nice. But up until that point,
there's nothing there. This little like two frame bud, I want that to be there
until this point here, or until this point here,
something like that. So what I'm going to
do is I'm going to duplicate it, so Command D, and then I'll just select
these two frames like this, I'll then go to layer time and enable time
remapping like this, I'll then zoom in a little bit. And instead of the two frames, I'll just go for the one frame. And on this frame over here, this is the only
frame that I want. So I'll remove this frame
over here, this keyframe. So if we had to have a look
at what this looks like, chi. It's just static,
which is perfect. So I'll put this all
the way at the start. Make it go until it
begins our animation. So doop. And then our animation begins. And this is all still
parented to the stem. Okay, that looks great. And then I will then
duplicate this animation or this composition
again, zoom in a bit, or move it over here and
then replace it with our flower eight frame loop, although we haven't made
that into a 32nd loop, so I'm going to quickly pop that into New composition,
composition settings. Change that to 30
frames or 30 seconds. Okay, and then just duplicate
this a couple of times. So we get to 50 and then
select them all Animation, Keyframe assistant,
sequence the layers. Okay, that is great. So I'm gonna save that and
call it flour 32nd loop. Okay, so let's go
back to plant six. This flour anim in, I'm gonna replace with
the flour 32nd loop. Like so. Let's have a look. Okay, that all looks
really, really good. I think it could begin the flower animation in
a little bit sooner. So I'm going to select Oops. Close that, close
that, close that. So select these
three flour layers and just drag them back a bit. Maybe even a little bit more. Okay, maybe a
little bit forward. It's probably about the
same as what we had it. Okay, so that looks
really, really nice. So we've got this layer over here that's using time remapping to be like just have a
keyframe on the first frame, and we're not going to
move the time at all. It's just going to stay
static on the first frame of the flower animation
in composition. And then we're going to go
to the flower Animation in. So frame by frame, it
builds in Shou do. And then from here, we've got the flower looping animation, which is an eight
frame loop inside of a 32nd composition. It's all parented to our stem. Okay, so you can
see that there was quite a bit of maybe a little
bit complicated setup, quite a lot of steps to actually get a looping animation working. But once we have a looping
animation working, we can then just simply replace our static assets with these
wiggly handmade assets, and it looks beautiful. The only thing I guess
I want to change here is make this longer. I want to see this on screen
for more longer. More, okay? So we increase our work area. And this by itself is
already beautiful. The fact that it's animating
in is it's lovely. It's amazing. So from here, we can duplicate this,
try some other things. We can duplicate some of our
earlier compositions and replace the static elements with the animated looping elements. Yeah, I think we've done
a lot of good work here. In the next video,
what I want to do is explore the what if
it's windy question. Like, how does this
plant or yeah, this plant interact in the wind? What happens if
it's a windy day? How do we make it look like, you know, it's
bending in the wind? So yeah, let's explore
that in the next video.
12. Flower in the Wind: In this lesson, the
curiosity that I want to explore is, what
if it's windy? How do we get this
plant to sway? What do the leaves do? I think this could be
really fun to explore. Inside of After Effects, I've got plant six. That's what we ended up with
last time. It's beautiful. There's a lot of
wiggly elements. Just this alone looks great. So I'm going to duplicate this. Command D. This is plant seven. I will work with this a little
bit later, but for now, I want to just test out getting
this whole thing to bend. So what I need to
do is pop plant seven into its own compositions that we can work with
the entire thing. So like this, it's now all inside of this plant
seven composition. And the reason why
I'm doing plant seven instead of
plant six is because, well, I still want to retain everything that is plant six. So I'll work inside of
plant seven just now. So maybe instead of
plant eight composition, I'll say plant seven windy,
something like that. What I want to do is use
this CC bend effect. So you could have some
effects and presets up here. You could search for
it, so CC bend it. There we go. Or you
could go to effect. And here it's like,
Well, where is this? Where could it be?'s
go under Distort. There we go. CC bend it. Tap on that, and it applies it to the layer
that is selected. Might be like, What is going on here? It doesn't look great. No, it doesn't right now. So here you can adjust the
start point and the endpoint. So this is the endpoint. So I'm going to make
this quite high. And you can see as
I'm adjusting it up, it shows or reveals more
of the composition. And then the start point, I'll make that quite
low down here. You might be like,
What are you doing? Well, I have some
experience with this. Now I'm going to
play with the bend. Okay, so that's quite nice. Maybe I can bring the star point or the
endpoint down a little bit. I was a little bit
better earlier. So that's really nice.
I wonder if I can bring the Starpoint up. Just want to make sure that
it doesn't get chopped off at any stage. Okay. And of course, we
can animate this. So maybe it starts out. Let's start animating a chair. But but B starts out over here, and it sways over quite a bit, and then it sways over
quite a bit again. Whoo. Okay, so this is what, 6 seconds, 5 seconds.
How does that look? So I just want to copy that, paste that, remove
this keyframe. So quite like that. This one
doesn't need to be as much. I don't think it is.
This one goes to 27. This goes to 14, then maybe this one can go
to something like ten. And this one can
go to minus five. This one can go to two, and then like zero. Let's have a quick look at
what that looks like. Okay. And what we can do here is
select all of these keyframes, right, click keyframe
assistant, Easy Ease. Looks a lot better. Okay, that looks lovely. And that happens
over 10 seconds. So maybe we can make all of these come a little bit closer. So maybe this isn't
necessarily wind, per se. Maybe it's just a plant growing and it's a bit
heavy or something. Maybe it can end. A
little bit to the right. Okay, so it's a really
nice animation. It's super fluid.
It's beautiful. I like it. So you can have a lot of fun
with this bend animation, CC bended Animation or effect. Okay, but now I have
the question of, like, what about the leaves? Like, what fun can
we have with those? And so that's why I created a new composition or duplicated plant six into plant seven
cause inside of plant seven, I actually want to change the rotation of each of the
leaves. So let's do it. Let's go for leaf one,
which is over here. What I'll do here,
you can see that, hey, this is actually
looking a bit weird. So perhaps we can jump
into here, jump into here. I'm going to select all
of these and just tap on this continually collapse
transformations. Let's see if that has
any different server here. There we go. So it's not taking up
the entire composition, which is just a lot easier
to then select the leaves. Okay, so these come in, and then I want them to
rotate a little bit. So right now, I don't
think these have any animations or
keyframes or anything. So it's gonna come in. Whoop.
And yeah, at the moment, I've got a third quality, but I maybe even be able
to drop that to a quarter. It's feeling a little bit slow. And then I'll just
start animating the rotation a little bit. So let's go here. And so for each leaf, yeah, I can do this individually. How I kind of feel
what it feels like. And I want to do each leaf individually because yeah,
they're individual leaves. Like we could create this animation and then create a composition of it and then replace each of
the leaves with it, but then it'll be all the same. So I want each
leaf to be unique. Okay, that looks pretty cool. And so I will then use easy ease Okay, that looks great. I'll select this one. I'll just press R for rotation
and do the same thing. And I'll use EZ Es
from the beginning. So, yeah, it should
go up and down. Maybe it would stay in one
place a little bit longer or one kind of rotation takes a little
bit longer or shorter. Okay, let's have a look at that. Okay, that's looking
really cool. And I'm thinking, Oh, no, why did I choose one with
eight leaves, you know? Like, why couldn't I have
chosen one with three leaves? Well, let's do it all. I don't think it'll
take too long. Okay, let's go for this one. To Go for keyframe
assistant, go for Easy Ease. And if I select Easy Ease
right now, it, you know, applies that easy ease to
the rest of the keyframes. Let's speed things up
here a little bit. And you can see
that there's like I kind of want to
always have movement. Like, the more natural
it feels, the better. Yeah, it kind of feels like
each leaf now has its, a life of its own,
which is lovely. Alright, so right now,
this looks pretty cool. We have all of
these, like, leaves like swinging in the wind. Yeah, that looks
great. What about our rose or our flower? I think, at this point, yeah, we can start animating it here. And maybe we need to go
inside of this 32nd loop two and select all of these and make sure that
collapse transformations is on. Yeah, that's great. Okay. So the point, the anchor
point is actually down here. So I'm gonna move
it back up here. Okay? And then I'll
press R for rotation. And then let's start
rotating this just slightly, make sure it's on easy Es. Okay. And you can see how
nice this looks with a frame by frame
loop hand drawn. And then we're just animating the rotation in After Effects very easily,
very powerfully. Okay, let's have a quick look
at what that looks like. Okay, that looks really cool. So then let's go to
plan seven or windy. And I'll just been doing that
all inside of plan seven, and this is where the CC
bandit effect applied. And it just looks like full
of life, right? Like, yeah. So yeah, I think
that if we cap this at around about 10 seconds and press N to make our
work array go there, otherwise, it's like,
how do we stop this? But let's just say it's
a ten second animation. So maybe it comes here goes five Let's make you
go to five this side. And then let's go for, like, negative ten this side, and then let's go for seven
this side. So it's windy. Maybe a bit more windy
in the beginning, but it's still, you
know, swaying a bit. It's lovely. It's so full of life. The wiggles, Oh, everything. It just looks
really, really cool. So now at this point,
you can apply this kind of effect to any of the other compositions
that you've made, make duplicates,
do some bending. You could even replace or duplicate this one and
then replace plant seven with plant two or plant
one or something like that. What I want to do in
the next two lessons are two curiosity explorations. The first is, how do I make this look a
little bit more abstract? Can I just use the
flower multiple times to kind of create
like an animated pattern? And then the second one is, can I bring in more texture into the background
onto the flour, maybe even change the color, but just make it
even more handmade, feel like it's really texted, really, you know, hand
drawn without taking it back into Procreate and hand
drawing the whole thing. So in the next lesson, what I'll do is try to create something a
little bit more abstract, and then the lesson after that, I'll create some kind of
textured background Procreate, and then bring it
into After Effects. All right. See you
in the next lesson.
13. Abstract Flowers: In this lesson, what
I'm going to explore is a more abstract kind of
composition animation. I'm going to try take
this flower and create some kind of pattern or
animated pattern from it. So let's go inside
of After Effects. Let's go to the project, and yeah, let's have a
look at what we gotcha. P p p elements. Got flower one, and
we've got this flower 32nd loop and flower
Animation in. So what I'm going to
do is I'm going to duplicate the flower
animation in, which is like that and then get it to do
a bit of a ping pong. So let's come on D, flower Animation
in out ping pong. Alright. Let's zoom
out a little bit. Or let's do
composition settings. Let's go for 5 seconds. Okay. Okay, that's cool. And then
the flour eight frame loop, one, two, three, four, five. I'm going to copy that. Command C. And then this gets to the end and Command V. I'm
going to press left brace, and then go Command shift left brace to make them
all go to the bottom, and then just space these out. Not like that. Okay,
so it animates in, and then sticks around
for five frames. Okay, that's great. Now I need to basically animate
these all out again. So command C or
sorry, Command D, and then command
shift right brace, Max it go all the
way to the top. And then I will then press left brace to align them all up and then select
this bottom one, flower four, select
flour in one, and then animation,
keyframe assistant, sequence layers, no overlap. Okay. Okay, so we've
got flower four here, and down here, we've
got flower five, and we've got flower one. And flour in one. So I
don't need that one. I'm gonna press in here to
decrease our work area. Okay, let's have a look at this. Alright, I wonder
what it would look like without four,
three, two, one. So I'm gonna delete that and then all of
these flour ends. Let's have a look
at that. G make it a little bit quicker.
Yeah, I think that's better. Okay, so what we got
now is we've got a looping ping pong flour
coming in, flour going out. It's just gonna keep on looping. So we're gonna have
some fun with this. So this is called flower Anim in out ping pong,
which is great. So let's add this to a
new composition by bump, and we'll drag this all
the way to top into comps. So let's go for
flour Abstract one. Open this up, and I'll tap on this transform or
claps transformations, and I will move this
position over here. Okay, I'm going to go until
I get the full flower. Let's go to
composition settings, 5 seconds. Yeah,
it should be good. Okay, so now I've
got this, you know, this flower, and I'm going to make sure that it's
in the middle for now. If you don't see this
align window or panel, just go to window and align, and I align layers
to the composition. Okay, so yeah, it's pretty cool. Now, what I think
could be pretty cool is having a bunch of these. So maybe one, two, three, four, five, six,
maybe eight of them. So I'm going to go and press
R for rotation, go to 90. Okay. Press Command D, press R for rotation,
negative 90. Okay, then select both of them and just use my keyboard
to put them in the middle. So something like this
could be pretty cool. Maybe it's a little
bit too close, so a little bit to the right, a little bit to the
left, maybe one more. Okay. Okay, that looks great. Except it is not
really looping, is it? Okay. So let's go into here. Let's go composition,
trim comp to work area. Okay. And then we've I'll
flour anim out ping pong, and this is 3 seconds ish. So maybe like 31 frames. Okay, so I'm going to add
this to a new composition, and I'm going to say
ping pong 30 seconds. Okay, then composition, let's
go composition settings, change this to 30 seconds. Zoom out a little bit. This shouldn't take too long because this is a
little bit longer. Okay, let's see
what we have here. Okay, that's great. Should be fantastic in and
out and in and out. Great. Okay, now we're on flower abstract
number one again. So instead of the ping pong, I'm gonna go for ping pong 30
seconds and replace those. Okay, let's go into this one and just check that collapse
transformations is on. Okay, then it's easy to
select my layers again. Okay, then it's just
going to keep on going over and over and over. Okay, but what's really important here is
that we actually get a length or composition duration that fits the loop so that
it loops like perfectly. That would be great. So
inside the ping pong there's three frames or
3 seconds and one frame. Okay, so let's try that. Let's go to three and one. Let's see if that loops
nicely. I think so. Okay, that means that we
can now duplicate these, Command D. Press Command
and write brace. Okay, so we might
not get four here, but let's go for three. Command D, and command
and right brace. Let's bring it down
a little bit. Okay. That looks quite nice. Okay, so maybe it's a little
bit too symmetrical, but it looks pretty cool. So flower test,
flower abstract one, Command D, flower abstract
two. Let's open that up. And I'm going to
start just dragging each of these layers
a little bit. Maybe I'll drag them all
to the left to begin with. So it means it starts
somewhere around here. And they're still
going to be looping, but they're going to be starting and ending at slightly
different times. So I'm dragging some to the
right and some to the left. Okay. And that looks
like, really nice. It kind of feels
random, it's lovely. Yeah, I like that a lot. So you can use your
elements that you've created to create different
kinds of animations, sometimes a little bit more
conceptual or abstract, sometimes a little
bit more real, sometimes super rigid,
sometimes windy, you know. Whatever you want, like, give in to that curiosity. It's just another composition,
another duplicate, another replacement of
elements and layers. So have some fun with
different kinds of animations, different kinds of concepts. In the next lesson, I'm going to create
a little bit of textured background
inside of Procreate, bring it into After Effects, and then start putting
that on top of some of our compositions to create
some kind of more texture. So it really feels like this
is a legitimate handmade, hand penciled kind of
illustration slash Animation.
14. Adding More Texture (and Getting Stuck): Okay, this is future Rich, the Rich that is editing and putting this
course together. Now, I made a choice
to keep this lesson, this version of this lesson in because actually I get stuck. I'm like, there's
one critical thing that I don't quite
understand or I forgot, and it kind of,
like, trips me up. And I even acknowledge
it during the lesson. But still, there's a lot of
parts where I'm just like, looking down, really confused, like, a very big
scowl on my face. But I want to keep
it in because I want to show you that
when you're exploring, sometimes you get stuck. I want to show you how
I go about fixing it, how I go about solving it. I want to show you that
I am not super human. So if you need to, just fast forward
through parts of it, and then yeah, just watch
how I solve it at the end. In this lesson, I'm going to create an animated background. It's going to be five frames, it's going to be looping,
it's going to be textured. And the reason I'm
doing this is to add even more texture to the
background to the elements. So I'm creating this
background in Procreate, and then exporting
it as a PSD and then bringing it
into After Effects. I'm going to create a
new ultra HD document, rotate a little bit. My brush is swans. I'm gonna turn on
Animation assist. Make sure it's at ten
frames per second. Just onion skins,
nothing for now. And I'm just going
to make this, pretty big, as big as possible. I really like to take up a lot of space here, the
whole document. So I want to try,
like, fill most of the document, but
then leave, like, nice textured gaps, almost like a photocopier wood or some
kind of really cool texture. Maybe you can see this as
like a little bit of grain, dust, that really nice, like, old film feel. Okay, and then I'm going
to do this five times. So add frame. Let's
get to it again. Okay, let's have a look
at what that looks like. Pretty cool. So maybe I
just do three frames. And with a ping pong, it'll
kind of be like four frames. Okay, let's play that. So we get a ping pong.
Okay, that's epic. Let's move the background ller and then I will share this
as a PSD photoshop document, send it to my computer. Fantastic. Alright, here we are. And it's called
Untitled Artwork. I'm going to rename
it big dot PSD. And the good news here is that we don't need
to trim the layers because the layer contents are the same size as
the document size. So I'm just going to
drag it into imports, inside of After Effects, composition retain layer sizes. Okay, that's great. And then I'll drag
BG into elements. And let's open up BG, composition,
composition settings. Let's change it to white. Okay? 30 frames,
that's okay for now. Let's select all of our layers except
for our background, which we can delete. And then option right brace to make it just one frame long. Then we'll zoom in. And then duplicate frame
three in the middle. Duplicate that and then
just bring it out there. So there's a nice
ping pong effect. Press N to reduce our work area, and then composition, we
can trim comp to work area. Okay, there we go. So BG, I'm going to rename this BG Loop and then drag
it into a new composition, call this one BG
Loop, 30 seconds. And then composition,
composition settings. Let's change this to 30 seconds and then duplicate
this five times, select it all, duplicate it. Select all and press Command D, one, two, three, four, five. There's 60 versions of this. That's okay. Select
the first one, shift, select the last one, Animation, keyframe assistant, sequence layers,
no overlap. Okay. Okay. Do we have 30 seconds
yet? We do not. Okay. So let's do this all again. Command D, command
shift, left brace. Okay. And then we'll
just drag all of these, like so. Okay. So now we should have more
than enough, which we do. Okay, so we've got this epically texted background
that we can now use. Okay, so Command S, save that. Let's close elements, close
imports. Let's go to comps. And yeah, we've got plant seven windy that I reckon
we can apply this too. So what I'm going to do
is select this Command D, plan seven windy with BG. Okay, so let's open this up. And I want to apply
the texture to both the plant and
the background. So let's close this
elements BGop Okay. That's pretty intense. It doesn't quite look
looks really stormy. It's lovely. Maybe that can be something else
that we can explore. Like, I'm like, Oh, storm rain. Like worms, raining,
growth, like that epic. Leaves blowing off, you know? Just lovely. Okay, so
under Effects and Presets, I want to search for inverts, or channel inverts.
Let's invert that. Okay, so it would be
like white on black. So let's change composition, composition settings,
background color to black. Okay, that looks quite nice. I wonder if we need to
reduce the opacity, so I'm going to
just drill down to transform or press
T for opacity. I don't think so. What we could then do is look
for something like levels. Pop that on. Um, I'm wondering if this is
actually changing anything. It doesn't look like it.
Let's go for curves. Just trying to
make it, you know, maybe not so dark or so black. It doesn't really
look like it's doing anything. Did do do. Of. No, it's not. All right. Well, then we'll just have
to live with it for now. Okay, so, yeah, I still think
it's, it's pretty intense. So what I'm going to try to
do is go layer new and solid, and I'm just going to
make this a white layer. Press T for opacity and then reduce the
opacity a little bit. Okay, maybe we go for 80. So we're putting
something on top of the background layer to
not make it so intense. Yeah, I think that
works really well. Okay, what I'd like
to do now, too, is if we zoom in here, I'm going to take off
this white layer. Is that underneath here, like the white
leaves are on top, so I wonder what that
would look like if perhaps plant seven had a blend
mode of multiply. And if it doesn't really work, it might be because a multiply or a blend mode doesn't work on a background color and needs an actual solid or
something to work on. So I'm going to duplicate this and just move
it to the bottom. So turn off this one. Going to see if it has
any kind of effect. Yeah, not so sure, actually. Okay, so now what I want
to try to do is add this texture to
this plant layer. So I'm going to just put
that back on normal. Yeah, it doesn't really look
like it's had much effect. Okay, back on normal, and then I'm going to
go to my project, bring in BG Loop 30 seconds
and put this on top again. And here, what I want
to do is say, Hey, just be visible where this
plant seven is visible. So if you can't see this, tap on toggle switches and
mode to see your track mate. And then you could
either use this, which is kind of like
a clipping mask, or you could use the track mate, which does something like this. Which, yeah, it's really
interesting, right? It's totally changed how this
feels because it's like, it's all black now, but
it's a lot more textured. And the reason why
we can't see in between them is because
the leaves and the flower, it has that fill, remember? And so if we really wanted to, we could go into leaf one and leaf four here and
turn off the fill over here. And we have to do that for each frame in the animation for a leaf and for the flower. And then it would finally
update all the way over here. Plant seven windy
with background. But for right now, I think this looks really, really cool. It feels a lot more
dark, a lot more heavy. And if you're like, Oh, but what if we invert to
this? Okay, cool. Let's try that. Let's go for layer new adjustment layer.
And this is at the top. You can press
command right brace. And then we can search
again for invert. Let's pop that on this layer. How does that look? Yeah, that looks it's beautiful, right? Okay. Then, perhaps I want something in the
background again, you know? So these two are linked
because of the track mat. But then this particular one, yeah, it doesn't have I can't
really see him, you know. So I'm gonna try
and get him back. Opacity is at 100.
It's definitely there. It's got, uh, kind of weird. So he's definitely there. I don't think this
one has anything to do with it being
there or not. Alright, at this point,
I'm a little bit stuck, honestly, like trying to figure out why
this doesn't work. And so if this happens to
you, like, that's okay. Like, you're allowed
to just move on, leave that composition as is, or be like, Cool, I
like it, how it is. Not exactly how I want it, but this is part of exploration. You could go down a path and
kind of just hit a dead end. There's one more thing that
I think I can try right now, and maybe you have this idea while you're walking or in the shower or something, you're like, Oh, yes,
or maybe you wake up at 2:00 in the morning,
like, I think I got it. Yeah, try it in the morning
or if you can't sleep, then just get up and
go check it out. So what I want to try to do
here is inside this BG loop. What I want to do or
inside this BG loop is layer new and
I'll choose a solid. I'll go for white, and I'll just add
this at the bottom. And maybe this will make
a difference. Not sure. So, come on, S, let's close
that Bj Loop 30 seconds. Yeah, there we go. So I think I was like,
trying to invert it, but it was just inverting, like, the visible bits and not the background
layer underneath. And so if a composition has a background layer of white and you invert the composition, it just, like, inverts
the contents and not the composition's
background. So yeah, this for me
looks much better. Okay, there we go. Lovely. And here I might be like, Okay, maybe three second loop for the background is too short
or maybe the brush is wrong, but now I can go into Procreate, create a little bit
longer Animation, background animation or use a different brush and
then bring in it again. Yeah. It looks really cool. Yeah, it's beautiful. I love it. Okay, let's try that out on comps,
flower abstract two. So I'll just duplicate that
flower abstract three. Let's close some of
these compositions. I will copy this
background loop 32nd, and I will paste
it in over here. And maybe here, all I
need to do is I need to change the mode to multiply. Or what I might need to do is delete all
of these flowers, bring in flower abstract two, and then I can use a track
mat on flower abstract two, something like that. Maybe it looks a
little bit weird. Maybe I need to invert this one. And then BG Loop 30 seconds, just duplicate that,
bring it down below. No mat. And let's
take off invert. Yeah, maybe not as
effective as the other one, but maybe we could try this out. So I really want
these to be white. So let's take off multiply
normal invert. There we go. Maybe too many inverts
going on there. I guess this also doesn't
need a multiply effect. Yeah, so it feels kind of nice. I think that I could work on the background a
little bit more. But, yeah, I think it's
yeah, a nice exploration. And it was really nice
for me to show you what happens when I get stuck. Like, I don't know everything, and sometimes I do know stuff, and I just missteps or
something changes after effect. So if that happens, like Google it,
go on to YouTube, try figure it out, ask AI, like, this is happening, or
sometimes you just need to, you know, step
back, take a break, and then come back
a little bit later. And the next lesson, what I'm
going to explore is adding some color into my black
and white compositions. I'll see.
15. Exploring Colour: Lesson, what I'm going
to explore is adding color to my black and
white compositions. There are a couple of
ways that I can do this. Sometimes it works
best with one way, sometimes best with another way. So let's see what we can get. Okay, I After Effects, where I am right now is on plant seven windy
with background. So it's beautiful, it's
textured, fantastic. I then got plant seven windy, which has these
veins in the leaves, but I quite like plant
seven windy with BG, so I'm going to duplicate that, so command D. And then I'll
say with BG poll color. Let's go into here. And
a very simple way to add color here is to
go to layer new solid. And we could go
for a deep orange, we could go for a blue. This blue's quite lovely. Okay? And if you do add a solid, you'll see it at the bottom. In the solids, it goes into
a solids folder. Okay? So you might be like, Yeah, but it's just blue now. So where it says mode, which is like your blend mode, if you don't see that, tap on
toggle switches and modes. Tap on multiply, which
looks quite nice, kind of starry or maybe
like nighttime ish. You could also set
this to screen, which, yeah, that
looks really nice. If you pop that
adjustment layer on, Oof. So something like this,
yeah, it's beautiful. I feel like, Okay, that's great. Let's create a new one. So layer new solid. Maybe let's go for a pink, like a light pink or something. And then we'll
change this. You can change it to almost anything. So what does overlay look like? Has a different kind of
effect. Dancing dissolve. Nope. What about a color bun? What about a linear burn? So they all have these
different kind of effects. Depends
on what you want. You can explore all of these
different blend modes. But let's go down to
screen for this one. So it totally depends
what you want. If you want texture, if you
want it to be smoother. Yeah. So I quite like that. I think I like the blue
a little bit more. Perhaps you even
want to, you know, merge blue and pink. So I'm gonna press T
to get to opacity. And then you could even make something a little
bit more purple. You could animate the opacity. Yeah, there's so
much you can do. Okay, so that's one
way to bring in color into our animations. I'm going to adjust
the opacity backup. Maybe just turn that off
because I really like the blue. The other way, especially if
there are multiple elements, there's only really one element. You've got your plan seven, and that's the only
thing that I can change. Sure, there are background animations
that we're using too. But let's go up here. I close my elements
folder, plan seven windy. See, this only really has one element inside
the composition. Plan seven, on the other
hand, has a bunch. So I'm going to say command A or Command O, just
collapse them all. And you'll see that there's
a lot of elements in here. So let's select plant
seven, Command D, and I'll rename it as
plant seven. With color. Okay. So here I can
select my flower. I can select my leaves, and I can change their color. So let's make this flower
pink or something. And there's a bunch of different ways you can do
this on After Effects. So if you go to effect and you go down to color correction, hue saturation is pretty easy. You can also use something like change to color or change color, but let's go for
change to color. And from we'll go from black
to let's go for a pink. Something like that. And if nothing changes,
don't be alarmed, you may just have to change
some of these settings, so change hue lightness
and saturation. Okay? So that's interesting. It changes the
white fill as well, which is, yeah, it's a
different kind of effect. So if we select this
change to color, effect, copy that, select our other two flour
layers and paste that. Let's have a look at
what this looks like. So that alone, looks
really interesting, right? Like, it's just this
really pink flower on top of this black plant. So, yeah, I quite like that. I wasn't going for that,
but that looks really nice. So we can maybe say, like, plant seven with color one. Okay, we can duplicate that
plant seven with color two. Let's open this one. Or maybe we're actually
still in plant seven. Okay, so let's duplicate
or delete that one, rename things a little bit. Okay, I'm going to copy
that plan seven over here. And then this plant
seven this plant seven? This plant seven.
Okay, paste over here. Confusing. I know, but now plant seven is the
original plant seven and then plant seven with color one is now this one. Then we can duplicate this
plant seven with color two. And perhaps for the leaves, we can use hue saturation. So effect if you don't want
to use the effect menu, you can go to the
Effects and Presets. Search bar here and just type in Hue saturation and
color correction is the menu item
that it's under. So if you go to effect
or if I type here, effect color correction and then hue saturation,
there we go. So here I would go colorize, let's zoom in a little bit. Still on a quarter. Let's
change it to a half maybe. The lightness, let's
bring that up. Let's bring up the
saturation a little bit, and then colorize
this to be green. Saturation, drop that. So something like that
could be pretty cool. Not too saturated. Okay, cool. Then I select hue saturation
here. I copy that. I select the rest of the
leaves and the stem two, and then I just press
Control or Command V, and it then populates
the entire composition. And so, yeah, that's
it changes it, right? Now it kind of feels more like a kid's drawing very innocent. Okay, so, yeah, I really
like that. That's great. And so now what we can do
is say, plant seven windy. Let's duplicate that. Plant
seven windy two with color. Okay. So open up this. Okay, so this one has
the wrong plant seven. There we go. So let's
go to plant seven, windy two. Let's
update this one. Okay. Plant seven
windy with color two. Okay, then plant
seven with color two. So this is windy
now and with color. And you can see now how
this changes things a lot. Color adds something
else into animation. So there are tons of
possibilities here. Again, explore, given
to your curiosities. In the next lesson, I will cover exporting your animations
from After Effects. There's quite a lot to cover
there. So I'll see there.
16. Exporting From After Effects: Alright. In this video,
I'm going to show you how to export your animations
from After Effects. But, whoa, there are tons of different ways to export
something from After Effects. You can use After
Effects itself. You can use Adobe Media Encoder. You can export as an MP four, an MOV, a Photoshop
file, an animated Jif. You can export with
an Alpha channel. It totally depends
on what you want to do with your exported animation. So I'm going to go
through a couple of different options or use cases, and we're going to start with a very simple stock
standard export or what it's called in After Effects, it's
called a render. So right now we've got plant
seven windy with color two that we finished
up in the last lesson. It's not a looping animation. When it starts again,
the flower is nothing, and it grows into something. So we don't need
it to loop, right? So with your timeline selected, you've got this, like,
blue box around it. Tap on composition, and then you're going to
tap on add to rendic. This is the easiest way to
render this composition. So you tap on there, it
goes to your rendic tab. It's got the best settings, and you've got it at
15 megabytes/second, which is honestly, it's great. Like, if you're needing something of high quality,
you can change it. And so you can tap
on this drop down. You can go for 40
megabytes/second. So sometimes I o for that. Sometimes you can
go for high quality or high quality with Alpha, and I'll talk about
that in a moment. Lstless is like the best of
the best of the best quality. I don't think I've ever
actually needed this. Again, Photoshop sequence. And if you want to
do something custom, go into here, check
out the formats. Like if you've got some
sound and you've done some sound compositing
or whatever, yeah, you might want to export an MP three or a PNG
sequence if you want to take your images into
Procreate or somewhere else. All right? So cancel. You can also just tap on that to get that output
module settings again. But most of the
time, I just go for h264 match render settings, 15 megabytes/second, and then
here you can tap on this. Honestly, I've never, ever
used any of these things. The only thing I've
used over here is the quality best or no, actually, I've always
gone for best. The resolution, I've changed
this to half or a third. And when you do this, it just
speeds up the render time. So if you're not sure if
it's actually going to render how it looks
like in After Effects, as opposed to in your finder or somewhere else, just render it. Maybe you need to render it
at half or third quality, just to preview that
everything looks like it looks like everything
is working really nicely. And if it is, then you can go back and change
the resolution to fill and then
export it again. Okay. Who. It's a lot of
like, Oh, yeah. If you need this,
if you need that. But most of the time, you
won't need to do anything. Output two, we will then
go to Downloads folder. I'm going to create a new
folder called renders. Sometimes I create
a folder called De if I've got stuff that's
not just renders. Okay? So let's go
and create that. You can change the file name
if you want to and save. And then you tap on render. And you've got this
little render bar here. This is really nice and quick. And when it's finished, it
makes that lovely sound. And seriously, this is
like music to my ears. I remember waiting 24
hours or longer for one of my college animations
to finish rendering. And when something is
rendering in After Effects, you can't do anything else. It's rendering. You can't
change compositions. You can't do anything, right? You can cube animations
to be rendered, so you can have like ten or
100 and just go like render. And we'll just, like,
process them all. But right now, let's
check out our finder. And inside of our
renders folder here, we've got plant seven, windy with color two. And that looks
great. Super cool. Okay, so that is Export one
done or render one done. Now, if you're like, I
want to render this with a transparent background
because I want to take it somewhere else outside
of After Effects, maybe into Premiere Pro or somewhere else that
you do editing, you want to add it on top of video or other animations
or you want to send it to Procreate dreams,
Who, how do we do that? So let's go inside of plant
seven windy with color two, and we'll tap on
this button here, which is a toggle
transparency grid, and nothing happens because
we've got this white solid. So if we take that off, you'll then see this
transparency grid. Now, this won't work for every animation because
some animations, there is no
nothingness behind it. There is no transparency. There's a video behind it, and you can't make that
transparent, right? So this is a special
case, a special scenario. So what we do here, again, we go composition
and then add to rendic and we then select
high quality with Alpha. Okay. And here I'll be
two, underscore one. Cool, let's render. Fantastic. Here you'll see that it has a black background. So Finder won't
really support this. Also, it's really interesting
to know here that the whites in the leaves
show up, which is cool. Okay, so Finer doesn't support Alpha channels in
a video, which is fine. Some apps don't support
Alpha channels at all, but After Effects
does Premier does, maybe some of the apps that
you use also support it. So I'm going to go
inside my After Effects, like Project Window here and I'm going to
type in renders. And then I will add
there's 21 to it, and then drag it into
a new composition. And there we go.
It is supported. Alright. So if you wanted to, you could go layer a new solid. Let's go for a light
a light sky blue, and we'll drag that underneath. Okay. There we go. And so that's how you export something with an Alpha channel. Now the next thing that
I want to cover is exporting a looping animation. So what we'll do is
we'll go to our comps. Let's go to flower
abstract number two. And what we've got Che
is something that's like just over 3 seconds. And back in the
day when Instagram just looped your
videos, that was great. You could, like, upload a three second animation and it looped and looped and
looped and looped. Fantastic. But now
it does one play, and it's like, Hey, you
want to watch this again? Which is not what
we want. We want this to loop and loop and loop. So what we're going to
do here is drag flower abstract two onto
a new composition. And the process here is
much the same as before. It might be like,
sorry, what's going on? Why is there a blue background? Because our composition
settings have changed. So let's go and
change that to white. Let's change this to roughly
30 seconds. And zoom out. Okay, and then we duplicate
this a couple of times. Ba ba pa, select the first, and then the last Animation, keyframe assistant,
sequence layers, Okay, go. And what we need to
do is we need to come to the end of
one of these layers, Zoom in just before the switchover the
frame before press N. Then we can zoom back out. Let's see if this transition from the end of the animation to the start actually works. Okay, so something's
going on here, right? It's like, What? Like,
it's a bit weird. So I'm going to
double tap into here. And the reason why this is
happening is because, cool, we've got a work area here, but our composition is
still 5 seconds long. So we need to go composition and then trim comp to work area, which is fine for
this composition, doesn't affect it at all. But if we go to
flower abstract four or maybe we call it
flower abstract two, long loop because I'm not sure how long it's
actually going to be. And we named it loop. Okay, so inside here, let's go and select all
of our layers again. I'm then going to press
my left brace and then Animation keyframe
assistant sequence layers. Okay, now let's try this again. I'm going
to zoom in here. Maybe around over here, just 28-29, press N. Zoom out again. Let's see
if this loops nicely. Yep, I think it does.
Okay, fantastic. Here we can trim the
C to the work area. So composition, trim
Com to work area, and then we can say composition, add to render Q, or we can then say add to Adobe
Media Encoder Q. Now, I've already opened my media encoder. I'm just
going to tap on this. Normally, when I open this, it takes a long time
to actually open. It jumps up and down, and it's like, Is this thing
actually going to open? So when you open it
for the first time, just be aware that it
does take a while. The benefit of using Media Encoder is that
you can carry on working in After Effects while Media Encoder is rendering
stuff, which is great. If your computer can
handle that, fantastic. Sometimes when your computer
is rendering stuff, everything else is like, slow. It's a great time to go for
a walk, go for a shower, make yourself coffee, tea, make dinner, something, right? If you've got a
beast of a computer, just carry on working. So this is H 0.264, great match source
high bit rate. Who, there are a lot of
different things here, but you could be
adaptive high bit rate. It's slightly different
After Effects. If you don't change anything, it will go into a special After Effects
media encoder folder. So we're going to change
the output file to renders. There we go. And press play. It will connect to
the dynamic server and then start rendering. Now what's interesting here
is that I noticed it had a black background which I don't think was
the point, right? So, I'm curious to know whether this is an Alpha channel or not. I don't think it is,
but let's just check it out. Dip, dip dip. Let's pop it in here. No,
it's just a black background. So if we go back to our comps, go back to the long loop, we want the white background. So I'm curious now to see what happens if we render
it in After Effects. So add to render Q
and call it loop one, render. It looks
like it's white. Okay, so be aware
that there might be some things weird between the two different
ways of rendering. If you wanted to make sure that it had a white background, you would just need
to add a white solid at the bottom as a layer. Then it would render
white. Let me show you. Okay, so let's go in here. I think we've actually got
some solids that we can use. White solid. We've
got a bunch here. I'll just put it at the bottom, and then composition, add to media encode a Q. There we go. And then let's press Play. And it looks like it's white. Okay, so went to the AME folder. So let me show you
where that is. It's not in your renders folder, so go to After Effects, then you have to go to Plant
Animation, AEP AME folder. It's got a bunch of temporary
After effect files, and then you've got
your render here. Fantastic. So you can actually select all of these logs and auto save things and
just delete them. This one here is
just an extra file like creator while
creating this course. You don't need to worry about
that. You should just have plant Animation dot
AEP in your folder. The next thing I want to
discuss is animated Gifts. Alright? Because
sometimes you're like, Yeah, I just want a
cool little Jiff, especially if you're
using a ten frame per second project
or a composition. So let's go back
to After Effects. And let's go to flower abstract. To Okay, so this does not
have a lot of frames in it. If you want utmost control, either export a Photoshop file. So let's try that
or export images and then take those
into Photoshop, or you can export
an animated Jif. And I like using media encoded
here because honestly, to find it in After Effects either takes me a long
time or it's impossible. So I'm going to say
composition to media encode Q. And here under h264, we'll scroll up and go for an animated GIF and then
we'll say renders, save. Now, this is
actually really big. It's like ultra HD. What we may need to do is tap on animated Jif here to
change some settings, and we'll check this
little box here, change the width to
one oh eight oh, and then that will go to 192 oh. Okay. The background
was also black there. So we could actually just
delete that delete it all. Let's go back to
After Effects here. Let's add a white solid at the bottom, and
then do this again. Okay, it'll be an
animated Jif now because the last format
was an animated Jif. We just tap on this, and then let's change the width
and height again 108 oh, which reduces the size, the file size, and
the width and height. If it's too big, I don't think some apps can
actually handle it, but I think this is fine. So let's render that And then we should
have a Jif somewhere. Here it is. I'm going to add
it to our renders folder. I might feel a little
bit sluggish or slow because it's actually
doing quite a lot. But there we go. We've
got an animated Jif. Let's try a Photoshop file next. So composition, add to render. But but Photoshop. Okay, it looks like each
frame will actually be a PSD. So I'm just going to create
a new folder called PSD. Okay, render. Let's
have a quick look. Yeah, so each one
is an actual PSD. Basically treats
it like an image. So I'm going to delete that.
It's not really what I want. And then, again,
we'll go back to flower abstract two
composition, to render Q, and then Photoshop, let's
do something custom. So format. Let's go for a JPEG sequence or
PNG sequence. Okay. Yeah, let's go to the
Downloads folder, renders New folder, PNGs. Okay, let's save that. I guess you could
uncheck Save in a subfolder. Let's hit Render. Okay. Now you've got these as PNG files, which is really great. If you wanted to take
these into Photoshop and export a animated
Jif from Photoshop, it's a lot more
powerful when exporting jifsOr if you wanted
to send these to Procreate on your
iPad or bring them into a Photoshop
document and then send that to Procreate
to then animate on top of or Procreate dreams,
you could do that, too. Alright, so hopefully
this has given you a really good overview of
exporting from After Effects. Most of the time, I just use the stock standard
export feature. Once I've completed
a composition, I add it to the render queue in After Effects, press render. It renders really quickly. I have it in my
Downloads folder. Fantastic. Other times, I need something a
little bit more custom, and so then I start exploring, tweaking, testing the
different settings to find something that works best for what I need it for right then. Whether it's taking it into Procreate dreams, taking
it into premiere, taking it into Procreate, posting it on YouTube or
Instagram or TikTok or whatever. If you have any questions
around this, just hit me up. I'm happy to answer
them and help out. Now, in the next video, I'm going to talk about what's next for you going forward
after this course, and then after that,
we'll end the course. Alright, see you
in the next video.
17. What’s Next?: We've got a bunch of different animations
that we've created, but what's next for you? Well, I guess the thing is keep on doing what you've
learned during the class. What do you want to explore next? What are
you curious about? Is it adding sound
to your animations? Because sound can just
make animations pop. Is it creating something
now in your own style, your own illustrative style? Do you have some
things that you want to explore by yourself? Do you want to take all
of those leaves and hand animate every single leaf to be a slightly different leaf? Do you think that
your wind plant could be a little bit
better than mine? Try it out. Seriously, there are so many things that
you can explore. On top of that,
start having a look at animations that
you really like. Try slow them down, see how they animate. Ask yourself, why
do I like this? And then try replicate
that in your own style. And as you start
replicating that, you'll then be like,
Oh, but what if? And then you've got
a path to follow? You know, you're following
your curiosity again. If you're like, but I still need to learn a couple more things, go look on YouTube. Go look on Skillshare. I have got a bunch of courses on Procreates, Procreate dreams, Procreate Animation,
After Effects, stop frame Animation, how to create mesmojft they
keep on looping. The world is like it's endless. Like, there are so
many cool things that you can do with animation. If you're ever stuck, and you're like, but how do I do this? Just seriously, go to
YouTube, go to Google, ask your chat bot, just be like, How do I do
this in After Effects? And oftentimes, it'll
give you a video, I will explain it to you
and you just be like, Cool, thank you so much. It's never been easier to
animate in After Effects. And you start plugging in
these beautiful handmade, texted frame by frame
animations that you do in Procreate or procreate
dreams or even on paper. There's just so much cool
stuff that you can do. Just keep on exploring
your curiosity. What are you curious about? What are those what ifs? Keep on giving into them. Keep on exploring. Seriously, you
just may end up so far away from what you've
ever thought possible. It's just this amazing
explorative kind of journey. In the next lesson,
the final lesson, I'm going to conclude
this course and then say Adios. Alright.
I'll see you there.
18. Conclusion: Okay, this is the
end of the course. Thank you so much for taking it. I hope you've had fun. I hope you've been like, Whoa, this is just ridiculous. Like, combining Procreate
and After Effects and then being led by our
curiosity or my curiosity. That is just it's epic. It's an epic way to animate. It's an epic way to explore, to just create a bunch
of different animations. I hope you're just exploding. And I hope this way of creating animations brings
attention on social media. I hope it brings
more client work in. I hope that you can maybe
even just approach clients or client briefs
with more firepower. More confidence, more like, Hey, this won't actually take my whole life to
do this animation. I've got this process
of iteration, of exploration that I can
fall back on, that I can use. It's been a real pleasure for me to do this
course because I don't really normally do an explorative kind of
process with students. I normally teach you guys
this is how it's done. So if you could
do me a favor and let me know how you
found this process, it would mean the world to me and also to students
who are like, should I take this
course or should I not? It will then help them know whether they should or shouldn't if you want more courses, resources, newsletter, that
kind of stuff from me, if you want to check
out my artwork, visit Rich armstrong.net, and I will see you
in the next course. Alright. Bye for now.
 Rich Armstrong, Multi-hyphenate Artist