Transcripts
1. Introduction: Single most beneficial skill
that I taught myself as a photographer was
how to light a scene. I was familiar and comfortable with shooting
in natural light and all of the problem
solving that comes with shooting with a
natural light source. But being in a studio
setting where I had to shape and I had
to control the light, thing that was really
incredibly overwhelming for me. If this sounds like you, then you have landed in
the right place. In today's class,
we're going to be demystifying the art
of studio photography. We're going to be looking
at how you can use studio photography and
studio lighting to level up your
portrait photography and how you can use a
series of techniques, both basic and more
advanced techniques to bring your ideas to
life in the studio. We touching on everything from strobe lighting to
continuous lighting, film photography to
digital photography, diving into the terminology
associated with studio photography from terms
such as strobe lighting. What is strobe lighting?
What is a strobe? What is a constant light to understanding different
types of equipment that you might have heard of
such as flats or C stands. We'll be exploring how to get
started in the studio from choosing the type of
lighting you want to how to connect a
flash to your camera. We're also going
to be looking at some lighting setups that you can take from this class
and apply in your own work. My name is Sir Keri, and I
am a portrait photographer. At the beginning of my
career, stepping into the studio was something
that really frightened me. I didn't have a traditional
education in photography. No one had ever held
my hand through a studio process and taught
me how to set up lights, how to shape lighting, how to to grips with all of the things that are
in a studio setting. Shooting in the studio can be somewhat of a daunting task. But it's also the
skill that's had the biggest effect on my career. Since I started to invest
my time and energy into it, it is a skill under my belt that has come in handy
time and time again. So join me in
today's class as we take studio photography
studio lighting, and all that it entails, and we make it just that
little bit less scary. So you can step into
the studio and feel confident in what you're gonna shoot and the techniques
you're gonna use.
2. Class Project: Welcome to the first lesson in this class all about
studio photography. In this lesson,
we're going to be talking about your
class project, which is a project
that I want you to keep in mind as we're
moving through this class. At the end, you're going to
submit the class project to the class project gallery
where we can share feedback. We can chat about
each other's work, and hopefully grow as a
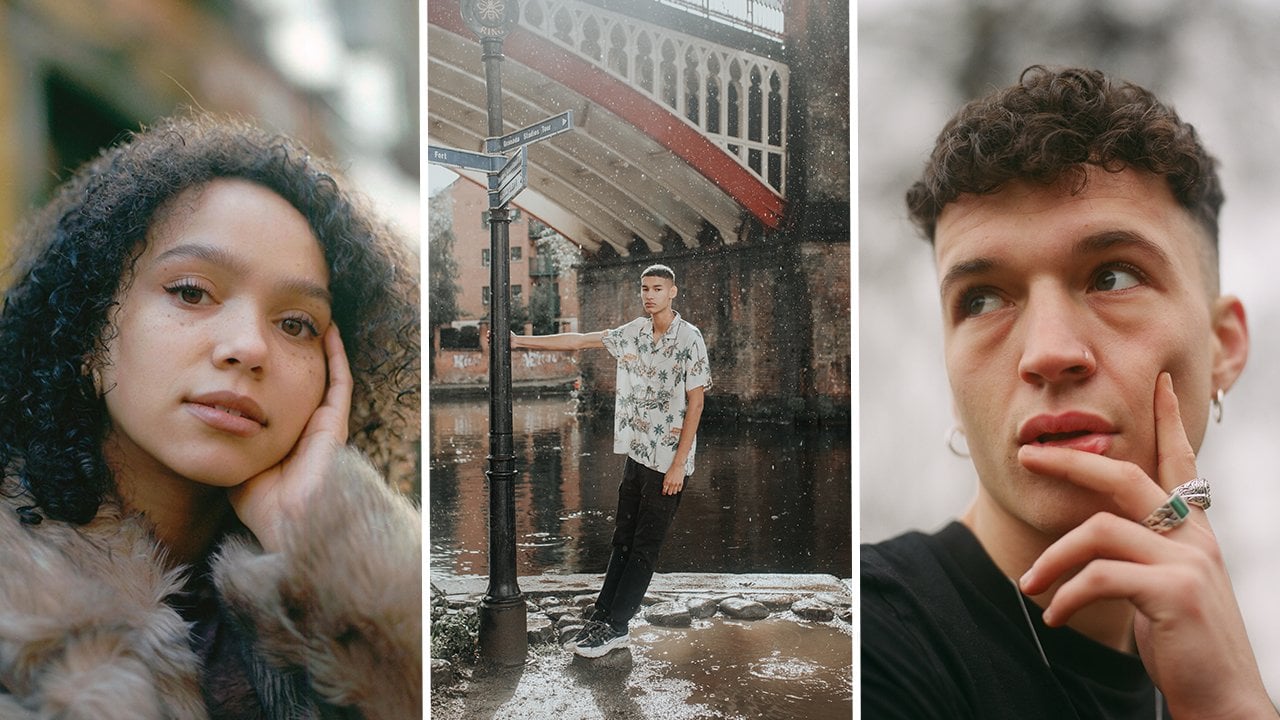
community in studio photography. So your task is to shoot three different images using three different lighting setups. So as we move through the class, I will be giving you
tons of ideas of different lighting setups that
you can use in the studio. So don't worry if you're at
this point, you're like, I don't know any
studio photography, I don't know any studio
lighting setups. That's not a problem. That
is what this class is for. But keep in mind that
you want to be using three different setups
in your class project, whether you hire out
an actual studio or you use your home a room like this where you can
use different sources of lighting to
light your subject, whether that is yourself
and you want to do a self portrait or whether that is one of your friends or
a model that you know. Is going to be three portraits, each one using a
different lighting setup. When you've done your
shoot, just upload those three photos to the
class Project Gallery. And bonus points if you can
even talk about what kind of lighting setups you did use for three different images. But keep that in mind, we
are going to move now into the first proper lesson
throughout this class, and we're going to be
talking about the difference between artificial lighting
and natural light.
3. Artificial Light vs Natural Light: In this fair sesson, we
are going to be diving into the very
basics of lighting. We're going to be exploring
artificial lights versus natural lights. So both natural light and artificial lighting can be
used in a studio setting. But what sets them
apart? What looks can be achieved and
how do you use them? So natural light is likely to be the type of lighting that
you're already familiar with. It refers simply to the natural light that
comes from the sun. And whilst we can use various techniques to
control natural light, it is very much up
to the weather. A lot of it is
beyond our control. Artificial light,
on the other hand, refers to lighting
that is man made, and often we have complete control over
artificial lighting. So this could include
ambient lighting, such as, you know, lamps in a room or street
lamps or something like that. But it also includes
continuous LEDs or strobe flash lighting. In this class, we're going to mostly be focusing on strobe, which we also call
flash and continuous, which we also call constant when it comes to
artificial lighting. So there are two main
differences when it comes to using natural light
versus artificial light. Natural light is much
more accessible in the sense that it's free
and everyone can access it, regardless of the resources that you have available to you. And this is why it is usually
the type of lighting that we first become acquainted with and first become
familiar with. The second difference
comes to how easy it is to shape the
types of lighting. Natural light, what it can
be shaped and manipulated, has much of its own mind. So working with natural
light is more of a problem solving exercise to
achieve your desired look. There's so many things beyond your control that you
just have to kind of work with rather than being
able to control completely. However, artificial lighting, especially when you're in
a controlled environment, such as a studio or a room that you can
make completely dark, allows you the ability to fully customize
your lighting set. And have full control
of the outcome. When you're working
in the studio, it's really likely that
you're going to come across both types of lighting, both natural light
and artificial light. Oftentimes, studios are marketed based on their ability
to let natural light in. So you might see a lot of things that say
natural light studios, and this is something that you
can use to your advantage, especially if you are more comfortable with
using natural light. Sometimes it can be tempting to just for using
that window light, the light that is coming
through naturally into a room. But of course, it
has its limitations. The time of the
year, the weather, those kind of variables
really do have an impact on how much available
light you have in a room, as well as the positioning
of the studio or the room, how that lights, and how the
sunlight interacts with it. So that could be if the rooms
south facing, for example, then your light source is going to be
different depending on different times of
the day compared to a room that is north facing. Because of this, it can
be really difficult to have a plan when it
comes to natural light. You might have a plan
in your head, but as soon as you come into
the studio that day, and it's an overcast
day instead of a bright sunny day that might completely change what you
have in mind for the shot. And that is why it's
really important to have a good understanding
of artificial lighting for those instances where natural light just won't suffice or you can't mold or shape that natural light
how you want it to. So in the next lesson, we're
going to be looking at the differences between two
types of artificial light. We're going to be looking
at flash slash strobes, and we're also going
to be looking at constant slash
continuous lighting. So join me in the next lesson, and we can talk about
strobes and continuous.
4. Strobes vs Continuous: So in this lesson, we're
going to be exploring the difference between two
types of artificial lighting. The first being strobe lighting and the second being
continuous lighting. So let's start with
strobe lighting, which is maybe the
kind of lighting that you first think of when you
think of studio photography. What is a strobe
slash flashlight? A strobe or a
flashlight refers to a light that produces
a series of short, intense flashes of light that
illuminate your subject. Even if you've never used
a studio flash before, you're probably aware of
the concept of a flash. Even if it's from your
phone camera, for example, when you take a photo
on your phone with the flash as so let's take a photo to
show you what I mean. The flash goes off. You have
that short illumination, and that is
essentially a strobe. So studio flash is
work in much the same way as a phone flash, but with much more
power and ability to customize and
shape the lighting. What is a continuous light
or a constant light? So a continuous light
also referred to as a constant light is the kind of opposite
to a strobe lighting. So where a flash will have a series of short
bursts of light. Constant light, as per the name, is a constant stream of light. You can get continuous light in lots of different formats, such as LED panels, fluorescent tubes,
tungsten bulbs. And because of its
constant nature, it's often used a lot in
video as well as photography. So what are the pros and
cons of using a flash? So a flash will freeze your
subject or the motion. So depending on the
power of the flash, your subject is going
to be frozen in motion. So this is great
if you are trying to shoot some really, like, high speed movement or anything where you need your subject
to be frozen in motion, then flash is a really
great way to use this. Also, you have a lot more power, which means you can
shoot at a higher F stop because you have more light coming
into your image. Shooting with flashes
can be great for film photography where you
have a predetermined ISO. So you're going to set the power on the light
and you're going to set your ISO depending on
the film and your camera. And then you shouldn't
theoretically have to change anything else because if you're controlling all
of the other variables, then nothing is changing
throughout the shot. When it comes to constant light, what are the pros and the cons? So a big selling point of using constant light is that it's easier to see how you shape
the light in real time. So when you put a
constant light on, you can see straightaway where that light is
hitting your subjects. And as you move the light, you are seeing in real
time the effects light. It's also great for video,
like I said before, and it's good for film
photography as well, because of the fact that
you can see the light. You haven't got as much guessing to do with stroke photography, with flash photography,
once you take that photo, you only know what
the lighting looks like once you look at the photo. Obviously, with
film photography, that is a little bit more
difficult because you are not seeing the photo in a
lot further down the line. That's why a lot of people aim to use constant light when
they are shooting on film. You can also use strobe and
constant light together, and that is something
that we're going to touch on later on in the class. But really, it is up
to you whether or not you use constant light
or you use flash. Some people prefer
one or the other. So shoots will cool for flash, some will cool for
constant light. And as you get more comfortable
with exploring both, you'll have a better
idea of which projects will need a flash and which projects will
need constant light. In the next lesson,
we're going to be talking about modifiers and exploring some of the
popular attachments for both constant light and
also strobe lights.
5. Modifiers: So this is the
first lesson where we're really going to
be getting stuck into some of that weird terminology that comes with
studio photography. And in this lesson, we're
going to be talking about something
called modifiers. So what is a modifier? A modifier does exactly what
it says it does on the tin. It modifies the light. Essentially, they
are attachments that you add to your light, whether that is a
constant light or a flash that alter how the
light source is going to look. So you might have already
heard of certain modifiers, such as soft boxes or umbrellas. Soft boxes and umbrellas
are really commonly used to diffuse the light to create
a softer light source. So think of it as the
clouds over the sun. That is essentially a
modifier for the sun. The clouds diffuse the light causing a softer light source. And using the cloud analogy, again, the bigger the cloud, the more diffuse the
light is going to be, and that is the same when
it comes to modifiers. The bigger the soft box, the more diffusion you're going to get on
that light source. You can also use modifiers that don't soften or
diffuse the light, but just shape it
in a different way. So this includes
modifiers such as barn doors or
projector attachments, which can be used to affect
the spread and shape of the light while still keeping
a harder light source. In the next lesson, we're
going to be talking a little bit more
about what I mean by hard light source
and soft light source.
6. Hard Light vs Soft Light: In this lesson, we're going
to be talking a bit more about hard light sources
and soft light sources. So although we
touched on this in the previous lesson about
modifiers, in this lesson, we're going to be
exploring it in a little bit more detail with examples of both types of lighting and how
you can achieve it. So what is soft light? Soft light refers to light that is less directional
than hard light. Essentially, it has a more gradual transition
from light to dark. It creates softer shadows
that are more diffused. And often because of
these softer shadows, it can be more flattering to use soft light in
portrait photography. Soft light is typically created from a larger diffused
source such as a light with an overhead scrim or a soft box used
as a modifier. Back to our sun
and clouds analogy from the previous lesson. Soft light would be the sun
with a cloud in front of it. Hard light, on the other hand, is a more concentrated
intense light source, creating harsher and more
well defined shadows and highlights and
much more contrast. So this would be more similar to the sun with no clouds at all. So a really sunny bright day. When you look down
at your shadow, your shadow is quite crisp and harsh and there's
a lot of contrast. Hard light can be achieved
by just using a bare bulb, which essentially means
using a light source without any modifier attached or other modifiers that don't
diffuse the light source, for example, a snoot modifier. There are so many different
types of modifier. You can explore to achieve
hard and soft light. And so much of it all just
come down to you exploring and experimenting with the type of light that you
want to create. Hard light is often
used to create drama, more dramatic images. It's used a lot in high
fashion photography. Whereas, like I said,
soft light can be used more in a flattering way
for portrait photography. In the next lesson,
we're going to touch back on modifiers, but with a different approach, we're going to be looking
at how you actually attach modifiers
to a light source.
7. Attaching Modifiers: So in this lesson,
I'm going to be showing you how to attach this softbox to this
constant light. There are so many
different types of modifiers and lights
that you can use, so many different brands
with different mounts, but this is generally a pretty common way
to attach a softbox. I'm also going to be setting this softbox so you can
see how to do that. So this light we have here
is called a NNLtFursa 60 C, and this is a full color
RGB constant light. We'll get a little
bit more into what all of that means later
on in the lesson. But for now, what we're
going to be doing is attaching this Nan Light
softbox to this Nan light. It's important that
your modifiers match the brand of light
or have an adapter. So often you might hear of
a Bowens Mount adapter, so Bowens Mount adapter, Bowens Mount is a
very common mount for a light source
basically to have. Some light sources will
use different mounts and you can use, for example, a Bowens mount to
attach to that light so that you can then attach
Bowens modifiers. In this case, we don't need
to do that because both of these are nanlte, but
just watch out for that. If you are using
different brands, make sure that the mount is the same and that they
will attach properly. So what I'm going to
do, first of all, is I'm going to open up the softbox and then we're
going to add it to the light. So as you can see, this softbox, it's basically going to
take shape like this. But what you have to
do, first of all, is click these little parts
of the softbox into place. So you're going to do it one
at a time. It's pretty easy. You don't need to
put too much force, and you're just going
to pull each little arm until it locks into place. You can see here how there is a lock to lock it into place. So you're going to go all
the way around and just do this on every little
arm. On the softbox. Sometimes I just
like to put my hand inside of the soft box just so that you can
get a little bit of a better grip because as
you kind of move round, some of them will become a little bit more
tricky to click in. So that is all locked in. As you can see now, what we have is a big reflective surface. So the light is going
to come in here and bounce off of this
reflective surface. So what we need to do now is put the diffusion sheets on top. So this is really easy. It just works with Velcro. So these have Velcro. This thinner sheet goes
on the interior side, so you're going to stick
it to the near side. And you're going to
want to make sure that all of those
gaps are filled, that there's no light going
to spill out from the edges, and all of this is tightly on. Then comes the top
diffusion sheet, and that's just going to go on to the upper part of the Velcro. So once you've got
it all on and ready, that is your softbox,
you're going to want to attach it to the light. In terms of attaching
it to the light, you can see here the mount that we've got on the nan light, and we can see on here the
mount on the soft box. On the nan light,
there's a little button where you can click
in to lock or unlock. I'm going to press that down, and I'm going to
marry up the ridges in the soft box to the
little gaps in the light, click it in and then
twist it to lock. Now, that is completely on
the soft box. On the light. The soft box is
now on the light. We've attached it. And to
detach it, it's very simple. Place it down again, press in that little lock. Let's
find it so you can see. So in this little lock here, you're going to press that in, twist it again and lift
it off very easily. And then in terms of
taking this apart, I'm just going to flip it over, remove the Velcro diffusion. And then we just need to unclip these things that we've
locked into place. It's a lot easier to do it. Afterwards, you just push
these little spikes, and they're going to
unlock and release the arms. There we go. And then you can pack
that away really nicely. I've also got a clip here in
the studio of me attaching a bigger softbox to another
light, a Bowen's flashlight. So I'll play this video
so that you can see me doing both a constant
light and a strobe light. Okay, so every light is
going to have a man, but they are all pretty
self explanatory. For this one to detach
it from the modifier, this is a soft box modifier. There's a little button here. If you just squeeze that and twist it and it
just twists off. I literally it goes
on the same way. Fit it in there, and then you just trying to get
the grooves of the modifier to fit into
the grooves of this butt. Like I said, different
mounts work differently, but generally, it kind
of works very similarly. You just slot the
modifying mount into the light,
twist it, and locks. If in doubt, there's so
many tutorials online, depending on your specific equipment that you can
get to grips with. In the next lesson, we're going to be
looking at how you can connect your camera to a flash.
8. Connecting a Camera to a Flash: So in this lesson, we're
going to be talking about how you connect your
camera to a flash. And there are three different ways in which you can do this. The first way is the
most common way, and that is using a trigger. So your light should come
with some sort of trigger which basically works as a remote between your
camera and the light. You essentially need to set the channel on the trigger and the channel on the light
to the same channel so that they can communicate
with each other. Once you've done that,
you put your trigger on the hot sheet of your camera. And they should
speak to each other. There is a very important
difference, though. If you have a camera that has a cold shoe and not a hot shoe, you're going to need to use
something called a PC cable. And a PC cable essentially
is just a little cable that is going to go from
the PC port on your camera, which is often
found on your lens in various film cameras, and that is either going
to go into the trigger of the light or it's going to
go into the light itself, depending on the
model of the light. Again, connecting your camera to the light source
is going to depend on your camera and it is
going to depend on the light. So if you are in have a little giggle on
whichever light you are using, you should be able to
get a full explanation. In terms of constant
light like this an light, you don't need to connect your camera to this light
as it is constant light. You're just going to be
able to photograph it. You don't need to
trigger a flash. Not going to have to link anything together to
be able to do it. You could literally
take photos with your phone using a
light like this. You don't need to connect
your camera in any way. If you're using an
on camera flash such as this Godox V one, then you don't need a trigger. You can just click this bit onto your hot shoe and you can control the settings
on the back. So at the moment,
it's set to TTL, which means through the lens. What this is essentially
going to do is it's going to read the settings
from your camera and work out the power that the flash needs to achieve
your desired look. So this is the easiest
way to use a light like this if you're doing kind
of, like, running gun stuff. If you need a little
bit more control, you can set it to manual, which is likely what your
flash is going to be set. In the studio. So you can see here that
we have fractions, a little bit like shutter speed. The lower the fraction
is, such as a 1.4, the more power the flash
is going to let out. And that's the same when
you're using flashes in the studio and not just
on camera flashes. In the next lesson, we're
going to be talking about the modeling lamp and what it does and what
you can use it for.
9. Modelling Lamps: So in this lesson, we're going to be talking about
a modeling lamp, and I'm going to be
showing you what this does using this GO Doc V one. So a modeling lamp
essentially models the light. So just as with a
constant light, you can see the
results in real time. You can see how the
light is shaped. If you want to do
that with a strobe, you need to turn on
your modeling lamp. So different lights are
going to operate in different ways in terms of how you actually turn the
modeling lamp on. But essentially, what it
does is it turns it into a constant light so that you can model how that light looks. And this is also not only really useful in terms of modeling the light and seeing
how the light looks, but it's also great if you
are using manual focus, whether that's with a film
camera or a digital camera. Modeling lamps on strobe
lights don't tend to stay on for a really long time,
usually a minute or two, but that should be enough for
you to kind of get to grips with what it is you are shooting and what
you need it for. And if it turns off, you
just turn it back on again. Once you take the photo, that modeling lamp is
going to disconnect, and the flash is going to fire. So I'm going to show you
what that looks like now. So we put the modeling lamp on. And then if I was to fire the flash, that's
what's gonna happen. You're gonna get
a burst of light. During that burst
of light is when the photo is going to be taken, and then your modeling lamp
should switch back on again. In the next lesson, we're
going to be talking about other tools that you can use to alter and shape your lights.
10. Reflectors, V Flats, Polyboards: So in this lesson, we're
talking reflectors. We're talking V flats,
and we're talking plybods. What are these? These are all things
that you can use to help shape your light
aside from modifiers. A reflector does what
it says on the tin. It reflects the light. You can find reflectors in loads of different
shapes and sizes. So a very common one is to have a reflective surface that
you can use as a reflector. Often these come in
large circular packages that are three and one
with different colors. So you get, like
a silver, a gold, and a white that all alter
how that light reflects. A plyboard is board of
essentially polystyrene foam, and one side is
usually painted black. One side is usually
painted white. The white side is used to
reflect light and dark side, the black side is used to
block light and create shadow. A V flat is two boards that come
together creating a V shape, and it basically does the
same job as a plyboard, but in a slightly
different shape, you can fire light into these plybards and V flats
for light to reflect out of you can have
them to the side of an image for light to
spill and reflects off of. You can essentially use all of these things,
reflectors, plyboards, V flats to stand in
for additional lights, creating negative feel and reflecting light back
into your image. Personally, these
aren't things that I use in every chute, but they can be useful if
you are only working with one or two lights and
you need a little bit of an extra light to fill
in some shadows on one side or to add a little bit of light to
the back of your model, for example, and you can just bounce the light that
you're already using into these reflectors and plybods and V flats to help add or remove
light from your image. In the next lesson,
we're going to be looking at different
types of backdrops.
11. Types of Backdrops: So this lesson is
all about backdrops, and backdrops are essentially the thing that you're shooting
your model in front of. For example, really
common backdrops that you can use are fabric
backdrops that are essentially just a sheet of
fabric that have been painted or printed on to create some sort of
interesting backdrop. You also have green screens, which I'm sure you're aware of, which is essentially a green bit of fabric or paper
behind your model that is often used to superimpose other
things onto in post. You can also use coloramas which tend to be big rolls of paper. So you're really
likely to have seen these if you have been
in the studio before. Often, there are kind of rows of coloramas different colors
for you to choose from. And you set it up
on essentially what is two kind of,
like, long tripods, a little bit like lighting stands with a bar over the top, which will fit your
colorama and then you can pull the paper down and
use it as a backdrop. The other type of backdrop
is using a photocve. And a photocove is essentially a room that has been
designed so that the corners the corners of
the room seem apparent. So we call this infinity cove, because it looks like the
room goes on for infinity. Often these are white, but it really depends on the studio
that you're shooting in. In the next asson, we're
going to be talking about tethering how you do it
and why you might use it.
12. Tethering: So in this lesson, we're going to be
talking about tethering. What is it and how do you do it? So tethering
essentially refers to connecting your camera to
your laptop or computer, and you're essentially
live streaming the images. So you're connecting it
using a tethering cable, and this tethering
cable is going to connect from your
camera to your laptop. As you take the
photos, those photos are going to go straight
onto your laptop. It's really common to
either use light room or capture one to tether images. I've got a little bit of an example that I'm
going to play now. Okay, so we're tethering. This is a tether P cable, but you can use any tethering able it depends on your camera, so I'm cheating on a Sony. This is a USB C to a USB, and then I've got an attachment. Essentially, you're
going to just plug it into your laptop. When using capture
one, it's really easy. They have a tethering section, you click tether then
in this area here, it should pick up. On your camera, you might
need to switch to PC remote. And then it's picking
up the camera. Should come back
there, there we go. And you can see the seconds, everything In terms of
doing this in Lightroom, it's a little bit different. With Lightroom, you want to go file Capture start capture. You can choose where
it's going to save here. So I'm just taking
it tethering folder. And then the same thing
again should come up. You can also tether using
different wireless controls depending on your camera and the device you're tethering to. So, have a look into that
if that's something that you prefer rather
than being wired up. The idea of tethering
is often used so you can show your client in real time the photos
that you're taking. It also gives you access to editing tools
as you're working, which can often, you know, take away a lot of the mystery
of what you're shooting, as you can see in real time
what the photos look like and what adjustments you want to
make will look like in post. Of course, this is only
available for digital shooting. You cannot tether
film photography. So tethering isn't something
that I do all the time. It's usually something
I do if I'm working on a clothing brand or something
where the client is in the room and wants to
kind of keep up to date with the images or really have that oversight
over what I'm doing. In the next lesson, we're going to be setting
up a constant.
13. Setting Up a Constant Light: So in this lesson,
we're going to be looking at an RGB
constant light, and I'm going to be
going through some of the controls on it with you. So we've got with us here
the Nan Light foursa 60 C. It's currently connected to the mains, as
you can see here. And we're going to
just be exploring some of the different options. So I'm going to switch it on with this little button here, which is just kind of
like a little switch. First mode that it's on is CCT, and we can use these dials
to control the light. So this one here is going
to move up and down. This one here is going to dim. Alter the value of
whichever one we're set on. So let me dim this right down because I don't want
to blind myself today. So we've got that at 2% now. CCT stands for correlated
color temperature, and we work in
values of kelvins. So if you see a digit that
has a K on the end of it, such as 5,400 K, this means you're
working in CCT. If the number is
lower around 3,000 K, that means that the
light is warmer than a higher number such as 4,000 K or 5,000 K. Often we consider a figure around
5,500 to be daylight balanced as this most accurately mimics the
natural light from the sun. So I can come down
to this value here and I can alter the
temperature of the light. So as you can see
now, this light is becoming much warmer. If I go the other
way towards 5,000 K, we're getting a much
colder light source. So what this light
can also do is it can also project colored light. So to do this, I'm just going
to click the mode button. Then we come into HSL. So HSL is hue, saturation
and luminance. And again, we have dim, and then we have hue,
which is going to be the value of your light. So as we're going through, we're scrolling through
here the colors of light. And then saturation
is going to be the intensity of that color. So I'm reducing it now, you can see that
the light is going back towards a white light. As I increase it, it's
becoming more colored. So those are really
the main things that you need to
know about constant. Is understanding CCT
mode and understanding HSL mode and how you can use white light with some constant lights and with some
constant lights, you can use RGB mode. Some
lights, you can use both. If a light says
that it's bicolor, this really tends
to mean that you can only use it in CCT mode. If it says it's RGB, then you can also
use colored lights. But in the next
session, we're going to be jumping into tips for how to use film when
you're in the studio.
14. Tips for Shooting Film in the Studio: So before we actually
start jumping into actual lighting breakdowns, we're going to be talking
about how you can use film cameras in the studio. So we're going to be looking
at tips for shooting with strobes and tips for shooting
with constant light. So starting off, we're
gonna be talking about using film
and strobe lights. My number one tip
is to test that the camera is connected to the lights without
any film in it. So this camera, in particular, is a Mima Az 67. The way that I
would test this is either to test it with no
filming, not load the film, but if I've already loaded
it, the great thing about this camera is that you
can remove the film back. So I can remove the film back and then
trigger the shutter. And if the camera is
connected to the light, that light will flash. But if you already have
your film loaded and you don't have a camera where
you can remove the back, then one of the ways
that I like to do it is to shoot a blank frame. So what I'll do here is I'll
just cover the lens with a lens cap or
something like that. Find my frame to see if
the light comes off, and then I shoot
the second frame as a double exposure so that you don't waste
that singular frame. My next tip when it
comes to shooting with strobes is to utilize
the modeling lamp. Using the modeling lamp can
be a great way to see what your light is doing
before you take the photo and also to help you focus
on a camera like this, which is all manual focus, you will need all the
help you can get. If you do have a
digital camera on you, then I would
recommend dialing in the settings to that
camera to be able to have a more accurate
way of metering the light so that you can see if it looks good in
the digital camera, you can just plug
those same settings into the film camera. When it comes to
shooting strobes, the best film stock for me, tend to be film stocks with slower ISOs because of the high output of
the strobe lighting. The great thing
about this is that they also tend to be cheaper. So things like C
like gold 200 is my go to when it comes to
shooting flash in the studio. But what about when it
comes to constant light? So shooting film with constant light is something
that people do all the time. I do it all the time, as it is a great way to see how
the light is moving, how you're shaping the light before you actually
take the photo. Best tips, again, are to again, meter before you take the photo, whether it's with an
external light meter or with a digital camera, Meter before you take the photo, read the light in the situation before you plug those
settings into this camera. And whilst with flash,
you're going to use film stocks with lower ISOs, you're going to use
higher ISO film stocks for using constant light because there isn't
that same output. So anything from
like a 400 ISO to an 800 ISO is great for
using with constant lights. Great examples are
Kodak, torture, 400 or 800 Sinise 800 T.
They're great ones to use. When you're in the studio,
using constant lights. But in the next lesson, we are actually going
to be looking at our first lighting
breakdown and talking about those lighting setups that you can take
into the studio.
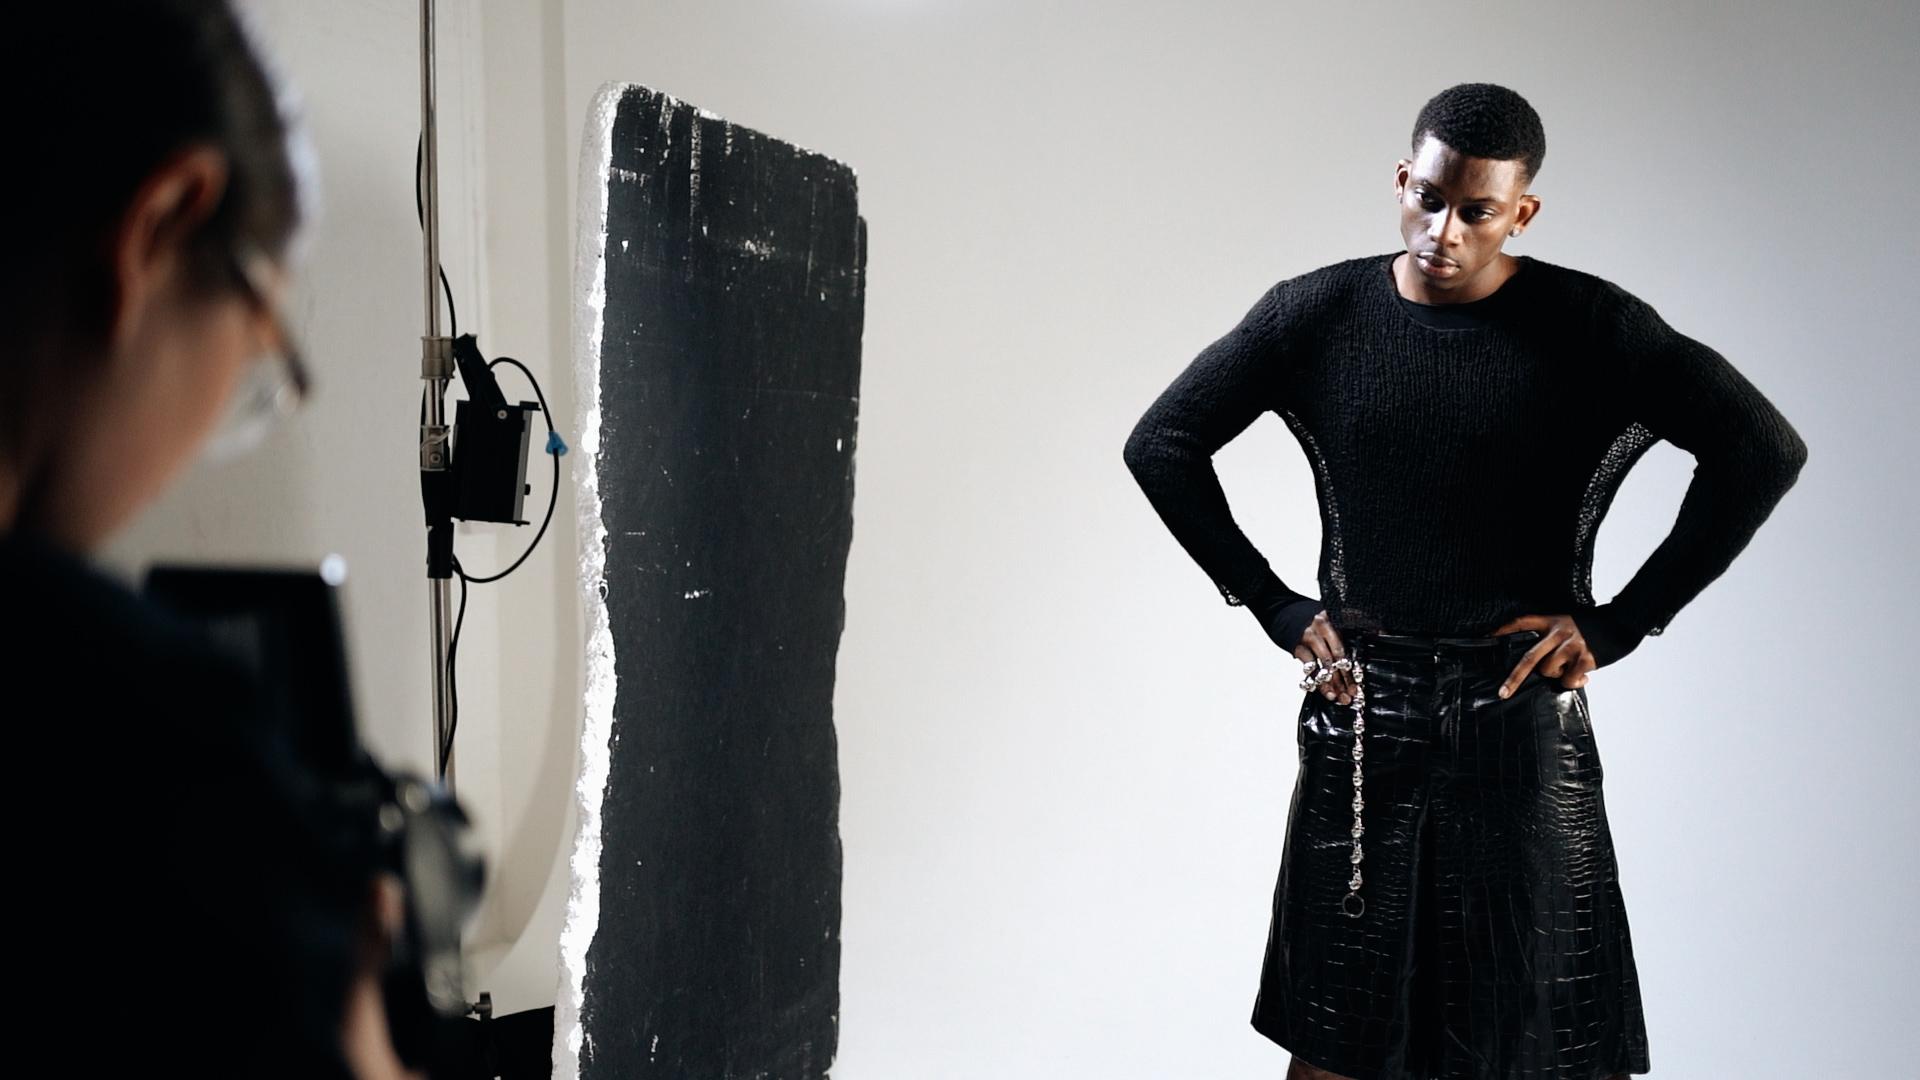
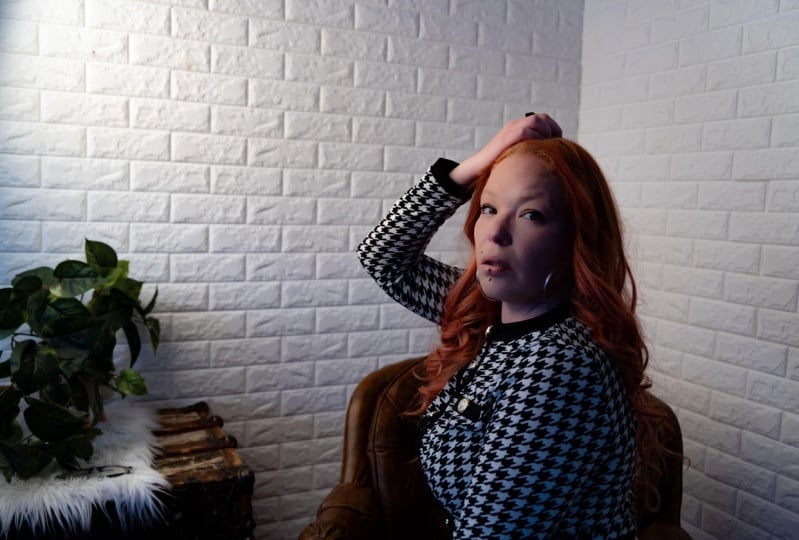
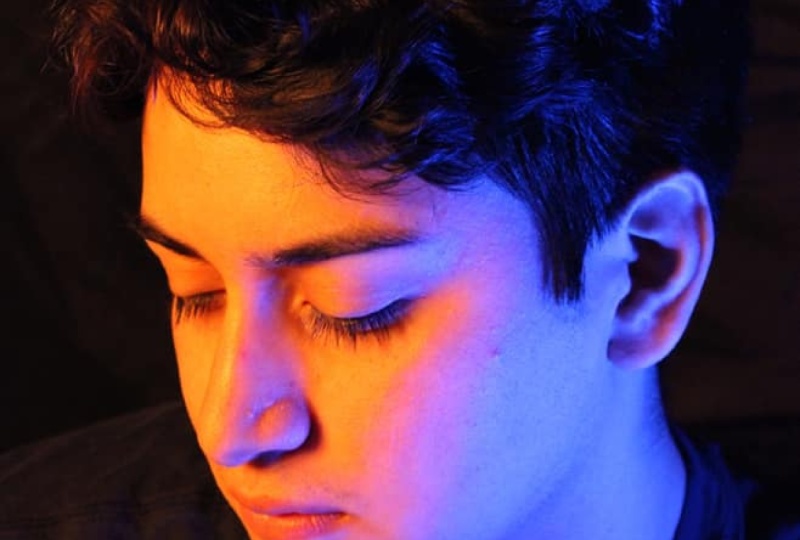
15. Lighting Breakdown: Direct Hard Light: So you have successfully
made it through all of the beginning
part of this course, which is about how to actually set things
up in the studio. Now we're going to get stuck into techniques that
you can actually use in the studio lighting techniques that you
can use, that I use. We're going to be going
through a variety of different lighting setups. We're going to be
talking about how to set these lighting setups
what equipment you need, and we're also going to
be showing examples. So first, we're
going to be talking about hard light again, and we're going to be talking about using this direct light, really simple setup that you
can do with just one light. So the equipment that
you're going to need for this is either a bare bowl. So this can be a flash
or a constant light. Either one is fine, but we're going to go for this
really hard lighting, so you don't need any sort
of modifier on this light. That being said, you can
also achieve this with a reflected dish on
your light or you can shoot this with something
like an on camera flash. So this one is a GodoxV one that I showed you in
the other example. This is actually a modifier, so this is a little magnetic dome that diffuses the light. You can do this with or without. It's still going to be
a pretty hard light. And essentially,
this light source is directing the light
directly at your subject. You're going to get
the harsh light, harsh shadows behind them. It's really commonly used in music photography for kind
of like portraits backstage. It's really commonly used in more high fashion images where you want that kind
of harsh direct look. So you're literally
going to This is the easiest lighting setup
that you can probably use. You just want your light
to hit your subject, so it's going to go
directly at your subject. Depending on where you
position that light, you're going to notice where the shadows
are going to fall. So I'm going to turn
this modeling lamp on, and we're going to
use me as an example. Let me take that modifier off so you can see what
that does too, let me turn that down a bit, because it's a little
bit bright for my eyes. So we've got this
modeling lamp on. There's no modifier on this right now. It's
just the torch. And you can see my shadows
behind me are really hard, depending on where
I put the light that is going to move
where the shadow is. If I put this dome
on, you're going to see a little bit of
diffusion in those shadows, but still, you know,
they're still pretty hard. This is essentially
a really good way of seeing where the shadows are going to fall
on your subject. So this would be side lighting, but we want direct light. In the next assume, we're
going to be looking at completely different
type of lighting setup, and it's going to be a
little bit more complex, and we're going to
be looking at mixing strobes and constant lights.
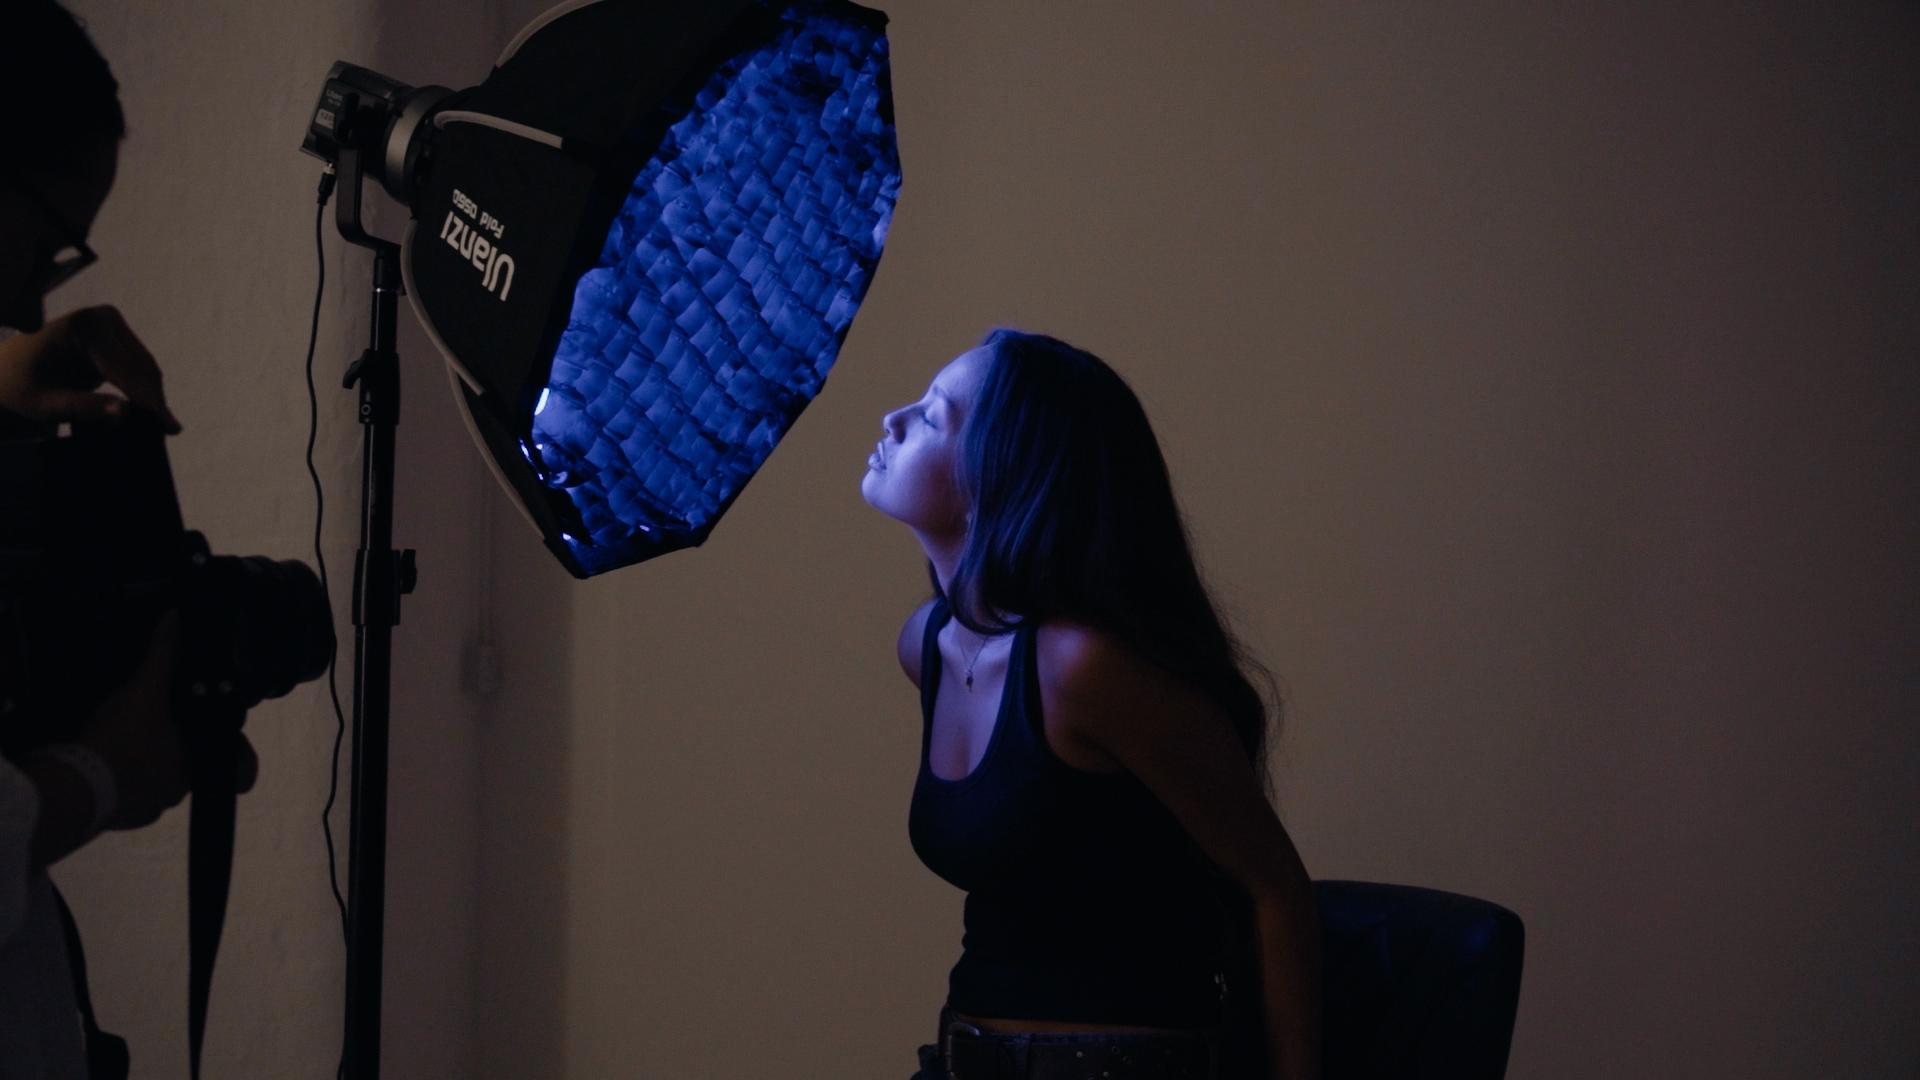
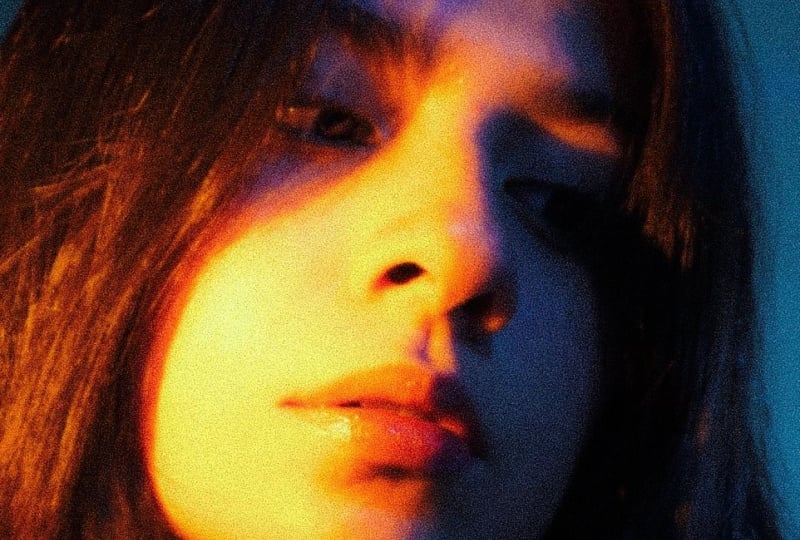
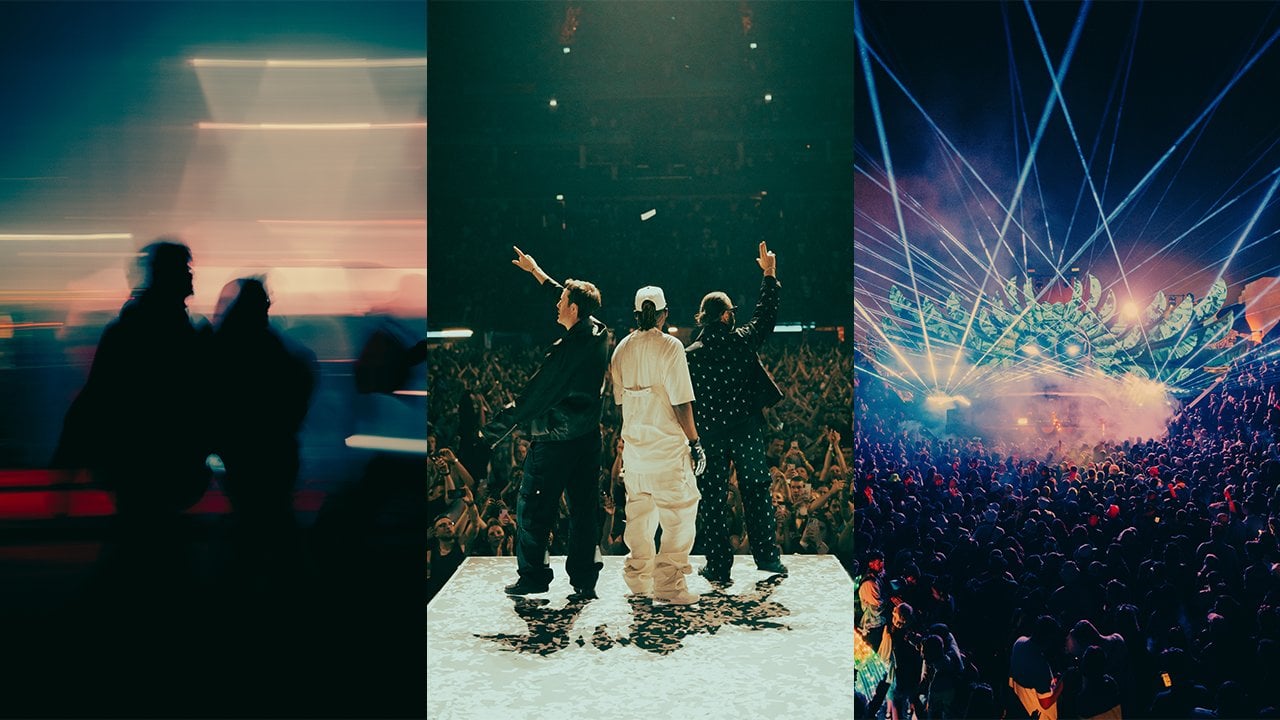
16. Lighting Breakdown: Mixing Strobes & Constant Light: So in this lesson, we're going to be
looking at mixing lighting from strobes
and constant light. We're going to be looking
at two techniques in particular, using this mixture. One will be dragging
your shutter, and the second will
be just introducing extra color from your RGB
lights into an image. So essentially, what you
need to do here is set your shutter speed on your
camera to a slow speed. And this is going to allow more ambient light into the image. Alternatively, you can
also reduce the amount of light that comes from your strobe light so you
can reduce the power. When we say it allows the ambient light to
come into the image, in this case, the ambient light is going
to be your constant light. The first technique
that you could use is dragging your shutter, which essentially
refers to taking a photo and moving your
camera as you do so. With a slow shutter speed, what this is going to do
is it's going to drag the ambient light across the image that the flash is
going to freeze your subject. So you're going to get something
a little bit like this. There are lots of different ways that
you can utilize this, and a lot of it is
just trial and error, but using this technique is a really great way to add
a little bit of interest into your images and do something a little bit
fun in the studio. Secondly, you can also use
this similar technique, but keeping the camera
still instead of moving it to just allow that ambient light
into your image whilst still making use
of strobe lighting. So for this example,
what I did was I pointed the RGB light onto the back of the cove to give that orange glow on
the back of the cove. And the strobe light is what
is lighting my subject, and the slow shutter
speed is allowing that orange warm light to come through and
light the backdrop. So you have that mixture of an RGB light and a strobe light. So, in the next lesson, we're going to be
looking at creating shapes with constant lights.
17. Lighting Breakdown: Creating Shapes: In this lesson, we're going
to be looking at how you can shape light using
various techniques, such as using a
projector attachment or using everyday objects in your house to manipulate
the light and create shapes. We're going to be
looking at projector attachments and how you can use them to create shapes
with your constant light. So we're going to be
using a nan light, which is the same
one that we set up earlier on in this class, but we're going to be
adding a projector attachment onto the light, which essentially is a way
of shaping the light using these little metal
attachments that are going to go in and out of the light source and
block the light. You can also use
something called gobos, which are little metal
cut out shapes that are going to go in front
of the light and essentially act like a
stencil for the light. One of the great things
about projector attachments is that it gives you
so many options. Not only can you use gobos, you can also diffuse the light by defocusing
the light beam. When you're looking for
projector attachments, you need to be aware
that there are different size
projector attachments, which will alter how large
you can make the light. But generally, if you move
the light source further away from whatever is
your subject is on. So if that's the
backdrop, for example, that light source is
going to be bigger. A lot of this is just
trial and error. The great thing
about constant light is it is really easy to see how what you're doing is having an
effect on your image, which should help
you when it comes to making decisions
and playing around. And also, of course,
your clients can see real time what it is that you are working on and
can kind of give any input. I really like using a
projector attachment with an RGB light again, as it gives me
even more options, and occasionally I will use
it with a second RGB light, which means that I can use
the projector attachment as a key light and use a
second light as a fill. We talk about key lights. So key lights refer to the
main light in your image. If you want to know more about terminology
and definitions, then I will put more
information on this in the project resources which you can download from
this skill share class. Saying in this realm of
creating shape with light, we're going to be using
things that you might have in your home already
to alter that light. So in this shot, what
I did was I used a big panel of tin foil. You could also use
wrapping paper that's been crumpled, anything
that's reflective, and I attached it to
a light stand like a boom so I pointed the
light at the material so that the material
would reflect the light back into my image. This is a lot of
trial and error, trying to get the
shape how you want it to and the light to
fall where you want it to. But the results can be
really interesting. So it just goes to show
that you can kind of use everyday household items
in your lighting setups. In the next lesson, we're
gonna be talking about one of my favorite lighting setups. It's my go to if I
only have one light.
18. Lighting Breakdown: One Light Set Up: In this lesson, we're
going to be talking about probably my
favorite lighting setup, and it's my favorite
lighting setup because it can be done
with just one light. So for this lighting setup, we're going to need
something called a boom arm, which is essentially a
lighting stand that can come across horizontally
so that we can attach the light
above our subject. I like to use a really
large soft box for this and place the light directly
above the model's head. You can then experiment with where your model is positioned, moving them forward or backwards to see how that
light falls best. Not only is it a soft setup, it's also quite dramatic because of where
the shadows fall. And you can also use
things like reflectors to reflect the light back into
your model from the ground obviously the light's
coming from above. So if the light's
coming from above, it can hit that
reflector on the ground, bounce it back up
into the model, and that way you can utilize
less dramatic lighting, but still only using one light. In the next lesson, we're
going to be looking at our final lighting setup, and that is a really
easy technique called bouncing light.
19. Lighting Breakdown: Bouncing Light: So in this lesson,
we're going to be talking about bouncing light, and this is one of the probably easiest
ways to use lighting. You can do it with something
like a speed light, just like on camera
flash like this, or you can do it with
your lights in a studio. And it essentially
just refers to pointing your lights at
a reflective surface. Often, you're going to bounce it from something like a ceiling. Ceilings tend to be white. They tend to be great
reflective surfaces. If you bounce the light
from the ceiling, it falls back into your image, often creating a very
diffused light source. I've got examples
on screen now of various different times in which I've used this lighting setup. So we've come to the
end of the class. So in the next lesson, we're going to be doing a
little bit of a recap and talking about things you might want to keep in mind when you're doing your class project.
20. Wrap Up: Congratulations. You have made it to the end of the class. And hopefully this
class has given you that little bit
more confidence and knowledge to head
into the studio and start shooting portraits
in a studio environment. I know that studio photography
can be really daunting, but hopefully this gives
you an array of resources that you can come
back and reflect on if you do get stuck. You're in the studio.
Remember just to have fun. So much of studio photography
is about experimenting, enjoying yourself, and seeing what new creative things
you can come up with. In this class, we've
explored constant light, we've explored flashes,
we've explored various modifiers and
how to attach them. We've looked at specific
lighting setups that you can now take with you into
the studio and try out. For your class projects, don't
forget that you need to be doing three different
lighting setups. So you're going to
take a portrait with three different setups. So that could be one
with a hard light setup. You could do a mixture of strobe and constant light, which we explored in
an earlier lesson, or you could simply use a diffused overhead
light like we did in another lesson with
the overhead softbox. But I'm really
interested in just getting you guys to head into the studio and start thinking
about setting up light thinking about what
it is you want to be shooting and getting to grips with all of the tools that you can have access to in
a studio environment. Understanding and using
studio lighting has the ability to take your
photography from level to level, really understanding
how to adept into your images and knowing that when you have
this creative idea, you have the tools and the techniques to be able
to put that into practice. I'm really looking forward to be able to have a look
through your class projects. So please submit them
and we can all kind of share feedback and look at
what we've all been up to. The great thing about
studio photography is that there are
endless possibilities. And hopefully, now you've
completed this class, you have that bit of
confidence to get out there and start exploring those
endless possibilities. So thank you guys so much for
joining me in this class. You've enjoyed it, I have
plenty of other courses here on Skillshare from
mastering natural life, if that is something you
are also interested in to understanding color
theory and photography. But in the meantime,
get into the studio, enjoy what you're creating, and I can't wait to
see what you make.