Transcripts
1. Trailer: Hi, welcome to my Adobe
After Effects course. This is the course
that is going to introduce you to
After Effects and everything that you
need to know in order to get started in the program. My name is Chris and I'm
a full-time filmmaker and photographer from England. Adobe After Effects is a really important part
of my editing workflow. If I need to do visual
effects, motion graphics, or any other complex animation which is
outside the realm of Premiere then I always jump straight into Adobe
After Effects. With this course, I
am going to start off by creating a
brand new composition. Then we're going to explore the user interface and show
you different windows, different workspaces, and
the different buttons and tools available to you. How to input video footage and organize that footage
in the project bin. How to create solid and shapes, how to animate single layers, and then we're going to
talk about keyframing and easy ease keyframes, null objects and parenting,
motion blur activation, masking, and how
to combine masking and keyframes to create
masking animation. Then we're going to move on
to creating text and then combining shape and text to create a lower third animation. Then we'll create 3D
texts from our 2D texts. We'll do 2D motion tracking, 3D motion tracking, and add a text layer into our footage by using
this tracking data. Then we'll move on to effects, green screen
footage, rotoscoping the puppet pin tool and
character animation. Then we're going to go into color correction and
color grading of footage inside of After Effects or just color matching of footage. Then we'll talk
about expressions, exporting, and then lastly, we've just got a nice ultra and summary video to summarize
this whole course. This one one going
to be a long one. This is going to
be very in-depth. I'm going to show you
everything that you need to know about all of these
different topics. Let's begin. Let's
start learning how to use Adobe After Effects.
2. Create a New Composition: We've just opened up
Adobe After Effects, and this is the menu that you're going to be greater with. This is the New Project tab. If we go up into the top left, we can either go New
project or Open project. Then we also have a New Team
Project and Open projects. This is just a shared project. You can share a project file with a few different
people over the Internet, over your Creative
Cloud service, and that's what this is. But chances are
you're going to want to select New Project. You can also see down here, you've got your old projects. Unfortunately, I've
had to blur a few of these because they
are client edits. Just ignore the blurring, and let's move on to
create a New Project. We'll select New
Project, and that opens up Adobe After Effects. Straight away, we've
got these two boxes. We've got New Composition or New Composition from footage. We don't want to start
with this, we want to import our footage later on. Let's start with
New Composition, and that will load up this
composition settings Window. You can see we've got
a composition name, and we can rename this, After Effects Intro, for
example but of course, feel free to put your
project name there. Then we've got the basic
settings, our preset, is HDTV 1080 25. Then feel free to
select any one of these different presets, but I do like the look
of the HDTV 1080 25. If you want to, you can
change the width and the height of your composition. If you wanted to help
with your aspect ratio, then you can lock it to
a specific aspect ratio. Let's say we wanted 16:9, but we wanted to downscale that. Let's go, 1080, and as you can see, that's
going to downscale to this. But I do want 1920 by 1080, and then I'll pixel aspect ratio should be set to square pixels. Frame rate can be the
framer of your projects, but I'm going to use
25 in this example. Resolution, full, and this is just our playback resolution. Start time code, keep that at 0, and then the duration is how long the composition
is going to last for. Then you've got the
background color, and you can change
this if you like, but generally, I advise
to keep this as black. Then we'll press
'OK', and we have a brand new composition
now created.
3. Exploring the User Interface: Now that you've created
a brand new composition, we can now start with
creating some assets or walking into different
parts of After Effects. But before we do that, I'm just going to
give you a quick tour of the user interface and the different
options and buttons available to you in the program. Let's start in the top left. Up here, you can see we've got our selection tool and the
keyboard shortcut for that is V. Then you've got
your hand tool and the hand tool is just going to move the composition around. If you've got the
hand tool selected, you don't have to worry
about affecting anything. If you're trying to move that
with the selection tool, you can hold down space
and move it like this. But there's always the
risk of forgetting to hold space and then you end up moving something on the composition, so I wouldn't advise that. Just go straight to
the hand tool and the keyboard shortcut is
H. Then move it across, you can see we have got the zoom tool and this is
just going to zoom in. As you can see down here, you've got 1,600 percent, so that's just going to
zoom in or alternatively, you can just go
down to this box. It should say fit or 133 by default but you can
always just zoom that in to however far
you want it to go. Then moving across,
you can see we've got these three buttons. They are greater and
that's because these are all to do with 3D workspaces, which we'll get onto
in a future episode. Then we've got the
rotation tool, which is going to rotate
a specific object. Then we've got the
rectangle tool and if you hold on to that, we long press that
and drag down, you can see we've
got a rectangle, a rounded rectangle, ellipse, polygon, star tool. Selecting one of these and then just drawing on our
composition is going to allow us to create
a specific shape on our project but we'll get into shapes and solids
in the next lesson. Moving on, we've got the
pencil and this is just going to allow us to draw
our custom shapes, it's going to allow
us to do our masking. But again, we'll get onto
that in a future episode. Then we've got the
horizontal type tool and if we drag down, you can see we've got the
vertical type tool as well, so that's going to allow
us to add some text. Then down here you
can see we've got the brush tool and this is just a paintbrush and if you've got a
object on this layer, you can double-click that, go into the paint settings, and then you can
just paint and add specific paint onto
specific layers. You can see if you go into
the paint tab on the right, you can see you've got constant, write on, single
frame or custom. There's different
ways of animating your paint on in After Effects. But moving on, then we have
the clone stamp tool and this works very similar to
how it works in Photoshop. You can basically just take
one part of your video, move across, and then just
paste that in somewhere else. It's quite a handy feature. Then you can see we've
got the eraser tool and that's just going to undo anything that we have done with the clone stamp tool
or the paintbrush tool. Then we've got the roto brush
tool and if we drag down, we can see refine edge tool. This is all to do with
rotoscoping and if you don't know what
rotoscoping is, don't worry. As you guessed,
there's going to be a future episode on it. Then lastly, up here we've
got the puppet pin tool, which is going to allow us
to do character animation. If we drag this down,
you can see we've got puppet position, puppet starch, puppet bend, puppets advance, puppet overlap pin tool. These are all to do with
character animation. Again, we'll cover that
in a future episode. Then we're just
going to go up onto the top bar and as you can see, you've got all of these
different windows here. Let's go up onto the
After Effects tab. We'll go down to preferences
and as you can see, you've got all of these
different settings down here and an important one to have
is media and disk cache. Because essentially,
when you drop video footage into
After Effects, it's going to create
a cached file so that it loads up
quicker next time. But as you can see
in this example, I've enabled the disk cache
and the maximum disk cache in my example is 93 and if
I empty the disk cache, it's actually going to delete quite a heavy amount of
data from After Effects. It only deletes the
unused cache files, so it deletes the cached
files from old projects. But there you go, you
can see in my example, are you sure you
want to delete all 185 gigabytes of disk cache? If I press "Okay", my computer is
going to get rid of 185 gigabytes of unused data. This is really going to help
to speed up your computer later on when it starts to
glitch out a little bit. Of course, if you
want, you can also change the folder
of this disk cache. If you wanted it to go on to a specific folder or
a specific drive, then just go ahead
and select that. You've got all of these
other complex settings which you can get into in
a later time but for now, we're just going
to ignore those. Then we're just going
to move on into window. As you can see, if we're
go into workspace, at the moment we're
set to all panels. If we go down to animation, After Effects is going
to completely change. As you can see, we've
got different settings over here and these different workspaces
are going to allow us to focus on different parts
of the editing process. You can see you've got
color, you've got a default, you've got effects, and that's going to add the effects
window over there. Then you've got
essential graphics, learn, libraries, minimal, motion tracking,
paint, small screen, standard, text, undocked panels. Then you can just reset
if you wanted to. These are basically just
different workspaces to allow you to focus
on different parts. If you're adding effects, you can go into
the effects space. If you're coloring, you can
go into the color space. If you're doing some
motion tracking, you can flick over
to motion tracking. You get the point here. But generally, I
like to keep this as all panels or default
and then I'll go into window and I'll add in the specific tabs that I
actually want. Let's see. At the moment,
effects and presets is not there but we need that, so we're just going to tick that and then
effects and presets will populate over here and this is where all of
our effects live. Let's move on to this
tab on the right. You can see we've got all of
these different other tabs. You've got content aware fill, you've got your motion tracking, paragraph alignment, character, libraries, align,
effects and presets. This is where all
of your effects and your presets and your
transitions, they all live. Let's go into keying, you can see the
keylight plug in there. That is something that we
need to do green screening. If we go into animation presets, you can see we can create an animation
background like this. But we'll get more into the
Effects and Presets window, again, in a future episode, so we'll just move on. Again, if you wanted to search
for something specific, so maybe you're doing
some color grading. You can search for
levels and you can drop a levels plug-in onto
your footage like that. Again, if you wanted
to add something specific onto this section, then you just go to window and then you just
add it in over here. Maybe you want your
Lumetri Scopes for some color grading, you can just add
this in over here. But we'll turn that off
for now and we'll move on. Down here, just underneath
the composition, you can see we've got
all of these buttons. This is your zoom, as we've already mentioned. This, down here, is your playback and
paused resolution. If you're struggling
a little bit, if After Effects keeps
crashing and lagging, then you can pull this down
to quarter resolution and it will play back in the
quarter of the resolution. But when you render it will
still be full quality, so don't worry about playing
this back in quarter. Then you can see
you've got all of these other settings down here. You've got fast previews, you've got your
transparency grid, then you've got toggle mask
and shape path visibility. You want to keep this on. If you have this
off, you'll have a difficult time when
it comes to masking. Then you've got a
region of interest, so you can focus on
maybe just this area if you wanted to but I'm
going to turn that off. Then you've got your framing and this is really helpful
when you're adding in specific items or you're
adding in some animation. If you turn on the
proportional grid or the title safe grid, you can use this as
reference to make sure you get the perfect shape and
the perfect positioning. You can see you've
also got grid, guides, and rulers
but generally, I'll just keep these
off by default unless I really
need them later on. Then you can see
down here you've got show channels and colors, so if you wanted to isolate
a specific channel, the red channel, the green, the blue, the Alpha or the RGB, you can select one of these. Then this button down
here is going to reset your exposure then you can adjust the exposure
there as well. Then this button here is just
going to take a screenshot. If I press that, that is just
going to take a snapshot, which I can then save to my
camera roll or my Finder. Then down here you can see
we've got the timeline. This is where all of
the footage is going to live and then I can
basically add in everything down here when it
comes to motion blur and 3D and keyframe animation and everything is going to
populate down here. Now, I can't show you how
this works, unfortunately, without adding in any footage, so let's go ahead
and do just that. Let add some footage
into our composition.
4. How to Import Footage: When it comes to importing footage into Adobe
After Effects, you want to make sure that
you are in the projects tab. Now, if you just right-click, you can go down to
Import and select File, Multiple Files, From Libraries, Import Adobe Premiere
Pro Project, Vanishing Point,
Placeholder or Solid. We're just going to
begin by selecting File. Then from here that will load
up the Finder and you just want to navigate through
to all of your footage, highlight everything
that you want to import and just press Open. That will take a
second and then all of your footage will
populate over here. If we double-click the footage, it will load up in this
composition window over here, but you can see if we go back to Composition Aftereffects Intro, the footage isn't there, we're just previewing it in this different window over here, so this is our footage. If you want to organize
this footage by the way, which I definitely
recommend doing, because if you get loads of footage and solids
and shape layers, this could all get very
confusing very quickly. If you just go down
to this button here, the Create New Folder button, you can go ahead
and rename this to footage and then you can just
select all your footage. I'm holding down Command on
my keyboard, by the way. I'm on Mac, I believe it's Shift on Windows, but
I could be wrong. But Command is the button you want to hold down and
then select all of your footage and drag that in to the footage bin, like this. Alternatively, rather than pressing new folder down here, you can just right-click and
select new folder like this. Then of course, if
you wanted to add some more organization, you can just scroll
across like this, so we're just going to
pull this across so we can see everything over
here and then we can just right-click on each individual footage and
rename it if we wanted to, or we can select this
color box here and we can specifically add colors
to each individual clips. Let's say the city
traffic B-roll can be a dark green and that will change the color of
that to dark green. Maybe all of our JV footage we can add to dark
green and therefore, when we need that footage, all we have to do
is find everything with a dark green
color and you know, you're going to be
able to use one of those specific bits of footage. But let's say you're ready
to add some footage, so let's say we'll add
the city traffic shot in, I'm going to scroll across on this bar here,
as you can see, this blue icon is what I'm going to use to scrub
through the footage. You can import the
footage by just dragging it all in like this. As you can see, this
footage is much larger than our
10-second composition, so if we only wanted a
few seconds of this, then we could just double-click the City
Traffic footage up there. We'll scroll through to
the point that we want, so let's go for
this car coming in. We'll just press
this button here, this is going to
create an endpoint, and then we'll scroll
through to the end of that. We'll select this button here
and this is the out point. Then we can drag that
footage back in and we're only importing
that selection. If you only wanted a specific
amount of footage and then just adding an in
and an out point is a quick and easy
way of doing that. The problem is, if you don't do that and you just drag all of your footage in it
means you're just going to have to slide through, find the bit that you want. Then we'll have to hold Command Shift and
D to make a cut, scroll across and go
Command Shift and D again. But as you can see,
that's a faff, and then once you've done that, you have to delete the start, the end, drag that
middle back to the beginning and that's
just a nightmare. But that is how you import
your footage into After Effects and then get that
into your Compositions. Now as you can see down here, you can see we can
actually access all of these different options. Let's explore some of
those now that we've got some footage in place. Instantly you can see we've got toggle switches slash modes. I'm just going to select that
so that we get this view. Now, this mode here, if we select Normal, you can see this is going to
load at this option here, so we've got Dissolve,
Dancing Dissolve, Darken, Multiply, Color burn. These right here are
your blending modes. This is basically
a way of adjusting the opacity and the color of the shot so that different shots can come through and you
can create overlay effects. This is really useful. But again, I'll get more into this in a future
episode when we do come across something
that needs to be screened or multiplied. Then moving on,
we've got a TrkMat and I'll get onto this
in a future episode, parents and link we'll
also get into in a future episode and then let's go to toggle
switches and modes. As you can see, you've got all of
these other options. The two that you're
probably going to need the most are motion blur, and then we've also got
the 3D conversion box. So if you select that,
it's going to convert this 2D layer into a 3D layer. But then you also
have just here, you've got your
adjustment layer. You've got frame
blending, effect, quality and sampling, for comp layer, and shy. This is going to hide the
layer in the timeline if you shy it like this. Then of course, up
here you can see we've got these
other settings here, so this is going to
activate your motion blur. This is a graph editor which makes things look very
complicated for now, then you've got
your enabled frame blending hides all the layers, so if I hide this layer, you can see it's
suddenly disappeared and then you've got
this option here, which is your mini flowcharts, which again is starting to get a little bit complex for
this introduction. Let's ignore that for now, and let's move on
to the next episode of this After Effects course.
5. Creating Shapes and Solids: Moving on, we're going to
talk about shapes and solids. Now, shapes and solids are really important
inside of Adobe After Effects because you're
going to need these to create many different
types of animation. Let's begin with solids. In order to create a new solid, you first want to
select the composition, then we'll go up into Layer, go New and Solid. That should load up this
solid settings window. We can call this Solid 1
or Solid 2 or Red solid, whatever you want to call this. Then we're going to make
the size 1920 by 1080. You can lock the aspect
ratio if you like. Then you can select units. You can go for pixels, inches, millimeters, percentage
of composition. It's completely up to you, but I'm just going to leave
this at 1920 by 1080 pixels. With a pixel aspect
ratio of square pixels and then down here you can see we've got the
color and the color box. You can either use
the eyedropper tool to select a specific
color of your choice, or you can select the
color box and you can go ahead and find a color
that works for you. You can just pull this down to get to the different colors, and then once you find a color
that you like the look of, so let's go for maybe
this purply blue color. You can then just move the cursor around until you
get the color that you want. This here is the color that you want to pay your attention to. As you can see at
the moment, I'm in the top left corner,
so this is white. I'm going to pull
that down to the bottom-right and with black. Then somewhere in
the middle gives us a nice purple. We'll
press "Okay" on that. Once you're happy and
then press "Okay" and this is our new solid. There's many different things
you can do with solids. You can create a Solid 2, go ahead and then create another effect on
top of the solid, or you can go ahead
and mask on the solid. If we go up to the pen tool, you can actually just draw
a mask on the Solid 2, get a custom shape. But again, we'll get more into masking in a future episode. Or rather than masking that, you can actually just go into the transform properties of the solid and we could just
decrease the scale of this. We can move the position, we can rotate this and put this wherever we need this to go. But moving on, we've got solids and then next
up, we've got shapes. In order to create a shape, you can either first just go
up into this option here. It should be
rectangle by default, but if you drag that down, it will reveal rectangle, rounded rectangle,
ellipse, polygon and star. I'm going to select the
rounded rectangle tool and then I just
want to move over to these two options up here. You got fill and stroke. If you select the word "Fill," you can see it's going to
load up this menu here. This option here is none. This is solid color,
this is linear gradient, and this is radial gradients. A gradient is just two
colors blended in together. I'm going to select "Solid
Color" in this example, but feel free to select
"Linear" or "Radial" gradients. Just going to press
"Okay" on that and then if I go
across to the box, you can see I can change
the color of this. Going on, you've got strokes. I'm going to select
the word "Stroke," and that is going to bring
up this option again. Solid color, linear
or radial gradients. I'll select "Solid color." Press "Okay", then
I'll select the box. I'll select white
in this example. Press "Okay" and then I can
increase or decrease this to increase or decrease the size of the stroke and for reference, a stroke is the outline
around the shape. Let's go for a really large one, so around 50, if I draw my rounded
rectangle in here, you can see it's got
this large stroke or this larger border. Now at the moment, you can see, it's actually really bad
quality and the reason why it looks like this is because our playback resolution
is set to a quarter. If we change this to full, you can see that now
it looks really sharp. Now once you've
created that shape, you can go ahead and
change the look of this by dragging these blue
squares around. You can "Drag" these around
as much as you like. But because essentially we're just animating the scale here, because we're
affecting that scale, you can see unfortunately, there's going to be
inconsistencies with the stroke on the top and the bottom
and the left and the right depending on
what you do with this. Rather than doing that,
I would just recommend getting the shape that
you want straight away. You can select rounded
rectangle tool and find the shape that works
for you and get that perfect straight
away rather than adjusting it later on and ending up with
something like this. But let's say you didn't
want a rounded rectangle, an ellipse or
polygon, or a star. If you go over to the pencil, you can actually just draw
your own custom shapes. As you can see, I've just
got this really random shape and if I wanted to change
the size of the stroke, I can just pull this
down with that selected. I can change the fill color if I wanted and then I can also get rid of the
stroke if I wanted. Alternatively, I can
get rid of the fill. It's completely up to
you. But the great thing with the pen tool is once
you've created that shape, you can actually hover over the line and you can see
that icon changes from the star to the plus and this means you can actually
add a point on, and then change
the shape of this. You can add another
point, change the shape, add another point, change
the shape. That looks great. Of course, it's not just
these solid points, so these solid harsh
corners that you can add on to this shape. If we delete this
and start again, I'm going to create
the first points. Then I'll move over here, and I'm going to hold
onto the cursor. I'm going to hold on, "Drag"
down and as you can see, that's creating this curve. Rather than just a solid line, I can actually
create this curve. If I release to
create that point, you can see I can actually
move these two points to change the look of this line. I can affect it on this
side and then I can also affect it on
this side as well. This means you can create some really interesting
and really unique shapes using this and then if you
wanted to add onto this, so let's say you've
done this and then you went back to
your selection tool. If you wanted to carry on, just go back to your pencil, select that point
and then you can just carry on the
action like this. There you go, and that
completes that movement. Again, if you wanted to add
one of those curved corners, you just hold down. There you go. You get this really interesting and awesome looking drawing using the masking
in After Effects. Of course, if you want it to
move the position of this, then you just select all of
that and then just move this across like that.
But there you go. You can see with
these three options, you can create a layer, new solid to create
just a large rectangle, you can go into
this option here to create a shape,
or alternatively, you can go to the
standard pencil, and then just draw out a shape.
6. Getting Started with Animation & Keyframes: Now that you've created
new solid and new shapes, how on Earth do
you animate these? Well, inside of Adobe After Effects with
that layer selected, you want to go in to transform. Then as you can see, you've
got anchor point, position, scale, rotation, and opacity. The anchor point is
at the very top. Let's start with
the anchor points. The anchor point you can see
is this icon in the middle. Essentially this is
where this layer is going to animate from, the moment the anchor
point is in the middle and that means if I
move the rotation, it rotates around the middle, but if I was to move the anchor
point to the bottom left, like this, as you can see, this is the anchor point and
it's now in the bottom left. If I was to adjust
the rotation there, you can see that changes
the look of the rotation. Generally, I like to keep the
anchor point generally in the middle unless I want
something very particular. Keep your anchor point
in the middle roughly. Then from here, you've
got position and this is just the position on
the horizontal axis and the vertical axis, so left and right, up and down. You've got scale, so
that's just going to decrease the size and
increase the size. If I unlink this, you can see I can actually
control the scale of the horizontal and the
vertical scale independently from one another. I'm just going to keep
that locked for another. Then we've just demoed it,
but you've got rotations, so this is just going
to spin around. Then you've got the opacity, which is just how intense
can you see that. Zero is going to disappear, 100 you'll see is completely solid and then 50 is going to be somewhere in the middle
and be fairly transparent. You can see if I turn on
the transparency grid, you can see that
transparency grid starting to come
through our 50 percent, but if I pull up
to 100, you can't. That brings us on to the
question of how do I animate? Essentially we animate using
keyframes and keyframes in After Effects are basically specific points that
represent specific values. You'd created new points at the beginning saying
that the position is 960 and 540 and then
two seconds later, it can be 1,300. Then it will move from the first point to
the second point and it will move from
that first set of values to the second
set of values. It sounds complicated, but let me show you
how you do that. Let's go roughly one second
in and we're just going to select this new stopwatch
icon on the position. Then we'll move over to the
two mark and you can see at the moment the values
are still 960 by 540, but if we move this
over to the left, you can see the
value is now 600. It's changed from 960 to 600. As you can see between
these two points, that is now going to move. The moment that movement
was fairly comfortable, it was a comfortable pace, but if you wanted
to speed that up, you can just decrease
the gap between those keyframes and
that'll be really fast. If you wanted to slow that down, just increase the gap
and that's going to take much longer to get
to that same position. That's the basics of
animation in After Effects. All you need to do is
just create keyframes, move something or do something, and then creates a new key-frame and the change in
value means that after Effects is going to
animate from the first set of values to the second
set of values. With that in mind, we can
do the same on scale. Craig Bryan and
keyframe on scale, we'll move to that
second position keyframe and move the scale down. Now positioned as gala going
to animate at the same time. We'll do the same
for rotation as well so new keyframe on rotation, move across and we'll
just rotate this around 90 degrees and
when we play this back, you can say it's
going to scale down, rotate and the
position is going to go over to the left, like this. As you can see, that was a really simple
and really basic animation using the transform tab, but at the moment the animation looks a little bit robotic. That's because these keyframes here are linear keyframes, but we want to
convert these into bezier keyframes or
easy ease keyframes. In order to do that,
all we have to do is just highlight all
of those keyframes. We'll right-click one of those. We'll go down to
keyframe assistant, and we'll select Easy Ease. Essentially what this
Easy Ease conversion is doing is rather than suddenly starting
the movement at the keyframe and stopping
at the other keyframe, it's going to slowly ease into it and then ease out of that. Let's play that
back. There you go. Now, you can really see it as it comes
into its position. You can see that
slowly goes into that position rather than just stopping like it did
before like this. If we now redo that so highlights right-click keyframe
assistant and easy ease. Now you can see that
looks a lot softer. I generally prefer
using Easy Ease keyframes over the normal
keyframes because as I say, this looks a lot
nicer and will make your animation look
more professional, but what if you wanted
to animate beyond just the position
scale and rotation. Well, if you go into the
"Add" button up here, you can see we can
add a whole bunch of different settings. We've got rectangle, ellipse, poly star, path, fill, stroke, gradient fill, gradient stroke, merge paths, offset, pucker and bloat,
repeater, round corners, trim paths, twist, wiggle paths, wiggle
transform, and zigzag. Now I'm not going to go through
every single one of these because they're all going to do something slightly different, but essentially
they're just adding another variation on
top of this animation. Let's go for trim paths. Now, trim paths is really good because it's going
to basically animate around to wipe off or wipe off. If I go into trim paths
and go end to zero, you can see that's
going to animate off. If I start with an end of zero percent and then go across and pull that
up to 100 percent, making sure that I
create that keyframe, you can see this is how
that's going to look. Again, if I increase the gap
between those keyframes, that's going to
slow that movement down and that has
now animated on. Let's create a little sequence. Let's pull these trim path
keyframes to the beginning. That's going to animate on. Then it's going to move across. Again we want to
convert these keyframes into the easy ease keyframes. Let's play that back
and see how that looks. We animate on and then
we rotate around. In a matter of minutes, we
can see we've created all of these keyframes and we've got this really nice animation
now taking place. Of course, like I said,
if you go into add, you can add all of these
other options and experiment throughout this,
so round corners. As you can probably imagine
if we go into that, it's just going to round
off those corners. You can see zigzag. If we go into zigzag, it's just going to add a
zigzag to the edge of this. Again, you can animate this over time as well if you wanted. Maybe you could animate
this up and down over time. Maybe we start at six
or any keyframe on size at six will move
across, pull that up. Then we'll move across,
pull that down, move across, pull that up, and move across, pull that down. Then between all of
these keyframes, we're going to see this
action on the zigzag. If you wanted to
keep repeating that, you can highlight all
of those keyframes. We'll go Command and C to copy or Control and C,
if you're on Windows, move across Command and
V or Control and V, and then just keep copying
and pasting these on. You can see we've got
this zigzag animation now taking place, but I think that looks awful. Let's get rid of the zigzag plug-in and we'll just focus
on what we've got so far. You can also see if we go into rectangle one, this
is our shape layer. You can see we've
got our stroke, our fill, our transform, so we can actually affect the
stroke on its own as well. We can change the color of the stroke down
here if we wanted. We can change the
opacity of the stroke. We can add a stroke width, so we can take that
away, add some more. Again, this has got that
stopwatch icon next to it so we can keyframe
that over time. It starts off with
a large stroke and then over time
that reduces as well. Then we've got line
cap and this is just going to change the
look of this line. You got a butt cap
at the moment. You can change that to a round cap and it will look like this. We can go into a projecting cap and it will look like this. Then you've got miter joint, round joint, or a bevel joint. Again, that's just
going to change the look of that stroke there. There's a nice round joint them. Then you can add or take
away dashes if you wanted, so there's dashes at the moment, but as you can see, if I increase the dash, that is how this
is going to look. There you go. You can
offset that as well. If you wanted as well, you can actually animate
that to rotate around. We'll start at the beginning, create brand new keyframe on offset using that
stopwatch icon, move across, pull the offset up, and then it's going to
animate from that first value to that second value. That's how that looks. Then
you've got taper and wave. Again, feel free to just go into all of these
different settings, play with everything here, and get really familiar
and comfortable with what each and every single one
of this is going to do. Like I said, I am not
going to go through every single one
because this course is going to take forever if I do
that for every single one. Just go through, have a
look, and have a play, but that is how
you would animate single layers inside of
Adobe After Effects.
7. Null Objects & Parenting: Now let's say you've
got multiple layers in Adobe After Effects
and you want to animate them all
at the same time. Now you could go into every single layer and
animate them individually. But the problem is
if you've got 5, 6, 7, 8, maybe 20 layers
in After Effects, trying to go through
all of these, do all the animation, it's just going to take forever. So there's a quick
and easy way of doing all of that
at the same time. That is to use a null object. Now a null object is essentially just an object which
isn't visible, but you link everything
to the null object. When you animate
that null object, everything linked to it will
animate at the same time. Let me show you what I mean. Let's just begin by
creating a few new shapes, so we'll go up here. We'll create a rectangle, then we'll create a circle, then we'll create a
star. There we go. Now let's say I
wanted to make all of these bounce in, for example. I could go into
every single layer, so I'll go into transform, and then we'll pull the
scale down to zero percent. Credit brown and keyframe
on scale at zero. We'll move across,
increase that up to 120, move across again, and then
pull that down to 100. Then when we play
that back, you can see we've got this
nice bouncing. But the problem is
we can either copy the scale or we could
just go into every layer. We can add the scale animation. But the thing is, again, if we've got all of
these different layers, it might take a while to
get all of this done. Rather than doing that
for every layer, instead, let's go into layer
new null object. As you can see, this is
the new object here, this red square here. Now from here we want to link shape layer 3, shape layer 2, and shape layer 1 to this null object because at the moment they're not linked. So you want to
highlight all of those, and then you can see here
we've got parents and link. Now, if you're not seeing parents and link here
for some reason, then it's because
it might be hidden. So you just want
to right-click in this area up here somewhere, columns and make sure parents
and link is selected. If this is what you're seeing, just right-click columns and
select parents and link. Then with that selected now
you want to select all of those shape layers and then
grab this wiggly icon. This is a parent pick whip. Select that, hold that down and drag that over to the null 1. Essentially the
parent pick whip or that wiggly icon is
essentially just saying that these
layers should now be connected to the null object. Which means when we
animate the null objects, all of these should
be connected. You'll get confirmation
of it being connected in this box here. As you can see it, it
should say null 1. If they all say non, it means I haven't been linked. You can either drag
that like this, or alternatively
you can just select the box and select the
null 1 of your choice. If you've got multiple
different null objects throughout your composition to control different layers in different areas of
your composition, then you will see null 1
and null 2 and null 3. Make sure you're selecting
the correct null object. But now that they're linked
to that null object, we can go into the
transform settings of this null object. We can create brand
new keyframe, position, scale, and rotation. We'll go back in
time a little bit. We'll increase the scale, and then we'll go
back a bit again. We'll pull that down to zero. As you can see,
they're all now going to animate on at the same time. Just because they're
all down link to that null object doesn't mean you can't animate all of
these individually as well. Let's say you want
to add rotation on the star layer for example, you can just go into there. You got transform, create a
keyframe on the rotation, move across and
rotate this around. As you can see, it's
going to rotate the rotation on its own, but it's also going
to follow the action and the animation from
that null object. As well as the
individual animation, you can also link this
to a null object, to control a group
or a selection of different layers inside
of Adobe After Effects. Null objects are
extremely useful and learning the power of null
objects at this stage is really beneficial because it's going to help to carry you a long way in your career
inside of Adobe After Effects. Every time I have to animate something in
Adobe After Effects, I always use a null object. If I'm creating a lower
third and lyric video, a visual effect, it
doesn't matter what it is. If I'm inside of
Adobe After Effects, chances are I've probably got at least one or null
objects on my timeline. I'll put a little bit of
time into playing around with creating null objects
inside of After Effects, linking all your shapes and your footage to
that null object, and then see how that's
going to respond with the different types
of animation that you put into that null object.
8. How to Activate Motion Blur: Before we carry on, let's take a second to talk
about motion blur. What is motion blur? Motion blur is that blurring
that you get in a shot. So let's ignore
Adobe After Effects and motion graphics
and everything inside this program for now and let's just take this
back to cameras. The general rule of thumb when you're filming a
video is you want your shutter speed to be
double your frame rate. So if you're filming at
25 frames per second, you want your shutter
speed to be one over 50. When you do this, when you set your shutter speed
to one over 50, you're going to let
a natural amount of motion blur into your shots. So this means that when you move the camera or somebody
moves in the frame, if you screenshotted
that specific moment, zoomed into the action, you would see a blurring. The reason why we want
that blurring over no blurring is because it
looks a bit more natural. If you pull your shutter
speed on your cameras all the way up to around one over 1,000, it doesn't look natural. It just looks a bit too crispy. There's not enough blur. It just doesn't look right. Generally, when you're filming, the golden rule is to keep
your shutter speed down to around one over 50 or if
you're shooting slow-mo, you want to pull it
up a little higher. The same thing can be applied to After Effects and
motion graphics. If we jump into
this project here. Carrying on from the previous
null objects episode, you can see at the moment
there is no motion blur. If I zoom in at this action, these are popping
in really fast, but at the moment, there's
just no motion blur. It looks too crisp and it
just doesn't look quite right and some would say
this looks almost amateur. This is why we need to
activate the motion blur. Let's close down
all of these layers and then you want to
make sure that you can see this icon here. So you've got these
three circles. If you can't, then you're
in the wrong mode. So make sure you select
the Toggle Switches/modes. Then you want to highlight
all of those shape layers. Don't select the null objects. There's no point because we
can't see the null objects. Then you just want
to select the box underneath motion blur. Then make sure this
motion blur icon is blue. If it's gray, there won't be any motion blur even
those are selected. So make sure this is blue. Then when we play this
back to the beginning, you can see that it looks
a lot better already. You can actually
see if we've got halfway through the movement, there is a lot more blur there. So this is without
and this is with. Adding motion blur onto
your composition is a really quick thing to do
and it does help to make the difference especially
when you combine that with some Easy Ease keyframes with
your keyframe animation, having that smooth
keyframe animation and then adding some
motion blur onto that movement is
going to help to make your work look more professional
and have more character. Now, motion blur can be quite strenuous
on your computer, I am completely aware. So when you're working, just turn off motion blur, and then when you go
to render this out or you put this
back into Premiere, or whatever you're
doing with this, turn the motion blur back on, and that will enable
that motion blur again, so work with it off and then
turn this back on when you need to export this or
send this to a client.
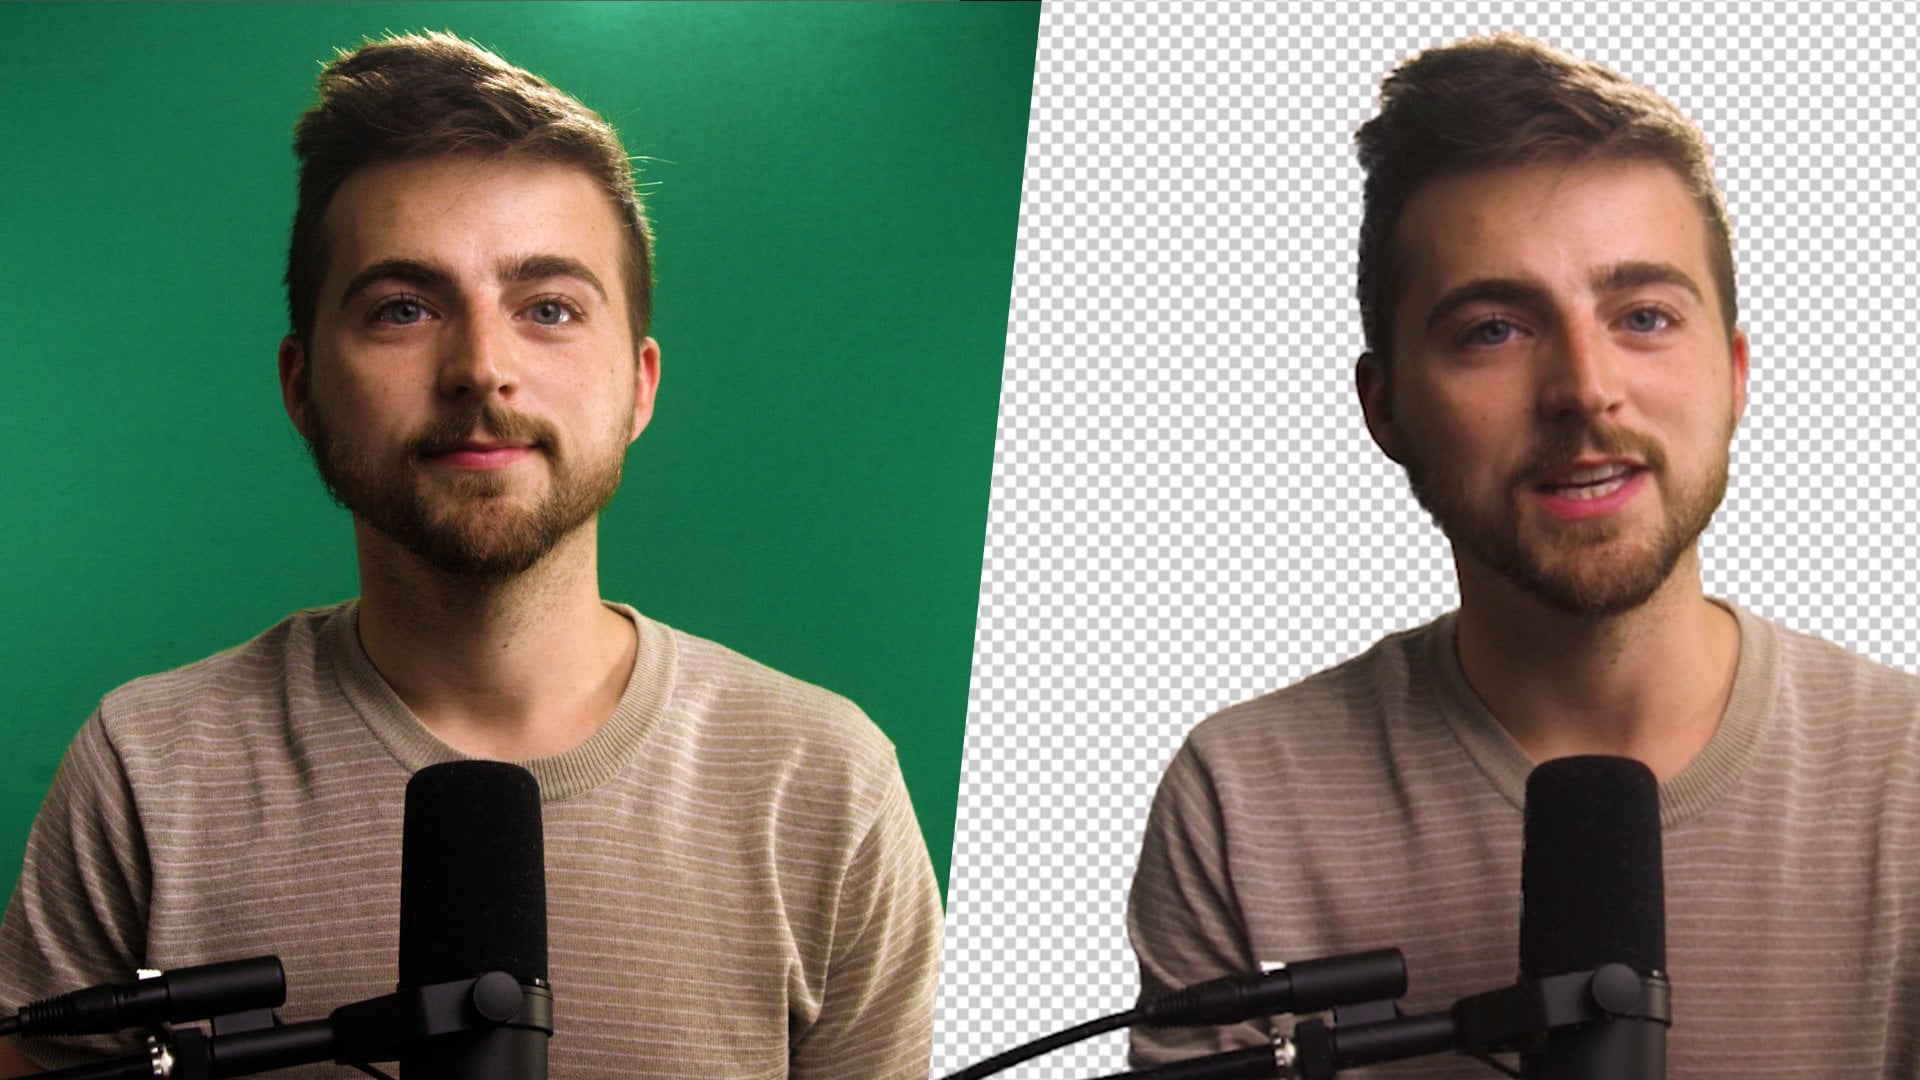
9. Masking: Next up we're going
to talk about masking because
masking is one of the most important features inside of Adobe After Effects. There are so many
different video effects and things that you can do with masking so it's
really important that we take the time
to jump into this. Let's jump into After
Effects and let's drag some random footage
into our composition. Let's start with the city
traffic footage, for example. As you can see at the
moment, we've just got this 3 and 1/2 second clip of our city traffic and at the moment we've
just got the full video. But if we select that footage and we go
up to the pen tool, so select pen tool, we can actually draw
over an area of our footage and that is
essentially masking. You can see I've cut out the
rest of the video and I'm only focusing on this
one part of the video. Now at the moment that
mask isn't really doing anything and that's
because it's not animated. In order for this
to do something, we need to combine
keyframe animation and masking together. I'm going to go through
to the point where this car stops,
somewhere around here. Then I'm just going to go into that drop-down arrow
in the traffic, we'll go into masks, Mask 1, and we'll create a brand new keyframe on the mask path. Then we'll pull it all the
way back to the beginning. We'll go back to the
selection tool and I'm just going to move this
mask over to the left. Don't drag the entire thing over like this because you're
going to affect the position. You want to select the mask. Select this keyframe,
select this larger square, and then move this
across to the left. Then you can just
go ahead and move these different
points up like this. You can see I'm following
the movement of the car. Now when we play this back, it's going to animate
from this keyframe to this keyframe and that
mask will now follow. Of course, because that car is moving too fast
in the middle, so somewhere around here, I do need to move
this entire mask over to the right like this. Now we've got 1,2,3 points
on our keyframe animation. But of course it's
not just isolating specific objects that
masking is useful for. Masking is really
useful if you wanted to focus on specific areas
for specific effects. Let's duplicate this footage. We'll go Command and C
and V or Control C and V. We'll zoom out a little bit so that we can get a
good selection here. Let's go 100 percent. We'll go into that pen tool. Then I'm just going to draw
a mask around the sky. It doesn't need to be perfect. That's completely fine. I've got this mask
around the sky. Now from here, I can actually go into Effects and Presets. I'm going to touch very loosely
on color correction here. There's a full episode coming
later on in the course. But if we just search
for levels and drop levels onto this mask, this layer here
with the mask here. If we solo this by the way, you can see its only the sky
that's going to be affected. But we can pull the
input black down to really make that sky pop. This is before that effect and
this is after that effect. Then as you can see, now, this is before and
this is after. It's really helped to isolate that sky and make the sky pop. The problem is that
if we zoom in, you can see we've got this
harsh line where we can see the edge of the
mask. That's fine. We'll just go into that
city traffic layer, drop-down, go into
masks, Mask 1. You can see here
we've got mask path, mask feather, mask opacity
and mask expansion. We need to focus on the feather. If we increase
that mask feather, that's going to soften up
that edge and there you go. All of a sudden that hard
edge has now disappeared. This is zero and
this is around 100. If I zoom back out, you can see that now looks really nice. Of course, if for
some reason though, your mask wasn't exactly close to where you
needed it to be. Let's just focus on
this area for now. As you can see, if you wanted
to expand that and get that closer rather than
moving these points, you could just increase mask expansion and
as you can see, that's just going to move that
mask downwards like this. Then of course you've got
mask opacity as well, which is just our opacity. If you only wanted
to use this effect, let's say we pulled this
all the way up to here, but you didn't want
it that intense. You could just pull
the mask opacity down a little bit and that just
helps to fade out that effect. But masking is really useful
for this purpose as well. You can create some
really awesome effects and color grading and some really awesome
isolated effects using masking in After Effects. Then of course,
again, we can go back to cropping our footage and we can do that to create
a split-screen effects. Let's say we've got three
video clips on our timeline. This is Shot 1, this is Shot 2, and this is Shot 3. Let's go into
transform on all of these layers so transform,
transform, transform. We'll just pull
the scale of these down a little bit to begin with. Then I'm just going to
focus on this first layer. I'm just going to just draw a mask around the right
side of this frame. Then I'm just going to
move the position of this over to the right, like this. Then I'm going to
move that food layer over to the left and I'm just going to draw a mask
around that one as well. As you can see, you may need
to zoom out or just move up if you want just to
make sure you get that off the frame
because if you don't, it will click the
edges like this. Just take that out. Then we'll focus on
that last layer. That's this layer down here. I'm just going to decrease
the scale of this a little bit and
then we'll go into that mask and I'm
just going to follow this movement like this. There you go and as you can see, we've now got this
split-screen effects and these three videos are playing
back at the same time. We've used masking and scale and position to create this really
nice split-screen effect. Now let's say you wanted
to animate this over time. You want it to
start here and then this shot is going
to grow over time. In order to do that, you
just want to go into the mask and create brand
new keyframe on mask path, on every single
layer, mask path. We'll open up the masks, Mask 1, new keyframe on mask path. Then we'll move roughly
1 and 1/2 seconds over. Then from here we'll go
back to our selection tool. We'll select this first video, and we'll just move these two right points
over to the left. I've held Shift to select those two points and then we'll drag that over to the left. As you can see, a new keyframe would have been created there. We'll go to the second layer, select those two points and
move that over to the left. Then I'm just going to
go to this bottom layer, and I'm just going to
move to this top point over to there. Now when we play this back, you can see there is now
this animation taking place. We've done a split-screen
effects and then we've animated that overtime using our
keyframe animation. We've got this really nice
dynamic split-screen effects and all it took was a
little bit of masking, scale and transform and
position keyframe animation. That's an example for
how After Effects works. It's not just enough
to know one thing. You have to know everything
in After Effects to add up different
elements of an effect. Take this split
screen animation for example, this is masking, but it's also
adjusting the scale and the position in
the transform menu. Then it's also leaning into
keyframe animation as well. That's multiple skills
needed in order to create this effect and
that's the beauty with Adobe After
Effects as a whole. Once you know a few of
these key plug-ins and a few of these key features
in After Effects, you can build on top
of those to create some really interesting
and unique effects moving forward, there you go. That is the basics of
masking in After Effects. There are so many
different cases where you would use masking. Masking is one of those key
skills that you need to know in order to proceed
in After Effects. Make sure you put the time into learning
masking efficiently. Because once you know
how to mask in objects, there are so many
different things that you can do with masking as a whole.
10. Text Creation: Moving on, we're
going to talk about text in After Effects. All you need to do is go up to the top bar of After Effects, go to the T icon, you can hold that down
and you can either select the horizontal type tool
or the vertical type tool. Typically, you
want to start with the horizontal type tool, select anywhere in
your composition, and then type out a word, a phrase, whatever
you need to type out, type it out here. Then we want to go to the
paragraph alignment window and a character window. Now, these should be on the
right of After Effects, so you've got character and
paragraph, they're here. But if you can't see
them for any reason, then go into window and make
sure a character is ticked, and then you also
want to make sure that paragraph is also ticked. We'll first start off with
the paragraph window. We're just going to
highlight all of this, so command an A or control an A. Then we'll send to align this. Then we'll go into character. From here, we can
change the font. You can scroll through, select the font that you want. Then moving down, we've got
the weight of the font, so you can go for a light font, you could go for a bold font, it's completely up to you. Then over on the right,
you've got the fill color, so this is the color of the
fill, this solid color. Then under here, you've got a stroke option, so you can add a stroke. As you can see, if I increase the size of this to
make that more visible. You can really see that
stroke coming through there. Then you can also
increase the size of that stroke by pulling
on this setting here. Of course, so you don't
have to have a stroke and if you don't want to
have that stroke, then just select this box here, and then we'll go back to
our normal fill color. Then moving on, we've
got our size here, so this is the size of the font. You've got your
line spacing here. Then you've got your tracking
or your kerning here. This is the spaces in-between
the letters like this. This obviously is the stroke, and then you've got
a few options here, so this is the height
of the texts like this. You've also got this
option here so you could shrink it vertically. Then down here you've
got a fake bold, you've got a fake italic, you've got all caps. Let's say this was lowercase. There you go, you you now see
lowercase into uppercase. There you go. Then down here, you've got these small caps. If it is all caps, then you can select
small caps and that will put that down into
small caps for you. Then you've got superscript, so it's going to
put it up there. If you needed to do E
equals MC^2, there you go, you can select this two to be at that and
that's going to be your squared like this, or alternatively,
you can put it down, it's completely up to you. But I don't need that, so I'm going to go back to
our normal text. That is our text now created. From here, I would load up the proportional grid and
place this in the middle. Now, the moment you can see that the anchor point is
set to the bottom, this means when we want to
rotate or animate this object, it's going to rotate from here, which is not what we
want unfortunately, so I'm going to go into that
text where I transform, and then I'm going to
move the anchor point up. I'm going to move that
anchor point to the middle, and then I'll move the anchor points that the texts now is in the middle of the
canvas or the composition. Now, you can see if we
were to animate the scale, it animates from the center, and if we were to
animate the rotation, it rotates from
that center point, which is what we
want. There you go. That is our simple text now created inside of
Adobe After Effects. Of course, if you wanted
to create a lower third, then you would need
to combine texts, animation, null objects, and potentially
even some masking. In the next episode, I'm going to show you how
to do exactly all of that. We're going to combine
all of that to create a really
awesome lower third.
11. Combine Skills to Make a Lower Third Animation: If your text's now created, we can actually go ahead and
change that to a full name. I'm just going to go ahead
and type my name out, and from there,
I'm just going to decrease the size of this. I'm just going to
pull that down. Then as you can see, by pulling the size
of the font down, it actually moved this anchor
point up to the top here. I'll just zoom in. There you go, the anchor point is now
no longer in the middle. Rather than doing that, I'm actually going to
go into Transform, and I'm going to pull
the scale down here, and now that anchor
point is in the middle. This means if we want to
rotate that later on, we can do that without it affecting where the anchor
point is going to be. We've got a name, we just
need to add a subtitle, so I'm just going
to copy this text. Then we'll change this
text to video creator. Of course, feel free to
put whatever you want. Then we'll just go into the transform of this that
will pull the scale down, we'll pull the position down. There you go. We've
got our-self, a cool lower third potentiale. We've got the name and then
we've got the subtitle. Of course, if you wanted this
to be a little bit lighter, so you didn't want
this to be as bold, then you can just
go into character and pull this down to
regular or medium, then we can make this
italic or normal, completely up to
you, but you just basically want to get this to a point where
you're happy with. Don't decrease the size here because it's going to
affect the anchor points. Just focus on the text, the weight here, and then all of these
other settings. Then you can move this back into position down here in
your Transform tab. As you can see,
we've got our name, and we've got our subtitle. Now from here, I'm
just going to go ahead and create a solid background. In order to do that,
I'm going to go ahead and create a New Solid. So we'll go, Layer, New, Solid. Go ahead and select the
color of your choice. I'm going to select
this purple again, and we'll drag this
to the bottom. Just so you know, down here
in this timeline setting, anything at the top
is going to go to the very top of the edits. If you wanted to see this text, but this solid was on the top, then you'd want to
pull the solid down to the bottom to reveal the text. Anything at the
top is going to be sitting on top of whatever
else is behind it. Then from that we're
just going to go ahead and select that solid, we'll go into our
Rectangle tool. I'm going to load
at the proportional grid for reference, and then I'm just
going to draw a mask around that. Like this. There we go. You can
see we've got our name, our subtitle, and
the background. Now we just need to go ahead and animate these in overtime. So let's start with
this background, I'm going to go into that mask, we'll go roughly
half a second over, and create brand a
keyframe on mask path. Then we'll go to the beginning, we'll select these two
right points on the mask, and we'll move this over
to the left, like this. We've got this nice animation
coming on, and in fact, I think it would be quite
nice to add a bounce to that. We're just going to make
another keyframe at the end, so we've got 1,2, and 3, then we'll go to that
second keyframe, select those two
right points again, and then we'll extend that over to the right even further. It's going to go further
and then come back. But as you can see, that
doesn't look quite right, so I'm just going to decrease the gap between these
keyframes at the end, and that looks a lot better now. That is now animated on, we can now focus on
animating the text. Now there's a million
different ways of animating your text
in After Effects. Of course, you don't
have to do anything particular, but in this example, I'm going to show you
this cool character letter slide up effect. I
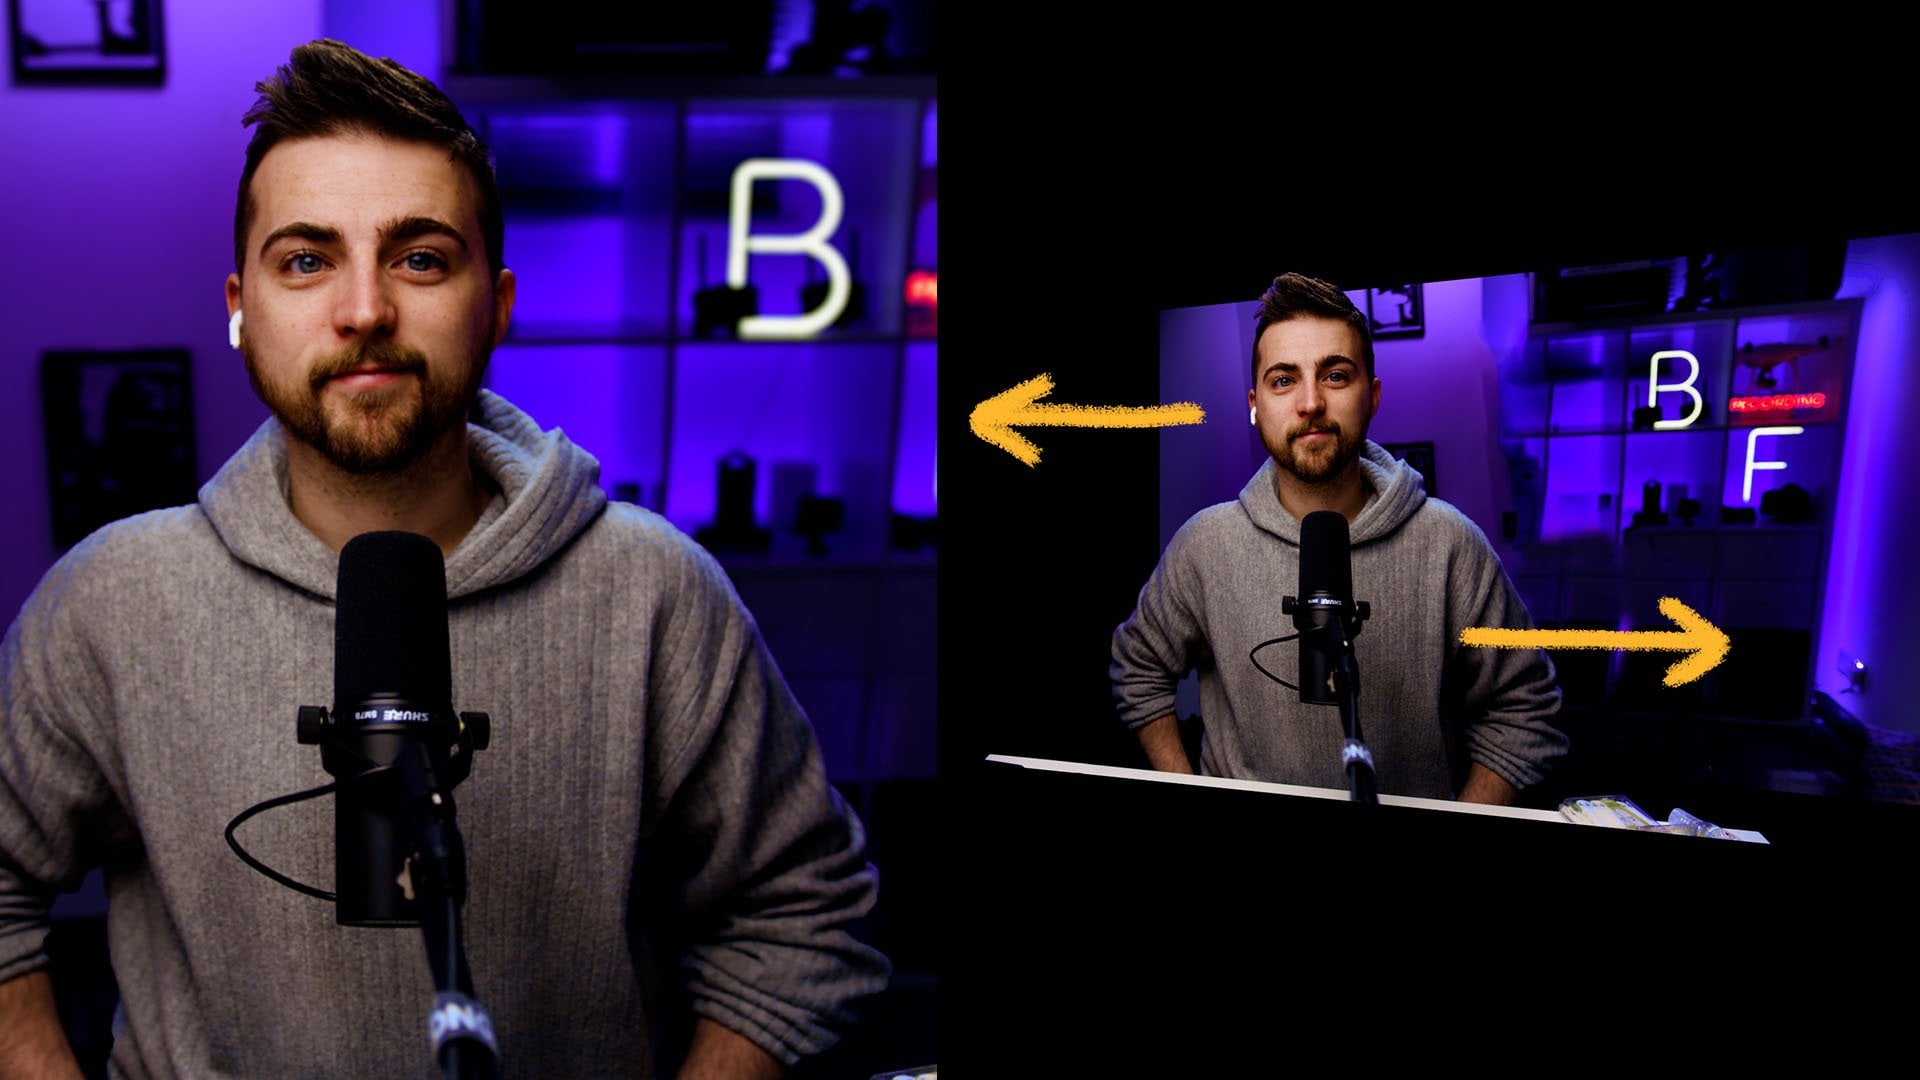
think it looks quite cool. In order to do that, we're just going to go into that name. So we'll select the
Drop-down arrow, and then we'll select Animate, we'll select any one of these, but in this example I'm
going to select Position. Then we'll go into Range
Selector, Advanced, and in the advanced section, I'm going to go down to Shape
and we'll select Ramp Up. Then we'll go down to Position, and I'm just going to
pull the position down underneath this
background layer. There you go, like this. Now we'll go to Offsets, and we'll pull this down
to negative 100 percent. We'll wait for this to animate, and then we'll create a brand new key frame on the
offsets at negative 100. We go a few frames
over and we'll pull this up to plus 100. When we play this back, you
can see those characters are all going to go in
a letter by letter. Now of course the
problem is we can now see this text just
waiting there. It's waiting to come up. In order to fix that,
we're just going to select the text and we're
just going to draw a mask around this background so that it looks like
it animates up from the bottom of that
purple background. There you go. That comes in, this comes in, and now we
need to animate this title. Maybe we can just do a more of a subtle animation so now
we can go into Opacity. We'll go Drop-down arrow, Transform opacity down to 0. Brand new key frame
on the stopwatch, then we'll move over and
pull that up to 100 percent. Let's play this back and
see how this all looks. There you go, that
looks really nice. Now this looks great, but
the problem is they're all normal linear keyframes. There's no Easy Ease
keyframes here, which means the
animation doesn't look as smooth as it could look. I'm just going to
highlight all of these keyframes and go
through the process of converting all of these
to Easy Ease keyframes. Now let's play
this back, see how this looks. Much better. Although the problem
is, I would argue that this name coming in now looks a little fast so I'm just going to separate these
keyframes a little. That now looks a lot
better. There we go. We've got this all
animating in now, but the problem is this doesn't really look like a lower third, is in the middle of
the composition. It's a bit too large. So in order to fix that, we're just going to parent
all of this to a null object. So we'll go Layer, New, Null Object, highlight
all of these layers. Use this Pick Whip tool or
this banner to select Null 2, and then from that we
can go into Null 2, Transform, and we can
decrease the scale down, we can pull the position down, and now this can just perfectly sit on top of our video footage. Let's just drag
some random footage into there. There you go. You can see that we've now
got our lower third created on top of our footage,
and this looks great. Of course, if you wanted
to animate this out, then just follow through
all of those same steps, but just in reverse
animating out. Again, this is only one
example of a lower third or a text animation that you can do inside of Adobe
After Effects. Of course, you
don't have to have these letters animating up and the subtitle fading in on the opacity with
this purple banner. Of course, feel free
to have a play around, look at other tutorials
and figure out new and exciting ways of
animating your text in. But this is just one
way that I would create a lower third inside of
Adobe After Effects. So this specific skill
involved creating texts, creating a new solid, masking key frame animation, null objects and parenting, and then we tied that
altogether to create this really nice lower
third animation. Now the beauty with this
lower third animation, if we delete this footage, if we toggle the
transparency grid, you can see this is actually
on a transparent background. Which means if we move
this up to the middle, we can export this from After Effects with that
transparent background, and we can use this in
other programs outside of After Effects and just drop
that directly on our footage. I'll show you how you
export videos with a transparent background in a future episode in this course. That will be in the export
section towards the very end. Now that we've
completed this episode, my challenge to you is
to go ahead and create a really awesome
lower third animation using all of the techniques that you've seen in this episode. I'd love for it to include
a null object, masking, text animation and
the generation of some sorts of shape
layer or a solid. Once you've done
that, just upload that to the Class
Project section, and I'll be replying to
everybody that uploads a lower third into the
Class Project section.
12. 3D Text: Now that we've created
our texts and we have created a lower third
using that text, we're going to take that
one step further and turn our 2D text into 3D text. That means we need to
work now in a 3D space. I'm just going to delete
this lower third. I'm going to toggle off the
transparency grid like this. Then I'm just going to
create a new title. Let's go for 3D
TEXT, very original. Then we'll get
into character and we'll search for
a specific font. I'm going to use
monster at bold. I'm going to increase
the size of this. Then I'm going to put this
roughly in the middle. Somewhere around
here. There we go. Don't worry at
this point if your anchor point is at the bottom of the text because that is
completely fine for now, because we're going to
convert this into 3D text and generate our movements from cameras rather than the
actual position of this text. Now that you've done that,
you just want to turn off the proportional grid. Then we want to go into
this layer down here. We've got the 3D texts there. We're just going to
press this third button along or this last
button in the sequence, this is our 3D button, 3D layer. Toggle this on, and that will
convert that into 3D text. Now, if we go down into
the drop-down arrow, you can see we've
got text, transform, geometry options and
material options, and geometry options
is grayed out. Now, the reason why that's
grayed out is because the renderer is
set to classic 3D. But if you select "Render" at classic 3D and change
that to Cinema 4D, that will allow you
to create 3D texts. As you can see, geometry
options is now in white. This means we can jump into there and change some
of the settings. But before we do that, I'm just going to go
back up into text. You can see we've got text
path options and more options. There's a few options here
that you can play with. But we're going to
go into transform. As you can see, transform now looks a little bit different. You've got your anchor point, you've got your position, your
scale or your orientation, and then you've
got your rotation splits into different axes, and now your anchor point,
your position, and your scale, they all have three
options rather than two. That's because not
only are we going side to side and up and down, we can also now go
forwards and back because this is a 3D space. I can move the position
left to right. It can go up and down, but it can also go
forward and back. Now, this may just look like I'm scaling this up and
scaling this down. But I'm actually moving
that further back in space. When we have a digital camera in and we have some lights in, you really see the
importance of that later on. The same thing could be
applied to this scale. If we unlink the scale, you can see we've
got this scale here, this scale here, and then this scale is going
to take that further back. Then we've got orientation. This is just going
to do some fancy rotation things for us. Then coming down here
we've got x rotation, y rotation, and our
normal z rotation. Now, moving now, we want to turn
this into 3D texts because if we rotate
this a little bit, you can see, this
is still very flat. You can see here, we can't really see
anything back there. In order to turn
this into 3D texts, we're first just going to
go into geometry options, and we're just going
to add a small bevel. A bevel is just the
rounding of the corners or just the corner
of that 3D layer. Then in bevel style, you
can see we've changed this from non-angular,
concave and convex. If I change that to
angular, you can't really see anything
at the moment. That's because we haven't
extruded this text. That sounds complicated, but
I'll show you what I mean. At the bottom here, you can see we've got extrusion depth. Extrusion is basically just how large it is traveling
back into the space. At the moment it's on zero, so it's just 2D. But if I increase that, you can see that's
going to go backwards in space, so 100. As you can see, we've
now got our 3D text. But the problem
is at the moment, this is just a big
block of white texts. We can't really see anything. Because this is all white, it's all just blurring and it's getting difficult
to read the text. This is where we need to
introduce digital lights. I'm just going to come up
with 3D texts layer for now. Then I'm going to go up
into layer new light. In here, you can see
we've got the name so, we can call this Spot Light 1. Then we can go down into
settings and we can change the light
type from spot to parallel points or ambient
sound scholarly spot for now, you can change the
color of this. Basically your texts
at the moment, it's just a white blank canvas. If we were to shine a
red light at this text, the text would now
turn red because it's got a red light
casting on it. Pick a color of your choice. I'm going to go
for a purply color to match the theme
of this course. Then you can increase or
decrease the intensity. You can increase or
decrease the cone angle, which is just how large
that light is going to be, then you've got the
cone feathering. If you increase, that is really going to be
a soft fall off. But if you pull that down, it's going to be really harsh
and direct like a spot. I'm going to keep that
nice and soft there. Then you've got the
falloff and you can have a smooth or inverse-square
clamped falloff. This is basically
just how the light is just going to
fall off the text. I'm just click that at none, we'll press "Okay",
and as you can see, we've now got purple texts
and that's because we're casting a purple
light on the text. Now, let's just first
start with this. This is our point of interest. At the moment, it's in
the center of the text. But if I put this
over to the right, you can see this is a point of focus and now this is
getting the most amount of light and it's falling off and we can't see
the three anymore. I'm just going to pop that
in the middle roughly. You can see up here
we can actually move this light
around like this, so we can move it across
individual axes like this. As you can see, you could
actually animate this, so it starts over here
and then animates on to create this
nice 3D text effect. You can do that on this
axis and then you can also bring it forwards
and backwards as well. You can see this is our light
and moving it around is going to reveal different
parts of this 3D text. If I take it back here, it's more of a backlight
for bringing it up here. It's a nice side light, which is going to create
some nice shadows back here. Feel free to move
your light around to get the type of effects
that you're after. However, I think
in this instance, I want a light up here in the top right to cast
the shadows back here. I want a light behind just to add a little
bit of a backlight, just so that we get
a little bit of separation from
this and the back. I'm going to go into
Layer New Light. We'll change the color
of this to a light-blue. Press "Okay", on that. We'll press okay on that. Now you can see that's adding
another round of light, but we don't want
this to be up here. We want to send this back. I'm just going to
open up spot light 2, we'll go into transform. Then you can see we've
got points of interest, position, orientation
and the rotations. Position is what I
want to focus on. This one is going
to go side to side. As you can see if I zoom out, you can see that is going
to go left and right. The second option is
going to go up and down. I can make this nice and high and assume that's what I'm
going to do in this example. I'll take this nice and high. Then this option is
going to take this behind as you can see. If we just zoom back in, you can see this is how this
is now starting to look. If we take this even
further back like this, you can see it's clipping
the corners a little bit. Now you can go
into light options and you can increase
the intensity to get a more dramatic effect just on these edges
as you can see. Alternatively, rather
than doing that, we can just bring this back
round little bit more again, just so it's not so
behind. There we go. We're getting a nice
little hair light just on the side of the lights. Again, that if you did want
to turn up the intensity to make that more obvious
then feel free to do so. Of course, it's about if you
wanted to change the color, then you just go back into that color box and just change
to a color of your choice. In theory, you can just keep adding loads of different lights and just making this look exactly how you
want this to look. We'll add a third light in. We'll make this. Let's go for maybe a dark
purple, something like this. Press "Okay", and then I'm just going
to move this over to the left just to add a
little bit difference between this purple light
and this other purple light. If I turn that on and off, you can see how that changed
the look of that text. Now at the moment, we're just
seeing this in one view. If we go down to
the bottom right, you can see we've
got active camera and we can change this
to the very front. We can change this to the left. We can change this to the top to see where
these lights are. If I zoom out, you've
really get a sense of where all these
lights are coming from. You've got lights here and it looks like we've
got a light here as well, just on the side so we
can move this around. If we wanted more, ease on where this
is going to go, then we can go to the right, we can go to the bottom, or we can go to a
custom view and put that where we want it to go. As you can see that's a 3D text. But we can just take this
back as the active camera. Then we can actually
change this from one view to four
views if we want. We get a full understanding
of what's happening here. Let's get into this
front view here. If I was to move
this light around, you can see it moving across all of these other views here. It's just helping you get
a clear understanding of where all of these
lights are in the space. This is very useful
if you've got loads of different lights
in the space and you've got loads of 3D objects in the space because it's going
to help you define where everything is in the space and where
everything needs to move in order to get the type of effects that you're looking for. But you don't have to do that,
you can just keep this as one view if you'd rather
keep things simple. Now at the moment
you can see down here it says active camera. The active camera is
just this static camera, just looking forward. But the problem is, because we haven't actually
created a new camera, there's no camera movement. In order to create some
movement in this animation, we're going to go into
Layer, New Camera. You can see there's loads
of different settings here, but generally you
just want to keep this as the default here you can see you can change this to a one-node camera or
a two-node camera. You can change the lens. You can do whatever
you want here, but I'm just going to keep this as a default, I always do. Then I'm just going to go into that camera,
we'll go transform. You can also see
down here you've got camera options so you
can add some zoom, you can add some depth
of field focus distance. You can change the aperture, blur level, irish
shape, irish rotation. All of these technical
camera settings, but the one that we're
interested in is transform. Transform is basically going
to be the camera movements. We can move the camera
around like this so that we get this nice rotation.
We can go like this. We've got a nice
rotation up here, go forwards or backwards if we wanted to get closer in on this. Then you can see we
can also rotate. Now, of course, as well
as animating the camera, you can also animate
the text as well. If we go into that 3D text, you can see if we create a
brand new keyframe on the, let us go for the y
rotation at the beginning, we've got a few seconds
over and we'll pull that down to a negative number. You can see that if
I drop the quality down to quarter and
then play this back, you can see we've got this
really nice 3D text animation. But you could also combine that with some camera
movement as well. As well as the texts
spinning around like this, maybe you could get the camera to come up and
down so we'll start down. Crap, brand new keyframe
on the position, move over to around
three seconds. Then we'll boom
up so that we get this really nice jib
effect or this jib shot coming from below
to above the text. Of course feel free
to move that as well, just so that we can see
everything that is happening. There we go. Now
let's play this back. There you go, you can see you've got
the camera coming around then up the 3D text
is orbiting around. It's creating this really
nice 3D animation. Let's play this
back in real time. There you go. Of course, if you wanted to as well, you could also
animate the position of the lights over time. Let's take the yellow
spot for example. At this moment in time
we'll create brand new keyframe on the position. We'll go over to around
three seconds and we'll just move the position
of this light around. Now, we've got the
texts rotating. The camera is booming up and the light is also moving
at the same time. Combining all three of these creates this really
nice animation. Let's play that
back in real time. There we go. That
looks really nice. Of course, if you
wanted to as well, you could grab all
of these keyframes. You could right-click one of those keyframes and we
can convert those to easy ease keyframes
to smooth out that movement like we learned
in a previous episode. As you can see
that it's going to look a lot smoother now. Of course, this has
drifted over to the left because we've
animated the Y rotation. We can just fix that by creating a brand new key
frame on the position. We'll go to three
seconds and we'll just move the position
over like this. Now of course, you
can create 3D layers, you can create 3D backgrounds, and you can cast shadows
from this text onto your background to create
some really nice animation. But of course, I would
advise you to practice your 3D text animation skills. Jump into all these
different settings. Jump into your lights, your transform and
your lights options. See how all of these
different settings affect your 3D texts. Play with colors, play with
different camera movements. Play with lights,
play with cameras, and then just
experiment to create some really interesting
and amazing 3D texts. There you go. That
is the basics of how you would create 3D texts and then animate that 3D text inside of Adobe After Effects.
13. Motion Tracking: Now moving on, I'm going to talk all about motion tracking. In this episode, I'm
going to talk about 2D motion tracking and
in the next episode, I'll talk about the
3D camera tracker. Let's move on from this 3D text. We're just going to get rid
of the 3D texts for now. We'll just delete that
and I'm just going to drop a random video
clip into the timeline. Let's go Street Handheld. As you can see, I've got
this random Handheld footage of this video clip, and it's a little bit wonky. If I wanted to add some
text into this scene, I would need to motion track the scene in order
to put something into the scene because
the problem is if I just create a title, so I'll go "T", will
go random text, and we'll just add a little
bit of line separation there. If I wanted to add this
random texts into the scene, like stick it to the footage, at the moment, it
just doesn't work. You could try creating a
keyframe on the position and then moving over and trying to follow the
movement yourself. But the problem is, this
never looks quite right. If we play this back, you can see because the
camera's shaking, that text isn't going to move at the same time as the footage. Rather than doing that, this
is where we can motion track the footage and then add that tracking data to
that text layer. It sounds really complicated, but it's not actually
too difficult. In my opinion, motion
tracking is one of the most important first
steps into visual effects. If you wanted to track
something into a scene, you would use motion
tracking in order to do so. It's not just text that
you can add into a scene. You can add random
visual effects, you can add video footage, you can overlay some
green screen footage onto attract video. There's so much you can
do with motion tracking. Let's go into the
2D motion tracker and begin tracking this footage. Let's just delete
this text for now. We'll just turn this off by
selecting the eyeball icon. It's still there, but
I've just hid it for now. I'm going to focus on this text. First of all, I'm
going to change the resolution up to "Full". Then from there I'm going
to change the "Window" from the current Default workspace to the "Motion
Tracking" workspace. As you can see that has changed the look of after effects. This is the window
that I'm focusing on up here, you've got Tracker. Motions Source is going to be
Street Handheld, Current Track, "None" and if I select that, you can see it's going to
come up with Track Camera, Warp Stabilizer, Track
Motion, Stabilize Motion. Warp Stabilizer and
Stabilize Motion is going to try and smooth
out that camera movement. It will track the footage
and then it will apply some tracking data to that
to help to smooth this out. We don't want that though. We
want to go ahead and select "Track Motion" Now, this will load up
this menu here. Our motion source
is Street Handheld. This is our footage layer. Then we've got Current Track, Tracker 1, Track Type
can be Transform. Then we want to go
ahead and select all of these if
they are relevant. If the footage that
you're tracking is on a tripod and it's only
panning and tilting, then you only need to
worry about position. If it's handheld and
there's a bit of rotation, you would want to take rotation and if you're zooming
in or zooming out, you would want to select scale. Now, I don't zoom in on this
footage as you can see. This is just me moving
the camera around. That means I'm going to have to use position and rotation. Then once you've done that,
you could go now to "Edit Target" and you want to go
ahead and select Null Object. You'd have to create
a null object. So "Layer", "New", "Null Object" and the target
is going to be Null 3. Then if we go into "Options", all of the sections, you can just ignore, so just go ahead and
press "Okay" on this. Now you want to go ahead
and analyze the footage. With that footage now selected, we first just want to zoom into the footage and we're going
to focus on track point 1. Essentially we've got
these two squares here and then we've got
this point in the middle. After Effects is going
to want somewhere which has got a high
amount of contrast. This blue in-between the white on the parking sign
is going to be perfect because this track
is not going to move around outside of
this blue too much. Then you've got
to find somewhere else for the second one, something else which is
going to be high contrast and maybe the corner of
a window, for example. It's really important
that when you're applying these tracking markers, that you don't apply them here. After Effects is looking
for high contrast areas in order to track the footage. If the camera moves and it's just in the
middle of the sky, it won't know where the
camera's going because there's so much of the
same color around. Whereas if I place this in
the corner of a window, it knows that if the camera moves down and all of a sudden, it's moved up to the whites
then something has gone wrong and it can fix itself to go back to this corner here. You're looking for some high contrast areas on your track. Now once you found
those two points, you want to go ahead and press "Play" and then just
watch through that clip. As you can see, if I just pause that you can see
that's drifted over. I'm going to move over to here and I'll continue that track. As you can see, that is now
following those two markers. But you can see
at this moment in time when I move the
camera quite aggressively, there was a little
bit of motion blur and that has completely
sent me track off. I'm just going to
go back in time to the point where it went wrong, that was here. You can see. Now I just want to
move those points back up into those specific areas. It's really important that
you go through and do damage control here
because if you don't, all of a sudden in the text or the layer that you
want to track in, will just go flying off
in a random direction. Just move these tracking points over to where they need to go. As you can see, because
there's motion blur, it's difficult to
get that track. There's no longer
that contrast there. It all just looks
like a white blur. Whilst the camera is doing, this janky movement, you've got this aggressive motion
blur in the shot. I would have to go
through and manually track every single
frame. There you go. You can see that's moved
quite a lot and again, you can see the middle
of this parking, the middle of this P icon no longer is blue and contrasted. It's just a white blur. I would just go
through the process of just doing that for all of this footage and then
once that stabilizes, either can then just leave that to render out and do
what it needs to do. But I don't need to show
you the entire workflow, so I'm just going to leave
that at that for now. I'm just going to have
to delete the footage here from about six
seconds onwards. But feel free to work
through the entire clip. Then from that, we
just want to make sure that our target is Null 3. We can press "Apply", Apply Dimensions to
the X and the Y. Press "Okay", and now you can
see we've got all of this tracking data applied
to our footage. As you can see when I zoom
into this parking sign, you can see we've got
this tracking point perfectly sticking to that sign. At this moment in time, you want to go ahead and add
your text into the scene, and then we're going
to parent and link this to the null object. You can use the
pick whip tool or you can select the Null there. Now when we play this back, you can see that text is
now sticking to the scene. Like I said, though, it's not just texts that you
can add in here. You can also add in
random shape layers. Let's create a random ellipse. We'll parent this
to the null object, will turn off the text. Now that you're going
to stick to the scene, as you can see, is
drifting a little bit. I'd have to go in and fix that to make sure
it doesn't drift. But that's doing
a fairly good job at following the movement. Of course, it's not just
shape layers as well. We can drop in random footage, so let me just drop in this
other city traffic footage. It's about three
seconds long I'll pull the scale down so that
it fits in the scene. We'll parent this to the
Null 3. There you go. That's now tracked into the scene and it's doing
exactly what it needs to do. There you go the tracker window inside of Adobe After Effects is a really great way
of motion tracking the movement of your camera, creating all that tracking data, and then adding that onto an object that you want
to add into the scene. This would be really awesome
if you wanted to add a person into the scene that you filmed on a green screen, or maybe you want to do some
screen replacement and place some footage on a TV
you would just track the TV and add that
onto the footage. There's so many other different
things that you can do with the motion tracking
and the tracker window. Now, Adobe After Effects does allow you to
track like this, but it does also have
a 3D camera tracker, and I'm going to talk about
that in the next episode.
14. 3D Camera Tracker: Motion Tracking Continued: The 3D camera tracker is an alternative way of
tracking your footage. Now, I actually do prefer using the 3D camera tracker over
the standard Tracking icon, because this 3D camera tracker, I feel like it requires a
little bit less effort. You're leaning more
into the program. Therefore, if you
had a shot with a fairly simple amount
of camera movement, then I would lean
into this and trust the automation of After Effects
to track this reliably. Let me just throw some footage in and I'll show
you what I mean. As you can see, this is
a somewhat complex shot. I'm moving forward in
space and there is a little bit of camera
movement in the shot. I'm just going to
trim this down to maybe six seconds because I'm not going to track
the whole thing. Now we can just focus
on these six seconds. Rather than going into
the tracker window, I'm going to go back into the defaults or maybe
even the effects window. Then in effects, some presets, I'm going to search for 3D camera tracker and drop
that onto the footage. Now at this moment in time, Adobe After Effects is just
going to analyze the footage. Depending on the specs of your
computer and depending on how heavy this footage
is in After Effects, this may take 30 seconds, this may take a
minute, two minutes, five minutes, 20 minutes. This all really does depend on your computer and the
footage that you're using. But once that has done, it will come up
with this solving camera banner and
it's just going to turn all of that tracking data into tracking points
and there we go. Once that's done, you can see if we play through the footage, you can see we've got all
of these colored crosses and if I hover over
those crosses, you can see we get these
red targets appear, and these are our
tracking points. What you want to do here is scroll through your
footage to find a tracking point
that works for you and find one that you
feel like is reliable. In this example, let's put something floating, maybe just behind this bench. Let's go forward in space and let's select one of these
tracking markers on the floor, so let's go for this one. We want to select three
tracking points and doing that will load up this red target and once you've found a target
that you like the look of, so look for one that looks
like it belongs in the space. As you can see, this one looks
like it's on the ground, whereas this one looks like
it's floating up above the ground and then this one doesn't look
like it belongs anywhere, this one's gone terribly wrong. Select three tracking
points that work for you. Once you've found
that, just click that, then we'll right click and
we want to select create, null, and camera. We could also create text in
camera or solid in camera. But in this example,
because I want to add in multiple different
types of media, I'm just going to
go create, null, and camera, and doing that
After Effects has created a 3D camera and a
tracked null object. As you can see, that null object is tracked into the scene. You can see the scale is
reducing as I move towards it and it's stuck on the ground
at that specific moment. Now we just need to go ahead
and create some texts. We can insert some media, we can add something
in to this space here. Let's start with some text. Going to go back to
the standard window, so I'll go defaults, and as you can see, we've
got character here. I'm just going to go up to the T icon and create some text, so 3D text and then because
this is a 3D camera, we want to convert this
2D text into 3D text. We don't have to
extrude it like we did on the previous 3D episode. But converting it into
a 3D space allows this text to be tracked
into this 3D scene. You can see, if I move
through this footage, you can see that is
now going to stick into the scene like this. You can actually
see the camera is moving forward and if I change the view from
active camera to top, you can actually say this is our tracked footage and
then the camera here, this is the camera. After Effects has
analyzed the footage, realized where the camera is in the space and created
this digital camera, and then that camera is
going to pass through, so it's added in this text into the scene and then
the virtual camera or the real camera is going to pass through this
text like this. If I zoom out, you can
see that full movement, so the cameras starts back there and then travels through. You can really see this if I go into that full view option. You can see the top right, you can really see that camera now passing through that text. If we go back to
our active camera, go back to our main composition. Like I said, you can
now see this text tracked into the scene. But let's say we wanted to
send this even further back, so we don't want this
so close to the camera. We want to send
this further back. In order to do that,
we want to go into that 3D text, we'll
go transform. Then from here, we want to
go into position, not scale. People often think here that you have to
pull down the scale. You think because it's smaller, it's going back in space, but you're just making it smaller and then it's
stuck in that same space. It's still here,
it's just smaller. You want to reset the scale and then we're going to
move on to position. I'm just going to
start by moving the position over to
the right a little. Then I'm just going to
go to this third option, and I'm just going
to push that 3D text back in space like this. There you go, you can see
the camera is now going to travel towards that
text and again, if I go into this top view, you can see, here's the
text at the moment. You can see I can push
this forward like this, or I can push it back in space and that's
what we want to do. We want to push it back
physically into the space. We're just going
to send that back and now when we play
the footage back, we can see that
texts for longer. Then eventually the
camera is going to pass through that text and it's going to
look really nice. There we go. That
looks really cool. The camera has passed through that and the beauty we're doing this 3D camera
tracker is it look at how the text is wobbling
around a little bit. It's got that bump
from the camera. Because I film this handheld, there was a little
bit of handheld shake and that has been
translated into the text and that
makes it really feel like it's a
part of this shot. Of course as well,
we can combine this 3D camera tracker, the text tracked into the
scene and our 3D text. If we go into this 3D text, we'll go geometry options. We can extrude this back like this and now we can
actually pass through this. As you can see, the
sunlight is coming from, you can see the
shadow is over here, which means the sun
is up on the left, but we are in the shade. We can go ahead and
create a light. Let's go for a light here. We'll make this maybe a
yellow light. Press "Okay". Now I'm just going
to zoom out to find that light. It is up here. I'm just going to move
this over to the left, like this and then I'm
going to push it back into the scene because the light
is up here somewhere. We want to send that light
back into the space. We'll go into
transform position and will send this light
backwards like this. When we play this back,
you can now see we've got our 3D text motion
tracked into the scene. So we've combined that
3D camera tracker and a motion tracking. We've combined 3D text, and then we've added this
all together to create this really awesome and
dynamic fly through texts effect in
Adobe After Effects. But moving on though, it's not just 3D text that we can
add into this space, we delete that 3D
text and instead, let's add some random footage. Let's go for this random
green screen footage. I'm just going to
make this a 3D layer, so we'll turn this
into a 3D layer. Then I'm just going to send
this back into the scene. There we go, as you
can see, that is now tracked into the scene as well. Of course, if this was
footage of somebody standing full body shot of
them on a green screen, you could key out the green, track them into this scene and as long as you match the
light with color correction, it would look like they
were standing in this shot. That has been achieved simply by just this 3D camera tracker and converting this into a 3D layer. You can see there's loads of amazing possibilities
with motion tracking and especially this
3D camera tracker because it is so
pinpoint accurate. Go ahead, track some footage. I'll make this handheld footage available for you to
download so you can track some aggressive handheld
movement footage and I'll also upload something
a bit smoother as well. Feel free to play
with this footage. Use the 3D camera
tracker and then use the standard motion
tracking on these layers. Figure out which option
you prefer and do some cool motion tracking
with this footage.
15. Exploring the Effects and Presets Tab: Next up we're going to jump into the Effects and
Presets tab inside of Adobe After Effects
and figure out which effects that we
have available to us, which presets we have, what's good, what's
bad about them, and then we're also going to
jump into how we can control those specific effects on
our individual video clips. Let's get into it.
At the moment, we are in the Default tab. Of course, you can
select Default, you can select All Panels, or you can select Effects. It's completely up to you, but with one of those selected, you want to navigate over to
the Effects and Presets tab. If we just look at this tab, you can see we've got
Animation Presets, 3D Channel, Audio, Blur & Sharpen, Boris FX Mocha, Channel, Cinema 4D, Color Correction, Distort, Expression Controls,
Generates a Immersive Video, Keying, Matte, Noise & Grain, Obsolete, Perspective,
RG Trapcode, but that is a paid plug-in
that I downloaded, so let's ignore that one. Simulation, Stylize, Texts, Time, Transition,
and Utility. As you can see, we've
got a great range of effects plugins and presets
available to us here. If we start with
Animation Presets, you can see we've got some backgrounds that
we can throw on. Let's create a new solid. We'll go Layer, New, Solid. We'll turn this to
black and press "Okay". Then I'll just turn off
that footage layer. Let's just drop this
Apparition background on. As you can see,
that's just going to create this background here. We can animate that using
the Evolution up here. We've got some Contrast
which we can play with. We've got Brightness. You can change the
colors of this. It's completely up to you, but then that looks
horrendous though, so let's get rid of that. We can move on into any
of these other presets. You've got Silk. You've got Pixels. You've got Magma,
you've got Indigestion. Then moving down,
we've got Behavior. We can do some really
cool behaviors here. These are animation
automations, I guess. You've got like an
Autoscroll Horizontal, Drift Over Time, Fade In Over Layer below, Rotation Over Time, Scale
Bounce, Wiggle Position. Let's go for a
wiggle for example. Let's create a new solid or a new shape and let's drop this Wiggle Position
on to this layer. As you can see,
that's just going to create this animation and that's just going to
wiggle the position over time. You can see we can
do Rotate Over Time and that's just going to just keep rotating over time. If you wanted to increase that, then we can just
pull that up here. As you can see, that looks great, but
we'll get rid of that. We'll move down to
Image Creative. You can see we've
got some coloring, so you can colorize a blue sky. Let's go to our footage layer. We can colorize the sky blue. We can colorize sky orange. As you can see that adding
in this effect here. You've got grayscales,
glow, and shadows. You've got a lower third. You've got Lower Third Holdouts, Mood Lighting and Streaks,
Vignette Lighting. Then moving down, we've
got a special effects, so we can go for a Bad TV. We can go for multiple exposure in bust light leaks,
night vision. Then moving down in utilities, we've got Alpha from brightness. We've got a Crop
Edges effect and, as you guessed, it's
going to crop the edges. You can control those
individually if you wanted. You could flip. You could
flip and flop. You can flop. You've got some keying, so
you can do some blue blur. You can do some green blur, levels, computer to video. Now if we go into these shapes, you can see we can drag
any one of these on. We've created this
funny background. I've got a kaleidoscope. It's quite cool. We've
gotten nerve nets. That looks quite
cool and you could do something quite cool
with that to be fair. You've got nerve net penta. Then moving now down
you've got 60s textbox, which is this. You've got chasing line dots. You've got ring
charts like this, but then moving down,
you can see we've also got sound
effects synthetics. We've got some text animation, so let's just add some
random text in here. We'll just go Brooker. If we go into that text
there you can see we've got 3D texts we can animate in. We can do maybe
raining characters in and then that's just going
to animate in like this. You can spin in by word. You can spin in by character if you wanted to separate
that a bit more. You can create a
typewriter effect so that's just going
to type in like this. Then, of course, you've got
blurs, curves and spines, expressions, fill and stroke, graphical, lights and optical. You've got loads of
different settings here. Then we've got transform, dissolves, transform
movement, transform wipes. That brings us to
the end of all of these transitions and
all of these presets. Let's close this down and let's move on into
the next folder, which is a 3D channel. You can add some 3D channel
effects into there. You can add some audio effects. You can do some blurring
and sharpening. If you wanted to just blow this, just add one of these
random blur effects on and that will
blur that layout. You've got a camera
shake deep blur, CC cross blur, vector blur, directional blur. That is exactly what
it sounds like. You can just add some blur and change the direction of that. Then you've got the
Unsharp Mask and this is just going to help with
sharpening up your footage. Let's turn this on. Let's
zoom all the way in. The quality is set to
full at the moment. Let's focus on this sign. If we drop the Unsharp
Mask onto this layer, you can see we can
increase this and that's going to sharpen
things up for us. The thing is though with
the Unsharp Mask is it looks very ugly very quickly. I wouldn't recommend
adding too much of this, but just adding maybe
just a small part of Unsharp Mask can help to sharpen up a slightly
blurry shot. Then we've got Mocha AE. This is an advanced motion
tracking software that you get when you download
Adobe After Effects. I'm not going to jump
into that because that is an extremely complex piece of software and you
don't really have to do that if you've got
the 3D camera tracker. Later on down the line,
when you need to do some advanced motion tracking, then that's really beneficial. Then you've got a cinema
4D folder with cineware and this is just basically
helping with our 3D rendering. When we extrude that text, we're just using cinema
4D as the renderer. Then you've got some
color correction. All of these different effects are going to do
different things. You can tint this
and change this to two different colors
like this if you wanted. Of course, you can pull down the amount to tint as
well if you didn't want that super intense effect or maybe we can go into
maybe leave color. We can just leave the blue, pull the amount 2D color all the way up and everything
is going to go great, except for that color
that you selected. If we turn this off and select
the green in the trees, let me turn that back on, everything will stay except
for the green in the trees, but we'll turn that off and we'll move up.
We've got curves. Curves are really important
color correction tool. I'll get more into
curves when we do the color correction episode, but the basis of curves is
this is the highlights, this is the shadow. Top-right highlights,
bottom-left shadows. Then you can jump between
each individual channel and you can target
the highlights, the mid tones, and
the shadows on each individual layer to change the coloring
of your footage. Curves are very
powerful, but we'll get into that on the color episode. Then you've got
changed to color. You can select maybe the blue in the sky and you can
change this to red. That's how that would look. You can change hue to hue lightness and saturation to get an exact match
if you wanted. We can just flick through
these, see how that looks. There we go. You can see
you can change the color of the sky by using this. You can see though it is
catching the bottom here so you can just mask around the top. We're just going to
mask around the sky. Then we'll duplicate
that layer and we'll delete that effect
from the bottom layer. Then we'll have to just delete that mask and there you go. You've got that really cool
sky color change effect and it's not affecting
the rest of the frame. But moving on, we're
going to carry on past color and go into distort. In distort, these are
just basically ways of distorting your footage as you probably
would have guessed. You've got magnify and
that's just going to create a circle in the
middle of your video. You've got mirror. If
we rotate this around, that's just going to
mirror the corner. This creates some really
cool kaleidoscope inspired effects. You've got corner pin. Corner pin is really useful. If you wanted to
add your footage onto a TV screen
or a phone screen, you just changed these
corner pins to fit that screen and
it will look like it's playing on that
specific device. Very powerful. Then you've
got expression controls. We'll get onto expression
controls properly in a later episode.
Ignore that for now. Then we can generate some
specific effects here. Let's go onto this black layer and let's generate a lens flare. As you can see, this
is our lens flare that we just generated and the settings are up
here to change that. Again, everything with a
stopwatch can be animated. If we create a brand
new key frame on the flare brightness and move over and then change
the value of that down, you can see that's
going to animate down. Of course, you can
do that to all of these specific effects. Let's delete lens flare and
let's add in cell pattern. For example, you can create a brand new key
frame in the contrast, move over, pull that up, and that's just going to
animate over time like that. You could do the same with
the evolution as well. New key frame at the
start, move over, drag this around,
and that's going to animate between those
two points like this. But moving on, we have
got Immersive Video, so ignore that one for now. This is just virtual reality. Keying, we'll get into in
the very next episode. Matte is getting a little bit complicated for now,
so ignore that. Noise and Grain is
just your video noise. If we turn on the video and
we add in a round of noise, if we increase this
all the way up, you can see that digital
noise coming through. We can either use color noise
or black and white noise. We do all this into a number
that we're happy with, but we'll just delete that. You can do Remove
Grain if you've got a little bit too much
grain so you can focus on a window and you can just work on removing the grain. Just work through
the settings here. Then you've got the
old, obsolete effects, which are still
in After Effects, but they advise you
not to use these ones. You've got a basic
3D to help you flip. Then you've got basic texts.
You've got a color key, which is a basic way of
keying out a specific color. If you were keying in Premiere, this is the option that you
were probably familiar with. Luma Key, Path
Text. Carrying on. We've got Perspective. There's our 3D camera
tracker that we used before. We've got a
simulation and we can add in all of the
complex simulations. Let's add in particle world and this is going to add
in a particle simulation. This can be really
beneficial and you can create some really
interesting effects with the particle world and particle systems,
but let's carry on. We have got Stylize
and we can do some really cool effects
with the Stylize plugin. Let's go for a cartoon effect, or maybe we can go
for some glass, or we can have kaleidoscope. That looks quite trippy. We can go for CC plastic. We can go for scatter. We can use motion tile. A motion tile is very
handy, by the way, because if you change the
output width to 300 and 300, then you mirror the edges, if we decrease the scale, you can see it's
just going to mirror the edge of the frame. That means you can do
some really cool scale out transitions between two video clips and
that will look really cool. Then we've got Text. This is a great
way of generating random numbers or you can
generate a time code. That's just going to
play the seconds. Then we've got Time. You can
add in some echo effects. Let's add echo. That's
just going to do that. We can change the echo operator to maybe screen so that
it's not so intense. We can actually add
in a bit of a delay. That was cool. You've
got Pixel Motion Blur, or you've got Timewarp,
Time Displacement. Then we've got Transition. We can add in one of
these transitions, which we can then manually
animate over time. Completion, you'll just animate. We start at zero, move over, go up to 100. Then when you animate
between those, that's how that looks. Then you've got Venetian Blinds, which you're probably
familiar with the sound of. That's just going to
transition between like this. Then you've just got your
Utility plugins down here. Effects are really powerful
in Adobe After Effects. Generally, I like
to keep away from the presets and just focus on the effects because
then you've got more control over
what these are doing. If you go onto YouTube
and you search for a specific tutorial, then you're going to
probably get introduced to specific effects and plugins
inside of this section and then you'll get
specific numbers and specific settings that you need to follow in order to
get a very specific effect. But feel free to look through all of those different
effects and presets, have a play with all of them, and then just search
on YouTube for a tutorial if you wanted to know something about one of these particular plugins
or how it works.
16. How to Edit Green Screen Footage: Moving on, we're going to talk
about green-screen and how to remove the green from
green screen footage. Now, hopefully, you've got solid green screen footage to work with because
if you've got poor, unevenly lit footage
which is filmed in the wrong camera settings and hasn't been filmed properly, then this is going to be
very difficult for you. I'm going to make
the green screen footage that I'm editing in this specific episode
available for you to download. Feel free to download that so that you can
edit along with me, but when you're editing
your own stuff, make sure you've got a perfect lit green screen and make sure that the footage you're
editing is actually workable. Your experience may differ completely if you're
using different footage, but all the steps that
you need to follow are exactly the same.
Let's get into it. You've got your
green screen footage inside of After Effects. This, as you can see, is a fairly evenly
lit green screen. There are a few darker patches and a lighter patch over here, but After Effects won't have
any issues with this at all. In order to green-screen
this, we're just going to go Effects and Presets and search
for Key Light. Key Light 1.2 should pop up, and we're just going to
drag this onto our footage. Then we're just going to use
this eyedropper tool here in screen color to select a green color close to the
person on the green screen. Instantly that green has disappeared and
turned into black. Now, it's really
important here that we go into View and change final result to status so that we can get a clear view
of what's happening here. Now, white is the solid
that is going to be kept, black is a clean
green screen key, and then the gray is
somewhere in between. It's a bit messy and our
aim here is to try and get rid of that without
eating into the person. In order to do that, we
can go into Screen Gain, and we can pull this up, or we can pull this down. As you can see it
pulling this up is going to help to get rid
of some of that gray. Then we'll go into
screen balance and playing with this
is going to help our subject to appear a bit more white. Don't
take this too far. As you can see it if
I take this too far, it does start to eat into
the bottom a little. This is a juggling act. I think 30 is perfect for this. Then we can go down
into Screen Matte, and we can focus on Clip Black. We can play with
this a little bit. Don't take it too far. As you can see, if I
zoom into my hair, if I take this too far, you can see, unfortunately,
it starts to eat into the side of myself here. I'm just going to leave
this at around 40. Then if I zoom back
out, I can play with Clip White and
that's just going to help to smooth out
this white here. This right here is a
fairly decent key. Of course, you do have all of these other settings
available to you, you've got inside
mask, outside mask, foreground color correction,
edge color correction. But essentially, when you're using this key light plug-in, the main settings that you want to follow are Screen Color, Screen Gain, Screen Balance, Clip Black, and Clip White. Using all of those
settings should get you to a point
where your key should be pretty much
99 percent there. With that done, let's
go out to final result. As you can see, if I toggle
the transparency grid, that is looking pretty good. The hairline isn't
too bad at all, there's no artifacts floating
around in the background, and that, to be fair, is a fairly successful key. There's a little bit
of black down here. If we just select
that footage and create a mask
around the subject, then that will get rid of
that. There you go, like this. From here, to clean
this up even further, we first just want to start
by duplicating the footage. In order to do that, I'm
just going to go command C and command V. That
is on Mac I believe. Copy and paste is control C, control V on Windows. Then we'll go to
the bottom layer, we delete Key Light. Then we'll go into
Toggle Switches/Modes and change to this menu. Make sure you can
see the Track Matte. Then you want to change
the Track Matte from none to Alpha matte green
screen footage. If we toggle the
transparency grid, you can see we've got
a really clean key. If my key was a little bit messy and there was a little bit of fuzziness on myself
before I did this, then just duplicating
that footage and setting the Track Matte to Alpha will help to iron out any issues. At this moment in time, you can just select both of
those video clips, right-click, and
pre-compose them into their own pre-composition;
so green footage. Now essentially
you can just drop the subject onto a background. New solid, let's
search for a color. Let's go for a blue maybe, press Okay, drag this under the green footage,
and there you go. We've successfully
keyed out the green, and now I am now on
a blue background. Of course, you don't have
to do a blue background. You can add some real-life
footage in there. Let's drag the city traffic
footage in again underneath. There we go. Now
it looks like I am in front of this
traffic footage. Although the problem
is if this was real footage then
the background would blur just a little bit. It's a bit too
harsh at the moment and that looks completely fake. In order to fix that, I'm
just going to go into Effects and Presets
and such for blur. Then I'm going to drop camera lens blur on
to that footage, and we'll just increase
that a little. I'll keep that at around 506. As you can see, if I
zoom into this edge, you can see the edge is being
eaten into a little bit, you can really see that
if I increase that up to around 200 or
so. There you go. That doesn't look great. In
order to get rid of that, we're just going to
go down to Repeat Edge Pixels and select
that to fill up that edge. But I just want to pull that
down to maybe five or six, and that should look great. Of course, though,
at the moment, this doesn't exactly match. It looks pretty decent, but it doesn't match perfectly. The background is just a
slightly different tone to the foreground. In order to fix that, just got to go into
Effects and Presets, and I'm going to
search for curves. I'm going to drop curves on to the subject or the person, that green screen footage layer. Then from there, I'm going
to go to the red channel. I'm going to go down to
this option here which is Show Channel and Color
Management Settings, and I'll select Red. Now the point here is to try
and get the darker parts of the frame to match
the same color as the darker parts of this. We're focusing on the
red channel first. Like I said before, these are the highlights and
these are the shadows. If we just focus on these
shadows over here on the left, this is the shadow here,
then this is a shadow here. As you can see, the shadows
are a little darker. I'm just going to pull
that down a touch. The highlights in this space, well, they're not
exactly super bright. That's probably, say, the
clouds are the highlight. I'm just going to
pull those up to match a little bit more. There we go. I'd say
that matched roughly. There we go. That looks
like it belongs there. Then we'll go into green, and we'll change the channel
down here from red to green. We're just going to do
the same process again. We're going to focus on
those shadows again. The shadows over here should match the
shadows over there. I'm just going to pop them
maybe just up a touch. The highlights are quite muted, so I'm just going to
pull that down a little. That looks like it matches. Now we can move on to blue. Then we'll go down
to this option, and we'll select Blue again. Again, you really
want your highlights and your shadows to match. The shadows are over here and
the shadows are over here. These should be
matching at this point. We might need to bring that up just a little, so around there. Then I'll highlight
in this frame, should be matching the
highlights in the sky. That is up here. There we go. Maybe look at this
sign, for example. This is a reference of
where our highlights are. That now looks great. That looks like it belongs in this frame. If we turn this back to RGB, and we pull this back to RGB, you can now see that
matches a little better. I would argue that my skin is just a little bit on
the red side though, so I just go in and just pull those
highlights down a touch. Now that looks like the
footage now matches. If I turn it off, and I turn it back on, you can see now that
matches a lot better. This looked really orange
and over the top before, whereas now it's
a bit more muted, and it looks like it could
be part of that scene. That probably is one of
my biggest pieces of advice when you're doing
green screen footage. It's all well and good
just taking the green out, but you want to try
and color match the green screen footage and the background
that you're using. Now, before these
curves, this footage definitely did not match, but after applying
that round of curves, this footage now
matches a lot better. Now we can move on to color correcting the
footage as a whole, rather than just isolating
the individual layers. But there you go.
That is how you would green-screen or remove that green screen from your footage inside of
Adobe After Effects.
17. Rotoscoping: The Rotobrush & Refine Edge Tool: Next up we're talking
about rotoscoping. Now, rotoscoping
quite simply put, is green-screen without
the green screen. Let's say you
filmed a footage of somebody against the background and you want to put
something behind them or you want to change
the background, then you would have to cut
them out to get rid of that background in order
to change that background. But without a green screen, it's a little bit more
difficult and that leads into rotoscoping rather than keying. Now, I'm just going to use
this green screen footage inside of Adobe After
Effects for ease. But of course this does also work on other footage as well. You want to try and
get your subject on a high-contrast backgrounds. If the subject is
wearing a black jacket and you're filming them
against the black background, then After Effects
is going to have a very difficult time figuring out what is the jacket and
what is the background. If you can try and get your
footage that you want to rotoscope in a high
contrast environment, so maybe a black jacket
on a white background, then that's really going to
help out with this roto. In this example, I'm
just going to cut down this footage to three seconds, just so that we're not
waiting all day for After Effects to
analyze the footage. But then once you've imported your footage inside of
Adobe After Effects, you want to select that layer, go up to the top bar
and select this. This is the Roto Brush tool. We'll select that, double-click the footage, and that will load up this menu. Now from here you want to scroll through to the very beginning. As you can see at the moment, this brush here, this is
fairly small at the moment. It's green and that
means when we draw over somebody is
going to keep them. But if we wanted to remove
them we just hold down option and then draw over that area and that's going
to get rid of that section. Our aim with the Roto
Brush is to draw within the subjects that we want to get this pink
outline around them. But as you can see,
that is very messy because our brush is a
little bit too small. If you go into brushes and you increase the diameter
of the brush, that will increase the diameter of that specific brush as well. If you can't see
brushes by the way, then just go into Window
and select Brushes. Make sure there is a tick there. Once you've increased the
diameter of this Roto Brush, you just want to paint
inside the person. Try not to go outside
the lines if possible. There we go. That is great. Although the problem is I have gone outside the lines
here so I'm just going to hold Option and
I'm just going to paint around that bit
to remove that section. That is pretty much good to go. From here, it's
really important that this gray box is filling up the entire duration of your video clip in order for that to analyze the entire clip. If it's only set to a second, then it's only going
to roto a second. Make sure that's all
the way to the end. Then we'll just press Space
on the keyboard to play. After Effects is just going
to play that frame by frame, and it's just going to
add this outline around. Now as you just saw,
my hands then came up into frame and it didn't recognize that
these were hands, so we want to go through frame-by-frame and
just paint these hands in. There you go. Now
it should follow. If it doesn't follow for
any reason, then just stop, go back and then just paint
over that item again. There you go. That's now
doing what it needs to do. That's doing a great
job of analyzing. Of course, there if for any
reason though it doesn't. Again, the hand comes back up. It didn't pick up the fact that it needed to keep the hand. If that happens,
just go back in, paint over that hand and
then we'll play frame by frame to make sure that is now
adding that into the roto. I'm just adding
this hand back in. As you can see, it's
added this corner in, so we'll just hold
option and remove that corner at the
hand back in there. That looks great. I
wanted to analyze that. If we play this back, you can see that After Effects has now created this pink outline
around the subject. This looks great,
although there are a few moments down here
where I cut out the cable. I'm not going to bother
going in and fixing that. But if this was your example, I would recommend going
in and fixing that. Otherwise you'll end up with
a bit of a mess in the edit. But if you wanted to
double-check this, you can just select the
toggle Alpha boundary option. This is what your
footage will look like. As you can see, the hair still
looks a little bit messy, but we're going to go
in and fix that with the refine edge tool in a
moment, so ignore that. Just look at these
edges of the subject. Feel free to change that
to this third option, toggle Alpha overlay
option if you would rather see that in
a different color. Let's go for a yellow maybe
and increase that up to 100. There we go. That's
how this looks against this yellow background. Of course, as you can
see on these hands, I'd have to go back in
and do a little bit of roto work to get the
hands perfect down here. There's a bit of over spill. But for now I'm just going
to leave that as it is, and then I'm going to go back
to our main composition. As you can see, we've
got the person isolated. Now, like I said, the hair is a bit of an issue throughout. As you can see, because the edge of my hair
is a bit frizzy, it's not getting
rid of the green. In order to go in and fix that, we want to just go to
the Refine Edge tool, double-click that layer again. Then we'll go back to
the very beginning, and we're just going to draw
around the hair like this. Make sure all the
hair is covered in this Refine Edge tool like this, and that will turn your
hair black and white. The white is the hair and
that's going to keep the hair, and then the black is everything that it
doesn't want to see. Once you've selected your hair, you can just play this back, and After Effects
is just going to go through frame-by-frame, render that out, and get a really good roto
around your hair. This is honestly one of the best ways of
removing somebody from a background because if you didn't have
the Refine Edge tool, you'd have to go in and
be very precise about your road swing and it
would be very difficult. The Refine Edge tool is
an absolute dream when it comes to rotoscoping in
After Effects. There you go. When we zoom back out and we take this back
to the beginning, you can see the rotoed edge
is following the subject. You can see that Refine
Edge tool is on the hair. Now when we go back to
our main composition, you can see that hair is
looking a lot better. There's still a little bit of that background coming through, but it's a lot better
than it was before. Of course, you can go
into the Roto Brush and Refine Edge tool. As you can see, you've
got the Refine Edge tool. You can shift the edge across so you can actually
eat into the hair a little. Then you can add just a little bit of
feathering to soften that off. Then if we go up to
the Roto Brush Matte, you can see this is going to
be the rest of our subjects, so not the hair, the
rest of the subject. You can see if we
shift the edge, we can actually eat back into the subject so we can
eat into that roto. That's going to
help to get rid of that background spilling over. Of course, we can feather that off as well if we wanted to. But let's zoom out and
let's have a look at that. I believe that looks great. There's a little bit of a
mess on the hands down here, but I'm well aware of that. Now from here I can
just go ahead and add text layers behind myself. I'll create a new text,
add that behind myself, and that roto is doing its job. I'll just duplicate
this footage, drag that bottom layer
underneath the text and delete the Roto Brush icon. That means that text is
now going to sit behind myself in this composition. Of course, you can treat this
light green screen footage as well and you can do a background
replacement so we can drag that same city
footage in again. Then from there you
just go through that same color
matching process to match the color
in the foreground to the background color as well. The Roto Brush and the Refine Edge tool
in After Effects are both extremely powerful ways
of removing the background. It doesn't matter
if you didn't film your footage against
a green screen, as long as you've
got footage filmed in a high contrast environment, there's a different
color behind them, then you're going to have
a really easy time using the Roto Brush and
the Refine Edge tool in Adobe After Effects. It's really great because
you can go all the way into a background replacement or you can just roto a
specific section. Then when that section
passes over something, you can add text
layer behind them, and it looks like that person is in front of that text layer. There are so many different
creative possibilities when it comes to rotoscoping. Have a play with the
Roto Brush Tool and the Refine Edge
tool and see what you can create using these two different tools
in Adobe After Effects.
18. The Puppet Pin Tool: Next up we're going
to talk about a slightly different way of animating items and object inside of Adobe After effects, and that is the puppet pin tool. Let's get into it, so we're
first just going to start by creating a new shape
or a new solid, so I'm just going to start
with a rectangle tool. I'm just going to draw a long rectangle across the center of our
composition like this. Now the puppet pin tool is
marked by this icon up here, so puppet position pin tool. We're going to select that, then I'm just going to
create three points. I'm just going to
select the middle, the left, and the right. Once you've created
those three points, we're just going to
go down into effects, Puppet Mesh 1, Deform, and then we've
got Puppet Pin 1, 2 and 3, so as you can see, a new key-frame has already been made on each one
of those points, and puppet pin 3
is on the right, puppet pin 2 is on the left, and puppet pin 1
is in the middle. Essentially a pin is just
a point where we can move. As you can see that it's just going to move around like this. If I move the middle, that's going to move
around like this, and then if I move to the right, it will move around like this. Now as you can see,
we're getting this box appearing and that is
because we've got a stroke, so if we turn the stroke
off, that would disappear. From that, we can
go ahead and create an animation using
the puppet pin tool. There's key frames
already made at 0, but if we go over to one second, we'll move all of
these pins over. Now you can see, we can animate this from this position into
this position, so as you can see
that's it's creating a bit more of a natural look. It's kind of crumpling
over and folding, and I feel like you
wouldn't be able to create that without the
puppet pin tool. We carry this on and we'll go round and we'll just crumple this up like this, there we go. Let's see how that looks. There we go. You can
see that incident looks a lot more natural now. It does snap into
a position here, so I'm just going to
create a key frame before that point
on every layer. Then we'll delete that last
key frame so that it doesn't crumple up into
that point there. It folds in and
then crumples in on itself like that, and of course, we can always convert these
key frames from linear to easy ease to change the
look of this animation. That now looks a little
bit more different. Now the puppet pin tool
is really powerful. Obviously, this is
a weird example. I feel like I wouldn't
use this for anything. But the puppet pin
tool is especially useful when you're doing
character animation, so I'm just going
to import a PSD of a very simple and
very basic character. I'm just going to import file,
and then as you can see, I've got character.psd, so I'm just going to open this up and that will load this menu. I'm going to import
this as a composition, and I'm going to have
editable layer styles. This means when we open up
this character pre-comp, you can see we've got
these basic character separated onto every
individual layer, and this is really important. I'm just going to copy all of those layers into our
main composition. Now we can use our
puppet pin tool to isolate each individual limb. That means we can create a
point here, here and here, so you've got the
shoulder, the elbow, and the wrist on both arms. Then we've got points up here, a point on the knee and then a point is on the ankle as well. Let's start by just
renaming these. I'm going to right-click
that top layer, we'll go rename left arm, line 3 is right arm, line 2 is left leg, and then line one is right leg. It's super important
that when you're doing character
animation that you name all of these layers what they are and
what they represent, because if we're using the puppet pin
tool and we've got all of these different
layers stacked, it can get very confusing. Let's just focus on
this arm to begin with. This right here is a left arm. I'm going go to that
puppet pin tool. Select the puppet
position pin tool, and I'm going to
create a point here, a point on the elbow,
and a point down here. Now we'll go into that left arm, we'll go Effects puppet mesh 1, Deform, puppet pin 1, 2 and 3. As you can see, that
key-frame has been created at that point there
where we created them. Of course, if you wanted
to move that over, feel free to do so. But we're just going go roughly
a second over from there. I'm just going to make it look like this character is
putting their arm in the air, so I'm going to move
the elbow up like this, and then I'll move the
wrist up like this. Then this point here is
serving as an anchor, so if we didn't have that point, these two points of the arm
would just be flopping about. But with this anchor
connected there, it means no matter
where I move these, that is always going
to be anchored in at this position here. So that means the
arm isn't going to disconnect at any
moment in time, which is super handy.
Let's see how that looks. There you go, it does
look a little bit funky. He definitely snapped his
arm halfway in the process, so I'm going to have to
correct that like this. There you go and their arm
is now going to go up. The animation was a little
bit junkie, I am aware, but we're going
to carry that on, move over and move that
last key-frame over. Move this point over like this, move this point over like this. Now we're going to
play that back. You could see we've
got this weird wave animation now taking place. Of course, the animation is a little funky and we can convert these to easy ease key-frames to smooth
that out a little. As you can see, if you spent some time on that and you
really clean this up, then you could create a
really convincing animation in this character. We can make this character move, we can make this character jump, we can have them
waving in the air, but the puppet pin tool or the puppet position pin tool is a really awesome and really
creative way of adding animation and bringing
characters to life inside of Adobe
After Effects. Now, Adobe After Effects isn't the place where you would
do character animation. There is an entire different
Adobe program for that. But if you just wanted some really simple
character animation in After Effects, then using that
puppet pin tool is a very quick and easy
way of doing so. Of course, you're
not just limited to character animation with
the puppet pin tool, you can bring objects to
life and animate them in really new and interesting
ways by using this tool. But the puppet pin tool
is a really great way of adding life into
your still assets.
19. The Basics of Colour in AE: Next up we're going
to move on to color. Now, Adobe After Effects isn't really the place to do
your color grading, but color correction or
color grading inside of Adobe After Effects can
be very useful to one, age-specific editing
effects, or b, if you want to combine two different video clips
together into the same comp and then you can
just match those in After Effects and then do
all your grading in Premier. I'm just going to show
you a few basic tips and tricks on color grading and
color correction inside of Adobe After Effects for when you feel like you do need
to add a splash of color or to match the colors of two different clips together
while you're editing. Let's just start with
this traffic footage. We've got city traffic,
let's drag this in. There's multiple different
ways of coloring your footage. If you go into Window, Workspace, you can
switch to color, and that is going to load
up the Lumetri Scopes, or alternatively, we can
keep things really simple. Just go back to our default
window and search for Lumetri and drop Lumetri color
on our footage like this. Lumetri color will
populate up here and in the basic
correction setting, you can see we can
add a Basic Input LUT to add a splash of
color onto our footage. Of course these can be
quite intense though. If it looks a
little overexposed, then feel free to
get rid of that. But I'm just going to keep
this ARRI_universal_DCI lot on here for now. Then we can go down to white
balance and we can change the white balance by selecting something white in the frame, like that, or alternatively, you can adjust the
temperature and the tint by using
these two options. If you pull it to the left,
it will call the clip down, if you pull to the right, it will warm that up. Then the tint left goes
green, right goes purple. It may be you're filming
on a camera and it got a slight green tint. If that was the
case, I would lean this towards the purple, so maybe five or 10 percent, just to pull that green away. Then moving down
we've got the tone, so we've got exposure, then we've got contrast, so you can add contrast,
decrease the contrast. In this example, because this is quite a
contrasted a lot, I'm just going to pull
some contrast away, then we can isolate
the highlights. I'm just going to pull
these down like this. These shadows are the
darker parts of the frame, so highlights are
the brighter parts, shadows are the darker parts. I'm just going to pull
the shadows up a touch. The whites obviously are the white parts of
the frame so you can add a bit more life to them
or you can pull that away. Then the black is obviously is the black parts of the frame and decreasing your black just
adds a bit more contrast, so I'm going to do that
with maybe negative 10. Of course, if you're not happy
with what you've created, then you can always
just press "Reset" and that will reset all
of those options there. Then moving down just under
here we've got saturation. But I wouldn't
bother messing with the saturation too
much at this point, I would just keep that at around 100 and move down to creative. Now, inside of creative you
can see we've got a look, and this is where we
can add our custom LUT for color grading. You've got all of these
different LUTs here. You've got these Fuji ones, you've got Kodak ones, you've got SL, ones over here, you've got a blue cold, you've got a blue
ice, day for night. Feel free to work
through this list and choose some coloring
that works for you. Then once you selected a LUT
that works for your project, you can either dial down
the intensity or dial up the intensity by using the
intensity slider here. I'm going to keep that at
around 80 or 90 though. Then we've got the adjustments
and we can increase faded film to just
soften up those shadows, so we're just bringing
the shadows up. Sharpening is
digital sharpening, and generally I
keep this at zero. Then we've got the
vibrance and the vibrance is basically the
same as saturation, but it's going to look
a lot more natural. If you pull the saturation up, everything looks
completely fake, it looks really weird. But if you pull the vibrance up, everything is looking a little ugly when
you go all the way, but it doesn't look as surreal, it looks a bit more natural. Generally if I'm
increasing the saturation, now I pull the vibrance up a touch and then I pull the
saturation up a bit more. Making those colors
pop is going to go more with the vibrance
and the saturation. Then we've got
some split toning, and this is basically
just adding colors into the shadows, so the shadows are
the dark parts, highlights are the bright parts. Let me give you an
extreme example. These shadows are now
leaning towards red and the highlights are
now leaning toward blue. Then from that you've
got curves and I've briefly explained
how curves work, but I'm not going to do
curves in this menu here. I'll show you the
curve separately. Then we've got our color wheels, and this is helping us
to isolate the shadows, the mid-tones, and
the highlights. Shadows will lean
towards the blue, midtones will lean
towards orange, highlights will lean
towards orange as well. As you can see, that's going
to look really dramatic. That is the Lumetri color
and then is one way of doing your color correction
or your color grading in After Effects. As you can see this is
before, this is after. It's a bit extreme,
but that works. Now, moving on, if we
go into effects and presets and go into
color correction, you can see we've
got all of these other coloring options, so I've got some auto color, auto contrast, auto levels, and generally, I would lean away from anything
which says auto. Then we've got black
and white, which is just a basic black
and white filter. We've got brightness and
contrast and this is just going to increase or decrease the brightness and the
contrast and the shot. Broadcast colors,
color neutralizer, color offset, all of
these are really cool, I advise you to go through and have a play with all of these. But the two that I love the
most are curves and levels. Let's start with curves. I've briefly talked
about curves before, but curves are really
powerful because you can target each individual
color channel. If we start with
curves on the RGB, we're affecting all of
the channels at once. Now, in curves, the top right is the highlights and the
bottom-left is the shadows, and then this area
is the mid-tones. If we look at this
shot, we can see the shadows aren't
exactly very contrasted, so I'm just going
to pull those down towards here and make that a bit darker to add more contrast. The highlights, which are
these brighter parts, these could do with a bit
more contrast as well so I'll just pop
those up a touch, and then the mid-tones
can come down a little just to make that pop. As you can see, if I pulled
the mid-tones up here, it's all going to overexpose and it will all
underexposed down here. Of course, you can
do some masking and isolate different
areas of the frame, but we won't do that for now, we'll just focus
on these curves. Then we'll move down to red. We can do some color grading
with this red channel, so maybe the highlights
need a touch of red and the shadows
need less red. Then we'll go to green and
we'll pull the highlights and the green down and the
shadows on the green up, then the mid-tones down a touch. Now this is looking a bit blue, so we'll pull the blue away. Then we'll just pull the
highlights of the blue, maybe to the left a little just to make that
blue sky pop a bit more and we'll pull the
shadow down. There we go. If we turn this on and
off, you can see how dramatically that has changed. Of course, though,
that was curves. We can now go onto levels,
and there are two levels. You've got levels and
levels individual colors. Generally, I always
select levels. If you drag levels
on and then you drag levels individual colors, there's not a
massive difference. You basically get
everything here. On the individual
colors you get red, green, and blue
isolated in a tab. But if you go into levels, you can jump between those
different colors anyway. So I wouldn't bother with
individual controls, I'd just start with levels. Here you could increase the
input black to add contrast, you can decrease the input
white to add some highlights, you can put the Gamma down, and then you can jump between the channels and pull all of these options around to get to a color that
you're happy with. Now, let's say you wanted to do some specific color grading, so let's say you
wanted to change the color of the
sky, for example. If we go into change
color or change to color, we'll drop the change to
color on the footage. You can see we've
got a from and a to. We can use the Eyedropper
tool to select the blue sky, and then we can change the
two to a different color, so let's go for a green sky. Press "Okay" on this,
and then from that, you can see we can
change this from hue, hue and lightness, or we can change this
to hue and saturation, or hue lightness and saturation. I generally leave this at hue because it looks
the most realistic. Then of course you can
always just increase or decrease the hue down here. If you decrease this down, you can see you're
starting to get that color bleeding through
with the original blue. You want to dial
that hue in until you've got the
perfect selection, so around five percent
will do the trick. Then you can
increase or decrease the softness just
to soften that off. You can already see that
if I zoom in on the sky, if I pulled it up to a 100, it's softening it up, but it means I have
to pull this up in order to hide all
of that ugliness. That really does work if you wanted to change the
color of something. Of course there
you've got all of these other settings
in the color tab, so go through all of
these options and all of these different plugins
and presets, have a look, see how these affects your
footage, but there you go, that is the basics of
how you color and grade your footage in
After Effects and I would definitely
recommend jumping into After Effects and playing
with all of these plug-ins. Like I said previously, I wouldn't do my main color correction or color
grading in After Effects. I would only really
use coloring if I was trying to match a
few clips together, or if I just needed something
to just pop a little bit. Generally I would do my editing and my color
grading in Premier, and then I would only
use After Effects for my motion graphics and
those visual effects.
20. Animating with Expressions: Next up we're going to talk about a slightly different way of animating in After Effects. The reason why this part of the animation episode is so far into the course is because this can be a little
bit intimidating to new users inside of
Adobe After Effects. We've talked about
keyframe animation and keyframe animation is great because you get
complete control, exactly what you're
going to get. You change the
values of one point, you change the values
of the second points and After Effects
is just going to change that object
or that item from this one point to
the second point. Great. But what if you need
to automate something? Maybe you want something to just keep rotating infinitely, or maybe you want
something to just wiggle around and you don't want the pattern to look predictable. Well, this is where we can lean into a different style of animation and that is
the use of expressions. Now expressions are one of
those things that a lot of people find really
intimidating in After Effects. You can get some really
complex expressions, but expressions are
nothing to be scared of. You can start with some
really basic expressions to really make your life
easier and then you can learn and copy other
expressions from the Internet to get something
that you're looking for. First of all, before we actually
go into the expressions, I'm going to show you how to add an expression into your footage. I'm not going to do this
on our video footage. I'm going to create a new shape. I'm just going to create
a circle or an ellipse. I'm just going to
change the fill color to a bluish purple, we'll remove the stroke. Then I'm just going to
place this in the middle. There we go. I'm just going
to change the anchor points. I'm just going to
go into transform, and I'm just going
to move that anchor points that this circle
is now in the center. At this moment in time, we've got this very basic
circle in the center of our composition and
it's not doing anything. That is until we
add our expression. Let's say we wanted
to add an expression to animate the scale
of this circle. We would go down into
transform and select scale and rather than
creating a keyframe, instead we're going
to hold option and then select that
stopwatch icon and that loads up this expressions window and this is where we can
add in our expression. Let's delete transform.scale. I'm just going to go
into my notes app to load up an
expression and we'll start off with a
wiggle expression because this one
is fairly simple, so I'm just going to
copy this code here. Wiggle, (10, 50)I hold option, select that scale and I'm just
going to paste that in. Wiggle (10, 50). Now, I'm just going
to click out of this box because if
I press "Enter", it creates a new line. I'm just going to
click out of this box and that is going to
wiggle the scale. As you can see, that
looks extremely bizarre. It's just going all
over the place. That is because of these
numbers that we've used. In this example we've
got two numbers, so we've got 10
and 50 and that is the frequency and the amplitude. Basically, the frequency or the first number is how many
wiggles it's going to do. Then the second number, the amplitude is how
far it's going to move. If we go for the frequency first and we pull
this down to one, so frequency 10, amplitude 1. That means there's going
to be loads of wiggles, but it's not going
to travel very far. There you go. If I zoom in, you can just about see, it's only just
wiggling around here. If I pull that up to maybe five, that should be more noticeable. There you go, if we zoom out,
it's still quite subtle. But if I was to pull
the amplitude back up to maybe like 40, for example. You can see that is going to
travel a lot further now. We can take that even further
and go up to maybe 90. Now that's really
going to travel. Now let's go on to frequency. At the moment the frequency
is 10 and this is how many times that
is going to wiggle. Let's pull this to one, and now it won't
be moving all over the place and there you go
that is much slower now. Let's pull it up a little bit. Let's go for three.There you go. Now you can see it's moving
around a little bit more. Of course, this
wiggle expression doesn't just apply to the scale, so let's copy this
wiggle expression and delete it from scale, so the scale is back to normal. We'll go into position
hold "Option" on your keyboard and then paste that wiggle expression
in and click out. There you go, the
position has now been affected by the
wiggle expression. I'm not doing anything. I
haven't created any keyframes, but that is now moving
on its own accord. Of course this same rules apply. We can change the amplitude and the frequency again so you
get different results. Let's change the
frequency to five, and let's change the
amplitude to 200. It's going to move around
a lot and there's going to be a few more wiggles
in this one now, so that's becoming a bit
more aggressive now. Wiggle is really good when you want to just get
an object moving, so you just want it
to just be doing some random movement around. Wiggle is really good
because it's just going to fidget around the
space that it's in, moving on now, I'm going
to talk about rotation. In order to see this
rotation expression working we're going
to need a square, so I'm just going to go
into the rectangle tool. I'm going to load up that
proportional grid and I'm just going to draw a
square around this point here. From here we'll go into
transform on the shape layer. We're going to affect
the rotation here. We're going to go
into our notepad again and we'll go
up to rotation, and this is the expression
time times 200. We'll copy that in.
We'll hold "Option", select the stopwatch icon, paste that expression in, click out and that is just
going to keep rotating. Again, I'm not
touching anything, I'm not doing
anything that is just rotating around and
there's no keyframes, which means it will
just keep doing this motion over and over again. Of course, if I pull
this number up, so let's go 400. That is going to go
much faster now. If I pull that down
to a smaller number, like 20, that is going
to be a lot slower. There you go, those
are two really simple expression
controls that you can use in Adobe After Effects to help automate
specific animation. Now, if I just go into my notes, you can see you can do a bounce, you can do a motion
trail, a loopOut, and then of course
we've got the rotation and the wiggle as well. But of course, if
you just search Adobe After Effects expression
controls into Google, you'll find a whole list of
different expression controls available to you to
automate specific controls. Expressions are leaning into the slightly more complex
side of Adobe After Effects. To be honest, it's not
very frequently that I use expression controls when I'm editing inside of
Adobe After Effects, it's only in those rare
instances when I want something to loopOut or do
something random, that I use an
expression control. Expressions are
definitely not essential. You don't need to
understand expressions, but it is really nice if
you wanted to automate some animation inside
of Adobe After Effects.
21. How to Export (Normal, Transparent Background, Compressed & Batch Export): Lastly, we need to export
our video once we've done everything that we need to do inside of Adobe After Effects. We now need to export this
and turn this into a video. When it comes to exporting, there are many different ways
of exporting your video. I'm going to show you all
of the different options available to you right now. So with your projects selected, you first just want to
go ahead and select the work area that
you want to export. As you can see, this video
is only four seconds long, but the composition is 10. I'm just going to drag this
selection marker over to the end so that now we're only export in
these four seconds. Then from that you just want
to go up into composition. You want to go "Add
to Render Queue." This will load up
the Render Queue. Now you've got three
settings to play with here. You've got your render settings. If we select "Best settings", that will load up this menu. So quality should be best, resolution should be full. Everything else here
is completely fine. Frame rate, you can either
use the compositions frame rates or you can reset that to a
different frame rate. Typically though,
you just want to keep this as the
comp frame rate. Then we go to the output module, select "Lossless"
or alternatively, whatever else it says there. Generally, these are the
settings that I like to use. So QuickTime,
post-render action, non, video output, RGB, depth,
millions of colors. Then you can resize this or
crop this if you wanted to. But generally I keep
these on ticked. I'll press "Okay",
then I go "Output 2". This is going to select where we're going to
render this video too. You want to select the
folder of your choice, press "Save" and
you want to press "Render" and After Effects is just going to render
this video for us. [BACKGROUND] They go, you can
hear the sound, it's done. They go, you can see
that has been exported. But the thing is though, if we look at that, it's
a four second video. That four second video
is 485.3 megabytes. Unfortunately, it doesn't
play back in the Finder. If I imported this back into
After Effects, it does play. If I imported that
into Premiere or Sony Vegas or another
video editing software, it will play, but it won't
play back from here. That's really annoying. Next up, I'm going to talk about a transparent background export. We'll delete the city traffic. I'm just going to
press the T icon. I'm going to make some texts. Let's just add some
basic animation to this. They go, so we've got
this slow animation up. Now we want to export this with a transparent
background like this, so that we can use
it in Premiere or another video
editing program. In order to do
that, we'll follow those same settings
will go to composition, add to Render Queue, we'll go best settings. All of this should
be exactly the same. But when we go into
this lossless menu, you want your format
to be QuickTime. Then we'll go down to
video outputs and select a video RGB and Alpha. Alpha is the transparent layer, and RGB is this solid layer. You want to select
RGB and Alpha. Depth should be
millions of colors plus this should be
pre-multiplied mattered. Then we can put this
wherever we want this to go. We'll press "Save",
render this out. [BACKGROUND] There you go. You can now see we've got
that transparent layer. These are much
smaller because there was only this small
amount of data, that file size is much smaller. Let's drag some footage
on the timeline so we can actually see this in effect. If we drag this After
Effects intro on, you can see that is now on a transparent layer and it's
sitting on top of this. When you drop that
into Premiere, Sony Vegas, Final Cut, whatever your editor is, that will be on a
transparent background. That's really good if you're
exporting lower thirds or text animation
from After Effects. But the problem is going
back to that first export. This export size
is 485 megabytes. Let's track that same
footage back in. It says four second video. Rather than adding this
to a Render Queue, I'm going to add this to the
Adobe Media Encoder Queue. Now, Adobe Media Encoder is an alternative
piece of software. It's a completely
different piece of software to After Effects, but it's specifically
designed to encode your projects from Premiere
After Effects Audition. You can run everything
through encoder. An encode is really
good because you get more advanced export settings. Makes sure you download
encoder before you try this. Then once you've
loaded up encoder, you then want to select
this first option, and that will load up a
menu which looks a lot more similar to the export
window in Premiere. You just want to go
ahead and select H.264. You can then set a preset. I have my presets up here, which is the course preset
or a VBR 30 optical flow. But you can go ahead and
select maybe YouTube 1080 HD. Make sure the width is 1920 by 1080 with a square
pixels of one. You can either let your
hardware or software encode. Then will go to the
bitrate settings, select "CBR" or "VBR 2
pass, " it's up to you. You can see down here is
the estimated file size. If we pull this to the left, it's now 258 kilobytes. But when we pull that all
the way to the right, it is now 31 meg. Try and get a fairly
sensible file size here. I'm just going to max it out
at 62 because 31 is tiny. Then down here you've got
time interpolation and generally I would keep
this as frame sampling. Then you can just
set the output name to wherever you want this to go. This is going somewhere
random at the moment. I'm just going to pop
this into that folder. We'll go compressed, press "Save", press "Okay, " and all of these options have now been amended
so we can just press the play button and
encoder is going to export that for us rather
than After Effects. Now when we open up that window, we can see we've got After
Effects intro compressed. We can play the footage
back, which looks great. But the beauty of this as well is if we look at the
file size that is 31.4 as opposed to 485.3. Of course, you you export
from After Effects directly. But I would seriously
recommend downloading Media Encoder from
Adobe's Creative Suite, because that's going
to give you these much smaller export sizes. The beauty with using
Adobe Media Encoder as well is you can batch
export your videos. Let's say you've got this video. We'll go "Composition", add to Adobe Media
Encoder Queue. Then let's say we've also
got another sequence. We'll create a sequence
from this footage. I'll create comp from selection. Let's say we want to add
this to the Render Queue. Then we'll select the
"Green footage pre-comp" or new comp from selection will add this to
the Render Queue. As you can see, we've now got all those three videos queued
up ready to export so you can go in adjust all
of those settings of those individual video
clips and you just press "Play" and Adobe Media Encoder
is going to work through those one by one and export those without you
having to do anything. This means if
you've got multiple files or multiple videos inside of Adobe After Effects
that you need to render, then running them all into the Adobe Media Encoder Queue means that you won't
have to do anything. It's all automated and you're not going to have
to keep going in and manually pressing exports or adds to the Render
Queue in After Effects. There you go, those are
the many different ways of exporting your media from
Adobe After Effects. Of course, you don't have
to export your media. Alternatively, if you're
editing in Adobe Premiere, you can use the
dynamic link feature from Premiere into
After Effects. You can take some footage, put it into Adobe Premiere. You can replace that with an Adobe After
Effects composition. That would dynamic link that
into Adobe After Effects. Then you can do all your
edits in After Effects, and it will link
back into Premiere. This means that you can
just export that media from Adobe Premiere rather
than After Effects. All of those edits that you
did in After Effects will be attached to the
version in Premiere. If it sounds complicated or if you're interested
more about that, then check out the Premiere
pro course because there's a section specifically
about dynamic linking. I really think that would
be really beneficial if you're interested in that
dynamic link option. But there you go,
that's it for exporting all your videos from
Adobe After Effects.
22. Outro & Summary: There you go. You've now
successfully completed the introduction to Adobe
After Effects course. At this moment in time, you
should be fairly comfortable with the user interface inside
of Adobe After Effects, you should now be able
to use a wide range of different effects and
plugins in After Effects, and you should be able to do
quite a lot in the program. All that's left for
me to say is thank you ever so much for
watching this course. I really do appreciate
your support. I hope this course
was beneficial. I hope you learned
something, and of course, please feel free to
check out some of the other courses that I have
available on Skillshare. I have a full Premiere Pro
course similar to this, where I go deep into Premiere. Then I've also got a
green-screen course, a transitions course, and an introduction to
filmmaking course as well. I'm very keen to keep uploading
these courses and keep creating these educational
videos for you, so if there's anything in particular that you
would love to see, then please feel free to
leave your suggestions and your comments in that discussion
section on Skillshare. Thank you again for watching. I really appreciate
your support and I'll see you on the next
course. See you there.
 Chris Brooker, Filmmaker & YouTuber