Transcripts
1. Intro: Hello, and welcome
to this class on creating your own magnets
using air dry clay. My name is Patricia and I'm
an artist and I've actually started air dry clay as a hobby a few years
back and nowadays, I actually sell my own theses. I wanted to make this
class for you so you can dip your feeds
on air dry clay. And understand that this is a very affordable and very
easy hobby to start with. You can make very simple things just to start and
then grow from there. On this class, we'll be
making some magnets, some cute magnets for you
to put on your fridge. We'll start by talking
about what is tro clay, what you can use it for,
the different brands, as well as all the materials
you'll need for this class. After that, we're going to start making our pieces step by step. So we'll start by making our
templates for our magnets, then we will sculpt our magnets. Then after everything
is dry and ready, we will paint them,
varnishing them, and they'll be ready for you
to put them on your fridge. At the end, you'll have
something that you've made by yourself from scratch and
that you love as well. Then you can grab
all the knowledge you've gotten from this class and make so many other things that you can make for yourself. Or to give to other
people or even to start your own store
and sell your own art. Are you ready to make
your own magnets and start a new hobby? Then I will see you
in the next video.
2. What to Create With Air Dry Clay: Hello, and welcome back. These first few videos, we're going to talk
about air dry clay, the tools that you need, what
you need those tools for. We're going to be
talking a bit before getting our hands in the dough. But yes, we're going to be using air dry clay and what
is air dry clay? To put it simple, it is a very versatile and water
based modeling clay. And it doesn't require a kiln, an oven or anything really
for it to harden and to dry. That's why it's called
the air dry clay. You can model anything and
sculpt anything using this, let it dry and then it is
ready for you to paint, add some varnishing, and
you have a piece done. It's great for that
because it is easy to use. It is very affordable and you don't need an extra step
of baking your piece. You do not need any special oven or anything else for it
to dry and to finished. Now, what can you
do with tra clay? Well, basically, anything and I will show you some examples. The most simple things you
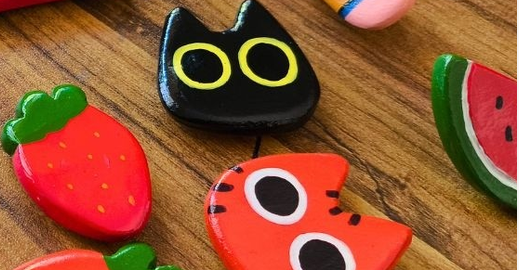
can do is, for example, some pins like this one here and we're going to be
making something similar to this cat over here. You can also make some magnets, which is going to be our
exercise of this class. What we'll be learning
to do in this class, we can make some key chains or some charms and pendants like
this, something like this. As you can see, you can draw or paint on top of your clay. You can also make some figurines and decoration
objects in general. As you can see, I do
make a lot of cats. You can also make
more useful objects, for example, incense burners. Like this one here, you put your incense
stick and you have this cute incense burner
for you to have at home. I also have another one
for a cone incense. I just put the
incense in here and the smoke will come
out out of the mouth. You can make a whole lot of other stuff like
a jewelry plate. For example, you can
make actual boxes, key holders as well, a lot of decoration objects. You can really make everything
you might want to make. You just need to be creative. The only thing I don't
recommend though is to use it for food stuff. Anything that your
food will touch, I don't recommend using this air dry clay or air
dry clay in general, mostly because this is
not water resistance, and yes, technically, you can add some varnish that
is water resistant. But with the heat, for example, with
the water and so on, it doesn't hold up very well, so I personally do not use it for stuff that
will hold my food. For that, you have
actual ceramics and specific clay for that and
that usually is baked. Also I'm going to be showing you very simple techniques
right now you can start with easy stuff and so you don't
need as many tools, but you can really
make a lot with just the knowledge that
you'll get from this class. We do know whatever click is
and what you can do with it. Follow me to the next video. We'll talk a bit more about different brands. I
will see you right
3. Best Clay Brand To Use: Hello, and welcome back. As I said, we're going
to talk a bit about different types of brands of air track clay
that you can get. Honestly, the thing you need to know is that for now for you, it doesn't really matter. They are going to be
very similar with each other and what I'd recommend is for you to get something that is
easily available to you. So you can find it in a craft store or
online very easily. And something that
is affordable. I think that in
general, at least the brands that
I've tried so far, it is very affordable
and the difference in price between
them isn't huge. For example, for this class, I'm going to be
using the DAS Relay. This is a very good one, very affordable one, and I think it's the one that
most people will use. I sometimes use this one. Other times I use another
brand which is called Jovi, but personally, I
prefer this one. But let's say you have just
one of them available nearby. They are very identical
and even price wise, they are very identical as well. Really just pick whichever
you prefer at the time. There are other
brands such as Scott, if I'm not mistaken. I know that Creola also
has some air dry clay. Personally, I've
never tried them, but from what I understand, they are all very similar. So for a beginner, if
you're just starting, I say for you to just go to your nearest craft store or
if you want to order online, look up for the DS one, for example, because
this is very affordable. This is one kilo of clay, but you don't need this much. There is 250 grams, if I'm not mistaken,
you can get that one. It's very inexpensive and you can actually make a whole
lot of pieces with this, especially if you're doing
smaller stuff like this. That is what we're going to do. That will be more than enough. Then you will see if
you like this y or not. If you want to get more, maybe you can try different brands and
see what you prefer. Also for the color, I'm going to be
using the white one. Is also a reddish one,
the terracotta one. I prefer to use white mostly because a lot of times
I will paint my pieces white or with very light colors and having the clay itself already in white will make
things easier because I don't need as many coats for painting. For example, as you
can see this one, I used a reddish clay. It didn't make a whole lot
of difference because I actually have a lot of
reddish colors in here. Again, preference, if you do the brownish
or reddish color, you can also do that. Oh, yeah, I think this is it for now when it comes
to air dry clay, just get whatever you can find and as long as
it's an air dry clay, I assure you you'll be
able to do just this. Yeah, I will see you
in the next video.
4. What You’ll Need For This Class: Hello, and welcome back. Now we're going to talk
about the materials you'll need for this class. Now, I try to keep it as low as possible and to use stuff that you might
already have at home. Even some of the things
that I will show you, you can probably find some substitutes with stuff
that you have at home. The first thing is going
to be the air dry clay. Again, I have this huge block, but you don't need to
get something this big. We're going to be making
three different magnets, so you don't really need
a whole lot of clay. Of course, you can make
more pieces if you want. Then we're going to
need a rolling pin. The rolling pin that
you get will be used only for air dry clay and
not for food anymore. Actually, as you can see, it's already stained
with different clays. This is going to be
used just for this. Now, if you don't have one
of these, that's fine. This is going to be used
to flatten our clay. Honestly, at the beginning, I didn't have this and what
you can use is honestly, any object that is
cylindrical, you can use that. When I started, I
would use jar made of glass for this because I didn't have anything else. That works. Something else you
can use is just get a plastic container or any kind of container or even a flat
surface that you might have. You can use that along
with some weight, maybe your own weight
on top of it and you can flatten the
clay that way as well. If you don't have a rolling pin, don't worry, use anything else. You might have a tomb
to flatten the surface. Now, next, one thing I
like to use just so I have my clay a bit more
even is these sticks. I put this on my surface with the clay between them, and
then I roll it. This way, my clay
will be this high. But again, these
are not necessary. They help. Also, these are just two sticks that
are glued together. Again, you can make this with
whatever you have at home. You don't really need a
specific tool for this. These are optional. Next, this one
will be important. Some kind of knife, I
use this zacto knife. You can also use the Shizactu as well or any kind
of knife you have, so we can cut our shapes, our figurines that
we'll be making. Then of course, we'll
need some magnets. For this class, I'll be making three different magnets and what you choose is
totally up to you. These are the things that
you can find at $1 store, for example, or a
craft store as well. I like to use this size and I like to use the darker
ones because usually they do look stronger than
those other metallic ones. But it doesn't really matter, get whatever you prefer. If you have smaller
ones, for example, you can glue two of those if
you think one is not enough. Just find some magnets
and you'll be fine. We will need some paint,
some acrylic paint, doesn't need to be too specific, something from the Dollar
store will also work. These are actually
from the Dollar store and they've been great
so far for what I do. Just find a few the
colors you want to have. For example, maybe a
collection of tubes that sometimes find guh will
work as well very well. If you prefer or if you have
gouache instead of acrylic, you can use those as well. Then we'll also need
some brushes to use our paint in our clay magnets. Now the size of the brush will really depend
on the designs we make. I brought just a random
few right now to show you, but at least a medium one and a smaller one for finer
details will be enough. Now, another thing we
will use, although again, this is optional,
and I'll tell you why it is some acrylic markers. Now, for me, it
is easier to draw smaller details using acrylic markers than
using the paint. I have the RX brush markers as well as some Poska markers, but it is totally up to you. Again, you don't really need this you can also
get a fine liner, anything that you might
have at home, it will work. I have here this penty one, but any brand will work like a micron one,
the micron sakura, the ones from a Huhu as well, this is just a fine liner, a black one and I use
this for the same reason. For example, for the cat's eyes, I rather do it with some
markers than with paint. Why? Because my hands tremble
a lot and it's much more difficult for me to control some brushes than it is markers. If you have this kind of issue, using the markers will be much more helpful than the brushes. If you want to draw a small
face in some of our magnets, the markers or the fine liner
will also be very helpful. You'll also need some sandpaper, so we can send our pieces
before starting to paint. Some gloves and a mask are
going to help you as well, and I will talk about
those things when we get there to finish, you'll also need
some varnishing. You can either use an
acrylic varnishing that you can brush or one
that you can spray. Personally, I prefer
to use the spray one because it's very quick
and very easy to use, but both will work. These are the main
tools you'll need. Also, be sure that you have a surface that
you're not scared of scratching perhaps as well as dirty it because this is
a very dirty hobby and yes, you can mostly clean it, but sometimes some residues
will be left behind, so I do recommend having surface that you
don't mind messing. Something that you can
use is, for example, a plastic towel or
perhaps a cutting board. Oh yeah, and we'll
need a small sponge, as well as a small
container for water. Now, these are just a general. I just want to give you an idea of the materials we'll use, but don't be scared because
at the start of each step, I will tell you what
materials you'll need. You don't need to have
everything by hand right now, but you can make perhaps a
list and I'll even give you a small checklist of stuff that you need.
It's easier for you. You have a small guide.
For now, this is it. Don't forget, I have
a whole checklist for you for all the materials
that I'll be using here, alternatives if you need those and optional things if you're
curious about them as well. I will see you in
the next video.
5. Creating Templates: Hello, and welcome back. Here we are our first step of creating our magnets
using air dry clay. The first thing
we're going to do is create our templates for the
magnets we want to make. As I said, if you want, you can just print out
the template. I've made. We're going to make
three different magnets, so we're going to make a
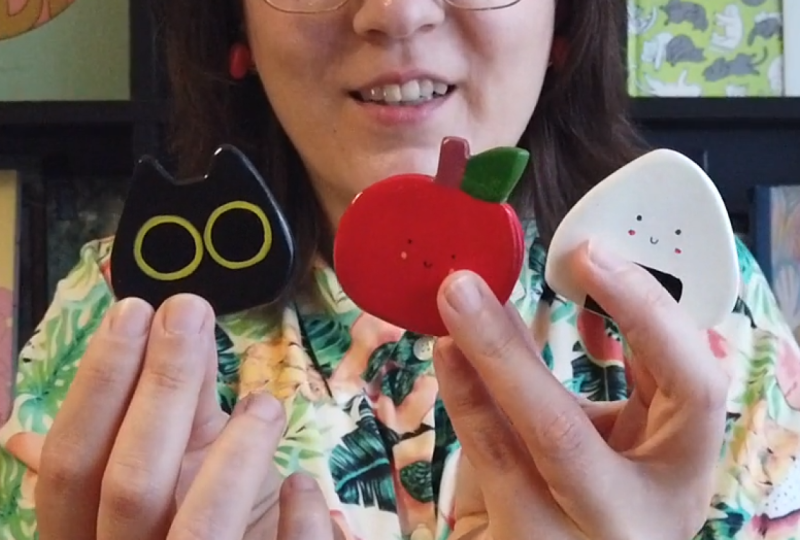
cat and on gii rice ball. And an apple. These are the ones
you're going to make, and I did create some templates for you to
print out and use those. If you want, you can also
make your own drawings. If you want to make something
else, you can do so. I'm going to make these drawings
right now and cut them. What we need right
now a piece of paper, a pencil, and some scissors. Now, I think I forgot to mention these materials in
the previous video, but that's why I did
the checklist so you won't be missing anything
like the pencil you're using, the scissors you're using
don't really matter. The paper same thing. This is just a print paper
and as you can see, it's a bit used already. I did fold it in the middle. Because if you want to have your drawings as
symmetrical as possible, one thing we can do is just draw half of drawing and then cut it. That's what I'm going
to do right now. Let's start with the
cat, for example. Also, you don't need to have a super good drawing of this, just a general shape. I'm going to start my
cat with a line like this and then a triangular
shape for the year. Then I'm going down down down round it up
and there we go. I have half of a at drawn
and as you can see, I started drawing from the
place where it's folded so that I then can just cut this area and I'll
have both sides. Kat is done, as you
can see, very simple. Let's go for the Oigiri. I'm going to make this Oigeri as triangular shape,
a bit rounder, which is the usual design, let's say we see for
those rice falls. Same thing and I'm going to draw Triangle but with
the corners round. Something like this.
As you can see, I'm not being super
detailed with this or trying to make a perfect drawing because
we don't need to. Now for the apple, we
can't really, we can. But the way I like
to draw my apples, it doesn't really work as
well with this technique. I'm just going to draw
here to the side an ample, but it's going to
be very simple. We're going to draw
a circle or a heart, actually, a mix of both. As you can see, my lines
are not good at all. It doesn't matter
because we're going to these are just a mold
for all our magnets. There we go. A mix of
a circle with a heart, let's say, you can make it
perfectly round if you want. Now I'm going to
draw here the stem. Now, I do like to keep the drawings thick because when you are then
sculpting with the clay, the thinner things are, the more difficult it
will be to handle. Also, once the clay dries tends to get smaller and now
I like to add here, a small leaf there we go.
My drawings are done. Now I'm just going to
cut everything up, so it is ready for me to
sculpt in the next step. Just going to grab my scissors and we're going to
start with this. As you can see,
I'm only cutting. This is the folded side, and I'm cutting all around
the lines that I've made. Also, this doesn't need to
be perfect and there we go, let's see what we have here. See a cute little
rounded triangle and we have our first
mold for our magnets. Let's go for the next one. Our cat, don't worry
too much about how good your drawings are or
how well cut they are. I can assure you it will
look cute because we're making very simple shapes,
very simple designs. It will look cute, whatever we do with
the paper right now, we can fix it when sculpting. So cat is done as well. Look at this very simple shape, but really, really cute. Now the last one,
our apple this part, if you want to be
repeating designs, you only need to do this one
give this template somewhere in a small box in a drawer in your holly
cart, I don't know, but just keep those whenever you want to make a cat
magnet or a cat pin, anything with this shape, you can just pick
it up and reuse it. Now, of course, since
this is done in paper, if you want you can
use a thicker paper, so it helps for longer. But since it's in paper, of course, after a few uses, you will need to remake
those because the paper will start to get damaged because
of the clay moisture. But I've made over
100 cuts using clay, using a paper from
paper baag you know, and I'm still using it. It's still good enough. I haven't had to remake it yet, so it will hold for a bit. The apple is also done and we got here as you can see there
are some mistakes here, but that is perfectly fine. We got our cats or
apple and our onigit. I think I like the
apple this side better. And this is it for now. These are our
templates that we're going to use to
create our magnets. Now, once again, if you want, I've made this digitally,
you can print out. I have a PDF for you to download where you
can find a checklist, as well as these drawings. You can print those
and cut them. And if you want, you can go through the step, draw your own, and you can
even draw any other design. You don't need to make the exact same drawings I'm making here. At the same time, I
know it is easier for you because it's one
last thing to think about. But if you want to
be more creative, have your own unique magnet, then feel free to do so. With that said, I will see
you in the next video.
6. Cutting The Figures: Hello, and welcome back. This is it. We're going
to start using our clay. I know you've been
excited for this and yes, now the real fun will begin. Now, first, what we'll
need for this step? We're going to sculpt
our figures, or magnets. What we'll need is the drawings that we
made or templates. Three of them. We're
going to need our clay. Don't forget if you're using a table that
you're not comfortable with dirting or
damaging it by mistake. Do find surface,
something to protect it like a cutting board
or a plastic towel. I'm using that baking paper that you used to put on the oven.
That's what I'm using. I don't really need a
whole lot of space here, so I kept things simple, then we're going to
need our rolling pin. If you don't have one, you can use a dar, as I said before, or you can also use some box or plastic
container engine and then just press on it. Oh, yeah. This is always
useful to clean up your hands from time to time
or clean up the workspace. A g is always useful when
doing these kinds of crafts. Then we're going to
need our sponge, some water doesn't need to
be a whole lot of water, but we will need it to moisture our clay from time to time
and to smooth it out. She's up to a knife or
any kind of knife really. And I'm going also to mention some optional items that
you can have some sticks, so you can have an
even clay surface. But for the sake of this class, I'm not going to use them. I can show you that you can
make this without this, and all you need is something
to flatten your clay. You put your clay in here, you have the sticks
and as you're rolling and flatten
the the clay, it will get as high as
the sticks you're using. You might have seen
already that you have some air dry clay
kits around with lots of silicon tools like this one and the ball tools of various sizes. Now, these are the
ones I use the most. Again, not going to
use this in the class, but I'm going to tell
you how I use them. Usually I use this one. This is really small
as you can see, and I do use it to, for example, have my clay. I will put my templates
and I will use it to draw around it so I know
what I want to cut it. However, you can do
that with a knife. You can make the drawing lightly and then you can properly
cut it with a knife. That's what I'll be
using this time around. But usually, I use this one
just to help me out a bit. I find it is easier to make that drawing that outline
than with a knife. As for the silicon ones, I use this one the most for very specific pieces
that helps us smooth out the
surface that we are using especially if you want to do some
corners in your clf. For example, for the
incense burners, we have those corners right and I want to smooth it
out. This will help me. However, for example, for
the magnets specifically, I only use my hands. You can do this without
any specific tools. With that said, let's start. I'm going to move things
around a little bit, and I'm going to grab some clay. I actually have
here a bit already. Not sure if this will be
enough for all the drawings. I think I want a bit more. Also, be sure, the clay itself
is not very problematic. But be sure when
you're doing this kind of hobbies to be in a
well ventilated place. For the sake of this class, I'm doing this here
in my recording area. But usually I'm in
a specific place. I have a small studio
where I'm doing this with windows
open and everything. So I'm going to move this here. Now before we do anything and this depends on whether
you live as well. But let's first massage
our clay for a little bit. For me, it's usually
very humid already, and as you can see,
it's very malleable. But depending on where you live, your clay might be a bit
harder and have less moisture. It really depends on
the areas that you are, but it's always good to massage the clay for a bit
before working with it. After we do that, we will lay it down and we will use our
rolling pin or your jar, wherever you're using, and
we're going to flatten it out. Try to be as even as possible with the
weight you're pouring. As you can see my paper heat is moving a bit, but
that's all right. That's not really
an issue for me, and I think we have a
good thickness here. Let me just move it just so you see how thick we have it
right now, it can be more. I would say, I'm
not going to say it could be less
because as it dries, it will decrease in size and it might be a bit more fragile and it could
break more easily. Also, don't forget
you're going to get your hands very
dirty, very fast. Now, before we do anything else, I like to use my sponge
and with a bit of water, I like to smooth
out the clay first, especially underneath it
because here as you can see, there's not a whole
lot of texture. What I'm going to do
is I'm going to dip just a little bit of it and
I even take out the excess. Mostly because my clay
is already pretty moist and I don't want
to add too much of it, and then I'm going
to smooth it out. Find all those
irregularities and pull them away and smooth my clay. Doing the same thing,
see this side, we see it more. For example, you see
these gaps here. I'm going to try and close them. Now, I'm usually not very
perfectionist with this, mostly because I like to see the imperfections in my pieces. But obviously, more the smoother you
want your clay to be, the longer you'll have
to spend doing this. And applying more or less
strength as you do so. I'm happy with what
we have right now. Now what we're going to do is use our templates right there. I'm going to turn this the other way around
again. All right. Now I'm going to start
cutting out our drawing. I'm going to start with the cat. I'm going to place
it right here, going to grab my small
knife and we're going to go around our
drawing our templates, sorry, and we're going
to create an fline. Now you don't really need to be super perfect with
this because again, you can smooth it out as you're doing the
next thing. All right. First one is done. Let's go for the next. Let's see our onikiti. I'm just going around my template and outlining
the shape I want. Let's remove it and now lastly, our apple right here. Let's do the exact
same thing. All right. That part is done next, we're going to actually cut
everything I'm going to be extra careful here because I don't want
to cut the table, but we're just going to go through the outline
we just made, but cut it all the way down. One, two. Let's remove it. There we go. See, we
have here our cat. It's not perfect,
but that's fine. We can still fix it
in the next step. Now let's cut the on gii. This is a very
simple shape to do. It's perfect for a
beginner. There we go. Let's move it here.
As you can see, it is pretty thick right now, but this will decrease in size as it dries and you
will see that later on. Just one more. This is the most complicated one,
but we can do this. I can't wait to see how
they will look at the end. They will look so cute. We are definitely in
the ugly phase of clay. Don't be too scared if you
think everything is looking way too messy because believe me, we're
going to fix that. We have here our three magnets. Now whatever's in excess can go back to the rest of
the clay or if you want, you can make more magnets
or more figurines, whatever you want to make. Now I will see you in the next video where
we're going to smooth out our magnets and let them dry and talk a bit more
about the drying process.
7. Sculpting And Smoothing: All right. Hello,
and welcome back. We cut our magnets, and now what we're going
to do is smooth everything out so it looks a
bit more finished, let's say, before
it starts drying. What do we need for this step? Basically, just some water, perhaps a sponge though. To be honest, I mostly use
my hands to do all of these. These are very simple
shapes and you can do this by using your
hands and fingers only. What we're going to do, we're
going to start here with on the gearing.
With a rice bowl. I'm just going to start dipping my fingers in the
water and try to smooth out these edges
that are a bit too rough. Sometimes you don't need to apply a whole lot of strength, we is going to go
through with it, very slowly, use the water
to smooth things out. In some areas, you might need
to apply a bit more force, but usually with this shape, you're good with just
a bit of pressure. And the water will do the rest. Just go through everything
just like this slowly. You can go back and forth if you're not
happy with something, one side, and then the other. Also here this area and here we can use our
sponge if you prefer. Now, because I had this
baking paper underneath it, you do see some marks
here from the paper. I'm going to leave it because
for me, this is fine. But if you're doing this in a very flat surface
with no obstacles, let's say, and no textures,
this won't happen. If it does, you just need to smooth it out
with some water, a sponge, and just go over it. Also, don't stress too much
about this because you can fix a lot of little things
during the sanding process. For now, I'm going to
leave it like this and I'm going to go for the next one
and do the exact same thing. Now you might notice some
of these are waiting. I will start to
dry up a bit more, but that just means
you might need a bit more water
if it does happen, rounding this year a bit more, it looks similar
to the other one. So we're shaping things up
according to what we want. This is a fairly simple process. If a bit messy. This is really a rings
and repeat process, so just be patient, smooth everything out and shape things up
as you want them. And once you're done, go for the next one. Finally, my apple, this
is the most complex one, but as you can see, our shape is very simple, so it won't be much trouble. As you can see, I'm not
using any other tool. Your fingers will
be enough for this. Don't worry if you
don't already have some clay kit full
of different tools. It is fine. You don't
really need it right now. Does it help you?
Yes, of course. But as I said, for this for making magnets
and pins in general, I never use any tools. I just use my fingers. For me, it's enough and I feel I got more control
over what I'm doing. But this is of course a
matter of preference. Some people might prefer
using those tools. For me, this kind of pieces, it's enough to use my hands. But of course, if you do have the tools and you
want to try them out, experiment a bit, see
what you like to use. Then also, feel free to do. The whole point of this
is for you to get to know new hobby, experiment, have fun. There's really no wrong
way to go about it, so use whatever
you have at hand. As you can see, I leave
things very imperfect because I like it for
it to look handmade. I like for my pieces
to have imperfection, so this is how I'm
going to leave them. And for now, this
is going to be it. We're going to have to wait. We're going to leave
this to dry and it really needs to dry
100%, all right? Because otherwise, humidity will get trapped inside the clay, you'll paint it,
you'll varnishing, and it might damage your clay sooner or later some
mold appearing, some cracks, you name it. We're going to leave it to
dry for at least 24 hours. Now, once again, this
depends on where you live. If you live in a
very humid place, if it's the winter, chances are it's going to
take a bit longer. If you live in a drier place or it's the summer and
it's very warm, then it might get faster. Also, do not put it by a window where it will
get direct sunlight. I know that that sounds like
it will speed things up, but that usually is way too much heat and too much light and it
might crack your clay. Find a nice place that doesn't
have direct light on and a dry place and just leave it for at least 24 hours or 48. Generally, I leave it for a day and a half just to be
sure that it is properly dry. How do you know
it's properly dry? First of all, it will be very light compared
to what it was. Another thing you'll notice
is that indeed it is dry. You won't notice any humidity in the piece and you'll also
notice that it is very hard. For example, let's say that
you pick it up and you try to put your fingernail
on your piece. If it does leave a mark
of your fingernail, that means it's not yet dry. If it doesn't leave a mark, then it is properly dry. It is really hard, not malleable and whatever
you do it won't leave a mark, then it's good to go. Usually, that's the
way I sometimes test it when I don't
leave it for that long. Now ways for it to dry faster. Sometimes some
people leave a fan. Let's say you leave
it in the room, you can turn on a fan inside that room and that will
help dry the piece faster. Using a humidifier
also does the same and some people will use a hair dryer for
it to dry faster. Now, personally, I
think that is not very efficient and if you're
going to do that, might as well just
wait for a day and a bit for it
to dry properly. What I have personally, I have a small fan. Inside the card box, I have a wire rack and I leave my
pieces in there with one of these baking papers between the rack and my pieces and
I just leave them there. The next day, I go pack and they are usually dry and
ready for the next day. This is going to be it for now. We're just going to
leave our pieces to dry. Also, be sure that they are
flattened in a flat surface. Otherwise, they
will start to bend and once you have your
pieces properly dry, I will see you in
the next video.
8. Sanding Your Pieces: Hello, and welcome back. Now, it's been around a day. I recorded the past video yesterday and now my
pieces are all dry. Here they are trying
to show them to you. It's always a bit hard. But yeah, here they
are. They are all dry. Usually, I honestly will
leave them for a bit longer, but I wanted to keep
up with the class, so they are good enough. If your pieces are
also very dry, it is time to go
for the next step, which is sending the pieces. Now, is this a mandatory step? Not really? Perhaps you do a
rougher look on your pieces. It might also depend
on what you're doing, if it's another kind of
decoration or some jar or something and having it have rougher look as part of
it, then you don't need to. It's a bit a preference
issue really. As I said, I do like my pieces to show
some imperfections, but I still like to
smooth them out a bit more and for them to look a
bit more cute, let's say. What are we needing
this time around? Well, the most
important thing is some sandpaper and I
bought this a supermarket, but you can find this
pretty much everywhere. Sometimes it's in
a row like this. Other times, it comes
in small squares or rectangles and you don't need to find
something too coarse. A light sandpaper will do great. For example, this one is quite coarse and it's a bit
more than I usually like. But it's what I have right now, so I just use it. It doesn't really make
a huge difference. Also as you use it, it will wear down and
become a bit softer. I I feel it is too hard, I'll just wear it down and
then send my pieces that way. So yeah, we need some sand paper that you can most
define anywhere, and then this is very important. You should wear a
mask and some gloves. Now obviously, you can have
a better mask than this one. Usually, I do this in a
very ventilated space. I wear a mask just for some extra safety
because the dust, this is going to be making
a whole lot of dust. It is a very fine dust and
it's going to go everywhere. That's going to be my
second recommendation here is for you to be doing this in a very well ventilated place. Right now, I'm going
to be doing this here. I'm going to be opening my windows just so
it is a bit better, we don't have this
place full of dust. But I would recommend if
you can do this outside, if not just could be in a
very well ventilated place. When we finish
sending the pieces, I also and this is optional, but I like to have a brush, a note brush that I have
around and so I can dust off the rest of the dust when I finish as well
as, where is it? Our trusty wreck. Bags are always very
useful to have when doing any kind of craft because you're always
cleaning something, yet when I finish
sending my pieces, I like to go over them and
clean them a little bit, just so it doesn't
have too much dust attached to it before I paint. I'm going to be using
a plastic container like this and I'm going to be
sending the pieces inside, so once again, I don't have my desk full of dust,
the floor, everything. This way, I can
contain it a bit more. But you can also do this
inside of a cardboard box. For example, you can just get some surface,
you're getting bored, maybe lay down some newspaper, for example, so it's easier to gather the dust
and throw it out. I'm going to be showing you. I'm going to be recording
only from above, so it is easier for
you to see as well, how I usually go about
sending mic pieces. All right, we're all set up. I'm sorry if it's a bit
too noisy right now and the sound isn't great because I'm using
another mic right now. As I'm wearing a mask. But yeah, I'll just
pick up my piece and start going around with my sandpaper and
don't be afraid of being a bit too rough with
it because it will hold up. The only reason your
pieces might not hold up is because they are not dry yet, not completely dry
and that might happen as you're sending
the piece it might break. But what I'm doing right now is I'm just going around it and cleaning up those
imperfections and I also like to round the edges. So instead of them being very hard like this, I like
to round them up. As you can see, there's
already a huge difference. And it just took a few minutes. Now a lot of artists
will really take the time to make the piece
as smooth as possible. I don't because
again, as I said, I do like my pieces to
have imperfections. I think that makes
them more unique. I usually just smooth them out generally until I like the look like it's
not rough anymore, but you can still see
some imperfections. Also, you can shape your piece a bit more
while doing this. This is also the time for that. I think I'm done
with this piece, so I'm going to use the brush. See how the dust just
goes everywhere, and as much as you
clean, look at this. As much as you clean, there's always
dust. It's amazing. Now I'm using the g to
try to take more of it, to clean it a bit more, and then I'll just
leave it to the side, and I'm going to send the other. Also, see how much
it reduced in size. These pieces were all so thick when we finish them
and once they dry, they reduce in size very much. This is something to
take into account with any kind of ceramics really. Any kind of clay,
this will happen. Clay is always before
drying is full of moisture and once it dries
whether by air or by baking, it will reduce in size because it will
lose that moisture. Also to round up the edges, I did not explain this. Hopefully you can
get it by watching. But I try to make a
rounded movement. Going something like
this is a bit softer and adding a round
movement instead of going sharp down and I'll try to round my
edges as best as I can like this.
Brushing it again. Also, can you see here the
amount of the less piece? This one is a bit more complex, but the concept is the same. Just go through
everything slowly until you're happy with the look of your
piece. All right. Brushing it again, try to
remove as much as I can. Here we have it, our
three pieces, I send it. Again, you can keep at it as much as you
want until you have a really perfect smooth look or if you like to leave
some imperfections, you can leave them
just like I have. You can round the edges or not. Obviously, it's totally
up to preference. Once you're ready, I will
see you in the next video.
9. Adding The Magnet: Hello, and welcome back. Now we're going for
a very simple step of this whole process, and this is probably going
to be the shortest video, but we're going to apply
our magnets to our pieces. What we need right
now is our pieces. Then we're going to
need some magnets. Again, you can find
this mostly anywhere. You don't need to use the
exact same ones I'm using. If you prefer to use those silver ones that
are a bit thinner, you can do so as well. This can usually be found
in dollar craft stores. Yeah, just try to find some
or even online and you can use those it's perfectly
fine and also glue. Now, I use the strongest glue I can find and I do recommend you do so as well because a lot of times using weaker glue, will end in some sadness. It's not a huge
issue with magnets. Speaking of which
we're doing magnets, I chose to be making this about
magnets this time around, but you can do something else. Again, for example,
you can use a pin. If you want to make a pin, it really depends on what you
want and feel free to do. For example, you can also make
cute earrings using this. You just need to find
some earring backings and glue to the
piece, same logic. So yeah, I have here
three magnets and I'm going to put them
down into my pieces. I'm going to turn
my pieces around. This is the time where you
want to really choose what is the best side of your piece and decide which
one is going to be the back. Usually the backs of my pieces are a bit harder as you can see the edges are not rounded and sometimes they are not
as refined either. So yeah, this is going to be it. I'm going to turn them around, and I'm going to glue them down. Of course, there are other
ways to attach your magnets. You can, for example, hide your magnets inside the clay
as you're making things. It's not as noticeable as
a nice amount of glue. This is a big magnet, so I'm going to add
a good amount of it. But otherwise, if you want, you can even make a
slot for the magnet. It is planar and it doesn't like you don't have
the magnet and then the piece comes out. If you want the
piece to be flatter, you can excavate a place for your magnets when you are sculpting the piece,
you can do that as well. I'm trying to keep things as simple as possible
for you right now. So this is mostly it and now we just wait
for them to dry. This doesn't usually
take a long time, but I like to wait for at least half an
hour, maybe 1 hour, there's always
other stuff that we can do while we wait
and then come back just so we sure that
they are properly dry and the magnet won't be moving around as we
paint the pieces. Yeah, I'm going to let
this dry for a little bit, and I will see you
in the next video.
10. Painting Your Clay: Hello, and welcome back. Now it is time for us
to go to the next step, which is a very fun one. We're going to paint our
pieces, our magnets. Everything is ready for that and what do we
need for this step? Well, very simply, we'll
need acrylic paint. I have here a few tubes. Now you can choose
all the colors, but we'll go there in a moment. Yeah, we'll need
some acrylic paint. Or if you prefer, we can also use
some gouache paint. Some people will only
use acrylic markers, for example, instead of
painting that works as well. I'd rather start with paint and then add details with markers, but that also works
if you prefer that. But if you're going
to paint way, we'll also need a few
brushes, some medium brushes, and some that are a bit finer, just for some parts that are harder to reach or
for smaller details. Then we will also need some water to clean our
brushes when we need to, sometimes to dilute our paint a little bit and we'll also, I did forget to bring it. I'll use my baking
paper for that, but we'll need a place
to add our paints. But honestly, you can use
almost anything for that. For example, you can use
this kind of baking paper. I use not carton of milk. So I'll just open
the milk cartons, clean them very well, and I'll use those
as paint palette. You can also use some kind
of plastic container, or if you prefer you can buy those plastic paint palettes with the spaces for the paint. So really, you can use
mostly anything for this. Let's start painting.
As for the colors, I'm going to keep
things very simple. And so I brought a black
paint for my Ani gii, but also for my cat, I'm going to paint a black cat. I'm going to keep my cat very simple and just a solid color. In the PDF that you downloaded. There's also a few examples of patterns and colors that
you can paint on your cat. So you can use that as a guide. If you want some ideas, we're going to start
with the rice bowl because it is the simple one. I'm just going to add here
a bit of white paint. I do like the consistency
of the paint, usually I don't add more water. Also since my clay is white, I don't really need to go and
add a whole lot of layers here in this case in this piece because
it is already white. I just need to add a little
bit more just so it is a bit brighter because the
clay is a little bit grayish, it's not perfectly white. I will add one, maybe two layers of white. This part here, this
process is very simple. We're just going
to grab the paint, go around our piece. Our hands and fingers
are going to get dirty. But, we're just going to
go around the whole piece. You don't need to
paint the back of it since you do not see
it most of the time. I'm going to leave it for now, so it dries for a bit and
then we can add another coat. Next, I'm going
for the black cat since it's only
also a solid color. I tend to waste a lot of paint. What I try to do is try to add small amounts
of paint each time. Then if I see I need more, I will grab more as I need. Because sometimes I will
just make a huge mess with the paint and waste so much of it that I rather
do things this way. I had a bit of water
here this time, and as you can see,
the paint is much more diluted this time
around. It's better now. If you wet your brush a bit, it makes it easier to spread your paint
throughout the piece. One coat and I'll paint that
here a little bit later. Let's go for the next one. I forgot my g you're going to need your g this
time around as well, so I'm going to
bring it right now. We are back, so now I'm
going to clean here one of my brushes so we can
use the red for the ample. Since usually my process, if I have different
pieces to paint, usually, I will try to make patches of
pieces of different pieces, so I don't have to be
switching paints all the time. But if it happens, I will be always jumping
from one color to the next. Trying to move things along. Otherwise, we're just
waiting for things to dry. Making one coat of
paint in one piece, moving to the next, adding another coat and I'll go around doing this and
repeating this process. I'm only adding color to the place where I
want it to be red. Now what we're going to do is I'm just going to be
jumping from piece to piece until we don't
see the white of the clay and then move on to another color if it
needs another color. I think most of it. Is okay right now, I'm going to add the
green to the apple leaf. Now this here is going to be a bit more difficult,
but we can do this. We just need to pay
attention and try to be careful and make the shape
we want to make. All right. We can also use an acrylic
marker for this part. However, I don't have a
green that I like for this, so I just paint it. This might also depend on the tools you have available
to you at the moment. See if I can do this. If you find this doing
this a bit too stressful, which I totally get it, and you have a green
marker at home. I do recommend leaving the
leaf for the next step, which is we're going
to add more details to our drawings to our pieces by using acrylic
markers instead of the paint. I'm going to let this dry for now and once everything
is properly dry, I'll probably add just one
more coat here to my leaf, but you don't really
need to see that because it's more
of this really. For most of my pieces, I go for two coats. It's usually enough with
the paint that I have. I'm just going to leave this
overnight, for example. And we can move on to the next video where
we add more details.
11. Adding Details To Your Pieces: Hello, and welcome back. My pieces are fully dry. It's all good for us to
go to the next step, which is adding our details. What are we going to
need for this step? This is optional. You can use the paint
for this as well. But personally, I think it makes it easier
to use some markers. I'm going to be using some acrylic markers
to add my details. I specifically like
these RX markers because they have a
brush tip like this. For me, it is easier to draw certain things using a brush instead of another kind of tip. I'm going to start here with my cat's eyes because it's the one that will probably
need more layers, and we have to wait for one part of the ice to draw
to draw the other one. I keep my cat's
design very simple. I just draw huge eyes on my cat, so I'm just going to
grab a yellow marker and I'm going to go
in and draw some ice. So two circles, and
we're going to go slowly until we have a size
that we are happy about. For example, something like
this, I think it's good. Now let's draw the
other. We're good. Now, I let it dry for a bit and then add at least
one more layer. The eyes aren't super centered. They're not going
to be symmetrical, that's going to be very hard
and will come with practice. Once again, I think that makes
them silly if they are not 100% centered or if one eye is slightly
bigger than the other, I think it makes
my cats look a bit sill and I think it's very fun. I'm going to put my cat
to the side and grab my rice bowl and I'm going
to add the seaweed part, which is going to be fairly easy because this is a
very simple shape. We're going to go in, be sure you have it in
the right direction. And we're going to
draw a rectangle. You can start smaller and then
make it bigger as you go. I feel that sometimes when we make something really
big right away, it can be more difficult to fix. Sometimes we have
this really big area and we might make some mistake. Also, if we change our mind, we can't really change it or it is a bit more difficult
because of course, you can paint over it, but it is a bit more difficult
and it will take longer. If we start smaller
and grow from there, you can change it as you go. So for example, I
have this rectangle, but I want it to
be a bit bigger. I'll just add here
some more lines to my rice bowl and you
might ask yourself, why am I using the
posca instead of the brush? No real reason. It was just the
first one I grab. Now I'm going to
also paint here. Now let me take a look at it, trying to decide if I want
it to be bigger or not. I think so. I think
I like it this way. Let's keep it like this. Now I'm going to
go back to my cat again and add another
layer of yellow. These ones tend to
drive very fast, both of them actually, they tend to drive very fast, so you can move from one piece
to the other very quickly. Let's draw or paint
in this case, this stem on apple, I'm going to grab here a brown. Marker. Now I'm going to paint here this little
stem that we didn't paint when we were using
our acrylic paints. Again, I think it is easier to go with an acrylic
marker for this part. The brush tip also
helps me get into these smaller spaces
where with this one, I don't have a smaller
tip than this. It is a bit more difficult
to reach. So there we go. Something else we can do is add some a little
details to the leaf. This time around I'm
not going to do it, but if you want to,
feel free to do so. Let's go back to our cats. I'm going to make
just one more layer here before we do the
inside of the ice. All right. This is
going to be enough. I like these colors right now, and let's go back
to our ambiguity. I'm going to use
the brush this time around and it will be faster, but don't forget the
underside of the seaweed, and I think we are mostly
done with the seaweed area, we can then add a
seed little face. Are we going to add tut
fast to our apple as well? We can. I think
that will be fun. I think we'll do that.
I'm going to make another coat here
on the stem unit. Now let's add the inside of
the ice to our cat and then I think we can draw silly faces
on our other two mamnets. Here now we're going to draw another circle inside the
yellow as big as you want, but leaving a bit
of yellow showing. I know this part can seem
a bit daunting and scary, but believe me, after
you do this a few times, it gets very easy. It's almost intuitive to do. There we go, look
at them, so cute. He looks ready to jump
and attack something. Cute faces, very simple. We don't need to overthink this, just two dots and a small mouth. Try to be as symmetrical
as possible, but listen, it is okay
if it's not perfect. We are not perfect beings, and there we go,
look at how cute. Let's drop another face
here on our apple. Because I'm really
feeling that drawing another cute face on
our apple, two dots. I like to keep the
faces very small. I think it makes it
cuter. There we go. Look how cute she is, so happy. Now I want to add a
little bit of blush. I'm going to use this reddish, almost pinkish marker and add a little bit of blush to
my apple and rice bowl. Not sure if it will pop up here. I could actually use
yellow for the apple. We're going to do that.
Apple, we're going to use yellow for a little
bit of blush. There we go. Just two small dots, cute and now adding some
blush to our rice bowl. All we're missing is adding just at least one more
layer to our eyes here, and then I think we can let this dry and we can
varnish our pieces. Okay. There we go, look at them. Can you believe the difference? We started with
just a blank piece of clay and now we have these really cute pieces.
This part is done. I'm going to let this
dry for a little bit. This doesn't need to
dry for a long time. Usually something like
20 minutes, maybe less, and then we can add our varnish and make
everything look even cuter. I will see you in
the next video.
12. Varnishing Clay ✨: Hello, and welcome back. This is it. We are almost done
with our pieces. This step is very
optional as well. You can leave your pieces as they are if you wish to do so. However, I do like to add some varnish to them
for two reasons. One of them, I think
that the shining effect makes it much more
cute than without it. Also, the varnish will add
some protection to your piece. If it falls or something, you have an extra
layer of protection. But mostly, I find it cute. You can use liquid varnish
and brush it on your pieces, or you can use some spray
varnish like I have here, pay attention when
you are buying your varnish that is glossy, for example, and transparent. That's the most important
because if you prefer a mat effect on your
pieces, then that's fine. But just be sure you are
buying a transparent varnish so you don't have any surprises when varnishing the pieces. So I'm going to be
using a spray one. But if you prefer, you can also use a brush
one, one, a liquid one. The main reason I don't use it is it doesn't feel as
glossy as a spray one. The spray one is also
much quicker to apply. You just spray it. I like to give it two layers
and that's it. The third reason
is you have to be very careful when brushing
the pieces with your varnish. Because a lot of times the varnish and the paint
have this reaction. If you brush it
once, it is fine. If you brush it again, you smudge your piece. You should probably
use a mask or at least be in a very
well ventilated place. That's what I'm going to do. This is going to be very quick. I'm going to open
up my windows and then I'll just spray my
pieces, very quickly. I'm going to add two layers. I'll spray it once,
wait for a few seconds, and then do it again
just to have extra shiny and so I have an
extra protective layer. Okay, windows are open. Don't forget to follow the
instructions on your can or you are varnish any varnish
that you decide to buy. Read instructions first. If you are using a spray, you should shake it a bit before using and
now we can do this. If it shows this quote, sometimes it gets a bit white, especially if you're
using dark colors, don't worry, it will
become transparent, let it dry and you will
see that it is fine. This is it for now.
Just let it dry and I will see you
in the next video, let it dry as longer as you can. Usually, I'll just pick my
pieces again one day later, so I'm sure it's properly dry
and then they are finished. I will see you in the next
video once everything is dry.
13. All Done & Assignment: Hello, and welcome back. Our pieces are finished. I have them here.
Everything is dry now, and here's the cat. Look at it. So pretty, so shiny. I love it. Let's see the next one. Our only giddy also
really, really cute. And finally, our apple. I'll try to show
them all together. This is not very easy, but here they are all
of them together. Our three magnets that we did from scratch
with a dry clay. So this is mostly it, but I just wanted to show you
how they look at the end, and also I wanted to show you something else and talk
about your assignment. First of all, I wanted to show you because I know that
starting a new hobby is always a bit scary at first because we have so
many expectations and sometimes the results
we have might not be up to what we are
imagining and that's okay, right, it's perfectly
fine and normal even. For that reason, I wanted to
show you the first pieces, the first cuts I've made with air dry clay and here they are. Like they are not
good, as you can see. This was my very first cat
that I made and so silly, nothing is centered,
and as you can see, I was for a while experimenting
with the designs, the looks that I
wanted for my cats and it wasn't going very well. But after a few tries and
a lot of experimentation, I figured it out and now I think my cats look really cute. I'm very happy about them and I can make different colors, different patterns, and
they are really fun to do. The more you do the best results you'll get because you
get more used to it, your hands, you get wielding
some muscle memory, even making the pieces
will be much faster. I would take a long time
to make just one cat. One of these magnets will
take me a long time and now I can finish one of
these in no time at all, not counting with, waiting
for things to dry, drawing the eyes was
a bit of a struggle, as you can see, and now
it's very natural for me. What I want to to know is that
you get used to it, right. Even if it looks like
you're taking a long time or it's not super
perfect, this is fine. I think that a lot of the
times if it's not perfect, it's even cuter and more unique. Just take your time and
have fun with the process. I think that's the
most important just like with drawing is
for you to have fun with the whole process
because that's the whole point is you enjoying
something you're doing, enjoying doing some crafts. And for your assignments,
very simple. I just want you to make
at least one magnet. If you want to make more
than one, you can do so. You don't need to make
the exact same design I've made in this class. But the idea is for you to make one magnet from
scratch from start to finish and then post some photos of the
pieces you've created. I can see them. I always love to see your work and
the things you do, once again, don't forget to download the material
that I gave you. If you want to use templates and these designs in specific, you can print them
out and use them, all the materials,
the checklists with all the materials
that you need. If you want, you can
also post photos of your process or just
the final result. It's totally up to you just
make at least one magnets, have a lot of fun and I will
see you in the next video.
14. Conclusion - Before You Go!: Hello, and congratulations.
You've made it. You've made one or three or even more magnets from scratch. Now, I hope you've
enjoyed this class and don't forget to post
your assignment. Your assignment is to make one or more magnets and
then take a picture of it. If you want, you can
also take a picture of the process and
then post it up so I can see it because I always love to see
the work you make, the art you make, it's always so amazing and I
hope you had fun with this class and
that it was easy to follow or as easy as possible. I know there are many
steps to follow, but once you get used to it, it's actually quite
simple and you can be very creative
with the things you do. I hope you do make more
things and if you can, I would be very grateful if
you could leave a review, more people can find this class. And if you want me to make
more classes on air dry clay, do let me know what
you'd like to see. I'm very curious and I would really love to make
more classes like this. Don't forget to check
out my other classes. Keep on drawing or in this case, keep on playing. Bye.
 Patricia Caldeira, Illustrator | Digital Artist | Designer