Transcripts
1. Introduction: Hello, I am Stephanie
chaos and I've been a professional artist
for the last 15 years. I mostly a sculptor, but I also paint and
my work has been exhibited around the
world in today's class, I'm going to share with
you a very fun project which is counting caterpillar
has from air dry clay. This is a class
that is going to be a great starting
point if you are looking to start
working with Eric play, which is a very fun and easy,
beginner friendly projects. I am going to guide you through all the steps on how to
build your caterpillar, how to use air dry
clay properly, and finally how to paint it. I also added a few variations so you can have fun with it. This is a really
fun class that I enjoyed making and filming. And I really hope you're
going to enjoy it too. If you're completely new to
sculpting and modeling clays, I would highly suggest to watch my guide to modelling
clays first. Now you do not have to watch the guy who modeling
clay class first. It's just a recommendation.
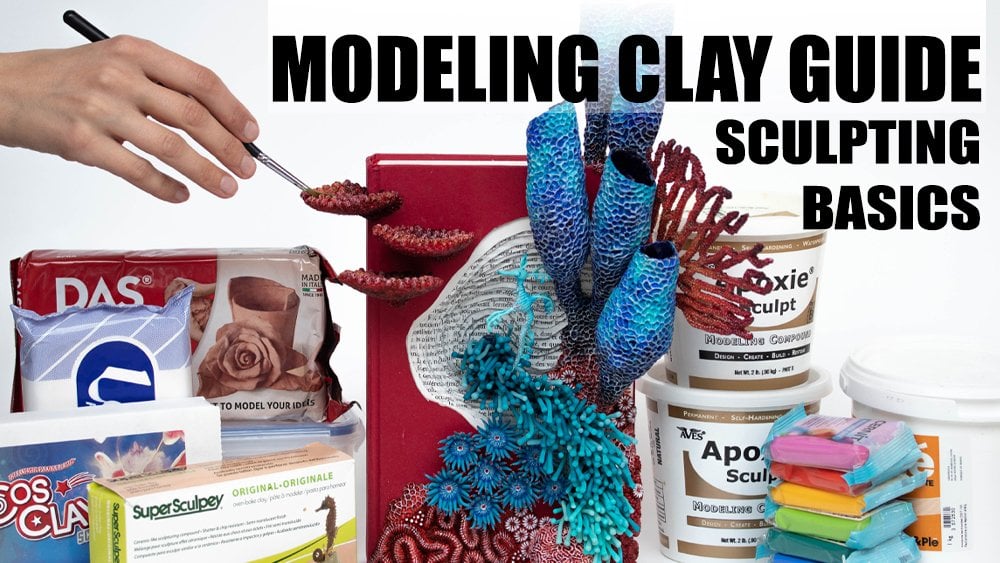
2. Materials : For this class, we will
be needing Android clay. I will be using das, which is one of the cheapest here in France and easy to find. You can pick any
other brand that is more local to you
called porcelain. Please note, you will need at least one that
drives flexible. Here, the Modena one
dries flexible wire, aluminum foil, acid
free white glue. This is a no-name brand. Make sure to use acid free. A dedicated brush for the blue. Best to take synthetic and
nothing too expensive. Sculpting tools. If you've got none. Toothpicks, the end of brushes, screws, or nails are
good alternatives. Acrylic paints, optionally, you can also paint with
watercolors or oils. Here is a split primary
palette with black and white. That's really all you need
for every imaginable color. Dedicated acrylic brushes. Synthetics are best. Varnish. Any acrylic
varnish will do. I personally really like the airbrush varnish
from Vallejo.
3. Sculpting Basic Caterpillar: We're showing you
the most basic one, simple straight caterpillar. And I made a little
sketch before sketching what you're going to sculpt this important
for many reasons. You want to have
it real sized so that you know exactly how big you want your
sculpture to be. And then you also
want to do a bit of sketching to understand
the shapes better. So I'm just going to
go quickly over it. This is quite
anatomically correct. You have the hand, which is this little thing here. Then you have the
torso with the legs, isn't the actual legs. You have three pairs, then you often have to more segments before
having four segments. With, for PRO two legs, these aren't actual legs, just extensions of the abdomen. So the abdomen basically
goes from here to here. This is the torso and
this is the hand. After the protocol eggs, you have two more segments, and then the last segment, again, the protocol eggs. So not all caterpillars
are made like that, but most are if you follow the actual anatomy of the animal that you're
trying to sculpt. Then it's going to be more
realistic when you go crazy and add spikes and colors and change
the shapes of it as long as you stay in that
anatomy and that organization. So head, torso, abdomen, you're going to be fine and it's going to look better as a whole. Now what we're going to
do is to make the core. And for that, I'm going to use aluminum foil and simply
scrunch it together. So you want your core
to be smaller than your sketch as we're going
to add the clay around it. So if the course too thick, then you are catabolized going to be a lot
thicker as well. Also, the core is
important because if you would do this just
out of air dry clay, it will take a long time to dry and it also might
result in some cracking. So generally
speaking, it's always better to have a call with
the general shape and then add the clay and it's going to give you less
trouble overall. So here the shape is pretty
simple, nothing very fancy. New wire or anything like that. We're going to give
it a bit of a twist. Just for interest's sake. I like to add some
acid free white glue before adding the clay. This is going to make
the clay stick nicely to the core and it's also going to seal the clay on the inside. Now, every clear is not
waterproof and no matter how much glue you're going to add on top of it and varnish, it's never going to be properly waterproof
in the sense that you're not going to be
able to put it into water. However, it's going
to prevent it from humidity and it's going
to make it long lasting. Now I'm just taking fresh
clay and I'm going to flatten it and then cover
the core with it. Of course, this shape
is very simple. But if you work on more
complex sculptures, the same technique
is going to apply. Your core is going to
be more complex with wire and more complex approach. In general, I would say most of the work is done on the
core in terms of sculpting. Because once your core is done, you just add the clay
and then the texture. Now, this is pretty smooth. You can use water to smooth
the clay a little bit more, especially for more
complex sculptures. That's going to be useful. Here. It's not super useful, but I'm just showing
you as pharmacists, you're going to be used to
having your hands caked. That clay is non-toxic. However, you can use
gloves if you prefer that. The hand, that one, then three for the
torso to extras, for the protocol eggs to Extras. And the last one is going
to be another pro to lag. I've been sculpting a lot
of casual polis, a suit. I did this fairly quickly. Do not hesitate and use
a ruler if that helps. You can always, if
you make a mistake and you can always use water, smooth it down again, and start a new. So here we're simply
going to mark the segments of the
caterpillar, all the rounded and underneath as well. I personally think that the torso should have a
little bit more clay. So I'm just going to add more clay number for
adding more clay. The first thing you
want to do is to brush a little bit of Watcher where you're going
to add the clay, that's going to help the clay
stick nicely to the rest. Can also graph the thing. Okay, I like this better. And just move the clay with
a little bit of water. Add roughly isn't a
so-called open Clay. So whenever it feels to dry, just add a bit of water
and keep working on it. Even dried up clay you can revive by just putting
it into water. What you're going to
do is we're going to push the head in a
slanted like this. And then we're just going to
review the segments here, SU three for the torso
and just all around. Okay, so I think this
shape is much better. Okay, now to round
up all the segments, I'm going to use a silicone
spatula like this one. I'm simply going
to push them all. And I'm simply going
to push down all on all lines that we
previously created. Now, depending on how shabby you want your
cortical atrophy, you're going to make it
more or less rounded. I do like chubby
or caterpillars. But if you look at actual
caterpillar pictures, you might want something
that is a little bit longer and less
rounded, flatter. So it's really up to you. I really would encourage
you to check out reference pictures of
actual caterpillars. Because it's going to
be easier for you to sculpt exactly what
you have in mind. You can always smooth
down the clay was a bit off Watcher at the
tip of your finger. For even chunkier look, you can add small lines. I'm using a silicone
pointed tool. It's also sometimes
called a color shaper. So sometimes you will
find these tools in the pastel section of
an art supply shop, and sometimes in the
sculpting section. Once your content with
your caterpillar, you can let it dry. After some drawing. For me, it's about
four hours later, but it's going to depend
on where you live. The top layer is
starting to dry. However, the bottom
layer is very wet still. And this is an ideal time for
it's for you to turn around the sculpture and then
work on the bottom of it. So here I'm simply going to
smooth down all the segments. So the catabolize going to
look nice on all sides. This is something I really
like about Andrei clay. Is that option that you
have to work on a piece slowly while it dries
and from all sides. And now for it to properly dry here I prepared
something quite simple. So it's just a box. This is a plastic box that
are used to cover acrylics. Then I have some mesh, and this is simply a paper
towel and I will put the caterpillar downside
down onto the paper towel. So this will ensure that
the caterpillar dries on all sides were not
squishing any parts.
4. Sculpting: Caterpillar Legs: You are going to attach
the legs and pro two legs directly to the body
using coal parcel and, and acid free white glue. So I'm going to use this
acid free white glue. Now, this is a no name-brand and from an art supply
shop in France, it doesn't really matter
what acid free white glue you're going to just make
sure it's asset tree. I'm going to use
this called parcel n. Now this one is
not my favorite. It's not very flexible, but it is very strong, like old cold porcelains. It is made in Belgium
and I'm in France, So it's cheap and readily available in this way
I'm going to use it. You can make cold parcel
and at home yourself. I have never tried, but that's an option or just grab whatever is local to you. I just took a chunk out
and while I work on it, I will keep it in a cellophane. And this I will keep in an airtight container called parcel and is a
great clay because it's flexible and
extremely strong. I haven't encountered
a stronger clay then called parcel and because it's basically a lot of glue, however, dries very quickly
so you want it moist. I'm actually going to add it's pretty soft as you can see. But I'm still going to add
a little bit of water. It's just press on water. And then I needed in this specific brand
is pretty sticky. So I'm going to have some
residue on my fingers. And you simply can
brush them off if you hate the
stickiness of it. You can also wear gloves. I'm keeping it
here. While I work. They basically keep
it in my hand. Take a bit of work. So I'm just going to
remove the residue. Now turn caterpillar
upside down. So this is basically the belly. If it rolls like this, you can also use this is like blue tag and then you
just place it on top. So then it does move and it's going to be a little bit easier, but if you don't
have it, it's fine. And this is the acid
free white glue that I keep in a
smaller container. And I'm just going
to dab the glue way needed all the tools
that touch the glue. I'm simply dropping
into some water now for each leg and taking
a small bit of clay. And then I'm going to roll
it into a sort of code. And then I'm placing the
cone where the glue is. Then I'm simply going to smooth the smooth
the core parcel and onto the array clay. Usually I start with my fingers, but you can use tools. This is also where
you're going to see if your clay is soft enough. It helps to dip your
toes into water. And then you repeat that
for all the other legs. Then take a piece of clay, roll it into a cone. Placed onto language and smoother clay down
onto the caterpillar. You will see this
clay is very soft. So you have to keep
your touch very light. Now for the protocol x, we are going to have
the same approach. However, the fruit two legs are bigger and you're just going to use more clean
and then we'll round it. So you leave two segments
alone and then it's those for the protocol x tends to really be more flush with the segments as
obviously they're not actual legs but more extensions, extensions of those segments. You want to attach them
a little bit further up. This time we're taking more clay and we're starting
just with a bowl. And then you can
flatten one side slightly and then put
it onto the glue. And then smooth the clay onto the Android
clay on both sides. You can point them a little
bit down and you just check. If it works with
the legs on top. You can push it a bit down so you want the caterpillar
to be able to stand. We will do that
again at the end, but that gives us
a bit of an idea. When you dip your tool and 21, I would suggest to remove
most of the washer. If you have too much water, it's going to be really
difficult to work with us. It's just going to add
too much water and then the clay is way too soft. Just keep going and
you throw two legs. I'd like to make them
a little bit more pointing towards the back. Then finally you just want
to put it upside down and then push it a little. So everything is flush
with the ground. So normally you put two legs should like
flatten a little. You can also help
and push them out. This is looking good. And then put it upside down again and let it
dry like layouts.
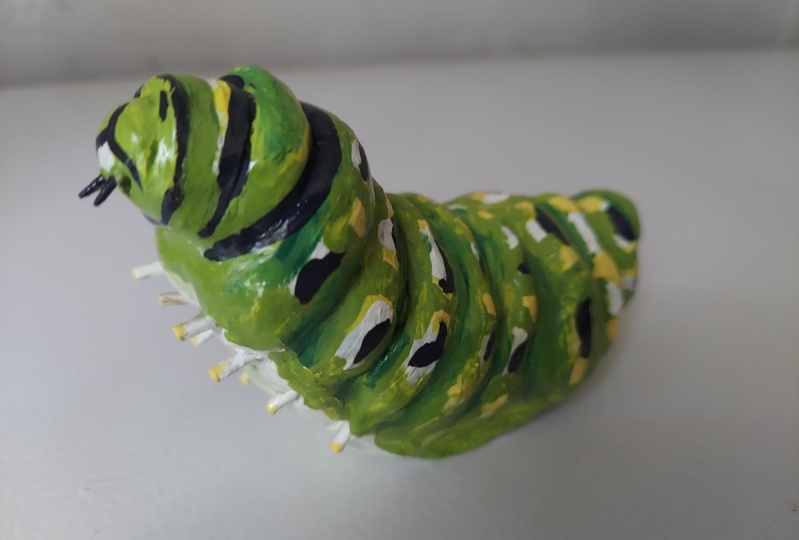
5. Painting The Caterpillar: The painting of
this caterpillar, I'm going to take inspiration from the black swallow tail. So this is a picture
phone on Pinterest. And I would encourage
you to find pictures of actual caterpillars
or maybe use your own as references as a base color, I am using cobalt two
coins and titanium white. Air dry clay accepts paint beautifully as das
called porcelain. So you don't really
have to prime it if you are working
with acrylics. Acrylics being a
form of plastic, it will also seal your airway clay so you don't really need
to size that either. Most Andrei clays are
acid free as well. While you wait for your
caterpillars first layer to dry. Simply spray some water onto
your acrylics and place a some kind of container on top of it to avoid
it's drying off. Usually acrylics
dry pretty fast, so you can work pretty fast on your first layers before
adding the patterns. You're probably
going to have to do a few layers to make
sure that the whole every nook and cranny is
properly covered with acrylics. Now I'm going to use
anthrax unknown blue. Finally, I'm going to
use a some quinacridone, magenta PR, one-to-two
and titanium white. To mix a light pink. I'm going to add dots
onto the caterpillar.
6. Caterpillar Variation: Up Right: We are going to sculpt
this caterpillar. It is very helpful to make a quick sketch of what
you have in mind. I've also added a few
protrusions here and there. I say it's useful
to sketch it out because we are going to
create the core first. And having a visual on how
big you want your sculpture, your final sculpture to be, is going to be very
helpful for that. So for the crime simply using
aluminum foil and I'm just going to scrunch it down
before adding the clay. I'm going to add some
acid free white glue onto the core just to make the clay stick more
nicely to the aluminium foil. And then we're simply going to wrap the core with the claim. So the first thing
we're going to do is to define the
caterpillar into sections. We're going to have a first
section for the hand. Then we're going to have
three sections for the legs. Then we have we're going to have two other sections without
anything attached to them. Then we are going to have four sections for
the protocol legs. Two more sections with
nothing attached. And the last section, which is also going to
have a proto-language. The sculpting is very similar to the first
caterpillar I've shown. So I'm fast forwarding
the footage quite a bit. Basically the same applies
as in the first example. Once you have your
sections in place, use a silicone spatula tool
to round up the sections and add lines later on with a pointed silicone
tool on the end. Smooths out the clay when
needed by using water. I originally poke some holes
to add wire for the legs. However, in the end, I did not use wire
on this further legs as they're small and chubby and wire wasn't really need it. However, I did use the host
that I am making here on the caterpillar back to attach
antenna like protrusions. Simply poke a needle
tool where you want to attach the extensions. You can also hand drill holes, wants the clay is dry. So after a few hours, you are going to be able
to move your caterpillar. So as you can see, the top is starting to dry, but the bottom is
still very wet. And I like to work the
bottom at that point. I'm simply just going
to readjust these. Then what I do is I have
these little boxes here, this little plastic boxes, but it doesn't really
matter what you put it on. Have some mesh because
I'm a sculptor, so always have some
mesh until this is just a paper towel and we're
just going to put it on top. That way the air circulates all around it and it's
going to dry evenly. So far this
caterpillar I premade some holes but the tide, so I'm just going to
drill inside of them. Now for this one,
we're going to add some antennas or something
that looks like antennas. And we're going to use wire and the Medina called
porcelain ASU. You can see here it's
air dry polymer clay and you want to
take the white one. We do want to cut the
wire the right size. And this is aluminium
arbitral wire. It is one millimeter thick
and we're going to take out some clay and put it into
cell phone while we work. I also like to when
I open the package is called counselor
or air dry clay. I like to spray in some water. And that makes it keep
it moist and fresh. And then grab
everything nicely up again and put it into
an outside container. If it's not soft enough, just spray a little bit of water onto your clay and mix it in. And I feel going to
do is we're going to take every time a bit of clay. We're going to roll
it in a long cone. Then flatten that the bits add just a little bit
of water, not too much. And then place your wire in the center and then wrap
the clay around the wire. And then repeat for
the five others. So these are now dry
and as you can see, they are very flexible. So I can really bend
them as I want to suit. Now I'm going to use
this cold parcel land and acid free white glue to
attach everything together. Now I'm using this one because it's just cheaper way I live and I don't need flexibility to attach it. So
that's why I use it. So first I'm just going to
check if it fits nicely. Okay, so they all fit nicely and there's no right
or wrong way to do it. So I'm going to do it one way. If you want to
attach them slightly differently than go
with what's most, most intuitive to you. I'm going to dip the
metallic parts into this and then into
my bit of clay. And then again. And then I'm going to put it where I want it. Now with some metallic tool. I'm just going to add water, but the clay is still very
moist soil didn't need to. I'm just going to push the
clay around and smooth it. The idea is that you
want to smooth it onto the caterpillar and
onto the antennae. And I use a little bit of water. I tend to dip my finger
into water and then brush most of the water off so it's moist but not
completely wet. Because if it's too wet, then it's going to be more tricky to smooth down
the cold porcelain. Now that's really
all there is to it. You can if you want already, move it where you want it to be. So I want them to go
slightly in front. That way it's already in place, then simply repeat the process. So again, just to remind you, I decided to go for cold
porcelain because that's just a lot sturdier and it's not going to break
because it's flexible. Flexibility is what you need for strength and not something
that is rock hard. That's why I always use called porcelain and preferably Medina, because it's very flexible
for these kind of pieces. I'm sure there are other
cold parcel, it's out there. I haven't tried them all, but you want one that is
very flexible and then you want to sculpt and attach
the legs and pro two legs. Nothing new here,
exactly the same technique we saw in the
basic caterpillar sculpture. You want to add the glue
first when you want your leg. Then shape the legs and she
tiny cones place on top of the glute and smooth
the cold porcelain onto the Android clay with
your fingers are tools. Once you are done with
shaping the legs, just make sure that all
flush with the ground so you caterpillar can
stand, then let it dry.
7. Caterpillar Variation: On An Object: This caterpillar
has a simple shape. However, it's going to
be seen from all sides. And I'm going to attach
it to this pencil. Now I'm showing you this
because in my work, I usually work on objects and I find it interesting
to mix medias. And so this is a way to show
you how it can be done. For this one, the sculpting
approach is slightly different as the caterpillar
will be seen from all sides. The idea here is to scope the
caterpillar and two times, making the head and torso first, letting them dry and then
sculpting the abdomen. In the second phase, I also poked holes where the legs and protocol
eggs are going to be, as this time, I will be using wire to attach legs
and protocol eggs. There's two time approach
enables you to sculpt all around while being able to hold the caterpillar
in your hands. This is crucial for more
complex sculptures as well. Working parts after pods
instead of all at once. In more complex sculptures, you might even start with a rough first clay layer to get the general
shapes into place. Let them dry, and then add new layers of clay
to add textures. If you already know
that you're going to use What pen or what objects
you're going to use. Like I do. You can push it in. You can push it into
the clay like this. So you can already have
a better grip later on when you're going to add
the feeds on PRO two feet, I'm making just the holes
for the wire later on. You can also make the holes, wants the clay is dry. But here we exactly know where we're going
to add them so it's easier to make holes when
the clay is still wet. And as well here. Then you want to
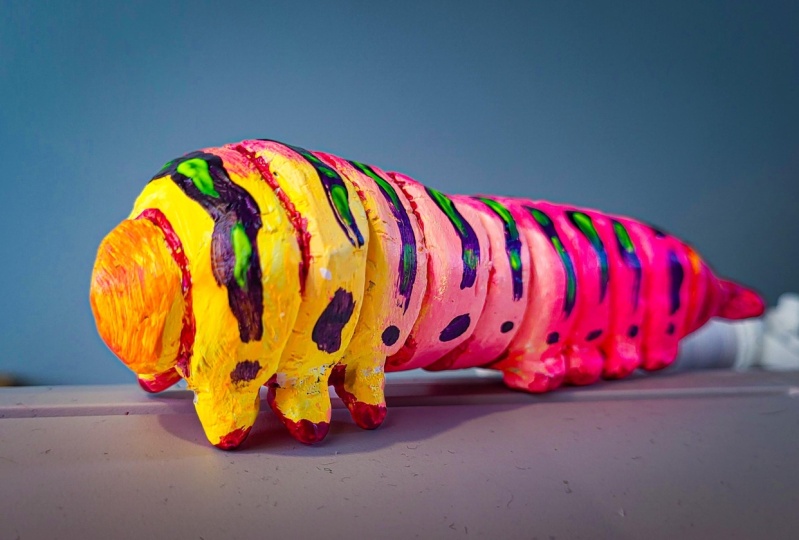
let it dry a little like you let it dry last time. Only this time. So the abdomen can dry. For the painting of this
one, I used quinacridone, magenta, Indian yellow,
and titanium whites. I decided to go for gradients
starting on the abdomen up to we had the first layers were rather a pastel colored. And I did glaze
them later on with more diluted paints to make
the caterpillar more vibrant. Generally speaking, I do layer the paint a lot on
my sculptures just because I wait for the
paint to dry in-between layers so I can cover
everything and all clay. I use acrylics as the
first sealant of my work, and that's why I like to
layer it quite a bit. I also decided to paint the caterpillar before
attaching it to the pencil. As it's a lot easier that way. Depending on the objects you want to attach
your sculpture on, it might not always be. So really try to assess
and think upfront what the best approach is
depending on the idea you have. So this is stainless steel wire. You can also use armature wire, which is usually made
out of aluminum. This is aluminium, but it is much thicker and the
horse are pretty thin. What I'm doing is to
dip the wire into the glue and then
into each hole. And I push it through to the
aluminium foil, the core. And then I caught pretty short as the arms are going
to be pretty short as well. I would suggest to leave
it to dry for awhile. And in the meantime, leave this in your box for the legs and the
protocol eggs and to attach the caterpillar
to my pencil, I'm going to use the VPM, which is a cold
porcelain from Belgium. This called parcel and is
not flexible about it is cheap and readily available in France and that's
why I'm using it. Feel free to use. Homemade called porcelain or whatever called porcelain that you have available
where you live. I would go with cold parcel
and for the feet simply because the feet are
going to be very small, very tiny and array clay tends
to not be flexible at all. Ends can break off, whereas called porcelain is really not something that breaks off and it just
prepared a bit of cold porcelain in
some cell phone. I mixed it with a
little bit of water to get it nice and soft. And the rest I'm going to put
back into an airtight box. So this is acid free white glare and I'm just going to add it on top of the wire. So I'm doing just two
at once, not more. And so you want to take little bits of clay
about that amount. I keep the clay tied in
my hand while I work. And so what you want to do is
to create a little cone and you push it on top of
the wire and down. Same with this one. And push it down. Then you want to use a tool to just kind of smooth it down. So would suggest to use metallic tools
with cold porcelain. And you also want to be
working fast because cold porcelain
dries very quickly. I'm also dipping my
metallic tool in washer a bit because it's going to make it easier to
smooth the clay down. So again, first, add the
acid free white blue than row a small
cone that you push. And then using a metallic tool, push the client own. If the clay starting
to feel too dry, spray some water cooled parcel
and really drives fast. But if you keep it
moist in the beginning, then you have more
time to work on it. The protocol x
again and the glue. This time we're
going to make the four on this side first. Then we are going to add the pencil and then make
the four on the other side. Actually not four but five. So I'm used to call
parcel and I'm sculpting. If this is too fiddly for you, you can go one by one. This time we're
making tiny balls, we flatten them a bit. And then push. You might need to take
your caterpillar and your hands to smoothen
the clay out. You simply repeat that for
the five legs on this side. And now we're going
to add some glue on all the protocol eggs
and also on the belly. Like so. I'm going to place the pen or whatever you
decided to work on. For me, it's the pen. And then push the clay
back onto the pen. You can bend the wire so
it's more easily accessible. And then just keep going
with the glue and the clay. And then let it dry overnight. Once the legs and dry, we can paint them in
the same color scheme. Be careful not to
overlap on the pen. So this is how it
looks right now. I would like to add a bit of dots and patterns
on top of it. So I decided to go with
cobalt, turquoise, and I'm going to mix it
with white just to make it a little bit lighter. You can take inspiration from real life caterpillars or just have fun with some
random patterns. You can also make a mixture of different patterns that you saw and liked on caterpillars
and make your very own. I would really
encourage you to find your voice and have
fun with the colors. You can always make sketches before
painting the sculpture. Although you can
always repaint it. If you don't like it. I often repaint my sculptures because I changed my
mind on the colors. And actually the layering can add a lot of
interests to it. So yeah, if you don't like what you did to just paint over it, it's going to be all right. And here I'm making
it symmetrical. So I'm going to do the
same pattern on this side. And this is the
final caterpillar. And this stage, I'm
happy with how it looks and I'm going
to let it dry. And then finally varnish it.
8. Final Words: So these are the
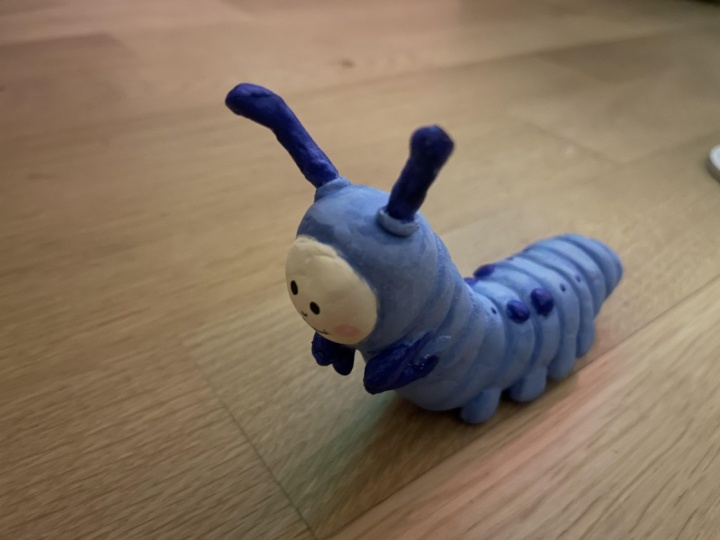
caterpillars that I came up for this class. Some of them you've seen
during the workshops. So the one on the pencil, this small striped blue one, and as well a bit
this upright one. Now, this one has
tiny spikes all over and the spikes are
basically made like the legs. Only they are much pointier. And of course, there's
a lot more to do. I really quite like the
spiky look of this one. I think there's a lot
that can be done with it. This one is exactly the
same than the blue one, just with another
pattern drawn on it. This one is also a
very simple one, only much, much choppier. I also have this one, which I find quite interesting. So it's a chubby one like this. However, I added
PayPal use on top. The people leaves
are pretty simple. And I'm just going to show you. What I did is to do washers
on watercolor paper and then to paint the leaves with gouache and finally
to cut them out. And I simply glued them on
top of the caterpillar. Paper. And watercolor is something that I like to use a
lot in my own work. And so I wanted to show you
and open up a possibility. And he owned the
caterpillars together. I really hope that this
workshop has been inspiring. Thank you so much for
watching this class. I hope you loved
it for the class. The class project is
pretty straightforward. I'm going to ask you to make your very own caterpillar feel free to play around with shapes, colors, and go as realistic or surrealistic
as you'd like. Please also share your final
project with the class. I love to see what
you come up with if you're going to share
it on social media too, don't forget to tag me. I go along the moniker
pretty plot on Instagram and Facebook and along the monocots definitely kill you
asked on TikTok, thank you so much
for watching and I really hope to see
you in my next video. Bye.
 Stephanie Kilgast, Contemporary artist.