Transcripts
1. Introduction AI Projects: Hi, everyone. I'm Susan Pradhan. I'm excited to introduce to
this interesting course. With the rise of AI, I have hand picked some
amazing open source AI Python projects that you
can try right on your PC. We'll begin with
text to speech, TTS. Check this curo TTS with
some sample voices. Hi, please subscribe to our
channel. Thank you very much. Hi, please subscribe to our
channel. Thank you very much. Hi, please subscribe to our
channel. Thank you very much. Hi, please subscribe
to our channel. Now, here is ESTTS All interesting and essential
things you need to know. And we have more insight,
including voice cloning. Next, we will explore AI
Image generation for free. Check out the focus AI
project where you can create unlimited AI
images on your own PC. And for those into
photography and videography, we'll look at phase fuson and other applications that can easily swap pass
for your projects, making the process
super fast and easy. This course is curated for
all computer integers. It's carefully
designed so you don't need to be an expert in
coding to follow along. By the end of the course, you'll have a collection of free open source AA applications running on your computer. Let's get started.
2. TTS Kokoro: Hi, guys, here is
how you can convert your text to speech
using Coco TTS. And here are some of
the sample voices. Hi, please subscribe
to our channel. Thank you very much. Hi, please subscribe to our channel.
Thank you very much. Hi, please subscribe to our
channel. Thank you very much. Hi, please subscribe to our
channel. Thank you very much. We will be installing this
Kokoro TTS to our PC, and it is very simple to do. We will be using Anaconda to
create a Python environment. And if you do not have anaconda, go to anaconda.com and
click on Free Download. Provide your email or
skip the registration and download the installer and install it onto
your computer. After this is done, go to the start menu and
type Anaconda Prompt. This is the one, open it. And first thing we need to do is create a
Python environment. For that, type Conda, create Na I will name it CocorO. Python is equal to 3.12. This will create a Python
environment, 3.12. Y and Enter. So the
Python environment has been created.
Let's activate it. Type Conda, activate
Cocoro and Enter. You can see the base name
had changed to C Coro. After this, we need to
install C CoroF that type PIP install Cocoro and
Enter. So this is done. Now we need to install
spaces for that type, PIP install spaces and Enter. So this is also done, and now we also need
to install gradioF that type, PIP install radio. So this is also done. Now in this folder, we have
created a custom file. So this is a Python file, and we have modified
the Coco TTS demo, and we will provide this. Anyway, copy this address. And on Anaconda, type CD, Control plus V, and Enter. So we are inside that folder. Now type Python, run
that PY and Enter. You might see some warnings,
but you can ignore it. And here is the Kokoro TTS. By the way, if this
does not uo opens, kindly copy paste this
on any of the browser. Anyway, this is the
Kokoro interface. Input your text here
and click on Gent. This is using this voice. Hi, please subscribe to your channel. Thank
you very much. So this is how this sounds. And you can simply
download this. Let me choose more
voices for sample. You can also change the speed. I'm using CPU, and
it works all good. Hi, please subscribe
to our channel. Thank you very much. Hi, please
subscribe to our channel. Thank you very much. Hi, please
subscribe to our channel. Thank you very much. Hi, please subscribe to our channel.
Thank you very much. We hope this video was
useful. Thank you very much.
3. TTS Edge: Hi, guys, here is how you can install Microsoft Text
speech to your computer. Microsoft offers
free text to speech. Let me quickly demonstrate. Let me open Microsoft as
and here is my sample text, which I want to convert
to an audio format. Let me quickly drag it to
Microsoft As, drag to As, Select All Control plus A, and click on Read
Aloud Selection. All interesting and essential
things you need to know. So that's Microsoft
As takes to speech. You can also choose a voice. There are lots of options, and you can also
adjust the speed. This works great. However, it does not allow you to
save it as mp three. You will have to
record the screen. So instead of that,
let's install this to your own PC and you will be able to save it
as mp three as well. For that, we will be using
this Github repository. Like every other projects, we will be using Anaconda. But you can directly install
Python and use it as well. For those who do
not have Anaconda, go to anaconda.com,
click on Free Download. You can give your email. I will skip registration. And download the installer
and install it on your PC. After this is done, go
to the start menu and type Anaconda and open
this anaconda Pm. So first, we need to create
a Python environment. For that type Conda, create name a TTS. Python is equal to 3.13. This will install the
latest Python version as of now, Enter and Enter. So the Python environment
has been created. Let's activate it,
Conda activate H TTS. You will see this base
name has changed to TTS. Now we need to install
TTS for that type PIP install AdS tTs and Enter. So we have successfully
installed TTS. Now, first thing, we need to
list voices that we can use. If you go to the skitter
page and scroll down. So with this command, this
will list all the voices. Simply type TTS and double dash list dash
voices and Enter. Now, here are all
the voices you can use for your project.
So let's use this. Let's use this one. You can use the exact voice
you want to use. Let me copy this without this dollar sign and
paste it to the notepad. Here is it. Now in this part, you can add your own text. For now, I will only
copy this part. Add your text here. This is for the voice
you want to use. You can choose any
voice you want. Let's choose one of the
voices and replace it here. And now also let's choose the location where
we want to save. Let me save it to the desktop. In fact, I will
create a new folder. Copy this address. And here after write media,
where's the location. Make sure to use the
inverted commas. Likewise, this is for the
subtitles in ART format. I will use the same location. Make sure to use the open
and close inverted commas. So this is done, copy this
and paste it here. And enter. This might take some
time depending upon your text length and voice
used. So this is done. And here is the output. We forgot to change
the file name. This is the name the
file will be saved as. You can use any name you want. Anyway, let's open this. All interesting and essential
things you need to know. And now you have text
in audio as mp three. But please make sure you are
connected to the Internet. Hope this video is useful,
thank you very much.
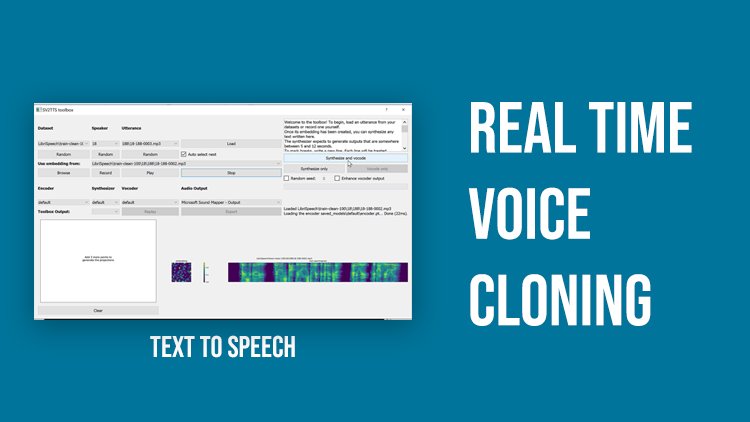
4. Clone your Voice: Hi, guys. Here is
how you can clone your voice using just a
few seconds of the audio. Please subscribe to our channel. So in order to clone your voice, we will be using this Five TTS. This is a Python application, and here are all the details
on how you can install it. Like other projects, we will be using anaconda
to install this. So go to anaconda.com, click on free Download. Scroll down and click on
Download Minicona Installer. And in here, you can download
the distribution Installer. Click here for Windows and simply download
and install this. The file size is nearly a ZB, so we have already
downloaded and installed it. After installing anaconda, go to the Start Menu and
type Anaconda. You will find this
Anaconda Prompt. Simply open it. So here is it. Now let me go back to the
Guitar Base. Scroll down a bit. Here is how you can install it. Let's first create a
Python environment, 3.11. Let me copy this
and base it here. This will create a
Python environment F five TTS with 3.11 Python. Now press enter y Enter. So we have successfully created the Python environment Five TTS. Now we need to activate
this type Conda, activate Five TTS, and Enter. You will see that the base
name has changed to Five TTS. Now let's install Five Tts. By the way, this is the command we use to
activate the environment. If you have NVDographics,
run this command. If you have AMD GPU, run this one for
Intel GPU, run this. And this is for the Apple
silicon one T Series. Now this BC does not have
a GPU, so I will skip it. So I will run this command. Let me copy this
and paste it here. Now, this will install
all the packages for FiveTTs and this
will take some time. So this is done. We also need to install
FFMPQ so type Conda install FFMP the compatible version for this is less than
eight Conda Forge. Basically, we are installing FFM Pig version less than eight, Enter, y and Enter. So this is also done. Now let's also
install Dodge Codec. Type PIP install
Dodge Codec Enter. So this is also done. Now go back to the guitar
page and download this. Go to code and download a Zip. The file size is very small. So it's downloaded,
showing folder. Now open the Zip file. I will close this all and
extract this to the desktop. So here is it. Now open this folder and go to the SRC folder and go to a five on the Squatts folder
and copy this address. Copy address, go
back to Anaconda, type CD and paste
it. Control plus. You can see we are
inside this folder. Actually, it's the infofolder. So we need to be here, copy the address again. City and paste it here. So we're now inside
the Info folder. Let me clear this up. After this, we need to open this Infer underscradio,
Python file. So type Python, infer underscore
gradio dot PI and Enter. Please note, during the
first installation, it might also download
some models which might be over a ZV in size,
so it can take some time. Anyway, here is a URL. You can copy this and open any browser and paste it here or you can press
Control and click on it. Here is the interface. Now
let's try to clone the voice. Let me simply upload the
do here is a sample audio. It is only 30 seconds of audio. Please use a clear
audio of your voice. Let me play it and
hear how it sounds. Hi, guys. So we updated our
iPhone to the latest IOS 26. And what's up with these icons. So this is my voice. You can also load
the audio text, but we'll leave this and
on text to generate, type the text you want
to convert to audio. So here is it. And on advanced settings, please experiment with
this for better results. After this, simply
click on synthesize. Since this PC does
not have a ZPU, it will take some time
to clone the voice. So please be a little patient to check if it is
working or not, go to NaconaPmpt and you
will see what is happening. It only uses small
part of the audio. You can see this reference
text from our voice, and this is the text we
want to convert to audio. Again, please note this will take quite some
time to clone the voice. So please be a little patient. So this is done. Now
let's hear how it sounds. Play it please subscribe to our channel.
Thank you very much. So this is how it sounds. Not exactly as my vocals, maybe because of the accent. We did try with other native
vocals, and it worked great. So please do give it a try. And if you like this
voice and settings, you can also use
this sad Number, so you will have the same voice. And to download, you
can simply click here, and the audio will
be downloaded. Now, if you want
to reopen the app after closing everything,
it is very simple. Simply go to the start menu
and open Anaconda Prompt. I now activate the environment, Conda, activate
Five TTS and Enter. Make sure the base
name had changed. After that, open the Five
DTs folder, go to SRC, Five under Scotts
to infer folder, copy the address, and type CD space Control
plus V and run Python. So we need to run this
Infer unders gradit or PI And you can press Control and click on the URL and use the application. This video is useful.
Thank you very much.
5. TTS Tortoise: Greetings, everyone.
In today's video, we will quickly
learn how you can install tortoisTTS on
your Windows computer. Now, we will be installing this tortoisTTS to
our Windows 11 PC. This one is developed
by James Betka. Anyway, to install this, we will use Anaconda. For those who do not have Anaconda, simply
Google Anaconda. And this is the
official website. Simply download this and
install it to your computer. We have already
downloaded and install Anaconda to save time.
So I will close this. After downloading and
installing Anaconda, also download these files. Click on code and download Jib, so it will be
downloaded as a Z file. I have downloaded this one too, and it is on my download folder. So here is the file, open this and then extract
this to the Dktop. So here are all our files. And this is the
Anaconda installation which I have already installed. After doing this, if you go to the start menu and
type Anaconda, you will see Anaconda
Pm. Open this. Now, the first thing we need to do is create a
Python environment. For that, simply type Conda, create DN, give
any name you want. I will write TTS. Python
is called the 3.9. We have tested with Python
3.9 and it works all good. So we will recommend
this version. Anyway, and hit Nta and Enter. So the Python environment with 3.9 person has been created. So let's activate this, type Conda, activate TTS. So you will see this base
name will change to TTS. I will type CLS
to clay all this. Let me minimize this. Open the Gita pase. You can find all the
installation instructions here. So let's first install PYTurg. Open this in newTa And
now select Asper UPC, Patuch build, choose stable, OS, choose Windows, packs, you
can either use PIP or Conda. I will use Conda.
Language is Python, platform, I will use CPU since this PC has
no graphics card. If you have NevdaGraphics, choose Koda 11.7 or
11.8 as per UPC. For us, we will use CPU. Now copy this and paste
it here and Enter. So this is done. I will clear
this so it looks clean. After installing
this, close this. Before running
these requirements, install PIs on file. Copy this. And paste it here. All done. Now let's run this
requirement text. We need to make a few
eddies to do this. Open the tortoise folder
and open requirements. And in here, remove this
NumbA which is twice here and also remove
this LVM light. If required, we will
install Numa manually. Save this, and it is done. Now navigate where our
tortoise folder is time CD. We will navigate here,
copy, and paste. So we are inside this folder. Now run PIP install. That's requirements dot TxD. So it is done. Now also run this setup
dot PY, copy this. And paste it here. So it is all done. Now let's see if
this works are none. We need to run this command. Basically, it will
use this text, and we will use a random voice, and the preset is fast. You can change the voice and as will the preset as per
your requirements. To explain Beta, go
inside Tortoise folder, open this Apt PY file. I will use a notepad
and search fast. So you can use ultra fast,
as you can read it here. Use fast for decent quality, use standard for good quality, and use high quality
for absolute best. However, this will take
less time compared to fast, and high quality
takes more time. For now, let's use fast. So let's copy this. Paste it here, so
the audio will have, I am going to speak this text. You can change it if
you want, and for now, it will use random voices
and uses fast preset. Please note, this will
take quite a long time. So this has been done.
Let's check results. Open the tortoise
folder. Go to results. So here are the audio.
Let me play them. I'm going to speak this. I'm going to speak this. I'm going to speak this. These are the random audio. So you can use this audio. You can also use your
own voice for it. For instance, here is
my audio recording. So these are my own voices. All you have to do is copy
this and in the totois folder, go to tortoise and open voices. And simply paste it here. You can check all the
audios and use them too. Anyway, let me clear this. Now let's try using
our own voice. We need to run some command. Here is a command. Let me
paste it in a notepad. You can write any text here, and we will use our own voice. In order to do that, we can use this voice
Iqalt directory name. So write IqalT and
the folder name. Make sure to have the
exact name of the folder. Copy the exact name
and paste it here. I will use a preset fast. You can also use high quality, but it will take some time. Now, copy this code and
then paste it here. Please note this process
will take a very long time. So this has been done. Now,
let's check the results. And here is our audio. Subscribe to our channel. Subscribe to our channel. Subscribe to our channel. It does not exactly
sound like my voice, possibly because my
accent is different, but please give it a try. We hope this video was
useful. Thank you very much.
6. Clone any voice with RVC: Hi, guys. Here is how
I clone my voices to Dracula and Andrew
Tate using RVC Project. Hi, guys. So I'm using
this sample photo with DeepLiveCam
and the OBS Studio. To make a deep fake
call on WhatsApp. Let me quickly call it, and you can see the
deep fake video. Check the description on how to do this. Thank you very much. To do that, simply go
to this RVC Gita page. I will provide the link,
click on releases. If you have NVDaGraphics,
download this version. If you're using AMD, Intel, simply download
this version. After downloading this,
you'll get a Z file. The file size is about
three point a ZB, now simply extract it. I've already
extracted the Z file as it takes a few
minutes to do so. Now in this version, it does not have the web interface
to clone voices, so we will have to create
that, but it is very simple. Simply duplicate this
go real time GI file, copy and paste it
here. Here is it. I rename it to web. Now let's edit it, right
click and edit in the no pad. In here, we need to
make a small change. Change this GI on the
score V one PY to infer dash web dot py and
remove this DML. Make sure to change
this to infer web dot py and save
it. So this is done. Now let's open this. This
may take some time to load. I so here is the interface. If this does not open
automatically, in this link, replace the zero dot zero with local host and add the port
and paste it to the browser. Anyway, now this offers
various features, but for this video, we'll only clone our voice
to other artists. Here, you can also
choose to train the voice which will
clone our voice. Anyway, here are the default available voices,
which is limited. So go to this website, voicedestmdels.com, and you can download
various voices as you want. For instance, let's
try with Dracula. Simply click here, and it
will download the file. Let's check the top voices. See if you like any voices. Or you can also search. Let's look for Autate voice. Let's use the one
with high Epoch. So the file size is
about two to 300 MB, as you can see, and you can download and use as many
voices as you like. So the download has
been completed. Show in folder. So
here are the voices. Let me quickly extract it here. Extract here. So here is it. If I open this, you will find dot pth and dot index file.
These are what we need. Let me quickly extract
Jacula as well. I and here are the files. Now we need to copy this to
the right folder to use them. Go back to the RCV folder, and go to assets
and two weights. This is our main folder
and go to assets and weights and copy the dot
PTH file. I will cut it. So it's here. Let's
copy the ****, one, two, Copy the dot PTH
file and paste it here. Now go back to the main folder again and open the folder logs. Here, we need to copy
the dot index file. Let me move this
one to Logs folder. Here is the TTS one And now, again, move the Dracula
one here, so it is done. Basically, we added
two voices for now, but you can add as much
voices as you want. So this is done. Let
me close this as well. Now you should find
the new voices here. If it is missing here, then simply refresh the
voice list index path. And here you can see
Dracula and tad voice. Let's try with Dracula. You can transpose this
and raise the October 12. Here are some settings
for you to play with. So please experiment. Anyway, here a the audio
file to be processed. Here I have my own sample audio taken from one of my shots. So this is how it
sounds. Hi, guys. So I'm using this sample
photo with DeepLiveCam and the OBS Studio to make a
deep fake call on WhatsApp. Let me quickly call it, and you can see the
deep fake video. Check the description on how to do this. Thank you very much. Now that's my sample voice
from one of my shorts. Let's convert it into
Dracula's voice. We need to add the
audio path too. For that, right click on
the audio file and copy as path. And paste it here. Leave this feature
index to default. In here, we can choose
the exact index file. So for Jacula, here is the one. Here you can choose
the settings. PM is faster but low quality, harvest is better,
but extremely slow. Create is better quality
but uses high GPU, and RM VPE is best quality with little GPU. So
I will use this. You can also tweak these
settings as prior requirements. So let's try to convert
it. And it is done. Hi, guys. So I'm using
this sample photo with DeepLiveCam and the OBS Studio to make a deep fake
call on WhatsApp. Let me quickly call it, and you can see the
deep fake video. Check the description on how to do this. Thank you very much. So that's the audio
indraculs voice. You can also download
this so it's saved. Now let's try with
Andrew Tate's voice. I will simply choose Tate. The audio is same and
change the Tate index. And let's try to convert it. Again, please play with the settings to get
better results. Each voices are different. So it's done. Let's
listen to it. Hi, guys. So I'm using
this sample photo with DeepLiveCam and the OBS Studio to make a deep fake
call on WhatsApp. Let me quickly call it, and you can see the
deep fake video. Check the description on how to do this. Thank you very much. To make it more relevant, we can add these settings and find the best
match that works. We really hope this video is useful to you. Thank
you very much.
7. Clone Your Voice Using OpenVoice Text to Speech: This video, we'll quickly learn how you can
clone your voice in seconds and as well convert text to speech
using OpenVoice. So basically, we will be installing this OpenVoice
to our Windows BC. We will be using Anaconda
to run this application. So for that, go to anaconda.com and click
on Free Download. You can give your email
or skip registration. I will skip the registration and download the installer and
install it to your computer. After Anaconda is installed, if you go to the Start
menu and type Anaconda, you will find Anaconda Prompt. Let me open it. Now,
the first thing we need to do is create
a Python environment. For that, type Conda, create double das name. I will use OpenVoice. Python is equal to 3.10. We have tested with Python 3.10. That's why we will
be using this one. This will create a
Python environment, OpenVoice with Python
3.10. Wile Enter. So the Python environment
has been created. Now let's activate
the environment. For that type Conda
activate OpenVoice. Make sure this buss name
has changed to OpenVoice. Now again, go back
to the guitar page. And let's download
all these files, go to code and download a zip. I have actually
already downloaded it. Anyway, showing folder, I would delete this one as I've
already downloaded it earlier. So here is the OpenVoice
C file, open this. And let me extract
it to the desktop. Let me close this. So here is a folder, open it. Now, we need to
copy this address. Copy this Go back to
Anaconda Prompt type CD, space Control plus V. So now
we are inside this folder. Now let's install
all the dependencies required to run OpenVoice. For that, type PIP, Install. That's requirements
dot TXT and Enter. This might take some time as it will download lots of files. You will be stuck at this
screen for a few minutes, so please be a little patient. I am fast forwarding it. So this is all done. We also need to install
FFMPZ to run OpenVoice. So for that type Conda
install FFMPZ and Enter. Y and Enter. So FFMPZ has also
been installed, so this is all done. Now to run these files, we also required to
install Jupiter notebook. For that type Kunda, install C, Kunda Forge, Jupiter Lab and Enter. So there was a little
typo with an extra T, so let me retype it again. It froze. Let me try
to re run the command. And now this seems
to work. Why Enter. So this is done. Now, we also need to install some widget
for Jupiter Notebook. For that type PIP, install, notebook, IPI wicket. So now everything
has been installed. Now again, go back
to Guitar pays. Scroll down, and you will find this users
link. Click on it. And we need to download
this V one and Vtheckpoint. Click on V one. For Demo
Part one and Part two, we need this checkpoint. Simply click here
and download it. I have already downloaded it. The file size is about 400 MB. Likewise, also download
this Vtoo checkpoint. The file size is about 116 B, and I've already download this one too. I
will cancel this. Let me go to the
downloads folder. Let me open this
V one Checkpoint and extract it
here. So it's here. Likewise, let me open V two checkpoint and
extract it here. So it's here. Now let's move
this to OpenVoice folder. Let me close this Open this
folder and paste it here. So we have the checkpoints here. Now go back to the
anaconda prompt. Let me clear this CLS. Now let's open the
Jupiter notebook, type Jupiter Notebook and Enter. So this is the Jupiter Notebook.
Let me close this all. Let's open this demo part
one. Now let's run this. Highlight this and
click on play. This asterisk means
it is working. So this is done. Now click
here and run this again. You might see this, but
it will work anyway. I will play all this. For now, we are using the
reference P three. Play all the so this is done, and now this is the text
we want to transcribe. You can add your own text here. And if I go to OpenVoice
folder and go to resources, this is the example
reference voice. Let me quickly play it
so that you can hear it. When I was a wanted man, the resistance gave
me a lot of help. So this is the voice
we are using for now. So let's try to see
how this works. So let's run this
one. So this is done. So the output name is
output in default. In this folder, if you go to output, let me rephrase this. So here is the output in
default. Let me play this. Please subscribe to our channel. This is a voice, and it
is working all good. Now in here, we can also add different styles to the
voice like friendly, cheerful, excited,
sad, et cetera. For now, let's try cheerful. I will replace whispering. I will use the
same earlier text. And let's run this again. So this is done. You can
also change the speed here and let me repress this. So here is the audio.
Let me play it. Please subscribe to our channel. So you can hear the difference. Likewise, this will use
the Chinese language. Now let's try with
our own voice. So here is our
sample audio voice. Hi, guys, here is how you can password protect your PDF file. Here is just more
than a minute audio. Let me cut this and paste it
inside the resource folder. And here is my audio. And in here, replace
with your audio name. It is audio dot mp three. Make sure the name and
extension is correct. Let me run this.
So it is all done. Now let's try with
our own voice. Let me change the output name, output and default
one, and run it. So this is done. So I'm in the output
folder. Let me refresh it. So here is it. Let me play it. Please subscribe to our channel. So that's the clone of my voice. It's definitely not so great, possibly because of my accent, but you can try with yours. And I can also add
emotions to it. Let's try whispering. And rename the output to
whispering one and run this. By the way, you can add
as much text as you want. And let me repress
this. So here is it. And let me play the audio. Please subscribe to our channel. So that's how it sounds. So this part is done. So this is using demo part one. You can also use Demo part two and Demo part
three likewise. Let me close Demo part one. Here is Demo part two
and Demo part three. Let me open Demo Part two. For the Demop two, it is suggested to add the
Open AI API key. For now, I'll skip this. But if you want, you can get the APIkey from Open AI website. You might get free credit if you are using it
for the first time, but eventually it is a
paid service for API. Anyway, I will skip this and
instead do Demo path three. Now, in order to use
Demo path three, we need to install some
more applications. Let me go back to
Anaconda Prompt. Press Control,
please C. This will stop the Jupiter notebook.
I will clear this as well. Again, let's open the
OpenVoice guitar pase. This is the one and go to uses. And click on Version two. You will need to install
Milo tts to use Version two. Copy this code and
paste it to naconaPmpt. Press anyway, and it will
install all the required files. And Demo Part three is a little
advanced than Demopt one. So please do give it a try. Again, presenter. It will download some files, so it will take some time. So all the downloads
have been finished. Now we need to install
furthermore dependencies. Without them, we had encountered
some issues earlier. So we have this
download NLTK file. This will be provided.
This will basically import NLTK and all
required files. Without installing this, we could not run Demo path three. So let's install this. I will put this inside
the OpenVoice folder. Let me copy the name. And now on anaconda prom, type Python andropausw
dot py and Enter. These steps are only
required for Demopat three. If you are satisfied
with Demo path one, you do not need to
install all this. Anyway, click on Download. So the downloads have finished. You can close this. So we
have installed everything. Now again, let's run Jupiter Notebook,
type Jupiter Notepad. Sorry, there is an error. It's actually Jupiter Notebook. Let me close the previous ones. Now, let's run the
Demopath three. Let's run this first.
If it is running, you will notice this asterik. So this is done. Now
let's run this as well. This will use the hick
Point Version two. Earlier, we were
using Version one. This is done too. So
this is all done. In reference audio,
use your own audio. So this is all done. So this is using the melo TTS, the one we installed earlier. So this can use the actions
of all these languages. Only use the ones you require. It can do it in multiple accent,
but will take some time. Let me run this. By the way, the output folder had
changed for this one, it's output version two. This is working. Is the output
version two folder. You will find all
the outputs here. And this will take some time. It will download the checkpoints as it requires for languages, and it will take some time. Let me quickly check
the output folder. So here are the outputs on various tones.
Let's listen to it. Did you ever hear a folk
tale about a giant turtle? This is with Indian accent. Did you ever hear a folk
tale about a giant turtle? British accent. Did you ever hear a folk
tale about a giant turtle? Now, let me stop
this Control Class C. So this is how it works. I will stop all this. So this is how OpenVoice works. Now, if you want to
reopen OpenVoice later, let me first close this all. Simply go to Stop Menu
and open Anaconda Prompt. Open this, activate OpenVoice. The base name should change. After this, Navigate
to OpenVoice folder. Please do not delete
any checkpoints, so copy this cd space Control plus V. So we are inside this folder and then
run Jupiter Notebook. And you can run
the Demo Part one, part two, or part three, as you want and always
make sure to run itself. Anyway, we hope this video was useful to you. Thank
you very much.
8. Fooocus Local Win PC: Hi, guys. In today's video, we will learn how you can create AI images for free using focus. So basically, we will be
installing these to our PC. There are sever ways to do it, but we will be using
the IGS method. Here are some sample images. Anyway, so we will install
these to our Windows PC. Here are the
instructions for that. Let's download the files. Click on Downloads.
Please note you will need to download more
than ten GB of files. So the file has been downloaded. Show in folder, and
this is seven Zt file. You can use Win War to extract
it. Double click on it. I will extract them to Desktop. Let me create a new folder. I will extract all
the files here. Please note this extraction
will take some time. All the files are here. You can simply run this bat file and it will download all
the necessary files. However, we have
had some issues, so we downloaded
the files manually. Let me go back to
the guitar page. Let's download these
default models. I will open this in a new tab. I Now we and save as a link. I will save it to the Dekter. These are small files, but download all of them. So it is done. So these files must go inside these folders,
focus models, checkpoints. Go to focus models, checkpoints and place these
files here. This is done. Now let's again download
this in Paint file. This is about 1.2 ZB. Open the link here. Sometimes
the link may not work, so please refresh it a few times till the download starts. So the download has started, I will pause this as I've
already downloaded this file. Make sure to give a few tries
if the link does not work. I will cancel this. Let me navigate to the file which
I have already downloaded. This is a file. Let me cut this. And we need to put it inside
focus models in pain. Focus models and in pain, past it here. So this is done. Now open this run that Bt file. So it will try to
download this file, which is nearly six CV. We have at issues
downloading this file. So let me copy this link. And paste it here. So the file is being downloaded. I will pause this too and cancel the download since I've already
downloaded the file. So this is a file which is nearly six GB. Let me cut this. So here is an error again. So we recommend downloading
the files manually. And these files would go to
focus models checkpoints. Let me go to the
folder focus models, checkpoints and paste it here. So basically, we downloaded these files and this
for checkpoints. And we also download it in pain. So this is all done.
Let me close this all. Now, if I press any button, the CMD will close. Let's again open the
Run Dot Bat file. This app requires Nevida, but this PC does not
have NivdaGraphics. So for the smooth operation, it is recommended
to have Nevida. However, if you don't have
it, here's an alternative. Go back to the
github, scroll down. And here is what you can do if you have an AMD
graphics card. Now, copy this code. Open the focus folder. Let me close this.
Right click on it, and you can edit it in the
notepad or Notepad plus plus. So replace all the code with
the Github code and save it. And again, open this
run or Bt file. Now, this will use CPU. The generation of images
will take quite some time. This will also
download some files, so please be a little patient. Finally, the application
is running good. Click on Advanced Hey, you can change some
settings, speed, aspect ratio, image
format, number of images, et cetera, and you can give any prompts you
like to generate images. Please note this will take some time depending
on a computer. If there are some issues, make sure your PC mess
the minimum requirements. If the app does not work, you will have to do
it with Google Colab. Now let's see how it actually works and create a demo image. Nepal images in advance, let's choose a smaller one. I will go with this one
I will have two images. We'll choose the PNG format. In the negative proms,
we'll say no people. I will also improve the prompt Nepal images with
Everest and other mountains. On the style, there
are lots of options. The cat image will give you
an idea of what you want. Simply choose what kind of
images you really need. For now, I will choose
semi realistic. And I will choose si cinematic. So you can choose anything
as per your requirements. And now click on Generate.
I'm FastForwarding. This generation will take some time depending upon
your PC capabilities. So you can see these are pretty nice and
realistic images. Please try and explore the options as for
your requirements. Focus will create
some great images. Anyway, we hope this video was useful to you. Thank
you very much.
9. Foocus on Google Colab: Hi, guys, here is
how you can create AI images using focus
on Google Colab. Now for that, open
the browser and simply Google focus
Google Colab. This is the one, open it. So you will say this. Make sure you're already logged
into your Gmail. After you are signed
in, simply click on this play icon and run anyway. Now, this will take some time to download all the files
and make the program run. So this is done. You cannot
use this local host link, but you can use this
radio link. Click on it. And now you can use Focus AI. Let me quickly try it, give any prompts you
want and generate. So focus has created
these beautiful images. Also, you can go to Advanced. Here are a couple of options. You can choose the aspect ratio, choose the number of
images to generate, the output format,
negative prom, what you do not
want in the image. And on style, choose the type of images you want, realistic, three D model, digital
art, choose accordingly. And this you can
leave it to default. One most important
note while using Google Colab is you must always
check the resources used. This is a free GPU
provided by Google, and you can use it
for a few hours, but do not continuously
use it or else it will exhaust the system and you will not be able to
use it for a while. So create an image, and if the GPU is
ten GV or more, wait till it goes back to seven GB and create
another image. Anyway, so try creating free AI images.
Thank you very much.
10. Facefusion: Hi, guys. So Fis fuson has
released another version, so it's 3.4 0.1. Let's try to install
it on our Windows PC. We will be using Anaconda. Go to anaconda.com and
click on Free Download. Now, you have to register
to download Anaconda, or you can also scroll down and click on Download
Miniconda Installer. And then you can download
the distribution Installer from here and
install it on your PC. After this, go back
to the guitar pace, click on code and download Zip. We have already downloaded it so here is the
downloaded jib. Once this is done, open
the Anaconda Prompt. So here is it. Let's first
create the Python environment. Type Conda, create, double
dash, name, phase fuson. Python is equal to 3.12. This will create a Python
environment, 3.12. Why and Enter so we have successfully created
the Python environment 3.12. Now let's activate it. Conda, activate FaceFusion. You can see that the base name
has changed to FaceFusion. So this is the FaceFusion
file we have downloaded. Let me quickly extract
it here. So here is it. Open the folder, copy this address Control plus C
and go to Anaconda Prompt, and let's navigate
to the folder, CD space Control plus. So we are inside this folder. Now type Python, Install
dot PY ONNX run time. After entering the code, you will find few options. This needs to be set
up as per your PC. Default Cuda, open
vino, direct ML. Let me quickly go to
FaceFusion Guitar pase, scroll down, and click
on Installation. So here is all the
installation guide on how you can install it. Anyway, here is how you
can use O and NX runtime. CPU runs only on your processor, no GPU acceleration, CUDA, for PC with NVDA graphics, Coral ML for Mac OS
m1m2, Apple silicon, direct ML for Windows using
DirectX 12 compatible GPU, open VNO for Intel
PC with CPU, GPU, et cetera, RCM for AMD
graphics, CPO GPU. So use as accordingly. Since this spec is Intel
and it does not have a GPU, I will use open VNO, but please make sure
to use it as per PC. Let me copy this
and paste it here. So we will run ONNX run
time with open Vino. Enter, this will download all the required
dependencies for FaceFusion, so it will take some time. So this is all done. So dependency issues. But let's see if
it works or not. Let's install FFMPZ too. So type Conda
install FFMPZ Enter, y and Enter, so
everything has been done. Let's see if everything
runs or not. For that, type, Python, FaceFusion no PY run and enter. This will download
some additional files. Now you can copy and
pass this R out to the browser or press
Control and click on it. So here is FaceFusion 3.4 0.1. It seems to work all fine. Let's quickly try to fea. Let me upload the source image. These sample images are
downloaded from Pixa Bay. And let me upload
the target image. You will first see the
reference image here. And here is the
face wrapped image. So here is pas fusin 3.4 0.1. We really hope this video was useful to you. Thank
you very much.
11. DeepLiveCam: Hi, guys. Here is how you can install DeepLiveCam by Hesider. This is how the live
webcam looks like, and this is the original video, and here is the video
after face-swapping. Now, we will be installing this DeepLiveCam by
HecsDr on our Windows PC, and it can easily swap faces and even run
on a live webcam. Now, in order to install this, we will be using Anaconda. For those who do
not have anaconda, simply go to anaconda.com
and click on Free Download. Provide your email address
or skip registration, and then simply download
and install on a computer. Once Anaconda is installed, go to the start menu
and type Anaconda. You will then find Anaconda
prompt, so open it. The first thing we need to do is create a Python environment. And if you go back
to the Github page, and here is the whole
installation guide. It is recommended to
install 3.10 Python. So let's do that. Let's
create a Python environment. For that type Kanda, create, double dash, name, use any name you want. I will say DeepLiveCam and
then Python is equal to 3.10. So this will create a
DeepLiveCam environment with Python 3.10. Yes and Enter so the Python
environment has been created. Now let's activate it. For that, simply type Conda
Activate DeepLiveCam. Here is the code, Conda
Activate DeepLiveCam and Enter. So this has been activated, and you can see the busname
has changed to DeepLiveCam. Now we need to
download some files, so let's head over
to the Guitar page. We will require models
to run DeepLiveCam. So download these models,
simply click on it. It's about 332 B, and I've already downloaded it. Also download this In swapper. It's about 264 B, and I've already downloaded
this one as well. Now we need to download
this whole guitar file. So for that, go to
code and download a Zip I've already
downloaded this one as well. So these are the three
downloads you will require. Let me head over to
my download folder. So these are the files
we just downloaded. Now let's open this Z file. And I'll extract
it to the desktop. Here is a folder, open it. Now in Models folder, open it. Now, simply copy these two
models, we downloaded earlier. I'll copy this, but
you can cut this as well, and paste it here. Mike sure to add it
inside the models folder. Now go back to
DeepLiveCam. Copy its URL. Then go back to NACOaPmpt
type CD space Control plus V. So we are
inside this folder. Now, we need to install all the required dependencies
to run this application. For that, type PIP install, there are requirements
of TXT and Enter. So basically, this will install all the required dependencies
to run this application, and this might take some time. You might be stuck here
for five to 8 minutes, so please be a little patient. So this is all done. Now we also need
to install FFMPZ. So for that type Conda install FFMPZ and Enter. Y and Enter. So we have installed everything. Now let's try if the
application works or not. For that, type Python, run that PY and Enter. So this is a simple application, and it is working all fine. Now for some reasons, if this is not working
and giving some errors, then go back to the
guitar pase, scroll down. And here you might
need to install Visual Studio 2022
runtime for Windows. If you do not have it, open this link and simply download these build
tools and install it. And if you have NVDA graphics, then you will need
to install Koda. Please install this
Cuda, go to this link. And download it for Windows
and install it on your PC. After that, simply
run these commands, PAP uninstall ONNX runtime, and install this version
of ONNX runtime with GPU. And while opening
the application, instead of using Python run PY, you can execute it with Koda. So this is the code
for NVDA graphics. We are using Anaconda, so we do not require to create
this virtual environment, so we are skipping this. Now, everything is done. Let's see how this works. Now, this is a
simple application. Here is an image, and
here is a sample video. I download it from
Pixels and pixels. Click on Select the Face. So this is the image, open it, and you will
see the image here. If you want to preview
for the live chat, select the webcam here. I will use the integrated
camera and then click on Live. So this is how it looks, and this is a live webcam video. It really depends on your
PC on how smooth it works. Mine is a little sloppy. It's doing all right, but
this is a live webcam, and you can see the moments too. So this is a live
webcam feature. Let me close this. Now you can also use this app to
swap faces on a video. So this is a sample
video. Let me open this. So this is a sample video
and it's not that smooth. Anyway, let's select the target, and in here, instead of
image, choose video. So this phase should come here. Use better images and videos. Now simply click on Start. Save the output
to your location. I will choose Desktop,
click on Save. This will create this
temporary folder. And in here, you
can see processing. This means it's working. You might also see this error
frame processor not found. For us, this app is
working all good, even with this warning. But if that does
not work for you, then we will create
another video to get rid of this error, but this worked all fine for us, and this processing
can take lots of time depending upon your PC,
graphics, and more. So the processing is done. You can also see processing
to video succeed. So here is the output. Let me open this. So this
is the processed video. And this was the original video. Now, the video itself
was a bit glitchy, but this is how the app works. Let me close this, or you
can click on Destroy here. So this is all done.
Let me close this. If we want to reopen this
app, it is very simple. Open the anaconda prompt. Here is it and activate
the environment. Conda activate
DeepLiveCam and Enter. So you will see the base
change name to DeepLiveCam. Now we need to navigate to
the DeepLiveCam folder, type CD and copy the URL. And paste it here and enter. Now we are inside the folder. After this, simply
run Python run PY. And if you are using NVDA, simply run it with Koda. Now, here is the application, and you can use it as you like. We really hope this video was useful to you. Thank
you very much.
12. IRoopDeepFaceCam: Hi, guys, here is how you can install IRoopDeepFaceCam
to your PC. Now, this is similar
to Deepf cam, but it has more add on features. It has this mouthmak feature
you can see the difference. Thise are some nice features. Anyway, now to install this, we will be using Anaconda. For those who do
not have Anaconda, please go to anaconda.com. Click on Free Download. I will skip the registration and simply download this
distribution Installer. Download it for Windows and
install this to your PC. After it is done, download
this, I rup DFAScamFils. Click on code and
download a ZIP. We have already
downloaded the files. Here is the file. Let me
quickly extract it here. So here are the files. After Anaconda is installed, go to the start menu and
type Anaconda Prompt. Here is Anaconda Prompt. Open this. Now first create
a Python environment. For that type Conda, create double dash,
name, IRoopDeepFaceCam. Python is equal to 3.10. This will create a
Python environment 3.10. Y and Enter. So the Python environment
has been created. Now let's activate it. You can copy this or simply type Conda activate Rub
deface Cam and Enter. You will see this base name has changed to Rub deface cam. After this, go to the
Rub defacecamFolder. This is a folder which
we extracted earlier. Now copy this address. In here, type CD and
Control plus V and Enter, so we are inside this folder. Now let's install
all the dependencies required for Rob Dfascam. For that Type PIP install, that's requirements
dot TxD and Enter. This will install all the
dependencies for IRB Dfascam. So this will take some time. So this is D. Let me clear
this all CLS and Enter. Now let's try to run
the application. Python, run that PY. So here is an issue. Non type object has no
attribute configure. So to fix this, we need to
install FFMPZ type Conda, install FFMPZ and Enter. Please check our other
video to install FFMPZ if this method does
not work. Y and Enter. So it is done. Let's
try to run it. Python run that PY. So here is Airub D fscan.
Thank you very much.
 Saujan Man Pradhan, WordPress Designer and Graphic Designer