Transcripts
1. Welcome to Class!: Have you ever felt
that searching for that perfect
reference image, only to end the
frustrated and blocked? What if I told you,
there's a tool that can eliminate the struggle and
regnit your creativity. Hi there, I'm Lina
professional artist with over six years of
experience in the industry. My journey has taken me through
many creative challenges, but discovering AI tools like GPN M Journey has been a game changer for
my teach process. In this class, I'm going
to teach you how to harness the power
of AI to generate a wealth of creative ideas and the perfect references
images for your art? Learning the skills is critical because it not
only saves you time, but also opens up a world
of creative possibilities. By the end of this class,
you'll be able to generate stunning customized
references that will enhance your artistic projects and
eliminate creative blocks. I've been there, stuck for weeks because I couldn't
find the right reference. It was incredibly frustrating
and demotivating. But since I started using
my journey for reference, I haven't experienced an block. My inspiration flows freely, and I received countless
compliments on the originality and
detail of my work. People often ask me where
I get my references from, and it feels amazing to have such a powerful tool
at my disposal. In this class, you
will learn how to harness the power of AI to generate endless creative ideas and high quality
visual references. We'll cover accessing and setting up CA GPT
and my journey. Using CA GPT for brainstorming and refining
artistic concepts, crafting effective prompts for mi journey to create
standing reference images, and practical tips and tricks to get the most out of these tools. Using reference images
in art is crucial. They provide foundation
for accuracy and detail, allowing you to create more lifelike and
compelling projects. Good references can spark new ideas and elevate
your work to new levels. AA is an incredible
tool that can significantly enhance
our creative process. It's not something
to fear, rather, it's a resource we can leverage
to push our boundaries. AA is the future, and by embracing it, we can make our
artistic journeys smoother and more innovative. This class is perfect for
artists of all levels, whether you're a beginner struggling to find
good references or a professional
looking to speed up your process and
find inspiration. You don't need any advanced
knowledge to start. We'll be using the
Journey and GPT, so having access to these
tools is essential. I'll guide you through
everything step by step. I'm t thrilled to share these transformative
tools with you. Let's dive in and unlock new creative
possibilities together. In the next video, I'll give
you a detailed overview of the class and we'll talk about your final project. Here there.
2. Class + Project Overview: O. Welcome to the
exciting journey where you'll learn
how to harness the power of AI tools
to find new ideas and create perfect reference
images for your artwork. This class is structured
to guide you through the entire process of
using GPT and M journey to generate creative
concepts and create reference images enhancing your creativity and efficiency. Here's what you can expect. We'll begin by setting up
GPT as our idea generator. We'll brainstorm new
painting concepts, and I'll give you some
tips on how to get responses that are tailored
for your specific needs. We'll then train need to
write effective prompts, which we can use in M journey. I'll show you how to set up
and navigate mi journey, understanding its features
and capabilities. We'll go through the
process of creating diverse and unique
reference images and we'll cover how to refine these images to better
suit your projects. By the end of this class, you'll have a solid
understanding of how to utilize these tools to find new ideas and create inspiring
reference images, giving you more time to
focus on your creativity. Your final project will
be a piece of artwork created using a reference image generated and refined
trough M journey. The format can be a
digital painting, sketch, detailed drawing,
or any medium you prefer. Pay attention to detail, and don't be afraid to let your unique style shine through. Apply the techniques of
generating refining and incorporating reference
images as set in the class. Focus on how these images
enhance your composition, accuracy, and overall
artistic expression. You'll need a computer or a
tablet with internet access, access to me journey, and your preferred talies. Don't forget to post your
project in the project gallery. This not only allows me
to provide feedback, but also lets you connect with fellow students and get
inspired by their work. Simply click on the
project gallery tab, applaud your artwork and
add a brief discretion. Now, let's dive in
and start creating. In the next video, I'll tell
you how you can access GPT.
3. How to Access chatGPT: What is CA GPT? CA GPT is a language model. It uses advanced machine learning techniques
to understand and generate human like text based
on the props you provide. Essentially, it's
a powerful AI tool that can engage
in conversations, answer questions, and provide general and creative
suggestions, and it's completely free. To access it, go to. Log in or create a new account if
you don't have one yet. After that, you'll be all
set and you can start typing your questions here or choose one of the
templates provided. In the next video, I
will tell you how I use changeP to help me generate ideas for my paintings.
See you there.
4. How I Use chatGPT to Generate Ideas: How pit can be valuable tool for brainstorming
and idea generation. And less creative suggestions, Capti can generate a vast array of ideas on virtually any topic. This is especially valuable for artists and creatives
who are looking to brainstorm new concepts or explore different artistic
themes. Fresh perspective. Sometimes we get stuck in
our usual ways of thinking. P can offer fresh unexpected
perspectives that can spark new idea and help break
through creative blocks. Efficiency. Instead of spending hours trying to come
up with new ideas. Can quickly generate
multiple suggestions with GPT saving time and effort. To get the most out of GPT for brainstorming
and idea generation, it's important to configure the settings to match your need, care so key settings and configurations that can help
setting a creative tone. You can set the tone of the responses to be more creative, formal, casual, or professional. For brainstorming
and creative ideas, you might want to set up more imaginative
and free form tone. Explicitly state
the desired tone in your prompt, for example, Give me some creative
and imaginative ideas for a fantasy painting. Control the length of the
responses to ensure they are detailed enough for brainstorming,
but not overwhelming. You can specify whether you want short concise ideas or more
elaborate suggestions. Indicate the desired
length in your prompt. For example, give
me a short list of three to five
creative themes for a painting or provide the detailed description of a concept for an
abstract art piece. The way you phrase your prompts
can significantly impact the quality of the
responses ticket from GPT. Here are some tips. Clear and specific. While open ended
questions are useful, providing context or
specific details can help cha GPT generate more
relevant and focused ideas. For example, instead of
give me some art ideas, try suggest some themes for
romantic landscape painting. Describe your artistic
style in detail. Msion whether you prefer
abstract realistic, surreal, impressionistic,
et cetera. For example, I enjoy
creating abstract paintis with bold vibrant colors
and dynamic shapes. Msion any specific techniques or mediums you commonly
use, for example. I use watercolors
weighting what to create soft transitions
between objects. Provide examples of subjects
you enjoy painting. Is the subjects or themes
you enjoy painting the most. For example, I love painting, street scenes with charming
old doors and potted plants. Highlight any specific interests or recurring motives
in your work. For example, I am
particularly drawn painting water elements
like oceans and rivers. Of for examples of
your previous work. Share descriptions of
your past artwork. This can help GPT understand your aesthetic preferences
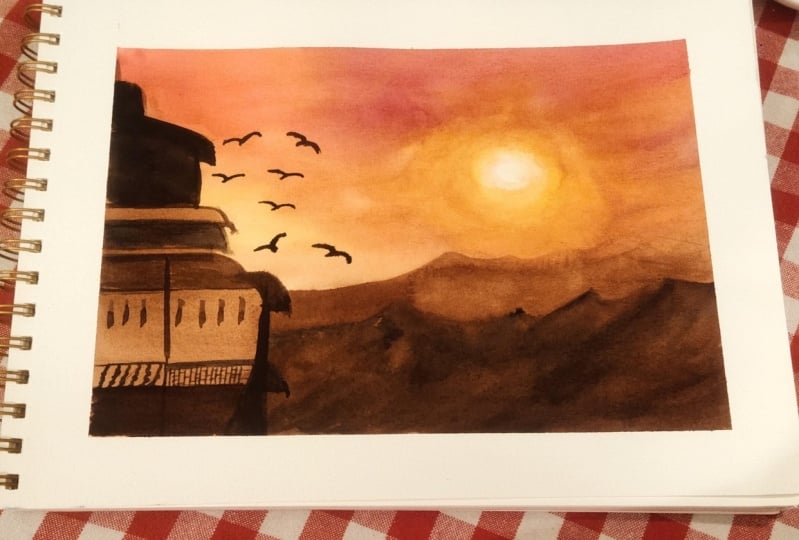
better, for example. Description of a
recent painting, a light house at sunset to
dreaming purple clouds. Specify the mood or emotion you want your painting to
evoke, for example. I want my next painting to feel peaceful and serene with
the touch of mystery. Set the context or setting. You can say specific parameters
like the viewing angle, the season or the time
of day, for example. Give me a list of ten ideas for panoramic paintings depicting the beauty
of Summer sunset. Use creative triggers. Provide creative triggers or keywords that resonate with
your vision, for example. Keywords, peaceful,
harmony, nature. Here's an example prompt
using these tips. I enjoy creating
magical reality, what color painting
using vibrant colors. I often used the wet
and light technique to create self transitions
between separate objects, and my style is semi realistic. I love painting, street scenes
with charming old doors, and potted plants next to them. For my next project, I want to create a series
of alyspired city scenes, convey a sense of peace and serenity with a nostalgic touch. I envision old crumbling walls, rusty boats, and laundry hanging from the old broken windows. Keywords, peaceful,
dreamy, vibrant. What are some unique themes
or ideas for this project. See now that it starts
generating the response, making a list of ideas, and explaining each
one separately. It even gave me some
tips at the end, which sometimes can be useful. We see that the list
of ideas is very rich. We have a diversity of
different settings, different cities and regions. Not all generated
ideas will be usable. We prepared to shift
through the responses and select only the ones
that truly inspire you. Quickly scan the responses to identify ideas that tend out or immediately capture
your interest. Mark or not the ideas that you find most intriguing
or promising. Think about the potential
of each idea and how it aligns with your
artistic vision and goals. Personalize the ideas by adding your own artistic style or
specific details. For example. If the idea is a sunset TT, you could refine it by specifying the time
of day and the mood, for example, vibrant
and bottling or dark. Dystopian. You can
let GPT know which suggestions you like
more and ask it to generate more similar ideas or to elaborate by providing additional details or elements that can be incorporated
into the painting. You can also correct
it, for example, if it gives you complex ideas, you can tail it you want more simplistic or
minimalistic concepts. Don't be afraid to refine your props based on
the initial responses. The first set of ideas
isn't quite right, tweak your question
and try again. After you take the
refined ideas, it's time to incorporate
them into your workflow. This could include row
sketches or moodboards, tasting different color
palettes or whatever it is in your practice that
you have adopted so far. In my case, that
would be asking GP generate specific prompt for
each of the ideas I like. Then I copy and paste these
prompts in my journey to create my amazingly
inspiring references. Keep watching and
I'll show you how.
5. How I Use chatGPT to Write Prompts: In the VA, I will
explain how to leverage CGPT to craft effective
prompts for M journey. Writing effective
prompts is crucial for getting useful
outputs from me journey. By using ChagpT to help write your prompts,
you're saving time, increasing creativity
and generating more precise and
inspiring references. To get detailed and relevant
responses from M journey, it's important to be
specific with your prompts. The more specific you are, the less room is left for
M journey to improvise. Whatever is now specified
in your prompt, M journey will decide on it. Providing context and details, helps me journey generate more accurate and
inspiring images. Include elements
like mold setting and key features you
want in the image. For example, instead
of pastel sunset, try sunset over the
mountains, pastel colors, the sky's yellow and orange
clouds are soft and purple, birds flying overhead peaceful. It's recommended that you start your prompt with the general
setting of the idea, then not the details
in mood, for example, a lakeside landscape a down with mist rising
from the water. Lonely boat near the shore
and birds flying overhead. Serene, peaceful tranquil. You can separate
the specification with combos or periods. It doesn't matter.
Knowing all this, we can train angiPT to
generate specific prompts for us that we can then copy
and paste inter journey. M journey can generate
images in different mediums, so you need to specify in what medium you want your
image to be generated. My advice is when you use
it to generate references, ask it specifically for
realistic photographs. Otherwise, it might
generate some kind of painting like coal
painting, for example, which will both influence your idea of
execution and confuse you if the generated image is in a medium that is different from what you're painting with. Using my previous example
with data inspired ideas, let's ask GPT to generate prompt for the
ones I like the most. So I will type generate separate prompts for
an AI image generator. The prompt should be in
the following format. Realistic photograph,
general theme details, moth. Please note that the prompt might still need
some refinement, but this is a great
place to start. Let's see what kind
of images we'll get. But first, let me tell you
how to access M Journey.
6. How to Access Midjourney: Mid Journey is an advanced AI power tool
designed to generate high quality and
creative visual content based on user provided prompts. It leverages deep
learning algorithms to understand and interpret
text descriptions, transforming them into
detailed and unique images. This tool is particularly variable for artists, designers, and creatives looking to enhance their workflow by
providing inspiration, references, and visual aids tailored to their
specific needs. To access Md journey, go to M journey.com. Again, you can log in or
create a new account. We access the Md journey
bot in the discord app, which you can download
on your MC PC or phone. You can also open in
your Internet browser. Once you're inside discord, you'll be redirected
to the getting started channel where you can learn
how to use Mid Journey. I'll give you all the basic
information you need, but if you want to dip, this is a great place to start. Here on the left, you can
see different channels. If you go to one of
the Newbie channels, you can see other people
generating images and have a look at what their prompt look like and what kind
of results they get. All this is too
overwhelming for me, so I prefer to message
the boat separately. Here I can see only
my prompt and images. Let me show you how you can
use this powerful tool to generate amazingly
beautiful photo references. See you in the next video.
7. How I Use Midjourney: In this video, I'll
explain how to use M Journey to generate
reference images for your art. So we already know how to access Mi Journey.
We have our prompts. Now it's time to test them. I copied the first
one from the list. Here I start by typing image, which is the command for
generating images here, and then I paste
the copied text. And I hit Enter. We wait a few seconds and
then the bot generates four different images in
response to my prompt. I can click on it
to make it larger, and if I click Open and browser, I can and see it
in great detail. Patomi journey here below,
we have some options. U is for scale, so we can scale any
of the four images. The white arrows generate another response to
the same prompt. F is for vary, so we can use it to ask the bot for variations of
any of the images. I like number two, so I'll
click U two to scale. This enhances the resolution and detail of the
selected image. Now with the image of scale, we have new options
to play with. First, we have the Upscale
subtle and Upscale creative. Upscale subtle option
doubles the size of your image and keeps details very similar to the original. Upscale creative also doubles
the size of your image, but adds new details
to the image. This is the upscale steel. And this is the
upscale creative. Going back to the
originally scaled version, let's explore the
rest of the patents. Here we have three options, four variations, very subtle, very strong, and very region. Very subtle will
produce new images that retain the composition and
colors of the original, but with subtle changes
to the image details. Now, the Bow generate
four new images, each one with subtle changes
compared to the original. You can see the composition and color palette are the same. Let's now try very strong. It will produce new images that vary from the original
image and composition, number of elements, colors, and types of details. We see here that the general
mode is the same but to have different compositions
and elements across the four new images. You can control
your default amount of variation when using the V buttons with the
high variation mode and low variation mode
in your settings. You can access your
settings by typing, slash settings, and presenter. High variation mode
is a default one. L et me now show you
the very origin option. When you click on
it, a new window pops up and you can see the rectangle marquee
tool or the sta tool to select areas of the paintings
which you want changed. For example, let's say I
don't like this bolt here. You also have the option to
edit to prompt if needed. I'll leave it like that for now. The pot now generates four new images that are
identical to the original one, except for the area I selected. I don't see a big
difference here, so let me try something
else so that you can get a better sense
of what you could do. Let's say I don't like this
area here in the background. I selected. We now have four new images, each one with a
different background. It added different buildings, somewhere, it added
birds and flags. Let's continue with the
rest of the buttons. I'll scale one of these now as I don't want to
scroll back up again. The next row of
buttons is about Zoom. It's pretty straightforward. You have the option
to zoom mot two times 1.5 or a custom zoom. Let's select 1.5 Zoom. Again, the boat will generate
four different images, each one expanding differently
from the original image. It mostly changed the
building on the right, but see how the building is different in each of the images. Finally, we have the arrow
buttons, which I love. Let's say I want to have the same image,
but with more sky. I'll click on the
upper arrow button. The bot will generate
four new images now in a two by three ratio, each with a slightly
different upper area. I like number two. I think it doesn't
need anything else, so I'll just scale it. And now I can save it
and I paint from it. In the next video, I'll give
you some tips and tricks to help you get even better
images. See you there.
8. Tips & Tricks: In this video, give
you more tips, tricks, and tools to a ti belt that
will help you generate more beautiful and
unique reference images. Let's get started. Let's just move on to
the next prompt that CaT GPT generated for
me. I'll copy the text. And we'll paste it
into this cord after typing. Here's the first tip. If you want the generated image to have a specific aspect ratio, you can specify that by typing, A R, and then the desired ratio. For me, this would be ten by 16. Which is actually five by eight, and you can see the bots
change that in my prompt. You can already
see the new images will have this aspect ratio. If you paint on a specific
size of paper or canvas, you can generate images
with the same aspect ratio, which will make the
sketching process easier and more accurate. My next tip is about
using the option. A is four stylized and basically means how beautiful
your image would be. Let me show you. I will
copy the exact same prompt. By default, this
setting is set to 100. So the images which
generated are generated with S 100 or
stylized set to 100. Let's just see what
would happen if we just turn it off by typing S zero, which means no stylizing. These are not by the toll, but have a look at what happens. If I give it the
exact same prompt, only this time with S 500. Look at that. This
is all gorgeous. But let me demonstrate
again with a simple prompt. It will be more obvious what exactly this option is doing. If I type the prompt
cute dog S zero, I get these dogs,
which are cute. Yes. But images
are pretty boring. If I type just cute dog, which by de fold means S 100, I get these new images
which are a bit better. Let's try with 500. You can already see
the difference here, especially number two and three look like there from a
professional photo session. We didn't specify that we
wanted realistic photographs. So number one and four look
like some kind of art. And finally, let's try W 1,000, which is the highest
setting for this feature. And now we have these beautiful, polished professional
looking images. Let me show you one more trick. I'll give it exactly
the same prompt. Only this time, I will
include the tata P function. This will give me four
photos that are created specifically with my personal
visual preferences in mind. Can you see the difference?
These have more warm colors? The composition is a
bit more creative. They're just more beautiful and appealing according to me. And you can tell they've
been generated with my personal preferences in mind because of this
code over here, which is the code for my personalization
here in my journey. If you copy it and paste
it in your prompts together with the Tata
P in front of it, you will get the images
with my preferences. You can turn on the
personalization mode by typing, slash settings, and clicking
on this potent here. This will mean that
every prompt you give the pot will have dP
by default in it. Let's try with our
previous prompt again. I will copy it and we'll
add P and S 200 at the end. Hopes I didn't at
a space after the e. These are corgeous. Let's now grab the next
prompt we have on our list. Now, if you want the bot
to generate two responses, one with and one without
your personal preferences. You type at the
end of the prompt, Carly Bracket, P, Carly bracket. It asks if I'm sure
I want to generate two responses and
I click on yes. I already see that both prompts have my personalization inside, which means both responses will take my taste
into consideration. This happened because I
turned personalization mode on so let me just turn
it off and try again. So this one is with the
personalization mode of. And this one is with the
personalization mode on. You can see this one
is more soft and subtle with warmer colors
and gentle contrast. Setting aside that the
boats are in the street, which to be honest is my fault because the prompts
aren't very specific. So how does the boat know what our personal
preferences are? You go to a joy and then you can either photos from
the Explore page. Or you can go to tasks
and then rank images, and you'll be guided
to pick one out of two photos that you
see on the screen. You just click on whichever
image you like more. You need to do this for
at least 200 images for the boat to get to
know your preferences. Here you can see that I did this for more than 2000 images. And lastly, let me tell you
about the image prompt. So My Journey allows
you to aplod an image, and then this will be taken
as a part of your prompt. So you start by clicking the
Plus button, aplod file. Then you can aplod an
image from your device. Let's try this one from
our last trip to Italy. I selected. And
then I press enter. Now I can write click
on it, Copy Link. And then I can type flamag
and then paste the link. You can also paste links
from images on the Internet. And now I can tell the boat
what it is that I want, and it will use both
the applauded photo and the text prompt
to create images. I'll just type an old door
in an Italian village, but you can give something
totally different and it will blade
those two prompts. In my case, I get
beautiful doors with the same color palette
as the applauded photo. I also didn't mention in the prompt that I
wanted potted plants, but I suspect it's because
my image prompt has one, so it decided to add
it in the response. This is it guys.
These are the tricks and tools that I use
in my daily practice. Once again, if you want
to dive deep into this, start with getting started
channel in the court although I highly suggest the
future tech pilot channel on YouTube is golden. Go have a look at it if you're interested
in learning more. I'll see you in the next video.
9. Wrapping Up the Class: Thank you so much
for joining me on this incredible journey
through the world of AI powered Art references. It has been a pleasure and honor to guide you
through this course, and I want to congratulate everyone of you
for completing it. I can't wait to see how you
apply what you've learned. If there's one thing I hope
you take from this class is the empowerment to explore new creative
possibilities with I. By embracing technology
like M Journey, you can streamline
your workflow, unlock new aspirations, and put the boundaries of your
artistic expression. I encourage you to continue
playing with the I tools and discovering what works
best for your artistic style. Embrace experimentation
and innovation. It's through exploration
that we grow as artists. Whether you're refining
your technique or embarking on a new project, remember that the
possibilities are endless. Remember to share your amazing projects in
the project gallery. I look forward to
providing feedback and seeing the incredible
artwork you've created. Also don't forget to follow
me on skill share and social media to stay updated on feature classes
and artistic tips. If you're interested in diving deeper into
what color journey, feel free to reach out
for a one on one session. Let's continue this artistic
adventure together. Thank you once again for
being a part of this class. Keep creating, keep exploring, and keep pushing the
boundaries of your creativity. Until the next time,
have painting.
10. Bonus Video: Painting Demo: In this bonus video, I'll do a quick painting using
this photo as a reference. Just a couple of notes. The painting is quick
compared to my usual process, which is longer,
and for this video, I'll keep it on the we side. You're welcome to join
me and follow along. As this is a class on creating the references and
not the paintings, I will keep the instructions
to the minimum. And if you have any questions, you can always reach out to me in the discussion
section of the class. I have prepared my sketch and taped the paper to my board, and now I start by
waiting the paper. I mix complex gray shade
using ultramarine, alizarin, emerald, and a little bit of van
Dag brown, and burn ciena. I add it around the door, avoiding the pots as
much as possible. I'm altering the gray by adding more lizarin
and van ****, and I use that color to paint
the arch around the door. I'm altering it
again by adding more ultramarine and I use that
color to paint the ground. Oh. Splatters to make it
more interesting. I combine Naples yellow,
transparent yellow, and transparent viral orange and add this color to the
upper part of the wall, altering it occasionally
with pure Naples. I add some braciena to it, and I use that mixed to
add some darker spots. Now, thicker Bantiena, I add some shadows
around the arch. I use deck to add some darker spots on the very edge between
the two colors. So random darker spots
with that color too. I continue adding some shadows
using that same color. I mix gray again,
and I use it to chaos around the pots
and on the ground. You can use just paints g too. Now I take some green and
I add a lizard into it. This metes it down and makes it more realistic
color for greenery. I start painting the plant by adding some spots
with that color. You can alternate
the color here to platters for a more
interesting look. I add to the mix, and I use it to
add some shadows. And some yellow for highlights. I make it more interesting and fun by flattering
clean water over it. I use more or less the same technique to paint
the other plant. I'm using a dry bridge to bland the water marks. You
could leave them too. It will look interesting, but I'm used to removing them
as long as it's possible. I now take some Bertana, and add it to the
center of the door. I'm switching to V D
and I add it around it. I add Sam yellow spots
to the big plant just to break down the green
pattern that has formed. I stepped on some hard diages, add some final splatters, and I leave it all to dry. My painting is now. The door turned out very pale, so I'll repeat the
same process of painting it just
using ticker paint. I'll use the tip of
my bridge to create the edge between the
door and the arch, keeping it and even
the show texture. Oh. While the paint is still wet, I will add on details
again with d. Here we also have some
things on the wall. I had some more
details with Van ****. Here I'll fill the square with a dry brush and so Ventana. And the same for
the other elements. Let's paint the pots now. I used the game Ventana and
I add the shadows with dy. I often days with a dam brush. I similarly paint the other pot. Here we see inside
the pot a little bit, so I add some vd brown
to paint the soil. And I add a thin line with
burnt tana because we can also see a little bit
of the pot above the soil. I add some texture using
gray and dry brush. I painted this using Bertana, and I had some
shadows using V a. I often d just a little bit, and I add some highlights
with Naples yellow. I define the doorstep
and I add more texture. I also add a little
bit more situation around the door just
here and there. Now, I'll see if I can lift some paint from the door
to create highlight. I will also define the
details with a flood brush. Some final touches
using the flat brush. Now, I'll use it to try and left some paint here to
paint the door knob. I add Burn ena around
the lighter circle, and then I add around
the burn iena. Back. So small details
with Van De Brown. Oh. You can leave your painting like
that or you can follow the next steps to make it
more colorful and expressive. Joos a color that
will contrast nicely with the colors you
have on your paper. For me, this would
be cob turquoise. I'll use it to add
smashes of paint here and there. So do. I feel I need to the
shadows a little bit, so I mix blush gray. And I use it to paint the
shadows around the pots. A. Let's dry now and it's time to build the tape. Valla, our painting is complete. Thank you so much for watching, and I'm looking forward to see your paintings in the
project section of the.
 Elina Zhelyazkova, Watercolor Artist