Transcripts
1. Course Intro: Greetings. I'm Vanessa S of S by VanessaS and
welcome to my course, AI for Sovis creating your own AI model for
garment visualization. In this course, I'm going
to show you how to create your own AI model in your likeness or similarities
to your likeness. And these can be used for your sewing projects so
that you can visualize the garment that you
want to make with the fabric that you want to use and how it
looks on your body. In this course, we're
going to use Gemini and Canva to create
the visual models, as well as to create
the final product. At the end, there's going
to be a class project, which I will discuss
more in that lesson. So if you're ready, I'm ready, I will see you in
the first lesson.
2. Lesson: Creating AI Model: Welcome back. So when creating a model of your likeness or similarities
to your likeness, there's a few things that you
need to do for your prompt. Now, understand that there's two ways that you can do this. One is you can create a text prompt or you
can do a photo upload. The text prompt, you will
need to add a description. This description
normally has the race, the skin tone, the hair type, hair color glasses, body
type, things like that. And it will provide you with more privacy because
there's no photo required. And the result is
you'll have a likeness, but it will not be an exact
replica or match of you. However, it will be similar. So if you tell the
prompt that you want a Black woman with
locks and glasses, more than likely, that's
what you're going to get. Now, she may not look like you, but she will be a Black
woman with locks or glasses. The photo upload,
on the other hand, is a little bit different. If you upload a
photo of yourself directly into Gemini or Canva, you're going to get
something closer to your likeness and a little
bit more accurate results. But you have to consider your comfort level with
sharing your image with AI, regardless of the platform. So a typical prompt
would sound like this. And what I'm going to do
is I'm going to show you the prompt results for
both Gemini and for Canva, we're going to use the
same exact prompts for both the text
prompt description and the photo upload. And I'm going to show you
the results for both, and then we're going
to compare them. Okay, so the text
description prompt is create an image because you always want to start with telling AI
what you wanted to do. So in this case, it
is create an image, a full body studio portrait of a Black woman with
brown skin tones and natural locks standing in a neutral pose against a
solid light gray background, even flat lighting, wearing simple form fitting white
leggings and a white tank top. Now, understand why this is important because
the goal is to take your virtual model and use your model for future projects, regardless of what the
fabric, the print, regardless of what it is, you can use that one
model that you're creating for different projects. So if you have her
neutrally dressed, then the clothing is not
going to be an issue. Okay. And so for the
photo upload prompt, you're tweaking it just
a little bit to say, you want a full body
studio portrait, but you want it to use
the attached image, okay? Alright, so here
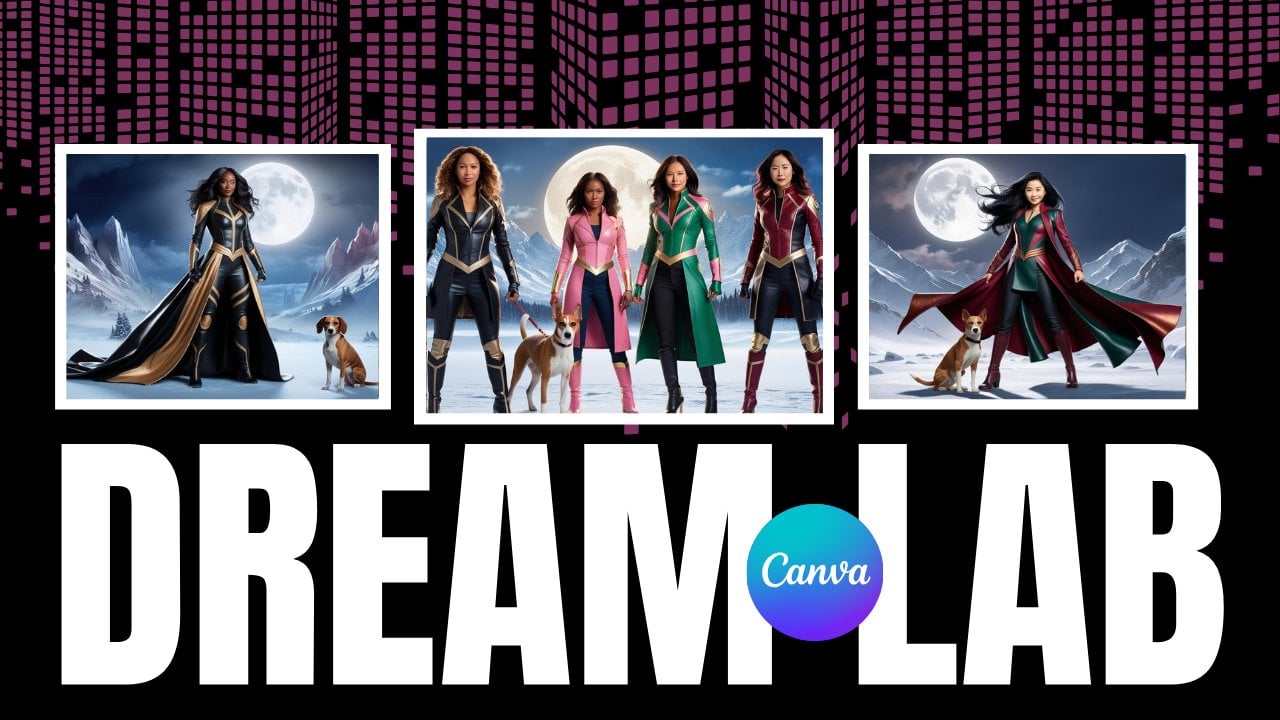
are the results. So the text description
provided me with her. Now, the photo upload, the photo that I uploaded, is this young lady right here, and notice that the
ness is the same, but it did provide
me with the garment, the background, everything
else, as I requested. So the text description gave me a very general
looking young lady. And then the photo
upload gave me an exact replica of the
young lady in the photo. With Canva, you do
the exact same thing. You use the exact same prompt. But you're going to find that
there's some differences. One is, Canva is going to
give you more iterations, whereas Gemini will give
you one image unless you ask it specifically
for multiple images. Gemini is going to
give you one image. Canva is going to give you four. Now, these are the
iterations that I received the results from
the same exact prompts. So text description. This is the young
lady that I received. And notice not only do I
have four different images, it's the same young lady, but it's different poses. For the photo upload, I use the same exact photo, and this is what
was returned to me. So notice that Canva does not provide the same
exact photo image, even though I uploaded it
and stated the same thing. Let's do an overall comparison. For the text description, Gemini and Canva both gave
us what we asked for. Canva, however, was a
little bit more creative. For the photo upload, Gemini and Canva both gave
us what we asked for, but Gemini was more on point as to the actual
description and the request. It's a preference. You can decide which is better
or which is worse. The whole point here is that both platforms can help
you when it comes to your sewing projects and using models that
actually look like you so that you can see how your garments
are going to look and feel. Now, we have one more step
when it comes to using your model and your likeness or similarities to your likeness
for your sewing projects. And here's my favorite part. One is you take the model, whichever you choose, the
one that you like the most. You take your model,
you add a pattern, an image of the pattern or either a picture of the actual garment
that you're wanting to make and then you can add a swatch or a picture of the
fabric that you want to use. And the prompt is really simple. Create an image of the model wearing the attached dress in the attached fabric with a natural pose. That's
all you're asking. What you are trying to do
here is get a visual of what this garment is going
to look like in the fabric that you want and then what it's going
to look like on you. That's the whole visualization, it's helping you as a
sovis because most of what sewing is is visual outside of the actual
construction of the garments. It's visual. So now you have
a way to figure out what this garment is
gonna look like on you before you have
to do anything else. And the results
there you have it. So we have our model, which we created in our likeness or similarity to our likeness, the pattern that
we're interested in making and the fabric that
we would like to make it in, and this is what it
would look like for you. So the workflow for
this is really simple. It's really simple. If you follow the steps,
it'll go by quickly. Create a prompt that describes the visual features
of your model, hair, texture, skin complexion, glasses, no glasses,
whether you want jewelry, whether you're a little pudgy, whether you're a little
thin, you can decide. Use the prompt and
Gemini and Canva. You can use either one or both. And then if you need to
tweak it just tweak it, revise the prompt and
regenerate the model, and then download your
image to your photos, create a prompt to use for the sewing garment of interest, add a swatch of the fabric,
the type of garment. If you have an image, attach the image and attach the image of your
model and submit. That will render you a model in your chosen garment for your visualization and to help you with your
sewing project.
3. Class Project: Let's talk about
your class project. For your class project,
you're going to create your own AI model in your likeness or similarities
to your likeness. And I keep saying similarities to your likeness because if you're using text to the text description
for your prompt, that's similar to your likeness. But if you're using your photo, that is your likeness. So it's either similarities to your likeness
or your likeness, depending on which
process you choose. So you're going to choose
your tool, Gemini or Canva. You're going to
choose your approach, meaning text description
or photo upload. You're going to
create your prompt, and then you're going to
generate your visual model. The second part is create a prompt to use for the
garment itself. Okay? Whether it's going to be
a skirt or jacket, pants, whatever the garment is, create a prompt to use for the sewing
garment of interest. Add a swatch of the fabric. Remember, you can
take a picture, you can go online
and get a swatch, tile, however you want to do. The type of garment,
if you have an image, attach the image and attach the image of your
model and submit. The image should render your model in the fabric choice and garment choice
of your choosing. Upload the image to the class project
folder, and that's it. So I can't wait to
see what you create.
 Vanessa S., Graphic Designer & Contributing Artist