Transcripts
1. Class Introduction: Ready to take your
affinity skills to the next level, then
this is for you. Today, I'm excited to
announce my brand new course, affinity photo
beyond the basics. This course is for anyone that already knows the basics
of affinity photo, but wants to take their
skills even further. We'll start by
taking a deep dive into selections and masks. Whether you need to apply an adjustment or
remove a background, you'll have everything
you need to make perfect selections
and affinity photo. After that, we'll learn advanced techniques for
improving color and light. These techniques are
very powerful and they're actually pretty easy after you've had a
bit of practice. Just look at this
before and after. That's what you'll
be able to do. After working on
color and light, we'll learn all
about photo cleanup. This is a very important
skill to learn, so I'll teach you all of
my best tips and tricks. By the time you
finish this chapter, you'll be able to remove
anything from a photo. By this point in the course, you'll have learned
so many new skills. The next thing that
we'll do is bring everything together
to complete three, start to finish projects. Each of these projects has been designed to bring
together everything that we've learned so that you can solidify all of your
new affinity skills. During these projects, we'll practice a step
by step workflow, which you'll be able to use
when editing your own photos. By the time you finish
these projects, you'll have everything
you need to make your own photos look
their very best. After mastering color,
light, selections, and retouching, you might think that the course
would be over, but I have a special
treat for you. After we finish
mastering those skills, we're going to continue
our affinity journey by learning compositing. Compositing is the
art of combining multiple photos into
a sinkle image. It's my favorite thing
to do in affinity photo. We're really going to
take a deep dive into it. You'll learn an easy
ten step method for creating
incredible composites. Then we'll practice
those ten steps as we make a series of
composites together. Each of these composites
is so much fun to make and we'll really help you to take your affinity skills
to the next level. After doing all of
these projects with me, you'll be totally prepared to make composites all on your own. But before we dive
into affinity, I want to mention that
this course comes with a few example files that we'll be using
throughout the course. I encourage you to download and use them because
practicing what you learn is the best way to retain all of these new skills
that you'll be learning. You can download those files in the next lesson and then
you're ready to begin your journey of becoming an affinity photo master.
Let's get started.
2. Download the Class Files: Before you begin this class, I recommend you download
the exercise files. These files will
be necessary for you to follow along
with the Tutorials. To do this, you first
need to come to the Project and Resources tab. Then click on the download link. The Exercise files will then be downloaded to your computer and you'll be totally prepared to follow along with the
rest of the class.
3. Selections & Masks: The first chapter
of this course, we're going to learn all
about selections and masks. Selections and masks are the most important tools
in affinity photo, but they can be a little tricky. We're going to take our time and dive deep into these tools so that we can really
bring out the best in our photos. Let's get started.
4. Masking Update: Before we jump into the course, I need to tell you about a small update to affinity photo. Troughout this
course, you'll see a pop up menu whenever I press on the mask button
in the layers panel. This pop up has a few different mask options that
we'll be using. But now after an update
to affinity photo, that pop up is no longer there. Instead, pressing
on the mask button will just apply a mask. How do we get the other
masking options now? Well, all you need
to do is hold down Option on a Mac or Alt on a PC, and then click on
the mask button. Then all of the masking
options will appear in a pop up just as you'll see
me do throughout the course. I think that's it.
Now we're ready to dive into selections and masks.
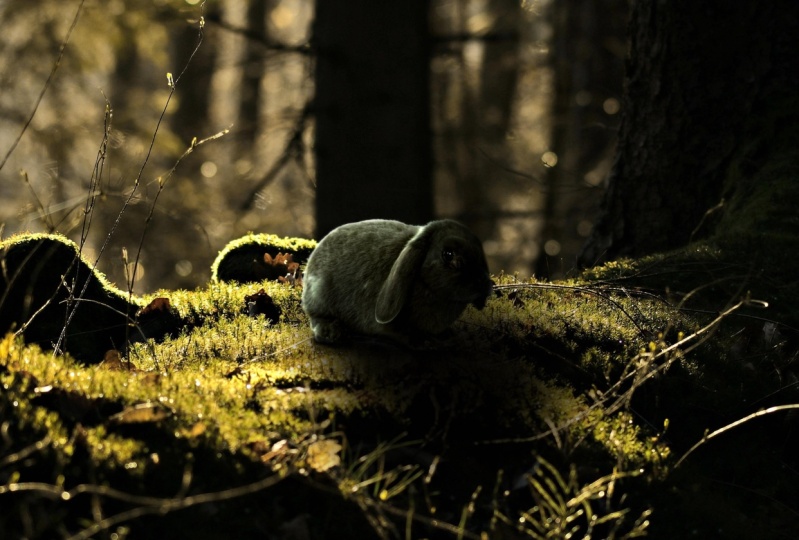
5. Removing Backgrounds: In this video, we'll learn the basic steps to remove
a photos background. You can find this photo
in the exercise files. For this video, I want to remove the background here
and keep our model. To start, I need to first make
a selection of our model, which I'll do with
the selection brush. I'll select that. Then I'll make sure up in the
context toolbar, I have snapped edges and
soft edges turned on. I can go ahead and click
and drag to begin making my selection to make this
go a little bit faster, I'll use the bracket keys on my keyboard to increase
the size of my brush. This will just help things
go a little faster. If you ever select too much, you can hold down
Alt or Option on your keyboard to remove
from your selection. Let me just select a
little too much there. Hold Alt or Option, and then all you need to do is click and drag to clean that up. Now I have my selection made. I'm just going to apply a mask to remove the photos background. I'll come right down
here and apply a mask. I'll press command or
control D to D select. Let's take a look at
how the selection went. To better see this on
this cheered background, I'll go up to layer and
then new fill layer. I'll just drag this
to the bottom. This will just help
us see this better. As you can see, this
has a very jagged edge. It's not a very
smooth selection and this continues all the way
around our models hair. This doesn't look very nice. To fix this, I'm going
to go back a few steps. I'll press command
or Control Z a few times until we have
no mask applied, but our model is selected. Let me show you what
I should have done. I'm going to have the selection
brush tool still out. Let's act like I just barely
made my selection here. Now I'm going to go up to the context toolbar to press
on this magical button, which is called refine. Once you click refine, you're automatically
applying matt edges to the very edges
of your selection. This means this will
look quite a bit softer. It has a feathered effect. If I turn matt edges
off in this dialog box, you can see we're right back to our problem of jagged edges. Refining your selection is a really great way to just
soften up that effect. Now, this is a pretty good start to improving the edges
of our selection. But to take this
one step further, we can also paint over the edges that we want affinity to
take a second look at. This usually happens with hair because hair is very
tricky to select. By default, when you press refine and this
dialog box pops up, you automatically have
this brush tool here. All you need to do is click and drag over the edges of the hair, and this will tell affinity, let's take a second
look at those areas. I'm just going to paint
over all of the edges. Once I've done that, I'll
go ahead and press Apply. Now we have a much
better selection made. I'm going to apply a mask that'll just remove
the background, and then I'll press command
or Control D to D select. Now, let's add that
fi layer again so we can better see what
the selection looks like. As you can see, this
looks a lot nicer. The edges are nicely feathered. We don't have those
jagged edges anymore. The hair actually looks
pretty well selected. It's not perfect, but I think this actually
did a pretty good job. Now, before I finish, I want
to show you how you can quickly clean up your mask for any of these problem areas. For example, I think this
area looks very smudgy, and you can see if I actually
turn off this mask layer, that that gray background is
peeking through the hair, and it's included
in our selection. We do not want that. I'm going
to grab the paint brush. I'm going to paint on this mask in black and white paint to remove and add from this
selection As a reminder, when you're painting in white, you're adding to your selection. You can remember this by looking over at the
layer thumbnail. You can see that white is
lit up where our girl is, and black is covering
the background, which means the background
is not visible. If I want to remove
this part of the hair, I need to make sure
that I'm painting in black, which I'll do. But first, I'm going to lower
the flow of my paintbrush. That way, I can have a
more gradual painting. Then I'll just come right in here and I'll soften this area. Maybe I'll make my
brush a bit larger. I find with hair that it
looks pretty good to make it slightly invisible in areas
where you want to remove. I just removed a
little bit of that. The hair looks a little
more transparent, but I think that's okay. Then to quickly switch
my paint to white, I'll just press x
on my keyboard. That's a fun little shortcut. I'm just going to
make sure that this sweater is all the
way filled in. We do not want that to be
invisible. There we go. If I want to, I can make
my brush quite a bit smaller and I can just fill
in some of these areas again. I think that looks a lot better. Here's what that looks like.
We are missing some hair. I could continue to paint a little bit more to
bring some hair back. But I think this looks a
lot better than where we started where that gray
background was really prominent. I'm just going to go around
and continue to do this. I think the edges of the
sweater look pretty good. I think I'll just focus on fixing up the hair a little bit. You can turn the mask
on and off as you go. I can see we need to
fill in this area. That's looking pretty good. This area up here looks
a little strange. Let's see what that looks like. It looks like we lost
some hair there, so I'll make my brush nice and large and I'll just fill in that area. There we go. It looked like it
was glowing white. Now we've got that
fixed up. All right. I think this looks really nice. Great job. Now you
know how to use selections and masks to
remove a photos background. In the next videos, we're going to build
on these skills as we learn other ways to use
selections and masks.
6. Gradient Masks: This video, we'll learn how
to add a gradient to a mask. But before we dive
into affinity, I want to help you
understand what's going on. Let's say that I wanted to remove the sky from this photo. To do that, I would first need to make a
selection of the sky. Then I could add a mask
to remove the sky, just like how we remove the background in that last video. But what's actually going on? How is the mask hiding the sky? The thing to remember
is black masks will hide parts of your photo, while white masks will
keep things visible. In this example, what's
really going on is that there is a
black and white mask being added to the photo. The sky has a black
mask covering it, so it's no longer visible, but the trees have a
white mask over them, so they don't become hidden. But what would happen if I added a mask that
looked like this? It's a smooth gradient that
goes from white to black. Well, in that case,
the photo would be fully visible over on the
white side of the mask. But then gradually fade away as the mask
moved towards black. But why would you
ever want to do this? Well, you normally wouldn't
do this on a photo. However, applying a gradient to an adjustment layers mask
is much more useful. Let's come back into affinity
to see how this works. In this photo, I want to
make the left side darker, the area where
she's walking from, and the right side lighter
where she's walking toward. It's very poetic. To create this look, first, I'm going to create a
dark adjustment layer. I'll come down to
our adjustments. Let's do a brightness
in contrast, and I'll just darken this. Why not? Let's go ahead and add a little contrast as well. Now with that adjustment
layer still selected, I'm going to grab the
gradient tool and I'm going to click from this
side toward the center. I'm going to hold down Alt
or Option on my keyboard, and I'm going to click right
here to open up our mask, and you can see this is what
the mask is looking like. It's going from white to black. In this white part, that
dark brightness and contrast adjustment is visible and then it slowly disappears. Hold Alt or option,
and I'll click one more time so we get
back to our normal view. Now you can see this. Here's
the before and after. Right Let's do this again. This time, I'll make
a brighter gradient. I'll go to our adjustments. Let's add a brightness
and contrast. This time, I'll just make it brighter and we'll raise
the contrast again. This time, I'll go
ahead and start it in the center
and move it over. That looks opposite
to what I wanted. Gradients will always start
white revealing your layer, and then it will
gradually fade away. I actually want this to
go the other way so that the light side is where she's
walking toward like that. I'm just going to get
out the view hand tool so this gradient disappears. Then I'm going to select both of these layers by holding
shift and clicking, and then I'll turn
them both off. Here's our before and
here's the after. Notice how smooth
these transitions are. I think that looks so cool. But there is one annoying
thing in affinity. If you click off of
the adjustment and then you want to go back
and change the gradient. I can get out the gradient tool, but now I actually have to re drag out that
gradient again. I can't just adjust
the points like this. Once I click off, I
can't get it back. That's an annoying thing
you have to remember. Once you set your
gradient in place, it really is there to stay unless you want to
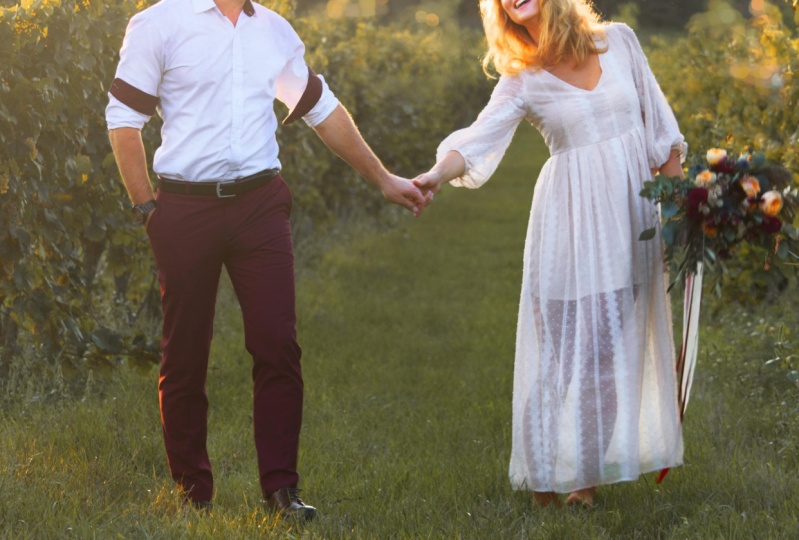
re drag it out. Let's go to the second photo. This is the other exercise
file for this video. In this one, I want to
make the couple look a lot brighter and the
edges of the photo, I want them to be darker. That way, the couple
just stands out better. To start, let's add a brightness
and contrast adjustment. I'll make this brighter, and
I'll add a little contrast. Now I'm going to add a
gradient to this adjustment. I'll start where their faces
are and then I'll bring it up toward the right
corner over here. Right now, this whole area is bright and then it
fades to darkness. But I think I want this
to be a radial gradient. I'll go ahead and change
that right up here. Now I'll hold Alt or Option and I'll click right here so we
can see what's going on. You can see it's
white in the center, so it's revealing
this bright layer. Then it slowly fades away to black so that this
layer becomes hidden. I'll hold Alt or Option
again and click. Now we can see the
before and after. This already looks a lot better. I think they looked
so dark before. They were in a lot of shadow. Now I want to do the opposite
to darken the edges. I actually want to
use a gradient mask that looks exactly opposite
of what we have now. Here's a little trick
to speed things up. I'm going to
duplicate this layer with command or control J. Right now, we have
an exact copy. But I want to invert this mask to make all
of the black parts of this mask white and all
of the white parts black. To do this, I'll press
command or control I. Now you can see what
that looks like. We have the exact
opposite going on. However, this is making
the outer areas brighter. I actually want
them to be darker. I'm going to click on this
icon right here to open our brightness and
contrast adjustment. I'll just darken this. All right. Here's
that darkness added. And here's the complete
before and after. Gradient masks are
such a great way to smoothly transition
between where an adjustment is applied
and where it's not applied.
7. Masking Groups: This video, we'll
learn how to use one mask to control
multiple layers. In this example, we'll be applying multiple
adjustments to this dress. First, we need to make a
selection of the dress. I'll grab the selection brush, and then I'll quickly paint
a selection onto our dress. It's not too tricky
of a selection, but for some reason,
these sleeves really don't like
being selected. I'll use the bracket keys to get a smaller brush and then
I'll just select those. Looks like I got the entire
dress selected perfect. Now that that's selected, all I need to do is
refine our mask. Remember this
automatically creates matt edges to our selection, which is great. I'll
just apply that. Then with the
selection still up, I'm going to apply an HSL
adjustment so we can change the color I'll just change
the color of the dress. Let's drag this over, maybe
make it a nice purple color. That looks pretty good. I'll D select with
command or Control D. Now you can see before and
after of that adjustment. Next, I want to
brighten the dress. Is there a way that I could use the HSL adjustments mask for the brightness and
contrast adjustment? I don't want to keep
making the selection over and over again for every
adjustment I want to add. Well, there is a super easy way. All you need to do is
hold down command or control and then
click on the mask. This loads the mask
as a selection, and then you can apply whatever adjustment
you want to it. I'll go to my adjustments and let's just brighten
up this dress. Very nice. I'll D select
with command or Control D. And now you can see
the before and after. This is a very simple way to use one mask to help you control
another adjustment layer. But if you want to
get really fancy, you could put your
adjustments into a group and then mask the group. I'm just going to
start from scratch. I'll just delete both
of these layers. Now we can go ahead
and start over. I'm going to apply
an HSL adjustment. This will be applied to
the entire image to start. I'll just make it that
purple color again. Then I'll brighten the photo. Then I'm going to place both
of these layers in a group. I'll hold shift to
select them both, and then command or Control
G to group them together. Now I'm going to select
the dress again. With the selection
brush tool out, I'll just start by making
my brush a bit larger. I'll click and drag to
make my selection. Oops. You can see it's not
snapping to the edges, and that's because I
had the group selected, not the dress layer. I'll deselect with
command or Control D, and I'll make sure that this
layer is selected so that I can click and drag and make
a selection of the dress. With the selection made, let's press re fine so that we can make
this a really nice, smooth, feathered selection.
I'll press a fly. Now we have a beautiful
selection made. But what do we do do it? Well, I want to apply
a mask to this group, so all of these adjustments are only applied to the dress. With the group selected, I'll go down to our
masks, I'll apply a mask. Now this group has been masked, I'll press command or
Control D to D select. You can see that all
of the adjustments in this group are only being
applied to the dress. The hanger is no longer being affected by this recoloring
and brightening. Now that we've done that, we
can add as many adjustments as we want to this group and they'll only be
isolated to the dress. To show you this, I'm just going to select a layer that's inside the group and I'll apply another adjustment
on top of that. Let's go with the
levels adjustment. I want to make this
dress look brighter. I'm going to bring the white
level over. There we go. You can see again,
this is only affecting the dress. It's that easy. If you want to get really fancy, you can add masks to the adjustments inside
of this masked group. I want to make just part
of the dress brighter. I'm going to add a brightness
and contrast adjustment. I'll brighten it up. Then I'm going to grab
the gradient tool and I'm going to click and drag from the bottom and then bring it up. This will make the bottom
of the dress s brighter, but the rest of the dress
will stay its original color. The reason I wanted
to do this is because the original dress looked a
bit darker toward the bottom, and this just evens
out its coloring. But as you can see,
this brightness is only affecting the dress,
not the background. As one more example of this. Next, I want to paint on some brightness just onto
a few areas of the dress. With that layer that's inside of the group selected still, I'm going to apply a
levels adjustment. I'll brighten the white level by bringing this slider down. Let's bring it down quite a bit. Then I'm going to invert this layer so that this
becomes invisible, and I'll do that with
command or control I. You can see now we
have a black mask applied to this adjustment. If I want to reveal
this adjustment, all I need to do is grab the paint brush
and then paint in white paint over the areas that I want to reveal
this brightness. I think in this case, I
actually want to paint this brightness over the
highlights of the dress, just to make it look a little
bit more shiny and bright. With a low flow, I
think 16% looks good. I'm just going to click and drag to paint and
add a little bit of brightness just to the
highlights of the dress. Because this is masked
onto the dress, I don't need to worry about
painting outside the lines. This is doing nothing because my painting will only be
clipped into the dresses group. I'll just do a little bit more
painting here at the top. You can really see what
this effect looks like. With that, I'm done
with my painting, so you can see the before
and here's our after. With the whole group, I'll
just turn this off so you can see what our dress was
before and here's the after. Grouped masks are
great if you need to apply multiple adjustments
to the same place. I really like using
this technique. It's really helpful. Now that you know even more about masks. In the next few videos, we're going to
take a closer look at a couple of different
types of masks.
8. Hue Masks: This video, we'll
learn about hue masks. Hue masks allow you to make a mask based on the
colors in your photo. In this example photo, we could make an
adjustment that will only affect the green trees
or the blue sky. First, let's edit up our sky. I'll go to our adjustments and let's apply a brightness
and contrast adjustment. I'm going to really increase the brightness to make this very obvious what areas are being affected. I'll just
close out of this. Now I'm going to go to our masks and I'll apply a hue range mask. With this dialog box here, we can choose which parts of
the photo we want to affect. We can do this by
clicking right in the middle here between
these two points and dragging this to adjust
what parts of the photo are being lit up
with this brightness and contrast adjustment. Down here, you can see the
trees are lit up and up here, you can see the sky is lit up, which is exactly what I want. With that position
right up there, I always like to come down here and just blur this a little bit. What this is doing is it's just adding a little bit
of blur to the mask, so there's no harsh cutoff
points between your colors. I'm going to raise this
to about five pixels. Now you can see
before and after. This is only affecting the sky. Actually, it looks
like there are some blue tones back
here of these trees. If I want to, I can
click right here. This will bring up
our hue mask again. I can adjust this by bringing
it over just a little bit more in this direction so that those trees
aren't being affected. They're a green blue. As I drag this out
of the green range, they should become
less affected. Now you can see
that this is mostly only affecting the sky,
which is really nice. I'm just going to click right here and now we can
adjust the brightness and contrast of the sky
to make it actually look good because this
is a bit extreme. I'll drag this down
and I think I actually want to make this darker so you can see the
clouds better. Then I'll just
increase the contrast. Now we can see the
before and after. Next, let's edit the trees. I'm going to make
another brightness and contrast adjustment. Then I'll make it super
bright once again. I'll go into our masks
and add a hue mask. Then I need to make
sure that we're affecting the
trees, not the sky. I think right here
looks pretty good. I'll make sure that I blur
this mask a little bit. Now as I turn this on and off, you can see this is only
affecting the trees. I'm just going to
click right here so we can adjust this and
make this look nice. I think I do want
these trees brighter. I'll just tone it
down a little bit. Let's go ahead and add a
little contrast as well. Here's what that's looking like. I really like how that looks. Now I'll just like
both of these layers. You can see the complete
before and after. Beautiful. Aren't
hu masks so cool? Now that you understand
how hum masks work, let's try a trickier example. With this example photo, we have quite a few different
colors in this photo, but we can still use hue masks to make all of the
colors really pop. To start, let's go ahead and apply another brightness
and contrast. I really like using brightness
and contrast all the way up because it's just really obvious what colors
we're affecting. I'll apply a hue mask. At this time, I think I want this to only affect her dress. Right now, the grass is very bright because we're
in the green range. But as I bring this up, You can see her dress
starts to glow. But if I take it too far, you can see the shadows in
her hair start to glow. I'm just going to bring this
back so that her dress is glowing. That looks good. Now only the dress
is being affected. I can go ahead and click right here to adjust
this a bit better. In this case, I think
I actually want the blue dress to look a
little deeper and darker. I'm also going to
increase the contrast just to make the pattern of
the dress pop a little more. Now that we're done with that,
I'll turn this off and on, so you can see what
this looks like. The dress looks really good, but unfortunately, we're also affecting the
grass in a few areas. To fix that, I'm just going
to grab my paintbrush. I'm going to paint in black
paint over those areas. I'll just increase the flow, so we're fully
affecting the area, and then I'll just paint
to remove that darkness. A Let's turn this on again. Here's the before and after, and I think that really
helped to clean that up. As you can see, now we're
only affecting her dress. I just want you to recognize how difficult selecting the
dress would have been. We have all of this grass here that's overlapping
with the dress. But using the mask, we were able to easily
just affect the blue color of the dress without
affecting the green grass. This is so cool. Next,
let's do the grass. I'll add another brightness in contrast and I'll bring this up. A at of u mask. We can adjust this range to make sure that all of the
grass is included. It looks like some of
the darkest parts of the grass are a little
bit more blue toned. I'm actually going to
move this node right here over until those areas
start to be included. You can see the before and here's when more
of them are included. I think this looks pretty good. With that done, I'm going to remember this time to
bring up this slider. I don't think I did
that last time. Then we can go ahead
and click right here and adjust the brightness
and contrast of the grass. I think once again, this
would look good with a little more darkness.
I think that looks nice. Here's the before
and after of that. Like you heard me mention, I do think that I forgot
to add a blur to this one. I'll just open that up and I can apply a blur
after the fact. That's no problem. So far,
we've done the dress. We've also done the grass. Now it's time to
work on our model. I'll add yet another brightness
and contrast adjustment. Let's bring that up.
I'll apply a hue mask. Now, I want this to affect
our model skin and hair. Skin is always in the
yellow red range, no matter your ethnicity. This is a pretty easy
way to just affect those areas, bringing
it over like that. To include more of
her hair though, I think I'm just going to
bring this node over more. Some of her shadows in her hair were a little more blue tooned. I just want to bring this over so that those are included. Maybe I'll bring the whole
thing up a little more. I think I need to
bring this up because the grass is being
affected back here. But I think this
looks pretty good. Now we're affecting
the model skin. I'm just going to
click right here on the brightness and contrast
so we can adjust this. I'll darken this, and I'll
add a little more contrast. Once again, I forgot
to blur the hue mask. I'll just click on
that and bring up the blur just to soften that. Now you can see that
before and after adding some beautiful contrast
to her hair and skin. Now that we've done all that, I think I want to add a
little more warmth to the ph. I think this grass just
looks a little bit blue. To add warmth, I'm going to use a white balance adjustment. I'll bring this all the way over toward orange to
really warm this up. Then I'll apply a hu mask. I want this to affect our grass, which I think it's doing
pretty good like this. I'm just going to bring
this slider over so we include a little bit more
of these shadows over here. And I'll remember this
time to bring up the blur. There we go. Now, I'm just going to click on our
white balance to adjust this. I think just a little bit
of warmth looks pretty good. This is before. It was a little more blue
toned and now we have a little more of a
yellow green color. Very nice. As a finishing touch, I think I want to make
the whole photo brighter. I'll just go into
the adjustments and grab a brightness and
contrast adjustment. Then I'm just going to make
this a little bit brighter overall with a little
more contrast. I'm not going to apply a mask. I want this to affect
the entire photo. Not every adjustment
needs a mask. Here's the before and
after of that brightening. Then I'll just select
all of these and you can see it complete
before and after. Now, before we
finish this video, I just have a few last
tips to share with you. You probably already
noticed this, but affinity will
change the color of the hue mask based on what color range that
you're working with. At a glance, we can
see this one's blue, so it's affecting her dress. As I turn this off and on,
you can see that's true. The green ones are both
affecting the grass and the red one is affecting
her hair and skin. This is a really quick way to easily see what
your layers are affecting without you needing to rename every layer.
That's pretty nice. And another tip that you did see me do is you can click on the H U mask at anytime to open this up and
make adjustments. I needed to do this
throughout this video because this is an
easy step to forget. That's pretty nice. This
is just like adjustments. You can click to
open those as well. The last one that
I actually didn't show you in this video is that hue masks actually have a
color picker that you can use. To show you this, I'm actually going to apply
another adjustment. Let's just apply a brightness
and contrast adjustment. I'm going to make this
totally bright once again. Then I'll apply a
hue mask to it. This time, I'll click
on the color picker, and I'm just going to click on the blue color of her dress, and you can see that this has
automatically jumped from the green up to the blue so that we're only
affecting the blue color. Hu masks are a
great way to apply adjustments to specific
colors in your photo, and it just really helps
you to edit faster without needing to make
painstaking selections. Now that we know more about
hum masks, in the next video, I'm going to teach you how
to use a different type of mask called the
luminosity mask.
9. Luminosity Masks: In this video, we'll learn
how to use luminosity masks. To see how this
type of mask works. We'll start off with
this practice file, which has five rectangles on it going from black to white. To see luminosity
mask in action, I'm first going to add a fill layer on top of
this exercise file. I'll go up to layer,
new fill layer. With this fill layer on top, I'm just going to
change its color. I'll bring the
node over here and let's just make it a
bright orange color. With this layer selected, I'll come down here and
apply a mask to it, and I'm going to select
luminosity range mask. Once you've applied this mask, you'll have this
dialog box appear. There are two nodes here
that control this mask. Since they are both all
the way raised to the top, that means that our fill
layer is 100% visible. But if I bring them
both all the way down, then you'll see
that the fill layer becomes totally invisible. But let's reset this,
bringing both of the nodes all the way back to the top and take a closer look
at what's going on. If I bring the left
node all the way down, then the orange is totally removed from the
black rectangle, partially removed from
the gray rectangles and not at all removed
from the white rectangle. But why is that? It's because this left
node controls whether a layer is visible on the
darkest parts of your photo. On the other hand,
the right node will control the brightest
parts of your photo. Since we only brought
the left node down, the fill layer is 0% visible
on the darkest side of our photo and 100% visible on the brightest
part of our photo. Of course, this works
in reverse too. If I only bring the
right side down, then the filler is no longer visible on the brightest
parts of the photo, but it's totally visible on the darkest
parts of our photo. I know this can be a
little bit confusing. Here's a little rhyme you can use to remember what's going on. Whenever you're using
aluminosity mask, the light is controlled
on the right. If you want your layer to be visible on the brightest
parts of your photo, make sure the right
node is all the way up. If you don't want
your layer to be shown on the lightest
parts of your photo, then bring that right node down. Remember, light is
controlled on the right. The last thing you
need to know about luminosity masks is that this curve line right
here controls more than just the darkest and
lightest parts of the photo. The middle area
of the graph also controls everything in
between those two points. If I bring this node over, you can see if you're watching
this picture right here, that less and less of the
orange layer is visible. I can continue to move
it over like that. Now only the very
blackest darkest parts of our photo have
the orange applied, and I can move it back to
apply it to more of the photo. Of course, this
works in reverse to. As I lower this node, the orange will no
longer be applied to the dares blackest
parts of the photo. As I continue to bring it over, you can see it gradually
becomes less and less visible on all of
these different areas. I know that's a lot to take in, but let's see how this
works on a real photo. In this example image, I don't like how dark
a lot of the photo is. We're losing a lot
of the detail. But if I try to brighten this
photo and fix those areas, you can see that while
those parts look better, the brightest parts of the
photo look way too bright. That's because adjustment
layers brighten the darkest and brightest
parts of the photo evenly, which makes the bright
areas way too bright. To fix this, I'm going to
apply illuminosity mask to it. Then I can control which
areas are brightened. If I don't want to brighten
these brightest parts of the photo and light is
controlled on the right, that means that I should
drag this right node down. This is looking so
much better already. But let's go a little
further and bring this light node to the
left so that R adjustment doesn't brighten the
brightest parts of the photo or the close to be brightest
parts of the photo. Just like we did
with the hue mask earlier in this chapter. Let's give this mask
a little bit of a blur just to smooth out
where this mask is affecting. This looks so much better. Here's what this
looked like before, and here's that brightening. Notice that the shadows on this rock are still
getting brightened, but the brightest parts on the rock are no longer
being affected. But I still think this photo is a little too bright
with what I did. I'm just going to
click right here and I'll just adjust
this ale bit. I think that looks pretty good. Much better. While I think
this looks really good, I think we're still
brightening the trees over here on the top left a
little bit too much. If we want to refine
this mask even more, all we need to do is grab
the paint brush and paint with black paint over the areas where we want to
remove the mask. I'm just going to lower
my flow. There we go. Then with a little bit
of a larger paint brush, I'll just use the
bracket keys there. I'm just going to
paint over this area, so those trees aren't
quite so bright. Now you can see what this
looks like before and after. All right. Great work. Now you know how to work
with luminosity masks. In the next video, we're
going to take this a step further and learn
about blend ranges.
10. Blend Ranges: In this video, we'll
learn about blend ranges, which are very similar
to luminosity masks. I'm going to start out here with the same lake photo that we were working with
in the last video. But I just removed that
brightness that we applied to it. Let's start fresh and I'm going to apply
another brightness in contrast layer and I'll bring up the brightness to
brighten things up. All right. Now with
this layer selected, I'm going to apply
blend ranges to it, which you can find
right up here in our layers by clicking on
this little gear icon. Here we have our blend ranges. We can control them with this
little graph right here. Blend ranges are basically the exact same thing
as lluminos D mask. The light is controlled on
the right, just the same. If I don't want this applied to the lightest
parts of the photo, then I need to bring
the right side down. You can see on our photo, now this isn't affecting
the rock quite as much. Just like in the last
video, if we wanted to, we could bring this
over to the left a little bit to reduce how
much this is applied to. I'll bring it over about the
same amount as last time. I'll just close out
of this and now we can see that
before and after. This looks great.
But it also looks identical to the previous
video. What's the difference? Well, blend ranges and luminosity masks are
pretty much the same, so you can use
whichever you prefer. But let me show you the biggest
differences between the two of them to help you see which one works
better for you. I'll just turn off this layer and I'll apply another
brightness and contrast layer.
I'll bring it up. And then I'll apply
aluminosity mask. Bringing that
highlight node down again and over to the left. As you can see, these two layers will brighten the photo
in the exact same way. But the biggest differences between the two of them is that the luminosity mask has an actual mask applied
to your layer. This layer, on the other hand, does not have a
mask applied to it. Blend ranges is a
hidden setting. Because of this, using
luminosity mask makes it a lot easier to see which layers have luminosity mask
applied to them. To edit it, it's very easy. Just click on the luminosity
mask icon like this. This is different
from blend ranges, where you need to
select the layer, go to the gear icon, and then adjust the
blend ranges from here. But even with this benefit of
having a more visible mask, I still prefer blend
ranges. Why is that? Well, I think that the less
layers you have, the better. One of the most useful things in affinity photo is
the layers panel. But I speak from experience
that the layers panel is also the most commonplace
for something to go wrong. The more layers you have here, the easier it is to make
mistake in the layers panel. In my own personal photo editing and throughout this course, we're going to use
blend ranges on individual layers instead
of luminosity mask. But as you've seen,
the luminosity mask really works exactly the
same as blend ranges. If you prefer using the
luminosity mask, then please do. But for me, I just like the simplicity of
these blend ranges. Okay, I know that was
a lot of chitty chat, but hopefully that clears
things up for you. We'll be using blend ranges a lot more throughout
the course. But for now, let's move on to the next lesson and learn
about the Pen tool.
11. Pen Tool: Let's learn about the Pen tool. The Pen tool allows you to make precise selections by connecting a series of points together. We're going to
start off with this simple image and then work our way up to more difficult
pen tool situations. To start, I'm just going to select the pen tool right here. Then up in the context toolbar, I'm going to modify
the settings. I want to make sure that we're
working in polygon mode, which allows you to lay down points and connect them
in straight lines. Another setting I like to turn on is called Rubber Band mode. This gives you a preview of what your line will look like as
you set down your next point, which I find very helpful. If you want to close your shape, all you need to do is click on the very first point here and now you have
your closed shape. Now, what do you do
with this shape? Well, once you've
closed your shape, you can easily turn your shape into a selection right up here. Then you can apply a mask
to remove the background. Whatever you have
selected, we'll stay put. I'll press command
or Control D to D select and we can see our
beautiful selection here. That was just a
quick little demo. Let me just delete this mask. This time as a better example, I'm going to lay down
four points going around this picture
frame to select it. After I've done that, I'll
mask out the background. Starting right here, I'm just
going to lay down a point. Luckily with rubber band mod on, we can easily see where
our line will lay. Then I'll just connect it
back to the first point. I'll press command or
control zero to zoom out. Now I'll just turn
this into a selection, and then I'll add a mask to it. You can see now our background has been removed, presmand, or Control D. I love how smooth and
straight these lines are. This is so useful for selecting geometric
shapes like this. But in this photo, I think
what I actually want to do is select this inner frame and then replace it with
a different picture. Let's delete this mask again. This time, I'm going to make a selection of this
inner frame area. As I go, I'm just going to click a little bit more
toward the outside. If you select a little bit too much of your frame
and then remove it, that actually looks better
than if you select too little, and then you have white parts showing through on
your selection. If you want to ever move any of these little
nodes around, you can hold down
command or control, and you can click and drag on the point to adjust
where it's positioned. With that done, I'm just going to turn this into a selection. Then I can apply a mask to it. This has done the opposite
of what I want it to do. I want it to remove
this inner part. Let me just de select
with command or control D. Then with this mask
layer still selected, I'm going to invert this
mask with command or control I and there we go. Now you can see we've cut out
the inside of this frame. Now we could easily just
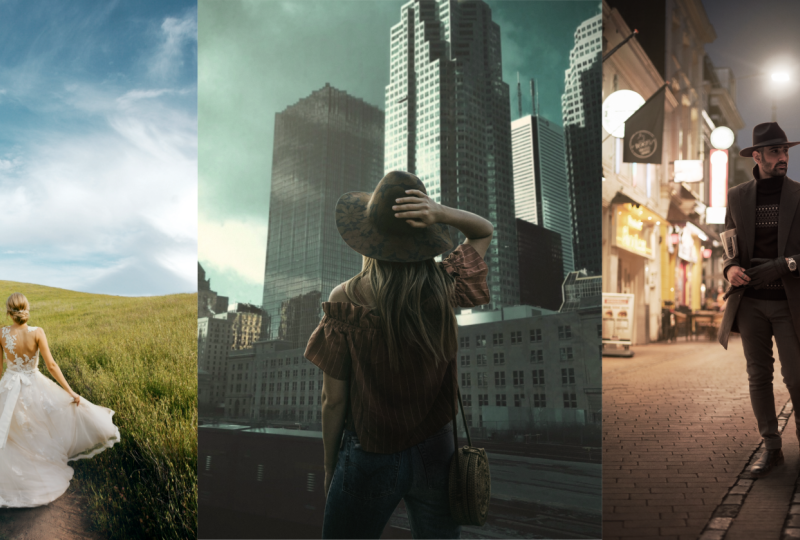
go up to file place. We could select
any of our images, I'll just select this girl here. We could open them up and
place them in the frame. I'll drag it to the bottom so that she's inside of
the frame like this, and then we can adjust how
she's positioned here. Lovely. All right
onto the next photo. In this photo, I'm going to
do a very similar thing, removing the inside of the frame and then
replacing the picture. However, this frame
is a little trickier. Notice we have this object
overlapping with our frame. For this part,
we're going to want to use a different
mode for our pen tool. I'll just select the pen tool. Then I'll show you that previously we were
working in polygon mode, laying down just straight
lines like this. I'll undo that with
Commander Control Z, and this time, we're going
to work in Smart mode, which is the second
one right here. In Smart mode,
affinity photo will be smart about how it decides
to place down these points. I'll turn on rubber band modes.
You can see this better. As I move and adjust where
I'll place the next point, you can see that the line
becomes more and more curved. This is a super easy way to get really beautiful
curved lines. I'm just going to
delete this curve, Let's start in polygon mode with the straightest
parts of our image. I'll just start
by clicking right here and I'll bring it around. Then when we get to
that curved object, we can switch into smart mode. I've made it to the curved area. I'll switch to Smart mode now. I'll just begin clicking
to create this curve. Feel free to make as many
points as you'd like. We're just trying to
create that smooth line. I think that looks pretty good, but I'll hold command or
control to adjust my node. Bring this down a little bit. I think this looks pretty good. You can see it's pretty
easy just changing the mode in the middle of
creating this pen path. I'll just make this
into a selection. I'll add a mask to it. I'll de select with
command or Control D, and then I'll invert my mask
with command or Control I. Just like last time, I'll
just place a new image here. I'll choose that girl again. Let's open that up and place it and drag it to the bottom. All right. We've
worked our way up. Now it's time to move
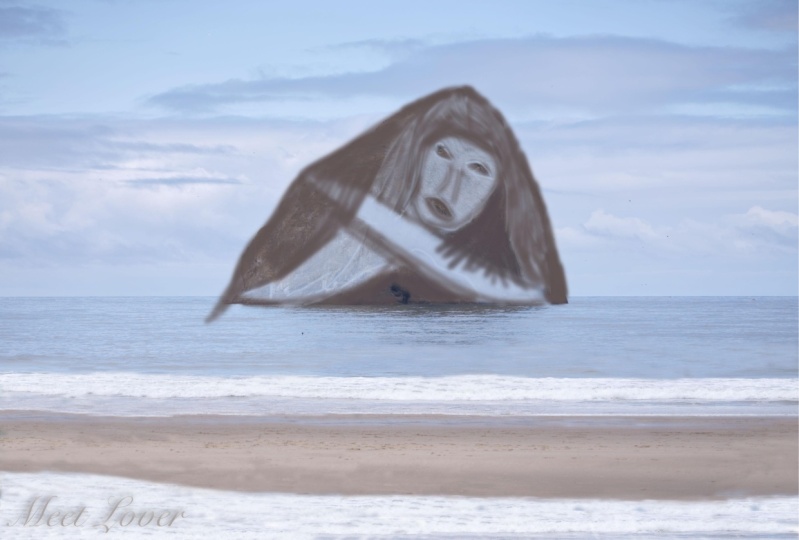
on to the last photo, which is the trickiest. I want to make a selection
of the statue here. This statue is way
too similar to the background to use the
selection brush tool. But the pen tool can make the
selection very precisely. To do this, I'm going to grab the pen tool and put
it into smart mode. There aren't really
any sharp lines here. Smart mode is our best bet to create all of these
smooth curving lines. I'm going to start right on the outside and then
I'll bring it in. I'm just going to connect
all of these points, creating a nice smooth curve
as I make this selection. You're going to need to lay down quite a few points because there's so many
curves to this image. The pen tool is very precise, but it can't take a long time. I try not to use it unless I really can't make the
selection otherwise. Remember that as you
go, you can undo any point that you lay down by pressing command or control Z. You could also hold
down command or control to move any of these
nodes around as you need to. As you go, remember that it's
actually better to cut into the statue a little bit rather than leave some of
the background behind. Just keep that in mind as
you're in some tricky areas and you're wondering if you should select a little
outside or inside. It's better to select more
inside of the statue. Now that I just finished, you can see that
this curve looks a little strange where
I finished my point. I'm just going to undo that
with command or Control Z. Instead, I'll lay a point right next to it
and then close it. You can see that curve
isn't quite as affected. We have our beautiful
crazy selection here with so many points. I'm going to turn this
into a selection. Then I'll add a mask
and I'll deselect with command or Control D. All right, I'm just going to add a
background to this now. I'll go to layer and
I'll add a new fi layer, and I'll bring that
to the bottom. As you can see, the pen tool is perfect for sharp
crisp selections. But sometimes it's actually
a little too crispy. Look how harsh this line is. Keep this photo open. In the next video,
we're going to learn how to soften a mask
that looks like this.
12. Softening a Mask: This video we'll learn how to
soften the edges of a mask. We're going to practice
by softening the mask that we made in the last
video of this statue. Like we saw at the end
of the last video, the edges of this
mask are so sharp. They're too sharp
to be realistic. I want to blur the edges
here to make them blend in with the background a little better and just
make them softer. But the key to remember is that I want to soften the mask, not the actual photo. I'm going to hold down Alt or Option and I'll just
click on our mask. This is what we want to blur, the black and white here. I want to blur this, and then our photo will
look nice and clear, but just the edges
will be blurred. To do this, I'm just
going to select the mask. Then I'm going to
add a Gaussian blur. I'm just going to place this as a child layer to our mask. Now this will only be
affecting our mask. As I increase the
radius, you can see, it gets a lot softer
on the edges, but the actual statue
stays in focus. This is pretty cool. I think this was a bit too
much of a blur though. I'm just going to bring
this down to about there. Now as I Zoom in, you
can see the difference. Here's the before,
the very sharp mask, and here's the after. Blurring the edges of the
mask is a great way to make pen tool selections
look more realistic. A little blur just
looks more natural. Now in the next video, we're going to bring together
all of the selection tools that we learned about to
make our best selection yet.
13. Combining Selection Tools: In this video, we're
going to learn how to use multiple selection tools
to make the perfect mask. I want to select our model here and remove her
from her background. To start, I'm going to use
the selection brush tool. I'll just make it a bit larger. Then I'll quickly click and
drag to paint a selection. Now, this is actually a
pretty tricky selection. The colors of our model, the colors of her dress and her hair are very similar
to the background. It's a tricky selection. I'm just going to adjust
my brush size as I go, and I'm just going to click and drag to try to add
more to our selection. I'll hold Alt or Option and I'll click and drag to remove
from our selection too. Just going all the way around. In between her legs, I'll
hold or options so that I can remove that little section
there. There we go. I'll just continue to do this all throughout
this election. As a tip when you're cleaning up the edges of your selection, just click and drag
slightly inside the lines and your selection
will jump to the edges. If you click and drag
right on top of the edge, it's going to jump
to the outside. That's just my
little tip for you. Stick close to the inside, and you should get a
pretty good selection. The selection is really struggling with the
hair, but that's okay. I'm just going to
end it here and I'll press refine up in
the context toolbar. This automatically gives beautiful matt edges
to our selection, but I'm quickly
just going to click and drag to paint over
the edges of her hair. Hopefully to refine
this a little bit more, although it's not looking
too great. That's okay. I'll just continue clicking and dragging and then
I'll press apply. Let's add a mask now, and then D select with
command or Control D. Yeah, that's a pretty rough selection, but we're going to do quite
a bit of cleaning up. It'll turn out beautiful
in the end, wait. I'm going to add a
background layer so we can better
see our selection. I'll go to layer,
new fill layer. I'll drag this to the bottom. Now we can zoom in and take a look at what we
have going on here. To start, I want to
clean up her hair. I'll grab the paint brush
tool and select the mask, and I'm just going to
paint in white and black to add and
remove from the hair. With a larger brush,
I'm just going to paint to fill in a
few of these areas, and then I'll go back to remove. We want to make sure that
all her hair is included. I don't like seeing all
these chunks missing, so I'm just going to paint over these areas to make sure
all of the hair is visible. Now that the hair is visible, I'm just going to
switch my color to black by pressing
x on my keyboard. Using a bit of a smaller brush, I'm just going to
come in here and remove some of these splotchy areas
that shouldn't be there. Here we go. I'll just continue to do that all
the way around the head. Feel free to turn the mask
on and off so you can see if you should include more
or less of a certain area. I think this area on top of her head should be a little
bit more transparent, so I'm just going
to paint over it in black and then I'll
paint over it in white once again to create
that transparent look. I think that's a
bit better. I am painting with a low
flow here as I go. I forgot to mention that. This should be just a
very gradual adding and removing of hair. The hair looks a lot
better, a lot smoother. We could keep painting to continue to clean
up the selection. There are a few other strange looking areas like down here. But instead, I think
I'm actually going to use the pen tool to be
a little bit more precise. I'll select the pen tool and then I'll show
you how to do this. Down here with her feet, you can see that her shoes
look a little bit strange. I'm actually going to
turn off the mask. Then I'm going to trace
with the pen tool in rubber band mode
and in smart mode. I'm just going to
trace around the feet. Remember to add as
many points as you'd like and aim to stick more toward the
inside of your selection. In this case, I'm going to
overlap a little bit with the sandals and
her feet as I go. I'm going to end my
selection about here at the ankle area and I'm just going to bring it
over like this. There we go, and then I'll
turn it into a selection. Now I'll turn the mask back
on and I'll select it. I'm going to grab
the paint brush. With this mask still loaded, I'm going to paint in
white paint inside of the mask to add back in any
missing areas on this mask. I'm actually going
to bring up the flow all the way to do this. I'll make my rush a bit larger. I'm just going to paint in
white all throughout this. You can see some
areas coming back. There we go. Now we
have the entire sandal. All of this area
is all filled in. Then I'm actually going
to invert my selection. I'll do this with command
or control, shift I. Now we'll be painting on the
outside of our selection, and I want to remove
from the outside. I'm going to switch
my color to black, and then I'm just going to
paint all along the outside. I'm going to be careful at this top area where I don't
have a good selection made. Just painting right along there. I'll press command or
control D to D select, and now you can see how much
better this selection looks. It just looks so
splotchy before. To soften this mask, I'm going to add a
gaussian blur to it. I'll drag it down like this. Now it's a child layer, and then I'll just
increase the radius. It really doesn't
need much of a blur, but I think that
looks pretty good. You might have
noticed when we added that selection that it did remove a little
bit right up here. That's no good. I'm going to
switch my color to white. I'll select the mask again, and I'm just going to fill
in those areas again. I can continue now with this pen tool technique to
clean up more of the edges. I'll select my pen tool
and in smart mode, I'll start on the outside
here and work my way in. There we go. I think this leg looks a
little bit messed up too, so I think I'll just keep
going all the way up it like this. That looks pretty good. Then I'll click, click, click. There we go. I'm just on
the outside of the leg now. I'm going to turn this
into a selection. Using the brush tool. I'm going to paint in black
to inside of the selection. You see these areas
right down here. I don't want that to be
included in the selection. With my mask selected, I'm just going to
paint in black paint to remove those areas. Up here, I think
I'll leave that. I think that looks good. Now I can invert my mask with
command or control shift I, so everything out
here is selected. I'll just switch my color
to white so I can click and drag along here to make sure the entire leg is
filled in nicely. And I'll stop when I
get close to the top. Now I can de select with
command or Control D, and you can see that just
looks so much better. I'm going to continue to do this process throughout
the rest of the selection, creating a nice selection
with the pen tool, turning it into a selection, and then painting on
either side of the mask. If there's some areas you see that really just need painting, I think it's totally fine
just to paint the area away. But using the pen
tool really does make a much cleaner,
sharper selection. Just remember to have your
mask selected as you do this. You don't want to accidentally
paint on the picture. I just finished
with the Pen tool, and now I'm going to double
check our selection by holding Alt or Option and
clicking on the mask icon. Now we can just zoom
in here and make sure that we didn't miss
any areas of our mask. I can see a little bit of
a strange area right here, so I'll just paint in
white to fill that in. Up here, I think this
actually looks pretty good. And there we have it. We've now cut our model out
of her background. To finish this up, I want to show you
a little trick to make this mask look even better. I'm going to add a brightness
and contrast adjustment. I'm going to brighten
it up quite a bit. Then I'm going to
invert this adjustment, so I'll press command
or control I. Now this adjustment has a
black mask applied to it, so we can simply paint in white to apply it to certain areas. In this case, I'm going to apply the brightness just to
the edges of our photo. This will help her to blend into her new white background
a little bit better. I'm just going to
softly paint over it. Maybe I'll lower the flow a
little bit to make this even softer. There we go. Just a quick way to help her blend in a little bit better. And make her look like
she belongs here. Now, I'll just turn this
off. You can see the before, and here's the after of blending her in a
little bit better. This only worked because the
background is a white color. If we put her on a
darker background, I would probably
darken the edges just to help her blend in. Now that we've done that, I'm just going to hold
down command or control to select our mask and the brightness in contrast. I'll trow them both
off so we can see the before and here's the
after with our model cut out. Great work. Now you
know how to make incredible selections and
masks in affinity photo. Now in the next chapter,
we're going to learn about Affinity's most
powerful tools for improving the color and
light in our photos.
14. Color & Lighting: Affinity photo has so many
ways to edit color and light. So far in the
course, we've really only used basic
adjustment layers. But in this chapter, we're going to take
a deeper look at Affinity's most powerful
adjustments for color and light.
Let's get started.
15. Curves for Light: Let's learn how to use
the curves adjustment to edit the lighting
of your photos. To see how this
adjustment works, I've prepared a few screenshots
of the curves adjustment. This is exactly
what the adjustment looks like in affinity. I just removed
everything besides the adjustment so that we
could really focus on it. The first thing to know
about curves is that this line represents
everything in your photo? At the top right, The line is representing the brightest
parts of your photo? At the bottom left? This part of the line represents the
darkest parts of your photo. As you might expect, the rest of the line represents all
of the other tones in your photo ranging from the darkest tones up to
the brightest tones. The line represents
everything in your photo before you make any changes
with the curves adjustment. But of course, the whole point of this adjustment layer is to change the lighting in your
photo. How do we do that? Well, as we bring the line closer to the top of the graph, we'll make things brighter. But as we bring
the line closer to the bottom of the graph,
we'll make things darker. That's how you use
the curves adjustment to change the
lighting in an image. In this example, we would be
making the photo brighter, since we're bringing
the mid tones of our photo closer to the
bright top part of the graph. But in this example, we would
be making the photo darker, since we're bringing
the mid tones of our closer to the dark bottom
part of the graph. That's about it. That's the general idea
of how to use curves. I know that all
might sound a little bit confusing, but don't worry. It's actually really easy after you've practiced
a little bit. Let's jump back
into affinity photo and practice using curves. Starting with this
first photo here, I'm just going to go
down to the adjustments and then I'll apply
a curves adjustment. I'm going to click and
drag on this line, starting right from
the middle here. As I drag it up, you can see
our photo gets brighter, and as I drag it down, you can see our
photo gets darker. I'll just reset
this line because I want to show you where things
really get interesting. We can add multiple
points to this line. Let's say that I just want the shadows to be a
little bit darker. I could bring this
part of the line down. But this is actually making
the entire thing darker. You can see that up here. If I wanted to not affect
the highlights as much, I could click right up here and bring this back in line with
where the line started. Now we're just darkening
the mid tones, and you can see this as I turn this layer off and back on. The clouds don't change. Only the darkest parts of the
image are getting darker. And we can do this in reverse. If I wanted to make the
brightest parts even brighter, I could bring that
point up and I could bring this back in line
with the rest of our graph. Now only the brightest parts of our image are
getting brighter. You can see that
here. The midtones aren't really being affected. Only the bright parts
are getting brighter. Now, this is pretty cool, but I want to show you the most common curve
that people make, and that's making the highlights brighter and the shadows darker. I'm just going to bring
this point up a bit over here and this part
down a little bit. By making the highlights
brighter and the shadows darker, we're effectively adding
contrast to our photo. You can see the
before and after. This curve is often
called an S curve. You can see it makes a
very slight s shape. I really love making S curves. I think they really
make photos pop. We're probably going to use this quite a bit throughout
the course. Let me just reset this because I also want to
show you that we can even change this highlight point and this shadow
point if we want to. Starting with the
highlight point, I could drag this point down. If I wanted my highlights
to start at a darker level, you can see this just makes
the whole photo darker, but mostly it's making our
brightest spots darker. We can do the opposite over
here with the shadow point. If I bring this up,
the darkest parts of our picture will get lighter. But what if I wanted to
do the opposite and make the shadows even darker or
the highlights even brighter, these nodes can't go
any lower or higher. Well, what we can
do is actually use them to affect the
slope of the curve. Coming down here to our shadows, I could actually
bring this over, which makes the whole slope
of this curve steeper, meaning that what used to be a mid tone is now a dark shadow. Right here on the line has
now become right here. You can see that now The
darkest parts are even darker. I could do this in reverse if I wanted to. I'll just reset this. If I click and drag
this one over, you can see we're starting our highlights at
a brighter point, meaning that our highlights
just got even brighter. I know that was a
lot to take in, but let's quickly edit a
few photos using curves, and I think everything will
make a lot more sense. In the courses Exercise files, we have four more
photos for this video. We'll just start right here. For this photo, I think I want
to make it a bit brighter. It just looks a little
bit dark right now. I'll go to our adjustments,
I'll add a curves. Then I'll just
click and drag to, brighten this up. Much better. Here's the before and
here's the after. That was very quick and easy. Let's go to the next one. I think this photo
looks a little bit faded and needs more contrast. I'll go down to our
adjustments, apply a curve. This time, I'm going to
apply an S curve to add that contrast by making the highlights brighter
and the shadows darker. Now you can see this
looks a lot better. The dark parts of our photo, like the eyes of the bird
or this dark branch, look a lot more
dark and contrasted next to the light parts
like the light background. Let's do the next
one. For this photo, I think I want the shadows
to be a little bit darker. They look a little bit
gray at the moment. As a little bonus tip, you can actually quickly apply a curves adjustment
by using a shortcut, which is command or Control M. I don't know why it's M. That's just something you need
to memorize, I guess. I guess you can think about
as being a curvy letter. Let's make the shadows darker. I'm going to bring the
shadow node over to the right so that all of the darkest parts of our
photo are even darker. I think this looks a lot
better. One last one. In this photo, I think I need
this to be a lot brighter. All press command or control M to apply a curves adjustment. Then let's go ahead and
make this brighter. Now the photo looks better, but I think the
highlights in the photo, especially on her face, are just looking a
little too bright now. To fix this, we could
go back into our curves and try to change
how this looks. But I don't think that's
going to work very well. I think what we
need to do is keep the curve nice and bright
and use blend ranges. I'll go and click
on the Gear icon, and I'm just going to reduce how much this is affecting
the highlights. Light is on the right. I'm
going to bring this light node down so that this isn't affecting the
highlights as much. If I bring this note
all the way down, the highlights look
a little bit flat. I'm going to raise this just so it's partially affecting
the highlights. I think this looks pretty good. Here's the before
and after of that. Now that I'm seeing
this, I think I do need to make this just
a little bit darker. But I still think this looks a lot better from
where we started. Curves gives you so
much flexibility when editing the
lighting of your photo. But would you believe
this adjustment actually has even more to offer? We can edit the colors
in our photo too. We'll take a look at that
in the next video. F.
16. Curves for Color: In this video, we'll
learn how to use curves to change the
color of your photos. But before we dive into curves, you need to know a
little something about how colors work. You've probably
heard of RGB before, which stands for red,
green, and blue. These are the three colors that computer monitors combine
to form every other color. But what you might not know are the opposites of
these three colors, which are cyan,
magenta, and yellow. As you can see, cyan is
the opposite of red, magenta is the opposite of green and yellow is the
opposite of blue. But why is this important? Well, when using the
curves adjustment, we can add any of these
six colors into our photo. But that's not entirely true. What we're actually
doing is adding or removing red, green, and blue. But since red green and blue are the opposites of cyan
magenta and yellow. If we remove red green or blue, it will appear as if we've
added cyan magenta or yellow. By using curves, we
could add red or remove red in order to add cyan. But that's enough t.
Let's see this in action. Starting right here,
I'll press command or Control M to bring up
a curves adjustment. So far, we've been working
in the master color channel, which affects the lighting. But if I click here, I can
actually go to the red, green or blue color channels to affect the colors
in our photo. I'll just go to the red channel, and you can see this
line has changed to red, representing the red channel. Using this, I can raise this
to add red to our photo, or I can lower it to
remove red or add cyan. I'll just reset this. This line works just the same as before, allowing us to
independently control the highlights or the shadows. I'm just going to
create an S curve here to show you how this works. If I add red to the highlights, I can raise that up to do that, and I can lower this line
to remove red and add can. Now we have red highlights. You can see that in his
white fur and Cyan shadows. Here's the before
and after of that. In this next photo. I want
to make the shadows in this photo more blue toned without affecting the
colors in the highlights. I don't want her skin or her dress to start
to be tinted blue. To do that, I'll
press command or control M to bring
up our curves. Then I'll go into
the blue channel. I want to make the
shadows more blue. Go over to the shadow side, I'll increase this to add blue. But I'll bring this
line back down here so that we aren't
affecting the highlights. Now you can see the
before and after. The shadows are a
lot cooler toned, but her skin still
looks just the same. To make this effect
pop even more. I think it'd look nice if the shadows also
had a bit of cyan. Cyan is the opposite of red. Let's go back up to
the red channel, and I'll go ahead and remove
red from the shadows to add, and I'll make this line meet
up here in our highlights. Our highlights aren't affected. Now you can see the before
and here's the after. Let's go to our last one now. I'll just add a curve. For this one, I think I want this overall photo just to
look warmer like it's sunset. To do this, let's start
in the red channel. I'm going to add red
to the highlights. I'll raise this up and then I'll lower it so the
shadows don't become too warm. That's pretty good. Another warm color is yellow. Let's go to the blue channel. I'll remove blue to add yellow. Then I'll raise this line
so it meets back up here. Now you can see we've added red and yellow, really
warming this up. Let's go into the
last color channel now, the green channel. I think I want to remove just
a little bit of green from this to make the photo appear a little bit
more magenta toned. Now, the green magenta
color channel can strongly affect photos and make them look a little strange. I try not to alter it too much. I'm just going to bring it down just a little bit to
add that magenta. Now you can see that
before and after making this lion look like
it's looking at the sunset. Curves can be tricky
to learn at first, but it really is an
amazing adjustment. You can make your photo
brighter or darker, add contrast, change the colors, or all of the above. After you've had a little
bit of practice with curves, you'll want to use it
on all of your photos.
17. Color Balance: This video, we'll learn about the color
balance adjustment. Color balance allows you to easily change the
colors in your photos, shadows, midtones,
and highlights. We'll be working with the same three photos that we used in the last video so that you can see how this adjustment
compares to curves. Starting right here, I'll
go to our adjustments and I'll apply a color
balance adjustment. Coming right up here
to the total range, we can choose if we're
working in the shadows, mid tones, or highlights. I'll just go to the shadows. Then down here, we
can see these sliders represent all of the colors
that we've been working with. We have cyan, magenta, and yellow and we have
RGB, red, green, blue. You can very clearly see
their opposites here, which makes this a little
bit easier than curves. In the shadows, I'm going to
give this a very can look. Then I'll go to our highlights, and I'll give this
a very red look. This is just the same as what we did with curves in
the last video. Now you can see the
before and after. That was super easy. Let's go ahead and
go to the next one. I'll apply a color
balance again. This time, I'll go
to the shadows and let's make the shadows look a
little bit more blue toned. I'm just going to bring
the science slider over and I'll bring
the blue slider over. This is just the same
as what we did before, and you can see that
before and after, the highlights are
still unaffected because we were only
working in the shadows. That was so easy. Let's go to our last one here. Again, I want to create some
nice warmth for our photo. I'll go to color balance. Let's go ahead and start
in the highlights. Remember we added yellow
and red to our highlights. I'll start with yellow
and bring this over. I think this needs
quite a bit of yellow, and I'll add some red. I think I'll also raise the
magenta just a little bit. Let's go to the mid tones next. I think to affect
this photo more, I need to add these
same warm colors. I'll just bring the yellow over. I'll bring the red over and
a little bit of magenta. Since we're here,
we may as well add a little bit of color
to our shadows. Since we warmed up the
highlights and mid tones, I think it'd look nice if
we cool down the shadows. I'll just add a
little bit of blue. And a little bit of magenta. Here's the before
and after of that. Once again, this was super easy. Affinity has so many ways
to edit color and lighting. Curves is such a
powerful adjustment, but honestly, color balance
might be easier to work with. I usually use curves to adjust lighting and use color
balance for colors. Now that we've learned
about these two adjustments for affecting colors, I want to show you a more
advanced one in the next video.
18. Advanced HSL: In this video, we'll take a deep dive into
the HSL adjustment. To start, I'll apply
the HL adjustment. Then I just want to start with a really quick review of
how this adjustment works. Using these sliders,
we can change the hue. You can see every part of
our photo is affected, the butterfly, the leaf
background, all of the colors. I'll reset the slider
by double clicking. There we go. In addition to
changing all of the colors, we also have all of these
color channels right here. I could go to the green one, and then I could change the hue of only the green
parts of the photo. I'll just reset again by
double clicking on the node. That was just a
really quick review, but now let's dig a
little bit deeper. While I'm still in
this green channel, I'm going to drag the hue
slider all the way over. You can see that this
is looking a little bit splotchy. I'll reset this. I'm wondering if it's
looking splotchy because our leaves also have
some yellow tones. Maybe we should try
the yellow channel. Now you see the yellow areas have become splotchy and
filled in with color. Wouldn't it be nice
if we could combine the yellow and green channels together so that we could
change the entire leaf? Well, actually, we can. But we'll need to use this
circle right up here. This inner circle
represents all of the colors that will be changed
as we use these sliders. You can see right now
we're positioned somewhere in the green to orange range. However, the only parts of
this photo that are 100% being affected are
the colors that are in between these
two middle nodes. This is 100% affected. This is 100% effective and
every color in between. These outer nodes
are like a gradient. This point right here
actually is 0% affected. It goes 100-0 with these
green to yellow colors, and the same goes for
this other outer node. It tapers off into 0% once
you get to this color. If I want to affect
more of the greens, I could move this
node over more. Then I could move the
mid tone over more so that all of those colors
are affected even more. I could also move this middle
point over to make sure that all of our yellows are
nice and included here. Now you can see the leaves are
colored a lot more evenly. There's not as
much splotchiness. Now that we have that entire
part of the leaf selected, I could double click to
reset the hue slider, and then I could alter
the color however I want. Maybe I want to cool it down and make it a little
more blue toned. I think I'll also desaturate
it just a little bit. Maybe let's lighten it
up a little bit as well. Now you can see them before and after of just toning
down that green color. Let's practice this again. This time working with
the butterflies colors. I'm going to go to the blue
channel to start and I'll bring the hue over so that you can see what's
being affected here. This is very uneven coloring. It's not all changing
to the same color and this middle part looks
completely unaffected. I'll just double
click to reset that. Let's go to the cyan channel
and bring this over. You can see a lot more of the butterfly is being recolred, but as it tapers off, these colors are looking
a little bit strange. I'm going to make sure that coming over here to our circle. We have more blue included. To do that, I'll drag
this node over more. Now we have more
blue being affected, and I'll also bring this middle
node over more like that. I'll just double click and now we can use this slider to
affect the butterflies colors. I think I'll bring this over a little bit more toward blue, just to cool down its
colors a little more. I also really want
to desaturate this. It just looks so
oversaturated right now. Here's the before and after of the butterflies colors.
It's not perfect. I think this stock photo was
a little bit too overclred, too saturated, but I do think
this is an improvement. That was great in all,
but I want to show you another way of working
with the HSL adjustment. I'm just going to delete
this one and I'll apply another HSL adjustment
using a shortcut. For HSL, it's command
or Control U. Again, you really doesn't
make sense for HSL, but I remember command or control because you sounds like. I don't know if that
helps, but it helps me. We've used our shortcut
to open this up. Now, I want to show you
another way to work with this, which is using the picker. To use the picker option, you first need to be in a color channel that
you want to affect. You can't be in the main colors
to use the color picker. I'll just go to the greens
and then I'll use the picker to sample a yellow toned
green color in here. I'll just click and
you can see that this has moved over to include
more of the yellows. I'll just reset this.
You can see again. We're in the green channel,
it's all over here. I'll use the picker,
and if you watch this, it jumps on over to include
more of the yellows. Now, I'll just move
the hue over and you can see all of the leaf
is being affected, which is so nice.
I'll just reset this. This time, I'm going to try
to sample the butterfly. I'll go to the cyan channel
and use the picker, and then I'll click
it right in here. You can see that jumped over to include more of the blues, and now I'll adjust the hue. You can see that still
doesn't look quite right. Even though the color
picker could be useful, it's still important
to understand how color ranges work and
how the circle works. Because the picker could
be a good starting point, but you might still
need to adjust some of these points to include more colors and just make this
look a little bit better. I'm just going to delete this because I want to
quickly show you how the HSL adjustment is a bit
similar to the hue mask. I'll press command or
Control M to apply a curve, and I'm going to make
a very bright curve. Let's just really bump that up. Then I'm going to
go down here to our masks and I'll
apply a hue mask. I want to brighten
up the butterfly. I'm going to move this circle so that all of the points
are in the blue range. Then to include more, we can expand our gradient to make sure all of the
butterfly is nice and lit up. And we can go ahead
and give this a blur. Now we can go back to
the curve and we can adjust if we want this
brighter or darker, and we're only affecting
the butterfly. I just wanted to
point that out that this circle is pretty
similar and we can adjust these points just the same expanding them to
include more colors. Now I want to show you another
example of working with the HSL adjustment
using this photo here. I press Command or Control U, and now we have the
HSL adjustment up. I'm going to use
the color picker in the CN section to select
the color of these pillows. Let's see if we're affecting
all of the pillows, and I think we are.
That looks really good. Now, you might notice that the pillows are being affected, but so are a few other things. As I turn this on and off, you might notice the blanket on the left is being recolred, as well as the shadow
area over here. Sometimes with the
HSL adjustment, you might need to
paint a little bit to make this perfect. I'm just going to grab
the paint brush tool and I'm going to
paint in black on this HSL adjustment to remove it from this blanket and
from the shadow area. I'll just turn this
on and off to make sure everything
has been changed. I'm actually noticing that it is reflecting red on this
pillow right here. But I actually think
that looks good. It's reflecting because
the pillow on top of it was blue before,
reflecting blue. Now it's reflecting red. I think that
actually looks nice. Now that we've done that and the right things
are changing color. I can go back into
our HSL adjustment and choose the color
that I'd like for this. I think I actually want
these pillows to be green. I'm just going to raise the hue until it looks
like a nice color. I desaturated a little bit, and maybe let's
brighten up the color. All right. After
those adjustments, I think this looks really nice. Here's the before and
after. Great work. You're now in HSL master, and you can change the individual
colors in your photos.
19. Blend Modes: Learn about blend modes. Blend modes allow you to mix
multiple layers together. They're like opacity,
but smarter. To see how blend modes work, I'm going to use this
simple image here. On the left, we have pure white. On the right, we
have pure black, and then we just have a few
shades of blue in the middle. I'm going to copy this
with Command or Control C, then I'll bring it over to
our next exercise file here, and I'll just paste it
with command or Control V. As you can see, this layer has been
placed on top. If I wanted to blend
with a layer beneath it, I could just reduce
the opacity like this. These layers are
blended together, but only because this
is more transparent, there's nothing really
smart about it. To really get into the
smartness of blend modes, only to apply a blend mode. To do that, just come right up here to where it says normal, and you'll see this
big list open up here. First, let's apply darken. The darken blend mode
looks at both layers and only keeps the darker
pixel from each layer. That's why the black
rectangle is fully visible because black is
darker than everything else. In contrast to that, that's
why the white rectangle is totally invisible because white isn't darker than anything. Then in the middle,
you can see that the darker parts of
each layer are visible, the cat's black fur
is kept visible. But where the cat has white fur, now it's been turned blue. Let's take a look at
another blend mode now. That was darken. Let's go to lighten. Lighten is the exact opposite of darken. It looks at both layers and only keeps the brightest
pixel from each layer. In this example, you can
see the white rectangle is fully visible while the black
rectangle has disappeared. Just to look at
another blend mode, let's go down here to color. Color will give the bottom layer the color of the top layer. That's why the sides have
become black and white because there's no color or
hue in those rectangles. But for these middle ones, you can see they've turned blue just like the blue rectangles. This is like a recolor
adjustment. All right. What's the point? When would
you want to use blend modes? Well, most of the time, you don't actually need
to use blend modes. Opacity and masks work
perfectly fine for most photos. But there are certain situations where blend modes are useful, a few of which we'll learn
about in upcoming videos. But the main goal of this video is just to show you
that blend modes exist. Now, even though I
will be showing you blend modes more in
upcoming videos, I can't resist showing you at least a couple of uses
for blend modes in this one. Let's go to this
next exercise file. I'm going to copy this
with command or Control C. Then I'm going to paste
it on this bird image here, I'll do that with
command or Control V. Let's take a look at how
blend modes will affect how this texture
blends into the birds. I'm going to first
change this to darken. You can see that this is
keeping the darkest pixel. All of the white areas on this bird layer
are now invisible. But if we want to keep
more detail than that, there's actually
another really nice blend mode called multiply. You can see some
of the detail has come back from those
lighter areas. If you'd like, you can also
still reduce the opacity of this layer just to make the
white areas more visible. We can use blend modes to add
light to a photo as well. Let's come to this last photo. In this one, I want to create a light burst coming
from the photo. I'm going to grab
the ellipse tool. I'll click and drag
to make a circle. Then I'm going to add
a gradient to it. I'll go to the gradient tool and starting from the center, I'll just click
and drag outward. For this outer color stop, I'm going to make it
a nice orange color. Then I'm going to turn this
into a radial gradient. Now we have this
beautiful ball of light. Let's use a blend mode to
blend it into the photo. Going to blend modes. I'm going to go to our
light and blend modes. I think I'll use
screen for this one. This one looks pretty nice to blend this in even
better with our photo. I'm just going to
apply a blur to it. I'll apply a Gaussian blur. I'll just raise this up. I think I want this
even more blurred. I'll just type in this box 300. Very nice. Now I can use the move tool to
reposition the circle. Just like that, we now have a beautiful light
burst on our photo. Of course, we can reduce
the opacity of this. If we want this to
be a little less intense. That looks great. As you use affinity photo, you'll learn more and more
uses for blend modes. But don't worry about learning what every single
blend mode does. Even though I've used
affinity photo for years, I still don't actually know use cases for every
single one of these. The goal of this video is just to introduce you to blend modes so that we can keep
practicing with them throughout the rest
of this course. A
20. Global Color Correction: This video we'll learn how
to color correct a photo. There's actually a
lot of different ways to correct a photo. Depending on your photo, one technique might work
better than another. In this video, I'll teach you three different techniques
for color correction. That way, you'll have
multiple options in your tool belt when it's time for you to work on
your own photos. Method number one is the easiest
and best place to start. It's simply adding a white
balance adjustment layer. I'm going to come
to our adjustments and then I'll apply
a white balance. Using this adjustment layer. I like to just play
around with this slider, I like to make it
warmer and then cooler. I'm looking at the photo
as I'm clicking and dragging and just seeing what makes more sense
for this photo? In this photo, I think it makes more sense to bring
it more toward blue, and you can see the
difference here. Here's the before and after. This is really just using your eyes and trying to
see what looks better. But there are
definitely more precise ways to do color correction. Let's move on to method
number two for this photo. Tth number two is a really cool little
trick that you can use with the
curves adjustment. I'll press command or Control
M to bring up curves. Then I'm going to go into each color channel to
adjust the colors. Let's start in the red channel. The strategy for this
is to actually look at this little histogram here
that we have in the middle. This whole gray area. I'm going to make
each of these points line up to the very
edges of the histogram. I just brought the shadows over to meet the darkest point. Then just using my eye, this one's a little trickier. I'm going to try to line
up the highlights node, right about there. There we go. Then I'll go into
the green channel and I'll just continue
this process, bringing it over
to meet the edge. Last, we'll do the blue channel. The blue channel hardly needs
the highlight moved over, so I'll just do a little bit. Now let's take a look at
the before and after. Here's what our
photo looked like before, and here's the after. To be honest, I don't know
exactly how this one works, but I do know that
it's amazing and it really does help
for color correction. Let's do another example
with this curves technique. I'll go to our next
photo and apply a curve, command or Control
M. Then I'll go into each color channel
and we'll do it again. I'll just drag this over. We don't need to move the
highlights over in this one. The highlights are
so bright that the histogram is just bumping
right up against the edge, which makes this
a little easier. I just finished in
every color channel. Here's the before and after. This definitely looks better, but it's not quite right. I think our color correction has made the shadows very dark. Maybe we need to adjust
the lighting a little bit. I'll go back into my curves and in the master color channel, we'll be able to
affect the lighting. I'm going to bump
up the brightness just on this very edge, and then I'll bring the
highlights area back down. I really don't want to brighten the highlights,
just the shadows. Now let's take a look.
Here's the before and after. You can see the shadows on her dark coat here look a
lot better than before. That's method two. It's
a pretty cool trick. I'm going to show
you one more method. That's a really cool trick. Method number three
is using blend modes. To do this one, first, I'm going to start by
grabbing the rectangle tool and just clicking and dragging
out a rectangle like this. Then I'm going to find a part of the photo that should be white. In this photo, I
think the flowers on her dress are supposed to
be a nice white flower. What I'm going to do
is I'm going to grab this color picker right
over here in our tools. I'm going to change
the radius to five by five just so we sample
more of the color. Then I'll click right in
here to sample that color. The rectangle should have
changed to that color. If yours didn't, make
sure it's selected and then click here
to apply that color. Now we have this light green
color that should be white. Using the move tool.
What I'm going to do is I'm going to
stretch this rectangle, so it covers the entire photo. Then I'm going to use
blend modes to change. This is where the magic happens. I'm going to use the
divide blend mode, which you can find
right down here. You can see the colors of our
photo look so much better. Here's the before and after. I honestly never use the divide blend mode except for with this color
correction technique. I'm not even really
sure how this works, but I do know that this technique is really
cool for color correction. Let's do another example
with the divide blend mode. Going to this one here, I'm
going to make another square. Then I'll use the color
picker and five by five. I'm going to click on an
area that should be white. I think that her shirt
should be a white color. I'll just click to
sample that color. Now you can see that that color has been applied to our square. It's a very dark
color, isn't it? I'm just going to
use the tool to stretch this across the
entire document here. Then I'll change the
blend mode to divide. As you can see, the white
balance looks a lot better now, but I think the whole image just looks way too bright now. To fix this, I'm going to
add a curves adjustment with command or Control M. I want to decrease the
brightness of this. But I'm going to make sure my adjustment is underneath
our color correction square. That way, I'm only
affecting the photo, not this square here. With that done, I'm just
going to come over to our highlights and I'm going
to darken them like this. As you can see, as I
darken it more and more, you can actually see these
trees and her hair start to reappear before they were missing because the
photo was so bright. Go ahead and lower this down until you can see
those details again. We still want the photo bright, just not quite that bright. I'll select both
of these layers to see the before and after. Now you know three ways
to color correct a photo. Depending on your photo, one of these techniques might
work better than another. For example, in this
last technique, you need to make
sure that part of your image has a
white color in it, so that can make it
a little bit tricky. But I would say just give all of these different
techniques a shot and see what looks
best for your photo. In the next video, we're
going to continue with this color correction by doing some more targeted
color correction.
21. Targeted Color Correction: In this video, we'll
learn how to color correct a specific
area in a photo. Sometimes it's not
your whole photo that needs to be
color corrected, just a particular part of it. Most often, this actually
happens with skin. The human eye is
really trained to pick up on even the slightest
discoloration in skin. Sometimes cameras
don't accurately capture people's skin tones. For example, in this photo, I think her skin is looking
a little bit too green. You can see this especially
in some of the shadowy areas. It just has a slight
green tint to it. But lucky for us, this
is a really easy fix. All we need to do is apply an HSL adjustment to the
areas that we want to affect. I'm going to press
command or Control u to bring up the
HSL adjustment. In the master color range. I'm just going to
make this hue very extreme so that we can
see what we're doing. Because now I'm
going to actually paint this adjustment
only on the skin. To paint on the adjustment. First, I need to invert this layer with
command or Control I. Now we have a black mask. All I need to do is grab my paint brush and
paint in white paint on this black mask to reveal
the blue HSL adjustment. I'll bring my flow all the way up so that we
can see it better. Now I'm just going to click and drag to apply this blue
color to the skin. This is just temporary, but it's a very easy
way to quickly apply an adjustment just to the
areas that you want affected. I'm just going to
carefully paint all around only on the skin. If you paint outside the lines, remember you can
always press x on your keyboard to
switch your colors, and then you can paint in black
to remove the blue color. I just finished painting. I think I missed a spot there. There we go. I know this looks a little
crazy, but stick with me. The next thing we're going
to do is we're going to remove paint from any areas
that we don't want it. I'll press x on my keyboard, and I'm just going to
paint this over her lips and her eyes to
remove the blue tint, we really don't want
it affecting here. The eye color looked
just fine in the photo. It did not need
color correction. If you leave it on
the lips and teeth, sometimes it looks
pretty strange as well. Now that that's done, I'm
just going to click on the HSL adjustment so that we can adjust
the colors better. I'll just double click on
this node to reset it. Now I'm going to adjust the
hue to remove the green tint. You can see as I
bring this down, her skin becomes
even more green. I'm going to bump
it just up a bit, just to bring a little
more red into the skin. I think I'll also
increase the saturation just a little bit to
bring extra warmth to it. All right. Now we can see the before and here's the after. When we first opened this photo, you might not have noticed that her skin had a green tint to it. But now with the
before and after, I'm sure it looks a
lot more obvious. I think this still looks
a little intense, though, so I'm just going to lower
the opacity of this layer. You want to be very careful
with skin not to overdo it. The more you practice
with color correction, the easier it becomes to notice
when your colors are just slightly off with a
simple HSL adjustment, you can easily color correct
any part of your photo.
22. Color & Lighting Project: This video we'll practice
the skills that we've been learning by completing a
start to finish project. This is the perfect
way to review what we've learned and
for you to practice using these skills in
a real world scenario. Where do we begin? When opening a new photo, the first thing I like to
work with is the lighting. Since this photo is looking
a little bit too dark, I'm going to start by
brightening it up. I'll press command or Control
M to bring up the curves, and then I'll raise
up our mid tones. You can see what that looks
like before and after. This definitely has helped to bring more light into the image, but I think the highlights have just become a little
too bright now. We could try to fiddle around with our curves
adjustment to fix it, but I think blend
ranges would be easier. I'll click on the gear icon, and I'm going to
lower the highlights node until I think
this looks nice. I don't want to
take this too far or the photo will
start to look flat. I'm just going to lower
this about halfway. All right now you can see
the before and after. After I fix the lighting, the next thing I like to edit is the overall colors in my photo. I'm noticing that the
colors are a little dull. I want to add some saturation. I'll press command or control you to bring up the
HSL adjustment. Then I'm just going to
go color channel by color channel to adjust each of these different
color channels. Starting in the red channel, let's go ahead and bump up the saturation to see
what will be affecting. I can see we're affecting
the skin and these flowers. I think I just want to increase
the saturation of that. Maybe I want to bump
it over a little bit. To bring a little bit
more redness to it. Here's the before
and after of that. You can see there's
just a little bit more red in the skin now. Very nice. Let's go to
the yellow channel. If I bump this all the way up, you can see we're affecting quite a bit of the photo here. This is affecting the green
grass as well as her dress. I think I will increase the
saturation of these areas. Then to make the photo
a little bit warmer, I'm just going to bring
them up a little bit. You can see this makes
them a little more red toned versus making
them more blue toned. I think I'll just
raise this just a bit, not too far. Let's
go into greens. This is affecting more of
the grass, that makes sense. I think for this one,
I'll go ahead and increase the saturation a little to make those colors pop. Then I do think I still want to make this photo overall warmer. I'm going to raise the hue, just to introduce
more warmth and more yellow tones into
these green areas. Here's what we got so far. This is looking so good. Let's go into the cyan channel. You can see that they're
cyan in a few strange areas. I really don't want
to affect those, so I'll leave those alone. Go into the blue channel.
I'll raise this now. Again, we have some
weird areas lighting up as well as the blue
flowers on her dress. Interesting. I didn't even
know those were blue. I think just to mix things up, maybe I'll just desaturate
those blues. There we go. Next, I'm going to go
into the magenta channel. The magenta is affecting
the flowers and her lips. Right. I think I will increase the saturation of these areas. Then maybe I can make the flowers a little bit more purply by
bringing this over. All right. As I've been
adjusting all of these colors, you might be wondering how
I know what exactly to do. To be honest, I don't. I'm just going with my gut as I'm adjusting all these colors. I know I wanted this
photo to look warmer. For most of these colors, I just erred on the side of making everything a
little bit warmer. I think we're off to a really great start adjusting
the colors. Here's the before and after. It's starting to look more
like a golden sunset, which is really pretty and makes sense because you can see
the sun right back here. I want to continue to warm
up this photo even more. Let's add another
HSL adjustment, command or Control U. Then I'm going to go
into the green channel, and I'm just going
to use the picker to sample a bit of
this grass color. Now that that's been adjusted, I'm just going to adjust the hue to make this area even warmer. Here's the before and
after of that. Very nice. To continue to add a little
bit of style to our colors. Let's do a color balance
adjustment next. I love this adjustment.
Let's start with the highlights and let's
warm them up a little bit. I'll just bring this
slider over to add yellow. Then I think in the shadows, I also want to warm up
the shadows a little bit by adding magenta. I'll
just bring this one over. Last for the midtones, I think I'll just make
them overall more warm. I'll bring the red slider
over just a little bit. I'll bring the
yellow slider over, and maybe a little
bit of magenta. That seems like a good mix. Here is the before and
after of color balance. It's subtle, but it really does add some beautiful warmth. After editing the overall
lighting and colors. The next thing I
like to do is edit the lighting and colors
of specific areas. I want to draw more attention to the subject of the photo. I want to do this by adding a little bit more
contrast to her face. All press command or control to bring up the
curves adjustment. Then I'm going to give this
curve a slight S curve. I'll brighten the
highlight areas and darken the shadow areas. Now this looks pretty intense
on the whole picture, but I'm going to invert this layer with
command or Control I. Then using the paint brush tool, I'm just going to
paint this just over the areas that I want
more contrast added. I'll paint in white paint, and maybe I'll lower the flow
a little to make this less harsh with a bigger brush. I'm just going to paint this
over her hair and her face. Here's the before and after. I think I might want tone
that down just a little bit, so I'll lower the
opacity a little. But you can definitely
see that the focus is more on her with
this contrast added. Another way to add
more attention to your subject is darkening
everything else. It'll just make your
subject glow a little more. To do this, I'll
press command or Control M to bring
up another curve, and I'll just darken this curve. I'll invert this with
command or control. Then I'll paint again
with a low flow. I'm just going to paint
in white paint on this black mask to
darken everything else. We're just darkening the edges. Now that I've done that, I think I want to use blend ranges because I don't think
I want the shadows to become overly dark. I'll go into blend ranges
and I'm just going to lower the shadows node so that the shadows aren't quite
as affected by this. I think I'm just going to
bring that all the way down just to soften
that look a little bit. Now you can see the
before and after of that. She definitely is
standing out a lot more. This is looking so good.
We're almost done. For our last step, I want to add a sunburst to this photo, just to emphasize
the sun a little bit more and accentuate these
beautiful sun rays. To do that, I'm
going to start by grabbing the ellipse tool
and drying out an ellipse. I'll use the
gradient tool to add a gradient from the center
and going outwards like that. I'll make that other color
stop and orange color. I'll turn it into
a radial gradient. Now we can start
working with this. First, I'm going to
change the blend mode to screen so that it blends
into the background better. Then I'm going to add a blur, this blends in even better. Bringing the radius
all the way up. That looks okay, but I think I want even more of a
blur for this one. Let's go 400 this time. Perfect. Now I'm going to use the move to resize and
position where this is. With this layer selected. I'm just going to
make this larger. I think I want this
totally covering this corner and then overlapping with her face just a little bit. I think this looks really good. I'm just going to lower the opacity a little so
it's a little less intense. Now we can see the before
and after of this circle. Then I can go ahead and select all of our
layers with shift, and we can see the
full before and after. All right. Great work, everyone. That was a really fun project. This definitely
looks a fantastical, a little less realistic, but I do think that this really adds some beautiful
warmth to this photo. Now you know how to take all of these different skills
and apply them to your photos to really enhance the lighting
and the colors. In the next chapter,
we're going to shift focus and learn how to
clean up your photos.
23. Photo Clean Up: In this chapter,
we're going to learn how to clean up our photos by removing unwanted things like
power lines or trash cans. Now, if you've already taken my affinity photo
for beginner course, then you already know how useful the painting brushes
for things like this. You just make a new pixel layer, get out the painting brush. Turn on current layer and
below, and then paint. Just like that, you can easily remove unwanted
things from a photo. But as great as the
painting brushes, it's far from perfect. For trickier situations, you'll want to use
the clone brush. We'll learn more about the
clone brush in the next video. Then throughout the
rest of the chapter, we're going to learn
about how to use the clone brush for
real world situations. This is going to
be a lot of fun, so let's get started.
24. Clone Brush: In this video, we'll learn
about the clone brush. We'll start off with the very
basics of the clone brush, and then we'll
practice using it in some real world situations throughout the rest
of the chapter. To set up using the clone brush, it's extremely similar to setting up using
the painting brush. We'll start by adding
a new pixel layer, so we have something
to paint on top of. Then I'll select the clone
brush. It's right over here. It looks like a stamp. Go ahead and select that. Then we can go up here's the context toolbar and change it to current
layer and below. Now we're ready to
use the clone brush. I'm just going to make my
brush a little bit larger. Then I'm going to sample an
area that I want to clone. To do this, hold
down Alt or Option. Your cursor will change into
a crosshairs icon like this. Then you can just click right where you want to sample from. You can see this crosshair
will be left behind. As I paint, you can see that
crosshair actually moves, showing you what
you're sampling from. I can continue to do this
as I move over here. You can see this frog
starts to appear. I can click and drag to
paint to reveal that. I can continue this all the way across cloning all
of the animals. These animals have
been painted on a fully separate pixel layer, and you can see this if I
turn off the background. This is completely separate
from our original. Now, this is a pretty
simple example of using the clone brush, but we could actually be more precise with our cloning
if we wanted to. I'm going to zoom in
here and I'm going to hold down Alt or Option to
sample the tail of this zebra. Then I can clone this on any other animal to
give it a zebra tail. But first, I need to make sure
I'm on a new pixel layer. Then I can go ahead and click and drag to
paint this tail on. Now, it looks like we've
sampled a bit too much. We actually have some zebra
stripes on our elephant now. To get rid of those, we
can do this super easily. Just come over here and
select the eraser tool. Then you can just erase the
parts that you don't want. I'll just increase the flow, and then I can come
right in here. Remove all of those
zebra stripes. Then, since this is a separate
layer all on its own, I could also use the move
tool to reposition it. We can move it a little
higher, a little lower. We can place it
wherever we want. I think I'll make this
a little bit larger. That was a funny example. I just want to show
you one more thing you can do with the clone brush. This time, I'm going to
add a new pixel layer, and then with the
clone brush selected, I'm just going to sample
any of the animals. I'll hold Alt or Option
and I'll sample the zebra, and I'll paint it
right over here. Then I'll sample the frog, I'll do option, and I'll click, and I'll put him right here. Next, why don't we do the bird? I went a little too close
there. They're overlapping now. Maybe I'll undo that and place
it a little farther away. Using the clone brush, we can place these animals
wherever we want. We can put them on as many
separate layers as we want, and then we can
move them around. Now you know the basics
of the clone brush. I recommend that you continue to practice cloning some
of the animals here. Then when you feel comfortable
using the clone brush, you can move on to the next
lessons where we'll use the clone brush to clean
up a series of photos.
25. Cloning Edges: In this video, we'll learn
about cloning edges. But what does this mean? Well, when you're
cleaning up a photo, you're often going to start with the painting brush since
it's super easy to use. But one thing that the painting
brush really struggles with is the edges of
people and objects. But luckily, we can use the clone brush to
clean up these edges. Now, in this photo, I just want to remove this
part of the mural. It's sticking straight out from her head and it just
looks a little strange. I'm going to add a
new pixel layer, and I'm just going
to start by using the end painting brush
to remove what I can. Go right down here
to these tools, I'll click on this little
triangle to open them up and I'll select the
en painting brush. I'll change it to
current layer and below. Now I'm just going to go over this area with the end painting
brush to see how it does. I think it did a pretty
good job up here, but then it starts to look
brown and smudgy in this area. I'm going to grab
the eraser tool and with a little bit
of a larger brush, I'm just going to erase
over those smudgy areas. We still got most of it gone, and that looks pretty good. But I'm just going to use the clone brush to
finish this off. I'll add another pixel layer. I'll select the clone brush. Then I'll change it to
current layer and below. Now I can hold down Alt or option to sample a
good part of the wall. With a little bit
of a larger brush, I'm just going to go right in here and I'll remove what I can. I like to sample
different areas as I go by holding Alt or
option and clicking. Then cleaning up like this. This just makes it so the wall doesn't look quite so repeated. For example, if I take this crack and paint
it right here, it will be strange that there's two very similar cracks
right next to each other. This looks pretty
good, but we still have a little bit of
white right here. I'll hold alt or option and
I'll sample right over here. Then with a smaller brush, I'll just paint very carefully right along the
edge of her hair. All right. I think that
looks pretty good. I'm just going to zoom
out a little bit. You can see this. With both
of these layers selected, here's the before and after. I think I can still
see a little bit of strangeness on
the wall behind her, even though the
white paint is gone. I'm going to hold alt or option and I'll sample another
part of the wall. Then with a larger brush, I'm just going to smooth out these edges just a little bit, just going to tap on
them a little bit, and I think that looks a little better just cleaning
up that texture. With that, we've easily
used the clone brush and the painting brush to
clean up this image. I think this looks
a lot better and the edge of her hair is
very clean and precise. Now that you know how to
clean up tricky edges. In the next video, we're
going to learn how to clone clothing
to clean it up.
26. Cloning Clothing: In this video, we'll learn how to use the clone
brush on clothing. For this photo, I want to remove the logo on
this man's shirt. Just like in the last video, we're going to start off
with the painting brush and then we'll use the clone
brush to clean up our work. I'll just zoom in here. First, I need to add
a new pixel layer. I'll select the painting brush. Then I'll change it to
current layer and below. Using this brush, I'm
just going to paint over this entire area to
remove the logo. I think that did a
pretty good job. Here's the before and after. But you can see that this crease right here has
become interrupted. There's just a
strange break in it. There's also a new crease
forming right here. The texture just
looks a little off. But we can clean this up with
the clone brush super easy. Let's add a new pixel layer. Then I'm going to
select the clone brush and I'll change it to
current layer and below. Now, I'm just going to start on the very top of this crease. I'll hold Alt or Option,
and then I'll sample that. Then I'll drag it straight
down and I'll begin cloning. Trying to get it close
to meeting that point. Then I'm going to
sample from down here. I hold alt or option to do that. I'll just bring it up
so these points meet. Wow, that looks really nice. By starting from the
top skinnier part and the bottom wider part, we were able to match
them up pretty well. You can see what this looks
like before and after. Now I think I'm going to take
care of this extra crease. I'll just sample an area right next to it with t or option. Then I'll just da
to paint that away. I think that looks
a little better. I think another area, another crease has
appeared right here. I'm just going to sample
an area right next to it. Then again, I'll just click click a few times
to remove that. This is looking pretty good. Here's what we started with
and here's where we are. I think this area looks a
little strange as well. I'll just sample one
of these lighter areas and I'll cover this dark
area up a little bit. I think this looks pretty good. Just checking in with our work. I'd say that looks really nice. Here's what we had before, and here's the after
with the logo removed. Cloning clothing to remove
logos can sometimes be tricky, but with a little bit of time in patience and the clone
brush, you can do it. In the next video, we're going to do a little bit trickier of an example as we try
to remove power lines.
27. Removing Power Lines: In this video,
we'll learn how to remove power lines from a photo. Right off the bat, we can see we have quite a few
power lines here. Let's go ahead and start
with a pixel layer, and we'll just use the in
painting brush to begin. I'll change it to
current layer and below. Let's see if we can remove
this area just with a large pass like this.
Let's see how that does. Since the blue sky background
was pretty simple, it actually looks like it
did a pretty good job. I'll just paint over that area where it looks a little smudgy. You can see that
before and after, I don't think we need
to use the clone brush for that. That
looks really nice. Next, I'm going
to do these ones. I think I'll just try
to do the same thing. That did pretty good,
but it actually remembered that this line was here and just duplicated that. That's no good. I'm going to use a smaller brush and I'll just paint carefully to
remove this one. Nice, and then I'll do the
same thing with this one. Those lines were simple enough. They were on such a
clean background. It wasn't too tricky. But once you get into
this power line crossing th the couple and these
buildings back here, this is where things
get complicated. I'll start by just removing a small part. Let's
see how this does. We'll use a small brush and just paint right
through there. Now, that looks pretty smudgy. I'll undo that. We'll
just come back with the clone brush to fix that
up. Let's try this part. That did pretty good. I think going through the
buildings is a bad idea. I'm just going to stick to painting right over
the sky like that. We'll just stay right in
between the buildings. That did. Let's go
back over that. Now we have this big
area right here. I'll try to paint
over all that I can like that. That
did pretty good. Now we have these
skinny lines going over all of these different
things. Let's see. I think this background is
a little simpler down here, so I'll just paint across here, and that did good. I'll do the same with this one. Then we have some
trickier areas. For the trickier areas, I think I'm just going to
go in with the clone brush. I think I'll leave it at that. Now starting back over here. I'm going to add another
pixel layer and on this one, we'll use the clone
brush. I'll select that. I'll change it to a
current layer and below, and then we can get
started cloning this area. I'm just going to
decrease my brush size, and then I'll sample the sky. I'll hold Alt or
Option and I'll sample up there. Then we'll paint that. And that. Now, we have
some antenna back here. I'm going to hold Alt or Option to sample
this area down here. Then I'm just going to
bring it straight up, and I'll click a few
times to fill that in. Then for this area
close to her hat, I'll just sample, and then
with a very small brush, I'll just finish
cleaning this up. That looks really
good. Here's the before and after of that. If you didn't like the look
of this line right here, you could also just
fully remove it. I'll go ahead and do
that so you can see. There's no problem removing extra things if you don't
like how they look. Continuing on over here, I'm just going to
remove this area. I'll hold alt or
option to sample the sky and with a
very small brush, I'm just going to carefully
go right along the edge here. Now, it looks like this color is actually a little different. I'm going to have to
sample closer to the area, and then I'll paint just to
blend those colors together. That looks pretty
good. Ops, I'll press command or Control Z to
undo anything I don't like. Remember that you
can also erase using the eraser tool if you really don't like
how an area looks. Now, as I'm painting here, there are some different
hues going on in the sky. I think it would be a good
idea to lower the flow of my brush just to blend the
areas better a little bit. You'll have to paint over
the area multiple times, but that might be better. So the colors can blend nicely. Last for this last
black spot right here. I'm just going to
sample the green of the building and I'll
cover it up like that. I don't know if this is exactly what the
building looks like, but at least now we can't
see the power line anymore. I'm just going to
sample on each side and bring it in like this. That looks pretty good. I'm just going to use a larger brush and I'm just going to dab right here where it looks a little smudgy, and you can see the
before and after of that. I might have gone too narrow
with this green area. I think I'm just going
to come right in here and I'll just make
this a little wider. There we go. I'm sampling
lots of areas as I go. Just to blend things better. That looks really good. Let's move on to
this other building. Again, we'll start with the sky. I'll sample out there and
then I'll just bring this in. Then for this yellow area, I'll sample that color
with a very small brush, I'll just go right
underneath it and click very gently to
fill in that area. I'll go up a little
bit and sample that color and bring that in. I'll sample a little
closer and bring this in. The more areas you
can sample from, the better it'll
blend. All right. I'll sample this lighter color to fill in this spot right here. I'll just sample from
this side and bring it in and then this side
and bring it in. This edge is a little
bit tricky right here. Then I'll sample the sky. I'm going to sample
this bottom edge right here and I'm just
going to paint it over. I'll sample it again
and paint it over. Just trying to fill this in and make it look a little better. I think that looks pretty good, and we are going
to be zoomed back. I think that looks really nice. This area looks a little smudgy, so I'm just going to
sample the sky and with a larger brush, ops. Make sure that layer
is still selected. With a larger brush,
I'm just going to paint over that to smooth that out. I'm just going to continue this process for these other ones. Sampling with alter option and filling in all
of these areas. Clonin can definitely
take a while. It takes a lot of patients to continually sample
and then paint. But I think it's a really
satisfying thing to do. It really helps to
improve your photos. It's actually not too hard. It's just a little
time consuming. I just finished doing
my cloning and now you can see that
before and after. This looks so much better having the sky nice and clear and open, and now you know how to do
a very complicated project, removing something that goes right on top of other objects. That's really hard to do. Now that you know
how to do that. In the next few videos, we're going to take a look
at making cloned areas.
28. Masking Cloned Areas: In this video, we'll
learn how to add a mask to a cloned pixel layer. In this picture, I want to clean up this white space
right down here, this white paint
that's on the ground. It's in a little bit
of a tricky area though because her legs
are right in front of it. We'll have quite a few
edges that we need to deal with as we're
painting this away. To start, I'm just going
to add a new pixel layer. Then let's start with the in painting brush to
see how this does. I'll put it on current
layer and below, and with a larger brush. I can go ahead and get
started painting this away. That did, but the pattern seems to be repeating
a little bit. You can see this right here
over and over and over. The edge over here
looks a little strange. I'm just going to undo that
with command or Control Z. Instead, I think I'm just going to use the clone
brush for this one. I'll get the clone brush out, and then I'll change it to
current layer and below. Now I'm just going to
begin by holding alt or option in sampling
an area over here. Then with a larger brush, I'm just going to begin
painting this away. Now, if I keep pressing down and just painting
all the way across, you'll see that we'll start to sample the white
rectangle again. That's why it's important to sample multiple points as you go before that happens. If I continue, even more, you're going to start to see
the white rectangle again, so I'm just going to come over here and sample
a little more. I'm not going to worry too
much about the edges yet. We'll get to that. Right now, I just want to erase
all of these parts so that this part of the
sidewalk looks nice and clean. We no longer see any
white paint over there and this edge
looks pretty good. I'm going to continue this in this section and in this one. I think this looks pretty good. Here's the before
and after of that. This area still
looks a little bit too light compared to
the sidewalk around it. I think I'll just go through one more time and just add a little bit more of a
darker sidewalk to that. I can see repetition right here. I'm just going to go in with a different section of
sidewalk and paint over that. I think that's
looking pretty good. Now the white paint is gone, but you can see that we've
just painted a right over her legs. That's
not very good. Now there are a few
ways you can fix this. One is just to go in with the eraser tool and
erase the edges here. But that's a little
bit destructive. If we want to do this
in a better way, we can apply a mask
to this layer, and then we can paint with
black and white paint to add or to bring her
legs back into this. I'm going to add a mask. Then I'm going to invert it
so that it's not visible. I'll press command or
control I to do that. Other way you could
do this is to go to mask and then just
apply an empty mask. This will automatically
apply a black mask. That's a little bit quicker if you want
to do it that way. Now with this black mask, I'm going to grab the
paint brush tool. Then I'm going to paint
in white paint over her legs with a much
smaller brush. There we go. Now, since this mask is black, that means that we'll
be painting to hide the white sidewalk and we'll be able to easily see
where her legs are. I can take a super small brush here and just paint
right along the edge of her legs to remove that white part without
going over her legs. This takes a little bit
of careful painting. Take your time with it. In my opinion, it always looks a little bit
better to remove a little bit extra leg than
to leave extra white paint. I'm just going to remove
a little bit extra. Then I'll go through and remove the rest of the white
paint on this side. I'm going to continue this
in this section next. Now, the great thing about
this being a mask instead of erasing is if I erase
too much like that, I can just press x on my keyboard and I can
bring her leg back. It's a lot less
destructive this way. I really like doing it this way rather than using
the eraser tool. I just find that
it gives you a lot more control over
what you're painting. All right, I think this
looks a lot better, and that was a pretty
easy way to remove that. Without it being destructive
and using the eraser tool. Without looking a lot
better, in the next video, we're going to learn how to take our cloned area and move
it to a new location.
29. Moving Cloned Areas: Let's learn how to move
around our cloned areas. In this photo. What I want to do is I want to cover
up this trash can. Now, it's in a
pretty tricky spot. We have a patterned brick
wall right behind it. I'll need to bring some
bricks over to cover this up. Then the rest of this,
I'll just sample over this white concrete
texture to cover that up and a little bit of
cleaning up on this edge here. Let's go ahead and get started
with a new pixel layer. I'll select the clone brush. Then I'll change it
to current layer and below and we can go
ahead and get started. Now, what I want
to do is I want to clone this better part
of the wall right here. It has a very large section of bricks that we
can sample from, and then I want to move it
just right on top of here. Now to more easily
see what I'm doing, I'm first going to sample with alt or option right over here. Then down here,
I'm just going to begin painting my
little brick patch. That way, I can easily
see where my bricks are. I'm actually looking
at the cursor up above where I'm painting to
draw this rectangle, so I can make sure that I'm only including bricks in this. Once the outline is
done, I can just make my brush larger and then I
can fill in the rest here. I think this looks really good. Now I'm going to
grab the move tool, and since this is a
separate pixel layer, I can easily just move this
right where I want it. I'm going to try to
line up the grout lines of the brick right here so
that they match up nicely. I think I'll actually
lower it a little bit. I just want to make sure
that this entire wall, this entire seam right here
is covered with bricks, and we can just remove the
extra that we don't need. I'll just lower this down until the grout lines
match up like that. Since we are using
the move tool, I could also resize this
and make this a little bit larger if I needed
to, and I think I do. Now it looks like it
lines up down here. And it lines up up here. That's perfect. We don't
need all of these bricks. We actually only need bricks where we're covering
up the trash can. What I'm going to do is apply an empty mask
to this layer. Now we automatically
have a black mask. Then I'll just grab the
paint brush tool and I'll paint in paint
over the trash can. I like preserving as much of the original
picture as I can. That's why I like using a
mask and just painting what I need rather than keeping that
entire rectangle of bricks. This also helps me to smooth out the bricks a
little bit better so that they blend together instead of just having a big
blocky rectangle, taking up that whole area. All right. That
looks pretty good. Here's the before
and after of that. Now, this area up here looks
a little strange to me. I'm wondering if I can erase that part and it looks like that's the
trash can right there. I can't really do
anything about that. But now that that line's gone, I think this looks a lot better. Here's the before and after. In the process of
painting that in, I painted a little too over
our model shoulder here. I'm just going to paint in black paint to remove
this from our mask. Then on the other side,
I'm just going to paint in white paint to make sure
this doesn't look too fuzzy. That looks pretty good. Now that we've taken care of the
top part of the trash can. All we need to do is sample from this area and bring it
over to cover the trash can. I'm actually going to use a new pixel layer though so that we keep this
brick layer separate. Then I'll grab the clone brush and we can begin to
paint away this. I'll hold alt or
option to sample, and then I'll just
paint over the area. I'm just going to
paint away the bulk of the trash can to start. Then I'll go back and
clean up the edges like the very top edge
with the brick wall there. Now we're having a
bit of a tricky area. You can see that
behind the trash can, we have a darker
shadowy concrete. I'm just going to
use a smaller brush and I'll sample over that area
to start to bring it over. I want to fill in this patch
of texture right here. I'm not sure what
that is, but I'm just going to go over that
with this gray color. I'm just sampling and
painting as I go, trying to get that
all covered up. Now that the trash
can is all removed, I'm just going to
blend these two areas and I'll do that
with a low flow. I'm going to take
this lighter color and with a large brush. I'm just going to
gently paint it over the area just to
smooth that out. Oops, I sampled some
brick. Let me do that. Oops. This is why
it's a good idea to sample lots of areas or you'll start to sample
a little too much. I'm just going right
up against our model here and just dabbing
that darkness away. I think that looks pretty good. Nice and blended. Next, I'm going to do this top edge
of the bricks right here, and I'm going to do that by
just sampling the very edge, and then bringing
it over like this. I'm going to try to
line it up nicely, and then I can begin painting to bring this edge over
and I'll paint beneath to get this area, and
then I'll bring it up. I'm going to need
to do that again, so I'll resample
that area again, and then I'll start
it again right here. Bringing this over. Sampling right on that line was a really good idea so that we could get that line
nice and crisp. But also, I don't know
if you can see this, but there's a slight highlight and then shadow right here. There's a little bit
of a lip to this. I was able to copy
that over as well. It really looks like a
seamless transition. I want to create the
same seamless transition down here because it looks
a little f right now. You can see that
that's because that's where our trash cans at. I'm going to copy this area and I'm just going
to bring this over. I painted a little bit too much. I'm just going to bring out the eraser and I'll erase that. We didn't add a
mask to this layer, so I'm just going to take a little shortcut
with the eraser tool. Then I'm going to
bring the clone brush out again and I'm
going to get rid of this shadow that was
underneath our trash can. I'll sample a tile over here
and then I'll bring it up. Again, I'll pull
out the eraser tool and I'll just press
E to do that. I'll just clean up the edge
of this bench right here. That looks like a
very harsh line. I'll undo that. Let's just bring the hardness
of this brush down. Then I'll just paint
right over that area. All right, that's
looking pretty good. All right. And with that, we've totally removed
the trash can over that very tricky area. The Bricks were a
pretty tricky area. We're able to blend
that in very nicely. Great work on this project. In the next video, we're
going to finish off this chapter with a
big clean up project.
30. Clean Up Project: In this video, we're going to
put our skills to the test, and we're going to remove
a person from a photo. Now, for this
example, we're going to remove this girl
from the photo. I know that's a little sad
to do in a wedding picture, but maybe they're not friends
anymore or something. I don't know what
their story is, but we're going to
remove this girl. Now, something tells me that the painting brush
isn't going to cut it. This background is
pretty complicated. Why don't we jump
right into cloning? I'll add a new pixel layer, I'll grab the clone brush, and then I'll change it to
current layer and below, and then we can get
started with this. I'm going to use a
low flow as I go here just so I can
blend things together. But maybe we can go a little
bit higher than this. There we go. I hold alt or
option to sample an area, and then I'll bring it over. Now, we don't want
too much repetition with the tree branches. I'm mostly going to stick
to sampling the leaves. I think it'll just
be a little less obvious if the leaf
pattern repeats. I'll just paint this all a way. And I'm going in from
both directions. That way they blend
together nicely. Now, for this branch right here, this is a tricky, but I'm just going to sample
an area right beneath it. With a smaller brush,
I'm going to go in and try to
rebuild that branch. I'll sample again and do that again. That looks pretty good. I'll just put some leaves right next to it to clean up the edge. Very nice. I'm going to continue this all through the tree area. Now, as I'm painting, I
might get my painting a little bit over this girl
right here and that's okay. We're going to go back
and mask this layer so that we can clean that
up if that needs to happen. I just finished with the tree. I think this looks pretty good. Now I want to clean up
this edge right here. I'm going to sample starting
from right over here, and I'll just try to match
this up and paint it across. That didn't match very well, so I'm going to that sampling from right there,
trying to match that. That looks better. I'll just
paint this across and do. I'll do that one more time
just to finish off this area. Trying to match that
up. That didn't work. Sometimes it's a
little hard to see, but I think that
looks a lot better. Painting all the way down
through the grass now. I'm going to try to
paint horizontally, so you can see the lines here. We have a yellow patch, I'll continue that across,
and then down here, it gets darker, so I'll
continue that dark section across just to make sure that this looks nice
and consistent. I'm going to bring
the painting right over this girl's dress, and now you can see our model
has been fully removed. I don't really like how
this edge looks though. I'm going to come right back in here and I'll try to even
this out a little bit better. I think that looks at better. Trial and error a b there. But I think that
looks pretty nice. With that girl removed, now we can add an
empty mask to this. Then I'm going to
paint in white paint to remove this girl again. I'm going to bring my flow
all the way up to start, and then I'm going to use a bigger paint brush to
fully remove this girl. But I need to make sure
I'm painting in white. Now that I finished
painting, I'm just going to switch my color to
black and I'm going to paint on the very
edge of this girl to make sure she hasn't
disappeared at all. I think this looks really good, but we're not quite done. Now that we removed that girl, you might notice that
we have a bit of a shadow on our girl
right over here. This is from where the girl was standing and casting
a shadow onto her. To make this look even better, we're going to add
a little bit of brightness just to the
edge of this girl's dress. I'll do that with a brightness and contrast adjustment layer. I'll brighten this
up quite a bit. Then I'll invert this with
command or control I. Now using my paintbrush, I'm just going to
paint in white with a low flow to gradually add this brightness
to that girl's dress. I think I need an
even lower flow, so I'll just undo that. Since I brightened it so much, we just need to go
very softly with this, gradually adding back
in that brightness. With that painting done, now you can see that before and after, that just looks a
little bit better. Now that that
shadow isn't there. Now, as a final step, we're going to crop
this photo in so it doesn't have this
awkward blank space. I'll grab the crop tool, and then we can
just bring that in so it's even on both sides. Then I'll press apply. Just like that, we've totally
cleaned up this photo. I'm sorry that girl needed to be removed like that.
That was pretty harsh. But now, if you ever
have a situation where you need to remove
a person, you can do it. Great work on this project. You now know how to clone
away just about anything. Now that we're done with this
chapter, in the next one, we're going to learn
the most common ways to retouch your photos. O.
31. Retouching Skills: This chapter, we'll learn
about the art of retouching. There are so many
ways to retouch your images and in this chapter, we'll learn about
the most common ways to improve your photos. I know you're going to learn
a lot in these lessons, so let's get started.
32. Removing Shadows: In this video, we'll learn
how to remove shadows. As you can see, in this picture, our model is fully
covered in shadows. Our goal is to brighten her up. To do this, we'll use a
curves and an HSL adjustment. Let's go ahead and get started with our curves adjustment. I'll press command or Control M. Then I'm going to brighten
this up quite a ways. Then I'm going to invert this adjustment with
command or Control I. Then I'm going to use
the brush tool to paint on this black
mask in white. I want to flow
fully up for this. I'll just grab my paintbrush and white paint and
then I'll begin. The reason why I decided
to raise the brightness so far is because I want to be able to see
where I'm painting. I don't want to paint outside
of the lines in this case. If we paint outside of
the edges of our model, then we'll have a halo of
light surrounding our model, and we definitely
don't want that. By raising this up so far, it just makes it a lot
easier to avoid that. One strategy to make sure
that you fully cover your model is to first paint and outline just
around the edges, and then you can hold Alt or Option and click on this mask. Then you can simply fill
in the rest of it to make sure she's fully
covered in this white paint. Our model is fully covered. Now that that's done, I think I want to refine my
curves a little bit. I'll just click on this
curves adjustment. Then I want to make it so our highlights stay
nice and bright. But maybe our shadows aren't
affected quite as much. I like the shadows to still
look nice and deep and dark. That's a good way to do that.
Now that I've done that, this contrast looks a
little bit extreme. These highlights
are pretty bright. I'm just going to go into
blend ranges and I'll lower the light right node over here just so our highlights are affected a little bit less. I think I'll bring it
down to about there. Now we can see that
before and after. O model is definitely
a lot brighter now. But sometimes when you
brighten up a photo, the colors can change a bit, and in this case, I think the colors are looking
a little bit muted. Let's try to fix this. I want the colors to be improved exactly where I
painted on this mask. I'm going to hold down
command or control, and I'm just going to click on the mask to load
it as a selection. Then I'll press command or control to apply
an HSL adjustment, and then I can begin to
affect these colors. I definitely know
I want to increase the saturation to bring
these colors out more. Then we can adjust the
hue slider slightly. We can bring it more toward green to bring out
some of the redness, or we could increase
the redness. I'll double click to reset. I think in this case, there's quite a bit of redness going on. I'm just going to bring
it slightly over to the left side just
to reduce that. I'll D select with command
or Control D. Now you can see the before and after
of the HSL adjustment. It's very subtle,
but I think this makes the colors
look a lot better. I'll just select
both of my layers, and now you can
see the before and after of bringing our
model out of the shadows. Now, you know, you can
use curves, blend ranges, and an HSL adjustment to easily brighten up the
shadows in your photos.
33. Dodging & Burning: Let's learn how to
dodge and burn. Dodging and burning are
just fancy words that photographers use for brightening
and darkening a photo. When you're burning a photo, that means you're
making it darker. Just imagine a burnt piece of
food and how that's darker. On the other hand, dodging is
making the photo brighter. But the terms aren't
really what's important. What is important is being able to control your
photos lighting. In this video, we're going to learn four different
lighting strategies. We're going to learn how to darken areas that
are too bright. We'll also learn how to brighten areas that look too dark. Then we'll learn how to make the highlights and
the shadows even brighter and darker in those areas we really
want to stand out. To start, I want to darken
areas that are too bright. You can see in this photo, the sky is super bright, and it almost looks a
little distracting. The star of our show in this photo really is this
beautiful waterfall. I want the background to have less contrast so that less
attention is drawn to it. To start darkening the sky, I'll press command or Control M. I'm just going
to darken this. That looks pretty good. I like how you can see
the clouds better. I'll close out of
this and then I'll invert this layer with
command or Control I. Then I'll use the paint
brush and we'll paint in white paint over the sky
to reveal this darkness. Again, I have 100% flow. I think that's perfect for this. I'm just going to increase my paint brush and I can
begin painting this. As you can see, the sky
looks so much better. But as I was painting, I did get some of my painting on these dark mountains here, making them even darker. Lucky for us, we don't need to go back and clean
up our painting. Instead, we can use magical
blend ranges to fix this. I'll open up blend
ranges and in this case, I want to remove this from
the dark parts of my photo. I'll go to the shadow node
and I'll bring this down. All right, that's
perfect. Now you can see that this adjustment
is only affecting the bright highlight that
we have in the sky and it's no longer affecting
the shadowy mountain areas. Now that we've darkened
a bright area. Let's brighten up a dark area. In this case, I
want to brighten up these mountains just so they
look less deep and dark. I'm going to go ahead
and add a bright curve, Command or Control M.
I'll brighten this up. That looks a lot better. I'll close out of this and I'll invert this with
Command or Control. Then with my paint
brush, I'll just paint in white over this area. I'll paint it on the beach here, and then I'll bring it up
onto the mountain. All right. Now I also
accidentally painted a little bit too much on the
sky there, but that's okay. I'm going to use blend ranges
again. I'll open that up. I'm going to remove
this from any of the highlights. I'll
bring this down. I think I'll bring it over
a little bit more just so we're really only
targeting the shadows. Now you can see
before and after, we're only brightening
the dark area, and you can see both of
these before and after. We're really just
making these look a little bit more faded and less contrasted to help draw the attention more to
the central feature. Speaking of drawing
more attention. A great way to draw
more attention is to increase contrast. A great way to do
that is to brighten the bright areas and darken the dark areas
just to make them pop. To start, let's brighten the bright areas by
brightening up this waterfall, I'll press command or control. Then I'll make this
nice and bright. I already know that I don't want the supply
to the shadows. I'll just go right
into blend ranges and I'll lower the shadows node. That way they're
not being affected. Then I'm just going to invert this adjustment layer with
command or Control I, I can paint in white
paint to reveal it on only the areas I
want it revealed on. Now, in this case, I want to do a bit more of gradual painting. I'm going to lower my flow just so I can slowly build up
my paint in those areas. With a little bit
of a smaller brush, I'm just going to come right in here and paint on these
highlights to brighten them up. I'm also going to
paint a little bit on these highlights back here. Just bring that
across like that. Now you can see this.
Here's the before and after. They're glowing. It's beautiful. Now
that we've done that. Let's darken the dark parts of the photo to finish this off. I'll press command or control M, and then I'll darken the curve. Once again, we don't want to darken any of the highlights. I'll just go into blend ranges and I'll bring the
highlights no down. Maybe I'll bring it
over a little bit, just to make sure we're really targeting the darkest parts. I'll invert this layer
with command or control I. Then with a nice low flow
like we've been using, I'm just going to paint this on this rock wall over
here to darken it up, as well as this area
right here with the tree. Maybe I'll also paint it
over the stick right here. Now you can see that. Here's
the before and after. By adding this
foreground contrast. I think this really makes the
waterfall stand out better. Now I'm just going
to hold shift, so you can see all
of these layers. Here's the complete
before and after. It looks like it's
a whole new photo. That's such a good change. As you can see, doing dodging and burning like
this can really help you to draw more attention to the
areas where you want it and reduce attention in
background elements where you don't want the focus. Great work. You're now
a master of lighting. For your convenience, I've added this little cheat sheet to
the chapters Exercise files. Using this sheet, you can quickly refer to
the steps you need to brighten or darken shadows and highlights
in your photos. All you need to do is add a curves adjustment
to brighten or darken the photo and then use blend ranges to target the
area you want to affect. Out of these four things,
the most common thing you'll definitely do is number
one, brightening shadows. This is what we did
to the trees in this video and the woman
in the last video. Because this is the most
common thing that you'll do, I added the steps
for branding shadows to the very top of the list. By using all of these steps, you have everything you need to totally control the
light and your photos.
34. Extending Backgrounds: In this video, we'll learn how to extend a photos background. Let's say I have this photo, but I want it to be
a little bit longer. To make it a longer image, I'm going to bring
out the crop tool. You could just crop it down to get the
dimensions you want. But instead, I'm going to
crop outward like this. Sometimes you just need a little bit more space
in your photos. With that crop out, I'm
going to press apply. Now you can see we have
these blank areas here that need to be
filled in to make this look more realistic. To do this, I'm going to start by using a super easy method. I'm just going to
come over here and grab the Marquee selection tool. Then I'll click
and drag to create a selection just up until you're touching the subject and
then back off a little. We only want the wall
in this selection. Then with this background
layer still selected, I'll press command or Control J, which will create a duplicate
copy of this layer, but only keep what's
in our selection. I'll press command or
Control D to deselect. Now I can take this layer, select the move tool, and
then I can stretch it out. That looks pretty good. Let's
do that over here as well. I'll make sure I have the
background layer selected. I'll bring out my Marquee tool, and then I'll make a selection until we're touching
our subject, and then I'll back off a little. Again, make sure that your
background layer is selected. That way, the selection is
selecting directly from here. Then press command or Control
J to duplicate the layer. I'll press command or
Control D to deselect. Then we can get out our
tool and stretch this out. You can see this
looks pretty good. I'll select both
of these layers. You can see the
before and after. Stretching is a
pretty good strategy, but it won't look good if you
stretch this out too much. Let me just show you this. I'll get out the crop tool
and I'll bring this out. Then I'll press apply. If I
stretch this one even more. You can see the texture
starts to look pretty bad. It's pretty obvious
that this has been stretched or
warped in some way. This first technique
really only works. If you only want to stretch
out your sides a little bit. But if you want to extend
them even further, we're going to need to
use the clone brush to copy the background
and stretch it out. I'm just going to start by deleting both of these
wall extensions. Then I'll select the crop tool and let's just bring this out in even amount. There we go. I'll press a fly, and now
we can fill in these areas. I'll start with a
brand new pixel layer so we have something
to paint on. Then I'll grab the
clone brush tool. I'll change it to
current layer end below. Then we can get started
copying this over here and copying this area over here
to help this blend better, I'm going to be painting
with a lower flow. Then we can get started
by holding down Alt or Option and
clicking to sample, and then we can begin
to extend this wall. I think I'll sample
this darker area just to make sure
this blends nicely. Remember to sample
multiple areas as you go. This will just help things to
blend a little bit better. I really just keep my
finger hovered over alt or option because I press it down so much as I'm
doing this process. Now, because I'm
using a low flow, the texture can look a little
bit muddy in some areas. If that's happening to you, I just suggest you raise the flow and then
you can continue to bring the texture over
just to clean up those areas. I think that looks really good. Let's do the other side now. I'm going to sample right
in this crack right here, and then I'll bring it over
so that the crack is met. I want this to match up nice and then I'll
continue to bring it over. I'm just going to
do that on each of these cracks, trying
to line them up. That looks good, and we'll
do this one last one. I'll start it over here and
bring it over. Not bad. Once you have those main cracks, I think it's okay to just sample wherever and fill in the rest. A just like that, I filled in both sides of the
wall using the clone brush. Here's the before and after. The first method that we used is great when you just
need a small extension, or you have a simple background. I use this method all the time. But when you need
a large extension, or you have a
trickier background, the clone brush
is your best bet.
35. Blurring Backgrounds: This video, we'll learn how to blur the background of a photo. The exercise file
that we'll be using already has a blurry background, but you can actually add
a blur to any background. However, to blur backgrounds, you'll need to make
a selection of your subject first starting with a photo that already
has a little bit of a blur makes the
selection process easier, so that's what I'll
be using here. Let's start by making a
selection of our subject. I'll grab the
selection brush tool. Then with a larger brush, I'm just going to click and drag to paint a selection here. Remember you can
always hold down t or Option to remove from
your selection as needed. All right. Once you have
your selection looking good, go ahead and come up
here and press on fine. For this one, I'm just going to paint over the
edges of his hair. And then all press Apply. Right now, we have
our subject selected, but I actually want the
background to be selected. I'm going to teach you
a quick little trick to reverse your selection. To do this, you can
go up to the top, click on Select, and then
press invert Pixel selection. Or if you're a fan of
shortcuts like I am, you can use the shortcut, which is command or Control, Shift, I. I'm just
going to click on this. And now the background
is selected, which you can see by these little marching ants
going around the outside here. With this outer area selected, now we can apply a blur. I'll go to our filters, and I'll apply a gaussian blur. Then I can increase the radius. Now, keep in mind that when you increase the radius of a
whole photo like this, you're going to get some
transparent edges going on. I suggest checking on
preserve Alpha to fix that. Now I'll just press command
or Control D to D select. You can see we have even more of a blur on
our background. Here's the before and after. Now, this looks okay, but it could be even better.
Let me show you why. We have a little bit of a
problem as we zoom in here. You can see that
his black shirt is actually bleeding
onto the outside, creating this halo
of black right here. As you look around the rest
of him, you can see this. The colors that he has
are bleeding outward. This makes it look a
little fuzzy and strange, but there's a better
way to do this. This is good for very quick
blurs that you want to add. But with this better way, you're going to be
able to completely eliminate this halo of bleeding. For this better method, I'm just going to start
fully from scratch. I'll delete this gaussian blur. And now, we'll start
from square one. The first step to this method is actually duplicating
your background layer. I'll press command or
control J to do that. We'll need two layers for this because what
we're planning on doing is actually removing the subject from the background. We'll need one layer that
has just our model on it, and the other layer
with the model removed, just to keep these
pieces separate. With this upper layer selected, I'm going to select our model. Using the selection brush tool, I'm just going to quickly
make my selection again and I'll refine it
just as we did before. Now I'm going to add
a mask to this layer, which will remove the
background from this layer. I'll press command or control D. Now you can see that he's fully on his
own on this top layer. However, this wasn't
a perfect selection. There's some bleeding
going on here. I'm just going to
quickly clean that up, I'll grab the paint brush, and I'll quickly paint
in black to remove these areas. All right. Now we have these
two separate layers. But if I turn off
the model layer, you can see that
this bottom layer still has the model on it, and I want to remove
him from this one. To do that, I'm going to load
this mask as a selection. I'll hold command or control,
and I'll click on that. Then I want to
find a way that we could make the selection
slightly larger. I just want to make sure that our model is totally included. I don't want any of his black
shirt to be left behind. A super easy way to
expand your selection by just a few pixels is by going to the top of
the screen to select, and then down to
where it says shrink. Or if you want to, you could use the shortcut command
or Control B. With this, you can
grow your selection, and it will stay the
exact same shape, or you can shrink
your selection. In this case, I want it to grow, but I don't want it
to grow too much. I think I'll just type in 20. You can see now his
shirt is fully included. It's just barely hovering around the outside
of our subject, which is perfect.
I'll press apply. Now we can remove
everything inside of our selection to fix
the bleed problem. Make sure you have
the background layer selected and then go up to
the top to where it says, edit, and then paint. This will fill the area with
painting to fully remove it, and I'll just press command or Control D to end my selection. Now, I know this area
looks a little funny. We have an exact copy of these
people right behind him, but don't worry, he'll be
covering them up fully. The main point of this is to reduce the bleed of his T shirt, and I think this is going
to be perfect for that. Now on this layer, I'm just
going to go to our filters, all fly a gaussian blur, and I'll increase
this to blur it. Then I can put our model
right back on top. You can see this blur just
looks so much better. No bleeding, it's nice
and crisp, very nice. And you can see the before
and after adding that blur. Now, the gaussian
blur is pretty good, but I want to show you
another option you have, so I'm just going to
delete this layer. Instead, I'm going to apply the maximum blur. This
blur is really cool. Let me just raise the
radius to show you. It turns everything
in the background into light spots like this. I'll turn on preserve
Alpha and circular so that these squared off
lights turn into boca balls. I think this looks really nice. Here's the before
and after of that. To make this blur
look even nicer, I want to fade in the blur. The closer you are
to the camera, the more things
should be in focus. The ground right here
should be more in focus than the blurry
area back here. To create this look, I'm
going to use my paintbrush. I'm going to paint in a
low flow in black paint, and I'm just going to remove
this front area of blur. With my brush nice and large. I'm just going to
paint over this area. Just to remove it a little bit. For some reason, this
maximum blur filter makes everything super bright. To darken this, I'll
press command or control and I'll
darken the background. Now that I've darkened it,
everything in the background looks very red. I
want to fix that. I'll press command or control. I'm just going to
move the hue slider so the background
becomes less red. I think we'll desaturate
it a little bit as well. Now you can see the
before and after of that. I think that just
looks a lot better. I'm just going to hold
down command or control, and I'll select all of the
layers we just worked on. Now you can see a
complete before, and here's the after. Great work on this. Now you know multiple different
techniques you can use to blur the backgrounds
in your photos.
36. Defringing: Let's learn how to
remove the fringing from your photo
selection or mask. Now, if you don't
know what fringing is, that's totally okay. You'll know exactly what I'm talking about in just a minute. But first, we need to
make our selection. I'll grab the selection brush. Then I'm going to make a
selection of the couch, our model, and the floor. Basically everything other than the pink wall that's behind her. Remember to hold alt or option, to remove anything from your selection that
you don't like. In this case, it's important
to remove the pink wall from between her fingers.
Make sure you do that. Next, I'm going to
refine my selection, and I'll just paint right
around the edges of her hair. Then I'll press apply. With our selection made,
I'll just add a mask to it. I'll de select with
command or Control D. Then I'm going to add
a background to this. I'll go to layer,
new fill layer, and I'll just place
this underneath. Now you can see what I'm talking about when I say fringing. It's basically the background
getting left behind in our selection or the background is simply reflecting
onto our selection. You can see that over here
with the couch as well. It's reflecting on
the shiny couch here, and you can see it over here. It reflects on the very edge and on the inside of the couch. Now, depending on your photo, a different defringing technique may work better than another. I'm going to teach you
a few different methods so that you're prepared
for any photo. I'm just going to start right
up here with this area. To remove this fringing
for this first method, I'm simply going to
paint away the fringing. I'll select the mask layer
and my paint brush tool. Then with full flow,
I'm just going to paint right along the
edge to remove it. Now, this is very tedious, and it's pretty tricky to
paint in a straight line. This requires you
to be very careful. There must be a better
way to do this. Well, lucky for us, there is I rest command or
Control Z to undo. Instead, I'm going to take advantage of the selection
that we have over here. I'll hold Command or Control, and I'll click on the mask
to load it as a selection. Then I want to make it so that this pink fringing is no longer included
in our selection. To do that, I'll need to shrink our selection by a few pixels. I'll go up to select, and then down to
grow slash shrink. Because I want to shrink this, I'm going to type in
a negative number. I'll go with negative three. Then to just make
sure our selection looks nice and smooth, I'm going to check on
where it says circular. This just smooths
out any rough edges, and then I'll press apply. Now I can begin painting
to remove and Whoops, it looks like I'm selecting
the inside of this couch. I want to reverse
this selection. I'll press command or
control Z to undo that. Then to invert our selection, I'll press command
or control shift I. Now we should be painting
on the outside edge. You can see this
looks a lot nicer and we're able to easily
remove this fringing. Now I'll just de select
with command or Control D, and you can see how
much better this looks. No more pink fringing. My next method that
I want to show you is desaturating
the fringing. This is perfect for areas
like this where it's reflected onto your subject and you can't just
paint it away. To desaturate this, I'm
going to press command or Control I to bring
up the HSL adjustment. Then I'm going to fully desaturate this by bringing
the saturation down. This is desaturating
our entire image. I'm going to invert this
with command or control I, and then I can paint it in white paint so that it's only on the areas
where I want it. Before I begin painting, I'm also going to make this
a child layer to our model. That way, I'm not
desaturating outside of here, and later if I decide to
change the background color, that'll look pretty strange. I'm just going to desaturate in white paint right on the
areas where I want it. I also noticed there's some pink reflecting on her
sleeve over here, so I'll just get rid of that. As you can see desaturating
is super easy. But I noticed that this couch actually has a bit
of a blue tint. This doesn't match perfectly to have it fully desaturated. I'm going to open up my
HSL adjustment again. I'll increase the saturation
so you can see the color. Then I'm going to
bring it more toward blue so that it matches
the couch better. Now we have more of a blue color and then I'll lower
the saturation. Until this blue color is about as desaturated as the
rest of the couch. You can see that
looks pretty good. Now it just looks like the
couch is reflecting here, and this matches a lot better. You can also see that we have
some fringing over here. This is a different
color than the couch. I think I want to do this
on a separate layer. I'll press command or
control you one more time. I'll make it a child
layer once again. And then all fully desaturate and then invert this layer
with command or control I. Now I can paint over the
area to desaturate it. This time, I think
I'm going to lower the flow so that I can just
layer on this desaturation. Let's see how that looks. I think in this case, this
actually matches the floor. Here's the before and after
of removing that. All right. Now it's time to move
on to Method three, which is using the clone brush. For this method, I'm just
going to zoom into her hair, and we're going to
fix this tricky area. I'm just going to
start by adding a new pixel layer so that I
can clone directly on that. Then I'm going to drag
it beneath everything else so that this is underneath
those two adjustments, and then I can begin cloning. I'll grab the clone brush, I'll change it to
current layer end below, and then I can get started. What I'm going to
do is I'm going to sample inside of her hair. I'll hold Alt or
Option and I'll click. Then I'm just going to paint
it right over the edges. You can see that this is fully taking care of that fringing, will still keeping all of the little hair texture
that we can see. I think this looks really good. Just so you know,
this really only works because this
is a child layer. If I brought it
outside of the group, you can see that what we're
actually doing is we're sampling her hair and bringing
it all around the outside. It looks a little
funny this way. But as a child layer, you can see that this
looks just fine. I definitely suggest using this method if you ever want
to remove french from hair. As one last method, we're simply going to change
the color of the fringing. On her arm right
here, we can see that she has some red
reflecting on her skin. We can take care of this
with an HSL adjustment, so I'll press command or
control you to bring that up. Then let's shift this so
we can see what will help. If I bring it over to the right, this is adding even
more red to her skin. I need to bring it to the
left and actually introduce a little bit of green to
counteract that redness. Then I'll invert this layer with command or control I and I can use the paint brush to
gradually add that to her arm. With a low flow, I'm just
going to paint right on the edge to remove that redness. Now you can see the before, a lot more red, and
here's the after. You can do this all
over your model using as many layers as you need to to remove the
fringing in this way. Using these techniques,
you really can remove fringing from any photo. That's everything you need
to know about fringing. But just for fun, let's finish this video by changing
the wall color. I'm going to close
up the models group. Then I'm going to duplicate this group with
command or Control J. With this lower group here. I'm just going to
delete everything. I'm going to delete the mask and all the adjustment layers, just bringing it all
the way back to normal. I'll turn this off so you can
see this next step better. Using this duplicate copy, I'm actually going to place the fill layer right in between. Then I'm going to change
this fill layers blend mode. I'm going to change it to color. Now, whatever color
this fill layer is, it will directly affect the wall and
everything in between. In order to change this
fill layers color though, you need to have
the move tool out. Then you can change the
color to anything you want. I'll just change it
to a purple color. Then I'll turn the
model back on. She's on her own on this layer, and you can see that now she covers up that purple
version of her. This is a good way to change the wall color because
you can still see the wall texture before with the fill layer just being
white underneath everything, you couldn't see any
of the wall texture or the shadow down here. This is a good way
to adjust that. Now we can change this
to any color we want. We can desaturate it, we can make it a lighter color. Since we took care
of the fringing, just about any of these colors looks right for this photo. Let's take a look
at all of our work. I'm just going to turn all of our fringing layers off so you can see what this
would have looked like. Here's the before of our work, and here's the after. You can see this
fringing would look pretty bad if we
change the wall color, by defringing, this just
looks a lot better. Great work on this video. You now know how to
defringe like a pro.
37. Advanced Skin Retouching: In this video,
we'll learn how to do advanced skin retouching. To get started, I'm going to duplicate this layer with
command or control J. Then using this layer, I'm going to end
paint on top of it to remove some of the main
blemishes that we see here. Because of that,
I'm not going to change it to current
layer and below. I can just keep it set
two current layer. It's pretty simple and easy just to paint directly on
top of the layer. Why don't we always duplicate the photo as we're
doing painting? Well, we usually use
pixel layers for this and pixel layers keep your
file size a lot smaller. They also allow you to move your painting or cloning around, like we did with the brick
wall a few videos ago, and they allow you to
directly erase onto your pixel layer without disturbing your
image underneath it. If that's all true, why did
we just duplicate this photo? Well, that's because
we actually need a photo layer to split into two separate layers for the frequency separation
technique I'm about to show you. It really is just
in this advanced skin retouching case
that I would do this. Looking at our end painting, here's the before and after. This is really nice. I think
it did a really good job, and this is good
for most photos. But for high
resolution close ups that you really want to
take a step further, we'll need to use
frequency separation to really clean this up. I'm just going to
duplicate this layer one more time with
Command or Control J. On this layer, we're going to do our frequency separation. To start, I'm going to go
to the top to filters, and then I'll select
frequency separation. Frequency separation
is basically splitting your layer into
two different layers, one for the texture,
and one for the colors. As I increase the radius
in the dialog box, you can see this even better. This side keeps all of the skins fine
details and texture. You can really see every
little detail here, but it's gray scale. All the colors are
separate over here, and you can see the nice colors
here without any texture. I'm going to lower the
radius just a little bit. I think ten pixels looks
pretty good for this one. You can still see all of the little details and this
side looks nice and blurry. I don't want to bump it up
too much or the blur just gets a little too extreme
for what we're about to do. Ten pixels looks pretty good. I'll set it to that and
then I'll press apply. Over in our layers,
you can see we have a high frequency and
low frequency layer. I'm going to turn off these
two background layers. We'll come back to those later. But for now, I just
want to show you that our high frequency layer looks just like it
did with the slider. You can see all of our
little texture details, while the low frequency
side really is just fuzzy and is showing
us all of the colors. Let's take a closer
look at how this works. I'm going to have
my high frequency and low frequency
layer turned on. Then with a high
frequency layer selected, I'm going to begin to clean
up some of the skin details. I'm going to get out the
clone brush for this. I'm going to leave it
set to current layer. We're directly affecting
the high frequency layer, so there's no need to
change the settings here. Using this high frequency layer, I'm just going to sample an area that has good skin texture, and I'm going to
clone it on top of any areas that have
bumps and blemishes. I'm just going to
do this to clean up the forehead a little bit. There's a few bumps
that were left behind. This should easily clean it up. Now, what I want you to
keep in mind here is that the high frequency layer
is a gray scale layer, which means that
I'm not affecting the colors here,
just the texture. If I sample an area
that's a little bit smoother and has
less skin pores, and then I bring it over
onto this light area, you can see the skin
pores details disappear, but this area is
still nice and light. In fact, you can see
this even better if I just sample her
eye for a minute, and then I bring it over
here onto this pink area. The pink color stays, but you can see all
of the texture of her eye lashes. I'll
just undo that. You can see the opposite if I do clonin on the low
frequency layer. I'm going to sample
this pink area, and then I'm going to
bring it on her forehead. You can see that because low frequency is dealing with color. It's taken that pink color, but with a high
frequency layer on top, you can still see all
of the skin texture. I'll undo that. I'm going to continue to do some cloning with a
high frequency layer. I think I want to reduce some of the texture in
this highlight. I'm going to do that
by taking some of the forehead texture and
just bringing it down here. You can see how
this is softening that highlight area by not having such
intense texture there. I'll also do that
with this area. Another area of texture
would be fine hairs. We all have peach fuzz. This isn't anything
to be ashamed of. But if there's an area where the peach fuzz is really standing out and
you don't like it, you can take skin texture from another area and just paint
over it to remove it. Now that I've cleaned
up the skin's texture, I'm really excited to
show you the next step. But before I do that, I just
want to show you what a difference cloning on the
high frequency layer made. To show you that, I turned
back on this layer, and now you can see
that before and after. This is especially
apparent on the forehead, where she had quite a
bit of texture before. Now I've cleaned that up
just to smooth that out. Now I'm going to select
the low frequency layer and using this layer, we can fix skin discoloration without ruining the texture
that's on top of it. To do this, I'm
actually going to use our paint brush tool. I'm going to sample colors and apply them to areas directly. I'm going to use a
low flow for this. I'll bring it very low. Then to sample colors as I go, I'll hold down Alt or
Option and I'll click. This makes it so the colors directly applied to
our paint brush. Then I can click and drag
to paint this color in. This dark spot over here
I want to take care of, so I'll make sure that
I paint that color over there. That looks a lot better. Here's the before
and after of that. You want to be careful though to stay away from the edges. You can see that I painted
a little too much, and now the hair is
a little too light. I'm going to press command or control Z until I undo that. You really want to avoid
any edges like that. I'll press command or control Z. Now I'm just going to
continue to sample nice colors and apply them
over areas that I want to fix. I think I'll fix some of these dark circle areas by sampling a brighter
color and applying it. There we go. I'll sample this color over here
and bring it down. Trying to avoid any edges like the lips or the
side of her face. I like the blush color here. I think I'll extend
that a little bit. Bringing that rosy color
more onto both cheeks. I think this looks pretty good. I just want to show you
now here's the before and after of painting on
the low frequency layer. We've really even out
the colors on her face. Painting on the low frequency
layer can take a lot of time and patience to get the
colors looking just right. But another way you can do
this is actually applying a blur to the low frequency
layer. I'll select that. I'll go to our filters, I'll apply a blur, and
then I'll increase this. You can see we're applying
a blur to this layer. Then I'll invert this layer
with command or control I. On this black mask,
we can actually paint in white paint to
reveal this blurring. This will smooth out the
skin colors even more. Be careful to avoid the
edges as well with this. You don't want to
blur the edges. I'm using a very low flow, so it's hard for me to see if this is making a difference. I'm just going to increase the flow and I'll do this again. Just blurring the
colors of the skin. With that, I'm just going to
turn this off so you can see the before and after
of blurring the skin. This gives it an even
softer airbrushed look. By painting directly or
using a gaussian blur, either way, we're really
softening the colors on the low frequency and I think
this looks really nice. Now I'm just going to
show you a before and after of all of the frequency
separation we've done. Here's the before,
and here's the after. Then if I turn on
our original photo, you can see that
before and after, with all of our
painting included. Here's a complete
before and after. You definitely won't do
frequency separation on every single photo you edit. But for situations like this
with very extreme close ups, I think this is a
beautiful way to customize your editing and really get all of the fine details
looking just right. Great work on this project and great work in this chapter. Now that we've learned
so much throughout the course, in the next chapter, we're going to bring
everything together and complete three different
practice projects together.
38. Practice Projects: So far in this course, we've learned a lot of
different affinity tools. But if all you wanted
to do was take a regular photo and
make it look as best, where do you even start? That's where this
chapter comes in? In this chapter,
we're going to take three images and we'll edit
them from start to finish. These projects will
bring together everything that we've learned. We'll review curves,
HSL, clonin and more. But more importantly,
we'll see how all of our affinity skills can work
together on a single image. This is the perfect
way for you to solidify everything that
we've been learning. That way, you can
feel totally prepared to make your own photos
look their best. I'm so excited to do
these projects with you, so let's get started.
39. Wedding Couple: For our first project, we'll be editing a photo of
this lovely couple here. But before we jump into editing, I want to go over my
game plan with you. In general, I like to follow six main steps when
editing a photo. Clean up, global lighting,
global coloring, targeted lighting,
targeted coloring, and finishing touches. This means that we'll begin editing by in
painting and cloning. Then we'll move on to fixing the photos overall
lighting and colors. After that, we'll
adjust the lighting and colors of specific areas. Then to finish, we'll
take a look at the photo to see if anything else
could be improved. These six steps are good
guidelines for editing a photo, but they aren't hard
and fast rules. Like any guidelines, they're
just a good place to start. Up first, let's do step
number one, clean up. Does anything in this
photo need to be cleaned up with
painting or cloning? Well, as I'm looking
at it, not really. I don't really see any sticks
or leafs out of place. I think this looks really good. Step one is done. Nice work, everyone. Let's move on to step number
two, global lighting. Looking at this picture, I feel like it's a
little bit too dark. I'm going to add a
curves adjustment, command or Control M. Then I'm going to
bring the lighting up. So that we don't make
the shadows too light. I am going to bring the
shadows down a little bit, just to create a little
bit of an S curve. I think that looks pretty nice. Here's the before and after of that first global
lighting adjustment. Step number three
is global coloring. I'm going to press
command or control, and I'll bring up the HSL
adjustment so that we can boost our colors in
every color channel. Starting with the reds,
I'll just bring this up. And you can see that we're
affecting the skin and his pants and a little
bit of the flowers here. I think that for each
of these colors, my goal will be to bump
up the color saturation, as well as warm the colors up. Let's see how we can do
this with this first one. I'll increase the saturation. I already think that
looks a lot better. But right now the skin is
looking a little bit red. Maybe I'll bring the hue slider
over to the left just to introduce a little bit of yellow to make it
look more golden. Now you can see the
before and after of that. Already off to a great start. Let's do the yellows next. Wow, the yellows are pretty much affecting the grass
and her hair. I will bring the
saturation up for this. Maybe not too far though. Then to warm up all
of these yellows. I think I need to bring
it over to the right. Yes. I'll bring it over to
the right just a little bit. Then for greens,
I'll bring this up. H. It looks like the greens are really just
affecting the shadows. I don't really think those areas should be very saturated. I think I'm going
to desaturate them. Maybe let's warm them
up just a little bit to introduce a
little bit more yellow. Next we have CN. I don't really want
to change that. Those are just random
splotchy areas. I'll double click to reset
that. For the blue channel. Interesting, the blue channel is affecting her
dress and his shirt. Now, her dress and his shirt
really should be white. This is a wedding picture. I think I actually want
to desaturate this. Just to make this more close
to white rather than blue. And last we have Magenta, and I don't think
we need to change anything there, so I'll
double click on that. Here's the before and here's the after of doing all of
our HSL adjustment. I'll select both
of these layers. So we can see the
complete before and after of our global
lighting and colors. We're off to a
really great start. It's time to move on
to the next step, which is targeted lighting. The first thing that I want to target here is our subjects. I want to make
them look a little bit brighter, so
they stand out more. I'll press command or Control M. Using this curve, I'm just going to increase
the brightness here. I'm increasing the brightness
in the highlights area, and then I'm going to make
the shadows meet the line. There's a lot of shadows going on on our subject
with his pants, and I just want to
make sure that those remain unaffected by
this brightening. Because this is
targeted lighting, I need to make sure that I paint this only on the areas
where I want it. I'll invert this layer
with command or control I. Then I'll grab the paint brush. I'll paint in white
with a low flow. I think that looks good. I'll just bring this to
the areas where I want it. I really want her to stand out in her beautiful
white dress. I'll go ahead and
paint over her. I'll paint over her
flowers as well. I'll paint over
him and his shirt I didn't paint on the pants. I just don't think that they need to be brightened
up very much. But now you can see the before
and after that painting, I think that's
about all I want to do with targeted
lighting for now. Let's move on to
targeted coloring. Now, when I think
targeted coloring, my mind first goes to
adding a sunburst. I really like the
look of that effect, and I think this picture
would be perfect for that. You can see there's
a rim of light on the back of his head,
on the side of her. I think the sun is coming
from this direction, and we can add a little
bit of light there. I'm going to grab
the ellipse tool and I'll click and
drag out a circle. I'll grab the gradient tool and I'll drag from the
center outward. Let's make this a
nice orange color. I'll make it a radial gradient. Then I'll change the
bled mode to screen. I'll go to our filters and
I'll apply a gaussian blur. Let's just bump this up. I think this needs to be
bumped up quite a bit more. I'm going to type
in 800 for this. Nice and large blur there. Now I'm going to grab
the move tool so I can adjust where the
circle is positioned. I want this whole corner
to be brightened up, and I'll also overlap it on our subject just a
little bit there. This is looking pretty good. Here's the before and
after of that light burst. Now that I'm done with
that, I think I do want to lower the opacity
just a little bit. Before and after. Now that I've done
that, I think I want to add a little bit more
light to their faces. I'm going to
duplicate this circle with command or controlled J. Then I'll move the
duplicate copy. I'm just going to
rotate it around here and make it a bit smaller, so it's only affecting
their faces. Right now we can see that
before and after of that. I do think I need to lower the opacity quite
a bit on this one. I just want a little bit more
sunshine on their faces. Here's the before and
after both of those. Here, Let me get
out the hand tool so those blue lines go away. Here's the before
and after of that. I'm going to deviate
a little bit from our steps because at this point, since I've added this targeted coloring with the yellow
light right here, I think that this
looks a little bit too bright in some places. I'm going to go back to step four and do some more
targeted lighting here. To start, I'm going to
press command or control, and I want to reduce some
of the brightness here. I'm going to bring
this down to darken. Then I'll press command or
control I to invert this. Using the brush tool, I'm
going to paint in white paint. I need to reset that to
white and a low flow. I'm just going to paint this on areas that have
become too bright now. I think this front
area shouldn't be quite so bright, so
I'll paint it over that. There we go. Everything is about bringing the
focus to them. If one area is way too bright, it'll look pretty strange and it'll take the attention
away from them. I'm also going to paint
this on his pants. I think they should look
a little bit darker. Let me undo that. I think
I need a lower flow here. Then I'll just paint
this over his pants. Over his shirt. I
think that got a little too bright and his face. I also painted over her face. You can see that
before and after, just bringing a
little more contrast back to our subjects here. This looks great. Darkening those shadows
really did look nice. But I think we can make the
shadows actually look even better if we added a little
bit more color to them. Just to contrast the
highlights in the photo. To add color to our shadows, I'm going to use a color
balance adjustment. I'll go to the
shadows total range. Then I'll add a little bit
of color just for fun. Let's see what this looks
like if I add Cyan. I don't think that's
the right look for this photo since we were
trying to warm up everything. Maybe Magenta would look nicer. I do like how that looks. I'll just bring that
over a little bit. And you can see that
before and after of that. Oh, that looks so pretty. I will say though that
sometimes color balance can make your whole photo look
overall a bit darker. I'm just going to quickly add a curves adjustment and I'll bring it up to counteract that. Now I'll just select
both of those layers. You can see the before and after of adding color
to the shadows. I think down here in the grass, this looks a lot better after Getting back into
targeting the coloring, I want to work on all of the
greenery of this photo next. All of these plants
are beautiful, but they are distracting from
the subjects of our image. I think we should just darken
them and desaturate them just a little bit so the
subjects can stand out more. I'll press command or control you to bring up our
HSL adjustment. Then I'm going to go
to the green channel so I can begin to
affect the greens. As I bring the saturation
down, nothing's changing. I'm going to use our picker
in the green channel, and I'm just going
to click right here, so we're affecting the greens. I could see this jumped over and included a lot more yellow. Now I'll bring the
saturation down. Perfect. Now we're affecting
all of those greens. Lowering it all the way is a very arty look if you want
to go in that direction. But I think I'm just
going to bring it down. Just a little bit. I also
wanted to darken this. And I think I'll bring it up just a little
bit to warm up the greens. Now you can see the before and after of just toning down
all of the greenery. I'm taking a step back now and I'm looking at everything
that we've done so far. I think after
everything we've done, the whole photo just looks
a little desaturated. I know I did just reduce quite
a bit of the saturation. But I think that we're at
a good place now where we can add a little more
to the entire photo. I'll press command
or control you. I'm just going to
bring up the of every. Here's the before
and after of that. Okay, I realized that
didn't do anything because I'm in the green
color channel Whoops. I'm going to go to our main
color channel. There we go. That makes more sense. I'm just going to raise
the saturation like that. Now this is pretty intense. I'm going to use blend ranges
to affect this differently. I don't think the shadows look very good when they're
over saturated, I'll bring the shadow
side down and over. So the highlights
in her hair and the highlights of our plants get that little
saturation boost. Right now, here's the before
and here's the after. This looks really good. Now we can finally move on to step number six,
finishing touches. Are there any last small changes that would make this
photo look even better. Well, I think I'd like to have this background be
a bit more blurred. I think that would be
a fun thing to add. I'm going to go to our filters. Then I'm going to
apply a maximum blur. If you remember, this blur
creates boca ball shapes, and I think that
would look really beautiful in the
background of this. I'm just going to raise the radius until we can start
to see those boca balls. Then I'll change it to circular. I'll also turn on
preserve Alpha, so the edges of our photo
don't become transparent. Then I'm going to
press command or control I to invert this. Now I'm just going to
use my paint brush to apply this blur
to the background. I want this to only be applied
to our vineyard back here. I don't want to paint
on these plants that are more in the foreground. I'm going to avoid
those as I paint. You can see we're
getting a bit of a red rim of light
going around here. I don't like how that looks. I'm going to take my
brush and I'm going to paint in black paint
just to remove that. That looks really
nice. Here's the before and after of
adding that blur effect. Beautiful. Now, I just
want to select all of our layers so we can see a
complete before and after. Wow, what a difference. Once you start stacking on
all of these adjustments, you can really see how far
you can take these photos. Before, this really
looks like a picture that you just took
on your cell phone, and now we have a beautiful professional
looking wedding portrait. You probably noticed as we did this project that the six steps really are just guidelines. Things get more complicated in the real world as you add
more and more adjustments on, you want to counteract some of the effects and bring
another adjustment on. It gets a little bit complicated jumping back and forth
between color and light. But I hope that you'll still
find the six steps to be a good starting point when
you first open a photo. Of course, we'll continue to
practice the six steps more in the next videos so that you can really
get the hang of them. Great work, and I'll see
you in the next video.
40. Ocean Rock: In this video, we'll be
editing a photo of the ocean. Now, normally, I like to start with step number one clean up. But for this photo, the lighting and colors
are so bad that I think it'll actually be tricky
to see our cleanup work. Instead of starting
with cleanup, let's do global
lighting and colors, and then we can come
back to do our cleanup. Let's start with Step number
two, global lighting. All press command or Control M. The first thing I want to do is just brighten up this photo. I don't want to
brighten it up to the point where the
shadows look dull. I'm also going to bring down the shadows to create a S curve. This already looks a lot better. Here's the before and
after. Very nice. Next step three, global colors, I'll press command or Control U, and we can go color channel by color channel to
affect these colors. Starting with the reds. I can see we're affecting
the rock and the sand. I think I'm just
going to increase the saturation of these areas. Then I think I'm going to
bring the red out of them just a little bit by bringing the slider
over to the left. For all of these
colors, I'm just trying to boost the color, so it's easier to see them. I think that looks pretty
good. Next for yellow. It's not really
affecting anything, so I'm just going to leave
that one alone, for green. Again, I just won't do
anything with that. Now for Cyan, you can see this is affecting
the ocean and the sky. I think I'm going to bring
up the saturation of this. Then I want to add a little
bit more green to this. I'll bring it over. I think I'll need to raise
it up to do that. You can see that
right now the ocean just looks a little
bit too purply. As I bring this up, we'll
get a little bit more of that green color. Next for blue. This is affecting quite a bit of our sky and ocean as well. I think I'll just
increase the saturation. Then we can play around
with the hue a little bit. I don't really like how it
looks play around with that, so I'll just leave
that one alone. Last, we have magenta. I don't think I want to
change anything there, so I'll leave that one alone. Now you can see before and
after of that HSL adjustment. I think the ocean's
colors look a lot better. Now I'm just going to show you a before and after of both
of these adjustments. Here was our picture
before and here it is now. With both of those layers done, I think it's finally
time to circle back to step number one
and do some cleanup. Now, it's important
that you always put your clean up layers
underneath any adjustments. I'll just select
the background and place my pixel layer
on top of that. If I were to place this
on top of these layers, then I would be sampling
from all of these, and I wouldn't be able to come back and make
adjustments to them. It's a good idea just to keep
this underneath everything. Now I'm going to
begin in painting to get rid of some of the
things in this image. I'll change it to
current layer envelow, and then I'll get
started in painting. Now for this photo,
I think I just want to clear out
everything other than the rock and the ocean because I really want the focus to be on how beautiful this rock is. I'm just going to paint
over just about everything, all of the people, everything on the beach, just to
clear it all out. I just finished with my in painting and now you can see the before and after just cleaning
up all of those areas. Now, I do think I want to go in with the clone brush next, just to fix up some of these
areas that I painted on. I'm going to add another new
pixel layer and on this one, I'll grab the clone brush, and I'll change it to
current layer and below. The main glaring issue I see is right here where
that car door was open. You could see that this tinted the colors to be
more of a blue cyan, while the rest of the beach was this pretty red
yellow toned sand. I need to sample some
of this color of sand and bring it on over just
to make this look better. With that new pixel
layer selected, I'll hold Alt or Option to sample some of the
better colored sand. Then with a nice large brush, I'm just going to bring it over. Wow, that already
looks so much better. Here's the before
and after of that. I'll sample right on this edge here and I'll
bring it over, trying to match that up there. I'll do that one
more time, starting farther back and
bringing it over. That looks so much better
for that car door. Now it's time to look
and see if there's any obvious repetition
points here. That's the problem with cloning. Sometimes you'll get
exact repeats of areas. For example, we have two little bumps in
the waves right here, and then they repeat
again right here. I'm just going to take
some different wave and remove that bump. I'll do it over here as well. We want all of these areas just to look a little bit different. I see this rock
right here repeats as well. I'll just remove that. Go ahead and check in with
your work and make sure that any areas of repetition
are removed. With that done, I'm
just going to go through and make sure
that any other areas where I remove people are
still nice and clear looking. We don't want any splotchiness or anything left
behind from that. With that, I think
I'm done cloning. You can see the complete
before and after. Great work. Now we're done with
steps one through three. Now it's time to go in with
some targeted lighting, and I really want all of the focus to be on
this beautiful rock. I'm going to use light to
bring more attention to it. First, I think I want
to darken the water. I'm going to select
the very top layer and then I'll just press
command or control. I'm going to make this darker. Then I'll invert it with
command or control I and I'll use the paintbrush tool to paint and white
paint over the water. I'll just increase the
flow all the way for this. Then I can begin painting. I think this will just
add some nice contrast. The water will contrast
more with the sky, and I'll frame out
the rock nicely. Here's the before and after
of darkening the water. Next, I want to
brighten the sand, just to contrast with
that water better. Again, I'll do
command or Control M, and this time, I'll
do a brighter curve. I'll invert it with
command or control, and then I'll just
paint it over the sand. Here's the before
and after of that. Right now, I think
the highlights have gotten a bit too bright, the sand is almost glowing. I'm going to go into blend
ranges and I'll bring the highlight side down
and maybe over a little. That way, we're mostly just brightening up the dark
shadows of the sand. I think that looks pretty nice. Next, I think I want to brighten the sky so that the rock
stands out even more. The rock is nice and dark
and if the sky is brighter, I just think that'll
look better. I'm actually going to make
a selection of the sky. I'm going to select
our photo layer. Then with the selection brush, I'll just make
this a bit larger. I'll make a selection
of the sky. I'll hold Alt or
option just to remove that part and any other parts. It looks like we have some
people in a canoe back here. I guess I could
have removed that, but I think I'll
just leave that. I think this actually
did a pretty good job. I'm just going through now and removing anything
that doesn't belong. I have the whole
sky selected now. I'm going to add
a curve to this, I'll press Command or Control M. I'll bring this to
the top of our layers. There we go. Then I'm just
going to brighten this up. I'll D select with
command or Control Z. You can already see how
much better this looks. The rock looks a lot
more striking already. Let's focus in on the rock now and give it a
bit more contrast. I want to make a selection of the rock just to
make this easier. So I'll select our photo layer again and with the
selection brush. I'm just going to quickly paint a selection over the rock. It's up to you if
you want to include the reflection in
the water or not. I think either way
looks just fine. Then I'll remove
this little circle cut out from the rock
by holding to option. Our rock is now selected
so we can go ahead and apply a curve to this
with command or control. I'm just going to raise
this to the top of our layers just to
keep things organized. Then I'm going to
make an S curve to add contrast to this rock. The highlights will be brighter and the shadows will be darker. I'll de select with
command or control D. Now you can see
the before and after. Now, I actually don't
really like how dark the shadows
got on the bottom. I'm going to grab
my paint brush and I'm going to remove
this with black paint, I'll lower my flow, so I'm
painting very lightly. I'm just going to remove a
little bit of the shadow here. I think that looks better. We've now finished with all
of our targeted lighting. I'm going to select all of these layers so
that you can see a complete before and after. This looks so striking.
I think it's beautiful. We're almost done, we're just
going to do step five next, which is targeted coloring. There's not a ton I want
to do here with the colors because I think this photo
already looks really nice. But I do think I want to
give the water a little bit more of a boost by bringing
it more towards Cyan, just so it doesn't look
so cold and gloomy. I'm going to press
command or Control M. Just to practice, let's use the color channels to add more cyan to the water. The opposite of Cyan is red. We need to go into the red
channel and take away red. You can see how this warms
up the water with that cyan. Very nice. I'm going to
invert this with command or Control I so that I can
paint it just on the water. In white paint, I'll
quickly do that. I am painting with a low flow, so I do need to go over
this a couple of times. That looks pretty good.
Here's the before and after. I don't really like how the
white is now tinted to can. I'm going to go into blend
ranges and I'll bring the highlight slider down just so that those areas
stay bright and white. But I think this
color looks a lot better before and after. The other area that
I want the colors to pop a little bit
more is on the rock. Rather than making
a new selection, I'm just going to load
this rock as a selection by holding command or
control and clicking on it. Then I'm going to add
in HSL adjustment. I'm going to go into the
global color channel. Then I'm just going to increase the saturation to
bring out the colors. I think I want to
bring the hue slider over more toward
yellow and green. I'll press command or
control D to D select. Now you can see how those colors just stand out a bit more. I actually think this
looks a little too bright, so I'm going to go into the opacity and I'll
just lower that. It's time for step number
six, finishing touches. I think the rock
looks really nice. It has a lot of contrast
and good colors. But I think the water just
looks a little bit flat. There are ripples in it, but I think I want these
ripples to stand out even more. I'm going to sharpen the water. I'll go into our filters and I'm going to apply a clarity filter. This adds extra contrast just to the areas where
you paint this on. First, I'm going to increase this clarity slider
up quite a bit. You can see what's
happening here. Here's the before and after. You see how the ripples
stand out a lot more. I'm going to invert this clarity with command or Control I. Then I'll paint in white
paint just over the water. Again, I'm painting
with a low flow, so I'm going to go
over this a few times. And here's the before
and after of that. I do think I still want
to lower the opacity, just so this isn't so intense, but I like how that
looks before, after. I just have a couple of
last touches I want to do. One is to take this
wave right here, this dark wave in the water, and I just want to
extend it across, just to make this
look more like it's an area that's good for surfing. To do that, I need to go back down to our clean up layers. I'll select the top
clean up layer, and I'll put a new pixel
layer right on top of that. To bring this wave more across. I'm going to use the clone brush set to current layer and below. Then I'm going to hold
down Alt or Option to sample an area with
a larger brush. I'm just going to
bring this wave over. I'll sample again
and do it again. Then I'm just going to
clean up any areas of repetition, with
a smaller brush. I'll just go in here
and clean that up. I know this is a little funny and waves don't really
work like that. But I do think this
is pretty striking, just adding that wave in. Here's the very last
trick I want to do. I actually want to bring some of the people back
into the picture. I liked it when there were
people in the picture. It really showed the scale of the rock and how huge it is. Just to give more
perspective to how big the rock is, let's
bring them back. I'm going to go to our in painting layer where we
removed all of those people. With that layer selected, I'm going to lower its opacity. Now we can see what the
picture looked like before, and I'm just going to use the eraser tool and I'm going to erase on
the painting layer, where I want the
people to come back. Now, the people I want to bring back are the people
in the water. I'm just going to erase
over this guy right here. And over this little
boy right here, and over this reflection
that I had right here. Then I'll go into the clone brush layer and
I'll do the same. I think I cloned over
some of these areas, just bringing it
all the way back. Last, I'll go onto
this pixel layer and I'll just make sure that
that's fully cleaned up. This one I have to be
a little more careful because I added the
wave back right here. With a nice small brush, I'm just going to add his back in. And you can see now this looks a little strange right here. So I'm going to grab
the clone brush and with a smaller brush, I'm just going to bring
the dark wave in again. Painting right up
against the ar. All right, I'll go
in from the other side and continue to do that. I'm just going to go back
to the painting layer and I'll increase
the opacity again. Now you can see those people are added back into our picture. I'm going to select all of
the layers that I have here, and I'll turn them all
off so you can see the complete before and after. What a beautiful
difference this has made. It really feels like a
totally different picture. Great work on this project. Now that we're done
with that, we're going to do one more project in the next video to really
solidify these six steps.
41. Sidewalk Model: This video, we'll clean up and enhance this portrait photo. Now, normally, the first step to any photo is the
cleanup process. But just like with
the previous video, the lighting and colors
in this photo are so bad, but I think it would be
difficult to see or clean up, especially in this
dark puddle down here. Instead, let's start
with global lighting and colors and then we'll circle
back to clean up after that. Starting off with
Step number two, let's do some global lighting. Like I said, I feel like this image is a
little bit too dark, so I'll press command
or control M, and I'm just going
to brighten this up. Now, I don't want
to lose the shadow, so I'm going to bring
this to meet the line. You can see that this looks
a lot brighter and nicer, but the highlights are a
little bit too bright. I'm going to go to
blend ranges and I'll bring the highlights node
down just to reduce that. The photo is still brighter. Now it's just not
over brightened. Here's the before and after. Let's move on to step number
three, global colors. I'll press command or Control U to get out the HSL adjustment. Then we can go color channel by color channel to adjust this. Let's start with
the red channel. This is affecting her skin. I want to increase
the saturation. So we can see that color better. Then I think I'm going
to shift the hue over to the left just to reduce
the redness a little bit. Moving on to yellow. I'll bring this up
and you can see that this is affecting the
greenery in this photo. Now, I don't want this to
become more saturated, so I'll leave the
saturation slider alone, and I think I'll shift the hue over so it becomes
more red toned. I'll just bring
that up. Like that. Go into green. This isn't
really affecting anything. I'll double click to reset that. Let's move on to Cyan. We're affecting the sky. I do like adding
cyan to the sky, so I'm just going to increase
the saturation here. Then to make this even more. I'm going to increase
the hue slider over to the right side. Let's go into the blues next. As I increase this, you can see this affects
all of the puddle, a lot of the sky, and her genes. I think I am going to keep
this a little more saturated. Then let's see what
this looks like. If I bring it over to the left, this adds more purple hues, and I I bring it
over to the right, we're adding more green hues. I think I'm just
going to leave that alone because I like
how that looks as is. Let's go into Magenta. And this isn't really
affecting anything, so I'll double click to reset
that. Let's take a look. Here is the before and here's
the after before, after. I just want to add one
more adjustment to finish off editing
the global colors. This time, let's add a
color balance adjustment. I love adjusting each
total range separately. Let's start with the shadows. I'm going to add a little
bit more s to the shadows. Let's see if Magenta
looks nice too. I don't think I want
to add magenta. Adding blue looks a
little bit too intense, so I'll just leave
that one alone. Let's go into the Mintones next. Again, I think I want
to add more cyan. I like how this is
making the sky look. I think I'll add a
little bit of magenta here and a little bit of
yellow to warm this up. Last, we can go into
the highlights. Maybe we can warm these up. Actually don't like
how that slider looks. Maybe magenta will
look better. No. I think I'll leave
the highlights alone. Now we can see the before
and here's the after. Also like all of the layers
that we've done so far, and you can see the before and the after of all of those
global adjustments. Now that the photos lighting
and colors look pretty good. It's time to circle back to step number one and
do some clean up. I'm going to click on
our background layer, and I'll add a pixel
layer on top of that. You always want
to make sure that your cleanup layers are
underneath any adjustment layers. Using this layer,
I'm just going to start off by doing
some in painting. I'll select the brush, change it to current layer in below, and then we can get started
removing some of these areas. Now, the main things I want
to remove in this photo are the power lines in the
sky and in the puddle. Just make sure you
take care of those. Anything else, feel free
to try to remove it. Anything that you think would
make the photo look better. It doesn't really
matter. Make sure you take care of
those power lines. Down in the puddle, this
is a very tricky area. It looks very splotchy. Just be careful,
you might need to paint over the area a few times, maybe use a little bit
of a smaller brush. But if your area is still
looking splotchy, don't worry. We'll come back and clean this up more with
the clone brush. Now that I've done in painting, I'm going to go back
and do some cloning, just to improve a few
of these other areas. I'm going to add a new
pixel layer to start. Then I'll select
the clone brush, and I'll change it to
current layer envelo I'm just going to start
down here in this puddle. Like I said, this is
a pretty tricky area, so I'm just going
to go in here with a large brush and a low flow. Then I'm going to
try to blend some of these colors together to
make them look better. I just finished cloning. Here's the before
and after of that. I still think this puddle looks
a little splotchy though. I'm going to add a blur and I'm just going to blur that
area a little bit. We'll go to our filters
and apply Gaussian blur. I'll increase the radius, and since nothing's changing. I need to make sure that this
layer is standing on its own on top of all of
our clean up layers. I'll check on preserve Alpha. I think that blurr looks good. I'll invert it with
command or control I. Then I can use the paint brush. I'll paint with a low
flow in white paint. I'm just going to
paint this over the area to smooth
out the colors. Be careful as you're
doing this to avoid painting over your model. You don't want her
to become blurrier, just the splotchy areas. After all that
painting, here is the before and here is the after. I think this has done a nice job of reducing that smudgins. Now I'll just select
all of these layers. You can see the before and here's the after of our cleanup. Feel free to do any other
cleanup that you want. This is just what felt
good to me in the moment, but maybe you want to remove a little bit more of
the debris over here, or you could try removing
this car back here. Whatever feels good to you. Now that we're done with
steps one through three, it's time to move on to step number four, targeted lighting. To start off with this step, I want to darken areas of the photo to bring the
focus more onto our model. I'm going to select
the top layer and then I'll add a curves
adjustment on top of that. Then I'm going to darken this. Now, I want to darken areas without affecting the
highlights too much. I'm going to go
into blend ranges and I'll bring the
highlight side down. That way, any of these
areas we're darkening, we're really just deepening
the midtones and shadows. I'm going to invert this
with command or control I. Then I'm going to paint in white paint over the
areas I want darker. In this case, I'm going to
darken the fence behind her, the sidewalk behind her, and I'll darken
the entire puddle, which should help if we have any leftover smudginess
that we want to cover up. Now you can see the
before and after, just bringing the focus
up toward our model. I think the lighting
looks pretty good so far. I'm just going to move
on to step number five and do a little bit
of targeted coloring. To start, I want to
make another sunburst. I just really like that effect. For this sunburst, I'm going to make it come from
this direction. It looks like she
has lighting on the side of her face and
the front of her body, and then the back is more dark. I think this will
look pretty nice. I'm going to grab
the ellipse tool and I'll just begin
to make our sunburst. I'll add the gradient.
I'll set it to orange. I'll make it radial. I'll change the blood mode to screen. And I'll add a Gaussian
blur. Let's bring this up. I think I actually want to
type in a much larger number. Let's go with 600 this time. With that done, I'm
just going to grab the move tool and then I
can reposition this circle. I want this whole corner to be covered and a little
bit of her as well. I think I'll lower the opacity. I'll just bring this down. That looks pretty good. Now you can see
the before and the after just adding a little
bit more light to that side. Now, if there really was
a sunburst on that side, I think that that whole
area should be brighter. I think I want to add
another curves adjustment just to brighten that area. I'll press command or
control M. Then I'm going to make this brighter darkening
the shadows a little bit. I'm overdoing it
quite a bit because I'm going to paint this
on with a low flow. I'm going to invert this
with command or control I. Then I'm going to
paint in white paint. There we go and a low flow. I'm going to paint this on the whole front area
in front of our model. I'll also paint the entire
sky with this brightness. Then with a smaller brush, I'm just going to paint
the front of our model. Anything that would be facing the sun like the
front of her arm, the front of her
leg, and her face. I'm just going to bring a little more light to those areas. Now you can see the before
and here's the after. Now this brightening looks
a little too intense, so I'm just going to
reduce the opacity, and I think that looks better. Now that we've added
the sunburst and the lighting to the
front of the model. I want to add a little
bit more contrast back into this by darkening
the back of the model. I'll add another curve, and I'll bring this
down to darken it. I'll invert it with
command or control. Then I'll paint it
just on our model on the back areas where the
sun wouldn't be hitting her. I think this is adding
some beautiful contrast. Here's the before and the after. You can select both of
these layers to see the complete before and after. We're really just
painting with lighting, and I think this
looks really nice. We're finally on the sixth and final step, finishing touches. Let's take a look at
this photo and see if there's anything else
we want to improve. I think the lighting
and everything looks really good from far away. But maybe we should 00 in
and take a look at her face. There are a few
things that I could see that we could
take care of here. One is I see a little bit
of minor acne right here. If you wanted to
take the time to paint that away,
you totally could. But with how zoomed out will be, I don't really think
that the normal viewer would be able
to notice that. I think I'll leave
it alone for mine. Instead, something
that I want to improve is the
coloring on her face. I think it'd look nice
if we just smoothed out some of the harsh areas
of contrast on her face. For example, we can see that she has a highlight
on her cheek, but on the other
side, it becomes very harsh and dark
where the shadow is. I think it'd look nicer if that was a little bit smoother. I'm going to go down to
our background layer. I'll duplicate it with
command or Control J. Using this duplicate copy, I'm going to apply some
frequency separation. I'll go up to the top to
filters, frequency separation. And I'll increase
the radius so we can see a little bit more
texture on this side. That looks good.
I'll press apply. Now we have a high frequency
and low frequency layer. Now, to make things
easy on ourselves, I'm just going to select the low frequency layer and I'm going to apply a gaussian blur to
it. I'll increase this. You can see our colors
are getting blurred, while the texture
stays nice and intact. With that blurring done, I'm just going to invert it
with command or control I. Then I can paint
with a low flow and white paint to smooth
out these areas. I'll paint right
here on her cheek and try to avoid the edges.
We don't want to blur those. I think that looks a lot nicer. Here's the before and here's
the after before, after. Now, before I finish, I can see that her eyes are a little bit fuzzy
and out of focus, I want to add a little
bit more sharpness to them so they
stand out better. I'm going to select the
high frequency layer. Then I'm going to add a
high pass filter to it. I'll drag it out, so
it's on top of that. Then I'll raise the
radius until you can just start to see
the details on her face. Remember, we're
just trying to see the area that you
want to affect. In this case, I want
to see her eyes. Then I'll change the
blend mode to soft light. I'll close out of this and I'll invert this layer with
command or control eye. I'm just going to
paint this with 100% flow over her eyes and eyebrows. Here's how that looks. Here's the before and
here's the after. It's pretty subtle, so
I'm going to duplicate the highpass filter twice
with command or control J. Then even from a distance, you can see that this
has really improved, the contrast in her eyes. Here's the before and the after. It's time. Let's take a
look at all of our layers. I'll turn them all
off so we can see the before and here's thereafter. Now, it would be a great time to adjust anything that
you don't like. I think I went a little
bit too far with our blurring of her face,
this layer right here. I'm going to reduce the
opacity of that one. I also think I
might have applied too much brightness
to our model. I'll reduce the opacity
of that layer as well. Let's do that one more time. Here is the complete
before and after. Great work on this project. I know that was a lot of
layers and a lot of work, but we really made a great
difference with this photo. Now that we're done with these
three practice projects, I'm sure you could open any
photo and know just what to do to fix it up and make it look better
with its lighting, colors, and cleaning it up. Now that we're done with
that. In the next chapter, we're going to dive in to
doing some compositing.
42. Compositing Skills: For the final two
chapters of the course, we're going to do
my favorite thing to do in affinity photo. Compositing, Compositing
is the art of taking two different images and combining them into
a single image. I think compositing
is so much fun, but it can be a little tricky. We'll need to bring
together all of our affinity skills to make our composites
look their best. Luckily, for us, there's an easy ten step method that we can use to create
our composites. By following the ten steps, you'll be well on your way to making beautiful composites. The first step to compositing is to find the right photos
for your project. Next, we'll need to
apply a mask to one of the photos to remove its
original background. Then comes the easiest step, resizing and positioning
the masked photo to fit inside the other photo. After that, we'll
work on matching the overall lighting
of the two images, and then we'll work on matching the overall colors as well. Next, we'll add a shadow
to our composite, and then we'll create
a contact point. Now, you've probably never heard of a contact point before, but don't worry,
it's really easy. After that, we'll
add shadows and highlights to sculpt the
lighting in our composite. Then we'll match the
clarity of our two images, which just means that
they should have the same amount of
sharpness or blurriness. Finally, the tenth step
is to continue editing, which means that we'll make
the overall photo look better after we've matched the two images in our composite. I know this seems
like a lot of steps, but each step is actually
really easy to do. The whole process will go much faster than you might think. If you ever want to
refer to the ten steps, I've added this list to the
Chapters exercise files. Feel free to open
this list whenever you need a reminder
of the ten steps. I'm so excited to start
compositing with you. This is going to be so much
fun. Let's get started.
43. Step 1 - Find the Photos: In this video, we'll learn about the very first
step to compositing, finding the right photos. You can take your own photos for a composite or you could
find free photos online. I have three websites that
I like to use for this. They all have pictures that
are 100% free to download, so I love using
this as a resource. They're all really
easy to use too. All you need to do is
search for a topic. Then you have all of these
photos to choose from, and you can just come right here and download it by
clicking this button. That's Pexels. The next one I like to
use is called Unsplash. This works just the same. Search for your image, hover
over it and download it. Last, we have Pixabay, which works slightly
differently. Just type in what you
want. Then you'll need to click on
the image first, and then you can click here
to download it for free. You can choose which
size you'd like, and then you can press download. What should you look
for when you're looking for a composite image? Well, there are a few
different things. First, we have camera angle. Is the camera beneath your
subject, looking up at it? Is it hovering
above your subject, or is it more of a straight on? Here we can see we're looking
up at this cat in the tree. We're looking down at
this tiger in the water, and here we have
an image looking very straight onto our model. Another thing to consider
is the camera positioning. A close up portrait
probably won't mix very well with a
big vast landscape. Another thing to consider is
the lighting in your photo. Do we have very
harsh shadows with sharp contrast between the shadowy area and
the highlight area? Or is it more of
a soft look where all of the lighting is evenly
lit across our subject? When you're looking at
pictures like this, you can always make
soft light become hard by painting
hard shadows on it. But it's a little trickier
to make something with harsh shadows become soft. That's just something
to keep in mind. The last thing to consider is how easy is this photo to mask. In this photo, we have so
much hair flying through the air along with a very busy
background with the trees. This would be a
nightmare to select. But a photo more like this with a plain background is a
lot easier to compose. There's no shame in choosing a picture like this
that's easier to cut out. Okay. Now going into affinity. I found this forest
image on Pixabay. I think the lighting
in this photo will make a really
fun composite. Once I picked my background, I searched for some photos
that might work with this forest using the guidelines we talked about a minute ago. I found a few potential ones. I'll just go to file,
and then down to place. Then I'm going to select all of these pictures that I found, I'll hold command or control
to grab this last one. Then I'll just open these up. I'm going to place
all of these into our image because I just want to compare them and see which one works best for
this forest image. With all of these
loaded into the image, I'm just going to one by one, roughly cut them out to see how they would look
on this background. I'll just grab the
selection brush. Then I'm going to quickly
paint out a selection. It does not have to be perfect. We just want to get a general idea of
how this would look. I'm just going to mask this. Then I'll deselect with
command or control. I'm going to continue to do
this for the other ones. With the bunny layer selected, I'll just paint my selection
and then add a mask, and I'll de select
with command or Control V. I'll repeat
these for the last two. With these rough
selections made, now we can see one by one if these pictures would fit
into our background. I'll turn off all
the other layers, and let's just start with
this pumpkin right here. If I place this pumpkin right here and shrink it
down a little bit. I actually think this
would look pretty nice. The angle looks good, the lighting looks good, it's even coming from
the right direction. The lighting is coming
from over here, casting shadows on this side. That looks p n. Let's
see our next one. This statue looks pretty good. Let me just shrink it down. But one problem I'm seeing is the angle is a little bit off. In this forest photo, we're looking pretty straight on and maybe slightly downward. But with this angel image, it looks like we're
looking straight on and slightly up at the angel. You can see the bottom
of the angel's feet. It looks like this
angel is falling backward just because
of this angle. I don't think that
would work very well. Next we have this bunny. Let
me just shrink this down. I think this angle
looks really nice. We're looking a
little bit down at this bunny as well as the
forest. Those match up. Last, we have our cat. I think this one looks
pretty good as well. It looks like we have three
pretty good options here. Even though these other
options look pretty good, I think the bunny
was my favorite. I think we'll go with
this one as we learn about the ten steps throughout
the rest of this chapter. Using the guidelines
that I taught you about lighting and camera angle, you can use these to find potential photos that
match up nicely. But sometimes it's actually just better to see
what they look like directly in affinity photo by applying a quick
mask to them. I know that helps me a lot, just to narrow down
which one looks best. In the next video,
we're going to make a more accurate selection
of our bunny. M.
44. Step 2 - Mask the Subject: In this video, we'll learn
about the second step to compositing,
masking our subject. In the last video, we made a super quick selection
of the bunny. But now I just want to make a better, more refined selection. I'm still going to use
the selection brush, and I'll just click and drag to paint my selection
over the bunny. Luckily, this is on
a white background, so this should be pretty simple. Once everything is selected, I'm just going to
refine our selection. I'll press apply. Then I'm
going to apply a mask. I D select with Command or
Control D. Just like that, we've masked our subject. This was a very quick video. The next one, we're going
to bring this bunny into our document and
adjust how it's sized.
45. Step 3 - Resize & Position: This video, we'll learn
about step number three to compositing, resizing
and positioning. I want to copy this bunny and paste it into
our background. I'm going to select its
layer and then I'll press command or
control C to copy it. I'll press command or
control V to paste it in. Then using the move tool, I can resize this bunny. I need to make it
quite a bit smaller. I'm trying to scale
it so it looks nice. For reference, we have some
leafs and some sticks here. We can try to position
this and make it a little bit smaller so
it looks more realistic. I think I also want
to rotate the bunny. Hovering over this
handle right here, I'm just going to click and drag to tilt it a
little bit to the left. I think that just lines up with the surface a little bit better. And maybe I'll make it
a little bit smaller. Now that I've brought
this bunny into the image and I like
where it's placed. I'm going to do a little
bit of cleanup on the mask. I'll select the mask. Then
I'm going to zoom in here. Now, you might notice
that there's a white line running around the outside
border of our mask. This is a very annoying glitch
that affinity photo has, but it's very easy to fix. I'm just going to hold down Alt or Option and I'll
click on the mask. Then I'm going to
grab my paintbrush, and I'm going to paint in black paint right along the edge. This will remove any of that
white line that's there. That white line is just what's
left behind from masking. For some reason, it just likes to keep a little
bit of the border, a little bit of the
picture is still visible. By painting in black paint
right along the edge, we're just smoothing that out
so that's no longer there. And now you can see that's gone. That's a quick fix
to that little bug. Now it would also
be a good time to fix any glaring
issues on your mask. Now that we can see our subject in the
background like this. For example, if a
chunk is missing, now would be a great
time to fill that in. I think this looks good though. I don't see any glaring issues, but we might come back
and work on the mask a little bit later if we
notice something's wrong. With that, we are done with this video that was super easy. In the next one, we're going to start making the
bunny look like it belongs more in this background by adjusting the lighting.
46. Step 4 - Match Global Lighting: This video, we'll learn
about step number four, matching the global lighting. In this step, we're
going to try to match the overall lighting of our bunny with the
forest behind it. To start, I'm going
to add a curve, command or control M. Then this is only
affecting our bunny. I'm going to make this a
child layer to our bunny. Now we have six main
options we can try to get this bunny to blend
in with its background. We can make the midtones
brighter or darker. We could make the shadows
brighter or darker, or we could make the
highlights brighter or darker. In this photo, we can see that the forest has
very dark shadows. I'm going to bring our shadows
over, so they're darker. The forest also has
very bright highlights, which you can see on
these rocks here. I'm also going to
bring the highlights over just to brighten
them up even more. Now you can see the before and after adding a lot more
contrast to our bunny. If you're ever in doubt with which thing you should try
with the curves adjustment, I suggest just trying each
of the six different things, adjusting the midtones, shadows, and highlights to see
what blends in better. Keep in mind that compositing really is an art, not a science. You don't need to be
perfect with your lighting. Just try your best and I'm
sure it'll turn out just fine.
47. Step 5 - Match Global Color: In this video, we'll learn
about Step number five, matching the global coloring As we've seen
throughout this course, there are many ways to affect the color
and affinity photo. But in this video, I'll show you three
layers that I like to use when matching
color for composites. The first layer I like
to use is actually stealing the colors from
our background photo. Now, this technique might
look a little bit strange, but I promise it's
going to look really cool in the end,
so stick with me. For this first layer,
you're going to grab the background
layer and duplicate it with command or Control J. Using this layer, I'm going
to add a gaussian blur to it. I'm going to increase
this quite a bit until all of the colors
start to blur together. I think I'll add even
more of a blur here. I'll make this 200. Perfect. Make sure you turn on
preserve Alpha as well. Then you're going to
take this blurry layer, and you're going to make it
a child layer to the bunny. Now that those colors have been applied just to the subject. All you need to do
is have that layer selected and then change
the layers blend mode. I'm going to change it to color. Now it's taken all of those blurry colors and applied them directly
to the bunny. Now, all we need to do is lower the opacity until
this looks right. You can see we've already made a big difference here
with the colors. Here's the before,
and here's the after. That was a pretty fun trick, but I still have two
more layers that I like to use to really get these
colors looking right. The first one is a color
balance adjustment. The overall coloring in this forest is very
yellow and green toned. I want to affect
all of the shadows, mid tones and highlights to
lean more in that direction. I'm going to start
with the highlights, and then I'll add more
yellow and more green. Go into the midtones,
I'll do the same thing, adding more yellow,
and more green. Last with the shadows, I'm just going to do this a
little bit gentler. I don't want our shadows
to look too colorful, so I'll just add a little bit of yellow and ale bit of green. Now we can see the
before and here's the after before, after. The last layer I'd like to
add is the HSL adjustment. I'll just apply that with
command or control U. Now, right now, I'm
just going to stick to our main color channel
because I feel like this bunny looks a
little bit too saturated. I'm going to decrease
the saturation here. Then we can play around with the hue slider to
see what looks good. I think I want to continue
to add more green. I'm just going to
bring this down just a little bit toward green. Now you can see what
this looks like. Here's all of the color
adjustments we did in this video. Here's the before,
and here's the after. Using these three layers for adjusting the colors
is pretty simple, and you can do this
for any composite to really quickly get these
colors to match up better. We can see what this looks like with all of
our work so far, including that
curves adjustment, here's the complete
before and after. We've now matched up
the global lighting and the global colors. I think this looks so good.
48. Step 6 - Add the Shadow: This video, we'll learn about step number six,
adding a shadow. Before we can add our shadow to the ground in
front of the bunny. We first need to
determine which direction and how harsh the shadows
are in the background photo. We can see that we
have a burst of light coming around the
rim of this rock here, which means that the light is
coming from this direction. The shadow should fall
behind the rock like this. We should do the same thing
to our bunny over here. This should be more lit up, and then the shadow should fall right in front of the
bunny right here. Now that we know
where to place it, we can add a new pixel layer. Then we can paint
in black paint with our paint brush to
add the shadow. I'm just going to lower the flow so I can apply the
paint gradually. Then I'm just going to
make my brush a little bit larger and I'll begin
to place the shadow. Now, I just made a mistake. This has been placed as a
child layer to our rabbit. We actually want
to make sure that this layer is placed
underneath the rabbit, but not as a child layer. Now it should be being
applied under the rabbit, but on top of our background. As I paint, you can
see that's true. Shadows naturally fade out the farther you get
from the subject. Make sure you lightly
paint just a little bit of paint around the outside
edge of the shadow. I'm just going to lower
the opacity of this layer. Just to reduce this and so you can still see the
grass underneath it. Here's the before and after. The bunny already looks like it's blending in a
lot better here. In the next video, we're going to continue
to make the shadow look even better by
adding a contact point.
49. Step 7 - Create the Contact Point: Let's learn about
step number seven, creating the contact point. In this step, we're
going to make it look like the
bunny is actually standing on the grass and
not just floating above it. This can be done in two steps, painting on our mask and
adding a contact shadow. First, let's work on our mask. With the mask selected, I'm actually going to paint in black paint to remove
part of the bunny. By masking off the
bottom of our subject, it will look like the subject is pressing down into the ground. For softer grounds
like this forest, you'll want to mask a bit more, but mask less if your subject is standing
on a hard surface. At this point, we could also clean up the mask a little bit. In this case, I think I want to remove more of the
white fringing. I'll just carefully go around my subject to remove
a little bit of that. Now that we've cleaned up
the bottom of this mask, we're going to make a
contact shadow next. Remember how I
mentioned that shadows will fade the farther
from the subject you get. Well, the opposite is also true. Shadows get darker as you
move closer to the subject. For this step, we're
going to create a pitch black shadow going right along the edge right
underneath the bunny, where it's making
contact with the ground. First, I'm going to
close up this group, and I'm going to select this
pixel layer once again. I'll make another pixel
layer on top of that. So I can see what
I'm doing better, I'm just going to lower the
opacity of this pixel layer. Now that our shadow is a
little less in focus here. I'm just going to grab
this new pixel layer, and I'm going to paint
in black paint with 100% flow to create a pitch black shadow just
along the edge of our bunny. You just want to paint
this where your subject is making contact
with the ground. Don't continue this all around, just the contact
with the ground. Now that I've painted that on, I'm just going to
raise the opacity of this other pixel layer here.
You can see that again. Here's the before and after
of that contact point. This looks a lot
better. It makes the bunny look a
lot more grounded. But I think that this shadow
looks a little bit too light and there's a
pretty harsh transition. I'm just going to create
one more pixel layer and using a low flow once again. I'm just going to paint to blend these areas
together better. With that, I think our
shadow looks really good. Here's the before and the
after of creating our shadow, and here's the before and after of creating
that contact shadow. The contact shadow is such
a small little detail, but I think it makes
a huge difference.
50. Step 8 - Add the Shadows & Highlights: This video, we'll learn
about step number eight, adding shadows and highlights. We've already matched
the overall lighting of the bunny with the forest. But taking some time to
enhance the lighting in specific areas can really make your composites
look more realistic. The goal is to make the
lighting on our bunny, look like it's interacting with the lighting in the forest. In this particular composite, we need to make the front of the bunny darker and the back of the bunny brighter since the sun is coming
from that side. First, let's start by making the front of our bunny darker. I'm going to press command or Control M to get out
of curves adjustment, and they'll make it a
child layer to our bunny. Then I'll make this curve dark. I'll invert it with
command or control I. Then I'm going to paint
in white paint on this curves adjustment
to reveal the darkness. I'll make my brush larger. Then I'll just paint right
over the front of the bunny. Any areas that should be
blocked from the sunlight. I'll also paint a little bit of darkness underneath the bunny here and on this part
of its leg right here. This part of the leg would
be hitting sunlight, blocking this area from getting any sun. That needs
to be darker. I'd like the front of
its face to be darker, but we'll deal with that later. For now, this looks a lot nicer, darkening the front
of the bunny. Let's move on to the other side. I'm going to press command or control and make this lighter. Then I'll invert it with
command or control, and I'll paint this
right behind the bunny. Right on its back, and I'll also paint on this
part of its ear right here. I think I made that a
little bit too bright. I'm going to switch my
color to black and I'm just going to paint it off
of this bottom part here. Before and after. Now you can see both
of these curves. Here's the before and
here's the after. This already looks really good, but we can do even better. First, I want to teach
you about rim lighting. Rim lighting is what we can
see over here with this rock. The light is hitting
this side of the rock and it's wrapping around the
outside edge of the rock, creating this rim of light. I want to mimic that
on our bunny here. I'm going to make another curve. I'll make it very bright. Then I'll invert
it with command or control I. I'm just going to paint this in white paint right along the
edge of our bunny. Now, luckily, this has been
placed as a child layer, which means we don't
need to worry about getting this paint
on the outside. As I'm painting, I'm
just staying right on the very edge and I'm
adding in this brightness. I think I'll actually
bring up my flow for this. Adding this rim of
light right here. I'm going to stop
it about there. And stop it about here. Just on the back of the bunny, and then I'll paint
just a little bit of rim lighting right here. This looks very harsh, though. I'll undo that. Now I'm going to
lower my flow to make this more subtle on
this part of the bunny. We have our rim lighting done. Here's the before and after. The last thing I want to
do with this lighting is I want to darken the front of the bunny right here even more. It just looks too bright
for the shadow area. In this case, we already
added this very dark curve, but it just wasn't enough. Sometimes we just
need to paint in black right on our layer to
really darken something. I'll add another pixel layer. On this one, I'm
going to paint with a low flow in black paint, just to darken right here. We can also do this right
on the edge of the bunny to remove any extra fringing
that shouldn't be there. You can see that before
and after of that. With that, now you can see the before and after
of everything we did in this video
before and after. The bunny fits so much better
into this background now. I think this looks great. If you want to reduce the harshness of any of this, you totally can. But in this forrest image, the lighting really
is quite harsh. I think I'm going to
keep it just like this. Now we're officially done with our lighting for our bunny. I think this looks great. In the next couple of videos, we're just going to
finish up this composite with some little detail work.
51. Step 9 - Match Clarity: This video, we'll learn
about Step number nine, matching the photos clarity. I'm just going to
zoom in here and take note of how
sharp this photo is. In the background, we
have some sharpness, but we also have
some fuzziness here. On the bunny, we have
a lot more sharpness here on the front of the
bunny where it's in focus, and then it fades out and becomes blurrier on
the back of the bunny. This is because when
this picture was taken, it had a very shallow
depth of field, meaning that it very quickly transitioned from being
in focus on front of the bunny to out of focus as it got further away
from the bunny's face. But I don't really like how this looks for this composite. I want to balance
this out a little bit better by
making the front of the bunny more and the back
of the bunny more in focus. Let's start by making the
front of the bunny blurrier. I'll start by adding
a Gaussian blur. I'm going to make
sure this is placed as a child layer to our subject. Then I'm just going to raise the radius to begin to blur
the front of the bunny. I think that looks pretty good. Then I'm just going to invert this layer with
command or control I and I'll paint in white just over the
front of the bunny, where I want this to be
a little less in focus. I think that looks pretty good. It's subtle, but I think this just matches the
sharpness better. But now to make this
match even more, I just want to raise the sharpness of the
back of the bunny. I'll do that with
the clarity filter. Again, make sure this is
placed as a child layer. Then I'm just going to
increase the strength here and I'll bring
that all the way up. Then I'll invert this layer
with command or control I, I can paint in white
paint on the back of the bunny to bring
it more in focus. I'm going to select both of
these layers so that you can see the before and the after. Before and after. I think this looks a
lot more balanced. I know this might be a little
bit difficult to see after this video has been compressed
and uploaded online. But trust me, adding a little
bit more sharpness and blurring to balance out your image really does make it look a lot more convincing.
52. Step 10 - Continue Editing: This video we'll learn
the final step to making a great composite,
continued editing. Now that the bunny
and the forest are blending together so well. We can edit the entire
photo as a whole, and any changes we make will affect the bunny and the forest. Because the bunny and the forest are already blended together, they will stay blended as we add more adjustments
because the adjustments will affect them equally. Let's start off by affecting the overall lighting
of this photo. I'll press command or control M, and I'll make sure this layer is placed on top of everything. Now, for me, the shadows
in this photo are very dark and I'd like to
reduce that a little bit. I'm just going to bring
the shadow node up. But then I'll bring
the mid tones down because I don't
want them to become too light. That looks pretty good. Here's the before and after. Lightening up that.
I think you can see the details on the bunny
a little bit better now. Then I want to affect the
overall colors in this. I'm going to press
command or control. There are some red
tones back here and in these leaves that I
think are interesting, but maybe we want
a different look. I think it'd look nice. If we made this
more monochromatic, I'm going to go into
the red channel. I'm just going to
reduce the saturation. Then I'm just going to bring
the hue slider over to the left to add more yellows
and greens to these areas. Now you can see the before and after of reducing
the redness. Not only does this make the
photo look more monochrome, but it also helps the bunny to blend into its
surroundings even more. Now I'm just going to select
both of these adjustments, so you can see the
before and after. Now I'm just going to select all of the layers that
we just worked on. I'm holding command or control to quickly select them all. Now you can see the
before and the after. Great work on this composite. You now know all
ten steps that you need to create any
composite image. We're going to continue to
practice these ten steps as we complete three
compositing projects together in the next chapter. After doing all of these
course projects with me, you'll be totally prepared to make composites all on your own.
53. Compositing Projects: You've made it to the final
chapter of the course. Congratulations.
For this chapter, we're going to continue on our compositing journey as we complete three compositing
projects together. During these three projects, we'll practice the
ten compositing steps that we learned about
in the last chapter. As they say, practice
makes perfect. Once you've practiced the ten steps a few more times with me, you'll be totally
prepared to use this workflow to make
composites all on your own. This might be the last
chapter of the course, but I think it's
also going to be your favorite.
Let's get started.
54. Wedding Composite - Find the Photos: Let's do our first step to compositing, finding the photos. For this composite,
we're going to place the bride into a
brand new photo. Since this is a
practice project, I've already found the
photos that we'll be using by going to Pexels and unsplash. You don't need to worry about
finding these pictures. They're in the exercise files. But why did I pick
these two photos? Well, there's a few reasons. If you look at the camera angle, both cameras are high
up looking down. That's how we see
the top of her head. That's why it looks like this
hill is relatively flat. Next, the camera physician. Both photos were taken from a moderate distance
from the subjects, so we can see quite
a bit of them. Also, I chose this
because of the lighting. Both photos have lighting
coming from the side, producing soft but
noticeable shadows. And last, I think this will
be pretty easy to mask. Her hair might give
us a few problems, but the rest of the
image should be easy to mask away
her background. And speaking of masking. In the next video, we'll mask the woman from
her background.
55. Wedding Composite - Mask the Subject: Let's do this second step to compositing, masking
the subject. To begin, we first need to make a selection of our subject. I'll grab the selection brush. Then I can click and drag
to create my selection. Now, for this bottom
part of the dress, all you really need
to do is click once and the entire dress
is selected perfectly. But the top area of our
selection is a little trickier. I suggest just painting over
both of the arms fully, we'll remove these
green areas after. Then you can come up here
and begin to add hair in. Now the hair is really tricky in this image, unfortunately. Just click and drag until
all of it's included, and then you can hold Alt or
Option to remove as needed. Now, for these arm areas, this is a little
tricky because they have such sharp corners here. What I like to do is, I like to hold Alt Option and click and drag
to remove too much. Make sure that whole corner is included in what you remove. I'm just going to select our arm again, that's still there. But holding Alt option, click and drag to
remove all of that. Then lift up on alt option and click and drag to add again. This gives you a nice
sharp corner there, which you wouldn't have been able to really get otherwise. You would need to use
a very small brush in order to get that perfect. But with over selecting, I just think this makes
it a little bit easier. I just finished
making my selection. I'm going to press refine Then I'm going to paint just
on the edges of her hair. I'll include these two
little wispy bits, and then I'll go all the way around like that. Then
I'll press apply. Now I'm just going to
apply a mask to this, and I'll de select with
command or control D. You can see our mask looks
bad up here by her hair, but the rest of it
looks pretty good. We could clean up
our mask right now, but I actually like to wait until our subject is
in her new background. That way, I can just see
how much I need to remove. We'll take care of that,
cleaning up her mask and placing her in her new
background in the next video.
56. Wedding Composite - Resize & Position: In this video, we'll resize
and position our model. To start, I'm just going to select the whole
layer right here, and then I'll press command
or control C to copy it. Then going to the background, I'll press command or
Control V to paste her in. I'll grab the move tool so
I can resize this layer. Looking at the surroundings, I think she needs to be
a little bit smaller and I'd like her placed
right about there. Now, something you
might notice is that the lighting is actually
going in opposite directions. The sun is coming from this
direction in the background, casting shadows on the
backs of these plants. While in this photo, the light is clearly coming
from the other side because you can see this
highlight on her arm here and shadows
on her other arm. We'll need to flip one
of these pictures. I think I'm just going
to flip the background. I'll unlock the layer. Then with the moved to
selected, I'll right click. I'll go to transform flip horizontal That
looks much better. Now you can see the
light is coming from the right in both
of these pictures. I think I'm going
to select her layer and just make her a
little bit larger. I'll place her just like that. Now that she's placed
where we'd like her, it's time to clean up the mask. To start, I'm going to hold down Alt or Option and I'll
click on the mask. Then we're going to
do that trick to get rid of anything
remaining on the edges. I'll grab the paint
brush and I'll paint in black paint with full flow
right on these edges here. I'll hold Alt or option
and I'll click again. With that mask still selected, I'm going to go right
in here and I'll just remove these areas that are
sticking out from her head. I have full flow to start and I'm just removing
the biggest areas. Now I'm just going to reduce
the flow so I can gradually paint away right
on the hairline. Now, it looks like I
removed a little too much, so I'll press x to
switch to white, and then I'll paint
those areas back in. Then I'll switch to black
and I'll do the opposite. Just coming in here and removing all of the background areas. This looks pretty good, and as you zoom out, you can
see this looks just fine. You can't see any of those
weird flyaways anymore. To continue cleaning
up our mask, we could go down here to where the areas of her dress
are transparent. But we'll actually go
back and take a look at these later when
we're adding shadows. Because as you can
see, this is grass showing through
the original photo and we have grass here. I think we can add
a little bit of shadow here just to
make this blend better. But we'll do that later on. In the next video, we're going to work on the global lighting to make our model match
the background. H.
57. Wedding Composite - Match Global Lighting: In this video, we'll work on matching the global lighting. To start, I'm going
to press Command or Control M to add a
curves adjustment. Then I'm going to
click and drag this, so it becomes a child
layer to our model. Now I can adjust the lighting to see what looks best
for this picture. If I bring the mid tones up, you can see this makes her stand out even more. It
really doesn't help. By lowering it, this
actually looks pretty good. Let's take a look at
the shadows next. If I lighten her shadows, that looks a little odd. You can see her
shadows right here. They're just a little too light. It doesn't really make sense. If I darken those shadows, she doesn't seem to
match better either. I'll leave the shadows
alone for the highlights, we can darken them
or brighten them. I think darkening them actually looks pretty good,
so I'll do that. All right. And now you can
see, let me just go in here. Now you can see the
before and after. I think that's already
a big improvement. In the next video, we're going to match the
global colors.
58. Wedding Composite - Match Global Color: This video, let's match
the global colors. I'm going to use the
same three layers that we used on
the Bunny project. We can go ahead and start by
selecting the background, I'll duplicate it with
command or Control J. Then I'm going to apply a
blur to this background. Let's go with the Gaussian blur. I'll raise this
all the way up and I'll make sure to check
on preserve Alpha. I think I'll just blur
this a little bit more. Let's go with 300. With those colors
nice and blurry, I'm just going to
select this layer and I'll make it a child layer. Now that it's applied
only to our model, I'm going to change the
blend mode to color. You can see this looks
pretty intense on our model. I'm going to reduce the
opacity of this quite a bit. Now you can see the
before and the after. This is just reducing
some of the redness in our model skin to help
her blend in better. Let's do the next layer.
I'll press command or control you to bring
up the HSL adjustment. Right now, she
looks a little too desaturated compared
to the background. In the global colors, I'm just going to
raise the saturation. Then using the hue shift slider. I think I want to still reduce more of the redness in her skin. I'm going to move the
hue over to the left. Just introduce a
little bit more green. Now you can see the
before and after of that before, after. We only have one
last layer to do. I'll go to the
adjustments and I'll apply the color
balance adjustment. Let's begin in the shadows, and I'll just play with these sliders to see
what looks good. I think I do want to add a bit of red this seems to look nice. We might have gone a bit too far on these other layers
adding green to her skin. I'll just raise the reds a bit. I think I'll add ale bit of green and a little
bit of yellow. Let's go into the mid tones. Again, I think ale bit of red
actually looks quite nice. Maybe I'll add a little
bit of magenta to the midtones and a
little bit of yellow. I for the highlights. Let's see. That slider did not
look good either way. I'll leave the cyan
red slider alone. I'll add a little
bit of magenta. That one doesn't
look good either. I'll double click to reset that. Here's the before and after
of the color balance. Just bringing more color back. Now I'll select all of
these color layers and you can see the before and after. Let's see that one more
time closer before, after. Her tones definitely match
the grass a lot better. I'll just select all of the layers that
we've done so far, so you can see the
complete before and after of all of these
global adjustments. All right now that we're done with the global adjustments, we're ready to move on to adding the shadow
in the next video.
59. Wedding Composite - Add the Shadow: Let's add the shadow
in this video. I want to add a shadow on the
ground next to our subject. This means that this
can't be a child layer, I'll select the
background layer, and I'll add a new pixel
layer on top of that. Then I'll grab the paint
brush tool and I'll paint in black paint with a low flow, and a larger brush. Because the lighting is coming
in from the right side, I need to paint a shadow that goes in this area right here. I'll start just painting gradually right
underneath her dress. I think casting the
shadow like this looks pretty consistent
with the rest of the photo. I'm just going to
lower the flow even more and I'll paint on the very edge to
soften this even more, and I'll darken it as
it gets closer to her. This looks pretty
good. Here's the before and after of that. It looks like the shadow should have been
there the whole time. Now that we've added
this simple shadow. In the next video,
we'll take this further by adding
the contact point.
60. Wedding Composite - Create the Contact Point: Let's create the contact point. To start, we're actually going
to paint right on the mask to just remove a little bit of the mask right along the bottom, just to help it blend in better. With the mask selected, I'll paint in black paint with a very low flow right
along the edge, just to blend this in more. Now that we're finished removing some of the very edge area. I can see this part of
her dress is transparent. Now in the original photo,
it had green grass. This actually
blends pretty well, but this grass just looks a little bit too light
for this new background. I'm going to again paint
with a very low flow, and I'm just going to lightly go over that area to
help darken it. Just make sure you
don't paint away too. This so still have
this sheer panel of fabric over the grass, making it appear a
little bit lighter. I think that looks pretty nice. Now that I'm done with that, I'm just going to close
up this group, and then I'll select
the old shadow layer, and I'll place a new pixel
layer on top of that. Using this layer, I'm
going to paint in black paint to create
our contact shadow. I'm just going to
paint with 10% flow. With the Bunny project, we used 100% flow, but the shadows are a lot
softer in this picture. So we need to make
this very subtle. Remember this contact
shadow should only go where your subject is making
contact with the ground. Don't continue it too far
up the sides of the dress. Just where she's making contact. All I just finished with
the contact shadow. Here's the before and
the after before, after. I think this looks really nice and grounds it a lot better, but I'm just going to add
one more pixel layer and using a larger brush
and a lower flow. I'm just going to paint right in between the contact shadow and the regular shadow to blend
these areas in better. I think these shadows
look really nice. Here's the before and the after. As one last finishing touch, I want to add a
little bit more of a shadow to the
woman right here. The grass should be blocking the light from
coming right here. I'm going to add a pixel
layer right in here. I'll select the color
balance adjustment and place a pixel layer
right on top of that. Then using a super low flow, I'm just going to
paint right over the dress where the
light should be blocked. You can see that
before and after. It's subtle, but I think it
makes a good difference. Now I'm just going
to select all of the layers that we
did in this video. So you can see the
complete before and after. Now that the shadow on the
ground looks really good, we're going to continue
to add more shadows and highlighting to our
subject in the next video.
61. Wedding Composite - Add the Shadows & Highlights: Let's add some shadows and
highlights to our model. The lighting already
looks really good, but I think we can
accentuate it even more. I'm going to open up
our models group, and I'll just select this
pixel layer right here. Then I'll add a
curves adjustment on top of that with command or Control M. To start, let's add more highlight to our model. I'll brighten this. Then I'll invert it with
command or Control I. Then I'll grab the
paintbrush tool and we can paint in white paint
with a low flow. Maybe I'll raise this
just a little bit though. With around 10% flow, and I'm going to
add highlight on the side of her body
that should be lit more. I think it would look
nice if the right side of her body just had a
little bit more shine to it. I'll just paint that
in right there. Now you can see that
before and after of that. Let's do the opposite next. I'll press command or
Control M once again. But this time we'll
make it darker. I'll press command or
Control I to invert this. Then I can paint in white paint on the left side of
her body to darken it. And you can see the
before and after of that. I'll just select both
of these layers. You can see the before and after I think that lighting
looks really nice. Now I have one last optional
step that you can do. After all of the adjustments that we've added to our model. It's starting to look
like her dress is a peach color when maybe it's more meant
to be a white color. I have nothing against
colorful wedding dresses, but this is just optional. If you want to reduce this, go ahead and press
command or control. Then in the main color channel, we can just reduce
the saturation. I'll lower it completely. I'll press command or
control I to invert this. Then I'm just going to paint
in low flow over the dress, just to reduce some
of that coloring. Now you can see this looks a little bit more
like a white dress. Here's the before and after. Now, I'll just select all of the layers we did in this video. So you can see the
before and the after. Beautiful. Great work.
We're almost done. In the next video.
We're going to match the clarity from our
subject and background.
62. Wedding Composite - Match Clarity: This video will
match the clarity. In order to see the clarity, I'm just going to zoom in here. You can see that the
background image is a little bit more fuzzy
than our model here. You can see all the details on the models dress very well. I think we should
blur the model just a little bit to help
her blend in better. With the models layer selected, I'm going to add
a Gaussian blur. With this placed
as a child layer, now I'll just
increase the radius. You can see this already looks
like too much of a blur. We're losing all of the detail. We need to keep this very low. I think 0.2 looks
pretty good for this. Now you can see that before
and here's the after. That was very subtle, but now that our clarity
is matching, we can move on to the next video where we'll finish
off this project.
63. Wedding Composite - Continue Editing: Let's do the final compositing
step, continued editing. Now that the model and the
background match perfectly. We can place any adjustment
that we want on top of them, and they'll affect
both of them equally. We can add as much style, we can change up the
colors however we want. Here's what I'm going
to do for this one. I'll select the top layer, and then I'll press command or Control M to add a
curves adjustment. I want to make this
image brighter. I'm just going to
click and drag on this node to raise
it just a little. Next, I want to start
adjusting some of the colors. I'll press command
or control you. I'm going to go color channel by color channel to
adjust each of these. We did a lot of adding green and yellow to our model to make
her match the grass better. But now, I think I
want to bring out more red tones to warm
up her skin again, this will also warm up the
grass at the same time. Let's start in this red channel. You can see this is affecting
the path and her skin. I'm going to increase the
saturation right here, and then we can adjust the hue, moving it more toward
green or more toward red. I think I'll leave this
one alone for now, and I'm just going to
move on to the yellows. If I increase this, you can see this is affecting
most of the picture. I'm going to raise
the saturation. Then I'm going to make
this one more red. I'll move the hue slider upward. You can see this adds warmth to the entire picture,
not just our model. Go into the greens.
Let's raise this. Nothing's changing, so I'll
double click to reset that. Let's go into CN and
we're affecting the sky. Here's where I want to
have a little bit of fun. I want the sky to
be less saturated, but more green toned. To start, I'm just going
to lower the saturation. Then I'm going to
bring the hue slider over to introduce more green. I think I'll also
brighten up the sky a little bit just to
reduce the contrast. A going into the blue channel, I want to do the same thing. I'll desaturate, and then I'll move
the hue slider up to add even more
green to this. Maybe I'll lighten it
a little bit more. And for magenta. This
isn't affecting anything, so I'll double click
to reset that. Now you can see the
before and after. These colors are a
lot more stylized. But I think by fading
out the sky like this, it's helping to bring the
focus more to our subject, which I think looks really nice. Let's just add one
more adjustment. I'm going to apply the
color balance adjustment so that we can
affect the shadows, mid tones and
highlights separately. I'll start in the shadows. Let's see how it looks
cooling down the shadows. I think that looks pretty nice. Maybe I'll cool them down even more with a little bit of blue. Now that we've cooled
down the shadows, let's go into the mid tones
and see what we can do here. I think cooling
down the midtones also looks nice,
so I'll do that. Maybe I'll add a
little bit of magenta. And going into the highlights. There's a lot of highlight in this picture with the
clouds and her dress. I'm not sure I want to affect the highlights, so I'll
close out of that. Now we can see the total
difference here is the before and after of all of
those final adjustments. Now I'm just going
to select all of the layers except for our mask. Let me see, I'll hold
down command or control. I'll click on all of these. And I'll just get
out the hand tool. And now you can see the
final before and after. Well, that was
quite the project. I love how this turned
out. Great work. Now that we finish this
beautiful wedding composite, in the next video, we'll move
on to a whole new project.
64. City Composite - Find the Photos: Let's find the photos
for our next project. For this next composite, we're going to place this woman into the middle of a city. Since this is a
practice project, I've already found
the photos that we'll be using on Unsplash. But why did I pick these two
photos? Let's take a look. First, I like the camera
angle in both of these. You can see in the
woman's photo, we're looking slightly
up towards the sky. In the city photo,
it's pretty similar. We're looking up at
these buildings. I also like the camera position. Both of these photos are taken
from a similar distance. We can see the hills in the
background of her photo, and we can see all
of the buildings in the city. It seems to match up. I also like the lighting.
They're very similar. In her photo, the sunrise
is shining on her face, and In the city photo, we can see that the light is coming from behind
the buildings. It's pretty similar. Both
photos have noticeable shadows. It doesn't seem too extreme, but I do think we're
going to need to make her shadows look a little bit
harsher to match the city. Last, we have easy to mask. She might actually take a
little bit of work to mask, but it shouldn't be too crazy. It's always nice when
people wear hats, so we don't need to worry
about their hair so much. Those are the two photos
that we'll be working with. Let's move on to
the next video and we'll mask the woman
from her background.
65. City Composite - Mask the Subject: Let's mask the subject
in this video. Now, I'm going to be
honest with you here. While preparing for this video, I tried using the
selection brush to make a selection
of our model, and it really wasn't
working very well. What do we do when the
selection brush isn't working? Well, in that situation, we can turn to our good
friend, the Pen tool. I'm going to select the Pen
tool and then I'll change its settings so that we're in smart mode with a rubber
band mode turned on. Also make sure you have snapping turned off for this step. Then we can go ahead and
get started tracing her. As I'm tracing her, I'm going to lean toward
cutting more of her off to remove any fringing that we can see
as we're tracing. It's always a good
idea to cut more inward rather than leave some
of the background behind. I'm just going to
click click click all the way around
the outside of her. When I get to her hair,
I'm honestly just going to cut through
the flyaway hairs. It won't really make a huge difference for this composite. It's totally fine
to leave those out. That took a little while to do, but it wasn't too difficult. Now that that's done, I'm just going to turn this
into a selection. Then I'm going to go down
here and add a mask. I'll de select with
command or control D. Now we can see our
smooth, beautiful selection. Now, before we finish, I do have a few more areas that I'd
like to remove from the mask. We can do that by simply tracing the areas
with the pen tool. I'll start down here
right where her bag is. I'm just going to trace this whole area Once
I have that traced, I'll turn it into a selection. Then with the mask selected, I'll grab the paint brush, and I'll paint in
black paint with full flow to remove what's
inside of my selection. I'll D select with
command or control D. Then I'll do this again. I'll grab the pen tool, and I'll just trace over a few more of these areas
I'd like to remove. You can see this green
and red fringing is pretty bad right here
in the nook of her arm. I'm going to make sure I
definitely cut out those areas, so you can't see them anymore. Last, this area is a
little bit tricky. It would be hard to trace
it with the pen tool. Instead, I'm going to use a
low flow on my paint brush and I'm just going to paint this little area right on
the mask in black paint. If you paint too
much, you can press x on your keyboard
to switch to white. You can bring some of that back. All right. With that, we're done cutting out our
subject from her background. Great work. In the next video, we're going to
copy her and we'll paste her into her
new background.
66. City Composite - Resize & Position: In this simple video, we're going to resize and
position our subject. To start, I'll make sure that we have her background
layer selected, and then I'll press command
or Control C to copy it. I'll go into her new
background and I'll press command or Control
V to paste her in. Now, I'm just going
to use the move tool. I'm actually going to
make sure that I have snapping turned on because I'm going to snap
her so that she fits just perfectly
into this image. Once you see that red line on bottom, that
looks really good. She's lined up on top as well. Then I'm going to center
her just like that. Now, because she's lining up perfectly with the
top and bottom edge, we actually don't need to go and clean up her mask
from that white line. But if you did shrink her down, then you could start to see
that white line appearing. You need to go on her mask and just paint in black
to remove that. But because of the way I'm
choosing to position her, whoops, with her perfectly
lined up and centered, we won't need to
worry about that. That was nice and simple. In the next video, we'll
start to match her lighting.
67. City Composite - Match Global Lighting: This video we'll match
the global lighting. I'd like for her lighting to
match the background better. I'll press command or Control M to bring up the
curves adjustment, and then I'll make
this a child layer. Now this will only affect her. Then I'm just going to go through all of the
six things we can do with the curves adjustment to see what looks
right for this. We can brighten it.
That's not right. Let me just darken that.
Then for the shadows, Lightening it
certainly looks wrong. I think I'll actually darken
the shadows in this case. Just a little bit. Then
for the highlights, we can brighten them
or darken them. I think I'll also darken these. This photo behind her has a
much more of a moody look. I think this looks a lot better. Here's the before and after
of adjusting the lighting. I didn't realize how faded
and gray she looked. Now she looks a lot deeper
and it matches better. All right, great work.
In the next video, we'll work on
matching the colors.
68. City Composite - Match Global Color: This video, we'll work on
matching the global colors. We're going to use
those three layers that we like to use
for matching colors. Let's start by duplicating the background layer with
command or Control J. Then I'll add a
blur to this layer. I'll increase this and make sure preserve
Alpha is turned on. Then I'll increase it even more. Let's go with 200. Now that those colors
are nice and blurry, I'm just going to place this as a child layer to our model. Then I'll change the blend
mode of this layer to color. Wow, that looks really intense. I definitely need to
lower the opacity. I don't want this affecting
her skin quite so much. I think I'll bring
it down quite a bit. Now you can see the
before and after. You can mostly see
the difference in her red shirt before, after. That was a good start. Let's
do the HSL adjustment next. I'll press command
or control you. I think her colors need to
be a lot less saturated. The background is full of
a lot of grays and blues. Let's start with
the global colors, and I'll just bring
the saturation down. Then I'm going to
change the hue slider. Moving it up would
make her more red, so I need to move at
the opposite direction. Bringing it to the left,
just introducing a little bit more of blue to it.
I think that looks good. Here's the before and after very subtle
adjustments so far. Let's go out with a bang and do the color balance
adjustment next. Starting in the shadows. I know I definitely
want to add more cyan to her. Let's start there. Adding a little bit of cyan. I think I'll add a little bit
of green as well and blue. Let's go on to the midtones. Again, I'll add some cyan. I was thinking
about adding green, but I don't want her skin
to become too green. I'm actually going to
add magenta instead. And then I'll add
even more blue. A going into the highlights. I'm going to add even more cyan. I'll add some more
green and more blue. This looks a lot more extreme
than our other adjustments. Here's the before and after. Now we can see all of
these color adjustments, here's the before and after Wow. Let's look at all of our global adjustments from
where we started. She definitely looks
like she fits into the scene a lot better before, after. What a great start. Now, normally the next steps
that we do would be to add a shadow to the ground
and then add a contact point. But because of the way this
composite is positioned, we actually don't
need either of those since we can't see the
ground beneath her. But we will need to add some nice rim lighting and shadows directly
onto our subject. Let's move on to
step number eight, adding the shadows
and highlights.
69. City Composite - Add the Shadows & Highlights: Let's add some shadows
and highlights. Now, my goal for this video is to darken the
back of her more. Since the sun is shining
in front of her, there wouldn't really
be light back here. I also want to enhance any rim lighting
that we have here. Let's go ahead and start there. I'm going to add a
curves adjustment, and I'll make this
nice and bright. I'll invert this with
command or control I. Then I'm going to
use the paint brush. I'll paint in white
paint with a low flow. Let's bring it all the
way down, I think 5%. Then with a larger brush, I'm just going to paint this
on the left side of her. I'll paint some light
right here and here. I'll also paint a little
bit of light on top of her arm right here
and right in here. Now you can see the
before and after of that. I'm going to add one
more curves adjustment, Command or Control M. I'll make this nice and
bright as well, and I'll invert it with
command or Control I. I'm going to use this layer to paint
on our rim lighting. I'll raise the flow, and I'll use a bit of
a smaller brush. Then I'm just going to paint on the very edge to add
even more light. I'm trying to do this a
little bit more soft, but I still want to add
that lighting there. I might have added
too much there. I'm going to switch my color to black by hitting x
on the keyboard, and then I'll just remove
a little bit of that. Nice. Continuing on, painting in white paint, all
the way down here. I think I'm also going to add a little bit of
light right in here. Then a little bit on her arm and in the nook of
her arm right here. In addition, we can
also enhance some of the fabric on her shirt
that has highlights. I'm only going to do this in areas where it should be bright. Right here, the sunlight
is hitting her arm. I'm just going to
add a little bit of light right in there. Then over here on this
part of the shirt, I'm just going to enhance
a few of these ripples. That looks pretty good.
Now you can see here's the before and after of adding the rim lighting
before and after. Here's the before and after
of all of that lighting. That looks really
good. But now we need to balance it by
adding more darkness. I'll press command or Control M and I'll add a dark
curve this time. I'll invert it with
command or control I. Then I'm going to paint
with a very low flow. Just to add this to
the back of her. I'm basically going to
paint this everywhere other than where I just
painted that light area. And now you can see the
before and after of that. Now, even after all
of that darkness, there's still a few areas that
look a little too bright. I'm going to add a
new pixel layer, and I'm just going to paint
directly on this layer and black paint to reduce the
light in those areas. In this bright
spot on her shirt, I'm just going to add a
little bit of black paint. Then on the back
of her pants here, oops, I went a little too far. I'm just going to add a
little bit more black. We want both sides
of her pants too, and I think that looks better
and a little over her hair. Here's the before and after adding a little
bit more darkness. Now you can see all of
those lighting layers. Here's the before and the after. Wow. Painting with light
makes such a big difference. I think this looks a lot
better. All right, great work. We're almost done.
In the next video, we're just going to
match the clarity between these two pictures.
70. City Composite - Match Clarity: This video will match
the clarity Now, normally with this step, I would zoom in and make sure that the clarity between
our subject and background is exactly the same. But in this picture, she's standing at quite a
distance from the city. Instead, I'm going
to use this step to add a bit of a
blur to the city. I'm going to close up her group and I'm going to select
our background layer. Then I'm going to
add a Gaussian blur. I'll just zoom in here so
I can see this better. I think I'll raise
the blur like that, and I'll make sure preserve
Alpha is checked on. Now, to make this
look more realistic, I'm actually going to
apply a gradient that way the blur can fade
from here to here. This area should be a
little bit more in focused, and then it should gradually get more blurry as we go up here. I'm going to start my gradient right up here at this building, and I'm just going
to drag it all the way down to the very bottom. Now you can see that we go from a blurry building and then it gradually
becomes more in focus. I think that looks really nice. Then one last thing
that I want to fix is actually the
mask of our subject. If you zoom in here, you can just see how harsh this line is. I want to blur the mask to blend this a
little bit better. With the mask selected, I'm going to apply
a Gaussian blur. I'll make sure this is a
child layer to the mask. Then I'm going to
raise the radius. If I raise it too much, there
starts to become a halo. I actually want to be
very subtle with this, blurring it just enough
to soften that edge. I think that looks nice. Here
is the before and after. Now that we're done
with that blurring, in the next video, we're going to
finish this project by doing some continued editing.
71. City Composite - Continue Editing: This video we'll
continue editing. Now that these images
match each other so well, we can put as many
adjustment layers as we want on top of everything. I'm going to start by
adjusting the lighting. I'll press command
or Control M. Now, something that
stands out to me in this picture is just how
dark the shadows are. I'm actually going to raise the shadows to lighten them up, and I'll just do
this a little bit. Then I'm going to darken the mid tones, just
to balance that out. You can see this just
makes the picture a little less extreme. Here's the before and the after. Just a subtle difference. Next, I think I actually want
to make the photo warmer. It's just so cool right now. Go into the adjustments, I'm going to apply
a white balance, and I'm going to bring this
slider over to add warmth. Then I'm going to add
a little bit of green. A. Like that. You can see this gives a
much different feeling before it was a cool dark city. Now we have that little bit of warmth coming from the sun. I think this looks nice
and I'm going to take all of the rest of the
adjustments in this direction. To continue to take
it in this direction. Our next step is going
to be adding a sunburst. I'm going to do this by
adding a burst of light to this corner over here where
the light is hitting her hat. I'll grab the ellipse tool. I'll click and drag out a circle and then using
the gradient tool. I'll drag from the
center outward. Let's make this orange. I'll turn it into
a radial gradient. I'll set it to screen,
and I'll add a blur. I'll just type in this box. Let's go with 400. Then I'll just grab
the move tool so I can adjust how this
is positioned. I want this to cover
this whole corner and a little bit of her hat. That's very extreme right now, so I'm just going to
lower the opacity. Now you can see the
before and after. I want to brighten
this effect even more. I'm going to add another curves adjustment
with command or Control M. Then I'm just
going to brighten this. I'll invert this with
command or Control I. Then I'm just going
to paint with the paint brush tool
in white paint. I'll need to reset
this color here. Then with a large paint
brush, maybe not that. I'm just going to paint in
this area. To brighten it up. Here's the before and after. Now to contrast this a bit, I think I want to darken the
right side of the picture. To do this, I'm actually
going to use a pixel layer. I'm going to paint in black
paint over this area. I'm going to paint all along the bottom here and all up here. I've painted a little
bit too much there, I'll describe the eraser
and with a low flow. I'm just going to erase
that a little bit. Bringing the brush out,
I'll paint over that again, keeping it a little
bit more ****. You can see that I
painted over our model. I actually don't like
that. I'm going to lower this so it's
beneath our models layer. I'm just darkening
the background. Now that I've
darkened that area, I like how it looks down here, but I'm noticing
this blue part of the sky a lot more. I
want to reduce this. I'm going to click
on our top layer again and I'm going to press command or Control you to get out the
HSL adjustment. I think I'm just
going to make the whole image less saturated. Then so I can target this area. I'm going to go into the scans, and I'm going to reduce
this saturation even more. I think I'll brighten
it just a little bit. Then I'm going to
shift the hue slider. I think I'll bring
it up, just to add a little bit
more warmth to it. Now you can see that before and after that area looks a
lot less intense to me. Now that I've added all of
those different adjustments, I'm noticing this
part of her shirt, it looks very dark and I'm wondering if I can
go back and fix that. I'm going to open up her layers, and I'm going to
see if this black pixel layer is what did it. I think it is contributing
to that a little bit. I'm going to grab
the eraser tool and I'm just going to reduce
that darkness right there. It just looks way too dark. I'll grab the paint brush because I painted away
a little bit too much. This area should still be dark. Then we have this adjustment, which darkened even more. I'm going to paint in black just over that area to
reduce that even more. There we go. I think
that looks better. Looking at our picture now, I think it looks really good. I just want to add
one more detail and that's actually
adding some noise. I think this style of picture would look really nice if we just added a layer of noise
over the top of everything. I'll go to the filters, and then I'll click
on add noise. I'm just going to add
a little bit of noise. You can see what this
effect is doing. I don't want to add too much. I think somewhere around
there looks pretty good. Here's the before and
after a adding noise. Okay. Our picture looks so good. Now, I'm just going
to select all of our layers so that we can
see the before and after. Here it is, the
complete before and after I think this project
turned out really nice. She looks so good and definitely fits into
the scene a lot better. Great work. Now that
we're done with that, we'll do one last composite
starting in the next video.
72. Street Composite - Find the Photos: Let's find the photos
for our next composite. For this last composite project, we're going to place this
man into a brand new photo. Since this is a
practice project, I've already found the
photos we'll be using by going to Pixabay
and Unsplash. But let's take a closer look at why picked these two photos. First, I really like
the camera angle. Both of the cameras are
about at eye level. I also like the camera position. Both photos are taken
from a moderate distance. They're not too close
or too far away. Now, arguably the most
important thing that really fits with these two
pictures is the lighting. The man is being lit from
behind in his original photo. When we place him
in the new photo, he'll also be lit from behind. This will help us to make our composite look extra convincing. Last, I think he looks very easy to mask. He's
wearing a hat. We don't have any flyaway
hairs. Very nice. Now that we've
found these photos, we can move on to
step number two and mask the man from
his original background.
73. Street Composite - Mask the Subject: This video will
mask the subject. This man is going to be
pretty easy to select. Let's grab the selection bruh, and I'm just going to
use a larger brush so that I can click and drag
to create my selection. Now, like I said
in the last video, he doesn't have any hair
we need to worry about. This selection should
actually be pretty simple. I'm just going to zoom in here and make sure I got everything. I'm going to use a small brush just to remove this
part right here. Our selection looks good, so I'm just going to
apply a mask to it. Then I'll de select
with command or Control D. I didn't do any refining this time because there aren't
really any soft edges that need refining areas of hair or fur like with
the bunny project. This was a super simple
selection just with the selection bruh.
All right. Great work. Now we're ready to move on
to the next video where we'll this ma into
his new image. H
74. Street Composite - Resize & Position: In this video, will resize
and position our subject. I'm just going to
select his layer, and then I'm going
to press command or Control C to copy it. I'll go to our background
and I'll press command or Control
V to paste it in. Now I can just use the
move tool to resize him. I'm going to turn
off snapping just so I can move him
around a little easier. I like the placement there. I'll admit it's a little
bit tricky to know how large he should be in
comparison to his surroundings. But I think this
looks pretty good. Now that we're done placing him, we can fix the white line bug by holding Alt or Option and
then clicking on his mask. Now I'm just going to
use a paint brush, and I'll paint
with full flow and black paint right
on the border here. With that cleaned up,
I'll just hold down Alt or Option and I'll
click on the mask again. Now that we have this
man in this background. You might notice that we have a little bit of light fringing. There seems to be
a little bit of a light halo going around him. But that's actually going
to work in our favor in this photo because the light
is coming from behind him. It's already creating a
natural rim lighting, which looks really good. But if you were to
place this man in a background where the lighting wasn't coming from the back, maybe it was coming
from the side. I would probably
want to clean up the fringing on the side that the light
isn't hitting him. That's just something
to keep in mind. But for this composite, this is going to work perfect. In the next video,
we're going to work on matching his lighting
to the background.
75. Street Composite - Match Global Lighting: Let's match the global lighting. I'm going to start by adding a curves adjustment
with command or Control M. Then I'll place this as a
child layer to our subject. Now I'm just going to play with this curves adjustment to see what looks good for our subject. Now, I already think he looks pretty bright for
this nighttime photo. I'm going to bring
the mid tones down. In addition, I think the
shadows on his black shirt look a little bit
too dark when you compare it to the
shadows in this picture. I'm going to lighten
this shadow point by just bringing
it up like this. I also think his
highlights look a bit bright on his
face, for example. I'm just going to
lower the highlights, just to dull those
down a little bit. Now we can see that before and after of doing
that global lighting. Nice and simple. With that done, let's do the colors
in the next video.
76. Street Composite - Match Global Color: Let's match the global colors. We're going to do our
three color layers. I'll start by selecting
the background and I'll duplicate it with
command or control J. Then I'll apply a
blur to this layer. I'll bring it up and
turn on, preserve Alpha. Let's just type in a number. We'll go with 500 this time. I really want these
colors to be blurred. That'll be nice. Then
I'm going to take this layer and I'll make it
a child layer to our model. Then I'll change the
blend mode to color. You can see we have the
colors reflecting on him. We have the warmth of the
street on his lower half, and then the coolness of the
night sky on the upper half, which is pretty interesting. I'm just going to lower
the opacity down, so this affects him less. Then we can move on to
the other color layers. But first, I just want to show
you the before and after. I like that this has warmed up his clothes down here before
they were pretty cool toned. It's also muted down his
skin tone a little bit. I think this just looks a
little bit more even for colors for this.
That's pretty good. Next, let's do the
HSL adjustment, I'll press command or control. Then I think I want to lower
his saturation even more. Just to prepare this for the other colors that we'll
add with color balance. I don't think I want
to mess with the hue, so I'll just double
click to reset that. But just lowering this
saturation is going to be a good start and now we can add our color
balance and really start to apply colors that
we think look good for this. Let's start in the shadows. Just looking at the
surrounding areas. You can see that the shadows in this photo are a
little bit warmer. All this warm lighting is making them a little
bit more red toned. I'm just going to
increase the red slider, and I think that's
all I want to do. I really don't want to cool down the shadows in this picture. Let's move on to the mid tones. Again, I think I
do want to raise the redness, so
I'll put that up. And I think I actually want to add a
little bit of green as well. I definitely want to add yellow. We're really not trying
to cool him down. We're just trying to warm
him up for this picture. Last, for the highlights, I'm going to add a
little bit of red, a little bit of magenta,
and some yellow. Now you can see the before and after of
the color balance. Before we really dole down his colors and now we're
just bringing them back so that his clothing and his skin is all evenly colored. I think this looks really
good before, after. Now you can see the
before of all of our color enhancements
and here's the after. Last, I'll just show you all
of our global adjustments. Here's the before
and after of those. Now that he's fitting so
nicely into this background, we're ready to add the
shadow in the next video.
77. Street Composite - Add the Shadow: Let's add a shadow
in this video. Now, just looking around at the shadows that are
already on the ground. You can see that they look
pretty soft in this image because there's so much light coming from different
parts of the image. As we're painting a shadow
underneath our subject, we need to keep that
in mind just to use a light hand
for this shadow. Now I'm going to close up his group and select
the background. Then I'm going to add a
new pixelayer on top of that so that the shadow
appears underneath him. Then using the paint brush, I'm just going to
paint in black paint with a low flow to
add this shadow. Now with a larger brush. I'm going to begin
painting his shadow. Now, the light is
coming from behind him, but I think I still want to
paint the shadow at an angle. I can see a lot more
light from this side. I think I'm going to
paint the shadow, so it reflects diagonally
down like this. I'm just going to start right by his feet, and then
I'll bring it out. I'm going to darken it a little
bit more toward his feet, and then it'll fade out
as we get farther away. I think I might have
painted a little bit too much right there though. I'm going to grab
the eraser tool and with a very low flow. I'm just going to paint
with a large brush to remove a little bit of that. I think that looks better. I'm just going to grab
the brush tool again, and using a larger brush, I'm just going to go
over this one more time. Now you can see that before
and after of that shadow. I kept it very soft. I think at this point, I do want to go back in
with the eraser and just erase a more of
it to keep it even softer. But I think that
looks pretty good. I'm just going to
go in here also and erase a little bit of
the shadow behind him. It really should
only be appearing right underneath him
and in front of him. With our shadow in place, we're ready to move
on to the next video, where we're going to
create the contact point.
78. Street Composite - Create the Contact Point: This video will create
the contact point. To start off with
the contact point, I'm just going to
zoom into his shoes. Then I'm going to
select his mask because now's the
time to clean up the mask down here and create a little bit more
softness on the edge here. I'm just going to
grab the brush tool, and I'll just paint
with a low flow. Maybe I'll bring it up a little
bit though to around 15%. Then with a nice small brush, I'm just going to begin to
clean this mask up ale bit. I know it was a little
bit strange down here. I'm just going to clean
up any weird areas and also soften the edge. Now, keep in mind that he has a hard pair of shoes
on on a hard surface. We shouldn't erase too much
with the bunny project. The bunny was on grass. It made sense to paint
away more of the bunny. But here, I'm just going to
lightly paint some away. I think that looks pretty good. Now with that prepared, we can
create our contact shadow. I'm going to select
this pixel layer and I'll add another
one on top of that. Then I'm going to
paint in black paint right along the edge to
create our contact shadow. I think I'll just lower
the flow a little bit. Then I can begin painting. Remember that this
shadow is only for where his shoes are
contacting the ground. Don't paint it all the way up
his shoe on the right shoe, just on the part where
it's touching the ground. I think the shoe looks a
little bit strange right here. I'm going to go on
the mask and I'm just going to paint away a little
bit more of the mask. I think this light line right here is just coming
from his shoe. But I don't want it to be there, so let me just get rid of that. Now that contact shadow
looks pretty good. Here's the before and after. Now, I'm just going
to add another pixel layer so that we can blend the contact shadow in
with the existing shadow. This transition shadow
should be pretty soft. I'm just going to use
a little bit larger of a brush and I'm going to
paint right along the edge. Maybe I'll undo that. I'll
lower the flow even more. I'll paint right
along the edge of this contact shadow
to blend it in. Using a larger brush,
I'm also just going to enhance the shadow
that's underneath him, darkening that a little bit
more, and then fading it out. Here's the before and
after of that blending. Now you can see the
before and after of all of the contact shadow
work that we just added. Very nice. I think this looks really nice and really helps to
ground our subject. He no longer looks like
he's just floating there. I think that that's the
hardest part when placing your subject because it really did look like
he was floating. But with this added shadow, now we can see that it looks like he belongs in that area. I think his size looks good. That's all really nice. Now we have him placed,
his shadows done, and now we can move on
to the next video where we'll refine the shadows and highlights that are
on our subject.
79. Street Composite - Add the Shadows & Highlights: Let's refine the shadows and highlights that are
on our subject. We already know that the light
is coming from behind him. We need to refine
the shadows and highlights a little bit more to darken him more in the front and then add some rim
lighting around him. I think this will really
help to enhance this effect. I'm going to start by selecting
one of his child layers. Then I'm just going to
add a curves adjustment. We'll use this first
one to darken him. I'll go ahead and
darken this one. I'll invert this layer
with command or control I. Then I'm going to paint in
white paint with a low flow to reveal this just over
the front of our subject. I think I'll save
his head for last. I'm just going to start
darkening the front of him. Remember this is a child layer, so there's no need
to worry about painting between his legs. That's not a problem there. I'm trying to avoid
the very edges where we're going to be
brightening in a second. But I think that
looks pretty good. Now I'm just going
to add a little bit of darkness to his face, and then I'm going
to concentrate a little bit more darkness
under the rim of his hat. Then I'm going to
add a little bit of darkness to the front
of his hat as well. Now you can see that
before and after of that. I think that looks pretty good. Now I'm going to add
some more lightness to his outer edges, I'll press command or Control M, and we'll make
this one brighter. I'll invert this with
command or control I. Then I'll paint in
white paint once again, and I'm just going to
paint this on the edges. I'm not doing rim lighting yet. This is just a general
brightening of the edges. I'm mostly going to do
this for the top of him where the light
is mainly hitting. But I think I will
add a little bit to the rest of his edges, just a little bit. That
looks pretty good. Here's the before and after
of that delicate lighting. Now we can go in with
a harsh lighting by adding some rim lighting, Alps command or Control M. I'll brighten this. Then I'll invert it with
command or control I. Since this is rim lighting, I'm just going to up
my flow a little bit. Then I'll use a smaller brush, and I'm just going to
enhance this rim lighting. Now there already is
existing rim lighting, which makes this super easy. Just paint in those same areas, enhancing them a
little bit more. Is this on his mask? That looks a little strange. I'm just going to
quickly select his mask and I'm going to paint that
in to connect that line. That looks a little bit strange. I totally missed
that. I'll switch my color to black
just to erase the extra there. That's better. Back to the rim lighting. I just finished
the rim lighting. Here's the before and after. Now that we're done with
all of that lighting. I want to show you
an advanced trick. You can see over here on the left side that
his highlights are looking pretty white
and on the other side, they look a little
bit more warm toned. I don't really like the look
of these white highlights, so I want to enhance
the yellowness of them. Let's do that. I'm going to apply a white
balance adjustment. I'm going to
increase the warmth. And I'll add a little
bit of magenta as well. Now our subject looks very warm, but I only wanted this to
affect the highlights. I'm going to use a blend ranges. I'll click on this gear icon. Then I'm going to bring
down the shadow node, and then I'll bring it over, so it's only affecting
the highlights. Here's the before and after, you can really see this on
the newspaper before, after. I think this is a little harsh, so I'm just going to
lower the opacity. But you can see how this just softened the harsh
whiteness of the highlight. I just have one last
finishing touch and that's actually
down here on his shoes. I think this highlight just
looks a little bit too intense and I want to tone
down the colors in it. I'm going to press
command or control you. I'm going to desaturate this. Then I'll invert it
with command or control I. I'm just going to paint in white paint over the
shoe to reduce that. I think I painted with
too harsh of a flow. I'm just going to lower that. Then I'll do that one more time. Just trying to reduce the
yellowness a little bit. Here's the before and
here's the after. Let's see before and after
of all of the layers we did. Here's the before,
and here's the after. Great work on this video. I think all of those shadows and highlights really helped. In the next video,
we're going to match the clarity between our
subject and the background.
80. Street Composite - Match Clarity: Let's match the
clarity in this video. To see the clarity
that we need to fix. I'm just going to
zoom in right here. You can see that
our background has a lot more noise than
our subject does. I want to add a little
bit more noise to our subject just to make
these two areas blend in. I'm going to select one
of the top layers here. Then I'm just going to
apply the add noise filter. Make sure that's a layer
standing all on its own. That looks good. Then we can go ahead and bring up the noise. I think this level of
noise looks pretty good. It has a similar noise
to the background. Now, typically, noise is
mostly present in the shadows, which explains why the dark area of this background
has so much noise. But on our subject, I don't want our highlights to be too
affected by this noise. I'm actually going
to use blend ranges to remove this noise
from the highlights. I think I'll bring it over
a little bit as well. You can see the noise
is still present, but now it's more subtle
in these highlight areas. Then as you move on to
a more shadowy area, you can see we have
quite a bit more noise. Here's the before
and after of that. I'm just going to lower
the opacity a little bit. Just to reduce this
a little bit more. But you can still
see the before and after and how this helps him to blend in with
his background better. That was a very subtle step. Now, I think we're done
with being subtle. Our model looks really
good with this background. In the next video,
we're going to complete this composite project by
affecting the photo as a whole.
81. Street Composite - Continue Editing: Let's continue editing
in this video. It's time to affect
the entire photo. To start, I'm going to apply a curve on
top of everything. Make sure this is no
longer a child layer. I think I want this
overall picture to look a little bit more moody. I'm just going to darken it. Just a little darker. Next, I want to make the sky a
lot less noticeable. Right now, it just
looks so saturated. I'm going to press
command or Control U. Then I'm going to desaturate
this all the way. I actually want this layer to be placed underneath our subject. That way, I'm not affecting
him at all with this. I really only want
to affect the sky. I'm going to invert this
with command or control I. Then I'm just going to
paint in white paint with a low flow to
desaturate the sky. That looks pretty good.
Here's the before, and here's the after. Next, I want to enhance
the lighting in this photo by grating
light bursts. To start, I'm just going
to grab the ellipse tool. I'll add a circle. Again,
this is placed behind him. We don't want any of this
light to be on his front. This should only be behind him. Then I'm going to grab
the gradient tool. I'll just start from the
center and go outward, and I'll make this
an orange color. I'll change it to
a radial gradient. I'll set it to screen, and then I'll add a blur to it. L et's go with 500. Then I'm just going to select the circle and I'll
lower its opacity. There we go. Then I'm going to grab the move tool and
I'll reposition this. I'm going to enhance
the lighting over here. I'll just do that. Then I'm going to duplicate
this oval twice. I'll press command or
control J to do that. Then I'm just going to move
this oval over to this side. Then I'll move this oval
over to the center. You can see we have quite a bit of light coming from these. I think I'll just
select them all and I'll lower their
opacity even more. Now you can see that before and after of
enhancing that light. This looks really nice. Let's contrast this lighting by darkening the
ground a little more. I'll select one of the
light bursts and I'm just going to add a pixel
layer on top of that. Then I'm going to
paint in black paint, and I'll just paint
over the ground. Just add a little
bit more darkness. Again, this should be behind our subject since we only
want to affect the ground. Now you can see the
before and after. Again, I want to lean more
into the moody vibe of this. I wanted to look like he's a detective walking the streets. To create that effect
a little bit more, I'm going to desaturate
this photo even more. I'm going to go
back to the top of our layers and all press
command or control you. Then I'm just going
to desaturate I think I'll also
shift the hue slider just to warm it up slightly. I'm moving it up to the right. Now you can see this. Here's
the before and after. This is really helping to reduce the yellow tones back here, creating a more flat photo. Last, I think this would look nice with a little
bit of a vignette. I'm going to press
command or Control M. I'll darken this. Then I'm going to go into
blend ranges and I'm just going to make sure
that our highlights aren't affected by this fintte. I think I'll move it over
a little bit as well. Then I'm going to invert this. Then I'm going to paint with
a low flow and white paint, just to add this
fgette to the edges. We're trying to draw the
eye into our subject. Here's the before and
after of that vignette. At this point, after all
of those adjustments, our shadows look really dark. I'm going to apply a
curves adjustment, and I'm just going to raise up the shadows to lighten them. I'm also going to darken the
mid tones just a little. You can see the
before and after. With that, I just
want to show you all of the global edits
that we just did. Here is the before
and after of those. A much different feeling now. Now I want to show you the before and after
of everything that we've done. Here we have it. Here is the before and after. Great work on this project. This was the very last
compositing project. After having all
of this practice, you now know how to
take the ten steps and you should be able to apply
them to your own photos. I hope you have some
fun getting out there and making
your own composites.
82. Class Conclusion: Great job. You made it to
the end of the course. You are now in
Affinity Photo Master. I hope you enjoy taking
all of your new skills into the real world as
you edit your own photos. Thanks for watching,
and I'll see you in the next Affinity
Revolution Tutorial.
 Affinity Revolution, Affinity Instructor