Transcripts
1. Children’s Book Cover Design & Illustrating Mockups: Hello. My name is Veronicaa. I'm an illustrator,
surface pattern designer and teacher
based in Germany. In this class, we
will be illustrating together cover for a
board book for children, and then we will
be placing it in a hand drawn vector mock
up in affinity designer. This course is for
those illustrators who would like to work on developing their children's
illustration portfolio. But it's also for those
artists who are interested in taking their affinity designer
skills to the next level. Together, we'll be drawing
acute character for kids and designing a clear
and clean cover for a board book for small kids. A big focus of this
course is learning how to create vector book mockups and affinity designer
from scratch, which can also be saved up
as assets or as templates, and they can be repurposed
as many times as you like. Presenting your
work on mockups is a very important part of presenting yourself
as an artist. Because in this way, you
can show potential clients, editors that you could
be a good hirer because you are able to create with
the end product in mind. On top of that, in this class, you will get very familiar with the most important
vector drawing tools and affinity designer from
the rectangle tool, the corner tool, the shape tool, the pen and the pencil tool, and really highly
requested by my students, the vector brush tool. This is just to name a few. Some prior affinity designer
interface knowledge is a plus if you want
to take this course, but it is also suitable
for complete beginners. I'm sure that you
can follow along. However, if you're
completely new to affinity, you could consider
taking my beginners introduction class first to get familiar with the interface. This way or another, I
hope to see you in class.
2. Getting Started: Hello, everybody. Let's
get started with our cars. To get started, all
that you will need is your affinity designer software
and your drawing pencil. I'm recording this
course in March 2024, and my affinity designer
version is 2.4 0.2. I'll be showing my
demonstration in affinity version two on my iPad. However, you can
definitely follow along regardless
of your version. That means that the steps
that I'm demonstrating in this course can be applied to both version one
and version two, as well as to the iPad
and the desktop version. Just please bear in mind. I'm a big fan of
drawing on the iPad. So in this course, I'm
teaching you as usual, a lot of useful hand
gestures for the iPad. I think this will be
the only thing which unfortunately won't be able to replicate on your
desktop version. When I was creating this course, my number one objective, when I was thinking about
my teaching objectives was to think of a fun project
where you could learn even more about affinity
designer or you could build on the beginner
skills that you already have. So you can actually have
two goals for this course. Maybe you already are a children's picture book
or book illustrator, and maybe this course will help you to develop
further your portfolio, and then the end
illustration with the mockup that you're
going to create, it's going to be
a perfect example to include on your
website portfolio. This is scenario number one. And then scenario number two. It's just a fun project. It's a book cover design. You can make it for kids, you can make it for adults, so we can definitely band the
topic to whatever you want. It's basically for
the artists who want to learn more about
vector illustration. Maybe you want to step away a little bit from Adobe products. Maybe you're transitioning
into affinity software. Perhaps you've taken my pattern design
courses in affinity, and now you would
like to double in a little bit more in
general illustration topic. This fun project for the book cover design and for creating mock
ups from scratch, will definitely enable you to practice more the vector tools that you can find
in the software. Even if you're
already a beginner, you will become much more
confident in using affinity, or you will learn some extra skills on top
of what you already have. Your task is to create with me a vector mock up for
a board book cover. It could be a cover, actually, like I said, for any book. You could choose your own
target audience here, or it could be
specifically a cover for your Kidlet art portfolio for board books for
babies and toddlers. The project that I tackle
in this course is to design a cute board book cover for really really small kids
like babies and toddlers. You can think of a sweet
animal or a cute creature. I have this cute T rex here on one of the covers
that I created. And it's best that you choose your own animal or your
own idea for this project. But if you do want to follow
step by step and copy exactly the teddy
bear cover that I create in this course,
feel free to do that. You just have to be mindful of copyright and you cannot present them this
work as your own. You can treat it as an
exercise and then just keep it in your personal files without sharing them
on the social media. If you're active on social
media, you can, for example, share your final
work on Instagram using the hashtag magical
vectors as usual. If you're in our
Facebook Affinity support group for Illustrators, then you can also post your final work there and
you can ask for a critique. If you're feeling, you would
first love to take more of an introductory course into the Affinity Designer
interface at a lower pace, please consider taking
my beginners course. This class is for both affinity version one
and version two users. Thank you so much for
taking my course. Now let's move on
to our project.
3. Mockup Document Setup: In this lesson, we will start our new board book project
by creating a new document. I like to work in 4,000
pixels square format. We will be creating a mockup
for such a board book. This is just an example. It's in a square format. But you can of adjust it to your own needs or create
multiple projects, and after taking this course, you can also make different
mokps with different formats, for example, a rectangle
format, this longer one. I think it's called a
vertical rectangle format, or even this horizontal
rectangle format. But for now, we will stick
with the square format, and I will be creating a
canvas of 4,000 pixels square. To create your new document,
you have to hit new. A new document, I already have my own preset because
I work with the 4,000 pixels square format quite
a lot also for my patterns. This is already set for me. In case it's not set for you. You can change your dimensions by selecting 4,000
pixels over here, and then you keep 300 DPI. In case you want to work with
different units, of course, you can go to the menu
below and you can, for example, work in inches or in centimeters.
It's up to you. For this project, we are
not creating an artboard. In case this is toggled on, you have to toggle it off. The color format I'm
always working in is RGP and more
specifically as RGP. If you already know
that this will be a project for print
or if it comes from the specifications of your client when
you're designing in particular your cover, then you can also enter here
this color format menu. And you can go all the way down to select for example, CMYK. But I guess this is more
relevant when you're actually designing your cover
that will be for print. The focus of our project is to create a mockup
that will probably end up on your social media
or on your portfolio website. For screens, we're going to stay with the RGB color format. I will show you in a minute how easy it actually is to convert an infinity designer
RGB to CMYK for print. I actually prefer
to start working in RGB because the color
spectrum is wider. Then if need be, I can always convert any illustration
that I have, for example, I had this request last month from my agency. They wanted to prepare some
print promotional materials for clients and they sent out a request
to me asking for a few illustrations of
mine in the CMYK format. I can show you how
to convert that in just a few
seconds in a minute. But first, let's create
our new document. The white area is going
to be our canvas. Now, I just wanted
to quickly show in case you change your mind
and you want to convert this RGB file into a CMYK
file, it's super easy. You just go to this
Hamburger menu, those three horizontal lines. You click on it, and then
you choose convert document. Over here, you can change
your color profile. I can select this RGB option and then scroll
all the way down. Select CMYK. The uncoated FOGRA 29 is the one that I tested together with my illustrator friends that works the best in our
experience for print. When you're converting your
S RGB illustrations to CMYK, the colors are the most
accurate with this format. This is what I would recommend, or you can go with
US co for example. When you select that, then you click this little
select icon here. Or if you don't
want to change it, then you can hit
the cross and stay with the original color format, which is what we're going to do. Now we're going to start by creating our background layer. We can do that by choosing
the rectangle tool over here. There are different shapes
that you can choose from. We will choose a
simple rectangle. Then we're just going to drag
and hold with one finger on the screen to create a
perfect square shape. Now, we go to the color studio. Let's just change
it to any color. This is our fill. This is the color of the
inside of our canvas. The circle that is empty inside is the stroke,
which is the outline. We want to flip it
up, deselect it. You can also deselect it here because we don't
want any outline. Then if you have this
magnetic snapping on, you will be able from
the move tool to position your square
precisely in the middle. You can also go to
the alignment tool, which is also accessible
from the move tool. Over here, this icon.
When you click on it, you can choose a line center and a line middle and it will be placed precisely
in the middle. I use actually the
alignment tool quite a lot. Here in this upper right corner, we can also unclip our canvas. If you have taken my
pattern design classes, you know this very very well. When we unclip it,
we can see what is placed outside of
our original canvas. The original canvas, if I
go to the layer studio, and I turn off the visibility of this rectangle background
that I just created. The original canvas is this original white square that showed up when we
created our document. So if I were, for example, to for whatever reason, copy this square and position it somewhere
outside of the canvas, I can do that by probably
already know this gesture, two fingers on the screen
from the move tool. This is how I can create
very fast applicates. If I want to position it outside of the canvas or I
want to position my mood board or
my color palette outside of the canvas,
I can do that. If I want to see only
what is on my canvas, what will be printed out
or what will be exported, then I again go to this
weird windshield icon and I just press it to turn off the visibility of all the stuff that I might have outside of my original canvas. If I want to see
my mood boards or my color palettes or whatever
I put outside again. I just have to toggle
it off and on again. Some people were asking me why this clip to Canvas option
is not working for them. Over here, there's
a small triangle which you can open and you can see a few other
options here. I have this clip to Canvas
option here deselected. If it's selected, then this
is not working properly, you basically have
to make sure at the beginning that
this looks just like on my screen that this clip to Canvas
here is deselected. And now everything
is working properly. Here is a delete icon. I can remove this
extra rectangle. If you want to quickly rename this layer here in
the layers panel, you can just quickly swipe to the left and here we have
the rename layer option. We can just name it background. This will be our
background layer. Also, again, when you
swipe to the left, you can delete it. There's also a delete icon here and in the lower
left corner here. But what is also handy is that once you know this
is my background. I'm not going to
move it or change colors, you can also lock it. This will prevent you from
moving it unnecessarily. I don't think it's such
a big issue for me, so I'm not locking it. But in case you keep moving it, just remember that
you have an option to lock it and it gets this little padlock icon,
it means it's locked. If you want to
unlock it, you again swipe quickly to the left
and you can unlock it. In this lesson, we
created our new document. Make sure also to save it. Right now it's untitled. If you would like to save it, you need to give it a name. This document will
also tell you. This is the RGB color
format, 4,000 pixel square. When you click on this
three vertical lines menu, you have an option
to save it as. Here you can give it a name. You can name it, for example, something like a
board book mockup, maybe number one, maybe you want to create
different mock ups. Then after naming it, you
can save it to either to storage device to your iPad
or to your Cloud storage. We save for example, in my files folder on my iPad, I have a dedicated
folder called 2024, which is the year of
creating this course, kids portfolio, and this
is where I would save it. Now the name is changed. If we were again to
enter this document, and let's say I'm going to put my name from my assets panel, we already want to
create our signature. So something was changed
in the document. If you go back to
your home page, you will see it has this icon and it means it needs
to be saved again. Then you just go to the
three vertical lines, the Hamburger man
and just click safe. No save Save as only if you
want to rename it again, and safe if you want to save it. Just by exiting this document, it doesn't mean that
it will be saved. You have to do that manually
every now and then. It happened just really a
few times that my program, my affinity designer
software crashed, but nothing was really lost. There's still some
internal working memory, so to say, that will prevent
you from any work loss. It's only in the
case you want to maybe save it up to
your Cloud storage and someone steals your iPad or it falls into water or
something like that, and you really want to make sure that your files are safe, then you really have to
pay attention that you're saving everything to
your external storage. To recap, we created a new
document 4,000 pixel squared. This will be very
social media friendly. The color mode is SRGB. We created a background layer. We refreshed the clip
to Canvas option. We know how to use
the rectangle tool to create our background shape. From the move tool, we also know how to align
it in the middle. In the layers panel, we know how to rename
it or to lock it. In the next lesson,
we will be working on the actual shape for
our board book mockup.
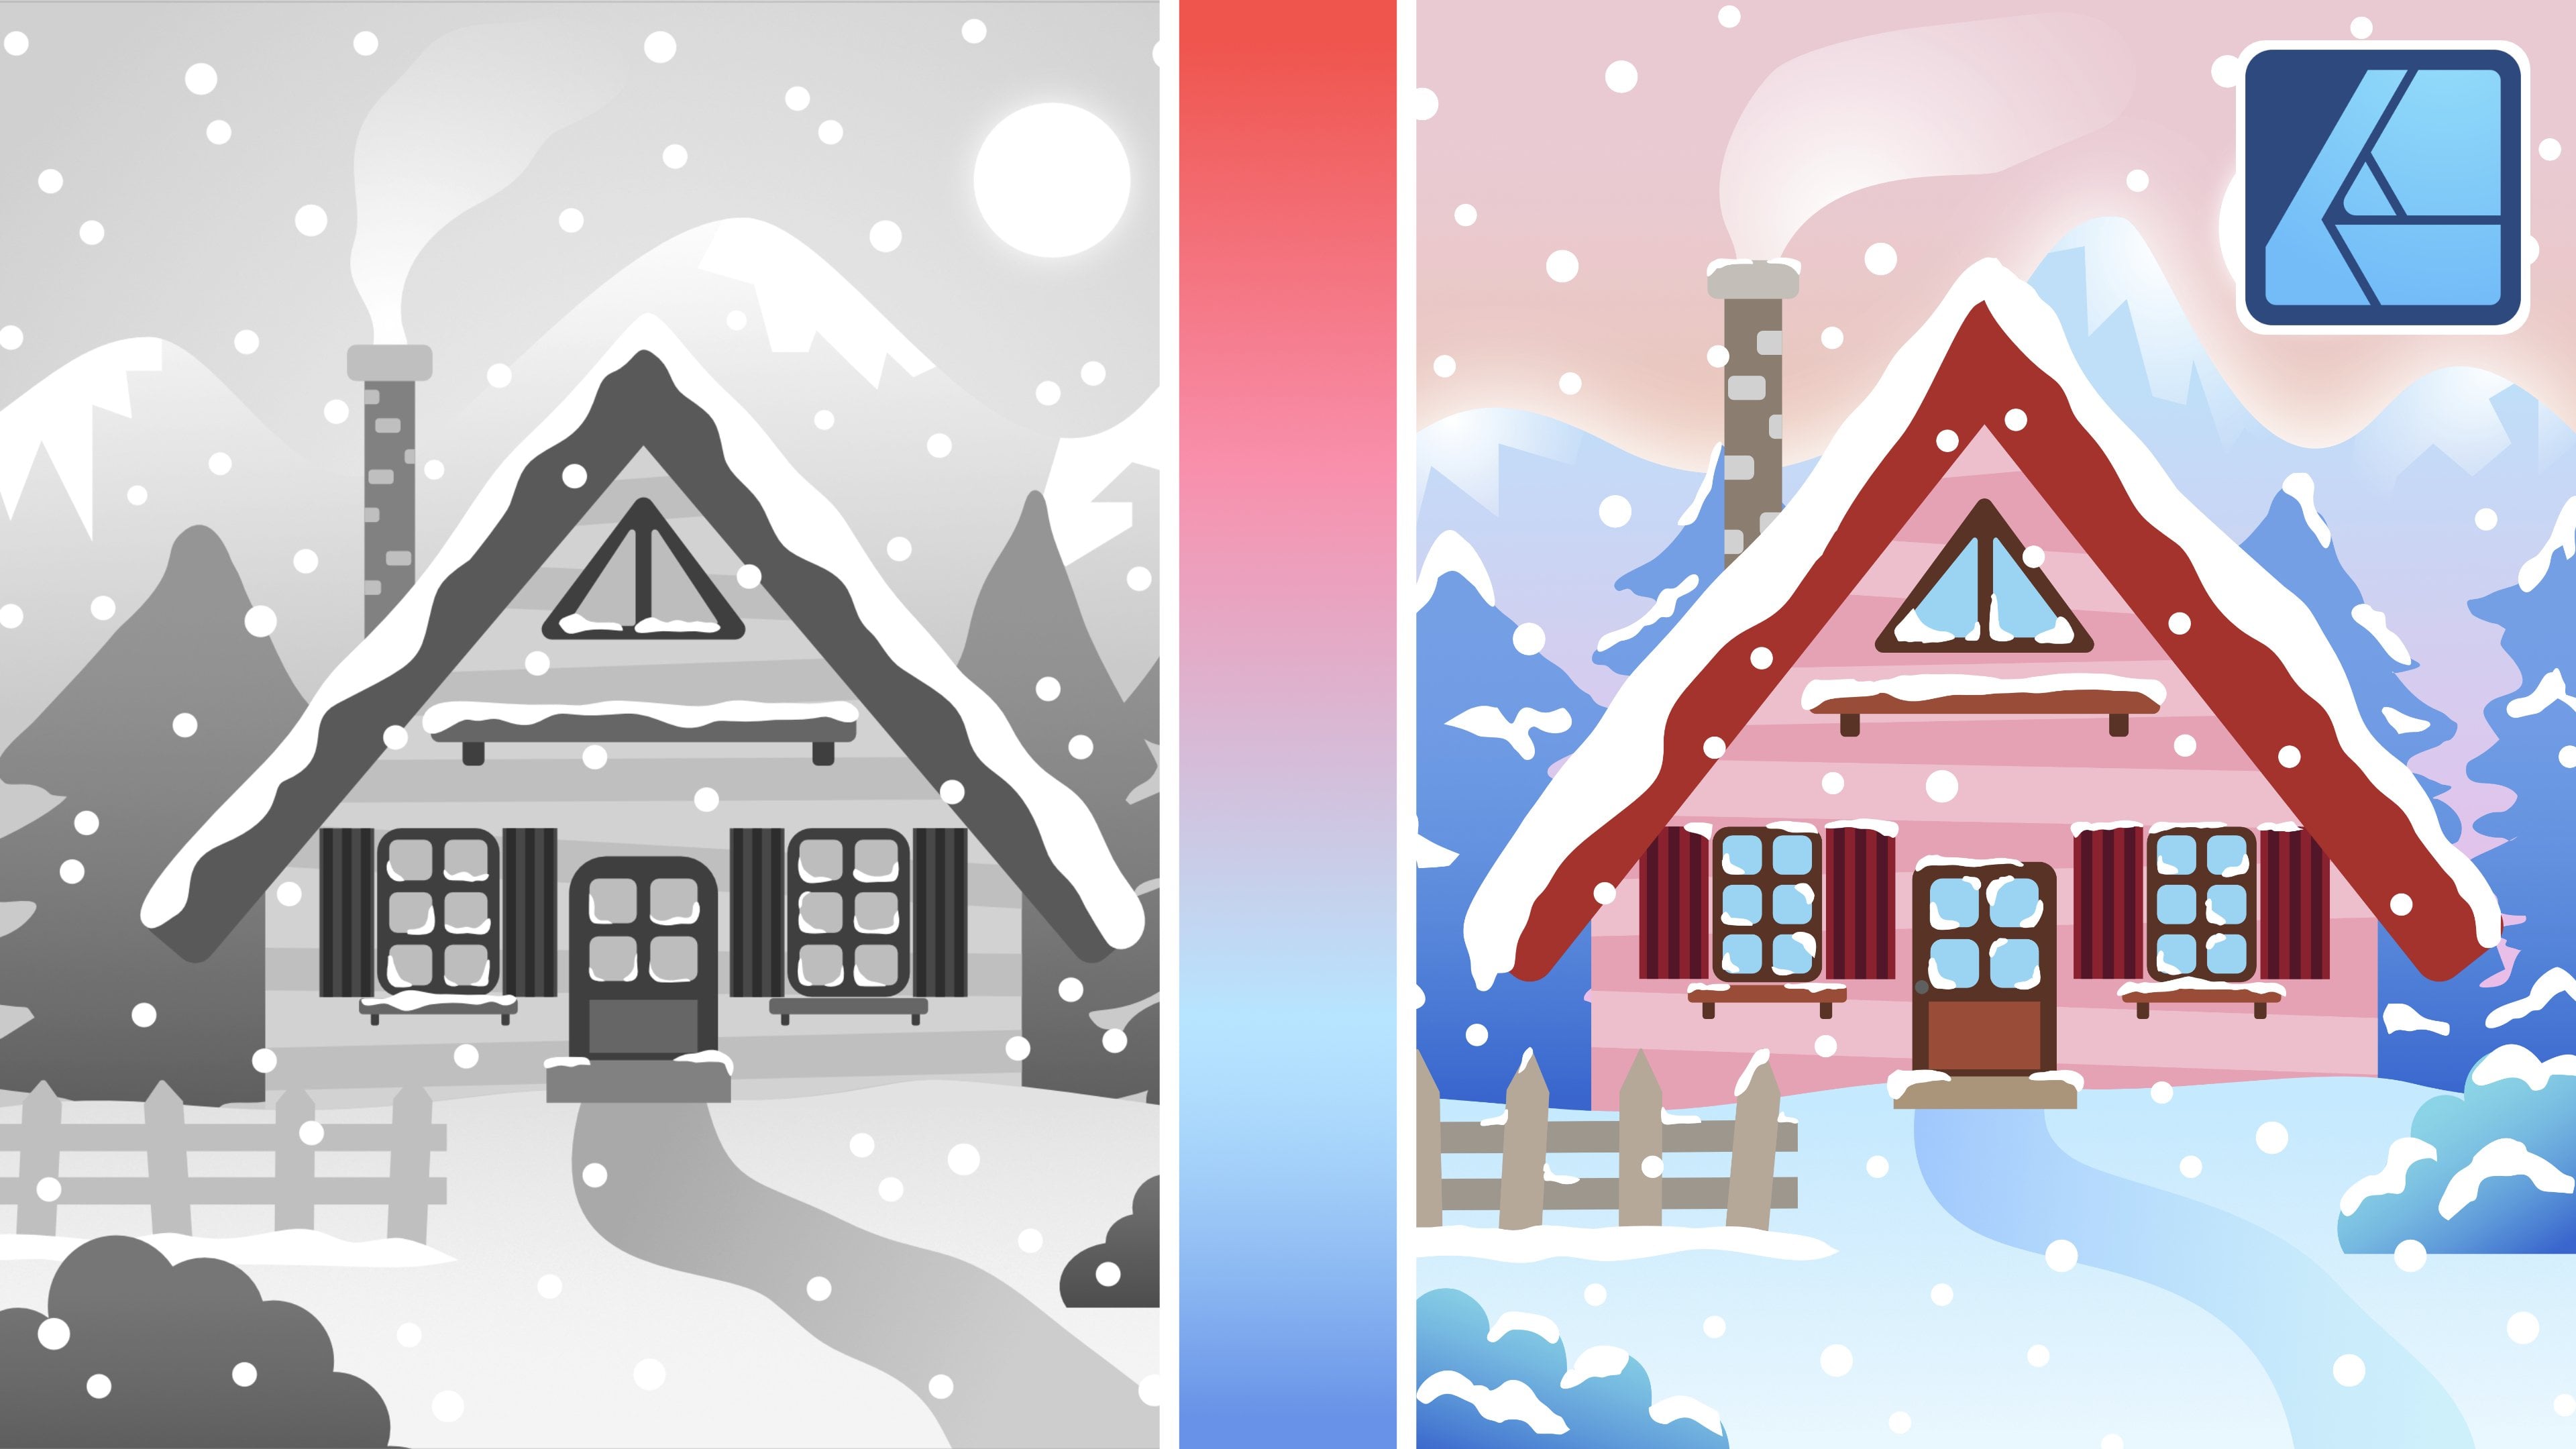
4. Board Book Mockup Shape & Shadow: Now that our working
file is ready, we will be creating
the actual shape of our board book mockup. We will be going ahead
with this square format. It's basically a square shape, but those two
corners are rounded. Now, to get started, we go
to the rectangle tool again. We select rectangle. Now remember to create
a perfect square, you have to hold on the iPad, one finger on the screen. And then you start drawing. This will be our perfect square. It's not that visible right now because the
color is the same. But let's choose another
color, maybe this yellow. Now you can go to the move tool. You can select one
of the corners. If you don't have this
one finger on the screen, then it will start creating
a rectangle shape. Again, to snap back
to a perfect square, one finger on the screen, and now you can create
your square again. If you want to center it fast, also from the move tool, you go to the alignment tool. An center align middle, and now your square is perfectly in the
center of your canvas. Can also clip this canvas. We see exactly what's
going to be on our export. Now, let's maybe change the background color to
something more subtle. Okay. And our board book, let's make it a little bit
darker so that you can see what I'm doing and the shape
of it a little bit better. We can also rename
this rectangle shape by swiping to the
left, rename layer. Okay. And we can rename it to maybe just mock up
or board book mock up. Now this is still
a rectangle shape. You can still
manipulate this shape. The options are a little
bit limited though. If I were to now want to manipulate the corners
of this rectangle, this will not be possible. We have to convert this
shape into curves. To do that, we go to
the three dots menu in the upper left corner. Our mock up square is selected, and then we convert it
to curves over here. Now, also, you can see here on the layers panel the
icon has changed. Those little geometric
shapes imply that this is still a shape created
from our rectangle tool. This little path with the node handles is a
symbol for curve shape. With curves, we have a
little bit more options. For example, we can adjust
corners with the corner tool. This is what we're
going to be doing now because remember, we got to create those rounded
corners on our mock up. Okay. Having this mock
up shape selected, I will still go to
the color studio, and I will make sure
that there's only fill and no stroke because
it happens quite a lot, especially when you
start a new document that when you create
your first shape, it will have some default fill, but it will also
have a black stroke. But this is correct. We have the blue inside on our mock up and
we have no stroke, which means basically
we have no outline. It's all good. Now we can
go to the corner tool. You can also double check
where those options are by selecting this
question mark icon in the lower right corner. This is where you see the
icon for the corner tool. It's in the upper left corner underneath contour
node and move tool. Let's go to this tool. Now you can see that we have four nodes on the
corners of this shape, one, two, three, four. And they are sharp.
If it was rounded, we can go to the Motel. If we wanted to change
it to a rounded node, there would be a
little circle icon instead of the square. Now we can work on those
corners one by one, but I would rather do
it at the same time. First, I click on
this one corner and you see that now the
remaining ones stay in white, which means they're
not selected, and the one that is selected
gets this blue fill. If I want to select corner
simultaneously, more than one, I have to again
hold one finger on the screen and tap the other corner, and
then you can let it go. Now, the corners on the
left, they remain white. They are not selected
and they will not be affected by our changes, the corners on the right, which will be those little edges here, they will be affected. We will be able to
change them using the corner tool and they got this bluefll it means
they're selected. Here in the upper
part of the screen, at least for affinity
designer version two, you have a menu when
you click on it, you can see what
options you have. You can select rounded corners. When you zoom in,
you will see that it already started to
round up your corners. They can be also
concave straight. When I zoom out, you
will not see it yet. Those two corners are selected. Let's go back to
the rounded shape. I can just tap on one and drag it all the way down because
two of them are selected, you will see that
both of them are affected by this
beautiful corner tool. Now we just have to eye it Okay. Maybe you have also a
board book at home, so you can see this
is actually not that dramatic of rounding. I think something like
this will be enough. You can zoom out, see if you like the shape more. And then you can just go back to the move tool and now
those corners are all set. Fantastic. The shape of
our board book is all set, and now to make it even more realistic
because it's a mock up, I would like to show you how I create cast shadow
underneath this book. Okay. Okay. We have
our mockup selected. We can go to the three dots menu and duplicate, make a copy, and we can take the
one underneath, swipe to the left and remain
this layer to shadow. Then we can go to
the color studio, get out of the swatches
by clicking here. I like to change my colors with hue saturation luminosity
sliders, HSL sliders. Again, we have the shadow
layer selected color studio, and I will just make it darker. And I switch of the visibility of our mock up, you
will see underneath. We have exactly the same shape, but in a darker color. I'm going to switch off
our mockup and move to the shadow so that you
can see things better. We will be using a Gagen blur to create this shadow effect. The Gagen blur will help us to blur out the
edges of this shape. To do that, having again, selected the shadow layer, we go to the layer FX options. Again, clicking on
the question mark, you will be able to
locate it over here. It has this FX icon. You have a lot of
beautiful options here. We will be selecting Gagen blur, which is at the
end of this list. You have to first
of all, toggle it on and then you click on it, and this little
option here for me on the left side because I'm
right handed will show up by sliding it up and down, you will be able to adjust
the blur of this shape. I leave it at about 27 25. We can still adjust it when
we see everything together. Another thing that I like to
do for this shadow shape. Right now here, you have
different blending modes. Sometimes I might have
different backgrounds, which will have some
decorative elements, and then I want
the shadow to play together with those elements
and to blend in very well. I already change its
blending mode to multiply. You can just move through
the arrows left or right, or you can click on
the blending modes. We started with
normal. And you can just choose something
out of the list. But I think multiply. I also have a class actually for procreate users about using
the multiply blend mode. Multiplying my experience is the best blending mode
for creating shadows. Okay. Just to recap, it was exactly the same
copy of our mock up shape, converted into curves
so that we were able to adjust the corners
of our mock up. We changed the
color to something darker and it could
be also black, but I like to go with a bit of a dark purple or dark
navy blue color. I think they work very well for shadows and we change the
blending mode to multiply. Now, let's bring back our
original mock up shape, and you can already
see that it Yeah. This is without the shadow. It's a very subtle difference
and this is with a shadow. I'm going to select the shadow, go to the move tool, and I'm going to offset
it a little bit. You can also change its size. If you still want
to keep the shape, one finger on the screen, you can make it a
little bit smaller, offset it a little bit. I can already see
that we will have to maybe adjust it a
little bit further. If this is too harsh, also depending on
your background, the color of the background, and what's in your background, you can select your shadow and you can lower its opacity if
it's a little bit too much. You do that by going
to the three dots. Here you can also
reduce the opacity. I usually reduce
it to about 90%. I think with this purple
background, it looks okay. 85, I think it is subtle enough. You can offset this shadow to the right side to the left
side, or keep it central. It all depends on your
aesthetics, so to say. Now we can tap outside of the canvas anywhere
and we see we have a very basic mock up pretty much ready
for our board book. We have the canvas clipped. Let's just sort
again our layers. The mock up shape, the shadow shape,
and our background. If you want you can
also group everything. If you want to
select everything, you can just swipe to the
right on each of the layers. And then hit the group icon, or you can just select
one of the icons and two fingers tap
on the top layer. It will select everything. You can also see that
this shadow layer got this F x icon, and it indicates
there was an effect, namely the ausion blur
effect added to this layer, it's just an indicator
that it was manipulated. Then you can group
it, swipe to the left again, and rename it. So now we have our basic
board book mockup. In the next lesson, I will show you how
I like to create signatures for my
mockup files. Okay.
5. Adding Your Signature: In this lesson, I wanted
to show you how I add a signature to my illustrations
or to my mock ups. I think it's really necessary these days to put your name, on your art or on your mock ups, they might lend re posted on someone else's social media or someone might find you
through Pinterest. It might be a potential
client and they might not know who you are if you didn't
sign your artwork. It's really best practice
to sign your art. As you probably know,
you can work with assets in affinity designer. Those are pre saved elements. You create something
one time, for example, this board book mockup, and you can actually
save it up as an asset. I have a whole category
here called branding and I have different types
of signatures for my art, so they are already pre made. For example, when I click on this signature, I can insert it. I have my website here, you can basically
either use the name of your website or your
own name or well, some people use their
Instagram handle. But I wouldn't recommend
using social media handles as your signatures
because social media are unpredictable.
Something can happen. Someone can hack your account, your Instagram
account, for example, and it can get lost. Then if you have to change
your social media handle, it's a bit of a fuss to change all your signatures
on all your artworks, for example, in your portfolio. That's a bit of a mess. Your name is your name and
your website is your website, no one I think has your
website, it stays the same. It's also a very
good practice for your professional portfolio work to have a website that is your name and your surname
and just.com as simple as it is because you your name,
this is your brand. I would suggest to go with your name and
with your surname. Here on the left, you have the text tool. This is called the
artistic text tool. When you click on
it by dragging, you start basically typing. Let's say I would like to type in just my name
instead of the website, back to the Moto, and
now I can resize it. Now what I like to
do when I want to addit this font further, I'd like to go to the menu to the text menu that you can find on the right side over here. This is where you can change
the font of your letters. You can make it bold or incursive or you can
have it underlined. You can center it, for example, or if you have a few lines, you can also change the leading, so the spacing
between the lines. Now, a word about fs. Affinity designer doesn't
have all the funds. Some of the funds, you
have to find them, for example, on Google funds, you have to download them, for example, to
your iPad device, and then you have to
install it in affinity. I will show you where to find it and where to upload
some extra funds. You have to go back
to your home page and then you have
to go to settings. Here under settings,
you go to funds. If you want to add a new fund,
you have to have it saved, either to your Cloud storage or to your iPad
device and then you have to click the plus
icon and you can add it. Those are all the funds.
They were not in affinity. Those are free fonts that I found somewhere
on the Internet. Some of them are quite
basic, for example, Poppins, all those different
variations of poppins. This is a really popular
font in web design, and even though it
seems very basic, it's not included in affinity. A lot is not included, or I have some more
fancy fonts here. This is where you
would add them. Once you add them if you click Done and you go back
to your document, any new fund that you
installed will be then available in this drop
down menu, no problem at all. Okay. For a long time, I use this Cooper black font, which you can also find online. I don't remember where anymore, maybe even on Google Fonts. I would probably
use this because it's this font as
part of my branding. In case you need any
particular size for your text, you can also input it over here. But I just like to zoom
out by pinching my screen. From the move tool, I just
like to eye it so to say, see if this will be okay. This is your signature here. This is my old
signature, this one. To make it stand out more, you can also add the
background to it. For instance, when we go to
the rectangle tool again, you have the rounded
rectangle option. I think it's really cool. We can create this shape
from the rectangle tool, it's still a geometric shape. You have a few options
for every shape. For example, for this
rounded rectangle, you see this red dot over here. You have the option to drag it, either make it standard rectangle or to make
it super rounded. This is what I did
with this one. I made it super rounded. Then you go to the color studio, you change it to white, and then you have to exit this rectangle tool
to the move tool. This is underneath. All good. Then you have to
see for yourself, how it will fit if you
want to make it more narrow or a little bit wider. Also having those two layers
selected from the move tool, you can go to the
alignment tool and you can align everything
in center and in middle so that everything
is perfectly centered. We have done the centering
also to our mock up here. Then you can also do it
more selectively by just making sure that you select
only what you want to center. Okay. To demonstrate it again. Let's say we have
this text here. We want to center
it again perfectly, selecting those two layers, alignment, a align center,
and a align middle. At the end, you can also
group it, swipe to the left, rename, signature
This is selected. You can make it
smaller or bigger, and you can just place
your signature here. That's just an example. Of course, this text, when
I double click on it, I can go to the Color studio and in case this will be the
color of my background, I can also change the text color to the color of my background. I'll keep it in case I want to switch to this other signature. Now your final task for this basic mock up is to
design your own signature. It could be just plain text. It doesn't really have to be
on a background like this. I would only recommend that you make sure that
it stands out. You can also check the contrast of any of your illustrations. This is what I'm teaching
in all of my classes now, by checking the
gray scale version of your illustration
or of your mock up. You do that by going to the
navigator studio over here. Under main view mode, there's this icon here,
which is, I don't know. I think it's like three circles. And layered on top
of each other. When you toggle it on and off, you will see everything
in gray scale. If this has good contrast, then you are good to go. This is where we can
check it very fast. Our basic mockup is ready. In the next lesson, I will show you how I am saving it up to my assets library so that we can reuse it anytime we want.
6. Repurposing With Templates & Assets: In this lesson, I wanted to show you two ways in
which you can pre save this mock up so that you
can recycle it basically. Every time you have
a new board book cover that you want to
showcase in your portfolio. It will be just a matter of a few seconds so that you
can reuse this mock up. One option is to save
it as a template. This is what I
basically also do with my pattern design templates, the automated templates for
surface pattern design. You can save this entire
document, into a template. I'm just going to kick
out the signature. Let's say this will be
my basic document setup. I have my signature, which I can also switch
off if I want to, and I have my board book mock
up with the mock up shape, with the cast shadow, and with a background layer. If I wanted to recycle
this document, I don't have to duplicate
it from the home page. I don't have to create
it all over again. I can just save it as an
affinity designer template. To do that, we go to the
main hamburger menu. Here we have an option to expert this as templates.
We click on it. Now the extension file for this document is zero
point AF template. Because I saved my document, I showed you that in the lesson
about the document setup. It retains the name that I actually want
for this document. It's called board book
board book mop one. I'm going to keep this
naming convention because maybe I would like to create mokps for different
board book shapes. Then I can just name it the
board book M two or three. I'm going to go
ahead and save it. Now, by default, I'm going to
save it to my iPad storage. It recognizes the last folder
that I was working with, which is the kids
portfolio folder. But I also have a dedicated
templates folder over here, which is it's just called
zero because alphabetically, it will be on top, templates. You can still change the
name if you change your mind and then you hit safe and you have it saved as a template. Now if we were to create a new project and we want to recycle, reuse this template. We go back to our Board
books project folder. This time, we don't have
to create a new document. We can just directly
go to templates. This is where I have
all my templates. That's the last one that
we created Board book mockup number one template.
I'm going to click on it. And this is exactly
the same templates. You see, now we have two, and if it was another project, I would have to go to
the Hamburger menu and just rename it. I'm going to close it without
saving because right now, we're just working on this one. This is option number one
to recycle those documents. Option number two is to work with assets with
the assets library. This is where you find
assets on the right side. You have already seen
my branding category. But I have many. I have one category called mock ups where I also
store my clothes mockups, the ones that I'm
sharing with my patrins and on my, as well. Those are hand drawn mock
ups for parent design. I also have my books mock ups here right
now just this one because this is the format I
like to work the most with. Now, if we put everything
into a group into a folder, We could rename it
to board book one. You got to put into your main folder everything
that you want. If you don't want the signature, you can just kick it out and
then it will not be saved. But I want to save everything. I want to have my
signature in this asset, and I want to have the whole all those mock up elements with the shadow in the
background here too. This entire folder
has to be selected. Then you go to the
assets library. For the sake of doing
this exercise together, we can created a new together. We can add a new category. You have to rename it.
Maybe something like books, mock ups, whatever
you want to name it. We hit, and we create a
brand new assets category. We also have to
create a subcategory. You have to nest all your
assets in a subcategory. By clicking again on this hamburger menu on
the right side, you can rename it.
Maybe you want Subcategory for board books. You can create again, from this upper Hamburger menu, you can always create
another subcategory, by clicking on it,
you can maybe 22222. Name it something like
picture books or magazines, whatever you want to create.
I can also delete it. For now, I'm going to
delete it and I will just leave this one
subcategory over here. Then when you click on the Hamburger menu for this
particular subcategory, you can select Add
asset from selection. This is our entire selection. You see a small preview here. We have our background.
We have our signature, and we have the shadow and
board book mock up shape. If I were to delete it, we have our original
4,000 pixel square canvas and if I wanted to quickly create mock up
for my illustration, you just go to your assets
library to this category and insert align it in the middle and you have
your mockup again. This is what I've done. Let
me show you an example. This is what I did on one
of my older illustrations. I had a cover design and I wanted to quickly
create a mock up. This was this ABC book
cover. This is the mock up. Originally, I just had this cover design for
an ABC baby book. I didn't want to create
a whole new document, which you can do, but I wanted to do everything
in one document. I wanted to have
my covering design here all vector based, and I wanted my mock up. I would go to my book mock ups and I would insert
it here directly. And then I would just create duplicate a copy of discover, shift it to the top, and then drag discover into
the mock up shape. Then adjust the size. Man so I can see better. I would center it as I want, and then I would go because my original design
is still here. I would go here and I would
adjust the other shapes. Everything is vector based, so there's no quality loss. Here I would leave the
documents as they are, but I would just make
sure that I have my background layer on
this one is locked. I'm going to unlock it, move to, and I would just extend it so that I don't have any
weird edges. Okay. Go to close everything. Originally, I just had
my book cover design, but I was able very quickly to mock it up everything
just in one file. That was the other mock
up that I have done. It's just a personal preference instead of having
two separate files, I like to work basically
in one document, and then when I want
to export my mock up, I go to export and I
export everything as JP. I save my image to my photos. If I only want to
export the cover, I just turn this
mock up invisible. And again, hit Export share
and save image or export it, save it to my files. This is super easy.
In this lesson, we learned how to export
our mokps as templates. That's next time we can
use it from our home page, and we also learned
how to create assets category and to save
it up as reusable assets. Now, in the next lesson, I wanted to show you a few fun
exercises on how to create different backgrounds for
your mokps so that you can add some variety
to your designs.
7. Personalized Backgrounds: In this lesson, we will be adding a little bit more
interest into your background. This is an example
that I've shown you in the previous lesson that's a book cover that
I've done before. You can just keep a single
color of your background. Over here, when I
go to the layers, you will see it's
just a single color. If you have more of those in your portfolio website
or in your social media, then you can just go to
the color studio and maybe change colors so that
you have more variety. But another option
to make your feed or your portfolio website
more interesting. Is to add some extra details
onto the background. For example, here I added
a simple checker pattern. In this lesson, I will be showing you the checker pattern, diagonal lines, and stars, how to add them very, very fast. Later on, you can also save them into your assets library. I'm going to show you again my mock ups category over here. I already have a few backgrounds for those mock ups
saved up as assets. You can just do the work
one time and then you can save them as assets and reuse them as many
times as you want. This will save you
a lot of time. Now, let's go back to the
simple grid over here. We will start by creating a very simple
checkered pattern. I like to do a
checkered pattern by using the square shape. I'm going to choose from
the rectangle tool, my rectangle shape, and I'm going to draw a
perfect square and it will snap into a perfect square if I hold one finger on the screen. Then I'm going to go
to the move tool, and snapping for this
one has to be on. I'm going to position it
perfectly in the corner. You will see that it
will snap and you will see those guiding
lines over here. Yeah. Next, I'm going to
create perfect copies. You can do that very quickly on the iPad by using the gesture with two
fingers on the screen. Then every time you
release your fingers, it will create a
shape and you can keep using this gesture to
create duplicates very fast. Here it's just important that
it really snaps together. And sometimes the best way to do that is to get
everything out of your group and to switch
off everything else, we're going to also
change the color. Okay. And now the program is not confused by any
other elements that were in this document and
it will snap perfectly. We can also prepare a checkerboard pattern
with two different colors. I'm going to keep one
and red and one purple. Now I'm going to select
both, and again, two fingers on the screen
and I will create a copy. It's snapped. I see the
green line and the red line. Okay. Now I'm selecting
everything again, and I create another copy. Now I see, here I
need this color. I'm just going to
select this one. Every time you tap, I love it. It just recognizes this shape, and it selects it right away. This is what you don't
have in Procreate. For example, if you want to
find something in Procreate, you have to go to the layer or I think in affinity
is just so much easier. Let's resize it, but let's also keep it as a perfect square. Again, one finger on the screen. Let's have one more this color. Okay. Okay. Now we're going to select everything
and again, create a copy. But we will offset it and
put this color over here. You have to trust me everything
snaps here perfectly. Now we have two perfect rows. Now again, I'm using this very handy gesture to select everything
at the same time. I'm choosing just one
layer going to the top, two finger tap on the layers and everything is
selected right away. Again, two fingers to
create a copy Okay. And now we can create
copies of those two rows. So every time I'm
touching the screen, I'm creating a copy and
when I'm releasing, then the shape is created. Now we can group
everything. Okay. I'm selecting all the layers, and I'm using the grouping
icon to create a group. Let's maybe resize it. Another thing that I need to do is to sert it a little bit. Just to be really sure that I'm selecting really the same color. I'm going to select only
one from the move tool, you can go to the
same fill color. The same color so this purple is selected and we
can also group it. We can make a subgroup, again, fill color on the
orange red one group. Okay. And now we can change those colors on the group level.
This is my purple. That was my orange. I can for example, choose the
purple for the other group, and from the luminance slider, I can make it a little bit brighter and I have this
type of a checkerboard. I'm going to swipe to
the left, rename it. Checker board checkerboard
checkerboard pattern and we can go back
to our mock up and we can place this
checkerboard on the background. Okay. Also from the move tool, we can resize it as we want, so we can make it a
little bit bigger. Position it again from the alignment tool
perfectly in the center. If we wanted to change the color really fast,
we can also do that. I think it's a good practice
to keep everything more consistent to choose some of the colors that are
already on the cover. Maybe I can choose this pink. I will choose the first
color. That was nice. That was the previous color, the main color of
the background. I can choose this
pink over here. For this one, I can see what
it will look like with this green or maybe this yellow. Here, it's a little
bit too blurry. But you see where I'm
getting with this. The color changes on this
grid are super easy. I can keep the color
from the cover and then I can just lower its brightness and the
same with this pink one. I can lower it like this, make it a little bit more subtle. Then also click my signature and choose the color
from the background. That looks very nice pastel. Now if I wanted, this is my checkered board. This is the main background
color that we started with. And my signature is here. I can also bring it here inside. If I just wanted to save this one background
without the mock up, I can select those two layers, group them, and label it as something like
checkerboard background. Then I have only
backgrounds here. There are already backgrounds
with my signature, by the way, even though
we cannot maybe see that. But if I just wanted to save this background
without the mock up, with my signature,
I have to make sure this is selected on
the entire group level. Then we go to assets backgrounds add asset from selection,
and it's there. Another quick and
dirty technique is to copy this
background layer. We can do it from the
three menu duplicate. So now we have a coffee. We can switch off the
visibility of the other one. We could from so we
don't have to go to all those individual
colors from the top level, we can just change. Okay. We can change the
color of the entire grid, so we can choose a field
that will be purple, and then we can go to stroke and choose a white stroke
for everything. To manipulate the
stroke further, we can go to the stroke studio. Over here, we can change if it's soft or if it's
a little bit thicker. Again, if it's
something that we like, we can just leave it as it is. I usually like to switch on this scale with object option because it means
if I'm resizing, it will retain the width
of the lines that I liked. Then we can maybe I'm
going to also change, see the color of my signature
here on the fill site. I like when the colors are
a little bit more uniform. If I like this background, the same making sure that
I'm on the top level, so the top group level assets, and I can save this
background too, super easy. Okay. Now I have those
two backgrounds. If I wanted to use
this one again, I can just insert it again, and if I'm in a new project, I can keep using it
over and over again. We have background number
one, background number two. Now, let's create a copy
of this background. I will already rename it as
diagonal lines background. We will kick out the
checkerboard pattern, we stay with this
original purple that we had at the beginning, and now we will
create diagonal line. I start with the rectangle tool. I'm just creating a
simple rectangle. The inside will
be wide and there will be no stroke,
there's only Phil. Now I have to move
to the move tool. Perhaps I'll have to make
it a little bit longer. To have it at
exactly 45 degrees, I can start rotating this little handle
that you see on top, one finger on the screen, and we'll move again
by 15 degrees 30, and then exactly 45. Then I'll try to
eye it so that it's really more or less
in the middle. But you don't have
to be that precise. We have a line that goes right across my canvas at a diagonal, and now we'll create copies, two fingers on the screen. This time, I'm really
just eyeing it, it doesn't have to
be very precise. I'm going to create copies. If you don't like this gesture, you can also make
a copy by going to the three dots menu.
And it duplicate. This will actually recognize
that it's a power duplicate. It will remember by how much this other line was
offset and it will be exactly the distance that was used previously
if this makes sense. Let me show you that again. I'm going to go to this middle line and
create my first copy. It's going to be
more or less here. Now, if I don't move it anymore. Again, I can use the
power duplicate function. I go to duplicate and the
distance will be recognized. It's just that I cannot
tap anywhere else. I have to be very careful
here not to tap because this power duplicate
function will forget the previous settings, but until I click
duplicate duplicate, it will be remembering exactly the distance that I used before between the two lines. Yeah. We're going to
group everything. Group. We can add the same color on the
entire group level, and then we can just play a
little bit with the contrast. I will also changes
back to the move tool, the signature of mine to this darker purple
that I just created. And there you have it. We have diagonal lines
as our background. Again, I can save them
up as my background. Add asset from selection and
this will be also saved up. We have one, two, three. Now, another example.
I think last one. We will again create a copy, and now I will rename
it to Stars background. This is just to show
you that you can create basically
any shape you want. Let's kick out those
diagonal lines. Maybe change the color to this blue and also the color of my
signature to the same blue. Another fast way is to create
stars in your background. I like to use the pento so
you can find the pento here. At first, we will make test. We will start our first point. As we do that, we have to
make sure that the fill is on and we can change
the fill to white. Now this fill function will be feeling the shape that we are
creating with the pen tool, and we will be able to see better the star that
we are creating. This is star number one. Now I am closing the shape
and hitting the x sign. Now we have a star like that. If you do not hit the x sign, it will want to
continue this shape. You have to build your star. Right now, you
see, this is blue. It's a bit unfortunate because
you see that the shape has also let's call
it a working line. You see that maybe this
one, I hope it's visible. This shape is not closed yet because there's no
blue line here. To close it, I have to click on this first points that will become the last
point and then x, I'm releasing this new
star shape is created. I can manipulate it as well, go to the move tool, make it a little bit more
narrow or bigger. Or if it looks a
little bit too wonky, I can go back to
the node tool here. This one actually changed
to a rounder node. I can make it pointy
again over here. It will be sharp again, and this one also got
a little bit wonky, so I can turn it
into a sharp node. Again, from the node tool, I can keep playing
with this shape till I'm happy with
my star shape. I can keep creating new stars, or I can just create
maybe two or three, and now just work on copies. So this one, maybe
rotate it a little bit. One more, maybe go
flip it over here, make it a little bit bigger. Maybe this one also bigger. Zoom out to see if I
like this background, flip it horizontally
here perhaps. Another copy here,
zooming in and out. I'm having a look if it's well balanced and
if I like it overall, let's flip it again
and rotate it. I'll make this one bigger. You see the nice shadow of
our mockup is here as well. If we didn't add this shadow, then it would be a
little bit too flat. Then I can also
group all the stars, and I can sign them also a new color and play
with it like this. Since everything
is vector based, it's super super easy. We have our signature, the stars and the background.
Stars background. I already renamed it. Again, if I want to save it to my assets, I go to my background
subcategory at asset from selection. And there you have it.
How many backgrounds have we created in
something like 15 minutes. We have the stairs
background, diagonal lines, our simple checkerboard
background and a checkerboard pattern
with two different colors. This is just a
suggestion, of course, you can stay with
the original color. It all depends if your
feed is not too chaotic. It also depends on your style. I also created some
cover mock ups with the elements from
the illustration. Maybe this will be the last
example that I can show you. I'm just going to quickly create a copy of the stars background. Let's just call it background. I will kick out the
stars by deleting them and we'll make
it visible again. It's going to be this
blue background again. In the mock up, the cover that
I am using this one here, it's actually the cover that
I created in this document. It also includes
all the elements like this little alligator. Those are all vector
elements that I created to to design discover. Because everything is vector, this document is really
not heavy at all. It really doesn't matter
that you're creating multiple designs on one canvas. It's not like pixel
or raster art, the document will
not be super huge. I was thinking
those two flowers, I can create a copy. We're going to choose duplicate. I can try to smoothly
move them out. I'm going to close my mop
then I'm going to bring those flowers into my
background group. Moved to. Those are the copies
that I created. Perhaps, I'm going to open them, and what shall we do? I like this blue, so I'm
going to use the blue of the background which
version shall we do? I'm going to make it
a little bit lighter. Then the blue on the flowers, I will also make them
a little bit lighter, maybe increase the saturation, so that it's still quite subtle. Now we have all those flowers. Let's also make them bigger. They come from our illustration. If we use them as an
element of our background, this might also tie this
small cup more together because it will be based on a repetition of the
elements from the cover. We can start creating copies. Maybe flip them a few times horizontally so that they
look a little bit different. We can also play
around with the scale. This will be a faster version if we make the elements bigger, but you can also
make them smaller. Let's make a copy of this one. From the move tool,
we can flip it again. In this way, slowly, I am building
another background. Which repurposes the elements from the cover that I created. Let's put this flower here, Zoom out, doesn't look good. Sometimes it doesn't look good, you don't have to continue
can just abandon this idea. But I think in this case, especially if we keep a
similar color palette that will not be
too overwhelming. I think it can look pretty good. Let's flip it again
horizontally. One last time, flip it Okay. So that they are
distributed evenly. I like to have even a
little bit of something, something in the
corners so that it looks more like a
repeat pattern. I can rename it flowers, for example, this can
be my background. If this is not enough visible, I can also change
take the new color from this flower as the
color of my signature. We have a simple
color palette here. This utilizes only the blues that we're already
used in this cover. There's a repetition of color from the same
color palette, and I think it looks
really cool this way. I am certain that if you post such a mock up on your social
media or on your website, this will really draw
people's attention. All right, so far, we learned how to create
our board book mockup. We added a shadow. We also explored a
little bit how we can diversify and personalize the
background for our mockup. This is where you
can actually stop. You can already take cover that you worked on
outside of this course, and you can put it
into a mock up and upload it as your
project to share with us either on skill share or on Instagram or in our
Facebook affinity group. Or you can continue
in the course. We will be drawing a simple board book
illustration together. You can treat it again
as an exercise to practice using affinity
tools further. I hope that you liked those
background exercises. If you would like more, then I am warmly inviting you to create a cover with
me from scratch now. S in the next lesson.
8. Our Book Cover Project: In this lesson, we
will be drawing vector based board book cover for a book for toddlers or
for babies from scratch. This is a great exercise for those of you who
would still like to continue practicing using Affinity Designer
vector based tools. It's also a really
great exercise for your picture book portfolio. As my project, I actually thought of a
very, very simple concept. It will be the Hello, Mr. Bear book cover. For your project,
I would like to invite you either to
draw your own bear or to change the animal or to even draw a creature that is completely
different from this bear. The basic design of this
cover will be like this. We will have a title. There will be hello, Mr. Bear. There will be a bit
of a side element on the left side of the cover, and then there will be
the hero of our cover. Everything will be vector based. In this lesson in this project, I will not be using
the pixel persona, which you can find
in infinity here. But just a reminder, you can, for example, draw your entire base
as vector shapes, and then you can continue
working on your cover by using the pixel persona with pixel brushes and
with pixel textures. But I like everything to
be as vector as possible. In this lesson, I will
be also showing you how I'm using the vector brush tool, which is basically a vector path with raster or pixel
texture on this path. In my honest opinion, working with vector based
tools as much as possible, close to 100% gives you
the biggest flexibility, especially regarding
any color changes or any scale changes. That's why I will
always advocate that you stick to vectors
as much as possible, and this is what I'll be
showing you in this lesson. This is the cover that
I created previously. I will be using it as a
bit of a cheat sheet, and I will be drawing it
again on the basis of this sketch so that I can show you exactly how I
created this cover. There will be the text tool. I will be showing you how I like using the text tool and how to adjust it and change it to curves so that you
can edit it further. And something for
defense of texture, I will be also showing
you how adding this vector brush texture and also the texture to
this background so that this vector based
illustration is not too flat. This is especially
dedicated to people who do like texture and they think that vectors look a
little bit too flat. I also prepared a few
other covered designs. Here you can see them on the
mock ups that I created. This is just to show you what I am encouraging you to
do for this project. You can also draw a bear
like me for your cover. Just make it a little
bit different, try not to copy it one to one. Maybe also try changing colors. But for your
portfolio, especially, you can create a
whole collection of similar covers
because it's actually a really good practice for
the portfolio to show clients that you're able to create
not only one design, but a few other similar designs. In this way, your clients will know that you can
stay consistent, that you will have a
style that will be very similar throughout more of your illustrations because they want this continuity
from you as well. Drawing something like a bear or a bunny is a very
classic choice. I think if you are aspiring to be a successful especially
picture book illustration, you should definitely
have some bears or some bunnies from the animal
world in your portfolio. But you can also try for this
project to choose a hero that is not necessarily a
typical bear or a cat or a dog. There's lots of deals
for bugs and insects. This is trending dinosaurs very important in a children's
picture book portfolio. And this is not shown here, but you can also consider doing some inanimate
objects like hello, Mr. Pencil, or hello, Mr. Flower pot. Maybe a plant,
hello misses Cactus. Try to make it playful and funny when choosing the
character that you will draw for your cover. First, we will draw our cover, and then we will
also create a mock up with our signature
that will accompany this cover that you
will be then able to use in your portfolio or
upload to your social media. This was basically the
introduction to our project. You are more than welcome to publish your ready
made projects, for example, on the
social media and tag me so that I can
share your work. We also have an affinity
designer support group that I will also
share a link to. If you're watching this
course on Skillshare, then you can upload
your beautiful mock up. Not just the cover, I
would like you to Yeah, especially to practice
building those mock ups, I would like to ask you to
publish your final mock up. Now, join me in the
next lesson where we will be drawing our
cover image. Okay.
9. Book Cover Affinity Demo Part 1: I am warmly inviting you to
do this exercise with me. I will be drawing exactly
the same cover image and affinity designer. It's all pretty much
vector based except for some occasional
raster texture. You can totally copy
the steps after me so that you can practice using affinity designer and
affinity designer tools. If you're copying it one to one, I would like to ask
you to keep it just in your personal files and not to share it on
your social media. I would suggest that you basically take your own
sketch instead of mine, and you draw your
illustration but with your own sketch following more or less the steps
that I'm showing you here. So I will be teaching
you a few tips and tricks that you
will definitely be able to apply to
your own final cover. The sketch that you see here, I did it in the pixel persona. You can also start
your project by sketching in the pixel persona
by switching over here. I'm going to hit this plus
and create a new pixel layer so that you can see better
and on the stroke side. Not the fill on the stroke side, I'm going to change the color to something different than this blue so that you can see. This is where you can
choose your brushes. I have a whole folder with my favorite pixel brushes here. But there's this one brush
from the acrylic folder that I keep recommending throughout all the courses that I produce. You go to acrylics, and this
is the met acrylic zero two, and when you swipe to the left, you're able to save
it as a new brush, rename it, and then you can
move it to any new folder. This is how I created the folder with my
favorite brushes. But this is this brush over
here on the left side, you will see this circle here, you can change the
size of your brush. So this is this new
pixel that I created. This is basically where you can start sketching your own
idea for this cover. I suggest that you also
leave this site element because it looks pretty nice
for covers, and this is it. You can also import your sketch, so we can go back
to the designer persona in case you were sketching in a
physical sketchbook or perhaps in procreate. You can also go to
the Hamburger menu and place and then you can find the JP with your sketch and you can import
it here. It's up to you. You can either sketch
an affinity or in procreate or even take a photo from your
physical sketchbook. I'm going to remove this
other sketch layer. Now, I do recommend that
your sketch layer should be in the multiply blend mode so that you will be
able to see better. Then I like to lower its
opacity a little bit. The sketches and
multiply blend mode, which you can
change here and the opacity is a little bit lower. Now, we start our project by creating our
background layer. We go to the rectangle tool. We select the rectangle. And then we can create
our perfect square, go to the move tool, make it maybe a
little bit smaller, and you can go to the
alignment tool over here, and then you can align it
exactly in the center. Then by default, it's probably
going to have a stroke, but we only want fill. Since I have my
color palette here, I'm going to grab it from
this original illustration. I'm not going to be teaching
here about color palettes, so you have to have your
own color palette at hand. You can also just place from your storage,
your old illustration, like an older illustration of yours that has your
favorite colors, and you can keep
using the colors that already belong
to your color palette because they come from some
artwork from your portfolio. In this way, also
your body of work will look more
consistent and more professional when you
showcase everything together in your
website portfolio or on your social media. Alternatively, you
can also place here outside of the canvas, some old illustration of yours. Then when you want
to select the color, you just go to the color studio. You have this eyedropper here, and then you can choose any color you want and apply
it to your background. This is our background. At the beginning of any drawing, I like to first draw my vector shapes by using
shapes from the rectangle tool. Then slowly, I move towards using ither the pen tool
or the pencil tool. But the very base, I like to first use the pre made shapes as much as possible. This is one advice that refers to efficiency
and working fast. One more rectangle for this
side element over here. I'm going to create
this rectangle. And change the color maybe too white so
that I can see better. If I clip the canvas, I will see exactly the canvas that I'm actually working on. I'm going to change slightly the size of this side element. Maybe so Next, I will
create the eyes. From the rectangle tool
I'm going to choose ellipse and create
the eyes of my bear. The eyes are simple eyes, just a round shape. I go to the move tool, position it more or
less where I want it, two fingers on the screen, let's create a copy, change its color to white. If I want to retain this shape, one finger on the
screen, like so. And then I'm going to draw this reflection
on the eye here. I'm going to group it, so it's going to be one e y. Now from this group
level, so to say, to fingers on the screen, we create a copy, and I
make a perfect copy here. Because our sketch
is it multiply, even though it's on top
of everything else, I am able to see everything perfectly because it
has this blending mode. Now the nose is
also pretty easy. We go to the rectangle tool, and here you can
find the hard shape. Let's say more or less
this type of size, we change it to black until you are in this rectangle tool menu. Each of those shapes will have a few unique options where you can manipulate
this shape further. In particular, for
the heart shape, you can manipulate this
little point here. You will see there will
be a red point that will enable you to edit
this shape further. Like I said, for each
of those shapes, it's going to look a
little bit different. Then when you want to
move and rotate it, you have to move back
to the move tool. Zoom in zoom out a lot. I'm going to bring
it under the yes. Remember, sometimes
when you don't click properly on the shape,
you're going to click here. You will not select this heart right away because
the sketch layer is on top. You either double click or you go into the
layers panel just to be able to select
it as you want. Now we have the nose.
Now, a quick trick how to draw this mile
is to use the pen tool. For the penal, I will
just make two points, super simple vector smile. One point here and
one point here. Next, we don't want to fill. We want the stroke,
which is the outline. When you go to the stroke tool, you will have a few options. You can make those
ending points rounder. But I like this more
graphic type of lines. I will use this sharper edge
on my stroke with the width, you can also change the
width of the smile. I see. Then we go to the node tool and
we're in the middle. I'm just going to
drag it like this. This is a perfect, super easy vector smile. Of course, you can also move the edges to your liking,
zoom in, zoom out. This looks a little
bit different, but actually
actually this smile, I can keep it this way. Automatically, I always select scale with object for anything that has a stroke so that in
case I want to resize it, it's going to retain
exactly the width. We have the little phase. I will also group the eyes. It's really recommended to group as much as you can
right at the beginning because the number of layers
will really start growing. I like to group them right away. Now let's make those
cute little cheeks. Let's go to the
rectangle tool ellipse. It remembers that last
time we used the stroke, we're going to flip it
up, go to the fill only. From my color palette, which is this original cover, I'm going to select this pink. I'm just going to place
it here more or less. I'm going to the move tool. As I'm drawing, as
I'm going to draw the entire face of the bear, I can still adjust it. I just made another
copy. And we group it. Now I will also be able
to assign the color for those cheeks on
the group level. This will make color
changes super easy. If I do it for those two cheeks, instead of doing it separately, I go to the group level. I have my pink color, and I'm able to change
the color here, super fast for those two objects just because they are
grouped together. Let's see what else. Those
ears. This is super handy. Again, we are using
the pre made shapes, there's a shape called segment, we will create a segment that looks like the inside
of the bear's ears. Right away because you
have a few options, we are in the rectangle tool. You have a few options to
change the shape further, so I can make it a
little bit more flat. But this is what I
don't want to do. I'm just going to keep it and instead of messing
it up further, I'm going to move
to the move tool. And change it from there. If you would like to commit
to this shape. If you don't need
those fancy features from the rectangle tool, then the safest
way not to mess it up further is to
change it to curves. You go to the three dots
and you convert to curves, and now it's not
a shape anymore. If you go to the node tool, you see it has nodes and further changes can be
done on the nodes here. But all the other options
that were available through the rectangle rectangle tool, they're not available anymore. But sometimes it's good to convert it to curves right away so that you do not make
any changes by accident. One ear here. Now,
let's make a copy. And another one here. In case you're moving
your background layer all the time, and it annoys you. You can always swipe to
the left and just lock it. The same with this
little element here, so we can lock this like so, and then the insides
of the ears, let's group them as well. It will also be easier
to recolor them. Now the pause you probably
guessed it's an ellipse. We're just making simple
circles, grabbing the color. From the color studio, moving to the move to one
circle two fingers, copy. Retaining the shape, one
finger on the screen, and now another copy. Let it go and another copy. We can also switch off
the sketch to see better. That looks nice. We are
grouping everything. And we are bringing
back the sketch. You might think that we are done with those pre made shapes, but I still want to keep the
roundness of the character. I'm going to build the body of the bear still by using the rectangle
tool and the ellipse. I want the ears of
the bear to be round. If I were to do that with the pencil tool or the pen tool, it wouldn't be that easy. I'm still building
from my shapes. But at least all
those extra elements, I can group them. So that they stay away. And for my circle, I will select this darker brown. I'm just going to draw a circle
that will be the safest. Otherwise, it might
change the color of the previous element aan From this circle, I will start building the
basic shape of the bear. This will be the face more
or less another copy, and we will create the ears. This is my first ear
and another copy here. I really love working
with the iPad because I'm able to use
all those gestures. The phase number
one, number two, another copy for the p Okay. And another really big copy
for the body of the bear. Okay. More or less. This will be just my
basic grid so to say. Now we'll be adding
the remaining shapes with the pencil tool. Let's group that.
Turn off the sketch. This is what it looks
like right now. Now we have to add the
remaining outline of the bear. We bring back the sketch and then we go to
the pencil tool. Before we use the pencil tool, I just make a test if the
settings are what I want. Normally, there
won't be any fill. Or the shape will
not close itself. What you want from
the pencil tool right now is you want the fill to be on and you want
the auto close on, so you want to close
your vector shapes. This is all good. I'm
in the right folder. Now I am drawing the
rest of the bear. But those basic shapes
that I created before, they are my I don't know
how to call helping grid. That the general round shape
that I want is retained. Maybe a little bit
more fluff here. And also here, the
arm of the bear. I can switch off the sketch, clip my canvas, and
now in general, I can see if that's
something that I like. Maybe this I will make
a little bit more fluffy and you can keep
your ears rounded, or you can also trace it a little bit and make it
a little bit more fluffy. But at least the basic shape
of the circle helped you to stay within this shape.
That looks nice. Now, Now, the little
trick from the Move tool, we are going to
select everything, like all those shapes
that we just created. You see the outlines
of those shapes. Then from the Move tool, we can add all those
shapes into one shape from the bullion operations menu
here in under geometry. Having all those
shapes selected, we can choose Add and this
will just make one shape. We can also remove the group. From the top level, the group
icon, we can ungroup it. Now here we just have
the body of the bear. If we unclip it, there's another trick to make
everything tidy. For some of you, it
might be annoying that there's some elements
outside of the canvas. There's also a very easy
way to get rid of it. The original background layer, we can create a copy by
selecting duplicate. Then we can move it
above this bear shape, select both of those layers. Then we can go also to bullion
operations or geometry, and we can choose intersect. Now this blue
background layer has cut the body of
the bear like so. It's maybe a little bit less
annoying and more clean, especially when we
unclip the canvas, some elements will
be sticking outside. But the original
shape of the canvas, the 4,000 pixel square canvas, this is what will be exported. This is our actual cover. Okay. So I guess it's just a cosmetic suggestion if you want to keep
it super clean. Okay, what have we got? We have the base for our cover, and we have the bear. I am also missing the mouth. The white area on the bear. I can also bring it into
the same bar folder. The body of the bear, I can
move it inside of this group. Now I will make
another test from the pencil tool
because it's going to remember this brown color
that I used before. But on this test block, I'm going to change the color
to white and delete it. In this way now that
I'll be drawing, the new color will
be pre selected. I want to see if it looks good. Maybe from the move tool, I can make it a
little bit smaller. So. You can also go to the node tool and you can change the individual nodes or you
can also remove the nodes. But I think this looks good
to really know if I like it, I will switch off the sketch. I think that looks cute. I can also usually this
first node is a bit it's missing one
handle and it looks as if it was too much. I go to the node which
is next to it and I just drag the handle a little bit so that this area
is more rounded. But again, this
is very cosmetic. Move tool. Let's move
those cheeks a little bit, make them a little bit smaller. Now I can see better because
I drew a little bit more. Zooming in zooming out. I think that looks nice.
10. Book Cover Affinity Demo Part 2: Now my bear is here. Now, the fun part is the text. We will be creating
the text from the artistic text
tool over here. You just select text
and you start drawing. And it will remember by default the last
font that you used. This is not the
font that I want, but I will just
cap slog the text and start writing what
I need for my cover. Hello on one line then return. Mr. Point Bar. Then to the move tool, I'm going to change
everything to black so that I can see better going
to make it smaller. Here on the right side, you have more options
for text over here. So for starters, I'm going to center everything
a little bit better. Now you can choose
any fund you want. Remember in one of
the previous lessons, I told you that affinity
comes with some funds, but not with all of them. If you want something a
little bit more fancy, then you will have to try to search for
good funds online, but there's a whole bunch
of really amazing funds. For example, go to Google funds and
download some new funds, do your research, and then
make sure to add it to your affinity designer program so that they show
up on your list. This Berlin fund, is the
one that I really like. I also found it somewhere
for free online. You just have to also
be sure that it's free for commercial
or personal use. You have to double check the
copy rights for this fund. Let's clip our canvas so
that we can see better. But choose any fund
that you like. Something a little bit more
bold is good for covers. Try to avoid cursive,
for example. If this were for children
who can already read, even though board
books are usually for the parents to show it to their babies or
to their toddlers. But still for the babies
are for the toddlers, you want fonts that
are really bold, fat, and not too dainty
or not too narrow. Okay. Now we have our text, and I'm going to
create a copy of it. Duplicate. The original, I
will just switch it off. Then this duplicate text layer. I'm going to go to three dots, and I will convert it to curves. Now I will be able to work on the letters in a
more flexible way. I'm going to open
this folder and I will put hello into one group. Then from the move tool, I can already separately
make it bigger. Huh. Okay. I'm going to put Mr. In one folder so that I can move it as a group
in an easier way. And bear in another folder. I'm going to bring
back my sketch. Maybe switch off
those words here, open the folder with hello. This is where the fun starts. Now that it has been
converted to curves, you will be able to work on
those letters independently. You can also tip
them a little bit, and you can even go
to the node tool and you can change the shape. If I wanted to make just this
area of this letter longer, I can do that too,
but I don't want to, so I'm going to move
back to the move tool. Okay. Let's see what my
sketch is telling me, I want this letter E to
be a little bit lower. Then I'm moving to the letter L and I'm
going to make it a little bit maybe longer. The other letter L can go here. Maybe I can to pit
a little bit more, so it's a little
bit more wonky and playful. Then my letter. Let's make it a little
bit bigger too. Again, if I go to
the group level, I'm able to move it in a faster way because
it's in the group. Let's bring back Mr. Pair. We have, I'm going to
make it a little bit taller. Maybe also tip it a little
bit to this side, and then R, I also want to tip the dot, I want to make it a
bit smaller, like so. Okay. We're getting
somewhere here. Finally, by the bay at the B. I want it
a little bit bigger, also tipped to one side. The letter, maybe also
a little bit taller. In a minute, I'm
going to switch off my sketch so I can see better. The letter A also tip so that maybe the
tip of this letter A gets nested here, and the letter r, we can tip
it to, but make it bigger. Again, if I wanted
to do any changes, I can go to the node tool I can select just the middle and
move it somewhere else. You have a lot of
more freedom when you convert this original
text to curves. So that's a nice little trick. Also, then you can change the colors of those
letters individually. This wouldn't be that easy if this text just state as text. Let's switch off the sketch and now double tap and I will already change the
colors of the letters. This is the same color. Now, that was this color.
I'm going to fix that. This color together with the O. They will have the
same yellow color. The contrast will
be better if we add this outline in white. Phil, again, is yellow, and we need to change
the stroke to white. Then we go to the Stroke Studio. I want my outline to be on
the outside of my shape, so I choose the last
alignment option. And then I am choosing a wider stroke for my letters
here. That looks good. Back to changing the fill. Obviously, this will be
faster for me because I have done this cover before. We're going to change
this letter to white. Okay. Okay, that
looks good to me. This is my new text. And this is my backup. I still keep it as a copy so that in case I
want to change it, I don't have to
tape it over again. This is my backup, which
I'm switching off, and this is my text. And I can still place it differently so
that it looks good. Now we will add some
extra elements onto this left side of my cover here. This is the element
that I'm talking about. We go to the rectangle
tool, rectangle, and I'm going to draw
another rectangle, switch off the stroke and
change it to this blue. Then I'm going to make from
the move tool an exact copy. Snapping will help me to
position it right next to it. And I'm going to change it to this other blue color, like so. We can also clip our canvas
so that we can see better. Let's see how it starts. There's a little
bit of white here. What I'm going to
do, I will make sure that both of
them are selected. I will already clip it. By dragging it inside, you are clipping it
into that shape. Let's move it a
little bit more up here and let's make
it more narrow. Now I will create copies. Snapping is helping me to
retain the same distance. You see the guiding lines
help me and one more copy. Great. Now I can sort one color into the group and the other blue color
into another group. I can also group them together
so that I will be able to change their size or their with much faster when
they're together in a group. Another thing that I
want to do is to add a little bit of a stroke
on this main shape so that it stands out better from the blue
of the background. This rectangle, we will
also add a stroke in white. Clip the canvas, go
to the stroke tool, and here we can still
adjust the width and see if it's not too fat,
this is too much. Let's make it a little
bit more subtle. We can also change the
colors here very easily. Maybe I want this main
element to be blue, and I'm going to change this
blue to white so that I flip the colors a little
bit so that my white is not in the corners here. I think this looks
better. Now we will add this texture
to the background. This is a texture that you can actually get within affinity. You will have it
saved to your assets. The textures that
I'm talking about are called memento textures by Pixel Bura you will be able to download
it as far as I know, with this affinity designer
version from your home page. Let me show you. Okay. You
have to exit your document. This is, by the way,
our exercise sheet. In the meantime, I also
encourage you to save your work. Next, when you click
on your account, you will have a
few extra options, and affinity will give you
some add ons for free. For example, artista affinity designer
brushes by Pixel Buddha. This is where you see the
description of this set. It's going to look
like that, that you will have this
little cloud icon. By clicking on it,
you will be able to download it onto your device. In the description, you
see that you will have pretty big set of pixel
brushes, 60 pixel brushes. Why not? They're
actually pretty cool. Plus ten textures in
affinity designer assets. Once you download this, when you open your document, you will be able to
see those textures in your asset studio. Let's go back to
our exercise sheet. This is where you
get your assets, and then you will have to
click on the categories, and you will have to find this folder memento
textures by Pixel Buddha. Right now, you
cannot see it very well because it's
black on black, but this is actually
a new thing that came with the latest
affinity designer update. You can also change the background color
in your asset studio. You click on the Hamburger menu, the three vertical
lines, background. And you can choose
a light background, which is still not
super visible, but it can help a little bit. The first texture is the
one that I want to use. You click on the first texture, insert, and you have this
little noise texture. I want to rotate
it by 90 degrees, make it bigger, like so. Then I'm going to drag
it onto my background, which is still called rectangle, but I can also
swipe to the left. And just change the
name to background. Now I have this texture inside, but it's raster texture. I think they said in the
description that it's a PNG, so you cannot really
change this color easily, but what you can do and
what I have done here is you can change the
blending mode. Let's do that. You have to have this
texture selected, then you go to the dropdown menu for blending modes and
you look for overlay. Now this beautiful texture started to work together with the background and
instead of black, you have this
slightly darker blue taken from the background color. Okay, guys, we are nearly done, but we also need to draw this
beautiful vector texture. You would have never
thought probably that this is not pixel. This is vector because
it's on the vector path, and it will retain this
whole vector flexibility. So you will be able to
manipulate it beautifully. I'm going to show
you that in a minute in the affinity
designer persona, so we're not moving
to the pixel persona. There's a whole bunch
of brushes which you can also see in the
brushes library over here. You can click on
different categories, and I have some brushes that I also bought from Franken Tune, But a lot of the brushes
already come with the program, and it's not really necessary
to buy anything fancy. Everything is already
here. You don't have to spend too
much money on that. What I want to do is I want to add this beautiful texture. I think I used this classic
flat marker texture here from the markers category. You want to go to
the vector brush. Then when you're drawing
with vector brushes, you can change the colors
later on from the move tool, but initially, you
have to choose your new color.
Not from the fill. Again, vector brush,
not from the fill, but from the stroke menu. Make sure that this
empty circle is selected when you're
on the vector brush, and then select the
lighter brown color and make sure to apply it. This is also where
you can change here the size of this brush. I'm going to move to my
bear to the bear shape. Okay. And now I'm going to start drawing looks very random. And the curve that
I just created, I'm going to drag it and
clip it to the bear shape. Okay. This is just
the beginning. Now you have to exit
this vector brush. For example, you have
to go to the move tool. You were drawing
with the stroke. Remember, it's like a
stroke vector path. I will switch it off. Now that I know that this
is the brush I want to use, I can go again to the
vector brush tool, make sure that it's big enough and I can start drawing again. But this time, I will be within my clipping mask and I will
be able to see better. Sometimes I will be leaving some gaps so that it all looks
a little bit more stripy. Okay. This I can kick out. This was only my test
to see things better. From the stroke studio, I can continue playing
with the with, but I can also go to the
move tool and I can maybe change the position here so that some textures
are more visible. It will take you a little bit of time to adjust it
to your liking, maybe to fix some areas. Like here, I think I wanted
to be a little bit closer. But this is the flexibility
of a vector path. You have here a lot
more flexibility than with a pure pixel brush. I can also click here and add another note so that
I can manipulate it even further.
That looks good. Like I said, some areas,
especially on the edges. I want to leave it
out so that it looks as if I really painted
everything with a marker. I'm going to make this
one a little bit longer. That looks good. You
can also create a copy. This is my way of
testing textures fast. You can create a duplicate. Then you can hide your original. Then you can go again
to the brush studio and experiment with
different brushes. For example, you
can go to pencils, and see what you can find there, or I think there was
something like dry media. Here in dry media. That
can also be interesting. You just select a brush, and then you still have to go to the stroke studio and play
around with the with. Maybe you want something
like this. Charcoal. That can be interesting. If you still need to fix that, you can stay on the
node tool and you can just play around
with it basically. Then when you hit X, you deselect that actually
also looks nice. This is how I like to test. I sometimes take a screenshot
or I export my end result, and then I keep switching
between one and the other to see which
one I like bet. I know that I was supposed
to copy this original here, but as you see, it's really not possible to copy it entirely. But this new version that I created to show you my process, I actually like it a lot, so I think I'm going
to keep that I will not try to replicate this exact cover that
I created before. This is my ready made cover. Let's recap what we did. We created our base background. We added some raster texture onto it in overlay blend mode. We created with the
rectangle tool, those side decorations
on our cover. We learned how to use the text tool and also
how to convert it to curves so that we
are able to recolor it or to change
the nodes better. We have more flexibility
in this way. We build our teddy bear
from the basic shapes, and then we continue building on it by using the pencil tool. We briefly used the pencil
to create the smile, and we also use the node tool
to edit it in a better way. Last but not least, we also used the vector brush to add
some extra texture. If this texture was
just pixel based, if I drew it in the pixel perzon would be very hard
for me to recolor it. But because it's
on a vector path. Let's also maybe make a copy because it's on the vector path is really super easy to change. I have to go back to
the move tool to change any colors and now I can
do any changes I want. But let's go back
to the original. So in our last practical lesson, we will be inserting this final cover for our
board book into our mockup.
11. BONUS: Pencil Tool 2.6 fixes: H Hello, everybody. Welcome to this update
video for iPad users. Zarif rolled out their newest software updates
across Affinity Designer, Affinity Photo, and
affinity publisher. I'm under the
impression that there's a whole bunch of videos
about the desktop version, but only very few videos
for the iPad users. And if you've been
following with me, then, you know that
I'm an illustrator. I predominantly
illustrate now for children's publishing and
for my illustration work, I always use affinity
designer on the iPad, and I always use
the Pencil tool. So I will be skipping
the rest of the updates. This video will focus
only on the pencil tool because this is the most
important tool for my work, and the changes that were part
of the most recent update, the 2.6 0.0 update will
really make your work easier, and I would like to highlight what exactly changed
in this video. So heading back to
the Pencil tool, I'm also going to use this
older sketch of mine, where I created this
illustration just to demonstrate how the Pencil tool changed and what you need
to take into account. There's also some icons
that you will see here in the contextual menu that have changed, so do
not be confused. Everything is
actually quite easy. In essence, there's no
more forced smoothing. There's also better
control over the stroke. So there's basically better control over what
you're drawing. And there are some new
auto close options that can really improve
your efficiency. All right, so the very
first thing that changed, luckily, is that there is
no more forced smoothing. Previously, the pencil tool would always apply some
level of smoothing. So we really didn't
have full control. And when I was illustrating
projects for clients, I felt very frustrated after the previous update because what I was drawing
was unnatural. And what I wanted was a feeling that is more organic
and less vector like because all my artwork, even if I use some texture, this is all vector
brushes or vector shapes, and vectors tend to look
a little bit more rigid. So the previous update
really destroyed my workflow and caused
me some frustration. And I'm very, very happy that Serv got rid of this
obligatory smoothing. So right now, you can draw lines that are more kind of rugged. Do I have an example,
for example, if I wanted to draw the man of the pegasus
in a more rough way? Previously, this whole
line would be more smooth. What does it mean? I
would get more rounded. And the shape that
I drew would not be reflected in the line that
the software would draw. And on affinity forums, I found that a lot of artists, for example, who were drawing
maps, illustrated maps. They were in particular,
very frustrated because when they were
drawing the outlines of the countries for the maps, then they needed all those
tiny little details, they didn't want smoothing. And in my work, it
was exactly the same. Sometimes I really
wanted this more hand drawn feeling and the smoothing
would destroy everything. Right now, this is fixed, and the only way to get smoothing
would be if you opt in, for example, for some
form of stabilization. Right now, if I click in here, you see, nothing
has changed here. There's a rope stabilizer
or a window stabilizer. Which you can also set the force of the stabilizer
here on the left side. So if I wanted my line to be, you see, more smooth, then you can use stabilization, and you can be more intentional, about choosing whether you
want this smoothing or not. So with this regard, you
have full control over here. Now, another thing
that changed in the contextual menu
are the icons. I didn't take any screenshot
or I would have to find some old screenshots from my old work to show you
what exactly changed. But those two icons
are different. You can also click on the question mark to
see what is over there. The one on the left is about using line,
using an outline. And the circle that is more
full is about using fill. So if you want a
line, right now, it's selected, you will just, let's get rid of
this stabilization. You will just get an outline. So for example, I could use this Let's increase the
width of the stroke. I could use this when I'm drawing or creating a project for a coloring book if
I only want outlines. But for me, more
often than that, I draw without any outlines. So we can also start by going to the color studio and then just choosing color
from your swatches. U and then you will
have no outline. And if you want a line, you can select this
use line symbol so that you can also
draw with an outline. Right now, both of
them are selected. You will recognize that
something is selected by saying that this gray background of
the icon changed to black, that means that it's selected. If I don't want an outline, I just deselect seline. And then another important thing that changed is the auto close. There's a whole menu
of options here. The first one obviously
means that there is no Autoclose then
there's close near, close far, and close always, which can really make your
work very efficient sometimes. So auto close basically connects the start and end points of stroke automatically. And before this auto
close changed behavior and you really needed
to come very near. So this will be
the second option close near to close a shape. And oftentimes I failed
to close a shape, and it was again another
thing that frustrated me. Right now, you can, for
example, choose close near. And you will have to
again come quite close. You see there's a small red
selection that tells you, Okay, this auto close
will be recognized and the shape will be closed.
So now it's closed. But I don't think I'll
be using this option. I think I'll go straight
to Either close far that you have
more wiggle room. You don't have to go super duper close for the shape to close. Was a small mistake there. Let's do it again. You
don't have to go super super close and the shape
will be still closed. Or clothes always is very cool. For example, if I wanted to
draw the wing of the pegasus, I would just go like this. And here, I just let it go
at it closes automatically. This is exactly what we had
before the previous update. So if I was drawing this cloud, I would start somewhere
outside of my canvas. Sorry, that doesn't look pretty. But I would just draw
what is essential without wasting my time to go all the way up here because
this doesn't matter. The illustration will
be cut here anyway. And now that we finally
have this close always, I think I'll get
back to it and I'll just get outside of the canvas, draw my cloud, release it, and everything is
closed automatically. If I wanted to draw
this tail, the same. Sorry, this doesn't look great. Depending how you like to work, you can choose among
all those options. You also don't have
to close it off. You have to switch it
off if you're just drawing with the stroke,
so just with the line. Personally, I would
recommend that you either choose close
far or close always, and I think I'll stick to close always because this
will just snap. Look at this. This
will just snap so fast and have me save so much time. I just have to make sure that the whole film selection
is where I want it to be and everything snapped in a
very pretty and fast way. So those new auto close options
are much more intuitive. They will give you
the ability to create more natural linework despite the fact that you're
drawing with vectors. You will have
better control over your style after all those
pencil tool updates. And the new Auto close will give you basically better shape
building capability. And the fact that
smoothing is off, this is, I think the best
news will mean that your vector illustrations
will feel less mechanical and you
will be able to embrace some more imperfection in your perfect vector
art, so to say. So what do you guys think about those new changes and
about the update? Let me know in the comments
or in our Facebook groups, what you and if you found
this video helpful, please give it a like and make sure to
subscribe to stay updated about any affinity news or new affinity tutorials.
Thank you for watching.
12. Using The Board Book Mockup: All right. This is the fun part. We will be placing
the final design of our cover image into
our board book mock up. I have my backgrounds and my book mock ups here
in the Assets library. If you are following
the previous lessons, then it's probably the
same case for you. I'm going to insert this
background for starters. From the move tool, I will position it in
the middle of my Canvas. The other layers, together
with the sketch, the title, the Teddy bear shape, and also the background
for my cover image, I'm going to group it. You can also delete the sketch if you don't need it anymore. I would still keep this
original text text as a backup because you can also recycle
this whole document and use it to create your
other cover images as well. We have the background. We
have this little side element, we have the Teddy Bar our title. I'm going to swipe
to the left and rename it as our cover. This is just our
background and separately, I have my board book mock up, so I'm going to insert it as well and change its
size a little bit. The color doesn't
matter that much. I'm going to position
it in the middle, either by having snapping on and paying attention
to the guiding lines or you can also go to the alignment tool and select a line center
in a line middle. That looks good. Now, this
will be my mock up here. The background.
The book mock up, I'm going to also group it
and rename it to mock up. Now this cover here, I will make a copy, duplicate. I will bring my background. This is my board book
mockup with the shadow. Here we have the shadow
that we created. I think I wanted to be a little bit more bluish,
the shadow here. Making sure I'm on
the right layer, I'm going to make it a bit, a little bit more saturated
and a little bit more blue. Okay. And now into this
cover placeholder, this shape over here, I'm going to drag my cover image into it. Now obviously, from the move tool because
it's been clipped, it became a clipping mask. Now I have to use the move
tool and adjust its size, so that it looks good. But this is really the fun part. Now if I wanted to export it, I would go to the three vertical lines, the
Hamburger menu. I would click on Export, JP, And over here under pixels, if you wanted, for example, the dimensions for Instagram, 1080 pixels, I can
change my scale, and then I can share it
by saving it to my device or sending it over
through airdrop, for example, to my computer. I click on Share and
I can, for example, save my image over
here or save it to files or air drop it
to any other device. Sometimes I like to post for my social media
directly from my phone. This is where I would try
to find my phone over here. But we're going to cancel this. Then if I wanted to export
only the cover image, then I just switch
off the visibility of the mock up,
there you have it. I can also maybe let's
go to the mock up here. Let's make a copy
of the signature, drag it out of the mock up. Into the cover. I can also
especially for my website, the agency that
I'm working with, they don't want my signature. They want everything to
be non branded by me. But for my personal website, I always include the signature. So I can just copy paste over my signature here and
do the same thing. Hamburger menu export. If I'm happy with those
dimensions for my website, I can also just change it. I actually have 3,000 pixels square for my website portfolio. I can also do that
share and then either save it to files or save
a match on to my iPad. In this way, I have
everything in one document. For me, personally,
it's a waste of space to create two
separate documents. I have everything in one, and
whatever I need to export, I just either make it visible or invisible, and that's it. This is what really
works for me. It's very efficient. This is it. This is the end of our exercise. We worked on our cover image. I tried to repeat my steps
to create the same cover. In the end, it's a little
bit different because I used a different
vector texture, but it still looks very cute. Next, we put this cover
onto our board book mockup. Another thing that
I wanted to remind you of is that it's always a good idea to explore this exercise and
this topic further. In particular, for your
website portfolio to create not only one
cover image like that, but at least one more. Let's say 2-3 would
be a good number and then to put it on your
website, for example. Because it's always good to have at least two examples of a similar project
or a similar style, as it will be very
good to show to potential clients
that you are able to draw in the same style, not only in one illustration but across multiple
illustrations, so to say, so that your style is retained the TRx is super cute. I hope that you really enjoyed doing this exercise with me, and I will be really
looking forward to seeing your creations
either on the social media, for example, Instagram
or Facebook, or in case you're
taking this class on Skillshare in the project
gallery over there. Yeah, you can't wait
to see our work.
13. Scale With Object: This last practical lesson
is a complimentary lesson to the previous one because I've noticed there's one
thing I didn't show you. I was too focused on
recording the course. Normally, I am much
more mindful about it. But as I was recording,
I completely forgot. Namely when we're on the
move tool and we have our original vector cover
design this one here. If we scale it up or down so that it fits our bookmo You
see, there might be issues, this vector texture
that we created with the vector brush tool will get smaller or
it will get too big. The reason why this happens, and I haven't noticed
that when recording the previous lesson is that
on this vector path texture, the scale with object
is switched off. When I created my duplicate
that was my original cover. I created a copy that I then wanted to insert into my mockup. This from the stroke studio, the scale with object
option was turned off, and this is what you
have to be mindful of. On one hand, it's
a pretty easy fix. But if you are using a lot of textures with the vector
brushes in this way, it can be a bit of a pain. You either just work
on the original cover, which already has
all the settings in the proper way or there will be a second solution that I'm
going to show you in a second. But in case you
would like to work with this original cover with all the vector elements that you have drawn over here, we have the body
of the teddy bear and this is the texture
that I am talking about. If it's just this texture, which in my case, this is it. This is the only element that
is not scaling properly, then it's a very easy fix. You just go here to
the stroke studio, and you switch on scale with objects, and
now it's tuggled on. Now this texture over here, As I am from the move tool, moving my cover design, it will scale properly, you. Let me maybe zoom in. This will follow the
original design. This would be the
solution number one. Let's maybe bring
it back properly. Solution number one will
be to manually go into your folders to look
for your texture layer, which is here, to
have it selected. Now it switch to the node tool, but it doesn't really matter, then you go to the
stroke studio, and you make sure that this is toggled on scale with object. This is option number one. Option number two, is to
export your final cover. When you think, I'm done, this is my final cover, then you can already export
it as a JPEG, for example, into the storage in my case
to the storage of my iPad, and then you can
place this JPEG image into your book mockup. When you clip to Canvas, what you see when you
clip out everything else, this will be exported. Be mindful if
there's any mistake, for example, your book
cover is a little bit cut. This will also be exported. When the canvas is clipped, what you see when you
want to export it. This will be exported, so be mindful of any
possible mistakes. I'm going to correct that.
Then all you got to do. Now that you're happy
with your covered design, you go to the three vertical
lines or the hamburger menu, and then you select export. You can stick with the
original canvas size, which in my case is again
4,000 pixels square. And then you hit
Share and you can either save it to files
or I just save the image, and that means that
it will be saved into the photos albums, so into my camera role of
the iPad, which is okay. Later on, I tag them up or
they get stuck in my albums, but I can reuse them
for my social media, for example, to share with my followers, and
then I hit cancel. Now it's super super
easy. Can switch it off. We can go to our mock up
exercise folder to our cover. Now we will be placing the JP image that we just exported, by the
way, it was a JPA. Let me just remind
you that over here, you can choose the file type. It can be a PNG or a JP. I usually stick with the JP. Let's cancel. Now
we can go again to the Hamburger menu or the three vertical lines
menu and hit place. And then place from photos
and we will have to find the cover design that we
just saved from our device. Place from photos,
and there it is. I selected and I hit Add and then I just up
onto the screen with the apple pencil
or just with my finger, and the image is placed. Of course, I have to then go to the layers panel and I have to drag it into my cover shape. Then from the move tool, I can adjust it to my
liking and because it's a static JP it doesn't
include any vector elements. It will not change the
shapes or the textures, everything is safe so to say. These are the two ways in which you can troubleshoot
in case you're having issues with scaling your texture after creating
your illustration. Number one, you can
just make sure that your original texture has the scale with object
option toggled on. Okay. Then number two, you can just commit
to your final design, you can save it to
your internal storage or to the files folder, and then you can place it
and from the layers panel, then you can manually position
it within your mockup. This is it. I'm not anticipating
any further issues, but if there's anything else, do not hesitate to reach out
and I'll be happy to help.
14. Final Thoughts: Okay. Thank you again
for taking my course. I hope that you
really learned a lot. You can always
reach out to me and suggest any new course topics. You can also reach out to
our community on Facebook. We have a dedicated group for illustrators who
like to work with Affinity Designer
and Adobe Fresco. You can publish, for example, your final work there, and
you can ask for a critique. I would also like to ask you to leave a review for this course. It's really valuable
feedback for me, and I read each and every one of the reviews that you're
leaving here on Skillshare. If you are interested further in developing your portfolio
for children's illustration, then I would like to
warmly invite you to join our Patrion portfolio
club where each month, you will get a
creative brief with a task to develop your
digital portfolio. So we have one brief for pattern design and one brief for children's picture
book illustration. You will also get a bunch of
behind the scenes of how I develop my creative business from working with my art agency, to improving my own portfolio and working on my
professional website. If you need further help
learning affinity designer, I am warmly inviting
you to check out my other affinity
designer courses. I have quite a few
affinity designer courses about pattern design because this is what I used
to specialize in. But there's also one course for complete beginners
introducing the interface and the most important tools, and there's also my most
popular vector assets course, which was meant for
pattern designers, but it can be used for any
type of general illustration. I developed one free
resource for this course. It's like an Poo workbook about board books design and what you should
pay attention to. If you want to include those in your professional portfolio, so don't forget to
download this resource. Thank you again, very much
for taking my course. And I will see you
in my next class. Bye bye.
 Weronika Salach, Art with MAGIC