Transcripts
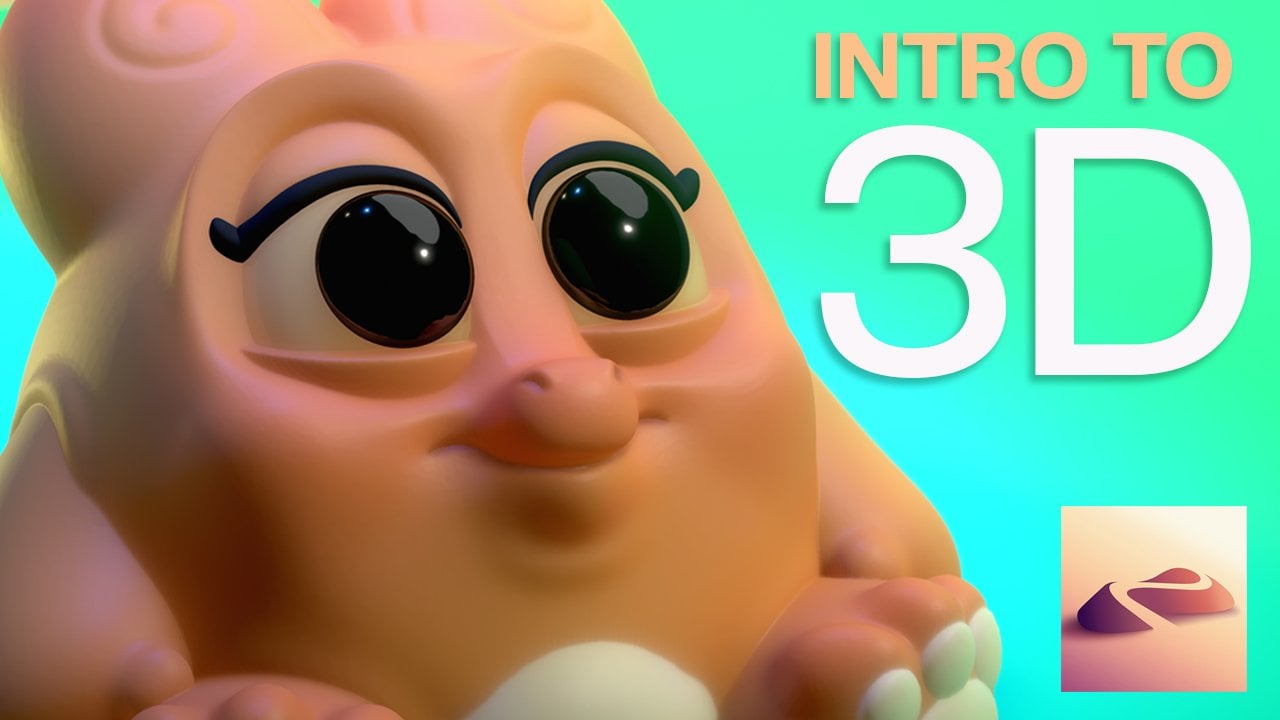
1. Advanced "Chibi" Character Design with Nomad Sculpt: What's up, guys drug-free
Dave, here and welcome to the danced 3D character
design with nomads sculpt. This is a little bit
more of a challenge. By now you've taken
some of my classes. You've been working with
them as scope for awhile. So it's sort of it's
time to up the ante. It's time to do a scope that's
a little more challenging, but also it's gonna be
way more rewarding. So of course, you
know the drill. What you're seeing
right now is the class, so everything you
see, you will learn. And I've also included
some extras in this class. We have some 3D scopes
that I've made, some 3D accessories
that you can plug in. And I'm really excited to teach
at more of a faster pace, more along the lines of
how I would normally sculpt and probably how you scope when you're
doing your projects. And I think that you
will be able to create some amazing designs once
you work through this class and you just kinda pick up
some things that I do when I really go full out and I really
pulled out all the stops. Alright, I hope you guys are excited to start this project. I'm excited to teach. Let's jump to the next
video class project.
2. Class Project: What's up, guys, welcome
to the class projects. So there's two tools that I'm going to use a lot
throughout this project. The first one is
the smooth color. So this is essentially just the smooth tool
with zero intensity. I'll show you how to make
that brush in a moment. And also the smooth
edge around Edge tool. So this will round out, round off edges and that'll make it easier for
us to decimate. So I'm gonna go
through all of that. But it makes sure you check
out these two videos, make sure you have those tools. So when I mentioned
it, you'll be able to just quickly and easily
use those tools. Also make sure you
download all of my extras. So I have about ten to 15 different sculpted
characters that I made. You can plug them
into the scene. They don't have to be in the
same place that I do them. You can be creative. You can make them bigger or
smaller, wherever you like. Also, I've included
an HDRI image to images that you can
plug in at the end if you're interested
in that sort of thing. So you can use an image as the background and just kinda
bumps it up a little bit. It makes it really cool. And for anyone who's interested, I was going to add
this video here, but I want it being too long. So on YouTube there's gonna be a video where I bring
this into Blender. And now it's not gonna be like a step-by-step video that
would just take forever. Plus it's the computer so
you can't see my fingers. But I'll generally walk you through my process of
bringing it from Nomad sculpt into Blender so
that we can get a really amazing off the wall
render from Blender. But yeah, I think
that's about it. Let's jump right into it. So there's another
tool that we'll use in all my videos pretty much. And it's really easy. I
call it the smooth color. And essentially it just helps
you blend in these colors. So the way to make
it is just take your smooth tool, tap it, hit Clone, and now you can rename it to
anything you want, smooth color,
something like that. It'll show up on the bottom. So all you have to do now is turn the intensity
all the way down and then go back to
the brush and then Save. And now you have your
smooth color brush. You can still
control the radius. And basically what that does is now you can go over the edges. This works better with a
mesh that's not very dense. So you can get some really
nice smooth colors this way. Shout-out to procreate
effects on YouTube. Lots of handy tricks like this. This was one of the first
things that really, really helped me out back
when I first learned it. And I'll be using it in this tutorial and I pretty
much use it all the time. So here's a quick note. I will use a round edge tool or a round edge brush the videos and I want to show
you how to make it. So we just have a regular box here and I'll show
you what it does. So if I use the
round edge brush, I can just drag from the middle. And you'll see that
rounds off everything. So if I do this multiple times
and just rounds the edges. So it's a very useful tool and I'll show you
how to make it. So we bring the
box back to zero. You take your smooth tool. So you click on the
smooth tool clone and just say You name it
edge or smooth image. So smooth image, it's going
to show up down here. That'll be your new tool. You can move it
wherever you'd like. So here, I don't
change anything. Here. We go to the next one. And then we have these options. So instead of dot
won't lock radius. I leave everything
else the way it is. Let me go to Alpha. This is just the
default. That's fine. Fall off. Preset,
change this to flat. So change that to flat filter. I don't really change
anything here. And then pressure. You
want to make sure that you uncheck, Use
global settings. So uncheck that, change
both of these to preset and then make
them both flat. Okay, so now we go back
to the tool, tap, Save. And then you essentially
have the rounded edge tool. So you can just pull
from the middle. And voila, let's jump to the next video,
Getting Started.
4. Hood Blocking: Alright, so let's
dive into the hood and that's why I think
I like the pink hood. The jacket is yellow. It doesn't really show
a different hood here. But I think the
jacket, I think this would be a double hood hood for the jacket and then this
would be coming out of it. So I think the way I
want to do that is make a sphere and then slice it. So we just have the top half. So the top half is flat and then the bottom half is still
round from the sphere. So we'll go to the hood, will add a sphere,
will bring it up. Increase the size. Maybe we can flatten
out a little bit. Maybe not, we can
just leave it normal. So let's tap left. Let's move it a little bit. So it's basically
you're going to be the jacket and
then it's gonna be, uh, it's kinda comes to
a point in the front. So the front doesn't have to really have to come out because the hood is mostly going
to be towards the back. So I'm going to tap left again. I'll validate. And now I just
want to cut this in half. So I'm going to use
trim and rectangle. And maybe around, maybe
like the midpoint is fine. So maybe something like that. I'll take my gizmo
and move this up. So I hope that it kinda
makes sense the way I'm sort of
constructing this and the way that I'm like going about building
all of these things, this way just makes it easier for me to kind of understand. Otherwise, it can be very
you can just seem very, seem like too much. And he slowly just
build it out and it just kinda happens
after awhile. We have to imagine the
back part of the hood. And actually, I think
this is probably fine. The only thing that
I might wanna do, you notice I grabbed move. I'll use symmetry because even though we cut it in
half, it's still symmetrical. You see the two dots. And maybe just maybe it
makes it a little more hood like so maybe just something
like that for now. And also this foot is
much bigger actually. So let's tap on that and
let's just make it bigger. Let's take a look at this. So this kind of it
kind of follows, Let's see if this
hood was out here, it would come around,
something like that. Also, we have to
pay attention to where the front end of it. So the front end of this hood actually would be around here. So I'm going to stretch
it actually a little bit. Stretch it that way. It comes out well over
the sleeves as well. So I'm going to
stretch it this way. Move it down some that
feels that feels right. It feels right. So the rest of it, I
think we'll just expand and contract using
the move tool. We want to make sure
we have symmetry on. So now we just have to build
the rest of this hood. So I'm gonna pull this
back because this is a hood in another hood. So I'm gonna do
something like that. And it's a little bit
flatter on the top. There's a lot of flat space
here and not on the bottom. So that tells me that I
want to sort of flatness. I'm pulling this up a little bit since that's gonna be
inside the other hood. But the main thing is, is that let's make the
move tool of its smaller. When you look at the rim of this comes down and
then it cuts in. So I'm just going
to open that up a little bit and maybe bring
it down a little bit more. So something like that
feels pretty good. I think I like that. This is going to
go into the jacket and there's there
needs to be a lot of space for her her head
and things like that. And I actually think that I made the body a little bit too small. So there is, there is
that did I Let's see. If I bring it here. Now it's actually pretty good. Actually didn't do a bad job. The size is actually
do match up decently. Okay, So I think the sleeves
are a little bit too high. Maybe, maybe not. Maybe they just look weird
because they're boxy. So let's validate the sleeves. Let's take our round edge brush. Will tap on the sleeves. And do we need symmetry? No, we don't need symmetry
because they're in a mirror. Now I'm just going to pull. Soften these up a bit. And we can actually
take voxel Ramesh. I'm using a shortcut down here. It's the same as this voxel. Remember it's the same thing. I'm going to bring
it down to like 90 or 85 even then remeshing. So essentially this is
going to make it really, really dense. Wait, what did I do?
Did I do that right? Make sure I did that right. Let me do that again.
Auxiliary mesh on the sleeves. Okay. I did an x. I'm going to bring
it down a little bit lower maybe to like 50. So I just wanted
to be really soft. So that's why I'm lowering
the resolution so much. I'll take regularly smooth and just kinda smooth
it out. Some more. Regular smooth is a little more aggressive with the smooth, which is what I want, especially towards the top. So something like that. I think we can make
these sleeves and stuff a little bit bigger too. Let's take the greens.
We're going to gizmo. Let's stretch it out a little
bit and move it down a bit. We can do the same thing with the pseudo donut.
So we'll do that. And we'll eventually
you have to make the leaves a little bit bigger, I think, but that's okay. Okay. So all this looks good. The head is a little
bit still too small. If we lined it up, the hood is actually really, really big. So I'm thinking of
taking the hood, the ears, the hood ears. Let's bring this up to the top. So we have the hood ears. The hood. And what does this view? Oh, that's the that's
the jacket hood. Let's take all those. The ears, the hood
and this jacket hood and just make them a
little bit bigger. Let's take the head and the ears and just make it a
little bit bigger. And just make sure that you're checking out the reference. Because for me it's like I
have to really go back and forth and kinda
trying new things. And that's how I kinda make this work and make like
sculpting work for me. So sometimes I do take
a lot of extra time, like working on things, but that's just kinda
how I have to do it. Let's make it a little higher. So I'm going to take move and makes sure that
we're on the hood. And I just want to make
it a little bit. Here. I think. Even here, I look at the top view. I think I just want
to flatten out, flatten that out a little bit. Bring this down a bit. Because I think we're going
to wind up getting rid of a lot of this anyway. So yeah, I think that's good. The only other thing is I
wanted to do is bring the top forward because the top of the hood is going to be
a little bit more forward. So let's look at it
from a side view. Okay, that looks pretty good. I just want to make sure
that it's kinda flat. It actually comes down some too. So maybe that
wasn't a good idea. Maybe this is pretty good. Make it a little bit bigger. You make the move
tool a little bit bigger to get more and more of a smooth, smooth Sculpt. So I think that'll
be pretty good. Okay, cool. So now let's adjust the
ears just to make them around the same size so
they're a little bit, let's tamp this one so
that they work right? This will make them
a little bit bigger, a little bit further apart. There's that little
piece in the middle. So a little bit further apart. Something like that. Then maybe I'll
tilt mine a little back a little bit and
then move them back. I think that's good.
You can experiment and we might want to twist them out a little
bit or something. I think those look good. I'm happy with the position. So I'm going to validate and
then I'm going to use move. And where are we're still
in the mirror so we don't need a symmetry. So I'm just going
to make them more triangular by
pulling the bottom. And as such, you can. Kinda pull the top as well. Just so you have the nice round. Want to make sure
that you just have it nice and round like that. I'm going to do
just like to pull pull it back out a little bit. I would really do this if it was like a real cat because they have their ears are like domes. But I think it actually, it
looks good with this as well. Do a quick save. You never know when
you're gonna get a crash. So it makes you save often. Okay, Now it looks pretty good. I'm a little
concerned with that. It might not be high enough, but maybe it'll be okay. Let's see. I'm gonna move this
out a little bit in front. This kinda lowered thing. Because we want to
make sure that we see this shape up there. Maybe I'll even pull
this up from the top. Make it a little bit
bigger. That's pretty good. So I want to make sure
that when we can see that nice face on
the top of the hood. So we just needed to come
up and then come down. I think that's good enough. We can see it from the front. So okay, cool. Cool, cool. Still looks good. These
might be a little bit big, but you can adjust them
as you, as you like. Now that I'm looking
at it, a few other things we can do for now. Let's make these a
little bit bigger, the sleeves and the tourists. And let's move them back
a little bit so that she's her body moved out for the jacket is sort
of moved out forward. So let's take the sleeve. The jacket sleeve. And was this did I not know that's the shoe
was labeled this heel. Where is the these are the
shorts, jackets, sleeves. Oh, the sleeves
are all connected. Okay. So we have this leaves. I think I'm just going to maybe I'll just stretch them this way. And that's decent. So I'm gonna move them
back a little bit. Let's grab everything. I'm just going to
move them back. Tilted back a little bit. She's like putting
her arms back. That looks kind of cool. But I did there is
one issue though. So there is one issue there. The fact that these are not, um, they're not playing nicely. You're going to get in there. Get me off my make me
forget what I'm doing. So unfortunately, I had to
we have to do them separate. So let's just take this. Here we go. Move these back. So that's what I wanted,
something like that looks good. We can actually
stretch these out now that we've separated them. Stretch these out,
and then we'll just bring the donuts too. You just have to use the
gizmo to sort of get them as they were. Something like that.
Looks pretty good. So I want to take this cylinder and maybe we'll stretch it. Maybe we can flatten it
a little bit this way. But I mostly want to
validate it and smooth it. So let's take round edge and
just smooth out that bottom. Nice. So now we shrunk it a little bit so we can make it a little bit bigger. I think that looks good. Coming together. Everything
looks okay for now. Alright, so now we have to
get to the more interesting, a little bit more
tricky, tricky stuff. We're going to, we're
going to work it out. So let's take this outer hood and let's just make it
a little bit wider. Because I think I've
just been a little too. Conservative with the wideness. And I'm actually going to
push up the bottom a little bit because I because this goes around but it
goes over the sleep. So I think that actually
looks pretty good. And then with this, I'm just gonna make this
a little bit wider. Still. Didn't take this
one and open it up. And then I'll take this one
and open it up as well. Pull on the bottom two. What kind of pull out on the sides and the back just
so the hood kinda goes in. That's a little bit better. We have a little bit more space there for the hair
and stuff like that. So we can start to think
about how we want to do the dig out this and
we're going to use layer. But first, this is
just a me thing. I feel like I want
to adjust the ears. This one. I'm going to bring
them out a little bit. And then I'm going to actually
open this up a little bit, make it a little bit rounder
and more round on top. Maybe. There we go. That's pretty good. Feels right. I have enough room for that middle a
little hair thing, so that feels better to me. So we could, we could
actually voxel 3D mesh. These, these on there. We could probably do that. Now. Let's do it. So we have the hoodie
ears and the hood. Let's go ahead and voxel rule. Let's, let's first go to the hood years,
Validate, Join children. And then we'll take the
hood ears and the hood, and we'll voxel
rematch them together. Maybe around 250. Nothing
too crazy. So due to 50. And we can take symmetry and just kinda
smooth this out a bit. Looks good, hoods looking good. So now we want to make the
space for the face rhyming. There is a way to do
it with select Mask. You can kinda do it this way, but I'm gonna do, I think
I'm going to use layer. But here's the way that I
was thinking about doing it. Doing something like that. Tapping Invert and then using
the gizmo to move it back, to move it back, I'd have
to protect that one side. But then you have a
problem with these edges. The edges are really difficult
to get looking nice. So I'm not gonna do it that way. I'm going to use layer. And one important thing is you want to make
sure that you have enough space so we can make
this little face at the top. So we'll start down here. And what we basically
just need to make this outer rim might have to do this a couple
of times to get it right. So we're using layer
and we're using Sub, make sure that you have
subgroups. Tap front. And then it's gonna be
something like this. That would be one layer. I think that's pretty good. Then we'll just repeat that. Okay. It's twice. Let's repeat it again and just make sure you
kinda hit that outer edge. Still looks pretty good. We can probably do it once more. I think that should be good. I don't think we
really need to go any deeper than that. Back looks good. Now this is our face. We can adjust this
to where we want it. It is sunken in
there because she does have hair that
comes out on the top. So we'll make it
bigger like this. And she's not really gear, the faces are really
coming out that much. I think this is a good, a great start for that. So let's take the
hood and that's voxel remeshing it around 200. So that will change all the
things inside and we'll just smooth that out inside. Okay, that looks much,
much, much better. Yeah, that looks good.
That looks great. So now the head is there. And I think I want to pause here,
We're doing really well. Let's make sure we save and
then we'll come back and continue working on
we'll do the face shape. That's the trickiest part. Once we have the face shape, the rest is just cake. Alright, let's save.
5. Face Building: Alright, so, um, we
wanna do the face shape, but I want to open up the
hood a little bit more. It's a little it's a
little tight in there. Let's just use the
flattened tool, one of my favorite tools. So I'm just going to go along this edge and just
flatten it symmetries on. So I'm gonna go along this
edge and just flatten it. And then over here I'm
going to flatten it more. So it was sort of on
that edge a little bit. It doesn't have to be perfect as you see it sort of rounded. I'm essentially using the
flattened to just widen out the hood a little bit. And mostly just dislike
towards the front. Okay. That's good. Because we need a lot of space
for even like even clay. We can use clay and
then you subtract, need, maybe even subtract
a little bit more here. Okay, that looks pretty good. Then we'll just
smooth out inside. Just to give us a little
more space to work with. I think that looks great. Okay, so now let's do the head. And we just heard
us sort of shape it would just sort of
shape it a little bit. So we'll tap on the head. And I want to use Move symmetry. So the head is sort of like kind of goes like
this a little bit. So I'm just going to make
sure I'm on the head. I just want to pull that part. That's a great start. I know it's not, it's not much, but this is a salt
really subtle stuff. So it goes like this. It goes like this, and then it, It's like a triangle
almost at the bottom. But I wanna make sure
that this is nice and flat on the side. And then this part, I want to come in. So I might just even Sol LeWitt want to pinch at the bottom. Again, it's very, this
stuff is very, very subtle. And I know that the bottom
of the hood was there, so I'm just going to try to so you just want something like that and
just notice like I I turn it some time so the
back isn't like puffed out. Let's undo the solo mode. So we can kinda see it. And we can see that her, hers, the shape is a little
bit different than mine, so we need to fix that. We need to bring this part up because the bottom part like around the nose
and everything. It's almost like
if it's flat and it's like a bump,
like it comes out. So that's very important. But not only for the middle. So it comes out like that. And not only for the middle, but it has to come out
for these sides too. So I'm going to just turn it so the sides come out as well. And now all the time
we're still continuing to make this little
triangle at the bottom, which is a bit tricky.
I'm going to solo it. And the back is that we don't
really have to worry too much about the back, but yeah, I just wanted to make it
more a little bit more like a here we're getting close. We're getting close. But you just have to remember that
on the side view like this part comes out
where the mouth is. So it's very important. Let's take a look again. It's not bad. I'm going
to flatten it out a bit. And I'm just going
to pull the sides out because I don't
want it to be. Again, I don't want it to be. So that's pretty good actually. It's not bad. Actually can pull this
down a little bit. I don't know why I
made the chin so high. I think something like
that is really good. Kinda like in that. And of course that's
in pretty deep. And obviously we need
to work out this too. So let's take this hood. Let's use our round edge and let's just smooth
it out. Again. We have to drag out
from the middle. Might be a little too soft. So let's, let's go here and let's just go to multireligious
and it's subdivided once. Let's see how it is. Okay, it's a little
bit better now. A little bit better. And obviously this
has to come down, but we need to merge
this with the coat. And it might actually, it might actually be
beneficial to do that. Now. Let's do it. Why not? So let's take these
two parts and we'll just voxel, rematch
them together. So that's the spheres, the hood. And then as the coat, jacket mid will take these two. I'm gonna do a quick save. And then we'll voxel,
rematch them together. About 200. For now. I'll just
smooth it out. Again. Smooth everything out. Okay, I think that looks fine. We do have some details that
are going to happen here. We can sort of do them now, but they're not gonna be. We're gonna do a lot more voxel remeshing with the jackets. So don't worry too much
about the details, but they are a bit important. So there's a line coming down. So let's symmetries off. So there's a line that comes up and do a lighter than that. I can do it in the
middle line that comes up and it comes
around and it kinda makes that this is where that breaks off and
goes behind the jacket. So since we know that we can we can either take
drag or we can take Clay. Let's do clay with sub. Then we can just get rid
of some of this here. Let's actually do layer. Let's do layer. I'm going to undo that. So we have this crease here. This is just to show
where this goes. Because later on we'll just do clay and we'll
kinda build this up and make that like a
crease for the jacket. So let's do solo. So we'll do solo and
we'll use the layer. Again. With sub. We can just open this
up a little bit. Who we can actually
use symmetry. I don't think we need
to do another one, but I'll do it anyway. I just wanted to make
some space in there. Kinda help us out a little bit. So now when I solo, we have the hood
that it looks good. And eventually
we'll, we might have to actually there, we
have this hair there. So it's going to really
cover most of that. It's going to cover a
lot of the phase two. Okay, So speaking of the face, Let's get back to the face. Since that's the, that'll be like the most difficult part. You just want a shape like this, triangular for the
little hurdle chin. And then we can start to
work on all this stuff. So the cheeks are about here. Let's take clay. Let's just jump right into it. So we'll take clay, make sure that
we're on the head. And let's just let's
take it off of, so make sure it's not on sub. Let's just add a
little bit here, a little bit of clay here. Then we can add
some here as well. So I'm essentially just making this line where the mouth is. I'm literally just using clay. And I'm keeping that in mind. I'm keeping the shape
of that in mind. But I'm just using clay and
I'm just going back and forth to build where
that mouth comes out. They'll build a little
bit more cheek as well. But that's what I'm
really concerned. Not concerned about, but
worrying about is that mouth. And it's smooth. It goes back. So add a little
bit of clay here. It smooth, it goes back. And then the head it
looks like it goes back and then it comes
back out forward. Actually. So we can probably move
the whole head back. Then we can probably
take move and move the head forward like this. Because that actually
is way more accurate. Now the eyes. And we might not have to do
much with that. I'm honest. As long as we have
that mouth there, we might be pretty
good actually. So let's take smooth. And let's see, You know what, Let's multi-rate of the head. So we'll go here, multilayers and we'll just subdivide it. So it's a little bit stronger. When we smooth. Then let's just
softly smooth it. So that this is, this is what we want, something like this. So it's very subtle, but you can see
that the top lip, the upper lip comes
off like that. So that's pretty great. I think that'll work. So now for the mouth, we could use layer or we
could do select Mask, similar to what I did before. Or we can just do regular mask. Just make it small. So we'll try it this way first. It might not work. Let's look at the
shape of the mouth. It's just kind of like this. It kind of goes up into
a little bit of a smile. Then it's just wide and open. So it's just
something like that. So once you have that, Let's take wanting
to hear invert. And then we'll use our
gizmo and then we need to, we can just push this
inside the mouth. But we can do pivot. We can turn it this way. So just tilt that a little bit. Take the pivot off and
then we can move it back. So something like this. So I think that will work. I think that's deep enough. Okay, so let's
take the mask off. We'll go back to
mask will go here. And then we'll just do clear. It looks pretty good. Let's try smoothing. Let's just see how it looks. Well, it's not too
bad. Okay, smooth, pretty, pretty good. Might've made the math a
little bit bigger, I think. But I think that's okay. If you find that it
smooths too much, then we can always voxel
Ramesh it at like 200 or so. And then just try smooth again. So this should split. Is it not really doing less? Feel like it's the same. I think the multiverse
look better though, right? Am I wrong? I think just the regular
smooth look better. Let's try it again. It is very, very malleable, but I like it. I think it looks good. Okay, so the first thing I want to do, because I always do
this with mouths, is I want to take the
flatten brush and flatten. My why is it not flattening? It is. Let's voxel remission at 200. Let's smooth it again. I probably should have
just voxel, we missed it. Okay, so now we have the
cut-out for the mouth. Let's go ahead and box will
remeasure it around to 50. Slovak, sorry, mesh it
around to 50. Looking good. So now we can smooth it. Shouldn't, we shouldn't, shouldn't change
shape to too much. I think we're good there. Now I want to take flatten, and I just want to flatten
out these edges a little bit flat and a
little bit smaller. Especially where
sometimes there's like little anomalies like this. It's going to flatten them out. Just make that nice and flatten
there and then smooth it. Same thing on the bottom. Just take flatten,
just flatten out. This edge. Really want to get like
the more front-facing? Just kinda smooth it.
It's kinda looks better. Okay. I might turn
on a solo this good, The back of the head looks good. Not that it matters. But sometimes I count to see if I can push this
back inside the mouth. Doesn't really matter. Except now you can
see whatever that is. What pieces this well,
that's the hood. What does take clay
and clay away, baby? Okay. Back of the hood
still looks good. Still, Reimann. Okay.
This looks pretty good. And it will be, I think
it'll be better for us to, let's see what this
side with this, my set, the size of the head might
be a little bit big. It's kinda hard to tell. It's kinda hard to
tell without all this other stuff around. But maybe we should do the eyes because that will
give us a lot of, Let's see if we can cheat
and use the crease tool. If we cheat and use the
crease tool and go like this, we can kinda see
what it looks like. That's actually pretty good. I think they will actually work. I feel like the mouth is
a little bit too big. So if that's the case, I need to take drag and just
like shrink it a little bit. I just think it's a
little bit too big. There's subtle
shapes in there too. Like it goes up a
little bit in a smile. So that's very
important because that will make the
character like cute. That smile is very,
very important. I also want to use Move. I don't want to move
this up a little bit. And take your time when
you're doing this, you know, like it really makes a
difference when you really spend a lot of time
doing little details. So I'm just moving
this up so you can see more of a chin
underneath because you don't want it to just be like flat this way or
flat straight down. But okay, I think that looks a
little bit better. The only difference
is the reference. The doesn't really come
down in the middle. I kinda like it, but we'll
stick to the reference.
6. Face Details: The only other thing
is I might have made these too far apart. Sure. So I'll just
smooth it. Okay. So we have a good base for
the, for the eyelashes. And I do want to
add them because it will help keep our morale up as we work through the
whole rest of the thing. That is how I think
about it too. Excuse me. So we're using path, so we're using the tube tool. We're using path snap because we want it
to snap to the face. So we'll start one. It's pretty close
to the P down here. So then we have one. Here we go. Here we go maybe five. That will just adjust. Saw me tap this. Okay, so first
let's type radius. We'll make this one small. Obviously this side
is very small. This side is a little bit
thicker and it kind of goes off into a little
little flappy thing. So let's hit spline, make it nice and curvy. And then let's just match, will just match the reference. So this, this can
be kinda thick. I think that's great. There
is a little bit of a, there is a little bit
of a size difference. So I'm going to
type radius again. And maybe I'll just make this
a little bit wider here. It feels right. I think
that feels right. So let's mirror. Take a look. I don't think they're
too far apart. I think they're
actually pretty good. And this is one of those
things where you really have to just pay attention
to the details. But ultimately, I think
this looks pretty good. The only thing that I might
want to do on these is bring this up a little bit. And they might be a little bit. I'm going to tap a line. There might be a little bit too far apart from each other. So if so, we'll bring it in. Yeah, I think that might I
think that's the better idea. I just don't want them
to be too far apart. That's very important. Even before I validate. It might be good to
go go back in and just see if there's
anything else I needed that needs adjusting. I'm noticing I might
use crease and I'm noticing that there's like a
crease in-between these two. And I kinda like that. It's
sort of shapes to face. I might try to make that crease
and then just smooth it. Just to give that a little
bit more definition. I love using smooth that way. By the way, the only other thing is looking at it from the front, the face is a little wide and it's I feel like it can be a
little rounder here. So and these were all
the little things, the little things that I do. I like to take a lot of
time to really get into these details because I
think that's when it really, that's when it really hits. It's the little tiny, tiny, tiny details that no one else really does or
pays attention to. That's why you got
to pay attention to I might even to flatten on the side and just kind of flatten out this little
side plane a little bit. Just kinda smooth it out
and create these little. There might be a little long. Are they a little long? Let's take a look in
perspective and just see. There might be a little long. Go back to orthographic. Let's bring this
up a little bit, open it up some. Okay, I like that. I think that's I think
that works, So okay. So the only other thing I think I'm just
gonna validate it. I like it. I think it looks good. And they're very, they're very, they're very malleable now. So I'm going to box will
rematch them at 200. Lot of these things will have to come back later and decimate. We rematch them. Then we can smooth it out. It was on the face. I don't know what happened. Symmetries and on,
Let's go back. Voxel rematch them and makes
sure we turn symmetry on. Symmetry was off. So I need to so we have the tube, Validate,
Join children. There we go. That's
how we wanted. So I don't know why, but it was important that I go in and do that with the mirror. That way, I want to be
able to use the symmetry. I want to make sure that your symmetry is on both sides and not one is very important. So now we can
smooth and we don't want to do everything twice. It's a nightmare.
So that's perfect. The cheeks kind of go
into this so we can probably use clay and on the head and actually
add a little bit more here. So we'll just see
how this looks. See how it smooths out. Smooths out nice,
then we're good. That looks nice. We can even add a little bit
more clay down here. So essentially, I just want
to make sure that, you know, the cheeks are nice
and pudgy. Like so. Good, very happy with,
very happy with that. Alright, so let's do this, some more of these little
details on the face. So we have the little
nose and then we have these two little eye brow Finis, which shouldn't be
too hard to do. Me do a quick save. So I'm gonna go
ahead and add sales. I'm going to add a
cylinder or a sphere. Let's do sphere. So we're gonna make these two
little shapes here. So we use our gizmo, will bring it up, shrink it will do this very simply. Will mirror and we'll put it in the position that we want. Which looks like
probably around here. Think eyebrows are
up pretty high. She's happy. Will make
them a little smaller, even push them in. Pretty good. We'll validate and I'm
just going to use drag. Now I'll just drag these
into the shape that I want. This is pretty simple. You can put a little bend
in it if you want. And I can, I'll just
continue to push it in so it stays like flat, but feel free to make them as. Small or as big as you want. I think I dislike
them very simple. Maybe like this. I'll just push it into the
skin a bit more. Drag a little bit smaller. I think something like
this and I'm income good. She doesn't have very much
in a lot of this is being covered by the hair. That works a little
bit better for me. The reason why I
don't do it just with color is because I
like to view it. I can change the color of
these very easily if they're, if it's its own shape. So that's one of the reasons
why I do it like that. Cute, adorable little nose. I'm going to validate
this, call these eyebrows. What is this mirror
or this is the eye. Lashes. Wouldn't nestle these. Why not? Let's make a new still a
cylinder for this one. We use gizmo and bring
it up into position. Shrinking, ***, flatten it. And let's do, let's
just move it into place, closer into place. And we can always change we can always change the nose too. I might I might even change it. Might just give her
a regular knows, but let's see how this looks. Looks cool on the reference. Open it up a little bit. Can't really see
the shape of it. But it feels like it's
something like this. Maybe a little bit flatter. It's very tiny. Line it up like that. It's a little bit closer
to the lip. I think. I think it might even be a
little bit smaller than that. It's a little tiny bit
smaller than that. Okay, so we'll go
ahead and validate it. And I just want to do my
own little thing to it. I just want to
maybe bend the top. Let's go ahead and
turn symmetry on. What have been the top-down bit. I don't know. I just felt like it needed to be that shape. Now I'm going to
sub-divide it once. That way I can sort
of smooth it out, make it a little bit more round. I think that's perfect. So we do need to add these little, these cute little
eyelash things. And I might actually
flatten this out a bit on the eyelashes. I think that flattened out
decently. I'll take that. So there's two. There's one in the end. What we're going to make
two, she's going to have to. Alright, so there's
one on the end. So maybe we can just pull
this up and be done with it. There is another one. I wanted to make
this really small. I'm just pull off another one. I like it, but it's just
a little bit too big. I think that one
looks really nice. I'll even smooth this
out a little bit. Not too much because I don't
want to mess up the shape. But I might have to
voxel Ramesh this. Let's try to box will be
measured at like 200. And now let's see if we can
pull off a smaller piece. Still a bit too big. So this one was perfect. But I think I want to use I
want to use to other tubes. Now that's too much. Let's use one other tube. We're really going overboard. So I apologize. But really quickly. One
more tube here like this little green button. And we're going
to do this pretty much the same thing that we did. Whatsapp radius. This side actually
looks good as it is. Will take snap off. That way we can push it
into the into the face. Like this. This one will make really
small, like really small. And another node here, so I can get a little bit of
a curve in this, make this a little smaller. I think that's what more
liquid I'm looking for. So I'm going to
mirror it, validated. It's definitely more
what I'm looking for. Now. I might just take move, only going to use symmetry and
just push it a little bit. I think it's pretty
good. The only thing I'm having trouble with, as I kinda wanted, I might
even want to like away from the I think they just
want more of a curve. Yeah, I think I just want
something like that. So we'll Mirror, Validate. That's perfect. That's better. Okay, good. So let's just join these
malady, join children. Eyelashes. We'll just join them for now. Eyelashes. Okay. That's good. Let's say.
7. Hair Blocking: Alright, so we're
gonna do the hair. We're going to use
the tube tool. Either restart the video
because my throat is acting up. So we're going to
use path. Of course. We'll try Snap. We might have to turn it off. Eventually. We're using the tube tool. And let's start with
this one right here. So the point kinda comes
down to about here. So we'll make that one
will make the two. There might be all we need. So I'll just tap the
little green button. Sorry, I'm spitting
on the screen. So look, turn snap
off so that we can push this back further. We can raise it off of the rays it off with
the skin a little bit. So really it's something
very much like this. This is looking good. So of course we'll tap radius and we have these two nodes and now we can make this bigger. We can tap it again and
we can make this bigger. We can make this smaller. Pull this in a little bit more. Nice. I can, if I
could flatten it. But that's okay for now. I think that's pretty good. So there's these other pieces. So we might be able to, I'm gonna take this tube and just put it on top so
we don't lose anything. And this will be here. And I'm going to clone this. And they'll just move it over. And it's a little bit different, but it's not really
that different. So I'll tap tube up here so we can go back to these options. And we'll just make it
a little bit smaller. I think we can even
maybe even go to radius. The second radius. Religious make this shape. And tubes can be a
little tricky at times, but just take your time. So it's really
something like that. Who also spline? Spline makes it nice and curvy. So you do have to use supplied. Then actually it
looks pretty good. You spline on this one. Yeah. So nice and curvy. Make it a little wider. Even looks like it gets smaller. If you want to really match it, kinda do something like that. The back really small. Since that doesn't show. We have something like this. Now we have this going
back and honestly we can probably use we can use, we can continue to use
the tube tool actually, let's just use path
and multiple. Here. You could slow and
get a little wonky. I'll turn snap off, trying to get it where
I want it to go. So this one comes up
in front of the cheek. So something like this. This make this one
smaller, is bigger. It's spline. So it looks pretty good. Tip radius again, so
I can fatten this up. So we have front. I just want to pay attention
to where this is now the actual the actual
poses like this. So I'm just going to go
back and forth and just kinda make sure that it's
how I want it to look. I think this looks pretty good. Pull this up a little bit more. The whole thing might be
a little bit smaller. Just a little bit
with the gizmo. And I'm not too worried about the thickness and stuff
like that because we can use flatten and sort of flatten it out to make these
really nice planes. We can use crease.
So we'll do that. And when I use pinch to make these really sharp
points in the hair. So I'm not too
worried about that. This one might be nice. This is out more and
this is pointed down. Flatten the top.
Looking good so far. For this one, I
can probably use. So this one is more
just like a curve. I'm going to do snap. I
think of my tap on the head, it'll snap the head. Let's see. So we just
make our curve like that. Almost got it. Perfect.
I'll hit radius. Even though it
isn't really need. Honestly, you can't
really see the edge, but I'll do it anyway. I'll make this side a little bit bigger spline. And it's really, I think
it's because of snap. That's what it was. We'll
do something like this. Something like that
is pretty good. Make sure you're
kind of goes into the other hair. So I
think that looks good. So we have this little piece right here. So we'll do something like that. I'm going to take it off
of snap so we can bring it inside the mesh. Radius. The smaller size,
sticker spline. It looks pretty good. Now for these, we can probably
just use some spheres. So this is all here. I'm gonna move this all up just so we have all the hair together and I'm gonna hit Save. So you don't have to
do all that again. Now for these, I think
will use spheres. We use our gizmo put into place. Maybe a little bit smaller, and I'm just kind of
using where I see it in comparison to here to
the face, things like that. So that's what I use to sort of gauge where
I'm going to put it. You can see it's kinda
coming out of the hood. So that's what that's how I figured out where
I want to put it. A little bit squat. It's all clonus and this
one is right underneath. Maybe turned a little bit, it's a little bit thicker. It looks like maybe a
little bit further out. So that looks good. And clean it again.
Put one over here. This one in this position
roughly where she is? Like it's like this, it's
almost touching the mouth. Then I'll clone this. And this one is the same, it's a little shorter,
a little bit fatter. So I'm gonna take it off a line. That way I can just
stretch it this way. Easily, more easily. So
that looks pretty good. There's a little space here.
That looks pretty good. So I'm actually
going to clone it again and push them
back into the head. So this can be like
just that color hair. Maybe I'll bring it
up a little bit. And what we can do with
this, we'll validate it. We can use drag or move. I guess I'll use, I'll use drag. And I'm just going to drag
this up into the sphere. It's a bit hard to see. But I'm just taking this
back sphere and I'm just dragging this into this sphere. Not really much nuance to it. But eventually we'll put them
together so that it'll look like this is like hair
coming out and like rolling. So we just wanted
to add here coming out into that sphere. And I'm going to go
ahead and clone it. And we can actually
just slide it. And then we have two. And then this one is
pretty much going into it, just the same thing going into the bottom the bottom piece. So it looks like they're
attached and hairs coming out. These look really good.
There's a few things that will have to adjust, but nothing to,
nothing too crazy. There is a little bit
of space in-between. We don't really need
that much space there. I think that looks good.
I'm going to drag this up, see how this iLab really
liked this curve here. I'm just going to take
this sphere back here. Just drag it up so
that eventually we can flatten and make
creases and stuff in there. So we'll just do the same thing. I'm going to take this sphere, clone it, validate it,
and then move it back. And we'll do the same thing. This is kinda like just a cheat
because it's like a fill. It's like a hair fill. We'll make sure we
stretch it out. Bring it up like this, will stretch it into
that ball like that. And not to be too fancy. It's pretty much in
the dark. It's pretty blocked by most things. We can take the same thing, but this one will just clone it, validated the gizmo
and just move it back. Fills up all that space. It's kinda hard to see, but
then we'll just drag it out, drag it out Street. And even with this, even with this ball here, like if we validate it, we can pull this off too. So it looks a little
bit more natural. But I think that's
a really good, really good progress
with the hair. Since we're here.
Maybe we can do these hairs on top as well. I think with that we'll
just use spheres. This one hood hair could hear. That's funny. We'll validate it up. Just make like a little dollop. So it looks like
it's about there. We'll just take drag,
will drag it up. You can take it off
symmetry if we want it to be a little bit more. Actually let's do move. Want to be sort of on a
curve, something like that. You can make it a
little thicker. So we have that and
there's two of them. So we'll just clonus, make this one smaller. Maybe stretch it a bit. Just kinda put that there. Okay. So that's good. Again,
will come in and flatten that a bit later. So I think it's simple way
to make these little pads or the ears just to kinda
make that shape. So a could use a box Gizmo to bring it up. And actually, I wonder if we can go into the
primitive settings, make it linear, and then
bring down the density. We can make this a now. Okay, so we have our, our box. I'm just going to flatten it a bit and we'll go ahead
and validate it. And then I'll take round
edge and just round it out. Okay? Now we'll just move
it over, move it down. Just put it in the general area. I'll take the smooth just
want to smooth out the side. Okay? So you can kinda
see what I'm doing. I'm just kinda moving it so
it's in the general position. Then you can just take move. You can just move it until
it's how you like it. Just drag it in and make
it a little bit smaller. And then just continue
to adjust it. So maybe take drag, drag sometimes you can even
it out a little bit easier. I think that looks pretty good. One thing that you can
do on the actual hood, you can flatten it. Excuse the flattened tool. That might help it. That might make it look a little
bit easier too. To make sure that
this goes on nicely. And actually if you do that, you can use pinch and make
this really nice edge here. Something like that. Now I
want to flatten this part too. So it's sort of
positioned nicely. I'm just going to flatten it up. I think that looks pretty good. You can just smooth it. Okay. And I think I want to flatten this part just with
the bottom is a little I think I'd rather
move this out a bit. Keep it like that. Okay. You can also flatten
the sides a bit too. About the tiny, tiny details. Like really going in and
trying to make it perfect. It's perfect as I can
make it now, of course, we just did that with one
side, but it's really easy. We'll just add a mirror. And now we have it on both
sides, so we're good. So I'm going to tag both
these Validate Join children. So these would be the hood here. Pads. I'm going to put these ns
with them with the hood so they don't get
lost in the sauce. Save that I saved.
8. Hood, Face, & Pockets: Okay, so let's do
some hood details. Details from the hood. Either makes me think of
a movie that I liked, tales from the hood, old school. So we have these two little
spheres, really easy. We'll just use some
spheres for that. Probably should go through
and clean a lot of this up. But we'll do that after
we do these details. I just want to make sure
I do it at the top. So let's add cylinder. It's bring it to the top. And let's just call
it a hood eyes. We use her gizmo. Bring it up, will mirror it. Really small. And then we'll put
them into place. Again, be creative, you
don't have to do it exactly like I'm doing it or
like the reference. References referenced, you can
always change whatever you want from what I'm
doing is is your art. So I don't think that you can't do that because
you're more than welcome. I love to see it. So here's one of those little
nose is like we did before. So I'm just going
to clone hood eyes, bring it up out of the mirror. Actually, no. That was dumb. Hood eyes is fine. Let's just
go ahead and validate that. I think I like that. I'm just going to smooth these. You can use rounded
edge or regular smooth. I'm just going to smooth these
so they're kinda more like buttons. And I think
that's perfect. I'm not even going to do
anything else with that. These are my eyes. And I'm just gonna do
the same thing again. I should have just, I could
have copied the other one, but it doesn't take that, whoops, doesn't
take that long to just bring another sphere up. I'm gonna do this the
same way I did her nose. And actually before I do that, I'm going to take this
cylinder and I'm going to clone it and just hide it. And I'll actually,
I'll rename it. This is going to be mouth. I'll just hide that. This one didn't go
ahead and validate. Make it really tiny. It's gonna be right about there. Maybe tilt it, will move it up. See where do we want it? So it's right on the
bottom issue of the eyes. That bottom line of the eyes. So make it even smaller. Stretch it out a little
bit. Something like that. We'll put it in, give
it a little round edge, and then maybe drag
and I'm gonna do the same thing that
I did with her eyes. I'm going to turn symmetry on. Then we'll just do
something like this. Make it a little cute. Pull it up a little bit in the middle. I think that looks good. So now we'll do the mouth. So here we have the mouth. I do want to Let's
bring it up first. Oh, there it is. Okay,
so let's use our gizmo. And to make it easier, let's just snap it forward, like this and move it up. So we'll mirror, move
it out like this. Okay, so now let's
just duplicate this. So we'll clone this one. I want to move up a bit
and make it bigger. I'm going to move it apart. So if you see I'm
moving it apart. So we basically just want
this shape underneath here. And we're gonna do a
Boolean, Boolean operation. Boolean operation. I always have trouble with that. I think that looks pretty good. The only thing that I don't
like that as that's better. Maybe we will. Yeah. So I'm basically just making
this little this little w. So that's what
we're going to use. So I wanted to make
sure I turn it to this side and open
it up this way. And I just want to
take another look at it because I don't want it to be thicker here then this area so much just have to
adjust that a little bit. Okay. I think
that's pretty good. If not, that's workable. Validate that. So now we have both
of these mounds were going to voxel,
remiss them together. But we're going to hide mouth one so we can box
so we miss them. I'll do it like 200.
Let's see how this works. Okay, it's not bad. You can always take trim and
just trim off. We use Lasso. You can always
trim off the edge. There we go. It
looks pretty good. I'm going to box we
miss it again at 200. Actually, you know what? We'll take both of these
and validate join children. Now it's a little we probably should have done should
have did this earlier. Probably what we should've
done was at this point, I could have took this mouth out and just made
it its own mirror. And then I should have
validated these joint children, validated these join children. Then taking taken both of these. And then voxel remiss that
200 and that would have been the better thing to do. Okay. So it should be pretty good. I'm going to box where
you measure it again. So should be nice and sturdy. I'm going to take round edge. You can take smooth. You might want to just smooth
off the ends if you please. But I think that
looks pretty good. So now, if you want the heads
to be route more rounded, the answer, I think you
can just clip them. I think you would just
probably just clip the ends. And then you just have
to keep smoothing amount if you wanted
them to be more round. Bottom line of being like this. And then we'll just slowly put this into we can
take it off snap. We can move this into place. Okay, Nice. I think it looks good. And I don't really want
this thing here, but I do want little
dots. I always make. So let's make sure that
we so this is the hood knows who knows that I'm
going to nestle them. Mouth. Missile that to tube
is the heck is hair? Hair left? And now
it's on the left. This is the hair. So I'm putting these
in with the hood. This is hair left top. I don't even know where that is. Hairball. L1, base here left. I mean, you can name
these anything. I just wanted to kinda
know what it is. Hairball. L2. Since these are both
on the left side, HB, left. Okay? These two are the right. Each B are each be R2. And we can validate
these two holidays. Each be our back. And don't worry, I'm
not going to remember these HB are back to I'm not really going to
remember them or whatever. But all of these are just
so I know that it's hair. So don't worry about it. Don't worry about it too much. Here. Upper, right? That makes sense. Here. Top. Since that's the hair, the top of the hair. This is here. Top. Right. Okay. So we have all the hair. I don't think I
can validate this. I don't think I can take
this all I would like to nestle at all. Oh, good. So now we have all
the hair together and everything is in order. The hood, we have the eyebrows, eyelashes, cylinder,
What's this? So this is the nose. I'll do nose main. Knows my hair and eyes. So this is the head. So we can nestle all
this under the head. Good. So that's the whole
where's the eyebrows? Oh, I guess it's it's
it's still all together. Okay. Good. So everything is
pretty much together and this needs to be validated. Anything else needs
to be validated. Everything else Good. Okay.
Everything else is good. Okay. So we have that. We should probably do
something with the sleeves. The sleeves are pretty much you can kinda do
whatever you want with them. You can sort of add clay. If we want to like kinda make it puffy, sort of like that. Smooth it. Add some clay around just
so that the edges are not, doesn't look like a square. You can also flatten some parts of it out too. I look good. Okay. I wanted to
make sure that it was still so this is the sleeves are still in the mirror, so I don't I don't
have to mirror it. You don't have we
don't have to mirror them one at a time. Okay. So I think this is a pretty good it's going to flatten
this a little bit. Just so it doesn't
look like a square. Alright. It looks okay. We can probably add some details
eventually in the hood. And we can make these
little pouches on the chat. I think we have time
for that in this video. So jackets, sleeves. So we'll add a cylinder. I'm gonna take it out
of this mirror for now. That way we can
just do one side. So it is rotate. Alright,
so we just rotate that. Probably stretch it. And let's go ahead
and invalidate it. Let's subdivide at once. Let's do a little rounded
edge a few times. Then we'll take drag
and I want to make sure that we're dragging it evenly. So I want to turn symmetry on. So we want the red symmetry. We can tap the
symmetry over here. We can scroll down and turn on Show line that we can
see the symmetry line. But we want it in the
middle here as well. I think that'll be green. Yeah. So basically all that is is it allows me to move this side and the
backside moves as well, as well as the left
and right side. So I just want to make
the general shape. It's a little bit wider. I like that. I think that's good. I don't really need to go
too crazy with it. I think that's perfectly fine. So now we'll just take our gizmo and I'm
going to place it on one side because we can stick it in the mirror
and it will show up on the other side. Little smaller. Bend it. So one-half is sort of
going more in the jacket. You can feel free to
kind of shrink it more depending on how how thick or how far you
want to kind of coming out. So it sort of seems like
it's actually pretty good. It might be a little
bit further away. I just want to make
sure that it's nice and flush with the jacket. If you want a little extra
credit, you can take move. Make sure you go to Symmetry
and turn off the green. And you can sort of pull bigger, sort of pull it in, push it from underneath to make it conform a little
bit more to the jacket. So if I push it a little bit
and then I bring it back, conforms a little more to
the shape of the body. Now, of course, you know me, I can kinda like two
little details forever. So feel free to just
put it where you want and be done with it. Because I'm like a technical. I really love being super
technical about this stuff. So there is another thing
that I wanted to do with this that I think could work. If we use split. Trying to think of the
easiest way to do it, I'm thinking, you know what? I don't really
think it needs it. So what I was gonna do, I guess, I imagine we'll walk you through
what I was thinking. I was gonna do line and maybe just make like so
I'm using split and not trim. I'm just gonna make a
line through like this. And then voxel,
remember both sides. So like this side at 200. This side 200. Then use round edge and
smooth both both sides. And it's not, I
mean, it's not bad. It's not bad. I think I should have. The trim feels off to me though. So I have to do it again. But you get the
point. The split. I mean, I think that feels a bit better, but I actually wish it was
just completely straight. Now that doesn't feel
street at feels better. I know I get really excited
over the simple things. Loop and accidently
press box so we mesh. But I want a box where
we miss that 200. So I'm just gonna do the
same thing that I just did. 200. That this one
actually we mesh. There we go. And then do round edge. So this will just
round off those edges. All mammals, it's just so bad. Why do they look so bad? That it looks better? I'll do the same with
this just rounded off. I think that looks pretty good. You can even move it a little
bit so they're a little bit more flush like that. So now we have these two
cylinders that we can join. And then we can add mirror. And these will be the pockets. I think those are great pockets. Okay, let's save.
9. Coat Carving: First off, we don't really need this crease in the middle. So I'm just going
to smooth it out. Take symmetry and
just smooth this out. We don't really need it. Let's take Select
Mask Rectangle. And we don't actually
want symmetry. But what we can do is use that symmetry line
to go like this. And maybe we'll leave
a little bit of space. So we have something like that. And again, if you don't
see your symmetry line, just go to the symmetry option and you can turn it on here. Show line. I should adjust my speaker. Probably sound a lot better. Okay, so this looks good. So as I was editing this, I just realized that I
should have done this and I'll just do an example
with this view. So just pretend
this is the jacket that we just did the mask on. But I think our
jacket we've already read meshed and subdivided, so i'll I'll just
remember it around 200, so it's a little
bit more accurate. Really want the back. So now when I do it, just
brings this piece out. And that would've been
a much easier option. You can just clear the mask. You have something like this. You can box where you Michigan or you can just kinda smooth it. Then you can do your pinch. You can also do it the way
that I'm going to show you, but I think this
is the easier way. And I just wanted
to kind of fix that and show you how I would do
it if I went back in time. But we're also gonna we're
gonna cover this up later on. So either way, it's
good, you're good. So now we have this side masked. So what we can do
is take our clay. And it doesn't matter
if we have symmetry on because we have
the side blocked off. But just make sure
you don't have sub. So now I'm just going
to make this line. I want a fairly thick. So you can see I just kinda
continuously go over it. Just make it nice
and thick like this. Okay, I think that looks good. Now we can clear the mask. So now we have
something like this. We can box, sorry
my **** at 200. Just to kind of
solidify it up a bit. Can kinda smooth a little bit out of here and we can take a flattened and we
can flatten this. We'll just try to
get it nice and flat as much as you can. I know Flint and
can be a bit funny. Then I'll just lightly
smooth all this out. Nice. Now I want to take crease. I don't want to go along
this edge and just kinda I kinda messed
up a little bit. So you just want to be
careful that you don't. I'm good too far off the rails. Much better. Notice how
I just kinda follow this off so that it looks
like it's gone that way. And I do really like
how this little break. I like that. So I'm going to want to include
that. Wanna do it. We could probably use trim. Now we'll have to mask the
back or else this will happen if I use trim
and let's say lasso. We don't want symmetry on. But let's say I do that. Cut this. I'm like, Oh, this looks great. Trim nicely. It trims all the way through, so you have to be
careful of that. So the way to fix
that is select Mask. You can mask off the
whole back of the jacket. And then you can
do the same thing. So we'll just use trim. And I'm just going
to trim all of this until I think it's
the point where I want it. I'll just do
something like that. Now Boxer we measured at 200. Anytime I use train my box
will be mesh afterwards. Okay, So that looks pretty good. I'm going to turn off this line just so I can see clearly. I'll just use crease and just
sort of fix this up a bit. I'll use drag and just very delicately kind of adjust this
until it's how I want it. Maybe I'll flatten it out. Yeah, I want something
more like this. Make this bigger and
just pull it a bit more. I think that looks pretty good. I'm just going to smooth it and then I'm going to try to flatten this planet on this side two, on basically I want to make
like an edge planet in there. Do a little smoothing
inside of there. And then I'll use pinch. So hopefully to
make this a hedge, think that looks pretty good. I use pinch here as well. Pinch this side. Pinch this side as well. Again. Right? Now we can use clay.
Obviously it's sort of there's a spot here. So we use clay and
Sub you can sort of just will make the other
side of the collar. So something like this. Remember it, it'd be
very delicate with it. If you miss up, just undo. And try again. As you've seen me
do numerous times. And sometimes off-camera two. And here's another little
trick. You can do. Crease, sub. Alright, Alex, Good. Decrease regular crease. And just make that really nice. Okay, so first let's
take off the mask. We'll go to mask. We'll just clear it. Here's another little trick. If you're having
some issues with this and you just don't
don't think it looks right. Like I like my miles
to be really clean. I like the diminishes to be pretty clean as
far as CNO sculpting. Obviously, this isn't
were sculpting, so it's not gonna be as clean
as like some other apps. But there are some
tricks you can do. So for this, I might do this. So I'll add a box. I'll go ahead and,
and validate it. So we're just kinda make it. So we'll kinda put
it where we want it. Maybe a little bit thinner,
maybe around here. Stretch it out. I'm going to voxel, are going to heal talks
will be measured at 200. Let's give it a little
bit of a round edge. And how we can take move. You can sort of bend it to
go where you want it to go. Let's make sure we
have symmetry on now. You can just sort of form, fit it as you need. It looks great on the bottom. I might just smooth it a lot. And you can take
move and just kinda you can flatten it to
you can flatten it. It can't quite get it to
bend the way you wanted to. You can flatten some of it. You have something like this
and then you can just pinch the sides to clean it back up. Then you can go underneath
and you can smooth the actual jacket because we really don't need
that much of it. And then you can come
back up to the top. And we'll take move. But will, we don't
want symmetry? Then on the top? You can just kinda push and pull
to adjust it as you need. It can be a little tricky. If I can pull it up. You can use drag. Drag might be a
little bit easier. Smooth this time a little bit. It looks okay. Again, I'm just using
drag to sort of cover what we made already. Sorted like that. That's
another way you can do it. I think that it
looks way better. Yeah, I like it. It looks good. So another benefit to doing
this and doing this this way, I'm just going to
smooth it a little bit. So another benefit
to doing it this way is now we can sort of make
these creases in the jacket. So e.g. maybe we'll try. You can do them by using crease. There's all these little creases that are sort of like this. Smooth them out of it. It can look a little
bit more natural. And then you can also take
inflate, really small. You can sort of go around them. So it's pretty much just
like enhancing what we just made. That makes sense. Just to a little smoother. To make it look a
little bit more natural is a big one here. So we'll do crease. That may even take clay if you want to or you
can do crease actually, you can do crease and you
can sort of widen it out a little bit. Smooth. Then we'll inflate on one side, sort of like that. And then just be
gentle and smooth. If you find that it's smoothing
a little bit too much. I got was can box will
rematch the whole thing, maybe around 250 now, make it a little
more substantive. I'm just gently smooth it out. If you need some more inflation, you can just do it
a little bit more. Cool way to kinda do that. We'll do it on the
other side as well. You can even do it backwards. You can play it or you can
use clay to clay is a bit more easy as a flatter top. So clay is actually a good
candidate for doing this. We use clay. Smooth it. Then you can use crease. You can make it a
little bit bigger. Now that I did that I do it. I do have to push
this in a little bit. It feels like it
get rid of this. So I'll just use
clay and subtract. Just get rid of this
little bit here. So that's kind of
an easy way to do. Two folds and things
in the clothes. Make this a little
bit wider back there. This will pretty much
be covered by the hair, so I'm not too worried about it. I can probably move over a
little bit, but not too much. I'm gonna do a few more
little creases here. So I'll just use clay. There is a crease
maybe going up. I have it on sub It's
crease going up here. I'll just continually
go over the same spot. We have that nice crease there. Then I'll smooth it out. And the key is you really want these things to be
sort of subtle. They don't have to
be really, really. You can do the opposite. You can do clay and
do the opposite. And then do it like on one side. Just enhance it. And then just smooth
it. If it's still not, if you want it a
little bit more, you can always use decrease. Lately. Sometimes it does.
It takes me kinda going over my tools and trying a few different
things out to get to something that
works the best. That's ultimately what,
you know, what I want.
10. Coat Details: Okay, so for these, for the little pocket
areas I want to use inflate and definitely
wanna go around the pocket so that it looks good. And you can even
go will decrease. And we'll make some creases like they're from the pocket area. These clay around
the edges but not so sort of build it back
up a little bit smoother. Give us a little crease there. So I would just do a few of these around, doesn't
need too much, but it's really kind of a cool little trick
that you can do. And it's really easy
to just give it a little bit more personality
and things like that. To keep the jacket
from looking stiff and onto clay and sub I'll do another one here. And then I'll do regular clay and I'll build it up around it. Increase. Doesn't look. I'm gonna do another little
inflate lip around the top of the pocket. Looks good. To increase up here. Kinda going into the arm. And we do have to
work on the arms. Also. Let's do fold here. And we'll do a sub
crease just to kinda give it some depth
and then smooth it. Really subtle. I might use in Fleet. And that looks a
little bit better. A little bit more natural. To click Save. What's
cool about this, this obviously you can use
this for all your jackets or wherever you you do close
and things like that. You can use this. Let's do a crease up here. Yeah. Alright, so we have to
adjust the arms so that they kind of squeezed in
a little bit at the back. So we could try drag first. Let's make sure
we're on the arms. There's still in the mirror. So they are going to
match each other. Which is good for now. So I'm just kinda
flattening them. So they look like they fold in. Her coming from one spot. That made sense. So kinda like this. And we can make some
creases now in them. Clay in the arm is, is actually the arms look pretty good
and they're still very small, so to speak. So I'm actually going now
let's just move this out. They look pretty good. But I think we want to raise
the resolution on them. So I guess we'll
box will re mesh. Let's do it around 200. Okay, analysis, smooth them out. Sometimes I hit undo to
make sure that the symmetry is working as it's
supposed to be. So now we can just put some
creases in the sleeves so they have to look natural to. So sometimes I'll add a crease. And then maybe an
Fleet. Excuse me. Actually doesn't look too bad. I'll just use things like
clay and sub to just sort of make some dips and dodges. I might use inflate to kinda
make leg shapes like this. And see how they look
when the smooth them out. It's not bad. Is it looks good on
clothes, things like that. And unfortunately, we have
to take symmetry off because we don't want it
completely same. So I'm just gonna do a few more little little
detailed cutouts in the sleeve. But then we don't want them
to be too symmetrical, so I think that's pretty good. We have the cuffs as well. So I'm going to take
the sleeve out. And then I'm going
to add, I'm going to add its own mirror. Now we can take these to validate and just call
these the sleeves. And these would be the cuffs. Obviously. Let's
rename this so we don't get confused. Cuffs. And I kind of I
should have I should have not joined children. I kind of forgot. That's okay. We can just use split and then just use rectangle and
just do it like this. So then we have two sleeves. I don't want to go too crazy on the details and the sleeves. So just flatten this
a little bit more. This a little bit more. It's a little aggressive.
It looks good. And we flattened this a bit. I don't think we need
too much on the back. Put onto a nice at all. I'll do a little
crease on the back as well. For the turntable. I think that looks good. So we'll do something similar, but obviously we're not
matching the symmetry. So I think it'll
look a little bit better that they're
not exactly the same. Okay. Saw looks really good. I just want to make
this look different. So I had another crease
here for this side that looks a bit better. So just some more smooth
going into the jacket. The way the story goes. And we'll do some bigger
inflates. The hood. Smooth this out. Just to give the hood a little bit of life. Go ahead and give a nice
crease underneath here. Probably turn symmetry on
for that. ***** hate it. Here we go. We can continue
to do what we did before. Maybe this has, will
turn symmetry off. Ebay code has some folds and
stuff back here as well. Try inflate. It's a little big. Just make some little marks
and inflations just so everything doesn't look too
like it to look realistic. You can, you don't have to
do this many little details, but I love doing
these little details. Especially with close,
like close as always, kinda difficult to sort of figure out how to
make look decent. So I was kind of
excited to do this, this model with clothes. So I think that
looks pretty good. My kinda want nice like stitching across. I don't really need it. We'll maybe we can use crease in sub because that will give
us a nice crease as well. So let's see how this will work. Let's turn symmetry on. So we use increase in sub. Really good so far. So I'm just being really gentle because I'm going to
keep it smooth and then meet up and have that
nice beautiful scene there. I see some little ribs here. So I have to smooth those out. I think that looks great.
Let's do a quick save. And I also want to, we need to, Let's just solo this part. And we use layer. And we need
to open this up down here. So I think that's pretty good. I don't think we need
much more than that. I'll just add another layer. But I think that's pretty good. That works perfectly. I'm going to solo
it again and then just smooth it out on the edges. Smooth it out a
little bit inside. Rocking and rolling.
11. Drawstrings: Alright, so let's make
these little strings here. Draw strings which
are super cute. So we'll just use tube. We can snap it for now even though we don't really
need it snapped. So we'll just do
something like this. Take it off snap. They're pretty
straight and simple. Let's go ahead and bit thinner. Hopefully you can
hear the music. The worst little bit of a bend in there. Maybe a little bit over, a little bit up, maybe a tad bit smaller now I kinda like it. Kinda like it like that.
I think it looks good. Just bend it a little bit. So it feels a little
bit more like it's coming straight down. Since that's how gravity works. There we go. So I think that
looks pretty good. Go ahead and I
would validate it, but you know what
else we can do? Let's extend it a little bit. Then validate. Oh,
actually we can mirror it. Wanting me right now I'm
not going to be here. So let's validate it. And then let's use split. And we use rectangle and
we'll split it this part. In this top part, I'm
going to smooth that off. Do you need to smooth that
crazy, but that's alright. Now with this part, I'm
gonna make it a tad bit bigger in Tampa lines so it can shrink it
a little easier. Move it up. And I'll just use rounded edge, I think, just round digit. I think that's good. In both of these. I just want to move
them up a little bit. I think they're a little long. Now I want to put that
little Let's name them in a, Nestle them under each other. And name this quote string, quote string, cap. And I want to add
a little tourists. And this will just be
a little ring that'll go at the top. So validated. Actually, I don't want about the will make it really small. We didn't validate. We do not want to validate. It will make it a little
bigger, shrink it. That looks pretty good. I keep moving onto
a different mesh. I'm just going to hit Lock. Sorry, I know it's a bit loud, but I'm gonna get through
this one little part. Maybe I wanted a
little bit here, a little bit bigger. Maybe something like that. I think that looks pretty
good. I believe it. So now we can Nissl
this inside here. We'll pause. Alright,
so now we can just take all of this. Notice. We can take all of these
and we can just clone it. Rename this one, right? Because it's the right one. And we can validate. So make sure that we're
on the right one. And we'll move it to the right. We can just kind of adjust it. I think the most
important thing is to, we do want it to be sort
of in the same spot. The tourists at least. So I think that's important
to have in the right spot. We can still adjust
all of these things separately to block on. I was wondering why everything
was being annoying. Just take his hat in there
for now and adjust this. And I think I just
want to use move. Just kinda give us a
new its own thing. I don't want it to look
like a carbon copy. The other one. Okay. And so the tourists, this is the code string. I'm not sure actually why
it's connected to that. Here's the cat. Okay. I was just
using the wrong one. So confused. And just poke that that
other half better. I think that's good.
Yeah, it's different. It looks as natural. As I say that I decide that this is just taking up
too far from the jacket. Okay, that's good. So now we have all of these and I'm just going to join the different parts
together. I think. Cope strain, coach, stream, cap, and string, ring. So now they're altogether
so he can color them. They're all be the same. Of course. Always continue
to see new issues. Always. Just pull this out a little bit. Here we go. A quick save.
12. Hands & Boots: All right, We're doing
good, re very well. Get the fingers out of the way. They're very stylized. First I want to take this and I'm going to
flatten inside of it. Just flatten out the inside. Just real quick, smooth. I think I want to flatten
out this edge now. And I also want to, and this might be
a little tricky. Let's select mask,
the front edge. So let's take lasso
with select Mask. And just front match the
chest to the front edge. I want to use. We'll try smooth first. I just want to shrink. Yeah, that works actually. I think that might have worked. So let's undo the mask. Clear. Just smooth the whole thing now. So I just wanted to
get the shape as though this part is sort of
like narrowing, tapering. That's the word. So that's how it's
trying to go for. I just want that part
to be sort of tapering. And they're a little big, but
I don't mind that too much. We could actually make the
arms a little bigger honestly. But I mean, I'm okay with it, but just just thoughts
just thinking out loud. For fingers. Is this part. So this is the jacket. Center crease. Okay, So let's add
where's the head? Let's do it. Knew the head. Because it's gonna be
the same color as this, the skin, it's
gonna be skin tone. So let's do one side
first and then we'll just mirror it. Will validate. I don't want to try to do
these as simple as possible. I know fingers can get really
out of hand really fast. So really just
something like that. I want a really simple
shape, like that. Shape or the size isn't as
important and where it is. So maybe she has. You can make five fingers, but you can make four fingers. It's really the placement of them. That's the tricky part. Starting to feel a bit better. Rotated a little bit. It's a little, it's
a little tricky. It's not bad. It's not
bad and the drawing is rotated a little bit
more. Let me do that. And you can change the pivot. So if he tapped pivot, then I can put it exactly
like I want to move it. So let's see, this is
the top of the finger. So I set the pivot. So now let's say I
just want to move it straight down over. It makes it a lot
easier once you can understand the pivot
and how that works. Okay, so in the drawing the fingers are a little
bit pointed back. Which I think looks kinda cool. So let's say that is the
pose flattened a little bit? So maybe something like that. Maybe then it looks good.
Track it a little bit. So the finger-like
sort of tapers a bit little bit more curvy. Okay, I'm good with that. So essentially you just
want something like this. So now we're just
going to clone. Let's just make sure
we label this finger. And let's clone it. So
we'll go to gizmo clone. And I think I want
them all touching. That's the angle. Kinda like that. Let's clone it again. Sure to turn it a little bit. Like this one can be
a little flatter. I feel like this one can have
a little bit more of a bend and this one is really thick. So I'm going to flatten out when to make it a little bit smaller. If that was like
the pointer finger, it would be a little smaller. So really just like a
couple little sausages and there may be even turn
this a little bit. This one is massive. If we want to make a pinky, if you wanted to five fingers, a little bit smaller. Maybe we'll just angle it off. Like that. Shrink this one a
little bit more. Okay, so let's add
a little thumb in. They're not really sure
how I wanna do the thumb, but I'll clone this one. Clone this finger. Let's turn it around. Just wanted to feel thumb ish, which I don't think is a word. Make it a little
smaller. Bring it down. Like it would be sort of
like this and the drawing, you see a little bit of it. But again, it's like
you can't always go off of the reference because their reference could be
wrong or just not look great. So you really have to
make it look right. So this one, I want to turn
along with the fingers. Think that feels better. This one too. I'm going
to turn it so they all are kind of in unison. But it's still huge. I'm gonna make it
a little smaller. A little flatter. Might even do that. Let's see how this looks here. That's actually not
bad. With a thumb. I just wanted to be against the A little bit more. I
think that seems good. And then to connect them all, we can just put a
sphere in there. This will just be our connector. Like that. I think that's good. So this will be the poem. Go ahead and connect all of these connected to the palm. So I think that's pretty good. Then we can take
these and put it in a mirror. On the other side. Too. Beautiful. Alright, I think I accidentally
a voxel reinvest the shorts and didn't
record for the shorts. As you can see here.
You can just voxel, rematch them, validate them, and box we miss them, they're
in a pretty good spot. The only thing that I
was thinking is I might add a little bit of movement
to them in the reference. They look like they're sort of, they might be do I need, I don't think I need a symmetry. They look like they might be
kinda splayed out a little bit. The tiniest bit. So maybe something
like this. Let's see. These are in there in
a what do you call it? It's in a mirror. So that's why things are happening the
way they happening. It can get a little confusing
when things are in mirrors. But I think that looks fine. That looks pretty much like
the like the reference we might add something
under there but maybe not. So onto her legs. They look pretty good. The only thing that the
legs need is there. Her legs are a little kind of bends a little bit like
they're a part a little bit. So let's validate them. They look pretty
good altogether. And let's see, the legs
are also in a mirror. So we should be able to
where's my there we go. We should be able to
use move and just kind of pull them out a little bit. So something like that. You don't want to put
a little bit more on the on the outside, just make them a
little more round. So something like that, I think is pretty good. Alright, so let me
do a quick save. Now we have to get
into this boot, which is a little tricky,
tricky, tricky, tricky. So the first thing is
I want to align this up. This looks pretty good. I'll go ahead and validate that. I'm going to have
3D mesh it at 200. Doesn't even need that much, but we measured it actually
before we re mesh. Let's just round edge it. So this is gonna be very round. We may not even need
to remeasure yet, so let's just not, Let's chill with the 3D mesh. Let's make it this shape. Let's use symmetry. And let's do so. Show line again on
the symmetry tool. So we need that and we also need the other one, we
need the green one. So now let's just make
the shape of the tongue. Well actually it's
actually a symmetry works well for what we
need at the moment. Something like that is perfect. Maybe a little bit, bows out a little bit
more. On the top. This is quite flat. I'm feeling something like that. I think that looks good. I'll go ahead and round
edge it one more time. I think that looks pretty good. So my idea for the boots. So we have the tongue, the tongue is
looking pretty good. Although we still have some
work to do to make it sort of like the reference, an idea for the boots. Since we haven't validated it, we still have these
options here. So I think we'll hit whole. Also make sure that you're
back on orthographic. We're going to miss tap hole
and we have a hole in there. And you see there's like the
pink layer and then there's a white layer inside. And it's inside, but then
it sort of comes out here. So I'm thinking we'll
wrap a tourists around and just stretch it down. So this might work. I'm not 100% certain, but
that's the art of it. So I'm thinking first we'll
bring this down some. So just far enough to where the white layer will
probably be up to here. So I think that's good. And I want to take this
blue and stretch that out so that it's a
little bit thinner. Like so. So I think that's a
pretty good start for that. Now, we can also take, you could also use an
another cylinder actually. Now that I'm thinking about it. So I was thinking like we
take the shoe base, clone it. I'll rename it shoe base white. And I was thinking we
bring it up, flatten it, flat it a little bit more than we use these tools to make this a little bit thicker. Bring this out a little bit
even flattened, even more. So I was thinking
something like this. Now actually it's a little
wider on the bottom, so got to be careful with these. So I'll make it a
little bit wider. So if we do something like that, maybe I'll make it
a little higher. If we do something like that, then we can validate and we
can run round edge over it, it, even if we box will be measured to maybe
150 or maybe even less, maybe like maybe like 80. Then we do round edge. It's still not as
soft as I want, so let's remember it even lower. It's more what I'm looking for. So something like that. I think that's a better option because it sort of
bows out a little bit. I think it looks a
little bit better. Can probably even make it
a little bit bigger too. So something like that. Okay, So for the tongue, Let's take off the green. So we'll go into symmetry
and turn off the green. I don't think we
need that anymore. I think we can
bend this a little bit and let's push it in and just sort of figure out what
we want it to really work. You know? And I might
actually come to think of it. Let's put the tongue
up to the leg. And I might just take
these and stretch them. We'll go ahead and validate
this piece as well. Maybe if we stretch it. Because this is
supposed to be in front of in front of the leg. It's looking good so far, but we still have
obviously a lot of work to do. Let's trim this. In the meantime. We'll
validate this ball. Will do trim. We can
use a rectangle. And I'll trim it
right below that. Maybe even a little bit lower.
And we need to make it. So remember early on I was talking about
the front of this. So I just want to raise it up. Let's turn symmetry
on this shape, which is very important to me. I want it to be round, more like her boots. And that looks good, but we
want to make sure that it's round here as well. In this view, something
like that I think is good. So while we're doing
that, we can probably just fill out this shape a
little bit by pulling it back. Can you, that's how
it looks better. So let's turn off symmetry
and just to this side.
13. New Soles: Get rid of that. We do also
have to deal with the tongue. So maybe let's see if
we move this out a bit. And now this is the tricky
part that I was thinking of. I think it would be
nice if we can take this and make this white. How it comes down here. I don't know if
it's going to work, but it might work. I don't know if we
need symmetry or none. Let's try it. So I was thinking of bringing this out and then pulling it down. Let's make this a
little smaller. If it works, it'll make
sense. What I'm trying to do. Symmetry is probably
not my friend. She probably undo
this a little bit and turn symmetry off. Now I just want to open, I want to open this up. Smooth this side. So we can get something
a little nicer. Smooth it out. So
hopefully you can kinda see what I'm thinking. I know it still
looks a bit weird. So something like this. I'm actually going
to flatten this out, smooth this out a little bit and maybe I'll flatten
the inside as well. So this is sort
of what I'm going for, Something like that. So let's try to match
it with the other side. So we'll move this out a bit. I hope it's symmetry is still
working. I think it is. Yeah, I think it is. Okay, so let's bring this out. It's kinda straighten
this a little bit. Maybe drag, maybe flattened, flattened the inside as well. Okay, so that's decent. So now we can kinda work
on the tongue a bit more. So maybe we can bring
it up a little bit. And then we can use move. And we can just sort of maybe
we'll turn symmetry off. Just kinda fit it in there. A little bit better. I think that's
working pretty well. And I'm gonna do clay
with sub and just get rid of this piece. That's still looks alright. I think that's a decent start. If you really want to be perfect
with it, you can adjust. I can adjust this a
little bit to make that perfectly level.
Like pull this out. Tad bit. Same thing
with this side. Just try to keep a level
butt, pull it out. So then it looks like the tongue is coming out from the middle. I think that looks all right. Okay. Also, I'm noticing that the tongue comes out
a little bit more. Here. I want to make sure I do that. Can you squeeze it a
little bit more? Inside? Nice. We're getting there slowly, but surely we're getting there. Okay. I'm just kind of
paying attention to the boot and making
sure everything is how I want it to be. What is that? One in the world is that I
don't know what that is, but let's see if we
can smooth it out. Or we can think really, hopefully yours didn't have
that smooth here as well. So I'm going to move
on. Remark, a voxel gray ramus, this two-hundred. And do the round edge again. Or maybe just a straight smooth. The smooth has to
be a little more aggressive. It's pretty good. This looks a bit wonky to me. I don't think I did
anything to the back of the boots, but that's all right. We'll live. Alright, I think I want to redo the
bottom of the boots. Unfortunately, name's going
to delete this. Delete this. I think I really
needed, I think you really need to redo the bottoms. Take this piece and
just trim it as well. Okay, so now let's
just add cylinder. But I want to take it out of, I want to have it on its own. So this will be the soul. He just wasn't clean
enough for me. It's the only problem. It
just wasn't very clean. Wasn't as clean as
it should have been. Let's just go ahead
and stretch this. Mean to me, do a quick save. Now that I can have a
better understanding of how I wanted to do the boot. I think that'll be better. So first I'm going to
make it real thin. Okay, so something like this
would work pretty well. The only problem I had
is if I wished that I could I wish that I can move it but
then not have it move like up and down at all. If that makes any sense. Like I wish I could
spread it out. If I validated, I wish
I could spread it out without it
moving up and down. I just want to spread it
out in a certain direction. So that's the only tricky part. Okay, so let's validate, and let's go to our symmetry
and turn this on as well. This might help with that. So we'll do move. We don't want symmetry. We just want to expand
this to the boots. So it's very similar
to what we did before. But I might I might actually
delete that from this video. Didn't, it didn't look great. I'm going to go real small
because I really want to try to get this
looking real clean. It looks clean now. We just have to maintain
the cleanliness. All right, so as you can see, that it really just stretching. The mesh to cover the feet. Go back to drag for this
like little sections. So you just want to make
it as clean as I can. So let's decent. And
I want to make it as, even as I can as well. So move might be a little
bit better for that. I think that's
good. I don't know how this moves so far up. As I was saying before, it will be nice
if I could do it. So but it wouldn't
move up and down. That's the only annoying part. I can tell here that it
moved up a little bit too. Okay. This pretty clean. So once you have
that and it kinda goes around, it's clonus. And this one. I can bring down, make a little bit bigger, and then just stretch it down. And even though it
looks a little funny, hopefully we can just trim it. Maybe a good trim would work. Let's stretch it out a lot. Then let's trim it
with a rectangle. We have to do we have to talk. So remeshing needed clean trim. That trimmed nicely. Now we can move this up and
now we can trim the bottom. Now we have a nice, clean trim. Beautiful. That works so much
better than the other one. Okay, so now I'm going
to box remission again. We miss it higher. Eventually we'll bring it down. Let's do 250. And it's
too rounded edge. Probably didn't even have
to green mesh that high. Let me get rid of
those like ribs. Okay, That looks nice. I can probably do
the same with this. But let's walk so remeasure
it and just see how it goes. I'm tempted to just
leave it how it is. But I kinda wanna give it
the old boxer we mesh. How did this get messed up? Who was like perfectly clean? I'm not going
to worry about that. I'm just going to stretch
out the actual boot, the top part of the boot. Instead. There is a little bit of a loop on the back here. This is kind of extra, but I love, I love
extra little details. Let's take select mask. So let's, let's do line
and see if we can get a diagonal, something like that. So now let's reverse it. So we'll go to the Select mass settings of
the Mass settings and Burt. And let's just make
it a bit bigger. Just a little bit. Let's see how that looks. I think it looks good. I think with a good smoothing, we might be able to its flux
or we miss it again to 50. Harden it up a bit. So I think that gives us a
nice little line there. Maybe we can smooth it
enough so that it pushes, pushes back past
the point of our, our little lip in the soul. If not, then we'll just
have to take move and just kinda scooted in a bit. Maybe scoot it down. You can maybe go over it
with a little crease action. We can use symmetry even I don't know, little crease action. So now we have, now
the boots just have a little extra flavor. Never hurt nobody. So let's go ahead and see if
we can do Select and Mask. Let's just do regular mask. We have two voxel re-image. This bad boy, it's Fox
will 3D mesh it like 200. Go ahead and smooth it a little
bit. It needs smoothing. Masks should be much better
now it's much better. Let's turn on symmetry
and stood see if symmetry still gives
us anything decent. Saves us a little work. I can go back into
the mask settings. We can up the shell thickness, maybe even a little bit more. I wish you would extrude it so that this was like
nice and flat. That would be that
would be perfect. But we can have everything. Phenomenal boxer, we miss
**** around 200. Smooth. It didn't really work. Let's see if we can trim it. Maybe this'll, this'll work. Data might look a
little bit better. We can do move and just kinda
bowed out a little bit. Split. Voxel remission, smooth. Maybe that's the ticket. Looks better than
it did, at least. I'm okay with that. So now we have a little
piece on the tongue. I think there's a cool detail. Still a little Save.
14. Boot Straps: Okay, So for these bootstraps, I don't really know
what's going on there. We're going to make
it really simple. I think we're going
to make just like a cylinder open strap
that goes across. And then we'll try
to make a strap that goes over like this. And maybe we'll just put
something in the middle. And we do have to do this
one little white loop that's going to be
connected to that. So that'll be with a tourists. I believe. We can do that when we
can do that one now. So these are the souls. We still have to do some
work with this soul, but we'll do that in a second. So let me do a quick save. And let's add a cylinder. Again. We're just
gonna use one side and then we can
mirror everything. Because sometimes with
both sides going, it gets a little confusing. I get a little confused. Okay, so we're gonna do so we're going to do one strap
that's kinda high like this. Keep accidentally moving things. Sticky fingers. And we're not gonna do
it all the way around. So we're just going to
probably just like cut it. But we're going to do
something like this. I don't think we need to
even make a hole in it. Could, but let's just
kinda make things, makes things more
difficult sometimes. So we'll do something like this, will make a strap pretty much in this general area like that. I'm going to clone this. So this will be shoe strap. I'm going to clone this one. Let's go ahead and
validate this. And this one, I'm just going to bend like this. And I'm just going
to validate it because I don't want to
think too much about it. I probably could have. I can still just kinda squeeze
it together a little bit. So something like that. Okay, so now let's figure out
these straps a little bit. So let's click on this one. And let's take, let's take
drag its turn symmetry on. So let's see where the line is. The line is there,
that's perfect. So let's just take move or let's take drag
instead, because it's, we need a smaller,
smaller movements. So I'm going to push this n. They don't want to
push this in here. Hopefully that makes a
little bit more sense. Now what I'm trying to
do, it looks pretty good. Now that I've pushed
pushed that in, I'm just going to
trim off the back and do rectangles better. So I'll just trim that off. And I would just have
this front part, 761. So we need to voxel
remission it. I'll use the d 200
and I'll go in, I'll go back and
decimate a lot of this. Let's mole-to-mole Torres first. So we'll go up here
or sub-divide first. And then we'll voxel remission. Still has those things,
but that's okay. Just smooth it out. And I definitely want to
smooth out the back part. So we'll keep this
nice and smooth. I definitely want to smooth out the back part so it sort of
looks like it's tapering. Okay. It looks pretty
good. We're going to do the same thing
with this one, except for this one. Let's make this a
little bit bigger. And we may not need symmetry. Let's take drag. You can move it in easier. So I just want to make
it connect down here. That's kinda my goal to make
it do something like that. Now we have to do the
inner part as well. So we have to push it in. Here we go. Maybe
like drag it up. And this is like super, super detailed doing like
the inside of the shoe. But hopefully you
can just kind of, as long as you understand
what I'm doing, it's really not that confusing. I mean, I guess you can
see what I'm doing. But I just wanted to do
something like this. I can trim off the back. That was checked the other side, make sure we didn't cut
anything. We don't want to. So this looks pretty good. I'm going to go ahead
and box that we mesh it to 20 or so. That's fine. I'm not even worried
about that anymore. They can just smooth
it. I'm working on this for awhile now. But it's gonna look so great. I think it already
looks really good. Okay, So this is
looking pretty good. The only problem now is
that they're a little bit like actually don't mind that they're touching
or anything. I'm okay with that. Maybe even this one we can either move it out a
little bit, maybe. Like so. I think that kinda works. This we can sort of
move out a little bit. I think that looks good,
that looks nice there. This back part is a
little bit more finicky. Maybe we can look smooth. Let's just drag trying
to track it out. It looks good. I think that looks okay. Just trying to make it
a bit more straight. I don't think ultimately
it looks pretty good. I think it looks good. Okay, so that looks nice. Nice, nice, nice. We can add another
little. We add a box. You really, I think I'm, I think I'm gonna make this
class and advanced class. I think because if anyone's
here is still here, working their way through this, then you are just like me. We are the the true riders that just want to like make the coolest things
that we can make. Let me say I'm
doing all this talk in a crash which is send
me through the roof. I might have to just give up. So we got to make sure
that doesn't happen. So I kinda like sometimes she's kinda have this like little thing on them. I always think is kinda cool. Let's take move and
give it a little, a little bend in the middle. Oh, I don't have symmetry. I'll do dum, dum. Cha, little bit more. Just like that. Kinda cool. Because we can fix
it a little bit, something like that. So the only other thing
that I wanted to do besides working on
the soul is to do those little these shoes
traps, all of these things. I think we can I think we have to do
some quick decimating. So we'll just estimate them. We've already smoothed
them out pretty much so we should be able to
decimate them down decently. So that's good. 970
for that shoe strap. This shoe strap is a little bit. The only thing left on this, this shouldn't really be. That's a little bit better. I think that's fine. I'm really I'm
really looking for those crazy details
than I would. I say I would like
I'm not gonna do it. I'll go into the top of this. Just to something like this. Oh, I didn't realize.
Symmetry is to be careful. I would maybe do something like this and then try to smooth it. Then you really so then it's
really not eaten into it. Yeah, sometimes
you've had oodles of all those little things. You could also like
flatten this out a bit. If you want. Letting it out a little bit. Either way, almost anything looks good at this
point in time. But I do want to add though,
that little tourists. So let's go ahead and
add the doubtless. Move it up to the
general position. Make it smaller.
Make it thicker. So let's tap gizmo. Make this a little thicker. That gizmo again, Something like that. I think maybe on both sides. Let's clone it. Let's type a line so that we can just
go straight this way. So we have our two
straps. You know what? I think I might still
want it to be here. Maybe this one too,
let's bring it up. Really make it look
like it's stretch it. Really make it look like
it's part of that thing. So this one, I might
have to move over a little bit again. It's good. Maybe it will stretch
it a little bit, make it a little fatter. See it kinda looks like
this comes down and then it sort of does its thing there. Make it a little smaller. So it looks like it's coming
from underneath. Validate this one to like it. I think that looks good.
That looks real good. I didn't just mess something up. Let's do a quick save. Love all these little details. As much as I'm like, I
want to get this done. I get so excited with
the thought of like eventually will be
lighting, lighting it. And I think I might
tack on at the end of this class how to bring this into Blender and
render it there. So I'll render, render
it here. Excuse me. And for those that are thinking
about Blender wanting, wanting to get into
it, bring it there, and render it there as well. So we have to do this
little part in his shoe, which looks like I think
the best way to do that. There's a couple
of ways actually. First we could use tram
and we could use polygon. So it looks like it's
just something like this. I'm going to use the
black dots for this by double tapping the dot
or just tapping the dot. So it looks like this
would be around here. Decent, maybe a little bit
shorter. I think that's good. Now for the front, maybe we'll just, we'll
just do this flattened. Let's turn symmetry on. Maybe we can just get
some symmetry help. Nope, not that way. We want to turn green
off and just use red. That was almost perfect. I need to let go here
and then come back. I think that's better. Okay, So that looks pretty good. I'm going to voxel remission
because I always do. And then I just want to, let's try round edge. Actually, let's not
try round edge, Let's just smooth
out the bottom. Okay? I was a little bit worried
about the symmetry, but it's only the sides. So that's okay. Now we have a little
groove there. Maybe we can use flatten again and just kinda flatten it here. Flattened here. Nice. Well, that's the back. The front. What's up with that? That's terrible. Smooth this out a little bit. Just refund. I wonder
what happens if we do. What we can do. Can do select Mask, select Mask and rectangle. Make some fun treads
on the bottom. This is just extra that
no one's going to see. You can totally skip
over this part. One's ever going to see these. Only you guys will
know about this. Hopefully you guys
will know about the secret, the secret sauce. So when I post about this, just write secret souls. Everyone else is
gonna be so confused, but only the people
that make it this far then writes secret souls. And I'm not even going
to, I'm not even going to answer and
say what it is, because it'll just be
something between us, will just know what
secret souls means. Okay, So the boot looks great. I'm happy. I'm happy. You're happy. All right.
15. Decimation Station: Let's take some of
these like e.g. this box, even though
it's quite small. Because still sub-divide it. This sub-divide. Get it down quite low. Still looks great. It's still
looks good. No worries. That's 970. These are
these little loops. This can definitely be smaller. 348 for loop. So we'll do 348 for
this loop as well. And let's join these
together. Shoe strap. Okay? Okay, So this part, I definitely want this
to be connected to this. Those are always gonna
be the same color. So, um, so this tourists, I'm going to bring in this here. It's good. They
show up over there. That's perfect. That's
exactly what I want. Now these two, I'm
going to join together. Join those together. Perfect. This color is a little different than the rest of the shoe, but I think it can just
be the same color. So let's find this, which is in, okay, so here's the tongue.
The tongue is white. That part is white. So I'm going to bring this into, this should be no change. And these two I'm going to join. Those are all the white parts. This is the base. So that's gonna be the
same as this part. So let's see where's that? So that's up here. Shoe knows. I'll bring into shoe base. No change these to join. So that's the shoe
base and the shoe knows she knows. The tongue. Oh, I messed this up tonight. I definitely messed that up. Separate this this part this one is supposed to
be with the shoe based. So I'm going to join those. All of these parts are white. So I'll join. This is shoe. So this is the shoe base. And others can be
a bit confusing. And all of these should be
the same color I think. But definitely these two straps, shoes, trap shoe strap. Join those. Shoe
sole and shoe sole. Make those the same color. So we'll join those. She knows we can delete this. You don't have to
follow along with me basically just right now we're just organizing your organizing all this stuff because it gets really confusing when we
don't we don't, we didn't use these
tourists this. So I'm gonna delete
them. Well, this is the other Tung hi. This is both tongues. This is both tongues. So I'm just going
to keep instances. These are the tongue, so
these should be white. Here. Both of these together
I think we can join because this is
all the white parts. Perfect. So this box, I'm going to connect
to the shoe strap and I'm going to bring
it into the shoe base. What does the heel I
don't know what that is. So this is this shoe sole. Bring it into the shoe base. Now it's on that
side as well. Good. This I think we can
delete the legs. Look good. So let's go ahead and validate enjoying children. So that's the legs. Shorts look good. It's Validate. Join children. Shorts
to round edge on them. Everything looks good.
Boots look good. Too. A quick save. Okay, this little
piece, the shoe base. A lot of things
actually, what is that? All of that I
probably should have. Now what we can do,
we can separate, then we can sort of figure
out. So that's 262. So let's go ahead
and decimate that. Still looks good,
still looks good. Maybe that's it.
I'm seeing a little bit. Let's leave it there. Shoe piece. Okay. Alright, so the white, That's 199 K as well. So I'm going to separate
this and we can always, we can put these back together. But I just want to
see what is so big. The tongue. So let's decimate. Let's, let's get the
other tongue first. This is both the thalamus
as both these two can go together. I don't
know what this is. What is this? Okay.
That's the tongue. Decimate that. Hey, that's good. 95 K. I don't even
know what this is. We're going to bring it down. Whatever it is. Then
this That's that part. That part actually not that big. Maybe once, twice
more, I think is okay. Alright, so now
we have the heel, we have these pieces,
these little pieces. So let's go ahead
and decimate those. Mature. We keep an eye
on it, see how it looks. Maybe we'll keep it there. Keep it there. Still looks
pretty good. All right. Now I'm just going
to go through and just like even
this little piece, decimate this couple of
times. So it looks good. The pockets decimate them to excrete. Okay. I wasn't sure
what the pockets are connected and it gets there. This is 209 K. I don't know if I want to
leave it or let's see if we can decimate it at least once in the details
to look pretty good. So I think I'm okay with that. And we'll try once more. I think that's okay. 26, the arms are 122 K.
These separate. They are. So let's decimate the arms. Let's go back to 3,000. So we'll bring this
down to the same thing. Alright, let's see, these
little strings don't need much, so we'll bring that down. Same thing with
these little pieces. The little tourists, this
meat that down hundreds good. We did the short, so he
didn't do the shorts. There any details
you want to do on the shorts or do we just
want to leave them? I think they're fine. I think we need any details
in the shorts. So decimate. Get them down to a reasonable
number. That's good. The legs meet those needs. We want to put little
knees on the legs. Us way too long. We go knees. Maybe. No. I guess she's fine. She's really need liberties. Hands, fingers. I'm pretty happy with these. So why don't we validate and join children? And can probably voxel we merged them together at a pretty high number,
maybe like 450. Do a quick save. And then let's voxel
rematch them together. I just did it high so
we don't lose a lot of this detail that I like. But I do want to
smooth out this part. I think that looks pretty good. I don't mind that they
touch a little bit. I think that's fine. So they're connected. And then we can go
ahead and decimate hands down a little bit. Still looks good. So we'll
leave it there for now. Jackets connected,
we have the hood. So the rest of this stuff
we can voxel Ramesh. I think towards the end, I think we have all the
main things for now. Other than the cuffs and stuff. Of course, we have to voxel, do all these things as well, but we will continue
in the next one.
16. Hair Details: Alright, so let's plug away at some more of these
little details. Can work our way back up. For these little cuffs. She has little cuffs in there. So I don't know if
we need symmetry. Let's see where they are. There in a, in a mirror. So we can just take crease. Then I think we can
just kind of add in. Some of these. Don't mind
that they're kinda thick. Love it. Easy enough. It might be that a
knockoff, a decimate. They still look boom. It will just keep
it, it will keep it there. I think that looks good. So let's work on
some of this hair. I don't know if we need
to decimate any of these, any of this just yet. But essentially this is
going to be creases. So I'm just gonna
do some creases. Not going to try not to
spend a lot of time on this. Because I don't really
think you need to K. So we make some little
roles like this. And we can use in Fleet to sort of get like differences in
height, things like that. And you can eat or
you can use clay to get some differences in texture. And we can use crease for this back part to that part, we might need to sub-divide a little bit better. Now we can get to
these hair things so the front can be smoothed out. And let's just take crease. There are some creases up. I really would rather not have to have to memorize these. But I might have to. Let's see, we can
do we're pinch. Pinch looks fairly good. This is very low, that here is very low res, it's only 1,000. But I think that's
pretty workable. So maybe crease and sub is good for some
of these as well. Let's choose this one. Because Cresus, so
it will give us some really nice definition. I think that's great. I might
even do that with this. And if you have a spot
since I don't want to, it might this might be
a good a good place to if I wanted to
use crease again, let's turn it off
so you can go up here and go to den topo, turn it on, make sure
that it's on there. We might be able to get decent. Kinda moves it around
a little bit too much. So let's forego that. This is not too bad right there. It's a little annoying. And since I'm coming this far, I'm going to not do it. So I'm going to
sub-divide it twice. Let's see if that maybe I don't have to do anything
more than that. Let's move this back out. Let's try crease again. That's way better. Way better. So pinch this, pinch that. It's way better. I'm going to smooth it again because he was just
looking a little bit like I already done
too much damage. That's good. Alright, so let's go
ahead and sub-divide it. Smooth out the tip. It looks good. The best way to do this. I think just crease. Let's make it go a little bit underneath their chip. And the trick of you
feel like your lines aren't moving
smoothly as you like. You can go into where is it? So go here and go
into stroke and you can adjust the
lazy Rope Stabilizer. And this should kind
of steady it up. A little weird because
it starts late, but steady it up a little bit. It looks great. We'll
take crease and sub. And I'm going to turn
the lazy rope back down. Can easily create a little bit of this to these things. And I think this
looks really nice. Now. I'm going to
make it needs that. I think it looks great as is. Alright, so I'm
going to add crease in sub two, this one as well. First, let's smooth out the tip. And it's great. Then I think
we'll just do the same. Moving along to the rest
of these little hairs. This looks on looking
a little bad. So I might have their subdivided this one. Look so good. Silhouette just so I can
get another one in there. I can even flip it around. I want to do like some depth. This thing. I want to add these
two together. So here, oh, there we go. This here. Hairball are no. This is it. Now. There is. I was right above it. So these two I
think I'm going to box will rematch them together. And like 200. I couldn't really weird back
there. I'm just smooth. It would just do the same thing. I think I'll take
crease and sub. Sure exactly how I
want to do this. It's a bit difficult with this being round because you can't really
get to all sides. I'm not really paying that
much attention to this. I'm just really making pretty just make them pretty loops. The swirl. Then every now
and then I'll just use sub and I'll just kind
of enhanced them. Make them look really clean. I think that looks great. It looks good. Looks really good. Now I think we'll take
both of these pieces. You it is. Let's do the
same thing as his boxer. We mash them together into
a quick save this out. And then we can do the
same thing for this. You can sort of just make our little round pieces in, push some of them back. And then we'll just do
sub and we'll just kind of a little extra. Looks good. And only when you
really need to do too much. It looks great. Okay, so now we have this
piece and a piece back there. So a box, we miss them
together like 225 or so. Smooth it out and rinse
and repeat, really crease. Just two little round bits. I actually thought
this was gonna be a lot more difficult. But it's not too bad. Once you kinda get into
the role akin to the flow. Of course, like if you guys
have any issues at all, you can write them
in the description. Actually need to check it. Changed my email because I get emails for everything
except when people asked me ask a question.
Just don't get those. I'm going to smooth this out. I'm going to use my
good old crease and sub medicare might be a little bit easier to see. They want that. Maybe that's
a little too aggressive. We'll just deal with one. And maybe it will do we will do a regular crease in there. Can handle that. And it did these way better
than I did this one. This one looks ugly,
but in comparison, Let's do crease in sub c if we can bring this one
back from the dead. Sorry, simply not as
nice as the other one. I guess that's just
how it's gonna be. Okay. Definitely good enough. I'm
definitely happy with it. Definitely happy with it. Alright, so let's see. These are kind of big. So let's see if we can just
decimate these. They still look decent. Then I'm happy. I'm just kinda big. Decimate, decimate. Decimate. Okay. This
one's kinda big. Make sure I can't really
discern any quality difference. Is decimate, decimate. Okay. So one thing I was thinking, I've been thinking is the head might have to
come down a little bit. I want to tilt it
back a little bit. That's better. Another thing I've been thinking
is for the hood. It's a little bit wet. Want to flatten a little bit
more underneath on the top. We can still use symmetry. I guess we can. Oh, maybe not. Maybe we'll just
leave it. As it is. Part of me does want to just
lose some of this clay here because it just doesn't feel like I don't want it like the hair is
going through the hood. So I think we just need to
back this up a little bit. Okay. Now we'll
just smooth it out. Just to give the
hair a little bit more police to come from. Unlike that, details
look pretty good. These guys are kinda big. I've been thinking,
thinking that for awhile. Hi, everything's connected now. Oh, well, I'm leaving
them ON really quick. Let's just do this last
piece. Let's forget about it. Symmetry, what are you doing? It's a sub it. How much? Just a little sharper. Some places. Okay. Good. Save.
17. Coat Accessories: Alright, We're doing
really, really well. The only other things that I had been thinking maybe is we just make something
for the pants. And we didn't even have
to go crazy with this. I'm going to join
all of these again. I'm going to join
all of these shoe base, which is save. So if we want to just
do something simple, side these for the shorts
will just add a cylinder. Make no sense. That don't make no sense. So at least now there's just one other little layer there. So another little
layer ever heard? Whole body? What if we want to do like a
little baby detail? You can do like do
like a little box. Shrink it up, validate
it will do round edge. Now it's just the time
for light little details. Because pretty much at the I like to have fun little
details like this. That's sort of just
like the little bist, the littlest bit of just
something different, you know, and like making it so it's not completely symmetrical
on both sides. I like that. We can make these little
pieces out of cylinders. Let's make sure this
box is very small. I designated a couple of times. So now let's add. So this will be on the jacket. These little cylinders, there's these little cute little pieces. Snap. Just like a green one over here. Take it off, snap over here a little bit, a little bit higher. Salary and let's actually
push it in a little bit. Wasn't as smooth as
I wanted to try. Now, let's do move. There we go. So we have that little patch and there's like
little pieces on it. So let's decimate
this little loop. I guess we didn't do round
edge. Do round edge. We should be able to
decimate it is to, once There's these little
tiny, What did I just add? These little tiny specks. It will just use circles
for her spheres. Like here, is validated
and decimated. And then we'll clone it. Let's clean it again. See if we can put
one in the middle. Let's see if we can make a line. So we have a little
something there. There's another
one on this side. Doesn't have to be
exactly the same, but I kinda like it and there's some little
pins on her shirt to we'll join those. This is the pin. Pin eyes cylinder will make one on the other side. Snap it forward, bring it up. Take it off snap. So I'm going to validate
and maybe we'll just make this one
a different shape. Make it a little smaller. And this one, we'll
do a little cylinders was taken off snap. Now I'm just kinda
being creative with it. Having fun with it. Clung over here. Another one. Symmetry. All right, so let's
validate these pieces. Maybe we'll do a little
rounded edge on him. And I really, I don't know
why I want to do this so bad, but I'm going to
decimate them as well, including the little mouth. But these, this one
I want to clone or make it a little bit bigger. Let's take this symmetry off the green one and just push this, push it back into the
jacket a little bit. How much should it
did that before? Because now I have to move all these back, but that's okay. I just wanted to make that
one a little bit different. Something interesting. She's have a little heart or
maybe like a little star. I don't want to
make a star though. Really don't. She's a button here to, I don't think I noticed that, but I think I want to put
the buttons on this thing. Cylinder, cylinder,
cylinder. What is this? These can all be the same color. It's going to join
these cat eyes array. So that's the pin cat face. Then we have these
little ears, nose, and cat ears or should be
kept pen really. Is this? I don't know what that is. I got to figure
out what that is. Is this both pins? Oh, that's that one. Oh, that's an I 0. I see. It's put pin one up here to
connect all these to pin one. And let's connect
these two. Join. This can be pin one iss, one pin one eyes. And then here's the cat ones. So these, those are all in pin. Alright, so let's make this little amalgam
sure what that is. You can make it hard
or make it whatever. Maybe we'll make it a heart. So we're still working on
what does this cylinder, that's the skirt. We'll just make that a skirt. Alright, so let's
go back to the pen. So this area, add a cylinder, cylinder seems to work for pins. Let's move it up and
out. Snipe at front. Will shrink it up. Let's mirror it first before we move it off the center line. And let's validate it.
And let's take drag. And let's just try
to make like a little heart type shape. Given that I think
is pretty cute. Let's take this Mirror
Validate, Join Children's. So now it's one piece. Will voxel 3D mesh it. At 200. We use rounded
edge to finalize it. And then we can decimate it. So this would be heart pin. Then we can just decimated
because we don't need it to be that big at all. 648, perfect pivot, reset pivot. So the pivot goes where
we need it to go. Stick this on. Let's
take snap off. Stick this on a
little pocket here. Let me get really tiny. Put it up over here. So we'll put it directly on. I think that looks good. Then we can clone
it and maybe we can get away with putting
another one here. That works. Then we'll just do a little cylinder
or a little sphere. I probably should
have put this fear on before. Maybe different. I'm not gonna spend too much
time on these old guys. Let's make sure that we
validate and decimate them before we clone them. Otherwise would just
making our project huge. No reason. Pull it
out a little bit. Okay, I think that's good. We join these two. Let's clone this. What did I just do? What they wanted to do is clone this sphere will put
this one in heart. Pin will put all these together, will take this sphere. Let's move it over here. Make it small. I really need to already
organized or make this pivot work for me. That should be much better. Just my view. Okay, good. Let's add a little tiny sphere. For the button. We'll go ahead and validate
it and decimate it. Maybe we'll call it in two. I added three because
this is where it looks like it kinda
pins together. So it kinda made sense
to me to be there.
18. Teefies: All right, So for the teeth, I think we'll just
use a cylinder. This is kind of a
cooler at a torus. So let's go to the
face, the face head. Okay, so now we'll
add a tourists. Move it up, I should save. And we move it up
right into the mouth. Like this. Now you can
see that it's kinda big. So let's shrink it. Shrink it this way. Back out. Open it up a little bit. Something like that looks good. Let's tilted a little bit. It seems perfect. It seems about right. Let's take the gizmo
and make it thinner. And then it's also
take the gizmo and stretch it like this. We might have to do a
little bit more adjusting. Think something like
that is perfect. Little longer. So yeah, I think something
like that is good. Obviously, we don't need
we don't need the back. So that was why we tilted it
a little bit, move it up. So it sort of
already on an angle. So we can validate it, we can solo it, and we can just trim the
back with the rectangle. Let's turn it a
little bit this way. Shim it like that. Un-solo it. Right now I'm locked so I
don't choose anything else. So that should work.
Smooth out the back. Turn symmetry on the
back a little bit. You believing move the backup. Smudge, flatten it. Is it bugs you like
it's bugging me. Okay. That's pretty good. It looks good. So now I just want to mark off where the little fans are gonna go. So I'm gonna take crease. Just mark off a little
close together. So we'll kinda mark
it off like that. Where the things will go. I think it's better if we
just make our own fangs. So this will be T fees. And I want to add spheres
and make the fangs ourselves and lay them on top. I think that'll
just look better. You can go ahead
and mirror them. So of course will
flatten them up. This a little smaller. Move them into place. And just kinda been
them until they're like perfectly in place. Something like that.
We'll validate them and then we can drag down to make the little
fangs just refer to the. The reference if you need. I think that looks pretty good. You can use flatten. Why is this not the filename? What's going on here? Okay. This is odd. Man, the wrong one who announced flattening. Okay. That was weird. See if we put it
back in the mirror. It feels still flattened.
Who now works? Weird? So this way we can just make it a
little bit sharper. Think that looks good. Something's going on with nomads, so
I'm going to save. I can't choose anything. But as long as it's saved,
I'm going to save it again. Should be good. Restart. Here we go. Now everything's working. Seems like it's working. Just want to smooth out
the rest of this teeth. And actually we can use drag
so that we can use crease or drag on the back part to like make sure that
kinda goes away. Can even use drag a
little bit. Drag that. Submitted, that looks great. For the back teeth. He really wants to add a
little detail back there. Just kinda go like that. I don't really want too
much going on back there. So we have that, That's nice. We can we can add
another tourists. Go ahead and join these. Tvs will join those. I don't know what
this mirror is. That's the hands.
Nike labeled hands. So the TVs were going to add another tourists and will
make the bottom teeth. And we'll do the same thing
that we did with this one. Something like that. I still want it to be
a little bit thinner. So you didn't really
need to be thinner. It just needs to be stretched as perfect. Hi. I think that's great. I can move it up a little bit. I think that looks
good. And I'll just move the back a little bit so it looks like it goes
down a bit more. Don't even have to worry
about the rest of the thing. And if you really want, you can take crease symmetry. You can just keep those
teeth a little something. You feel like it. Same
thing with the top. Just give it a little something. Alright, so and we could paint inside the mouth. But there's another
thing that I like to do. Well, let's decimate
these teeth. Backup. One. Doesn't need these teeth a little
bit. That's good. I was like keep it
under 1 million. So we could color in
the back of the mouth. But we could also. What's a good plan for that? Do mask solo that we could take mask and then mask off
like whole section back here. You didn't back here. So we can mask that and
then we can bring this down some and then extract it. Will go back to the face
and clear the mask. Let me go back to the
little mask thing. And Fox will we measure like
200 and then smooth it out. So I know this seems weird. But now we can color
that in black. So the back of the mouth
will always be black. The only thing is
we don't need it to be big so we can decimate it. I think that's fine.
Okay. So un-solo it. I might even just smooth it
a little bit more. Actually. No, let's choose Move. It was just kinda move it out a little bit into the
sides of the mouth. So now we have like, uh, yeah, so that's a good,
that's a better deal. I know it seems weird,
but I'm digging. It. Knows. Ease.
These all look good. By decimate these. Decimate these. All right. So we've got the teeth.
Oh, the little tongue. Let's do a quick save. This time we got, Let's
do a quick tongue. So we'll do a little cylinder
tongue will bring it up, shrink it, stretch it. Let's go ahead and validate it. And let's take, take drag. Just open up the
back a little bit. We use round edge and give
it a little bit of curve. So we'll give it a small
little push from underneath. Puts in there. Perfect. Good. That's good. This up a little bit. I
think that's perfect. The only thing that I wish I could see Morrow
was this back teeth. I wish I didn't. Can
use clay on them. Kinda grow these
back a little bit. Okay. All right. I don't think there's
any more details. I don't think there's
anything I missed. I think it all
looks pretty good. Oh, the tail. So maybe there's the
tail and the next one.
19. Swirly Tail: Alright, so we're almost there. Let's just make a, make a little platform. I don't think we have to be
might've had one already. We already have one. We did. So we have a little floor
to increase the size. Like so. And let's just
make a little tail. So we use the tube tool. And we don't need path. If I want to do the tail
exactly like the reference. We don't have to make
this really big, I think. Spline, make it nice and spiny. Maybe actually on the
ground is a little better. Maybe the tail
comes out this way. Risks on the ground. And then maybe even get smaller here. Buckling there. No buckling. Okay. Yeah. I don't like that. Go till it goes right up
in there. I believe it. That's nice, interesting. And I don't think
there's one thing that needs to be any bigger. I think this is good.
All right, I like that. So let's validate it. Could've made that a
little more pointy. So we'll validate it
will box where we mesh. It will do the 25250. Smooth it out. That little part
is not being cool, so I'm going to remiss it smaller just to
get that part out. You know what we can do now? We can trim trim right about there. And
then we'll wrap Box. We miss this at 200. Should stay nice and smooth. Then we can do our crease action paint right into the floor. That's better. Go there. Let me come come across the whole nother doesn't
really look good. Maybe we will do, Let's
do another one here. Let's do sub, you know, I like that good old. Sweet sub. Yeah, it's like it
doesn't have to be perfect. Looks good. We'll do some regular
creases on this side. Without the bottom. A little bit.
20. Extra Friends: Alright, so now I'm
just going over some, making some extras, some assets that can we
can plug into the scene. So I'm just actually be working
some older scopes that I did that I think would be
fun to use in the scene. One being this cat. And I have a few other things
that I'll include. I think you guys are having fun, so I figured I would just kinda show this process
as well. Because why not? I've actually been working
on it for awhile now. Just occurred to me. Why not just random? And I just want to show you
really quick how to bring those characters in. So before we color it, we're just going to bring in these extra little characters. So we go to here and then
we go to Add to see. You can go to wherever
you saved them at, will bring in the white cat. Open, will move him into place. I was really small. Maybe
the scope is really big. I don't know. Look at the front,
I might be on it. Let's go back to orthographic. Just we can line it up with the ground a little bit better. And put the cat here. Maybe we can put it even
a little bit closer to the arm until it looks great. Now let's see what else we have. And to seeing you
have a popsicle, we have a fruit purge. Let's take a look
at the front again. A little bigger. And you saw that it another
little tip that I do. You can move the pivot down to make it flush
with the floor. So now for this character, when I enlarge him
and move him around, he'll be on that pivot. I don't have to
constantly move him to where the flow rate is. How much space do I have? I
don't have that much space. Turn him like that. Where we can just make him small and put them in the front. Could do that as well. Maybe that's a
little bit better. Nestle him in there
a little bit. That looks nice. So let's
see what else we have seen. The popsicle and it's
already colored. Let's make sure we get this
right. Now. It looks good. And I'm gonna do the same thing. Let's turn it to the left. I'm gonna do the same thing.
I'm gonna move the pivot. We can reset it or
read it to the middle. Now let's just move it down
to this. Flush with that. Now I can make it a
little bit bigger. While we're here, we might as
well bring in another one. Popsicle game device
ON green horned frog. This is q little weird
frog that I made. But I think it'll be great for our scene. They're so small. We'll keep them small. Maybe we'll put them over here. Let's make sure we look to the right and make sure that he's in the right spot. Okay,
that looks good. I'm going to change the pivot just so it's flush
with the ground. So I do want to change
the shape a little bit, makes it a little bit easier. Want him in the front. Let's erase this a little bit. Maybe leaving. I don't know
if I want to stretch it. I couldn't move it
up a little bit. Then maybe he would
have more space. So let's go ahead and find. So here's the way care. Here's the fruit purge,
Here's the popsicle. I might go in, I should
probably change this to the green horned frog, but at least we'll
know what it is. I think I think you
guys will be fine. Kinda wanna put
him in the front. I like him in the front.
I might have another, there's another fruit
character we can add into 0. So let's do the game console. To sing game console. That's big. Well maybe we can like Nestle it in there. That would be kinda cool
and very unexpected. Move it over here, term press, post-process backoff. Maybe over here. We had this view, it looks better from the front. Then this, we can
move this back. So I might add one
more fruit character. You guys can add in. Alright, so added in
some new fun things that we can add to the scene. So I'm just going to find those. We have pear fruit. Another little character. We can add in. And then there's also this
other little character, frog. Just kidding. Close. Okay, let's bring the pivot down in case I want to resize or move him at
some point in time. We need to bake this. Anyway. It will snowball him right with these little guys. Excuse me. Okay, So we have
some little characters. You can take them
away or keep them. But I think it
looks pretty good. I might add in some
little floaty things too, like little pluses are hearts. Sometimes those are really
fun to also add in a scene. Like, I don't know
if I have any saved, but things like these, like little heart, then
you can just clone. I don't know if it cloned. I just call on
someone or cloned. Need to. Okay, this heart pin. So hard pin to this, move it up, float. You can make it a
little bit bigger. And see what happens if we do round edge. How much we lose. Might have to sub-divide it. And then do rounded edge. See voxel remission
if it's any better. And I'll just decimated again. Probably didn't really
need to do that. I kinda wanted the edges
a little bit round. So that was my, that was my thinking. I didn't
want the edges. I wanted to edges a bit round, change up the, you
know, where they are, the front back,
things like that. I don't think I
put in pixie cat. Think I forgot to add one
of the characters in here. Excuse me, pixie cat. So now we've got pixie
cat in there as well. And I'd actually
like to make a star, like a cute little barley
know how to do that. But if I had to guess, just want to put these. Together, I probably
do a cylinder. I do snap, put it forward. Obviously, you don't
have to do all of this. Really. If you're not feeling
it the way I am, I love adding these
little things. I love it. So let's use this, these two. And move will turn
on the symmetry. So new star should have feels right to me. Does feel right. Now I
don't know if we can use I'm just going
to name this star. Name it probably three times. So if we do radio, radio, let's turn that one off and
do Is that the right one? It might be, but I need to I need to adjust
the placement of them. Not quite other. That's cool. Little shape. That's it. Where do you see put? I think it's C. Okay. Now we're cooking. So now I think I just have
to, whoops, a girl. Which way to move these
to complete the star? That looks great. Make
it a little thicker. And then I think I just have
to do move and adjust this. So now we can take this, we can validate
enjoying children. We can box so Ramesh it. We can do rounded edge. Now we have a star. I'm definitely saving this star. Even I don't really have to. I mean, I know how to
do it, but I'm Steven, I'm saving this star for sure. Will make it nice and small. Maybe we'll back up just one
and we'll save it there. I'll include it in case you
guys don't wanna do this tar. I'll just include it. Because you guys have
done a lot of work. So I need to export just
the selected object. Export, save to files. We'll save it in
the same folder. Star, pivot, rosette, pivot. So 90. Why it's
not acting right? To put this a little bit
higher so we can see it. Maybe even a little bigger.
I'm okay with that. We'll clone it. We will do a smaller
one up here. And we'll call it again
and we'll just do maybe we'll do one up
in the front somewhere. Something like that. You can even lay some on the
ground and stuff too. You really want to like, like maybe they're confetti or
something like floating down some on the ground. And the cool thing about
stuff like that is you can actually make them like
little lights and stuff too. Which I think will look nice. So I think that's good
with the details. And I'm happy with
these details. Alright, so all the
stars are good. I'm just going to join them. Stars. So I'm gonna take this and move it down and we keep all our extras together. So let's keep all of
our extras down here. Popsicle body, main console. So we'll keep all of
these together that way. We can just turn them off, turn them off easily. And then we can just start, then we can light it, and then we can color. Safe.
21. Lighting & Coloring: Lighting. Let's do some lighting. We did some other way this from other lighting really quick, but I don't want to I don't
want to include that. So it should have probably
look something like this. Obviously, I just
turned everything matte white, super easy. I dislike to light that
way a little bit better. So first return on
environment off. So we're looking at
the front respective. Okay, So now all
the lights are off. We can add our first light, which is just the sun sunlight, which is kinda like
an area light. And usually it's pretty
good where it lands. So I'm just going
to keep it there. I'm going to pose the
character about here. And then I'm gonna go to
the camera and add view. This way we can. We have our view there
so we can go back to. So it looks pretty good. And I think I might keep I might not make it too much
brighter than that, maybe only a little bit like so. You can change the
shadows to soft, gives it a softer shadow look. And let's change the name
of this light to key. Alright, so let's
add another light. But this light we can
move over to this side. Can China here. But let's lower the intensity just so it's a little
bit lower than the other light,
something like that. So this will be our,
our fill light. So it's just filling in
some of those shadows, like to make that soft as well. Now we're going to make
a light back here. So this see how this
darker shadow is. We're going to make a bright
light and bright rim light. Let's name this one. Fill with an F, will add another light. And this one sometimes
I make it a spotlight. It doesn't matter
where we were. I move. If it's a sunlight, it doesn't
matter where you move it. But I'd like to move it in the general direction
of where the light is. That way just helped me remember what I'm doing and
where the light is. It just easier, a bit
easier to access. So this is what we want to see, that nice bright edge. That's what I want. Nice
bright edge coming from. Coming from wherever. You can adjust it left
and right if you want a sharper edge or bigger edge, that kind of thing, I
think that looks good. Maybe I'll make it
a little brighter. And then I want to
do a top-down light. So this will be, we'll
call this one rim. Then we'll add another one. This will be a spotlight, will bring it directly
above and pointed down. And it's actually kinda nice. I kinda covers the kind of light brightens
up the face of it. Which I think looks great. This one I like to make a
little bit cool like that. Then some of these
other ones I just like to make a
little bit warmer, even fill light and make
it a bit more warm. But one of them
feels I just made one it feels a
little bit too warm, is the key, might be the key. Make that a little more neutral. Not too warm. Shadows
to just a smudge. Oh, you know what it
is this backlight? That's what it is. Backlight
is a little too warm. Okay. I think that looks great.
Too. A quick save. So now let's turn on the post-process and
double-check our lights. They still look pretty good. I'm going to turn the
environment back on. And of course I'm using my, this background or this
environment. Let's turn it down. So we still want those
shadows in there, but I think that looks great. I think that's good. It's
not too light, not too dark. It looks nice. And if
you want more shadows, if they feel like
there's not enough, you can turn up the
ambient occlusion and post-process should make
the shadows a bit darker. Like so. Let's go
ahead and save this. Alright, so let's
dive into coloring. So I'm just going to
match everything up. Obviously, you can
change the skin tones, you can change whatever colors. But I'm just going to try
to stick to this that way. I can move through it as
quickly as possible. All right. So let's start with this hood, which is a light pink. And as we go, I might also change some
of these two subsurface. I just think it
looks really good. So I'll change it to
subsurface and then maybe I'll just scale it down a little bit so it's not so see-through. But now we can pick our color. This is just like a light pink. It's a little bit
lighter, but it might be because of the light. This light we might
be able to bump up a little bit and
it would actually look a little bit more pink, a little bit more light
pink, I should say. The lighting head plays a
big role in how colors look. So this makes absurd, Well, scale it down to similar color, but it's a little darker. Maybe something like that. And this is the same
piece of the same colors. Might be easier to just tap in color hair. Let's go ahead and make both of these subsurface
scale that down. Somewhere like that. Actually we can join
these together. Mouth and the picture
is this decimated. It's actually not decimated. So I'm going to decimate
that. The thing I caught it. What about the 0s? So it's always
good to go through and just make sure everything is decimated properly.
A little nose. That's okay. On her little nose. 5810. We can probably
estimate that once without much loss. So these are kind of like a thermocycler,
chocolatey brown. Actually. They
almost look, look, look black because I could chocolatey brown like that. And the mouth is the same color. This is pretty much the
same color as this. Of course, again, we can make these things
subsurface. Scale down. I might this in the mouth
am I leave not subsurface. Alright. So her
eyes can be darker. Very dark. I want to turn the roughness up. I don't want any
gloss from the eyes. Some of them are from the eye. Lashes. I just want
them to be black. Her skin, I'm gonna do along
with the hands and the legs. So firstly, let's make
them all subsurface. Tone it down a bit. You can
see right through the leg. So we'll turn that down. And let's grab a color for it. So I don't know if I wanna
make her the color of the art or maybe like a
chocolate color. I'm not sure. I think I want a more realistic, but tempted to do. Let's try to find the one
from the reference first. Initially move the
reference over here. Let's transform. We'll move it over here for now. And we'll move all this over just enough so we
should have room for this panel over here, which you can see
I made my panels bigger chest for the classes. Okay, so now we can see
everything should be left handed. A hard color to match. Maybe that's the
best that we can do. This little bit is kind
of like a little reddish. I think that looks about right. And I'll make it subsurface. Scale this down a bit. These are not here. But I like adding them to
my characters like that. Make them subsurface. Subsurface always
makes them look a little bit more natural. It treated those dark
shadows that I hate. Damped like them. Okay, So the hair what we can
actually do with the hair is could actually just put all the hair together. Join. Live dangerously. So let's change it
to sub-surface. Scale it down a bit. Now we can adjust the color. I might change it a little bit, I may make it a little
bit more dynamic, but for now, let's
just try to match it. I think that looks good. The teeth, I know we can
join these all joined. Know these are the bottom teeth. So the teeth, I
want to make sure I touch this Tethys last
so it'll take that name. So let's join there. So the teeth aren't usually
do them pure white. I usually do them
a little bit off. White. Just to smudge. Also do the teeth subsurface. So maybe somewhere along there. And also for this color, I want to make them
a little bit less, a little bit more glossy. Maybe not completely glossy, but we can look here and
see how glossy we want. So maybe something like
that. It should look good. Okay, Then we have the
little tongue in there. Let's go up to the red. Bit, hard to see. But we'll just match with
the sphere. Looks good. Maybe we'll just
roughen it up a little bit. I think that's good. We might not have to
do subsurface with it, but well, it's just
stay consistent. Scale that down to a
quick save just in case this has extras and
the other one's white. Okay, so I'm gonna
save this one. Okay, So we're
looking good so far. So let's take the coat sleeves. We can link together. We can join these, the separate sleeves they are. So here's the sleeves. And the jackets center crease. And we just want the coat. But actually don't
know where that is. 0 jacket mid, that's what it is. So let's just join
these and the pockets. So we have the sleeve
cuffs, the jacket mid, and the pockets. You can join. Now. I messed it up. Okay. So I need to undo. So let's take away
the pockets for now. And the sleeve cuffs, which leaves us with
the jacket made. We need to validate these, so let's validate join children. So these are the
cuffs, these are the pockets validate
child children. Here's the pocket jacket, cuffs and jacket mid Let's join. Okay, perfect. So now everything
should be good. So the jackets all together. Now we can color this,
this yellow color. Crime poor. So let's change it
to sub-surface. Will lower the step because we don't want it that see-through maybe like 0.01. It's usually my go-to around there were changes to yellow. It looks like a good match and make it a little bit more rough. And really try to
match that material. I think that looks great.
So we'll paint that. I love it perfect. Now we have these little,
these little things. I think I want to
make these a little bit a little bit darker. Maybe it will bring up the roof, the metal miss a little bit. Kinda make those stand out. Then we have the
genes are the shorts, which we can make a sort
of darkish blue color. Maybe a little bit darker, can take the metal miss out. We can do paint and
we can change this to sub-surface, scale it down. And maybe even I don't know if I
want that to be the same color or a different color. Make it the same color. Maybe a little bit lighter. Legs look good. So this has white. Maybe we'll take my baby. Don't cry. Pink that way. But now let's take this part
and let's make it pink. A little bit of a darker pink. That's pretty good. I want it to be nice and shiny. Probably around
the perfect around the same level of
shininess. That's good. And we'll go up here
to our subsurface. Scale this down. We can go a little
bit below one because it's a sneaker shoe boot. So that's why this part, I guess we'll make
this orangey color. Nice peach color. And this, I think I want to
not connected the shoe base. Interesting. I'm a little
bit nervous if I choose so. So what I'm gonna do, We
should bring all of these out and we should add their own mirrors. That's
what we should do. So this would be the sole straps and the box to bring them out and just give
them their own mirror and then validate each
one and join children. So this would be
the straps base. Validate their base. This is the he made sure I can separate this. I just feel like there might be a need that we need there. Okay, we need these
two for sure. So let's join. This is the base, so I'm going to join these two. And this is the tongue part. So I'm going to join this. So if I hide these
and I let go of that, oh see, that's a double tongue. So let's get rid of this tongue. I'm going to bring this out
of whatever this is delete. I don't know how the tailgate
and the mix salary of shoe base and we'll
validate shoe base. So this will be shoe base white so we don't
get confused again. This will be the shoe base. So we'll call it pink shoe. Alright, nice. So now we
have the shoe based way, the straps. I believe the soul. Perfect. So let's
do a quick save. Okay, so now we can change this, all of this to the
same color. Nice. Alright, we'll come
back and we'll, we'll cover some more. Safe. I think I just saved.
22. More Coloring & Details: Okay, so the tail you can make the tail whatever
color you'd like. Bebe. What do you want? Well, you need come up. You can come up. I'm
trying to teach a class. Okay. Bye. Okay. How was the animal? So for the tail, I think we just want to make it like it will just
make it this color. Feel like it maybe a little bit more richer, richer, pink. I don't know. Maybe it will just
match this color. Okay. Who needs to make it subsurface? Almost forgot. Okay, boom. I think we
did that for the shoes. These are actually
quite high decimate. Does having twice
the dangerously. These are the whites.
So let's make sure that this has
subsurface it is. Let's make sure the white
part is subsurface. It is not scale it down so
it's not so see-through. Shorts, legs are
everything else. Is the soul. Nice. Let's make it
subsurface first. Tonic town of it. Nicely, sort of brownish, rubbery, rubber ish color. If we can find it. Maybe a little more red. Feels about right
here, feels good. So we'll paint that. Perfect, perfect. These are pink, this one
we can make a pink color. We'll make that a pink color. You need a lighter pink. Might even make it an additive. Let's make this green. Like a nice light green. And that looks good. So
I'll make it subsurface. Tone it down. We'll do the same with this. These little guys. Let's
just do a nice off-white. So we'll go to
maybe around here, will make it a nice off-white. And then we'll make these. Let me check the,
remember we sold. Remember resizing now,
so that should be good. Now let's make these
a little bit of, a more of a peachy, off-white little bit, tad bit more reddish. Here we go. That's good. Actually, I wouldn't mind this being a little more glossy. Since usually those
things are like plastic. Alright, let's save
this view as well. This will be coloring. So that way when we go out, we can easily type back
in to the same spot. Color these, let's
make them subsurface. Would actually be cool. You know, it'd be really cool. I'm going to colonise first. Let's check on the size of them. Okay. They're pretty small. I can probably decimate them again since I'm
going to clone them. So I cloned knees. And then I change
this one to additive. Then make it a nice
pink paint that pink. And actually I liked, I liked the brightness
and Protestant they really need to be
that much brighter. But we can always make
it to 0 is unlit. Turn the opacity
down a little bit. That's kind of interesting. These other little pieces. Just want to make those pink. And we can make them
sub-surface as well. These little bits, Let's just
make like a darker green. And maybe it will just too. Maybe we'll make them additive. So they sort of
stand out as well. I'm okay with that. Let's make this heart
came and see it now. Let's make pink. This one. Let's make
like a plasticky. Maybe yellow or orange. Let's make it a
little more orangey. Little bit more plasticky. Let's make it
subsurface. Hit panel. Maybe we don't want
this substance. Let's make it opaque. Speakers subsurface
and turned up, turn down the translucency. Alright, I, so I think
those look good. These little buttons will
make like a chocolatey brown. This is just one button. Join the buttons and
rename them buttons. Excuse the cats crunching
in the background. Nice chocolaty brown. I think. Glossy but not that policy maybe
around there. Like that. Oh, and let's not
forget her eyebrows. Those will make them
subsurface down. Good. I'm pretty good. So she
does have these two. Maybe I should make
them with a shape. Maybe that will be
the smarter idea. Rather than paint them on. We can try to paint them on. Looks good. Let's hit
them a quick save. Save our progress. Alright. It looks nice too. I have a post-process on, I do. And taking a lot of
screen grabs. Why not? See everything is subsurface. I don't think I mean, this this doesn't look like
it's subsurface. We'll do that. I don't mind if the
caps aren't subsurface. I'm okay with that. The buttons, they
might stay opaque. Opaque ink. Alright. So we have here, I think
we're in really good shape. These little, these little eyes. Paint those color we want ease just to a darker color
and rough. Or that one. Maybe we'll make these a
darker color. Instead. Make them a little bit
darker and Rob, better. Alright, cool, cool. I think everything is
sub-surface as it should be. Everything looks good. So the only thing that
I'm struggling with is let's turn subsurface off
our post crop post-process. Oh, there's another
thing I forgot. The back of the mouth.
Remember we had that dark piece so that we
can make either a really, really dark red, I think,
pretty much black, but I want to turn
this all the way up and paint all so that way the back of
the mouth is always going to be dark. Okay. Everything looks pretty good. We can keep the floor. Maybe like a beige color
so it's like a light. Not so distracting color. The night that the roughness up. That looks pretty good.
I think all the colors are I think all the colors
look pretty accurate. You guys don't know the joys of both trying to teach and then
trying to wrangle a cat. I do want to add that
extra little detail. Let's get out of post-process. So we'll do pain will
do it on a new layer. So we'll just have
new layer up here. You can actually do it with
kind of like a red like that. What do paint? Lower the
intensity a little bit. You can do something like this. We'll make this a
little bit bigger. So it's short if feels like,
you know, that circle. But it's a little
bit more realistic. Obviously this is a bit
more realistic then. Having an actual
circle on your face. And we can do Smooth Color. Smooth color is just smooth
with zero intensity. The intensity turned down. But you can save
the tool and just That'll be smooth, Smooth Color. And you can kinda
smooth it out a bit. Try to blend it a little bit. Works better on
lower res models. But it's really good, especially for this
type of character. Let's do a little bit
here too, actually. Can you get that little red? Even around here on the face? A little bit of red
really goes a long way. And then we can go
into the, actually, let's, let's talk a little
bit more on the lips, the lips lipid rich area. Let's add a new layer. Let's bring this
up a little bit. And maybe we don't need it. This red. We can just make it
like a little bit more, a little bit lighter. Let's turn it all the way up. Because we can always
lower the layer color. So let me have a
nice pink lip there. And we can do it a little bit
pinker even on the bottom. You can do bit lighter. A little bit lighter
for the bottom lip. So that looks good. We'll take smooth, smooth color. We can just try
to smooth it out. It might not smooth that much, but even that little bit
of blend I think helps. Let's actually color
all the way up here. I should put more lights on
so I could see it better. But sometimes I like
to be a renegade. Okay, and it looks great. So let's add a new layer. And this is going
to be inside mouth. I'll just call it n mouth. This is just so I don't forget, I'm going to bring
all these layers. I'm probably going to
flatten the layers. But for this one, we want to go with a
dark inner mouth color. Can be a little bit more mature. It actually now we'll just
paint inside the mouth. Worried I was going to happen. Lock it in place. I think anything was coming. Anyone's going to see
the roof of your mouth. But it's kinda nice to have a little bit of this.
I can see it anyway. The lip color. So I think that it
looks pretty good. I think we did a
good job in there. Right? I think the mouth looks great. The only other thing you can
do and this is way extra, is you can take like e.g. locked. That's why you can take like things
like the hair, like around the edges and you can paint them
a little bit darker. E.g. like, you know, like we have the jacket. You can take the color. You can lower the color a
little bit, make it darker. You can sort of paint
where there's a crisis. You have to like paint
and then smooth. See how there's like a little
bit of something there. So that's something you
guys can do on your own. Because that's, you know,
that's very time-consuming. But it just kinda wanna show you the benefits of doing it. And why I do that. Sometimes. It just gives like an
insane level of detail. You don't have to really
rely on ambient occlusion or things like that so much because it can give
you a lot of that detail. Should add symmetry on. Just gives you that
little bit of something. You know, there's, there's subtle color differences
and changes with the life. And it's just
something I do when I'm from what I'm drawing. The other thing, like
the hands, make a layer. Go back up to our red. Here's another opportunity to do tiny symmetry.
Do need symmetry. You can paint the fingertips
a little bit more red and smoothen out. The knees to the legs
are pretty small, so I think I'll do it
right on the legs. Actually turn the intensity down since I'm doing it on
right on this one layer. So I'll just add a little bit of red and then just
kinda smooth it out. A little bit of redness, I think does a lot. Okay, perfect.
23. Final Details: So we can bring back
our little friends and you can color them
how you'd like to. I think for the stars, the stars, I wanted
to like a yellow, deep yellow like this. I want to clone this star's
name is star is add. And we can actually do this, give them a little
bit of a glow. And we can take the add one. And sometimes if you make, maybe make this a
little bit darker, it looks a little bit
better, like that. It'll look really nice
and post-process. So give a nice glow. Turn the opacity up a bit. Here we go, That's nice. We can do the same thing
with the little hearts. So I'll clone these. Put it right underneath
name and add. And let's adjust
both of them first. So we have both of these and
we'll change them both to the Kurdish soft reddish color. And then we can take the ad and then we can adjust
that one to additive. Always unlit, nice pink color. I think I like it. You can
adjust it as you want. You can just go back to here
and you can up the opacity. Then you might have
to make it a little more rich to keep
that pink look. I think that looks nice. You can color these
guys in my like. So white cat. I don't think he has any
layers. I'll he does. I should have deleted
all these layers. So I'll probably go in and
delete, delete these layers. I don't even know what
some of these are. Okay. So the mouth crease and
that's the pink and the ears. These two, I'm going
to merge down. And then the darker, Wait, do we have
anything darker? I don't think so. So the
darker maybe I'll paint. If we wanted to do him like a some cats relate that
nice grayish blue. Make sure he's nice and
maybe something like that. Course you can call them
whatever you'd like. You can change the eye colors to probably should
have joined them. You wanted to like super
like cat, cats eyes. I don't think I mind it black. Then this little guy
find a color for him. Like kind of like that
sort of lime green color. A little close to the frog will do like a purply color. So we'll do like a purply color. Maybe a little bit more rough. These, we can make green eyes. Just keep it simple and
do like darker versions of these little dots. Maybe we'll make those
a little bit lighter. Frog is a little higher up
off the ground, I'm noticing. So keep an eye out for
that kind of thing. All the way from
up here, meet him perfectly on the ground. But I guess I don't know what happened
to these hearts. Maybe it's because
they're connected. Sometimes it gets a little weird when when they get connected. So I have to clone it again
and do the same thing. Additive, always
on, let raise up the opacity and then adjust the color a little bit. Nice. They actually looked
better than the last ones. And maybe the stars
will raise the opacity. I'm going to find
the right one stars add that up a little bit. Sometimes you can get
a cool effect like if you go to the
original one and make it a little more
like orangeish her read. Sometimes you can
get a cool effect. See if we can get it. Doesn't look like it's
changing much pain at all. And let's adjust the other one. See if we can get a little
bit about orange-ish outside. Let's take the color
and already is. Not really listening to us. Here we go a little
much, little into that. We have that interesting
kind of glow. That's a little bit better.
Alright, it looks good. Change the background. To be more festive
for our scene. Let's get rid of the reference. I don't think we need it.
Post-process is looking good. You can do depth of
field if you want. But I don't think we really need it to make the floor
sub-surface as well. Let's make sure that it's
as rough as it can go, actually, because that's
shine is pretty bright. I'm going to take as much
glare off there as I can in the screen,
in the background. Last but not least, There's a little screen
on the main console. And I want to make those green. Let's change them
green being all. So now they have a little bit
of a green glow over there. I'm going to lower the
subsurface or this Popsicle. So it's not so
completely see-through. I like it's see-through but I don't want it crazy see-through. Okay. They're
connected. Okay, good. Alright, I think I might be
officially done with this. Go to Select, get rid
of everything else. Because if you go to view,
then this thing pops up. It's kind of annoying.
I think that's it. Let me save before I
make any rash decisions. So we'll save it. We'll do a nice little tool
table. See if it works. It's really bright in the
back, but that's okay. The front that matters. I can ever get my turntables
to be in the middle. So it is what it is. But yeah, I'm really
happy with it. Okay, You can stop spinning. Now. Let's go back to our view. Right? And that's it. I'm going to get rid of this. One last time. I'm going to save this view. Name it done. Right? And then
we're going to see that. That's gonna be it.
24. Extra: Custom HDRI Background: What's up, guys? So here's how you add a background HDRI
image to Nomad scoped. So we're just gonna go here. And then we go to
reference image. And we have our image here. So just you can
tap on the image, tap Import, and then
you tap your photos. If you have more than
one, that's fine. So I made a bunch
of these images. So I'm going to
grab all of these. So then we can add
them and then we can see which one we like. So once you tap on one, it's going to show up here. So you just have to go, just go back there and go
into transform. And you can make it bigger. Something like this.
Which is pretty cool. You tap it again. Oh, actually we
need to make it a little bit bigger. I think. Make it a little bit
bigger like that. Then what we can do is this is one of those
times where you wish you had a Select All. Actually, I don't even
think we have to do that. That is a play myself. Let's take this background
and let's just grab this, grab a color next to it. Just something I wanted
the same type of color. Then we can stretch it. Actually. Stretch
it if we want to. You don't really have to. But the roughness
up, the roughness, you can see the light
more. That's weird. So maybe we'll do, I guess
something like that. You can still see the light. Maybe it's because
it's selected. I would like to. If it's opaque, if it
makes a difference, let me get completely black
and turn the roughness up. So strange. Okay, So I think I know how
to mitigate that. I probably should have
saved the position. Session was pretty good. So we'll put it back here.
That looks all right. And we just need to
adjust this rim light. Even if it's just by
either bringing it up. So it's off of the street. But probably the smartest thing is first, let's save this. Let's do City. So we saved the
backdrop in there. And now we can change that
light to a spotlight, which will give us more control. Okay, it's the same spot. It looks like it
should be pretty good. So let's try turning
it up so we can see it because I can't
really see it right now. There it is. I see it now. There it is. So that's good. Raise it up a little bit higher. Maybe like it's
coming from there. Can make it as dark or
as bright as you want. Maybe I'll add a little
bit more redness to maybe the light
coming from above. So that's the dislike. This might work with a little
bit more blue actually, because there's a nice
blue in the middle. So that kinda works. And then also the key
light coming from here, that's this light. Maybe we'll add a little bit of, can either add warmth or
maybe redness though. There's a lot of red
in the background. Kind of like orange-ish. So might be nice to
add some of that in. Let's take another look
and then we can make it brighter or darker
as we see fit. I think that it looks nice. I think that looks cool. Then we have a nice, a nice background. So I'm just going
to save this as actually I think
it's fine to save. I'll just save it as it is. Could we can always get
rid of the background. Already changed the lights. So that's kind of annoying. But let's, let's export this. See how it looks. Right
back in a second.
25. Thank you! : All right guys, welcome back. If you are here
listening to this video, if you were able to get
through all of this and you're still here hanging with me then. I'm impressed. This was
this was a tough project, that was a long intense project. But I think it's one of the most rewarding
projects that I've done. So hopefully you feel the same. I hope that you've
just been creative and feel free to change things and move things and
really make it yours. This is your art. I wasn't sure if I should
do an advanced class year. So I hope there's at least
a few people that are able to do it and finish it. If you just focus and
really spend the time and just don't cut too many corners and you have to
cut some corners. But I think it's
amazing what we can do that I'm really looking
forward to what you make. So please rate and review.
It really helps me out. I can't wait to see
your projects if you posted on social media tag me, drug-free day, of course,
you know all that. Youtube, there's gonna be my transition from
Nomad to Blender. So that might be helpful if
you're thinking about that. You can check it out and kinda
see some of the problems I run into and also
see the render, the Blender Render, which takes a long time. Alright,
well that's about it. You've heard me talking a lot, so I will leave you there. I can't wait to
see what you make. Please remember to upload it
to projects and resources. I can't wait to see it.
As always, keep drawing, keep sculpting, and I'll see
you all in the next video. By the way, I did record
this all again because of the focus breathing,
which was terrible. That's when they kinda
focuses in and out. So now I'm doing manual focus, so it shouldn't be an issue
as long as I'm in focus. But the focus breathing
was that was killing me, so I had to do
something about it. So hopefully this is better. And also just thank you. Thank you for your
continuous support and thank you for spending
your time with me. I know you didn't really
sign up for this, all this talking, but I
like to I'm a real person, so I'd like to talk to
you like your real people Because you are and
because I care about you. So sometimes I just like
to add a little bit of a how I actually feel I'm not trying
to sell you anything. You've done it, you've
put in the time. And I know you want to
go work on your project. But I just wanted to
say again, thank you. I appreciate all of
you. I love teaching. And yeah, so go check out more. There's gonna be more. This
is only the beginning. Just going to keep
getting better. Alright, I'll see
you in the next one.
 Dave Reed, 2D & 3D Illustrator - Brooklyn, NY