Transcripts
1. Manipulation: Hello everyone. My
name is Ahmad Raza. I'm a digital artists and creative director working
from past seven years. I've been very
lucky to work with major brands including
United Nations. They are not there.
The guide me, Pepsi got rid of Canada, go. I don't know if
Pakistan, in this class, I will teach you basic
technique of creating complex photo manipulations and a streamline workflow of
creating photo manipulation, you will learn some basic
drawing techniques, compositing use of
advanced Photoshop tools, masking custom brushes,
environment creation for different filters and creation of commercial graphics. The class is divided
into a few parts. Greeting inspiration,
references, idea, then collecting the sources
and secretaries and understanding of drying
in photo manipulations, 30s, creating a
composition and 40th, creating shadows and
highlights by masking. And 50s natural elements addition in detailing
of our manipulation. So let's start the class.
2. Idea Developemnt & Resources: So first thing, the
manipulation is idea. We create idea,
we've got inspired, we find the sources and then we start compositing of picture. I saw this picture and this picture given me an idea to create
something like that. But two for the other brand, like I wanted to do it for
a VR program or a map. So we will start
reading this picture and we will see what components
are in this picture. And we will collect
debt components. There are two sources from
the internet are we will shoot them and then
we will compose them. This picture, have bird, it have a basket inside. Our children is sitting
and playing again. Behind it we have birds flying and we have seen the
sky in the background. So these are the components of this picture or
this manipulation. If we want to recreate
something like that, we have to find
these components, but some additional components as valid that sports our idea. I collected some components
from the Internet. This is same bird flying. Bird flying. So we can choose the variation which
settled first. We have a basket and we
have a VR program picture, children playing a game, some row fixes to sport
The manipulation stuff. After that, we will go to the Photoshop and
slow start compositing. But first of all, we need to create and
collect these resources for us to start the word
parent, support our idea. Some resources to
collect these pictures, we can shoot them or there
are before websites like three big fixers which can
support your Shutterstock. These website can look by the stroke which you can get
free pizza as well from it.
3. Basic of drawing: The second part of class is understanding of drying
in photon and population. While doing photo manipulation, we have to focus on
two parts of prying. Number one needs shadows
and second is highlight. Highlight is a
part of object who is facing the light
directly or in the direction of
light while shadow is apart of object
opposite of the light, other side of the
light direction. We mostly represent
highlights with bright colors and
share those with dark colors and
dark tones because the highlight is the
reflecting surface due to the light facing it. We divide highlight
into two parts. Main highlight and the
middle don't highlight same. We divide shadow into two parts, main shadow and mid-tone shadow. Whenever we are doing
photo manipulations, we have to focus on shadows and highlights because focusing
on shadows and highlights, it gives our photo manipulation
more realistic effect. Head out. I am going to share
with you some examples how we can practically use
the shadows and highlights. In this example, our
highlight is on the direction of light source and shadows on the opposite direction
of light source. And we can see how we
can use the shadow as a guide and shadow on
the contact with ground, as well as how we can use
soft shadow and shadow edges. We have to focus these rules, these points in our
photo manipulation. It will help us and provide our manipulation
realistic effect.
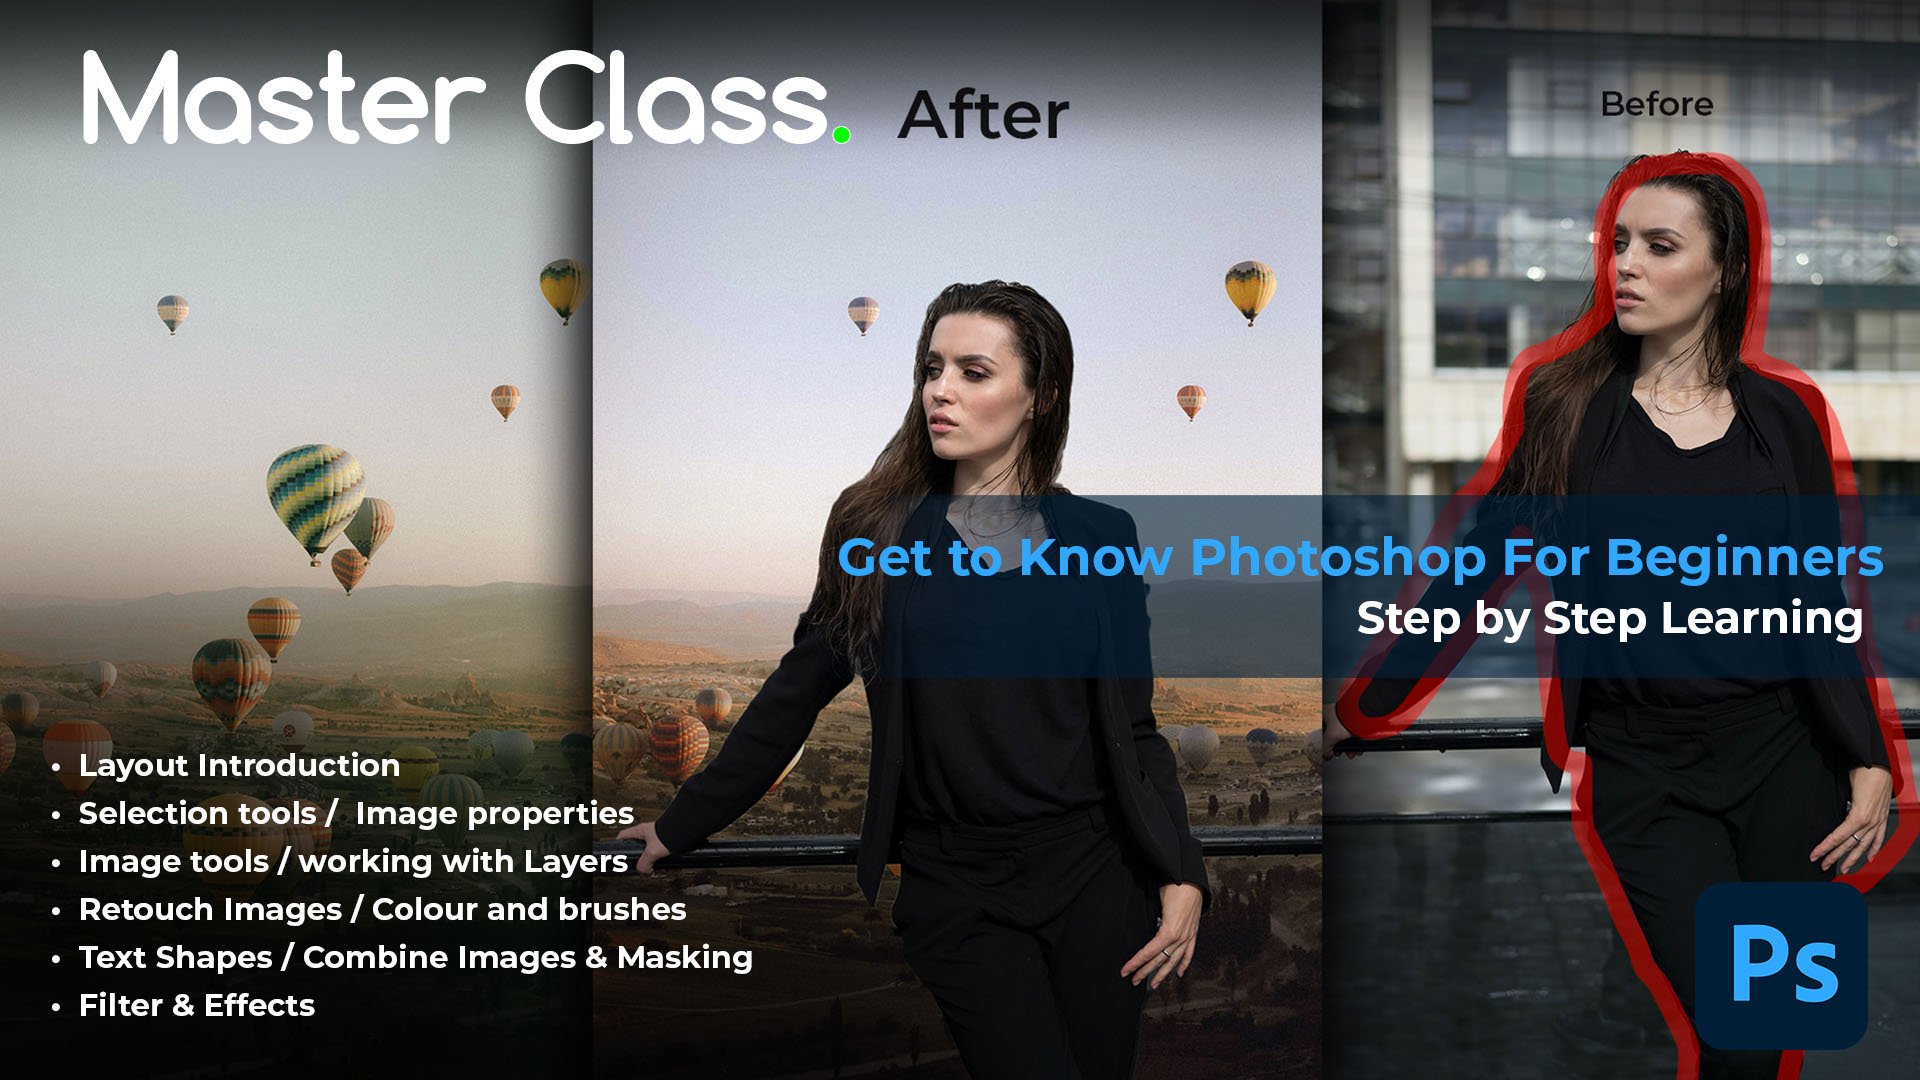
4. Compositing: First of all, to
start compositing, we will open our main file, which is VD, and we will
open it in Photoshop. I already opened it. And then we will
start tracing out debarred so we can separate
the bird from background. We will select
Polygonal Lasso tool and start making the selection. You can take your time and zooming the immediate
start selecting slowly. You can achieve all
the birds details. There's a time taking process, so it will take some time to create the selection of bird. I already created a selection, so we will Layer via
Copy the selection. And here is our selection. We can separate it from
the background and then we will need a
background for the board. We will use the sky
background we have here. Will upload it on Photoshop. Selected. Besides it, we need to do
little bit of lighter. We need a little
lighter background, so we'll just lower its opacity. And behind it we will
create a white layer, so it gives a brighter look. After that, we will add starting our elements for the
further manipulation, we need a basket over the bird, will put it on the bird. Also, we need to, we need to, we need to lower the position
of word just a little. And then we will resize the basket so it looks
the exact proportions and relatability
with the picture like moss and weird
and visual ratio. So it doesn't look FEC. Then we will remove
the handles of basket because we don't need
the various zones. That requirement of our four, what kind of manipulation
we are doing, which purposes we are
doing. After that? We will open the fixture
of children playing. Game. Head is I am telling you a shortcut for
the selection. We can go to a select panel and then we will select subject. It will automatically,
automatically select our subject very quickly
and we can separate it. Here is our subject selected. We can use Quick Selection tool to refine our
selection little bit. We can use Alt tool to unselect
the unwanted areas and after that layer work or B and leave the
original layer and we have the child size it, and we will flip it horizontally
just a little bit soon. Then we will resize it to
look just a little bit. After that to do give a look to the children
is inside the basket. We will select layer and
create a layer mask, and we will hide it all. After that, we will select the brush tool and
start creating the selecting the mask once where we need to
get that child visible. We will select white color. The mosque will
start a building. Yes. Now it's so much better. The child is looking
inside the basket. After that, we need to
add some elements like, we need to add rope that will
bind the basket with birds. So it will look
realistic approach. We will select the select Quick Selection
command G shortcut to separate the layer
from original layer. And then we will resize it
according to our requirement. Then we will resize it. Find. Then we will Command T
and select the wrap tool. And with the rep tool week, we will give it a little bands. So it gives a realistic
look and feel. Like it's originally bended. Then we will copy this layer. The other side of
basket as well. We will erase it from
there Towards grams. So let's look at some of
the other side of broad. Similarly, we will do same thing with the side of the bus, cute, but we will duplicate the layer by selecting
the Alt key. We can duplicate it by
going through the Layer. Duplicate, Layer. Duplicate, then select it. And we'll read it
according to needs. Same we need to draw
from behind the side. Then we will raise
unwanted ADL focus. So far, we developed our
composition and style, but there is no shadows, no fire liars, No detailing.
5. Shadows & highlights: For creating the shadows. This way is very
easy and quick way. And this way gives us a
margin to get to the legs, or it gives us a margin to change the
shadow and highlight layers. If something goes wrong. What we will do, we will garner mosque and lower it down and it will
be shared those. But then we will
hide all the mosque. We will hide it all
by just selecting the background color and
creating mosque called black. After that, we will
select the brush tool. Lauded size a little bit, and we will start creating dark shadows,
are full shadows. It is the part where we
have very little light, dog, very good positive
direction of the light. A very realistic look and field. After that, we will load
some more best T for MIT, the mid-tones of shadow. We start computing
wider range of shadows. Everything there light
is not reaching or shadows like the backside of y. After dad, we will do
same and we will create another mask and we will rise the Karl Marx and
increase it highlights. And then we will adjust black older Lamarck
so it will hide all. And we will just increase the areas
where the light is directly touching the surface. Like the upper area of genes. The head off the
edges of things. We will correct. Playing with the
shadows and highlights. It takes time to create
shadows and highlights. The more time we will give
them more realistic look. It will give us girls marks
our overall on the plane. And if we do something out of
our object, it will impact. So we need to take
precautions if we do it. We need to unhide it for it, we will just use the
black color and brush it over the required area and with the full opacity
and it will hide down. These are the basic technique
for shadows and highlights. After that, we will start
detailing of the illustration. In the detailing look, we need to smooth,
smooth out some, some corners of the
will select the white and a little bit of feather will clear it to do. After Dad, we need to detail this illustration
a little bit more. We will add some elements. We need to blow,
blow to the sky, will duplicate the layer of sky. Go to the filter. We will select Gaussian Blur. I'll tell a bootleg
3.6%, it's perfect. Then the picture is in motion. We need to give a little bit of blur effect
to the board as well. We will create the
duplicate layer of bird, and we will go to
the Filters again, go to the blurred
Gaussian, blurred. Enabler. We'll give it a little bit of motion blur and it
will give start giving the effect of moving
fixture in the motion. We will keep this layer
behind our original picture, regional Bert, Bert earlier. So it will, it will
not mix too much, but give a decent amount
of effect to create. After that, we can split
this fact as value with the children picture as well. And we can try if it looks
some sort of effect and do it, do something realistic
approach with this, it is getting a little
realistic approach to our last session, so we will keep it. After that. We'd need to add some stamp brushes already in my Photoshop for the sky. I will put some custom
brushes for you as well in the project resources
so you can download it and easily install
it by just clicking on the icon and it will start installing and
you can enjoy using it. After selecting the
brush, Sky brush, we will start painting it. Just increased among sky, little bit lower
in the sky size. Start giving all about experimenting
and styling. We have different style of sky. This one would be perfect. Some parts. Previous guy. By using Smooth tool, we will add this globe as well. It started getting very, very realistic and very professionally commercial
approach to our artwork. After detailing, we will do the final touches
like playing with overall curves of the picture and highlights
of the picture. Then we can pretty much our
manipulation is complete. This is very basic and very streamline workflow of creating any type
of manipulation. We need to. When you to focus on shadows, we need to focus on highlights and the understanding of drying. The more we understand
the drying, the more realistic share and professional manipulation
we will create. After that, we will just design it according
to our requirement. We will use some text to
create it into poster. We can just use
it as an artwork. It depends on our requirements.
6. Extra elements: We will try to add
some extra elements that will make our
manipulation more realistic. For example, we will add flank load on the
shoulder of our children. The manipulation, just a
little bit of scaling. We will resize it
a little bit so it fits the shoulder of our figure. Yes, a little bit more precise. The more we focus on it, the more realistic it will look. Just do more rotation
and that little bit of sizing is looking
perfect right now. Almost perfect here. We will add the layer mask, reveal the real Mars, and we would remove the
layer mask from the front of our children so the flank loads looks flying
and behind the in children. It will look more and more realistic feeling
our illustration, we will use a hard brush to
it really cleared the edges. Shall feed. We will lower some opacity so we can clear the edges
very carefully. Look more realistic, and then we will change our
best to the 100%. Yeah, I think it's
looking perfect. Zoom in and try to check
the rotation and angle. Just a little bit too. I think it's perfect.
Then we will try to add any other extra
element which is vertical. But before that, I think we need to play with the
levels a little bit. It would look more with the
theme of our manipulation. The word I have a
image of a bird. Multiply it, so it would look like on our image and
resize it accordingly. Then it is the background with magically and lower the opacity. So it will look so
close to our bird, but behind the scene
in the background. And try to reduce some birds. I think, into full
number of birds that perfect increase
the opacity again. Then I will increase our best to or further
there as well. It is some birds
from that group. I think was used to land. Software is to use
our brush opacity to almost a 100% and the
opacity will be around 20%. So it will look up. Some birds are fair,
they are far away, and some birds are closed. They add more clear. It will look more realistic. I think it's looking
perfect now. Yes. We will save our power
station is finalized now. I will save the file.
7. Class project: This is the result of our photo manipulation
for the class project, you have to create your own photo manipulation
with your own idea by following the
steps I described you in the tutorial
or in the lesson. You have to follow,
first of all, creating the idea
and then you have to collect the resources
and then composition, then playing with shadows and highlights and
then detailing. After Dad, when you
finalize your project, submit it in the project section so I can have a
look and feedback. You and other students as well. Feedback and comments
do for the growth. And if you guys have any
questions regarding the lesson, you can also asked me
in the project section.
 M Amir Naseem, Graphic Designer / Creative Director