Transcripts
1. Intro: Hi everyone. I am Michael and I am a brand identity designer and a 3D. Adobe Dimension has been very helpful to be in bringing my designs to life. Using high-quality and photorealistic 3D mock-ups. Mock-ups are a great tool for graphic designers as it allows us to visualize our design concepts without having to produce it physically. 3d has never been this easy. Adobe they mentioned allows even those without prior experience with 3D to create really amazing renders. This course will walk you through the creation of a 3D mock-ups for brand identity projects while understanding the basic tools of adobe Dimension, will, by the end of this course, you will have the basic understanding of Adobe Dimensions interface and be able to start creating awesome looking mock-ups for your branding projects. We have downloadable resources available for you so you can follow along. And I highly suggest that you post your work in the project section below. So without further ado, let's proceed with our first lesson.
2. Exploring the Interface: So when you open that I mentioned, you will be greeted by this welcome page. So you can explore their collections online. They also have a learning section, as well as a recent tab. So we have two buttons here. So you can create a new document and also open either you mentioned file and saved on your computer. Let's hit Create New. And this will bring us to our 3D workspace. So let's have a quick overview of the interface of adobe Dimension. So let's start by talking about the one here on the middle. So this is stir crazy Canvas. So this is your main workspace. We have here on the upper left, the day mention with the Canvas. When you click that, you can also change the property of your best bet going here, we are properties since to put this on Instagram. So I'll change the canvas size to a square. So I'll change the height to 1024. The resolution 72 would work just fine for now. But if there's something that you want to be printed, you can adjust this to a higher resolution, say 300. And then down here you can toggle on and off the grid. Of course we want this on because this will serve as our guide as we do our project. So right now you can see that the canvas is not fitting our screen. So what you can do is there's a drop down here. You just select canvas. So on the right side is the scene panel. So this is where all the elements can be found. So we have here the environment, also the camera. So if we drag an asset, you can see that it was added to our scene panel. In the scene panel, you can also see the parts that make up a specific asset. And when you click this arrow on the right, you can see all the materials and all the textures that define the look of your asset. On the far left is your toolbar. So we have there a Select tool. We also have some tools that you can use to move the camera. And also we have tools here that you can use to move the canvas. Beside the toolbar is your starter assets panel. So Adobe they mentioned already has some pre-loaded stuff for branding projects. We have here a coffee cup, we have some soda cans. You also have a foot bag. And down below they are assets here that you can use for cosmetics, skincare, branding. We have here very organic materials like light, OK. We also have metals like brass, even glass material. And lastly, there are also materials for liquid, like beer or olive oil. Next theorem at the URL is your lighting. So these are different options that you can use to change the mood. And up here are directional lights. So basically they function as additional light source that you can simply drag. The exterior lighting are your images or you can use as a background. Or you can drag images to layer onto your object like this. In the succeeding lessons, we will dig deeper into these different features of a dimension. So don't worry if it's too overwhelming at this point. In my opinion, the best way to learn they mentioned is to actually do some projects where I discuss speakers. So for the next video, we'll jump right away to doing our first branding mockup.
3. Understanding Basic Dimension Tools Pt 1: All right, so for this section, we will be diving deeper into the basic tools of adobe Dimension while working on a 3D mock-up project for a coffee brand. So another way that you can create a document is to click this ellipsis. This will allow you to have access to the Canvas size and resolution. So the canvas size is a square and we'll have the resolution of 72. Hit Create. Okay, so far our coffee mock up. Let's start by. Let's Plays a coffee bag. Let's drag that in our workspace. What makes adobe Dimension different is that we are actually working exclusively on three dimensions, meaning that there will be three axes involved. So we have here the red, which is the x-axis, we have the green one, which is the y-axis, and then the blue one, which is the z-axis. So each object that you put on the scene will have this gizmo. So using this gizmo, there are three ways that we can work with this object. So we have the arrow, which is the move tool. So you can move it on x, y, and the z. So the next one is the rotate tool, indicated by the circle icon. So again, you can move in different axes, the x and y. And then lastly, you can also scale using this square icon. So scale it on one direction. In x, in Z. So similar to other Adobe softwares, it is possible for us to scale this object uniformly in all directions. And that's by using the Shift or by holding your shift. So when we hold Shift, as you can see, we maintain the proportion of our object and scale it uniformly. So while this gets small enough, for most instances, we can actually work on this. Tools separate. And we can do that by holding the select tool. And then in here we have the Move Tool, which is letter E, Rotate tool, which is the hotkeys are and then the scale tool, which is S. O. Let's go to the Move tool. So it's important for us to get used to the different keys that we would work with complex scenes. It is very easy for us to maneuver or to work around a. So I'm going to hit letter e. So as you can see, we have here another option which we can move our object on two axes at the same time. So it's moving on a single plane. Same as this one. And this one as well. Okay, so let's go to Scale Tool. So this one will allow us to scale on two axes at the same time. While the rotate tool. Again, you can rotate on one axis, but if you hold down an area inside the sphere, you can actually rotate freely on whatever direction that you want. So there will be instances that these specific tools can be very helpful. But I'm gonna go back to the default gizmos by hitting V, a keyboard. So if you happen to mess up the location, the rotation, and the scale of your object. The undo button also works in Adobe Dimensions, and it's the same hotkey with other Adobe software, which is Control Z. If there will be instances like this where I accidentally moved the object on the y-axis and you want it to stay on the ground. There's actually a shortcut here under actions that you can use. We have here moved to ground so you can just simply click that. Okay, so let me just adjust this one based on how I like it to appear. So just like that. So right now we are pretty much just eyeballing the movement of this object. But if you want to be very specific and accurate about it, you can actually modify it using the properties panel. So in here, you can input a specific value for what that position, scale and rotation. Or instead of just placing a value, you get. Drag this one. Again, Let's move to ground. And similar to holding the Shift button and there is an option for us to constrain our proportion. So to scale uniformly, we can just hold down Shift which is easier. And then up here is the pivot. So basically this is where you want a gizmo to be. There will be instances where putting it the center will be very helpful. For this one. I'll keep it at the bottom. So just a recap. Again. The arrow is to move your object. The circle is to rotate. Square is to scale or down Shift to scale uniformly. We have here under the Select tool, the specific tools we have move, rotate, and scale. And we have here the properties panel if we want to be more accurate with the way we work with our object.
4. Understanding Basic Dimension Tools Pt 2: Okay, so this part of the class is all about navigating the 3D workspace. So in dimension, there are three camera tools that you can use. And you can find these three tools in the toolbar. So we have here the orbit tool, the pen tool, and also the dolly tool. Okay, so let's start with RPA tool. So the orbit tool can be accessed by hitting this icon. Alternatively, you can use the number 1 and also the right mouse button to access the arbitrary. So this tool allows you to move around above. So move below your object or the 3D scene. And I think the best analogy that you can think of is that you can think this as like a satellite orbiting the Earth. So basically you can see all angles. Then the next tool is the pen tool. You can access this using to our space plus right mouse button. So basically, the best way to demonstrate is if I move this object. So let me go back to orbit tool. Say I move this along the x. So if I just use the orbit tool, it's very hard for me to go back to the object. But if I have the pen tool, I can assess using NumPy to this allows me to move left or right or up or down, but I am constrained to a specific viewing plane. So again, left, right? Well, so that's the reason why the icon is that one. Again, I'm constrained to a specific view plane. I can not see the back of the coffee bag. Okay, so let's move the coffee bag back to the rich. Do you span two? And then the last tool is the dolly tool or can access that seeing three or shift space, right mouse button. So this is very easy to explain. It's basically just zooming in, zooming out. As you can see, the way you are viewing the object doesn't change. It's just that you're moving closer and also moving farther from check. Okay, so if you ever mess up your view, for example, if I want this specific view, but I accidentally moved it to another angle. Please take note that the control z function won't work in this case. So control Z only works on assets and also materials in our scene. However, when we are with the camera angle, what you can do is it this camera and do it, we'll go back to that specific angle. But if you change your mind and you realize that the previous angle works much better, you can always redo. But one of the best ways, say for example, you've already found the best angle for you is to save your scene. Or a save that camera angle, or more specifically, use the camera bookmark. So using the camera bookmark, you can lock. So you can save that angle C if that view and return to it later. So I'm going to save this one. I'm going to bookmark. And let's deem this as C1. So when I orbit around the object or use the pen tool, you can always go back to that specific viewing angle. So I want to adjust our coffee bag. This view. Zoom in a little bit and use the pen tool. And the center there. Let's say that this is a better angle than the previous one. So we have two options. You can save this as another scene, but you can also update seen one. So if I click this, it will overwrite the previews bookmark. Again, if we our view and go back to that bookmark. So again, just to recap, we have number 1, 4 orbit tool, turret data object. We have numbered to the pen tool to view on a specific viewing angle and to move on right directions. And then number three, which is the dolly tool, to zoom in and zoom out. Actually, you can also access this using the middle mouse scroll.
5. Working with Multiple Assets: Okay, So since this is a coffee branding, I'm gonna pull up a coffee cup that I will add to our scene. So again, you can do that by dragging your coffee cup. So for this one, I intentionally placed at far because I'm going to teach you another tool that you can use in their mentioned. There will be instances that you have to make a duplicate of an object. So to do that, you can go here that will create a copy of the coffee cup. Or there's also another way to do that. So let me just undo that. And what you can do is the classic copy paste method. So in our scene, I can just click Control C to copy and then use control V to paste it and make another copy of that. Okay, so let's scale this down a bit. So this will be our small cup. Maybe use our scale tool. And since we are tight on space, you can use your Dolly tool or scroll down to zoom out and use our pen tool to put it in the center. Also, one of the best practices, as it is with other softwares, is to rename your assets in the scene. In this becomes very important once you have assets in your scene. It really helps if we get organized at this point. So this one, I can rename to smaller cup. And then this one too big coffee cup. Just to make it easy to recognize. What I'm going to do is to move this to the side a bit and use our orbit tool to adjust our view. If in case you place your coffee cup too far away from our coffee bag, which is the same case as this one. Of course, we can do this using our gizmo to place it closer to our camera. But there is a tool that you can use to align multiple objects in your scene. So right now the big coffee cup is selected. But what you can do is to select both the bag and big coffee cup. You seeing a selection box will create a box to select both. Or another way to do it is to select one. And then by holding Shift, you can select the other one. Using my orbit tool. I will adjust the view so you can see better what will happen. Both of them selected, go to Actions and then click Align and Distribute. When you click this button, the alignment guides will appear. So we have guides for different axes. So I want them to align on the same line as the coffee bag. But what you can do is click this Elaine max Z. As you can see, you can align your objects at the far end. And you can also align them at the center, like this one. To try on different axes. Let's go back a few steps. So this can be very helpful, especially when you have multiple objects in the scene. Also try selecting the three items. Then again clicking the align button. You can then center aligned. Using this. Also, distribute them equally. There are spaces between each other, so you can do that by using this rectangular bar. We have distributed it along x and you can use this one, just drag it to the left or right. The spaces between the objects distributed equally. Now let's use our tools to find a great angle for our objects. If we make a front view. Also, if you are dealing with multiple objects and say one of them is too far away from the camera view. Of course, you can use your pen tool, your orbit tool, to capture all of the objects on the same view. But another thing that you can do is using the frame selection. I can, I'm going to go back just to demonstrate. Okay, So if we use this button here, which is the frame selection. As you can see, it created a view where we can see all assets fitted in one viewing angle. Let's say you just want to create a frame for just the small cup. What you can do is long press or hold this one. And then it frame selection. That will create a view for this object alone. Again, if we want to capture all the objects, just click this one. I'm going to click V and use my arrow to move this back. Again, use my number two and tool to move this one orbit tool to adjust. Maybe this is a good time to bookmark because I'm liking how it looks. Let's name it. Front view. Zoom in a bit, and then update the bookmark. Also, if you change your mind and decided that you don't want the small cup to go into the scene. You can delete that using this trash can icon. Or you can simply hit the delete key in your keyboard in case you don't want to delete, but you just want to hide it from the view. What you can do is select your object and go to the scene panel. And then on the right side there is an icon that you can use to hide or show your asset.
6. Adding Materials: This section is where we bring life to our scene. The previous lessons are important steps so you can work comfortably. But this section will let you see the true potential of adobe Dimension. So let's start by designing the coffee cups. As you can see in our scene panel, the coffee cups are in a folder. So to access the individual parts, you can just click on the folder icon and then it will show you all the material. All the assets are all the parts which comprise the small cup, cup and the lip. So we have here, Let's start with the big cup. So if you click the cup, or if you click this arrow here or this icon here, this will bring you to the materials panel. So this model already has an associated material to it, which is the cup material. Its base color is somewhat gray, but you can change this to just a plain color. Say, red. Can use this one to adjust the color. Aside from this slider, you can also use RGB values, or you can go to a different color mode and then input the values. Well, let me just get my brand colors. I actually have a hex code here. Then let's change this to hex in input, this value, air. Then when we go back to our material, play around with the properties we have here. The opacity. Of course, when we slide this to a lower value, it becomes more transparent. When a 100 percent is completely opaque and low opacity is perfect for things like bless. You also have the roughness which determines how shiny or Matt your material is. If you go down, it becomes very so you can see it's very shiny and it reflects light. Then if you go up, becomes perfectly met. Of course, the best way to show that is to get a preview of how the render would look like to. You can do that by clicking this button, since the show render preview button. So if you click this, as you can see, it shows us a preview of how the render would look like. You toggle this on it will show you a very realistic preview with all the interaction with the lights and the interaction of a material with another object. So you can see here are a reflection of the small coffee cup. And you can see here properly the effect of roughness. So this is Matt, this being very shiny. As you can see, if we try to adjust the property, it starts off as very grainy and then it slowly building a better PV of the scene. So it does this every time you make a specific adjustment on the camera view or in the materials. Going back there, other things that you can play around in the properties panel. You have the metallic and also the glow if you want it to be a glowing material. In this one actually extends more than 100%. So going as far as when 1000% can give you hi allele luminous material, almost like glow stick. But let's bring this back to their original setting. Maybe adjust the roughness somewhere around 40 percent. Another way to add materials is by going to our starter assets. So next to our models are the materials. And if you're doing something like tree, the abstract art, you can go crazy with the materials. You can use. Brushed iron, brass comment. I, o. For the purpose of this tutorial, I'm going to use an appropriate material. So maybe let's try this glossy paper. As you may have noticed, the properties here is slightly different from the previous parameters. So now we have roughness variation. Also have a parameter or a slider for green intensity. Going to increase that to one is to give some details. And this is the case to some of the materials in adobe Dimension. So for example, if I go to my small cup and then change this to this material. You can see we have more sliders to play around. We have thickness. But let's go back. I'm going back to my big coffee cup. Adjust the roughness is variation. Then again, let's use our brand colors. I'll also change the color of the lid. It is also possible to link materials, say this small cup, we want it to have the same material settings as the big cup. What I can do is go to my small cup and then use this sampler tool or the material of the big cup. We will copy the material. Same for the lid. Let's do that. So now that we've linked the materials together, any modifications or changes that you will do to this material. It will also copy and also effect my other objects that are linked to it. So for example, if you change the color, this small cup also becomes purple. Well, let's go back. But in case you decided that they have to behave different, say you want this to be white. And then you already linkedin material. You can always go back and then click this Bricklin. So when we change, this becomes a separate or it behaves separate. Let's also work on our coffee bag. May be rotated a little. So right now our material is paper, round paper. But I want this to be elastic. So let's click another material. Now restart their assets. Will change it the plastic and I went to the same color as my cup. Right now it's looking very shiny for my liking. Maybe I just the roughness somewhere to this value. More or less matte finish to a plastic. Let's also try to adjust the metallic to see if that helps. And then lastly, let's adjust the rotation of this bag.
7. Placing Graphics: Okay, so now let's put our logo on to our coffee cup. Let's go to our big cup. Go to our materials and their actions. We have here, place graphic on model, so we can click that. And then this will allow us to browse our files. And in the class resources, you have a logo and a label design sample that you can use for this project. So I'm going to open that right now. The placement of the logo is looking really great. Now you have an option to scale this. So similar to our selection gets more. You can hold down Shift to scale this down and scale this up. When you're not holding Shift. It will scale all the on a specific direction event. Again, you can use your scale in the properties to scale this accurately. So again, the square icon is for scale. And this circle icon similar to our selection, this is also for rotation, so you can rotate that. And it also you can adjust the opacity. Ccs I go down it blends or with the background. Okay, so let's do that with a small cup as well. I'm gonna go here, go to COP. Again. Let's place graphic. Okay, so right now it's looking a little bit stretched on these axes. So we can try to adjust that. And by the way, you can simply drag this is more so you can change the position, the logo. So right now I'm pretty much just eyeballing a logo, maybe a little. But you can always use this properties panel to adjust it accurately. In the properties. And under placement we have here two options. One is D and one is Phil. So d tau is basically placing your graphics onto your object, similar to what we just did. On the other hand, will basically make your object cover the entire surface selected. So let's try that for this small cop going fill. And then when you click Fill will be another drop-down button here. So let me adjust the scaling first. So let's scale this down. So you can see when I scale this down further, you can see that it makes multiple copies of the same image. And it is doing that to cover the entire surface. Right now it's looking like a really cool pattern. And also you can still adjust the positioning. Oops, sorry. Well, let's zoom in. And then you can use this one. You can just drag to the correct or the position that you want. And then let's go back to our camera bookmark and view. Okay, so right now it's looking like a really cool pattern. But what I want to do is somehow have this blend with the background. So I'm playing with the opacity may be adjusted to 20 percent. You can just simply value here. Now we've actually used the graphic to make the background more interesting. So what you can do is, again, can place another graphic, the same logo. Adjust this. So now we have our logo on top of the graphics pattern that we just made. I'd like to mention though, that the materials here behave similar to layers in Photoshop. So the one on the top will cover basically the one below it. So just to demonstrate that clearly, let's go to our start their assets. If we go here to our images, Let's use this purpose stars. Let's put that as a material which you can do by dragging it. And by the way, if you want to use that as a material, you really have to drag the image like this one. Because if we just click it, it will be considered as a background. So you really have to drag that to your small cup. So back here in our materials, you can see that if we change the position, a logo with respect to the graphics, to rate now it's up. But if we place this, the graphics, the Star graphics covered the surface since it is on top. So that's how this panel behaves. I'm going to delete this. Okay, Let's go back to our big cup. A pattern as swell or this one, I'm going to use an image from the starter assets. Let's try this dash S. And let's drag that, change the position with respect to the logo. Let's change this to fill. And then let's scale this down. It's changed the opacity. Let's try to change the positioning. Let's also work on our coffee bag. And in your resources you have here I labeled design that you can use. Again, let's drag this to change the position. Let's use the square. Do change the scale. I'm going to use my orbit tool to change the view for now so I can see if I placed it correctly. Right now I'm just eyeballing to find the perfect spot for this label. Somewhere at the center. Okay, let's use our camera bookmark to go back to the front view. Let's also add a pattern background. You can do that by dragging the image again. But another option is to go to our big coffee cup. In this case, the Control C and Control V. With work. It will get the values for the properties. But you have to change back to Phil. And again, let's place the graphics, the label, front of the pattern. Let's click the render preview to see how it looks right now. And now we have our brand assets with our logo and our label.
8. Editing Graphics in Photoshop: So this section will just be a short one. But I just want to show you how to edit graphics in Photoshop and have it automatically adjust in a dimension. Okay, so let's work with our small cup so I can show you how it works. So going back to our cup, we can pull here an image from the starter assets. I'm using this bulk adapts. Again, adjust that. And Adobe they mentioned actually has a built-in feature that allows you to edit graphics. So here in your Properties and their image, click this one, and then click this pencil icon. And this will open in Photoshop. And now that you're here, you can do all sorts of good stuff that you can do with Photoshop. As an example, you can go to your image. Or maybe you can use this one, adjust the UN saturation. So you can do this to change the color or the background of the pattern. And also you can go to Filter. Click this layer, then go to filter. And you can actually use liquefy. You can mess with the pattern. You get more abstract. Click Control S to save. And when we go back to the mentioned, you can see that it adjusts automatically. So somehow it functions like a Smart Object. So you can play around with all the images here, the gradients and the patterns. And also you can use your own image and then edit that in Photoshop. So that's it for this section. For the next part, we'll add background and also lights. So I'll delete this for now.
9. Adding Background: Okay, so let's work on our background. But before that, let me adjust. The view. Doesn't look centered right now. Again, I can go back to my camera bookmark and update the front view using this icon. So to change the background, you can go here to the environment. And under environment, we have here background in the Properties panel. Now, we have a lot of choices for that background. Now first one, of course, if you click this plus, we can simply use a solid color for our background. So maybe let's use light-blue color. I think this color really pairs well with our brand colors. We can work on our ground plane. We can adjust the level of reflectiveness. So if we increase this, it becomes more shiny and reflective. And you can also toggle that on or off if you want. Another option for the background is again by using our starter assets. So we have here are the diagonal gradient. You can just click this. So if we click this, it will be the background of our scene. And then from here, when you click the gradient, this is looking too bright. You can adjust the opacity. And also similar to what we did before, you can use this pencil button and edit it in Photoshop if you want. Let's bring the opacity down 2.2 K. So that looks good. But just to show you the full range of possibilities with dimension, you can change this to one of the backgrounds here. Maybe use this table, or maybe let's use this one. And then let's increase the opacity back to one. So right now, our models don't really match the scene. But you can use or you can manually adjust that using your 123 tools, your camera tools, and use the pen tool to adjust that. But Adobe they mentioned, has really made it easy for you to match your image with the background. So we have here under actions, match image. And so this one is a feature to match the lighting as well as the perspective of the scene. So we have here different parameters. We have here the canvas size, the lights in the perspective. So I'm going to uncheck the resize Canvas just so we retain the resolution or the image psi or the canvas size. So we have here create lights and camera perspective. So see what happens when I click. Okay. We'll load for a while. And as you can see right now, it automatically adjusts. And this is very cool. Because right now it's looking as if our models are really placed on this table. And if you go back to environment, it also added some directional light, just so it can adapt to the lighting of the background. Let's also go back to match image. Maybe we should be resizing the canvas so it fits nicely. Now our background. So we can use our tool. We can use V and then select all mandalas and then use the square one to scale this up a bit.
10. Working with Lights: Right now it's looking really nice. Our assets are blending well with the background. If you're not happy with the lighting, you can of course, modify that. We have here, our under environment, we have environment light. And in the properties you can adjust the intensity. What to make it brighter or dimmer. You can do that here. And also the way that the light hits our objects. So you can do that using rotation. So as you can see, the reflection changes when I do this. You can also use this color eyes. You can click the check box and change the color. Maybe use yellow. You can also change that temperature. Warmer or cooler one. Maybe let's make it or armor to give it a coffee shop feel. So you can use this to give personality to your mockups. In the starter assets, you have more options for environment lights. So you can play around with all of the settings here, depending on what works for your scene. We have here standard studio lighting. We have here a very colorful and artificial light effect like this one. We also have here outdoors, have sun rice, our road lighting. And up here we have directional lights. So for those of you who are familiar with photography terms, this is where you can add a three-point lighting. So these three are single source, but we have here a three-point lighting. So when you click this, the environment will automatically adjust. So we have here the key light, the fill light at the back leg. So this individual light sources, you can adjust them, can adjust the intensity. And also similar to the environment light, you can adjust the rotation. And an additional option here is to adjust the height. So you can see the effect of the slider to their reflection. Feel free to play around with the properties. I think the settings that we have here right now, it looks really good. So in the next video, we'll finally render our scene and do the finishing touches.
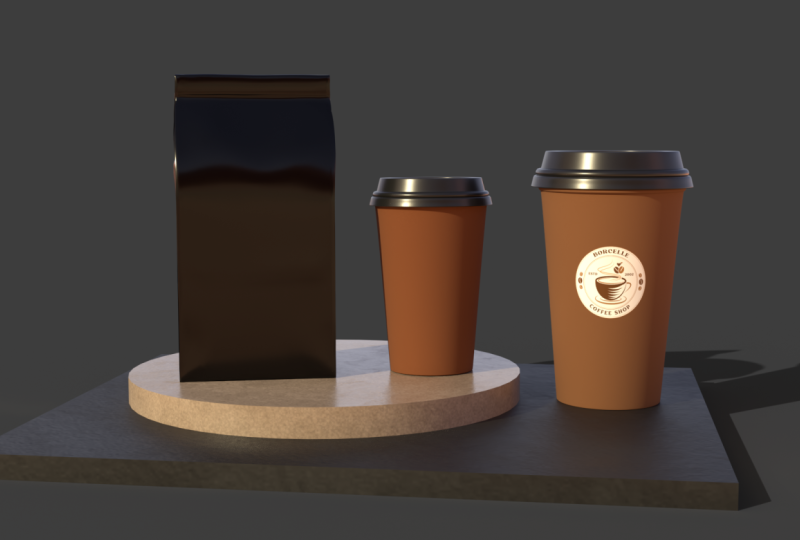
11. Rendering: Now it's time for us to finally to render our image. But before that, let me just move this a bit. So in the previous videos, we've been working on this Design tab. But if we want to render our image, we must go to this render tab. Okay, so this one gives us an explanation of what rendering is. So rendering is how they mentioned there's your design into a final image. Take some time to calculate all the lights, shadows, and photo-real effects. But more importantly, we must go here in our Render Settings. So you have here an option on what view you want to render. So we have here a current view. Your camera bookmarks will also show here. So as you can see, we have here the front view. We saved a while ago. But let's use the current view. And then also you can change the file name of your render. This works fine. We have here the quality of the final render. So you have three options here. Have low, medium, and high. Of course, the low-quality will render faster than high-quality. Usually a choose low if I want to see a quick preview of the final render. But if it's something that I will be posting online or turning over and change the setting to a high. Right below that you have options for export formats. So you have PSD format, and you can also choose PNG. And lastly, of course, you have an option to change the destination. For the purpose of this tutorial, let's change it to medium so it renders faster. And then when you have set up your settings, you can click Render. So as you can see here, it is slowly forming the final render. And under the Settings you can see here the render status. So you can see here an estimate of the total time that it would take to render your image. And also while rendering, you can take a snapshot of the progress in case you want to show a frame by frame progress of the render and do that as well. And if you want to change something in the design, you can always cancel this. Okay, so once it's finished, it will show you this message that your render is, has finished and saved. You can also check doubt time that it took to render. And basically that's it. If you go to your destination folder, you can see the final render that you just made. So what you have right now is a really good looking and realistic Mock up for your brand. It's something that is very hard to do even in a software like Photoshop or Adobe they mentioned has really made it possible for us to come up with high-quality looking mockups like this.
12. Post-Processing: So this section is all about post-processing. So Adobe Dimension, as with any other 3D software, sometimes the output that you have may not be looking at its best, and it would be necessary to do some finishing touches. So right now I am in Photoshop and I have here the PSD render as well as the PNG render. So we can work with any of these. Two are the post-production. I usually just use the PNG version. But for the PSD version, you have more control in adjusting a specific layer. Since you have here I rendered image layer and also a background image layer. So if you want to modify just the background, you can do that here. But for this tutorial, I'm going back to the PNG version. And then I will just use some of the tools in the adjustment to give this much better looking view. Maybe increase the vibrance. So you can see the difference. Maybe increase also or change the hue and saturation a bit. Going to slide this to the left, very slightly. And then lastly, maybe I can work with levels. Change this a bit. So you can do all sorts of things for the post-production. So for example, if you have a glass material, you can add a simple below. But in most cases, the adjustment layers that you have here, the tools here works fine for it 3D mock-ups. So I usually just play around with all the tools here. So what you have here is a really beautiful and post processed 3D mock up.
13. Outro and What's Next?: So Adobe, they've mentioned, is a really great way to show your design in its best form. And I have here other examples of the projects that I did in the past. 3d mock-ups like this will really impress your clients and it will really change the way you present your branding projects. So the question now is, what's next? I highly encourage you to post your projects in the project section below. You can use the resources that I provided. Or if you have your own projects, you can do that as well. You can also add this as part of your portfolio, or you can post this on Instagram. Thank you for joining me on this Skillshare class. And I'll see you around.
 Michael Lubrin, Graphic Designer & 3D Artist