Transcripts
1. Intro to Affinity Designer Quick Repeat Patterns Using Symbols: Hi guys and welcome. My name is Dolores
aspirin and I'm coming to you from sunny,
Manitoba, Canada. The class I'm
bringing you today is another Affinity Designer class. In this class we're going to be creating a repeating pattern using the symbols that we've created in the first
class of this series. I'm excited to show you this project because we're
also going to be setting up a template that
you'll be able to use any other pattern
design that you do. As a matter of fact,
I really encourage you to create a pattern
collection here. Take the time to use some of those symbols to make a couple
of complimentary patterns. A mini collection usually has only three or four patterns. You could do your
main hero pattern and a couple of complimentary
patterns to go with it. A lot of times these
little blender prints make your pattern design much more scalable and also really usable in
some of the mockups. So I would encourage you
to go ahead and do that. We'll talk more
about that in class. You're going to
find this first one so fascinating to create that, I think you're going to
be really smitten by the whole idea of using Affinity Designer for
your pattern design. I know I've taught you how to do pattern design in Illustrator, photoshop, in Procreate,
and now Affinity Designer. So between all of the programs, I think one of them will be your favorite and you pick
that favorite and use it. Go with whatever is
comfortable for you. All of the programs have
different possibilities, but I think you'll find
that this is one of the really fun ones to do because not only do you
see your single pattern, repeat the original tile, but you see it as it is recreated right before
your eyes in four tiles. That makes it super powerful. And I think that Affinity
Designer is definitely one of my favorites for designing repeat patterns just
for that reason. Now if you haven't
done so already, I'm going to
encourage you to hit that follow button up there. That way you'll hear about
my classes as I released them and you'll get any of the posts that I do
send out as well. I encourage you to
also add your name to the mailing list on my
website at Dolores art.ca. That way you'll get any of the posts that I
put out from there. Are you ready to get into
this pattern design? Alright, let's get to it.
2. Lesson 1 Setting Up the Repeat Artboards: Hi guys, welcome to lesson one. I think the first
thing we should do here is set off our art boards. That way you'll be able to have this repeating template that you can use over and over again. Let's get started. The first thing we need
to do for starting our pattern repeat is to
create a new document. And I'm gonna do that in pixels. So I'm gonna change
this to pixels. You can work in
inches if you'd like. What I'm going to work with
is a ten by ten documents. So in inches, It's ten by ten. In pixels, it would
be 3,000 by 3,000. So your preferences, when we do start moving things around, we either have to move them by 3,000 pixel increments
or ten inch increments. So I'm just used to doing
it 33000 by 3,000 as my base pattern document and all my math
is done that way. I'm just so used to it. So that's what I do. Now. I'm going to change my DPI or PPI here to 300 pixels per inch. Dpi is actually incorrect. It should be pixels per inch, but whatever, that's
another story. Okay, so 300 will allow us to have a
really good quality if we use any pixel-based motifs which we don't have
for this project. But it's a good, I think to
get into the habit of doing is having your resolution
nice and high. I'm going to hit Okay here. And that's going to open up my single ten by ten square here. And if we go into
art boards here, you can set up our
art board to also be ten by ten to ensure that
it is exactly ten by ten, go into your Transform palette here and you see I've
got it a little bit off, so this should be exactly 3,000. And by the way, a single click
is how you get into these. I know at first I was
double-clicking all the time and it just wouldn't open one single
click and it'll open up. We know that we've got that to the perfect ten by ten
measurement that we need. At the moment, we've got just one single art board and we've got no symbols at all. So I think the first
thing we should do is to create the other art board that we're going
to be using here. So let's go back to
the art board tool and that's found here. And let's just drag
out what looks like approximately four
times the size of that one. And of course we're
going to double-check it here so we know that
we need to have it. This is 3,000 by 3,000. So this one has to
be 6,000 by 6,000. Now if you want to
go by inches again, that was 10 ", so
this has to be 20 ". So let's go in here. This should be 6,000 by 6,000. So I know that this for sure is exactly four times the size. And the other thing
I want to do is to position this one
to this side here. When I'm doing my symbol in here on this art
board, I liked that. I can work and have
this always in view. If I have it on the other side, then a lot of times when I'm
going into my studios here, I'm obscuring the view of
that particular documents. So this is just a preference. You can decide if you may possibly want
it on the other side, if you're left-handed
or there's always a reason for the way
you set things up. Don't do it in
exactly the same way as I do if it doesn't
suit your style. So the next thing we
wanna do here now is create the object that's
going to be our symbol. So the easiest thing
for that is to create a rectangle and drag it out
to about the size there. I'm going to change
this to the 3,000. By 3,000, I am going to
remove the stroke on that. I want, I'm taking
it down to zero, but I'm also gonna go in here
and I'm going to flip that, that I know that my square has no stroke at all because
we want those four that are over here to perfectly line up
with no visible seam. If I had a stroke on it, then over here on my
repeat it, which show? Now the other thing is
I want to make sure that it's perfectly lined up. And at this point, I
might as well change it to the loops just within
the strokes here. I'm going to put my kinda
darkish brown in there. So that's no, I think it was this brown I was
using from my background, so I've got it set
up ready to go. And the only other
thing I wanna do is make sure that in
the positioning here that I've got
this at zero and zero. So now if absolutely
perfectly lined up there, you have to be careful that you don't end up moving
that one around. But that's what's going
to become our symbol. So we're going to go into
our symbols library here. You can see I was experimenting
a little bit here. I'm going to actually
delete this one because that was from that other experimental
document that I did. I want to add this
one to be a symbol. So up to the top here, add symbol from selection. And now you can see
that that is a symbol and it's been added
to my symbol library. Let me look at the layers
here so that you can see. I want to show you
a difference here. So the art board, the symbol itself has
this orange lines. So it didn't have an orange line before I
made it into a symbol. But now it has. Now the really cool
thing is that we can now take our symbol
that we created here and simply insert this and position it
where I need it to be. I'm actually going to
need four of these. So I could go ahead and pull them out of
the symbols gallery. Or I can just go up here to
duplicate and do it twice. So when you look in
the layers panel here, you'll see that I have four of them, which is what I need. Let's just follow through
with this and then we'll I do have the
amount that I need, so I've got my four. Okay. What I need to do here is to make sure that those are
all perfectly positioned. So I'm going to make sure
that first one is at zero. So the very first one, it
will be right in the corner, so it's going to be zero. And we know that one is
perfectly positioned. So let's grab this second one. And we know that
this board is 6,000, So we need this one to
be at the 3,000 mark. So let's go in and 3,000, right? And the top has to be at zero. So those two are
perfectly positioned. This one, I'm going to delete this one because I want to
show you a different method. Now, I'm going to give
you a little trick here. We're going to take and
select both of these. And you have to be past the edges to make sure that
they're both selected. We're going to
duplicate this. Now. It's duplicated it, but
they're right on top. But that's good because
we know that these are at zero and we can move these down just 3,000 and will be
perfectly positioned, right? So we're gonna go back here. Right now. We can leave the
x-coordinate to be zero. But what we want to change
is the y coordinate. And rather than put in the measurement of
3,000, Let's try this. We'll do plus 3,000. So plus means that it's
going to move this way. So I'm going to say, Okay, we now have exactly what we need for this
pattern repeats. I need to start
explaining to you how to work with the symbol
to have the repeat. And I think we can do
that in the next lesson. I'll meet you there.
3. Lesson 2 Artboards, Symbols and Layers : Hi guys, welcome to lesson two. In this lesson we're
going to be taking a look at art ports, at symbols, and at
the Layers palette. Let's get to it. I hope you've gotten a
little bit used to working here with the layers
palette because it's really the
most important part of this whole setup
for pattern design. What's important to look
at here is that we've got this one art board
within it is the symbol. And we know that
that symbol worked because whatever we
do over here changes everything on art board number
to an artboard number two has four exact duplicates
of this symbol, right? So by the way, even if you see that
little divot there or that little seam,
it is invisible. It's just, it has to show us somehow that there
are four parts. So that's the way it does it. You can always
really at anytime, click on any of the art boards and check out the positioning. And lo and behold, somehow I've moved that one. So this one needs to
be changed to zero. And I mean, it's
very possible zero. Okay. You could go through
and double-check all of them. There could be it could
have been me when I was pointing or enlarging. I think these are one is
off a little bit too. So somehow I think
I moved these tube. So 3,000 is correct for that. And we'll check
this 1.3 thousand. Okay, So these are Okay. I'm going to take place one of the symbols here, so
that first of all, I can show you how cool
this is, this repeat. And also so we can do a little
bit of a test on whether or not the symbol can
still work if it's locked. So let's just insert one
of our symbols here. Select whichever of the flowers
that you want to insert, hit Insert, and it inserts
such as randomly wherever. So you can see here
it's not working. We're definitely not
getting your repeat here. And the reason for that is
that this symbol that we just inserted is not
within this symbol. So that's what we need to do. And the way I do
it is to drag it. And when I am about halfway
down that next thumbnail, you'll see that blue
line appear there. Let go. And you can see now, as it is part of this symbol
which is repeated here, that now we have our
first symbol placed. I'm going to back this up so we can do this
experiment together. I am going to lock
this rectangle here. So you just highlight
it and go here to the layer settings
and hit Lock. And now let's insert
a symbol again. So it will insert, it
doesn't matter which one. And we can see it's not part of that symbol because
it's not repeating. We can now drag it
down into this symbol and it has worked
fine if it's locked. So I think I would
go through here now and just lock each of these to prevent us from accidentally moving
it when we don't want to. I couldn't remember whether
I had done that previously. It's been awhile since
I've set up a pattern. I guess. We can see it works. We can move around. Our flower knows that too, that you can use
the layers palette to help you with selecting. I just highlighted it
here and it moved. So you can see it's
working great. Our to appoint, getting the
repeat the way we want it. It looks like it's repeating, but one of the things that tells you that
it's not complete. What we're, what we're doing
here is not what we need is that this does not
repeat on this side. So this isn't automatic. And it's something that I'm gonna be teaching
you how to do, but it's not automatic that the repeat from side to side
and up and down happens. So you can see that it's
being cut off at the bottom. And that's typical. I mean, that's exactly
what it's supposed to happen here for some reason. Okay, there we go. So we have a problem. We need to figure out how to repeat it top and
bottom side to side. I'm going to leave this one
as my middle kind of a motif. And I'm going to go and
select and insert this one. I want to use this one
in the four corners. So you see right
now it's a problem because I don't have it
as part of my symbol. So I didn't even actually go halfway onto the symbol
to insert it and then inserted it just fine
as long as you get it within this orange area of
that main symbol. And it has to be the
one on art board one. But you can see that if I
position it here in the corner, it seems to work, but we still don't have the
repeats over here. So that means if you can
wrap your head around this, that everything we
create that overlap, that is cut off at say, on two sides, that
has to be repeated. So anything that I do on this
side has to be repeated. On this side, I would
have to duplicate it. So I'm going to do almost
the same thing as when we did those four
original squares. I am going to put that
first one in position. Then I'm going to duplicate. And you can duplicate here, or you can duplicate
in your symbols. You can also put two fingers down on the canvas
when you start, when you are duplicating
or dragging, and it will make a duplicate. So we can make this duplicate. We've kinda got it
showing on this side. The only problem is it's not necessarily
positioned right. You can see it's not lining
up perfectly, right? And then we're going to actually get that one lined up perfectly. We'll duplicate it and we'll put it in the bottom corners. So this one, think about it now, how far do we have
to have this over? And we know it is 3,000, right? So it might be just easier to
leave it in position here. So up to our three dot menu
here and hit Duplicate. You can see that it duplicated. One is right on
top of the other. And now what we wanna do is move that over to this corner here. So we need to have it selected. Then we need to go to the Transform palette and we
need to move it over 3,000. So we'd need to know the figure that we
need for moving it. And that's the exposition because it's moving
from side-to-side. So let's click on
this and we could add 3,000 and put it at 3,533.1. Or we could just simply
use the plus sign here and type in plus 3,000 and
it has duplicated it for us. So now we can see that this is perfect for a repeat because we can see
it now on this side. Now we can do the
same thing again. So let's get back to that
original hit Duplicate. We're going to go back
into the transform studio. And here we're
going to take the y coordinate and add 3,000. But just wait, why don't we do that with
the both of them. So I'm going to duplicate
this one as well. So let me go back to my layers that the last one
that we created, I'm going to go to duplicate. And now I'm going to hold down one finger on the screen and
that selects both of them. We know that they're
at the duplicates. So we can now go into
the transform studio, go to the y-coordinate
and put in plus 3,000. And we've created our
first pattern repeat. So I think this one is
going to be super cute. The neat thing about it is, you know, at this
point you could, and you notice here, as long
as I'm double-clicking, I'm working my way down. When I first selected, it, selected the entire thing. But if I drill down on it by
continuing to double-click, I can get the rest of my motif
that I'm after this one. I don't know why, but it
doesn't seem like it's grouped. I'm going to select both
of them and go into the Layers palette
here and hit group. So now I can move
this one and I can see exactly what's happening
in here as I'm doing it. But honestly now we've
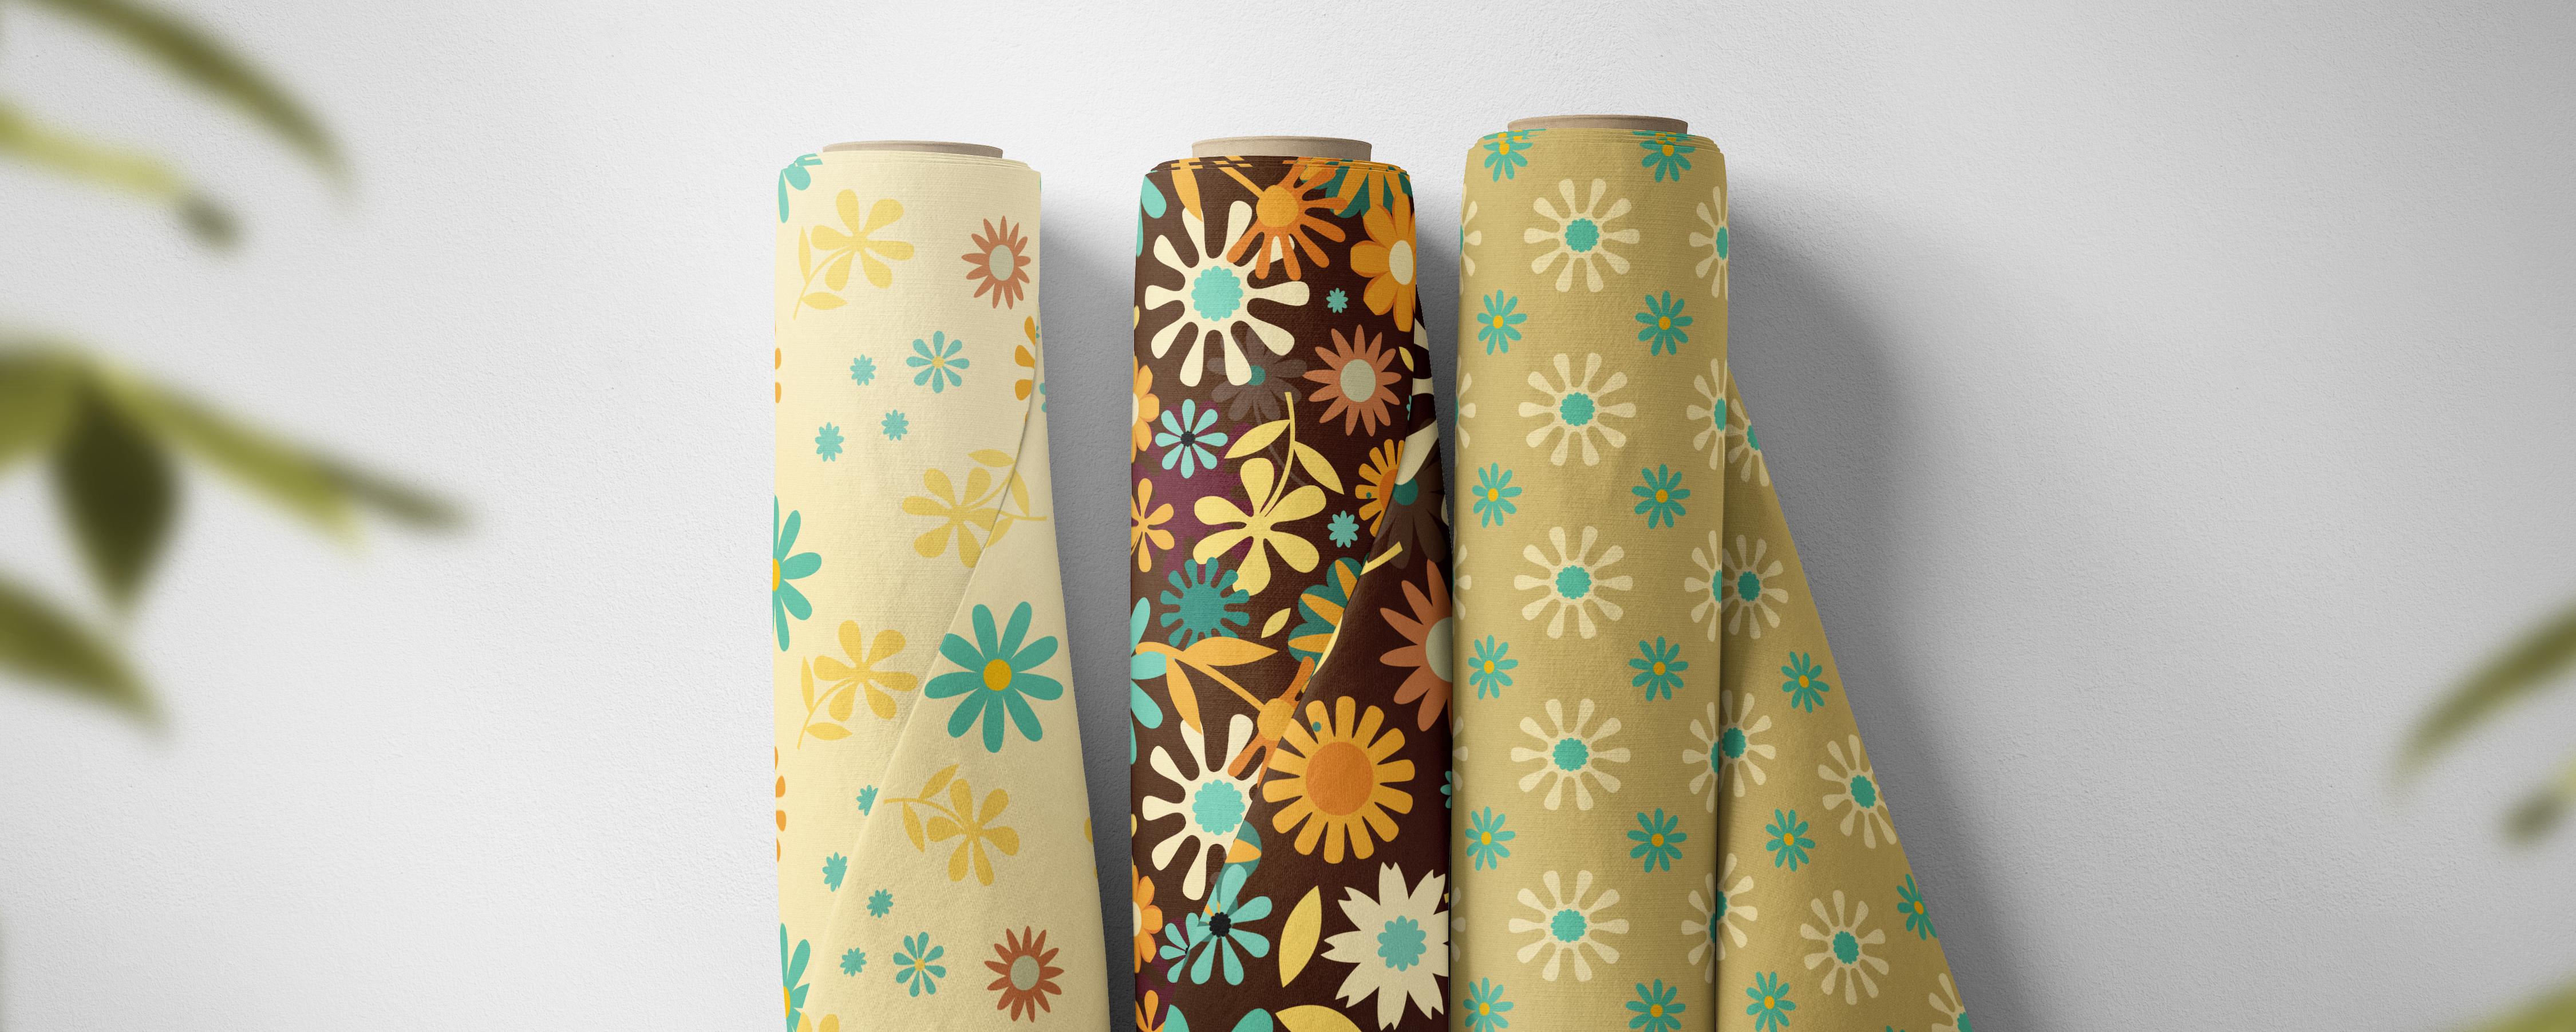
created our first pattern. And we're gonna be of course, making a ton of changes to this and adding more flowers in. But you could save this out. Your first repeat. And it can be used
on Spoonflower or for whatever purposes you have,
maybe scrapbooking paper. I'm going to show you in
the next lesson how to export this and have your
single pattern repeat. Alright, I'll see you there.
4. Lesson 3 Exporting and Testing Our First Pattern Tile: Hi guys, welcome
to lesson three. We've done that quick pattern
and now I think it would be a good time to actually do
a little bit of a test. Let's get to it. So I've done a fair bit of
experimenting with exporting. And I just want to show you the conclusion that
I've come to know it. A lot of programs you
can export as a JPEG. Well, you can in this program, so you can export
it as a JPEG or any other number of
formats like tiff and PNG. And personally I have found the most success with
exporting as a PNG. So let's take a look at that. I'm gonna go here to the export. And we've got all these
different choices here, like I just said,
and I've tried JPEG, I find that it's more likely
to leave that little bit of a white line around my image. So I don't want that. I want to just have an absolutely clean
and sharp edge and I have found the
most success with PNG. The other thing I wanna
do here is I want to export just that
single art board, that first art board, I'm going to click
on art boards here. I'm not going to change
anything else here. I think these settings
are all okay. And because it's, because
I'm selecting art boards now I want it to allow me
to do that whole document. I'm gonna go to art
board one here. It's going to be
saving it as a PNG. Let's just take a quick
look at the preview here, and that's exactly what I want. So before we had
the big art board and all I want is
this little one here. I can close the preview
and I can hit Okay, so now it's asking
me where to save it. I'm going to put it
into the folder for this class and you
can rename it here. You might want to call it
something like simple. I'm going to call mine simple coordinate
and give it a number because I may do
this as well with other intermediate steps
to my final pattern. So I'll say Okay here and
I'm going to hit Save. And I like especially
the very first time to go and test it. So let's use
procreate to test it. I'm going to add a new document and I'm gonna make a
big one, so 20 by 20. And I'm going to use the
Insert a File command here. I've got that one that I just named flowers,
simple coordinate y. You can see I did a couple
of tests here and that has imported it perfectly
for the one corner. Now I can go in and duplicate
it and bring that over. So far, so good, I don't see
a ghosted white line there. We could just merge
this down and then duplicate so that we can
just do that move once. And you can see absolutely no line there at
all showing in our brown. So we have now created our
very first pattern repeat. So that's super exciting. Now you know all the steps. So everything that we did
was correct and we can now go back to our document
and continue to work. So like I said, I would duplicate that one. So this one I want
to keep it as is this one I would
probably rename to be the same name as I just
saved it as I would call it flowers coordinate one. So that'll be your my
master document for that. And then I would say, okay, I could duplicate this one. And of course I could
immediately rename it so I could call it our
coordinate to hit. Okay. And so I've got the original. I don't want to touch.
This is the one that I'm going to be working on. And now we can just carry on. So we could still consider this to be sort of a coordinate. We could do all
kinds of things to make it different
though we could e.g. get rid of this one here. So let's cut that. And instead of having the four corner flowers and
the middle one the same, maybe this time we would
go into our symbols and add something contrasts
you like maybe this one here, so I'm going to insert it and maybe I'll make
this one bigger. And I want to make sure that I have it perfectly in the middle. So I would go into the alignment options here and click both of
these for center. So I'm aligning it horizontally and I'm
aligning vertically. And that was just part of my
Transform palette, right? So when you're in this
part of the palette, you just hit
alignment options and then you can click
on both of those. So I mean, I know I'm
making it look really easy. These coordinates usually
go pretty quickly. So again, I would
go here to Export. You don't want
before we do that, why don't we change this
background color on this one, just to have it
different and have a coordinate that
contrast a little bit. That's not going to work,
that's not gonna work. Now, I don't mind these
combinations except that right now this green is super neon, like the edges
here are just two. It's like they, they wiggled,
if that makes sense. So I need to pick a color
here that's going to work. And all the colors
I'm picking here in my regular set
aren't really working. But I think maybe if
we were to choose one of these and then just
change it slightly. So let's go back here
and make an adjustment. So something like that
could work right? Because first of all, it's not it doesn't have that wiggly edge
when you look at it. And it works well with
the color scheme. I think it's gonna work
okay, as a coordinate, and it still works with
our whole selection here. In fact, we could choose
to add this color to start to expand a little
bit on our color scheme. I don't want to
have it too crazy, but you do want to have a good selection for when
you're doing this process. So I've just unilaterally decided that that's
a good color to add. Indicate that we want
art board one only. It's a PNG or sizes
are correct here. Let's take a quick preview of
it and it looks just fine, just like it did last time. So we can hit okay here, it's already named,
so we can put it into that folder and hit Save. And now we've created
two patterns. You could go ahead if you
wanted to and test it. Follow all the same steps. Just make sure when
you're positioning it initially that you see those orange lines
appear yellowy orange. It's very easy to be off
by one pixel in there. That looks perfect. So we know that that has worked. So we know our
system is working. Now we can go and
really start playing around with perfecting
our patterns. So I will meet you in the next lesson where we're
going to talk about that.
5. Lesson 4 More Motifs to Fill Out Pattern: Hi guys, welcome to lesson four. In this lesson, I want to
add a bunch more motifs, and let's start moving them
around and figuring out a way to make this pattern
even more interesting. Let's get started. So did you notice
you probably did. I miss that. I had not put this into
the symbol properly, so it didn't repeat over here. It's okay because my repeat
I based it on art board one. So it did work. I want to, of course, habits
repeat here on all of my different art board
squares on this side. I'm going to also save
that and duplicate it. I'm going to continue
working with this document, but now the coordinates
are both here, so I know that I'm not
going to be affecting it by making changes
in this document. This document I want to
make into my hero pattern. So my main pattern, I want to move this art board
over a little bit here. So I'm going to go
to the art boards. I'm going to move this square out of the way
just for a second. And I'm going to use the
art board tool here and just change the coordinates on it just so that it's moved
away a little bit further. So I'm going to go into
my transform studio here, and I'm going to change
the position of it. I'm going to add 0, 200 pixels probably
would be good. Maybe a little bit
more than I'm going to select that square and put it back where
it's supposed to be, also in the Transform palette. So you can see here, what I need to do
is change this to zero and this to zero, and we're back to normal. I think that I want to change that background color
right from the get-go just so that I know
what I'm working with. And I want it to do
it the dark brown so that all of my symbols
really stand out on it. So at this point,
I can just start adding and I'm
going to just maybe insert two or three
to start out with. They're all kinda
piling up over here, so let's start
moving those around. So the first thing I
wanna do here is to make sure that they're added to the symbol that I need
them to be attitudes. So let's grab all of those were sliding to the right here. Actually, I don't
need that last one. So these four are the
ones I want to move in. So I'm going to grab them and
just pull them down here. And of course there's going to start repeating right away. But now we can double-click to grab the one that we want if we want to constrain
the proportions, remember that one finger
on the art board? What makes sure that they stay in whatever
shape they were. And I'm going to
reduce the size of this one at this point too. I guess it's two fingers, sorry, you have to put down to
constrain the proportion. I use so many programs
and they all have different settings
because this flower and this one are the same. I want to make them
different sizes. I'll make that a boat that size. I'll leave this one this size. You can of course go over the edges because
remember what we're going to have to do is to repeat them on the opposite
sides, but that's okay. Now that you know
how to do that, it's not that big
of a deal, right? So I'm just kind of placing them where I think
they will look good. And one of the things I'm
trying to avoid is having, let say, two colors that are the same close to each other. So I might move them out of
the way right at this point, if it's something
that I'm going to lock that rectangle
again temporarily. If it's something
that you feel that you could have in more
than one position. You can put two fingers on your art board and drag and
you'll get the duplicate. If you don't want
to do it that way. Of course you can do the either copy and paste or you can do
the duplicate here. So make sure you're drilling down to the one that you need. Duplicate. And then you can go ahead and
position that one. So I'm going to leave
it right about there. And I want to hit a couple of the flowers
I haven't used yet. So this one, I like that one because of this
little stem that it's gone. And you know what,
even though we have those symbols that
we've created, we could easily add
additional things here. So if you want it to
go in and add a leaf, we can go into the
shapes here and a leaf you could do with the teardrop shape
like I showed you, or you could do the ellipse. So if we were to
pull an ellipse, get your Node tool, click on one of the nodes there. Curves. And when we click on that, we can change it
to a sharp point. We can go in and fill it
with a color that we need. Well, that doesn't look
like the same color. So let's see what color
that is and add it. So we have a different
yellow here. That's probably what we
need to make the leaf and let's make it a bit smaller. Move it into position, hold down two fingers
and duplicate it. Change the position of that one. And that might be
actually a really fun one to use as a filler. So let's duplicate it again. I'm actually going to take all three of these and I'm holding down one finger so
that each of them, each of the different
parts is selected. And then I'm going to go
into this menu to do. To do an add here. What happened there? I see. Okay, so we've got our didn't add those in
the first place. So when I first made these, I didn't include that bit there, so that's included all of it. So I've got all three here. And now I can click add, and you can see that this
is now all in one piece. I would be interested in seeing if anything
happened here. And it looks like we've
lost our original symbol, but that's okay
because now we can add the symbol with the leaves. So that's kinda cool. And we do now have
this leaf here, which we could also
add to our symbols. So now we have this
leaf that we can bring onto our image
anywhere that we want. At any point that we want. You know, we can we can
make duplicates of it here that we could end
up using as fillers. So maybe I'll just
make this one really small and tuck it
in here for now, I'm sure will end up moving
all of this stuff around. But we're kind of getting our pattern filled out
a little bit here. So something like
this one here I think would be nice repeated. So I'm going to drag select
and put it in this area here, and I want to flip it. So I'm gonna go into the
transform and flip it. And I think I'll also
flip it vertically. So I've got it vertically
and horizontally flipped. One of the things I like
about doing that is that we're creating more of
a real tossed pattern that could be viewed in
any direction if we had only one and it had
the stem repeated, you can obviously see
this in the repeat, then that would make
it look like you couldn't use the pattern
sideways or upside down. So this just helps us
to give a little bit more of an end-use and
other end-use for people. They're not going to
look at it and go, well, I can't use that because
it's not going to get my pattern when it's
all in this direction. So let's insert a couple of these Reddy brown ones,
something like this. I love using as a subtle
background elements. So let's first of all make sure that we've got
it in our symbols. So make sure you tap and hold and then you
can bring it down and you'll see it obviously
in the other repeat. So sometimes when I'm
working on a single one, I'm not necessarily looking at the big picture because I'm
trying to get this kind of worked out first and
then I can always go and start moving
my motifs around. So I'm just generally at this
point putting in the motifs and just making a bit of a
rough arrangement with it. And always keeping
in mind that I don't really want too many
of the same color together. It could happen at times
and that may be okay. But overall, I think I
want to kind of avoid it. And I feel like I don't
have all my motifs here. So I'm gonna go back here and
check that last document. Maybe I didn't duplicate
the right one. X is way more symbols
on this document here. So that was a mistake on
my part that I should have duplicated this document to
have all of these symbols. So one of the things
I can do here is to pull out the ones that I haven't used and then go to the other document and add
them to my symbols library. Probably the easiest thing
would be to just kind of grab everything and Copy, then go into this document. And I'm just going to move
up here a little and paste. I'm moving this
all up so that it doesn't get too confusing here. And let's just take
a look at some of the ones that we may
not have had in there. This is the one I
was looking for, so I was thinking
that one for sure. Not sure I had that one and I'm not sure I had this one for now. I'm just kinda
trying to get them isolated so that I can add them. So these are a few
of the ones that could be very useful
to me right now. This one as well. That when I haven't got I don't know how I made that mistake.
Sorry about that. Folks would just need one. You guys. I'm moving that out of
the symbol so that I can just select it by itself. Yeah, because I forgot
this was that one that we had changed the shading on. So that would be a
really good one to add and that's
probably good for now. So I'm just going to just to
keep my document tidy here. I'm going to get rid of these. And now I've got some of
these different ones that don't have in this library
here, and I can add them. So I'm just going
to quickly do that. And then we can carry
on with our process.
6. Lesson 5 Filling Out and Perfecting the Pattern: Hi guys, welcome to lesson five. And less than five here, it's all about
perfecting the pattern. Let's get started. Now I've got all
of these added in. I think that will help me a
lot here because I'm going to insert a few more to just
kinda fill out my pattern. Now here's an example
of sort of a mistake, but not really It's assemble. So of course I didn't change
the color of it anywhere. I can still do that by double-clicking or
triple clicking to get to the level that I want and going in and changing
the color slightly. So I could do it with
the color wheel here, or I could go into
my swatches and make a selection that I know is
part of my color group. You'll notice that when
you do that though, it does change your symbol here. So just keep that in mind if you are making those changes. Really wanted this guy in here. So it might be something that
we put up here like this. Course is going to take a lot of financing to get our
pattern to look good. I just want to get all of my
symbols on here first and then I'll start worrying
about that next step. I'm going to go back to my
layers here and go into my symbol and lock that
again temporarily. So easy to lock and unlock. And it's good just to
not have it move on us. So I think I'm at the
point where I can start really thinking about my
overall pattern here, my whole design based on what
I've got going on in here. And now I can take a look at everything on my
screen at the same time. Might add one or two more. What have I not added? I don't think I've
added that one. And I can see it's not
in my symbol because it's not repeating elsewhere. So let's make sure
that you get it down into the proper symbol. I want a couple of those
little small fillers, so let's go in and mine those. So this is one I'm going to insert again that one's in the same color as
the background. So let's just change it to this color here and you
see what's happening here. I'm over here. I've
got it just kinda floating and it's not
part of the symbol. So I'm going to
bring it over here, and it looks like this one too. Let me see which other ones that's happened with this one. This one, this one
is not repeating, doesn't look like this
one is repeating. So some of those that I
added after the fact, I wasn't really paying attention to where they were going. But all I need to do is this. And now they're in the set and it looks like
this one as well. So this is why I like the
layers palette because it's just so easy to figure out things and move things
around this way. So can you see any other
ones that I may have missed? This one and this one. So the Layers panel is your
friend and now look at it like it's like a hardly have to do anything to really
get this to work. There are a few like this
flower and this one that are conflicting a
little bit because of the color being the same. So I could change the color or I could maybe do
something like this where I'm just moving different colors around
to make it work. This one I think I
could go smaller, have it as a fill, but also duplicate it. So I can either duplicated here or like I showed you here, duplicate or drag select. I find that drag selecting
is just a little bit hard when I've
got it This small, I could close this
video and make this as big as they possibly can
on the screen at this point. So bigger probably
will allow me to do the drag a duplicate
at any point here, I'm going to say that's good. Maybe I'll grab this little leaf and start repeating that
in a couple of spots. So let's see if I could
do to drag a duplicate. And I think that works. I think this one and this
one are kinda bugging me, goes to the way they are there. So I think I would move
this one in a bit more, maybe this one in this direction
and move that one down. So overall, I'm just probably
not important for me to have this onscreen and be walking you through
every step of the way. But basically, I'm
just trying to make it look as good as I possibly can. Keeping in mind that
I still need to do the duplications of the motifs
that are on the borders. So that's why I kinda like to perfect it at this
point because I don't want to have to be moving too
much once I have done that, repeat, it really is a big
deal because honestly, you could just get those four
if they happen repeated, and you could still
move them around. Here, there's a
duplicate and you see how that's causing a
problem over here. So maybe I'll actually go into the Layers panel
and group these. So somehow I had
a duplicate here. I'm going to delete
that duplicate, but then I can still go back to the group and move
that into position. And you'll see that
when I do that, it works just fine even if it's not exactly positioned
in the corner. The fact is I grabbed
all four of them at the same time and move
them so it was okay. Remember that they are
part of this group now. Whoops, not that one moved
and I don't want it to. When I look in the layers here, I can find that group
and be sure that it's all selected before I
do start moving it. Okay. So I just wanted to kinda
get it back to where it was, maybe a little bit higher to give me a little bit
of play right there. And then now I just need
to go through and repeat whatever elements are on the
sides to the opposite side. So that one, you have to
take a deep breath before you do it because you
want to make sure that you are going to be
grabbing all of them. So it's easiest I find to grab any of them
that are having to be repeated and have them
both selected and then duplicate and then make your move a cross to the
opposite side here. That way you're not moving individual elements because
if we're doing that, we'd have 1234, I
guess it's okay. A lot of these are just one on that side so it
wouldn't be too bad, but still these two happen to be needed, both on this side. So I might as well select
them both at the same time. Then I'll go in and
do my duplicate, and then I'll go in to
the transform studio. And here we need to move the x-coordinate
because it's moving straight across and
we know we need to move it plus 3,000. Hit, Okay, and now it has duplicated and you see how
it popped in everywhere. So now we do have
the second half of that flower everywhere,
which is fantastic. This one here needs to
duplicate it across on that side and I don't
know what is okay, this is the tail of this one. So we've already done
that duplicate cells one, we can do by itself. So let's duplicate it. Let's go to the
transform studio. And in this case it's still the x-coordinate that
we're doing, -3,000. And you see now we've
got the duplicate. And now wherever we see that
flower, it's fully formed. So this is the next one,
duplicate transform studio. This one is going to
go this direction. So that means it's
the y coordinate, but it has to move
-3,000 this time. And I know I'm going to
for sure be wanting to move that underneath
those flowers. But let's just follow through and do this whole process first. So this one, I want to duplicate the y-coordinate we need
to do here this time, but we need to do it at plus 3,000 so that we get
the copy down here. So now we've got all
of our duplicates. Everything looks
great in that regard. And the only thing I don't
like is this being in front. So when a case like that, we're going to select them both. We're going to go
into our layers and we're going to
just move it down. And sometimes I do it
in steps like that. I'll do just a few levels at
a time as I'm going through. I'm just analyzing
whether or not I want to go further down and now I
have gone all the way down. So I'm below the two flowers
that I needed to be below. Because they're both selected, I can move them to see if I can find a better
place for them. The only thing I can't
do is resize them. If I re-size them, then I'm going to have
to separate them, take one away and
duplicate the other one. I think I'm actually going
to go even further down because I'm feeling like
the further down and going, the better it's working as
far as sort of hiding it and getting it to look like it's behind and now it
doesn't look so bad. So don't love it. I'd like to have it maybe
below those as well. So let's just go
all the way down. I'm not sure why it's
not going underneath these over here
in my duplicates. So I'm going to analyze
that and figure it out. And in the next
lesson we're going to probably finalize everything, do our export and do a test. Alright, I'll see you
in that next lesson.
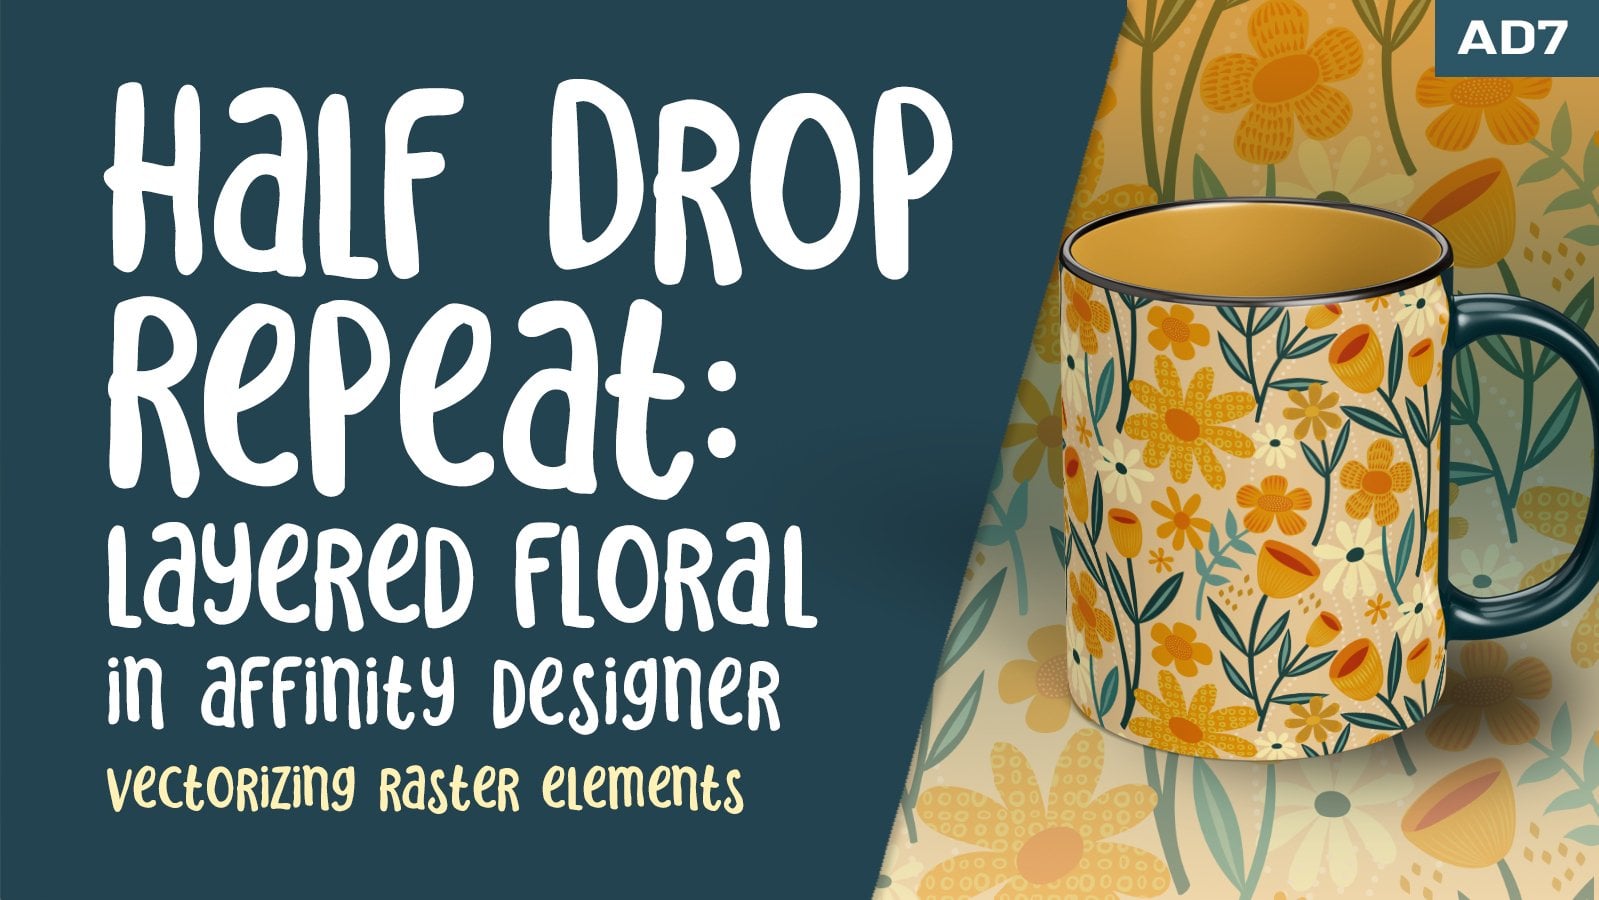
7. Lesson 6 Final Swatch Export, Test and Corrections: Hi guys, welcome to lesson six. Less than six here is all about
finalizing and financing. Okay, so I wanted to show
you a solution for this. Remember, these two are hiding the little
blue flowers here. So I try to just
move the flowers up, but they are here in the top of that symbol and it still
isn't making a difference. So I realize here that
what I have to do is take and move
these symbol layers. So I'm just grabbing them
and moving them down. You see that? Like leap frog. Okay. So this one is correct. This one is correct. And that's presented a couple of other little issues here
which we can deal with. That one's working, that
one is not working again. And now that's working. So we've got correct everywhere. So it just was a matter of
moving my symbols around. I'm going to experiment with
naming these eventually, just to see if, when I did that original repeat, if I could have
done it differently to mitigate that issue. If you have that issue like I did with these not showing up, just go in and change the
order of your symbol. But now that I'm looking at it, I would like to move
these a little bit. So I'm thinking that this
little one here, good. Well maybe that one could stay. Let's move this
one here instead. I'm thinking might work here. If we move this brown one and this brown one is one that
you could probably easily either eliminate or move lower down so that it's just more
of a background elements. So maybe like right in here
would be a good spot for it. And what I'll do
is just I'll make sure that it's moved to be below that flower and maybe
also below this flower here. So I'll pull it
all the way down. And now it's just more
of a background element. I think we have Our winner. I'm going to allow myself to be satisfied with
this at this point. And you know what,
I'm just noticing? And here I have one
that's bothering me, so I'm going to bring it
into the right symbol. So I gotta grab it
and move it down into this symbol so that
it repeats throughout. So I hope I'm not scaring you with all this
because, you know, there have been a few little
things that we've had to do to fix our pattern. But this is the way it is
and you don't need to be super duper crazy with
it the first time, you can just try some
really simple patterns. First to just get your legs
under-use so to speak. But I'm happy with this. I think I'm feeling like it is a decently
filled out pattern. It's balanced. There's not too many of the same color together. There's depth that we've created by having some symbols
in the background there. And I think that I
can take this and use it now in mockup and
be quite happy with it. Or of course, I could use it to upload as a collection
to Spoonflower. We've got this other
two that we created. So let's export this
one here as art board. So I've hit Export. I'm waiting for that to
just stop calculating. And here I'm going to select the one art board that I want. It's not allowing me to
select just the art board. So I'll take a minute
here to figure it out. And I'm thinking that it
might have something to do with having that
one layer lock. So let's go to that
layer and unlock it, and go back to our export. And let's see if we can
now select Art board one. We can. So I've got only art board one. I've got it still labeled
as flowers coordinates. So I'm going to change
that into retro, retro flowers hero pattern. And I'm going to hit return. And I'm going to say, okay, and of course we're
gonna go into our main bile or wherever it is that you're saving
these and hit Save. And let's go back to Procreate, to do a quick test. So I'm going to go back into
my class projects here. Those are my first
two coordinates. I'm gonna do a 20 by 20. I'm going to insert a file. We're going to grab our
hero pattern here and make sure that you see both of those yellow lines
before you stop. And then you can take a
look when you're doing the duplicate that you also
see those yellow lines. This one seems to have come in with a little
bit of an edge, and I'm investigating that. And I could see the
problem here right now. My Brown has shifted position
on that other documents. So let's just cut
these to delete, and let's go back to our Affinity Designer
document and let's make sure that
we have that perfect. And I should have
checked that first. That's something that
you should never, I should never do, especially if I'm trying to set
an example here, I'm gonna go back to this
probably when I unlocked it, I didn't know what I
did, but let's just make sure here that we
have this at zero. This at zero. So you see that they're
both here at zero. Now you can go to your export. Everything here should be fine. And let's just go into art, art board one, PNG, okay? And of course I want
to rename that again. So what did we call it? Flowers here, row, I'm going
to put two there just so that I know that
it's the correct one and hit Save back
into Procreate, insert a file flowers hero
to carefully position it so that we've got the
yellow lines duplicate. And that's absolutely perfect. So now we can merge that down, duplicate it, and
merge it down again. I've got my retro floral pattern in a repeat that I really like. And I think you could use it in pretty much any direction
and it would look alright, I can see a couple of things. I would change that
leaf is hitting it. So maybe that one was also
not in the right symbol set. So that's something now that I know I can go back and change. I still don't love
this flower here, so I may end up completely
replacing that. But overall, I've created what I need to create my
overall pattern. It might be fun to go in now and make some
other versions of it just to have a
different take on it, kinda play around with it. And I could see that little dot there when I did that repeat. I had no idea that
was even there. So that's something I would fix. You could definitely
put more dots in the background if that's
what you wanted to do. And we talked about
that in the last class. We did the pencil
tool, we did a, we went in and added some
width to our stroke. Let's take a look
at the colors here. I'm going to take
the stroke off, make it light than
increase it in size. And that does make a circle if you wanted
it to be bigger, of course you just
have to increase the size of the stroke. And remember that with the stroke you can also
go into advanced and make sure that you've got
it all rounded if that's what you want or
if you wanted squared. I think if you want a dot, obviously it has to be rounded, then you could go through and do these as fillers throughout. You could change colors to put different colored dots
in different spots. And as long as you've got
them in your main symbol, that symbol at the bottom. It's going to repeat throughout and I think that is
going to look good. So I think I might go
through and do that on all of this pattern and maybe
sub out that one there. You know how to do the
export and everything now, so I'm going to come
back to you with a look at using that
possibly in a mock-up, maybe that card mockup that
I've given you so that you can just see how
beautifully that can work. And really you've gone
through everything here. And if any designer
for pattern design, you know exactly
what you have to do. And my suggestion
to you would be to take that document that you
created and I should have. You are reminded you to
do that at the beginning. But that pattern
setup that we did, the original pattern setup
that was still blank that you could duplicate and
use over and over again. So that is this one
here is a grid repeat, so it's got the
four repeated here. And when we were at this stage, I should have reminded you to make a duplicate,
keep that original. And then anytime you ever
want to make a grid repeat, you can just make a duplicate of that and have it
as your template. So my mistaken not reminding you to do
that at the beginning, but I have now. Okay, So I will meet you
in that next lesson.
8. Lesson 7 Using the Mock Up : Hi guys, welcome
to lesson seven. Less than seven here is
all about taking a look at how this pattern can
work with our mockup. Let's get started. This
is where I'm going to show you the use
of these patterns. And I liked this one because
I can show all three. I can have the hero
pattern in the middle here and then the
two coordinates. So I've imported
all I did was open actually the different ones
that I am going to be using. Let's open up the third one. I did not bring that one in. So that's coordinate three. I'm going to say open. It just opens it
here in Photoshop. And to add it to my
patterns library here, I just have to click
the plus sign. I've taken off the
dot PNG part of it, but now I've got
my three patterns here and it looks
just from here, they're going to go
together quite nicely. So let's go back
to the mall cop. And the one I want to
replace is this one. And I can just see
the color here, so I can double-click on it. And I've got these mockups
setup as our width, a layer adjustment or an adjustment layer for
adding the patterns. So that's what I did here in case you are a Photoshop user, of course, that's not the
pattern that I would want. So I would go in here and
grab that hero pattern. I'm going to just leave it at the scale that it is
at, at the moment. And then we'll just save
this and go back to mockup. And it takes a second because it's updating this document, but you can see it here and it looks like it might
be a little bit big. I do love it big, but I think that maybe will need to go in and just change this. And because it's a pattern
and it's a seamless pattern, even if I change
this, Let's go 50%. It's seamless, so
it's not going to show any seams are any
little lines at all. Now, this is the one
I hadn't corrected. Remember. I had seen that
little dot there, but I figured just to expedite
the end of this course, I would just use it anyway. So I'm saving it here. And what it's doing is updating and it has updated it
here, which is great. So now I know that at 50% scale
it's going to work great. So I can go into each of
these layers and put it in, and it's actually coming in, it looks like at 50% already. So I don't need to
make the adjustment. I'll save. We'll see anyways,
sometimes I'm wrong. Actually, I'm often wrong. But yeah, it worked. And we've got that whole
bolts of fabric, correct? I'm pretty sure it's
the same scale. Okay, so now let's do one
of these other ones here. So we'll double-click
on this one, double-click on the pattern
layer that was there. We'll fill it with
our coordinate. Let's do coordinate one. And I've got the scale here at, accidentally came in here at 28. Let's try it at. That might have been
my last setting. Who knows whatever. I'm gonna go 20% and
say, Okay, and save. At this point it's a
bit of a guessing game. And I would spend a lot of
time thinking about scale if I was doing the upload to
Spoonflower or whatever, but at this point I'm not. So this one, I'm going to change the scale by
double-clicking on it. I'm going to go 10% here
and say, Okay, hit Save. And let's take a look here. And that scale seems
to be really nice, so I'm going to use
that here as well. So, wow, I love
that one actually. And I just hear my
company's arriving, were having a birthday party for my eight-year-old granddaughter
on your role tomorrow. And so I have to speed
up the process here. You know, the drill anyways, I just click on it. And you don't want this one
I hadn't done correctly when I did the first
particular pattern, I hadn't done an
adjustment layer. I'm going to do that now. And let's put that third
coordinate in there. And I think I'm going to try
maybe 15% for the scale. It save, go back
here and I might do bigger because of it being too close
to this one in size. So let's go back to that. And all you need to do is double-click on it here
and you can change it. So let's go 25% on
that one, save. I'm going to close a bunch of these because they're
starting to get unwieldy having
all of these open. And we'll go to the
next layer on that one. I think you can link them. I'm going to try that. So I'm going to get all of
them together and link them. And sometimes, I guess because I did it after the fact
that might not work, but oh, yeah, it's
probably because I don't actually have that as
an adjustment layer. So that was just, I must have
done it as demonstration and didn't follow through
with changing everywhere. So I'm going to say Save
here, and let's take a look. And now isn't that the
cutest sat right there. So I didn't put a lot
of time and effort into creating the coordinates. Obviously, I could
spend a lot more time and do a better job. And here I see I'm missing
the inside of the fabric, so I would have
to go in and find those layers and make
sure that I put that in. I will do that before I
make any other mockups or use this on my titles
or anything like that. But I think now we've gone through the
complete process to the point where you know
exactly how to do everything. I wish I had this mockup that I could give
you, but this one. Is way too complicated
for Procreate anyway. So you might have to
experiment maybe with that greeting card
mockup and putting a pattern on the envelope
as well or something. So I'll see if I
can do anything to make that mock-up usable. Or I'll go through my mockups and see if
there's anything else that I have that could work to show
our little mini collection. Alright, so I decided to create a mockup
specifically for you, and I created this
one from scratch. So I'm gonna be
showing you how to pop your pattern into that one. And I also just wanted to go back to one of the
ones that I've given you in the past and
show you what I did to retrofit that
particular one. So let's do that right now. Now we're going to
test this pattern on the mockup that
I've created for you. First of all, what I wanna do is import the final one that I did. So here I'm gonna do import, and this is the one that I did. I went a little bit
crazy with the dots. As you can see, I'm going to
swipe down and copy and go into that other
document that I had created that was 20 by 20 mi. Well, and I'm going
to just delete this. I'm going to paste, and I'm doing it here in
Procreate because I know that's something that you probably
have and know how to use. So I've got that
in the one corner. You know the drill,
we duplicate. Make sure we see the
gold lines merge down, duplicate again and move
it down to the bottom. It looks pretty crazy, but it's done and we're
going to merge down again. So now we've got a repeat
of our pattern. Looks good. There's no line
showing anywhere, and I'm going to
copy that again. So I'm swiping down to Copy and I'm gonna go
back into the gallery. You will have the mockup
that I'm giving you. And where did I put
that here it is. Okay. So this is the
mockup and I've made this from different sources. I've got the photos from different sources and put this whole thing
together myself so that it would work
for you here in procreate a pattern that
I already had in there. But I want to show you now
what to do with your patterns. So we've got it, we've copied it so we know its
on the clipboard. We're gonna go into the
little folder here that says pattern as clipping mask. We're going to open
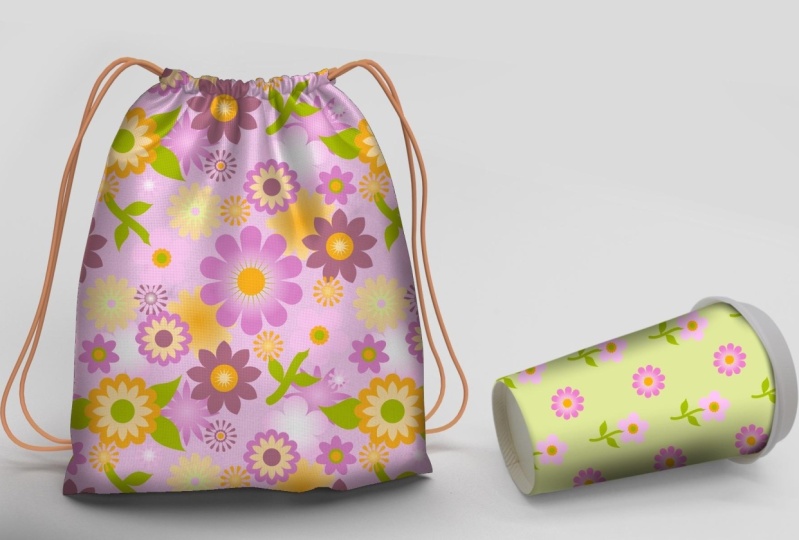
that up and you can see here that I've got that pattern clipped to
the shape of the bag. So what you can do here is
just delete and then paste. You're going to likely get
this with this pattern there. I'm going to turn
my snapping ox. I don't need that on right now. And you can resize it depending on the
size of the pattern. Repeat you want, then make
sure that it is on top. And all you need to do
here is use the option to make it into a clipping mask that has clipped it beautifully. I've already figured
out the shadows. I've got shading here. I've got the wrinkles
for the fabric, the shading I just
did with an airbrush. You can check whether or
not you wanted or not. I think it just gives it a
little bit more of a contour. And that's the steps
that you go through. The same thing goes
here with the cup. So in this case we'll just
delete the one that's there, three-finger swipe down piece
and get that into position. You can even rotate
it if you feel like your pattern would look
better at an angle. And I've already got
this as a clipping mask. I just happen to make
that layer or peace that layer between the
shading and the cup. And since the shading was
already a clipping mask, then it clipped it to the cup. So that's really
all there is to it. With this kind of a mock-up. I know that I've given you
also that card mock-up before. So let's go and take
a look for that. And here we go. Then which one do
we want to use? Let's use this one here so
we can go into this one. And I don't remember
how I did this one. I consent must be same or no
here we actually resized it. Easiest thing would be for
me to select this layer, make a new layer, fill that layer with black. So we've got just a block. I can eliminate that
card we had before. Then we can still paste, which will give us
our image on top. I mean, this one is
square and straight, so we probably could
have just used it, but I find it just
so much faster and easier to do this
sort of a thing. And of course, you're going
to want to go into hue and saturation and change the
color of your envelope. And same goes with
the background here. I would go into that and almost any color
would work with this, anything that's in your image. So I kinda like the blue
there and I think we had the earbuds
also colored here. So you could go in and recolor your ear buds to be similar. So same basic idea. Clipping masks are
awesome for this. So if you do have mockups, create clipping mask
layers, and that way, it's really easy when
you are at this stage to go in and create
quick mock-ups, I think I would prefer this
to be more homogenous. So I'm going to go like this. I think that makes
the cards stand out a bit more and I'll go a little bit to their redder side because that's what I
did with the envelope. And this is just an awesome
way to show off your pattern. But depending on where
you're selling it or whether you're just selling the pattern itself one way or the other. You've got a couple of
really great images now that you can use to help
promote your products. I know I'm gonna be using these little mock-ups
that I've made has images on my sales
page for this class. Alright, so I think we've covered everything
that I can think of. I would strongly suggest that you go through
now that you've got those symbols and create
two or three patterns, make a coordinate set. And that way you
can experiment with different mock-ups
that possibly have two or three items in there. So that's it for this lesson. And I guess I will meet
you in the wrap-up.
9. Lesson 8 Conclusion and Wrap Up*: Hi guys, welcome
to lesson eight. This is the wrap-up, and I hope you've really
enjoyed this class. I hope you've really enjoyed
the series actually. I think that the
progression between these three different classes
has taught you a lot of the Affinity Designer
tools and tools is studios together
make this program so very, very powerful. The more I use it, the
more impressed I am. There are definitely a
lot of similarities with Adobe Illustrator and
the pattern design that I can do on my desktop. But on the iPad, I've never found
anything as good as Affinity Designer and especially
when designing patterns. I love that you can
see all of the repeats together to really analyze whether your pattern
is working or not. That's really the power
of it throughly being able to see more than
one repeat without having to backtrack and redo things is just
so time-saving. The other thing I
absolutely love, I think, is just fantastic, is the idea that I can
add any sort of pixel, textures and data that I want. I don't have to leave
Affinity Designer to do that. I can just do it right here. So adding textures
and effects in the pixel persona is another absolute game
changer, in my opinion. So I hope you've enjoyed
trying to stuff out. We're going to have a
lot more affinity class is coming up in the future. This has just been
a good way to lay the groundwork and get you comfortable with
using the program. It's been super fun
hanging out with you for these classes
and I'm really hoping to see you in my
future affinity classes here. Thanks for hanging
off. Bye for now.
 Delores Naskrent, Creative Explorer