Transcripts
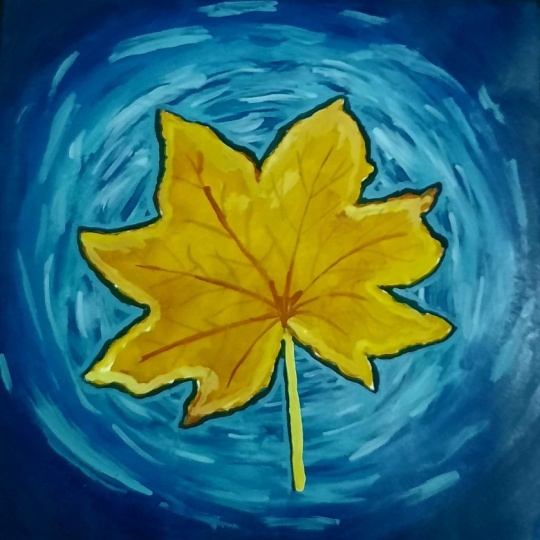
1. Intro: Such a small thing, a leaf, yet it leaves a mark,
however, briefly, a reminder that even
the gentlest touch can stir stillness into motion. When we were kids, especially
during the rainy season, we used to make paper boats and float them into the water. Watch them drift away with joy. Some childhood memories are
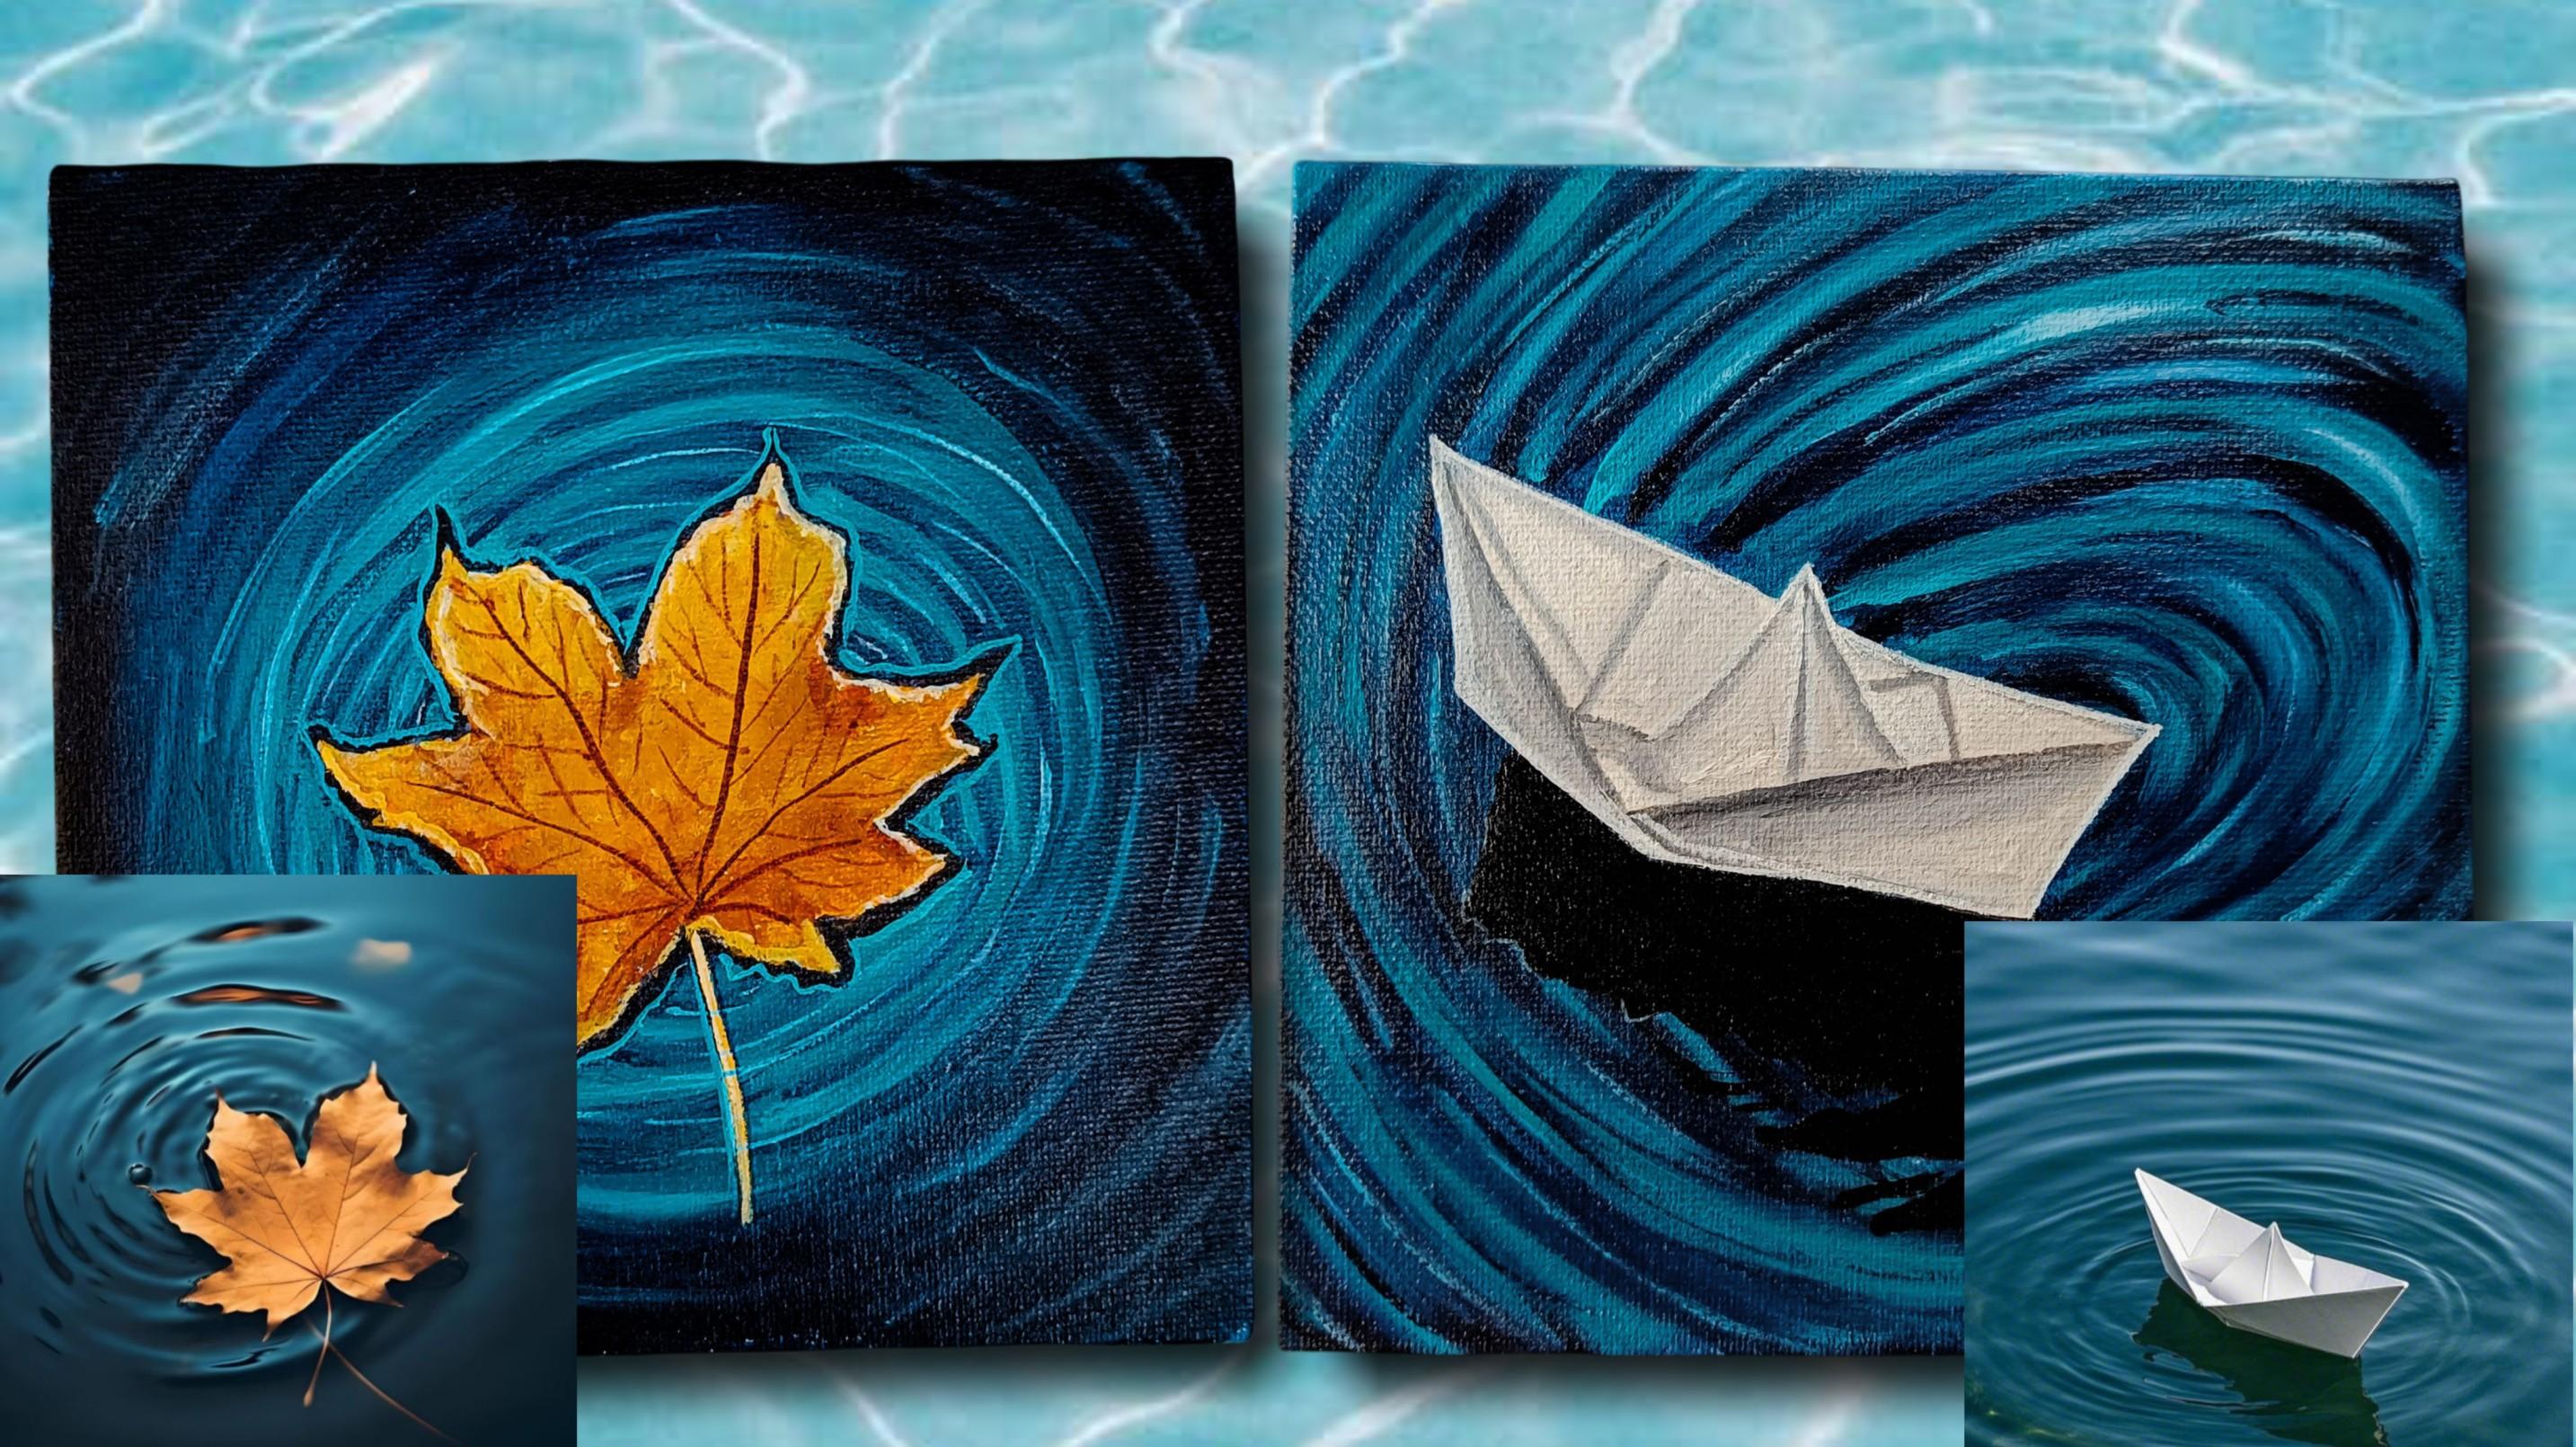
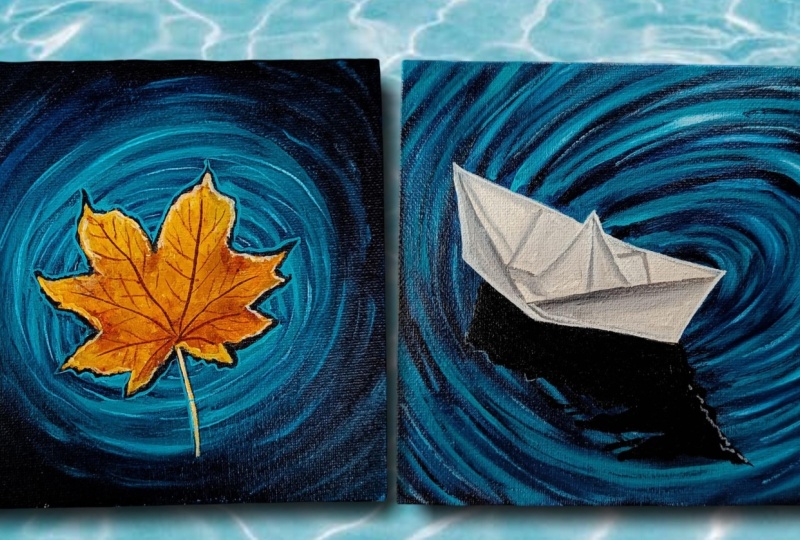
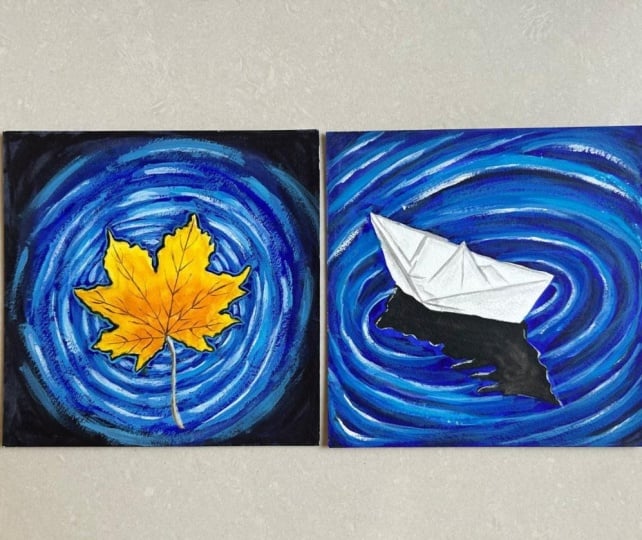
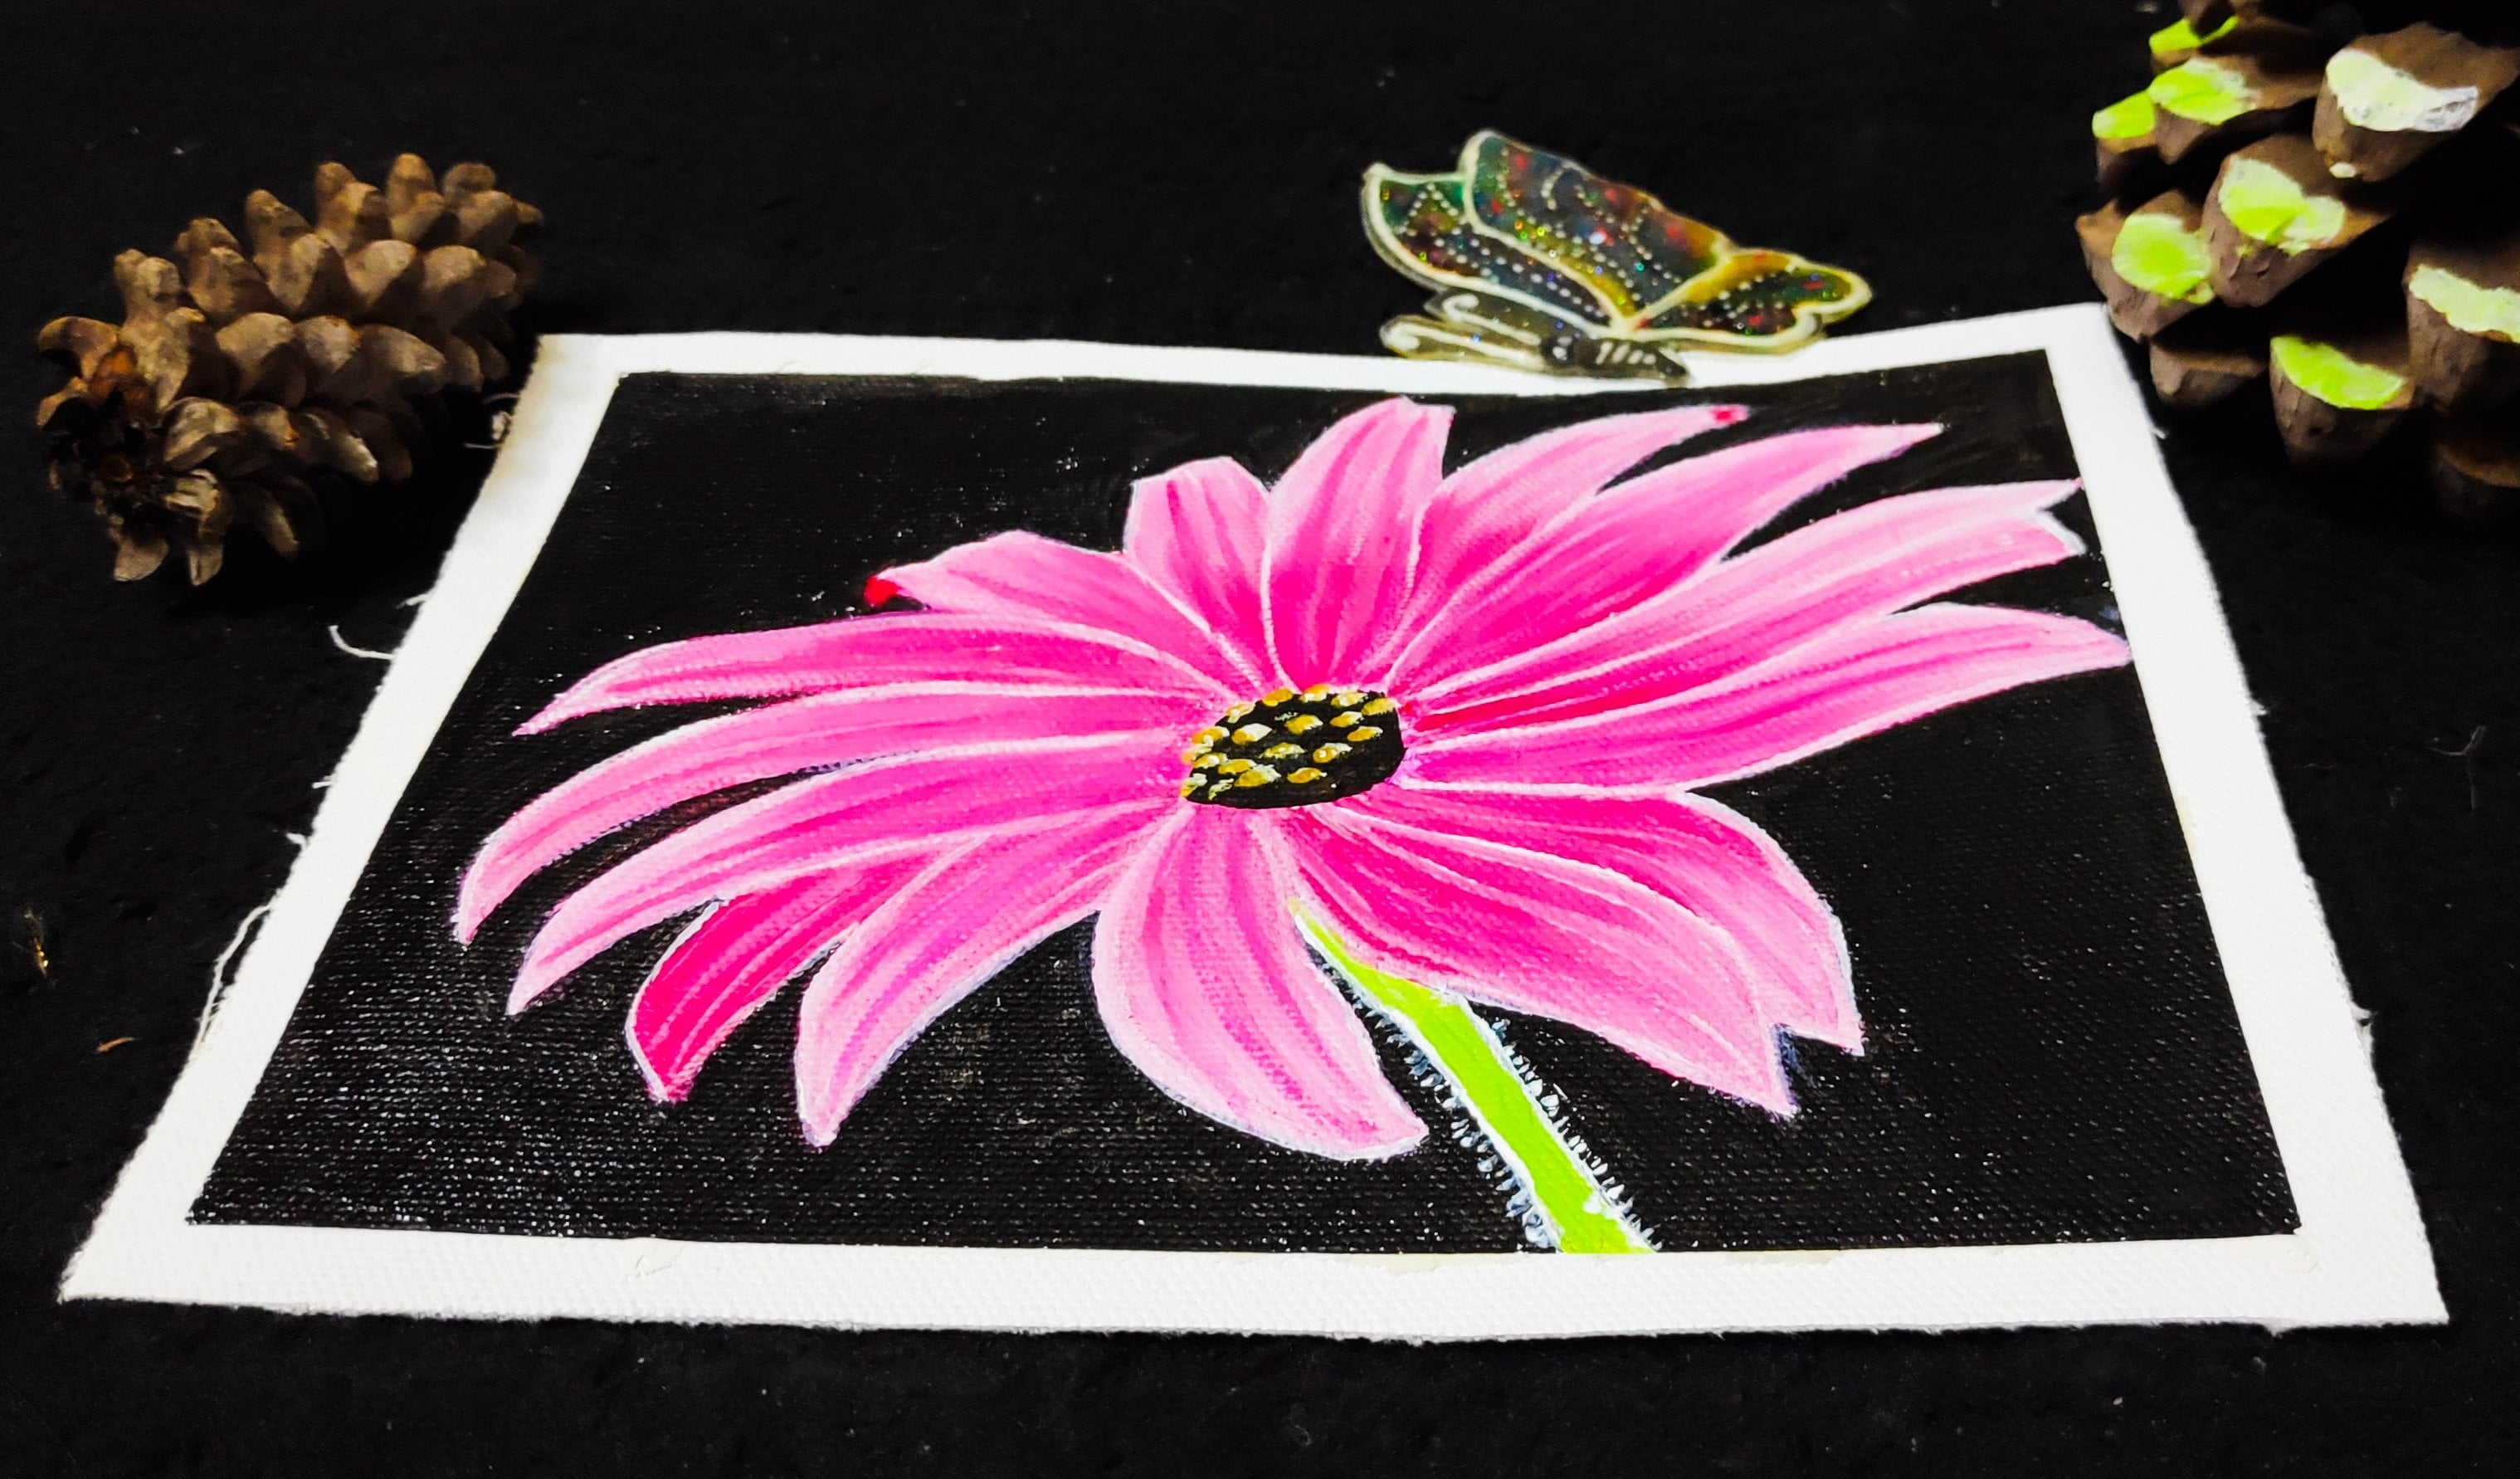
truly meant to be cherished. Thinking this in mind, so I thought of creating
these two beauties, one with the paper
boat and other with the dried leaves with
all the ripples around. My name is Mohiisna and I'm an acrylic
artist based India. I mostly do landscape painting and animals and bird
portrait painting. Many of you know me as Mohani Art Gallery from
my Instagram account. We will be learning these
two beautiful paintings. The first one this autumn leaf and the second one is
the boat painting. So first, we'll start with
the blocking and then we'll put the blending
technique after that, we will learn how to create ripples and blend them
then the leaf part and the leaf detailing of all the entire
process step by step. Then we'll come to
the next painting, that is the boat
painting, the background. This is the second
method which I will be using for creating
the ripples. It is a little tricky
than the first one. The first one is a little easy. The second one is a
little complicated. But if you will
follow the process, you will get each
and everything. I'm sure you will enjoy these
two paintings like I did. So let's start with these two beautiful
water ripples painting.
2. Materials: So let's discuss about the materials which
we will be needing. So these are the two paintings
which we will be doing, and this is the canvas
which I will be using. It is six by six inch, and this is doubled
primed canvas, but also I have done two
times priming of it. So if required, try to at
least at two times the gesso. And the color brands
which I'm using here is these three brands
that is of liquitex, Camel and Windsor and Newton. So these are the brands. Now, let's discuss
about the brushes. So these are the brushes. Mostly there are round brushes of different different sizes. One is the mop brush
and flat brush. So all these brushes,
apart from this, one more brush we will be using, that is the rigor brush, rigor brush for all the
detailings and everything. This is the rigor brush
which I will be using. So all these brushes we will
be using so apart from that, above written materials
we will be needing. So let's talk about the colors which we will be using here. So the colors are especially mostly same for both of them for at least the
background colors. So let's first discuss
about the background color. The first color is
the black color, which is compulsory in each and every painting for
lining, for detailing. Then the second color is
the light blue color. All these colors
are the base color, the watercolors which
we will be using. Then comes the pains gray. If you don't have pains gray, you can mix Prussian blue and black and make the paints gray. Prussian blue also we
will be kneading here. If you don't have Prussian blue, you can use Windsor blue and mix a little bit
of black in that. So any type of blue you can use, the sixth color is
the turquoise tallow. That is a little greenish color. If you don't have this, you
can use the teal color also. And then the so these are
the colors which we will be needing for doing the water and the water ripples for
both of the paintings. So in both of the paintings, these are similar colors, and also white is needed. That is the titanium white. So let's see how
the color looks. So this is the palette
which I'm using here. It is a glass palette. So just water on my brush and I'm just taking the color
and I'm just putting it. So this is black color. The second color is
the light blue color. If you don't have
light blue color, you can just mix serium blue and white and you can create
this nice light blue color. Then comes the pains gray. So it is a little
grayish, bluish color. So this is the pains gray, which looks like black, but it is not
completely black color. The next color is Prussian blue. It's quite dark blue color. So all these colors
we will be needing, and you can see my palette is the glass palette
which I'm using here. Second and second, last
is the turquoise tallow. It is a greenish color, and the rest is white. So apart from this,
we will be needing some other colors for the leaf. So for the leaf,
we will be using these are all background colors
which we will be needing, and for the boat, we will be
using black and white color. But you can see
these are colors, this is black, and
this is black and white, these are all background. These are all black
and white colors. So for the leaf, we will be using
some other colors. So here are the colors which we will be using for the leaves. That is the So three colors
we will be using the umber. Then comes the Indian
yellow and burn sienna. So these are the colors
which we will be using. So a amber and burn raw amber and Indian
yellow are similar. And this is burn Sienna. So these three colors
we will be using. If you don't have Indian yellow, you can use chrome yellow
or cadmium yellow, as well. So let's write the names first. Indian yellow is the first one. So you can see both
the colors are very similar and yellow ochre. So yellow ochre is also
brownish, yellowish in color. And the last color
is burnt sienna. So all these colors we will be needing for painting are leaf. And I hope you will enjoy
doing both the paintings. So the paintings are very
beautiful and very vibrant, so I'm sure you will enjoy this. So let's start with
our first painting.
3. Leaf Ripples - Background Blocking: Welcome back. So let's start
with our first painting. So this is a sketch which
I have already drawn. I will be sharing the
grid method sketch, how you can just take the reference and you can draw
it. These are the colors. The first color is
black, Talo turquoise, Persian blue, paints gray, light blue and white. So these are the colors
we will be using for the background
of the painting, which is the water ripples. So let's start first
with the outlining, and then we'll start
with the painting. So first, I will just outline this whole leaf structure
with black color. So let's start first
with the outlining with my black color and using my round brush of size
two or four you can use. You can also use your rigor
brush for outlining this. But since I need a
little thicker outline, that's why I have used
your round brush. So first, I will just do the outlining and then we'll start filling
the background. So try not to make
a straight line. It is a little bit
of crooked lines as you can see in the leaves. So don't make a
very smooth lines. So try to make it a little crooked and a little
zigzag lines. Make sure that your
color is not very thick when you are doing
all these outlining, your color has to be
a little fluid form, lots of water is there on my
brush and I've just taken a little color so that my color becomes fluid and
then I'm using it. There's much amount of water is needed when you're
using acrylic. Not too much water is required
when they use acrylic. Just I will just first do the outlining to just
enjoy this process. So now I will be using my flat brush for painting
the entire background. So first I'm taking
turquoise hallow with a mix of prussian blue and a
little bit of paints gray, and I'll start first
from the corner side. So I will first do you can see in the picture
that the sides are mostly dark and the inside
is mostly light in color. So, likewise, we have
to move the brush. So take thick colour,
don't take thin colour. Don't mix too much
water in your color. Otherwise, your
color will dry very fast because the more water
you add to the colors, the more it evaporates water evaporates and more easily
your acrylic colors can dry. Whenever you are doing
any blending process, take thick colors and
take very less water. Water is only on my
brush, that's it. I'm taking quite
a lot of colors, and I'm just trying to now
blend with the lighter color. So my dark color is still wet, so we can easily blend that
color with the lighter color. You can see I haven't
washed off my brush also. There is little color of
dark portion on my brush. I've just grabbed
that light blue color and I'm just filling it up. If you don't have light blue, you can use any
blue, serllium blue, cobal blue and just mix it with a little bit of
white to do that, and you can easily get
that light blue color. Blending it even if you
don't have pains gray, you can just use Prussian
blue and a little bit of black mix to create that color. Currently, I'm just focusing about the blocking
of the colors, how the colors will be
for the water part. Then inside part we will do once everything details and everything of the water is done. Just applying first
the darker color and then the lighter inside. This is one of the technique
where we make the ripples. There will be one more
technique which I will be teaching you in the
second painting. This one is a little
bit easier one, I thought of starting
with the easier one, then we'll go with a
little tricky one. This is a little easy for
creating the ripples. So I have just applied the first dark color and
then the light color. In both the paintings, you can use any of
the techniques, whichever techniques you like. So just adding the lighter color and trying to mix it
with the darker color. Every time you can
see I'm pushing the lighter color towards
the darker color. Even if there's lots of
color on your word brush, just wash off your
brush and just with your damp brush also, you can blend the colors easily. You have seen most of
the acrylic paintings. I do blending with
damp brush also. You can see starting
to fill the colors. Now the center part
of the color is left. I'm just adding a little bit of white and thalo turquoise. I will just apply
in the parts which are close to the leaves
with my round brush. Try to do it carefully so that the colors should not
go inside the leaves. It's okay if a little bit
of blending is missing. When we will add second coat, more focus on the blending part. Slowly, slowly, the background is filling and just
blocking the background. Very simple and easy way to create the ripples
with this method. Just enjoy the process
of filling it up. Once we are done with
all these fillings, we'll now do the
detailings also.
4. Leaf Ripples - Water Details: Welcome back. Let's start with
more of the water details. Now my background has
dried completely. We'll add now the
second layer onto it. First, I will add the ripples and the little darker
shade first on the sides. Just adding one more coat and
then we'll add the ripples. You can use your
round brush here, bigger size round brush, or you can use your flat brush, whichever brush you
feel comfortable with, you can use those brushes. I'm using similar colors and I'm just trying to add one
more coat on this. So that the colors look more
uniform and more vibrant. So adding one more layer
of this same color. So just adding the lighter
color and now I'm more focusing about the
blending process because here blending
is important. After that, you will not be
able to do the blending. You can see I'm doing
section by section because acrylic
colors dry very far, you have to do section by
section, the blending. You cannot do completely
the entire thing with first dark color and then light color because by the time you will
move to light color, the dark color will start drying where you
have first applied. Do it in parts like one part at a time so that it is easy
for you to blend the colors. Now here, you can see I'm
just blending it with my round brush and just pushing the lighter color towards
the darker color. This is how you have to
do the blending process. If you're still struggling with the blending of colors
and everything, there is a class on Skillshare, which has a complete Bigner
acrylic painting classes. You can watch that.
Try to follow each and every process slowly and very
peacefully, very patiently. Don't do all these paintings in a hurry because
whenever we do any such type of paintings which has a lot of details in a hurry, there are chances that we
may ruin our painting. Do it slowly, take your time. No need to do it in a hurry. Whenever you are doing the
second coat of the painting, wait for the first coat to dry. Don't overdo on
the wet coat only. First wait for that to dry and then apply the second coat. So I'm applying the second coat once my first coat has dried. If I would have applied
it on the wet coat only, my color would have started coming out, the
background color. This happens when
your acrylic colors become sticky and when you
apply the second coat on it, on the wet part, the
colors start coming out. Wait for the first coat to dry, then only apply the second coat. You can see how I'm
blending the colors. I'm just rotating my
brush in circles and I'm just filling it the first
with a darker color, and then I will blend it
with the lighter color. Just taking the lighter
color and putting it all around and I will blend it with my blender brush or you can use your mop
brush for blending it, or you can use your thick
round brush for blending it. Any brush you can use
for blending the colors. First I'm just applying a
thick layer of color onto it, and then I will focus on the blending part because
whenever we apply thick colors, the colors will
not dry very fast. Try to apply thick
colors and then to the blending with
your damp brush, and just with a
very light pressure of your brush, you
have to blend it. I will take my blender brush. The Mbndra brush will
be a damp brush, means it is wet and I have removed all the
water from my brush, and then I'm just moving the brush in circles
and I'm just trying to blend the lighter color
with my darker color. So this is how I am
doing the blending. If you don't have
this blender brush, you can use thick round brush, make it a damp brush and
then start blending this. You can also use
your flat brush, which has a thick hairs that also you can
use for blending. Any brush you can use, just make sure that don't push the dark color towards
the lighter color. Always push the lighter color
towards the darker color. So once my blending
will be done, then I will add the ripples. You can see how the
blending has been done. Now I will start adding the ripples with my
round brush again, taking the mix of
the darker colors, that is the Persian blue and
pains gray and just adding some nice circular
shapes of the ripples. Tick colors I'm taking. My color is wet. My background color is wet, my above color is also
wet and I'm just adding this darker colors of these
ripples here as you can see. Once I will add all the
ripples thick colors and then I'll start blending
it with my blender brush. Very easy technique of
doing the blending, first you apply the lines and then with very
light pressure, we will be blending
all these lines. And see how I have applied
the lines all over. You can also apply some
of the lighter lines onto the darker area and then you
can just blend their colors. Now first, I will
blend this color which is in the center
with my blender brush, damp brush and W a very
light pressure of my brush, I'm just trying to blend
the lines which are there. Do it very slowly and patiently. If there is a lot of
color on your brush, remove excess of color from
the brush and then start blending because sometimes it happens when you start
blending the colors, lots of colors sticks
onto your brushes. Again, remove all
the colors from your brush just by wiping it with your cloth and
then again blend it. This is how we have to
blend the entire thing. Just make sure that none of the lines are very sharp lines. They should look
like blurry lines. Very easy way to blend the
colors and you have to make sure that both background
and the upper color is wet. Then only this blending
process will take place. Otherwise, there
will be sharp lines.
5. Leaf Ripples - Water Final Details: Welcome back. So let's start further with the
water detailings. So now I will add a
little lighter colors. My background is still wet. It is not dry. So
I'm just adding more of these lighter
colors in between. And those colors also, I will blend with
my blender brush. Use thick colors so that
you can easily blend it. Don't use thin colors. So do it slowly carefully
using your round brush. So you can see how I'm adding
it between the darker ones. So a little bit of lines, also, I will add to the darker parts
just to add more ripples. And now with my blender brush, I will just try to
blend all these. Whenever you are using blender
brush, use damp brush. Don't use the wet brush
or the very dry brush. Use damp brush, wet it in water and just remove all excess of water and
then use this brush. Then you will see the
effect which is coming out. It's very beautiful
and very neat also. So you can see, I'm just
trying to blend all the lines, all the sharp lines
which are there just to make it more blurry. The lines. If you don't have this brush, you can use your
round brush also. You can use your thick flat
brush also for doing this. So just do it very
slowly and carefully. One by one, the ripples,
the lines which are there. So this is the entire
background which you can see. Now we will start
doing the middle part. Even if my colors have not
dried the background colors, still, you can do
the center part. It will not affect the
colors which are wet. But again, when you are
doing the center part, you have to be careful that your hand should not
stick to your background. So when it is wet, or you can wait for
the background to dry first and then
do the center parts. It's totally up to you how you want to start your painting. So now we will be
doing the center part. So for the center
part, I will first take the rigor brush
or the liner brush, and I'll first make the outline, which has disappeared because
of this whole coloring, as you can see, which we have
applied in the first part. So I'm just outlining
this with Pains gray this time and just
outlining all these thick lines. These are not thin lines. So try to make it
like thick lines. Don't make it very thin. So just drawing the lines all over. So once you have
drawn the lines, now you know where
to fill the colors. Wait for that first
color to dry. These all colors dry very fast, as you know, the acrylic
colours dry very fast. So by the time you
will do the painting, the colors are already dried up. So now we have
taken three colors. That is the so let's start
painting the middle part. So this time again,
I will be using my round brush and taking both Indian yellow
and raw umber. And I'll first apply it
on a little bit of white, also, I will add
because these colors are a little translucent. So white makes the
color a little opaque. And I'm first trying to
mix these two colors, these yellows and just trying to apply first on the background. And the corners, I
will be making it a little dark by using
this burnt sienna. So these are the corners which I will be making
it a little dark, and I will try to blend this color with
the lighter color. First, I will apply
the dark color, and then I will
wash off my brush, and then again, I will
take the lighter color and then I will blend it
with the lighter color. So this is how we
have to move on with painting of this
entire leaf part. So you can see I first
applied this lighter color. That side is the darker color. So mix of the light and
dark color is there. Wash off your brush,
remove excess of water and try to blend the colors
with the darker color. So this is how we do the blending inside any
object or anything. Just rotating it in circles and try to blend it with a
very light pressure. So these are some of
the techniques which is used when we paint the
objects or anything. Just rotate your brush
in circles and try to fill it the entire process. Whenever there is corner, I will make it dark
and the rest of the areas in the center
is mostly light. Slowly take thick colors and try to fill the colors
inside this leaf. You can see already
this warm color is looking very beautiful inside this cool color. So it's very vibrant color. It's coming out this warm color. So once you do this
whole leaf painting, it will automatically
this color will pop out from the cool color. So you can see, I've just
put the darker color, and then with the lighter color, I'm just trying to
blend these colors, moving the brush in circles. So I've just zoomed in a little so that you can see
it more clearly how I'm doing the blending of colors because this base
painting is important, how you are filling the colors. Somewhere it is dark,
somewhere it is light, especially in the
corners, it is dark. And in the center part,
it is light in color. This is how you have to
fill in these whole leave. You can put two leaves
also if you want, you can put one leaves. Any like two to three
leaves also, you can put. It's totally your choice, how you want to paint
your leaf structure. So this is the process,
how we paint the leaves. Just rotate your brush in circles and try to
fill the paint.
6. Leaf Ripples - Leaf Blocking: Welcome back. So let's start
further the leaf blocking. So you can see more than half we have already done,
only few is left. So again, the corners
will be dark, and the middle part
will be light in color. So this is how we have
to move the coloring. Fill all the details
and do it very slowly, especially the corner parts. Don't especially the color should not go inside
the water part because we have already done. Suppose, in case if it goes
also just you can remove or you can redo it just by using the
same background color, but wait for the
first color to dry, then only redo that. So this is how you can
correct your mistakes if it happens if some of the colors come out
of the boundary line. So every time you
have to wait for the first background
color to dry, then only try to do
the second coating. So you can see how I'm just
trying to fill the colors, especially making the corners dark and the centers
little light. So this makes the leaf look more realistic
since it is a dry leaf, so it makes the leaf
little more realistic. So just making some
more darker patches to the corners and then trying to fill
it with the yellows. So once we are done with all
the filling of the things, then we will try to
draw the veins of the leaves which are there
once this filling is done. So we're almost done with
the filling of the colours. Now we will add
some details to it. So the details which little
bit of more lighter color in the parts which in the center
of the leaf especially. Making a little bit more
light in color, the areas. So now you can see the
whole coloring is filled. You can see how bright
this beautiful warm color is coming up on this cool color. So just adding a little
bit more lighter colors and taking my again, round brush and making
the lighter lines. You can see it is more of
white and less of yellow. So just making the lines
thicker lines on the edge of these leaves just
to make it look more popping out, more vibrant. I will be outlining
the entire area. You can see I have outlined the entire area with
this light color. Now, a little bit
of lighter shades, I will just add to the
sides just to make it look a little more realistic. So I'm just trying to make
it a little look more real. Just making it a
little bit more shiny the above part because the sun rays are falling
on that part. So making it a little bit
more lighter in color, just by adding some
more whites to it. Making it more vibrant and
more white and light in color. Do all these processes
very slowly and very carefully because already we
have done the background. Now I will just make a line, which is the stem
of this leaf with my white and this
Indian yellow mix, adding one thick line. So we're almost done
with the blocking. Now we will be doing the detailing part. B
7. Leaf Ripples - Final Details: Welcome back. So let's start
with our final details. So now we have done the
blocking of the leaves. Now we will be doing
the detailing. You can do second layer of
blocking of the leaves also, if you feel that
it is not correct, if you want to smoothen
up a little bit more. But I feel that in one coat
it has come up very well, so I'll not be doing
the second coat. Now I'm just adding thin lines in the ripple lines
which you can see, very thin lines
with my rigor brush mixing this white and
this light blue color, adding some of the thin
ripples which are there. Also taking pains gray and just highlighting the
lines of the stem. Also, I will make a
little bit of lines, which I think have a little gone because of this
yellow colour filling. I'll just make all the lines
a little bit more brighter and more visible using
pains gray color. Just outlining it one more time. Now, this is not compulsory
if you feel that these lines are perfect for
you, so you can leave it. But I feel that in some of
the areas the lines have gone because filling
off this yellow color. That's why I'm
repeating it again. Now, again, I will
take my blue color with a mix of white, just make the color
a little fluid. Again, we will outline
the outer part of this dark line, not
the inside part, the outer part, just to make this painting look more lively, more vibrant and
more three look. I'm outlining the outer area. Try to use thin colour. Don't use very thick colour, so just outlining it. Whenever I take any
reference image, I don't do the exact copy. I just do a little bit more of my innovative steps
and techniques also to make the painting look more beautiful and more vibrant. Just highlighting all the
areas as you can see, You can see there because
of this light blue outline, this whole leaf structure has become more beautiful
and more vibrant. Now I will add the lines, that is the veins with my this born Siena and
a mix of paints gray. Again, use fluid color. Don't use thick
colour when you are drawing lines, any veins. If you will use thick colour, then thick lines
will be created. Try to make it very
thin and then use this color using
your rigor brush. Brush and draw very
thin lines as possible. You can see how
thin the lines are. So I really enjoyed painting this whole leafy pad
and the whole ripples. I hope you too. And if you
are trying out this project, do tag me or share this project on my Instagram that
does Moni Art Gallery. I will love to reshare
it on my stories. And we will be doing the
second painting also, that is the boat painting. I hope you enjoyed
doing this like I did. I really enjoy doing
this painting. It has come out really well. I'm really happy with it. Just a few veins and
detailing is left, and we are good to go
with this painting. Just a little bit of lines, I will add to the
darker parts also, some small ripples and
then we are done with it. This is it. Let's meet
in our next class, which is the boat painting.
8. Boat Ripples Background Blocking: Come back. So let's start
with our second painting. That is the board painting. This is the sketching
which I have drawn. This sketching will be there
in the reference photo. You can check it out
and you can draw it by yourself to the canvas, which is already primed and we'll start
painting over here. So let's talk about the colors which we
will be using here. Let's talk about the colors
which we will be using here, similar colors as we used
in the previous painting. So the first color
is Prussian blue, paints gray, light, blue, Tallow turquoise and white. All these colors we
will be using for the background painting
using our flat brush. So we will be moving
our flat brush in form of circles like how the
ripples are moving. Similarly, we will be
moving the flat brush. We'll start from the corners and then we'll do
the center part. So let's start first
with this color that is the Prussian blue and a little bit of
turquoise mix sorry, not turquoisPains, gray mix because we
want a very dark color. That's why we have to
mix a little bit of the pains gray color,
not black color. If you don't have pains gray, you can definitely
use black color. But again, when you're using black color, don't use too much. Otherwise, the complete painting will turn out to be blackish. So try to make it a little
bit of dark bluish color. And if you are not having
the Prussian blue, you can use any blue, add a little more
amount of black to that to make it
a dark blue color. So you can see, first I just focusing on the
blocking of colors. So the sides are mainly
dark and the inside is mostly the ripples, which you can see over there. So first I just adding
the dark color. And you can see it is
a thick coat of color. It is not very light color
and very thick color. Don't use too much water. Water should only be
there on your brush. And rest are complete
thick colors. When you use thick colors, the colors will not dry fast and you can easily
blend the colors. You don't need any other
medium to blend the colors. Especially when you are
living in a dry weather, the colors dry very fast
when you are using acrylics. So better use thick color
and apply it on the canvas. Now I will be using
my round brush, mixing this, put the
colors together. And first, I will
start making in circles with this brush. I'm just filling it up, taking this blue and the
tallo turquoise mix, and a little bit of
this Prussian blue also mix and trying to make the
ripples with light color. So take your time and
do slowly because this is a little time
consuming method when you apply this
type of method. Now I am just first making
the shape of this whole, boat which is there, and
then I will fill the colors. You can also put here the
masking fluid which comes, and then you can paint it. That is also an easy option so that the color should not go inside the object which you have created.
That also you can do. Or you can just create
a simply line with your color and make sure that the colors don't
go inside that line. Even if the colors a little
bit go inside that line, you can easily correct it because these are
acrylic mediums. You can always
correct the colors by overdoing on top of it. Now I'm using a lighter color and making the circles
as you can see, taking a little bit of white, and again, adding the
more lighter version. Like this, I will be
making the circles, as you can see in the picture. So alternate dark
and light colors, I will be adding, and I will try to blend
the colors also. Like in first code, if it is
not blending, it is fine. But whenever we will be
doing second and third code, we will try to
blend that colors. You can see I'm
just again taking my light color and trying to blend it with
the darker color. So this is how we have
to do the blending, mixing first the darker color, then the lighter color, and make sure that both
the color has to be wet, then only you will be
able to blend the colors. So do it carefully,
follow my steps, and I'm sure you will be
able to do this painting. If you have never tried
acrylic painting, you can watch my class,
which is for bigness, especially how to use Acrylic, the color wheels, color
compositions and color blending. Everything is there.
You can see in my class descriptions the
link you will get there. So you can see I'm just
putting the colors first, the dark, then the light. Like this, we have to make
the colors in circles. So this is how we have to paint the entire background coating. Likewise, you have
to blend the colors. A little bit white, you can mix because sometimes
the colors don't pop out the light
colors when you mix this light blue
and this turquois. So you can add a
little bit of white also in between and
slowly just make the circles like this and
alternate light and dark color, we have to first make
the background details. You can do this painting
even in Gauche also. Gauche will also work very well when you are
doing this painting. If you are not aware of Gauche medium or something,
you can watch my class. There are many classes of gauche landscape paintings
which are there, which are very easy
and easy to follow. If you have never tried it out, to try it out and
check how it looks. So just trying to make these ripples first and just filling it with
the dark color, especially the corners of the canvas and just making
the circles over here. A, now you can see here I have put already the darker color. And since my darker
color is wet, so my lighter color is easily blending with
that darker color. So this is also one of the technique of
blending the colors. First, I'm just
making the ripples. If in first code, you are not able to blend the colors, it's
completely fine. You can just use
these outlines first, and then in the second code, you can do the blending.
It's perfectly fine. We are just focusing on
here the blocking part. So focus on the
blocking of colors, how the alternate colors you
have to do the blocking. So similarly, we will be doing here also below and leaving the area which is the
reflection area of the board. The rest of the areas we
will be covering like this. If you don't have
any of these colors, just use dark blue
and light blue and you can make this texture. Any color you can use, there color is not a boundation. You can use ultramarine blue. You can use Kobal blue. You just have to add a little
bit of greenish color. Somewhere it is yellowish. When you will add a little bit yellowish to the blue color, it will turn out to be
a light bluish color. That is the sea green color.
That also you can do. So any color you can use, color is not a boundation. Here, my focus is on how
to create this painting. Through ripples, you can use any color background,
whichever color you want. Any blue, you can use
ultramarine cobalt or serleium. Just if you want
to use dark blue, add a little bit of black to it. If you want to use light
blue, add white to it, and a little bit yellow to it to make it a little greenish. So this is how you can
just make the colors. Here, also, I'm just
trying to fill it up, leaving the area which
is the shadow area. Just taking blue now. I've just applied the
lighter color in between, I'm just adding
those blue colours. You can see on top
of this dark color, I've just applied
this lighter color, and I'm just trying to blend
it with the dark color. This is how you have to do
the entire ripple parts, leaving the shadow part. Even if some colors
go inside the shadow, it doesn't matter because
ultimately we have to do that part with dark color, that is the black color. So it is okay if some of the colors go inside
that shadow part. This is the whole blocking. Now we will start more of the
detailing of the ripples.
9. Boat Ripples Blocking Reflection: Welcome back. So
let's start further. So now we will start
with the blocking here. I've taken black
color as you can see, and I will just do the
blocking of this area, which is the reflection part. So let's start first
blocking this. So you can use any brush, whichever brush you feel like, but first we will
do the outlining and then we'll start with the blocking so that
the areas where we have to block in the
reflection is clear. I'm just making
first the outline of this reflection first. Little bit of area is
covered with this color, so I'll fix that I'll
just outline it. So whenever you are
doing any outlining, make your color fluid and use your rigor or liner
brush for outlining it. So once we have
done the outlining, then we'll start
with the blocking. You can see I have outlined
each and every area. There is a part which is
left with the blue color. That also I will cover it up and we'll block in this part
with complete black color. Try to use mars black
or carbon black for filling up this area, not the ivory black because ivory black is a little
transparent color. Just using my round brush and I'm trying to block
in this entire area, which is the reflection area. Now, whenever you are
using any blocking thing, use a fluid color. It should not be milky
color, you can say, it should not be a very thin
color or a very thick color. And my water is there on
my brush and I'm just picking the colour and mixing some water
with my brush only, and I'm just colouring
the whole area here. Like this, you have to
fill in the colors. Mm. We have just done one
coat on the background. There are two more
codes to be done. Then only this whole
background painting will be complete. First, I'm just blocking this
up and it's almost done. This is just the first blocking, don't worry about it. If some parts are electro
is not even, it's okay. We will be doing at
least two more codes and then you can fix it up. Also covering the area, which as you can see, it is
left with a darker color, covering it up with the paints gray and a
little bit black mix. Later on, we'll fix the ripples. Let's now do the second at of the rippers on first one side
and then on the other side. So let's start with you can
start with flat brush also. You can use your round brush whichever brush you
feel like you can use, but here I will be using a little bigger size round brush that is of size six
or eight you can use, depending upon the
size of your canvas. If you're using a
very big canvas, then try to use a
little bigger brush. So it all depends upon the size of the canvas
which you are using. My canvas is not very big, so I'm using six
and eight number. So making again, same thing, first the light color, then the dark color like this, I will start blocking again. Same way which we did
in the first one. So do it slowly, take your time and don't mix too
much water in your color. Water should only be
there on your brush. When the color is thick, the colors won't
dry very fast and you will be able to
blend those colors. So try not to use too
much water in this. You can see slowly,
slowly I am just creating the shapes and now
it is becoming more darker and clear the
shapes which I'm making. I've just added a little
white to this lighter color. Again, I'm making the lines in the darker one also and
then the lighter ones also. You can also blend this with
your fan brush or you can use the mop brush or blender
brush to blend this. If you don't have
all those brushes, you can use simply
your thick round brush to blend these things. So this is the second
type of painting, which I'm showing you over here. The first type is a little easy. This is a little bit of time consuming and a little
bit of complicated also. But if you will follow
each and every process, I'm sure you will get it. So try to do it very slowly, take your time, don't
do it in a hurry. So slowly, slowly
alternate colors, one dark, one light like
this, we have to move on. Once we have done one side, then we will move
towards the other side. So slowly slowly, I'm fixing
the shapes also and I'm making it more circular and I'm trying to blend
the colors also. You see the color difference between the first one
and the second one, it is becoming more and
more bright and popping up. So that's why we have to do at least two to
three codes when you are using acrylicon canvas. Again, I'm just
applying another layer. Again, dark, light, dark. This way, you have to move the colors and simultaneously
blend the colors as well. It's very easy way of doing it. It's okay if the colors are
going inside this boat. We will be coloring this. We will fix that. It's okay. It's perfectly fine if
the colors are going inside a little bit
in the boat part. Like this, you have
to move in circles. Enjoy the process and do
it with full patience. You can see I'm just
blending the colors, the dark colors, and
the light colors. Mostly, I'm pushing
the light color towards the dark color. If I feel that the
dark color has gone, I'm again applying it. This is how I am trying
to blend the colors. Once we are done with this, we will also do the blending
part with a blender brush. So first I'm just
adding the colors. And Fully slowly, I'm just filling it up. Take your time and do it slowly. Don't do it in a hurry
when you are creating, especially the
background because background is very
important in this.
10. Boat Ripples Blending Background: Welcome back. So
let's start further. So again, we will be doing the part which is on the
reflection part which is there. You can see there are lines
which are not visible, the ripples, the darker lines. So we will fix that
with our round brush. So let's start with
first the darker colors. So first, I will apply
the darker colors on the sides of the canvas. So slowly, slowly, I will
move towards the other side, and I will start filling the lighter colors also with
a mix of darker colors. So slowly, slowly, we have to create the nice ripple shapes, the round shape of the ripples. That's what we want over here. So first, I'm just
applying the darker color. Then I will apply
the lighter color with a mix of taloturquoise, and I will try to blend this
color with the darker color. You can see I'm not washing
off my brush again and again because all these colors
are similar to each other, even if a little bit of mix will be there,
nothing will happen. The colors will only change to dark and light
color. So it's fine. Every time you don't have to
wash off your brush and fill the coloring part because
both the colors are similar. It's not much difference. Now I'm just adding
little white, and I'm just applying more
and more ripples to it. So likewise, we have to fill this entire part with ripples. So you can see how when we are adding the
second code to it, it becoming more
and more beautiful. So the more time you
give to your painting, the more your painting
will come out very well. So whenever you
are painting this, just check out how it is looking where you feel that there
is light and dark shadow, likewise, do it slowly.
Take your time. Don't do it in a hurry. I would not suggest to do
this painting in a hurry. Take your time and do it. Take your own time,
take tea breaks, whatever you want, and do it. Because these
paintings take time. So you can see slowly, slowly, I'm just applying the dark and
light color alternatively. Wherever I feel that there
is only light color, I'm applying the dark ripples, where I feel there
is only light color, then I'm applying
dark and where I feel that there is dark, I'm applying the light colors. So likewise we have
to move like this. Now, size of the brush, you can take any size depending upon the
size of the canvas. My size of the canvas is 6 ", but if you are doing
on a bigger canvas, use bigger size brush
like six or eight. This is the four number
of number brush. So you can use bigger size brush when you are using
a bigger painting. Even ten and 11 will also work if there is a very
big size painting. Like I have done in
one of my painting, which is 16 by 20 inch, the same painting I have done, but I have used a bigger
size brush in that. And similar painting it is. If you will see on my Instagram, that is Mohini Art Gallery, you will find the bigger
painting as well on that. So this is the whole idea. I wanted to teach you guys this painting because I
really liked this one. When we were small, we used to make paper boats, and we used to put
it in the water, and we used to especially during the rainy season when there was a water
logging or something, we used to make paper boats, and we used to just put it in
the water so that it swims. So this is how we have
enjoyed our childhood. And this is one of
the memory which I remember that making
of the paper boats. I hope you have also done
that in your childhood. So just trying to make more and more
vibrancy to these colors, again, you can see I'm just
adding the darker color. Then some lighter
color also I will add. First, I'm just making it dark just by adding a little bit black also to this to make
it a little bit more dark, very little amount of black, not too much because already
paints grazed there. So don't add too
much black to it. Otherwise, everything will
turn out to be black. So just I'm taking thick
colour, putting the colors, and then I will put
the light color, and then I will do
the blending part. This time, the
blending part I will be doing with my blender brush, you will see over here, which is a very good blender
brush from Princeton. And it's very, very good brush. I really liked that
brush when I bought it. It's very thick brush from
the Princeton company. So I'm just using you can
see the light color now. Already, my dark color is wet, so I'm just trying to put
the light color in between, and then I will blend it
with my blender brush. You will see the magic when
the blender brush works. So whenever we are blending it, I will just wet the brush, remove excess of water, and then I will be using
that brush over here. So that means we have to use damp brush for blending
the entire thing. Now, once we are done
with the blending, then we will move
towards the other side. First I'm doing the one side, that is the third coat
which I have put. I'm just blending those colors, as you can see with
my blender brush. I'm moving the brush in the same direction like
I have put the colors. So don't press the brush, do it with a very soft hand. If you don't have blender brush, use round brush, which
has a thick edge, not the pointed edge. Use that brush to
blend it or you can use the synthetic fan
brush for blending it. So any brush you can use
for blending this thing. But this brush really
creates magic. It really blends the
color very well, as you can see over here. Now I will apply a little bit
more lighter color to it, and then again, I will
start blending it further. I'm just putting some of the lighter colors in the
darker color portion, as you can see, and
then I will try to blend these colors
with my blender brush. Very slowly and with very light hand you
have to blend it. There should be no sharp lines of these colors should be there. That's why I'm
trying to blend it. My background is also wet, so it is easily blending
with the background color. See how beautiful that
one side is looking. Now we will do the
other side also, the part which is the
below part of the boat. So everywhere if you are
doing the canvas painting, try to do at least two
to three ads of it, then only that vibrancy of
the painting will come up. And take your time and do it. Don't do it in a hurry. I would not suggest to do these types of
paintings in a hurry. It is not a bigner
level painting. It is a little intermediate
level painting. So do it slowly. Take your time. Watch first the video, then do it or you can
do it with me also. That also you can do. So any whatever is preferred, whatever you feel like
you can do like that. So here also, I am just
blending the colors. So you can see how it is
looking after blending. Oo,
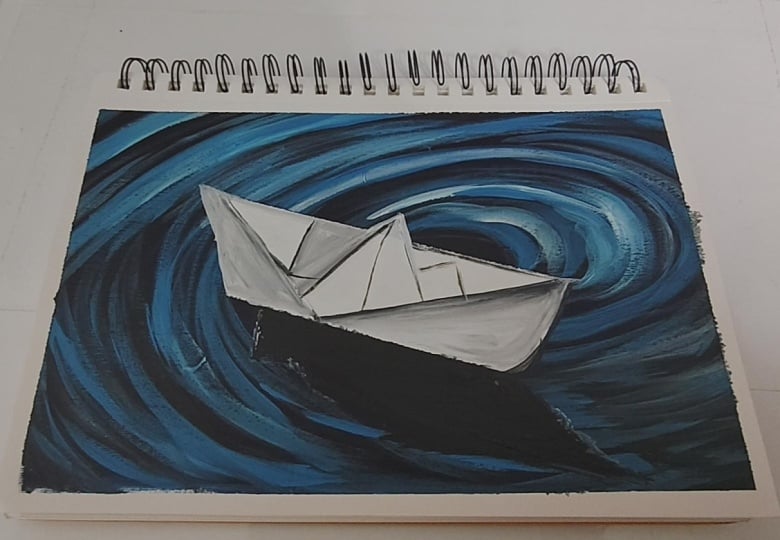
11. Boat Ripples Boat Blocking: Welcome back. So now let's
start with the boat blocking. So let's first redo
the reflection part. Let's do one more time, the blocking of the reflection. And then we'll start
with the blocking of this whole uh boat, little bit of dark lines I'm
just adding here and there. So here I feel that there
is lots of white lines so just adding the darker colors. And now let's do the
little blending, still you can see my
color is wet behind, so it is not mixing it
with the lighter color, it is becoming lighter. So we will wait for the first the color to dry a little bit, and then we will do, again, a little bit of
the darker lines. So now let's take
the black color and just fill one more coat
on this black part. Again, here also I'm using my same round brush
and I'm fixing here a little bit of shapes which has been removed because
of these lines. So I'm just fixing the shapes also of this dark black color, black reflection which is there. So doing one more
quote on this to make it more prominent
this reflection. Oh. So you can see now it is popping out that reflection part and a
little bit of lines also, I will add to this
reflection part. So just making first
the shape properly, and a little bit of lines I
will add to the reflections. So a little bit of shapes these some of these are the
shapes which are there, which has been removed
because of these blue colors, which has gone inside these reflections when
we were painting it. Also, some lines I will add to the outer part
also a little bit, just to make the
reflection more look real. Now, once the
reflection is done, we will be doing the upper part of the boat which is there. So first, we will
outline it with the nice light gray color. So here, also a
little bit is left, so I'm just filling it up. So first, I will just outline the entire thing
with gray color. So taking my brush, which is the round
brush of smaller size, a little of two or
four you can take and take white and a little bit
of mix of black in this. We have to make a
light grayish color, not very dark grayish color. So I will just make first
the lines, the outer lines, also the inside lines, I will be drawing with this
nice light gray color. All the lines I will be
drawing with this color. So these are quite thick
lines which I'm drawing. These are not very thin
lines, you can see, because already I'm using
a thick round brush. These are all thick lines, which I'm just outlining it. Once I will outline the shaves and then I will start
filling the colors, the colors is actually
white and gray only. So different shades
of gray is there. So I'm just first outlining
so that it will be clear that where we have to put the colors and where we don't
have to put the colors. So just outlining it with
a light grayish color. And then we'll start doing
more details in this. You can see already
it is looking so beautiful once it
has been outlined.
12. Boat Reflection Background Third Layer: Hello, all. Welcome back to background third
layer details. So you can see we
have already done two layers and my background
has completely dried. Now I will be doing the second, sorry, the third layer
again with my round brush. First, I will apply the colors, and then I will blend it
with my blender brush. So I'm just taking
a few more colors because my colors
have got finished. So just taking a little
bit more of the colors, and then we'll start
with the painting. I've just taken the paints gray and a little
bit of the Prussian blue. And again, I'm repeating the
same process as you can see, same ucular shape and
mixing both the colors, both the dark bluish color, and just making the one area
a little bit more darker. And then I will blend it
with the lighter color. So this is how we have to do
at least two to three coats so that the vibrancy
of the color is there. The more you will
do the layering, the more the color pops up whenever you are
using any canvas. So try to do at least
two to three layers of coloring when you're doing
acrylic painting especially. And if you're using canvas, if you're using paper in one
or two layer, it is fine. But if you're using canvas, at least two to three
layers is must. So I'm just repeating
the same process and same thing thick
colors I'm adding. And then I will start with
the blending process. So taking the lighter
color and applying it everywhere just to make the colors look more
bright and more bold. And then I will start with
the blending process. Then again, I'm adding a
little bit more lighter color in place where there
is a darker area, a little bit in the
lighter area as well, and just applying some of
the colors as you can see, So this is how we
have to slowly do the painting of the background. You can see there are
so many layers which we have added when we were doing. You must have seen
the first layer, and now it's the third layer how vibrant this is looking when
the third layer comes up. Now once we have applied
all of these colors, now I will do the
blending part with my blender brush
using damp brush. So do very slowly
and try to blend all the colors very slowly. If there is lots of light
colors on your brush, just remove the
excess of light color from your brush and then again, try to blend those sharp
lines which are there. So this is how we have to do the blending of all
the sharp lines. It's a bit time
consuming process, but try to do it slowly. It's not required that you
have to do it in one go. Take your time and
do this painting because this painting requires time and requires
patience as well. Similarly, I will be doing
on the other side also. Just enjoy this cool
colour process of blending and try to
blend yours too. Wherever you feel there
is lots of light color, add some dark color, where you feel that there
is only dark color, add some light color. So this is how we have to do the circular part with a mix
of light and dark color. Adding some light color in the parts of the
dark color also, as you can see,
and then I will do the blending as we have
done on the other side. So you can see how bright and vibrant it is looking
once it has been blended. Also, I think a little bit of color has gone inside
this black part, which I will fix it again
by adding black color. So try to do it slowly, take your time and do
the blending process. This black part, I will
do it a little bit more because some of the colors have gone inside this
black part also. So taking a little bit
more of black color. And just applying one
more coat on this each and every process plays
a very important role. Even this black reflection should look vibrant
and more popping out. So that's why I'm applying
again one more layer of it. Also, you can see I'm
adjusting the shapes also.
13. Boat Ripples Boat Details: Welcome back. So
let's start further. Now we will do the
boat detailing. So now we will be doing a
little painting of this board. We have already outlined
it with gray color. Now I will make it a
little darker gray, and then we'll start
with the painting. So first, we will
paint this area, which is a triangular area. You can see over here with
a dark grayish color. And as we will go down, we will make it more
lighter and lighter. So transition will be
from dark to light. So this part will be like that. Similarly, the other side also we will be doing
similar way like we did it over here from
dark to light transition. So try to do it very
carefully and slowly because we have already done
the outside background, and we are doing
the middle part. So try to do it very
carefully and slowly. If suppose if some of the colors go outside
your boundary line, you can just fix it by using
the same background color. So you can see I'm doing the other side of the boat
using the same color, again, the same transition
from dark to light. Oh. You just have to keep one
thing in mind that the edges, whatever edges are
there we have done, you have to do with
the gray color, and rest of the
center part will be light grayish and white color. So it is like that we have
to paint the entire board. If some of the shapes
are not proper, this is the best time to fix the shape of the boat
just with white colour. But make sure that your
background color has dried up. So you can see I'm just fixing the shapes
also and I'm filling the colors from dark to light transition
on both the sides. Similarly, all these edges
will be in grayish color, and the center part will be a little lighter grayish
and whitish color. So try to do it very
slowly, carefully, one by one, the area to
make it look more real. If any mistakes happen
or anything happens, you can always overdo it with
the same background color. But you have to
keep in mind that the background color
has to drive first, then only overdo
it on top of it. Just use a smaller
size round brush or the liner brush also you
can use for the lining. It all depends upon your choice, which brush you want to use, but for filling it,
use the round brush. So slowly, slowly,
I'm just making the lines and I'm filling up
the colors, as you can see. So try to do all
these paintings very slowly and very
carefully one by one, because this is the
main center of point of the painting where whenever
we see this painting, we'll first focus on the
center point that is the boat. So this has to be perfect. Try to make it as
perfect as possible. Especially the lines which
are the outer edge lines, it should be very
sharp and very clear. So you can see I'm making
this area a little bit more dark just by adding a
little darker gray color. Similarly, I'm doing it
on the other side also. This is how we proceed
slowly one by one. The outer edges also I will be doing with the liner brush. First, I will just fix all
the areas which are there. Now, just making a
simple line with the white and
grayish white color and also with a little bit
of blue mix with this white. I'm just adding some
lines over here also just to give a little
edge to this reflection. Very small small things make your painting
look more perfect. Now with my liner brush, I will just do a little
bit of lining also. So if you're comfortable
with round brush, you can do the lining
with round brush also. But if you're not comfortable
with round brush, use your lineup brush or your rigger brush for
doing all these things. So just do it very carefully, and all the edges should be
very sharp and straight. So you can see I'm doing
it again and again so that the area which
is the edge area, it should be sharp and pointed. Now I'm taking my
rigor brush and making it more pointed with
my rigor brush. So do it very carefully when
you're doing the edges.
14. Boat Ripples Final Details: Welcome back. So let's start final details of the painting. So I will just add
some of the lines with my rigor brush just to make it a little bit more more
ripples should be there. So wherever there is
the lighter lines, I'm just lighter colors. I'm just adding the lines
with my rigor brush. So nice thin lines and
thick colors I'm adding. I'm not adding thin colors
because I don't want this color to dry very fast because I have to blend
also these colors. So wherever there
is lighter portion, I'm just adding
these dark lines. And I will also be adding the lighter lines once I'm
done with these darker lines. So once I'm done with
the darker lines, I will also be adding
the lighter ones in the darker places and also in the lighter places
where there are lines. So just first adding
the darker ones, and then we'll start
with the lighter ones. So use thick color. Don't use thin color
because if it dries, you will not be able
to blend these colors. Now I'm taking the
lighter color, and I will just do
the similar process. And wherever there
is darker area, I will just add some lighter. Even on the lighter parts also, I will add some of these lines, and then we'll start
with the blending. You can do half of the portion and then blend it
and then again, do the half portion like that. As you can do it. But since
your winter has started, so my color is not
drying very fast. So it is possible for
me to blend the colors. But if you live in a
very hot and humid area, so do it in parts. First, do the first
part and then blend it, then do the second part,
and then blend it. So this way, you can
complete the whole painting. So if you are living in a
very hot and humid place and your color starts
drying very fast. So do it in parts and don't sit directly under
the fan or anything. Otherwise, your colors
will dry very fast. So you can see now
I am just blending the colors with my damp brush. This is my damp blender brush. I have wet the brush,
remove excess of water, and then I'm just
blending all the colors. So this is how you have
to blend the colors. If you don't have
this blender brush, you can use a thick round brush. We should not have a round
pointed tip on the top, it should be a nice round brush, but it should be
flat on the top, then you can do the blending. Even with your flat brush, if it is thick, you can blend it using your damp flat brush. Any brush you can
use for blending, but it should be a thick brush. So slowly, slowly,
you can see I'm blending all the lines
which I have drawn. Once we will do this
all blending of lines, we will just try to fix the
area which is the boat area, some of the pointed
edges and everything. We'll try to fix it. So you can see just trying to
blend all the areas there. So now we will be doing the little bit of the
fixing of this board part, just making some of
the areas pointed, just making both areas look
more white and more pointed. So especially the edges, the corner edges
and the above area, which is a triangular shape
area just to make it a little bit more
steep and pointed. Try to fix each and every area
where you feel that it is not properly pointed and
edges are not very sharp. Just try to fix it up. Doing it slowly one by one. Now making the above area which is there a little
bit more pointed. Because this area,
I feel it should be very pointed and very steep. I should have very sharp edges. So if your edges are very
sharp, it's completely fine. But if it is not, try to
make it as sharp as possible just by adding white colour and a little mix of black to it. So this is the way we fix all the lining part
and everything. If you feel that somewhere
the lines have come out, just take the background
color and fix it up. So that's what I'm
doing over here. I'm just fixing
the corner areas. So if you're trying out these both the paintings to tag me
or share me on my Instagram, that is Mohini Art Gallery. And if you feel that
acrylic painting is difficult and you
are not able to do it, first try my bigner lesson, which I have already attached
a link in the description. You can check it out, and then
you can do this painting. It will be much more easy when you will do that bigner level and then you will start this. So just try to do each and every corners very sharp and full edges
should be there. So you can see that edge and making it a little more pointed. So if yours is totally pointed, you can leave that portion, but if it does not, try
to make it a bit pointed. Now, just watch your painting at f that what all
things you can fix it. If it looks perfect for you, you can leave it here as it is. But if you feel that
something is missing, some of the lines
are not straight, some of the areas are
not properly done, this is the right time to fix
the things which are there. I know it is a
never ending task. You have to stop somewhere, but try to fix it as possible. You can see I'm just making the outer area more this white, just to make it more vibrant. Just outlining it all over with white color using
my rigor brush. So we are almost done
with this painting. I will teach you
the varnish part, how to do the varnishing of your painting with one of
the paintings I will use, and I will show you how
to varnish your painting. So before varnishing
your painting, just leave your painting for one or two days like that
and then do the varnishing. Don't do it all of a sudden. Once you have done
this painting, wait for the paint to settle and then varnish it after
one or two days. So just the final edge which I'm making. H. So I hope you enjoyed
this painting like I did. This is one of my
favorite painting which I thought of
teaching you guys. And I'm sure you will
also enjoy while doing this painting,
especially this painting. So do try it out and
share your projects. I would love to see
your project works. So, finally, we
are done with it. And thank you so much
for watching this.
15. Varnish: Welcome back. Let's see how to do the varnishing
of the painting. Now my painting has
completely dried. I will be using this foam brush
for applying the varnish, and the varnish brand which I'm using here is
from liquid tech, and it is a satin varnish, which I will be using here. So let's take out the varnish, and I'll just sprinkle some
of the liquid on my canvas. And then using my foam brush, I will just apply it in one
direction evenly, all over, as you can see, I'm not
pressing my foam brush, and I'm trying to apply this varnish all over
in a very even manner. And then to check if it has
applied or not all over, once you have applied all
the varnish all over, just pick up your canvas and see if it is shining
or not all over. Then you can see that you
have applied the varnish. So you can see I've
just applied it. I will just pick it up
and I will see if it has applied all over or
not, and this is it. Same thing you can do it
for the other one also, but try to do at least
two coats of varnish. So once the first
coat dry, again, add at least two layers of
coat on it, and this is done. Thank you so much
for watching. H.
 Mohini Sinha, Acrylic and Gouache Artist- Nature Lover