Transcripts
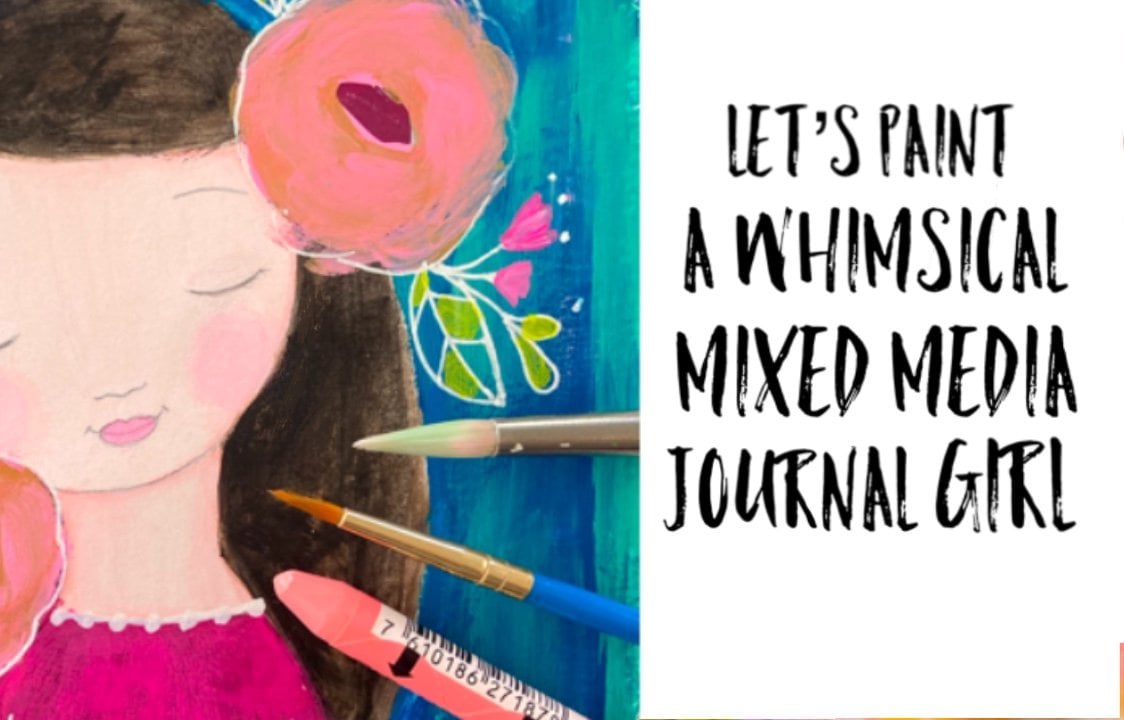
1. Class Intro: Have you been wanting to
loosen up your painting style, then this class is
definitely for you. All right, I'm Michelle per cat, founder of Michelle
protect studio. I create colorful and
whimsical inspirational art. I'm a mixed media artist,
floral painter, teacher. I'm a recovering
perfectionist in art school and for
many years later, I worked mostly in
digital illustration, but I suffered from
extreme perfectionism. When I started a daily painting
practice in my journals, my style began to loosen
up and when he began painting florals and
my mixed media girls, I was finally able to say
goodbye to my perfectionism. Together in this class, we'll be painting
a super cute angel using a loose acrylic
painting style that's perfect for
beginners or more advanced painters who'd like
to loose it up their style. I'll show you
step-by-step how to draw the beginning sketches to
the finished painting. And you'll only need
a handful of colors. So come on, let's get painting.
2. Supply List: First you'll need some
brown craft paper. I'll be using this scrapbook
journal from Desso. It's six by six, but don't worry if
you don't have one, you can cut a six
by six inch square from a brown paper bag
and you'll be all set. You can also paste it in your sketchbook if
it's big enough to. You'll need only
six colors, gold, pink, peach brown,
yellow, and white. It's a super simple
color palette. For my brushes.
I'm using a really old, well-loved flat brush. It's a six and then a two
round brush also well-loved. You'll need a white gel pen. I like both of
these Jelly Roll by Saqqara and also
uni-ball signal. They're both great. And I will be using the unit
ball signal for this class. You'll need a pencil and
also appear of scissors. You'll need a piece of brown
paper for your word collage. Not too big, just a small sheet. And also a water
container in a palette, I use this Tupperware
container all the time. I just take the lid off, flip it over and I use
that for my palette. You'll need an eraser. I'm
using a kneaded eraser. I'll show you how to use
it in the first lesson and then some paper towels to keep close by, and
that should do it. Let's go have some fun.
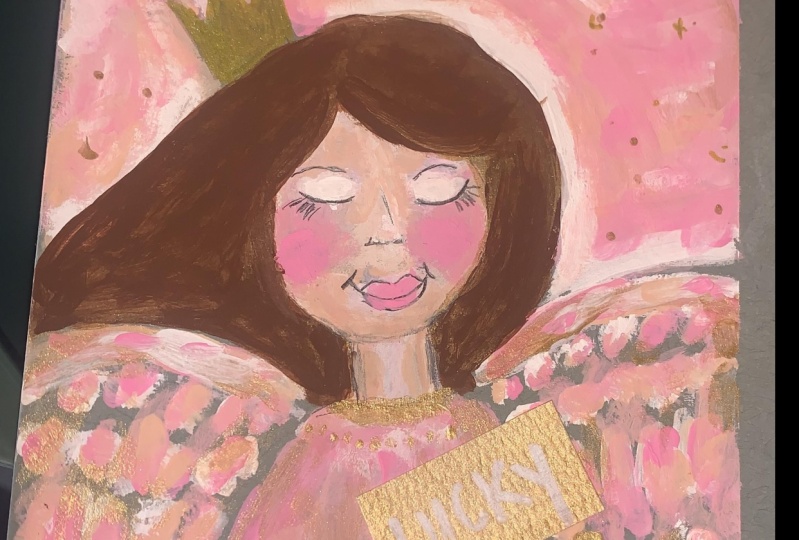
3. Sketching Your Angel: Just wanted to mention
if you're a beginner, so you can always practice this or any lesson in
your sketch book. First. Got my craft paper sketchbook, my pencil and my kneaded eraser. And I don't know if
you've ever used one of these. The really fun. They're kind of
like silly putty. If you need a clean eraser, you just pull it apart
and you can scrunch it up to a point to erase any area. They're just really
great to work with and they don't smudge or leave eraser marks like
regular pencil erasers. So to start, I added a line
down the middle very lightly, so I know where the
middle of the pages and where a need
to start drawing her head will be
drawing that in first. I just want to draw a circle right in the middle of the page. I don't want you to
stress about during a perfect circle minus
actually a bit square, but I like it like that. And I'm drawing it in
lightly because we'll be cleaning up the drawing
a little bit later. I'm drawing in two
lines for her neck. Now I want to give
her some shoulders and I'm going to bring that line right down to
the bottom of the page. The same with the other side. She's looking pretty
cute already. Then I'm going to draw a line for the top of her shirt here. We've got our basic shapes in. Now we want to add her wings. Her wings are gonna come off her shoulders just like that. Same on either side. Now we just want to get
her hair in place before we go on to the rest of the
wing details for her hair, I'm going to give
her some side bang and I'm going to bring
the line over lake that her hair is a bit higher
than the top of her head. So I want to start it
a little bit higher. I want to start at
above her head. And then coming down this way. Wonder here to be blowing
in the wind a bit. So I'm curving her
hair over to the left. Then another curve off the page. Then the same on this side. It's going to come back down again over her head this way. Then I'm going to make it
flowing to the left as well. So it's behind her head. I'm just going to erase those
lines that we don't want. She's looking awfully cute. I'm going to darken
up the lines a bit so you can see
them a little better. Now we can finish up our wings. Know, we have her hair in place. And I'm adding another
line here under the top line of her
wing to indicate that it's a little bit
thicker on the top. I want to do the
same on both sides. The feathers at the top
of her wing or sort of condensed and tightly
woven together. So I usually add a couple of rows of half circles
all the way across. Then the second row will be staggered so they're not
directly under each other. They still want
to keep it loose. I'm not concerned at all
about how perfect they are because there'll be covered
up when we paint them. So they're more like guidelines so we know
where the paint will go. Now the feathers will know start getting longer and looking like feathers a little bit more. So there are just two lines that come to a rounded
point at the end. I want to add a row of these
on both sides of her wings. The feathers at the
bottom get really long in there a bit diagonal. I'm just following the direction
of the wings up above. They're just straight lines. These lines start in-between each point of the
feather above it. It looks great. She
looks like an angel. Now. We're ready to sketch her
face and I'm going to add a line right
down the center of our face so we know where
the middle is just to help us with the placement
of our features. And then another line about
halfway across her face. So now we have a better
idea where the eyes, nose, and mouth will go. And it usually draw the eye. It's first I liked them a
little bit below the line and also a bit further apart than they
normally should be. And then a little bit
larger to where they look. It looks cuter for the nose that will go about halfway between
the eyes and the chin. But I usually like
to move that down a little closer to the mouth. For the middle part of the nose, I'll add a small U-shape. And her mouth is about halfway between the bottom of
her nose and her chin. I'm going to draw in the
middle of her mouth. I'm going to draw
a really big smile on her because
she's really happy. I'm going to put
some dimples, honor, there just two lines on
the outside of her mouth. And for her lips. I started about a
quarter of the way in and then just bring
her lip up towards her nose and then there's
a little indent the top of the lip and then over
to the other side. And the bottom lip is just one curved line that connects both
sides of the upper lip. Let's finish up her nose. For her nostrils there just
to use on either side. Now I think I'm going to
darken up her features just a bit because we'll be
painting over this. And we might just
lose a little bit of her features, but that's okay. We'll just put them
right back in. Not to worry. Then we have to
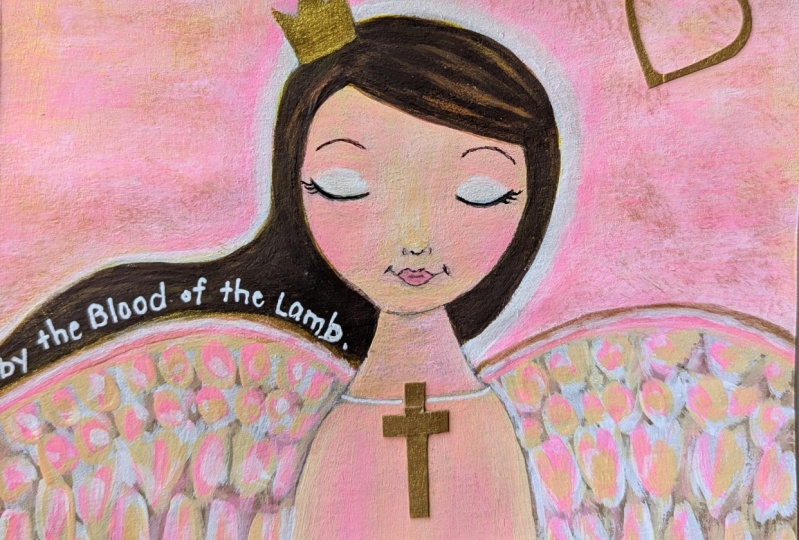
add some eyebrows, easy, just two curved lines. She's looking so, so cute and I'm so excited to paint her. Lastly, I'm going to add
a crown on her head not to pig will give her
a real cute one. I'll start it on the inside of her hair and add
three points to it. I'm making a point in the
middle a little bit larger. Just a really simple
and fun little crown for acute angel. So get ready for
some fine because we're going to start
painting our next. I'll see you there.
4. Face Painting: Okay, So let's start
painting our angel. I've got white, peach and pink, and I'm starting
out with the white and my number six flat brush. First, I want to
lay in some white. I'm not that concerned about
how messy it is right now. I'm adding white where the lightest areas of her
face would be her forehead, her nose, eyes, chin, her cheeks and neck. Displaying that in
really quickly. I'm going to wash my
brush off pretty fast. Dry it completely
because I want to keep going with the painting
while it's still wet. So it'll mix a bit. Now I'm rubbing in some
pink, getting really messy. Just blending it
together with the white. Maybe a little bit
more in her lips. Another quick brush
wash, drying my brush. And then I'm gonna go right
into the peach. With this. I'm just intuitively adding it or I think it will look best. And then you also want
a good combination of all the three
colors on her face, white, pink, and peach. But I don't want
it to be so thick. I still want to be able to see some of the brown
paper peeking through, even though it's painted over, it still comes through as
another layer of color. On my brush is clean again
and I'm going to add some more pink on her cheeks. Painting nice and loose. I love those rosy cheeks. And I'm going to go back into my white and add back some more of the white
highlights on her face, on her eyelids, nose, and chin. Now I want to press a bit
harder and do some blending. If they see an area that's a little too light or too dark, I can always go back in and add more of whatever it needs. I still want that good mix of
all three colors in there. I love these colors, the pink, peach in the white
mixed together, they're just so pretty. The white really softens
that pink so nicely because it's very bright on
this brown paper. So at this point, I'm adding color and blending it wherever I think the
colors might need to go. I'm adding them intuitively
and just spontaneously. Going to add some
more white highlights here on the side of
her neck and face, and a little bit more
on her forehead. Nose. Doesn't have to be perfect. Messy is better at this point. And let's put a little
more pink on her cheeks. I love it already and
it's not so smoothed out. So I can still see
all the brushstrokes, and this should be
fairly dry by now. So next, let's grab our pencils and put back
some of her features. Then give her face
some detail. Okay. So starting with her
eyelashes and darkening up her lashes, her lip lines, the lines under her nose. She needs those
dimples on her lips. Then we're going to put
back in her eyebrows, her chin, as well as
her face and neck. A little bit on her
hairline. Looking good. Now I'm going to take
my small round brush and wet it a little bit. I want to add some white on her eyelids to brighten them up. A little personality. A little bit on the
tip of her nose. Then next, I'm going to
add some pink on her lips. That's a little thick,
so I'm just going to dab it with my finger. Perfect. Then I'm going to add
some more pencil work to go over those lines. There's more definition again and put the final
touches on her face. Much better. Go over the
nose a little bit more. Give her some lashes. Like to put a few in the
corners of her eyes. Like three little lashes
there on the edge. Some eyebrows. Then let's also go over
her chin and the sides of her face. Okay. So I see a couple of areas
that need a quick touch up. So I'm gonna add a little
pink on her left cheek and fill in the space
by her right eye in our cover up that
white on the forehead. We're going pretty fast and
furious painting or face, so it's easy to
miss a few spots, but that's okay. We'll
fix it right up. Right now. I'm gonna put her
lashes back in real quick. I think she looks gorgeous. Next we'll be painting her top, so I'll see you there.
5. Painting Her Top: In this lesson, we'll
be painting her top with just two colors, the pink and the peach. I'm going to start filling in the color loosely and
randomly just filling it in. I'm adding peach and pink
wherever I feel it needs to go. Just trying to fill this
area with both colors. I'm going to wash
my brush off and dry it so it doesn't
get some mighty. Then letting them
mixed together. In some areas. I want a good mix of both the pink and
the peach together. And some of my
brushstrokes will be light brushstrokes and some
will be a little bit heavier. Just intuitive, fun process that I just love working
in this loose style a lot. I don't think too much. It's just fun to slap the paint on and smash it
around a little bit. Maybe just a bit more pink. I really just want you to have fun and play with the colors. You're doing. Great. Let's get painting
the wings next. I'll see you in the next lesson.
6. Painting Angel Wings: Okay, So let's get
painting her wings. In for this lesson, I'm using white,
pink, and peach. The first thing I'm doing
is adding a layer of white. I'm going to keep this
really loose and I'm coloring in the shapes that
we sketched in earlier. I'm not using a ton of
paint on my brush just enough to lay in a
light first layer, because we'll be
adding the pink and the peach on top of this one. I'm working pretty quickly, which keeps it much more loose and messy as
good for her wings. Messier is always more fun to. I'm not going to cover up all of the brown paper because
I love the color of it and it's got a great contrast against the white and
the other colors. It really makes them pop. I'm not filling in the shapes
all the way or perfectly. I just want light
loose brushstrokes and I'm just laying
in the shape. So the looser the better. Painting fast really helps
to keep things loose too. Now I'm going to
clean off my brush and dry it with my paper towels. Then I'm going to start right
in with my peach layer, the same way I painted
the white layer. If it mixes together with
the white, that's fine. But I don't want to
cover all of the white, just some of the white. This peach layer will just
be more loose and intuitive. Some areas I might
want to cover more of the white and some
areas and not as much. But wherever you feel you
want to do with the peach, you can cover up
more of the white. It's all up to you. This should dry quick enough
so that we can go right into the painting of the pink
layer, which is nice. I like to work that way. I hate to wait for paint to dry. I'm so impatient. But if the pink isn't
completely dry, That's okay. If we're layering and mixing
all at the same time. Is looking so pretty alright. I'm going to clean my
brush off and dry it again on my paper towels in, go right into the pink now, my favorite pink
ever bubblegum pink. I just love it. I think it's the
happiest color ever. In a little pink goes a
long way with this layer. It's looking like I
might need to back off a little bit
because it's super, super bright against
this brown paper and against the peach. It really pops off the page. But that's okay because I'm
going to go over this again with some white highlights
after finishing up this layer. Then it went to finish. I'm going to just
fill in some of the brown in the middle
of the wings while my brush is still
wet with the pink. Just to add a little
touch of color over the Brown In-between.
Looks great. I'm back in the water cleaning my brush off again
and dragging it. I'm gonna go back to the white and add some highlights
here and there. I'm randomly adding
some white mostly to the edges of the
feathers for more detail. So it's not all the same. Makes it look more interesting. Love how that looks. I think I'm going to add
a little bit more peach after I'm done with the white. Yeah, I think I'm going
to add the peach. I like that a lot. Then whatever peach
is left on my brush. When I'm finished,
I'm going to go in, just smash it around to fill
in those in-between spots. Just like it did with the pink. I just love it. In
the next lesson, we'll be painting
the background.
7. ANGEL BACKGROUND PAINTING: Let's have some fun
painting our background. I'm gonna start with peach, and I'm just moving
the paint around. Whoops, losing my paintbrush. It's an old one, but
I love this brush. This stage of the background. I'm filling in the
space with color. I'm not worried right
now about the placement. I just want to get
this area filled in using all three colors, peach, pink, and white. Just adding color at this point. I'm going to clean my brush off because I don't want
it to get to mighty. And it's a good idea to
keep your brushes clean, especially at the
beginning stage so the colors are
nice and bright. I'm using just some quick
downward brushstrokes. I'm going to add
some white while the paint is still
wet and let it just mix a little bit with the pink
and the pH here in there. Now instead of just
the three colors, we have two more we know have light pink and light
peach as well. I'm just using my intuition
for the background. And I want you to do the
same wherever you feel you want more of one
color in an area. More pink, more
peach, maybe white. I want you to just have fun
in work at your own pace. You can go fast
and furious or you can work at a
slower, slower pace. Now the background is
pretty much covered. So now I can start shortening up my brushstrokes a little bit. I can let the paint mix little bit at this point to flicking. So pretty I love these
colors together. I'm going to add
some more white. I'm going to add some
more white around her face just to make her look
a little bit more angelic. Maybe like a little halo. I think that'll be fine. Love that. If you get a little paint
in here, that's okay. We'll be painting that next. So get as messy as you
want for this layer. I'm going to soften up the halo, so it's not so bright. I'm going to go back
into the peach, start filling in and get
to work on that top area. Get that filled in
a little bit more. I really liked all the bursts
of color in the background. It's almost like fireworks. It looks so pretty. I'm making little decisions along the way during
this process. Where do I want more color? Is an area too bright? Should I add a little white
over it to tone it down? Do I want the colors
to mix together? To make the background softer? You get to make all these
decisions along the way, but I don't want to
stress about them. I just want you to get
excited about them. That's the fun of
abstract painting. You never know where it's
going to take you in. All the decisions. Add up to one big
beautiful painting. For the next few minutes, I'm just going to speed
this up just a little bit until we get to
closer to the end. And then I'm going to take my small round brush
and add a few details. I'll see you then. I'm using my small
round brush now to get some smaller details in. First, I switch my
brush to be able to get in-between the points of her
crown a little bit better. Then I'm going to add
a few other details. When I finished with this. I want to go over her halo with white one last time and
a couple of places. Just to brighten it up there
on the top of her head. Here we go. I also wanted to add a little more pop of white on the background
in a few places. That should do it. I love these colors layered
together like this. They look so pretty. Next we'll be painting her hair. So I will see you
in the next lesson.
8. Hair Painting : Now I'm going to add a
layer of yellow tour here. I'm using my small round brush. And after this layer will
be adding a linear brown. The reason I'm painting
with this brush is because I want there to be some
texture in her here, like there isn't real here. In painting it with the smaller brush will
give it this effect. I loved working this way. I love to layer color
instead of mixing it. And if they do mix it, loved to mix it right on top
of the paper or the Canvas. To me, it's so exciting
to see what happens and how the colors look
when they're used this way. I just love how pretty she looks so far with this technique. Nice and loose and
happy and fun. Okay, So I'm going
to let this layer dry and I'll be back to
paint the brown layer. Now I'm going to paint
a layer of brown on top of the yellow layer. And I don't want to
completely cover up the yellow with a heavy
layer of paint. I want this to be thinner
than the yellow layer was, so we can still see the
yellow underneath it. I'll be adding a bit of water to my brush occasionally if
the pink gets too dry, but I still don't want
it to be totally opaque. I'm painting the
areas on the sides of her face and neck a little bit darker because there would be some natural shadows there. Then to keep the paint thin
down on the rest of her here. I'm pushing down a bit harder on my brush just to
spread the paint around. But if the pink gets too dry, just add a bit more water. Acrylic does dry very quickly. I'm loving the texture
a lot and you can see the yellow
peeking through that. I'm going to move my
water in my paint over so I don't get
my sleeve in it. Whenever I weird anything white, something inevitably gets on it, paints spaghetti
sauce, you name it. I'm painting this the
same as the yellow layer, but I'm just switching
it around to give it some movement and
texture and the paint, because the entire
painting is so full of beautiful movement. So I wonder here to have
that same look in effect. She's looking
absolutely adorable. I'm going to let the music
play while I finished up her here and I'll meet
you back at the end. So the last thing we need to do is to get her crown painted. We'll do that next. I love her. She's so cute. I have my gold paint out and I want to get her crown painted. We're done with the painting. In the next lesson, we're going to add
some lettering collage to decorate her dress a bit. So I will see you there.
9. Adding Your Collage Word: In this lesson, we'll be
painting the brown paper with some gold and
then we'll add a word. And if you'd like,
you can add a phrase, but I'll just be
adding one word. I don't have to cover too
much space for one word, but sometimes I
paint a little more in case I'm not happy with the first round of my lettering. I'm going to paint
about halfway. And that should do it. I love how this gold paint looks
on the craft paper. It's so pretty and it's shimmer. That's looking pretty good. So next will be lettering are word I'll
reveal what my word is. The word I chose to letter
and collage is dream. It happens to be my word
for the year this year. And using my white gel pen, I'm going to letter it
in my own handwriting, which is a cross between
capital and small letters. Just tower I print. Then the last step will be to cut it and add it to
our angel painting. I have my scissors and I'm
going to cut the word out. And I cut pretty close to
the edges of the letters. So there's about an eighth of
an inch all the way around. I'm trying to cut it
as evenly as possible. Little too small for
my paper cutter, so I have to use my scissors. I'm going to offset
it just like that. And it looks so cute.
10. Project Description : Your project for this
class is to create this angel on brown
craft paper using my layering techniques and
then choosing a word or phrase to hand letter and
collage onto your angel. As I mentioned in the
supply list lesson, amusing a brown
craft paper journal. But if you don't have one,
don't worry about it. You can cut a six by six peaks
of a brown paper bag and glue it into your
sketch book if you'd like to do that, that'll
work just great. And you're free to use a different color
palette if you'd like. I can't wait to see your angels. Don't forget to upload them
to the project gallery.
11. Thank You!: Thank you so much
for taking my class. After uploading your project, you can also add them to
your Instagram stories and tag me at Michelle
underscore per kit. And if you enjoyed this class, please leave a review. I really appreciate it. Thank you again for
taking my class. I'll see you again soon.
 Michelle Perkett, Teacher, mixed media artist