Transcripts
1. Hello and Welcome!: Hi, I'm Southern California
artist Michelle per cat. From Michelle for kit studio. I create colorful and
whimsical inspirational art. I'm a mixed media and digital artist teacher
in floral painter. Living in Southern California. I'm constantly inspired by the blooming flowers
I see every day on my walk in this class was definitely inspired
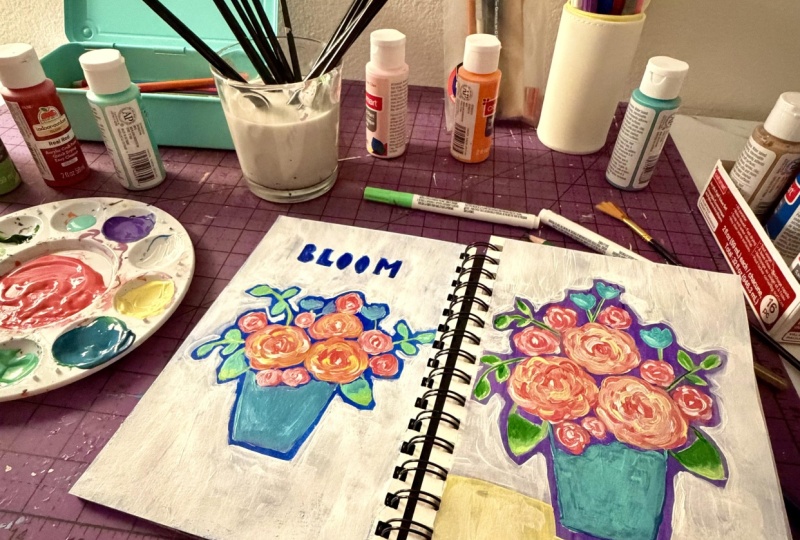
by all of them. Together. In this class, we'll create
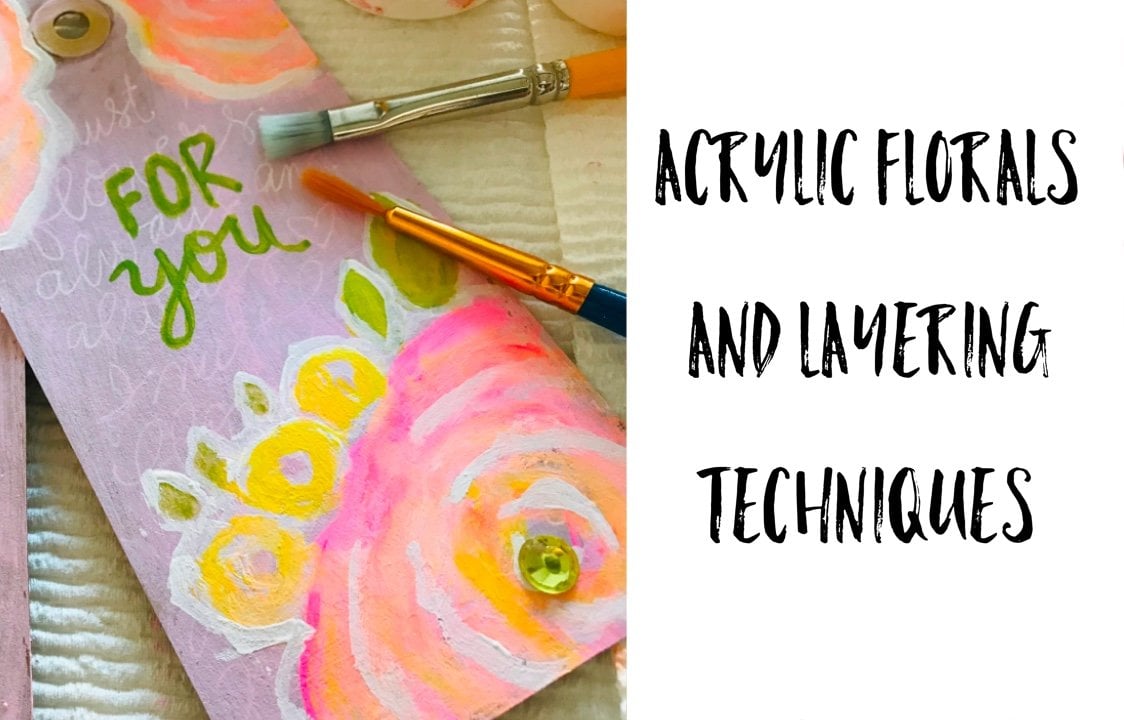
a colorful floral bouquet, and I'll show you step-by-step how I build up each layer using my signature floral
layering techniques that are so easy and fun. This class is great
for beginners who have recently
discovered acrylics. And for those of
you who are more experienced and
acrylic painting, I know you'll love
this technique. And when your
floral is finished, I'll show you how to add a hand painted sentiment that
will tie it all together. And now we want to teach
these techniques to you. By the end of this class, you'll have a frame work of art. I hope you'll join me. We're gonna have so much fun.
2. Supply List: Okay, Our first
supplies, our paper, I'll be using Strathmore
mixed media paper. The size I have is 11 by 14. But since we're going to be
working in five by seven, I cut two pieces into
five by seven and cut too just in case this paper
is really, really sturdy. I use it all the time
for my paintings, on paper, for paint. I have all the colors
listed below in. I'm gonna be using
Martha Stewart paint except for my white. It printed out a PDF for you
to download and print of the floral image
I'll be painting and I'll show you
how to transfer that in the next lesson. I sized it to fit a
five by seven page. For brushes, I'll be using a size six flat
brush, pretty small. Number two, round brush and
a number 12 size flat brush. I'll be using that to
paint the background. And then also a little tiny one, round brush size one room brush. You'll need a pencil
and an eraser. I got these both at Staples. Nothing fancy, but a white eraser would be
helpful for the last lesson, but you can use anything
you want as long as it's a clean eraser
because it will be erasing over white paint. I'll be transferring
the floral image onto the mixed media paper
using graphite paper. This is by speed ball, and I'll be showing you how
to use it in the next lesson. We'll also need some white and some bright
green green as well, but all the paints
are listed below. You'll need a palette
in a water container. I use this Tupperware
container all the time when I'm working
on small paintings, I just fill up the bottom
with water and use the top from my palette and it's
super easy to clean. You'll also need
some paper towels. Lastly, a sketch book would be helpful because
they'll be giving you a quick floral tutorial
in my sketchbook. So whatever you have
on hand will be great. And then next will
be transferring the floral image onto our paper. So I'll see you in
the next lesson.
3. Floral Transfer: Now we're going to transfer our PDF floral image that
you can download and print. It's in the projects and
resources section below. I'm transferring it onto my five or seven paper and I think you can see
it under there. I've got it all lined
up ready to go. For the placement of your image. The bottom of the flower
pot is just about an inch and a quarter above
the bottom of my paper. And then there is the
same amount of space on the left and right
side of the page. And then we'll be adding
a word above the floral. So you want to leave
more space at the top of your page then at the
bottom of your page for the word I have my paint bottles in my eraser holding down the
sides of my paper. You can do it this
way or you can tape down the edges so your
paper stays in place. I'm going to slide
my graphite paper in-between my printed floral and my five by seven paper,
and we're ready to go. I'm using a mechanical pencil, but any pencil or pen is fine. And you don't want
to press too hard, just firmly will do the trick. If you don't have
graphite paper, you can hold your paper up to a sunny window and
transfer it that way. It won't take you too long. While I'm transferring. I want to check under my drawing now and then just to
see how it looks, looks pretty good so far. Now I'm going to speed this up a bit and I'll see
you when I'm done. Let's see how I did here. I'm going to carefully
lift up my paper. Looks really good.
It came out great. I don't think I'm going
to make any changes. It looks like a nice
clean transfer, but if you need to darken up
your lines with your pencil, now's a good time to do that. The darker the better,
because we'll be painting a layer of dark blue. Next, I will see you
in the next lesson. Let's get to painting
that floral.
4. Painting your first background layer: Now that you have your drawing transferred onto your paper, it's time to paint a layer
of indigo blue over it. And I'm using my large
flat brush size 12, but whatever size brush you
have will be just fine. For this layer. You'll want to add a lot
of water to your blue, almost to the consistency
of watercolor. Because you want
your layer to be somewhat transparent
when it's dry. So you'll still be able to
see your pencil drawing. If you're a beginner with acrylics and this
might be something you won't want to
try to get a feel for in your sketch book for us. So I'll leave that up to you. So again, a thin layer of blue
and it's okay if it looks streaky because you'll be painting a layer
of white over it. When I get over my
pencil drawing, I'm using more
water to lighten up the paint so it's even more
transparent over the drawing. So when you fill
up the whole page, let that dry completely and we'll start on
your floral layer.
5. Painting the first floral layer in white: The first thing I
want to do is trace over the pencil lines
that we transferred. And you can see even
with the dark indigo blue over them,
they're still visible. And amusing my white paint in small round brush to
trace over the lines. Before I do that,
I'm going to add quite a bit of water
to thin it out so it's easier to work with
and it won't dry so fast. What I do is twist my brush
around in the paint a little bit and that evens out the
paint on the tip of the brush. In acrylic paint
dries super fast. So you'll need to wash
your brush off pretty frequently to keep the
paint from drying out. Just add more water to
your paint every now and then as well to
keep it thin doubt. Just outline your floral sketch and take your time with this. No need to rush it. Move my paper towel over so you can see what
I'm doing with it. I'm dabbing some of the
excess paint on it. It doesn't have to be a perfect
outline because we'll be filling in all in with the
layer of white after this. And again, if your
paint gets tooth there, just wash it off and pick
up some fresh paint. Again. I'm going to let the
music play while I finish outlining the flowers. And next we'll be filling
them all in with white. So I will see you then. We have our painting outlined, and now I just want
you to fill it all in with a layer of white. You're basically coloring your floral bouquet
with white paint. To do this, I'm using
my small flat brush and this is a good time to make little adjustments to your flowers if you
think you want to make your flowers a little larger
or the leaves larger, then this is a good
time to do that. But I think I'm gonna keep my flowers the same
size as they are. I'm going to let
the music play till we get towards the end
of the painting here. And I will pop back in. Before I fill in
the bottom half. I don't want to fill in the leaves in the
container completely. I want to leave
about an eighth of an inch of the blue showing through under the
leaves and the flowers. Because when we outline the background will be
leaving the same eighth of an inch space all the way around the entire outside
of the bouquet. So this will give it the look of a shadow under the flowers. What I'm doing right here, I think I'm going to switch over to my flat brush to fill the rest of
the painting in. I really like how bright an opaque white the container is. I'm going to add
another quick layer of white to the rest of the
flowers and the leaves. Then we'll have a nice
bright white surface to start painting
our floral layers. Now we've got a fresh,
beautiful white layer. Next we'll start painting
our flowers. I can't wait.
6. Quick floral tutorial : Okay, so for this
floral painting lesson, you'll need your sketch book, some hot pink and yellow paint, your water in your
small round brush and your size for flat brush
or whatever size you have. I'm going to show
you how to paint the larger flowers first using your flat brush to give you a little
bit of practice. You want to just wet
your brush a little bit but wipe off all
the excess water just to soften up your brush
because we want to just use straight paint and load up
your brush with your pink. The first stroke will be to create the midpoint
of your flower. So I'm gonna make
a half circle on the left side of the flowers midpoint and
the same on the right. And I'm pushing down on my
brush to get a thicker stroke. Just keep adding more
and more half circles on either side, a little larger each time until you get the
size that you want. And then clean and
dry your brush and we'll be ready to
add some yellow. While the pink
paint is still wet. I'm going to go right
into the yellow and do the same thing that I
did with the pink layer. Paint the half circles
on either side until you paint
the entire flower. Now you can see it's starting to mix a little bit
into the orange, which is definitely what I want. But I'm going to
clean my brush and go back to the hot pink paint. Dab off all the water
from the brush. Add some pink, is still a
little bit too much water. I'm adding more
pink because I want a good mix of the yellow, the pink, and the
orange together. And I want more, a little bit more
now of the yellow. I'm going to clean
my brush again, dry it off and add a
little bit more yellow, and that is looking perfect. Next, I'm going to
show you how to paint the smaller flowers. Now I'm gonna show
you how to paint the smaller flowers so you can practice in your sketchbook. And for these, you'll need
your small round brush. It's the same process,
only smaller chorus. Again, a bit of water, dry off the brush, and start with your hot pink. I'm loading up my
brush with the paint. Same thing, 2.5 circles to
make the flower midpoint in more half circles on either side to make
the flower larger. And these fires are pretty tiny, so we're not gonna need very
many strokes on this one. That looks great. They'll clean my
brush off, dry it, go right into the yellow and add it right on
top of the pink. Some nice bright yellow. And if it mixes too much, just clean off your brush. And I'm adding more yellow and mixing the paint
right on the flower, getting all three beautiful
colors mixed together. Perfectly pink, yellow, and
orange look so beautiful. I'm going to add just
a tad bit more pink. So just have fun
mixing your colors and experimenting in your sketchbook
and see what happens.
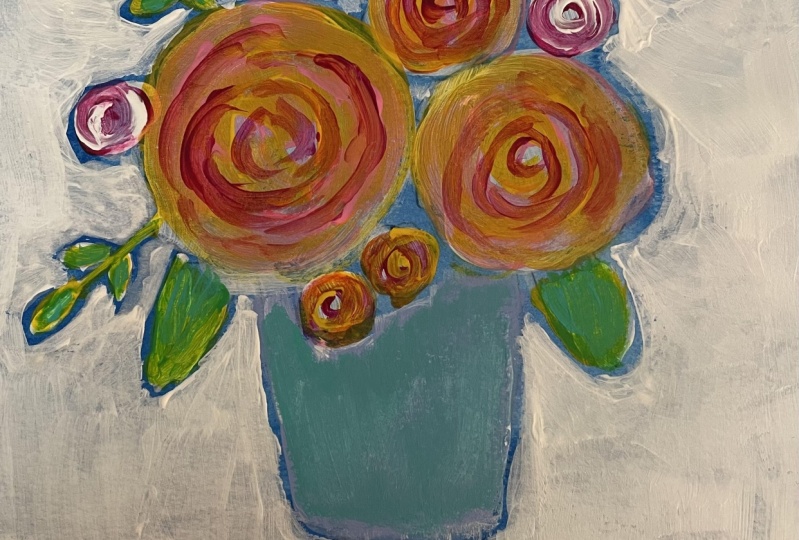
7. Painting your floral layers in color: First I'm going to paint
the three largest roses with my flat brush and
I want a teeny bit of water on my brush and
then to dry it off so it gets a little more
flexible and softer. Just as I did in
the last lesson, I'm starting with
pink and adding my half circles to either side. Just keep adding them until
the flower gets filled up. If the pain is thicker in
some areas, that's okay. I love it when that happens. So after the flower
gets filled in, I'll wash all that
pink off my brush, dry it and go right
into the yellow. That's mixing with the
pink really nicely. But I want a little
bit more yellow, some cleaning off that orange that it's making and I want to pick
up more yellow. That looks great. Mixing the
paint right on the flower. Now I have three colors, pink, yellow, and now a
beautiful bright orange. But I want a little
bit more pink, so I'm going to clean off
the yellow and go back into my pink till they get a really good mix
of all three colors. I'll do the same process
for the other two roses. And just have fun
with these and go Is stickers thin with the
paint as you like. Again, I'm adding
my pink getting my midpoint started and filling in this paint on both
sides of my brush. So I'm taking advantage of that and cleaning my
brush, drying it. Then they go right
into the yellow. Looks beautiful. I'm onto the third one. That was an easy
one. The third one will be filled in in no time or flowers or getting a
little bit smaller. It's okay if you go outside the lines a little bit
and onto the background. I love how the
thick paint looks, almost like butter
cream flowers. Then a little bit more
pink and we're done. So let's paint our
smaller roses. I've added white to my palette. I'm using my small
round brush this time to paint the smaller
roses in white and pink. I'm starting with the pink, loading up my brush. Starting the same
way as they did with the larger roses with my 2.5
circles around the midpoint. Now I'm going to wash my brush, dry it, and then go
right into my white. Look how pretty that works. I loved this pale pink when the bright pink and white
mixed together. I'll do the same with
the other four roses. And I'm going to
speed this up a bit. And when I'm done,
we'll start in the tulips at the
top of our bouquet. I've added some light blue and white purple to my palette, and I'm going to fill in
the three tulips up top. I'm going to start
with the purple. Wash and dry my brush
and go right into the light blue and mix
them right on my painting. These two look so
nice, mixed together. I'll keep mixing until
they get the colors. I want a good mix
between the two. I want to see both
colors pretty equally. That's it. So next I'll
be painting the leaves with Chartreuse,
yellow and aqua. Now I've added
some chartreuse in yellow for the first
layers of the leaves. I'll add a layer of yellow first to all the
leaves and stems. Then I'm going to
add the sharp truths on the top of that layer. This yellow layer will
show through really nicely under the chartreuse
in the aqua layers. So now I'm going to add a layer of Chartreuse
over the yellow. And then next we'll add
some of our Aqua over this layer and it
will show through as a nice bright color
under the aqua. For this layer of arco, I don't want to cover all of the yellow just on the
inside of the leaves. It just want to give
it a dusting of the aqua and not super thick. We can still see the yellow and Chartreuse underneath
for some depth. I just loved seeing this
yellow coming through. It's so beautiful. Paint all the leaves and stems are floral bouquet
is almost finished. The last part of our flower
bouquet is the flower pot. And for this, I want to go
back to purple in Aqua. I want to lay in the
first layer with purple using my
small round brush, just so it creates a bit of texture on this layer
with the brush. And then I'll switch back to my flat brush to paint
the aqua layer on top. In. I do want this
layer of purple to dry first before
adding the aqua, because the aqua layer will
just be a painted over layer, not a mixed layer. And I want the purple
to show through, so I'm not adding a
heavy layer of the aqua. We're done with our
floral bouquet. And next we'll be painting
our white background.
8. Painting your white background layers: Now it's time to paint our background layer in
first I'll be filling in the area around the outside of the flora bouquet with
my small round brush, I want to leave an outline
about an eighth of an inch, just like I did at
the beginning of class when I was filling in the big leaves and
the flower pot at the bottom of the painting. This will give it a bolder look. We'll give some
contrasts between the florals in the
white background. This part does take a bit
of time and patience, but it's actually very relaxing. It's one of my favorite
parts of the painting. If it's not completely opaque, that's okay because we'll
be adding another couple of layers of white over the
background later in this lesson. Also painting the background in this area with the
small round brush. We'll give it some
texture as well. Like we did when we outlined
our floral in white. If the white pink,
it's too thick, just clean off your brush and
then start back in again. Looks like we've got some good texture going
so far. That's great. I'll let the music play until I get this section filled in. And after that, grab my flat brush and paint the
rest of the background. Now with the larger brush, I can really get a lot more faster coverage over
the background, but also some nice
texture as well. Don't worry about how
messy this white layer looks because Messi
is good right now. Mine is definitely messy. And that's okay. If the paint is a bit thicker in some places, that's great. We want all the texture
we can get on this layer. So have fun. Get his
messy as you want. When I'm done with this layer, I want to let it completely dry. I'm going to paint
one more quick white layer over this one. Let that dry as well. This layer looks great. I'm going to let this dry and
add one more quick layer of white lab deck completely dry. The background looks beautiful. We have a lot of depth, a lot of texture and movement. But now I'm using my
large flat brush to even out the background
a little bit more and give it
even more texture. Let the larger brushstrokes just dance over it with
some more movement. Looks like frosting. In the next lesson, I'll show you how to sketch
and paint your word. But before we do that, you want to make sure that
this layer is completely dry.
9. Adding the word BLOOM: Alright, so let's get our
word onto our painting. I'm using my pencil in my eraser and the word I'm
using is bloom BLOSUM. Be adding it right above
the floral bouquet. Want the bottom of
the letters to be at least a half inch above
the top of the flowers. So when we know
where that will be, we can draw a really faint
line across from where I wanted to start the word to
where I want to finish it. So I'll start the
word right about here and n right about here. And then it'll be erasing the lines after we
paint the letters. I'm going to sketch the
letters in free hand. And for those of
you who want to use a different word than bloom, this is how you can
add your word to. If you need to erase
some of the lines, not to worry, you can easily erased on top of
the white paint. It won't ruin your painting, but you just want to make
sure that your eraser is clean and white eraser
would work best. My letters are just simple
block letters and I'm just eyeballing the distance
between the letters. There's only five letters, so it's not too difficult. Okay, that looks pretty good. I think I'm going to make the
B just a little bit wider. Next, I'm going to
erase some of the lines in-between the
letters by eraser. Now we want to darken up the lines so you can see
them a little bit better. Next, I'm going to paint the first layer of the word
bloom with some indigo blue, the same color as the first background
layer that we painted. I'm using my small round brush and I'm going to do exactly what we did in the first lesson where we added lots of
water to the paint. I want to do two things to match the color of
the background. So it's a bit lighter than
straight out of the tube. And also I want it
to be transparent, almost like watercolor,
because we'll be layering purple on
top of this layer next. And we want this blue
to show through. And it looks like it's
matching up well with the blue from the
bouquet outline. I'm just going to fill all the letters in the same
way I just did with the B. Sometimes it helps to
turn your paper around. It's a little bit easier. If you right-handed. That is, if you're left-handed, it's
probably the other way. One last letter, I'm
going to let this layer completely dry and then we'll add our final layer of purple. We're gonna do the same thing, water down our purple paint a lot like we do with the blue. When I paint the letters. It will be like a watercolor
wash, very watered down. I don't want to
cover all the blue, so just a light coat of
purple. Not a whole lot. We did so much layering though with the rest
of the painting. We want our letters to have
that layered look as well. I'm not even touching
the edges and really only painting in the
middle of the letters. And they want less
purple and more blue. Because we want it to tie in with the blue
and our bouquet. Looks so pretty. You're finished.
I really want to thank you for taking my class. I hope you enjoyed it.
10. Project Description : For your project, I'd like
you to create a five by seven floral on whatever
paper you like. And you're welcome to use
your own color palette and use another
word besides bloom. I provided a PDF for you to download and print
of the floral image. It's in the project
and resources section. In less than three, I'll show you how to transfer the floral image
onto your paper. If you want to. After
you print your image, you can cut it down to five by seven before you transfer it. But just make sure that there
is at least an inch and a half of space below
the flower pot. Also equals space on both sides. Enough space above the floral
for you to add your Word. If you have any
questions at all, just drop me a comment below
and I'd be happy to help. But most of all I want
you to have fun with your painting and I cannot
wait to see your florals.
11. Thank you!: Thank you so much
for taking my class. After uploading your projects
to the gallery below, you can also add them to
your Instagram stories and tag me at Michelle
underscore per cat. I'd love to connect with you
there and also on Pinterest. If you enjoyed it, please leave a review. I'd really appreciate it. Thank you again for
taking my class. I'll see you again soon.
 Michelle Perkett, Teacher, mixed media artist