Transcripts
1. Introduction!: Hello and welcome to this class. My name is debug three, and I am an artist
based out in India. I have been teaching at
professionally since 2016 and I have had the
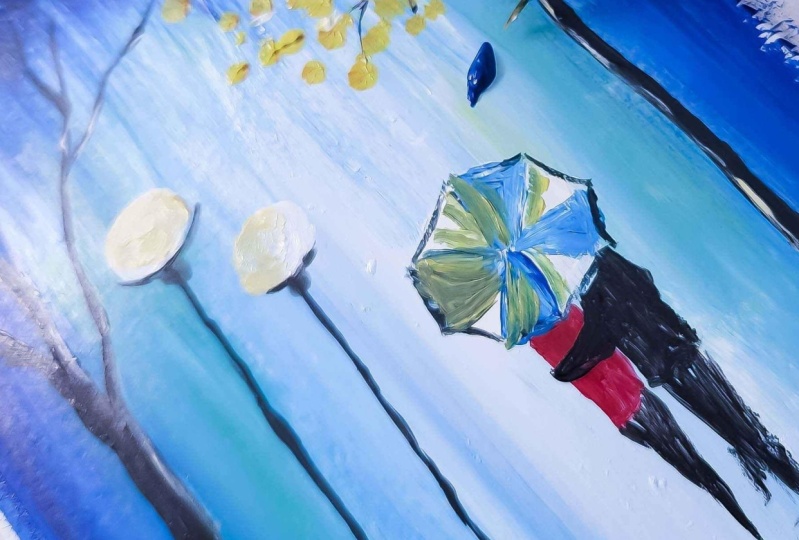
pleasure to teach over 20 thousand students. In this class. I will teach you to paint this gorgeous romantic
monsoon walk painting. I have taught this
painting to hundreds of my students and they proudly
hang it on their walls. After finishing this class, you will also be able to create this painting and add
to your home decor. I will start this
class by telling you all the acrylic art supplies and then teach you the
basics of color theory. In the first tape
of the painting, you will learn the basics
of acrylic blending. Finally, you will see my step-by-step process and learn all the techniques
to create this painting. So get ready for this
beautiful acrylic adventure. And I look forward to seeing
you inside the class.
2. Art Supplies: Okay, so the acrylic
art supplies for this class are
very minimalist. I have used an acrylic
painting people. And I've cut it down to A5 size, which is half of the A4 size. And I've stuck it
on a foam board for taping down the
sides of the paper. And the colors are very
minimalist for this painting, I have used this
blue, dark ways, deep blue and cadmium yellow. These are the two main
colors for this interval ending mixed with
black and white. And the other two colors that I have used absolutely
at the end of the painting, which is red and purple little bit absolutely tiny touch of colors to create the
color of the umbrella. And black and white at these two fluid acrylics
that I have used. Brushes are just three brushes. One flat brush to cover the
background, to round brushes, one a little bigger and one
is absolutely line on one. So this Tico round brush is for creating the textures
of the leaves in the tree. And Islam liner brush is for creating all the thin
lines like the trees, the branches, and the umbrella. And finally the couple. Okay, so that's all very minimalistic supplies
for this class. And let's get started now.
3. Color Theory: Data there are just
three primary colors, yellow, blue, and red, as you might already know. But there are different
types of yellows, blues and read,
write like in any, I look at my lemon
yellow, cadmium yellow, medium, cobalt blue,
ultramarine blue, yellow, blue, turquoise blue hue, Crimson, lake, quinacridone red,
and this is cadmium red. There are so many different
types of primary colors. Why are the primary colors? Because all the
other colors can be created by mixing
just three colors, yellow, blue, and red. Now, you can mix and match
and try different types of yellows and blues and reds and see what kind
of colors you get to. But for this class, I am going to select cadmium, yellow, turquoise,
blue, and crimson red. The end, I'm going to show you how many different types of colors that you can create just by mixing these three colors. Of course, by mixing it
with white and black. So here on my white
and black, okay, so it's tapped by taking
out all the colors. I'm using a flat brush
for this demonstration. Alright, so I'll start
with the lightest colors. So this is the yellow. So I will just mark out the
three primary colors first, and then I'll show you all the different types of colors that you can
create with this. This is the turquoise, blue. So you can see just by mixing white to these primary
colors already, you are creating a
different shade of color. Okay, Now, let's start by
mixing these two colors. Now we're varying the intensity of the proportion of one of the colors you can create
different shades of green. So if this is the lighter green, you can mix little
bit more blue to this and you can
create a darker green. So you can create
two shades of green. I'm not just to you. If you vary the intensity of
the yellow and the blue, you can create even
more multiple colors. Now, let's mix. Truck is blue and red, crimson, red, and this
is the color you get. Now, if you mix it with white,
you get a different color. Now, if I mix more
of red to this, this is the color I get. And if I mix more of blue to this color I get. So this is more violet ish color and this is more of
the purple sheet. So you see how many
different types of colors you can create. Now, let's mix yellow and red, and let's see the
palette that we create. Beautiful orange color. Now, if I mix more
of yellow to this, you create a lighter
shade of orange. And if I use more
of red to this, I will create kind
of dark orange. Okay? There are so many varieties of sheets that you can create just by mixing
these three colors. As you can see. Let's say, I'll take
little bit of yellow and just a tiny bit of black, and I love this
color so you create another shade of
green just by mixing a little bit of
black with yellow. Look at that. Okay? And you can mix all the colors together
and see the color you get. You can actually
mix a red and black and create this beautiful maroon each color that we mixed a little bit of white so that you can
understand the color. Black. Okay, now to this color, if I add a little bit of blue, little yellow, tiny bit more of leg, you create kind of like a
pistol shade of brownish color. See how beautiful this color is. So you can try and make
some trial and error. You can just come up
with so many colors. So let me think of some other
color that I can create. Some red, some yellow. So we created the
orange already. Let me add a lot
of white to this. And look at this pretty color. So if I add just a tiny
bit more red to this, it becomes this being shared. And if I add just a bit
more of yellow to this, as much Next, let me try
some white with the green. And the nice they still
share that you get. You can create a different
kind of green also. This is more of
like a bluish green That's such a pretty color. And if I mix more
yellow to this, you get two different shade. What else? What else, what
else colors can we create just by mixing
these three colors. Okay, so this is just a
lighter version of the blue. So by mixing, so this
is where I've added a little bit of white to
the red, to the blue. But if you add more white to get to an even lighter
color like this, I absolutely like light blue. Okay. Same thing. Let me make some white with anybody to read and you create this
beautiful baby pink color. And if I mix these
three colors together, absolute Lee chest,
the primary colors. So you get a color
very close to black. So this is the
color that you get, which is almost like John, dark brown to me. It mimics little bit
of white to this. And of course, how
can I forget if you just make it black and white to get a beautiful gray shade. So more wide you add lighter. Your tree becomes. Just look at the
different types of color shades that we created
just by mixing three colors. Isn't that so beautiful? So just try this out. Any other different forms
of blue, yellow, and red. And you will see that there are so many
different types of colors you are able to
create just by mixing three colors along
with white and black.
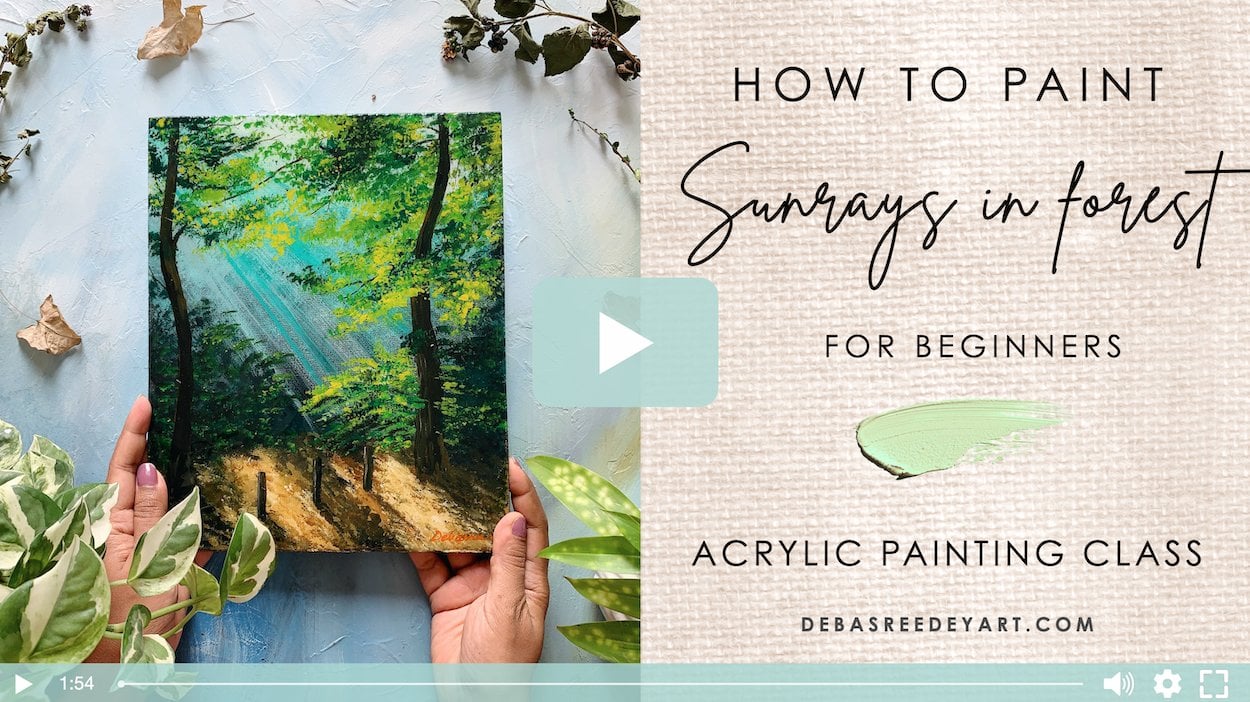
4. Step 1 - Background Blending Part 1: In this lesson we do
actually using a mix of body acrylics and
fluid accurately. So as you know, I always
use mostly fluid acrylics, but I decided to use this
turquoise color in from camel. And I wanted to use this
instead of my usual teal blue. So this is kind of like a darker version
of the same color. So I'm not just a
thick body acrylics, I'm going to use some
of the fluid acrylics, also, a mix of colors. I'm taking on the
blue and white, but feel free to use whichever
blue you have at home. It can be cobalt blue, yellow, blue, or teal blue,
Prussian blue. Whatever blue I
would just recommend not to use ultramarine blue because that's a little
different shade of blue. So these are the two colors
that I'm going to use. And I'm going to take out just a little bit
of chrome yellow, the name of this
yellow, cadmium yellow. So I'm just going to cover
up the background now. And for that, these are
the colors that I am. I have to get out. I'm using a flat
brush aid eight, which is properly proportionate for my A5 size,
that acrylic paper. So first thing what I'm doing
is starting with my blue. Now as you know, if you use a thick
body acrylics, sometimes you need to use
a little bit of water. But instead of water, I am actually taking little
bit of white to mix it up. So the blending that we
are going to be using in this painting is pretty
much a vertical blend. So if you've taken
my blending class, you would have a very good
experience of blending. And you can see
that the texture of the paper is so high that it's not reaching the paper. So that is why I'm
going ahead once again adding little bit more. But look at the strokes. Are the strokes are
vertical and it's pretty much lines are visible. I want the lines to be visible. So that is why I'm not blending
them out very smoothly. It's like the
heartbreak heartland. So that is what I am doing here. Yeah. So it's dark on the side and light as we
are moving into the center. Let's keep adding more of white as we are
moving to the center. If you haven't done
the blending class, I would highly
recommend you do that. Practice a lot of blending and this painting will be
really easy for you. And you will understand a
lot about blending as well. So you'll see as I'm
doing this blending, I am making sure that
the lines are visible. All these vertical
strokes that are forming, keeping them visible. And see if I go
again on top of it. Let me do a little bit
and show you if I just keep going on top of
it multiple times, you see it becomes solid color and that
is not what we want. So that is why we want
to go very gentle. And just a couple of strokes. When you see the
strokes are visible, you'll leave it at that. You just don't go over it again. So I'm adding more of light
as we add in the center. The background
looks beautiful for this painting once we
finished the background. And you can actually,
if you like it, you can use it just as
abstract background. Also, really fun technique. I'm adding more white
plus the Santo. And as I move towards the right, I am going to add more
of that dark purple, which is my talk with deep sea. The first layer
that you are adding onto the paper or canvas
wherever you're doing, makes sure that you've
covered the entire canvas and all these white spots that
are visible are covered. One of the easy way
of doing that is adding a lot of Chisso. If you just throw
your paper or canvas, this, they get
covered very well. And then your paint. The paper really easy. It doesn't have those
white spots left out. But if you don't have JSON, you're doing directly
on the canvas like me, then you might have to go with your color a
couple of times. But you can see how beautifully the background is
getting done now. We're almost done. I'm just going with
the dark blue ones and then on top of this to show the vertical lines. So you're not putting pressure. Good, Very gently holding
my brush very loose. And the vertical lines. Alright, now to
decide that done, we're going to add
just a little bit more of dark blue on the top. In the vertical
direction itself. But very loosely and
easy one I'm not doing is not coming in stopping. I'm coming in throwing it
so that it doesn't look like it just happened and it just stopped
after some distance. I'm just throwing it down. And in the process I'm
creating a beautiful texture, keeping it dark on the edges. And as we come inside, I am making it light. Right now. Let's just throw it in there. Sometimes I'm holding
my flesh side of the brush and some time I'm pulling the thin
side of the brush a little bit of white to
show that it shows me very loose strokes. Not I do not have too
much paint or empty. A lot of patients.
5. Step 1 - Background Blending Part 2: We want to go a little
bit on the bottom also, but I think, okay,
let's do it right away. So not too much seal. We will do it little later. But for the time being, since the reason I'm doing this right now is just because my
brush has mix of colors, the blue and the white. So that is why I'm just doing
a few horizontal strokes on top of this beautiful
vertical strokes that we did in the background to show it's a monsoon painting. And this is just
to show the water, What waters on the
land basically that, that's why we are adding
this quite like it. We're going to come
back here and do this a little bit more later. But this is just
for the time being. It's just a little
bit, not too much. Observe one more thing
while I'm doing this. Vertical strokes from the top, I'm not coming in stopping
at the same level. So some places I'm
stopping here, some places I'm dragging
it a little town. And that's all. Now. The background is
not completely done. Now what I'm going to
do is I'm going to wash this brush before
this background dry, so it's not a 100% dried yet. So what I'm going
to do before ij's, I'm washing off my brush, you can actually change to
a different brush. Also. Just a little bit of yellow. Watch what I'm doing. Watch this but don't do it. Just going. Okay. That's a lot of
water and things. So I'm just wiping
off the excess one. Absolutely less yellow. And just a few strokes
in the center. You strokes divide
the canvas into half. On this health we're
doing in the center, on this halfway
between the center. This is one of my very
favorite painting. I've taught this to so
many people in mind, physical classes in the past, and I love teaching
it every time. This has to be this has to have very light paint and water. And I'm doing
absolutely dry strokes. That's it. This is
the end of step one. And we will let this dry. It's almost dry.
It's like 95% dry. Once it's completely dry, we'll pick up on top of it. And to all the beautiful
things on top of this stick.
6. Step 2 - Tree Trunks & Lamp Posts: All right, my Canvas
has completely dried. Now, let's start
with our next step. For the next step, I'm
taking out some black and I'm using a
small round brush, which is size tree for me. Okay, so again, the size
varies depending on the brand. All you need to do use is a size which is proportionate
to your Canvas size. And what I'm doing is
I'm going to create two trees on both the
sides of the games. All I'm doing is just creating a and C. I'm using little
bit of water with this state because
with a small brush, if you don't use little water, it just becomes too
dry to Jack the lines. Alright, now I brought indigenous and now let me
create some of the branches. I think this is one of my
most favorite part of sadism. Mistake that happened. You just make it another branch, right? Let's create some more branches. As I was saying, this is, I think one of my most favorite
part of ADP eating too. I love creating trees. All right, so lift one
is pretty much done. You can feel free to add more
branches if you want to. Let's do the one on the right
side exactly the same way. Start with a thin line. You've never been
better for me to use a liner brush to
do the branches. So if you have a liner brush,
feel free to use that. Alright, the end, Let's,
let's do the end. I'm just doing all the
black lines first. So these are our two
trees that's done. Along with that. I'm just
going to do two more lines. And for that I'm not going to use this round
brush because it's pretty cheap for me
for the canvas size. So I am going to my liner brush retain and I'm picking up
the same black again. I'm just going to create two
small lines. Check this out. Check comes once. I'm keeping
it above this treeline, keeping the perspective in mind, and this one even smaller
because it's inside. Now let's do the best. These are basically lampposts. We're going to do the
light on top of this. And let's just do the
bees little bit makeup. Solid, something on
which it stands. There you go. Now let's do the bottom of it. So for that, I'm
taking a little bit of the same blue that you
use for the background. Whatever do you use depend. Use that. And I'm doing it fast because before
this black dries, I want this blue to
mix up with this black and create this kind of
blackish Lewis bluish line. Okay, so that's the
reason I'm just doing it. If you feel you're black
has already tried, just feel free to pick
up Elizabeth black. Okay. So see, this black
was pretty wet. The moment I went on top
of it with the blue, some of the Atlantic trade picking up a little bit of black because black has tried already, which I'm sure for you
also must have dried. So feel free to pick up
a little bit of lag. And we just adding
a few more lines, which are basically
the water lines. So once I'm painting, we are adding some water lines
in horizontal direction. And I'm using this black
and blue mix color. All right, so this step
is done in this tape. We created the tree
with the black, these two lines and just
fill that do teens, I'm just making things just
a little bit more broad. And we created some of the water lines on the adult and the
bottom of the canvas. So that's all for second step.
7. Step 3 - Leaves: Okay, let's start
with the next step. For the next step. In this step, what we're
going to do is we're going to add some leaves on the tree and we're going
to add the lamp posts. I'll actually start with that because I think it's
the most fun step. So what I'm gonna do is
rather than use a brush, I'm going to use my finger and pick up the paint in
pretty much the round shape. And I'm going to touch it. You just make a small round. And on this one, this is a little bigger, this is a little far. So that's why it's
a little smile. And then just to
make the shape nice, I am going to use this round brush and
just add a little bit of yellow to this and
move it around a bit. But do you see your
circular shape is already formed with your
finger, which is, I think, pretty cool thing because I've seen people
struggling to make the circle with the brush. So I felt we using the finger, I think wouldn't be
such a cool to do it. I'm just going to add more of yellow to show the
warmth of the light. Right now with the same brush, with the same round brush
and just going to move on and create some
of the leaves. So watch, watch this, take how I am
creating that nice. All you're doing is just moving
your brush, adding paint. And you see the
texture of my paint, the one that I'm using here. It's a little weird because it's like not sticking to my Canvas a lot and it's kind
of popping out. So that is just this color. So what I'm going to do is I'm just going to take
out a little bit of my fluid actually
chrome yellow. And let's see what
happens with this. It's just sticking
to the Canvas. It's just the brand. So all I'm doing is touching and kicking it out
just a little bit. You see how I'm
doing it? Watch it, just touch and throw it out. A bit. Pretty fun step to
do, leaves this way. And along with that,
I'm just going to add a bit of white also. Some places and asthma we want the right side. I'm going to keep
adding little bit of glue along with my yellow. So you'll see it'll
give a little bit of a greenish shade, shade. And I'm using, treating that
green without using a grid. So just to make it look shadow on the right side,
I'm using the top. This side light, light
and decide shadow. Always light on one side, shadow on. Adding more white. In some places. I'm moving to select more
light and the colors because the light of the
lamppost is falling on it. And that's why it's kinda
like my leaves are done. And now what I'm going to
do is just add this bit of this yellow touch up
on the tree trunk. Okay? So not a lot
is basically just a light falling on the
tree, very less yellow. You saw a kind of wiped
off the excess paint. For this one on the
left side tree, the light is going to
be on the right side. And that's it. It's
the end of this step. In the next step we're going
to add the beautiful golf. But before that I
just wanted to do just a little bit of this
line below the light. Remember we had done
this light line, this is just got wiped off. And mom said, one more small thing that I'm going to do is
just add a little bit below because the light
is falling on this also. See light and shadows, such an important thing. Painting. End of this step. In the next step we're
going to add the couple.
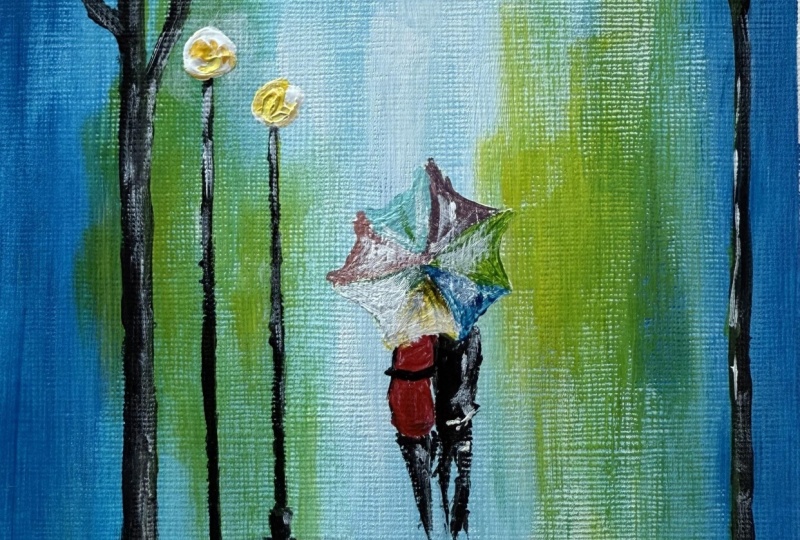
8. Step 4 - The Walking Couple: Let's start with
the last step of the painting where we're
going to create the couple. Okay, now I know this is the
most intimidating part of the painting because I'm
telling you from my experience of teaching this painting
multiple times before. But trust me, if you
just follow along, it's gonna be fine,
don't worry too much. So the two colors that
I'm taking out for this tape is Prussian blue and crimson red because I need a little
bit of red and pink. So I'm just taking
off crimson red so that I can mix white with it and make it very simple. Now, I'm going to mark out the whole coupled with a white. However, I recommend
that you do it with pencil to be on the safe side. Alright? So this is pretty much where our
couple comes. Okay. So pretty much in
this much space. It's literally small
space. I know. So first thing I'm starting
with the umbrella, which is just a little
below this lamppost. Creating the stocks of the
umbrella. That said done. And what I'm gonna
do along with it is we do fill it up with white. Doesn't matter what direction. Just fill it up
because we're going to add color on top of this. The reason I'm filling
it up with wide is because if we make it white, whatever color we add on top of it is going to be
more prominent. However you want to
just fill it up. Okay, Now the first thing
you're doing is just mocking it up with
domains and right, so just mark it out and
then you can fill it up. Now, I'm going to mark
out the couple as well. Instead of white, I'm
going to use black, but I recommend you
do it with Jorgensen. Okay. So it's a very,
very rough sketch. This is where the guy comes on the right side and the girl gums and the leg. This is where the body you
see Much marked it out. So that's all
you're going to do. Marketing, just added feet up incentives so that
you know where it ends. So this is pretty much
ready in the eye. So now let's start
filling it up. I am starting with dread. Putting the color
on the girl's body. It red. Continuing with that,
I'm just adding black. To look at this. I'm not
making two lines for two legs. Okay? Then it looks
a little funny. So just create one line. That said, make sure that
you're not doing two lines. Those two lines. What
makes it look funny? Cool. Now let's move on to the guy
and create the body first. And this is this small space
that has lived here is basically where his hand. So let's fill that up with
black color on the body. That's it. Done. Now
just to make sure that it looks like
you understand. The body line is what I'm
going to do is with white. It's going to make a few more
on the side just to show that short quiz, maybe. And now we will do the band. Again. Don't do two lines. It's just one line
and another line, Lizzie, small so
that it looks like they're walking, moving forward. And that's it. Do you see
how cool the body looks? It's just not too much
complicated, just a few lines. And I'm going to do
the shadow of them. Sure. So let's do that itself
right now itself. And then we will go
into the umbrella. Let's do the shadow. That's it. Done just adding
a few more lines here. And the white has
almost dried as well. I'm just going to go and add
a color in the direction. Now, this is the time I'm doing it in the connection,
I have one. So I'm creating this box inside the umbrella and I'm filling it up with the
white again on top of this. So this time the white
becomes more solid because we had one doubt or white already. And we will start
adding some colors into the my first color. I'm mixing it up with a
little bit of Prussian blue. And I'm adding from
the center out. Next I'm going to mix up a
little bit of red and blue, make them, make it valid. Just because I added
the white before. Now when I'm adding the color, it's kind of mixing up with the weight and giving
you a really nice ****. So that is why you add the white first and then you
go on to the colors. Now finished, Let's finish
up this other side. For this side, I'm just going to add a little bit of yellow. Fred and just a touch of black. Okay, now, I know
I did pretty fast. Please watch it again. If you have two and
then you can do it. That is it. Now, I'm just going to
finish it up with the adding just a few what or
what aligns with white, because white is what makes
it look really bright. And we already had a lot
of lines from before. So all I'm doing is adding a
touch of white in-between. That became a lot. I'm going to wipe it off a bit. There you are. Painting is done. I'm going to take off
the masking tape. It's a really easy
painting as you could see, we finished it really quick. Now, all I want you to
do is do it once on a small canvas like this and then really do it
on a big canvas. Because the main, main competent of this painting is the blending part that we
did at the background. Great. If you can do it
on a big size canvas. The blending with a
big size of brush and then the elements
that really less, but still it makes it
really nice composition. I hope you enjoyed
creating this painting and I look forward to seeing
what you create it.
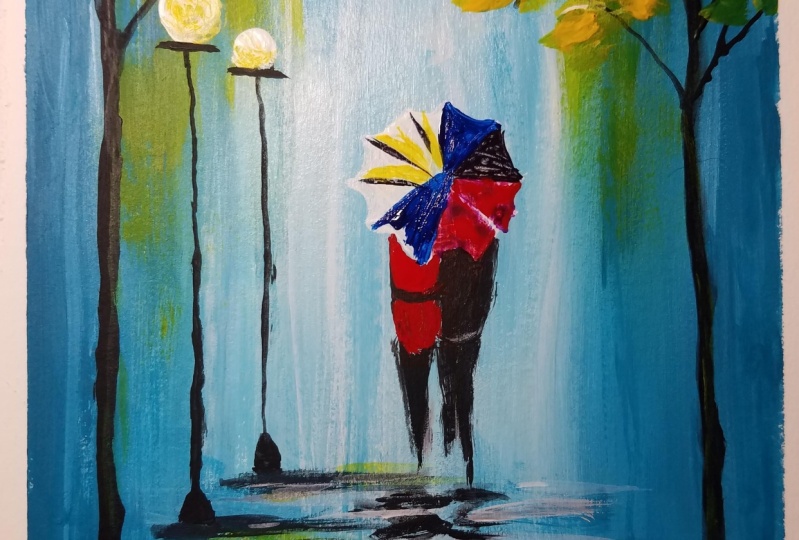
9. Final Words + Class Project: That brings us to the end
of this painting tutorial. I had so much fun painting it and you should
totally give it a try. This is the final
look of my painting, and this is the original
painting that I did. I can't wait to see
what you come up with. So share your projects. Take a picture of your
finished painting. I would love to see them. If you liked this class. I appreciate you're
writing a review for this class and ask me any
questions in the discussion. But I invite you to explore all the different
classes that I've created for you
here in Skillshare. If you want to up level your painting scale and create
some amazing landscapes. If you enjoyed painting with me, feel free to follow me
on Skillshare to get notified every time I
publish a new plan. If you want more, check out my painting
tutorials on my website, my artist portfolio, as well as all the other work that I do. I appreciate all the
love and kindness from you guys in terms
of review and reading. Thank you so much
for being here. Follow me on Instagram
to keep up with the latest updates and
all the fun stuff. Thank you once again
for joining me in this class and happy painting.
 Debasree Dey, Acrylic Artist & Educator