Transcripts
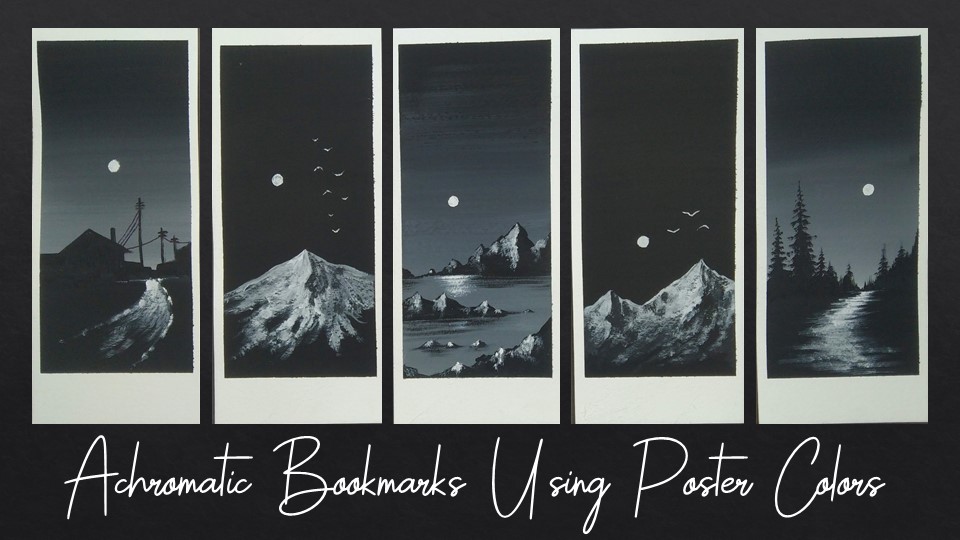
1. Introduction: Recently I've been
really interested in reading books and it makes me feel amazing when I find some beautiful
elements written in it. And I was wondering that let me create some beautiful bookmarks which are easy and simple for all of you
to create as well. And I wanted to keep
the team achromatic. Hey everybody, I'm I'm a self-taught
independent artists and interior designer
by profession. We are going to talk about all the art supplies that you will need for this
particular class. I'll be giving you
all the details about the brushes that
we're going to use. And the most important, the watercolor paper
that we're going to use. So we'll be starting by giving some amazing gradient
and darker don't effect. The team is going
to be achromatic. So we are only going to use black and white color.
No need to worry at all. That glass is absolutely
beginner friendly. And you're definitely
going to enjoy painting these amazing elements in
every particular bookmark. At the end of the class, I'll be teaching
you how to remove your side tip carefully so that you get amazing and both
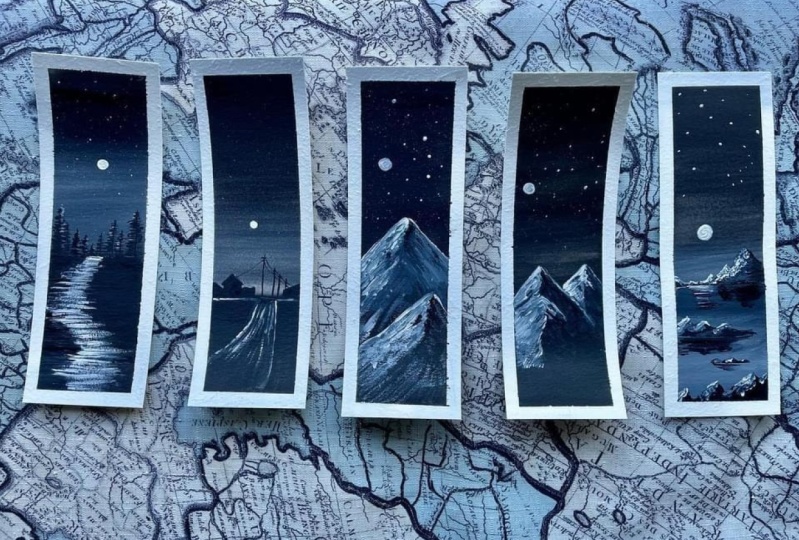
edges for your bookmarks. We are going to paint five
beautiful and amazing, elegant bookmarks that you are definitely going
to enjoy painting. It's going to be a really
fun and easy glass. So without any delay, grab your art supplies and
let's get started.
2. Art Supplies: Hey everybody. So
before we start, it is very important
for all of you to know the correct art supplies that you will need for this
particular class. The first one is a simple
mug that you will need to hold some clear water so that you can clean
up your brushes. We will need a simple
masking tape of one-inch, two-sided tape, the
watercolor paper, so that we can get
some clear edges as simple season to remove the additional part in
the watercolor paper. As simple ceramic palette, no need to worry in case you do not have a
ceramic palette, you can use any other
good alternative as well. What I like about this
palette is you have these little sections where
you can separate the colors. Then we are going
to use two colors, which is monochromatic theme. These are both two
colors, black and white. No need to worry, you can
use smaller bottles as well. You will need a simple tissue
napkin so that you can dab your brushes on it to
remove excess amount of water. Then the amazing part is that we are only going
to use two brushes. One is a 1 " flat brush, and another one is a size
one detailing brush, which is basically around dash. So these are the two
brushes that you will need. Now, let us talk about
the most important thing, which is the watercolor paper. So these are Canson
watercolor papers. The important part is that you have to take
care of the GSM. So these are 300 GSM and 140 LB. You will find these
people's very easily in any nearby
local art store. So we will also need
two more elements. One is a simple black
marker from fabric acid. So this is basically a
simple black marker, which we will use to add some
details to the bookmark. The second one is a fight
pen from Sakura Gelly Roll. And this is a solid white pen, which will help us to add some more details
to the bookmark. So these are all
the art supplies that you will need for
this particular class.
3. Lets Tape the Paper: Hey everybody. Now let us take the
paper that we're going to use while
painting the bookmarks. So as you can see, I have
my watercolor paper ready. What do you have to do
is simply place it on the desk where you are
going to paint carefully. Now, the reason behind
side tipping is that you need this perfect edges
while we remove it. So here I have my one-inch
masking tape and you have to simply just paste
it on the side edges. Make sure that your masking
tape is parallel with the paper so that you will get a perfect edge
while removing it. Now let me paste another
tape on the left side, one on the bottom, and one on the top. And we are ready
to start painting.
4. Bookmark 1 - The House: Hey everybody. So let us start painting
the first bookmark, which is the house. This is one of my
favorite bookmarks. So as you can see, my
watercolor paper is ready, which is being tamed carefully. We'll be starting by using
a 1 " flat brush and take some amount of water
from the cup that is placed. Just apply a thin coat of water on the watercolor
paper carefully. Make sure that you do not
apply access amount of water that will
spoil the painting. If you think that you have applied excess amount of water, what you can do just simply dab DR. flat brush on
the tissue paper. Again, you can just observe the movement
of my flat brush. I'm just applying it
to certain level. Also makes sure that no area
is left for applying water. Now I have taken
solid black color in my flat brush and we'll start applying it from the top area. You can see I'm just taking
it in my color palette and we'll start applying
it from the top portion. You can observe the movement
of my flat brush carefully. We're starting from the
top area and will slowly move towards the bottom portion. One thing that I
can tell you all is that in case you're
not that much confident enough to apply a solid black coat on
the final painting. What you can do is
that you can use a simple script of paper
and you can try to apply this solid black coat on that first gradient effect that we're going to
create right now. And then you can come
towards the final painting. This is one of the habits that I have developed over time, that practicing on
a rough scrap of paper and then coming
towards the final painting. It helps a lot to
avoid mistakes. I have simply clean
my flat brush and now we are taking
solid white color. The colors that we are using, our poster colors basically, it gives you a nice
solid matte finish. When it dries up. I'm applying the solid white
color on the bottom portion, and now we are going to move slowly towards the above area. You can see how beautiful
the blend looks. The more horizontal strokes you apply that to
your flat brush, the better results you'll get. Just simply repeat
the same process. Now, in case you find that
there is some amount of water, you can definitely dab your
brush on the tissue paper. It will soak the excess
amount of water. And you'll be able to
blend both black and white together in
a very nice way. And it'll be very
honest right now. It might be looking
a little bit wet, but when it dries up, we are definitely going
to see the results. It will just make you feel
generally satisfactory. And we are almost done painting the entire gradient
effect in the background. So now let me apply
a thin coat of water on the bottom potion just
below the horizon line. So the water is dirty, but
it's fine because we are going to paint it solid
black so there is no issue. You can just keep this in
water. No need to change it. Now the reason behind
applying a thin coat of water is that it's
called a wet on wet technique in which we apply a thin coat of
water initially so that you can move your brush in a smooth manner and the
color can spread evenly. I have taken some solid
black and the flat brush and I'm just simply applying
it on the bottom portion. So you can see that
this time we are not creating a gradient effect. We are just applying a
solid black color because we want the ground area
to be absolutely black. And then we're going to
create the elements above it. You can observe the
movement of my flat brush. I'm very carefully
trying to align the horizon line in a parallel way to the
bottom side damp. So just make sure that you
will do it in a slow manner. No need to hurry at all. We're done painting
it. Now. I'll be using my detailing
brush of size one, which is basically
a round brush. And you can see in
my color palette we have solid black color. So we are starting with the
house on the left area. This is not at all difficult. You can just observe the
movement of my brush. I started painting the roof and simultaneously we can
paint it solid inside. You can see how beautifully
the houses looking. And we have to just
blend the color with the bottom
solid black color. There's a wall in the left area, so I have painted that as well. Again, I'll be suggesting you the same method in
case you find it difficult to paint it in the final painting
directly want you can use, you can use a simple
scrape off paper or a sheet of paper on which
you practice regularly. You can practice this
entire thing on that first, and then you can come
towards your final painting. Now, let us create
some more walls on the right area to make it a
little bit more attractive. I'm just adding
solid black color inside the walls and you
can play with levels, you can create any
other thing as well. This is not compulsory to make it similar the
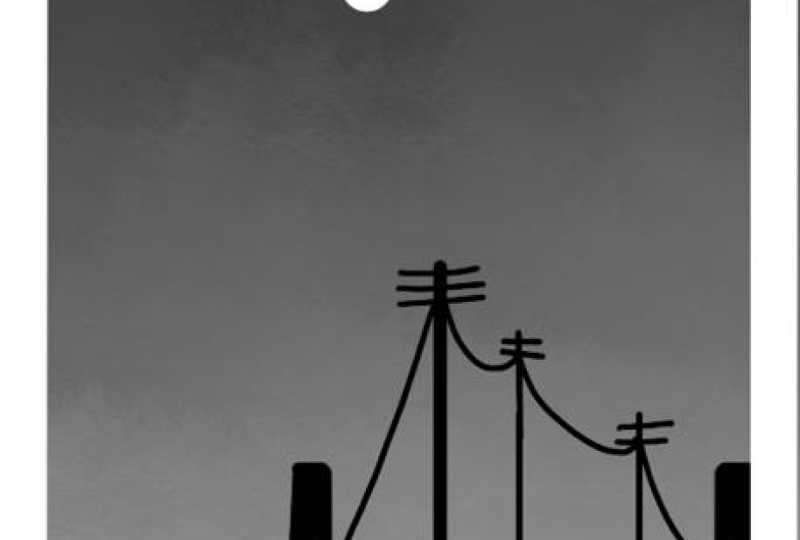
way I have made. I thought, let me add some nice electrical poles to make the scene look
even more beautiful. And then I just added a
simple vertical line, which is a little bit
bigger than the house. Similarly, we'll be painting some more electrical
poles on the right area. So I have just made another
vertical line and one more, which is smaller than that. To add some more details
to the electrical poles, what we can do is we can add these little horizontal
strokes on the top area. So if you might have absorbed
the electrical poles, are looking jolly amazing
with the background, which is j at the end. We are almost done
painting the entire scene. Now let me add some wires. So I'm using a simple
marker to draw the rise in case I have missed
it in the art supplies, you can just simply find a black marker so that you can
get a nice thin wire line. You can also make
them in a random way. It is absolutely fine. Now let us add a nice street on the black area that we have painted on
the bottom portion. So I have taken
some light and make sure that you have very
less amount of water in your brush because we
want the street to be rough and have a nice texture. So you can see I have used
my detailing brush and I have some amazing white color, which is looking really vibrant
on the black background. So we're just making it
in our curved manner and it is getting bigger as it comes towards
the bottom potion. To thinking with
the perspective, basically, no need
to worry at all. This is very easy. Just make sure that you do
not have more water in your brush and you'll get this amazing, beautiful texture. I'm adding a little
bit more vibrant, white near to the house area. And we can add these
random strokes. You can see how beautiful
the street as looking. Now, let me make a small moon on the sky area where we have
the nice gradient background. Take some solid white color in the detailing brush and
simply make a small circle. This is not at all
difficult, just carefully. You have to make a small circle. You can also design
the position of the moon according
to your convenience. I have tried to keep
it in the center. Now simply remove this I taped. Be very much careful
while doing this. Try to remove this
item in an angle so that you do not end up
tearing your painting. And you can see how beautiful
the edges are looking. Let me remove the
last step as well. And our bookmark is
completely ready. So we have a small hole
on the top left corner. So will be just simply using a simple scissors
to cut it out. No need to worry, it's
absolutely easy and simple. I'm just going to take my pair of scissors and
I'll cut the extrapolation. Let's try to cut it
in a parallel way. And the bookmark is ready. I hope that you enjoyed the first bookmark,
which is the house. And got to learn something new.
5. Bookmark 2 - Elegant Hill: Hey everybody, welcome
to the second bookmark, which is elegant hill. And as you can see, my watercolor paper is
ready with the site. We are going to apply a
thin coat of water on the background initially so that your color
can spread evenly. Make sure that you do
not leave any space and you have not applied
access amount of water in case you have just
simply dab your brush on the tissue napkin and you can absorb excess
amount of water. So now we'll be
taking some solid black in my 1 " flat brush and we have to apply
the entire background this time, which is black. There is no gradient effect. So this is not at all difficult. We are just applying a solid black color in the background, but make sure that you
do not have more water. Try to have good intensity
of color so that you can get a nice solid dark
black color in the background. Also, while applying
the black color, make sure that any spaces
not left painting. Once the color is dried, I have taken my detailing
brush off size one, which is basically around rash, and we have taken some
solid white color in it. And I do not have
any amount of water, just some solid white color. So you can see how beautiful the texture looks
for the mountain. You just have to simply observe
the movement of my brush. I'm just moving it in
a bottom direction. Let us paint 1 mol hill, which is a little bit smaller. You can see how beautifully
the blend is looking. To get this amazing texture, you just have to
make sure that you do not have water in your brush. Just try to have
solid white color. In case you find the color a little bit difficult to apply, then you can add some
amount of water in it. So I have just taken some more solid white color to enhance the mountain and make it a
little bit more realistic. So we are just applying some more white color
on the bottom portion. We are making it look as if it is fading away on
the bottom portion. That is no particular
way of doing this. You can do it in a random way. In case you're not
confident enough to paint it on the
final painting, what you can do is you can
simply take our graph, scrape off paper and
practice on that first and then you can come
towards your final painting. It will definitely avoid
chances of mistake. To give some depth, I
have taken some black and the detailing brush and we're
applying it on decided, which is on the left portion. Let us do the same to the
smaller hill as well. So take some more black and
add it to the smaller hill. You can see how beautiful
the depth is looking. And they're trying to blend
it with the background color. We are almost done
painting the mountains. Now, let me use my
white pen to just simply draw a moon in
between the mountains. You can see how beautiful the combination of mountains
and moon is looking. So this is going to
be a bookmark which is having a very minimal work. Let us draw some boards. I have taken my white pen
again and you have to just simply wrote the V-shaped. This is not at all difficult. And in case you find difficult
painting these buds, you can definitely practice
it on a sheet of paper. To make the moon a
little bit more vibrant, I added some solid white
color in it with my brush. Let me remove the site. Be very much careful
while removing the site team tried
to remove it in an angle so that
you do not end up tearing your beautiful bookmark. As you can see how beautiful
the bookmark is looking. So let me remove the side paper, which is having a hole
on the left corner. Just use your scissors and
cut it out in a parallel way. And the bookmark is ready. I hope that you
enjoyed painting this. This was a very quick and
easy bookmark to paint.
6. Bookmark 3 - Dense Forest: Hey everybody, welcome
to the third bookmark, which is a dense forest. So as you can see,
my watercolor paper is ready with this idea. The process is absolutely seen. We are going to
apply a thin coat of water in the background. So no need to worry at
all in case you apply access amount of water
on the watercolor paper, you can simply dab your brush on the tissue paper and remove
the excess amount of water. Makes sure that no spaces left. Now I'll be taking
some solid black color in my flat brush. And we'll apply, we'll start applying from the top
portion as you can see. And in case you find more
water in your brush, just dab your brush on the tissue paper and try to make it a little bit smoother. Now, let us just add some more black color
on the top portion. I find it a little
bit lighter in tone. So now what we're going to do is we're going to take white. So I have simply
cleaned my flat brush. I have taken some nice
wide post Aguilar in it and my color palette,
as you can see, Saudi. And now we are going to
apply the white color from the bottom potion and will simply move towards
the above Adrian. Try to blend it with
the black color so that you can get a nice
gradient effect, creating some amazing
gray in-between. I find there is more
water than my brush, so I have simply dab
it on my tissue paper. You can see how beautiful the
gradient effect is looking. Now let me paint
the landscape area. So just below the horizon line, we are going to take
some solid black color and we are going to paint
it absolutely black. You can observe the
movement of my flat brush. It is very much in a
horizontal direction. And you just have to apply it in a solid way to try to have
more color and less water. We are absolutely done with
the landscape area as well. So now what we're going
to do is we're going to paint some
beautiful pine trees. Here. I have my detailing
brush of size one, and I have taken some
solid black color in it. So I've simply drawn a
vertical line as you can see. And once you are done
with the vertical line, you have to make
these little strokes which are coming
towards the down area. Or we can say downwards. And as you move
towards the landscape, or I can say the horizon line, you have to increase the size of the branches
that we're making right now. This is not at all difficult
if you practice it. In fact, this is
something I always suggest my students in case you are not that much
confident enough to paint on a final painting. And if you have
some sort of fuels, what you can do is you
can always maintain an art journal or
you can use it off, scrape off papers,
which are always waste. Or you can use a backside of
a used paper to practice. Once you practice, the chances of making mistakes
becomes very low. So I have painted one more
binary and we are adding these little pine trees to
give a nice perspective view. So I have added these
little vertical lines to make it a little
bit more densa. I'm moving towards
the right area by adding these
little lines only. And then we can
fill it with solid black till the horizon line. We can also make some nice
little mini pine trees, which will look really amazing. But you have to be very much
careful while doing this. Use the tip of your detailing
brush so that you can give this beautiful details
to the forest area. And we are almost done
painting the entire forest. And you can see how
beautiful it is looking. Make sure that there
is no whitespace left between the horizon line and the photos that
we have painted. I'm adding some
more pine trees so that it looks a little
bit more detail. And we are almost done. One thing that you
can observe is that the entire forest area is
having a nice perspective view. Now we're going to create
a nice street effect, making some random
horizontal strokes. So I've taken my detailing
brush, clean that up. So instead of black,
we're going to use white so that it gets an amazing contrast
with the background. No need to worry
at all. You just have to make sure that you do not have access amount
of water in your brush. Just tried to have
solid white color. And try to make these
random horizontal strokes which are coming towards
the bottom area. And as it comes towards
the bottom area, it has to get bigger
so that it looks. And our perspective way. You can see how beautiful
the texture looks when we are applying
it on the black color. No need to hurry at all. Try to paint it slowly
and in a calm way. And as you all know that I would definitely
suggest you to practice it on a scrap of paper first and then come towards
the final painting. You can see how beautiful
the street is looking. I'm trying to add some more dense white
color in between area so that it looks
a little bit more vibrant and it can get a nice contrast with
the background. So I'm now painting
a small moon. So I have taken solid color and my detailing brush and try
to make a small circle. And the bookmark is done. Let me add some more
solid white color on the nail portion from
the street is arriving. Now, let us remove the tape, make sure that you remove this. I'll type in an angle
so that you do not end up tearing your
beautiful bookmark. You can see how
beautiful the edges are looking as we remove this item. Now let us remove the
access people that is having a hole on the
top left corner. I'll be using my scissor
and just remove it in a parallel way to the paper
and the bookmark is ready. I hope that you enjoyed this
particular bookmark as well.
7. Bookmark 4 - Moonlight on Mountain: Hey everybody, welcome
to the fourth bookmark, which is moonlight on mountain. This is an absolutely
amazing and easy bookmark. So we'll be starting applying a thin coat of water on
the watercolor paper. You can just simply
observe the movement of my flat brush and
make sure that you do not apply access
amount of water. In case you might do that, you can just dab
your flat brush on the tissue paper and remove
the excess amount of water. Now, in my flat brush, I have taken some
solid black color and we're just applying it
on the watercolor paper. The reason behind
applying thin coat of water is so that you can move your brush in
a smoother way. But make sure that you do
not have access amount of water right now because we want a solid dense black color. Also make sure that
you do not leave any space between the tip and the paper that will not give you a perfect edge while
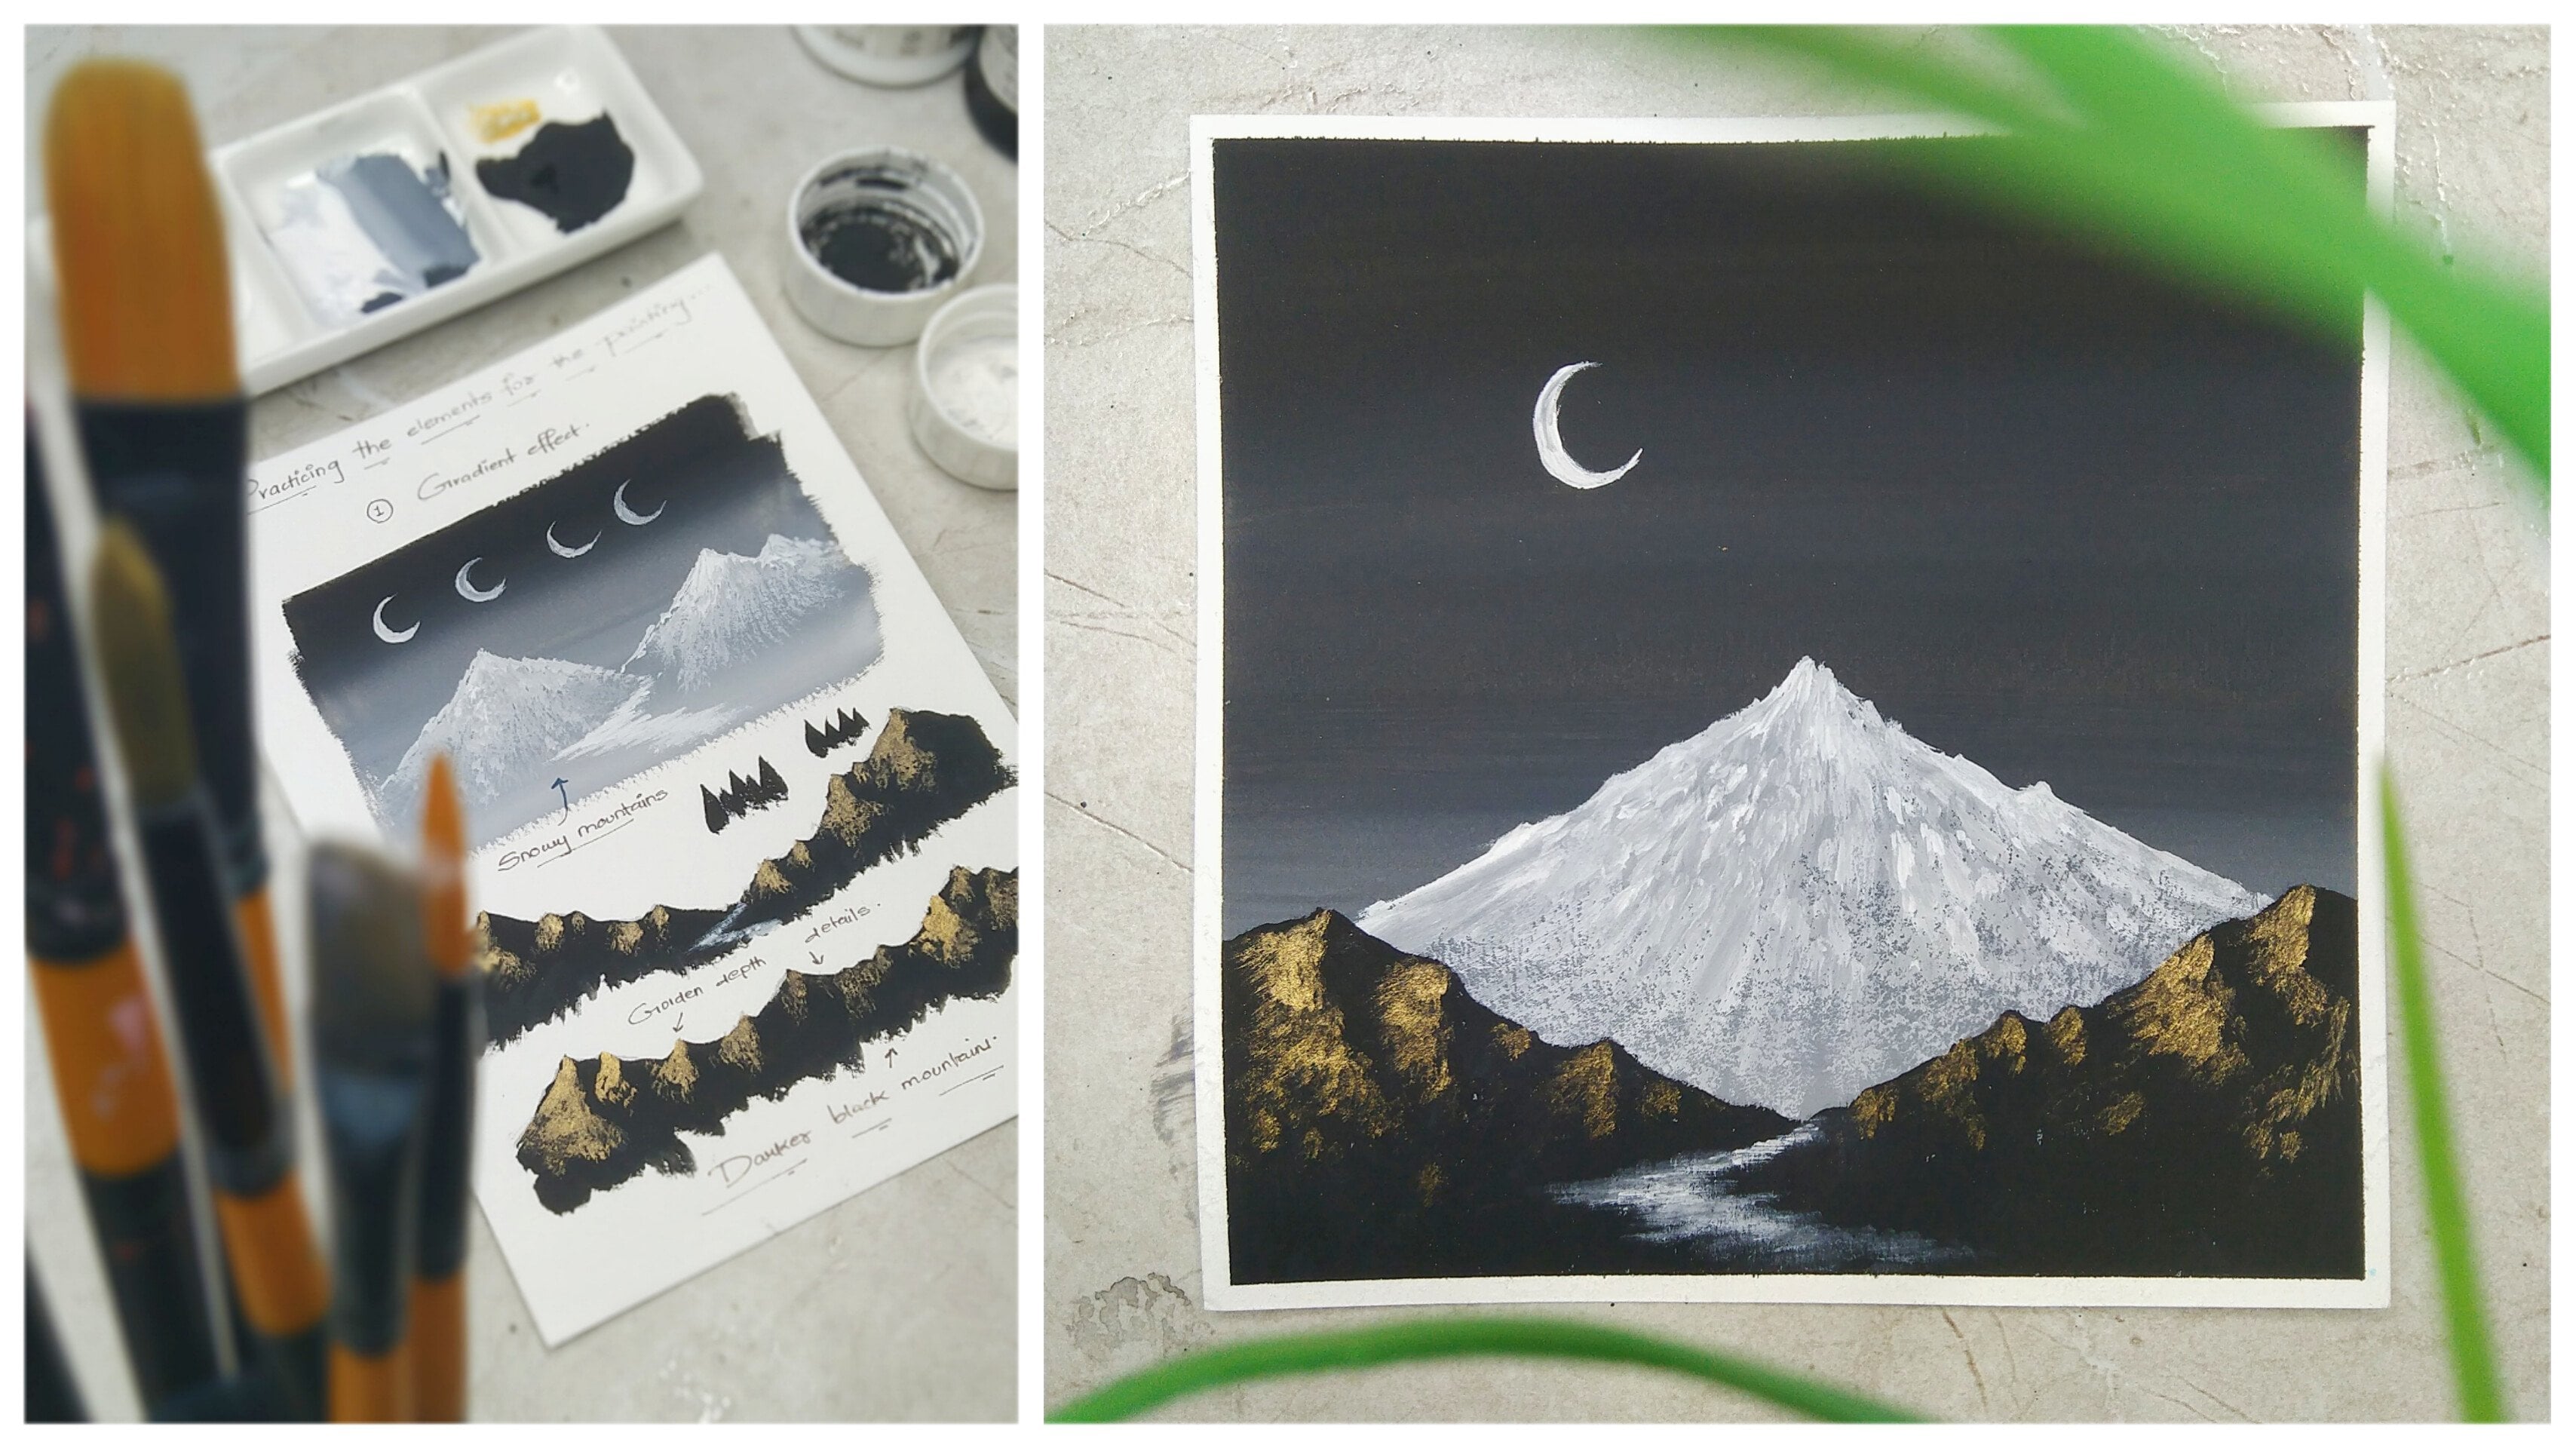
removing this item. Now let us paint the mountain. I have taken my detailing
brush of size one, which is basically
a round brush. And we are starting to paint the hill from the top portion. So try to have a nice
triangular shape. Now, make sure that you
do not have more water. Tried to have solid
white color in your brush so that you
can get amazing texture. Now I'm trying to make
a nice texture and this random fee only there is no
particular way of doing this. You can make it very
random and natural. So initially what
we are going to do is that we are going to apply this solid white texture and the complete area
of the mountain. And then we'll add
some nice depth to it. So you can see I've
left some black space. Also, you can make
your natural patterns. You can experiment all the time. In fact, you can make
two mountains as well. So now I have taken
some even denser and more vibrant white color
and I'm trying to apply it on the left so that we can give it a nice dense
and depth effect. I'm enjoying painting
mountains these days. It makes me really feel
calm and composed at times. You can also try to do
this on a regular basis to practice it in your
journals or practice book. In fact, if you are finding painting this
mountain difficult, what you can do is you can
practice it on a raft, scrape off paper first, and then come to
the final painting. So I've taken some
solid black color in my detailing brush again, and I'm trying to add some
depth on the right area. And you can see how beautiful
the mountain is looking. Now I have taken some
solid white color. I have cleaned my
detailing brush, and I have painted the moon, as you can see, a
simple small circle. Now I will be using my
white pen to paint, or I can say, draw the buds. Drawing the birds is
not at all difficult. You just have to draw this
V-shape and a random way, you can just have some variation in sizes according
to your requirement. You can also add only two
boards if you want to. I wanted to add it in a group, so I have added somebody
having different size. I'll be removing the
side tail as usual, tried to remove the side
tip in an angle so that you do not end up tearing
your beautiful bookmark. And you can see how
beautiful the edges looks when you remove this item. As one of the most
satisfactory part, I'll be removing the
additional paper, which is having a hole
on the left corner. As you can see, how beautiful
the bookmark is looking and this was also amazing and
easy bookmark to paint. I hope that you
enjoyed painting it.
8. Bookmark 5 - River With Hills: Hey everybody, welcome to the final and the last bookmark, which is revolved with hills. This is also one of my favorite
bookmarks that as usual, we are going to start
applying a thin coat of water onto watercolor paper. You might be thinking we are repeating the same
process again and again. But this is the
part of painting, so I have to explain it. So make sure that you
apply a thin coat of water carefully and in case you have applied excess amount of water, just dab your flat brush onto the tissue paper to remove
excess amount of water. Now I have taken some
solid black color. I'm applying it from the top portion and coming
towards the bottom area. I do apply solid black dense
color on the top portion and make it a little bit lighter as you come
towards the down portion. Or just make the horizontal
strokes initially. Make sure that no
area is left between the paper and decide tape now will be taking some white and we are trying to apply it
from the bottom portion. And now once we apply
in the bottom area will move towards the
top areas slowly. So you can see how beautiful
the gradient effect looks. So that is a nice gray
in-between and we come across a nice whitish shade
on the bottom portion. So it's not exactly white, but we get a nice
gradient effect, which is the purpose of painting right now
the background. So I wanted to make
the bottom area a little bit more white. So I have added some
more white color. And I'll be simply moving
towards the above area. You can observe the
horizontal strokes that I'm making right now. No need to hurry
at all in case you find creating a gradient
effect a little bit difficult. What you can do is that
you can use a scrap of paper first and try to
create the effect initially. And then you can come
towards the final painting. Now let us start
painting the hills. So I've taken my detailing
brush of size one. I have taken some
solid black color in my color palette,
as you can see. So we are going to start
painting the house from the middle area of
the watercolor paper. Now that isn't any specific
way of doing this. You can paint the
house according to your requirement or any random natural
shape that you like. I'm trying to make it
as natural as possible, but try to make it look
as if they are hills. Here. One tip that I can give you is that what you can do? You can just make the frame of the hill initially and
then you can fill it with solid black
color so that you can get an idea how your
health is going to look. I've done the same.
I have simply made the outline and filled it
with solid black color. Now let us add some nice
reflection effects side-by-side. Just have to make this
horizontal lines below the ****. To make a nice
reflection effect. Tried to have less amount of
water and solid black color. Now let me paint another hill, which is on the left area,
a little bit smaller. There are going to be
a lot of hills that we are painting in this
particular bookmark. The method is absolutely same. I'll be just painting
the outline initially, and then we'll be filling
it with solid black color. One thing that I always
tell my students is that always try to maintain a journal or a practice book
in which you can always add the elements that you want to paint or you
can practice too. Because once you practice
it on a daily basis, what happens is the chances of making mistakes can
get really less. It also helps you
to keep a record of what all you have
painted till date. For me, it's like creating a very satisfactory
factor in my life too. Resolve my odd no matter
how amazing it is or not, because you have given
so much time to it. It is something which is
very special to your heart. So now let me add
one more **** on the left God now so that we just finished
painting the hills. Now I'm adding some little
holes in between so that it looks even more
denser and beautiful. And we can add some
more reflection effect. So to enhance the mountains and add some more details to it, what we're going to
do is we're going to add some amazing texture effect. So I've taken my same
detailing brush, and this time we are having
some solid white color in it. And make sure that you do not have access amount of water. And on the left portion
of the mountain we are just adding this beautiful
whitish texture, which is going to be the
moonlight basically. You can see this makes
the mountains look even more realistic and a little
bit more attractive. We have simply just added some nice texture and it
makes it look really amazing. In fact, it makes it look
a little bit more 3D. Rather than applying a
simple solid black color. You can do it in a
random way as well, but try to have it
in left aligned way so that there is some sort
of sense to your bookmark. Basically, some adding some
more vibrant white color on the edges to make it look
a little bit more beautiful. Now simply take your
detailing brush and draw a small circle which
will replicate the moon. So the white texture that we added is basically the
reflection of the moon. Now to enhance the
water body also, what I have done is I'm making these little random horizontal strokes and just below that. So that a nice reflection effect as given to the
water body as well. You can see how beautiful
this bookmark is looking. Now, let us remove this. I tried to remove the
side type in an angle so that you do not end up tearing
your beautiful bookmark. And you can see how beautiful
the edges are looking. While we remove this idea, I'll be using my
scissors to remove the top-left corner hole, which is the additional bind
to the watercolor paper. And you can see the
bookmark is JD. I hope that you enjoyed
this last bookmark as well. And I hope that you've
got to learn something new and creative.
Keep practicing.
9. Class Conclusion: Being an artist,
I always love to explore new and
creative art forms. This time we have used bolster colors as a
medium to explore. I think that making these beautiful bookmarks
will definitely make you generally
feel happy and amazing and gaze you
on a book Posen. Then you can use this particular bookmarks
and your books, or you can also give
it to your friends. And of course, one thing that I always tell my students is domain Dana odd journal to
practice on a regular basis. This makes the mistakes very minimal and you can definitely keep a
record of your artwork. I hope that you got to
learn something new and creative from this
particular class. I'll be really excited to see all of your projects into
the project gallery. Happy painting, and
keep exploring.
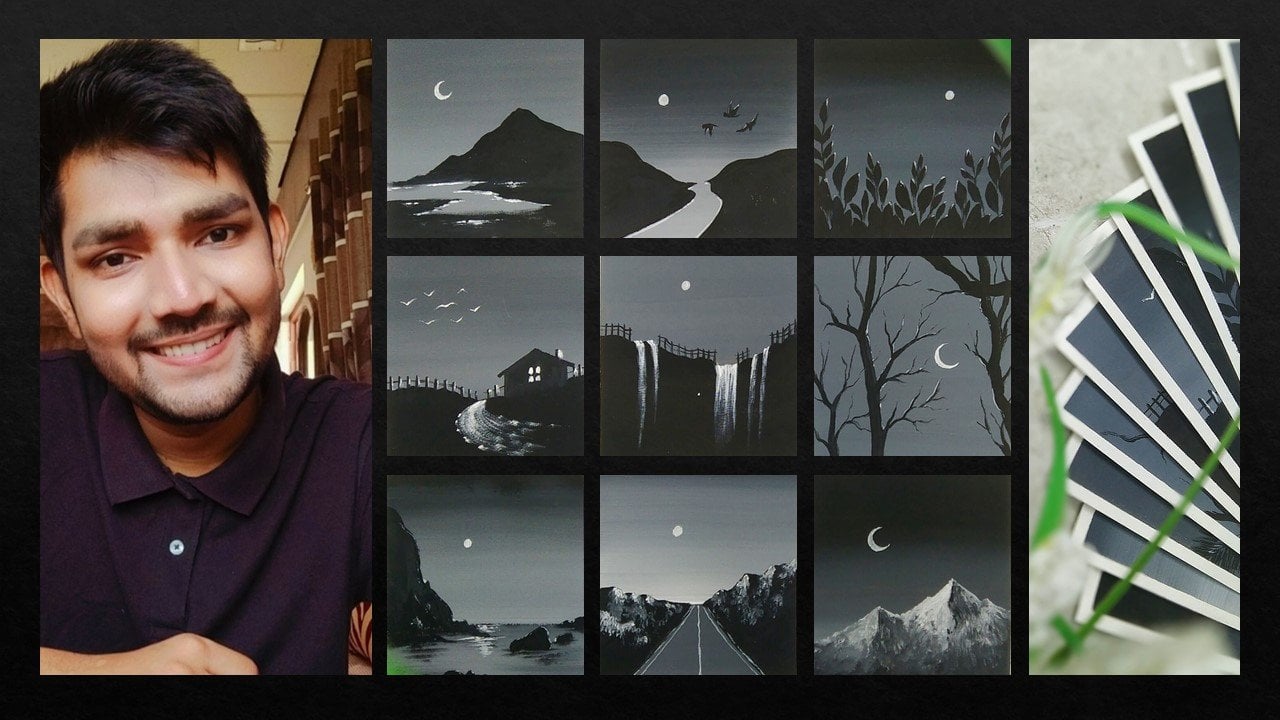
 Rutvik Patel, Artist and Instructor