Transcripts
1. Introduction: If I go back to my
childhood days, I remember how scared
I was to paint. I used to think that
painting requires a lot of knowledge and
practice, which is true. On keeping that in mind. I thought that let
me come up with minimal paintings
that anyone can try. I always believed that
anyone can paint. You just need some
basic art supplies and some basic methods to paint. Hey, everybody,
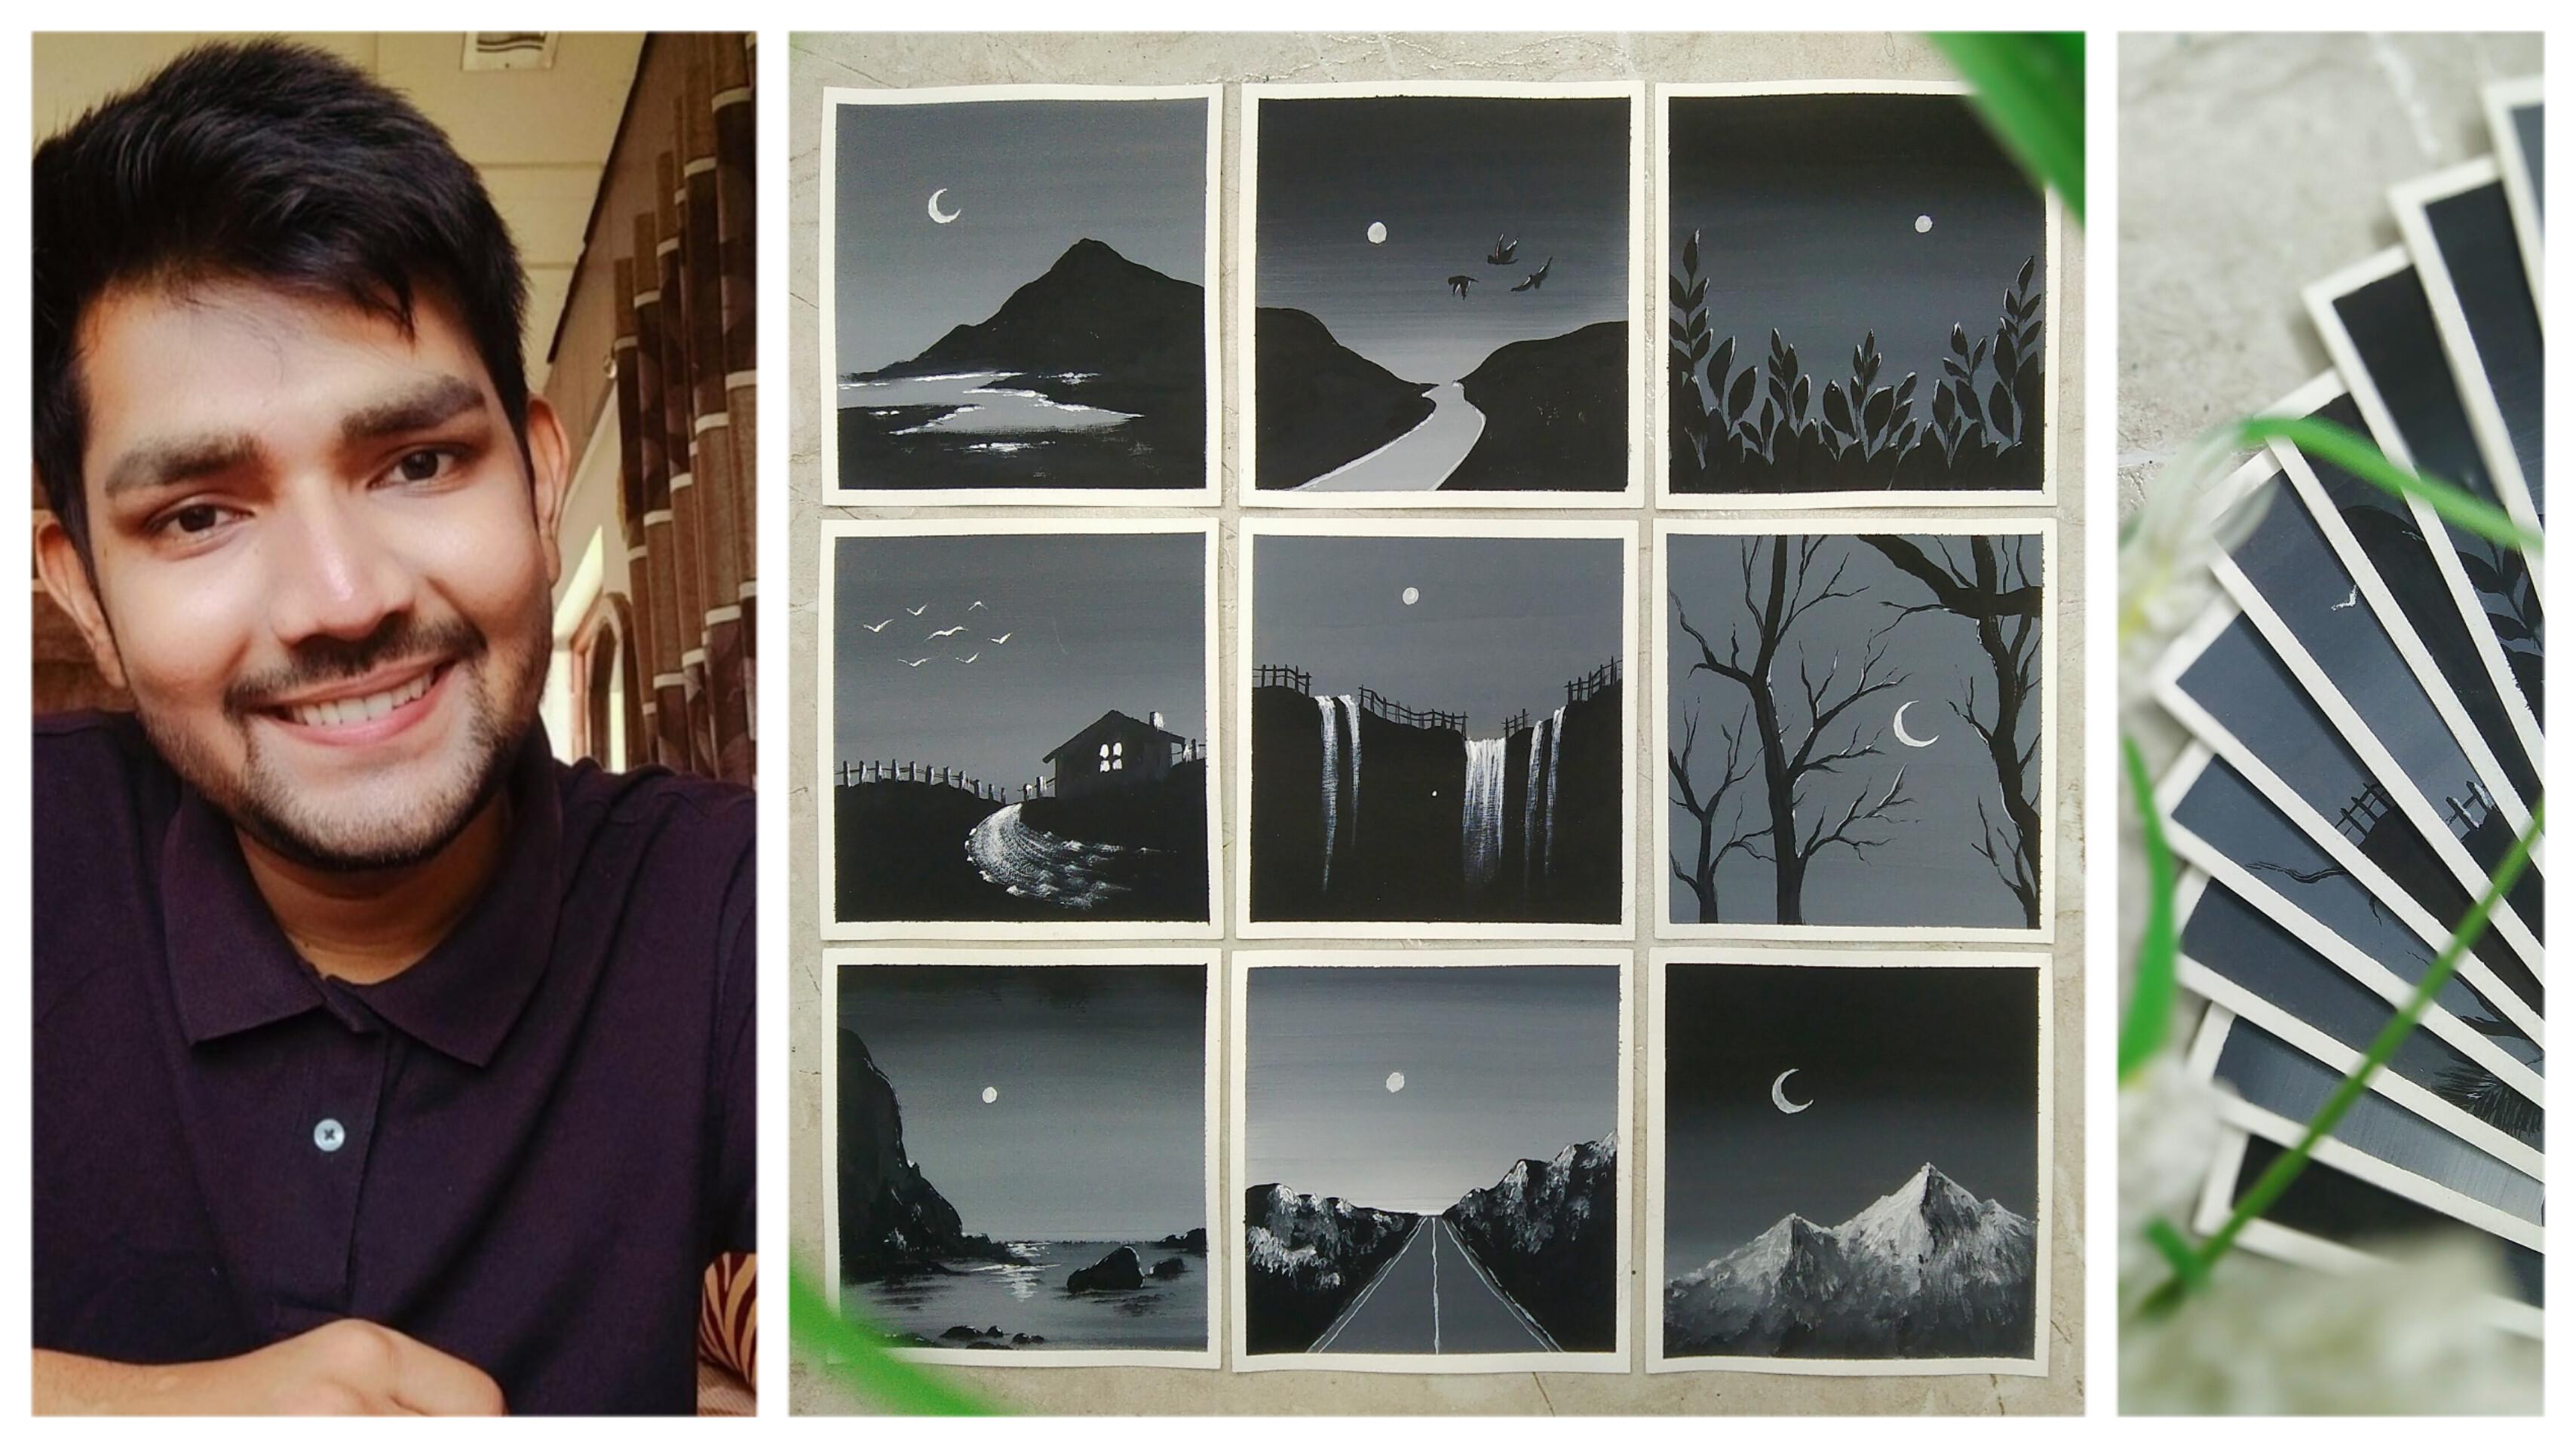
myself protect buddy. I'm a self-taught
independent artist and an interior designer. In this class, we
are going to paint ten minimal paintings
with postdoc allows. We're going to talk about
all the art supplies that you will need in
this particular class. We are also willing to talk about the brushes
that you will need. Watercolor paper
that we're going to use for this
particular class. I'll be teaching you how you
can cut and A6 sized paper into a small perfect square
will be saved taping the entire painting
so that we can get a nice wide edge will be using only two colors which are
going to be post-doc allows. Those aren't black and white. The entire class
is a combination of beautiful
landscapes, cityscapes, elements that you can paint easily using basic and
minimal techniques. No need to worry at all. That glass is
absolutely beginner friendly and you're going to definitely fall in love with it. Each and every painting won't take you more than
10 min to paint. So you can paint according
to your time convenience. Every painting is going to be
easy, simple, and elegant. So you are going
to definitely love all the class projects that
we are going to create. The class is going to be a
ten days painting challenge and I'll be really excited to see all of your class projects. So without any delay, grab your art supplies and
let's get started.
2. Art Supplies: Hey everybody. So before we start, it is very important for all of you to know the correct art supplies
that you will need for this particular class.
No need to worry. That isn't anything
extraordinary or only some basic art supplies. So the first one is
a simple still-life, or you can also use
a plastic scale. So this steel edge is having dimensions in
centimeters and inches. So we're going to
use this to cut D A6 sized paper
into perfect square. The next one is a
simple pencil that I know everyone wants
to be having. Then comes the most
important part, which are the brushes
that we're going to use for the entire class. So the first one is a simple
flat brush of size 1 ". As you can see. Then the remaining three brushes are basically detailing brushes. So the sizes of every brush, let me tell you that in detail. So the first one is size three, phase one, and phase pipe. So these are the 3D dealing
rash and that you will mean according to the painting that we are going to paint. No need to worry at all. In case you do not
have the same brush, you can use any other
good alternative as well. So these are the brushes
that you will need. Now, let me go to
the next art supply, which is a simple
ceramic palette. As you can see. I'm so sorry, the palette is very dirty. So this ceramic
palette is having basically three sections to
have your colors accordingly. No need to worry in case you do not have a ceramic palette. You can go for any
other good alternative or any other plastic
palette as well. Isn't it amazing for
the entire class, you will only need two colors, black and white, which
I'll post the colors. You can also use gouache
colors if you wanted to. Now the next time supply
is a simple Caesar. So we will need the
scissors to cut the A6 size paper into
a perfect square. Then we have a simple
tissue paper to dab the brushes so that you can wipe off the extra amount
of water from the brush. So we always keep
the tissue paper nearby only by we're painting. The next one is a masking tape. The masking tape is
basically often one-inch, two-sided tape, the
watercolor paper. So that when we remove, we get a nice white border. Then some basic art supplies
like sharpener and eraser, which won't be that much in
use, but you can have it. Then the most important part is the watercolor paper that
we are willing to use. These watercolor
paper are 300 GSM. And GSM is something that you have to take
care off so that you can apply heavy washes
on it. The size is A6. No need to worry in case you
do not find the exact size. You can go for any
other good alternative. We're just going to create the rectangular
paper into a square. So you just have to take care
of the GSM, which is 300. Now the last art supply
is a simple cup or a simple glass in
which you can have your clear water so that you
can clean up your brushes. These are all the art supplies that you will need for
this particular class. Now let's move towards
the next part.
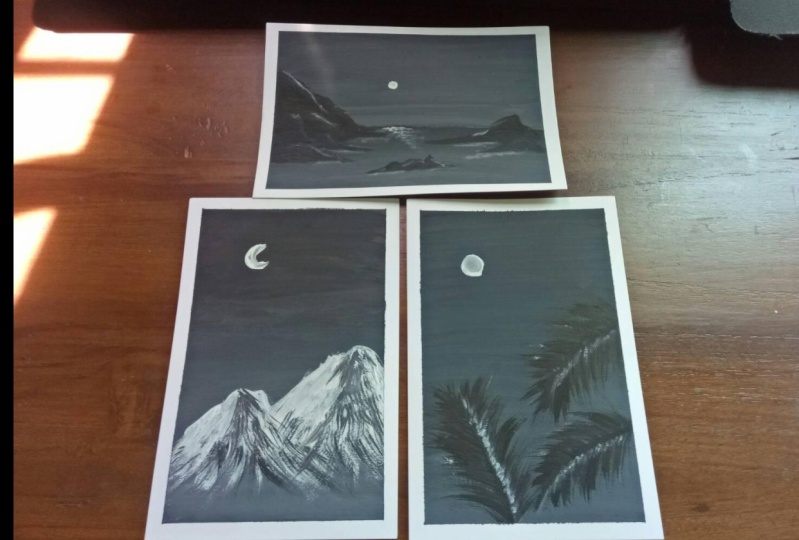
3. Class Projects: Hey everybody. So
before we start, let me take you through
all the class projects, which is our attendees
class project. And let me talk about every individual
painting in detail so that you know what
we are going to paint in every
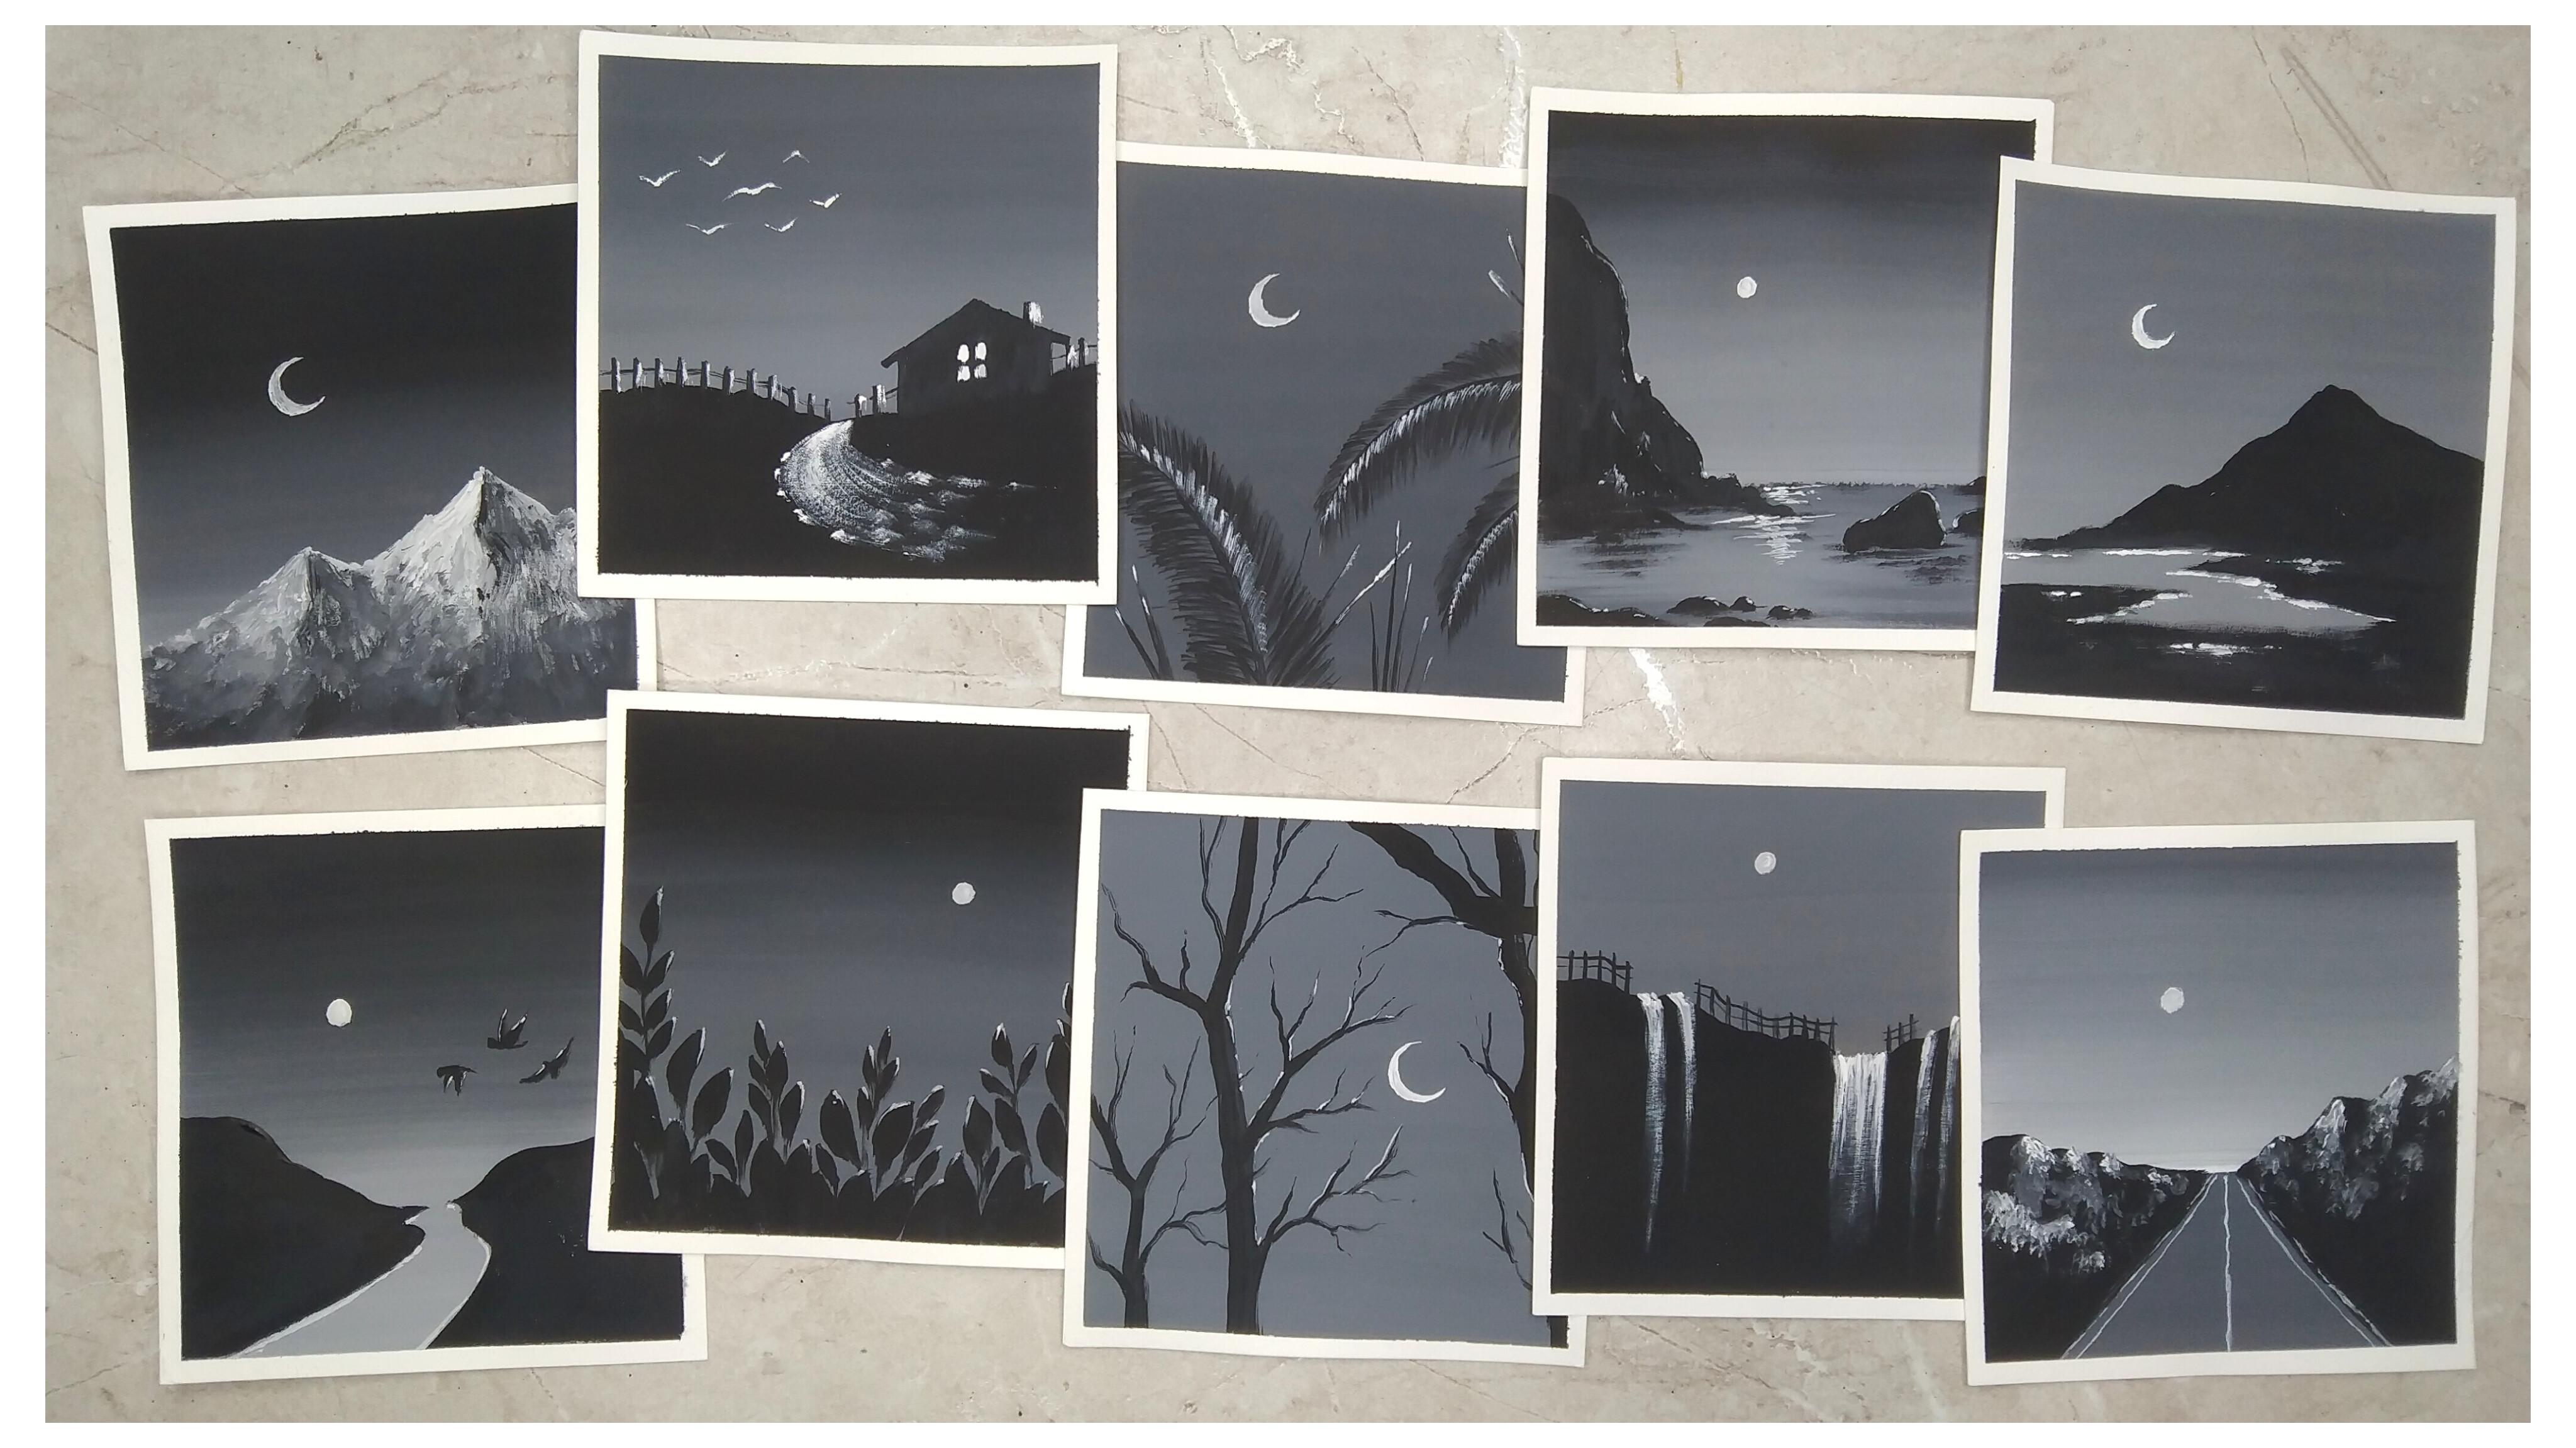
particular painting. Here I have all
my ten paintings. Let me talk about
the first painting which is coconut leaves. I have given it does mean particularly because
this painting is having an absolutely amazing gray shade
in the background. We have a beautiful moon and coconut leave that
we are going to learn in this
particular painting. The second one is a
beautiful plants at night. And it is a very simple
and easy painting, having a nice
gradient background, a moon and beautiful
plants at the bottom. The next painting
is a waterfall. And it is a beautiful elegant
painting in which we have created a nice whitewater
body on black hilly area. And we have a simple
elegant moon. The next painting is us
know League basically. And it is having a
beautiful snowy league with amazing giant mountain and
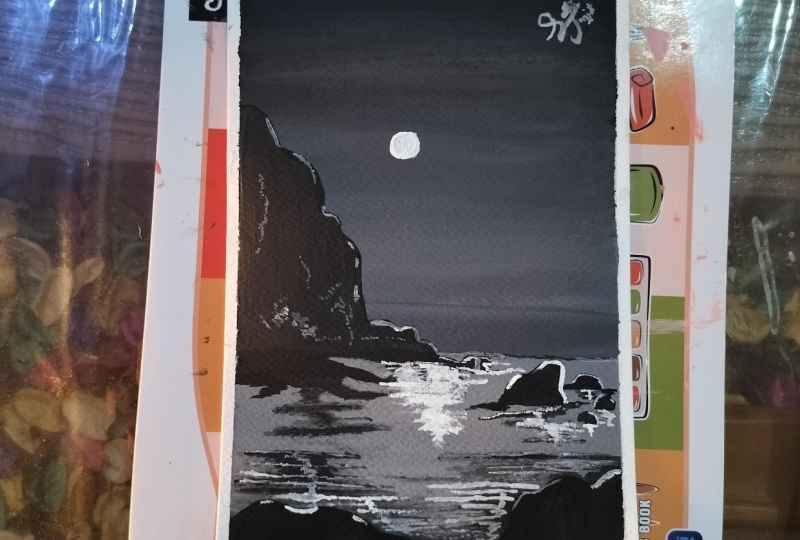
the moon as a common element. The next one is a giant hill, and it is a seascape basically, and the view is
absolutely amazing. It is also having a water body that we are going to paint. The next painting is
road and the hills. And it is a beautiful painting in which we have a central road having hills on the surroundings and a beautiful elegant moon. Then we have a painting which
is one of my favorites, which is classic branches, in which we are going to
paint these minute branches, having an elegant
moon in-between. Then we have elegant hills. This painting is amazing in
which we are going to learn how to texture the mountains and give a nice natural effect. The second last painting is
going to be curvy plateau, in which we have a nice adored
and some beautiful words. Then we have the last painting, which is the lighthouse, in which we are going
to have a lot of elements that we are going
to learn how to paint. These are all the ten days projects that we are
going to create. And these are going
to be simple, elegant, and easy
class projects. So without any delay, Let's
move towards the next part.
4. Lets Cut the Paper: Hey everybody. So now let us cut the paper before
we start painting. No need to worry, it is an
absolutely easy process. So here I have my 300 GSM
watercolor papers of size A6. So you can see the
sheet is basically rectangular in shape
and we're going to cut it into a perfect
square so that we can get exact sizes for
the ten days projects. So as you can see, this is the particular painting for
you to get other friends. We are just going to convert the rectangular sheet
into an exact square. Now to cut the
rectangular paper, we will need a
simple steel edge. In case you do not
have as D latch, it is absolutely fine. You can use a simple
plastic scale as well. Let us take the
width of the sheet, which is 10.5 cm. Now similarly will
mark the end 0.5 cm on the longitudinal side. I'll take two points. One at 10.5. And let us take another
point as well so that we can get colinear line. I've taken two points. Now simply place
your steel edge or just scale parallel to the edge. Just try to make it parallel
with the people that, so that the r squared
becomes perfect. And you can also match
the dance, of course. Now we'll just count
the remaining part. I'll be using my simple Caesar
to cut the remaining part. Just follow the line
that you have drawn. Me very much careful while
doing this so that you do not get a draft line. Just tried to cut it in a straight manner. No
need to worry at all. Do it carefully. And with
patients, as you can see, we have got a ninth, both x squared and we are
ready to paint. I hope not. You got the entire process. Now, let us move
towards the next part.
5. Lets Tape the Paper: Hey everybody. Now let us take the watercolor
paper that we have cutted. I have my perfect square
watercolor paper, and here is the
masking tape of 1 ". And we're going to use
this masking tape to tape the watercolor paper
so that when we remove it we get a nice
perfect white border. So let us start by placing the masking tape on
the bottom area. So just try to place the masking tape
parallel to the paper ends so that you get a
perfect parallel whitewater. Try to keep some part
of the masking tape on the watercolor paper
and some bad on the surface on which you
have gotten the paper. Once you place
your masking tape, just dab your finger
carefully and make sure that your
masking tape is properly stuck with
the watercolor paper. As you can see, I'm just
applying my finger on the masking tape to
make sure that it is completely stuck with
the watercolor paper. Now let me apply the last
step and we are done. This is how you have to
apply the side taped to the watercolor paper for
every individual painting. And the reason behind doing
this is that after painting, when we remove this ITP, get this particular
white beautiful border. Now, let us move
towards the next day.
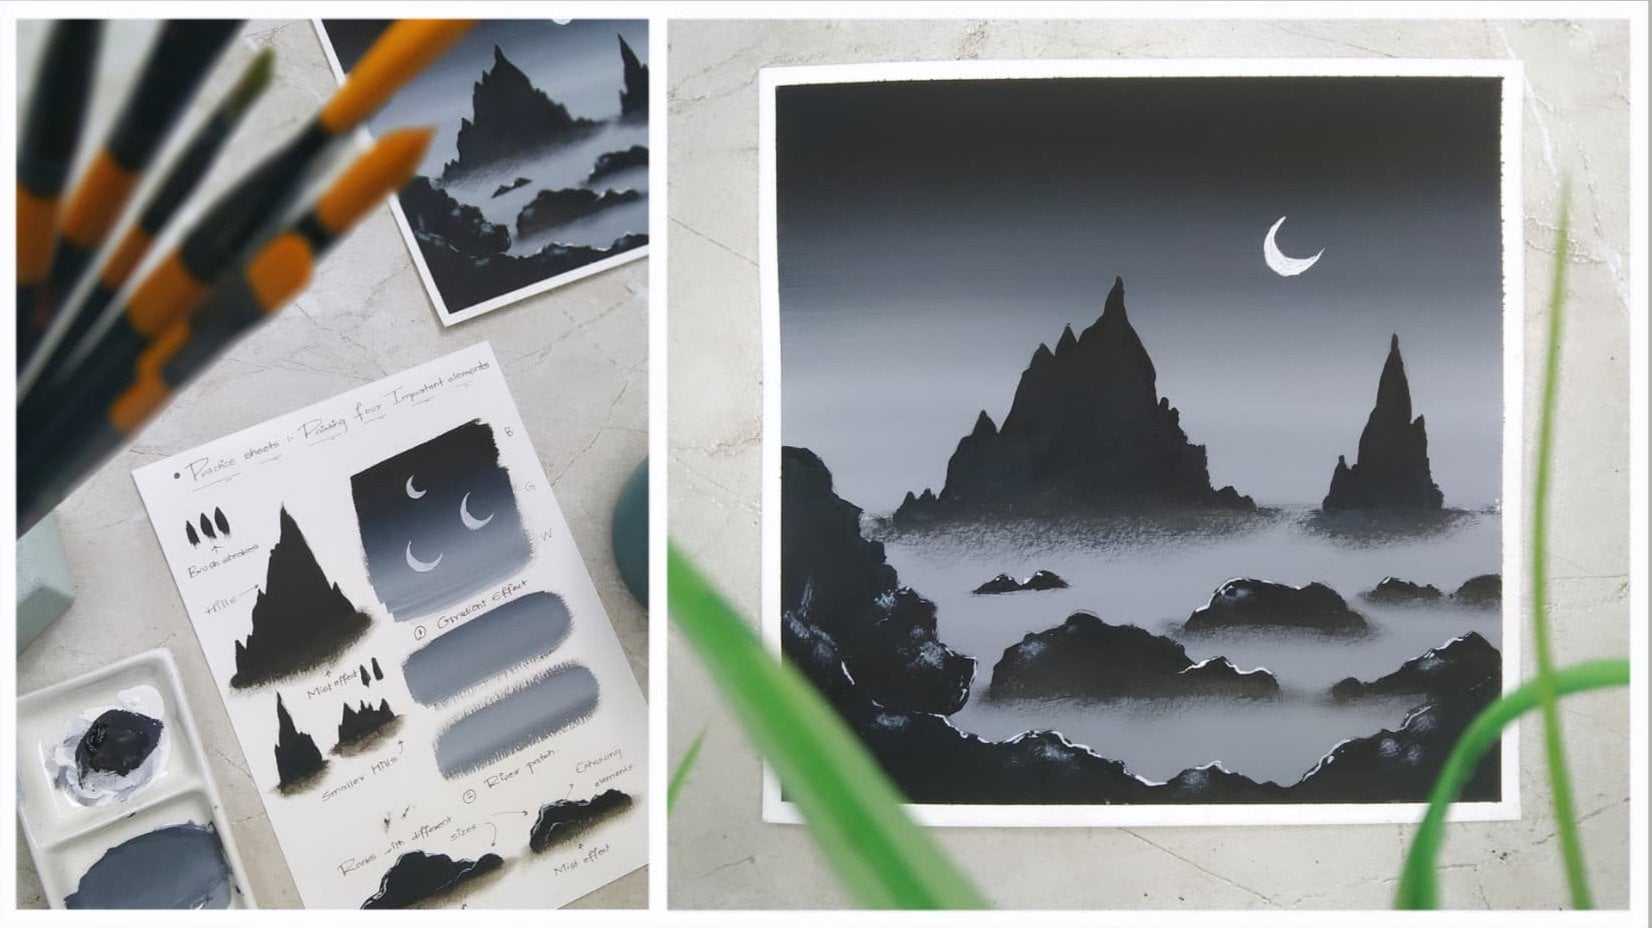
6. Project 1 - Giant Hills: Hey everybody. So now let us start with the first painting, which is giant herds and which is basically
a seascape view. So here I have my two
colors, black and white. You can also see that I'm
ready with my entire setup. I have my watercolor paper
ready with this idea. So I'm using my one-inch
flat brush to apply a thin coat of water on the
watercolor paper initially, you just have to simply observe the movement of my flat brush. You can also see that I'm ready with my ceramic palette and tissue paper to remove the excess amount of
water in case needed. I'll be just making
these horizontal strokes up to certain level on the watercolor paper,
as you can see. Now, I have dabbed my brush
on the tissue paper to remove excess amount of water because we just want
a thin coat of water. The reason behind applying
a thin coat of water initially is so that
when we apply color, it can spread easily. This is basically known as
a wet on wet technique. So now you can simply
observe my color palette. I have taken some
darker tone of black, and I have just applied a nice horizontal stroke
on the top most part. You just have to make these
beautiful horizontal strokes. You can just make
sure that there isn't any space left between the
masking tape and the paper. Now we'll add a little
bit of white to the black color so that we
can get a nice gray shade. No need to be that accurate. It is absolutely fine. This is painting and only
to take it seriously, just try to make a lighter tone than black, which is greenish. You can see I've
mixed some white, so I have got a nice
gray tone shade. Now we'll be applying that just below the darker tone of black. So as you can see, there is
a little bit of difference. Now we'll take some
more white and create a little bit
more lighter shade. As you can see, I'm just using my same brush to create a
nice shade which is lighter. And this time I'm applying
it on the most bottom part. Now we're going to blend
all the three together. Once you have applied
the horizontal strokes, as you can see, we are going to make the brush a little bit dry by dabbing
it on the tissue paper. I'm just trying to apply as
much as strokes possible so that it looks more
perfect and smooth. As you can see, I have
dabbed my flat brush on the tissue paper so that excess amount of
water is removed. Now once you apply
the dry brush, it gets a nice blend. So all the black, gray and the lighter tone
of pride that we have applied will blend together and gives you a nice
gradient shade. This is how we have
created the background. And as it dries up, you can see how beautiful
the background looks. Now let me paint the area which is going to be
another shade of gray. You can create your own
gray shade as well. This is going to be
absolutely fun part, so no need to take
that seriously. I've just added some white and tried to make another
shade of gray. And I have applied in
directly this time. I haven't applied a thin coat of water this time because
the area is very less. So now I'll be
taking some water in my color palette so that the color becomes a
little bit smoother. Make sure that there
isn't any space left between the paper and
the masking tape. So we have almost painted
the CAGR as well. But let us create some gradient
effect to this as well, but by some other technique. So what I'm going
to do is that I'm going to take another brush, which is going to be
my detailing brush. Let me take some black and
my flat brush pause and let us add some black to the
top layer on the sea area. So what we're going
to do is we're going to take a little bit of black color and flat brush. And I'll be applying a
simple horizontal stroke on the top most part. As you can see, we got a nice
gradient effect this time. So that is the difference in
the color from the top to the bottom part. No
need to worry at all. Be very wet patient
while doing this. We are ready with the
seascape as well. So now let me take my
detailing brush of size five and I'll be taking
some darker tones of the color that we have created. Let me take some darker black
tone and detailing brush. You can also use a
round brush as well. The detailing brush is basically a round
brush only and just have a pointed tip so that
you can add my new details. So by using this,
I'm just adding these vertical strokes to show some nice waves in the sea area. You can see I'm just
moving my brush and this horizontal direction and adding these minute details so that the painting looks a
little bit more attractive. That isn't any particular
way of doing this. You can add these little
horizontal strokes according to your
requirement as well. You just have to follow
the steps and the methyl. No need to take any water in
the brush and just try to have some dry colors so that it can blend
with the background. So this is how I have created some nice effect
to the City area. Now let us paint the hills. I have taken my detailing
brush of size one. So the hills are going
to be absolutely black. But in case you are not
that much confident enough to paint the hills
directly to the final painting. What you can do is you can practice them on a dark strip of paper that we have gathered
from the A6 paper only. And then you can come
towards your final painting. No need to worry at all in case you do not get the exact shape. It is absolutely fine
because mountains are eventually having
natural shapes only. So you can follow your own
natural shapes as well. You just have to create
these beautiful hills. I hope that you got an idea. Now let me come to
the final painting. I'll be using my detail brush and I'll be taking
solid black color. Let us start with
the outline first. We are going to
have a giant hill. On the left side. I have somehow created a
nice loopy giant hill. And it is absolutely unnatural shaped by
having pre decided it. You just have to make sure that you use the tip of
your detailing brush. Well, there are difficult areas. Now we'll be filling it with solid black color. No
need to worry at all. Just follow the
direction of the brush. Don't make any is exact strokes and just try to
follow the pattern. And you have to just
make it solid black. No need to worry at all. It is not at all difficult. I have somehow painted
it completely black. Now, let us just add some details on the bottom
area so that it looks that it is a mild or we can say submerged in the sea area. That'll be just
making another point. These strokes on the bottom pad. Trust me, this is
very satisfactory. Be paying these beautiful hills. And we can also make these little horizontal strokes to make a nice shadow effect. And as you can
see, I do not have any excess amount of water
in my detailing brush. This is absolutely color. When you find your
brush a little bit dry, then you can add that to
according to your requirement. Now let me paint a small hill
on the right area as well, which is also
submerged and C area. So since the hills are in water, we have to create these beautiful shadowy
effect so that it looks a little bit
more natural and your painting becomes
little bit more attractive. You can also add
these little stones. I'm just using the point
of my detailing brush, which is helping me to create these beautiful
little shapes. So no need to hurry a doll and just be very patient
while doing this. And again, I'll
repeat that in case you're not that much
confident enough to paint the hilly area or the hilly part in the
painting directly. No need to worry, just dig up, scrape off paper, practice these random natural
shapes on that floss. You can create your own as well. And then you can come
towards the final painting. As you can see, I've added some more stones on
the bottom part, which is looking
absolutely amazing. Now I'll be taking some
solid white color and my detailing brush size one and the lead
painting, the moon. Just simply take some white
color in your color palette. Take your detailing brush, dab it on the tissue
paper so that your rational becomes
a little bit pointy. Now going to be
painting the moon and it is not at all difficult. You just have to create
a simple circular shape, as you can see, will be
very much careful while doing this so that
you do not spoil your background by
adding white color. You just have to
make us them both Oracle and in case you are not that much confident
enough and just try to practice it on
a scrap of paper. And as you can see that I
haven't used any water, we can just use
solid white color. Now let us add some
nice reflection effect on the water body as well. So it does not at all difficult. You just have to make these
little horizontal strokes just below the giant hill. You have to make
it randomly only. That isn't any particular
way of doing this. As you can see, how beautiful the deflection in fact
looks just below the moon. And this is how you can enhance
your entire water body. Now in order to
get thin strokes, I'm just using the point of my detailing brush so that
the strokes are very thin. Let us enhance the
wrong body as well. So I will just outline it with white lines so that it
gets a little bit more. In contrast with the background. We can also do this
to those stones that are in the bottom portion. Let me add some details to
the giant hill as well. You can see I'm using the tip of my detail brush to do this. We can add some texture to
the giant hill as well. And we are almost done. You can see how beautiful, elegant, and minimal
the entire painting is. And I hope that you got to
learn something new from it. So now let us
remove this item B. They much get fooled
by removing this idea. So that is a
technique to do this. Just try to remove this item and an angle so that you do not end up tearing your
precious being Dean. As you can see, we
removed the side tape, how beautiful the
whitewater looks. And also this is the
most satisfactory part. Once you complete the entire painting and remove the site, it gives you an
amazing satisfaction. Let me remove the
last step as well. No need to hurry at all. Be very much common
patient while doing this. And the entire
painting is ready. Let me take you a
little bit closer. So this is the giant
painting and it is absolutely easy,
amazing and elegant. So you can see how beautiful
the details are looking. I hope that you enjoyed
this particular painting. Now let us move towards
the next painting.
7. Project 2 - Classic Branches: Hey everybody, you
are most welcome to the second painting which
is clapping branches, which is one of my most
favorite paintings. So we're going to start by
having a nice gray background. So as you can see, I have
my flat brush ready. And you can also see that we haven't cleaned
the color palette. It is absolutely fine. Since this is an
achromatic color scheme. It is absolutely fine if
you use the same colors. So I'll be just applying a thin coat of water
initially. As you know. The reason behind doing this is so that when we
apply the color, it can smoothly spread into
the entire watercolor sheet. So we just have to make
these horizontal strokes. And you can see the
water is dirty, but it is absolutely fine since we're going to
create a gray shade. So it doesn't matter
if the water is DoD. That'll be taking some white
in my color palette to create a nice gray
shade. As you can see. Whenever you want to
create any kind of shade, mixing any two colors
or three colors, just try to mix it
well with your brush so that you can get
an accurate shade. I'll add some black so that I can make it a
little bit darker. You can see how nicely I'm
trying to blend the colors. So be very much patient
while doing this. Now we'll be applying
horizontal strokes into the watercolor
sheet directly. Since we apply that then
Kotok water initially only my color is spreading
evenly on the entire sheet. As you can see. You can see a little bit of black strokes, but that is fine. You can blend it
afterwards as well. Just make sure that there
isn't any space left between the masking tape and the
watercolor paper on that wouldn't look nice when you
remove the masking tape. As you can see, I'm
just trying to blend the entire color so that I can get a nice even tone background. No need to hurry at all. Just try to make the horizontal strokes
as much as you can. And once you are satisfied with the entire background
color, then you can start. Also in case you're not that much confident enough
with the shade, what you can do is you can
take a rough scrape off. People tried to apply certain color of gray shades
that you want to create. Apply that on the
rough scrap of paper, then you can come towards
the final painting. So now let me tell
you how we are going to paint the
classic branches. So here I have my detailing
brush of size one. And as you can see, I have just drawn our
random rough line. And I have tried to
make it a little bit thicker since it
is the main branch. And from that main branch, we are going to create these ten branches which are
going to come out of that. So you can see how beautiful the branches will
look once you try to practice this on
adapt scrap of paper. So now let me make it a
little bit easier for you to understand where we
have this thick branch. You have to just make it a
little bit thicker by applying double strokes using your
detailing brush and wet, we want the branches to be ten, which are on the outer portion. We are using the tip of
the detailing brush. This is the basic
technique that we are going to use and the
final painting also. Now no need to hurry at all. You have to do this
with a lot of patients. So I have created a nice dark black shade
in the color palette, as you can see here, I have my detailing brush. I have simply drawn our
main branch initially, and I'll be just
detailing it out using the tip of my
detailing brush. As you can see, we are
just pointing it out so that it looks like
our main branch. There isn't any particular
way of doing this. As you all know that branches are always
natural and shape. So it is absolutely fine. You can create your
own shapes as well. Now, I'm going to repeat
the same process. I'll be just adding these
thin branches coming out of the main branch so that it looks a little bit more
natural and elegant. So there isn't any
particular way you can add the branches
wherever you want to. Again, I'll be adding the branch on the
left side as well. So in case you are not that
much confident enough to paint the branches on the
final painting directly. And you might think that you might end up spoiling
your background. What you can do is you
can take it up scrap of paper on the remaining paper from the A6 paper
that we have content. You can practice the branches on that first and then
you can come towards the final painting
so that you can be more confident enough to
paint these minor strokes. But trust me, this is
not at all difficult. Once you practice it, you will be getting
a nice hand on it. And also it will improve
your reading skills. The entire process
is absolutely same. So you can just observe how I'm adding these thin little strokes to make the entire branch a little bit more
dense and wider. So while I'm doing this, let me also tell
you that painting branches is also something
which is very satisfying. So by doing this
particular thing, You can just enhance your
technique of rush and you can also make certain patterns to
enhance your brush scales. So now I'll be repeating the same process and you
can just simply observe it. So these are the
branches that we have painted on
the left portion. Let us paint some
more branches on the top right corner as when the process is going
to be absolutely seen. That is going to be
a main branch which is having a very natural
shape as you can see. What also makes sure
that there isn't any space left between
the masking tape. Andy watercolor paper. I've taken another main
branch on the right area crossing towards
the first branch, which we have drawn on
the top right corner. So this is basically
a natural shape, which I'm talking about. So you can create your own
natural shapes as well. Now, add some water to the
black color in case you find your brush moving a little bit too rough on
the watercolor paper. That will help you to make it
a little bit more smoother. Side of just repeat
the same process. I'll be adding the ten
branches to the mainstream. So since there are no
leaves to the branches, we're just trying to create an elegant look directly only. So it's basically a dry tree. Now let me add
some more strokes. And we are almost done
painting the entire branch. Now let us paint a nice, elegant moon in-between
the branches so that they can enhance
the painting even more. I'll be cleaning
my detailing brush and watercolor that I have. Just dab your detailing brush on the tissue paper
so that you would remove the excess
amount of water. Take some solid white color,
and the color palette. Always take the color as
much as required only. We have to always
save the resources. And only two ways, the color, I've just taken a single drop of solid white color
and I have it in my detailing brush tried to make a small fee shape in
between the branches. You can also keep
the placement of the moon according to
your requirement as well. Once we draw, a nice V-shape will be making it a
little bit thicker on the center portion so that it
looks like our moon image. Patient and careful
while doing this because we do not want
to spoil the painting. And the background.
As you can see, the moon is looking
absolutely beautiful. And we are almost done painting
the entire moon as well. So as you can see, the moon
is in-between the branches. So we can also enhance
the branches by adding some little white strokes on the drainage area
to enhance them. Just try to add these
little minor strokes on the outline of the branches so that it can enhance
the entire painting. I'm using the tip of my
detailing brush so that I can get thin white strokes
on the entire drainage area. And you have to apply it in a random way only no
need to worry at all. So this can give you a nice
small effect or you can also consider it as
enhancing element. Anything is fine. I'm just adding some
little white strokes on the bottom branches as well. So we are almost done
enhancing the entire branch. You can do it as
much as you want to. Just make sure that you do not apply thick strokes
of white color. We are done with the
entire painting. Be very much careful
while removing the site. There is a technique
to remove this item, tried to remove the
tape in an angle so that you do not end up tearing
your precious painting. And trust me, this is a
very satisfactory process. So be very much careful and
patient while doing this. And it will also give
you a nice satisfaction. You can see how
beautiful that lean edge looks and the white border
looks really amazing. Let me remove the
last tape as well. And we're done. Let me take you to the painting
a little bit closer. You can see how beautiful
the details are looking. So no need to worry at all. You can create your
own natural shapes and your mom can be
a full moon as well. So I hope that you
enjoyed the painting. Now, let us move towards
the next painting.
8. Project 3 - Plants at Night: Hey everybody. So now let us start
the third painting, which is plants at night. So as you can see, this painting is going to be really fun. So here I have my flat
brush off size one-inch. I'll be applying a
thin coat of water initially on the
watercolor paper. No need to worry in case
the water is dirty and in which ways the background is
going to be darker in tone. So it is absolutely fine. Now to remove access
amount of water, just simply dab your brush on the tissue paper so that you can just remove
the excess amount of water from the
watercolor paper. So now we're going to create
a nice gradient background. So as you can see, I have taken
some solid black color in my flat brush and
I'll be applying the color on the top portion
of the watercolor paper. We just have to make a
simple horizontal stroke. As you can see, you can observe the movement
of my flat brush. No need to hurry, just do it in a very slow and
steady manner. So now we'll be creating
a shade of gray. As you can see, we have to
create a nice gradient effect. Softer black, we are going
to have a nice gray shade. So we have already applied
the solid black color. Now just below that,
we are going to apply a nice shade of gray in the color palette
you can observe, I'll be taking some
white to add it in black color so that we
can make a shade of gray. Don't raise the color, just take it in amount
which is required. You just have to mix the
colors in the color palette. As you can already see, that I've just applied a nice horizontal
stroke of gray as well. So you can see I'm making it just below the
solid black color. No need to worry, we are
going to blend it together. Now. I'll be taking
some solid white in my flat brush and we'll apply it just below the gray shade. It does not having
that major difference, but we just want to
create a gradient effect, so it's absolutely fine. So now you just have
to simply clean your flat brush in the
water cup, as you can see. Now we'll dab the brush on
the tissue paper to make it completely dry so that it
becomes absolutely dry. Now when you will
use the dry brush to blend the gray and
black color together, it will give you a
nice gradient effect. As you can see. I'm just trying to blend the
colors together. No need to hurry at all. You can do it very slow
and steady and v as well. Also in case you do not find
it that much easy to do. What you can do is just take
it up, scrape off paper, mix some gradient effect by using black and solid
white color together. Try to make your own
gray shades as well. You can do that. Then once you find
that you are confident enough to come towards
the final painting, then you can start applying the gradient effect on the
final watercolor paper. I'll be using two
detailing brush. One is of size one, and another one
is of size three. So we'll be taking
solid black color to paint the plantations. So I'll be using the lab
scrap of paper to show you how to paint the leaves. So as you can see, by
using the detailing brush, you can make these
beautiful Lean strokes. This is not at all difficult. You just have to apply this technique to
paint the leaves. And the reason behind using two different
detailing brushes is that you can have the
difference in sizes. So now I'll be using my
size three round rash, or we can also call it as
the detailing brush to make the size of the leaves
a little bit bigger. So as you can see,
this is how you can create bigger
leaves as well. This is how we are going to apply it on the final painting. Now, personally, I would also suggest you to practice this on a scrap of paper
initially so that you do not end up spilling
the final painting. And using the thin stroke of the detailing brush,
the tip of the brush. Basically, we are going to be in the minute details and
branches for the leaves. Now, let us come towards
the final painting. We are going to start by painting the bigger
leaves initially. So we'll be using the size
three round brush basically, which is the detailing
brush according to the language that I'm using. So as you can see, I have made this beautiful
leaves on the left portion. And there isn't any
particular way of doing this. You can add and make your own lives according to
whatever sizes you want to. But initially in
the bottom part, we have to make these leaves
a little bit bigger in size. Also, what I'm going to do is
that on the bottom portion, we are going to show the
plants a little bit denser. So we have to make
it a little bit more complicated by adding the leaves a little bit closer
to each other. And as we move towards
the upper portion will maintain some
distance between them. You can observe the movement, how I'm using my little English. No need to hurry
at all in case you find me painting a
little bit faster. What you can do is you can
take out a scrap of paper, as I showed you initially. You can practice to paint the
leaves on that paper first, and then you can come
towards your final painting. Now, I'll be taking my
detailing brush off size one, and we want the leaves to be a little bit smaller in size. So as you can see,
this is how we're going to paint the
smaller leaves around the bigger leaves. The concept is basically
painting the smaller leaves on the upper portion and having bigger leaves
on the bottom part. The mantle is absolutely same. This particular painting
deltas that by doing minimal book also we can create some beautiful
amazing paintings. And here I have the
composition of the leaves in such a way that it
looks like as if the plants I've drawn all
on the bottom portion. But you can also create your own compositions
by experimenting. And you can create the leaves on the sides or on the top
portion wherever you want to. So by adding more leaves, we are adding more details
to the painting and it will also enhance the entire
look of the final painting. Once we remove this item, I'm just trying to
add it randomly. Wherever I feel that the smaller
leaves will look better. Whenever you feel that
your brush is a little bit rough and you're not able to paint the leaf in
a smooth manner. You can add a little bit of
water in it so that the color gets a little bit loose and you can use the
brush carefully. So now I have simply cleaned my detailing brush of size
one and we'll be painting a small moon just above the leaves that have some solid white already
in my color palette, we don't want to
raise the color. Just take some solid
white and you're detailing brush and brush on the tissue paper
so that the tip of your detailing brush becomes
a little bit sharper. Now simply you just have
to make a small circle. I'm not painting the moon on the exact center of
the watercolor paper. We're just keeping it a little bit aligned
to the right side. But you can paint it
wherever you want to according to your preference. As you can see, I have just painted a small
circle and be very much careful while painting this because we don't want to
spoil the background. Now comes the most beautiful
and my favorite part. So we have been to the moon, so we are going to
enhance the lives. So just simply take your detailing brush and have some solid
white color in it. And we're just going to add these little strokes
on the leaves so that the leaves becomes
a little bit more enhanced and it can get a nice contrast with
the background. So you have to do
it in a random way. No need to worry at all. Just be very much careful
and patient by doing this. This is not at all difficult. You just have to use the tip
of your detailing brush, which is going to be pointed
and you have to make these little strokes on the
top portion of the leaves. Now you can understand
the combination of the entire painting. We have these beautiful
plants on the bottom portion. And there is this beautiful
moon, just about that. And we are showcasing
that the moon is enhancing the entire
plantation area. And it is creating
an amazing contrast with the background,
which is gradient. So no need to worry at all. You can practice each
and every element on a rough scrap of paper
initially or your art journal. And then you can come
towards your final painting. We are almost done with the entire painting.
Now, let us remove this. I t be very much careful while removing the
site team tried to remove this item in an
angle so that you do not end up tearing your
entire pressures painting. That'll be removing
the top one as well so you can see how
beautiful the sharp edge looks. So this is how you have
to place your site. If you haven't, please do
your masking tape carefully, then it won't give you
this perfect edge. Now let me remove the
last step as well. We're done. Let me take you a little
bit closer to the painting. You can see how beautiful the
entire painting is looking. It is absolutely simple, easy, elegant, and minimal. I hope that you enjoyed it. And now let us move
towards the next painting.
9. Project 4 - Waterfall: Hey everybody. So you're most welcome
to the next painting, which is a waterfall basically. And this is one of my
favorite painting. So here I have my flat brush steady and we're going to create a nice gray shade initially
for this particular painting. And you can see I haven't
cleaned my color palette. We're going to use
the same colors. We're going to save
some nice resources. And it is always
good to save colors. I've just added a little bit of water in the
existing color palette, where I had some black and white together and it became
a nice gray shade. No need to worry at all in case you do not have that
much enough color, then you can add some color. No need to worry
about the shade also, you can create your own
gray shades as well. So we're going to apply this shade on the top
portion initially. Also one more thing
that you have to make sure is that tried to apply the shade on adapt
scape of paper in case you find it a little
bit darker or lighter, you can apply it according
to your requirement. And you have to make
sure that there isn't access amount of
water in your brush, that will definitely
spoil your painting. This time we're going to use the entire gray shade directly
on the watercolor paper. We want a solid, nice texture, so we haven't applied at them
coat of water initially. So I have simply applied
a nice horizontal stroke from the dark portion of
the watercolor paper. And no need to worry
at all and do it in a very careful and calm way. And make sure that there
isn't any space left between the watercolor
paper and the masking tape. That will not give you
a perfect site border. We're not going to cover the entire watercolor paper
with this particular ratio. This is just to give a nice guy and sends the
painting is achromatic, So we are not going to
use multiple colors. We are almost done painting the entire sky area with
this particular gray shade. I'm just applying
some more strokes to make the color a little
bit more smoother. And as you can see, there are certain black lines bombing, so you can cover that up
by giving more strokes. Now once the background
drives, as you can see, it is giving me a nice matte
finish of the gray color. Now I have simply cleaned
my flat brush and dab it on the tissue paper to
remove excess amount of water. So now we're going to paint the entire mountain area from which the water
is going to fall. So I have taken
solid black color, as you can see in
my color palette. Just make sure that you have
a nice solid black color. No need to add some water in it. We just want a
solid black color. That's why I'm just directly
taking the color and you can apply it on a scrap of paper in the manner
I'm doing right now. So we're going to use the tip
of the flat brush to create such amazing niche area. You can practice this
particular style of applying the stroke on adult
strip of paper initially. And then you can come
towards your final painting. I have my solid black color and make sure that you have enough color in your flat brush. Add a little bit of water so that the color
can move smoothly. And you won't find your brush moving a little bit rough
on the watercolor paper. I've taken the black
color and let's start applying it from
the left portion. And I'm just making this random phase to create it in a manner so
that it looks like a hill. And then we'll take it to the elbow portion as we come
towards the right area. You can see the upper layer has been formed and it
looks really nice. Now the remaining portion, we are going to paint
it completely black. So now the remaining
white portion, I'll cover it with
solid black color. In case you find
that your brush is moving a little bit rough
on the watercolor paper. You can take some water. You can also observe the
movement of my flat brush. I'm just trying to cover the area and make sure that
there is no space left between the masking tape and the watercolor paper that will not give you a
perfect white border when you remove
the masking tape. So as you can see, that
is a nice contrast between the sky area and the
hurdle that we have painted. The sky area is having
a nice integration, which is very lighter. And the mountain
area we have the intended completely
dark black color. Now from this particular
dark black color, which is giving us an
essence of mountain, we are going to create some nice water bodies which
are going to fall from it. The reason behind
painting the sky was that because we want that gray layer to be in the background and we want
that to be in the front. That's why we painted
the sky first with gray shade and then we applied
the solid black color. You can always make sure that
there isn't any whitespace left so that you're painting becomes a
little bit more perfect. Now let us paint
the water bodies, which is going to be
the waterfall effect in the entire painting. I have taken some white-collar, take it in a less
than minimal amount only because we don't
need it that much. We have to save colors. I'll be taking my detailing
brush oxides one. And then we're going to take
some white color in it. Just dab the brush on the tissue paper so
that the Russian becomes a little bit
sharper and you can apply the white color in
optimum amount. You're not going to add any
water to the white color because we are not going to
apply a solid badge of pride. They want a rough stroke
from the entire hilly area. You can create the water
body wherever you want to. But I'm trying to create
it in a natural way. So there isn't any perfect
way of doing this. You can just start applying a
nice thin stroke initially, which will have a
solid white color. Now once you move
towards the bottom area, you just have to make sure that your brush touches the
watercolor paper less. And you make a nice
bit of texture, which will give you an
effect of Fallingwater. That's my I haven't taken any water in the
detailing brush. I'm directly applied
the solid color only. Now, I also paint another stream just
beside the first one. Again, the process
is absolutely seem. Initially you have
to stand by applying a solid white color from
the edge of the hill. And as you move towards
the bottom portion, you just have to
make sure that you address does not touch
as the watercolor paper that you can always dab the brush on the tissue paper to remove excess
amount of color. Awesome. Now let us make a ticket
stream in-between. I'm trying to apply this natural shade of white
and no need to worry at all. You can also create
the water bodies falling in your own way as well. There isn't a specific method or it is not compulsory to paint in the same
way I have painted. So as you can see, the stream
which we are painting, or the Fallingwater which we are painting on the middle part. I have kept it a little
bit thicker so that we can show some more water falling
in the tent abortion. And as you can see, the
texture becomes automatically rough because we don't have
any water in the brush. So on the edge we can have solid white color and as they move towards
the bottom area, you can make the texture a little bit too
rough and natrium, you can see it gives you a
nice effect of Fallingwater. No need to worry at all in case you find it difficult to paint, what you can do is you can just take our simple draft
scrape of paper, apply a solid black
color patch on it. And then you can
practice to paint this Fallingwater effect on it. And then you can come towards your final painting
to paint this. So now we're going to repeat the same process and we can add some more water streams pulling
on the left side as well. I'll be taking some more
solid white color and I'll be adding the streams
on the left portion. Let us add some nice thin
strokes on the left side. And initially I'll be applying the solid white color
at the top portion. And as I move towards
the down potion, I'll make my brush a little bit more away from the
watercolor paper. Now we're going to
repeat the same process. In case you find me painting
a little bit faster, you can definitely
slow the frame rate. Also, do not hurry. Just make sure that you paint it in a very patient manner. And make sure that
you are water streams looks really beautiful
as you paint them. We're almost done painting
the entire waterfall effect. Now, let us paint
the last element, which is the moon. And no need to worry at
all. It is very easy. You just have to take
some solid white color and make a small circle. Be very much careful
while doing this. We do not want to damage
or boiled the background. So that's why be very
much careful while making this small circular
shape for the moon. Just making it a little
bit bigger in size. The add some more white color, tried to have a nice
perfect circle shape. Now on the mountain
edge we're going to create a nice fence effect. So this is not at all
going to be difficult. You just have to take your
detailing brush off size one, take some solid
black color in it. We're going to use the tip
of the detailing brush. And you just have to make
these little vertical lines at certain distance and make sure that the fence is
not in the water. We just are going to make the vertical lines
where we have the ****, but on the initial stage where the water is
starting to fall, we're not going to paint
the vertical lines there. Be very much careful. We are not adding vertical lines in-between the water streams. I'll be adding the
vertical lines in between again,
as you can see, I'm just simply using the tip of my detailing brush to paint these beautiful vertical lines, which is giving me a
nice fence effect. Now simply repeat
the same process and it is absolutely easy. You just have to use the tip
of your detailing brush. Now in case you find this
difficult, you can definitely, again, practice this on a
scrap of paper initially. And then you can come
towards your final painting. Once we're done painting
the vertical lines, we are going to add
the horizontal lines to connect the fence together. And it will also give a nice detailed look
to the painting. We are going to add
two horizontal lines basically and be very much
careful while doing this. Use the detailing brush
very carefully and the tip. As you can see, we are done with the entire painting and I
hope that you enjoyed it. So now let us remove this. I t be very much careful while removing
the side t tried to remove the site type in
an angle so that you do not end up tearing your
precious painting. No need to hurry, get all the way much careful
while doing this. So as you can see, as
we remove the site, did we get a nice white border? And it makes the
painting look a little bit more attractive and perfect. So I hope that you
enjoyed the simple, elegant and minimal painting. Let me take you a
little bit closer. Now let us move towards
the next painting.
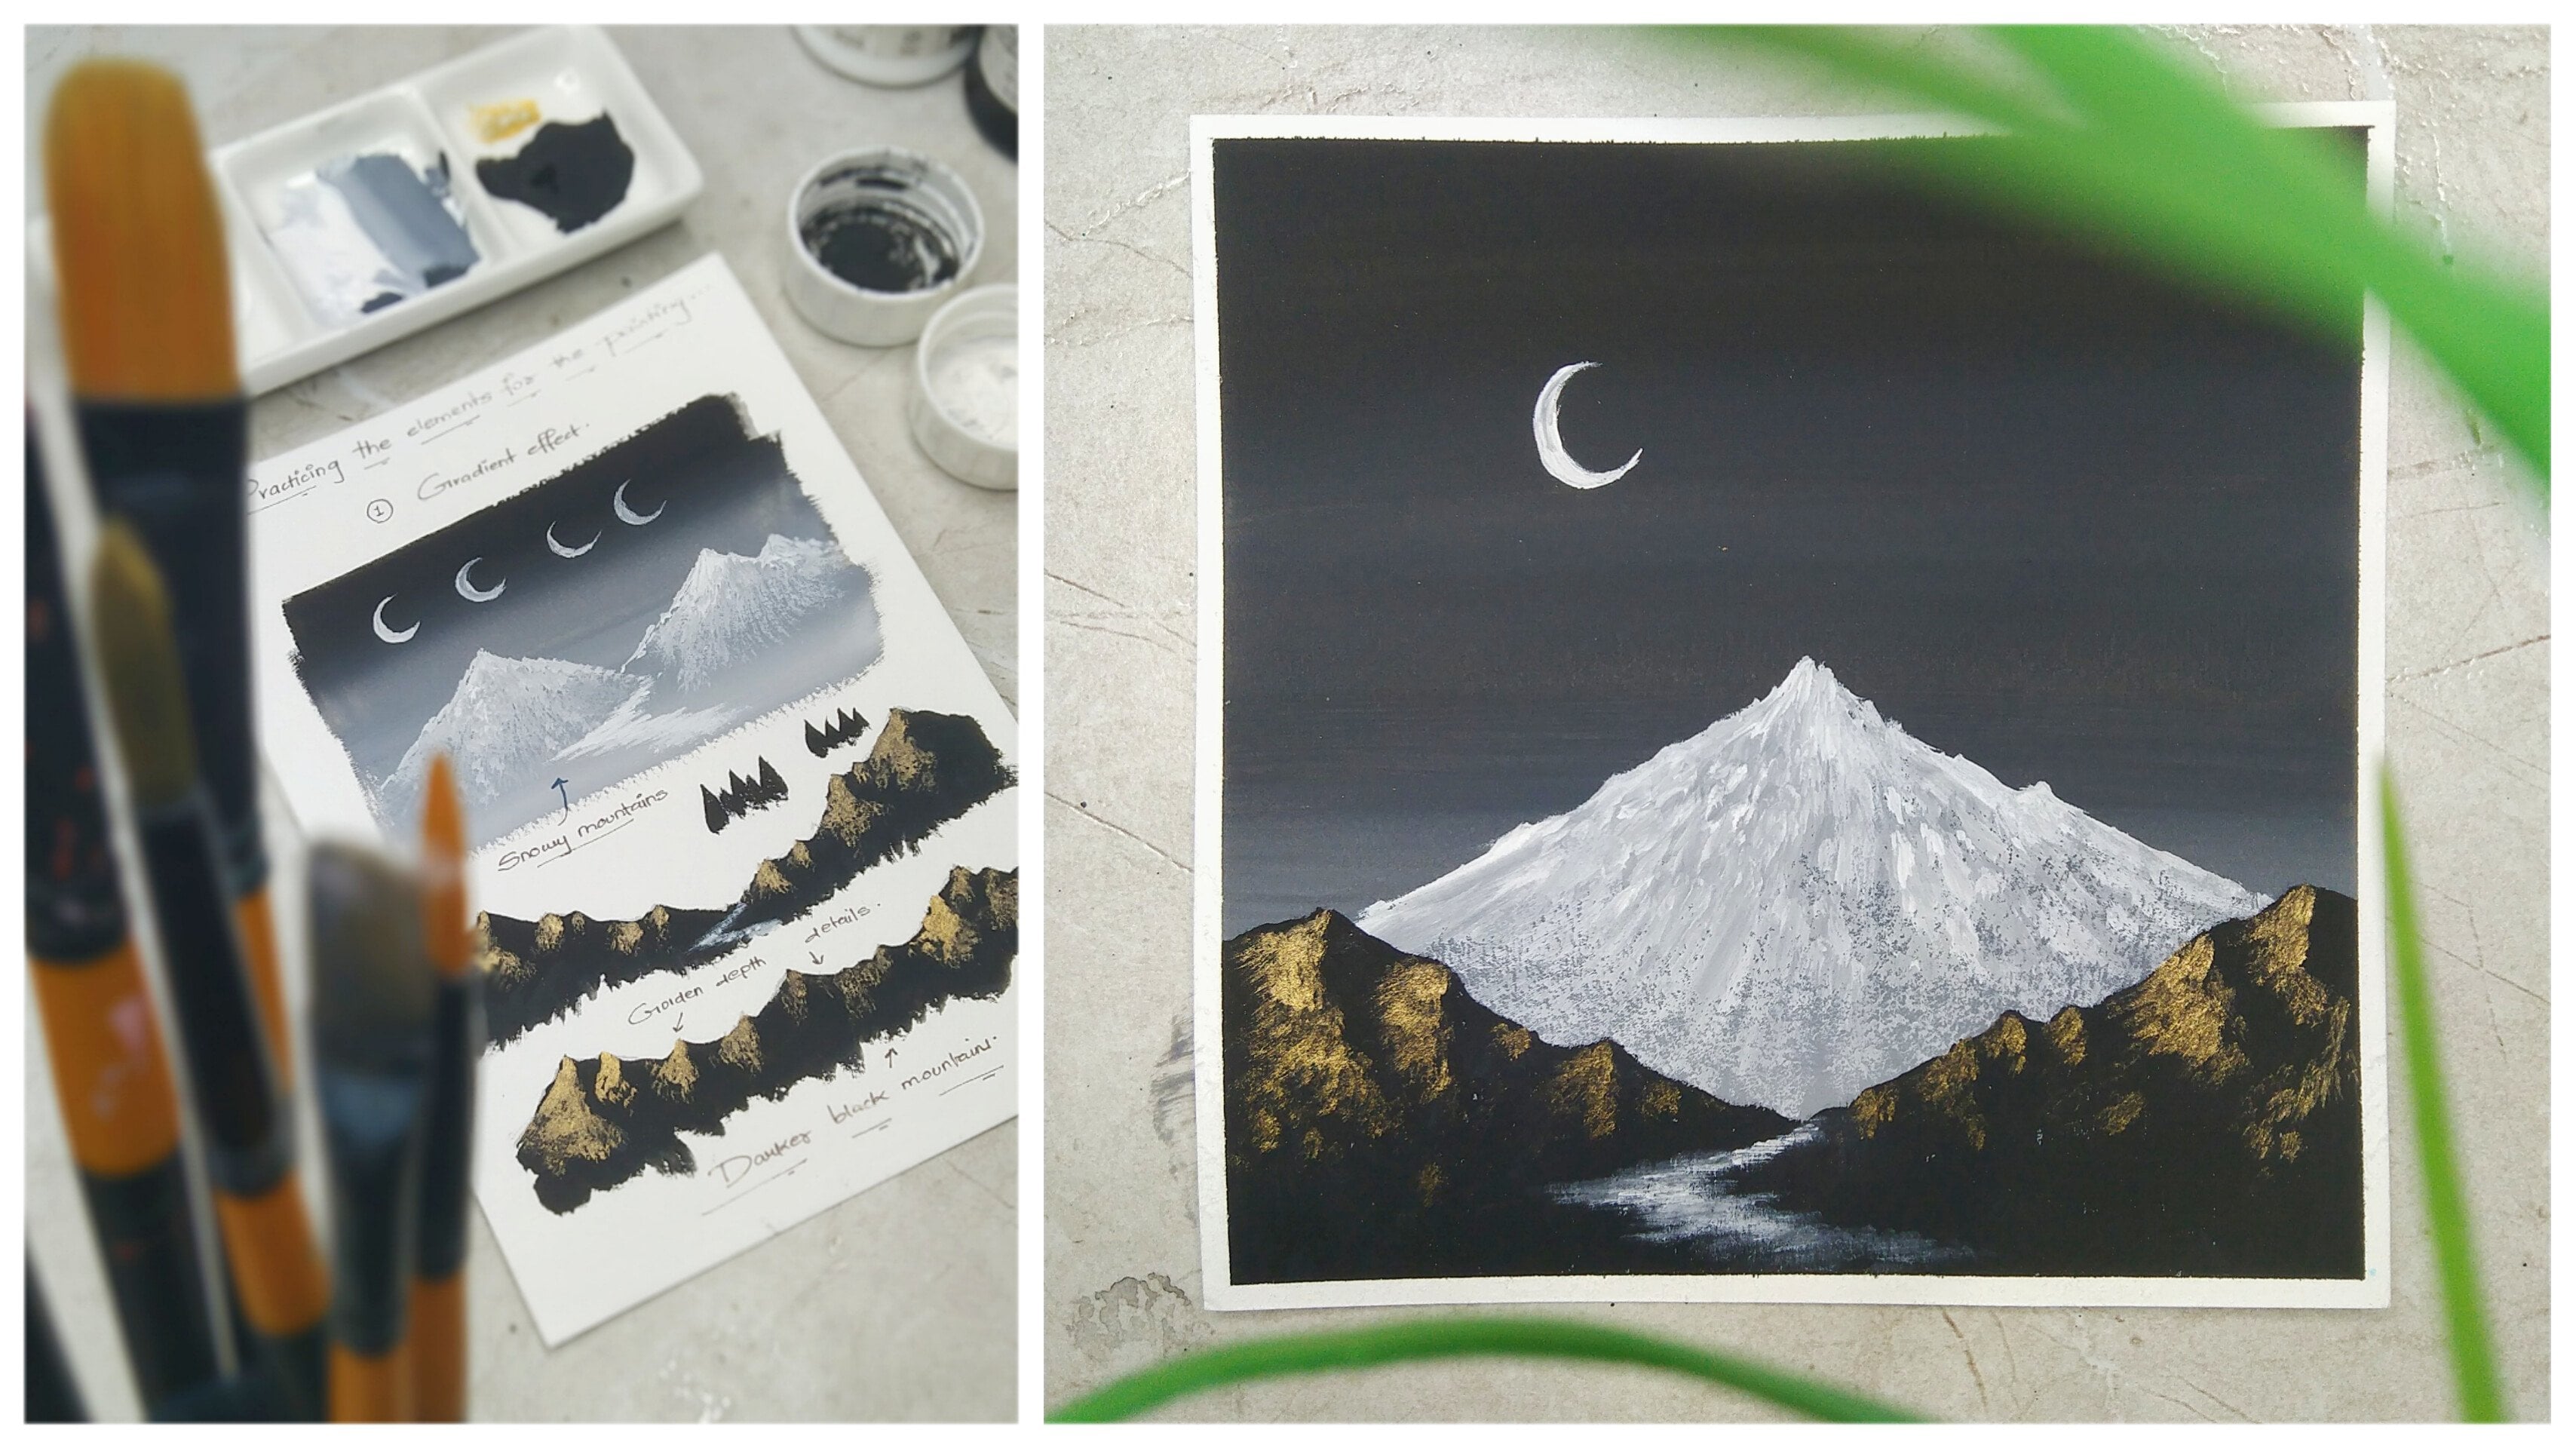
10. Project 5 - Elegant Hills: Hey everybody. So now let us start
the elegant hills. And this is also one of
my favorite painting. And so we're going
to start by applying a thin coat of water initially
to the watercolor paper. So I have taken my flat
brush of size 1 " and we are applying a thin coat
of water to create a nice gradient effect
in the background. Make sure that you
haven't applied access amount of water
in the watercolor paper. And also make sure that
there isn't any space left between the watercolor
paper and the masking tape. In case you have applied
access amount of water, you can just dab your flat brush on the tissue paper and you can make the horizontal
strokes again that will remove the
access amount of water. Now the reason behind applying
a thin coat of water is so that your color can spread smoothly on the
watercolor paper. So as you can see, I have taken solid black color and my flat
brush and I have started to apply the color from the top portion and I'm slowly moving towards
the bottom side. And you have to make sure
that there isn't any space left between the masking tape
and the watercolor paper. That value remove
the masking tape. There isn't irregular. The format that you
get after removing the masking tape and you get
a nice perfect white border. So now we'll be making
a nice shade of gray. And you can see I haven't
cleaned my color palette. We are using the same
colors that are already being used so that we
can save some color. I've just added some amount
of white and black color. And you have already seen that we are using the
colors again and again. So just below the
solid black color, I have applied a
nice gray shade, as you can see,
unknown into worry in case you do not
achieve the same ratio, it is absolutely fine.
This is painting. No need to take it
that seriously. Now once we have applied a nice gray shade just
below the dark black shade, we're going to take some white. Now this time we
are going to apply the white in the bottom portion. And slowly I'll be moving
towards the above part, blending it with the gray shade that we have painted initially. You can already see we have got a nice gradient effect
from black to white. And it is not an exact white. It is a lighter shade of gray, but it is absolutely fine. We just want to create
a gradient effect. Now no need to worry at all
in case you find to paint the gradient effect a
little bit difficult once you can do is you
can just take rubs, people of paper, try
to practice on that. And then you can come
towards the final painting. Now, just to show you, I was already having
a gray patch, which I showed you in
an initial painting. We are going to paint
the mountains by using the detailing
brush of size five. So this is how we are going
to pay in the mountains. So this is just a simple
prototype and you can also practice in this way on a rough
scrap of paper initially, then you can come towards
your final painting because this is not
going to be difficult, but you have to create
some beautiful textures. So it will be really great
if you practice initially. And that won't take
much of your time. Also. As you can see, I've taken some solid white
color in my color palette. I'll be using my detailing
brush of size five. And we're going to start with the outline of the mountain. The reason behind painting the outline initially
so that you can know how you have to apply the color
inside and only to worry, mountains are always
having natural shapes. So you can also create your
own natural shapes as well. Now once you are done
with the outline, you can just observe the
movement of my detailing brush. I'm just making these
nice rough strokes moving towards the
bottom portion. And as I move towards
the bottom part, it is getting a
little bit more rough and the texture is
forming automatically. So that isn't any
water in my brush, I'm just taking the
color directly. Also, one more thing
that you have to keep in mind is you have to use the brush in a way so that you can create this
particular texture. You have to tap your brush
on the watercolor paper. Now, I'll be applying
solid white color on the left side so that we can show some nice depth and
details to the mountains. And we are also going to add a nice shade of gray
in the mountains. No need to worry
at all in case you find me painting a
little bit faster, you can definitely slow
down the frame rate. So as you can see, we
are almost done painting the mountains with the white
color, solid white color. Basically. I have taken some nice black color
and my detailing brush. I'll be just adding this
depth on the right portion. You can see I'm just trying to add these rough texture so that the mountain looks a little
bit more realistic and it can create some more
amazing texture on it. It would be my
personal suggestion in case you are finding this
a little bit difficult. Or if you find making these textures a
little bit difficult, you can definitely take
your rough scrape off paper or any practice journal or odd book in which you
practice on a regular basis. Try to practice on that
first and then come towards your final painting that will enhance your
confidence of doing this. Now, I'll be just making
some darker tones on the bottom portion by using the black and my color palette, which I already have. I haven't taken the color. Additionally, we have
to save some resources. Always try to save
colors and you have to blend it using
your detailing brush. Just dab it on the tissue paper so that it becomes
absolutely dry. I haven't taken any water in it. You just have to blend
it in the way I'm doing. And no need to worry. It is going to be a very
natural looking mountains. So we are going to create
these natural Hills. And I would suggest
you can also create your own hills by making
some random shapes, by creating the combination
of three holds together. So now we're going to
paint the beautiful moon. And this entire painting, I'll be taking my
detailing brush of size one and just take some
solid white color in it. And I'm going to place the
moon a little bit left align. So draw a simple C-shaped
initially and try to make it a little bit
thicker on the center portion. And the tips to be
very much pointed. As you can see, we are done
with the entire painting. This painting was really easy, fun, and simple to do. That is really
looking very elegant. And in case you will find
it a little bit difficult. You can definitely
practice it first and then come towards
your final painting. Now let us remove this item. Be very much careful
value moving this IT. To remove this, I type in an angle so that
you do not end up tearing your watercolor paper and your precious
painting as well. You can see how beautiful
the white border looks. Now let me remove the
last tape as well. And trust me, this process
is really satisfying. It gives you a nice
satisfaction value. Remove the side chain. That may take you a little
bit closer to the painting. I hope that you enjoyed
this particular painting. Now let us move towards
the next painting.
11. Project 6 - Coconut Leaves: Hey everybody, So
you're most welcome to the coconut leaves painting. And this is also going to
be a really fun painting. So now, as you can see, I have my flat brush of size 1 " and they are going to apply a thin coat
of water initially. So for this particular painting, we are going to have a
simple gray background. There isn't going to
be a gradient effect. So initially we are going to apply a pen
coat cutoff water, make sure that there
isn't any space left between the masking tape
and the watercolor paper. The reason behind
applying a thin coat of water initially is so that your color can apply in a smooth way to the
watercolor paper. This time we're not going
to have a gradient effect. We are going to have
a solid gray color. I've taken my 1 " flat brush and you can just simply
observed my color palette. You're going to make
a nice shade of gray. So I'm just going to add some white and
solid black color. No need to worry in case you do not make the exact gray shade. It is absolutely fine. No need to take it
that seriously. So it is very important
to mix the color well. So just try to blend mode the colors
together in a nice way. Use the flat brush
carefully and try to have some good amount of color
in your 1 " flat brush. Simply just take us grape of paper and try to
check the shade. If you are satisfied
with the shade, then you can go to
the final painting. I want the gray shade to
be a little bit lighter. So I've added some
more white and I'll be blending it with
the color again. And I'll be making
the gray shade a little bit more lighter. So no need to hurry at all. You just have to be very much
patient while doing this. Same blending the color again in a very careful and
particular way. And you can just
now apply the code. As you can see, I'm
starting to apply the color from the top
portion and make sure that there isn't any space left between the watercolor
paper and the masking tape. In case you find
your brush moving a little bit rough on
the watercolor paper. You can add a little bit
of water in your color. Now you can see that we are almost done painting
the entire background. I'm just dabbing my flat brush on the tissue paper
to make the brush a little bit dry so that we can remove access
amount of water. The entire background
is ready now I'll be taking my detailing
brush of size one. And we're going to
paint the coconut leaves coming from
the right area. So there are going to be two coconut leaves that we are going to paint on
the right side. So let me tell you
how you can paint the coconut leave very easily. You have to just make a goal, which is going to
be a main stem. And then you have to add these little strokes using
your detailing brush. So initially I'm just using the tip of my
detail brush to me, these thin strokes to make
it look like a coconut live. And you can see this is
not at all difficult, you just have to practice it. Now the most important part is the way you have to use
your detailing brush. I'm just drawing a main stem
and you just have to connect all the small strokes to the main stem using your
detailing brush tip. As you can see,
this is how you can form beautiful coconut limbs. Now the reason behind
showing you this on a scrap of paper is so that you can get
a correct idea of how you can make these
beautiful leaves. Now it is not at all
compulsory that you painted in the same
way that I'm painting. You can create your own
composition as well. But it would be
really great if you practice it on a rough
strip of paper initially. And then you can come towards your final painting
that you do not end up damaging or spoiling your background that
you have created. So now I'm starting
with the first leaf. And I have just simply made a thin stroke
forming a nice goal. And I'll be connecting these little strokes
to the main stem. And not at all difficult. You just have to
leave your brush in a very lightweight and no need to make your hand very stiff. Just move with the flow and try to create these
beautiful strokes. So once we are moving
towards the down area and we are forming
these leaves as if they are falling towards
the bottom portion, will be forming little
strokes on the above area. Now this time what
I'm doing is that I'm trying to make these
drugs a little bit smaller than the bottom ones so that it looks a little
bit more in perspective. And the LEA will be a
little bit more attractive. No need to worry at all. Do it in a very slow
and steady manner. In case you find new painting
a little bit faster, you can definitely slow
down the frame date. Now, I'll be painting
another leaf just below the bigger one. Now this time we
will be painting the leaf a little bit
smaller than the other one. So again, the process
is absolutely same. I have drawn the main
call and will be forming the little strokes
connecting to the main stem. And this time we are just trying to make it a little bit smaller. Now it is not necessary that you paint two
leaves only you can make a combination of three leaves are
four leaves as well. You can experiment and try to create your
own style as well. That would be also great. Now I'm adding some more thin
strokes that you find in a coconut tree so that it looks a little
bit more attractive. Just using the tip of my
detailing brush so that I can get nice thin strokes
coming out of the leaves. This is not a complete tree. This is just some portion of the tree that is coming
in the painting. Now we'll be painting
another leaf on the left hand side corner
on the bottom portion. Now this is in a different
perspective again, but the process is
absolutely same. We have drawn a simple curve which is going to
be the main stem. And I'll be connecting
these thin strokes, replicating the leaves of
the entire coconut leave. Now this time I'm
moving the strokes in this upward direction
as you can see. And you have to follow the
same steps if you want to create a leaf on the area
where I have created. Or you can also
change the position. That is absolutely fine. You can experiment
with the painting, but this time I have taken
it in this particular way. So now again, on the other
side we are painting the strokes and no
need to hurry at all. In case you find me painting
a little bit faster, you can definitely
slow the frame rate and be very much patient
and come while doing this, you have to make the
stroke a little bit perfect and in a
very slow manner. Also one more thing
I would like to tell you all is that in case you find it a little bit difficult to paint it on the main
painting directly. What you can do is you can just practice this on our graph. Scrape off paper initially, and then you can come
towards your final painting. This would definitely
minimize the chances of mistake and your outcome
will be really nice. So let us add some more
strokes to the painting. These are just a part of
a coconut trees that you will find on the top portion
or on the bottom part. We are just adding these
little thin strokes. Now I have taken some solid white color and
the color palette, and we're going to
paint a simple moon. I'm just trying to create a nice small moon just
above the coconut leaves. And I have just created a C-shape and you
have to paint it a little bit thicker on the middle portion and
pointed towards the tips. No need to worry at all. You can practice this as well on a rough scrap of
paper initially, and then you can come
towards your final painting. Now, let us enhance the
coconut leaves a little bit. So we're showing as if the moon light is
falling on the leaves. So we are going to take
some solid white color and the detailing brush. And on the leaves you
just have to create these little thin strokes on the middle portion of the
entire coconut leave. This will enhance the
leaves and it will also make the painting look a
little bit more attractive. I'll be repeating the same
process on the below, coconut leaf as well. And the leaf that is on
the left bottom corner. I'm just simply repeating
the same steps. You can just observe the
movement of my detailing brush. No need to hurry at all, painted slowly and carefully. Try to make the stroke
as perfect as possible. And no need to add any kind
of water into the brush. Just directly take color
and your detailing brush. Let us also add some white color to the
thin strokes that we have added randomly so that it can also get enhanced
with the background. The reason behind adding white
color to the painting is that the background is darker in tone and it is solid gray, and it enhances the
entire painting, creating a beautiful contrast. Now, let us remove
the masking tape. Be very much careful while
removing the masking tape. Tried to remove the masking
tape in an angle so that you do not end up tearing
your precious painting. You can see while I
remove the masking tape, we get this solid white border, which looks really
amazing and beautiful. And this is one of the
most satisfying part. Let me take you a little
bit closer to the painting. I hope that you
enjoyed and got to learn something from this
particular painting. Now let us move towards
the next painting.
12. Project 7 - Night House: Hey everybody, now let us paint a beautiful night
house painting and we have a lot of elements in
this particular painting. We are going to start
with the background. Here I have my flat brush
of size 1 " and we'll be applying a thin coat of water initially to the
watercolor paper. No need to worry. The water
is a little bit dirty, but it is absolutely fine since the background is going
to be darker in tone. We are not going to apply
the thin coat of water to the entire watercolor
papers since we have solid black
color at the bottom. So that's why I have
just applied on the threefold portion of the
entire watercolor paper. Now we're going to create
a nice gray shade in the background so you can just simply absorb my color palette. I have added some white
color and the color palette, and I have used the same color, which was already in
my color palette. So we have to save
resources and color. At the same time.
I'll be creating these beautiful horizontal
strokes to create a nice gray background.
No need to hurry at all. Be very much careful. Make
sure that there isn't any space left between the watercolor paper
and the masking tape. Now the reason behind applying a thin coat of water
initially is so that your color and your brush can move
smoothly in the background. And you won't feel any rough
surface while painting. Just make as many strokes as you can unless you find a
nice collect background. Now once I've applied a nice gray shade
in the background, which is a little bit
too wet right now, I've taken some solid white
color in my color palette. And let me apply it on the
bottom portion so that we can create a little bit of gradient effect in
the bottom portion, we can also see it
as the horizon line. Now once we applied
the solid white color, we can blend it with
the background color. No need to hurry at all. Try to make the
horizontal strokes carefully in case you
are not that much confident enough to create the horizontal strokes on
the final painting directly. You can practice them on a rough scrape off
paper initially, then you can come towards
your final painting. So as you can already observe
that I have created a lot of strokes so that I can get
a nice perfect background. Now we are almost done painting the entire background,
which is the sky. Now let us start painting
the entire landscape area. So here I have my
detailing dash of size five and we'll be taking
solid black color in it. I'll be starting to paint the land surface from the left portion coming
towards the right area, creating an irregular surface. No need to worry at all. You can create your own
irregular surface as well. It is not at all
necessary that you have to paint it in the same
way I have painted. Now, once we have
created the top surface, which is irregular,
we'll be filling the entire white surface
with solid black color. I'll be taking some nice
solid black color in my detailing brush
and I'll be simply filling it with black color. So try to cover the
surface carefully, make sure that there
isn't any space left between the masking tape
and your watercolor paper. That will not look nice once
you remove the masking tape. And also make sure that there are no color patches in-between. You can just simply
place your brush and make the surface a
little bit more smoother. You can observe the movement
of my detailing brush. I'm just trying to create the surface a little
bit smoother. And you can use the tip of your detailing brush
always to create the surface a little bit
more perfect and beautiful. We are almost done painting
the entire land area as well. Now, let me show you
how we are going to paint the night house. Just simply take your
detailing, brush off size pipe. Tried to create the
outline of a house simply by making
these little strokes. And simply we are going to add solid black color inside it. You can see this is how a
simple house can be painted. No need to worry at all. Just try to practice it on
a rough scrape off paper initially and then come
towards your final painting. So as you can see, this
is not at all difficult. There is a simple triangular
shape on the top, and we have a simple
rectangular shape at the bottom portion. I'll be painting the
house on the right area. A little bit shifted
towards the right area. Basically, just use the tip of your detailing brush to create the outline so that we can
get nice thin strokes. Now once we get the thin
line, which is perfect, if you find it perfect, then you can make it a
little bit thicker in size. As you can see, I'm just trying to make it a little bit thicker. Let me add a small
chimney by adding a simple vertical line and you can make it a little
bit thicker also. Then let us give
outline to the walls. You can observe the movement of my detailing brush and simply will be filling it
with solid black color. No need to hurry at all. Be very slow and careful
while doing this. Try to leave some edge
of the roof outside the walls so that it can look a little bit more
beautiful and elegant. So as you can see,
it is very easy and simple to create
a simple house. Now, let us create some sense. You have to simply draw
these vertical lines. Just above the land surface. And this is not
at all difficult. Use the tip of your
detailing brush and create these little
vertical lines. Once we have painted
the vertical lines, we are going to connect them by adding a thin line
in between them. So you can see this is how beautifully you
can paint a fence. No need to worry at all, and also no need to hurry and
just simply take your time, practice it, and then come
towards the final painting. I've taken my detailing brush, took some solid white
color in it and just made for patches creating
a look of a window. Now let us create a street or rough street that would look as if it is connecting
to the house. So I have taken the
same detailing brush. I have taken some solid
white color in it. And we're going to start
creating a nice curved shape. What is happening is
that the street is coming towards the
outer portion, which is the bottom portion
for us in the painting. So as it comes towards
the bottom portion, we're going to create
the street a little bit broad and a little
bit wider in size. So you have to create it in a prospective manner and you have to create
this rough patch. Now the reason for creating
the rough patches, it makes the street look a
little bit more aesthetic. And you can create this by not adding any water
in your brush. Just simply take solid color in it that has enhanced
the fence as well. So I'm just adding
the vertical lines to the black lines so that it looks a little bit more brighter with the
darker background. Let us add some white
to the chimney as well. We are almost done painting all the elements for this
particular painting. Now, let us add some
beautiful birds in the sky. Again, I'll be taking my
detailing brush of size one and you'll just
have to simply create these little
thin strokes. And trust me, this is
not at all difficult. You just have to make V-shaped. So as you can see, I have
just created the board and it is looking really nice
with the dark background. I'm trying to create
thin strokes. And you can see I'm just
trying to make a nice V-shape. You can also make the body look like in a college or form. You can play with that as well. In fact, you can try to create
your own composition of boards and the combination of as much as boards you want
to paint in the background, just try to make it a
little bit aesthetic. So we are almost done
with the entire painting. Now, let us remove
the marketing team. Be very much careful while
removing the masking tape. There is a trick here. Just try to remove the
masking tape and an angle so that you do not end up tearing your beautiful
precious painting. And you can see how beautiful white border we are getting after we remove
the masking tape. And trust me, this
process is really very satisfying when you
remove the masking tape. Now let me remove the last
step and we are done. You can see how by
painting minimal elements, you can create
beautiful paintings. Let me take you a
little bit closer. I hope that you enjoyed this particular painting and
got to learn something new. Now, let us move towards
the next painting.
13. Project 8 - Snow Lake: Hey everybody, now let us paint a beautiful snowflake painting. And this is one of my
favorite painting. Here I have my flat
brush of size one-inch will be applying a thin coat of water on the watercolor paper. Now the reason behind applying a thin coat of water on
the watercolor paper is that your brush can move smoothly with the color
that we're going to apply. In case you find
access amount of water being applied on
the watercolor paper, you can simply dab your
brush on the tissue paper. Now we are going to create
a nice gradient background. So here I have taken some solid black color
and my flat brush, as you can observe
in my color palette. Now, after creating
certain paintings, I have cleaned the color
palette because now there will be a little bit
more messed up colors. So you can clean your color
palette after some time once you find that the color
is being used completely. So here I have taken some dark
black color and I've added a little bit of white in it so that we can create
a nice gray shade. You can observe my flat brush. We are going to create a nice horizontal stroke
at the top portion. No need to hurry while
creating the background. Now, the reason behind
applying the water, you can see how beautifully
the color is spreading. Also no need to worry at all
in case you are not able to create the same gray
shade that I have created. You might get another
shade of gray, which is absolutely fine. No need to take it
that seriously. This is a painting. You might find different
shades because we might be differing in taking
the quantity of colors that we are
mixing right now. I've taken some
solid white color, added it in the darker gray, which we already made, and made another shade of gray. And I have applied it
on the bottom portion. Now by using the same brush, I'll be moving towards
the upper portion. And you can see that there is a nice gradient background
forming already. So no need to worry at
all in case you are not able to form this
particular gradient shade, you can practice it
on a scrap of paper, try to create your own
gradients, shade as well. And then you can come towards the final painting so you can see how beautiful the
background is looking. So now I'll be taking my
detailing brush upsides type. And we're going to
create a nice mountain. No need to worry at all. Mountains always have
their own natural shapes. So you can also create your own shapes for
the mountains as well. Here I have tried to
create a single ****, but you can also try to create multiple mountains
as you want to. Now comes the part where we are going to
create the Snow Lake. So we'll be using the tip of the detailing brush to
leave some space in between so that the
background color will replicate us.
Thus, no lake. I'll be using my another
detailing brush of size one. And I have taken the
solid black color, the same solid black
color that we have used to paint the mountain. So by using this
detailing brush, we are going to
create the outline for this knowledge
that we are having. No need to hurry at all. Just observe the natural shape that we are trying to form here. In case you're not able to form the exact shape of the leg
that I'm trying to create. No need to worry. You can form your own natural shape as well by leaving some
space in between. So as you can see, I left some
space on the left portion. And I have created some
nice space for the league. In case you find me painting
a little bit faster, you can definitely slow
down the frame rate, absorb it carefully and then
you can start painting. Now once I have left some
space for those knowledge, I have painted the
remaining portion with solid black color. Make sure that there
is no space left between the masking tape
and the watercolor paper. That will not look nice when
you remove the masking tape. Now we'll be enhancing
this knowledge. So I have taken some
solid white color in my detailing brush
of size one will be just enhancing the outline for the lake so that it looks a
little bit more beautiful. And it can create
a nice contrast between the gray
and black color. You just have to use the tip of your detailing brush which
is sharp and pointed. No need to hurry at all. Be very much careful
while doing this. Try to take some optimum
amount of color in your brush. I'm also adding some
little white color around the lake area so that
we can replicate some snow. We are almost done painting
the entire Snow Lake. Now let us add a small
moon in the sky. I'm trying to make
a small fee shape, make it a little bit thicker in the center portion and
pointed in the edges. You can also decide
the position of your moon according to
your convenience as well. I'm just adding a
little bit more white and the other leg
area and we're almost done. So as you can see, it is a very minimal and
simple painting, but it is looking
really elegant. Now let us remove
the masking tape. Be very much careful by
removing the masking tape. Tried to remove the masking
tape in an angle so that you do not end up tearing
your brushes painting. This is the most satisfying part while removing the masking tape. Let me take you a
little bit closer. So I hope that
you've got to learn something new from
this painting. You can observe the
details carefully and I hope that you enjoyed creating
this particular painting. Now let us move towards
the next painting.
14. Project 9 - Road in the Hills: Hey everybody, now let us
create road in the hills. And this is going to be a really easy and
simple painting. So here I have my
flat brush of size 1 " and I'm just applying a
thin coat of water initially. Now the reason behind
applying a thin coat of water initially is that you can create a nice smooth movement of your flat brush on
the watercolor paper. This is also basically known
as a wet on wet technique. We're going to create
a nice background which is going to be gradient. As you can see in
my color palette, I have taken some
nice white color. And just going to apply
it on the bottom portion. This time, we're
going to start from the bottom portion will be
moving towards the above. But you can observe the movement of
my flat brush and the horizontal strokes
that we are making. No need to hurry a doll. Now we'll be adding
some black to the white color so
that we can create a nice gray shade just applied
above the white color. You can already see
the difference. Now will be applying solid black color
on the top portion. So now you can already observe the nice gradient effect coming from black
to the white shade. Now will be blending all
the three colors together. No need to hurry at all. Be very much careful while creating a nice gradient effect. And no need to worry about the shades that I have created. It is absolutely fine if you find your shapes a
little bit different because the amount and the quality of color that
we're using my default. So no need to worry about that. And in case you're not
that much confident enough to paint the gradient
effect directly. You can try to apply it on a rough strip of
paper initially, and then you can come
towards your final painting. You can see we have created the nice gradient
effect in the sky. Now let us paint the land area. So I'm trying to create a different shade
of gray this time, I have added a little bit of
more black and the color. And I'll be just applying it on the envelope option just
below the horizon line. So you can see this is a
little bit darker shade than the shade that we
have applied on the sky. Make sure that there
is no space left between the masking tape
and the watercolor paper. That will not look nice when you remove
your masking tape. Now, this particular
color is for the road. Now we are going to
paint the hills. This color will be
completely gone. So now we're going to just create the outline for the road. I'm using my detailing
brush of size five. We are going to paint the outline and an angle you
can see so that we can give a nice perspective
to the road as it is coming from a long way. So we have created
a nice perspective. And we're going to create
this solid black color, which is showing the hill part, which is surrounding
the road basically. So on the left portion
I have covered it with complete solid black color and tried to create an
irregular surface. Similarly, we'll be painting it on the right side as well, but we'll be
painting the hills a little bit bigger in this size. You can use the tip of
your detailing brush to create this
particular hilly area. And then we'll be filling
it with solid black color. No need to hurry at all. Do it very carefully and
make sure that there isn't any gray space left because the gray space is
only for the role. You can see I have
covered this with completely black color and it is looking really
amazing and beautiful. Now once we are done painting
the hills around the road, we'll be adding some
solid white color to the road to enhance
the entire road. So I'm using my detailing
brush of size one. And I'm just creating a
simple vertical line, which we generally
find on highways. We are also going to
add these ten lines on this side of the road so that it looks a little
bit more aesthetic. You can also make it a
little bit more smoother and you can double the lines so that it looks a little
bit more aesthetic. Time just giving it offset, but not a complete line
aligned in a broken farm. We can also make the center line a little
bit more thicker. Now let us paint the moon, a simple circle to paint the moon using
solid white color. And you can see the entire
painting is looking so beautiful by using
minimal elements. Now be very much
careful while painting the moon tried to create
a nice circular form. Now using the same
detailing brush, having no water in it. I'm just trying to add some
texture to the mountains. No need to worry at all. This is not at all difficult. You just have to dab
your brush by using some white color and create this texture on
the mountain area. It just enhances
the entire element and looks a little
bit more beautiful. No need to worry at all in
case you find it difficult, you can practice this on a rough scrap of
paper initially, and then you can come
towards your final painting. I'm trying to add some more vibrant white color
on the tips of the mountain so that it looks a little bit more
aesthetic and realistic. You can add as many
details as you want to. You can try to
create the texture a bit more beautifully by making the brush move on
the bottom portion as well. Now, let us remove
the masking tape. We are almost done
with the painting. Be very much careful by
removing the masking tape. Tried to remove the masking
tape and an angle so that you do not end up tearing
your precious painting. And you can see how beautiful
the white border looks. Let me take you a
little bit closer to the painting so that you can observe the details carefully. I hope that you got to learn something new and creative from this particular painting
where we have used minimal elements to create
an elegant painting. Now, let us move towards
the last painting.
15. Project 10 - Curvy Plateau: Hey everybody, you're most welcome to the last and
the final painting, which is the COVID plateau. So here I have my flat
brush of size 1 ". And we're going to create a nice gradient effect in the background in the
watercolor paper. I'll be simply
applying a thin coat of water in the
background initially so that we can have a nice smooth movement
of the flat brush. No need to worry about
the dirty water because the background is going
to be darker in shade. So it doesn't matter if
the water is clean or not. In case you find access amount of water in the
watercolor paper, then you can dab
your flat brush on the tissue paper and you can
move your plaid brush again. Now, I'll be just taking
some white color in my color palette
and we're going to create a nice gray shade. You can observe
that I have taken some white color
and I'm trying to apply this time from
the bottom portion. So once I've applied
a nice white color, I have plea mainly
horizontal stroke. Make sure that there
is no space left between the watercolor paper
and your masking tape. Now slowly will
be moving towards the upper portion by
creating aggression. And that is going to
be a solid black shade on the top portion. Now once I've applied a nice solid black color
on the top portion, I'll be moving towards
the bottom area. You can see that there is a nice difference between the white color and
the solid black color. We're going to
blend it carefully. Just make sure that there
is no space left between the masking tape and the
watercolor paper that will not look nice when we
remove the masking tape. Now you can observe
how beautiful the gradient effect
looks once it dries up. Now I'll be creating
the outline for the road which is coming
in between the plateau. No need to worry at all. If you do not form the
exact shape of the road, you can create your
own shape as well. But we are trying to make a
nice curvy road in-between. I'm using the tip of my
detailing brush size one. And once you have
created the outline, no need to hurry. Just simply tried to create a nice curvy plateau and try to fill a solid black
color in-between. Made sure that there
is no space left. Just try to apply
solid black color by adding less amount of water. In case you find your brush
moving a little bit too rough on the watercolor
paper surface, then you can add a little
bit of water in it. Make sure that there is no space left between
the masking tape, annual watercolor
paper, that will not look nice when you remove
your masking tape. Now similarly, we'll
be adding a plateau on the left portion as well. Once you have given the outline, fill it with solid black color. We very much slow and
careful while doing this. In case you find me painting
a little bit faster, you can definitely
slow the frame rate. You can already
observe how beautiful the plateau and the gradient
background is looking. And a good contrast. I'm adding to the left portion a little bit of
curvature so that the plateau looks a little
bit more aesthetic. Now let me show how you have to paint some beautiful
birds in the background. No need to worry at all. You just have to use the tip
of your detailing brush. We are going to create
some nice wings and some beautiful birds
in the background. I'm trying to paint
the birds and rough strip of paper
because this is the element that will mean a lot
of patients while painting because it is
very minute and detail. But this is not
at all difficult. You just have to practice it
on a basic art journal that you have and practicing book
that you must be having. Our adult strip of
paper is also fine. You can create these beautiful
birds on that first, and then you can come towards your final painting so that you do not end up spoiling
your background color. So as you can see, I'm using the tip of my detailing
brush and I'm trying to create the
same words that we created on the rough
shape of paper. Now let me create
another beautiful bird having some beautiful wings. And the second
board I'm trying to have the wings on
the bottom portion. Now let me paint the
third board as well. No need to hurry. It all. Tried to paint it in
a very slow manner. Take your time and be very
much careful while doing this. And also no need to worry in case you spoil the
painting as well. This is a learning process, so it is absolutely fine. We are done with the
combination of three birds. You can try to create
the combination of two or four boards as well. Now let me paint a nice moon, a little bit aligned
towards the left side. So I'm just trying to
create a small circle by applying solid white color using a detailing
brush oxides one. Let us enhance the road
in-between the plateau as well to just give
a nice outline to the road so than
the road can get a nice enhanced effect and
it can get a nice contrast. Let us enhance the
boards as well. I'm using the tip of my detailing brush on
the wings of the birds. Then dark painting is ready
using minimal elements. Now, let us remove
the masking t. Be very much careful by
removing the masking t. Tried to remove the masking
tape and an angle so that you do not end up tearing
your beautiful painting. So you can see beautiful the white border looks once
we remove the masking tape, delay much slow and
careful while doing this. I hope that you enjoyed
painting this minimal painting, having minimal elements
and the elegance of the painting is
already in front of you. Let me take you a
little bit closer so that you can
observe the details. So this is the last painting
for the ten days challenge. I'm very, very happy to share all the ten
paintings with all of you. And I hope that you
got to learn something new and creative from
this particular class.
16. Class Conclusion: I always believed
that anyone can paint and using
minimal elements, you can always create
paintings that can create some sense of
satisfaction in yourself. Being an artist. I always loved to
explore new art mediums. That is something I always
suggest my students as well. The most important part in any art or craft
work is to maintain an art journal in
which you can always practice and keep a
record of your artwork. Practicing is
something that will always take you one step ahead. I'm very happy to share
this class with all of you. And I are old that you
got to learn something new and creative from
this particular class. I would be really excited to see all of your projects into
the project gallery. Feel free to ask any
doubts AND gates you have. Let me know your
reviews for the class. Keep practicing and
happy painting.
 Rutvik Patel, Artist and Instructor