Transcripts
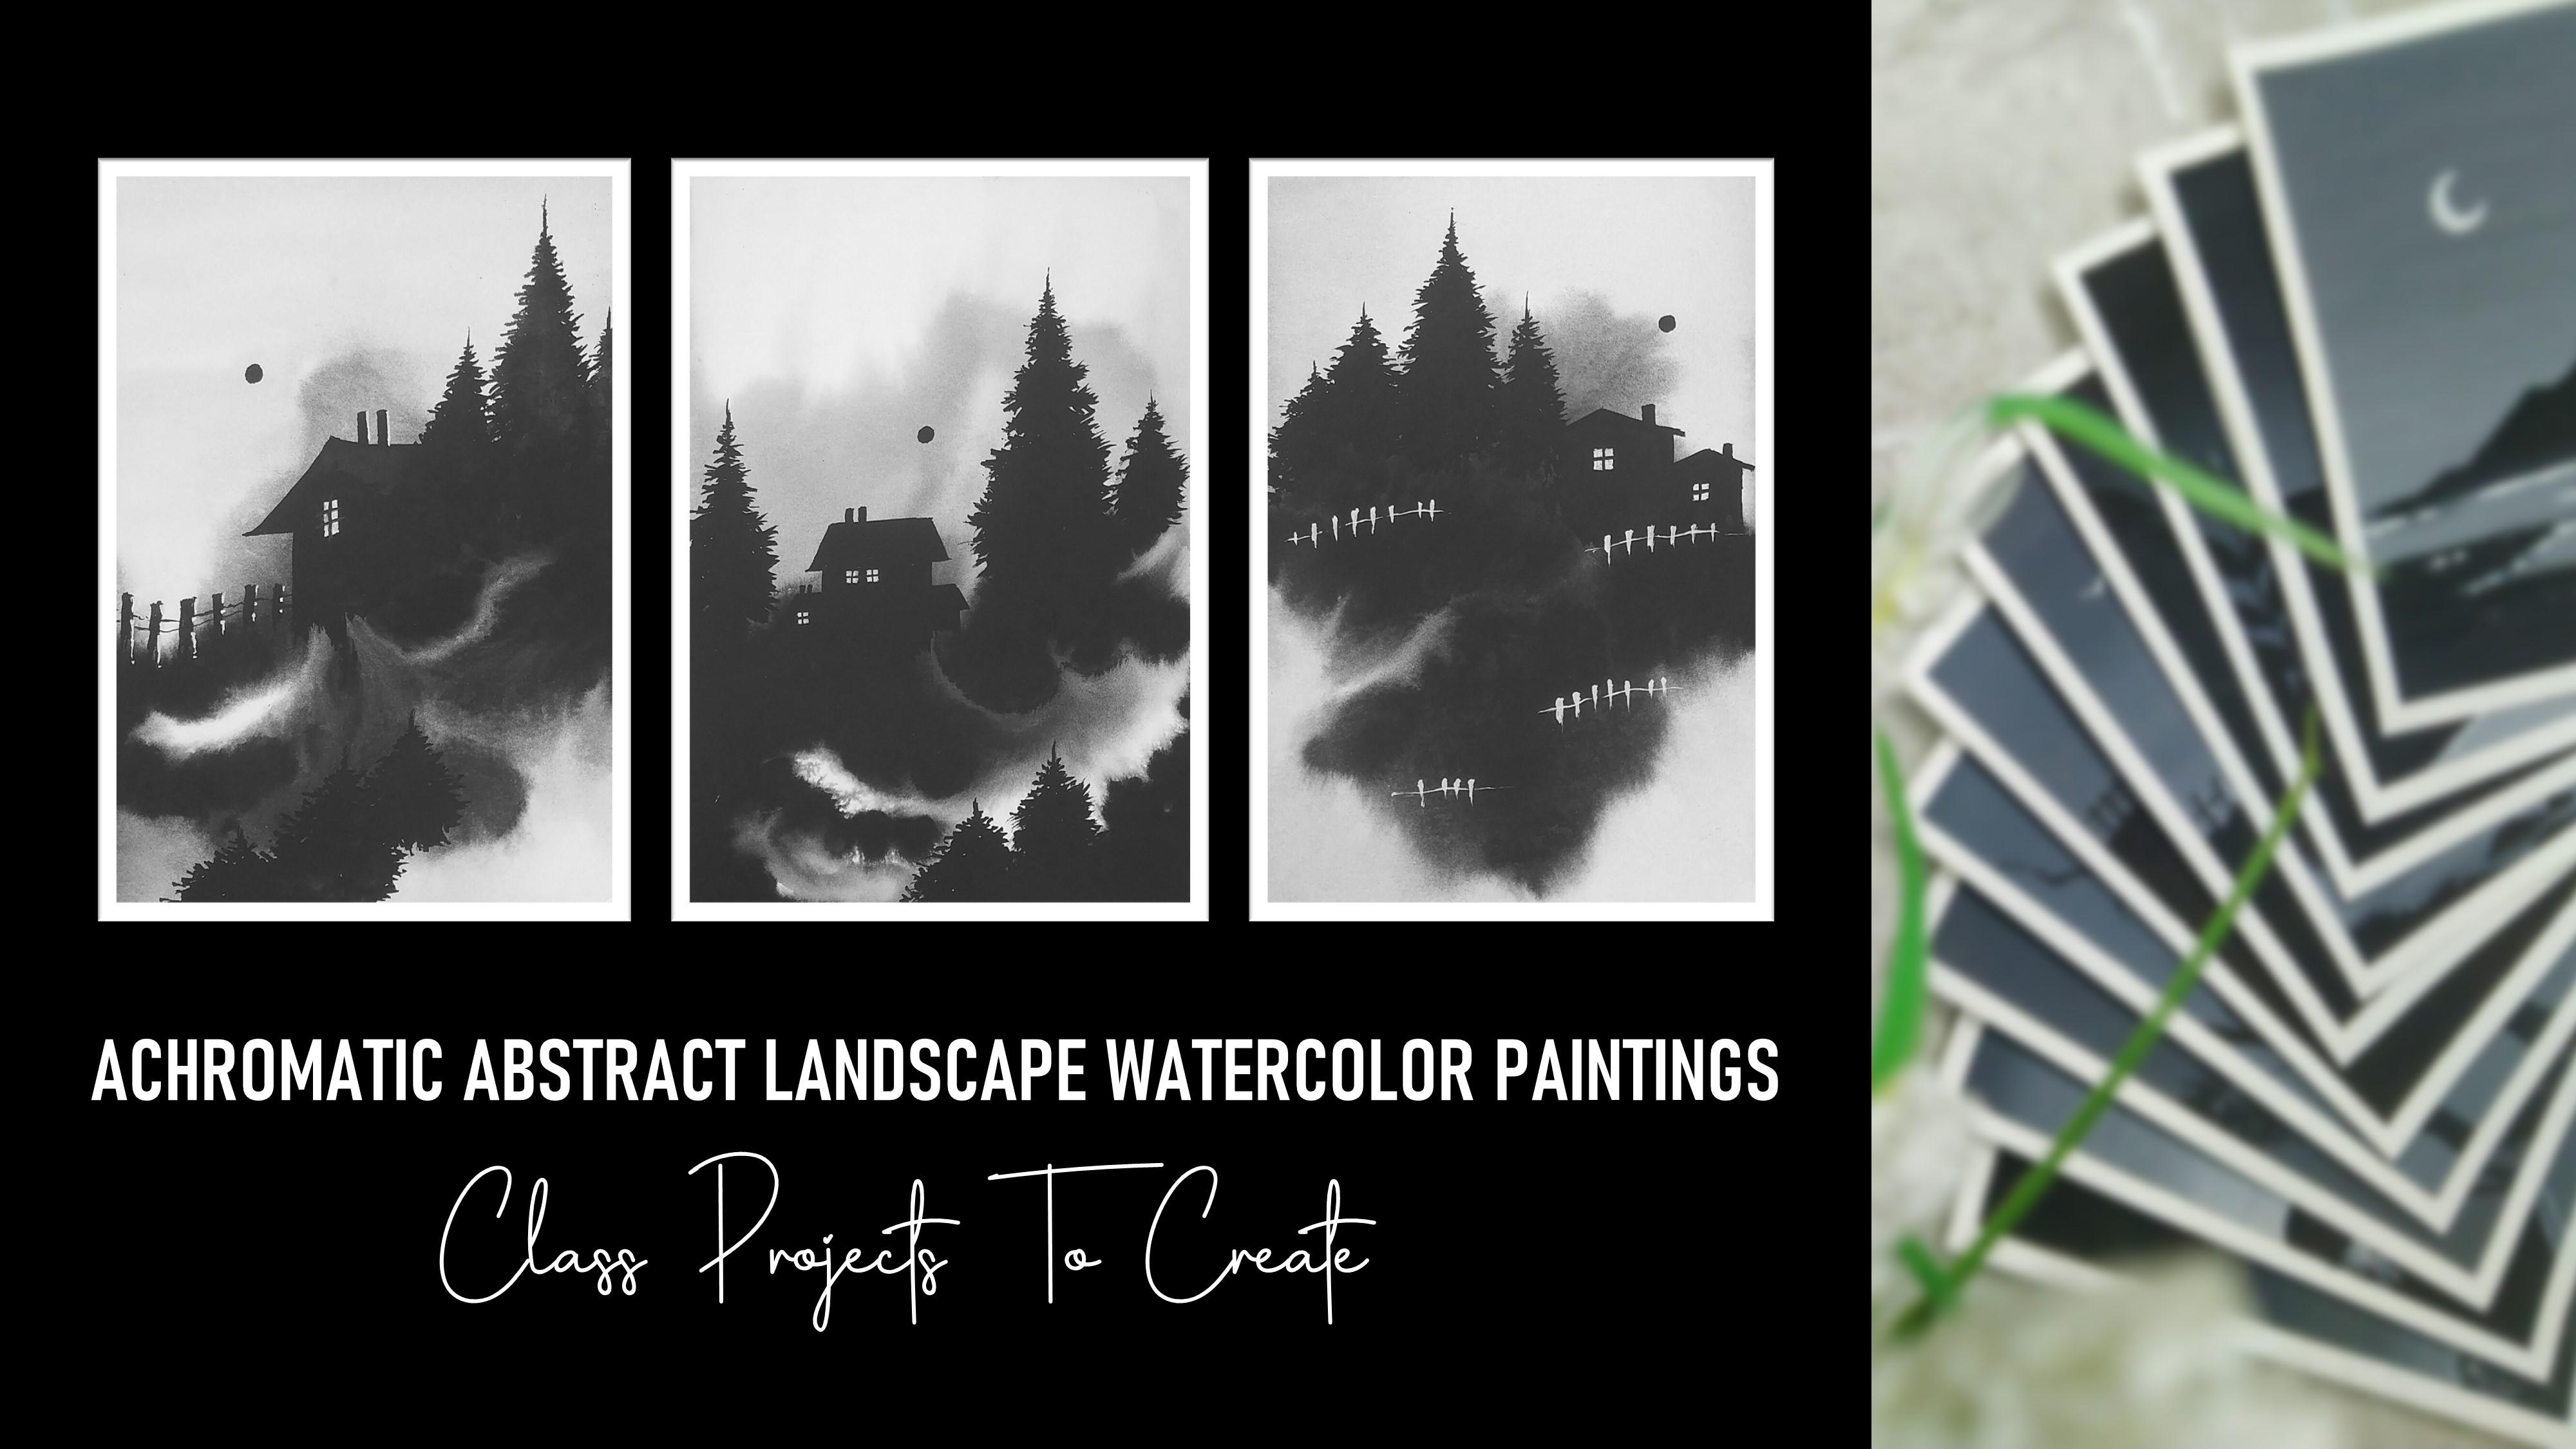
1. Welcome to the Class: In order to create some beautiful abstract
landscape paintings, which are very easy and
yet simple to create. Ipod, let me create a class in which you require
minimum art supplies. No advanced paintings, goods. We are going to create three beautiful abstract
landscape paintings, which are going to
be easy, simple, and elegant to paint.
Hey everybody. I'm just like I'm a self-taught independent artist and an interior design
and my profession. You can find most of my
artworks on Instagram. I go by the name, ship it out. So we're going to
start by knowing about all the art supplies that you will need for the entire class. No need to worry at all. You will find all the
art supplies very easily in any nearby
loop, Gladstone. They wanted to talk about
the watercolor paper and how you have to cite
David in a proper manner. Before moving towards
the final paintings, we are going to have a
beautiful practice session in which I'll be
teaching you how you can paint all the
elements that are used in the final paintings
in a very easy way. That are going to
be elements like pine trees having
variation and sizes, houses, abstract backgrounds and windows that we are
going to learn. That'll be starting by creating a beautiful abstract
background using symbol black color will be blending all
the elements with the entire background
that we have created. Having an amazing
abstract format. Watercolors generally gives you a beautiful output that
you can't even imagine. Once the abstract
background is dry, we're going to blend all the elements with the background. All the elements together combines to form a
beautiful painting. And we are also going to add some beautiful minute details
to the entire painting. The glasses absolutely
suited for beginners and also intermediate and advanced
level artists can try it. I'm very happy and excited to share this class
with all of you. We are going to have three
beautiful class projects. So without any delay, grab your art supplies, join me and let's get started.
2. Art Supplies: So before we start,
let us talk about all the art supplies
that you will need for this particular class. No need to worry at all that are very minimal art supplies
that you will need. And you will find
them very easily in any nearby local art store. Let us start with the first one, which is a simple spray bottle that you can find very easily. So there is some water and
we're going to use this to spray some water on
the NDI watercolor paper. Next up we have a simple cup in which we are going to
have some clear water. This will help us to
clean up our brushes. Now for the entire class, you will need only two colors, which are going to
be black and white. These are basically
watercolors and no need to worry
at all in case you do not have legal tubes, you can go for smaller
tubes as well. Then next up we have a
simple tissue paper. This will help us to remove access amount of
water from the brush. Then we have our simple
masking tape of size 1 ". So we're going to use
a masking tape to tape the watercolor paper
so that we can get a nice, beautiful
white border. Now let us talk about all the brushes that
we're going to use. So these are basically
quill brushes, but in case you do
not have quill brush, you can go for round
brush as well. So you can see how
beautiful tips all the brushes are having. So let me talk about the sizes. The first one is of size eight, then we have size two. Then we have sized for the
last one is size zero. So no need to worry
in case you are missing out on these brushes. You can definitely go
for round brush as well. Now let us talk about the
most important art supply that we need for
the entire class, which is the watercolor papers. These are the watercolor papers
that we're going to use. And the important part that you have to keep in mind is the GSM. So these are 300 GSM
watercolor papers and the size is a fine. Gsm basically stands
for the thickness of the paper so that you can
apply heavy washes on it. Then the last art supply
is a simple color palette. So I have a simple
plastic palette. You can go for any other
good alternative as well. So these are all
the art supplies that you will need
for the entire class. Now without any delay, Let's move towards
the next part.
3. Lets Tape the Paper: Hey everybody. So before moving towards the
class projects, let me teach you how you have to cite tape, your
watercolor paper. So as you can see, I have my watercolor papers ready here. Let me give you some
details about it. So these are watercolor
papers of 300 GSM. The GSM basically stands
for the thickness of the paper so that you can apply
heavy water washes on it. And the sizes a file. So here is the entire sheet of watercolor paper that
we're going to use. So just simply place it on the desk wherever
you want to paint. And we are going to paint
it in a vertical format. I'm just placing it
in the position. Now, once you are done with the position of the
watercolor paper, what we are going to use is a simple masking
tape of size 1 ". So no need to worry at all. The process is very
easy and simple. The reason for putting
up a masking tape is so that we can get this
beautiful white border. Once we are done painting and
we remove the masking tape, let us start putting
up the marketing. So I'll be starting
from the right side. So just simply put some
part of the masking tape onto the watercolor paper
and some pot onto the desk. And just make sure that the
masking tape is parallel with the paper edge so
that you can get a nice parallel white border. Once you place the masking tape, just simply apply some
pressure using your finger or thumb to the masking tape so
that it gets properly stop. Now I'll be applying
one masking tape on the top portion and another
one on the bottom side. So this is how you have to
take your watercolor paper
4. Lets Practice the Elements: Hey everybody. So before we start with
all the class projects, let us practice all
the elements that we are going to use
and all the paintings. So let us start with
the pine trees. You can see my watercolor paper is ready with the masking tape. So initially we can use a simple pencil to draw
these vertical lines, as you can see, which is
having variation in sizes. You can directly draw these vertical lines using
your quill brush directly. Also. Once the vertical
lines are being drawn, you have to use your
size zero brush. Take some solid
black color in it. Start from the top
portion and just mean these little strokes
coming towards the bottom part. As you move towards
the bottom part, you have to increase the
size of these strokes. You can observe that I have
painted the first pine tree. Now similarly, you
can observe that the second line
which I have drawn using my pencil is a
little bit bigger. So the pine tree would be a
little bit bigger in size, but the process is
absolutely same. You have to use the same
brush of size zero. Take some solid
black color in it. Start making these little
strokes coming towards the outer portion and
becoming thinner in size. And you have to move
towards the bottom but increasing the
size of your stroke. Then we have the pole pine
tree, as you can observe. This is again similar
with the first one. You just have to repeat
the same process. No need to hurry at all. Just practice it with some patients and
take your own time. Now you can observe
in the painting we have some little
pine trees also, which we can also
consider as shrubs. You can see I have drawn little vertical
lines and I'll be just adding these little
strokes around the entire line. So the strokes
wouldn't be bigger on the bottom portion and will be less in size or I can say shorter and size
on the top portion. This is how we are going to
create these little shrubs, or we can say little pine trees, which are on the bottom
portion, as you can observe. Now we have a beautiful
house element or the entire class projects
that we are going to have. So there are going to be
three different styles of houses that we
are going to paint. What I would suggest is that
in case you're not that much confident enough to paint it directly from your
detailing brush, which is of size zero. What you can do
is you can create an outline using
your pencil first, and then you can fill
in solid black color. I'm using the brush directly, but you can observe the outline which I'm making right now. You can see I'm using the tip
of my brush of size zero. I have created the roof. Now, just adding the
outline of the walls. This is the basic
shape of the house. And I have added one more
roof on the left-hand side. Once we are done painting the outline of the entire house, we are going to fill in
solid black color inside. Tried to have some good
consistency of color and less water so that you can
get a nice solid black patch. No need to hurry at all. Take your time and
paint it with patients. Also use the tip of your
detailing brush to paint in the difficult areas and
on the bottom potion, don't worry about the finishing. We're just trying to
paint the house so that you can get an idea
how you have to paint it. In the final class project, you are going to paint some
beautiful little chimneys on the top portion. These are just two
solid black lines on one rule and on the
other roof as well. You can see we are done
with the first house. This is the type of house
that we are going to have. Now will be waiting for the entire solid
black color to dry. So let us create
the second house, which is a little bit
different from the first one. I'll be creating the truth. Again. I'll be telling
you the same thing in case you're not that much confident enough to paint it directly with the
detailing brush. What you can do is you
can use your pencil, create the outline first, and then you can fill in
solid black color inside. You can see this is how I
have created a nice side view of the entire house that has a little bit of
vintage and type. And we'll be adding one chimney. Let us add to only
on the top portion. This is the second house
that we are going to have. Now let us start with
the third one as well. This is going to be a
simple perspective. I have just created an outline on the roof and I'll be painting
the walls as well. Now once you are done with the entire outline will be filling in solid
black color inside. You can observe the movement
of my detailing branch. And we'll be adding
little chimney as well. You can see how beautiful the entire cell out
of the house looks Now we'll be waiting for the entire solid
black color to dry. Here I have my quill brush
off 50, ready again? I have cleaned it up
and we'll be taking some solid white watercolor, will be just painting these little windows on
all the three houses. You can see how I'm using the tip of my detailing
brush to paint the windows. And why invite only so that we can get a
beautiful contrast. No need to hurry at all. Tried to paint it in a very
slow and steady manner. Use the tip of your
detailing brush to create these little square and
rectangular shapes. Now, also you have to wait for the white color to
dry up for awhile. Now using the same
detailing brush, I'll be taking some black again. And we'll be painting the
frame of the entire window. You can see how
beautifully we have got some beautiful parks
in the entire window. This is how the entire
house will look, enhancing the entire painting. I'm also adding the frame in the second and
the third house. No need to hurry. You just have to make this vertical and horizontal
line to create the frame. Now you can observe
we are done with all the three houses
that we are going to use in the entire class project. Now, let us combine all
the elements together. Now I'll be using my quill
brush of size eight. I have taken some good
amount of water in it and just spread it naturally. On the bottom portion of
your practicing paypal, make sure that you have
applied the water evenly. No need to hurry at
all, take your time and apply the water in
a very careful manner. Now as you can see, we have
taken our quill brush. I'll say zero again, and I'll be taking some
solid black color, having some water in it. Now, simply use the tip of your brush and dab it
in this natural manner. So since we want an
abstract background, there isn't any particular
way of doing this. You just have to dab your
brush onto the paper in a very random manner as you can observe how I'm using
the tip of my brush. And you can see how beautifully and naturally the
water is spreading. Now we'll wait for the
background to dry. So as you can see, how beautiful
abstract background we have got and the water
is dried completely. So this is basically
known as a wet on wet technique in which we apply the color after we have applied our coat of water on
the watercolor paper. I'll be using my brush, which is of size zero again. And we're going to paint
the first element, which is pine trees, which we painted initially, as you can observe
on the top portion, I have drawn the vertical
lines using the brush itself. And we are just blending it
with the background color. In case you're not that
much confident enough to paint the vertical
lines with the brush. You can use a pencil to draw
the reference line first, and then you can use
your painting brush. Also does not have
been necessary to paint it in the same
composition I have painted. You can do the variation in
the sizes of the pine trees. You can select the
position where you want to keep the house, et cetera. You can see I've painted
three pine trees, and I've blended it with the abstract background
that we painted. Solid black. Now will be blending
the house portion so you have to
observe it carefully. I have painted the outline
of the roof as you can see. And now I'll be filling in
the solid black color inside. You're going to observe
how beautifully the house is getting blended with the
abstract background on the bottom portion. Now using the same quill brush, I'll be adding another roof portion on the
right-hand side. You can also paint the walls filling in the solid black color inside small chimneys on the top portion using
the tip of the brush. Now let us paint the last
element, which is the fence. To just have to simply paint these little vertical lines
on the left hand portion, blending it with the background. Use the tip of your brush and connected by small thin lines. So this is how we have
painted the fence. We're done painting
all the elements. Now let us add some
minute details, which is the window
size to be taking solid white color and Mike
will branch of size zero. Let's clean the brush because it was already
having some black. Now just use the tip
of the brush and apply a small square shape. Again, if you do not find it easy to paint it directly
from your brush, you can definitely
draw a square using your pencil and then you can
paint it with your brush. Does add some white
fence also to enhance and create a
beautiful contrast between black and white. We connecting the
small vertical lines by adding a nice
horizontal thin line. Now to paint the frame,
I'll be just adding one vertical and horizontal line on the white color that we
have applied and the house. You can see the entire
practice sheet is ready. Just remove the masking
tape carefully. I have labeled all the elements. You can have a nice look to
the entire practice sheet. That would be really
great if you create a practice sheet before
starting the class project. That will definitely help
you to get a better output.
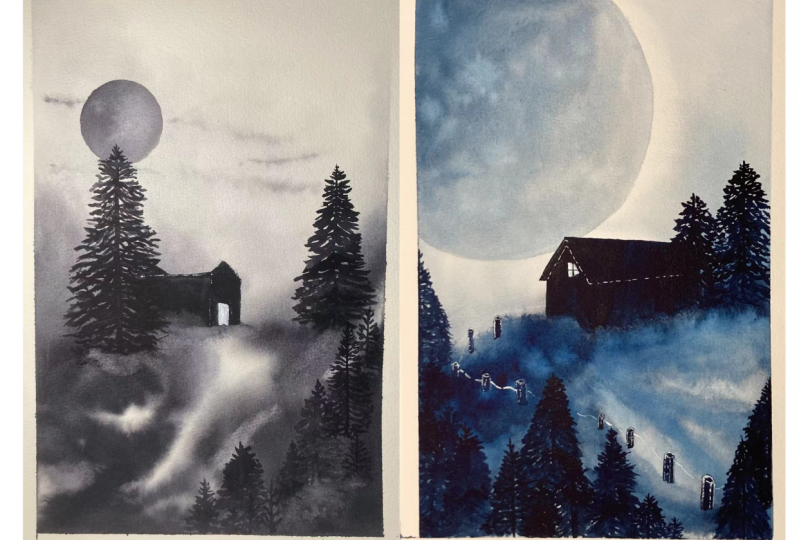
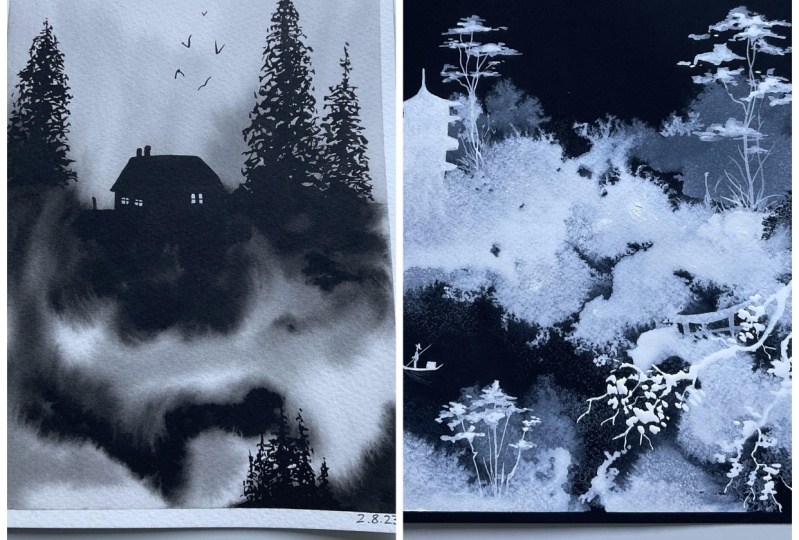
5. Project 1 - The Dense Forest: Hey everybody. Now let us start with
the first painting, which is the dense forest. So as you can see, I'm ready
with my watercolor paper, with the masking tape. All my art supplies
are well-placed. Mole Douglas, Black and White
are simple color palette. A tissue paper, spray bottle to sprinkle some water
onto the watercolor paper. All default brushes
that you will need in case you do not
have equilibrium, yes, you can definitely go
for round brush as well and a cup of water. So since we are going to create a beautiful abstract background, we want to have a
nice coat of water. I'll be using my spray
bottle and sprinkling some good amount of water onto the entire watercolor
paper, as you can observe. Now, once you can see the light reflection
onto the paper, this is a good amount of water
onto the watercolor paper. I'll be using my quill brush of size eight and will be
spreading the water alone carefully in
case you find that that is excess amount of water in your quill
brush as well, then you can dab it
onto the tissue paper. You're going to observe the
movement of micro brush. I'm trying to spread
the entire water carefully on each and every area of the entire
watercolor paper. Make sure that there
isn't any space left in-between the masking tape
and the watercolor paper. That will not look nice when we remove the entire masking tape. As you can see, we have applied
a nice tan coat of water. Now I'll be using my
quill brush of size four. And I have taken some
solid black color, having some good consistency
with water in it. You can observe. And also in case you find
that there is more color, less water than just apply some more water
into the color palette. I'll just use the tip
of your brush and apply the solid black color
and this random format. No need to worry at all. And also no need to hiring. It's an abstract backgrounds, so we just have to apply it in a very random
and natural way. So there isn't any specific
technique of doing this. You can observe the color
is reading automatically, and this is basically known as a wet on wet technique as well. So we have already
applied at ten coat of water initially onto
the watercolor paper. And now when we are applying
solid black color in it, with some good amount
of water in the brush. It is spreading in a very
natural and abstract format. On the base, you
can definitely use your quill brush to apply some
more darker tone of black. You can also observe
that I'm leaving some spaces of white in-between because we don't want the entire background
to be solid black. Now I have simply
cleaned my brush and the saturation of my
black color is less now will be blending it
with the above ocean. Now, simply, again, always cleaning my quill brush of size eight completely and will be just applying the water code. Again. You can see it will blend with the entire
paper automatically. This is the entire
abstract background that we wanted to create. Now we'll wait for it to dry. I know it might not
be looking that great right now because we haven't
added the elements yet. Now we'll be using quill
brush of size two. And we'll be painting
the first element, which is going to
be the pine trees. I'm using my brush. And as you can observe, I'm using the tip of
the brush to draw the vertical line initially
to paint the pine tree. And gives you an all that
much confident enough to draw the vertical line
directly from the brush. Once you can do is you can use a pencil and write
with that first, and then you can use your brush. So now using the
tip of your brush, you have to create these
little random strokes and upward and
downward directions. And as they move towards
the bottom part, we are going to
increase the size of the branches that we are going to paint for
the entire pine tree. You can observe that I'm just moving my brush and
this random direction. But as I'm coming
towards the bottom part, I'm increasing the size of
the strokes that I'm making. No need to hurry at all, painted in a very slow
and steady manner. Now as I come towards
the bottom portion, I'll be increasing the size of the strokes that I'm
making right now. And I'll be blending it with the abstract background
that we have created. Domain the binary look a
little bit more attractive. You can add these
little branches using the tip of your brush. We are almost done painting
the entire pine tree. I guess this is the
biggest pine tree in this entire painting. Now apart from this, we are having few more
binaries to paint. The process is absolutely same. So simply observe and follow. Another pine tree I'm digging
on the right-hand side. And this is a little bit
smaller than the first one. So the vertical line will
be a little bit smaller. And the process is
absolutely same. We are going to create
the middle strokes. And as they move towards
the bottom portion, we are going to increase the size of the
entire pine tree. For this particular G Also, you have to blend it with the abstract
background black color Now we have few smaller binaries that we are going to paint on the bottom portion and we're
going to blend it with the solid black color that
we have on the bottom part. So the process is absolutely
same, one vertical line. And you have to just make
these amazing strokes. And no need to worry
that you are not able to paint it in that
same way I'm painting. This is very abstract and
natural form of painting. Trees. And you also
know that trees have a very natural shape and their branches are very
random and natural. You can also create your
own compositions as well. The important part
is that you've got the technique,
how to paint it. So no need to worry about
the abstract diagram. You can also create your own abstract backgrounds as well. Now let us paint
one more pine tree on the left hand portion. So the process is
again absolutely seen the first vertical line. And we're going to create these little strokes
on the top portion. And as we move towards
the bottom bond, I'll be increasing the size of these tools that I'm making. Now again, I'll be
repeating the same steps, but you have to blend it
with abstract background, which is on the bottom portion. We're done painting
the pine trees. Now let us move towards
the next element, which is a beautiful house, which is on the center
of the entire painting. I guess almost on the center, will be creating the outline
of the house initially, in case you're not that
much confident enough to create the outline using
the brush directly. What you can do is you
can draw it with pencil first and then you
can use your brush. I'm using my quill
brush of size zero, and I'm trying to create the
outline of the entire house. So you can see I've drawn the rules and I'm now
drawing the walls. I'm also having a little roof
on the left-hand portion. So you just have to
draw the outline and then take some solid black
color in your brush again. And we're going to fill in
solid black color inside. No need to hurry. A doll painted in a very
careful and slow manner. Use the tip of your
detailing brush to paint in difficult areas. So you can already
observe that we have painted the entire roof with solid black color
and the roof that we have on the left-hand
portion as well. Now, let us paint the
walls of the entire house. So again, take some
solid black color in your quill brush and you can observe the movement
of Mike will branch. I'm trying to blend it with
the abstract background. It might look right now
a little bit to read, but once it dries up, it will give a nice
blend together. So you won't be able to
figure out the difference. Now let us add some minute
details to the house as well. Also, you can use the tip of your brush to
enhance the details. And then data hub
where there are difficult areas
like sharp edges. Let me paint some
small chimneys. So you just have to draw these
vertical lines just above the roof portion so that it can create some minute
details to the entire house. And you are painting would look a little bit
more attractive. Now I have clean my
brush off size zero, and I'm going to use some solid white color to
paint a beautiful window. Now just simply take
your quill brush, have some solid white
watercolor in it, and have less amount of water. Draw a small square. And as you can observe, I'm using the tip of the
brush to paint this squared. And I'll be just painting another square on the
other side as well. In case you find
painting the square directly a little bit
difficult from your brush, you can definitely
use your pencil first and then you can fill in
solid white color inside. Let us add one more window on the bottom portion where we
have a smaller roof as when. Now let the color
dry for a while. Now using the same brush, just clean it in water and we'll be digging solid
black color again. And aqua brush of size zero. Using the tip of the brush, we are going to
create some frame in the entire window to make it look a little
bit more attractive. As you can observe, you just have to use the
tip of your brush, mix symbol, vertical line, and a horizontal line. And you can observe how beautiful
than data window looks. Now, as you can observe, we are done with the entire
house element as well. Let us paint a beautiful
moon in the sky. You can consider it
as a son as well, since it's an
achromatic painting, you just have to
paint a small circle carefully using the tip of
your quill brush of size zero, you can paint it very easily. And we are done with
the entire painting. Since there is this
center portion which is a little bit empty, I want to add a little bit of
roof element here as well. So you can just
draw an outline and then you can fill in
solid black color inside. You can also draw or paint walls just below that and blend it with the abstract background. And now we are done with
the entire painting. Now, let us remove the tape. No need to hurry at all. Tried to remove the masking tape in an angle so that you do not end up tearing your precious painting
that we have created. You can already observe
the beautiful white border that we have got once we
remove the masking tape. This is the most
satisfying, but trust me, let me take you a little
bit closer so that you can observe the details in
the entire painting. So this is basically
the first project, which is an abstract
landscape painting. And I hope that you'll
want to learn something new and creative from
this particular project. Now let us move towards
the next project.
6. Project 2 - The Vintage House: Hey everybody. Now let us move towards the second project, which is the vintage house. Again, I'm ready with my
fresh watercolor paper and we're going to use
a simple spray bottle, having some water in it, sprinkle it as much as possible, try to have a good amount of water in the entire
watercolor paper. Now to spread it evenly on
the entire watercolor paper, I'll be just using
my size eight brush. And as you can observe,
I'm just reading the water completely in the
entire watercolor paper. Make sure that there
is no space left between the masking tape
and the watercolor paper. Now I'll be taking my
quill brush of size four, and we have taken some
solid black color in it, as you can observe in
the color palette. And try to have a
good consistency of water and color together. And just using the
tip of the brush, I'm just putting it on the watercolor paper
and you can see how beautifully the
color is spreading. This is how you have to create
your abstract background. And no need to worry about the outcome that is not
at all compulsory or necessary that you will get this theme abstract background that I'm painting right now. It can have
variations in shapes, since it's a natural form
in which it is spreading. So now to read the color
a little bit more, I'm using my quill brush off 58. Again, that is some water already in it and
no black color. You can just simply observe
the movement of my brush. I'm taking it upward and the color is spreading,
as you can observe. And only to worry
at all tried to do it in a very slow
and steady manner. Now let us do this on the
bottom portion as well. You can observe the moment. I'm just trying to
blend the color. We are almost done with the
entire abstract background to create a little bit more depth on the white portion
that we have above. I'm using my size eight
brush and just moving it in this particular
direction so that you can make it a little bit more
dense in the background. Now let us wait for the
background to dry completely. So once the background is dry, I'll be taking my quill
brush of size two. And I've taken some
solid black colors in my color palette,
as you can observe, tried to have less
amount of water and more color this time since we are starting with
the pine trees, I'll be starting by drawing
a simple perpendicular line. And in case you are not
that much confident enough to painting directly
from your brush, what you can do is
use a simple pencil. Draw the vertical line first, and then you can come
with your painting brush. To paint the pine trees. I'll be starting by applying little strokes from
the top portion. And as you come towards
the bottom band will be increasing the size of the
strokes that we are making. You can observe that
I'm using the tip of the brush to make it
look very realistic. And this is how you can
paint the branches. No need to hurry at all. Painted in a very slow
and steady manner. So as I'm moving towards
the bottom part, you can see I have increased the size of the
entire pine tree. And that is how natural
pine tree basically looks. Now we will be blending it
with abstract background so that it looks as if it is
the part of the painting. And you can definitely observe the way I'm using the tip of the quill brush to enhance the branches that we have
in the entire pine tree. Now let us move towards
the next binary, which is going to be
on the left-hand side. But this time it is going
to be a little bit smaller. The process is
absolutely the same. You just have to draw a
simple vertical line. And then you have to make
these little strokes from the top portion coming
towards the bottom part. And then you have
to blend it with them, that abstract background. So we are done with
both the pine trees. Let us add one more. On the right-hand side
of the bigger pine tree. You just have to simply
observe the process and no need to hurry a doll painted in a very slow manner. So it'll be blending
this particular binary with the abstract
background as well. So we are done with
the pine trees that we have on the top portion. Now, let us paint
some pine trees, which are going to
be a little bit smaller in size. In
the bottom part. You can see I have simply again drawn a vertical line and then I'm just trying to add a little binary on
the bottom portion. The process is absolutely same. And using this
particular quilt brush, you will be able to make these beautiful branch strokes AND gates you are missing
out on a quill brush. No need to worry at all. You can use a round
brush as well. That will also somehow give you this type of output that we're getting
from the quill brush? Now we are done with
the pine trees. Let us paint a beautiful
vintage house. I'll be using my quill
brush of size zero. And we'll be starting
with the outline first so that we get the exact idea where the house
is going to come. No need to hurry at all. And in fact, if you are
not that much confident enough to create the outline directly from your quill brush. What you can do is
dry it with pencil and then you can come
with your brush. Now will be just filling in
solid black color inside. You can observe the
movement of my brush and I'm just trying to blend it
with the abstract background. Also, you can give some good
finishing using the tip of your brush and
also try to spread the entire black color
in a proper even done, make sure that
there is less water and more amount of
color in your brush. You can see very
naturally the colors will blend with the
abstract background. Right now it's a little bit wet. Once it dries, then you'll be able to see the final output. You can already observe a beautiful fell out
of a vintage house. Now let us add some minute
details to the entire house. So we'll be painting two
beautiful vertical lines which will replicate some
chimney on the house. And that will also enhance
the entire painting. Now, in the painting,
you can consider this as a mall or a sun sensors
and achromatic painting. So you can consider
it either way. You just have to simply
paint this small circle. Use the tip of your brush to paint it in a perfect manner. We are almost done. Now we will be
adding few details. I'll be using the same
quill brush of size zero, and we'll be adding
some fence effect on the right-hand portion. So no need to worry at all. You just have to make these little vertical
lines which are a little bit thick and also not perfect since these
are wooden planks, so you just have to
paint it in this format. And also by adding
this fence element, it will also enhance
the underpainting. Now let us connect all
the vertical lines by putting ten horizontal line, which is not going to be a
perfect horizontal line. You just have to connect all the vertical
wooden fence elements. So this is how we have created a beautiful fencing element in the entire
landscape painting. So now I'll be taking my will
branch of size zero again and we're going to add a
beautiful window to the house. Initially also, we are
using the same brush. You just have to clean
it up in the water. And then you have to
take some white color so that you can get a
beautiful vibrant white color. And you just have to paint this beautiful rectangular shape and the house that
we have painted. And in fact, if
you're not that much confident enough to paint
it directly from the brush, you can dry it with pencil and then you can fill in
solid white color. Let us enhance the
fence as well. We're just adding this
little vertical line on the right-hand side so that it gets a little bit more contrast with
the background. Now, same thing you can do
with the chimney as well. Now let us add some details
to the window as well. So I'll be just
painting the frame, digging the same
quill brush of Psi zero and some solid black color, draw simple vertical line
and horizontal lines. You can observe how beautiful
than died houses looking. Now let us remove
the masking tape. No need to hurry at all. Tried to remove the
masking tape and, and angles so that
you do not end up tearing your brushes,
watercolor painting. And you can already observe how beautiful white
border we have got. Then dark painting is ready. Let me take you a
little bit closer so that you can
observe the details. I hope that you enjoyed painting this particular abstract
landscape painting as well. Now let us move towards
the next project.
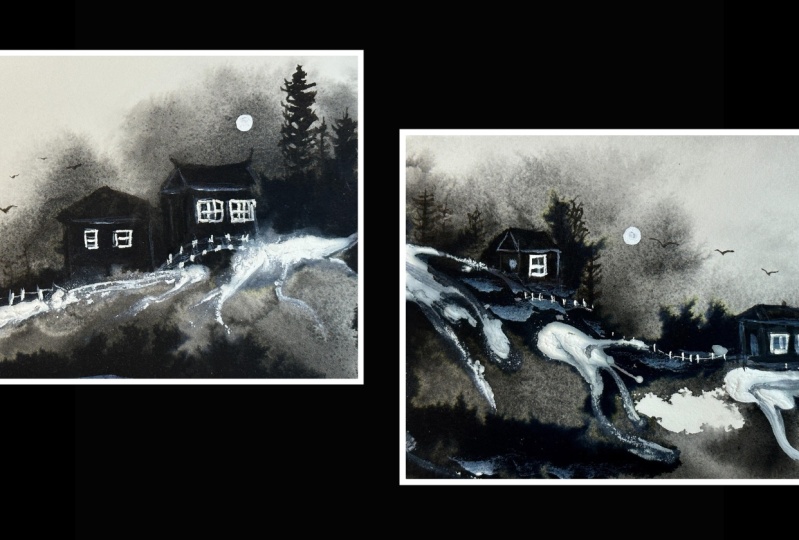
7. Project 3 - The Calm Village: Hey everybody. Now, let us
start with the Project Three, which is become village. As you can see, again, I'm ready with my watercolor
paper with the masking tape. Using the spray bottle, I'll just sprinkle
some good amount of water on the entire
watercolor paper. And now we'll be using
a size eight brush. And just make sure that
the brush is clean. And we'll just spread the
color in a good manner. Make sure that there
is no space left between the watercolor paper
and the marketing team. Also tried to spread the
water and then even format. So we are done.
Now, I'll be taking my cradle branch of size four. And we're going to create a beautiful abstract background. In the color palette. We'll be taking
some good amount of solid black color. No
need to hurry at all. Try to maintain a
good consistency of water and color together. And simply will be using
the tip of the branch. And I'm just letting
the color flow. You can already observe
the color is naturally just blending with the
entire watercolor paper. So this is basically known
as a wet on wet technique in which we apply a thin
coat of water initially, and then we apply another coat of water and color together. So this is how abstract
background is formed. Naturally. You can see how the
color is spreading. Also, as you can observe, that the colors spreading
in a natural format. So it is not a dog
compulsory that it will be in the exact same manner. I have got the entire
abstract background. It can be a little bit
different for you as well. So now I'll be using my
size eight brush again, and I'm just blending it with the white portion in the
entire watercolor paper. So we do not have any color and this particular brush only
some amount of water, as you can observe, just have to blend it with
the white portion. So no need to worry
about the background. It can be very natural
and authentic. Now just simply wait for
the background to dry. And once the background
is completely dry, we'll be taking our
elements to paint. As usual, we are going to start by painting
the pine trees, which is the first element. I'm using my quill
brush of size zero. And as you can observe, I have simply drawn
a vertical line. And in case you're not
that much confident enough to draw a vertical line
directly from your brush. You can do is you can just draw the line using a
pencil first and then you can use your brush
to paint the pine tree. I'm just making
these little strokes from the top portion. And as we move towards
the bottom part, we have to increase the size of the stroke that
we are making. You can observe that
I'm using the tip of my brush to get this beautiful natural
log of a pine tree. And this is how you have
to leave the strokes. You can observe the movement
of my brush carefully. Now once we move towards
the bottom part, we are going to blend it with the abstract backgrounds so
than the pine tree looks the part of the
painting or I can say the part of the background
that we have created. So as you can observe,
we are almost done with the entire pine tree. You can also make very
pointed out the top portion. Now let us paint another binary just on the right-hand side, but a little bit smaller. So the process is
absolutely same. Assemble vertical line to get a nice reference where the
position of the pine tree is. And you have to
simply painted in the way we have been doing
the first pine tree. At the end, you have
to make sure that you blend it with the abstract
black background. So now I'll be having two more pine trees on
the left-hand portion. As you can observe, I have drawn the vertical
lines initially only, and now I'll be
making these strokes. You can see this is
how you have to paint the pine trees in a very
natural and random way. You don't have to worry
about the perfection here since it's an abstract
landscape paintings. So no need to worry
about the output. So you can see how beautifully the bunch of pine
trees is looking together and it is being blended with the entire
background as well. Now let us paint the house. So this time we
are going to have a beautiful house on the
right-hand side portion. So I'm starting with the roof. And to paint the house, we are going to create
the outline first. In case you do not
want to create the outline directly
using your paintbrush. What you can do is you
can use your pencil. Try to create the outline
with the pencil first, and then you can use
your painting brush. You can observe, I have
created two beautiful roofs. One is a little bit bigger and another one is a little
bit smaller in size. Now we'll be filling in
solid black color inside. So make sure that you have good amount of color
in your quill brush. The size of the brush that I'm using right now is also zero. Also one more thing I
would like to tell you is that in case you're not having a quill brush,
no need to worry. You can use a round
brush as well. So now you can clearly observe the fallout of both the houses. You can use the tip of
your quill brush to add some minute details and to paint them that
difficult areas. I'm just trying to blend it with the abstract background
on the bottom portion You can use some amount
of water and color together to blend the
background together. We are almost done painting
the houses as well. Now using the same quill brush, I'll be taking some
solid black color again, and I'll be using
the tip of my brush. And we're going to paint two
beautiful little chimneys on the roof portion
of the house. So you just have to draw
this rectangular shape above the roof and no need to hurry adult
painted very carefully. So as you can see, we are
done with our two elements, which is pine trees
and the house. Now we are going to take
some solid white color and the quill brush
of size zero. And we're going to add
some minute details. So this is going
to be two windows. So as you can observe, I'm using the tip of
my brush to paint a small square shape on the forest house
as you can observe. And similarly, we'll be adding one more window in
these smaller houses. When while doing this, you have to paint it in a very calm and slow manner so that you do not
make any mistake. In case you're not
that much confident enough to paint it
directly from your brush. You can use a simple pencil
to draw the basic shape, which is a simple square. And then you can fill in
solid white color inside. Now using the same quill brush, I'll be adding some
little fence element in the entire painting
to enhance the details. You can observe.
I'm just drawing these vertical lines and these are a little bit thicker
on the top portion. And as they move towards
the bottom part, I'm just making it a
little bit thinner. So from the top portion you just have to leave your brush. And this is how you have to
paint the fence element. There isn't any
particular format in which we are creating
these little fence. You can make your
own composition and create the fence
element as well. So I'm adding few fence on
the bottom portion as well. Also, if you want to decide the position of Defense
where you want to paint it, you can dry it with
pencil first and then you can apply the white
thin strokes. Now we'll be connecting
the vertical lines by using the tip of the brush, adding these little
thin horizontal lines. And we're done painting
the fence as well. Now, let us enhance the windows. So I'll be taking the
same quill brush. I have cleaned it
with some water, taking some solid black color, just draw simple
vertical line and the white portion of the window and assemble horizontal line. So this is how we have
painted the entire frame and it will enhance the
entire look of the window. Now we are just going to
paint a simple moon or sun, whatever you want to consider, you can consider it, since it's an
achromatic painting and just draw a simple circle. Now, let us remove
the masking tape. Tried to remove the masking
tape in an angle so that you do not end up tearing
your beautiful painting. You can already observe how beautiful the white
border looks. This is how the final
painting looks. Let me take you a
little bit closer so that you can
observe the details. I hope that you enjoyed painting this particular painting and
got to learn something new. I'm very happy to share
this class with all of you.
8. Class Conclusion: In order to create some
beautiful landscape paintings, I came up with a
class where you need minimal art supplies and some basic art
techniques to paint. When it comes to creativity, that is a lot of things that you can explore using watercolors. As an artist, I suggest to my students to always
maintain an agenda that you can practice on a regular basis and keep a
record of your hard work. No need to worry about
making mistakes. It will definitely
improve your artwork. I'll be really
excited to see all of your projects into
the project gallery. In case you have any questions or doubts related to the class, feel free to ask them into
the discussion section. You can definitely
explore and create your own landscape
paintings as a red. Let me know your
reviews for the class, has it and courageous me a lot. Thank you so much for
joining the class. Keep practicing
and happy painting
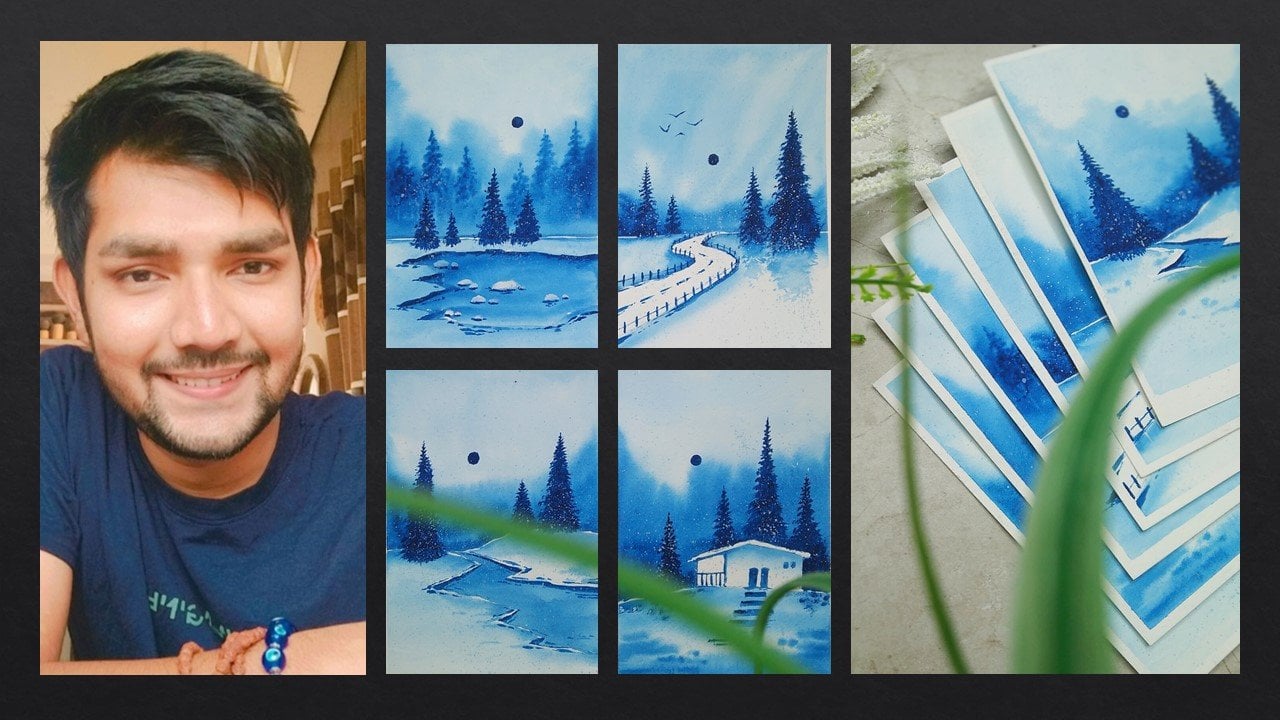
 Rutvik Patel, Artist and Instructor