Transcripts
1. Introduction: Painting florals have always been very fascinating for me. I'd always brings peace and satisfaction whenever we paint them on watercolor is one of the most suitable
medium to do this. Hey everybody, my
central tick Bataille. I'm a self-taught
independent artist based in good job India. I'm also a professional
interior designer. This class, we are
going to paint four different abstract
watercolors and plants, having different
compositions and elegance. It'll be starting with
cutting the paper into four equal parts. No
need to worry at all. I'll be taking you through
each and every step. I'll be giving you
all the details about the art supplies
that we're going to use. We're going to talk
about the size of the brushes and watercolors
that we're going to use. We're going to start
with a basic sketch, and we're going to
paint this on Clavel step-by-step having different
watercolor techniques. I will show you how to give realistic effect
to the patterns. And we're going to give an
amazing abstract background. And all the force and
flower paintings. We are going to give some
amazing flattering effect. And I'll show you how to
remove the side tip carefully. This class is absolutely
suited for beginners and also intermediate and advanced
level artists can try it. I'm very excited to share
this class with all of you. And by the end of the class, you will be definitely exploring
watercolors at its best. So without any delay, grab your supplies and
let's get started.
2. Art Supplies: So before we start, let me
give you all the details about the art supplies
that we're going to use in this particular class. Here I have all my
art supplies Pleased. Let me give you a brief
about all the art supplies. So these are the watercolors
that we're going to use. The watercolors that I'm
using are from Bristol. It is not at all compulsory
to use the same brand. You can go for any other
good alternative as well. In fact, what I would like
to suggest to you is that if you are a beginner talent with us students
grade watercolors, you can move towards
artist grade watercolor. The next thing is osteo allege. You will need this
particular scale to cut your A4 size paper
into four equal parts. You can use any other
normal scale as well. Some basic art supplies
like an eraser and a sharp. Now, now let us talk about
the most important thing, which are the brushes
that we're going to use. So these are basically
quill brushes. In case you do not
have a quill brush, you can go for a
round brush as well. So this is a size two brush, and this is a size 0 brush
that we're going to use. And only two brushes are required for this
particular class. The next one is a simple
pencil that we are going to use to draw a basic
sketch for these unclass. Now to cite tape, the
watercolor paper, you will need a masking tape. This is basically a
one-inch masking tape. Now here I have a simple
plastic palette in which you can use your watercolors
to blend and match colors. It is not at all compulsory
to have the same palette. You can go for any other
good alternative as well. Now, this is a
simple ceramic cup in which we are going to have some water to clean up our brushes and add water
to our watercolors. Now comes the most
important thing, which is the watercolor paper
that we're going to use. So these are watercolor
papers from Canson. And the most important
thing that you have to take care of is the GSM, which is 300 GSM, 140 LB. Gsm basically means
that thickness of the paper so that you can
apply heavy washes on it. No need to worry at
all. You can go for any other good
alternative as well. Just take care of the GSM. Now to cut the A4 size paper
into four equal bonds, you will need a
pair of scissors, a simple tissue papers to
absorb excess amount of water. So these are all the
art supplies that you will need for this
particular class. No need to worry at
all in case you do not have any particular
art supplies, you can completely manage it with any other good alternative. I hope that you've
got the brief. Now, let us start
with the next step, which is cutting the A4 size
paper into four equal bonds.
3. Lets Cut the Paper: Hey everybody, let's
cut the paper into four equal bonds so that we
can start with our paintings. So here I have my 300
GSM watercolor paper, which is of size A4. Now, I have placed my steel edge approximately
on the center. We are just taking
the half and I have pointed on 15 centimeters, which is half of 30 road point we can take so that we
can get a straight line. Now simply place your
scale on both the points and use a simple pencil
to draw a straight line. We have got a vertical lines up reading the paper into
two equal halves. Now we want another
horizontal line. So I have placed my scale again. So now we'll be taking a
point at 10.5 centimeters, which is half of 21 centimeter. So again, I have
taken two points so that we can get
a straight line. Place your scale, and
simply draw the line. Let me just keep the
paper and horizontal way so that you can get the
idea of the four divisions. Now, I have placed my scale on both the points and I'll be
drawing a horizontal line. So now as you can
see, we have got four equal bonds that we're going to use for
our four paintings. So now we're going
to cut this into four equal bonds using
a pair of scissors. Simply follow the line
that we haven't drawn. Do this slowly and
carefully so that you can get perfect and straight edges. Now let us also cut
the remaining parts. So now you can see
that we have got four equal parts to start
out with paintings with. And you can see how beautiful this little paintings
I willing to look. Now let us move
towards the next step.
4. Lets Tape the Paper: Hey everybody. Now let's tape the paper before we start
our first painting. So here we have all our for paper cutting and
we're going to use one of them so that I
can show you how you have to cite tape,
your watercolor paper. No need to worry at all. This is absolutely a very
easy and simple step, but you have to do
it very carefully. Here, I have my one-inch masking team that we are going
to use two-sided tape. Just simply decide the position
of your watercolor paper where you want to paint
and place it on your desk. Now one by one,
we're going to put the tape on all the four edges. I'm starting from
the top portion. Just make sure that the edge
of the paper is covered a little bit from
the masking tape and the remaining portion
of the masking tape shouldn't be on your desk. So I have covered a little bit of the watercolor paper area. Make sure that the
site deep and you'll be but edge are parallel
so that when you remove, you can get a perfect model. Also makes sure that you
tap the masking tape with your finger so that it is completely stuck with
the watercolor paper. As you can see, we are done with the top and bottom portion. Now I'm placing the
masking tape on the side edges and I'm just trying to make it parallel
with the paper edge. And I'm using my finger to place it well on the
watercolor paper. And we're left with
the last edge. Again. Just simply
repeat the same process. Be very much careful while
doing this so that you get good and nice, crisp edge while
removing the sighted. And we are done. I hope that you got the exact idea of how you have to tape
your watercolor paper. Now, let us move towards
our first painting.
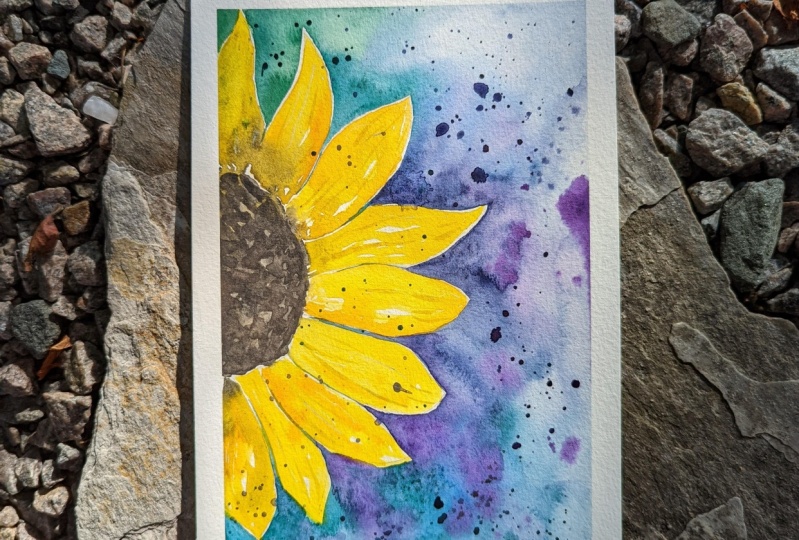
5. The Sunflower: Hey everybody. So let us start
with our first painting, which is this unblocked. So as you can see, I have my watercolor paper
ready with this idea. So we'll be starting with
our basic sketch first, I have a simple
pencil in my hand. And you have to just draw a simple rough circle
in the center area. No need to worry at all. This is not supposed to be
a perfect circle. You can just draw a rough
circle in the center portion. Now let us start
with the patterns. So we are going to
draw the petals around the circle area. No need to hurry at all. Draw the petals slowly, carefully and try to make them in this particular
shape as I'm drawing. You can also have
some difference in the shape of the petals, since large are the
most natural form. And that's it. We are ready
with the basic sketch. Now let us talk about the watercolors that
we're going to use. The first one is
gambit, lemon, yellow, ultramarine, sap
green, deep green, and black and white color. So these are the
watercolors that you will need to paint this
particular painting. So here is a simple
color palette in which I have kept
all the colors. Then you will need
a water container, a ceramic cup, which is basically having
some water in it. Two colors, which
is black and white, which I'm having in this
small containers and additional napkin to clean the brushes and takeoff
extra amount of water. So these are the two brushes
that we're going to use. The first one is a size 0 brush. Then the second one
is a size two brush. In case you do not
have a quill brush, you can go for round
brush as well. Now, let us start painting the center part
of the sunflower, which is going to be black. I have my size 0 brush and I'm taking some amount of
water and we're going to apply a thin layer of water on this interval just to make sure that your water doesn't
go into the petal area. Use the tip of your brush to apply the water on
the difficult areas. As you can see, we have
applied a nice tan coat of water on the center
portion of the sunflower. Now we're going to paint
it completely black. So here I have my black color
and we're going to take some darker values of
black and our quill brush. You can just observe it
in my color palette. To make sure that you do not
have more amount of water, we have to get maximum
darker values of black. So try to have less
amount of water in your brush and simply dab it in the center
part of this Angela. You can already observe
that the color is pleading with a very
amazing effect. This is because we
have already applied a thin coat of water
on this center part. And this is basically known
as a wet on wet technique. No need to hurry at all. Do it very carefully. Make sure that the
black color do not go outside and the petal area. Use the tip of your brush to paint on the
boundary of the circle. You can see the self-confidence. So now as you can see, we are
done with the center part. Now simply clean your brush. Let us paint the petals. So we are going to
make a combination of gamboge and lemon
yellow together. You can just observe
in my color palette, I'm trying to have some
nice vibrant values of gamboge and lemon
yellow together. Now let us paint the petals. So I'm going to start
with the top most petal. I'm using my brush in a
particular direction. You can absorb. They are
moving in a vertical direction so that we can paint the
petal in a particular manner. So as you can see, we have
got a nice shape body better. Now once you are
done with the area, have to just make your brush go a little
bit in the black area. And automatically there will be a little bit of black shade
coming in the petal area. As you can observe,
it gives a very nice, amazing effect to the petal and it makes it look a little
bit more realistic. Let me repeat it once again. We're painting the
second petal also, you can observe the
movement of my brush. And now when I'm coming
towards the black area, I'll be just putting a little bit of pressure
on the black area. And it will give
a nice effect of blending the black and
yellow color together. We are basically working on an abstract painting
so you don't have to worry about perfection. Abstract painting
is about having randomness and getting
unexpected outcomes. So it is absolutely fine to have to paint
it with patients. You can observe similarly, I have painted the
remaining petals. You have to just simply
repeat the same process. Now we are almost
done with the petals. Also. Let me paint the
last petal as well. So you can see how beautifully the black color in the center is blending with the petals forming these little wins together. And we're done painting
the entire sunflower. I'm just adding a little bit of more black little wins by
using the tip of my brush. And splitting it
in the petal area. To enhance the tip
of the petals. I'm adding some
black on the tips. As you can see, I'm
using the tip of my brush to add a little
bit of black color. Now you can see how beautiful
the sunflower is looking. Now let us move
towards the next part, which is adding an amazing
abstract background. For the background, we are
going to use three colors, basically, the green, sap green, and
ultramarine together. Now, I have just taken a combination of deep green
and sap green together. You can see it in
my color palette. And we're going to fill the area outside
these and Florida. So initially we are going to
start with darker values, which are going to be
near to the sunflower. And as we move towards
the outer portion, we are going to make it lighter. So what I'm doing is I'm filling the area near the petal
with darker values of sap, green and deep green together, you can just observe the
movement of my brush. I'm just trying to
fill the color in. Now I have taken some
good amount of water in my brush and we're just trying to spread the darker values. As you can see, that
is a nice gradient forming as we move outside
from the darker values. So you just have to tap your
brush and way I'm doing. You can move it in
a random formation since it's an abstract painting. Now similarly, we are taking some more darker values of sap green and
dark green together. Now we're going to
repeat the same process. I'm taking the darker values
of sap green and dark green together and filling it in the areas between the petals. No need to worry at all. This is a very simple and
easy technique which you can do to create an amazing
abstract background. And there isn't any
perfect way to do this. There is randomness while
you're moving your brush. Now let us take some
ultramarine and make it a nice combination
for the background area. The method is absolutely seen taking some darker
values of ultramarine, putting it in the area
between the petals. As you can see, we
have applied some nice, amazing darker values. And it is looking very nice, having a good combination with
sap green and dark green. No need to hurry at all. Take your time. Pain slowly and use the tip of your
brush or round brush, whatever brush you're using to paint in the difficult areas. Now, again, I have taken some water in my brush
and I'm trying to spread it to create
amazing gradient effect. One more thing I would like
to share with all of you is that this is a very satisfying
and relaxing process. So if you do it with a
calm and steady hand, you are definitely going
to enjoy the process. So as you can observe, the combination of dark
green and sap green looks really amazing and vibrant
with ultramarine together. And now we're going to repeat the same process on the
above portion as well, so that we are done
with the background. Now let us take dark green and sap green again in the brush, starting with darker
values and putting it between the petals
on the above portion. I hope that you got the brief correctly and method
of doing this. You can simply
absorb it right now. In case you are
painting with me and you'll find me painting
a little bit faster. What you can do is just simply observe the methods
and techniques once. And then you can paint according to your time convenience. So as you can see, I have
taken darker values of dark green and sap green on
the top left corner. And then I'll be just
blending it with water in my brush and creating this
amazing gradient background. Again. You can also observe that I'm moving
my brush and this random, they only there isn't any
particular way of doing this. So in case if you are thinking
that we're not getting the exact background as I'm having right now
in front of you, then no need to
worry at all because abstract painting
doesn't work like that. You can get any kind of shapes and patterns
while painting these. Now let us take some
darker values of ultramarine on the
top right corner. The method is absolutely same. I'm putting darker values
and between the petals. I'm taking some
water in my brush and blending it with
the background. Now we are almost done with the entire painting and
the background as well. So now let us give some amazing splatter
effect in the painting. I've taken some dark
green and green together, add some amount of water in your brush and just tap
it on the painting. You can tap your
finger on the brush and have some distance of the brush from the
painting so that you get this amazing
flattering effect. Again, I'm telling
you there isn't any particular perfect
method of doing this. These little dots will
splatter on a random way only. You just have to tap it. Just makes sure that you do not apply a lot of pressure on the brush because we want the
dots to be in a subtle way. Now comes the most amazing
and my favorite part, which is very satisfying, that is removing the site. I'll be very careful while
removing the side tape. Tried to remove the
tape and an angle so that you do not end up
tearing your entire painting. Be very slow and careful
while doing this. So as you can see, how
beautiful the edges are looking while we are
removing the side tip. And this is the benefit of placing the site tape carefully. Now let me remove the last
tape as well and we're done. Let me take you a little
bit closer to the painting. You can observe how
beautiful this particular abstracts and flower looks with this amazing
abstract background. I hope that you enjoyed and
got to learn something new. Now, let us move towards
the next painting.
6. Semicircular Sunflower: Hey everybody, now let us paint
a semicircular sunflower. As usual, we are going to
start with our basic sketch. As you can see, my
watercolor paper is ready with the site team. So in this particular
painting we are going to have a semicircle loss and Flavell on the left side of the
watercolor paper. I have simply drawn a rough
semicircle on the left area. No need to have a
perfect semicircle. You can just draw
it in a random way. Once you are done with
the small semicircle, you can draw these little petals in any random particular size. Just make sure that the petals are attached with
the semicircle. No need to worry at all in
case you make any mistake. Just use our simple eraser
and you can make it perfect. Again. Whenever you make
a rough sketch, no need to hurry at all, draw it in slow
and steady manner. Now let us talk about the
watercolors that you will need. The first one is gambit, then you will need lemon
yellow, ultra marine. I'm green, the green,
black, and white. So these are the
watercolors that you will need for this
particular painting. Here I have my size
0 brush and we're going to take some amount
of water in our brush. And in case you do not
have a quill brush, you can use a round
brush as well. Take a little bit of water in your brush and apply it
in the center portion, which is basically a semicircle. And we are going to paint
it completely bland. But I've just applied
a thin coat of water. Make sure that you applied
in the complete area and use the tip of your brush where you find it
difficult to paint. Now I'm taking
some darker values of black and my color palette. You can observe, make sure
that you have less water in your brush so that you can apply darker values to the
semicircular area. Now you can observe how beautifully the black
color is spreading. This is because we
have already applied a thin coat of water and
this semicircular area. And this is basically known
as a wet on wet technique. I'm using the tip of my brush to paint the difficult
areas as you can see. And you can also
observe that this isn't a perfect semicircle. This is a random
semicircle since levels are having unnatural
shape and boundaries. So don't worry about
getting a perfect shape. Now, I'll be simply
cleaning the brush, as you can see, and
my ceramic cup. And we are going to
paint the petals. You can observe
my color palette. I have garbage and
lemon yellow together, and I'm taking some
darker values. You can see that we have got an amazing sheet for
the sunflower petals. Now we're going to start with the first petal on the top area. You can observe the
movement of my brush and leeway much slow and
steady while doing this, that you did not
make any mistake and your color doesn't go
outside the boundary area. Now one more thing that you
can observe is that there is a nice blend of black color
inside the petal area. Since the black color was
already a little bit wet. And I'm just touching
the tip of my brush near the black color so that it gives a nice When effect
into our petals. So this is basically known
as abstract painting where you can get these
amazing random outputs. Now going to observe
how beautiful the petal color is
getting a nice blend, the center black color. Now we are just going to simply follow the
same steps and paint all the petals in case
you aren't painting with me and you'll find new
painting a little bit faster. So what you can do is
just observe the steps carefully and then you can paint it according to your
time convenience. I don't know, that
is something very peaceful about painting
these florals. And I don't know, you have
absorbed this or not. In case you're a beginner,
you are going to experience it for
the first time. But trust me, if you
believe in the process, you are definitely going to find the outcome very amazing. So we're done painting
the entire sunflower. Now let us paint the
abstract background. So now I'm using my
quill brush size too. In case you do not
have a quill brush, you can use a round
brush as well. So I have taken some
darker values of the green and sap
green together. So initially what
we are going to do is that we are going
to put the color near the petals and
between the petals so that we can show the saturation
near doesn't flower. You can use the tip of your brush or a round brush
in case you are using a round brush to paint in the difficult areas so that
you'll get a nice finishing. You can observe the
movement of my brush, how I'm painting
near the petals. I'm using the pointed tip
of my brush so that I do not spoil the nice yellow color we have got in the petals. Now simply, I'll be taking some water in my
brush and I'll be blending does
saturate it Colonia the petals with the
background area. You can just simply observe
the movement of my brush. I'm just tapping it and
trying to blend it. You can spread the color
as much as you want to. I'm just trying to keep it in an abstract way so
that it looks a little bit more natural and elegant. Now we're going to
repeat the same process, but this time I'm having
darker values of ultra marine. And I'm just putting the darker values of ultramarine
in-between the petals. Again, you can just simply
follow the same steps. I'm using the tip of
my brush to paint the difficult areas so that
we do not spoil the petals. You can observe the movement
of my brush as well. So you can see how beautiful
the background is looking. It is giving a
nice contrast with the vibrant yellow we have
painted in the petals. Now after applying darker
values of ultramarine, I'm again trying to blend it with some water
in the background. This is not at all difficult. You just have to take some water in your
brush and tried to tap it with the darker value of color and you'll get this
amazing gradient shade. I'm adding a little bit more ultramarine on the bottom part. Now let me take again some
deep green and sap green using my quill brush and taking some darker values that has put the color in between
the petals again, try to blend it with the
ultramarine as well. No need to worry, you are not supposed to have a
perfect blending effect. This is an abstract painting. An abstract painting
works like this only. Now once the darker
color is applied, I'm using some water
to spread it again. And we are almost done
painting the background area. You can tap it wherever
you find empty spaces. I'm very much satisfied with the background that
we have created. And you can see how beautiful
doesn't level is looking. And it is giving an
amazing contrast with the background colors. So now let us give some
amazing splashing effect in the background as well. So what we're going to
do is that we are going to use the same brush. And I'm just painting some water and mixing
it with ultramarine, deep green and sap green. And you just have
to simply tap it randomly on your watercolor
paper that you have painted. Add some water so that you can get these amazing droplets. You can tap your
finger or you can use another brush to tap it on the brush you are
having in your hand. And you can get these
beautiful splashing effect. Tried to have it on
some petals as well. Do it in an optimum mount. Don't make it too messy also. But as you can see it as giving an amazing natural
and abstract effect. I'm adding a little bit of more flattering effect on these slides looking
really nice. We are almost done by giving less flattering effect as
when you can practice this on adapt sheet of paper also in
case you find it difficult to do it in your final painting and you do not want to spoil it. Now, let us remove this IT, this is the most satisfying part and I love to remove this IP. Just try to remove
this item in an angle so that you do not end up
tearing your watercolor paper. As you can see as I have
removed the site team, the edge looks really
amazing and perfect. We have removed both
the side tapes. Now, let us remove the tape on the top and bottom part as well. I hope that you enjoyed painting this beautiful
semicircular sunflower and got to learn something
new and creative. Now I'm removing
the last day from the top portion and we're done. Let me take you a
little bit closer to the painting so that you can observe the details
even more clearly. You can see how beautiful doesn't lava is looking
with the background colors. I will be really
excited to see all of your projects into
the project gallery. Now let us move towards
the next painting.
7. Pair of Two Sunflowers: Hey everybody, now let us paint pair of tools and flowers. So this is going to
be a combination of tools and flowers
and an abstract form. So as you can see, we are
starting with a basic sketch. I'm drawing a simple semicircular shape
on the bottom part. And now we'll be drawing the petals using
a simple pencil. No need to worry at all
in case you do not get the sketch exactly
the way I'm drawing. It is absolutely fine since
it's an abstract painting. So there can be a little bit
differences, but it's okay. So now I'll be drawing one
more sun on the left area. The drawing isn't going
to be almost same. Again, a semicircular
shape on the left edge. And adding these little petals. No need to hurry a tall draw slowly and have some patients. Make sure that you get
your sketch perfect. Now the watercolors
that we will need is gamboge, lemon yellow, ultramarine, sap green, the
green, black, and white. So these are the
watercolors that you will need for this
particular painting. Now I'm going to use
my size 0 brush. And we're going to start
by applying a thin coat of water on the center part
of both these antlers. As you can see, simply applying a thin coat of water in the
center part of this n block, which is basically a semicircle. Use the edge, or I can say, use the tip of your
brush to apply this thin coat of water so that you do not go
out of the boundary. In case you're not
having a quill brush, you can use a round
brush as well. That is also absolutely fine. Now what I'm going to
do is I'm going to take some darker values of
black and my quill brush, having less amount of water
and more amount of color, and just simply tap it
on the semicircular. But you can see the color
is spreading automatically. This is basically known
as a wet on wet technique in which we have applied a
tin coat of water already. I'll be applying
some color in it. You can see how
beautiful the color is looking. No need to worry. The semicircular shape is not supposed to be
a perfect one since this is an abstract painting and flowers are generally
having a natural form. So it does absolutely fine. Now, let us paint the petals
for the bottoms and flour. What I'm going to do is that
I'm just cleaning my brush, as you can see in
my ceramic cup. And we're going to
take some gambles and lemon yellow together. Just absorbed the blending
in my color palette. I'm taking a little bit of gamboge and lemon
yellow together. You're going to have
some darker values of these colors in our brush. Add some water in
case you are not able to blend the colors
together well. So now let us start
painting the petals. I'm starting by applying
the color in the petal. And you can see how beautiful the vibrant yellow is looking. You can just observe the
movement of my brush. And at the end, you can just add the tip of your brush to
the black color. And it will spread
automatically into the pattern showing these little beautiful
veins and the button. So this is basically
done to give a nice natural effect
to the sunflower. No need to hurry at all, painted very slowly
and in a calm way. Now, let us spend the
remaining petals as well. You just have to simply repeat the same process for painting
the remaining petals. I don't know that is something
very much peaceful and are very satisfying energy UV
while you're painting florals. I'm just simply repeating the same steps for
painting the petals. Now let me paint the
last petal as well. I'm trying to blend it
with the black color also. You just have to give
this little strokes near the petals with the black so that you can give it a
nice natural effect. Now let us paint the
seconds and flower as well. The steps are absolutely same. You will just have
to apply a thin coat of water on the
semicircular area. Make sure that you do not
apply access amount of water and just try to have
it in an optimum amount. Now I'll be taking some
darker values of black, and I'll be simply adding it
in the semicircular area. And this is basically known
as a wet on wet technique. Use the tip of your brush to paint in the difficult areas. Now once we are done with
the semicircular area, now I'll be painting the petals while the
second sunflower as well, taking combination of gamboge and lemon yellow together again. And I'm using my brush
to paint the petals. You can observe the
movement of my brush. Again. We are moving it in
the direction of the petal. You can see how beautiful the
vibrant color is looking. You can use the tip
of your brush to give these little
strokes of luck. Now that we have in the
semicircular area, now, just repeat the same
steps and paint all the remaining
petals carefully. Just make sure
that you do not go out of your pencil boundary. So now I have just fast on up the video so that we
can consume some time. In case you are
painting with me, there's an option below,
you can slow it down. Also, one more thing that I
would like to suggest to you is that in case you
are a beginner, you are painting with me. What you can do is
that you can observe the process and steps initially, and then you can just rewind
it and paint it with me. So now we are almost done with the seconds
and clever as well. We are remaining with
two petals to paint. Also, do not forget to use
the tip of your brush to add these little black strokes into the petal to give this amazing natural
look to your sunflower. And now I'm painting
the last petal. We are almost done painting
vote does and flowers. And you can see how beautiful these sunflowers are looking. Now we're going to paint
the abstract background. I'm having my quill
brush, upsides too. And in case you're not
having a quill brush, no need to worry, you can
use a round brush as well. You can just simply
observed my color palette. I'm having a combination of deep green and
sap green together. I added a little amount of water in it because I want
darker values initially. Now what we are going to do
is that we are going to use the tip of my brush to paint into the difficult
areas so that you can paint in between the petals. No need to hurry at all. Paint slowly so that you can just give a nice
background effect. I want the colors to be more
saturated near the petals. That's why we are
having less water and more color and the brush. You can observe the
movement of my brush as well as I'm taking it outwards. Now once you have applied
darker values of the color, what we're going to do
is that we are going to add a little bit more of a deep green and sap green together between the petals
on the bottom area as well. So this is going to be the
basic steps that you have to follow for giving an
abstract background. So now what we're going to
do is that we are going to take water in the brush. And let's color this time and just blend it
with the background area. So you can already observe how beautiful the
gradient is looking. And this is how we have
to blend the colors. Now what I'm going to do is now this time we are taking
darker values of ultramarine and the brush
and paint desaturated color in-between the petals. Use the tip of your brush to paint in the difficult areas. The process and method
is absolutely same. Again, applying darker values of the color in between the
petals in the bottom area. So since this time we are having bad off
tooth and flavors. So you have to be a
little bit careful while painting the
background color. Make sure that your
color doesn't goes inside the petals because that
would spoil your painting. Now again, I have taken some
deep green and sap green together and I'm painting
it on the left edge area. You can also take
the darker values in between the petals of
the bottoms and flavor. So as you can see, where
I'm having difficult areas, I'm using the tip of my round brush and then we
have to spread that color. You can just press it or tap
it on the watercolor paper. Now I'm just repeating
the same process. I'm taking some
ultramarine and painting it between the petals of
the bottoms and flavor. I want the colors to be more saturated and
the other petals, That's why we are having
saturated colors. Now the reason behind
doing this is that you can see how beautiful
the contrast is coming in between yellow and ultramarine and the
green and sap green. Now again, take some water in your brush and blend it
with the background. As you can see how beautiful
the background is looking. And one more thing
that I can tell you is that painting plural
is really very satisfying and you are
definitely going to love the output as it's
an abstract painting. So rather than focusing
on the perfection, you can focus on how beautiful the
process and methods are. We are almost done painting the background for
the abstracts. And plus. Now let us add some details
into these and level. What we can do is
that we can add some more saturated
color in between the petals so that it
gives you a nice contrast. Now, I'm going to give a
nice flattering effect to the entire painting. What I'm doing is
that I'm taking some water and
combination of black sap, green to green and
ultramarine together. And you just have to splatter the color on the sunflowers
and the background. Just simply dab on your brush using your finger or you
can use another brush. Also. Tried to do it
in an optimum amount. Don't make it too messy. Just apply those flattering
effect variable you want to. You can also apply
this battering effect on the sunflower as well. It will make it look even
more natural and abstract. You can see how beautiful this particular splashing effect is looking in the painting. Now let us move
towards the last step, which is removing the side tape. This is one of my favorite part because it is very satisfying. Now, make sure when you
remove the site team, be very much careful. Tried to remove the side
tape and an angle so that you do not end up tearing
your watercolor paper. And I know that you do not want to spoil your
painting as well. That's fine. Do it very slowly. You can see once you remove
your site tape, how beautiful the
white edge looks. So that's why it is
very important to place your masking tape carefully when you haven't
started painting. Now, let me remove
the last tape on the top portion and we're done. Let me take you a
little bit closer so that you can
observe the details. So you can see how beautiful
the pair of tools and lovers is looking with this
amazing abstract background. I'm going to be
really excited to see all of your projects into
the project gallery. And I hope that you've
got to learn something new and creative from
this particular painting. Now, let us move towards
the next painting.
8. Isometric Sunflower: Hey everybody, you
are most welcome to the last painting which is
an isometric sunflower. Now let us start with a
basic sketch as usual. So this is going to
be assigned lab. I'm having a little
bit of 3D effect, which is basically
known as isometric. Same starting with some
petals on the front area. First, you just have to observe the movement of my pencil and
try to make a rough sketch. No need to hurry at all. Droid slowly and carefully. Now, the center part of the sunflower is going
to be a little bit of semicircular shape
that I have drawn above the petals that we have
done on the bottom part. Now, add few more petals above these semicircular
shape that we have drawn. I hope that you've got an idea. No need to worry
if you're not able to draw it in forest at them. Take your time Android slowly. Now let me add a little
bit of stem also. I've added a thin stem just
on the bottom portion. Now the watercolors that
you will need is gambit. Lemon yellow,
ultramarine, deep green, sap green, black, and white. So these are the
watercolors that you will need for this
particular painting. Now let us paint the center
part of this and Clavel, I'm using my size 0 brush. In case you're not
having a quill brush, you can use a round
brush as well. So what we're going to do is
that we are going to apply a thin coat of water on the
center part of the sunflower. Makes sure that you
do not apply water in the petal area because that will definitely
spoil your painting. Use the tip of your brush to paint in
the difficult areas. Now once you are done applying
a thin coat of water, we are going to
take darker values of black in the brush and just simply dab it in the area that we
have applied water. And you can already see how beautiful the blend is looking. So this is basically known
as a wet on wet technique. No need to hurry at all. Use the tip of your
brush to paint in the difficult areas and apply the solid patch of
black color carefully. You can see I'm
leaving the petal area very carefully and painting the black portion using
the tip of my brush. So we are almost done
painting the black part. And you can see how
beautiful it is looking. Now, let us paint
the petal areas. But before painting
the petal areas, let me paint the little
leaves that are always behind the sunflower and the stem also with
the black color. So you use the tip
of your brush to paint this thin line
till the bottom part. Chicken, observe the
movement of my brush. I have left some white
space in-between. Awesome. Now I'm cleaning my brush
and we're going to take the combination of gamboge
and lemon yellow together. In case you are not able
to blend mode the colors nicely use a little bit
of water in-between. Now can see how beautiful
the combination is looking. Now we are going to paint
the petals one-by-one. Be very much careful
and do it very slowly because we do not
want to spoil the painting. I'm trying to paint the petal
from the left portion fast. You can add a little bit of
water into the color to apply your color and more smooth
way on your watercolor paper. Now what you can do is to add some more details
into the petals. You can just take the
tip of your brush a little bit towards the black portion
that we have painted. You can see how beautiful
the combination looks and it will give a nice natural effect
to the petals. Now simply we have to just
repeat the same process, painting all the petals. You can observe the
movement of my brush. Also, do not forget to add the tip of your brush
into the black portion. Not that much, but a little bit so that you can
give it some depth. And the friends
between the petals. In case you are painting
with me and you'll find me painting a
little bit faster. You can simply just slow down the video.
There's an option below. One more thing I would
like to tell you that if you are using watercolors
for the first time, no need to worry at all. Abstract paintings
are generally very much random and draft in nature. So don't worry about perfection. Just follow the
process and enjoy it. Now I'm painting the petals that are on the bottom portion. And we are done with
the last petal also. We are done with the
dice and flavor. Now, let us move
towards the background. So initially what
we're going to do is that I'm using my quill brush of size two and I have taken
some darker values of sap, green and green together. You can just observe
the color palette. Make sure that you
mix the color as well and add a little
bit of water in it. We want more saturated color
in between the petals. So that's why I'm using the
darker values of the colors. Now you can observe the
movement of my brush. I'm just moving it towards the outer area and use
the tip of your brush. Or in case you do not have a
quill brush around rush to fill in the gap in
between the petals. Do it very slowly and
with a calm hand. No need to hurry at all. Make sure that your
background color doesn't go inside the petal. That would spoil
yours and clever. Now once we have applied
darker values of green, I'm taking some water
and my quill brush and just trying to blend
it with the background. Now you can observe
how beautiful the gradient is looking. You can observe how beautiful
the pattern is looking. That is, darker
values of colors, neon the petals, basically
the entire sunflower. And the color is getting lighter as they move towards
the outer portion. Now, I have taken
ultramarine and my quill brush and I'm adding the darker values
near the petals. Then you have to take some water and blend it with
the background. You're going to absolve. I'm just dabbing my brush and blending it with
the watercolor paper. In case you find this
difficult to paint, what you can do is just
take a simple rough paper. You're practicing book. And you can practice
this on that first and then you can come
towards your final painting. Now, again, we are taking some combination of sap green
and dark green together, blending it with ultramarine. The darker values are applied on the bottom portion
of this and blah. I'm not taking the
color into the stem just a little bit on
the bottom portion. Now, let us take some
more ultramarine and painted towards
the left area. You can observe that I'm moving my brush in a random way only, but with a little bit of attention that it doesn't
go inside the sunflower. There isn't any particular
way of doing this. You just have to tap your
brush in a random manner. Only. Now we are almost done
with the entire background. The top-left corner is left. So let us add some
ultramarine and sap green and green on
the top portion first. Now I'll just simply blend
it with the background. We are almost done with
the entire background. And the combination
of ultramarine and green together
looks really amazing. You can see the contrast between the sunflower and the
background as well. Now let us make it a
little bit more abstract by adding these splatter effect. I have just taken some
ultramarine and my quill brush. And you can add some
water so that you can get these droplets
on your painting. Tap your finger, or use another brush to tap it
on your brush with color. Make sure that you splatter these dots and then
optimum amount. We don't want to create a mess. I'm just tapping it and we are done with the
entire painting. So you can see how
beautiful these dots looks in the sunflower
and the background. Now we will be removing
the side Tape. Be very much careful
while removing this item. This is the most
satisfactory part of the entire painting. You can see how beautiful the side edge looks
when you remove this. I tried to remove the tape and an angle so that you do not end up tearing your
watercolor paper. Now let me remove the tape from the bottom and the
top part as well. I hope that you got to
learn something new and creative from this
particular painting as well. I would be really excited to see all of your projects into
the project gallery. Let me take you a
little bit closer so that you can
observe the details. You can see how beautiful this
abstract sunflower and an isometric form looks with this amazing
abstract background. I hope that you
enjoy painting this.
9. Class Conclusion: Creating vibrant and
abstract painting is always going to be a fun part for you all because you do not have to
worry about perfection. And if I have to
talk about florals, this is a subject
that you are going to fall in love with
once you start. I'm very happy to share
this class with all of you in case you have immense love for art
and passionate about it. I would like to suggest
to you that practice on a regular basis that would take you towards the next level. I'm very, very excited to see all of your projects into
the project gallery. In case you have any doubts or questions related to the class, feel free to ask them in
the discussion section. I hope that you got to
learn something new and creative from this
particular class. You can let me know
in the reviews. Thank you so much for
joining this class. Keep practising and
happy painting.
 Rutvik Patel, Artist and Instructor