Transcripts
1. Intro Abstract Geometric Textural Art in Procreate: Hi guys and welcome. My name is Dolores Nas print and I'm coming to you from sunny, Manitoba, Canada. So today's class that I'm bringing you is on creating geometric and textural abstracts. As you may or may not know. I've spent a lot of years working on abstract art and selling through POD sites. Clients I have dealt with includes studio L, Patton, PI creative, I Canvas, metaphors and a few more that I can't remember off the top of my head. I'm going to walk you through my methodology and I'm gonna make it as easy as possible for you by using Procreate brushes that I will supply. That way you can get started on this right away. And in the most efficient way possible. Throughout the class, I'm going to be teaching you the elements of art and design. And we're going to talk about what makes a composition really work. We're going to start by laying down some basic shapes, adding some textural interests and some accents. And then you get to see me finish it off in the way that I do when I'm creating a collection. I hope this sounds interesting to you. Now if you haven't done so already, make sure you hit that follow button up there. That way you'll be informed of any new classes as I post them and anything else that I send out in the way of information. If you want to take the time to add your name to find mailing list on my website. It's at shop dot Delors aren't got CA and that way you'll get any of the mailings that I send out from there as well, including sales on artists resources. Have you always wondered about abstract art and what makes it work? Well then this class is for you. Let's get started.
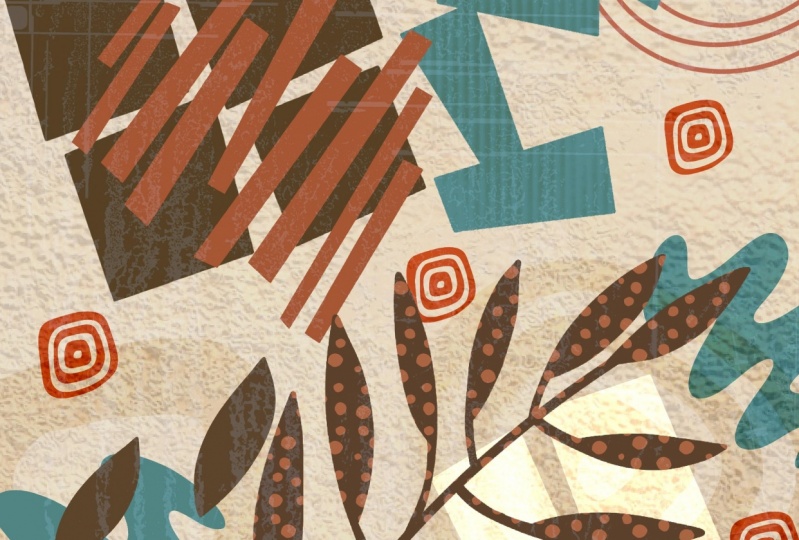
2. Ideas to Spark Creativity: Hi guys, welcome to lesson 1. And less than one here we're just going to take a look at some inspiration. Let's get started. I wanted to show you my inspiration for this project. This is something that I would do with my students quite frequently. In fact, in the four-year continuum that we had, I would do geometric abstracts in each of the years. So students really got to work a lot with geometric shapes. And the reason I did that was to really break down the elements of art and the elements of design. The elements of art would be probably heard of these before. Anyways, they're not just for abstract paintings are basically universal. And those elements would be things like shape, line and color than value in contrast, and texture and form. And these are all things that we'll be covering in today's class. So looking at my thesis work, you can see that he did use a lot of geometric shapes and especially in his later years because he had really bad arthritis or pain in his hands that prevented him from painting like you'd done earlier in his career. And he broke things down into really simple geometric shapes that he could cut. And so a lot of his work was cut to paper. And so that's a project that I really enjoyed doing with my students and it really helped them to break down that whole idea of composition and things like balance and contrast, focus, movement, pattern and proportion, and rhythm and unity. So those were the five, Well, no, actually six or seven had pink principles of design. So between those two things that I just mentioned, the elements of art and then the elements of composition. We can learn pretty much everything about those things in today's class. So I'm going to be trying to mention that as we go through now looking at the work that you see here, the colors are not necessarily what's really, I would consider salable right now. So let's take a look at a couple of inspirational things that I'm actually going to be covering in my trend forecasting class that's coming up. I usually do my trend forecasting in December when the Pantone color of the year is announced. So I've been compiling information, but I haven't got that together yet. So here's just another look at sort of general abstract design that you see out there. You can check it out in all different mediums. And I think we're starting to get a little bit more modern. Now, one of the places I go often when I'm trying to get inspired is this PIE creative. This is one of the publishers of that I sell through. Now, you can go through this site and find a lot of beautiful geometric work. And what you'll see here are really contemporary colors. So these are colors that you should be working with if you're considering selling in today's marketplace, these are things to consider. One of my favorite artists, tom Reeves, you'll see a lot of his work here and you can see how different the artwork can be, even if it is just incorporating different shapes. Now there's hundreds of pages here, a hundreds of artworks. So you could spend quite a bit of time here just kind of researching. And of course, these will be catalogs by color and bye compositional type by style. But you'd see that the common denominator through all of these is the color scheme. So, you know, checkout these color schemes and start thinking about doing a collection and creating at least five pieces that work together nicely. This is a really good example here. These five, these colors weren't great. The geometrics work well together. You can see these hanging together in a house or in each room of a hotel, or along the hallways of a large institution. So this is the kinda thing that is good to do for your research. Now if you're just starting to delve into POD art, selling large canvases and whatnot. I would suggest you go to one of the main POD sites and that's societies six POD sites like Society 6 red bubble. These are all good places to check out to find current inspiration pieces that have really modern and current color schemes. This is a page I went to take a look at for inspiration on the work that we're gonna do today. So we're going to be doing this kind of a piece where we've got geometric shapes, subtle colors, and a couple of leaf accents. So we're going to be creating those compositions and we're going to talk about that extensively through class. I definitely recommend that you go through and do a little bit of this research work before you start. So watch the class, go, take a look at some inspiration and then see what you can come up with. And I'd love to see a post your work. These are fairly simple projects that you could probably complete quickly, especially using the brushes that I've given you. So see what you can put together. I'd love to see everyone use the brushes and then see how differently we all create our pieces. Alright, so let's meet in that first lesson where we're going to get started.
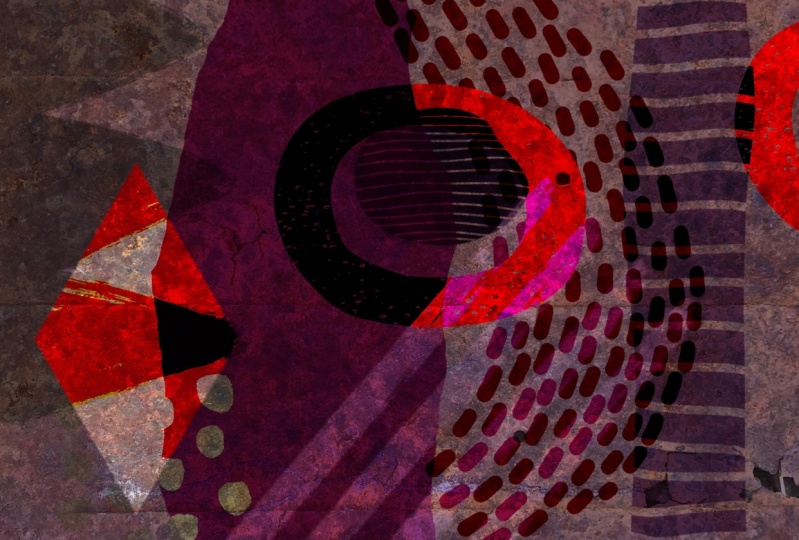
3. Brush Making and Layout Methodology: Hi guys, welcome to Lesson 2. In Lesson 2 here I want to talk about basic composition and we're going to take a look at creating a couple of quick brushes that we can use in class. Let's get started. So first I want to just take a look at a couple of the projects that I've done with this technique. So let's first take a look at this one here. What I want to point out here are a few different things. First of all, the composition and its, while it looks really simple, there's a lot of things going on here that I want to point out. I'm trying to cover all of the different elements of art. So I've got things like really interesting shapes going on. I've got lines. So when I talk about line, I'm not necessarily talking about just a single line. I'm talking about the lines that are formed within the arch as I compose it, then I've got different values. So when you look at this, you can see everything from really dark to light. So that's something I like to incorporate into every abstract art piece that I do. And at the same time I'm also working on contrast. So I've got some really dark against some really light backgrounds or other shapes that are really late. And then of course I've incorporated a lot of texture. So we'll talk about that as we go through class. And then overall, the form is something that we'll talk about as well. So when I talk about form, I'm talking about the areas, Let's see that are around the motif. So we would have what's called whitespace. Even if it's not necessarily white, There's definitely spaces between the artwork. And yet when you look at all of this and you think about the composition, it all works really cohesively. So we've got really great balance. Like I said, we have contrast. There's a lot of movement in here, so we've got a lot of lines pointing to. Things are lines leading your eye, everything forums, a pattern overall. So if you were to squint your eyes are looking at this from far away, you would definitely see a really nice sort of rhythm to the pattern. And of course, I've really worked hard at getting the proportion of all of my elements to work together. Of course, all of this and the way that I've composed everything makes it all look really unified. So those were things that you're going to be looking at, are looking for as you work through imposing something like this. One of the things I find really useful to think about, or just half of the back of your mind is working in sort of an odd numbers or contrasts, shape and size. For example, when I look at this, the main geometric elements that I see right off the bat are these here, the three main ones? This one here now I find as well, I've laid it out in such a way that there's no sort of straight lines being formed. Now I find also that the overlapping of the elements and working with the different values has unified the piece as well. So these are all things to work towards as you're composing this, I created a brush that has a ton of different geometric shapes that I can use really quickly. Of course, you could go in and just manually draw these things. It's very simple. A lot of these shapes can be drawn really quickly. Even though I have the brushes, There's times when I will draw a shape to just make everything work well. So don't feel that you're limited to the brushes that are here. I just find that this is a really good starting point because you can lay down some really nice shapes right away and get started with your composition of a thing. Also to note about the brushes is that even though you're working with a brush set, you can use them differently every time. So I may have the same elements, two different paintings, but because I've arranged them differently or colored them differently, or used a different blending mode, I can really make the paintings looked different. I've got two with this tile. I'll work towards having five that I can submit for art licensing. And I want to really encourage you at this point to really start thinking about VOD sales and how this might work for you. I had a great question from a student recently as to whether she was ready or not to start selling her art by POD? There's really no simple answer to that. I would say that the best thing to do to start and keep in mind everything that I mentioned in these courses about POD. And I think that's really important to work in collections. So I showed you that work on AI creative. There were specific artists. Of course, I really love like tom Reeves. If you looked at a specific style of Toms, you would see that he had five or more pieces in that particular style that could work together. So that's something to work towards as well. So if you are going to pose to POD, don't just post one piece. Make sure you post, I would say at the minimum, three or four that go together. I like doing five. That's what I generally submits. And we've done other classes. Abstract art. And whenever we do wind, I always show you several pieces that I have created in a particular look. So keep that in mind as you are creating your abstract piece for this class and try to work towards that goal. Now I'd really love to see you get your feet wet by posting here so you could create one or two pieces. I would say try to do too and use a really common color scheme. Create your abstract and then posted here. That way I can give you some feedback. And I think if you really helpful to other students, looking at the class to see as you work, how you plan on creating collections. All right, in the next lesson, what we'll do is we're going to start our composition. I'm going to do a third one for this series. I'll talk about the brushes and some of the different things that I've done to create the brushes and add interests. As far as creating the brushes, you've created so many brushes with me, generally, what I would do is create a 10 by 10 document. And here in my document you see all the different brush shapes that I've created. So for this brush set, it was actually quite easy because I just added a layer, fill it with white. They went for the Black, Pete. And I just use the monoline that's going to refund here. Yeah, I am in recent. Okay. So I just use the Posca paint marker, which is basically a monoline. You can find that your calligraphy stats. I said it actually quite small and then I went through and drew my shapes. So let's just quickly draw a shape in order to draw a straight line. You just pull and hold. I went through and did that. Try to be sure that you close the corners? I see a corner that haven't closed, so I'm going to have to go back when you do have the line straight. By holding it down, you can also move it around. So that's a good way to create interesting shapes here. So just pull straight lines, fill your shape. That little open area here. So I've got to fix that first. We have another one. When you are dragging in, you can also pull back and you can see the color dropped threshold settings. Now you want to make it high enough so that you're filling, you're not getting those little slivers of color along the edge. So you want to go as far as it takes to get rid of that. But not so far that it ends up filling your entire image to make any corrections like that little corner there, what I would do is sample my whites up nice and large. So I'm not using the eraser. It's important that you don't use the eraser if you've already made your white background, I guess have had worked larger. I probably could have prevented this from happening, but it's very easy. A tap to get my block again. You can go really small to fix something like this. And basically I've got my shape there. So as soon as I have the shape and I know that the white is filling the whole background. Maybe in this case, I'll just enlarge it slightly so that it seems more centered in the space. Now, you see this little area here. I have erased there somehow. So I guess at 1, I inadvertently switch to the eraser and that happens to be a lot because when I double-tap, you see how it switches. And I guess I must have a nervous habit of doing that. In order to fix the problem, I'm going to add a layer underneath, fill it with white, pinch those two together. And now I know that it completely. So then I would copy, go into my abstract shapes. Now I know that I've got the settings here the way I want them. So I will just duplicate one of these. And actually, rather than duplicate the window. And I will duplicate the w because I can have this w as well as far as the labeling. So I'm pretty lazy when it comes to labeling. So let's duplicate this one. We're going to go into this one. I'm going to change this to W2. It doesn't go into Shape. Edit, Import, paste, and hit Done. And now I've got another brush. So these are stamp brushes. I don't think you really ever want to use them as anything else, but I'd be the way I've got this set up, it will make kind of a scatter brush. I would suggest that when you get my brush set loaded, just duplicate one of them and dropping your shape like I did in your settings will be perfect. So now I've got this. Let's add a layer here so I can just show you, I'm going to fill it with white so it hides everything underneath. And let's sample some black here. And you can see that my shape works perfectly. So that's the way I did the brushes. Now you know that and you've got kind of an overview of what we're going to be doing. So in the next lesson, let's start composing our actual abstract art. I'll see you there.
4. Lesson 3 Starting the Composition: Hi guys, welcome to lesson 3. In lesson 3 here we're going to get started on that composition.
5. Lesson 4 Using Blending Modes: Hi guys, welcome to lesson 4. And less than 4 here we're going to add a background. And then we're going to really take a look at those blending modes to see how that can really enhance our luck. Let's get started. So one of the first things I want to do here in this lesson is to add a background because I don't think we can really proceed with this until we do have a background. So let's go in and add a layer. We'll pull that, we're down to the bottom. And I'm going to fill it with a color that I used for the other compositions, which was this color here, I really wish you could drag break from the palette, but that's the best I can do here. So let's take a look at those other ones and you know what, It wasn't the color I use, I don't think so. Let's go to that background. I'm going to sample it and go back. No, drag that palette out again. So the color unused isn't even part of this particular palette. I must have changed my mind halfway through, but that's okay. We'll do that right now. So we've got that color and I do like this color better because it's off to the complementary to the oranges. And sort of I have here. So that's, I think, a really good beginning. Now that we have that we can start thinking about blending modes and how we want to work all of this, I know we're going to add other motifs, but for now let's just go through and do some blending. So I'm thinking that maybe what would be good would be to have one of these as a reference. So let's save this one out as a JPEG. So I'm sharing it here as a JPEG. I'm going to save the image. So that'll go into my photos. So let's go back into our document here. And of course go into Canvas, Reference, import the image. And now we've got this here to refer to as well. So we're starting to run out of real estate here and I'll put that in here quite small. And you notice there that I just doubled tapped on it and then it fit into the window. I'm gonna get that pellet back somehow that got moved out of there. So let's bring that here. And I'm thinking I might have opened up the wrong palette here because I remember now that I had heal in that palette as well. So in a peruse my palettes here, this looks more like it. So I'm going to make that might default and pull it over here. And I think that looks a little bit more in keeping with what I've got there. I could also sample the colors for me here. Well, I could sample by holding down my finger on the reference image, and then I could take that and use it to drop into one of my motifs if I want to change one. So I think I'm going to change this one. And now it looks more like this color scheme. So the main thing I wanted to show you in this particular lesson was how the blending bullets can be used to really help unify the piece. And I don't just make it so that all of these pieces aren't competing so much with each other. So you pretty much have to go in and experiment. There's no true way of just knowing what works and what doesn't. So I just usually get onto the layer that I want and then just cycle through until I find something that I like. And this is a strong piece. I'm trying to decide whether I want that to be the sort of main piece, whether I want that to be more important than this one. And that's something I have to consider as I go through this. So if I wanted it to be the more prominent piece that I would probably leave it at normal. I would bring this one. Actually, I won't bring it down because I think what I'll do is I'll mess around with the blending modes on this 1 first just to see if there's something that I like as I cycle through. So remember that once you pick your blending mode, you can also go in and adjust your opacity. So I kinda like that. I like it for a couple of reasons. That it's made it a little bit more subtle. So it's not screaming in competition with this one. I'm thinking I do want to move that one up now. And then this one, I might also consider reducing the opacity a little bit just to get it to blend a little bit and I like that. So let's take a look at some of these other ones. I think this one we could change. You know, you have a reduced amount of real estate on my screen here. So at some point I'll probably close a lot of these two just allow me to have a bigger image here. So as I'm doing this, one of the things I'm keeping in mind is my color scheme because I don't want to really move too far off of that color scheme I have there. So I actually like this so far because it's still giving me this blending and yet the color stays the same. So I think I'm going to leave that one for now. This one here, Let's take a look at what could work for that. So if you find a blending mode that you like, but the color isn't right, then you can definitely go in and make adjustments with the hue and saturation. Now this one I like because it really ties in well with this. So you can see here at this point, I'm going to actually turn that palette off for now so I can enlarge my image. I'll move my reference up here. I can fit this to Canvas and then just maybe move it here. So I haven't a lot bigger. And so we're starting to get a really nice unified look here. But I see that what I need is a little bit more happening as far as, I guess you'd say texture. So like how this piece really gives texture and adds to the balance. So let's take a look at some of the brushes we have here and see if there's anything that could work for that. So that was this one that I had at the background of the other piece. So I could use it as well. I can use it again and just change it, change the position, and maybe change the color of it. Or I could create another one like it. That's always something that you can do and you can do pretty quickly on the fly. So consider that. I'm just going to use this one for now and we'll see how it works. So I'm going to pick a dark color because I know I'm going to probably use a blending mode here. So let's add a layer. I may end up moving it down, but we'll see, and let's check out the blending modes. So that's another thing that could make it different is that I use a different blending mode than the one I have here. So what I'm trying to do is add a little bit of subtle texture there. So I think I used one of these late screen or lightened. So let's go into screen and I'm going to order the hue and saturation, and I'm going to move it around. So I probably should have colored it like a rust color. That's probably what I've changed it to here. I can saturate it and I can brighten it or make it more subtle. Now we can enlarge it and decide how we want this one to work. So it might be too much if it's blending above all those layers because then it changes the look of these layers. So I'm going to move it down. I like that better, but I'm not sure about it now. We'll see, I might leave it, I might end up changing it. Notice how just changing the position or rotation does make it look quite different from this one here. Now, this one is one of the few that we haven't played with when we think about just changing the position there, I find it little bit too pink. It's not really working with this. So let's go into hue and saturation and make some adjustments. So maybe just desaturating it. And I do like that better. So we've done quite a bit in this lesson as far as rearranging items and we're getting there, I think it's starting to look like a good composition. So let's meet in the next lesson where we're going to just tie up some loose ends here, make it look a little bit better and think about adding some of this texture that's really going to unify the whole look. Alright. So I'll meet you in that next lesson.
6. Lesson 5 Adding Texture and Working with Clipping Masks: Hey guys, welcome to lesson 5. This isn't a lesson in which we're going to add some texture. And we're going to do that by using clipping mask. And we'll talk a little bit about Alpha Lock and why you may not want to use that in this case. Let's get started. Now, I know a lot of you have received from me the texture sampler or the texture full-stack. If you bought that, you'll have a ton of textures here. These textures, most of them are, many of them were made just using some of the resident procreate grains. So something like this. If you went in grain and you edited, you could go in and go into the source library and just change it for any other grains. So if you don't like the ones that I've given you, you can replace them and create your own. I think this one is recycled. That's when I really like so I've used that with a lot, and especially with my watercolors and stuff. So it adds a lot of really nice textures. So that's the one I'm going to use to create sort of an overall texture that you see on the other ones. So if you look really closely here in the background, you can see those filaments. So I think for now, I'm going to add a new layer at the top. I believe I used a really dark teal color, so let's go grab that and we're just going to paint it solidly over the whole thing. I don't like the way that looks. So of course what I've done is gone in and done a Linear Burn. So that's what I used for a lot of these blends. And I'm going to reduce the opacity. So I don't want it to be this texture. So I'm finding that I go about halfway down, maybe a little bit lower. So 40% is what I've got this one currently set up. So that's added overall texture to everything. So I really like that. Now personally looking at this, I think I really need something up here in this corner. And I might just repeat this one. If I was actually doing this right now in real life, I would probably create another brush similar to this. Actually, let's use this one that might make it different enough. And let's add a layer going to go to one of the really dark colors. Maybe let's try this. It looks purple here. We could move this a little bit more into the heels by dragging this. And we'll add this. I'm going to just stamp it in the middle for now. Then I'm going to experiment with the positioning. So this one doesn't have to look like a U, like this were a rainbow. It can be cropped, right? You kinda like this. I think I'm going to duplicate this. You'll see why in a minute. Remove one over here for now. And like I said, I'd probably take the time at this point to create a couple of other ones, but I won't do that on, on camera. That will waste a bit of time. And let's just move these around till we feel like we've got a really nice composition. And I think that really helps fill out this corner here. And I think what we used on this one, but we have nothing here. What do we use on the US exclusion on the windows and that gave us that kind of a Finnish. Not sure if that's going to work, but let's cycle through a few of these. And I think maybe what we need to do is pull this down underneath this circle to get any sort of difference here. And we're still not really getting anything because of the blending mode of the circle. Right now we've been around vivid light. So we could go back in and experiment a little bit with that too to see if we can get anything interesting happening in here so that one works. But the color is absolutely terrible for this particular composition. So we'd have to go into hue and saturation here and try to adjust this one to be a little bit more in keeping with the layout that we have. So I think we had it been more of a peachy tone. So it's a little bit crazy the way it changes the color when it is blended already. So because it's got this dark and blending mode, what you would normally think that you could do for humans saturation to change. It is not really working here though. It's not really changing the color of the way I want. So I'm going to go back to this. I'm going to leave that for now. We may be able to change that later on if we feel it's necessary. So now with this other one, I'm thinking that maybe we can just have a little bit of a corner of it sticking out here somewhere. And I've talked about this before, but I do like working in odd numbers when it comes to doing a composition. And I think I've mentioned it in all kinds of different classes. So it's not necessarily just for abstracts, so I don't mind that I think I will leave that the other one I was thinking I was maybe one of the other outlined leaves, so I might end up taking one of these away. Let's try turning this one off for now, adding a layer and then using those leaves up here instead. So that could kinda work, and it does work nicely with blending mode on this square. Now of course, as soon as I put in an element like this, I have to look at the composition of the other elements to see if they work. And I think now this one would have to be flipped. So a lot of this just relies on your judgment. The best way to create good judgment on this kinda stuff is to do a lot of research. So look at other works. You can read up about composition and design of abstract art pieces. I'll try to find a couple of really good links for you and add them to the course materials so that you get a little bit of homework. To learn a little bit more. I'm starting to really like some movement on this. I think it's really working nicely and I think it's a good time now to start adding some of the textures. So what I did with these now you can do it as a clipping mask, so it does seem to destroy your piece or you can do it by just using the alpha lock. So let's say on these windows is one called window. I use alpha lock and go into my textures. One that I really like using this brush concrete and I've used here you can see in the background. And what I did is mainly sampled the color that was there when a tiny bit darker and then introduce it in. So it's subtle. You can see there that it's quite subtle. And because it is already blended layer, the color that I choose here is not necessarily the color that I see with the texture. So that's one thing to keep in mind too, about using the Alpha Lock is that you may not truly get the color that you choose here. So in a case like this, I'm going to undo that and I'm going to add a layer above this. I'm going to define it as a clipping mask. So it's only going to affect this image. And now let's try putting that texture on. So again, it's giving that funny colors. So that looks like kind of a gray color. I'm going to go really the opposite on the color wheel, which would be an orangey. Let's see if we do it darker and now I think I like that better. So can you see that it's a little bit more in keeping with the color scheme that we have going on. Now the good thing about a clipping mask is you can turn it off if you want to. You can delete it if you want to, but your shape below stays intact. So I think that's what I'm going to use for most of these until I run out of layers anyways. So I'm gonna add a clipping mask on this one, and I'm gonna see if that color works okay on that as well. And it's not bad that one's on this particular blending modes that we had with the color is coming out pretty much like we see it here. So why don't we on this one, try more of a similar color. So I'm going to kill quite a bit more. She'll, I'm going to try actually lighter and see how that looks. So I do like that. You see, so that looks good already. You know, I'm really liking this piece. It's not even that far off from being done. So let's think about this piece here. And I think I wanted to try a different texture on it. So I'm going to add a layer, define it as a clipping mask. You see when it's a clipping mask, it has this little arrow and that means it's only affecting the layer directly below it. And I want to try this one here. So this is a big texturizing dry brush that I created in another class. And let's check that blending mode on that. So that's Lighten. I'm not sure. A so that color isn't going to work. It looks like it's almost color that we can use. And it's really brightening whatever color I put here. So I'm going to go darker. And I think that looks really good. That was just some little experiment to see if the colour was going to be okay, so that's almost exactly the color that's there. You can barely see it. So let's go a little bit later and you see how we get then a really nice bright effect. Now with a clipping mask, you can also experiment with blends. So depending on how textural you really want it to look, That's something to play around with the kind of like that one. So I'm just going to reduce the opacity on that. And yeah, I'm really liking it. I feel like we're lacking in this colors here. So I might just take one of these, like this one, move it up. And you see here I just slid it in-between an image layer and a clipping mask. So it created a clipping mask to make it normal again, just click off clipping mask there. Now with this one, I think what I need to do is increase the saturation on it so that it's closer to that. I'm reducing the brightness on that too. And I think it's saturated more than just make a slight adjustment here to get it to be more of that color. So yeah, I think we're well on our way to having a really nice finished compositions. So let's meet in the next lesson where we're going to try to finalize this one and see if there's anything else we can do to really make it work with the collection. All right. So I'll see you there.
7. Lesson 6 Perfecting the Layout: Hi guys, welcome to lesson six. Less than six here is all about perfecting the layout or the FLSA, we should have something that reasonably resembles a finished abstract art piece. I sure hope so anyways, let's get started. So one of the things I do at this stage usually is to check how it works with the rest of the collection. I'm actually going to close that reference off now and I'm going to show you a trick that I use. I go back into my gallery here and then I just two fingers to enlarge or open one of the documents. You can't do any editing here. This is just simply a way to scroll through what you've got. So looking at this one and looking at this one, those are my 2 first pieces here for my collection. Then when I moved to this one here, I'm seeing a lot less contrast. I think we're missing one of these sort of focal point. So a focus piece. And we just don't really have a lot of values here. So it's really important to assess your piece at the end and decide whether it's working with the rest of them. And even here, quick last of them. You can see, oops, you can see how dull this one looks in comparison to these. So this is a lesson where I'm going to do a few finishing touches. It may end up not even being my super finished piece because I always end up going back and doing adjustments once I have my five pieces or whatever it is I'm doing, I'm going to open up that one that we're working on and let's add one of these firms now, I would never use all of the same ferns for a collection. So what I would do here is maybe go into my ferns and see if there's anything else that kinda works with that one that we had. So this one I think will be really similar. So I think we're going to use that one. We're going to go into a really, really dark teal. And let's just add a layer and you can decide whether you want it above or below the texture. Let's look back at this other one and see what we did here or what I did here. So yes, I did add it below. I'm going to actually copy this texture layer because it's a little different, I think, in color than my one I have going on in here and I'm going to paste it in and then delete this one, go to Linear Burn and just reduce it down. I don't know. It was really close but I just felt like it wasn't quite the same. So I'm going to add a layer here. I've got that brush selected, and I'm going to for now just stamp it here in the middle. I can enlarge it and think about the positioning. And sometimes when I do this, honestly everything else has to change. So don't feel bad if it does. And I think that I've got way too much going on in here, so that's something that I definitely address now, also that the other documents were more of a black, so I'm bringing that brightness down so that it is a black. And then let's start thinking about moving some of these pieces around and make it now work with the ferns. So I'm wanting to reduce the business here. So I'm going to move this one out a little bit. And I'm going to take a look at darkening that a bit in a way that's how you know whether you've done your job as far as the composition is that if you add another piece to it, throw everything out honestly, because the other piece then becomes part of the equation that you should have been working on in the first place. So I mistake was in not having that as part of it when I was doing his compositional bits. So now I have to change things around. Which is, you know, for me, I think the fun part like solving a puzzle are saying. So this is the kinda thing that if you do rough sketches before you start, you can do a lot of this testing. And a lot of times it does save you time in the long run. So I would never suggest that it's not a good idea to do this. It is a really good idea to do sketches. I just like working in here. And to me, this is part of the fun, is solving the puzzle in here. I actually really like that white in there, but it's not how I've got my other pieces. So you can subtract might be a good blend mode for that one. My favorite so far, so I'm going to leave it there and I think I'm gonna do the same thing with this piece here. Or I will eliminated completely and repeat this element. That's another way to really unify a piece is to repeat some elements. Doesn't have to be a lot of it's showing that we can have that going on over here. And I always tried to avoid having something like this right in the very center. So keep that in mind. I'll get off to the side a little bit, always works better. Now I could have actually brushed those motifs on. Duplicating them worked as well. And much more quickly, I could put them all on the same layer now. And then think about my sizing and position. So I duplicated that layer just in case rather than destroying it completely. But I was wanting to play around with these blending modes a little bit here. Quite like that color screen is nice. My favorite ones color here. And that's really subtle, but I think it's really added some interests. So this one again, and that really adds sort of a form of texture as well. So I'm going to duplicate it again. I think I see where I may want to use it as well. Just have a couple of them peeking out, don't hear anything. I'm an add one more fern kinda thing in behind here. So I'm going to add a new layer. Not sure what color I want it. I'm thinking appeal. And I'm going to reduce the opacity of that quite a bit that I liked. So that really helps fill in this space here. I think we can move this back that way a bit. So sometimes it's a really good idea to take a break and take a look at maybe the originals in the series to see how everything looks together. I can look at this and I can tell you right now, I'm not happy with this one in comparison to these one of the things I'm seeing as soon as I look at it in this size is how busy it looks. There's just way too much going on. So off-camera, I decided to create a couple of other brushes that I could use. I want to take away this fern here because I don't think it works with the ones that are in the other two that I've done in this series. So I'm gonna delete that and I'm going to work on simplifying this. So let me take a look at that reference again, so we'll call that backup. And yeah, I think what I wanna do definitely simplify. I'm gonna take that for an out. His firm is a goner, the one I just took out. So this one here, let's get that out of there. And I am having second thoughts about these leaves after all that. So let's take those out and let's try working with this. So I created two more of those brushes. So similar to the first one, just kinda differently outside the leaves. I'm not sure which ones I'll use, but let's just start with this one here and we'll make a new layer, stamp it in black. Now that ended up becoming a clipping mask because I put it where there was a clipping mask. If I pull it out from the in-between those two, then it becomes a regular layer again. And I'm going to make my brush nice and big. There we go. Talk what overkill and I mean, that's really similar to that. So let's flip it and let's think about a different way of positioning it that might make it different enough from this one to make it obvious that it's not the same. And try that. And I'm going to actually make another layer and stamp that other one. So that would be this weird looking one. And remember if you need it bigger, go into your properties here and just increase her minimum and maximum size. Put that one over here. And now it looks like this one but a little bit different. So I think we're good with that. And now of course, we have to move everything else around. So with this over here, and I'm going to move it up so that it's not affected by those other clipping masks. And change it from being a clipping mask to a regular layer. And I'm deleting this one. Whoops, nope, delete, delete, duplicating that original gown so that I've got more leaves to play with. Now I'm not even sure that many of the use is necessary here. What this one does, this leaf thing is it kinda balances out that little bit of line art there so that I don't know if it's a 100 percent necessary. I'm going to leave it in for now. I still liked. So I don't know, I'm going to shut that one off for now. This one here, I'm going to just see if a bit better blending mode can be found. Subtract is nice because then it really brings it back to that color there. And let's just make it bigger. So that now kind of looks more like this one over here. The contrast on that clipping mask is not quite what I want now because I do want it to look as textural is it did bear. So maybe something like that works. And think about this window. What I like about this window, the way it is with a blending mode that it has is that it then brings in this greater orange, kinda like that. But I guess we can make it a little bit more subtle and we can move this a little bit. Now I've chopped up and up so many times, I'm just going to delete it or clear the layer. I'm going to grab that brush again, because it's exactly the same and I'm going to end up in almost the same position. I'm thinking maybe switching to something a little bit different that we haven't used. And I haven't used that one. I kind of like how nice and contrast D that cement texture is. I need to adjust the color of this one. To use the color of this as well. I'm going to try a different one here for a second and see how it looks. I'm going to clear this layer down to this one on there. Not one kinda works for me. I'm going to try removing that when temporarily and let's see, boat moving this one. I'm going to duplicate this one. Move it down here. Nope. So I think it's gonna take me just a tiny bit more work to get this done by. I'll come back to you in the last lesson and show you how this looks in completed form. Along with the other three are other two. So we'll have all three together and then we'll take a look at them on mockups and just have a little bit about the briefing, okay? As you see it here, it definitely is a whole process. You have to really be in the zone and you have to really think about how that works to be unified with the rest in the collection. It's not at all what I expected, but I'm getting a lot closer to considering this my final piece. All right, So let's meet in the wrap up and we'll take another look at how that all turned out. See you there.
8. Lesson 7 Conclusion, Mockup and Next Steps: Hey guys, welcome to the wrap-up. So in this wrap-up, I just wanted to show you a few mockups using this artwork. Now of course, I mainly use it for abstract art wall pieces, but I also use it for some POD items. If it's something that I haven't actually licensed through my agent, then is free game for any of the other kind of design work that I do. Let's take a look at a couple of mock-ups that use this artwork and you'll see that it looks great on just about any sort of peace. I really hope you've enjoyed this class today and if you haven't done so already, make sure you hit that follow button up there. Remember that's the only way to find out about my classes. As I released them, I tried to release a class every week. I may be taken a couple of weeks off around Christmas. But overall, I tried to keep a steady stream of new classes coming to you. I bought almost a 100 classes, so I want you to take some time to check those out as well. Believe me, everything you do works together to make you a better artist. I'd also like to invite you to check out my Pinterest sites. I've got one called the loris art dealers gastrin, and one at teacher Dillard's now sprint. And both of those have tons and tons of resources and information. I didn't even touch on that. But if you check out my artist's inspiration or art inspiration board, you'll see a ton of stuff. Just getting your mind going. If you want to check out some of my work, definitely look me up on some of those sites that I mentioned at the beginning. And also take the time to take a look at my Sawzall shop. I don't have as much of my abstract work there, but I definitely have all kinds of other stuff. And if you do have a site yourself, please share it here. I'd love to see your work. Remember if you have any questions or comments to lead them in the discussions area and if you do have time, can you leave me? See big C, little review. I love it when you talk about why do you do in class and how it has helped you. That really helps other students to decide whether the class is right for them and whether I'm right for them as a teacher, I'd love to hear what you say. So I guess that's it for now, and I will see you next time. Bye.
 Delores Naskrent, Creative Explorer