Transcripts
1. Class Introduction: There is an innovative
and new method of video editing that's been
introduced in recent years, and it's finally come
to Adobe Premiere Pro. It's called text based editing, and it has the
potential of saving you countless hours of
tedious editing. In this class, I'm going to show you step by step how to use it. Hi, my name is Scott Lou and I'm a video creator on Youtube. I've edited in Premiere
Pro for six years now and I have created
over 300 videos. And I'm not exaggerating
what I'm saying, that text based editing
can seriously transform the game of editing for you if you work with
dialogue very often. So what will you
learn in this class? Let me give you guys
a quick outline. First, you'll learn
about how to change and optimize some settings in order
to streamline the process for text based editing. Next, you'll learn how
to use the coolest and probably the best function in the text based editing tool kit, the delete pauses tool. I seriously think the function alone is worth checking
out and learning about. After that, you'll learn
all the basics and essentials of how to use the
main text base editing tool. I'll also discuss
a few techniques that I personally use
when working with it. From there we'll introduce an alternative method of using the text
based editing tool that'll be very
useful for those that tend to have more bad
takes than good takes. And to close things off, I'll walk you through a project of me using the text based editing
tool from start to finish. So who is this class for? Firstly, make sure you have the latest version of
Premiere Pro, downloaded. The features and tools that
I will be using are only available to Premiere
Pro 2024 and beyond, specifically version
24.1 and beyond. But other than that, you
actually don't really need to know much about how to
use Adobe Premiere Pro. If you want to use the
text based editing tools, all you really need
to know is how to open the program and
import some footage. So this class is definitely suitable for all
levels of editors. Of course, this
method of editing will only be useful for you if you're working with video that contains some
talking or dialogue. Which arguably that's probably the majority of
videos in existence. So I'm sure you'll find
some use out of it. The class project
will be to edit your first video using the
text based editing tool. There will be some
lesson assignments which serve as action steps that you can follow along
with to make sure that you're getting the
most out of this class. There's also a worksheet
available that outlines the class lessons
and class resources, so be sure to download that. Technology and software
are continuously improving and innovating on
how things can be achieved. For editing, that means tools
that help creators achieve their vision faster and with
less soul crushing tedium. This allows you to bring your
attention to the parts of video creation that
you actually feel passionate about and that
matter the most to you. So if you're ready
to learn about this game changing new tool, I'll see you in
the first lesson.
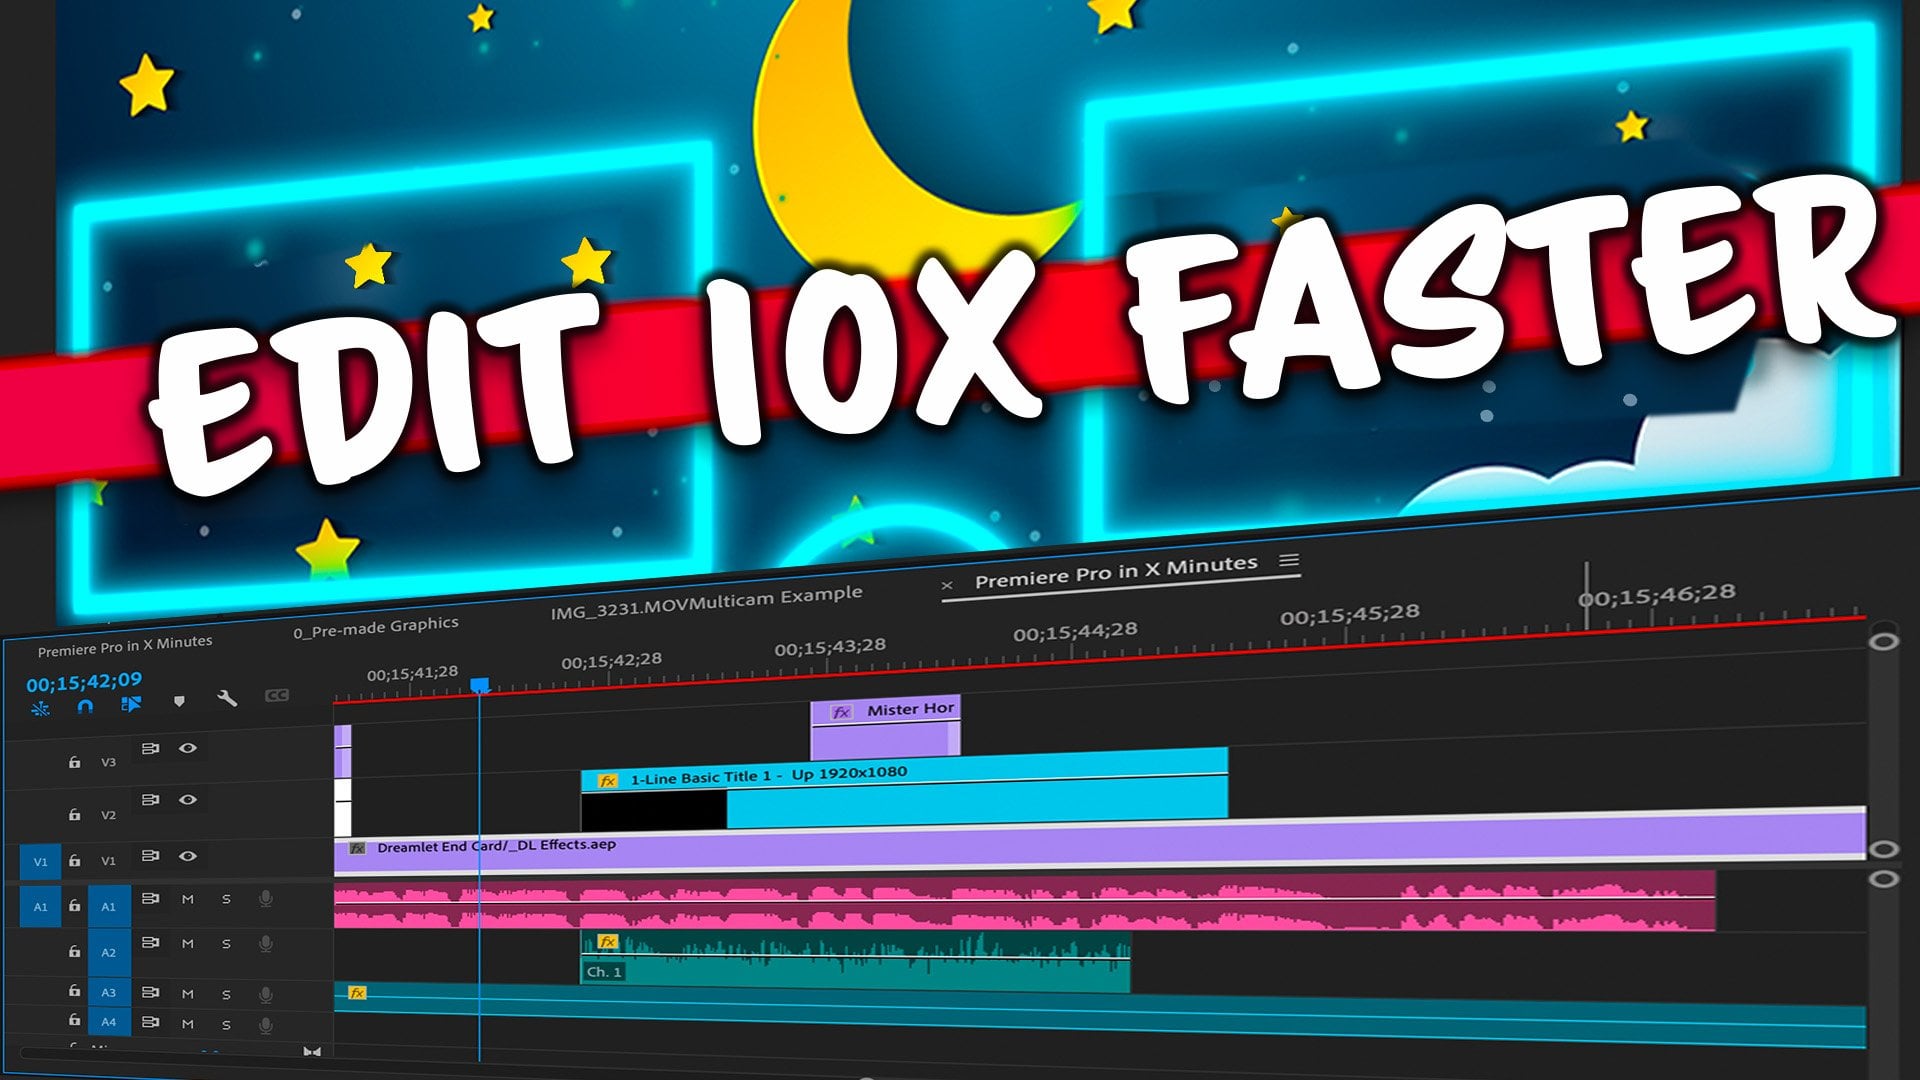
2. Optimizing Settings: Lesson will cover some
important settings that you should change to streamline your text based editing experience.
Let's get started. I currently have Premier
Pro opened up and I'm using my primary
project template. If you haven't created a project template for yourself yet, I highly recommend
that you do it can tremendously speed
up your workflow. Anyways, the first setting
we want to change will be changed by going to the top bar where it says Premier Pro, and then hovering over settings and hitting transcriptions
At the end. The preferences
window will pop up. And from here,
check the box that says automatically
transcribe clips. I personally have it to auto
transcribe only clips in sequence since I do bring in B roll that has audio that
contains speech sometimes. So I prefer not to make Premiere Pro do extra
work when unnecessary, but if you only ever
plan on importing files that you want
Premiere Pro to transcribe, then auto transcribe
all imported clips will be a better option for you. Or if you plan on bringing in footage and editing it later. That's another case where this
option would work better. For speaker labeling, I set
it to no don't separate speakers since I almost always record different audio files
for different speakers. Anyways, and most transcription projects I do only
have one speaker. Feel free to choose
yes, separate speakers. It won't really change
much for our purposes. Finally, I have
the box that says, Transcription languages enable
language auto detection checked and set to English. Al right now let's go ahead
and import some footage. Since we have the setting set to auto transcribe only
clips in sequence. Nothing will happen
when they're imported. We first need to either create
a sequence with the clips or place them into an
already existing sequence. So let's go ahead and do that. From there, you can open
the window that says text by going to window
located at the top bar, near the top right,
and then going all the way down to
where it says text. I keep my text window in the top left area and assign it the shortcut
of shift plus. So I never really
need to do that. I highly recommend you assign shortcuts for each
window you use. Often you can learn
more about that. And the project
template set up in my premier pro class about speeding up your
workflow if you'd like. Surprisingly, the transcript
is created rather quickly. I sometimes record myself rambling for ten to
15 minutes straight. It only takes about
less than a minute for a transcript to
finish generating. I've used Premier's
transcription tool for a very long time now and it's definitely the fastest
it's ever been. So hats off to Adobe for
continuous improvement here. Also make sure that you're on show program monitor transcript instead of show source
monitor transcript. Otherwise you won't
see the progress. Okay. So after it's done, you'll see a lot of text pop up, but don't worry about that yet. Instead, bring your attention
to these brackets here. And click it so that
it's highlighted. This is very important because you won't be able to do text based editing cuts if you do
not have this highlighted. So don't overlook this step. After that, go to the three
dots in the upper right and go to transcript
View options. Make sure that you
have basically everything checked
except for speakers. If you only have one speaker, then change your
minimum pause length to 0.2 or 0.3 for now, you can change this
later to your taste. We also have search
settings here. If you plan on looking for
specific keywords a lot, changing these might
help. Okay, Hit Save. And lastly, make sure you have follow active
monitor checked. This will make things
easier for later lessons. All right, the action step for this lesson is to go ahead and optimize all the settings that I mentioned
in premiere pro. After that, I'll see
you in the next lesson.
3. Deleting Pauses Tool: All right, in this
lesson, I'm going to show you how to use
one of the coolest, new features that Adobe
Premiere has ever released. And that is to delete silences. And it's actually
extremely easy. So after the transcription
is finished, with all the settings optimized, all you need to do to
delete silences is go to this filter looking icon
right here, and hit Pauses. From there, you'll see all
the pauses highlighted. Click on Delete, and two
options will pop up. The first is Extra, which
deletes the gap that is left in between the silences after the silences are
deleted or lift, which only deletes the silences and leaves the gaps in there. I pretty much always
use extract since I don't plan on filling those
gaps with any other clips. And then from there just hit
Delete all and you're done. Premier Pro does this in
a blazing fast speed, and honestly nothing
else I've used compares. I actually bought
and used Time Bolt, which is a program that
serves this exact purpose. And delete silences based on audio thresholds and levels
instead of dialogue. But I personally think
that this method is far more effective. Time Bolt requires you
to do it in the program and bring in a Json file
to finish the action. And even then, it takes time
for the cuts to be made. Premier does it in
literally 1 second flat, and with no weird
glitches at the end. In the cases where you
prefer not to cut out certain sounds or
perhaps live music my advice would be
to add a keyword or catchphrase right
before the dialogue stops and the music plays. This keyword or catchphrase should be something
you pretty much never say at any other point
in time in the script. So it's easily searchable. Something like sonorous,
soundstage or bombastic bassoon. Basically any real words that you can easily
remember and are likely to never say during the recording unless
it's for this purpose. After you find it
and highlight it, all you need to do
is hold command and drag the edge out so that
the sound is back in play. As long as you have
something like this, it solves the issue
of it only detecting dialogue and not sound or
sound level thresholds. And for those of you who have never used time bolt and don't really care about the sound threshold delete silence method, these are probably
all just fun facts. But just know that
premier prose delete silence function is
extremely solid. And not a feature that
should be overlooked by anyone who has to edit
speech or dialogue. Anyways enough praising
this new feature, let's talk about how to
fine tune it to your needs. So let's hit Undo, which brings back
your original clip instantly with no issues. Something you can't
really do with time bolt. And from here,
let's go back into the transcript view options and talk about minimum
pause length again. Right now I have it
set to 0.2 seconds. That's because I like having
a fast speech for my videos. If I wanted to go as
fast as possible, then I would lower it
even more to 0.1 seconds. As you can see, Premier
Pro will determine what a pause is based on
the seconds you set. So if the time in
between words is less than the time you
set, for instance, if I set it to 1
second as a pause, and the space in
between me saying the words is less than 1 second, let's say it's 0.7
seconds, for example. It won't be considered a pause
and will not be cut out. But if we lower this
to 0.6 seconds, then it will be considered a pause and it'll be
cut to the point where there's about 0.1 seconds of pause in between
what was cut. I do find it interesting
that all pauses get changed to 0.1 seconds
if you delete them. And that this number
cannot be adjusted. So I will actually give the
point to Timebolt here, since Timebolt allows
you to fine tune more of what's deleted and the
surrounding space around it, still premier prose delete
silence is quite magical. I do recommend that after you do this magical
delete silence, that you apply a constant
power audio effect to everything you can do this looking for it in
the effects window, right click constant power and set it as the default
transition effect. If it's not already, if the box to the left of
the name is going blue, then that means it's already your default transition
effect for audio. Now you can just highlight
the clips and hit command shift D if you're on
a Mac to apply the effect. You can also change this
shortcut if you'd like by going to keyboard
shortcuts in the top left and typing in transitions
and looking for apply audio transition
and selecting where the old shortcut is and
typing in a new one. I won't be doing that, but
that's just another way to look for the keyboard shortcut if you don't know what it is. And that is how you use one of the most awesome
features in Premier Pro. It's been a long time
coming. All right. The action step for
this lesson is to go test out the delete
silence function. You'll want to adjust
the pause time to your liking to figure out
what works for your project.
4. The Essentials: In this lesson we're going
to cover the main star of this course which is the
text based editing tool. Firstly, I think the
delete science tool is sort of like the
supporting character that stole the show. But let's at least give the
mainstar a good introduction. All right, so text based
editing is a very useful tool. That is essentially the
equivalent of being handed a script of what was actually said in
the recording and having the ability to delete
the words out of the script, while Premiere Pro edits out
that section of the clip. At the same time, it's like editing an essay
or school paper, which to some, that might bring back some
stressful memories. But it is definitely
arguably faster than the normal way of editing if you work with
dialogue and speech. Anyways, once again, I will
point out that you must have this bracket icon checked and highlighted if you want this
tool to function properly. Without it, nothing will happen. You also have the choice of extracting or lifting using
the shortcut keys here. Note that these are
editable shortcuts as well. Pressing the delete
key functions in the same way as the
extract button. So you don't really need to remember the extract shortcut
if you don't want to. That is the main feature. Two things to note though, it's a little unintuitive if you're just deleting
a single word, highlighting a single
word currently has no sort of like
feedback visually. So it's a bit confusing to
tell if a single word has been highlighted or not until you let go and move
your mouse away. I think that this
is a feature that could definitely use
some improvement. However, if you go
past a single word, you begin to see the
highlights from there. Once you hit delete, you'll see the text move to the next line. That's because the text is
connected to the eclipse. So whenever you make a cut, it will also make a new line
for both of those clips. The second thing to note, if you are deleting a word that is in the beginning or end, sometimes it leaves a
small silence when there is a silence next to the end of the words indicated by the dot, dot, dot symbol, be
sure to delete it. This can help avoid that issue. But sometimes there are phrases that don't have that
dot, dot, dot symbols. And when you kill that
word or beginning word, a little small clip of
silence still remains. That is quite unfortunate. The only way you can deal
with that currently is to just go into the timeline
and delete it yourself. Hopefully, that improves in the future since
it kind of kills the immersion of being in script editing mode instead
of timeline editing. But of course, let's
not forget our roots. Anyways, moving
along, we also have a tool called Edit Active Text. This basically allows
you to correct or change text if it was
transcribed incorrectly. You'll probably only
want to use this if you're planning on
creating captions, which you can do by clicking
this CC button right here. It's probably a good
idea to correct the transcribe before
hitting the CC button, but you can edit the text afterwards in the
captions window. And if you have a word that seems to be
consistently wrong, you can type it in Search and hit this mass replace button. This also works for both
the transcription window and the caption window as well. Okay, let's go ahead and
actually create some captions. I keep it to subtitle defaults. Let's hit caption Preferences, and from here I select
subtitle for Style. I do have my own created
style for subtitles, mainly for short form videos. So I'll go ahead and
apply that then. For maximum length
and characters, that's just how many words
you want to have in a line. So if you're doing short form, a lot of people tend
to keep it very short. So just a few words or maybe just one word
in a single line. If you're doing a
movie or short film, you'll want to keep
this at a higher value. Let's make it small for
demonstration purposes then. A minimum duration is
somewhat a similar idea, so we'll make that smaller, keep gap at zero. And for short form videos you'd want single lines
instead of double. Okay, let's hit Create Captions. And it does it pretty quickly. And now it takes us to a caption section where you
can once again edit the text. And if you want to
create your own style, go to the essential
graphics window, which you can once
again find in window. And from here you can change up your text however you'd like. And after you're done, just hit Create style. Name it,
whatever you want. And then a little
text style file is going to pop up in
your project window. You'll need that if you
want to access the style. So just store it somewhere
you won't delete it. And then the next time
you create captions, you will see it as an option
you can choose so you don't have to redo the
style for your text again. And that is primarily how I personally use the text
based editing tool. However, there is one other use for it that I don't really use, but perhaps you'll
find it useful. I'll cover that in
the next lesson. The assignment for
this lesson is to test out the text
based editing tool. Try highlighting some
words and deleting them. Testing out whether
mini silences are created at the end
of words and get used to switching between using the text window and regular
editing. Have fun with it.
5. Source Monitor Method: In this lesson we'll go over the source monitor transcription
method that allows you to add footage into the timeline rather
than delete it. All right, so at some point
you might have been wondering what's the show source monitor transcript
icon button thing? Even for whenever I click on it, it's basically
blank all the time. And that's because you
need to have something selected as a source
for any text to pop up. In order to do that,
just double click on some footage with audio
in the project window. If the footage hasn't been
added into any sequences yet, it won't have a transcription generated for it unless you
have the settings changed. So if you plan on
using this method, often you probably
want to generate a transcript automatically
when the footage is imported. Consider changing that setting. After a clip transcript
is generated, you can double click the clip, which brings it up on
the source monitor. From there, you can now
see the transcript in its ugliest form
with all the pauses. In order to change
this, you can go into transcript view options
and uncheck pauses, or increase the minimum pause
length to get rid of those. Unfortunately, you cannot delete the silences since you're
not working with a sequence. You're working with source
footage from there. The main function
of this tool is to go into the
transcript to find the parts that you want to add into a sequence that
you're working on. So basically the method is
similar, you highlight it, and instead of deleting
it, you hit Insert, which will place the clip where your time line playhead is and it will also ripple shift every other
clip to the right. The other option is
to use overwrite, which will once again place the clip on the time line
where the playhead is. But this time it'll overwrite the clips next to it instead
of shifting it over, hence the name overwrite. I think if you're
using overwrite, it would be ideal to hit V two or anything above
V one to instead place the footage on top of whatever footage you already
have instead of erasing it. But of course, this
highly depends on what project you're doing. Just letting you know that
you don't actually have to overwrite the footage you
already have laid out. Once again, both
overwrite and insert have their own shortcuts that all right and that's
basically it. As you can see, I
clearly do not have an optimized window set up
to utilize this function. Well, since I'm placing the source footage
on the same window as the program monitor. But if it fits
your self editing, I highly recommend
making sure that they are all on separate
windows in premiere. Anyways, that was
the second method of how to use this new
text base editing tool. Once again, I don't
really use it much, but perhaps it can be
useful for your needs. I'd say that this method is
more useful when you have a long recording filled with bad takes and only
a few good takes. And you somehow have keywords to distinguish the good
takes from the bad, so that you can
search for it and then insert it
into the sequence. But I'm sure there
are definitely a lot more uses than that. The assignment for this
lesson is to try out the transcript source
monitor method to see if it suits
your editing style. Perhaps I'm underplaying how valuable it is to
you personally. So don't let my own
preferences affect how much potential there
is for this new tool.
6. Order of Operations: In this lesson, let's
talk about a few ways of using the text based
editing tool effectively. Firstly, I must
admit to something. I may have introduced the
features in a sequence, that's not quite
the optimal way of how to utilize the text
based editing tool. I do blame the
delete science tool for being way too cool
to not talk about first, but let me make some amends. We're going to rewire your
brain into thinking about how it should be used
from start to finish. Of course, there
are different uses for this tool for every project. But I'll discuss the
standard talking head video type where
you have a script and you read from the script to the camera and then
edit it afterwards. In a project like this, you
want to import the footage, drop it into the sequence, and then from here
you're at a crossroads. You can either delete the
silences first and then start using the text based
editing tool afterwards. Or you can start off by using the text based editing tool first and then delete
the pauses at the end. You would imagine
that the results should be somewhat
similar, right? But you'd be wrong, at least for this version of
the tool as of this moment, as simple as the text
based editing tool seems, there are actually multiple
paths you can take and how you approach using
it for your project. And some of those paths can lead to more unnecessary
work than others. So let's talk about which
one leads to less work. One big issue with deleting pauses in the beginning
and then cutting using the text based editing tool
is that it leads to a lot of useless mini clips
with small silences. You can immediately delete
these in the normal time line right after making the cuts from the text base editing tool. But if you have a lot
of cuts you're making, this can seriously ruin the flow and slow
you down by a lot. The best option is to
start with cutting on the text based editing tool and then deleting pauses
at the very end. However, there is still
a wrong way to do this. You need to make sure that
you have pauses still checked and set to an optimal
value for your project. For me, this is
about 0.2 seconds. If you do end up
unchecking pauses for a cleaner look
at the transcript, you're actually
shooting yourself in the foot and creating
more work for yourself. Because you'll end up
with a timeline that has extra dead clips with silences in the beginning
or the end of the clip. But instead of short mini clips, they'll be pretty long ones. Unfortunately, even after
deleting pauses at the end, no matter what value
is set for the pauses, you simply can't
delete these silences. This means you're
going to need to go in manually and delete those
silences on your own, Which isn't a huge deal if you're working with
a small project. But if you're working
on a two hour podcast, for example, that's
going to be so crushing. So make sure that you have
pauses checked and that when you're doing the cuts in the
text based editing tool, you're also highlighting
the symbols along with the words
that you want to cut. As long as you have that in mind and those settings in place, the rest is pretty intuitive. What you want to do is read
through the transcription and delete the bad takes For me, my last take is
usually my best take. So if I were to see instances of the same sentence being
said multiple times, I will just highlight
every instance except for the last one
and then delete them, leaving only the final take. After this happens,
the transcript splits up and it does make
it slightly harder to read. That's one reason you
shouldn't delete silences first because it'll make things look really,
really messy. From there, you pretty
much keep doing the same thing until you reach
the end of the transcript. It would also help if you had
your original script out, so you can do a side by side
comparison as well to delete any mistakes assuming you don't ever want to deviate
off your script. I also recommend while
you're doing these cuts, that you highlight
from the beginning to the end of your cut. There's something
about highlighting from the end to the beginning, that's just slightly slower
and harder, at least for me. And take note that
you don't need to highlight from the left
of the first word. You can start to highlight on any letter after everything
has been corrected. That's when we go into
pauses and then delete them. And then don't forget to apply the constant
power transition. If you find that
the transition is bringing in unwanted audio, you might want to shorten your default audio transition
in the settings. Just go to Premiere Pro
at the top bar settings timeline and then input a new and probably
shorter audio transition. Default duration,
I have mind set to 0.25 and it works well
for the most part. If it doesn't,
then I can just go to the transition and
shorten it manually. And of course, if you do
eradicate these pauses, it's probably best practice
to play something like B roll over your footage so it's not constantly being cut. This was definitely
highly dependent on how much silence you chose to delete and what settings
you had for your pauses. Of course, you
could also be a bit more meticulous
about the deleting of pauses and delete only specific ones
instead of all of them, and that's pretty much
all there is to it. In the next lesson, I'll go ahead and show a
demonstration of me using it from start
to finish for a video.
7. Text Based Walkthrough: All right guys, we are in the walk through
section of this course. And for the section,
I'm actually going to go ahead and do it
from start to finish. I'm not just the
text based editing, Let's go ahead and
import the footage. So I have these two already highlighted and I'm just
going to drop them in. I have two angles of
me talking basically, and this is going to
be the conclusion of the video of
this whole course, so you can see it
at the very end. It's just a bit more of an
efficient way of doing it, since I don't have to
just play the video over and over again for you here. You guys can just watch
it for the conclusion. So the first thing I'm going
to do is set these two up in the same sequence and sync
them, Synchronize clips. Right here I have a
shortcut for that. Let me actually show you guys. So the shortcut that
I use is control, and then this pops up. You hit audio, and then you
just sync it up like that. And it's whatever is
on the left side, it goes to the right side. So that's what happened there. Now I'm moving it back and
I'll try my best not to state too many details of
what I'm doing for everything just to not
make this super long. But what I'm going to do is just leave the top one so you
can disable by I set it up, I just said I'm not going
to do too many details but you can enable and disable. I set it up as shift
command E. Sometimes I don't even remember exactly what it is my fingers remember. So it just happens
automatically, Judge. Okay. So now I can just
see the main video, and as you can see this is
a pretty lengthy video. I did a lot of takes, I actually made a blunder in
my audio in the beginning. I've been testing out
some new audio stuff. So I messed up with some
clipping, so I had to redo this. And let's see, Okay. The transcript might have
been already created since I had this footage
imported some time ago. So that's why maybe it popped up really quickly, but no problem. You guys already know how to set up the transcription
stuff in the settings. So let's go ahead
and start cutting. So I already know
this is just me talking and rambling and warming up, so I
can just cut that. And just as a review, also
throughout the course, I mostly use the
three dots right here to get into
transcript view options. But you can just click right there and it instantly
brings you in. So a much faster button
that you can click, so definitely use that pauses. I'm going to leave it
as 0.2 as I usually do. And I just wanted
to show you guys the settings real quick
before I got started. And then the method
is, as I stated, I just look at whatever I
repeat, which is a lot. I can see that I've
repeated first a lot. So I'm just going to
delete all of that. And I also have my
script right beside me. You can't see it, but
it's right next to me. And I can basically
read this out and make sure that it matches
exactly with my script. If I wanted to be meticulous
about this process. And I don't have to
worry about these, because at the end I will
delete the pauses in order to make the
best use out of that. Out of see, I can already see
that I made a mistake here, so I can go ahead and cut that
the best use out of that. Sometimes these pauses
right here, it's a slight indication as well that you might have
made a mistake there. Because at least for me, whenever I make a mistake, I pause just a little
bit longer than usual. Okay, And here's
another technique. Since I see myself
saying next a lot, I'm just going to go ahead
and search for next. Just so I can look
at the last next. And this one appears
to be the last next. So I don't really have to
read through everything. I can type in a keyword
that I'm seeing a lot of. And then just use this search
right here to find it. Okay, next you learn how to use the delete,
blah, blah, blah. I see multiple after that. So let's go ahead and do
that. Get rid of those, but you guys get the process. So far it's relatively
simple just scanning through the transcript
and doing deletions. Pretty smooth process. And for me it's usually not
the best idea in general, not just for me to talk
while you're reading. This will definitely
slow me down slightly, but I'm doing my best
for the walk through. Okay, towards the end I gave. But yeah, this is just
a lot of essentially reading and comparing
with my original script. It's just something you're
going to have to get used to. Okay, and I think
I'm getting pretty close to the end and as
you can see right here, the top clip is also
getting cut as well. That's because it's not locked. If you ever want to put footage there and you don't
want it to be cut, then you can lock it
and it won't be cut. But since this is like synced
up footage like camera B, then this is
actually really nice that it just cuts it on its own. So just make sure you sync
up beforehand and also realize that you can't exactly do this with
the other method. I know I'm sort of going
on a tangent here, but I just wanted to mention it. So if you were to like use the transcription
source method instead. And let me go ahead
and click this, so there will be something there and insert the good takes, because I did make
a lot of bad takes. So I could find the good
takes and then insert them. But the issue with
that is that I have two clips and I can
only insert one at a time. I'm not entirely sure if
there's a way to insert like a multicam situation type of thing and have it
synced up like that. So that's another reason
why I personally prefer this program monitor
transcript method instead it just makes more sense
with my workflow personally. And I'm making sure
to always delete the dooticons as well
as much as possible. And I left a note
here for myself saying that the first
time was better. And I do remember
that, so that's why I make sure to
go to the right one. So sometimes you can just leave
like some voice notes for yourself essentially and you can read it when you're editing. I think that's a
really powerful way to use this tool is to basically just use them as almost like
markers, audio markers. You can even say
like marker one and then search for
marker essentially. Or they seem to mostly do text. So if you were to do marker
one or say marker one, you'd probably want
to type in marker and then the letters of one. But that's just
another technique that I think would
be very useful. Anyways, I'm going to type in finally because I
say finally a lot. So all that since I know
that I went off script, whenever I see myself
repeating a lot, it's mainly because
I went off script and thought of something
to say on the spot. I'm not very good
at doing that yet. I'm still working on it. But usually it takes like three to four takes on
average, to get it right. If I'm making something up on the spot along with scripting, I feel like it's easier
to just like either 100% read the script
or 100% improvise. Doing a mixture gets confusing. Okay, once again,
congratulations. Once again, I'm going
to use this right here. This phrase is a
little too common, so it's a little confusing. Okay? And I talk about reviews
quite a lot. All right. That's all the cutting. Now that I'm done with that,
I can go ahead and delete the pauses. All right. As you can see we now have
the conclusion sorted out. I also chose not to
color the footage yet. It's S log three. That's why
it looks super washed out. Because usually when you put on any sort of filters or
colors, or effects, it increases the amount of work that premier has to do when moving around
in the timeline. So that's why I prefer to
do that after cutting. I could have done so beforehand and just turned off the effects. But there's a simple
way to color and I've shown it before in some
of my other walk throughs. I just create a preset and basically just apply to
the source and then, and then I'm done because
my preset is something I've created for this sort of like lighting
situation and everything. But I might need to
adjust a bit more color, but I won't do it for
this walk through. Maybe not I'll see.
Because sometimes I noticed the auto white
balance of my camera. I just went on the
fritz sometimes. So I have to adjust
it if it does, Okay. And then from here I'm just
going to go ahead and add some music really
quickly for me. I am a musician, so I have some music that I've already created
that I had in mind. For the conclusion,
it's just going to be a very simple piano sort
of piece that I made. And then I'll quickly balance it right here for negative 29. I've used it before, so I
basically know the levels. But let's go ahead and
take a quick listen. I'm primarily going to go
over the edges right here. Learned first, you learned about what the different settings
were and how to operate. Looks like I missed one, so
sometimes I will miss one, especially since I'm reading and doing this while talking. But it's as simple as a normal edit right there,
which is ripple delete. For me, I shift as the shortcut. And this is also why you check the edges in case it better fits your needs
towards the end. And you can see that these cuts right here are
super seamless. Like I haven't even applied constant power yet and
they already sound good. So applying constant power, it might not be necessary. But I do find that sometimes, like when you apply
constant power to a clip that you first used delete pauses to, it does help. But for this one, I guess
since there's a lot of like pauses in between
like the takes I did, it did some clean
cuts basically. Yeah. You don't really
notice the difference between with constant
power and without, but it's a good insurance
thing. Just in case. And to close things off, I
walked you through a finish, you're basically watching
the end product right now. I hope you were also able to
finish the class project. Okay. That's something that, and as you can see, I have the transcript
pulled up as well. So it's like I can see it at the same time I'm doing
this if I wanted to, it can be helpful in
certain situations. I think like let's
say for instance, I'm going to go ahead and make
a new timeline real quick. As an example, it looks
like it only partially created it because of
the work that I did. But this is good
enough right here. So let's go ahead and delete
the pauses really quickly. So one of the uses of having
this out while you're moving around is say like you
haven't done like, you haven't taken
out the bad takes. Instead of using this, highlighting it, and killing it. If you're more used to working
in the timeline like this, you could just ripple delete. And ripple delete again until
you find the good take. Or if you can see that
this from here to here in the timestamps is like
two bad takes essentially. Then you can just, you can ripple delete both of them like that and then you'll be
left with the good takes. It's an alternative way of doing things that maybe might
work for your project. Of course, it's not the most optimal sort of
method out there, but I just wanted to point out that there's like ways to sort of mix using the transcript view with working in the
timeline as well. Not just like only this one
and then only this one. So you know, there's
be creative with it I suppose depending on what
you're doing and experiment. That's essentially what
happened doing a lot of. And this right here is the most efficient way that
I've encountered so far. Okay. And yeah, that's
pretty much it. I think for the most
part we are done. The only other thing that we
would do is add B roll now, which I will go ahead
and quickly do since we're doing this
right now. All right, so this right here is just a list of
basically the lessons. So I'm just going to
overlay some B roll. I lock the layers right
here and I just actually, let's do this a bit
more efficiently. So I'll double
click this so that the source monitor comes up and I'll find something that
represents what I'm saying, which is like optimizing
the settings. So this right here
works pretty well, so I'll put an inpoint
outpoint and then I'll just grab the
footage and bring it in. And I also like including
some transitions. So I'm going to move this up so I can more
easily see this. So I use a plug in
called Premire Composer. I've talked about this
in my premiere course, and they have some
nice transitions that available also for free. I personally have bought some of the packs because I
very much like them, but you can check it out. They do have free ones
that are pretty legit. Okay, so we apply
that transition with the premier
composer learning. And oftentimes, I
can't really see it in the preview because it requires a lot of effects here and my computer is not
strong enough to handle it. So I kind of just
trust that it'll turn out well and then review
the footage at the end. So the process is going to be repeated basically I
just go over each one. I think the scene with
lift is kind of cool since really highlights the silences
that are being deleted. And I think like, that's
so cool to see, you know, like to visually see it even though I'd never use
it. Okay. All right. And I actually have something
that I might as well use here because it would be kind of a waste
for me not to use it. So for certain things, I create templates
for everything if I'm like repeating
a lot of tasks. So let's see if I
can find it, okay. Sequence conclusion. So I have some
previous transitions right here that I can use. Ideally, I would have
just used this timeline, which contains a lot of the
stuff that I normally use, but I wanted to start fresh
for you guys to see. It's and we're just going
to lock those two. Makes things slightly easier and now we have a new transition and basically I'll
just keep doing that until I fill up the list. So I'll do it off the walk through since I don't
want to be too repetitive. And then after that, we
have some switching. So this is one we go over, this is one we actually
utilize the second camera, so let's see where it stops. You're basically watching.
Okay, that's right here. And this is a nice way of also
using this transcript tool is like like visually
seeing where to go. Like I instantly knew that I was done here because
of this transcript. With the list done
with the list. So that's another good way
of using it, just like as to keep track of
where, what you said when and like what sort of
stage you are in the video. So this looks like a good
spot that I could apply second camera to and I have
this mic popping out later. I'm going to use Photoshop
to basically just content aware fill this and just overlay it since there's
no movement there. I will say the camera is a
lot better than camera B. So sometimes I question whether or not I should
even use camera B, but it's good practice to do. So it's just for me, my space isn't like ideal
for where camera B is. But I can adjust it a bit more to make it look better, but basically I would just
switch off right here. I also have an idea for B roll that I have yet to try out, but I think is a
pretty solid idea. So let's say for instance we had a whole bunch of road clips. I would create a
sequence for it and then drop all of the
B roll clips inside. These are not actual road clips, these are kind of the lessons, but pretend they're like five to ten second clips
of me shooting like perhaps B roll for my other tutorial stuff like cameras or microphones
or anything. Basically what I would do
for the B roll while I'm filming it is say out
loud what I'm filming. And from there I can go
into the transcription tool and basically look
like if I were filming a specific microphone like the sure SM seven
B or something, I would type in sure M7b and then I would be able
to locate that clip pretty much immediately unless I shot a whole bunch of
Sure SM seven stuff. Then I would need to be more
specific like saying sure SM seven panning shot then I
would type in that as well. So it's sort of
like a way to name your footage without actually
naming it in the finder. You're naming it out loud
while you're recording it. Of course, this only
works if you're recording audio
with your footage, but I think it's a good idea that I will be trying out next. I haven't had the chance
to try it out yet, but I did want to
mention it since I thought it was a pretty
good use of this tool. There's a lot of things that you can do with this tool that can really help speed up your editing, and I think
that's one of them. So hopefully that helps. And I think that's basically it. There's a lot of repetitive
tasks left to be done, like just filling
in these bro slots and just adding
the second camera. But I think you guys
get the gist of it. We've used the
transcription tool pretty much to the maximum at
this point for this video. So I'll catch you guys
in the next video and you guys can see
the final product.
8. Conclusion: Congratulations on making it
to the end of this class. Here's a summary of
what you've learned. First, you learned about what the different settings
were and how to optimize them in order to
make the best use out of the text
base editing tool. Next, you learned about how to use the delete pauses tool, which is arguably the best function in
this whole tool kit. After that, you learned
all the basics and essentials of the primary
functions of text base editing. From there, we introduced
the other method of using the transcription
source monitor tool in case it better
fits your needs. Towards the end, I gave
an overview of how to use the text based editing tool from start to finish in a clean
and efficient manner. And to close things off, I watched you through a project of me using the text based editing tool from
start to finish. You're basically watching
the end product right now. I hope you were
also able to finish the class project by
optimizing your settings and creating your first video edited using the text
base editing tool. Feel free to post
your finished project in the class projects section. Finally, I want to thank you for making it to the
end of this class. It's been fun getting to
show you guys how to use a tool that I think
is a huge time saver. And if you can't
really tell, I really, really like the Delete
Silence tool because I think tools like these
that make the process easier and quicker and that allow us to
focus on the parts of the creation process that we feel something about that
we feel passionate about. That's something that makes me happy that I got
to show you guys. So once again,
congratulations guys. You now have the knowledge
you need to adeptly use the new and very useful text based editing tool in
Adobe Premiere Pro. If you feel like you learned something or enjoyed the class, I'd appreciate it if you
gave this class a review. Reviews are super helpful
and you can also leave some feedback that I'll read and also apply to my next class. In the meantime, if you'd like to check out
what I'm up to, you can find me on Youtube. My channels are called
Dreamlet and Scotty Luke. You can also follow me here
on Skillshare if you're curious to what my next class is going to be about anyways. Best of luck with
your projects and I hope to see guys
in the next class.