Transcripts
1. Introduction!: Welcome everyone to this class. Today, we're going
to learn how to do this animation out
of steel image. In this case, it's an
image generated by AI, and we will animate it using Photoshop and after fext
to bring it to life. This is a simple
process that doesn't require hard or complex skills. You can follow this
tutorial without any prior experience in
Photoshop or after effects. The methodology is simple. We will start in Photoshop, and then we will continue
making animation. After Effects, this class goes fairly straight to the
point is meant to be entirely focused to
achieve these sort of animations based
on individual images, which you can follow along with the same image that I will
leave at the resource stub, which will help you get
the knowledge to animate other images on yourself
in the same format, and this is something that makes a huge difference and
it's quick to do. So without wasting
any more time, let's dive into it. M
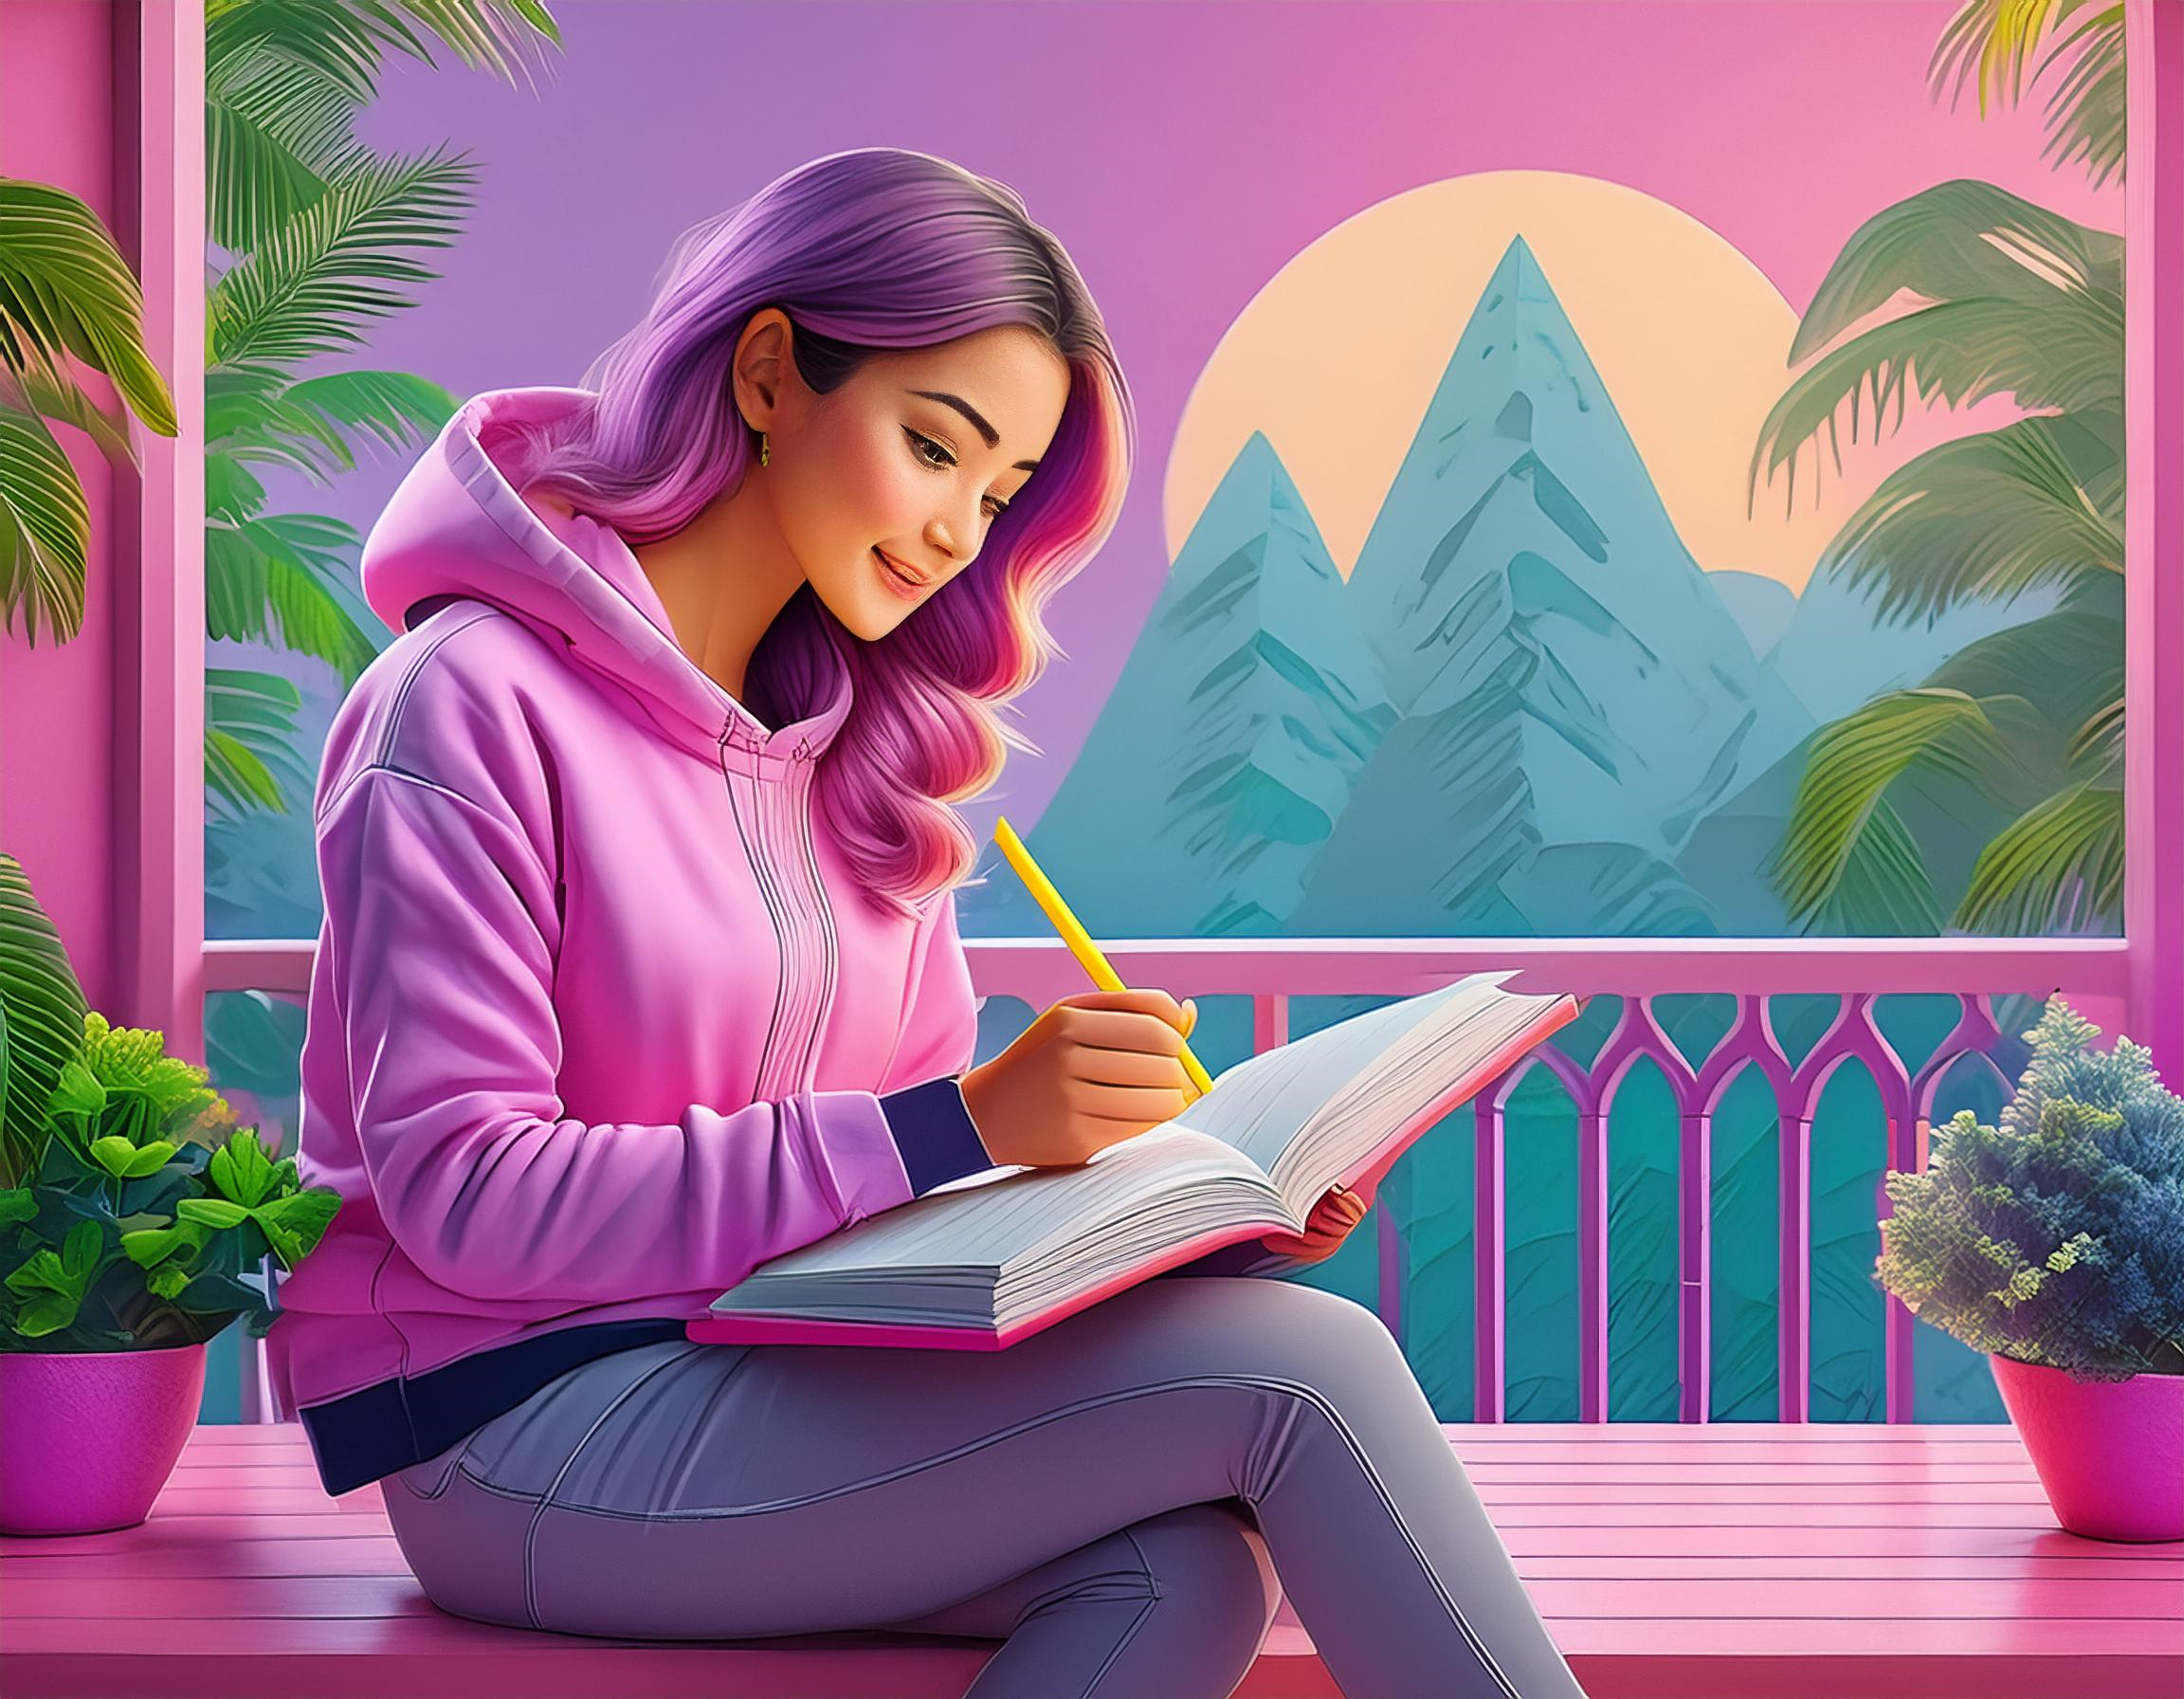
2. Photoshop: Preparing the image!: All right. So in this class, we have this image
generated by AI, and we're going to animate it to achieve a result like this. As you can see, from
a single image, we have some activity going on. We have some butterflies here
which make it very alive. We have this moving plant, which is not initially in the picture, but
we will add it. We have the girl that's moving. Her hand is also moving. Her eyes are closing
and opening, and we have some smoke going
on over here as well as some particles that are
overlaying in the image. So we're going to create
this. It's quite simple, but we will need photoshop. And after effect. And
in order to start, we need to basically think what are the movements or what
animation do we want to do. For me, the first one that
caught my attention was the fact that she is closing
her eyes and opening them. You can see we play the video. She has her eyes open, and then she close them. Like this and she
opens them again. But since we only have the
picture of her eyes open, in order to actually
make her eyes closed, we need to have another
picture like this, but with her eyes closed. And in order to do
this, we will have to edit in Photoshop her eyes so that now they are open and we will make
them appear to be closed. This will be a simple edit
and quite quick to do, but it requires some
creative skills. As we can see that
her hand is slightly moving as well as
her head and body. This will be quite
easy to do as well, but we will need to take some
stuff into consideration. So first, we're going to start by doing the animation
of her eyes closing. In order to do this, we go into Photoshop and we
will import the image. I have it here, and
I will just drag it it will open
here in Photoshop. Otherwise, you can just go here, file open, and
select your image. As you can see, our image
opens here as a layer, but we want to have
this layer with the eyes open and then another layer
with her eyes closed. This will be
straightforward to do. But essentially, we need to duplicate this layer in
order to have two pictures, one scene with her eyes open and another scene
with her eyes closed. So we're going to basically rename this layer to eyes open. So we double click
here on the name. I'm just going to name it open. And I'm going to
press Control J to duplicate the layer and I'm
going to tag here close. If Control J doesn't
work for you, you can select the
layer and go here in layer and duplicate layer, it will ask for the name that you want to put
on the new layer, and it will achieve
the same result. So we have the eyes open
and the eyes closed. They are essentially
the same picture. So what we will do is
that we're going to go here. We're going to zoom in. You can zoom in by
pressing Control and plus. Is quite handy, and you can move around with
the hand tool here. Or if you are using any other tool like the
selection tool here, and you can hold Spacebar
and you will activate the hand tool and then
you can click around while holding spacebar and
it will help you move. So we will use this quite
often zooming in and moving. While we are here,
what we're going to do is we're going
to try to apply some drawing skills in order to simulate her
eyes being closed. In order to start, we would need first a blank
canvas in a way. We don't want the
eyes to be open now. So we are kind of going to simply remove the
eye for a while, and we're going to create
her eye being closed. To remove this, there are
several ways you could use AI. You could use the
brush like this, brush here and try to
paint on top of her. If you have the right
color selected, maybe you very random color, it will not look good, but you can try to select one color. And when you open
the color menu here, you will get the pick tool. So if you click on
top of the image or on top of any
part of the image, it will copy the color. So we try to match it
maybe in the bottom. If I select the skin color here, it will change my color, and now I can just paint
and it's the same color. And now here on the top, maybe I will select
this darker brown. And I can just sat a little bit. If you want to change
the size of the brush, you can hold on Old
on your keyboard, which will also activate
the color picker. So if I hold on Old, you will see that now I can
select any color if I click. But we want to change
the size of the brush. So I hold on hold and I press
right click and I drank. You can see that we are
changing the size of the brush, which is very, very useful. You can see otherwise, you can go here on the properties of the brush
and change the size manually. But doing it like this, holding old and while
I'm holding old, I'm clicking and holding the
right bottom of the mouse, and I'm dragging and this will change the
size of the brush. And this also combined with just clicking
old and left click. We can copy the colors and change the size
accordingly very quickly. But see that when we
hold down old and click, we are copying the color but not in the active color
that we are painting, which is shown in
the top square here. You can see when I'm
painting with the brush, I will paint in
this light brown. And if I press Alt and select, let's say, this pink color, if I try to paint, I
will still paint on this brown color because the
pink has been copied below. In order to change this, we
have to see press letter X, which will change the
color that's being used. So whenever we hold
down Alt and click, we need to press first letter X to switch to the
newly selected color. So if you press Control
Z multiple times, you will go backwards. And you will undo our steps. This is one way to
do it, but we can also use some tools
that come in Photoshop. We have this tool
here, spot healing, and you can make it larger with the same methodology as we have increased the
size of the brush, and you can just select
more or less her eye, and it basically
generates a feel that's matching the content
that's surrounding the eye, and it really makes
a very good result. So we're going to just use this. And as you can see now, we have completely removed her eye.
This is not looking good. But we will really benefit
from having this sort of empty skin because if we had to make the eye closed on
top of the eye that's open, they would overlap, and maybe it wouldn't
look good at all. So we will just create an eye closed here
and that's good. As you can see, you can
hide and unhide the layers, and this will show you every time that you
hide the closed layer, it will show the layer that's
below, the open layer. So this will be nice
as a reference, but we will be always painting the closed eye on
the closed layer. So in order to create
the eye closed, you need to be relatively
creative on how you do it. If you are good at drawing, it will be easier
for you to draw it. But in general, we can just
try to approximate it. And in order to do it, what I'm going to do
is that I will select this pencil and I will kind of draw the shape of the
eye when it's closed. So I will look a little bit at the size that it has to have, and I will actually
draw it here so I can sort of keep track at all times
what the size of the eye. So I will start
something around here, and I will click once, and now I will click and hold, which will allow me
to create a curve. So I will create
something like this, not too much,
something like that. And now I will go here, and I will try to create
something like this. Later we will adjust
these handles to make it look a
little bit better. And now we will put
another p here. I will press control
that maybe here, and I will close the shape here, making something like that. As you can see, we have created this sort of shape that
resembles the eye being closed. This will be the
leads, essentially, and we will paint them in a
little bit of a darker color. But essentially now if we turn
on the closed layer again, we can just use this selection, this pen shape that
we have created, and I'm going to
press right click. We got these options, but first, I'm going to create a new layer. So if I press here on
the plus icon here, I'm going to create a
new layer and this layer will be the actual
lead of the eye, let's say, the closed eye. I will right click here and
click Create vector mask. And as you can see now, we
have defined mask here, which is very useful in
the way that whenever I hold down Control and
click on this part here, we will make the selection
of our shape of our pen. And now I press the brush
like this with letter B, if I paint now, you will
see that whatever I paint, it will only be inside
of this selection. So if I press the letter X to change to this pink
color just to show, you can see I'm
clicking but even if I click outside of this
selection, it will not work. It will only paint
inside the selection. Even if I di select this by pressing here
diselect or pressing Control D or going
to select diselect, it really doesn't matter because since it's a vector mask, Even if I click
outside and I'm trying to paint and change the color, it will not affect anything
but the eye itself. So if I change the color here, say, blue, just to show, it will only paint with the blue color inside this selection that
we have created. So this is very nice. So what
I'm going to try to do is, I'm going to try to resemble a little bit the skin
colors of her eye. And to do this, I'm
going to try to match a little bit the shading
care of the skin tones. So I'm going to
click click here, press letter X to
go to this color, and I'm going to try
to slowly create a So I'm trying to create something
that resembles a little bit the skin tone, just to get an idea of what
color I should choose. So as I said, I would
like to have the eyeing closed as a little bit of a darker color to
simulate the lead. So I will maybe select this
sort of brown color here, and I will just paint
it all like this. It looks from the distance, it looks decent, but, of course, it looks
just like a flat color. It makes not too much sense. So what I'm going to do is I'm
going to click this color, and I'm going to make it
a little bit lighter. And I'm going to make the
brush a little bit bigger, and I'm having this
brush selected, which is the soft brush, which is very nice
for these things that it creates a little
bit of a soft gradient, and I'm going to make
it even lighter just to kind of have a little
bit of shade here. And here I will maybe
select this one color, then to press X to go to it. Maybe here one. So as you can see,
we're creating a little bit of a gradient. Maybe I feel like it's a
little bit too dark here. So something like this,
and as you can see, we have already created
a little bit of an interesting shape here and the eye an interesting color. You can play always a little
bit with the shading. I feel like something
like this looks quite good to start with. And what we are going
to do, of course, is that we need the
eye lashes as well. We have them here
in the open eye, so we'll need to also put
them when the eye is closed. So in order to do this,
it's very simple. We can go to the layer
with the open eye, and we can just use the
pencil to select the eyelash. So the same way as we did, click here and we're
going to try to copy something like this
to start from the top, creating this curve,
and I'm going to basically go down here. We're going to zoom in more. Well, as you can see,
when I click here, we got this quite weird
shape because it's trying to follow the curvature of this path that we
have been creating. So if you don't want
this to happen and you want to have a
rather sharp turn, what you can do is that you can hold down here on
the last point. And if you click now
for the next point, you will be able to
have a very sharp turn. So we're going to
benefit from that. I'm going to place
it around here and now I'm going to close it
to something like this. If you want to move around
the points and the handles, you can select this tool here. You may see the path
selection by default. So you want to select
the other tool, you can just click and hold and then go to
the direct selection. And now when you
click on the points, you can move them around. So we're going to do
something like this. So, more or less, I
feel like this is a good selection
of the eyelashes. And what we're going to do
is that as we did before, we're going to duplicate
just this selection. So I'm going to right click and I will
press Make Selection. I will leave this
as default on zero. And this will make
a selection of the path that we have created. And now with this
bottom layer selected, the one that contains
the eyelashes, which is the one
with the eyes open, remember that in the
closed eyes layer, this one that is shown now, we don't even have the eyelash anymore because we
have removed it. So in this layer, with it being selected, we're going to press Control J once we have this selection. And right now, we will
not see any difference, but we have duplicated
the eyelash. So if I hide everything,
as you can see, we just have an eyelash here, we can rename it to eyelash. And what we're going to do
is that now if I turn on, again, these layers that
we have created before, the eyelash is not shown
because it's below. But if we bring it up, you
can see how we have it here. And now we're going to
basically press Control T to move the layer or we can just click this tool and kind
of drag it a little bit. But using Control
T is much quicker, and we can try to place it
somewhere that it makes sense. But as you can see, if
we even place it here, it doesn't look too good. So what we could
do here to benefit is basically we could select
this and we can flip it. So we flip it vertically by pressing right click
and flip vertical, making sure that you have first pressed Control T
and flip vertical. And now if I rotate it a bit by selecting close here to the corners and just
holding and dragging, we can sort of place it here. And as you can see, if I
move it around a little bit, we have created
already an eyelash that looks good I would
place something like this. And looking from the distance, it looks like her eye is closed very nicely,
very accurately. I really like how it looks. Maybe if you want it to look
a little bit more smooth, you can first select this layer. You can press Control
T on this layer as well and kind of adjust
it a little bit. So if you wanted
to make it bigger, you can move it around as
well, something like that. I will just give
you a quick tip. If you double click
this layer here, it will open this layer style. And there are several things that we can play around with. If you open the stroke, you can sort of
get some effects. But maybe we can benefit from
adding maybe a drop shadow. We can get a little bit
of an interesting effect. But what I think it's best
is that we go to this one, the bevel, and as you can see, gives a little bit of a
nice detail to the eye. I think it makes it
look more realistic. You can play a
little bit with the depth and the properties. So, for instance, if I put inner bebel and you can see
that if I turn it on and off, I think it gives a nice
effect, so I will leave it on. And now, when we go
away from the distance, it looks like her eye is
being closed. I like it. Maybe we can still try to soften a little bit this edge because it looks like it's
a very hard transition. So I will click this layer, and I will select the eraser. And with eraser selected
and using the soft eraser, I'm going to make it
quite big and I'm going to sort of paint on top. So you will see that
if I click a lot, I will basically
erase the whole eye. But if I only erase a
little bit the edges, you can sort of soften a
little bit how it ends, so it's a little bit more soft. I will do something very, very lightly so that it helps
transition a little bit. And I will finally adjust
it a little bit more. I will make it a
little bit longer like this and try to place it
a little bit accordingly. Something like that
looks good to me. It doesn't have to be perfect. It really depends on how
much time you want to spend. But if you want to be
even more precise, you can go to edit and
transform and warp, which will give you
these extra vertices to manipulate the
shape of the eye. This is very useful in
this sense because you can really have a precise
control of its shape. So I will make it that
it matches the eyelid, I will make sure that it fits nicely and it doesn't go below. When something like this,
I think it's perfect. We will call this eye complete, and it really looks
like her eyes closed. I like how it looks. We can compare with the initial video. And yeah, we have a
very similar result. So this is very nice. And recall that you can
always go to the closed layer and sort of still try to paint on this area if
you want to make it a little bit more
fitting with the eye. So I will just press the
letter B to go to the brush. I will maybe select this color, press X to go to it, maybe try to match a little bit. But I think that it looks
already fairly, okay. So what we can also do
now as a last touch, we can select the I then we're going to go to filter here and we're going to blur
it a little bit. So I will press a Gaussian blur, which if you increase it a lot, will look quite wd. But I think that a little bit, it helps it also kind of
blend a little bit better, so I will press here. And finally, I
will go to filter, and I will add some noise. So if you click A noise, it will help give
it some texture. So it will put it very,
very little noise. So maybe I type 2% and it gives it a
little bit of a grain. You can put Gaussian noise, it looks a little bit better. In this case, it matches
a little bit more than 1.5, something like this. Press okay. And I will
consider this done. So now we have to do the
same for the other I. In this case, we're going
to be a little bit quicker. It's maybe going to be
a little bit tricky as well because we have
the nose in between. Read the procedure
is very similar. So we're going to go
back to this layer, and we're going to
first delete the eye. So something like
this. Being careful to not remove the nose, for instance, and it will
not always look good, but I think that it
does a very good job. We'll make this smaller and try to just hide it
as much as possible. Something like that good. You can see this
correction tool is making a very good job actually
matching the shape, the contour of the
face, the silhouet. So now we have nothing
like I is disappearing, but we're going to create
something like this. And actually, instead
of creating it again, I'm going to
duplicate this layer. So the closed lead, I will just press Control J, and I have duplicated it. I will try to place it
here and try to use it in a way that we don't
have to create it again. So maybe if I make it
smaller, it will not work. But what we can do is we can
cut this layer a little bit so that it only shows
in the face itself. You can try to place
with the scale here. If you move it around, you can sort of try to match a little bit the eye
that would fit here. So, in fact, it
should be a little bit smaller because
it's further away. So something like
this, but of course, this doesn't make
sense because we have much extra lead here that
we shouldn't really see. What I'm going to do is
go potato a little bit. And I'm going to delete the part of the eye
that's outside her face. And to do this is very simple, we can go to the vector
mask that we have created, rest right, click and click
restaurants vector mask, which will now make it
into a regular mask, which means that if we paint black on top of the mask
with the mask selected, we will delete the mask. And like this, we can
just make it smaller. And if we press X
and switch to white, we will rebuild the mask again. But here we have a little bit of a bigger shade because we were painting that
was outside the mask. So whenever we were
just copying one color and painting outside of the eye. It's also being shown
here because we are revealing what was outside of the selection that
we have done first. But here, since we only have to delete this part
here, it's okay. We're going to sort
of make it like this, and it already looks very nice. We're going to duplicate
the eyelash again. So this will be
the other eyelash. And in this case, we
will have to flip it horizontally so that it's
facing the other way. But of course, here is
already too long again. So maybe this one we can just make it a little
bit smaller like this. And we will basically
erase part of it. So we're going to create
a mask on this eyelash. If I click this mask tool
here, we will create a mask, which means that if
now I paint with color black on top of the eyelash while this
mask is selected, where this white
rectangle is selected, it means that I will
erase the ALASh. However, if I switch to white by pressing X, I will
show it again. So this is using
an eraser that has the ability to go back
to what we have erased. Because if we use the eraser
while we select the shape, the eyelash, I will
press E for the eraser. It seems like we are
getting the same result, but now I cannot get back
what I have deleted. So we would have to
press control that, but the use of the mask
it really helps us being able to go back to what we
have erased at any point. So if we want to change
it a little bit later, we will always be able to
simply go black and white. So I will select the mask. I will go to the brush tool, so Letter B, brush
and paint black. And something like
this, maybe I can just leave it a little bit
that's showing outside. And I will try to
reduce a little bit the size of the brush and create a little bit of a pointy shape. Something like this, not
really too easy to see now because it's matching the color here of the hair, but it's okay. I like how it looks and perfect. We have the eyes closed. What I'm going to now
is that since I know that I like how her
eyes look like this, I don't think that I will
modify it later at any point. I will just simply hold down shift on the uppermost layer, which is this eyelash, and I will click this bottom
layer with a closed eye. So I will select all
of these layers, which are the layers which
make the eyes being closed. And with all of these
layers selected, I will press Control E. Which will merge them
into one single layer. And we have lost the eyelids, the individual
objects, the eyelids, the eyelash, the eyelash,
the other eyelid. Now we don't have them, but we have merged into single layers. So now if I press
this on and off, you can see that
we are closing and opening her eyes. So
it looks very good. And now you can imagine that if we go into after effects and we basically toggle on
and off these layers, we will make it seem like her eyes are being
closing or opening, so this is the first step, and now we're going to do
the animation with the hand. In order to make the
animation of the hand, it's a little bit more
tricky because in this case, we don't want to
create a new object in the image like
the eyes closed. In this case, we want
to use this arm, and we will want to move it. So if let's say I go to the layer with the open
eyes, for instance, and I select very quickly, I will just make it
you have to do it. But if I quickly select
this very badly, what we want to do
essentially is that we want to be able to move the hand a little bit like this and make it seem
like she's writing. However, see that whenever we move the hand in
any sort of way, we start to reveal
what's behind the hand, but see that we
have nothing behind the hand because this
is to the image. There's nothing behind. At the moment that we move something it will show
the empty background. So in order to move the hand, we will need to kind
of generate something fake behind it so that
whenever we move it, it doesn't show something empty, which means that, for instance, this sort of wooden handrail, we would have to generate it
here because here it doesn't exist where there is the
pencil in this part here. Let's say, it doesn't exist,
this wooden handrail. And at the moment that
we move the pencil, we would need to see what's behind this continuation
of the handrail, which would be very simple
to do if I press the brush, we would need to see this how
the handrail is continuing. I'm doing it very quickly. But something like
this, we need to basically see this and
not the empty background. So we'll kind of need to fix
this and do it ourselves. We'll generate the background for the places where we
don't have the background, which are covered by her hand, which will allow us
to move ahead and still see what's
behind the hand. Because right now,
as I said, behind her hand, there's
no information. There's nothing, and we need to kind of recreate it ourselves. So we're going to start
first by selecting the hand, and we're going
to forget also of the layer that we have created before with the eyes closed. We're going to just work as
if we had just one layer. So with this one selected, I'm going to use
this selection tool, I'm going to click it. And I'm going to try to select her hand by clicking on it, and it will select
the similar color, which see that it really
follows the shape of her hand. I will extend the mask by
clicking more in her hand. Finger here, and I will also include the pen
because they will move alongside together
with the hand so they can be selected in
the same selection. And I will maybe also select
this part of the leaf. And I think that this is good. We will not make her
entire arm move. So we don't really need
to select anything else. We will not need to generate
a background for what's behind arm itself just what's behind her
hand a little bit. But as you can see, the
selection doesn't really cover perfectly
her hand entirely. There's a little bit
of a border here. So I'm going to try to
simply drag it a little bit more so that it
follows her hand, this sort of glow that's
outside her hand. But if you click too much and you start to select
something extra like this, you can just hold down old and click and it will
start to get rid of it. So this is also nice. So making sure that we only have the hand and the pencil
something like this. Don't forget the bottom. See that we also
will need to account for the shadow because
when we move the head, the shadow will
also need to move. But we can also just get rid of the shadow and not
create any shadows. Adding shadows is just
adding an extra layer. But now we have this selected. And what I'm going to
do is press Control J. And if I hide this layer, you will see that we
have the hand here, so I will just do a picture
on the name and type hand. And now, if I click
Control and click on top of the layer icon here, I will select the selection
again, which is very nice. And what I'm going to do is that I'm going to go here to select, I'm going to modify, and I'm going to expand
the selection maybe, let's say, five pixels. And as you can see,
this will extend the selection around her hand. So now we really make sure
that everything is selected, even a little bit extra
that we don't need. But what we can do
with this is that if we go back to the open layer, we can hide the hand.
It doesn't matter. If we go to this layer, and now we go to edit and
fill and content aware fill, you can leave these settings at color adaptation
and opacity 100. If you press Okay, you will see that the
Photoshop tries to generate what's behind her hand which in fact looks
quite bad here, but in some areas,
it looks quite good. But see that we
still have the hand that we have duplicated
as another layer. So we really haven't lost much. But what this allows is that whenever we now move the hand. So if I press control
it to select this, if I now click the hand and I just press control the
and move it a little bit, you can see that now we
have something behind the hand, which is very nice. And since the hand will not
move too much until here, we don't really need to fix
perfectly these issues. For instance, if we move it
a little bit to the right, it doesn't really show
any of these mistakes. So this is quite nice and
we move it down as well. So we will not really
need to worry much, maybe just here on the side
and on this part here. So I will just hide the hand, and I'm going to try to
fix a little bit this. So using this tool from before, we can just select the layer open and try to
paint a little bit. And this will help kind of
get rid of these issues. It doesn't always work but sometimes if you kind of
help it and go slowly, you start to get rid of it. So with some patients,
we're starting to remove quite
nicely everything. As you can see, we
have removed most of the pink slip that had
been sort of created here automatically by
Photoshop trying to approximate what should be here based on the
content that's around. We're going to kind of
remove the shadow here and also try to smooth out a little bit the lines
here of the paper. We'll generate
something extra here. It will be quite simple. And sometimes if it
needs help here, as you can see, even if I paint, it doesn't seem to get
rid of this extra lime. Well, now it really does, but sometimes it gets stuck. So what you can do is go on
the brush and try to help it a little bit by sort of
matching yourself the color. And now you can use the tool
again and it will not have as much trouble trying to match the colors here
and generating the fill, which is good,
something like that. And for this, even
if we drag down, it will probably never
realize that it has to continue the pink
color downwards, so we will have to
do it ourselves. And in a very simple way, we're going to simply select
the pen and just go down here and I'm going
to also go around here and kind of
create this rectangle, and I'm going to
press right click, make the selection and now if I press a letter
B to go to the brush, I will copy this color,
press the letter X, and I will paint
here and that's it. More or less. We can paint now a little bit outside the
mask just to kind of get rid of this very sharp color and I will use the blue now to smooth it
out a little bit. I went to do the same
here on the other side. Even I will maybe
not select anything. I would just try to
painting like this. Will make the brush a
little bit smaller here, something like that,
it looks fairly okay. This one again, try to
make a straight line, and something like that
looks fairly okay. Maybe with the blue, I should make it a little
bit smoother here. And again, there are
different tools. You can use the
generative AI tool by just selecting here and typing here in the
generative field. But like this is
also good practice. And what we can do now is that if we turn
the hand on again, we will need to fix a little
bit this on the bottom. So what we can do is we can
take the stamp tool here, which will copy a
part of the image. So if we place the stamp here, we can make it
smaller or larger. I will place it here
and I will press old and click and it
will copy this line. So I will kind of now
paint based on this, I will click here and it
will copy these lines here, and I will try to
follow the lines, something like this, and
I will do it again here. The clicking and dragging, you can see that we are doing the lines and
something like this, starting to upgrade
a bit better. Well now hold this tool again, try to fix this. And something like this, I'm
quite happy here's how it looks because now this
allows us to move the hand, press the hand and control T, we can see that if we move it a little bit
around like this, we have extra room
and we are not ever showing what's behind in a way that it reveals
an empty background. So this is very nice. So if we place the hand,
something like this, we now have everything prepared to kind of animate a little
bit of a movement of a hand, which we will do
in after effects. But lastly, I want
to just delete a little bit this mistake
here of the selection. So I will just click the hand and press letter
E to select the eraser, and I will just paint
a little bit here to erase a little bit this. Okay, now it looks good. So see that we have now the
closed eyes and the hand. Of course, see that in
the closed eyes layer, I will rename it to closed. In this layer, we have
the hand and we had it in the beginning because
we have duplicated the layer at the very start. So it contains the hand as it was in the initial
state of the picture. While in the open eyes picture, we don't even have the hand
and the head we have it here, but we have this background. So we are interested
in these two layers to kind of move the head around like this, we
would move the hand. But in this layer
with the eyes closed, we just care about the face
itself and the eye area. So we will fix this
in after effects, or we could just simply make
this layer much smaller. So if I, for instance, select this box selection
tool and I will select around her face
and press Control J, you don't have to
do it because we will do it after effect. But basically it will get a crop of the closed
eyes like this. And this way, if we hide the
main closed eye pictures, and I just keep this one on, you can see that even
if I turn this one off, it doesn't show how
the hand is moving like it did with
the closed eyes. That's what we will
do in after effects. But for now, I will
just delete this one, just keep these three layers. And then after effects,
we will be able to add some extra effects here like articles moving around and animating the movement of
the hand and the eyes. For this, it is very important that you save the
project here in Photoshop as a photoshop file so you go to file and
you press save us, you will see that
you can save this as a Photoshop dot PSD file. Let's name it image layers. And we will save it. You
can press okay here, and now you can close this
and open after effects.
3. After Effects: Animating the image!: Now that we have saved
the photoshop file here as a PSD file
named image layers, we can bring it into After Effects and we will
animate it there. You can go to File M and
create a new project here, which will bring
this interface here. What we can do is very simple. We can go to new
competition from footage and we can
try to find our file. So I'm going to go here and just double click here and it
will open this menu, which will ask, how do we want to import this Photoshop file? We want to leave the
editable layer styles on, not the merge
layers because this will simply convert all the
layers into a single layer. We want to keep them separated. So we keep this option and we're going to press Okay
and see that this will create already
a new composition with the same size as
the Photoshop file. We can check this here
in composition settings. The size of the composition has adopted the size of the
image, which is very nice. We can check the size of the
image very quickly here. If we go here to properties, and we go to details, you can see the dimensions
of the image have been written here as
the size of the video. And we will leave the
framework here at 25 or 30, doesn't matter. Maybe we can leave it at 30. It's more standard, but it will not make too
much of a difference if it's 25, 29, 24, 30. I would recommend not to go
below 24 or not below 23.9. It's almost the same
between these two. And you can go higher, but it depends also on the style of the video that
you want to do. 30 is the standard. So we're going to
leave it at 30, and the duration can be kept at ten or however long
you want the video to be. For now, we can keep it at ten, but this you can change it at any point by going to
composition settings. Or pressing Control K
will open the same menu. We're going to rename
the composition as maybe something that's
more clear to understand, which will be the
final animation. And inside the final
animation composition, we have the image
layer Photoshop file, and inside the image
layer Photoshop file, if we double click, we will have the layers that we have created. So we have a new composition, which is called final animation, which is an empty composition
like this of this size. Inside this composition, we are placing our Photoshop file, which inside of it, it contains different layers, which they look the same
as they do in Photoshop, so we can hide them and see that here we
just have the hand. You just have the layer
with the eyes open, and we have the layer
with the eyes closed. At any point, we can
go into Photoshop. We can double click this, and
it will open in Photoshop. We can modify everything. And once we save the
file in Photoshop and we open here the file again, it will be modified.
So this is very nice. Let me show you an
example that if I open Photoshop and I will try to
modify just the hand, maybe, I will paint align with the brush or something
that's easy to see, and it will show up
here in after effects. This is very comfortable
because at any point, even after working on
after effects for a while, we can still come back here
and modify something in photoshop and I will show up here and we will not
need to do any changes. So here I have the
photoshop file open, and I will paint a line,
as I said on her hand. To see the hand, I
will make sure that the upper layer is
hidden like this, and I will just paint a line, and I will save the file, and you will see that
when I go back to Aftereffects it has updated. This is very nice. I will press Control that, save it again. C close Photoshop already, and it updates, and now
the hand is normal. So this is very, very nice. What I'm going to do now is that we can create
the animation. It's very simple. And
we're going to do, as I said, a few adjustments
here with these layers. So to animate the
hand is very simple. We have to benefit from the open eyes layer that we
have created because it contains extra background that the closed eye
layer doesn't have. So if we hide the
upper layer and we can just click the hand and
try to move it a little bit, you can see when
we move the hand, we have this background that we have generated by ourselves, painting it, which
allows us to move the hand and not
reveal anything or any artifact or the previous
hand because if we place the hand on top of the
closed eye layers, you can see that when
we move the hand, we will reveal the hand that was already in the initial
image, which is not good. So we're going to basically hide the closed eye layer and we
can move the hand like this. So we're going to press Control set to bring it in the
original position, and it's very simple to
make the animation here. What I'm going to do is that I will select this tool here, the puppet position
pin tool here, which will enable us to
create some movement while also keeping some
parts of the image still. So I'm going to show
a quick example. If I place a pin here
and another pin here, now I can move this pin here, the second one with
respect to this point, which you can see, it's like the anchor point and
we can move it around. So this is very nice. But if we just put two pins like this, it doesn't look good
because the sleeve is moving in a way that
it shouldn't move, shouldn't just come here and just go outside of
the actual hoodie. So we can just create more pins, which will lock the leaf. So I'm going to place one here, maybe one here as well, and another one here, and
even another one here. But I will make this just here before I
even moved it once. So something like
this, this will create a very solid hold
position for the hand. And now if I move the hand, you can see that this remains still because we have
locked with the pins, and this hand can move
freely like this. So that's essentially it. Now we just have to animate the hand moving a
little bit randomly. To do this, it's very simple. We can just select the hand, and we have to modify the position of this pin
that we have placed here. To see the pins, we can click the layer of the
hand and press letter U, which will open the pins
that we have placed. And the last one
that we have placed, the pin six is the
one here that is in her hand in the
knuckles and the others, as you can see, when you click over them, they
will be selected. So you have to find the one
that's here on the end. And if we move the
position of this last pin, it will move around, and it will essentially
create key frames. What we want to do is basically we start at the
original position. Like this, we start here
at the original position, and we want to move
it a little bit. After some, let's say, 1 second, I will place
it a little bit. Like this, the position, we press letter U, the
position of this one. I will maybe move it a little
bit hold down like this. So if I play the video now, you can see that her hand
is moving for 1 second, then it will stop
because we have set the value to be here
after 1 second, and at the second zero
is at initial position. After 1 second is at the
position that we have specified here by moving a
little bit these lighters. So I will move to another
second and maybe move it up a little bit now and
back something like this, and you will see that the
hand is starting to move. So this is very simple, and we could do this
a little bit more, but I will show you a
way that's much better. So I will delete this key
frames that we have placed. So we have the hand back
at its original position. I'm going to create an
expression here which will make the position move
randomly at all times. So I will just pull down all and click the
stopwatch here, which will open this menu
where we can type expression. We will type wiggle, and we're going to open
parenthesis and let's type maybe one comma two. Which will indicate
the frequency and the amplitude
of the movement, which translates to the position will change once per second, maximum plus two or minus
two values up or down. So if we just click away, we will see that the
expression is placed. And now if I press play, you can see the hand
is moving slowly. But it's maybe a little
bit hard to see because we didn't really bring too
much the amplitude. So we're going to
press five maybe, and it will be more noticeable. And as you can see,
the hand is already moving, and it looks quite good. You can experiment a little bit if you wanted to
move it quicker, maybe type two here. And
it looks quite nice. Maybe, to me, it looks
like it's fast forward, so I will just leave it at
one and maybe I will type seven just to have a
bit of a larger move. And yeah, that's it. Maybe even you can go 1.5. When something like
this looks good, maybe it will reduce
it a little bit more. 1.2, and that's basically it. We have the movement of
her hand very simple, which will continue during
the whole composition, the whole time that
this video is going on. And now we just have
to animate the eyes. Animating the eyes, as I said, it's stuggling on and off
this layer like this. We would close and
open the eyes. But of course, we
have to take into consideration that the layer with the closed eyes
also contains the hand. It's not just the eyes, but it's the entire layer. If I hide these two layers, the hand and the
open eyes layer, and I can press
the letter U here. To hide the key frames and
the different properties. You can see the
closed eye layer is an entire layer that
once we activate it, it will cover the entire screen. So even when we have
the hand like this, when we activate this layer, this one will overlap it. So we want to just
keep the eyes. We don't care about what's
outside of the closed eyes of this layer because we just want the eyelashes and eyelids
mainly from this layer. The rest is exactly the same
as in the open eye layer, and it's just bothering
us the fact that we have the hand as well in
the closed eye layer. So what we're going to do is that we're
going to just crop, as we have done as an
example in Photoshop. We're going to crop only the
part that we care about, something like a box
around her face, but making sure that we are not selecting anything around
the hand because we really want to have the hand and the
arm area and the book from the open layer because here is where we have
created the background. So we're going to go back
to the closed layer. And you can see that if you
have the layer selected and you select this box here, you can create a mask around the area that you want to keep. So I will just create a
mask here around her face, and right now we have cropped the closed ice layer into
this shape only the square. And now if we activate
the open layer, again, you will see that we have
the eyes closed on top, but it's only this layer. You can see if we move
this layer with RRP, we can drag it little bit. You can see that we have
basically duplicated the head when it has the eyes closed
and here on the open layer, we have it when it has the ice. Open. So if we just bring it back to the top and we
click it on and off, we are just opening and closing the eyes without affecting
the hand because we are only modifying
this area that's being determined by the shape that we have created here with
the rectangle two. We just creating a
mask around the face. So with this being set, if now I play the video, we will see that the
hand is still moving, but the eyes are always closed. And in order to basically
open them and close them, we would just need to click
this button like this. But there is, of course, a way of doing this automatically, and we will benefit from
an expression as well. So what we have to do in order to turn on and off the layer, it's basically modifying
the opacity of this layer. So if I press the letter T, or I go to this drop down menu and go here to the opacity, I will turn it on
and I will press the letter T just to
show the opacity. We can make it so that
when the video starts, her eyes are open. So I will drag the
opacity at zero, which is the same as
hiding the layer. And I will place a
keyframe here which will tell after effect
that at second zero, we want the ice, we want
the opacity to be at zero. Therefore, the eyes to be open. And after 1 second, I will
make her eyes closed. So I will place a
keyframe here at zero again because I want the ice
to be open for 1 second. But then after 1 second, I will move just
one frame after. So I will press control
and the right arrow. So I moved one frame and I
will bring opacity to one, which will make the
ice go from zero. You have press control and left arrow and control
and right arrow, I can move one frame. And at this keyframe, we have changed opacity
from zero here to 100 here, and it just goes from her eyes being open
to her eyes being closed, and it's open as long as the opacity is at
zero, you can see the value. It remains zero until
we get it to 100 here. It's very important to have
this keyframe at zero here as well because otherwise they will be opening the eyes very slowly. Because it would go 0-100
in around 1 second. While with this one hero, it will stay at
zero for 1 second, and then it will just
jump 0-100 in one frame, which means instantaneously,
basically, like that, you could move this one a little bit if you want
the eyes to open slowly, but this would generate a little bit of an effect that maybe doesn't
look too good. So we're going to just
leave it like this. They will open and
close instantly. So if now I press play, you can see how the eyes
closed after 1 second. And let's open them again. So in order to open them again, let's say that I want it to be half of a second,
the eyes closed. I will place a keyframe
at 100 opacity here, which will maintain
the eyes closed during these two
keyframes, these two. I will make a zooming
the timeline here by dragging this so you can
see it little bit better. During these two keyframes
we have the eyes closed. During these two, we
have the eyes open, and during these two
there the transition from the eyes being
open and closed. And I will do the same here. I have them closed,
and I want them open, so I will bring the opacity
here at zero, and that's it. If I press space, you can see that we are opening
the eyes for 1 second, half a second closed and
open them again. That's it. If we want this to be
repeating during the video, we could just copy this keyframe Since this last keyframe
here has the value of zero, and the first one
that we have placed also has the value of zero. We could just copy all
of these by pressing Control C and going into this keyframe here and
pressing Control B. And it would just replace the keyframes and we would
get the same result. See that we are repeating
the animation twice. But we can also do something that's a little bit more clever. We're going to benefit from the expression,
as I said before. Once we are here at the end, we can just out click the
stopwatch and we will open the expression menu here by pressing the
play button here. We can go to the property and just click the Loop
out, this one here. And as you can see now, if we press Spacebar at the beginning, it will loop this keyframe, and it's very important to have the first keyframe
here and the last one here to be the same
value at zero opacity because it will loop
nicely and smoothly. Otherwise, it would
make a sharp switch from this value here
to the value here. So if you press Spacebar
you will see that. Your eyes are being closing and opening as a loop, however, maybe you will want this to be a little bit less persistent. So we can actually press control here and use another
of the expressions. So we can go to the
same property here, and we will add the loop out
with a certain duration, which will mean that it will not loop again until this
duration has passed. So if I add, let's say, 2 seconds here, it will take 2 seconds before this loop
is being repeated again. So this looks better, and maybe you can
increase it to four. So if you increase it to four, it will take 4 seconds
for the loop to repeat. So let's play it. Now,
her eyes will be open 4 seconds until they close
again. So this is very nice. Maybe I will leave it like
this or maybe just 3 seconds. And something like
this looks good to me. Her hand is moving and her eyes are opening and
closing very nicely. We're going to press
Control S to save. This project is important, and I'm going to name it
something like image, animation. Good. In the original video, we could see that she was
also moving a little bit, her back and her head, and we're not going
to do this now in this video because it's the exact same thing as we
have done with the hand. So we would have
to do this here. We would have to
select her little bit. Create a new layer and then sort of replace the background
that's behind her. So whenever we would
move her head, we would see the
background here and not just an empty
PNG background. So this is something that is done the exact same way as
we have done with the hand. And then in that
case, we would have the layer of the hand and
the layer of the body, and we would move
the body the same exact way as we did
with the puppet pin. However, to make it this
a little bit shorter, we're just going to
do it with the hand. And now we are going to simply
add some of the effects here and also that leaf
that was shown here. So in order to do
this, we need to find first an image of a leaf. We could create or duplicate
one of these leaves here, but I think that since we can just make it
a little bit blurry, we can get a stock
image of this plant. So let's jump to the
browser and try to find a PNG image with a fern. This plant is named fern, and we can get one that has no background to make
things easier for us, or we could just
find another one that we like and remove
the background ourselves. But here, I can just
go online and try to find one that
resembles fairly okay. The one that we're seeing here. So I like this
one, thinking that I'm going to simply download it, and here it looks
like it's PNG because the background has this
sort of checker pattern, but it's not always PNG regardless of showing
this pattern. I will just give you
a small trick to know whether this
image is PNG or not. Is that if you
click and drag it, you can see the shape
of the image here while I'm putting it here on
top of this black surface, it looks like it doesn't have any
background, which is nice. However, if we try
with maybe this one, See that the checker pattern
is included in the image. So even if we don't
load it as PNG, it will have the white
and gray background. So we don't want this. This is a very nice candidate. However, when I'm
placing it here on top of this black background, I can see that it
has this watermark. I'm not sure if it's
visible in your screen, but it has some watermarks here. Maybe we can find another
one, but in theory, we should download it in an official page that
has no copyright images. So maybe I'm going to keep maybe I'm going
to keep this one, which has a watermark as
well here at the bottom, but we can get rid
of it very easily. So I will just save the image, and I will make sure that it's
in PNG. Going to be safe. I'm going to go back
to after effects, and I'm going to bring this
image here on the project and I will place it here on top of everything
in the composition. And you can see that the fern is being placed here. Is nice. I'm going to scale
it up a little bit, so I will press letter S to open the scale and just make
it a little bit larger. I'm going to press letter P, and I will place it
something like this, and I will pass letter R to rotate it a little bit,
something like that. And I will maybe make
it a little bit larger. And like this, I will also change the color a
little bit to match this darker green and I will blur it also so that it's not
so much in focus. To achieve this, we're
going to add some effects. So we're going to go
to Window and show the effects and pricets it
will show this panel here. We're going to bring
in the lumary color, so we can try lumetri color, which will give us many
properties to change the colors. We're going to go to
creative, let's say, and basic correction, and
we're going to make it a little bit darker by decreasing the exposure a little bit. Something like that. And I'm going to increase saturation
to make it more green. And this already looks
a little bit better. I like how it looks, and now I'm going to just
hide theme color effect, and I will add a blur. So let's use let's say one of these blurs that come by
defaulting after effects. We can use camera lens
blur and we will place it here on the bottom or
on top of lomtry color. It doesn't really
matter, but we're going to decrease the
blur radius a little bit, maybe just place it to one. It's blurred a little
bit. That's nice. Maybe just 0.5 will be enough. Look you can see the
before and after by clicking the FX here. Good and the effect
of the color. Nice. So with this
fern plant being placed at the right position
and with the right color, we're going to use
the same as we did with the puppet
pin with the ice. So I will select it. I will place one pin here
to lock the position here, and I will place maybe
another pin here, and I will just move a
little bit this pin by pressing you here
to show the pins. I will select the pin
to. Old click stopwatch, Wigle maybe let's move it two
times and more amplitude. So let's put 20 here. We'll see how it
looks. Maybe that's too much and too quick. So I'm going to make
this one and ten. Yeah, something like
that looks quite good. Maybe it's still
a bit too quick. So I will just put 0.5 Yeah, this looks good to me. So now what we can do as
well is that we can add some particles in this image to make it a little
bit more dynamic. So in order to do
this, we need to find like we did with the fern image, we need to find a video that we will overlay
on top of it, and it kind of has to
be like a PNG video, but the videos
don't exist in PNG, so we need to find one
that has, for instance, black background, and
we will just remove the black or it's dissimilar
with the green screen. We can just remove the
green out of the video, and it will just
show the elements that are in the video but
not the green screen. But usually it's very
easy to do it with black. So we're going to try to
find one of these videos. So I found this video,
which looks quite good, it's a dank particle
with black background, and it's a YouTube video, and we can download
it very simply. So we can just go here and use a YouTube MP four downloader
by typing YouTube. MP four downloader, and it will show so many
websites that we can use. I will choose one of them and
I will download the video. I have downloaded
the video here, making sure that it's in
Pfour format and I will just bring it to the project like we did with
Fern, like this. And this video, I will
just place it on top of everything and I will scale it so that it
fits the entire screen. Something like this.
As you can see now, when we play it, of course,
it will cover the screen. We don't want this, we just
want the dust particles. So to remove the
black background, we can just click here
in total switches and mode and switch
the mode to screen. Now once we play, we have the particles here, which in fact really suit the scene very
nicely because they come from this side and they
reveal her in a nice way. This is very nice. What we can do as well is
that we can maybe press letter T and reduce a little bit of opacity if you don't want them
to be so visible. Like this singles looks
a little bit better. It doesn't have
to be so obvious. And this is more or less if
you could do the same with the butterflies and smoke and
whatever you want to add. And also, I will show
you a small trick to add some sort of movement to the image as well in order to compensate
for not moving her body, we can add some dynamic movement as if the video was recorded
handheld by another person. This will help maybe sell
it a little bit more. And make it look
more like a video. In order to do this,
it's very simple. We will just reg letter
you to hide everything here and we will create
a new null object, which will act as a controller for all the
videos that are below, which will make them move with the wiggle expression
that we have used before. In order to do this, we can
select all of these layers by clicking on the upper
one shift and the last one, all of these are selected and we will drag the parent link Piquip here and we will
place it on the null object. Nice. Now, whatever we move in the null object will control the object
tota parented to it. So if I press P as
an example to open the position and I move the
position of the null object, see that all the
layers are being moved because they are related
to this new object. I will just click
the position here and add an expression by
clicking the stopwatch, wiggle and let's make
something quite subtle, one, one, which will make the
image move a little bit. I'm not sure if it's
too noticeable for you, but it's already moving. I will just make it a
bit higher so that you can see that it will not
look good if it's too much. You can see now the image
is moving like shaking. So you just need to find a set
of values that looks good. Maybe two, two will be better. I like how it looks, and you can do the same as well
for the rotation. So if you press letter
R and wiggle try one, one here because the rotation
is very noticeable usually. As you can see, the image is rotating a
little bit as well, but I don't really
like how it looks with the rotation unless
you do a very, very small value, so we can
try Wiggle one and 0.2. Something like this was good. And I think that
more or less this kind of solves our video. Be careful that if you increase a lot of the rotation here, it will show some black
lines here because the image is not big enough to fit the entire screen
because we are rotating it, so it gets out of
the frame here, and here it reveals the empty background
because if you select the open image and I will
show if you rotate it, of course, it will
show the background because here there's no image. So in order to
compensate for this, you can just increase
the scale a little bit. So now even if you are
rotating it a lot, it will still not show any black edges because you are having the image
a little bit larger, but I will just keep
it very slightly, and I will increase it just a tiny bit so that we don't have any of these black edges showing even when the rotation
is at the highest peak. And like this, we
have the image. But of course, be careful that if you scale the open eyes, you need to scale
also the closed eyes. Otherwise, you will get this effect which
doesn't look good. I will just copy the
scale here of 101.9. We'll click press Control C, go to the closed eyes,
open the scale, Control B. Like this, I have the same scale on both
eyes, and that's good. And that would be the video. I will just bring
the quality to full and I will double click here to make the screen focus here, and I will just go here in
the Zoom and press fit, and I will press Spacebar and
this will play the video. It takes a little bit to load because we are in full quality, so I will just press it to hold. And as you can see,
that's our video, feel free to add as many
details and effect as possible. You could add another leaf. Here, you could add
a bird flying here. If you have the bird
with a black background, you can just do it
with the screen mode, and it will just
remove the background. You could move maybe these
plants here as well. You could also again move her body or at different things, it is up to you and how much time you
want to put into it. But this is the general concept, and I hope that you
have learned how to do it properly and feel free to contact me if you
have any doubts. If you have animated the same
image or any other images, feel free to share them in
the projects of this class. I would really love to see them. R means a lot to me to know that you have
followed this class, and I will leave some feedback. And hopefully, right now
you have some extra skills to step up your aging game and bring your videos
to a new level. So I really say thank you to you again and I'll see
you in the next one.
 Auripher ∞, Creator