Transcripts
1. Course Intro Sora Bonus Edition: Hi, my name is Greg Kang. I'm a Canadian video
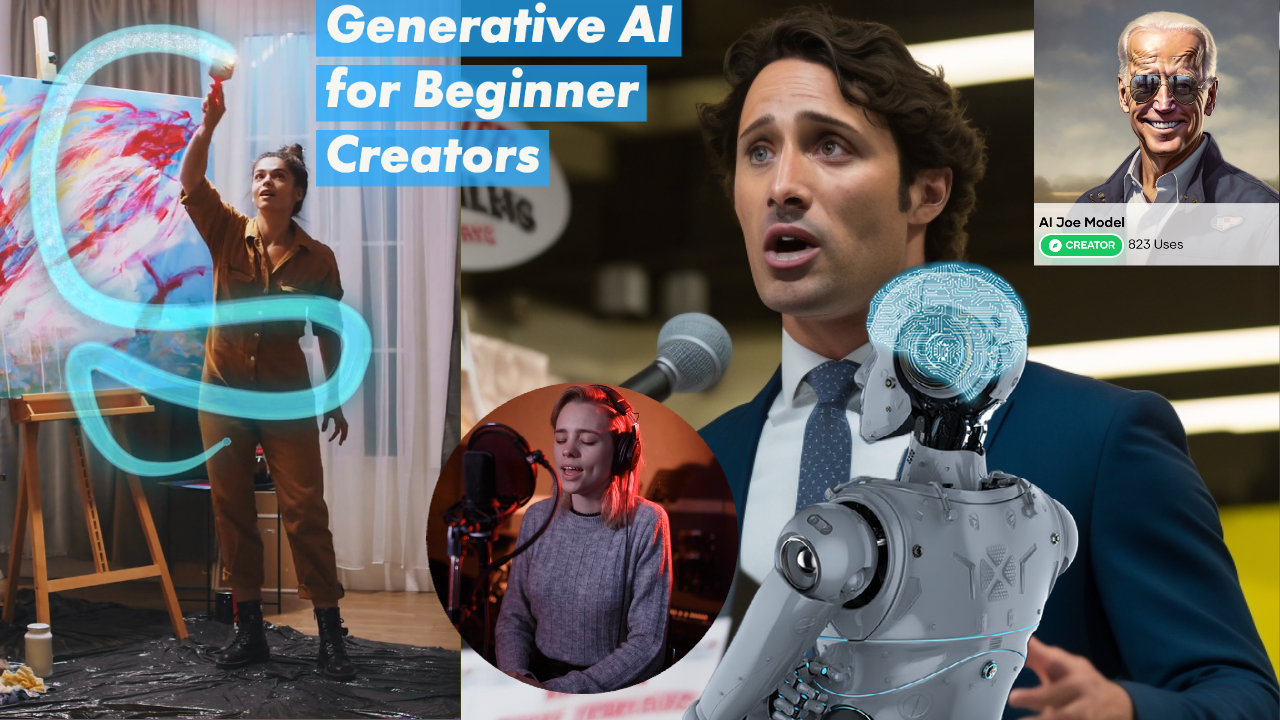
creator of over ten years. Welcome to the online
course for Generative AI, aimed at beginners
and creatives. Artificial Intelligence or
AI is super popular in 2023, mainly because of
the popularity of Open AI's HaibT four and
the new Bing by Microsoft. But creators can leverage other platforms to use
the algorithms and models to create their own
original content on platforms like
Adobe's Firefly, Mid Journey, Dolly two, Voicify soundful.com,
and Synthesia. In this course, you're
going to get easy to follow along
exercises that allow you to get the hands on
practice and also allow you to generate your
own original content. I look forward to
seeing you inside the course to starting your
own AI creative journey, so I'll see you on the inside.
2. Adobe Firefly Pt 1 - Text to Image: Alright, we're gonna look at Adobe firefly data and I say beta because
this is super new. It literally just got unveiled
a couple of days ago. It is mid May of 2023, and expect Adobe to
release new features. As the weeks and months go on. Adobe is probably
the largest company in the creative space. Premier Pro for video editing. They have Adobe Photoshop, illustrator and a
whole lot more. And we've seen the
startups that are playing around in their space like mid journey and Dolly too, with texts to image generation. So let's look at
Adobe Firefly Beta. So right now they do have
texts to image generation, similar to Dolly
2M, the journey. They also allow you to create texts effects so you
can create names, words, and easily changed the
designs using a textbook. We also have the ability
to create vectors, as well as me, color vectors. So the vectors are rapid designs that
don't lose our quality. No matter what scale or
resolution that you have a mat. We're going to jump
into the computer and we're going to
explore some of these new features that
Adobe Firefly has released. Either we're going
to take a look at Adobe's text to image. So this is very
similar to Delhi to, or month journey that you
may have heard about. But there are some
limitations of this tool. So I'm going to show
you some examples. And let's get started. So let's click Generate. Then you notice the text
prompt at the bottom. So it's English only right now. So you can basically
type anything. But the way I like
to start off is, Oh, look at these examples here to find an art style that I like. And then I'll just use their text prompts
and then modify them. This scrolling through. Still. Looking through an
art style that I like. Yes, I must be getting pickier. Okay, this one's good. This is pretty realistic, so I'm going to
click on Try prompt. So look at this long
description here. So I'll just show you some
basic navigation here. So we're always going to get
four tiles that you can, you can actually
download if you like it. You can hard it. If you want to add it
to your favorites. You can submit it to
the firefly gallery or you can even use it as a reference image
for the future. So if we click reference
image, you can see here, there'll be used to
influence future generation. Update the prompt
to see the results. Alright, so it's regenerating. On the right-hand side, what we have is we can
change our aspect ratio. So e.g. Instagram, they
use square one by one. But maybe you need to put
something on YouTube. And you want a 16
by nine widescreen. We have content-type, so
right now it's set to none. We can change it to photo to
get a more realistic look. Or you've got art or graphic. Okay, So this is really nice. It's got a nice art style, so I'm going to favorite that. I can click download to save it. So I'm actually
getting a download. And I'll show you what
the download looks like. It actually gives you a watermark on the
bottom left hand side. So you can actually use
this for commercial use. Not quite yet
because it is beta, I expect, expect that to change. Okay. So hopefully you
can see everything there. Okay, so let's look
at our artwork. So we actually haven't
changed our text prompt. So what I'm gonna do is I'm going to change,
use my imagination. Modern condo, modern 50, 50 story condo tower. Here. Let's click Generate. So it should be in
a similar location but different structure. I like this style. So I'm
going to favorite it. Okay, So let's just change this fifth Martin 50 story condo by the beach with ocean waves. Golden, sunset filling the sky. Okay, and let's regenerate. We can still see this reference
image on the bottom left. Wow, so this is
looking a lot better. Actually like this one. I like this. Let's get a variation. So on every picture tile, you're going to have
this icon shows similar. So I'm just going to click that. It's going to regenerate three other images that
are somewhat similar. Then what you can
do is actually, you can do it again to one of the three other
generated images. Click, show similar. So you can just see there's so many options to
create variations. It's like inception mode. Alright, I like this one here. Ocean waves and white sand. And a restaurant bar. Alright. Reminds me of Barcelona. Okay, This is nice. So let's play around with stuff. Let's change it to graphic. Okay, So, but more of a
conceptual type of artwork. Let's change it to art. And you can see the styles
that we're selecting. We can see them by the
text prompt here so we can clear them at anytime. But yeah, I just wanted
to point that out. So we've got art. Now. There's different styles. We can click effects. Bio, luminescence is click that. Let's click Generate again. Let's see what we get. Then we look more spacey. Very interesting. I think I like this one.
Still. Download this. Okay, so I want to
show you how we can also change
some other things. We got color and tone. So we can use a warm tone. Golden hour lighting
and shot from above. So let's regenerate. Didn't make too much of a
difference, little bit. But I think I've given you
some ideas and this is a good, good way to start. Okay, so let's clear the
styles once this regenerates. Okay, so let's do one more. Let's try something
completely different. So again, I like to start
off with different artwork. Let's look at examples. Okay? Okay, this side here
I like this one here. This is something out of
a architectural magazine. Tear design, a perspective
of a living room. Okay. A large cowork space. Wide angle changes to shot
from above, degenerate. I'm curious to see what
we get. That's nice. Let's add some people. And what else we can make
this more into a go. Get some dramatic
lighting generates. Alright, this is really nice. Let's download this one. Cowork space at the beach on a condo, rooftop, tall condo roof top. There. There we go. This looks like like bliss. I'm going to favorite that. Well. Alright, so hope I've given you some examples and some help for getting started with texts the image
on Adobe firefly. And you remember, you
can clear your styles and you can always
generate variations. And it just seems like there's endless possibilities here to create concepts or
artwork for any use. And just remember, you've got
that watermark right now, but that should change
in the near future.
3. Adobe Firefly Pt 2 text effects: Okay, welcome back. Let's look at the next feature. We just looked at text to image. And now we wanna go
over to texts effect. So we're going to click on
generates under Dolby firefly. And you can see we've
got some examples here. And we can scroll
through and use that as a starting points. And we can actually just enter the text
effect that we want. But let's just, I think
it's always easier to start from an example and then
you can start from there. So I just click that. And you can see the
text effect style. On the right side it
says, it says mossy. Alright. Okay, so we can
see this is mossy here, but we can also just
change the word. Let's just say I
wanted to create word organic with mossy. So you can see here the words change and we can see
what we have created. So we can submit this to
gallery Coptic clipboard, the typical options I'm going to like and just download this. And we've got four variations
we could choose from. So if I want to change
the fill of this organic, I can just click that and we
can see it's regenerating. Was nice. Or if you want something a little bit more
of this style, click that. There we go. So the background color is pink, but we can actually
change it to transparent, which is, I think more
useful if you want to. You want to use it with
a different background outside of Firefly, or you want to you want
to overlay it on top. It'll just be easier if
it's, it's transparent. Okay, let's try
another one here. So I'm going to
choose a word here. Okay, Sheikh, volume. So right now we have mossy. So let's choose a
different material. Platinum. And let's see what we get. Okay. Okay, we were getting sort
of a futuristic metal feel. So I'm going to choose
a variation here. Sheik for Yazdi. Alright, I like this one. So I'm going to download this. Let's try one more just
to drive the point home, I'm going to put my name. Let's try a different materials. Put fire and water. Very nice. And we have some
additional options on the right-hand side here. I'm just going to like
and download this first. Okay, So we have our
text effects fit. We can make it tighter
so it's closer together. We've got medium, we got loose. You can also change the fonts because right now it's copper. But we've got some more options, not as much as Adobe has
in their font library. But I think this is just Beta, so it's just a limited
amount of fonts right now. Hopefully they add more
and I expect they will. Let's try this font here. This, this interface actually is a similar field
to Adobe express. This program here, which I'll be going into when we go
into the next section. But we can also
change some colors. Here are the backgrounds. We can change text
colors, right? Very nice. And I'm actually just
gonna do one more. I know my coin. And see if we can get travel. Travel theme there.
Make it bigger. Nomad coin. Yeah, that's cool. You can see the fill there. So I'm going to download this. And there you go. That is our introduction
to tax effects.
4. Adobe Firefly Pt 3 Vectors: Okay, we're going to look at the third feature
of Adobe firefly, and it's called
re-color vectors. Vectors are artwork that no matter what scale you
have the graphic at, it will maintain the quality. So let's click on Generate and you can see the
first thing it wants it to do is to upload an S svg file. And I'll tell you, I didn't have an SVG available. I'm not a vector. Our creator. Maybe
you're in the same boat. So why do we do? Well, we have another tool
called Adobe express, and this is included as part
of the Adobe Creative Cloud. So actually I'm going to convert an existing artwork
that I created with Firefly to an SVG. So when you click on Plus, I'm going to click
on Convert to SDG. I'm going to choose one
of the images I created with Adobe Firefly list. Choose cowork space
at the beach. So you can see here it's
mixing some art and science. It's doing its thing. So now we'll have a vector
to use with Adobe firefly. And Adobe expresses a, it's an awesome tool. It's like Canva, but it's made by Adobe and I think it's there supporting
it really well. And just keep adding features
great for thumbnails, blog posts, YouTube
artwork course, online course artwork,
marketing, et cetera. Okay, I'm back on Adobe firefly and I'm clicking on Upload SVG. So I can see the SVG that I
created with Adobe express. It's uploading. Now. I have to describe the
color palette that I want. And not really sure, I'm just going to click
birth the beach tones. Let's see what we get. We have some sample prompts here
on the right-hand side. This one's pretty nice. So we can copy a clipboard,
we can download. And we can see the
prominent colors. We can shuffle them. Get different look. Okay, That's interesting. I like this one here. I'm going to download that. Now let's see what we get if
we choose terracotta desert, one of the sample prompts. Oh, very nice. So this is if we wanted to
create a painting, something that you hang up
in a room or cowork space. I think it was a make a
pretty good art work if you printed it out or
put it on Canvas. Maybe this one. Not quite doing it. So I'm going to use
trippy disco lights. Very colorful. Okay, and we have the option
to change the harmony. Let's try it. Triad. Interesting, let's change. Let's go back to default. So I think we did pretty well. So these downloads, this
is take a look at them. They create us another SVG file. So there we go. That's an example
of how we can use the re-color vectors
in Adobe firefly.
5. Intro to Generative Image AI dalle and midjourney: Alright, we're gonna take a look at the generative AI for images. This is one of the most
popular applications of AI. It's a lot of fun. And two of the most
popular platforms in this space are
dolly or dolly two, which is the latest
version as we speak, as well as mid journey. Mid journey. I would say at this
point in time, is the most sophisticated
of the platforms, but Adobe fireflies also
playing in the space. So we're going to take a look At mid journey and Dolly
too in some detail. And learn a bit more
about how we can use text prompts to get the type
of images that we want. And we do have Dolly too, which is now part of
Microsoft Bing's. So you have access to the
new version of being. You can also access dolly. So let's get on the computer and learn about these
different platforms. Create our own images. Hey, what's up, everyone? We're going to take
a journey and learn about AI image generator
called mid journey. So I actually asked Chad TBT, what is the journey? But what I'm gonna
do is I'm going to ask, being charged GBT, what are the most popular
AI image generators? If you just search for being, being dolly, you can
find it and it's free. And they call it
the image creator. It's okay. I find that it's not as good as mid journey from
my experience. But I'm still learning. Let's just look up
the query here. Let's put thing to
another country, Tokyo, in the year 3,000. Hyper realistic. Just want to make sure
you can see that too. Okay, so I've got my prompt here and I've got a
certain number of credits. So I'm going to put Tokyo and New Year 3,000
hyper-realistic drone. Aerial creates. Okay, so that takes
a little while. So the competitor is,
competitor is majority. So being charged CBT came
and said that Dolly, too powerful image generator can produce realistic
and in the margin of images from text prompts. It cannot AI elements or to real photos or expand
on existing images. I've done past videos on this. There's mid journey, a
community base image generator that lets users share and explore AI generated images
from text prompts allows users to vote on their
favorite images to see how others interpreted it, interpreted the same prompt. It offers unlimited free use but requires registration to access all features actually paid
$10 for my month journey. So this is my mid journey here. And I'll show you
some of my art. I'll give you a demonstration. So when you sign
up to mid journey, tom's guide also has
some good tips here. You're going to need to pay and then you're going
to select this server. So I paid about $10 US. And let me just take you
to the main site here. Well, look at this
one so you can see the prompts that they're using. Hair blonde goddess
wearing black and gold, low cut dress, nerdy pose. Max psi war, made of pure white ceramic and
golden 2050s technology. Made wife material. Really interesting
to see the prompts. So that's the gold figuring out these prompts and then
you can actually borrow. You can actually borrow
some of the prompts here. Look at this one young woman in genes for it's a
concert in the style of Ze spot T. He millimeters, F2, 0.8, golden lights. So there I've even describing photography or video jargon. So aperture and the
focal length of the lens barrel to get very
granular into what they want. Alright. So that's
the Explore feature. Okay, So this is
the main site that everyone will see at the
beginning and you go to sign in, go to this chord. Okay, so here we are. This is the main view. So what you gotta do is you actually have to
choose a channel. So I select new comer
rooms, newbies 32. Then this is the prompt
here and you push, press forward, slash and type. Imagine. Then this is where
you type in what you want. So I'm going to put
exactly what I put in being Dolly Tokyo in the year 3,000 high
hyper-realistic drone scenario. Then I'll press Enter. And you can see here it
says waiting to start. And this can take awhile, but you can actually
take a look at other people's art on mid
journey in the same channel. And you can actually, if
you see something you like, you can actually copy their description and then just replace it with the type
of art that you want. So you can see what
they use here, e.g. a. Symbol for desert garden, simple icon, 2D, small, HD. There's nothing else
here I really like. But you can see what happens when journey creates,
generates the images. So you get U1, U2, U3, U4, which means upscale. So it means make a
higher-quality version. So U1 is in this quadrant here. U2 is this one. E3 is in the bottom-left, U3 is in the bottom. The bottom right, v1, v2, v3, v4 are variations. So you can create variations
of the existing image. And this is what
it looks like when you upskill and image, you just get the single image and you can make
variations of that, or you can just bring that to a browser where
you can save it. So let's see if my
Tokyo images finish. Yes. Okay. So I like the one on
the very first one, so I'm going to press
u1 to upskill that. So I actually have to
scroll down to see my, my job which is being created. So this is the confusing part. It's not the most
user-friendly interface. And I believe people in
the channel can see this, but then you can, this part here says Only you can see this. But it looks like I can see
other people's prompts. So maybe it's just
the actual job that they can't
see or up-scaling. I'm not completely sure. So just so you know, you
can't do anything explicit. You're trying to
do anything like adult material or some
keywords like sexy, You can't do that. Yeah, there are
some guardrails in place probably for good reason. So I'm just waiting for my Tokyo image to upscale and I can show
you how I save it. In the meantime, I'll show you
some other ones I created. So it's the Mandalorian. This is an upscale image, so you can just right-click
here and then save it. And you'll get a beep when your image has
finished rendering. If you've, you've gone
on to do something else. So the format that you get, the photos in our, in PNG, and there are
about one megabytes. Let's take a look
at my Tokyo image. Okay, so here it is. So I can open this
in the browser and I can save, save as. So that's my image. It's 1.5 megs. It's a PNG. So it's
decent quality, but it's not a huge, huge file. So that's, that should give you a quick start guide to getting
setup with mid journey. So I'm still experimenting and I can tell you
it's pretty addicting once you get started because it's super cool being able to create anything that
you can think of. But you can really gotta
get specific if you want to get exactly what you want. So hopefully, this gives you some examples and look
forward to doing a follow-up. Once I've kept, get
more experienced. But it looks like mid
journey which we covered. And Dolly two or two of the
main players in the game.
6. Mid journey - How I created the Elon Musk Vs Mark Zuckerburg images using Midjourney: Hey, what's up, Greg here? And I'm going to
show you how to use generative AI to show
you how I produce some pretty good
images of Elon Musk and Mark Zuckerberg in a
fighting, fighting theme. Ever since I heard
about that match up, I've been thinking
about how can I use generative AI to
create some images I can share on social media that are not
copywritten by Getty, you know, the usual
distribution firms. And so then I started
thinking about which is the best platform to do this
because Adobe is firefly. While it's good, it
doesn't do celebrities. Same with being charged
CBT image creator. It won't do celebrities. Mid journeys are only
generative AI platform. I know of where you can create images that look pretty
realistic using celebrities. So I'm going to take you
through what I've done here. So we're on a journey. I've done the pay plan and the actual interface is on a social media
platform called Discord. So you will need
a Discord account and you need to
pay in US dollars. So I just signed up. And my first prompt, I did Elon Musk and the ring of Mark Zuckerberg,
cinematic realistic. So it gave me these images here, which I think are pretty
good straight out of the box and look
really realistic. But what I found is
they won't put Mark and Elon side-by-side
in the same image? At least on my attempts. Elon, Elon, no problem, but not just the two together. So this one here I
thought was pretty good. So again, if you feel like there's an
image you really like, you want to make
it higher-quality. You can use any of the EU
options, which means upscale. So U1 is this quadrant here. U2 is the top-right, U3,
bottom-left, bottom-right. So I upscaled U4 for this image of him with the
boxing gloves, downloaded it. And then what did I do next? Then another prompt,
Mark Zuckerberg in the ring was
cinematic, realistic. So that's the art style. And I got some
pretty good images. So I decided to upskill
image number one, which we got here. And I can even do a variation of the hoodie and
the boxing gloves. Marks famous for doing his wearing his hoodie,
looking very casual. And what happens
when we don't use that cinematic realistic
description in the prompt? Well, I did tennis players
versus pickleball players. So it did sort of a
more cartoonish style. And one of them was
pretty realistic. So I liked that and
I upskill that. But what I did notice is there isn't any
pickleball rockets. And I think that is because the model hasn't had enough data to train
off of pickleball, which is a fairly new sport. So I try it again. Tennis players fighting
pickleball players because that was the title
of one of my recent videos. Check that out if
you haven't already. You can see here tennis player and some
guy holding some stick. So to me, I think the AI language model doesn't
know what pickleball means. So I think actually here, this guy is actually
holding a pickle. Yeah, Again here
these guys aren't holding tennis rackets per say. This guy is not holding
a pickleball racket. So I think it's just because
it's such a new term. The model doesn't know
what a pickle ball means. So I can see that
being the same type of thing for new terms that
it doesn't understand. But take a look at
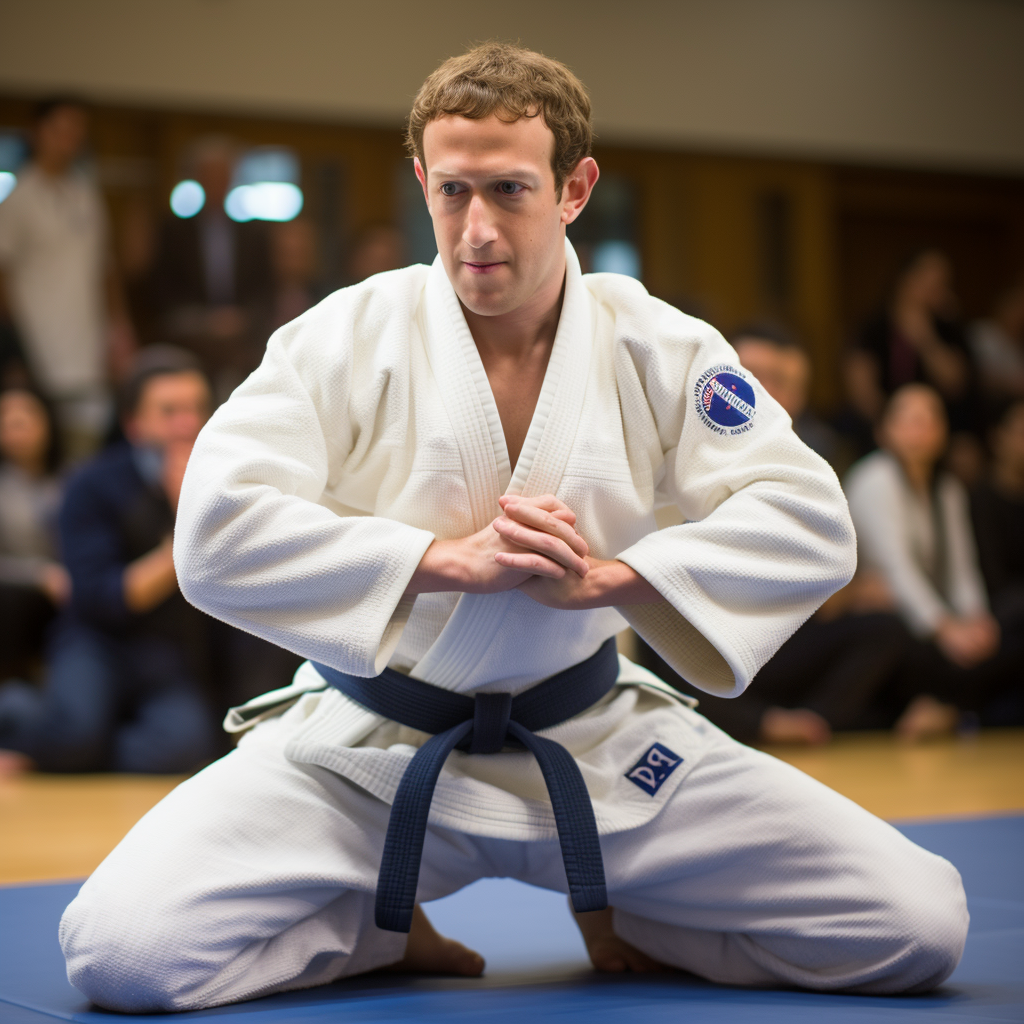
some other ones here. I put Elon Musk sitting on Mark Zuckerberg
in the boxing ring. A nod to Elance walrus. Move where you could
just sit on an opponent. But again, it wouldn't
put them both together in the ring. But they've done Elon
and Elon or just mark. So actually thought
this image here in the bottom right
was pretty cool. So upskill that I'm actually going to do a
variation of this one. I also like this one with Elon. I thought he was wearing
the Iron Man costume, but it's actually
just some body armor. So I upskill. So I could
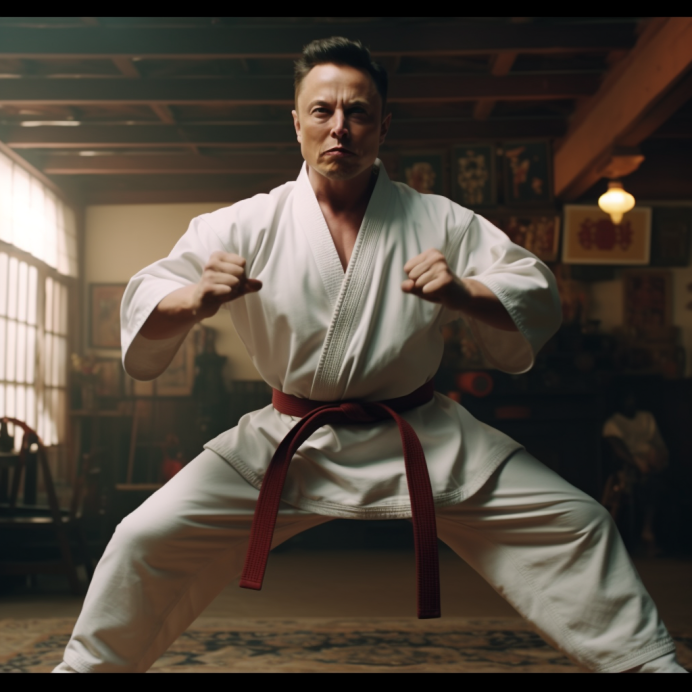
actually do a variation of this. And I did Elon Musk doing a
karate kick and came out with some pretty interesting images here with Elon in
a karate suits. That's pretty cool. So I'm actually going
to upskill that one. So this is what it looks like. Pretty realistic, Don't you think that's the
power of AI here? And just wanted to show you a few examples and maybe you could come up with
something more creative. And again, this is a paid
plan for mid journey
7. Adobe Photoshop ai generative fill - key techniques: Okay. Adobe January with Phil, My name is Greg Kong. I'm going to introduce you to this new AI powered
tool or Photoshop. And I'm still learning, but I want to get you started. I've had a bit of time to
test drive this feature out. And the first thing
you'll need to do is to download Photoshop Beta. So this is separate
from Photoshop. And the key feature here
is called generative bill. Uses AI capabilities
using a text prompt that is triggered by making
a selection on your canvas. So this is straight
from Adobe sites. Some things that you can
do are generated objects. Selected an area in your image. And then you'll have this prompt over here to
describe what you want to see. And you can also create, you can select
different variations of what creates for you. There are three
different variations, and I'll show you
how to do that. You can also generate
backgrounds. So select the background
behind your subject and then just select inverse and then follow the steps
to generate an object. Can also extend
images by extending the canvas and using the
crop tool to do that. And then using the generative fill prompt and just
leaving a blank. And that will
basically it will read what is already in the Canvas. And it will use that information
to fill up the rest. So that's pretty cool. There's also object removal. So you can select the object that you
want to remove and then just hit Enter on the
text prompt to remove it. Alright, so what are the
benefits of doing this? It's this similar theme
across different AI tools, whether it's mid journey, even chat GBT is a tax prom
who've got Bing Chad GBT. There's, there'll be fireflies. So this is built on
the same platform, but they've brought
it into Photoshop. And Photoshop is one of the
flagship products from Adobe. And I'm pretty sure they're
going to be bringing this to Premier Pro
on video later on, right now, images is what
they're focusing on, the media format that
they're focusing on. And they said they've trained
it on Adobe's photos. So you can be pretty sure that
you're getting images that are trained on hundreds
of millions of professional grade
license high res images. Alright, so let's get started. I've already
downloaded the tool. So this is a GoPro photo
taken from New York. So let's see if we
can remove myself. So select subjects,
generative fill generates, and let's see if
it can remove me. Let's look at the
other variations. Let's see what was there before. Not bad, not bad. Okay. So let's put something
else in front. Let's put something
like a hot dog stand. So I'm gonna go to
Selection Tool, hot dogs than with American flag and
customers waiting. Or maybe I'll even
try a photographer. Okay, I don't really
see the hot dog stand. Okay. It looks like could re-created the World Trade Center
craft beer place. Let's remove this. Alright, That's not bad Now let's extend this image. I'm just going to
slim this down. I'm going to select
the crop tool. I'm just going to expand this a little bit. Expand that. Okay. Now we have
these white borders. Now, let me use the
selection tool. Highlight the blank area, and then let's just
highlight the blank area. But we're also going
to get some of the actual image for reference. Click Generate, Fill,
just click Generate. See what happens. So this is gonna be pretty cool if it can fill up the rest. So this is huge. If you've taken a photo
but it wasn't wide enough. Alright, well that completely
changed the image. That's a bit more realistic. Created a not what we want. Let's try again. Let's try just select the
blank area and click Generate. It's a very complex patterns, so maybe that has
something to do with it. I can try the right side. Okay. That seemed to do a better job when I didn't select the image. Wow. Take a look at that. Now
for the right sides. Okay, so just selected
the blank spot. Generative fill. Leave the text prompt. Prompt blank, click Generate. Wow, that's pretty amazing. Let's see the variations. I think the first
one is the best. So let's try without width
has done a pretty good job. See the left again. We want to save this image. Let's just go to File Export, Quick Export as PNG NYC Chen Ai. Let's take a look at the image. So 34 mb as a PNG. So this is the finished photo. I think that's pretty amazing. Should we do one more? Let me see if I can find
another photo here. First, let's remove. Let's remove these guys. Generative fill. Let's see if it
just removes them. Great job. Let's do the same
for all these guys. And that bag on the beach. Great job. The Instagrammers are
going to love this tool. Let's just get everyone
else generative full. So this is a good example of removing unwanted
people in the photo. And while this is happening, I'm actually, I'm
visualizing what I want. So let's look at the variations. Okay, let's just remove
this guy from Ken. Great job. They see that Here, let's just see if we
can remove that as well. There's other ways of doing it. But let's just see if this is a one-stop
shop for removal. I mean, you could
use the stamp tool. I think that might
take some time. This is a whole lot faster. Great, they're great job. Okay, let's insert some stuff. Let's get a nice luxury yacht. And what I can do is I can try to extend the
canvas but more. Okay, Let's check out
the other yachts. Second one, third
one, third one. Case. Now, minimizing
the canvas. Now I'm going to
select the crop tool. I'm going to expand this. Let's just do it horizontally. Hit Enter, hit the selection
tool, highlight the blanks. Hit Enter, gender to
fill, hit Enter again. Let's see if we can
successfully extend this photo. Wow, wow. Now you've got more real
estate for more luxury yachts. Okay, let's try that. Luxury out with girls on boards. All right, Nice. I like that. Like that. All right. Let's take a
look at the original. Let's take away
all these layers. So we had the boats. This is the blank
area, we extend it. There's the extra
boats took away. The date starts to
take away people. And we're left with
the original image. So let's just recap
to summarize, to end this video. So we do use the removal
tool to clean up the crowd. We removed the dates. We added a yachts and the water. So adding an object, we extended the photo and
we added another yards. So let's save this. This is very happy with
how this turned out. This is an old photo that
I've been able to recreate. This has only 1.75 mb. But I liked that. I liked that it's really
kind of given a new life to an old photo and just so
many possibilities now. I mean, having a tool like
dolly or mid journey is cool, but being able to use these
AI tools on existing images, combined with the power
Photoshop is amazing. I hope you found this tutorial
helpful and good luck. Practice away and have some fun. Bye
8. Adobe express beta introduction: Alright folks, welcome
to Adobe express. So this is Adobe's competitor to the program called Canva. So you can use it to
create social media, thumbnails, posters,
graphic designs. It's a really useful tool. In fact, I've got video lessons just on how to use this product. But what we're gonna
be looking at here, you can just see all the
things that we can do here. I'm like Craig gifts. We can convert PDFs, organized pages,
even short videos. But what we're gonna do here is we're going to look
at the AI capabilities. Adobe has been trickling down different generative
AI capabilities. First with Dolby Firefly, allowing you to create text to images, texts effects, vectors. A lot more. It's
changing every week. But they also release
that capability into Adobe Photoshop in the
form of generative fill. But now they've released
adobe express beta. So you get this with your
Creative Cloud Suite, which gives you access to all the apps and
Adobe's platform, such as premiere,
Photoshop, Light room. And it'll be expressed. So now we see Adobe Beta. So if I click this, this is giving me the beta
site, new.expressed.adobe.com. And you can see it
looks very different. So I'm going to explore some
of the different features of this platform to give you some inspiration,
help you get started. So you can see as
soon as he loaded up, you see some images over here. My approach is I like to reverse engineer
images that I like. So you can see here in this, this row here, text to image. So I can pretty much just
type whatever I want to see. But if I like a
particular art style, let's just click this. You can see the
text descriptions. So this is a new type of skill, being able to take an existing
image and just modify it. It's not difficult. Just takes a little
bit of practice. So I'm actually going to
change this to a dog. But without changing it, you can readily see
in the bottom left, I can create
variations over here. And actually in the main
Canvas you have the ability to download it as a
PNG JPEG or PDF. Jpegs best for small sizes, PNG for best overall quality. And you can see here we
have the ability to add additional things like videos, different pages,
background colors. We're just going to be looking
at the essential features. Let's go back to
this image here. So I just clicked on the image and I want to get
back to this view. So you can see here style, it doesn't have any
particular style. I'm just going to
leave that for now. But we saw there we can
change the variations. Now, this is the magic here. Let's change the animal. That would be the
easiest change here. So let's change it to a unicorn. Fluffy unicorn. I like this art style. It's it's like a Pixar
type of quality. So there we go. We got some unicorns. Pretty cute. This one's got a pig nose. So let's download this P JPEG and save it pony, unicorn. There we go. So we liked this art style. Now let's actually
take a look at what the description says. 3d, adorable,
reflective eyes, long, fuzzy for 3D renders cinematic, smooth, intricate
details, cinematic. We need all that. When we're creating
this artwork, I'm actually going to
copy this description here in case I lose it. I want to show you the
different styles here. So we can, just by
clicking on styles, we can create a whole
different vibe. And once we click
it, click Generate. So it's generating a unicorn but with a whole different vibe. Let's select photo,
make it more realistic. Okay, it's generating
here in the bottom-left. Actually not too much different Let's try graphic palette knife. So this should be
drastically different. Maybe because of
the description, it's overriding
the content style. Anyways, let's try
something different. Let's do a puppy, French bull dog, puppy. There we go. That's pretty cute. Alright, so you can
see here that we are generating different animals
and pets in the same style. Let's try with a human and then we'll try a different
style here. I'm pretty athletic woman. Let's see what it comes
up with. Interesting. Still generating. This looks something out of a Disney movie and you
can see we can load more. Thing about Adobe assets is when you're creating something
with these platforms, Adobe's digitally marking
it so it can track it. If you'll just say
ever decide to make some commercial type of video. And people want to
backtrack and say, hey, wait, the, you create this
or was it generated by AIs? So That's happening
behind the scenes. I believe this is
still Beta, right? So they're looking for
a lot of feedback. And I think it's good to
give them that feedback, especially during early stages. Okay, let's create
something different here. Let's start from scratch. As I say, you want to
create a YouTube thumbnail. Alright, let's
click on Templates. Or maybe let's do TikTok video or a real. Let's do an Instagram real. There's a scroll through Lisbon, Portugal, starting new product. So I'm going to try to use
the power of generative AI. Okay, so why do we have here a time-lapse
video, black and whites. All right, Let's try. No, I don't think we can
generates videos with AI yet. But let me try it out. Click video and they
don't have it yet. Audio. Note. So let's just do
a text to image. And what size we doing? I believe this is vertical. So portrait. Okay. Colorful. Portugal. Actually, let's paste
that same description. 3d. Let's just take out a lot of the descriptors that we
don't need 3D Portugal. I'm curious to see what
it generates here. Oh wow. Okay, This is
completely different. So we can see here the tile. Except I probably should
have done this differently. Okay, I'm going to show you the texts effects
in a second here. So I think we can layer this up. All right, just trying to figure out how we bring this up. Is it this one? Or maybe let's just create
a text effect from scratch. It's trying to find the deleted. It Okay, Let's crop this so we
can at least see the bottom. I'm just free styling here. Okay, Enter square. Crop work a little bit. Okay. Now I want to do AI
generated texts. So you can see here same idea. We've got these templates. So I'm just going to find one
with a feeling that I like. This one looks interesting. And we'll just call
Lisbon. Lisbon. So we put the actual
texts we want over here. Let's load more. So this material actually
doesn't stand out. I'm going to try to do something rainbow color. Let's try that. So it takes a little
while to generate. And I'm just going to
change what it says Lisbon. Still generating. There we go. So let's just play this real. Okay? So a real is a little
bit more involved because a lot of
different elements to it. Okay, so let's change
the texts effect here. Blue and gold Marvel. Make a bigger. Okay, and then there's,
there's a few more elements. You have two more scenes. Let's actually do a delete that. Create new media texts image. Let's do widescreen. Coffee, black and white. Let's take a look at
how artistic we can be. We didn't add the descriptors, so this is where we end up with. So you've got to
put cinematic 3D. And I just, my
point is I want to show you how we can transform an image with different
descriptions there. Okay, so look, look at
the difference here. It's taking a little
while to generate. I think this is pretty good. Blends, right in. Let's just delete
that, put that there. Then the last scene. Let's put travelers traveling in an airport. We go Look how modern that is. Let's delete that. Yeah, I know it's not perfect, but let's just play this
back here off the top. So we've created our first AI, generated Instagram
real using 3D. Now it's gonna be super amazing when we get the texts
of video capabilities, which I think is coming soon. Let's just finish this off. I'm traveling. Let's just see what
it comes up with. And then we'll finish this
off by downloading the real. Wow, this is AI generated. It's pretty amazing. Here we go. We're done. Let's download this. Mp4 is recommended, so
MP4 is the video format. And then we can actually upload this to
our, to our Instagram. But yeah, so just to summarize, Adobe Express is a part of
the Adobe Creative Suite. And you have to click beta to
access these new features. So in this video we
showcase texts, the image, we used a existing image, which we reverse engineered just by changing the description. And you saw how drastic the results different that the results are just
with the description. So all the power is
in the text prompt. It's known as
prompt engineering. So we then went on to create
a Instagram real templates. And we modified that using AI. And I'm just going to show you that and then we'll
end this video. So some texts effects, less, some of it there I
blended in the AI generated image and
finished off with that. So hope you enjoyed
this tutorial on using Adobe express
beta with AI features
9. Intro to Voicify - Convert Songs to Popular Voices: Alright, it is time to
look at voice, the phi.ai. So this is a music platform
that allows you to share YouTube music videos
or music with this platform. And then have famous
music artists like Drake, the weekend, Justin Bieber, even famous voices
like Donald Trump, barack Obama, voiceover,
these popular songs for you. So a lot of fun. And this
is a paid subscription. We're going to jump
on the computer. We're going to look at the
different pricing plans, as well as how to
actually use it. In my time using the platform. I've used it to create remixes
or sell my favorite tunes, as well as download the
instrumentals the acapella does, and then share them
with my friends. So let's get started
with voice phi.ai. Everyone That's Greg here. And we're gonna be
looking at voice phi.ai. So this platform, out of all
the AI generative platforms, whether it's for
pictures, texts, audio. I think boys fight on ai is the most fun with this program. What you can do is existing songs and you could
put it through voice phi.ai. They have these AI covers with very popular
voices like Drake, Arianna, Bad Bunny,
Nick, human knowledge, even Elvis, they
are adding a lot of new voices pretty
much every week. And I'm going to show
you how to use it. So sure to stick around. So to use some of these
famous voices like AI Joe, which is for Joe Biden
or Donald Trump, you actually need to have
the paid subscriptions. So let's take a look at
their pricing over here. So these are the paid plans. So for 899, you've
got 25 credits and the credits never expire. Onetime purchase, you
get some conversions. But if you do the paid plan, which I have, you get
unlimited generation credits. You got access to all
the voice models. So you saw the Joe Biden or Donald Trump and get
priority queues. So it's going to generate faster and you get what we call
stealth generation. So if you do the, the lower tier plan, all your generate, all the generated songs you create are available
to the public. But with this pay plan, you don't have to share. So the next one is power user. And with that, you
can actually create custom models with your voice. I actually haven't tried that, but I just wanted
to point that out. This would be cool if Donald
Trump actually do this song. Let's try. Joe Biden. And you can see her 821 uses. I think that's an AI
generated images. Image. They probably use mid journey
to create that. Here we go. Joe Biden on Drake's hotline, Bling to skip forward. Okay. Do we used to call
me on my cell phone. Neighbors to the south. They know might be a little bit little
bit disturbing. Well, I think that's
actually pretty good. Now I want us here, Donald Trump on this track. I think this is a
pretty easy truck too. To train. Will do a Joe Biden
versus Donald Trump. Julia's to call me
on my cell phone. I think the Joe Biden AI
model is more realistic, but let me know what you think. Alright, so that's an
introduction to voice phi.ai. Hope you enjoyed this
tutorial and sample.
10. Intro to Soundful beta - Create Music Beats using AI: Okay, we're going to look at a music platform
called sample.com. So this is an AI
platform that allows you to generate original music, where you can look at different
music genres and you have the ability to customize the
tempo, beats per minutes. You can create variations. And then you can use
these music tracks and your video projects, whether it's for YouTube, maybe it's a short video or movie training
video or whatever. So we're going to jump into sample.com and we're
going to learn how to create our own music
tracks using the magic of AI. Hey, what's up, guys Greg here? And we're going to look
at sound full.com. So this is an AI music generator and it allows you to create
beats using templates, or you can even put in
a song that you like. So let's take a look at it. They do have a free plan. I ended up just doing one of the pay plants so
I can test it out. So here we are. We can, for the free plan, you get ten downloads, you get a stem packs. So a stem is what I understand. You get the different
layers of the instruments. So if you just want to take out the drums out of a
bead, you can do that. So that's what stems are. So you get over 50
templates here. I'm currently on
the premium plan. I paid $89 per year. I get unlimited track downloads. And then when it loops,
unlimited monetization. So I can monetize
videos on TikTok, YouTube, Twitter, and Instagram. And I get five stem
packs per month. Now this part is interesting, copyright available
starting at 49, 99, unlimited monetization. Alright. So let's get down to how
do we actually use this? Let's go back to sound awful. So I'll just give you a
quick look at my library. I'll play some tunes
that I've made. Let's turn up the volume. Okay, so that's 12b1, that's a hip hop vibe. And so on. In this column
here, they give you the track and the template, and then you've got the tempo and the key and the next column, duration, which is how long it is and the date that
you created it. You can even hard it. You can share it. So others can listen to the
track and you can download. And this is where you have
the option to download the stem or just an MP3 or wave. Wave is smaller, wave
is higher-quality. And like most AI platforms, do you have the ability to create a similar type of track? Alright, so that's
the basic interface, and you've got this player
at the bottom here. So let's just say you
want to create a track. You've got global tracks, which gives you a
starting point. So let's just say I
want to pick one here. Zenith. So we can click on this. We can get this, we can just download
the MP3 and off we go. But if we want to
create our own music, how do we get started with that? Okay, So the idea is
that you start off with templates and you can use one
of these moves are themes. There's 13 templates and
then different categories. Hip hop, there's 18 templates. Pop has 14 templates, EDM as 300s, templates. And then you have R&B, Latin, ambience, social media, drum
loops, instrument loops. So it's quite a lot of
exploration that you could do. So let's just say I want to
create a rig beaten track. Let's try a dark reggae tone. So I'm going to click on this. Alright, so see that
button over here. So we have some options here. We can create something similar. And then this brings
up the interface. So this is, this is where
you get the opportunity to mix or re-mix the song. You have the option
to change the beats. So we can create
something a bit slower. We can change the key
from minor or major. I'm just going to call
this reggae tone G. I'm just going to block my
camera because the way there. Okay, so in the bottom right, I've just changed
this to G major. I've slowed it down to
100 beats per minutes. I'm going to call it
rigging tone G major. And then we create a preview. So you can just see the
progress bar over here. Tracks will be
mixed and mastered when downloaded from my library. So that's where you
can download it from. But I want to hear it first. Okay, So if I liked that, I can click Save. Okay, and then I can
find it in my library. This is where it is. And so we have the option
to create similar. Again, we can share it. You can even edit it again. So it's a pretty nice interface. I find it pretty intuitive. So we can just do the
standard download for MP3 may take up to 10 min. Now I'm also going to download. Once this is done, I'm going to download
the stem just to show you what it looks like. Well, this is busy. Let me just play one
of my other tracks. Still another rig, it's on beat. So this has a nice beat. Okay, let's see
if we downloaded, if we do a stem download. I'll show you later when
we get that's the basic, that's the basic concept there. So we can take existing
templates, we can re-mix. And then you have the ability
to customize it based on the key as well as
the beats per minute. So there is another platform, and I thought it was this one where you can
actually give it a track, a commercial truck and it'll create an instrumental
out of that, but it doesn't work that well, but I can see that type of technology just, just improving. Okay, So the stem
download is complete. Let's just take a
look at what we got. I'm going to show
you what's in here. Let's see if we can
just get the drums. Percussion loop, string ambience. So you can see what a stem is. It's really just
breaking down the track into the different instruments if that's what you're
interested in. Here's the original. Yeah, and if you have many, you can put this in here in your midi device and
even further mixing. So that's an
introduction to sound fool.com for making
music tracks.
11. Course Summary: Okay, this is a pretty
short and sweet course. Thanks for taking the generative
AI course for creators. It's also a rapidly
changing landscape, but I wanted to get this content out to
you so you can have the first opportunity to play around and get the cutting-edge. Some of the implications
of this technology is, I think it may disrupt a lot
of the creative industries. I've already heard from
a friend that a lot of people that are doing graphical
designs or concept work, maybe a competition with AI. That's the unfortunate
part of this. It's inevitable that
This technology is only become more popular. You can only keep it in
Rob's for only so long. So my stance on this is so just try to embrace it and leverage it as best as you can. With Adobe now,
entering the space, they have the resources
and the reach with their existing ecosystem. E.g. Premier Pro, to
be able to do things like generate stock
video images. E.g. I. Understand that a lot
of their AI has been trained on their existing
Adobe Stock library. You also have the ability to generate texts, graphical texts, assets, as well as images
and a whole lot more. So it's going to get
really interesting to see how a company like Adobe integrates their creative generative
AI into their products. On the other side, we have already seen Open AI's technology trickling down into Microsoft
software e.g. co-pilot, that's going to allow corporate companies to roll out technology to
their employees. There'll be able to
use technologies like co-pilot to generate blog posts, e-mails, reports, using the
Power BI to assist them. When it comes to programs
like voice phi sample.com, these are fun to use and
also very useful to generate your own original music using
templates and platforms. Unfortunately, this
area may also be disruptive to music artists. But maybe there's gonna be a future of smaller
companies that can compete with the
larger companies because these technologies level
the playing field, you don't need a large team to generate a lot of creative
assets, creative images, music videos, who ultimately creates creative
production, short movie. So it'll be interesting
to see what comes out. In the next few years. I'm going to try my best to
keep this course up-to-date. I expect a lot of changes, but I think you've got the
fundamentals with some of the core platforms that
you can use to get started. Thanks a lot for
taking the course, and I'll see you again
online somewhere.
12. NEW - Bonus Demo Ai Generated Video using ai.invideo.io: Europe offers a plethora of
options for digital nomads. But it's important to prioritize reliable internet connections when choosing where to live. Whether it's the vibrant city, life of Berlin, or the
sunny beaches of Barcelona. Make sure you can
stay connected. Living in Europe
can be expensive. So opt for cost
effective options like shared spaces
or Air B and B. Save money by shopping at local markets and
cooking meals at home. Not only will you save money, but you'll also get to
experience local produce and culinary traditions caught up in the hustle and forget to
enjoy the beauty of Europe. Take time to explore and relax. Europe has a rich history, diverse culture, and
stunning landscapes waiting to be discovered. Step away from the laptop screen and soak in the experience. Maintaining a healthy lifestyle in a foreign land
can be challenging. But Europe offers
plenty of options From local gyms to yoga studios and outdoor activities like
hiking and biking. There are many ways to stay fit. Don't forget about your
mental health either. Take time for self
care and relaxation and seek teletherapy
services if needed. Europe is a hub for
digital nomads. Take advantage of this and join communities or co
working spaces. This can lead to
meaningful connections, potential collaborations
and new friendships. Being a digital nomad in Europe can be
incredibly rewarding. But it requires
careful planning, from choosing the
right location, to managing finances,
maintaining work, life balance, staying
healthy, and networking. These tips will help you have a successful digital
nomad journey in Europe. Remember, being a digital
nomad is all about finding the balance between work and exploration stay
connected and productive. But don't forget to embrace
the moments of adventure and discovery that come with living in Europe. Happy traveling. All right, so that video
was mostly created by AI. The voice over, it actually overlaid the voice over
with stock footage, but this is behind the
scenes of the actual video. In my video editor timeline, you can see on this layer here, I put my own footage on top to cover the watermark
stock footage. So let me show you the platform. This is what it generated
digital, right? So it's got all this watermarking
internet connections. When choosing where to live, it created the script, did the voice over, and it picked stock footage
to go with the script. Which is a pretty
great start actually. I downloaded the
video, I overlay it. This platform is video credit to my friend Thomas
for discovering this. He's my friend in Chang. You can see here, if you
want to create a video, you can select the
style of video, Youtube shorts,
explainer recent events. Now, discovering this
and experimenting, I wasn't sure if You
Tube will accept this, so I actually still don't know. That's why I overlaid it and I'm going to publish it and see if you Tube complains about it. I used to use a platform
called Synthesia Do. But they have since
changed their policy about doing current
event videos because the avatars they use
are actual people and there's some
liability issues there. So I wasn't able to use that
anymore for Youtube videos. And basically you're
using this to help you, right, As a creator, to get your message
or story out there. They have pay plans here, so the free plan,
you're limited by the amount of minutes per week. You don't, I guess you
get the stock watermark. But if the pay plan you
get use of up to eight, I think it is, 80 clips
a month of tock video. I already have my
own membership. But you get 50 minutes
of generation, up to 100 gigabytes of storage. And then they've got a higher tier plan which just gives you a bit
more of everything. So pretty cool. Let me know, what do you think about this and what do you think about
the video? Not bad, Right.
13. Grok 3 comprehensive demo: Alright. I've just paid for Grock, the first tier paid plan, and I'm going to
ask it a question. Describe which AI
model you are and your capabilities
and how you stack up against your competition
like hat GBT, Deep, Sk, et cetera. And then I'm going to tag the
Deep search, and let's go. So Grock three was
released on February 17, that's currently February 21. So this is pretty new. So the Deep search goes through this framework where
and does this analysis. Again, here's the answer. I'm Grock three, a
large language model from X AI release February 2025, Excel Math Science
and coding with advanced reasoning and
a new deep Sch feature. I outperform chat GBT, GBT four oh, and deep
Seeking specific benchmarks. I'm Grock three, a cutting
edge large language model. Capabilities include
advanced reasoning, WebEx integration. I can analyze posts. I'm available to
premium subscribers through a separate website. Okay, here is the detailed
analysis versus Chat GBT, I outperform in math science
encoding benchmarks. In Ala Marina, I score 1,400
higher than GBTs 13 77. Alright. Okay. What are your predictions for
these cryptocurrencies by the end of 2026. Bitcoin, solarium, XRP. And let's type let's click the Deep search,
and let's enter. Now, the advantage of searching on Grock is that
it can search Twitter, which is it's got a lot of people tweeting
their cryptopinion. So I'm hoping it'll search through all that noise
and factor that in. But you can see this
deep search analysis. It's really showing you
showing you its methodology. And while this is
hard to follow, I know it's going to
summarize it at the end. Alright, here we go. Here we go. Okay, let's start off. Okay, so it gives
you a thinking, analyzing, evaluating
key points. So by the end of 2026, Bitcoin is predicted to reach
around 150 K. Ium, 8,000. So currently Bitcoin
is just under 100,000. Solanas forecasts
for 400 XRP $4. And put an additional
point here. XRP shows a potential for doubling in value from
its current price. So let me check the
current price of XRP, which is currently $2.65,
so more than doubling. Okay, now it's giving
the current prices. Let's just check if
this is correct. It's actually a bit off. Bitcoin is 90,000. The Theum is 2773. So that's a bit off. Solana is 175, so pretty close. And XRP is $2.65, so
a little bit off. But it's nice that it's actually giving some solid
predictions here. Predictions reflect a mix
of technical analysis, spark of sentiment,
expert forecasts, methodology derived
from web searches using platforms like Interesting
Haven, coin Codex. All right. Now
they've got a table. That's great. And they also provide the growth percentage. So it looks like Salina has a lot of upside in
these predictions. Factors influencing predictions,
institutional adoption, US Bitcoin reserves, forium, the PectraUdate for XRP, SEC outcomes, Very good. Grock is very good
at predictions. I'm liking this. Okay, let's
ask this another question. What are what skills what skills and professions will be in most demand in the
next two to five years. Also, which jobs are
most likely to be replaced by AI in the
next two to five years? So I'm going to ask Grock
three with a deep search tag. It's going to go through
its deep thinking. You can see it's going through credible sources like the OECD. We can already preview
some of the answers, prompt engineers, AI trainers. These types of roles are popping
up, cybersecurity, Okay. I like how it breaks it
down by bullet points, as well as a section with
a lot more analysis. And then it also
has a table view. So let's just scroll back up to get a
preview of the answer. So skills in demand,
data scientists, AI engineers, renewable energy techs,
digital marketing specialists. And it's giving the
key drivers also jobs likely to be replaced truck drivers because
of autonomous vehicles, as well as retail salespeople, fast food workers are likely to be replaced
by robotic kitchens. Also data entry clerks
are going to be replaced by automation
and AI chat bots. And there it's giving the sources at the bottom
that you can link to. So there's some good questions by Grock, and it answered well. Let's explore some of
the image creation here. And you can see under
the bottom right, you can do the create images. And it's giving you
some sample prompts. But here I want to create
one of fun one of Elon Musk, driving with Donald Trump
in a cyber truck on Mars. Let's see what it can do here. So this is a familiar view, you got four tiles. It gives you a variety of different images
to select from. But you'll see here on
Grock three right now, it's only giving me two choices. And when we click
into the image, it's not giving you the
ability to create a variation, but you did see there is a small icon that allows you
to a variety of options. And I think one of those
is to refresh the image, give it a thumbs up,
copy it, share it. So the image qualities,
it's pretty good. It's not giving you the ability
to upscale it right now, and these things can
change very quickly. I've just adjusted the prompt to change it to
writing a rocket. And then once the image is done, it's giving additional
prompts at the bottom. They're flying a drone and you can scroll between
the images over there. You can copy it. You can save it as a JPEG. I'd say these images
look pretty realistic. They are watermarked by rock and you can see the
additional prompts there. So I'm just going to
say playing pickleball. So it's remembering the context from the original
prompt, which is great. So you don't have to type
everything out again. It's remembering the
previous chat that we had. If you want to start in chat, you can do that on the top
right and just start in chat. But all I did is just
put playing pickleball. And it understands
that I already asked it to create images with
Trump and Elon Muss. So here we go, two different pickleball
images to choose from. Alright, I'm going
to use Grock in conjunction with an
AI coding platform, Bloc new to see how relevant the code
that Grock generates is. So here we have a pretty
old arcade game from 1981. I'm going to ask Rock to create code that I could feed this AI coding platform
to create this game. Can you create code to replicate this old arcade game? Could use in Old
you called jungler. Okay. And we have the
Grock three model. Let's give this a try. Maybe I should have
put the think filter. Let's give it let's
give it a try. Using this code. Okay. So where's my
character? Let's see. I'm not sure which one's me. The game is a bit choppy. I'm give player a pink color. Well, it looks like
this code wasn't bad. I mean, it's created the frame. So, yeah, it looks like still
some things to work on, but it was Rock to create
some code that's usable. And, it's a good start.
14. Bonus - Review of Open Ai's Sora: Alright, and welcome
to Vancouver. We're going to look
at Open AI SA, which is the new AI
video generator product that's been hyped since, I think early 2024. And I've been trying
to get in to test it early. Just a bit of background. I'm a stock footage
video creator, where I license footage online on agencies
like Pawn five, Shoter Stock, Adobe Stock. And this type of technology
could disrupt what I do, the stock footage industry. It could also disrupt
other industries like animation movie studios
or animator jobs. But let's just look
at the basics first. So opene.com now has
their SRA product page. So you can come onto here, and they have two
different pricing models, which I'm going to explore. But when you scroll
down the page, you can see some of
the samples here. And these samples
on the feed are useful for a starting point. You can use them as
a reference point. You can get the prompt text. So prompt or prompt engineering is an essential skill that I found for a lot of different
types of AI applications, whether it's AI coding, generating images with AI, using Microsoft Bing, copilot, Adobe, firefly generator,
diffusion, you name it. The prompt is the secret sauce, and by using the feed
as a reference point, you've got the prompt
and you can just modify it to the
image that you want. So let's just take a look
at the pricing here. I'm going to go down to pricing. So I actually just got
the base HCBT plan. It's called HCBTPlus. So you can see here it's $20, and it gives you the ability
to create what they say up to 50 priority videos
with 1,000 credits, up to 720 P resolution, which is the lower
version of HD. But only up to 5
seconds duration. So that's a huge limitation. I'll also mentioned you get access to Chat
GBT's latest model, which I just tested out
briefly, hatGBT 40. And HGBT 01. Is it 01 or 01? I'm not quite sure, but
you get access to it and I actually
haven't touched it in a while because there's
so many AI systems. But HAGBTPlus $20 a month. I've already used
it up in one day. I've generated some videos. I reiterated some, but hAGBTP is 200 US
and this seems like where they're trying to push
you towards because you can generate full resolution
HD ten ADP videos. So that's full HD,
22nd duration. Five concurrent
generations, so you can generate five video
projects at the same time. The video projects that
I created 5 seconds, they typically take about ten
to 20 seconds to generate. So concurrent means you could
just batch batch, create. Another huge difference is the ability to download
without a watermark. So all the videos I created on the regular plan had an
open AI or SR watermark. And you get access to
everything with ChachBTP. So some key features of their product is
that you get a prompt, and I mentioned the
reference points. But a huge feature of
soo is a storyboard. So storyboard is like a video timeline if you
use a video editor, whether it's Final Cut Pro, e movie, Premiere Pro, Cap cut, basically, it allows
you to create one video, and then you can create a
second video on the timeline. And depending on how close those two videos
are on the storyboard, So will fill in the gaps. So if you watch the guide
video, the intro video, you'll see that if you place the second video
clip further apart, Sra can use its creativity
to fill more of it in. Let's take a look at some of the videos I've created here. So I started off with basic videos that I would I
would normally do myself. So drone video over Tokyo. 5 seconds, you really can't
get that much out of it, but it looks pretty amazing. I just did a plain
vanilla prompt, created drone video
in Shibuya, Tokyo. And I didn't ask it
to be hyperrealistic, because it sort of
looks semi realistic, a bit on the kind of the AI animated
side, hyperrealistic. So it does use some of the
skills if you've created other images on Adobe Firefly
or other AI animators. I did some other prompts here, so I did some pickleball
ones, and this is a test out. How well have they
trained their model? Because pickleball
is a newer sport. There's not a lot
of stock footage of it. And I can see here. Well, the model, I asked it to create an
attractive Asian model, which it did a great job at, but the pickleball paddle is actually just a
small tennis racket. So It doesn't look anything like a real
pickleball paddle. So that tells me maybe they didn't train their model
on pickleball footage, or maybe I wasn't specific
enough with my prompt. I should have said, Cute Asian girl playing
pickleball with a paddle, because if you don't if
you're not specific, it'll probably select a
racket instead of a paddle, which are two different things
in the pickleball world. I've also asked her
to create a video on, like, a BMW convertible
car, right? To test if I can create
real things or is it just going to be stock
manilla type of cars? And it actually did
a really good job creating this BMW Z
four convertible. But it does look a
bit unrealistic with the perspective the car
driving across the bridge. It looks bigger than
everything else. I did another one here with
a Japanese girl driving in Vancouver and a BMW.
This one looks really good. This is probably one of
the better ones I created. And you can see the Sora or open Eye watermark
in the bottom right. That's really it does get
your attention subtly. So people can tell
whether you've created this with Sora and
which plan you're on, because if you have
just the base plan, you're going to get
that watermark. Here's another one here
from a different angle. I think it did a
really good job. I asked it to create this
BMW video in Vancouver. And only 5 seconds, but I can tell it's pretty good. I did another pickleball video. This time, I asked it to dress this girl
in Lu even pants, and it actually
understood what it is, because these actually
look like Lu even pants, even though they're not
actually Lu 11 pants. So yeah, pretty good
job creating the video. But the paddle for the pickleball racket
doesn't look real. I asked her to do
something different, like a street fighter,
dragon punch. And it didn't quite
understand street fighters, so it just improvised, created some type of video
game character doing a punch. I did a drone video
of Vancouver here. I asked it to create drone video with the snow in the mountains, sort of like this on a nice day. And not quite 100% accurate. Actually, I would say
probably like 60% accurate. So the interface is
pretty straightforward. Some of the decisions
that you can make on the prompt would be
the aspect ratio. So 16 by nine is your typical
video that matches a TV, or you can do
vertical nine by 16. I did most of mine
in 16 by nine. And then you have the option to select your resolution four ADP, which is like DVD quality, 720, which is lower quality HD. And beside the resolution, you can see how long
it's going to take. So 720 P would be
four times slower. Four ADP is the fastest. And then if you have
the premium plan P, ten ADP is eight times slower. It allows you to
select the duration, but it's great out. If you have the base plan, all you can select is 5 seconds. So it just makes you
envious that you don't you didn't
select the pro plan. And there is a storyboard button which brings you straight
to the storyboard. So on the storyboard here, you can select where in
the timeline you want to create the video
with Click plus, and then you can
create your scene, just describe your
prompt over here. There's not doesn't feature advance options on
the video editor like transitions or text, that type of thing,
but I could easily see them incorporating
this in the Sra. So now that I've seen SA, I've used up my credits, and by the way, you can see your credits in the top right. You can see credits, 25 left, and you
get 1,000 credits. It's really hard, where I
haven't figured out how to track how much
credits your video uses. But you can go to the SA
Billing and Credits FAQ, and they have a table here. I'll just give you an example. So a five second 720 P video
will cost you 60 credits. A 1080 P video that's
10 seconds will cost you 600 credits, and so on. So you can take a look
at this table over here, and, you know, it looks like if you really
are serious, you have a team, then the pro clin is the way to go Unlimited generations,
higher quality. And, um yeah, so far, I think, early days,
a lot of potential. I did ask Chat GBT, when and if will this technology disrupt the
stock footage industry? It said it's definitely
a possibility in the next couple of years. And the same with the
animation industry, it could definitely disrupt the animation industry
because it's faster, it's more affordable, and AI
tools are only improving. But stock footage as
someone who has experience, I can tell you that
these AI models are not creating the images
realistically enough. Although they may have trained
their models on, like, a large amount of stock footage, I do know they partner
with Shutterstock. I can just tell from some of the really niche videos
like the pickleball, some of the drone videos
that it's not quite there. But definitely in the
next couple of years as the technology improves, this type of technology could replace the stock
footage industry. And as a stock footage
creator, yeah, I mean, it's with this type of technology,
it is inevitable. But in order for an AI
model to get there, it does need to train
on existing datasets, and that's where I
think the creators should be compensated. So, you know,
whether that's right or not is not a debate
for this video, but this is just my opinion
as a stock footage creator. As an animator, I don't
have that background, but I could see livelihoods
being disrupted. But again, uh yeah, I
mean, to get there, these models need existing data to train on to
improve the models. So that is my early impressions, first review of Sora. I've already used up
my credits in one day. The videos are very short, 5 seconds, low resolution. Some of my videos were
really impressive, and some of them were
a little bit weird. So let me know what
you think about Sora. And, um yeah, it's on OpenTye. It's available now.
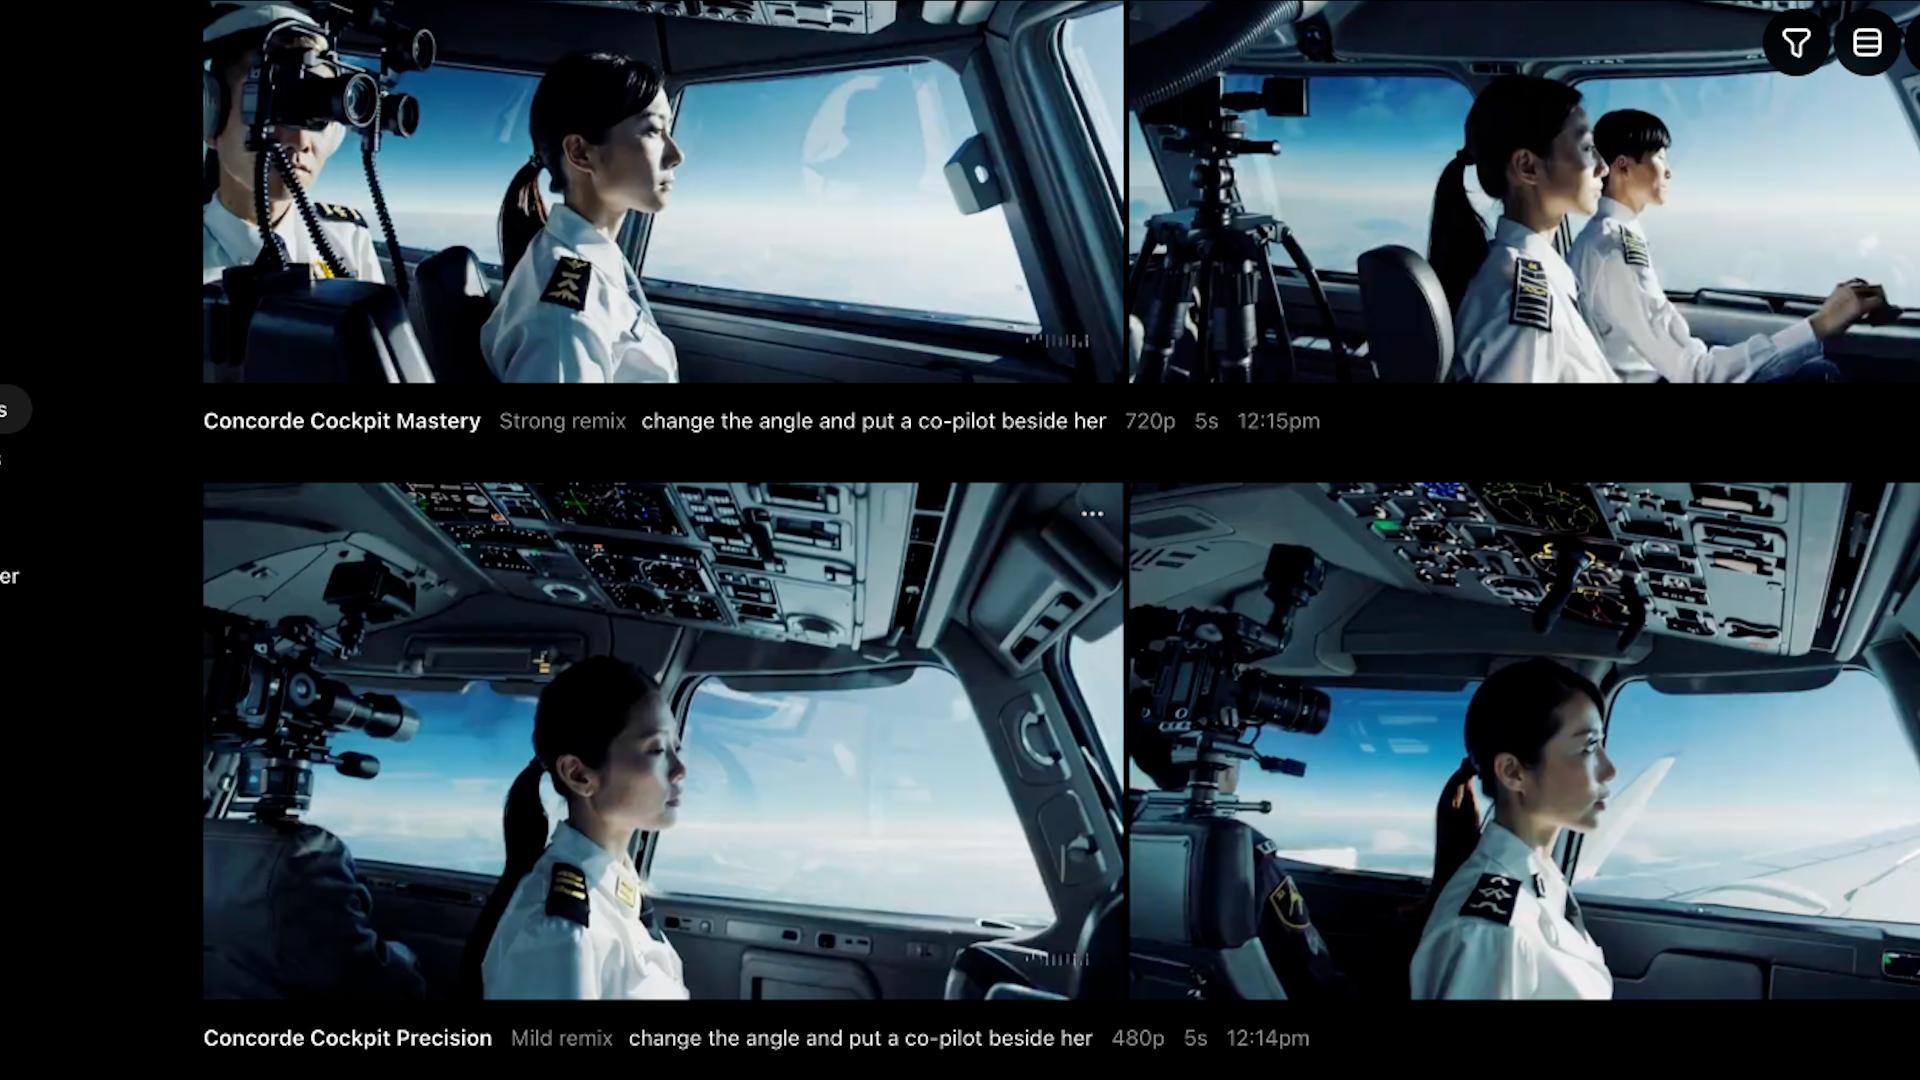
15. Sora interface tour: Okay, we're looking at the
main SOR interface here. So I'm going to start
from the top left. If we go over to Explore, we can look at the different videos that have been created. So let's head over there. And these are videos that have been created by other people. And this is a great
place to start. So if we click on a video
that you're inspired by, let's just pick this
one here by spawn 19. You can see here you have the icons at the
bottom right to remix. You can loop them, save them or search for
similar videos. So I'm just gonna click Save
and you can actually click into it and you can actually see the prompt that was made
to create this video. So later on in the course, we're actually going to go into reverse prompt engineering, where you're going to learn how to take an existing prompt, make it yours, and
create your own video. Alright, coming back
to the main screen, so I mentioned the saved videos, so that's where you can
access them all over here. So if you find
some favorites and you like that style of video, that's where you can find
them under your saved area. So your creations are under the library area
on the left side. So you can see some of the
videos that I've created here, as well as the prompts, and you can come back to edit these videos later on
and create more remixes. So favorites that
you have favorited. Obviously, they show up here, and you can also upload videos and photos that you
can use for Sa, and this is where
you can find them. If you want to organize
your videos better, you can create your own folders. And that's where they
are. On the top right, this is where you can
filter the videos. But on the top right
is the settings. So the main area you're probably interested
in is my plan, because this is where you can see how many
credits that you have. You can also see the maximum
concurrent generations. So I'm right now on a
special holiday plan, which allows you only
generate one video at a time. But if you have the pro plan, your concurrent generations
may be more than one. Max video duration is 5 seconds, and Max resolution is 720 P, which isn't super high because this monitor is
full HD, ten ADP. So right now in December 2024, the resolution offered under the plus plan is
lower than full HD. Okay, in the next video,
we're going to take a look at the different plans and look at which one
is best for you.
16. Sora choosing plans: Okay, we're going to look at
the different plans for Sra. So if we go to manage Plan, which you can access
from the top right, you can see that you've got the Chat GBT plus plan for $20. So this is a good starting plan. This is what I chose. It allows you to generate
something like 50 videos. You get 1,000 credits, and you're limited
to 720 P resolution and five second duration. So very short videos. And the resolution of 70 20 P, it's just higher than DVD, but it's lower than full HD, which is what my portable
monitor supports. So not the greatest resolution
for professional projects, but right now it's still just
in the experimental phase. So this plan is $20 US a month, and some other benefits as
you get access to ChIBTPlus. So once you're done
your SOR credits, like I was after a day, you can still use
HAHBTPlus for the month. The other alternative,
much more expensive alternative is the Pplin
for 200 US a month. You get unlimited generations, the highest resolution and
high volume workflows. So you get 10,000 credits, which will they say allow
you to create 500 videos, and up to ten ADP
resolutions, so full HD. 22nd guration and five
concurrent generations. And here's a big one. You can download without the watermark. So on the plus plan, all the videos come with a
watermark on the bottom right, and you can crop that out, but it's just it's
a lot more work. And you know, on the pro plan, you get 22nd video clips, so you could actually
create a commercial because they have no watermark. It's high resolution
and longer video clips. But if you're looking just to experiment to see
what's possible, I would say, go with ChachBTPlus
just to get started. And if you're creating professional applications,
like commercials, which is one application I can think of or even stock video, then the ChatGBTPPlan,
is probably a good bet. You could probably create
a decent commercial for prototyping or demoing an
idea for a product or vision, really, with what SR is capable
of, anything is possible. So I think that's where the
pro plan does come in handy. So yeah, with that in
mind, select your plan, and in the next video, we're actually going
to get started with the prompts to
create our first videos.
17. Doing our first video on sora: Alright, here we go. We've
got the prompt at the bottom, and we're going to create
a new video from scratch. So on the bottom here, I'm just going to
create a let's just say a spaceship docking onto Mars. So, the first thing
I'm going to do is select the
dimensions 16 by nine. And Okay, so you see the prompt to describe your videos or we're
going to put in our prompt, and then I'll go ahead and
select the different options. Okay. Create a cinematic
scene where a spaceship docks onto the moon with astronauts with astronauts. Okay, so that's my prompt. And at the bottom here, if you want a horizontal
video for YouTube, 16 by nine for
Instagram or TikTok, a vertical video nine by 16, And you can select
the resolution. So four ADP will be faster, but 720 P is high resolution. And then we can
select five, ten, 15, 20 seconds, but we're limited to 5 seconds
on our plus plan. Over here, you can select
the number of variations. I'm just going to select two, and we're just going to
create a basic video and hit Enter. So there we go. So from here on the top right, you can see your
video being created. So it's in the queue, and you'll see the progress on the top right
when it's ready. Okay. And it's ready, so we can click into
it. Let's check it out. So we have two variations, which means two
different videos. So this one wasn't quite
what I was thinking of. I like the one on the right, but I would like a different angle. So what we can do from
here is we can remix it. So click Remix, and we can
add or change the scene, change the angle to an overhead bird's eye with astronauts on the moon
awaiting landing. And then I'll click Remix. So remixes don't take as long, and you'll get two different versions that you can pick from. And this sort of follows the normal process of
getting a video you like. You might have to remix it several times before you
get exactly what you want. Okay, let's take a look. So this is a lot better. So let's just say I want to
go with one on the left. I'm going to click into it. And then on the top right, we have the option to download. We can select a video
with Watermark, or we can select a GIF, which is good for
sharing on WhatsApp. You know, it's just it
plays automatically. It's a bit smaller, and
yeah, it's easy sharing. But I'm just gonna download
a video with a Watermark, so I'm going to click
Download and there we go. Just go ahead and go
try your own prompts if you want to change it up and then go ahead
and download it.
18. Bonus - Reverse Prompt Engineering with Open Ai's Sora: Alright. So we're
looking at openly Eya. I've had more time
to experiment, and I can tell you the real
secret sauce is taking a look at existing images and
reverse prompt engineering. What do I mean by that?
I'll show an example. Let's just say like
this image here. What you can do is save it and you can remix it
right out of the box. And let's just go
with the first one. So click into it. And
then you see the prompt. See, the prompt is
the magic sauce here. If we click addtPmpt, we can see what it
looks like here. An airborne surveying mission in the Aero Commander strike with a ultra Cam Okay, this is not even
spelled correctly, so let's put a female
Japanese pilot in a concord plane with a ultra. Let's just take out
that part there. And a single camera in the back. Okay, so we have four ADP, 5 seconds, and then
two variations. Let's click Create So I just to four ADP so we can get a quick look at what's possible. I'm just going to show
you a previous video that I did while this
is in the queue. So this is one that I did
of a potential newscast. And if we click Edit Story, this is a multi scene video. So bustling room
in Washington, DC, bright lights
casting a glow with screens around the room displaying Bitcoin
passing 1 million. And then we have a second
scene and a third scene. In the fourth and fifth scene, fading out to Bitcoin
flying to the moon on fire. So this is a ten second video, and this is not actually
the original prompts. So I just modified
some of these prompts. So, for example, the
name of the newscaster, I changed from I
forget the name, but I just changed to Jake and I made her a Korean news anchor. So, yeah, that's just an example of a reverse engineer
to a storyboard. Let's take a look at the
video I just created here. So this is what I've created reverse engineering
that first one. And we have two variations. I'll just show you how we
can do a quick remix here. So if remixes we can do strong, mild or subtle. Do mild. Change the angle. Put another beside her. So remixes don't take us long, and four ADP doesn't
take as long either. Okay, you can see it's
almost done here. There we go. Okay, so it actually made a co
pilot with a camera on his head. A little bit weird. Okay. And there's the other copilot. So not perfect, but I
think you get the idea. And, um, We can also
change the resolution. Strong remix. So yeah, I'm just going to add a high
resolution copy to the cube, but that's an idea of reverse prom to
engineering and also remixing and using the
different variations to create something pretty great in a short amount of time.
19. Sora Editing our story: Alright, so in the last video, we did reverse prompting, and now we've got a
bit of a scene here. So we're going to look at
the story and how we can use a story to make a more
powerful multi angle scene. So on the video here, we're going to click View Story. And you can see here
that we get a timeline. So we're looking
at the story here. We can see that there's
two different cards here. The first one establishes the scene where we are
in a cozy living room. The second one explains that
a blonde girl leans closer, expression tender, and she
caresses the Brunet girl. So it's a second angle. And if we look at the actual
timeline in the bottom, you can see it's 5 seconds. So we can actually
create a third card. And we can describe the scene. Okay, so I'm gonna
place it near the end. So this third card is gonna happen near
the end of the scene. So I'm just going to
describe them exiting. Okay. So now we've
got three cards, and I'm going to click Create. So where you place the cards are important because it's
only a five second video. Okay, here we go. And you can see on the left
the left video that they've added
our third scene with him leaving the room,
holding hands together. Let's look at the
right video close up. Can see that in the right video, they're not really
leaving the room, but they are holding hands. So you can see the impact of creating that third
card in the story, and it gives you an idea of
how you can use the stories. So what I would do is take a video that you like
and are inspired by, reverse prompt engineer it, and then try looking
at the story and experiment with different
placements of the cards. You could place them
beginning or the middle or even creating your own third card like
I did in the story. And then let's see
what you can come up.
20. Create a video from image upload: Okay, everyone, we're
going to use an upload and show you what happens
when you use a photo with someone's face
versus someone who has their back turned
towards the camera, so you can't see their face. So I'm just going to enter a
prompt, have this girl swim. I've uploaded it
from my library, and I chose uploads. So here we go. I'm gonna click the right arrow to create video. I'm gonna expect that
we're gonna air out here because this video
has someone's face. But this is what
happened this is what happened when
I tried to create a video with my
existing image of my friend who's been
gracious enough to model. So I clicked Make this
girl have this girl swim, and it created a storyboard, a really nice prompter, but it won't create the video because someone's face
is in my friends. So let's actually
just Bout share. And look at the
one I just tried, and it said, This content
may violate our policies. This content can't
be shown for now. We're still developing how we evaluate which content
conflicts with our policies. Think we got it
wrong, let us know. I don't want to bother. What I want to do is
try different image. So I'm going to
select Upload Image. You have to agree with
these upload agreements. Okay. So I have a prepared upload here. And you can't see. So let's try this one here. Have this girl swim. Let's try again. Let's adding it to the cue. Has now being generated. So it started with an
upload of my friend, and I asked the woman turn around from her
first original pose. Okay, so we can make
it more descriptive. An Asian woman with long hair, light top and a dark
skirt and wave. Okay, our remix is just
about finished here. I'd say the video on the
right is the best so far. So this is actually a
pretty good way to start your image if you're looking
to replicate colors or scene and just have a
good starting point. Alright. I ready? So we've changed this
to a Japanese woman. I did a good job, actually. So there you go. Go
ahead and create your own story using
your uploaded image.
21. Open AI Sora vegas drone video: Alright. Here, I want to do a
drone video over Las Vegas. So I'm just searching for
perhaps a drone video, and then I'll try to
remix it. So here's one. Just click into it.
Let me just save it. An aerial shot Porto
Barrio Guatemala. Not really much to
it. Gonna change the 720 P. To variations. Las Vegas. Fada at night. Down the strip. Alright, that's great. Suspense is killing me. Four, three. Wow. This is amazing. This is better than expected. Both are pretty good, but I like the one on the left because you can see the Eiffel
Tower or the Paris Hotel. I'm actually gonna save
this one. This is great. Okay. So one remix
I want to do of this is I would like it to fly over the Baggio which
has these waterfalls. So I'm going to try to
remix it to do that. But I like the colors. And, wow, look out. This is I mean, this would be a pretty
rare shot to get, not hard to get these days, but drone videos at night
are a little bit tougher. But now that AI can do it, it looks like it
does it really well. Okay, let's do a medium remix. Do a drone flight over the Baggio waterfalls as they or Okay. Hopefully it
understands that. Bellagio is a pretty
famous hotel, but I'm not sure if Sora
understands that, we will see. Let's check the other one here. Yeah, this one, there's
actually two Paris hotels, and three of these. I'm not sure what hotel it is, but similar type
of air balloons. But you can see right
down the strip. Alright, let's check
out the remix.
22. How I made Cloud Girl: Okay, in this video, I'm going to share the prompt for the beautiful
pink hair girl, and I'm going to try to bring this pink hair over
to the Cloud Girl. So I'm going to
click on Edit Story. I'm also just go to heart
this so I can find it later. Like Edit story, and I want
to copy this prompt here. Okay. Now I'm going to try find Cloud Girl that I used
on the cover of the course. All right. Also giving you a preview of some of
the creations that I've made using different
techniques here. I did quite a bit on New Year's. Okay, so here's the Cloud girl, which I've taken from one
of the featured videos. This is one of the
signature scenes from Sra. Alright, so now I'm going to
try to mix this prompt here. Half Asian woman in her
30s works on her laptop. And sits comfortably on
a fluffy white cloud. All right. So the first card looks okay. And I'll just move the second card a bit
earlier. Let's click Create. Wow. That's pretty good.
I'm going to save it. So you can see this one
has an overhead angle. This one is more of a wide angle and then
it's coming in closer. So, there you go.
That's how we can take a character from one video and bring her over
to another scene. And, yeah, we got two
good variations here.
23. Bonus: How to use Google Flow veo 3: Here we go. This is
Google's Test Kitchen. Google Flow is the way to tell some short stories
by using text to video. So prompting, using
natural language to create video projects. So I had some time to
ready test this out. You might be thinking This is
similar to open the Iesora, but this acts a
little bit different. So here are some video
projects I've created, and I'll share my prompts. So you get two different options when you add or
prompt for video, and it is June 2025. So you get the option to
choose different models here. So you can choose up
to four with VO two. And then depending on
the model that you use, it will use up certain
number of credits and you can select four outputs. But by default, it's two. And things are constantly
changing here. So if I go to the top right, I can see the number of
AI credits that I have. I'm on the Google Gemini
Pro plane right now. So for this video here, put create a flyover drone
video over AA California. And you can see here it's using what looks like DJI drones
flying over AA California. This one was a slightly
different prompt, creating orbiting drone
over the LA Hollywood sign. You can see here the
signage is not quite correct. But there's the video. For each generation,
you can download it and you have the option to create an animated
gift into 70 P, original size 720 or you
can upscale it to ten ADP. Takes a little bit
longer to do that, and you have the option
to delete flag for output or just
maximize the video. There's also this
option to add to scene, which we'll look at later. All right, so this
is one project here. Let's just back out. I'll show you one
I created today. This one is Pickleball
Singles event with Barbecue Crescent Beach, BC Canada. So same idea. This one was created with Vo three and it actually created three different
scenes in one clip. Compare that to VO two. So the prompte was close up of attractive female pickleball
players touching paddles. All right. So let's create a new prompt, and let's just use
the latest model. So we're gonna click
over here. VO three. And it's saying it'll
use up 20 credits. Okay. Let's put a mix, pickle. Well couples playing doubles by the beach at night, drone aerial angle. Okay. I'm gonna copy this prompt. And I'm gonna get four
different choices. So we'll just let
this do its thing. Okay, while that finishes, I'm just going to go back
to this project here. And I want to show you
we can actually create a scene for any of
these videos, right? You just go hover over
it and on the top left, we can add to scene. And on the scene, we
can actually we can actually click the handlebars
to create an edit. There's a play button here. And from here, we can
actually extend the scene. We can add. We can extend, and you have to explain
what will happen next. So I'll do this for my
latest video project. Should be finished.
Okay, It's finish now. Let's just play these through. Okay, a little bit weird here. A five players. Come on. Let's get this
point. We got this. Come, let's get this point. Okay, let's just add this. And let's extend. Let's jump to another scene. Nightlife live music and
barbecue by the beach. Now let's change
it to Vo three Vo three fast and just
create two outputs. Beautiful models wearing
Pincklebll outfits. Okay. Okay, so we actually
have to use VO two fast. Since we're in
Scene Builder mode, All right. Let's
play this back to see if our scene is finished. Point. So we have our scene
one. Let's turn on the audio. We got this. Okay,
here's our next scene. Come on, let's get this
point. We got this. Okay, so it created
the second scene, and it's got Audio, and we have the option
to download this. Yeah, so that's your
introduction to Google Flow. So it can create pretty
good video with audio. Let me just show you some
other projects that I've done. So it was actually
pretty good at creating like, short videos. So here's the prompt. As you can see, it's
pretty detailed. Here's another one iron
domed defence using lasers to destroy
rockets and drones. So it's pretty powerful when you add the audio and then
you can extend the scene. I can only see it getting more advanced and the video
clips getting longer. So hopefully you found
this tutorial to Google VO three
using flow helpful.
24. Welcome to imagegen and whisk: Welcome to Image Gen, which is Google's AI model
for generating images, which you can do in
whisk or Gemini. So I'm going to show
you what we can do with whisk versus Gemini, and things are
constantly changing. So in Wisk, what you
can do is actually use a prompt to create the image and you can actually
animate it later. So that's the advantage of
using whisk over Gemini, whereas Gemini is kind
of an all purpose area for doing research, that type of thing, as well as creating images and basic apps. So my prompt here just looking at the
different variations. We can choose best quality and actually going to go
over to Gemini and use the same prompt
to see what we get. So we're using 2.5 flash, and I'm going to
change it to 2.5 pro, and I'm going to basically paste that same prompt,
create a beautiful, diverse pickable
couples on the art. So look what Wis created us. So pretty good images here, which we can refine
if we need to. So because I'm looking for
an image for a dating app, the older ladies
wouldn't fit in this, so I need to refine it. So I'm just going
to refine this, and then I'm going
to enter my prompt. And this is what Gemini created something
completely different. So, in my opinion, whisk is better if you're
just focusing on the images. Now, if you click
Refine on the top left, you're actually going
to get a lot of detail that you can use to
refine your image. So I'm not going to
get into the details, but I wanted more diversity. Wanted some Asian
people in here. So I really had to
refine my images. And this is just an idea
of what we came up with. So now I'm going to show you how to animate your images in whisk. Alright, here's another
project I created in Wisk, and I selected the animate
button on the top left, and this is with
the paid P plan. And what it's going to
do is just going to create a video from your image, which is pretty cool. Does take a little
while to generate, and I'm going to show you the actual videos after this
is done. But pretty simple. Yeah. So once you
create your image, you can click Animate and get a usable video for your
use in a video project. So that is Wisk in a nutshell. M
25. Starwars Ninja jedi with veo 3 sample : [No Speech]
 Greg Hung, Travel Videographer