Transcripts
1. Introduction: Have you been wanting
to learn how to incorporate mixed
media techniques into your watercolor paintings and going beyond abstract artworks. Hi, I'm Elizabeth and
welcome to my class, mixed media collage,
Sea Creatures. I'm a professionally trained
artist and art educator, as well as a published
author, Illustrator. And in 2020, I began
teaching for Skillshare, developing classes that explore a wide range of materials, techniques, and art
making approaches. As I share my creative journey and artistic practices
with my students, I love exploring mixed media
techniques and finding new ways to work those materials and
techniques into my artwork. My love of watercolor
techniques has led me to create many
decorative papers. Then came a desire to do something with all
of those papers. Collage provides a
great creative vehicle for me to take those pages further and turn
them into beautiful mixed media collage artworks. I'm also fascinated by the amazing features
that live in the ocean. So it made sense
to combine all of these things into a
fun class project. In this class, we'll explore
a few watercolor techniques. But if you're new to creating your own decorative papers or want to learn
more techniques, I have a few other classes
on skill share that focus on decorative paper and watercolor
technique application that you might find
helpful as you begin. This class can explore those by going to my skillshare
profile page. This class is intended for
creatives of all skill levels. As a fun way to use watercolor decorative
papers as collage elements. By the end of this class, you'll have created some fun decorative watercolor papers. Learned how to incorporate
them into a collage, as well as what mixed
media techniques you can add to further enhance your
secreature art and beyond. I hope you'll join me
in this fun class as we create our mixed media
collage secreature artworks.
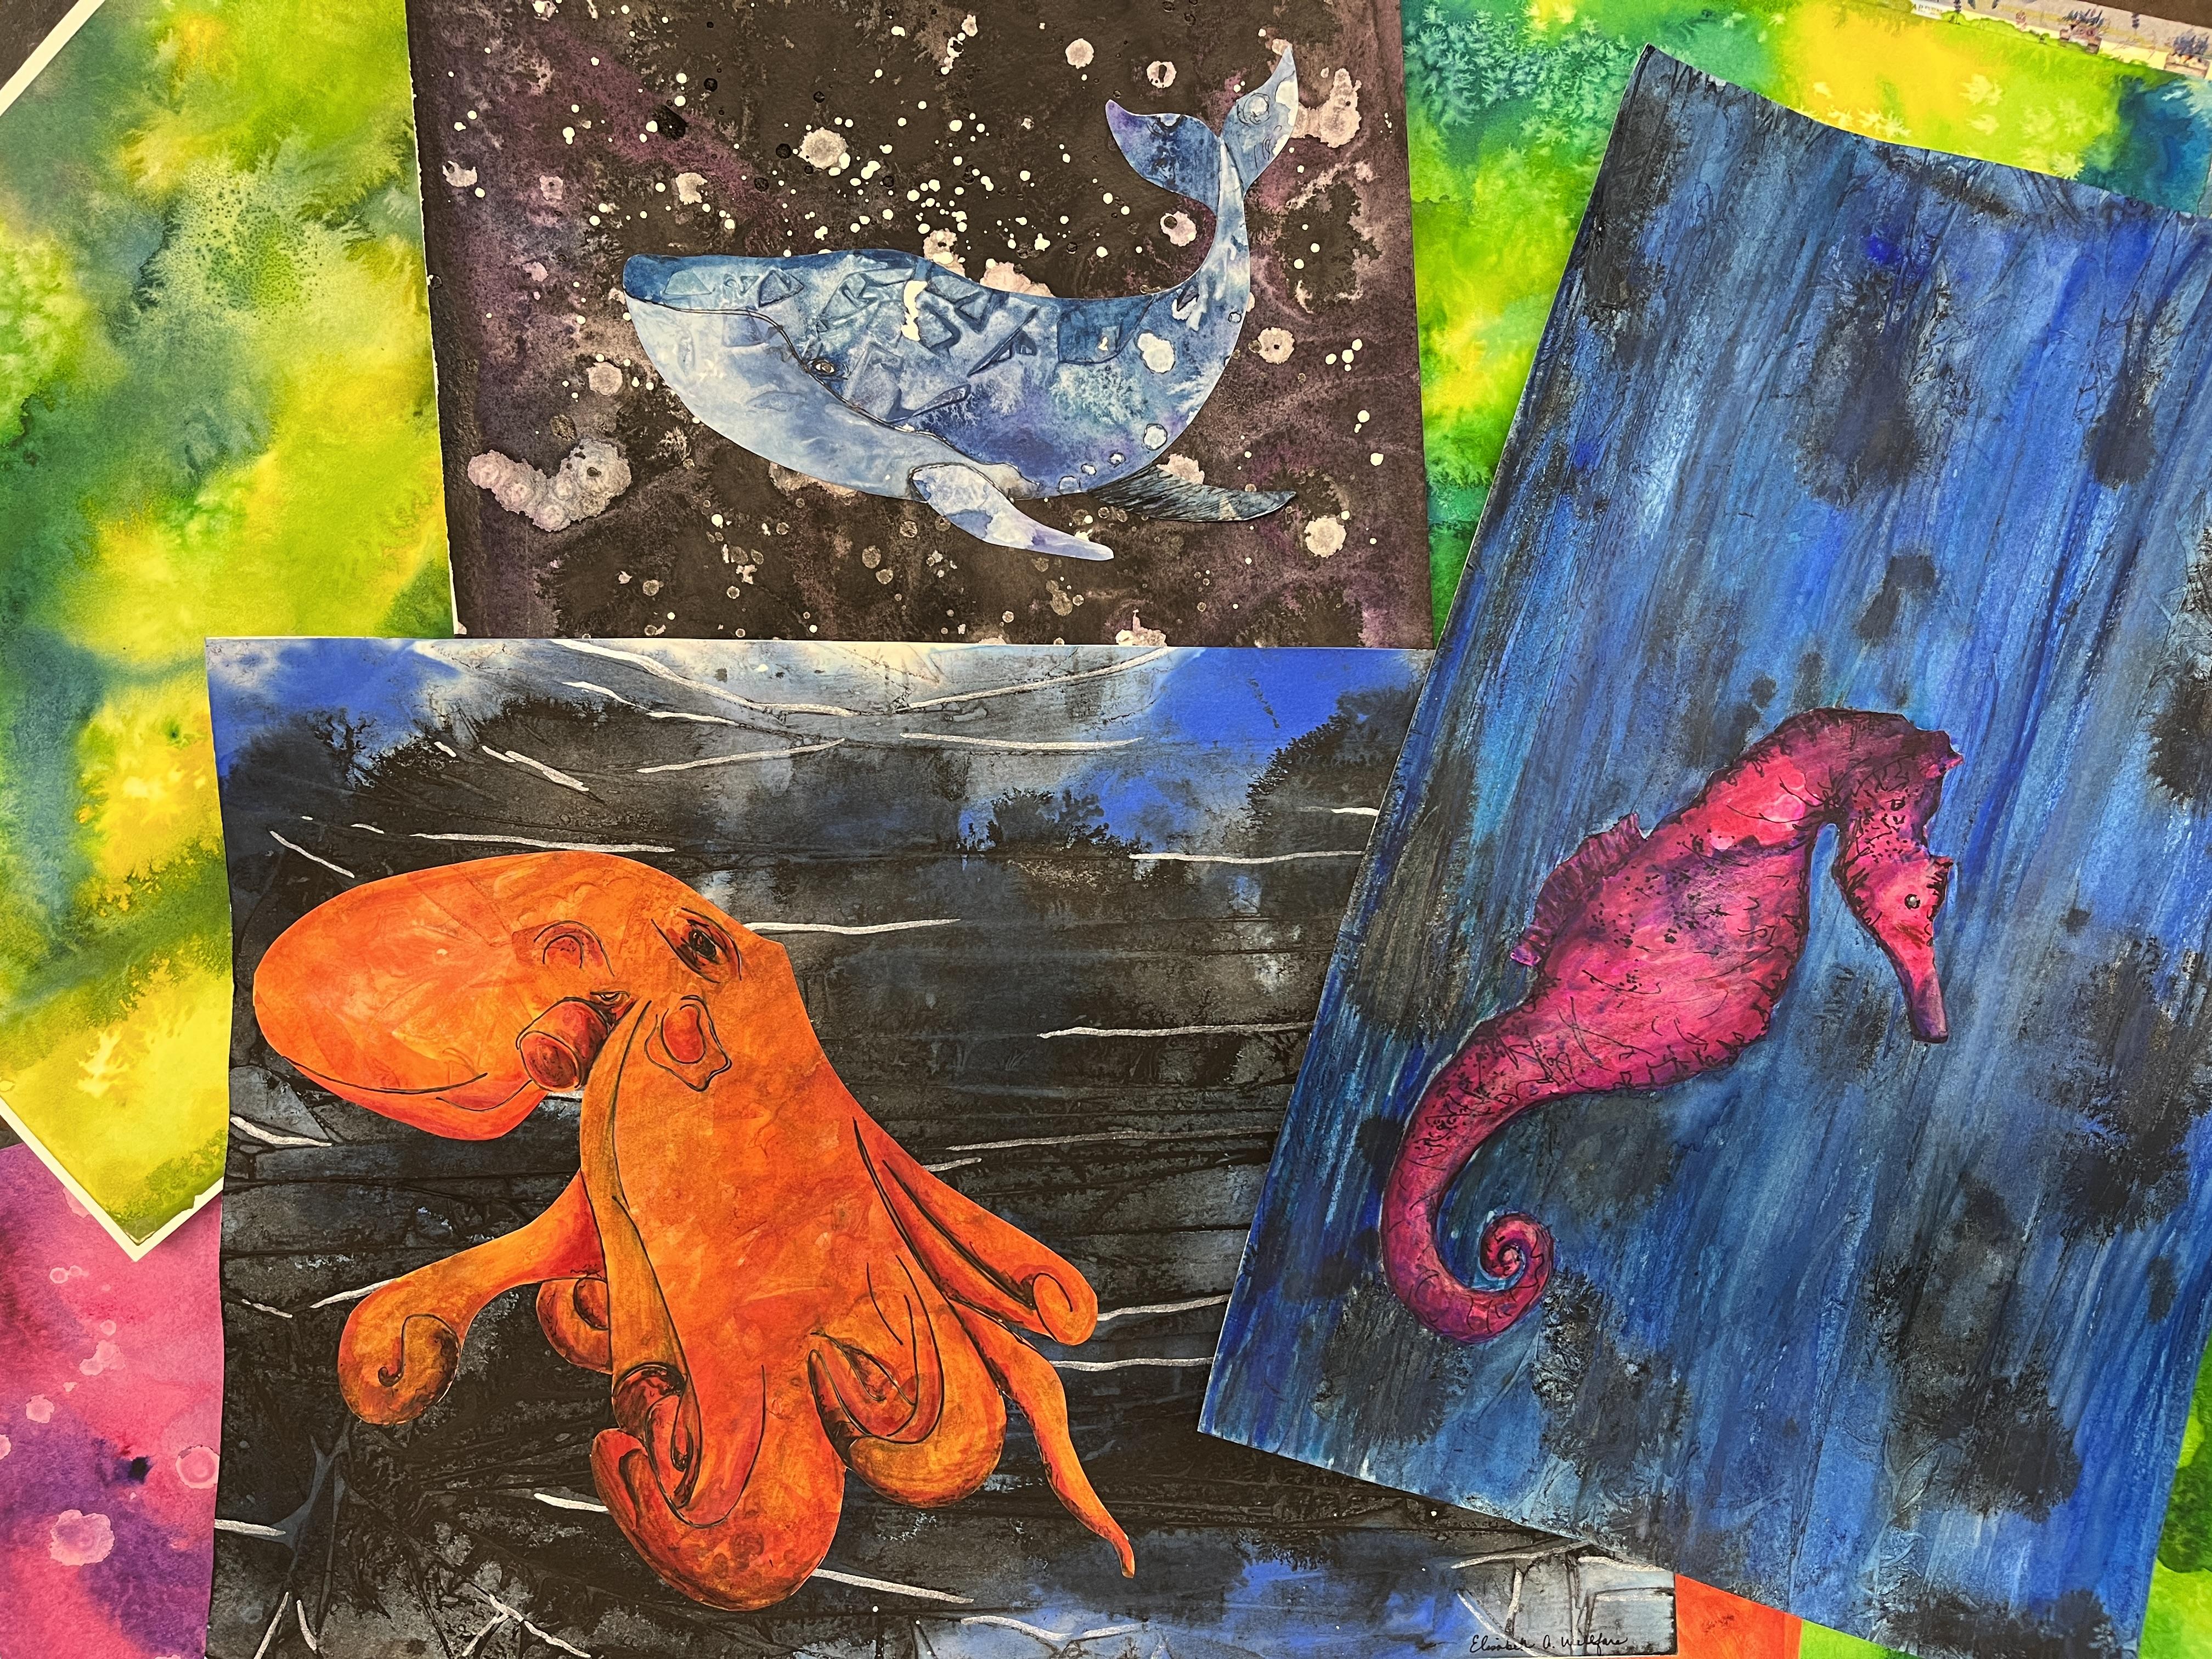
2. Class Project: Thanks for joining me
for our class project. We'll be creating some fun
watercolor technique papers, transferring our sea creature drawing to the back
of those papers, cutting out our creature, and then begin
assembling our collage. After the glue dries, we'll go back in
with a variety of mixed media techniques to help our sea creatures
start to come to life. You can find several
sea creature and line drawings in the projects and resources section
of our class. Choose whichever one looks
the most fun to you. You're also welcome to use your own reference images sketches to create
your class project. I find the website to be a very helpful site when I'm looking for
reference images. In order to access the resources that I have put together
for this class, you'll need to make
sure that you're on the Skillshare website rather
than the Skillshare app. The first step is to
gather up your supplies. Let's send it over to the
next lesson to take a look at what art supplies we're going to want to have on hand
for this class. See there.
3. Materials: Welcome back. Now
let's talk about what art supplies you will want to have on
hand for our class. Our final project
will be 12, 18 ". But you are welcome to
work smaller if you like. I prefer to keep
this project pretty large so that it's
easier to cut out the sea creature and
it allows me to have more fun adding mixed
media techniques later on. These are the
supplies that we are going to need for our class. We have some watercolor paper. I'm going to start with 12
18 inch watercolor paper. I really like Hanson
watercolor paper. That is this is 140 pounds. You could go thinner, but I wouldn't go much
thicker because you're going to end up having trouble
collaging it later on. All of the decorative watercolor papers that
I'm going to create for our class project are
going to start as 12, 18 ". But you could always go smaller. And then you'll end up with
a smaller piece in the end. But because we're
going to be cutting our sea creature
out of the paper, I want to start with
a nice big sheet. So I'm going to have
papers like this. And then from this I'm going
to have a page like this. It's going to be my background. And then I'm going
to have a page this size that is going to
be where my creature, my sea creature, comes
out of watercolor paper. Watercolor brushes, I have a really large brush,
something like this. This is a size 24. You could go all the
way down to a size ten. We want a nice big
round watercolor brush, and then you need your
watercolor paints. Basic colors are great. This is from a set of Windsor Newton paints that
I really enjoy using. Ideally, like you'd have
a rater of magenta, a yellow, and a cyan. And then you can make any
other colors that you want. You can make all
of your oranges. You can make your greens.
You can make your violets. And then you might want to
have kind of a neutral. I really like burnt sienna
as a neutral brown. Because then between that
and the cyan or a blue, I can get any dark
value that I want. Then we're going to
need a cup for water. I really like these containers that lemonade comes in because then I can take the powder out and then I have a cap on
it, which is really great. But any large cup of
water will be great. You're going to want a
cloth or paper towel, or kitchen cloth, kitchen rag to use to wipe off your brush. We're going to need
tape to tape it down. I use washi tape. You could also use
Blue Painter's tape. Or if you need to, you
could use masking tape. But if you're going
to use masking tape, it's very sticky. So you're going to
want to stick it down to your sleeve or your pant leg so that you can take some of the
sticky factor out of it. And then for our water
coloring techniques, we're going to need
some plastic wrap, some rubbing alcohol, it doesn't matter what
percentage it is, as well as some table salt. You could also use fine
sea salt if you wanted to, or you could use larger
ground sea salt. The different salts will have a little variation
in how they react to the water color and the crystallization texture
that it creates. But my go to is always just table salt because we
always have some on hand. Then to cut out
our sea creatures, you're going to want
either scissors or an exactor knife, or both. Depending on which
sea creature you choose and how intricate
its design is. Then you're going
to need a ruler. Probably at some
point, potentially, I use the ruler
to cut down my 18 by 24 in sheets of
watercolor paper. If you're working
from large paper and you want to cut
it down to 12 by 18, you may want a ruler on
hand to wet my watercolors. Rather you could just wet your brush and squeeze
it into your paint. I really like spray bottles. This is from the travel
section of our local store. It's really great because
I can just easily split my paints and then
they're ready to go to transfer our images. We're going to need
a graphite pencil for the graphite on the back of the reference image
to transfer it to glue down our sea creature
to our background. I am going to be
painting on with an old paint brush, my PVA glue. You could also use a glut. Gluicks may not stick as
well as you need them to. If you happen to have any
white liquid glue is great. I do a lot of bookmaking, so I have PVA glue on hand. Then to drop our rubbing
alcohol onto our paper, onto our watercolored paper. We're going to have
another watercolor brush. We're going to make sure
we keep this separate from our watercolor paint brush. This what I'm only
going to use to get the rubbing alcohol down
onto my paper later. Then we're going to go back in with some mixed
media techniques. I have a fine liner. I've got a variety
of brush pens. I have some Posca pens
also in white and black, just to add some pops,
depending on how I want to bring my sea
creature to life. I've also got some
colored pencils on hand. It just to add some
more layers in depth and dimension as we really take our sea creatures from a flat cut out watercolor sheet
to a mixed media collage. That should be it. You can add any other additional mixed
media materials that you like. But this is all that you need to be successful in creating
our class project. Take some time to gather
your materials and I'll meet you in the next
lesson where we will start exploring watercolor
techniques to create our sea creature textures and ocean skates see in
the next lesson.
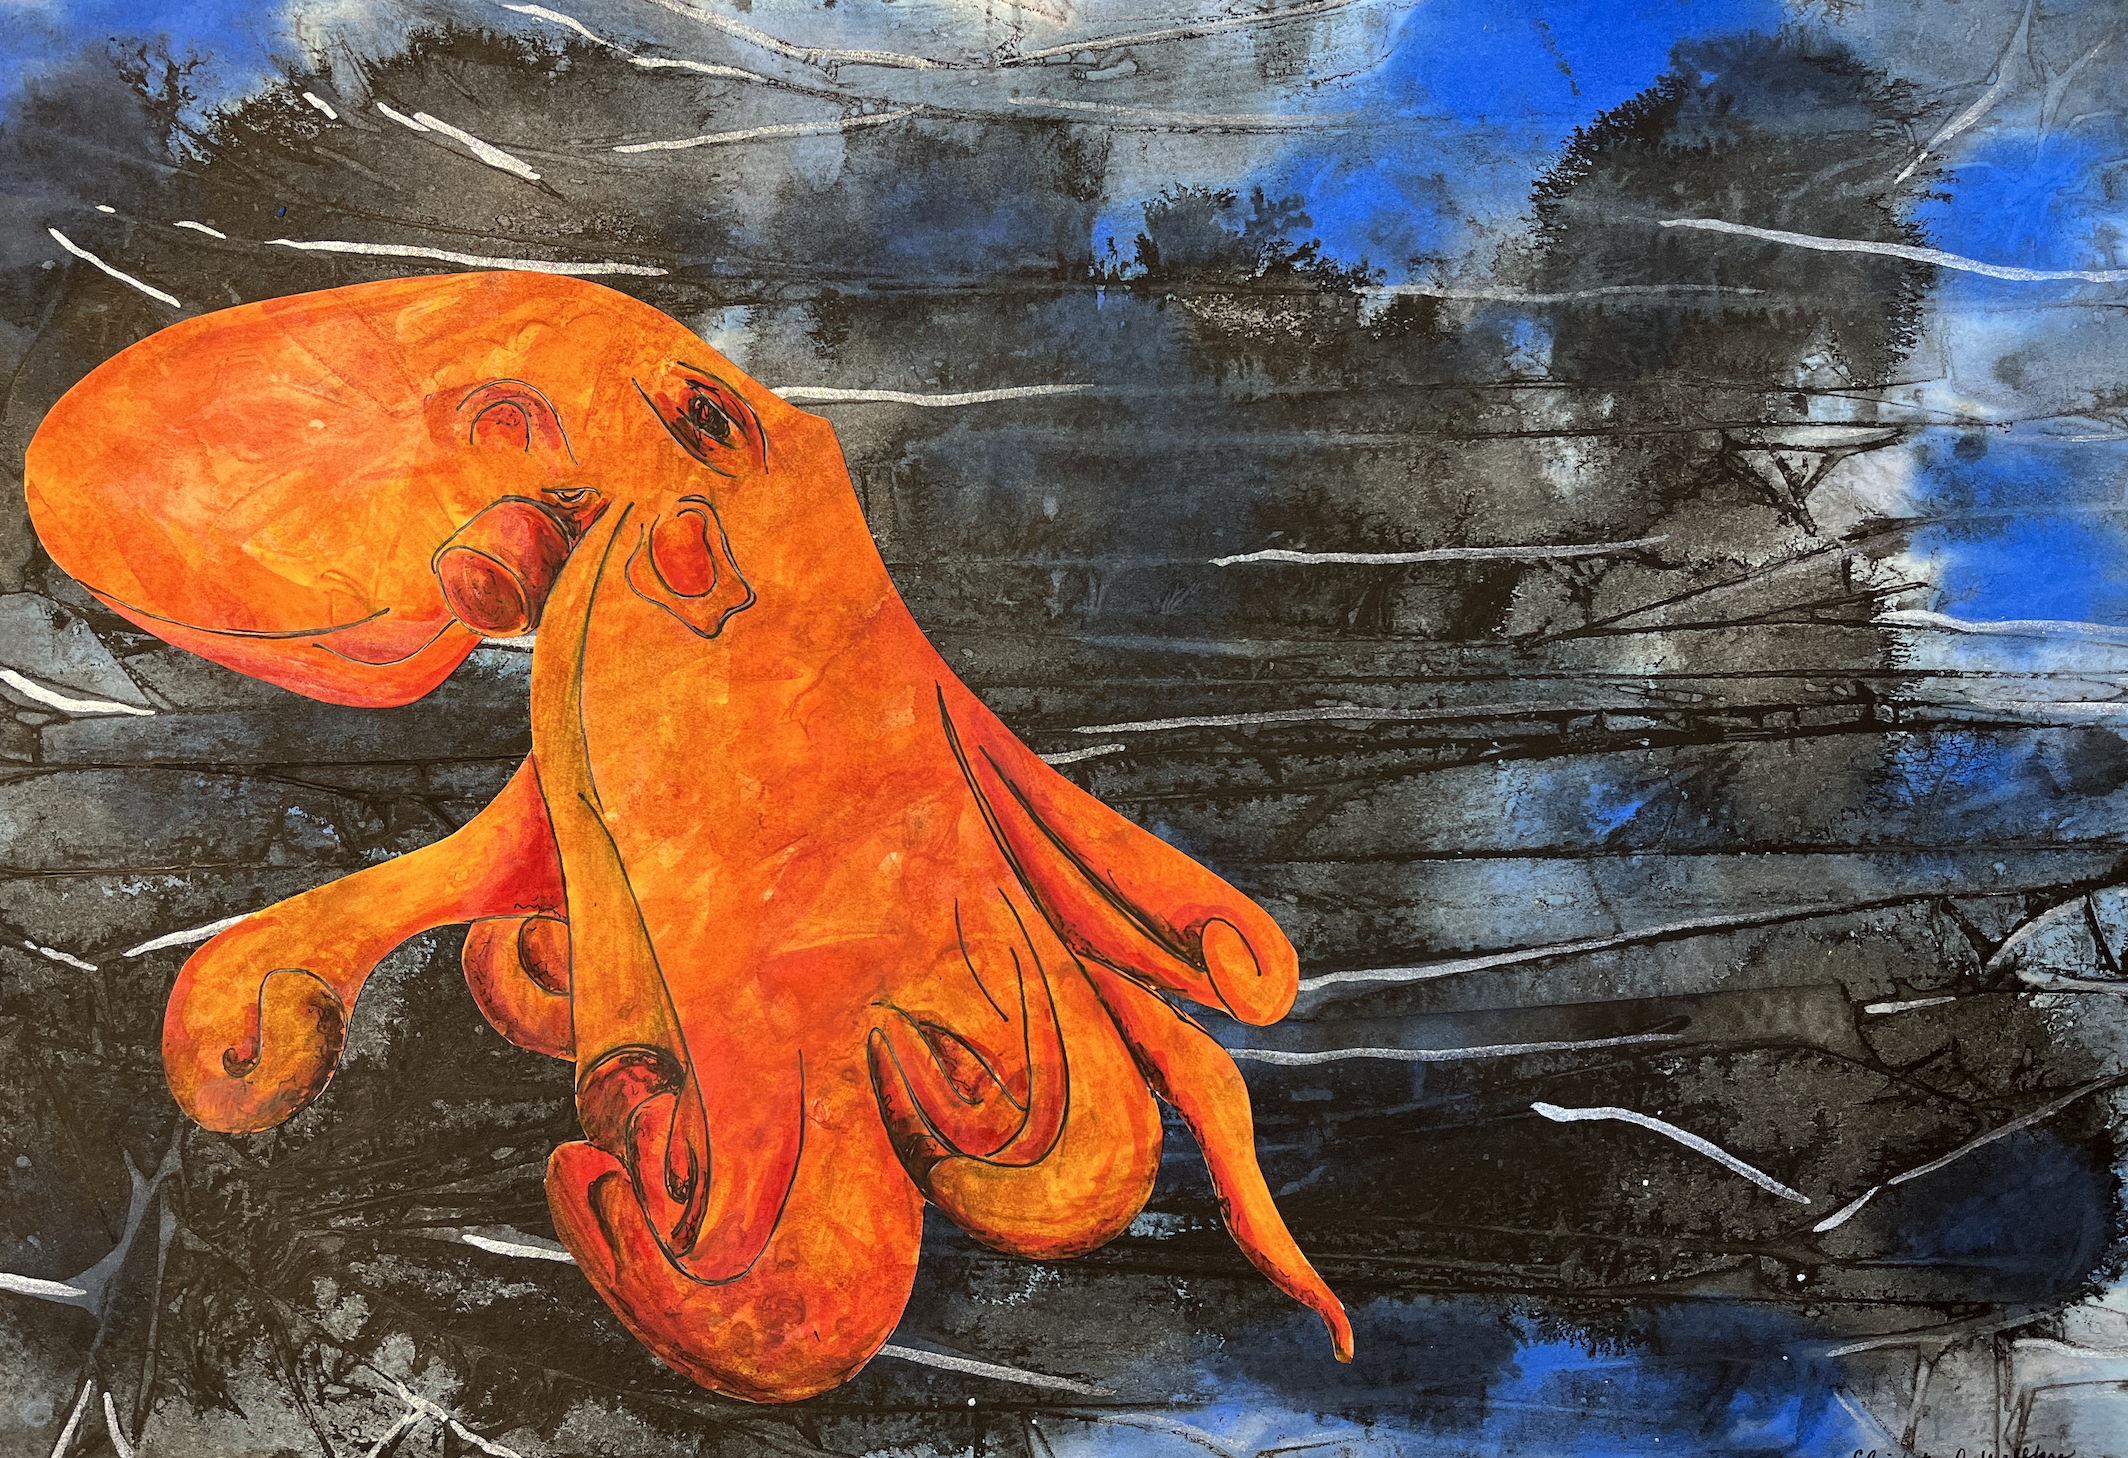
4. Plastic Wrap Ocean Background: Welcome back. Let's create our first watercolor
texture paper. I'm going to be showing you three watercolor techniques in total that you can
combine to create your sea creatures body
or you separately. For this class and
all three techniques, we will be using a wet
on wet application. When working with watercolor, it's all about controlling
how much water you use versus how much color
you pick up on your brush. We're going to be working with really pigmented
watercolor applications. So to get the boldest colors
out of my watercolor tubes, I'm going to go ahead
and set up a new tray, put a variety of blues down, because I'm going to start
with my ocean first. Most of my watercolors
are Windsor and Newton. Cut my watercolors. I really love the
colors they have. The quality is great, but whatever
watercolor you happen to have on hand will be fine. I'm going to do a
little test sheet to see how they all
look on the page. And then I'll get set
up to do my big paper. If you have a watercolor tube where you just can't
get the lid off, no matter how hard you try. One thing you can do because water color can be reactivated. You can pinch the end of your
tube, cut off the bottom. I got to squish the
paint back down. Then I can take a little
bit of plastic wrap, I can wrap up the end. I'm not wrapping up the end
to keep it from drying out, it's going to dry
out on the end. Eventually, I'm wrapping
up the end to minimize the mess that is created by having an open
tube of water color. I just tear off a
little bit of this, then wrap it around the end. It's going to keep the majority of the paint
that's still on the tube wet, but it's also going to keep this from squirting everywhere, all over my heart table. Like I said, I want
to do a test sheet. I'm going to set my larger
sheets off to the side, and I'm going to grab a smaller one of the same kind of paper. I'm just going to quickly
tear off a strip like that. I want to see what these blues look like on my
watercolor paper. I'm going to go ahead and grab my brush. I'm going to wet it. I've got my cloth off to the side and I'm just
going to pick up some color that is a really beautiful,
it's really in blue. That could be really lovely. I'm going to wash my brush off, grab some of my next blue
that is also really nice. You can also see what happens if you add
more water to it, because we are
going to be adding a lot of water at this stage. I can see what happens when I
pull that lighter blue out. What happens when I
pull out this blue? And if I was being really wise, I would have lined
up my tubes in the same order so that
I could keep track. But this is all
we're going to need. We're only doing one
project in this class, so I'm not going to
worry about keeping track of it and you
could sort it out later. This would be, this I
know is my Prussian Blue, which is one of my
favorite blues. It's just such a beautiful
dark blue, there's that one. And I have ultramarine,
I think is my last. Altramarine is very similar to thalo blue, which
is interesting. I've never compared
those two before. Pull that out a little bit. I might end up using all four of them. I
really love them. They give a nice variety, especially if I considered the Prussian blue
with either of these, either the Altraine
blue or the thalo blue with the seralan blue gives
me a nice variation of blues. The more color you put into
your abstract backgrounds, the more interesting
they become. Now that's not to say
you can't just work with one color or one color in black, which we're
going to be doing. We're going to get
some really intense black with our India ink. Just in general, when you're doing textured
watercolor applications, it's really nice to
have a variety of colors and values to work with. This is great. I'm going to
set this off to the side. I've got an idea
of what I want to do now so we can jump
into the big one. I like taping my paper down to plexiglass or to mason sheets. This works really great because our paper is going to
be getting so wet. You're going to want to be
able to tape it down now. I could tape it to my art table, that would be totally fine. But I want to be able to do more than one in this session, so I'm going to
use my plexiglass and then some masonite
sheets so that I can do a background and then move it aside
and do another one. I'm going to take my paper
and then I'm going to use my washi tape it down. You can also use painter's
tape, which is the blue tape. You can use masking tape. Masking tape may tear, so just be careful when
putting that down. Washi tape works great because it's fun to look
at which is just a bonus. It sticks down really well
and it peels up pretty great. I'm going to tape this
down so it's nice and secure on my plexiglass sheet. We want really, really
juicy colors to get the effects that are going to work the best with the
techniques that we're using. The first thing we're
going to do is do a wet application to our paper. I'm going to take my largest
brush and some water. I'm going to go ahead and
just wet the whole surface. I am going for the
water color to move, so I'm not going to be too
concerned about too wet. I don't want any big
petal areas though. Move it around on
your paper until everything is nice and wet. Because our paints
are already wet, we can go ahead and
dive right into those. I like to start with
the water color first and then I'm going
to go in with the ink. The black is so powerful that it's going to take
over anywhere that it goes. We're going to go ahead
and do water paint. Then we'll start dropping
in the black to really add some intensity to
our ocean background. The other thing that that
black is going to do is going to help our
creature pop even more. If we just had a
really bold ocean and we had a really bold, any other colored creature, they would be fighting
with each other for space on the page as far
as depth goes. But the black is
going to just push that blue background back and pop our creature
off of there. Which is going to be super
great for visual interest. But this is my all time
favorite technique in general, but it's also my all
time favorite technique for creating an ocean scene. Let's go ahead and super
loosely drop in our color, knowing that we're
going to go dark. I'm going to come
in with this later. I think I might start with my second blue which I
believe was my thalo blue. Yeah, this is Alter Maine, so I'm going to start
with my thalo blue. You can use any blue you have. And if it's okay if you
only have one, that's fine. Then I'm going to pop in my cerillan in a couple of places. Then I'm going to drop
in my compression blue. And then we'll get ready to
put some ink in there too. I'm going to go ahead and grab my second blue and just
start dropping it down. The water is going to
do what the water does. It's going to move
that paint around. This does not have
to be planned out. The more spontaneous
and splashy the better. Do not fill your
whole page in though, leave some white, because
we're really going for variation and
dimension in this. Then I'm going to go ahead
and grab some Cerrillan. Remember, it doesn't matter
if you don't have it, but if you have a light blue, why not try adding it in once that thaleoblue fades
out a little bit. It's not doing a ton of
exciting things there. So I'm going to move on. I'm going to go ahead and grab
some of my pression blue. So pretty. Oh my gosh. I just love it. I'm
going to drop that in. I don't want to over mix. I want to let the color
stand on its own. But anywhere that there's white isn't going to do
the saran wrap technique. I need the paint down in a
way that fills the page. Without filling the page, we're not doing a wash,
we're dropping color. If you're at all curious
about more of this technique, check out my Youtube channel. I have water color Wednesdays. Every Wednesday, I
drop a new video that features a different
application of water color. Sometimes it's abstract, like this, it's more
representational. It's watercolor something
every Wednesday. So, so fun. I love
watercolor so so much. If you're working with
stuff straight out of the tube and you get a couple of globs on there, that's okay. Just add some water to kind
of get those to move around. Now we're done with
the water color, so I'm going to go ahead
and wash my brush off. I'm going to dry it off. And now I'm going to get my ink ready. This is going to stay
wet for a while. I'm going to take my India ink. This is just Blick, Black
Cat waterproof India ink. Any India ink is
great in it's great. I'm going to grab a little cup. So I'm going to go ahead
and put the Indie in. Indie Ink will stain watercolor stains to
India ink stains more. I've got a little bit in here. I'm going to grab a small brush and I'm going to
just start going in. See how bold that is. It just pushes that water
color out of its way, so you've got to be careful how much you drop in.
You can splatter it. I can let it go down
and splatter swoops. But we want that contrast. We want to really create a
moody, beautiful ocean here. Now, I don't want to
lose my blues too much, so I'm going to try
not to go overboard. I'm going to let that be fine. Now you have a choice. You can leave it like
this and let it dry, or you can use the seran wrap, or you can do two. You can do one where you
let it be like this. Then one where you
do this Ran wrap. We're going to do this Ran
wrap because I really want to show you a really beautiful
texture for your ocean. I'm going to quick
rinse off my brush because I don't want to
let that ink dry on there. Once your ink brush
is rinsed off, then you're going to want to
take your plastic wrap out. We're going to want
nice big sheets. I'm actually going to scooch
some things out of the way, just so I don't bump anything. I'm going to pull really,
really big sheets a little longer than my paper. The traditional way to use it is to bunch it up
and put it down. For this one, I
really want you to explore pulling it lengthwise.
Fold it up a little bit. We're going to pull it,
we're going to stretch it. And then we're going to
put it down on the page. And then we're going
to use our fingernails or even a paintbrush handle to really reinforce those horizontal
lines and then squash. We're going to do the same thing until we have the
whole thing filled. We're going to have the
texture that we created with our wet on wet water
color and our ink. Then we're also going
to have areas where the plastic wrap is going
to add its own texture, scrinch it up, pull
it nice and tight. This one went down
ahead of time, But I'm going to make it work. I can sprint it up again, pull the lines, really get them to create those really
beautiful horizontals. One more section
should do it now. Our ocean creatures tend
to be more vertical. We're going, this is going
to be the whole background. I really wanted to go
horizontal this way. Because whatever sea
creature you choose is going to be a more
vertical creature than it is a
horizontal creature. Unless you're choosing a
different sea creature. If you decided to do a
lobster or, I don't know, a regular fish instead of the
octopus or the sea horse, then you could think, you could think about changing the directions of your seran. But I would still
encourage you to go horizontal because
if we think about currents in the ocean,
they're moving horizontally. This now has to dry. Do not take it off
before it is dry. This is such a wet page. I would let this sit
overnight, if at all possible. But you can peel it
up and check it, but if you peel it up too soon, you're going to have less of
an effect than you would. Otherwise, you're going
to want the effect. It's so fabulous. So we're going to go ahead and set
this off to the side. And then we're going to do
a couple more sheets with a couple other techniques to have as options for
our sea creatures. Now we are going to set
this very wet paper aside and move on to our second watercolor technique I'll see in the next lesson.
5. Salt Technique: Now let's shift
our focus to salt. In this second technique, we are going to be
approaching it the same way that we did
our plastic wrap. By doing a wet surface, wet application of
water color paint, and then sprinkling
the salt on for a really cool texture. For this one, I'm
going to play with yellow, yellow greens. Yellow, these are
Van go water colors. I have acquired a weird
smattering of colors in my time. I'm going to go
ahead and use that. One is permanent yellow, green. It's beautiful and
throw down some yellow. I really enjoy working
with warm colors, cool colors, analogous
color schemes. The warm colors, obviously
you've got your reds, your yellows, your
oranges, the cool colors. We have, our violets, our blues, and our greens. Analogous colors are colors that are next to each other
on the color wheel, if you started with, say, yellow, a primary color, I could go yellow, yellow, green, green, blue, green. That would be an
analogous color family. Or if I did, or maybe
if I started with blue, I could do blue, blue, violet, violet, red violet,
and go that way. They are colors that
are always going to mix well together because
they're close to each other. On the color wheel, they like to play together,
which is wonderful. I want contrast,
so I'm going to go ahead and grab a dark green. Also, you can use any
colors you want for this, I highly recommend either
going warm or cool. Now keep in mind we have a
cool background for our ocean. We're going for blues
for the ocean water. I recommend going
color contrast either go light and bright
with like yellows, pinks, pale blues if you
want to get a blue in there. Or go red, oranges. It depends on the creature
you're choosing to do, but we also don't have to
live in the land of reality. Have some fun with
it, really just play. I'm also going to, for fun, throw some turquoise
on my palette. Just like our last step, we're going to go ahead
and wet the water. I have gotten some clean
water so that I don't get a weird contamination
between the water color, the water color that
is in there from the last painting and what
I'm doing for this one, it doesn't totally matter, but I like to change my water between doing
big pages like this. All right. Again, we're
going to get it super, super wet for the
salt effect to work. We're going to be using
salt for this one. You can use table salt, sea salt, you can experiment
and try other salt. Rice does a whole other thing. I'm just using table
salt because that's what I had on hand in the
studio and it works great. It's one I really love. Again, I'm not quite
sure what animal, what sea creature this
is going to become. I'm leaning towards, I'm
going to do them all, but I'm not sure what color I'm going to use for which one. I'm going to go
ahead and put down this beautiful limey green, giving me dragon
leafy dragon vibes. We want it super saturated. In the end, we don't
want to have white. Well, I say that you
can have some white, but the more white you have, the less of the watercolor texture effect you're
going to have. I recommend just just going
for it with the color. We can always put some
white back in when we do the mixed media. All right. I'm going to go ahead
and wash my brush. I'm going to grab
some of the yellow. I'm also realizing I didn't
wet my water colors. I was so excited
to jump into this. But my brush is so wet,
it doesn't matter. Maybe wet your water colors
that for good measure. All right, that's super fun. I'm going to pop in
some of that contrast, That darker green, you
can splatter with it. It doesn't have to just
be a brush application. Dabbing is fun. However you want
to get it on there is up to you, is fine. I do want to keep some of
the brightness because I was talking about contrast. I want to have that pop of
light color against the ocean. All right, I'm going to pop a little bit more
of that yellow, which is contaminated
by my other green because I'm painting so
fast. But that's okay. It's made another
new, pretty color. All right, great. Now, just for fun, I'm going to grab
a little bit use. The turquoise is
going to go really nice to add some more depth to my darker green sections and just pull those
colors even more. In an interesting way, I've
got some goofiness happening. So I'm going to go in with a
wet brush and loosen those go the professional water color terms, the cooping effect. Oh my goodness.
Okay, that's good. I'm going to leave it like that. I've got plenty of color. It's super saturated. It's definitely wet. Now with the salt, I
recommend you put some in your palm and then pinch it. You don't want to put down a lot because what the
crystals are going to do is like a
straw or a sponge. They're going to absorb the color and they're
going to pull it into themselves and off the paper, which
is super cool. We really want to
have this effect, these little
surprises of texture. This is a more subtle texture. This will become, maybe this will end up being
a sea turtle who knows what's happening here is I have the water
color in the water and the different water colors are reacting to each other. Then the salt, anywhere
that's gone down that is pulling up the
pigment and absorbing it. Then I also have some
buckling happening, which is giving me a whole other textural thing, pretty fun. Water color is amazing, but we have to let it dry. We're going to go ahead
and set this aside. What's going to
happen is the salt is going to absorb the color
wherever it's been put down. And then once it's dry, you'll see the effect. You can see it a
little bit earlier on, but it's so much cooler
after it dries set. Set this aside, come back to
it the next day if you can. It'll be worth the
wait, I promise. Then you can either
leave the salt on or we can brush it off, or you can do a
combination of the two. Sometimes there's so
much paint on there that it doesn't really want
to release the salt crystals, but that adds a whole
other layer of texture. Now we're going to set our
salt texture paper aside and move on to technique number three. I'll
see you there.
6. Rubbing Alcohol Technique: All right, technique
number three. We're going to be working
with rubbing alcohol. For this one it's going to begin the same way
that we did as far as how we set up our
plastic wrap and our salt. And then we will add the rubbing
alcohol and you will see the amazing texture
that is created by this really amazing liquid. For this one, I have taped down my watercolor paper and
I actually taped it to the back of an empty
mixed media sketchbook. I save my sketchbook back for cutting boards for
different cutting and mixed media projects, but I have been really into
watercolor textures lately. Big ones really
wanting big ones, I started using
them to paint on. Also, they don't have
a long shelf life and this one is getting
a little worked, but it's going to be great. I've gotten some fresh water. I want to get my colors
out for this one. We're going to do
the technique with rubbing alcohol in
your health section, at your drugstore or big box stores here
in the US. Have them. It, it doesn't matter
the percentage. It's just that first
aid, antiseptic alcohol. But it's fabulous for
watercolor techniques. For this one, I'm thinking
more pinks and purples. I'm going to go ahead
and put down some pink, is my base color. I think I'm going to add in some dark purples for
my contrast color. Then I've got this. This is Windsor Newton two, but this is cobalt
violet squirts out. Oh yeah, that's pretty,
that's very pretty. All right. We'll get
those sailed up later. Okay. This time I'm
going to remember to wet my water colors with
me spray bottle. It's also activating the
water color under it. I'm not worried about
that. I'm going to go ahead and wet
it a ton again. Or we don't want petals, but we do want it to
be good and saturated. Then we really want to
load it up with color. Because the more color we have, the more impact we're going
to get with the techniques. The rubbing alcohol is going
to require you to need a second paint brush that isn't being used
for water color. Now, it doesn't have to be a brush that you can never
use for watercolor again, but you might want
to just mark it with some tape if you're
going to be doing a lot of rubbing
alcohol application in your watercolor journey. Just so you don't have to keep worrying about what
brush is wet because I wouldn't want to dip this
in the rubbing alcohol and then dip it in
the water color. It might be weird we're going to let this be though
of rubbing alcohol brush. Got my water down. I'm going to go ahead and
start putting down the pink. It's going to be goopy because I took it straight
out of the tube. That's okay. Again, I don't
want to fill the whole area, but I do want to
make sure that I've got lots and lots
and lots of color. This technique is a
little more forgiving if you're working a
little less intensely, but it's still
super cool because it's going to
create light areas. The more dark you have in there, the more interesting that's
all going to become. Dark versus water color,
Color against water. White paper, goopy paint, I'm not quite sure how old,
whatever this one was, this cobalt violet, it's a very pretty color but it doesn't want to
go on very well. I could have swatched
these out too, but I'm trusting the tubes
to be pretty accurate. Okay. I'm not sure
I'm going to be using that cobalt violet again.
It's a little strange. I'm actually going to have to wipe my brush off because that paint is really
sticking to my bristles. Okay, let's go for some
of dioxazine violet. It's a gorgeous
purple. I love it. It is darker than what
I've got going on. I might use it in a
more sparing way, also might play with how
I get this on the page. We're not painting our
sea creature, right? We're painting their skin. And who knows what part of the page we're going
to end up using. It's okay if this
is a little weird, you can always dab into the water some more to help
move your color around. I'm going to go
back to that pink and bring it back
without having it mix too much With that
purple weirdness is happening because of that
violet cobalt situation. It's fine. It's going to be fine. It's making it hard to get,
to get the paint to go down. I'm going to grab this
brand is Phoenix. I have some magenta, I'm going to stick that down. Different watercolors
behave in different ways. They also behave
differently as they age. Let's see what
grabbing a different. Yeah, there we go.
I'm losing some of that rosiness
but that's okay. There's like weird repelling things happening which I like, I just really wanted a
certain paint situation to show you these techniques. It'll be fine. Some of it
might be the paper too, just might be having one
of those weird days. Okay, Now I've got a super
saturated situation. As far as color and water. I'm going to go ahead and get, you can put this in a cup or you can just go
straight out of here. I only use this bottle for
this and then look at that. You just wrap it down and
it just pushes it away. You can also put it
in and touch it down. You can have more
control over it. I like to let it be wild. It is going to smell sterilized in whatever room
you're doing this in, but it does evaporate. So it's not going
to be too crazy. Yeah. Okay. I don't want to
wash this off in my water cup because my water cup is for my water color,
just like the ink. I'm going to go ahead
and rinse this off in the sink so that
this brush is clean. Again, to wash my hands
too, a little bit. Then we also have to
let this one dry too. We're going to go ahead and
let this dry overnight. Then we'll circle back to see what our
textures look like. In the morning, we have
explored plastic wrap salt, and rubbing alcohol In our
previous three lessons, they each create
really beautiful, very different texture for
our watercolor papers, but we have to let them dry, go take a break,
grab a cup of tea, and I will meet in
the next lesson for our watercolor texture
reveals. See soon.
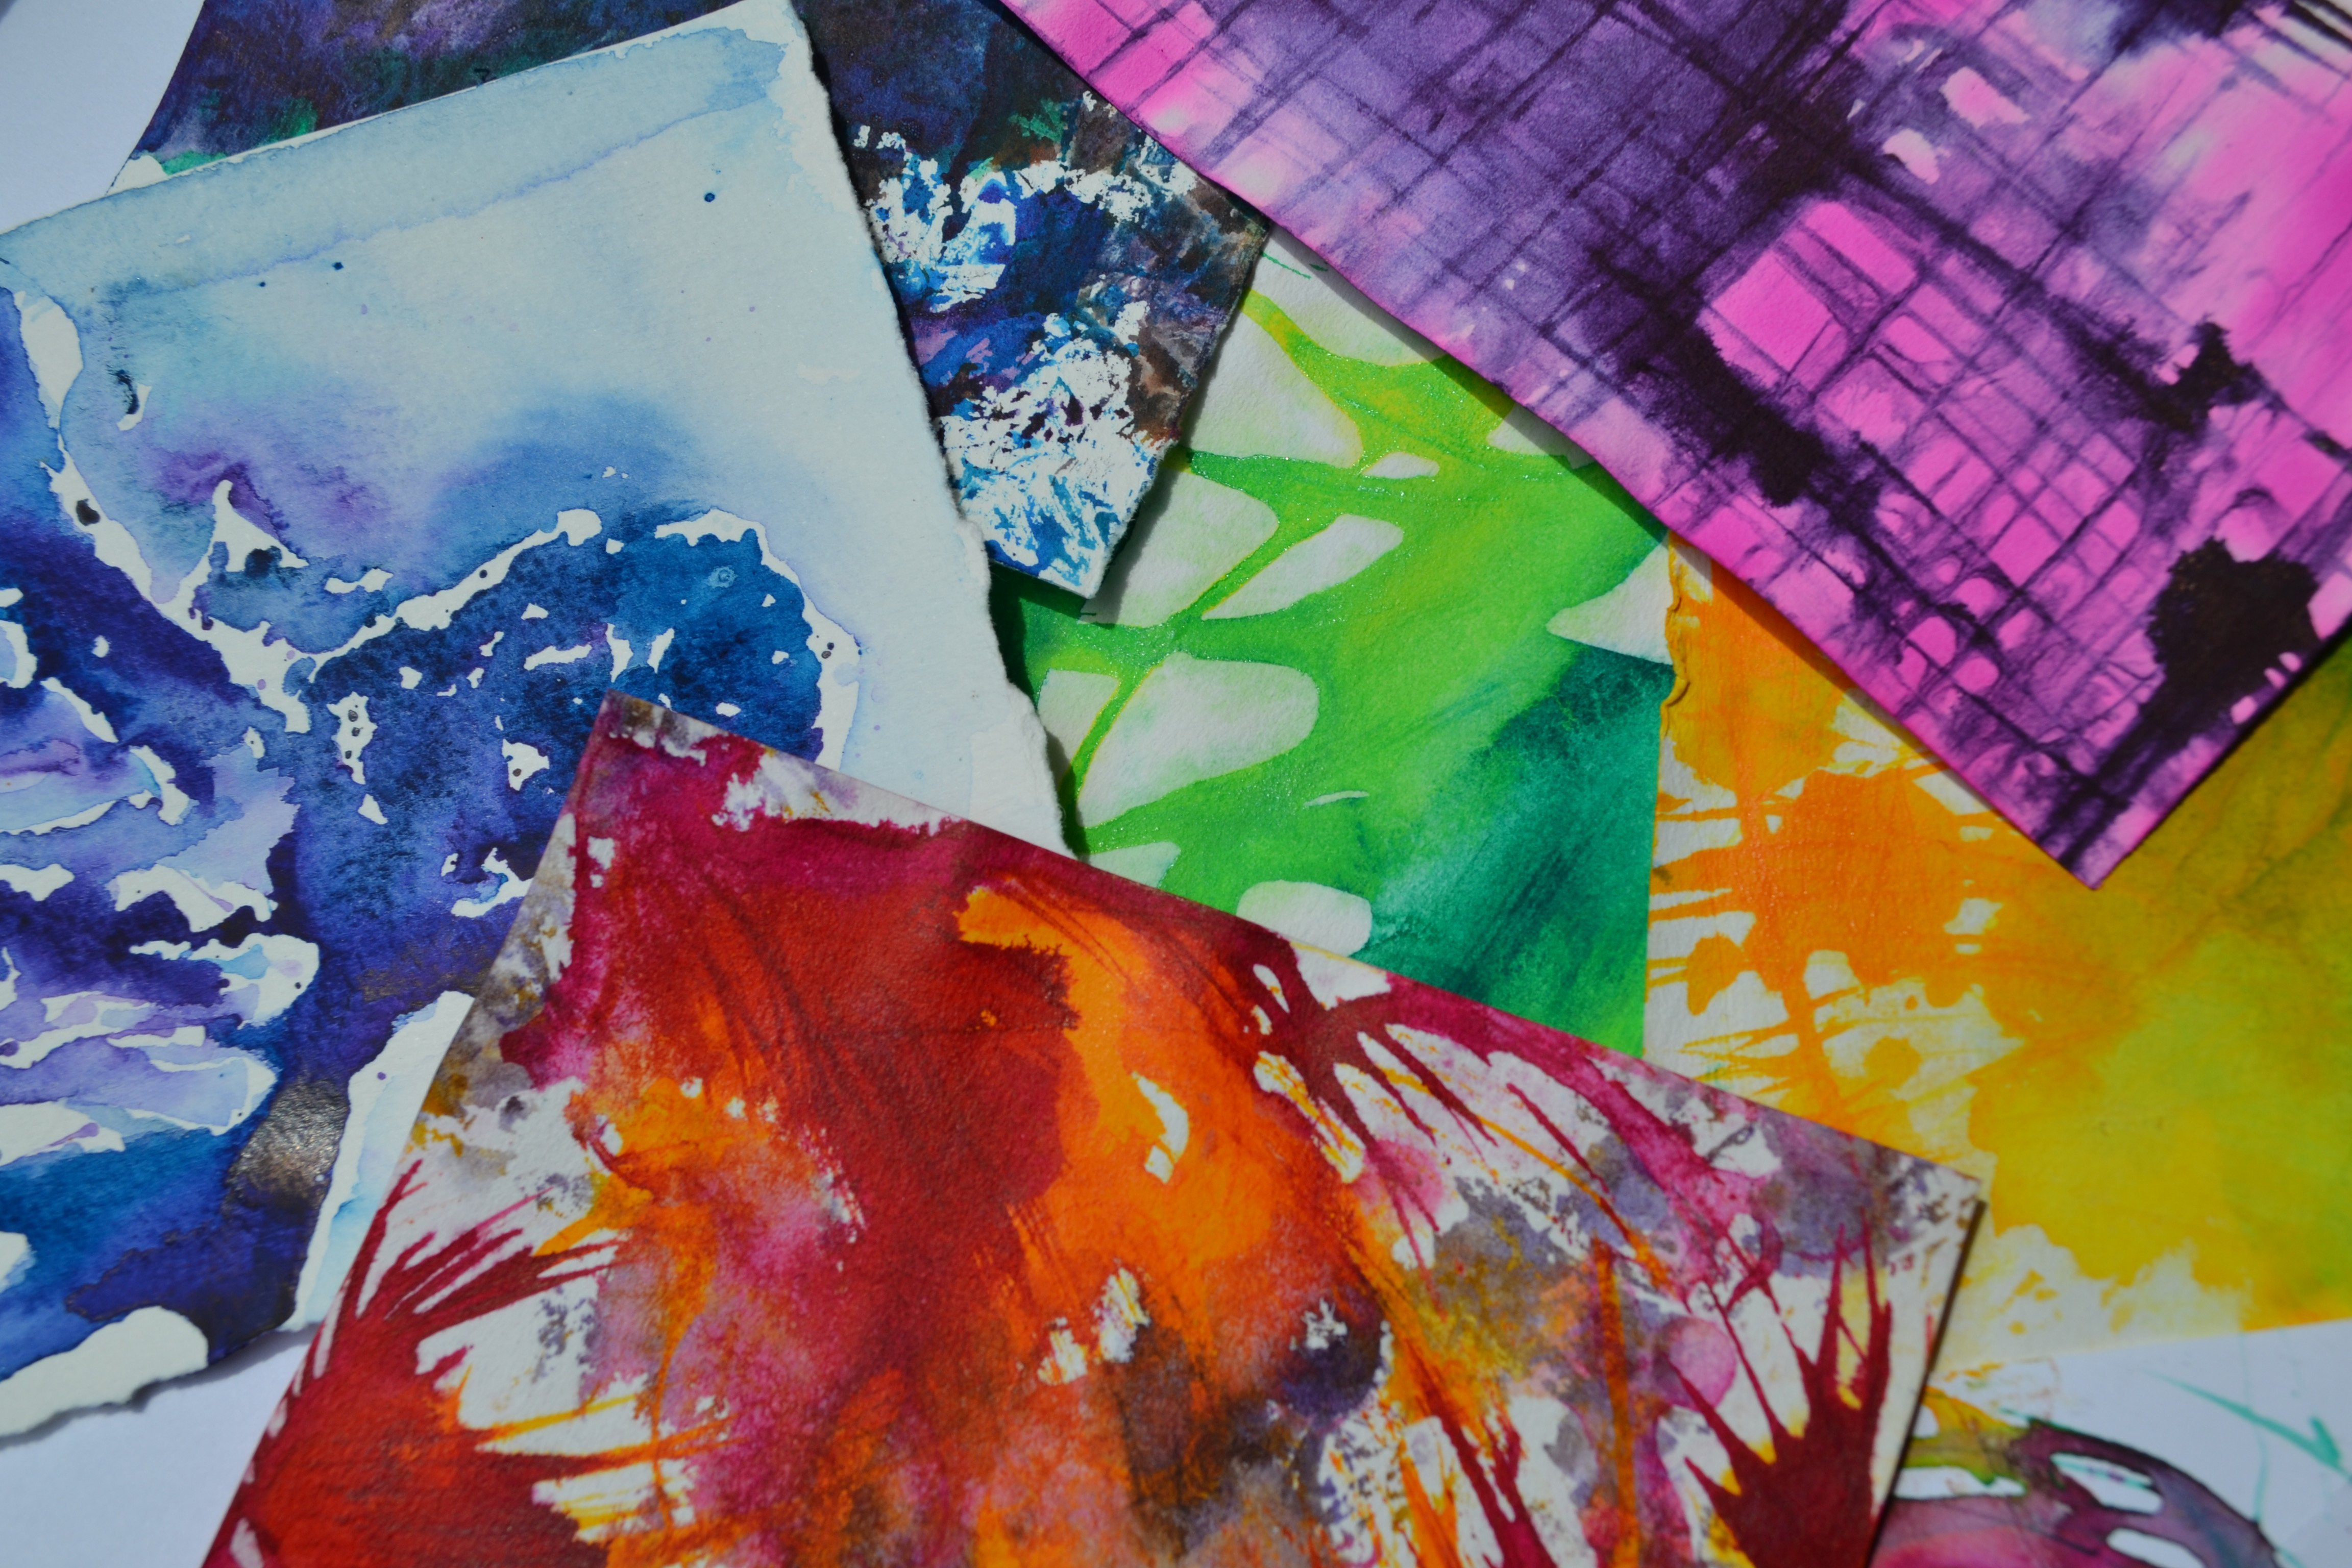
7. Texture Reveal: Welcome back. Now
let's take a look at how our textured watercolor
papers turned out. This is the result from
my rubbing alcohol page. You can see where the rubbing
alcohol was splattered. It pushed the color
aside and created a much more diluted version
of those colors. I love this. This is such a great
texture that you can use in so many fun ways and is perfect for a sea creature
mixed media collage. Then this is the salt one. This is also really fun. The salt crystals,
some of them got bled, really great, absorbed a lot more of the pigment
that was on the paper. Then I've also got
areas where the salt, you can remove the salt if you want to or you can let it be. This one has a really neat
that's really built up there. I sprinkled the salt
when I was doing it, initially while
the paint was wet, but then I had a couple puddles depending
on the warping of my paper. I really wanted to
make sure that I got some more in those areas. I dropped more salt in, I ended up putting
quite a bit of salt down in an area like this. And then also in this puddle, this section, I have a whole other texture
thing happening there. But you can see where the
salt pulls the pigment and some of it as it dissolved creates a whole other thing that's happening in
some of these areas. But salt gives you a
really fun texture. This could be for a
sea creatures body, but this could also be for some seaweed
growing in the ocean. You can add as many elements to your sea creature mixed media
collage as you want to. I think I'm going to stick
with ocean creature, keep it simple, but who knows? I really love the idea of using this in more ways than and adding more
elements to the clutch. Maybe that'll become
something I do in a bonus video, I'm not sure, but it's very fun and I'm excited to have it on
hand as an option. Then the other one we did
was the plastic wrap. This one I wanted to
save the reveal for now. What you do is you
peel back the paper. This gorgeous, almost
crystallizing feel to it. Because I pulled the
paper really tight. I have the stretch marks here. If I had crumpled
it and squashed it, would be a whole other thing,
be more like this texture. Anywhere the plastic
wrap touched it, created it, moved
the pigment a bit. You can also play around with painting your paper
with the pigment, putting the plastic wrap down, and then switching it up with your fingers and having it
move the pigment that way. That's a whole other approach
that I just learned. I'd never thought to
do it that way before, I've never seen it
done that way before. A whole new thing happening in a recent workshop
that I took. I'm going to go ahead
and take off the tape. When you remove the
tape from your paper, you really want to
pull it back gently. Want to pull it back on itself? If I pull it up, the chances of it ripping my paper
are much greater. I always want to make sure
that these dry all the way, so go ahead and carefully
remove your paper. If it rips your paper, it's not a big deal because we're not going to be
using the white edges. We get all of that out of
the way off to the side. I'm going to remove
my plexiglass board. Then what I like to do is I like to trim off the
white in this case, oftentimes with water colors, if you can get that
white border to stay clean and not have that
bleed like I have here, It's really sharp to have
that white crisp to it. But in this case, we
don't need it and we don't want it when it
comes to our sea creature. I'm going to go ahead and
trim the border off of all of my decorative papers
that we created. Then we can move on
to the next step. Before you move on, make sure
you trim off your borders. You can just do it
with the scissors. You can do it with a
ruler and exacto knife. Again, this doesn't
have to be perfect. If I had any little white extra, I could always go in with
some more paint and clean that up if it was a problem if I didn't want to trim it up. This is also a great
thing if your paper rips, when you're taking your tape
off, just trim it down. If you're going for the 12, 18, you have plenty of
paper to work with. So go ahead and do that
for your other papers. Now that we have three beautiful watercolor
texture papers, it is time to work
on our sea creature. So let's head over
to the next lesson to learn how to
draw and trace to transfer our sea creature image to the back of our
watercolor paper. I'll see in the next lesson.
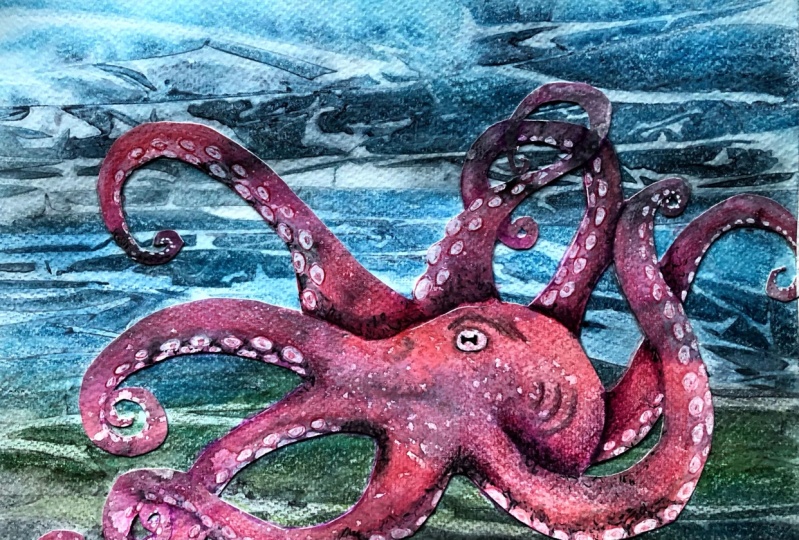
8. Trace and Cut Out Sea Creature: Welcome back. Now is time to choose which sea creature
you want to create. In the projects and
resources section, I have shared reference
line drawings and photographs for a sea
horse and an octopus, But you're welcome to use
any sea creature you like. Remember, you can go
to Unsplash.com or any other image resource site to find some great reference
images to work from. Think about the papers
you've created, the colors you've
chosen to work with, and what might best fit
the sea creature you're interested in creating
for your class project. This time I'm going to
go with a sea horse. I love sea horses and
I'm super excited to create a mixed media
collage sea horse artwork. The first step in turning our watercolor
texture papers into beautiful sea creatures is to transfer our drawing to the
back of our watercolor paper. So I'm going to go ahead
and choose my pink paper. And then I have printed out a drawing that I
created of a sea horse. This is one of the two
reference images that you are welcome to use in the projects and resources
section of class. You can free hand it onto your watercolor paper or you can transfer
it in a way that I'm going to show
you it's going to be a mirror image
because we're putting it on the back, we flip it over. If the sea horse
transferred like this, looking that
direction to my left, then when I flip it over, it's going to be
looking to my right. It's going to be a mirror image of what it is going
down on this, But it doesn't matter
how it goes down. But if you are someone who is something that's
important to you, I want you to know
that up front. Transfer it in the opposite direction you want it to face. To transfer a print
out picture like this, we are going to
first flip it over. I'm going to use a
number two pencil. I'm going to take my pencil. And where the line is, I'm going to scribble,
nice and dark. I want to get as much
graphite over that line as possible because then you
don't want to just trace it. Because the odds of
missing your line and having a frustrating
transfer experience, it's possible if you just
go wider than that line, you want to make
sure it's a nice solid block of graphite. We don't really want any
spots where it's missing. You're going to do that
around all of the edges. All right. I have graphite over all of the
lines of my drawing. Now I'm going to
put down my paper, my watercolor paper face down. I'm going to flip
over my picture. Then I'm going to grab
some tape and tape it down so that it
doesn't slide on me. I've just got some
washy tape on hand. I'm just going to care
off a couple pieces there, one on the other side. That's all you need. I'm going to use my
graphite pencil to trace over my lines. Anywhere I press down
with the pencil, it's going to be
transferring that line to the watercolor paper You
want to press down nice and dark to really make sure that graphite is
transferring on the back side. Just trace over your marks. Now, before you get too
far into the process, you do want to check this because you don't
want to get all the way done and then
find out you didn't push hard enough or you
didn't have enough graphite. I can go ahead and
peek, and I can see my graphite line is
transferring just fine. I can keep going
all the way around. This is also an
opportune time to add any additional details if you
want to change the outline, the outside edge of
your sea creature. The step after this
is to cut it out. If there's any extra
flare you want to add as far as the basic shape. Now's the time.
You're relatively neat with this
because we did make a very thick graphite line, graphite bold step
on the back side. All right? Everything
should be traced. I'm going to open
up. I'm going to take up one piece of my tape. They both came off.
That's okay there. I have traced my sea horse. Now what we're going to do is we're going
to cut this out. We have a lot of
extra paper here. If you're working 12, 18, you have a lot
of extra paper. Don't throw the extra away, save it for collaging. And who knows,
maybe you could be two sea horses or
some other creature, or shells, or rocks,
whatever you want. I'm going to carefully
cut this out. This is our actual piece. You want to take it
slow, nice, clean cut. You can use an Exacta
knife if you prefer. That might be good,
especially if you have a really detailed creature
that you've created that has lots of nuanced
areas to its body. I'm just going to take
it nice and slow. I'm going to go ahead
and cut across, then I'll get this
part when I'm done. The same thing down
here. I'm going to cut across to the
bottom of the tail. All right? And then
this extra goes in my collaging pile or, oh no, I screwed up, I need a second sea creature
pile I never get rid of. Less are very small. I never get rid of my scrap
decorative watercolor pages, especially the textured ones, because there's so many fun ways to use them, you
just never know. Go back in and I'm going to
cut out the rest of the head. There I go. Then the tail might
get a little tricky, but if it goes slow, it
should be all right. You can always bring
in an exacto knife or modify the design
if you need to. I'm going to do that side and then I'm going to
come over to get this site round and round and around the Pretend
you didn't see that, then let's reveal our sea horse. So fun. What I love about doing it on the back
side is that I'm not fretting or stressing over what part of the
decorative paper I, I am letting chance decide. So I'm going ahead and I know I have a giant sheet of
paper that is really fun. I know that any part
of this would make a really fun texture
for my sea creature, but by just randomly
flipping it over, randomly placing it down, and letting the
art fates decide, if you will, you end up with
some really fun results. Once you've transferred
your drawing, carefully, cut it out with scissors
or an exacto knife, Then head over to
our next lesson, where we will move
our sea creature into its ocean environment. See you there.
9. Collage Sea Creature: Welcome back. The first
step is to decide where we want to place
our sea creature on our ocean paper. You really want to
play around with it and consider the background. The sea horse is a very
vertical sea creature. When the ocean is horizontal, I get the horizontal
texture that I really wanted to feel like, the currents, but he
feels very squashed. He feels very boxed in here. I'm actually thinking
about turning it vertically and
putting him in here somewhere in a different way. Take all sorts of
different shapes as they're floating
through the ocean. I want to think about where
I want my sea horse to go. I really strongly
encourage you to avoid centering it depending on your art experience and your understanding of
possible compositions or layouts for your artwork. Centering it works
really well for some commercial purposes to have it right smack
in the middle, But this is just a really
fun mixed media collage. This could become something
more depending on how you decide to use
your art in the end. But I would encourage
you to play around, have it swim through your ocean
and see what makes sense. My sea horse is
facing to the right. I wouldn't want to
necessarily put him on the right because then
that feels closed in too. It just feels like there's
too much open space here. That helps me figure out
that I want him to be more left of center or left. But then he can also be
at any angle I want him to upside down doesn't
necessarily make a lot of sense, but he doesn't have to be
straight up and down either. He could be leaning forward, which I like I like that leaning forward look and then
trust your intuition. Whatever you
aesthetically like is the right answer and only
you know that for you. So I'm going to go ahead and
put mine on the bottom left. I'm going to have him angled
so he's looking down. Now I'm going to get a scrap sheet paper
and I'm going to glue him down to this section. I like using just regular
old printer paper or copy paper for my scrap paper
because it's fairly inexpensive and we tend to have a bunch of
it around because my kids love drawing on it and then obviously
printing purposes. So I'm going to flip
my sea horse over. I'm going to be using PVA glue. The only reason is I do a lot of bookbinding
and bookmaking, so I have PVA glue on hand. But any white glue is great. We also always have a lot of Elmer's all purpose
in multipurpose glue. It again, small kids, lots of art happening here. But any sort of white liquid
glue is perfect for this. I'm going to go ahead
and put it in a cup. And then I've got
an old paint brush, not a watercolor brush. I'm using an older acrylic brush and I'm going to
make sure I wash my brush out really,
really well. Because I would like
to still be able to use it, crilly paint. I'm going to go ahead and dab it in and start panting
in the whole area. I want to make sure that I don't put too much toward the outside, but I do want to make
sure I go right up to those edges that I know that my sea creature is
going to stick very well. If I go over the edge, it's okay because it's
on a scrap paper. Nothing bad is going to happen
to the paper underneath, and nothing bad is
going to happen to my art table or wherever you happen to be
working on this project. Again, we don't need a ton, a ton, a ton of glue. But we do want this to be very secure when we put it down. The paint brush does
a really great job of helping ensure even coverage. You do have to work a
little bit quickly. I'm going to move
that off to the side, bring my ocean back in. Just going to double check that, that's the way I want to put it, doesn't really
matter. All right. And then I'm going to take my
sea creature, move it over, get it where I want
it up a little bit, then I'm going to
squash it down. Now, at this point, you want to make sure you
have clean hands. You're going to start to
smooth down your sea creature that every part of it is getting attached to
the ocean beneath. The glue will make it a little bit softer
and more easy to rip. So be careful if
you have lots of tentacles or thin parts. Now at this stage,
we could keep going, but I really want to make
sure this is attached. Well, I'm going to grab
another sheet of paper. I'm going to put it
over my sea horse, and I'm going to put a
couple of heavy books down. I'm going to weigh it
down. I'm going to let it dry for about 30 minutes. And then I'm going to come
back, take all that off, and then we can start talking about mixed media techniques. Now, the glue on
our sea creature needs to dry a little bit, so I'm going to go
grab a cup of tea. And I'll meet you in the next lesson to
start learning about what mixed media techniques
you might want to incorporate into your sea creature
artwork. I'll see you there.
10. Mixed Media: Brush Pen: Welcome back. Now
let's begin to use mixed media techniques to bring our sea creatures to life. I love working back into my textured watercolor papers to further enhance
those textures, as well as adding details and create an illusion of depth. First up, I'm going to be adding some color and shading
with brush pens. You could do this
with water color if you don't have brush pens. And gradually work back
in building up some color and some value and really starting to define
your sea creature. Beyond the flat to be cut out, we have the outline
of a sea creature alluding to an ocean background. This could be it, This
could be all that we do. But let's take our sea creature and really start turning it into something magical and something that comes alive
in a really fun way. I have my dual brush pens. These are number one, go to art supply for working
in mixed media pieces, especially working back
into watercolor papers. I've also got my travel art set, which has some white pastas. I've got some sharpies. I've got some of my other brush pens. I've got some metallics because who doesn't
love adding metallic? I also have some different
calligraphy lettering pens. I really like the line quality
of this Hand to Fly brand. In particular, this
one is the extra small and it's waterproof
pigment which is just great. Some might go to
brush pen colors. I've got some fountain pens, May get the black
fountain pen out. That seems like something
I might want for this, as well as rest of my brush pen colors that
I've been using a lot. I really like having
a small bag of art supplies like this is easily ready and not buried in the midst of all my
other art supplies. So I can just grab it
and go, I can anywhere. I said, that's very
important to me. We might want to look
at a reference image to get some ideas for
ways that we can add more detail and dimension and even more texture and
life to RC creatures. All right, I've listed a
couple different images between splash and Google image searches just to
see what I want to do now. Obviously the texture
that we've created for R. C creature is not necessarily a realistic representation of that sea creature's skin,
scales, fins, whatever. But that doesn't mean
that we can't layer on some realism to really make
this fun and really exciting. I'm going to go ahead and I realized I didn't put in the E. I'm going to go ahead and add the roughly where the eye goes. Sea horses in particular
have a lot of fun details to them that are
really great to capture. I think I'm going to
go in with a brush pen first and start popping in some values as well as defining some areas of this creature a
little bit more. One of my favorite
parts to a sea horse is the fin on the back. When I layer in the brush
pen, it's going to give me, it's going to merge with and change the water
color underneath it. Don't be surprised
if you're using brush pens that
things change a bit. It's also going to have a couple of different
stages to it. We have to be open to the fact that it may have some awkward stages as
we work through this. The other arts apply.
I want to have on hand are colored pencils. Let me actually, well,
before I get those, I want to take my
lighter pink and brush. Most brush pens
you can blend them together if you do it quickly
when they're still wet. Now, this is also an
opportune time for you to add whatever other
stylistic elements you want. You don't have to look
at realistic images. You can make it fun. You can give it your
own personality, your own art style can
come into play here. There's no wrong way to go into mixed media when you're working
back into your collages, a couple of colors that make sense with what I have in mind. Metallics are always fun. I'm using the colors that are in the sea horse as my
inspiration for what I pull for adding in
the mixed media stuff. I want to do the brush pen first before I do
the colored pencil, because I think the waxiness of the colored pencil is going to keep the brush
pen from going down. Unfortunately, my all
time favorite pink is starting to go
out, but that's okay. I can use some other stuff here. I'm going to pop in some purple just adding a little more texture
to the fin area. And I also want to
do a little bit more definition down in the tail. Ultimately, I just want you
to have fun with this step. Mixed media art is
such a fun process, especially when you're using collage. You're
jumping off point. Be tight with it, just have fun. I'm going to jump back up here. I want to do some definition
texture along part and then it's okay if it goes back
onto the background. We're going to work on that too. I'm not trying to outline it, I'm just trying to give it
some darker value there that I can then fade out a bit. Now, some of the texture
that we created with the watercolor techniques
may disappear. That's okay. It's still there. It's still going to have changed your piece in a
really great way. The mixed media part of it
wouldn't be what it is without that underneath
Don't be so precious about the textured
watercolor paper that you don't play and explore. I promise you won't regret it. Well, that's what I want
to keep working back in. Yes, I am just scribbling because I'm creating
new texture. I want to let this
be playful and I want to see where
it's going to go. The more color I put into it, the more interesting
it's going to get. Trying to really, really love
it more of this dark red. And it's getting on the
dark side, that's okay. Might become a red
sea horse in the end. That's all right.
Some darker purple. You can go back and forth. You can really have some fun with how you play with
the colors and textures. I use my later brush pens
to do a lot of blending. They're all starting to dry out. Next up, we're going to add in some details and textures
with black ink pen. I'm going to be doing this
with my fountain pen, but you could use a fine liner
or even a ballpoint pen. Whatever kind of ink you
have on hand will be great. I'll see you in the next lesson.
11. Mixed Media: Ink: Now let's continue
to add interest to our mixed media
collage creature by adding in some ink
details and texture. I love the mark in line quality that I get with my fountain pen, but you can do this step with a fine liner with
a ballpoint pen. With a dip pen, it really
is completely up to you, and I highly encourage
you to explore and experiment to see what kind
of effects you can create. You could even do a test run on your scrap watercolor paper from where you cut out your
creature earlier. I'm going to do a little bit of definition with black ink, my fountain pen eye. I really like the
sea horses that have a lot of the
speckled texture. I'm going to go ahead
and add that in because it's black over all
of these layers of color. It's going to add another
sense of dimension. I can just do some loose
scribble lines to define that back fin will come
in from both sides. A sense of rounding,
just being super loose, and just following the curves of the sea horse and seeing
what needs more definition. All right, Look at my
reference images a little bit. There's a couple. A little bit of the speckling in the middle. I want to make sure that
I'm very careful not to start creating a
pattern with my marks. Their human tendency is
to even everything out. I want to make sure that
there's a feeling of randomness enhance the
curve of the neck. A little more definition
at the end of this out. Whatever part of the sea
horse that might be, make these come in a little
bit more dramatically. Create some feelings of lines, It really loose, it goes around. Now we're going to push our
colors and our values even further by working back into our sea creature with
colored pencils. I'll see in the next lesson.
12. Mixed Media: Colored Pencil: For our third mixed
media lesson, we are going to be working
with colored pencils. And continuing to go back
into our sea creature as we further define
it, add in details, bump up the color,
create more value range, and really start adding
in those details that we're going to bring
our sea creatures to life. This is also going
to make it pop off the ocean background in a
really interesting way. Great, I want to go in with some lighter values with
the colored pencils to help round out the shape of it and help pop some
areas brighter. I could also do
this with a white, but I really want
to keep it subtle. I'm going to do a
little highlight along its nose and around the eye, some super subtle shading. I'm going to pop some
brightness back in. This will also create a
translucent feeling on the belly. Put that in and fade it out, trying to make sure that
I'm not creating lines. I just want to have a
wash of brightness. I want to give him
some highlight on the end of his tail
that pops a little bit. This is a good time to check your reference image
if you're using water. Just any image of a sea creature that's
the same kind as yours. Sometimes it's nice to
have some reference to go off of for adding
in some shading to bring that brightness
down a little bit to add a little bit of highlight
went pretty dark up here. I might not be able
to make it look as good with some brightness,
but I'm going to try, if you go too far, describe a darker color and always
pull it back. All right. I'm going to take
a little bit of my dark and fade that into my light to help
round the belly, some really dark purple. I'm pushing pretty hard at this point because I
put this purple here. I need to put it other places to help unify the
picture. That's one trick. It applies to any subject
matter you're working with. If you're going to pop
a color in somewhere, try to put other places in the picture to create
a sense of unity. Pop a little bit of purple
up here, a little down here. It doesn't have
to go everywhere. As long as it's at
least one other place, it'll help everything
work a little bit better. Great, I think he is
pretty close to n. I do want to give him a
little highlight in this. It's going to be too big. It's a little too big. I'm going to go
ahead and let that. This is Posca pen,
it's a paint pen. It's great. I love having at least a white and
black Posca pen on hand. It's a little big. I probably should have gotten
my smaller one out, but I could let that
dry and then I could go back in with my fountain pen, and I can kind of
shrink up that circle. In our final mixed media lesson, we are going to add
more values in depth to our ocean background.
I'll see you there.
13. Mixed Media: Ocean Techniques: Now we have a
beautiful sea creature that is detached from
the ocean background. Now it's time to work back into the ocean with some
mixed media techniques, very similar to what we did in our previous lessons
for our sea creature. So that our sea
creature and our ocean start to feel more unified
and in sync with each other. Our ocean is pretty abstract. You can leave it this way
or you could start to define this even more if you creature is one that
would be dwelling on a shallower area or closer
to the bottom of the sea. Could go in and
put in some sand, put in some ground
at the bottom. If you do that, I
would make sure that your ground color is matches in value into darkness
as far as your ocean. Otherwise, it's
going to feel like sandy bottom plopped on
top of ocean background. And you really want to have everything work together
in a cohesive way. If you do a sandy bottom, make sure you do a leaning towards darker sandy bottom or whatever is going
to match your ocean. If you did a really light, bright turquoise ocean, or just a very pale
ocean background, then that's a different story. Mine's pretty dark because I
went in with that black ink. It changes it a
bit for me as far as what would make
sense with this. Now I do have salt paper, but this is very bright
and I feel like this is going to compete
with the sea horse. So I don't think I want to
do this for my environment. But what I am going to
do is I'm going to play with putting more darkness into and boldness into my
background to help it merge and become
more cohesive with my. I'm just going to take some
blue with my brush pens first and just start to play with what I've got
going on in the ocean. This is the same approach that we just did with
our sea creature. We're just adding some
more mixed media elements to help you unify
what's going on. Because I pulled my plastic wrap tight and ended up getting these bold lines that
were going to be horizontal and then ended up vertical because of
the animal I chose. I have to be careful, but I don't start creating a striped wallpaper
effect in the background. I want to blend this out, not being afraid to go in
with some other blues. I'm doing a little test
run here in the corner. I can always make this
more of a subtle effect. And it's going to get whatever
I do here in some way. I have to treat the
whole ocean that way. Now, I could also go back
in with water color. If you don't have brush pens, you could do the same thing by painting back
into your piece. That would also be totally fine. Actually, why don't we do that for the rest of it because
they're all water colored. Vib, it's going to look great. Got my water. And I've got the leftover blue
from when I created this. I'm going to go ahead
and activate some of it, loosely paint back in. The great thing is I'm not
going to lose my texture. It's, it might move around the water color that's
on the page a little bit, but it's not going to do
anything crazy to it. It is also going to activate
the brush pen I put down, but that's a cool thing, just becomes another layer that makes it even
richer in color, and texture, and value. I love that. Why
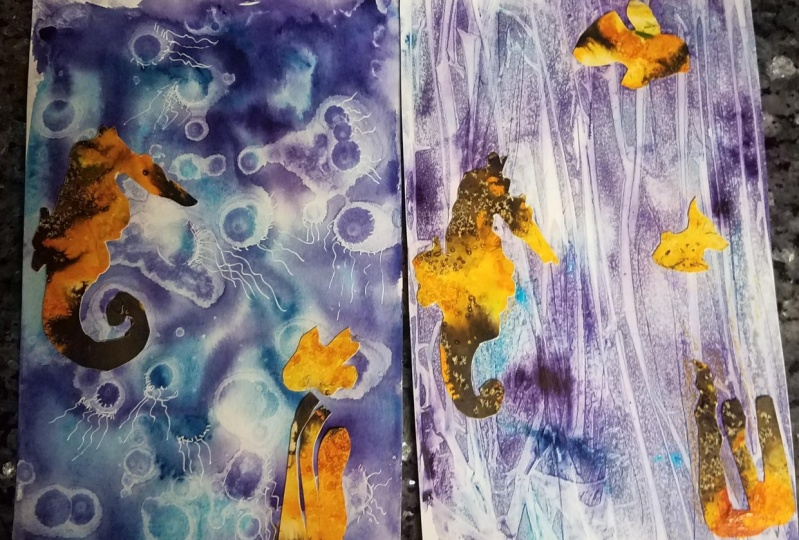
am I doing this? Well, my sea horse went from very bright,
let's compare it. My sea horse went
from this to that. You can see the big difference
between what I started with and what I ended with as far as how I treat
them a sea horse. I love it. I am in love
with the sea horse, but now I need to bring
the ocean water up to the same level so that they're not in conflict
with each other. I love mixed media. It's really a win win for me because it gives me an excuse
to go back in and do even more mixed media work. I'm sticking to this vertical
wash application of style. I think that looks pretty great. I do wish I had some of that brush pen texture in
a couple of the places, even though it's wet, I can still go in a little
bit. I'm scribbling. I'm racing. I'm blowing fast. It's going to be
great. Now because we're painting behind
around our creature. We want to make
sure that we carry whatever we do up there, we carry it down, both
color and line quality. Great. Now the darkness
of our background. The sea horse is still
brighter because it's a bright colored, brighter colors. But as far as color
intensity and hue intensity, they're more on par
with each other. It like the sea horse now
fits its environment. And actually it's so funny because all of a sudden
I'm starting to see jellyfish in the ink
botches, which I love. I think that's so cool. Play around with mixed
media techniques. I strongly encourage
you to go back in with watercolor or brush
pen to really start beefing up the colors and the values and starting
to create a roundness in a life sea creature and then adding black ink
is never a bad idea. Speaking of that, this
is dry so we can shrink up that reflection
piece and that's it. Or sea creature has
come to life through a combination of
watercolor textures, brush pen inching details, and subtle color,
pencil shading. Feel free to add in any
other mixed media techniques and materials that you like. Really, the sky is the limit. And I encourage
you to explore and experiment and to push these as far as you
want them to go. I am so excited to see how
your sea creatures turned out. So join me in our
final lesson as we wrap up the class.
I'll see you there.
14. Final Thoughts: Thank you so much for
joining me in this class and creating mixed media
collage sea creatures. I hope you are feeling
inspired and that you have added a new approach or two
to your artistic practice. I would love to see
your sea creatures. So please head over to the projects and
resources page of class and please upload an image of your artwork to the
student gallery. I would also love to see all of your watercolor texture
papers that you may not have used
in our project. Please include an image
of those two because watercolor texture papers are one of my most favorite
things in the universe. You can add text sharing
your thoughts about how the project went as well
as your reference image. If you chose to use
one that wasn't one of the provided ones in
the resources section, I greatly appreciate it if you took the time
to left to review, student feedback is the best way for me to continue to
grow as a teacher. And it also helps other
students find the class. Because as a student
skill share myself, I know that I often turn
to reviews to give me a little inside
information about what a teacher has to offer in each of the given classes
that I check out. If you wouldn't mind
taking a few moments, I really value your time and your thoughts about
how the class went. I continue to grow and make even better classes
in the future. So I hope you'll consider
leaving a review. I love sharing my
own art adventures, and my students work
on my Instagram. And if you post your
art to Instagram, please tag me at Elizabeth underscore Welfare so
that I can find your art online and celebrate
the amazing work that you were creating on
your artistic journey. If you want to stay up to
date on my newest classes, be sure to click the
followup button below. You can also join me on Youtube where I post
process videos, art techniques,
sketchbook tours, share my art adventures. And every Wednesday, it's
Watercolor Wednesday. So a brand new watercolor
technique will be uploaded and published
for everyone to enjoy. And I hope to see you in
a future class real soon. Until next time.
 Elisabeth Wellfare, Artist, Art Educator