Transcripts
1. Introduction: Welcome to the
pattern challenge. In this class, we will explore and grow our
creative styles through a fun and beginners friendly challenge.
Now let's be honest. Finding your artistic
identity takes time and dedication and you
won't magically walk out with the unique style
after watching this class. It is, however, a
great starting point and a really fun
challenge that will spark your creativity and
help you to reflect on your current style or the
style that you want to grow. My name is Maya Faber. I'm a surface
pattern designer and educator with a
passion for patterns. In this patent challenge, I will guide you
through seven days of exercises to explore different
art styles and grow. As a pattern designer, you can watch one
lesson per day for seven days or complete
the class in one day, if that is what you prefer. This class is for those
of you who already have a basic understanding of
how to create a pattern. If you need to learn
the fundamentals, check out my other classes
here on skill share. For example, create
an irritable pattern in procreate with calibrations, which is a great
beginners friendly class. I will be using procreate to
make patterns in this class, but you can use any
other materials or apps that you prefer. I've included some free
downloads for you. You will get a workbook that
we will be using in class. If you are using procreate, be sure to check the links in the class description for some free procreate
goodies on my website, including free procreate
brushes and color palettes. By the end of this class, you will not only grow
your panasi skills, but also have gained
valuable insights about your creativity that you can use to cultivate
your unique style. If you're looking to boost
your style even further. After watching this class, I recommend checking
out Pattern Rebels, which is my membership, where members get
exclusive access to monthly pattern
design classes. Free, procreate
resources, feedback, and sessions with me. Fun challenges, daily drawing
prompts and much more. Go to Pattern Rebels.com
to learn more. If you're ready to
watch this class, let's jump right in
and get started.
2. Your Project: Your project in this class is to create patterns for each of the prompts that
are sharing class. It will be amazing to see seven days of patterns from
all of you, of course. But I totally understand
if it can feel overwhelming to share so many
patterns here as a project, share a few or as
many as you wish. It would also be amazing to hear a line or two
about your reflections. Check out the workbook and the daily reflections
to learn more.
3. Downloads & Resources: I've included a free workbook in this class with some questions
for you to answer and reflect over for both each
of the prompts as well as a final reflection session at the end of the challenge. This workbook is made for
you and your eyes only. Use it as you wish.
Print it out or write directly in the PDF. The workbook is
available to download at the projects and resources
tab hearing class. If you use procreate, I recommend checking
out the links in the description of
the class to get my free procreate goodies on my website such as program
brushes and cal pets. Go to Maya Favor.com slash freebies to download
throughout the class. I'm using Pintrest
Boards for inspiration. I made these boards specifically for you my
students in this class, so that you can use them to
explore different art styles. Feel free to just stick to
using these pre made boards. Or if you want to
take a step further, you can gather even
more inspiration for the different art
styles for yourself.
4. Materials: In this class, I'm using
my procreate 12.9 inch ipad from 2022 with an Apple pencil and a paper
like screen protector. You can use an ipad
with Procreate like me or any other device or app, or any other analog
material that you wish. I will not guide you through how to create patterns
in procreate. In this class, we will focus
on the exploration of style. If you want to use procreate, but don't know how to create
a pattern inpprocrate, I recommend watching a few of my other skillet classes on pattern design before
you watch this one. Such as, for example, create an editable pattern, improcreate with
color variations, or three ways to create a half
drop pattern in procreate. For those of you who
are wondering about my standard canvas size
for creating patterns, it is a 3,000 pixels square
that I use here in class, you can use any procreate
brushes that you prefer. In this class, I will use various procreate brushes from me and my husband's
brand Faber Company. You can find some of them as free downloads on my website. Some of them will be exclusive for the members in my
Pattern Rebels membership. I will name each
brush when I draw with it and where to
get it in each lesson. As I know that this
is a common question, For inspiration, I've
made a Pinterest board. For each art style
that we will explore, you will find links to the boards in the
description of the class.
5. Overview: How to Watch the Class: In this class, we are exploring
and experimenting with inspiration from
different art styles to grow our own unique styles. We are exploring seven prompts from seven different art styles. The class is built up so that you can watch
one lesson per day and spend time to really hone in on that art
style during that day. But you can also of course, watch all lessons at
once in one day as well. Then you can dive into the exploration and
creation in just one day, whichever way you
prefer. Works great. After drawing each prompt, we will stop and reflect and ask ourselves three questions. Number one, what
do you like most about this pattern
that you have drawn? Number two, what challenges did you face while
creating this pattern? Number three, how does this pattern fit into
your evolving style? As a pattern designer,
when we grow and instead of just continue on in a fast pace and work
through the prompts, we will take some time to think about what we have learned
while creating this pattern. These are the daily reflections which you can find
in the workbook. You will also find the final
reflections in the workbook, which we will talk
more about and walk through at the
end of this class. After creating each
of the patterns, take a moment to fill in the reflections of
that prompt and leave the last part of the
workbook until we have finished creating
all of the patterns. I will guide you through all of this throughout the class. For each of the prompts, we will start with having
a look at the art style. We will check out the
inspiration board together and shortly talk about the style and some
other features of the style incorporate
in art designs. Note though, that I am not an art history teacher and all styles aren't
historical styles. Some styles are, for example, just using materials
I have gathered, styles that I feel are a good exercise to grow
your pattern design styles. And we won't dive really
deep into theory. The lessons will start with me explaining the styles a bit, and then we will together dive into how to create a
pattern in this style. As I mentioned before, this is not a class about how to create the actual patterns. And I won't at all go through patent techniques or
methods in this class. I will rather invite
you into my process to see how I would take
on this art style. If you want to learn
the fundamentals, check out my other classes
here on skill share. One very important thing to mention is that at the
core of this class is to analyze and reflect over how different art styles and
artists create patterns. The patterns that you create in this class are not made to
be shared anywhere else, except here on skill share and under the Project
and Resources tab. You can, of course, work
with your patterns, create and rework to
make them uniquely. But as we are heavily
going to copy other artists work here to understand different art styles and different ways of creating. It is not okay to share these patterns
anywhere else online. I know that you might feel urged to share
them on Instagram, but people don't always
read the captions, which is where you would
mention that this is an exercise and a piece that is inspired
by other artists. Please stick to only sharing your patterns here in this
class on skill share. With all of that said,
let's get started.
6. Drawing Prompts: In this class, I
talk about creating a pattern from a drawing
prompt each day. And it might get confusing that I talk about drawing
prompts and art styles. I just want to make it clear in this very short lesson
that the prompt for each day is to create a floral pattern in that art style of that
day or that lesson. If we are looking at the
bold and colorful lesson, your prompt is to create
a floral pattern in the bold and colorful
style I have chosen. To give you prompt to create floral patterns in
all art styles. That way, it will be
easier for you to compare the different styles as we
draw the same type of motif.
7. Day 1: Bold and Colorful - Overview of Style: Welcome to the first art style. I hope that you
are as excited as me to get this
challenge started. The first style
that we will create in is bold and colorful. I have named this style myself, but it's all about
immersing yourself in a world of vibrant colors
and playful shapes. And it's about bringing emotions
to simplified elements. Let's go over some features of the bold and colorful style. The bold and colorful
art embraces a vibrant, lively, and intense
color palette. Imagine vibrant red,
electric blues, sunny yellows, and lush greens. There's a lot of
primary colors here. In this style, we use
organic and flowing shapes. You will find playful curves and irregular forms that
can represent figures, objects, or elements
from nature. While the art is bold, it also values simplicity. It takes complex objects and simplifies them into
their essential shapes. The bold and colorful art is known for its dynamic
compositions. Elements seem to dance or
flow across the design, which create a sense of
movement and energy. Find inspiration in objects from your everyday life in
nature or figures, such as, for example, the human body or animals. We are transforming
these ordinary elements into simplified colorful shapes.
8. Day 1: Bold and Colorful - Let's Draw: Start to sketch and draw our prompt for the bowling
colorful art style. I will head over to
Pinterest and check out the Pinterest mood board for the bowling
colorful art style. Here I have gathered a bunch
of inspiration for you. You can, of course, gather
more inspiration for yourself, or if you tap one
of these images, you will probably find even more inspiration
below that image. I will use this board
as general inspiration, but at the same
time will probably be pretty close to
some of the shapes and the colors that
other artists have created on these images. That is why I don't want
you to share these patterns that you create any other
place than in Skillshare. And in this class,
let's just start. I will tap the three
dots at the top of my ipad and tap Split View
and head into procreate here. I will swipe so that my Pinterest window is
a little bit smaller, then I have my inspiration on
the left and I can draw on the right for this pattern. I could sketch some
shapes if I want to, just to get a feel
for what type of shapes that we are using and
talking about in this style. To sketch, I'm using
the perfect pencil. This is a brush that is free for the
members in my pattern ribbles membership and you can also find it in
our Faber company. Takes the brush
set on my website. Here, let's just
try some shapes. We will sketch a floral pattern. We will draw a floral pattern. Here I want to check
out how the bowl and colorful style makes
floral shapes. As we can see, it's
really simplified shapes. This is a good example where we have a bunch of
different floral shapes. I would just start
to sketch these. You don't need to start with a sketch if you don't want to, but I just want to do
that to get a feel for the shapes of the style. Oops, on a new layer, I will try to sketch some really loose flowers and try to keep it like, rough, maybe,
something like that. I think that I want to have
some stems in this pattern. I'm looking at the
inspiration here, but I'm not coping
straight off it. But at the same time, I'm trying to see how
these shapes are drawn. You can have some flowing
shapes and it can be really irregular in the edges of the brush stroke
and things like that. Just scroll through
a little bit. I really like this
one by Clare Ricci. Super nice style and super
nice pattern. Let's continue. I will try to draw some other floor shapes there
and maybe one of those, a little more like tulip like. I haven't really decided yet how I want this pattern to be, but now I feel that it might be nice to use the stems
and the leaves as well. I will actually just
select the flowers here and just drag them out to delete them and then continue on this style
that I really like. It's something that is inspired
by the Cla Richie piece, but at the same time with
different flower shapes. Yeah, just trying to find some different
inspiration here. Here's another one,
really nice by Clachi. Let's just continue with this. Maybe I want the stems and the leaves on each flower here, but I can just get a feel for where I
want the flowers to be. This one will continue
out on the edge, over on the other side. I can do that later on
when I repeat the pattern, something like that, and then that stem will go down there. Maybe I want large leaves. I probably want
some flower here, maybe one like that again. Then I want to stem
going down there. Something there. Let's another one over
here in this pattern. I'm trying to keep it loose. Just trying to fill
in the gaps with my almost like irregular shapes. I'm trying to experiment
and just see how can I get the same feel
in the pattern as the rough and irregularity that you have in
these floral shapes. Here's another one in this style that's
by Jessica Nielsen. It's super nice
style that she has. Okay, now we have a
bunch of inspiration. It's time to get this
pattern repeated. As you can see, I'm doing this really, really quickly now. I'm going to keep my Pinters
inspiration on the left. And then I'm going to
repeat this pattern. I will tap on the layers panel, tap the, I will repeat this. I am using my pattern
perfect templates, which are free for the members in my paternables membership. But if you've been watching any other of my more beginners friendly pattern making classes here on skillshare
or in my membership, you know how to create these types of patterns
with the selections. Let's move on and sketch
more motives here. There we will have something
that go down there. That one turned out pretty nice. Let's do another
flower over there, something like that,
then This one can go there may be stem
going down there. I think that this is good. Now, I probably want
to make sure that the edges on the left and
the right and the top and the bottom have
a good flow in it. I will actually repeat it again then just doing like that, and now I can flip it
around once again. Okay. So we have something
missing over here. I will just add a leaf there. I think somehow maybe like that, maybe that looks a
little bit weird. I could also make this
flower a little bit larger. Okay. I think that
this looks good. I have something going on there. Just fix that. Okay. Now I have the basic
shapes of the pattern. And I will start to draw. I will just bring down the opacity and start
to draw my pattern. As I mentioned before, this
isn't the class about how to create a pattern with the techniques and the
method and things like that. I won't talk you through exactly how to draw or how to
create the pattern. I will talk you through my thinking process and
how I explore this style. If you want to learn
more about how to create the specific patterns, check up my other classes
here on skillshare that are more beginners friendly
on this pattern. I will actually draw
with the selection tool. I will try to see what type of colors that are
used in this style. And it seems to be
really bright and colorful and a lot of primary colors like this, apples, super nice colors there. It's almost like the colors of the Posca pens, if
you've been using those. Let's start. I want to use. An orangey color. I'm just going to
try off some colors. I can always change
them later on. Let's just draw this flower. I'm trying to be real quick with the selection tool so that I get these
rough edges here. I'm just going to use the monoline brushes from
my free Procri brushes. You can download on my website to fill in the gaps that I get. But the selection
tool, then, let's see, the selection tool again, I will continue but
with another color and then another one. I'm trying to find
different colors for the different
floral shapes here. I'm trying out the
green for the stems. And then I want to move
over to some more flowers. I would really like
to have a color, this one should be pink. I want to have one more flower in another
color, may be yellow. Okay. So something like that. And then maybe I want to fill in something on top
of the flowers. Maybe I should just
use white for that. Black seems to be
pretty common as well. Let's try black. I
will add a layer. Oops, I know that I want
to save these colors. Don't forget that
if you are creating a pattern so that you can easily fetch your
colors later on, I'm continuing with black, making the details a
little bit smoother. I know that's
supposed to be rough, but it's a little bit too rough
on some places like that. And then going into
the stem layer, I will draw this one. I don't know exactly
how I will fill in the gaps on all of these. Maybe I want that to
go even further up. Let's try that out. And then seems to be
something over there. Now I'm going to repeat the pattern to be
able to fill in the, for me, this type of exercise, going in a quick pace. Because I'm creating
a class out of this, so it will be pretty boring for you to follow me
along for several hours. But also because I think that we are trying things out
and experimenting. And it's okay if you
create patterns really quickly and if the
details aren't perfect, because we're just
experimenting here. We are not creating
a finished pattern. Okay, moving on. Let's see. That flower could
probably be blue. Let's just fit that colors that. I'm filling that in. That one could
probably be yellow, just filling in the gap there. Yellow layer like that. And then we have another one here that could
probably be orange. On the green layer, I will create the
stems and leaves. I really enjoy this way of drawing in this style
with the selection tool, because it's not supposed
to be like perfect strokes. That's a liberating way
of drawing. That's good. And then going into
the black one, fixing the details a little bit, then I'm going to
repeat it again. Oops, If you have a
color fill selected, you won't be able to select the group you see. Now that I've made the orange and the yellow
on the same layers, I will just make sure to have
all they all the colors on separate layers and then I
can go to the green layer. Actually, I think I'm pretty
done with inspiration now. So I will just swipe
away Pinterest so that I have my whole window. Now I can tap the group again and create the last leaves
and the stem of that flower. Okay, turning off
the sketch layer, and let me see how this looks. I really like the look of this. Let's, I just want to have
like a cream white background instead of the super
white like that. Probably then I'm going
to try this pattern out in my pattern
tester on my website. I'm swiping down
with three fingers, Tapio, swipe down with
three fingers paste. Have the image
flattened over there. I'm dragging it up, tapping the three little
dots, split view. I have Safari as my browser, and you can find this patent
tester on my website. I will also link to it in the
description of this class. No tap and drag my image, I'm trying out my pattern. If you're using procreate or any other app on your
ipad or computer, it's really nice to try your pattern out
in the pattern tester. I really, really like
the look of this. It's not a perfect pattern. I can see one spot that
I'm not really happy with. I'm just going to head
over to procreate again, and I think it's over there. I'm just going to fix that one. It's that one in the
middle there, the stem, that doesn't go fully
below the other flower. Let me fix that. I want this one to
probably go down there and then just fill it in. Okay. I'm going to try this pattern out
inpropriate as well. I will sit down with your
fingers, tap, copy all. Sit down with your fingers. Tap, paste there. I will duplicate this. I will tap the selection tool, make sure that I have
magneticentnapping turn on. But first I will type in 1,500 pixels when I have the chain
symbol taped on so that I gather half of the size of the pattern
to the top left corner. And then I will duplicate it, tap and drag, place it
at the top right corner. Merge these layers
together and duplicate it just to see how my
pattern is repeated. This is my pattern and I'm
super happy with the result. Let me just tap split
view and pin dress to see the inspiration
and where it ended. I really enjoy this pattern. I think it's super nice and
I like the rough edges.
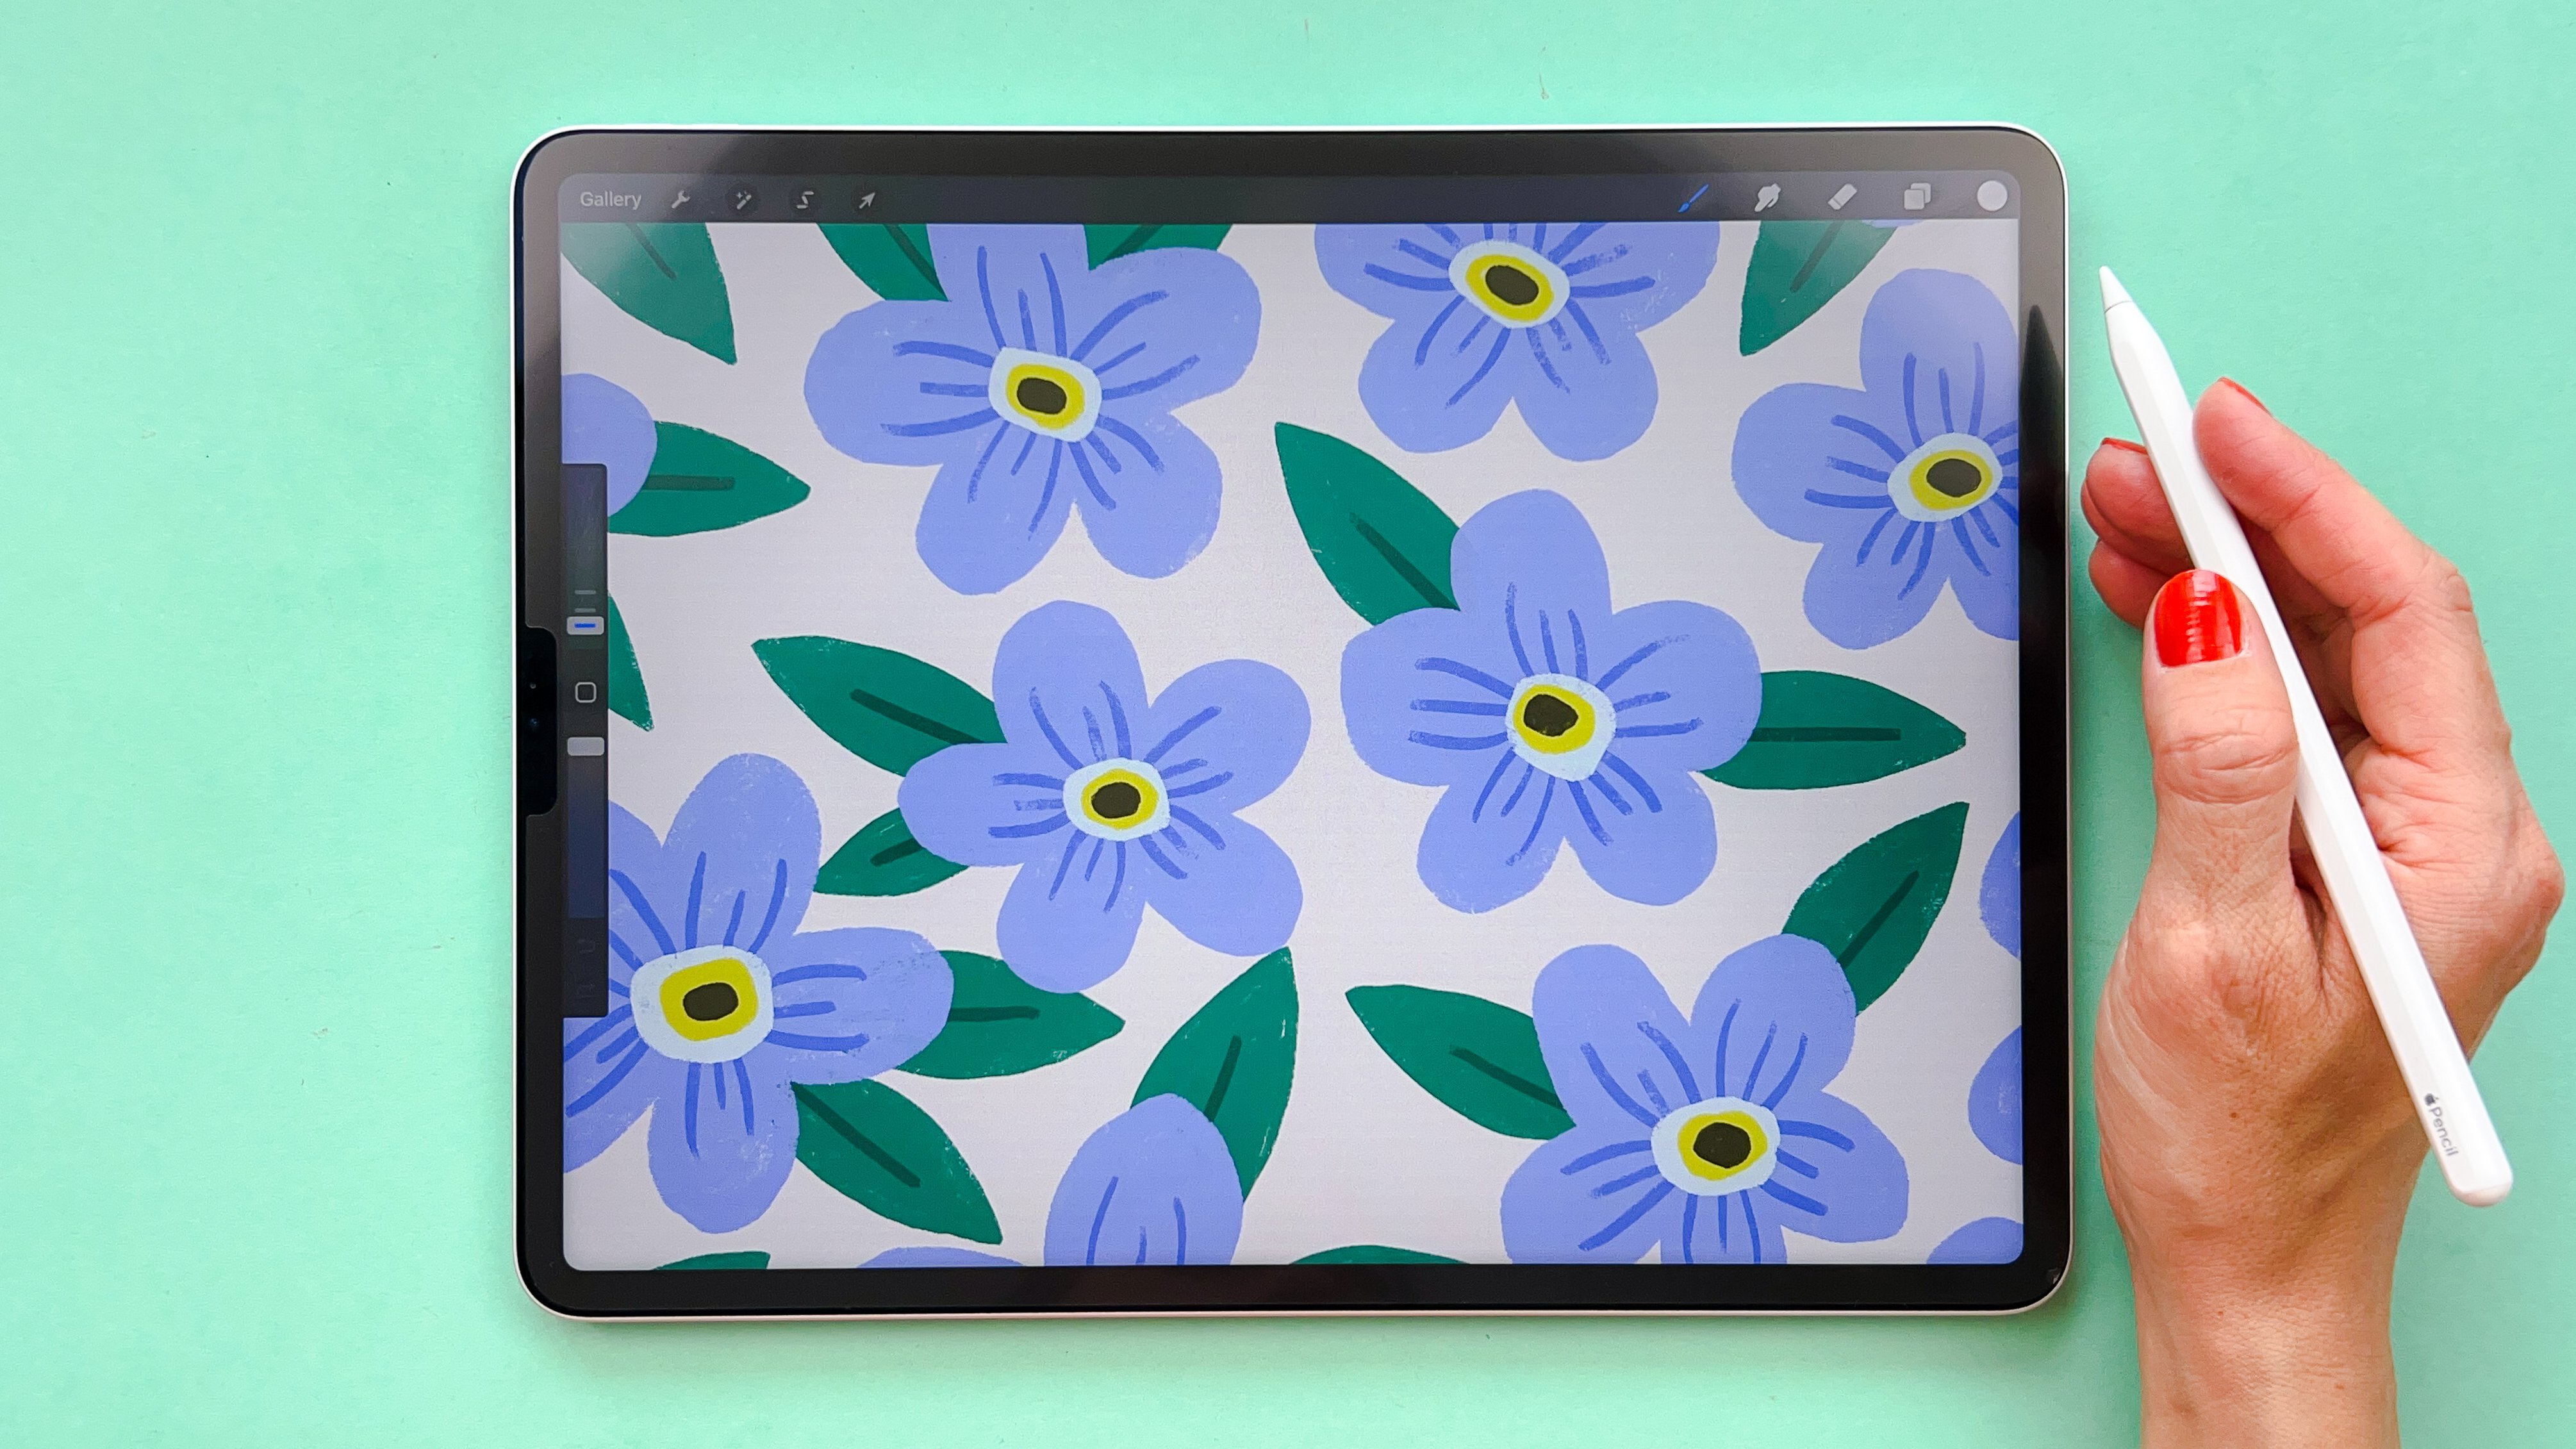
9. Day 1: Bold and Colorful - Reflect: Now we have drawn
the whole pattern. And I'm happy with the result. If I would have
created this pattern to use for something
to sell or whatever, I would have spent
more time with it. But now I'm experimenting
with this style. And the pattern doesn't need to be perfect or sellable
or anything like that. Now it's time to reflect
and let's head over to the workbook which you
can download in this class. I have just opened up my
workbook in files in on my ipad, but you can open it up
in your computer where it's writable with
your keyboard. You can write directly
in it on your computer. You might also be able
to do that on your ipad. You can also, like me here, for example, use your Apple
pencil and just write in it. You can also of course, print it out after each art style. Let's answer these questions. The first question
that we will ask about the bold and colorful
art style is, what do you like the
most about this pattern? That is both about what I
liked about how to create it, and also what I liked
about the end result. What I really like about
this pattern is the look and the rough edges and stroke I like to draw
with the selection tool. What do I like more? I like
the colors, bright colors. I also really like the
simplified shapes. Maybe you can't read
my handwriting, but that's perfectly fine. Because this workbook
is just for your eyes. This is supposed to
be only for my eyes. But I am just walking
you through here. What to think about with
these questions and how we can reflect about the
pattern that you just draw. The next question
is, what challenges did you face while
creating this pattern? The challenge is to keep it irregular is a challenge for me and also to stay out
of creating perfect shapes. Maybe other challenges. It might be hard to get the
emotions in the shapes. The really good patterns that
are made in this style is, at least my opinion,
is that those have really nice
emotions in them. It's hard to emotions in shapes, It's hard to get the emotions in the shapes and maybe
it's hard to figure out shapes that
aren't floral shapes, where to find inspiration
except floral shapes. Okay, then moving on, how does this pattern fit
into your evolving style? As a pattern designer, here
we are supposed to think, what can I take from this
exercise to my own style? Do I want to take something
in my own growing style? Or do I want to do that? That could, for example, be love the colors you usually create with muted colors and
these are really bright. Maybe you want to use
more bright colors. Maybe you also like the
irregularity with the strokes. Irregular, maybe
imperfect shapes. That might be something
that you want to take from this exercise and use
more in your own style. Now we have reflected about this pattern that
we have created, and it's time to move
on to the next pattern.
10. Day 2: Geometric - Overview of Style: Let's dive into the
geometric art style now. Geometric is a huge style and the inspiration can
come from everything, from rock and tiles, modern urban architecture,
or even plants or crystals. But we are going to break
it down and explore the core elements that
define geometric art. The features of
the geometric art. The colors are often carefully chosen to create contrast
and visual impact. Often we use a few colors, and you'll see combinations
like bold black and white, vibrant primary colors, but even muted tones for a subtle, but contrasting and
powerful effects. Geometric art is
all about shapes. Think squares, triangles,
circles, and straight lines. But even simplified
floral shapes. These shapes are
the building blocks of the geometric compositions. Geometric art strikes a balance between simplicity
and complexity. It can start with basic shapes and evolve into
intricate designs. How you arrange and repeat
these shapes will affect the simplicity or
complexity of the pattern. The composition of geometric art is about arranging
shapes thoughtfully. The placement, scale,
and orientation of each element contribute
to the overall harmony. Symmetry and asymmetry
are carefully considered to achieve a balanced and visually
engaging result. Geometric art draws inspiration
from various sources. Moroccan tiles, with their intricate
and symmetrical designs is a huge inspiration
for at least me. However, there are so many
sources for geometric design, such as modern
urban architecture. The natural symmetry that you
find in plants or crystals, or even geometric everyday
items in your home.
11. Day 2: Geometric - Let's Draw: Let's draw the geometric pattern in the geometric art style. I'm going to head into Pinterest again and the geometric board. Let's see what type
of inspiration we will find for this pattern. We will also draw flowers. Actually, I'm thinking
that we will draw flowers in all art styles because that way it's easier to compare the different styles. I want to find some
geometric floral shape, like for example,
this one could work. So if we want to keep
it really simple, we could do this one, which I think actually
is really cute. I think I'm going to do
something like that. Let's head into procreate and open up our split
view Pinterest. I'm finding my inspiration here. I am actually going to keep it super simple and do this one. I am just going to
start to sketch, actually I'm going to use the symmetry tool that
is available in Create. It's the drawing guide. As a drawing guide and symmetry and I want to quadrant there. Then I also probably
want to make sure that I have the quick shape setting set on something so that I can use
geometric shapes when I draw. You could just start with
this without sketching, But I am going to sketch anyway, because I think
it's often easier to understand my thoughts
myself when I sketch, before I draw the
actual pattern. Let's just start to sketch. We want some center here. Some center, then let's
see what we can do. Some floral shape. Maybe three. Yeah, that looks nice. One trying out different
floral shapes now, but I think I'm going to keep it like the one on the image, maybe something like that. That maybe this isn't
perfectly symmetrical. Maybe. But I'm just trying
out the shapes here. I think that that looks good. Then I can actually turn on the other drawing guides
just to see the size here. I'm just going to type
in like that and then just check out where I
want this flower to go. I'm just dragging down the
opacity on that layer. I'm actually going to
draw on a new layer. I think that I want
to go out there. We have drawing a
system. That one, yeah, but we don't have
the symmetries. I'm going to draw
the little lines here so that I make sure that my shapes are
perfectly symmetrical. Then I'm going to draw
maybe the center circle. And maybe the flowers
should go out to half of the size of
the, like that maybe. Oops. Okay, now that, and then I may be, want to
also make a little mark there that I know that the flower is
going to go in there. Then I will turn on the drawing, get again with the symmetry, and now I can draw
my actual shape. Now I have a sketch and I have the guides to create
this symmetric shape. I have found enough inspiration
of the Pinter board, because this is a S shape
and a super simple pattern will swipe Pinter away so
that I can draw this shape. Let's start on a new layer and I also want this layer
to be assisted. Then I want to draw
my shape here. Let's see what colors
I want to use. Maybe I need to use Pintrest to find some color
inspiration here. I could use any colors really. But let me just see
what I want to. Maybe blue and
white is like soft, blue and white maybe, or green. Not sure, Maybe
this one is nice. You could use any types of
colors for geometric patterns. But let's just find
something that we like. I can't really decide. I think I'm going to get
inspired by something here. Maybe this one. I like
the colors of this one. Let me just sketch
out some colors. First, I will use the mono line from our free procreate
brushes on my website. And then I can just use like
a green color, Turquoise, green, maybe like a used color, something like that, maybe. And should we have a
lighter and maybe a yellow, maybe more mustard, yellow. I'm not sure if I like
that one. Maybe darker. That might be nice.
Let's just try that out. I will save these colors, then I will just turn off that layer and
swipe away Pinterest. Again, shape the basic shape, I will use the monoline brush. That's from our five
procreate brushes that you can download
on my website. On that I want to draw the flow. I'm not sure which
colors I want to use. I'm just going to start. I hope that it's, it's assisted. And then I'm going to go down in size to maybe around 10% there. I'm going to start to
draw like that maybe. But I wanted to meet up were there and I want to
hold the shape so that I get a perfect shape. Then I could, if I want
to use the same shape, I could just duplicate that
one and rotate it two times. Then I get a perfect
symmetric shape. Then let's continue
with merging those. I want to add a new layer and the assist on
that layer as well. Let's just to use another
one of the colors. Will the green color here? Maybe I want to draw like
the center, like that. Then on another layer, I will draw the
small flowers here. Maybe a little bit smaller, maybe like that. I'm not completely sure, just filling that in
so that I can fill in the shape like that. And then I can drag that
one below the other one and fill in that shape. And then the next shape,
fill that one in. Then I can turn off the sketch. I can see now that I'm not perfectly happy
with the colors, maybe this one, let's just
try another background color. Maybe like a brighter green. And then I want this
one to be maybe white. Yeah, that want to be a
little bit more green. This looks nice. Happens if I fill that in. No, I don't think I
want that one white. Okay, let's turn off the drawing guide
here and let's see. I think that this looks nice. I'm not super happy
with the colors. I think that I also want
to add something else. Let's just add a layer
there and I will tap Drawing Assist here. I will actually just try to add something maybe in the
darker green color and just draw on like a
line or something here. Not sure what I want to do,
but I wanted to add something else to make it a little
bit more complex. Maybe that looks good. I can just move down that
line over there somewhere. Maybe I will actually just
duplicate this and rotate. It could merge, then I could just
connect it here somehow. Now I'm just styling with
geometric shapes here. I'm not sure what I'm doing. I think maybe want to
connect it somehow. Maybe it's like a round
like that, might be nice. Yeah, that looks good. And then maybe I want
to add some center here on the assisted layer, turn on the drawing guide. Maybe something like that. Now
I'm starting to like this, turn off the drawing at again, maybe what happens if we
add the yellow background? That looks nice.
Yeah, I like this, but I think that it's
a bit too simple. I want to add something more, so I'm going to head
back to Pinterest. Again, I'm going to try to find some inspiration for details to add to make it more interesting. Maybe it could be like texture
or dots or something else. Let's just try to add some dots, maybe layer on the drawing gate. Again, I think that I will use the paler green color for this. I can add some dots here now. I'm just like free styling to try to make the
pattern a bit more interesting then duplicating that like that. And that looks nice. And then should we
add something else? Maybe we should try to change the colors of these to
the lighter green color. Now I'm starting to like this and turn off the drawing guide. Yeah, I like where this is now. Now I will just try
out the patterns. I will swipe down with
your finger, tap, copy. All swipe down with your finger. Tap, paste. And then I
will tap split View. And try it out in
the pattern tester. Drag it into the patent tester. That looks pretty cool actually. It could be also nice to make a fake half pattern
out of this or to add something in the
middle. You could do that. Let's say that we want to
add something in the middle. I will actually just duplicate
all of the duplicate. Then group I will create
the pattern of it. That might be nice with
like an overlapping shape, but that's not the
look that I'm after. I'm going to grab that one and just bring it in smaller
and bring it to the center. You could also turn
on the drawing guide so that you know that
you're in the center. Should be the center now. I think I'm happy with that. I will swipe down
with three fingers, copy all this time we can try the pattern
out in procreate. I will just turn off the drawing
guide swipe to the right and use half of the size of the canvas to make the pattern smaller and then
just see how it repeats. I'm pretty happy
with this result. This is my final pattern for
the geometric art style. I think that you could
definitely make these more interesting and
with more texture and everything like that. But let's just have a look
at the inspiration and see where we are compared
to the inspiration. I think that compared
to the inspiration, my pattern here looks
a little bit flat. What I really like
with the other ones here are the texture, like the tile texture. Maybe that is something that I would like to add later on. We can add that when we
reflect about this pattern. But anyway, now we have created this pattern and it's finished. Let's just explore it like that, Save the image, and then you can share it as a
project here in class.
12. Day 2: Geometric - Reflect: Now it's time to reflect about what we enjoyed
creating this pattern. I will head into the workbook and let's see
what we can write here. What do you like the
most about this pattern? I like the simplicity,
for example. It can be that you enjoy drawing geometric shapes or
anything like that. I like to use few colors. I like how quick you can
make these patterns. As I use procreate, it's easy. With the symmetry tool, it's fun to use
the symmetry tool. That might be something that
I like with this pattern. What challenges did you face? I thought it was a lit with the colors to get them right when the pattern
was so simple and geometric. I also thought that it was
hard to make it interesting. I would probably
like to add takes during the future or
something like that hopes, then move on to how does this pattern fit into
your evolving styles? A pattern designer, well, I'm not super into
complete geometric shapes, but I like to quickly be able
to create a simple pattern. Maybe the speed can
be something that I like can also use it to
create blender patterns. I can really see that speed
to create blender prints. Blender prints are the
simplest of patterns. Maybe that is
something that I like. Maybe I also like to use
limited color palette. That was it for the
geometric art style. Let's move on to the next one.
13. Day 3: Scandinavian - Overview of Style: Next we are creating a pattern in the
Scandinavian art style, which is a design
and art movement known for its simplicity, functionality, and
connection to nature. The color palette
of Scandinavian art and design is simple
and peaceful. It usually consists of soft, muted colors like whites, grays, pastels, and
light woody tones. This palette evokes a feeling
of calmness and openness, which reminds us of the peaceful beauty
of Nordic landscapes. Some signature elements for
the Scandinavian style is simple lines and
minimalistic shapes that create a clean
and elegant look. Scandinavian art
balances simplicity and complexity by focusing on
functionality and minimalism. The design may seem simple, but they often incorporate
thoughtful details and craftmanship to add depth
and sophistication. Scandinavian art
and design focuses on simplicity and minimalism. Also in the composition, you can often see open layouts with a lot of negative space. The artwork often features balanced compositions and highlights the
important elements. The use of negative space brings out the sense
of calmness and order. Scandinavian art and
design draw inspiration from the beauty of nature, earthy colors, natural materials and organic forms can be
used as an inspiration. As well as clean
lines, simple shapes, and the use of negative space.
14. Day 3: Scandinavian - Let's Draw: Let's start to draw the
Scandinavian art style pattern. I am hitting to Pinterest to the Scandinavian
art style board. Here I will find
some inspiration. Generally, Scandinavian
art style is, as we said, like muted colors
or earthy colors, a really calm and clean design as we are trying to stick
to the floral theme. For all of the prompts, I am going to draw a floral pattern in
Scandinavian style. I'm thinking that
I'm going to do this classic Memco
pattern, probably. This is also like a
version of that one. But let's just go for the classic Romco style and translate that into
a new pattern. I will head into procreate, tab, split view, Procreate,
here I have, I'm actually just going
to be inspired by this pattern for this art style, then I can check out the colors, maybe if I want to change
the colors later on, but I could check out the colors from the other patterns here. But generally, there's
a lot of muted colors. Maybe I want to get inspired by this Stelen Bay style with like the green and
the black and white. That might be nice, but
for this floral pattern, I will actually try it out. The green and white
and the black, maybe. Let's see, let's head into the Mermeco pattern then I
will start to draw here. I will start with the
sketch again with the perfect pencil from
our Faber company. Takes the brush set and
it's also available for free for the members in my
pattern Bose membership. But let's just try, I'm
guessing that this pattern bill will be really similar
to the original. But let's just try to draw something that reminds
us of the Romco Floral, a very famous pattern. This might be a little bit similar to the bold
and colorful pattern, but let's see if we can find
some differences as well. But I am going to
draw these flowers. I'm not sure how
many flowers I want. Maybe this will be
too many. Yeah. Because I don't want
to draw this for. I'm actually going to increase the size of that a little bit, then just add a flower here. Maybe it seems like they
are really dense together, but at the same time, on some areas there's
some space as well. I will just strike that one out. I didn't like that
one. I deleted it. It should be pretty irregular. Looks a little bit of
air in between so that I can get those stems there. Maybe something like this. I don't want them in a
straight row over here. And maybe something over there, maybe something over here. This turned out really damps
but it might work anyway. Maybe that one should
be over here instead. This one could maybe
go up like that. I'm trying to keep this loose, but at the same time, it's hard to be too loose in the sketch because I still want to
make the pattern work. Okay, but maybe that's good. And then I'm going to
create the pattern of it to see where we
can fill in the gaps. Then drawing on
the sketch layer, again, trying to
fill in the gaps. Maybe something like
that, I'm not sure. Maybe a small flower there. Now that didn't work, I'll actually just erase this
one a little bit and try to get two flowers in this space here feels a
little bit dense, but It will probably be good. It will probably work. I don't want too much
empty space somewhere because that way it will look
really, really unbalanced. Let's try to add some
stems here and there. Something super simple, I think like that.
That's probably good. Now it's time to
create the pattern. I might want to make
this a little bit wider. We can fix that in
the repeat later on. Now it's time to
draw my motives. I think that I want to
maybe do like a green, black, and white. Let me see. I'm really inspired
by this Stein design. Maybe the background could be green and the flowers white. Let's just try that out. I am trying to get some
little bit forest green. That was too much
forest for my taste. That too, a little bit more
blue in there. I like that. Then on the top layer,
I will start to draw. I think that I will, I will
try to use the mono line tapered brush that's also available for free
on my website. 53 procreate brushes,
the monoline tapered, and I'm going to use white. I'm just going to save
that green over there. I'm going to use white,
the monoline tapered. And then I'm just going to drag the sketch above
and draw beneath it. Now, I don't really
need pentest anymore. I'm going to swipe that away. Now I'm going to
draw the flowers. I starting out with some shapes compared to
the bolden colorful style. I'm using a brush here and
not the selection tool, because the edges
seem to be a little bit smoother than with
the selection tool. But at the same time, I wanted this
supersymmetrical florals. That can be a little bit tricky because often for me at least, it feels like it's easier
to draw a symmetrical, smooth lines then drawing
these irregular shapes. I'm just experimenting here and I'm just trying to fill in the gaps here with the
flowers following the sketch. But not exactly like the sketch. I'm thinking that it might be really dynamic and organic
look if I just continue quickly with these shapes and just really quickly
bubbly shapes that looks like the Merrimco floral shapes, that one looks strange. I don't like that one.
Let's start new there. Okay. Maybe something like that. Oops, didn't I close
that over there? Okay, maybe we have one here. We can draw on this before
we repeat it like that. And then I'm going to
turn off the sketch. I think I will. Yeah. I'm going to try to do black as
the centerpieces here. Yeah, I think that,
that might work. I'm drawing in the
outlines first, then I'm going to
fill them all in. I'm trying to keep it loose, but I'm not sure how it's going. Let's see when we
reach the results. Okay, that looks good. And I want to turn
on the sketch. And I'm going to actually
add the stems here as well. At the bottom of the
florals like this, maybe where is this one going? Maybe here. Those
are two straight, I'm not sure. We will see. When we are finished. This one could go
down there as well. Probably. Okay, then we're going
to repeat flipping it around so that we can
fill out the empty space. Flipping it around
and drawing on this layer with the white starting with
the floral shapes, fill them in with the
color fill later on. I know that if you're
not using procreate, nothing of what
I'm talking about, procreate techniques
matter to you. But for those of you who
are using procreate, I still want to mention
some of these things. Okay, filling it in. Now we need the black layer. The black color. You can turn off the sketch
and just draw in black dots there. And on the stem layer will maybe add like that. I'm not sure if I like that, Maybe like that, like that. Okay. Then I am going to
repeat it again because I'm suspecting that we have a white space over
here, a negative space. I'm just going to repeat it once again. I was right. So we are going to expand
this flower a little bit. That will probably look better. Maybe even this one. This one, maybe this one. That is blank space over there. Okay, this looks good. Now you can go into the details and see if you want
to add something, maybe to balance out the
pattern like I'm doing here. Yeah, I think it's ready to be tried in the patent tester. I'm going to do that. Swipe
with three fingers copy. All swipe down with
three fingers paste. And I'm going to split view to my website
to the patent test. And I'm dragging in the pattern, procreate away and assuming
in and out on the pattern, I think that this looks good. There are probably some
details that I would like to change or
actually a lot of details that I would like to
change if I would have made this as a that I want
to use for something. One thing that I want
to try out is to change the colors to
more like muted colors. If I go to Pinterest and
see I want to have these like maybe like these
colors, big black. Let's try it out. On
the background layer, I will go for some beige color. Maybe a little bit more brown, maybe even a little bit darker. That looks nice. And then I'm going to go on that layer and just trying
out a darker color. Or maybe if we go for a darker
brown and the background, you could go for a
lighter brown on flowers. I am not sure how I
want this palant to be. Let's go into Pinterest. Again, it seems like there's a lot of white
backgrounds here. We have a base background
and blue flowers. Maybe I should try that one out. Base background, the
flowers could be some blue. Not that blue. Like a darker blue. Then how was it that
pattern there was a white. I forgot that. That
is what I'm feeling. I forgot the
little.in the center, I'm actually going to
draw that in Strange. But let's draw
that in with white because that will give
me more contrast. Maybe like that. Yeah.
Now, it looks much better. So strange I had it in the
sketch, but I lost it when, when I was drawing
the final motives. Adding the white on all
of the flowers here. And then I need to repeat the pattern to be
able to feel this in. Add those in. The other parts, I'll just delete that one and then I'm
going to repeat it. Then we'll actually
learn something. Or I learned something, maybe you didn't
forget that part. But I learned something
about the style, that if we just add one more
contrasting color there, it will be much more like pop. It will be a much more
interesting pattern. We're using few
colors, muted colors. But we work with contrast to
make it more interesting. That is definitely something
that's good to learn. I'm just going to
fetch that last flower there and that one, we are probably finished now. I will do once again, copy all paste and try
it out in my parent. Yeah, I really like this.
I think it looks nice. I'm going to keep
it like this now. I am going to try it
out in procreate, duplicating the image and
making it half of the size. Then I'm going to tap and
drag to repeat it like that. Now we have our finished
Scandinavian floral pattern. Let's check out our Pinter s
board to see the similarity. This is really similar. This would definitely go
as a copy, I would say, especially with the
colors and everything, but also with the stems
and the floral shapes. And yeah, we should definitely
not use this any other, place them on skill share. We are just doing this
for learning purpose. Okay, I think that we reach pretty far in the
Scandinavian art style. Again, this is a quick pattern. You could create a panel like this for hours to
really hone in on the style. This is our finished pattern. Now it's time to reflect. But first we will export the file so that
we can share it in class. I'm saving the image.
15. Day 3: Scandinavian - Reflect: Now it's time to reflect a
little bit about this pattern. I'm heading into my workbook, I'm writing in the file. What do you like most
about this pattern? I like that it's simple, seem to like the
simplicity and everything that I do that's also
very aligned to my style. That's not a surprise. I also like the
contrasting colors. How much you can do with just a little change,
what we call this. I'm just going to write
that how much you can do with a simple color change. I like that clean
and simple shapes, just like the style and simple. Okay. What challenges did you face while
creating this pattern? I think it's hard to make
really irregular shapes. It can be hard to find
the colors and contrast, maybe whatever else you, challenges that you faced when
you created this pattern, how does this pattern fit
into your evolving style? As a pattern designer,
I feel that this is a little bit similar
to the bold and colorful. This pattern fits
into my style as it's bold and minimalistic
and also few colors. Okay, that's enough for me, but you can give it a
little bit more thought. And write a little bit about how you enjoy
creating this pattern, what challenges you faced, and also what you can
take from creating this pattern into
your growing style. Now it's time for
the next pattern.
16. Day 4: Retro - Overview of Style: It's time to draw a pattern
in the retro art style. This is a style
that is inspired by the design aesthetics
of the past decades, which brings a nostalgic feel. It celebrates the iconic looks
of the past with colors, distinctive shapes, and
a hint of vintage charm. Retro art is known for its bold and playful colors,
often very colorful. And depending on the style
within Retro there can be brighter hues or
softer and moody hues. Retro art is known for its unique use of
geometric shapes, starbursts and bold typography, flower power, rainbows,
mushrooms, and all things. Hippy style. Retro art achieves a balance between
simplicity and complexity. It does this by using
clean lines and uncomplicated shapes along with intricate patterns and textures. The composition of retro art is usually balanced with
symmetry and repetition. These elements create
harmony and visual appeal, which directs the eyes to
important design elements. The inspiration of
retro art is from the design aesthetics of
around 1940s to the 1970s. Think flower power, rainbows,
mushrooms, and starburst. Fine inspiration in for example, home decor from these eras, such as wallpaper and textiles.
17. Day 4: Retro - Let's Draw: Let's have a look at the retro
art style Pinterest board. This style is all about getting that nostalgic
feel to the patterns. You can go in
different directions. You can go in like
flower power era or a more like muted
style like this one. But I am going to
go for this style. I think like outlined
floral shapes. I think that this might be
a fun pattern to create. I can see that there's
different flowers, but there is a lot of outlined
flowers in this style. This one is super nice as well. I really like this one. Okay, let's go for this one. I think it will be fan, then I will split view and tap split view
and tap procreate. Here I have my canvas in
procreate and I'm going to start to sketch this pattern
with the perfect pencil. In this pattern, new
layer in this pattern, I will just sketch a few motives and then I
will re use those motives and repeat them over the pattern that is
like one floral shape. There's this different
almost like layers of outline shapes and some more pedal shapes
that might be fun. Then another one, maybe
a larger one with more heroes like that, a little circle in the center. The rain is completely pouring down here
outside of my window. And I can hear it on like the window shield
or whatever it's called, I'm so if you hear the
rain in the background, I can't do anything
about this weather. It's pouring, it's
fall in Sweden. This is what we get sometimes. I'm terribly sorry if you
can hear the raindrops. I hope that you can
hear me loud and clear. Anyway, okay, maybe one more line over
there and then I can do like these larger ones maybe. And then maybe
split those in two. Now, I'm heavily inspired
by this pattern. I'm getting a little bit lazy
here because I know that this pattern will take
quite some time to create. It will be easier if I'm just finding inspiration
in this pattern. But you could definitely go back and find other patterns as well and see if you can find
some other inspirations. Now I'm getting this star, floral shape from that pattern. Maybe that might
be fun, I can see. Maybe I want to create a
smaller one like that. Okay, I'm going back and let's just take inspiration
from one more pattern. So that is not only
from one of those. I like these bold flowers here, maybe like that might be fun. Then leaves as well. I could do these leaves or the like the lines in
them, I'm not sure. Let's just try one leaf
to start with. Like that. I could do a few each. I think I really like
that lines in there. Maybe I don't want to do that because that will
take a lot of time. Yeah, for the purpose
of this class, I'm keeping the leaves clean so that it won't take too
long to create this pattern. There's one leaf, and
maybe we could have a more shaped leaf like that. I'm just going to
pull this up a little bit so that I can fit
something else here. Maybe we could do like a larger, like a stem with leaves or a branch like this that might be nice to fit in somewhere. And I'm
going to do those. Half divide it in half leaves with just
a little detail there. Okay, I'm finished with these motives now and I'm
going to fill them in. I will just drag down the
opacity of that layer. And then I'm going to
start to draw my flowers. Lets you see what
colors we want to use. It feels like retro,
like muted colors. I definitely like the yellow and green and pink that we
can find in these two, maybe yellow and green and pink. Let's just try it out.
Pink. I have one pink here. Let's start with that one. But actually let's
start with outline. We are going to create like a brown outline that is not completely black and
super sharp, but more softer. I'm going to say that
brown color there. And then I'm going to go
to the monoline brush, which is free to download on
my website, B.com Freebies. These are five free procreate brushes that you can download. Then I will try out different
sizes on that brush. Maybe 3% Yeah, I
think 3% is good. I'm going to start
from the inside just to do this rather quickly. I will use the quick shape, but you can draw with
free hand as well. We use the quick shape. I'm going to fill in
all of the lines with the monoline brush
so that all of the motifs are outlined. I'm just going to continue
with the small petals here. You know, I'm actually going to speed up this process
for you quite a bit because it will
take me quite some time to outline all
of these motives. So let's just speed it up. Okay, now I have drawn all of the outlines of the motives
and I will color them in. Let's just see, we
have those there. And that one on that
one I will actually, I think that I will copy all of the motives
in one layers. I will just with free hand select the motives and swipe
down with three fingers. Copy and paste that. I get them separately on different layers so that I can use them to
create the pattern. Okay. And then I'm
going to name them too, whatever, just to be able
to know which one it is. Medium, medium, two, maybe. I don't know what to
name them, but star, flower, flower one lower. Small flower two, leaf one, brand, leaf two. Now we have all of those there. Now I will actually add a layer below here and add
a background there. And then I will
group all of these. Group. Then I will
start to color them. I'm just going to move the
star flower a little bit because it's too far
out on the edge there. Coloring them in, let's
see, drop leaves. I want to be in a green color. Let's just head back to Pinterest to have a look
at our inspiration. I think that I want all of
the leaves to be one color. On this one you have all
of the leaves like bluish, turquoise, and on this
one they have our green. I think that I want
the green color. Let's try out one of
our green colors here. This one looks probably
good on the leaf. I will just select, continue filling, and
fill it in like that. Then I can do the same
on all of the leaves. Let's just track
all of the leaves, layers next to each other. Leave one is one. Continue to fill on the branch. Just filling in all of these with green because I know that I want
them to be green. This one, oops. Also green. Okay. Now, next is to color the other flowers. I know that I want
yellow, red, and pink. Okay, let t, to find some
colors then I have the pink. Strike that one out
there. That green one. Lest the pink one to color. Maybe the medium
flower, this one. Continue feeling that
smaller one could also be P. Then I could go for maybe
red on the large flower. I could do orange as well, but I think that I want to
go a little bit more red. Let's try that one
out that looks cool. Then something else could
be red on this flower. Maybe I don't know what else. Let's just continue with that medium flower
that could be yellow, then let's try that yellow out. That looks nice. And I definitely want yellow
on the larger flower, and maybe something
else in the middle, And the petals could be red. Now it is turning
into something. I will try to make these
smaller petals red here. Maybe I can bring in the green
and the flowers as well. I will try that out. Yeah, that might look
cool. Let's try that out. Maybe it could be like pink in the center again, or white. I'm not sure how does it look in the
inspirational images? Let's see this one then. Yellow, maybe it could
be yellow there. I could also bring in
a blue yellow there. I'm not sure about
the green one. Maybe we should try
a blue instead. That's not the right blue. Maybe another type of blue. I'm actually just trying things out here and
seeing what could fit. I want some like a
vintage style blue, a little bit lighter. Maybe that might look good. Let's use that for
now, at least. Maybe we'll change it later on. Moving on to the medium flower, they could have blue there. I don't like that blue, maybe. Yeah, that looks better. Changing the blue to a little bit more ocean
blue, I would say. Okay. And then in the
center of that may be P. Let's try that out. Yeah. Okay. Moving on to the star flower. The star flower could be blue. Then in the center
may be yellow, this little fellow over there. Or the small flower
could have a red center. And then moving on
to the large flower, petals could be pink. Here you can see there's missing a
little outline there. Fix that right away. Fix an outline over here. Normally I would draw everything probably
on separate layers. But now, as I'm
just experimenting, I don't mind that
much if my file aren't perfect because I won't use it in
any other way than just experimenting
in this lesson. Continue. Maybe blue
there, I don't like that. May be yellow, yellow. And then let's try blue in
the center. That might work. And then the other, the smallest flower that maybe
it could be red or yellow, let's try yellow,
yellow and red maybe. And pink, pink and red. Okay, now I've colored all of my motifs and it's time
to make a repeat of them. I will duplicate them, because I want to
duplicate them. And use them more in this
pattern than just once. Moving on, let's just change the position
of these a little bit that I like where
they are in the pattern. We have one there, then
we want the leaves to be going out from the floor of flowers in
different directions. Maybe maybe there create leaf. The leave could be like that. That might look nice. Then this k leaf could be
beneath this larger flower. I'm just trying things out and I'm trying to build
this pattern. Now, I'm not sure how I
want it to look quite yet, I'm just placing the motifs
around a little bit. I'm not super happy with that. This flower is blue. I don't know why I think it's because it's the only
one that's blue. I'm going to change it to red
and that's better for me. Then I'm placing that there. And the smaller
the yellow flower and the branch we could
change position of. I'm trying to make it dense because if we look
at the pattern, I can see now that I'm heavily inspired by this pattern
and it's pretty dense. I'm going to try to
make it more dense. Maybe overlap, being this might take some time to
build this type of pattern. Now we can just repeat
some of these flowers. You could flip them as
well and repeat them. I'm not sure where. Maybe over here. If we move everything else up there, I might be able to fit
this one over here. Like that. And then I want
some more leaves, maybe, But I'm going to continue to repeat the words a
little bit more. This one could go
somewhere here, could flip it to
make it a little bit more interesting,
the pattern. And then moving on to duplicating
the different motives. Basically, I'm just trying
to place the motives in different positions to
balance out the pattern. I will also add leaves. Now I will just
duplicate a drop leaf. Maybe that one can go from this flower. That
might look nice. And I'm going to
duplicate these leaves, one like that one, maybe on this one. Then that branch
duplicating that one. Basically just trying to
fill space in the pattern. In a balanced composition. This is not the
easiest task to do. There will probably be
quite some time before. I'm happy with the
result of this. I'm actually going to speed up the process here a
little bit while I duplicate and place
these motives in the position that
I want them in. Okay, so now I have filled
in the cavas here with my motives and I will repeat the pattern and continue
to fill in the motives. I will just repeat the pattern
first and then we will see what we need to do
with filling it in. Let see, now we actually have all of the
motives saved here, but we also probably
have most of the motives except
the red flower, which I actually want. We don't have that one. I want that one also here. I think that, that will make a balanced pattern to
place that one there. Maybe I want to flip it, then maybe I want to change that pink flower and just
move it up a little bit. I could maybe twist
it a little bit. Moving it up, maybe like that. I want the media flower, the smaller yellow flower, to be over here, flipping it, maybe like that. And then I want more green. I'm duplicating the branch that could go out from one
of these flowers, maybe. And then I want to
change the leave. This is a little bit of
work to get it balanced. Super fun. I hope that
I will like the result. I need something over there, I'm not sure what it is. Maybe it's a branch. If I flip it and twist it and place it over
there somewhere, maybe maybe like that. And then I need to
move those leaves, leaf over there might look good. Let's see, is a little
bit too far up. Accidentally cut
that one off. Okay. I'm not really happy with that. I'm maybe doing it just a little bit smaller, flipping it. Okay. So I think that this is
starting to look good now. I might want another
pink flower. Let's see if we can add one
more of the maybe here. I think that, that
might work over there. Maybe, let's see a leaf, maybe one more leaf over here. I'm just trying to
fill out the gaps without losing the balance. Maybe this is good,
I'm not sure. Let's try out the repeats. Swipe three fingers, copy and swipe down with
three fingers and paste. Then I'm going into Safari A, Dragging this in test. And look at that. I really
like how that looks. It's a super fun, like retro floral repeat. It is very similar
to our inspiration. I would not at all call
this pattern my own. It's the same colors, it's the same shapes and everything. But it was a really
good practice for me to create this repeat
with outlines, as that is not my typical style. Let's just repeat
it in procreate. I'm making the pattern
half of its size and then just repeating it like that. And look at that, I'm super, super happy
with how it looks. It's similar to the
inspiration image, but I had a really good practice when I created this pattern. Let's export the
Jpeg and save it.
18. Day 4: Retro - Reflect: Then we can head into the workbook to reflect a
little bit about this pattern. I'm scrolling down to retro
and I'm using the pen in preview to think about what I like the
most about this pattern. What I liked is the layers, like layers of
motives in my style. I typically don't create
that much layers, but I really like to
practice with that. Outlines was interesting
but quite time consuming, but it was interesting
with the outlines, the contrast that you
get with outlines, the fun details in the flowers, what challenges
did you face while creating these patterns out? Is time consuming, also getting a good balance. I think I am just
giving you examples, what you could write
in these boxes. But of course, you
should write what you feel when you have
created this pattern. How does this pattern fit
in to your evolving style? As a pattern designer, I
really like the floral motifs. Floral, and actually
the details. I could definitely
use that in my style. I also like the vintage colors. Okay, this pattern is finished and we're moving
on to the next one.
19. Day 5: Folk Art - Overview of Style: Next up is folk art, which is a lovely and timeless
style that celebrates cultural traditions and the creativity of everyday people. It focuses on bright colors, simple but meaningful symbols, and a sense of community. Folk art is known for its colorful and
vibrant color palettes. It often uses bold
primary colors like red, blue and yellow, which create a really striking
and happy effect. Folk art is known for
using simple symbols and images that represent
everyday life animals, plants, and religious
cultural themes. These elements are
portrayed in a simple, often flat style, making
them easy to recognize. I would say that folk art combines simplicity
and complexity. The individual elements are usually simple and
easy to understand. But overall composition
and the details with the textures tell
meaningful stories and are a bit more complex. Folk art compositions are
usually simple and balanced. They often have a
main focus with symmetrical or
repetitive elements, which creates a
feeling of harmony. Inspiration from folk
art is often from cultural heritage and
traditions and everyday life. Common elements to
draw are animals, plants, and cultural symbols.
20. Day 5: Folk Art - Let's Draw: Let's head into
Pinterest and check out the Folk Art
Pinterest mood board. We are going to create
a floral pattern in this art style as well. I just want to have
a look at what the distinct features
are of this style. It seems when I'm looking
at this inspiration board, that there is a lot of reflected elements.
Mirrored elements. We could definitely
use the symmetry tool. There is a I really
like these colors. There is a of animals. But we are not going to
get into drawing animals in this class because it's a
little bit more complicated. I also want you to
be able to compare the different art styles with the same type of motif,
with floral motifs. We are going to
stick to florals. What we can have a look at is, for example, this
type of floral. I think that that would
make a really nice pattern. Maybe like a diamond
shaped floral motif that's just repeated with some air in between with some
blank space in between. Let's head to procreate and
we will start with a sketch. Again, I am using the perfect pencil from the
pattern elements brush set. That is free for the members in my pattern repose membership. It's also available
to purchase in the texture brush
set on my website. Let's get started. I
will actually start with turning on the drawing guide
and the symmetry tool. I love procreate to sketch and drawing procreate
because it's so easy. It's so easy to try things out. It's so easy to
change your mind. Yeah, it's just so much
fun to draw procreate. Let's start with a new
layer and the one. I think that I want
to draw some type of floral at the top here. Let's just draw a line. Do we have drawing a
cyst on that layer? No, tap drawing a cyst. Then I just want to
draw a line there. I want some flower
to go up like this. Zooming in a little bit maybe seems like
the floral shapes and folk art are pretty simple. Some fun details, let's
just try that out. This is like a
simple floral shape. And then we could go for, I'll just bring that one down
a little bit to the center. Then we could do maybe something
that goes out like this. I'm not sure in which angle. Maybe like that flowing. And it could be probably more
simplified flower shape. I'm not sure if I want it to be perfectly symmetrical
or free hand, but I'm just going to go
for the freehand style. Now, I definitely would
want to add some details. I don't like where the
stem goes in there. I will just fix that.
Maybe something like that. The details maybe I can create, let's see, maybe I could do some dots because it seems like there's a
lot of folk art motifs. You have some details in the
motives, texture details. These are super cute. But heading back to that one, I think it had a lot of floral
shapes that we can get. In spite of something like that, this one could
also have details, maybe just like a
field in petal shape. Oops, this is a
little bit confusing. So there may be okay, I know what I mean
with this sketch. It's a little bit messy, but we will fix it later on. Then down here, we want something that
goes out like this, like a flowing,
maybe like a leaf. Maybe it can end in some
flower here as well. I'm not sure which type of
flower, maybe just like this. I'm just trying to keep
it simple now so that I will move through the process. It seems like the shapes should be simple and
then we will just add. Some details. I will
add some dots there. Dots seems like a really
common detail in this type of, in this art style. I guess there we have some things like that
that looks nice. And then maybe we want to
have like leaves going out here, maybe flowing leaves. Maybe we want to
bring this one down a little bit like that, maybe. But then the other
one didn't follow. Okay. So I need to, or actually I will
fix that just by fixing the position of
this leaf here, I think. Okay. Maybe something like that. And then we could maybe something going down
like that. Would that be nice? No, I don't like that
something going up here. And that could be just a
little flower like this. Maybe maybe I can bring some
details to that one as well. Then let's see what we want to do in this
space over here. We could use a flower
there as well. We should bring out
something here. Maybe the place, let's connect
with that flow up there. Again, we'll do that shape
and then fill that in. It's like a mini of those flowers in the
folk art patterns. It's common with like a
story and cultural meaning. But we won't do that in this lesson because it's a
little bit more complex. We are just trying to mimic
the style, the drawing style. Okay, continuing. Maybe we can bring leaf up
there. Would that be nice? Yeah, that looks nice. And maybe one more over there. I think that that
looks really nice. And then I want
something more here. Maybe the types of leaves again. Yeah, I think that
this is looking good. I might want to pull this
one in a little bit. I'm not super happy with
how this one looks. I will just erase it. And erase a little
bit of that line there to try to make it a
little bit more narrow. Maybe going up like that, instead I can use
that type of flower. Maybe I don't want that
dot or maybe I do. I'm not sure, I'm
really indecisive. I can feel instantly
when I draw this that this is how I commonly think. While I draw this is not
really close to my own style. That is why it's harder for me to come up with what
to draw, compared to, I would say the art
style that is closest to my style is the bold and colorful in that style is really easy for me to
come up with things to draw and just get
a good flow in it. But here, it's not
as easy at all. Maybe this is good. If we just pull out
something here, it will be more balanced. Okay, I'm feeling that
this is a nice motif. I'm not super sure, because this flower is a little bit too far out, too high up. Maybe I need to change
this one as well. I'll just erase that one now. It's just about the
balance in the motif. But I'm just trying
things out and I'm also trying to
see the flow of the inspiration here
that is really flowing. And also often like Ms. Flowers in these
types of patterns, this is like a nice
inspiration as well. Okay, but moving on, maybe we can bring that one out. And if we do, what should we have there? Should we have that type of flower or should we
have something else? Maybe we should have
this type of flower, like a leafy type of flower, maybe that feels more
flowing in the pattern. Yeah, I like that much more. That looks better, I think, because now we get
a good line here, let me just use another color. I will show you what I mean. Now we have a good flow that goes up through
this whole motif. Okay, I think that
I'm happy with this. May I want to add a leaf here? As I said, I'm not super
comfortable with this style. That is why I am so indecisive. Okay, now that looks good. I think that we need
some details here. I will look into that. This one that I have
with the details, there seems to be a lot of like petal shapes and also dots. I will add dots here, maybe something like that. We will see how it works with
all these details later on. Now we have details on that one. This one probably also
should have details. Maybe it can have the same as
the one at the top connect, connect with that
motif like that. Then I also think that this one maybe should have the same, we're bringing in
the same bold detail in this one as well. Then do we need something
else? Maybe this one. I don't know about that, but maybe some
detail, shouldn't it? I'm not sure. Maybe,
or maybe not. We will see when we
draw the actual motif. Okay, moving on to
color inspiration. I really like these colors. I will do that with
a darker background. For this, the idea is to just create this shape
in the middle and then repeat it with a
lot of air in between. That could make, for example, a great wallpaper design. Now I will just bring down
the opacity on that layer, and I have an extra layer here. Do I have something on
it? On a new layer, I will actually add
a background layer. First I will use like
a dark bluish color. Then I will actually create the sketch
with alpha lock and fill the layer with
white so that I can see the sketch on the
darker background and bring down the
opacity once again. Then I will draw
with a green color. For this I will use, even though that I haven't seen that much texture
in these motives, I have a bit of
urge to draw with a texture brush as it's folk art and it's
a free art style. I will try it out. I will use the
square and texture, which is free to download on my website in the mini
pattern tool kit. And then you'll get the sweet
sunflower brush set with the square and texture brush you want to use the same as me. Then I will just start to draw. Let's see where we will start. Let's start with the center. I definitely want the
drawing assist so that I have the symmetry tool on the. Or maybe I don't want it
to be on for the center, because I just want the
line in the center, like a straight line
going down like that. Then I will turn on
the drawing assist. Now I want to pull
these branches out. Is it too big? I'm not sure. Maybe I want to be, that might be nice.
Let's try that. On the smaller ones, maybe thinner on all, I am not sure how I want
this patent to look. No, I think it's too thin. Okay, let's go for 2% then. I will just pull down that one. This one, I'm trying to
follow the sketch here. Oops. Okay, that's good enough. And then this one. What I like with
this brush is that it's really like irregular
textured from the start. And you get a little
bit of unpredictability in the stroke which will make
it like a hand drawn feel. I really love that
effect. I love it. When you get the
texture you draw, you don't need to
add it later on. That's the lazy part of me, that okay, moving on, we will add the leaves. Let's just add the
green parts first. Should we start down here
maybe with the leaves now? I want a smaller one
because I want to have control over where
the leaves go. I think that the
sketch is a little bit too loud in the background. I'm bringing down the
opacity there so that I can also go like
free hand while I draw and not completely after the sketch. Okay. And then I am definitely not sure
what I will think about this pattern
when it's finished. I'm not super comfortable
drawing this. I don't know why, I don't know. We will see. Okay, moving on. Now we have and I will
just fill it in with the brush so that I get that
nice texture filling it in. And speeding this
process up for you a little bit because this will
take a little bit of time. Okay, moving on
to the next ones. Let's do the leaves over here and filling them in, and the next one over here, and filling that one in, okay? And then these ones
over there, 1234 and 5.1 on this side
and filling it in. Okay. I think we have
all the green parts now. It's time to move
on to the next. I will use the blue and red
from this Pinterest image. There were the similar. I have a red here
that I will use. I think that I want
to use a blue. I will say that blue
on the flower here. I will try that out. Oops, I know I need a
cyst on that layer. I'm there. Then I want to connect that
color over here as well. I'm using it on this flower. It seems to me that in
these folk art patterns, it's not always common that you use a few colors
and repeat them. If, for example, if we use
blue and red and green repeat, connect the pattern and
then I am not sure. Let's try the red one and see
where we want to place it. So I am going to definitely
want to try to do this one in red like that. Then I want to connect that
color over here as well. First I'm drawing
the main colors and we will draw the actual details. Okay, over there,
right over there. And then I guess we need
to have blue over there. Oops, I can see now
that I draw all of this on the same layers, I will actually just select
the red from that layer because I want it separately,
easily can recolor. I will just wipe down three
fingers cut and paste. And now I have the
red and the blue there on the blue layer. I will also draw these small flowers like that. Then we could add probably
like the red on the, on the ones like that. Oops, drawing assist needs to be on and adding the red there. Why did not that happen? Okay, again, drawing assist
needs to be on that layer, then we are the red. Okay, finally, now
let's add some details. I will pull up the sketch so that I can see what
details I had planned. And then I will use let me just see where I
want to add the details. Could I go even further? Maybe 1% Yeah, it is. Okay. Moving on. The details that I have
drawn in the sketch, I will draw with
white on a layer that is the symmetry tool turned
on the drawing assist. Continue that one. I think this will look
really nice when we sum out this one. That looks good. The other details,
I need to have one white layer below
so that I could add these things that are
sticking out from beneath the florals like that. And then like this. What else? We need to have the details on the red part that should
be dot on all of those. Maybe like a small something on each of the petals.
That looks good. Actually, then let's see, do we need to add some
more details here? I will turn off the sketch
and see I like this look, but I also like that it has the inspiration image
with the colors. It has some details
on the leaves. Let me add a layer on
top of the leaves. We can try with a darker
green color here. See how that will
look and lines. I'm not sure that maybe
I want to use like the sketching brush
again because I want smaller lines and they can go this maybe should
they go all the way? They could go all
the way. Okay, we can make a clipping
mask there as well. Then I could add the
lines like this. That's a simple way of
drawing the lines here. Doing this rather quickly. Okay, so that was a nice
subtle effect there. I think I'm pretty happy
with how this looks now. Maybe I want to turn
on the sketch again. Maybe oh, I forgot
something. On the flowers. Yes, I can see that now
on the flowers on top, I need a white, and I will actually the same brush and add. Maybe I can add the details
with the sketching brush now. Maybe that's better
because it's a bulky a little bit like
square in the edges. Maybe I want to change that
on other layers as well. Yeah, I really like that look. I think I will do that on
the ones at the top as well. I will just add Ts here. Okay, moving on to this one, maybe we can add dots
on that one like that. I'm not super happy
with how this looks. I will actually use the
pencil on that one as well. Maybe on this one as well, just so we get the same texture
there. I changed my mind. But that is what happens when
we are experimenting and that's part of the deal. Maybe like a drip shape there, now that we have a little
bit more pointed brush can do this details
feeling in the drip shape. There's a lot of details
in this pattern. Maybe that is what I'm, doesn't really fit
into my style. I'm a teacher. I draw
all kinds of things. I also learn all kinds
of things to be able to teach it for my
personal taste. This is a little
bit too detailed. I am a fast creator, I like to get the ideas
out of my head fast. That is also part
of why my style is minimalistic and simplified because I get super bored if I spend too long
time on one detail, that's just me,
that's just who I am. That definitely doesn't
need to be how you are, probably isn't, but
we all are different. And I think that the
style that we have also comes from our personality. That is a good thing
to think about. How do you like to create? How can you translate
that into a style? If you are someone who are
who really care about details and find some joy in
creating small details, then maybe your style
is more like intricate. If you're someone like me who my head is always
flowing of ideas, I feel like I can't get them
out of my head fast enough. Most of the time it doesn't really suit me to
create super detailed, super intricate
patterns and super slow because then what will happen with all of the rest
of the ideas in my head? That's how my brain works. Okay. Something like that. And okay, now we have all
of those details. I'm going to turn off
the sketch layer. I'm actually super
happy with this result. I'm going to turn off
the drawing guide and swipe to the right to
turn away Pinterest. This looks super cute. What I will do then is just to first select all
of the floral layers. I can group them. Then I will make sure that
it's centered. It seems like it's centered. Then I want to
group all of these. I want to swipe the right to duplicate it and just delete the background
in the first group. And turn off the disability. Then I will turn
my pattern around, twist it inside out so
that I can get my motif, and I think that I want
them in the same direction. And then I will
turn on the group. There we have, it
looks super cute. I'm super heavy with
this. Okay. Swipe down with three fingers, copy all. Swipe down with three
fingers, paste split view. And I'm trying it out
in the pattern test. Oh my gosh, I love
it. It's cute. And it has like a look, the circle, not
the diamond shape. Oh my gosh, I love this pattern. Even though that I had
like inspiration from, I'm going to try this pattern
out in procreate first. So I will just swipe
right and duplicate it. And then just make
it half of the size. Swipe to the right,
duplicate it, bring it to the right. Then merge these two together. Swap the right. Duplicate
it and bring it down. Okay, And then merge on that. I had a lot of inspiration
from the floral image. I think that I
actually came up with new florals That
is not like copy, but the colors are
definitely copy from that pattern that we
looked at in Pinterest. Let's have a look in Pinterest. Where is Pinterest there? This pattern, it has
the same colors. I would definitely
change the colors if I would want to do
something with this pattern. Now let's just share and save as a Jpeg so you can
save it in class, then this is our pattern.
21. Day 5: Folk Art - Reflect: Now it's time to reflect. Let's head over to the workbook. I will draw in the workbook, what do you like the most about this pattern like
that? It's super cute. When you reflect, you don't, you're not going to show
this to anyone else. You can write anything you want. Anything that comes up in
your mind, it's super cute. I really like the
one motive repeated. I like the flow of the
flowers, flowers and leaves. Okay. What challenges
did you face? Well, I faced, that's
kind of the details, the details a little
bit time consuming. That is just my personal taste
and also the challenge I faced maybe to get
a good good vibe. Folk art can be so many things, I think it can be
hard to get like the folk art vibe because
folk art is so many things. How does this pattern fit
into revolving styles? A pattern designer, well, I like the repeat with
one motif, floral. It could definitely
be like wallpaper. I like the way that I
repeated that pattern. I also like the look
of the details. But how to simplify? Because that is my style. I want to simplify. Even though you might feel that the details are simplified, I felt like I was putting so much effort into
creating these details. Maybe if I want to create these types of
patterns in my style, I might want to
simplify the details. Even maybe by stamp brushes
or anything like that. Okay, that was the pattern. Let's move on to next art style.
22. Day 6: Watercolor - Overview of Style: Let's dive into watercolor art, which is maybe more of a medium than a
specific art style. Watercolor is a lovely
and versatile medium that uses transparent
water based paints. It's known for its smoothness
and creative expressions. That comes from the
unpredictability of watercolor. Watercolor art is
known for its use of transparent, watery colors. Artists can create
a wide range of colors by mixing and
layering paints. This medium often
includes soft pastels, but also viant splashes
and delicate washes, creating a feeling of
transparency and light. Within watercolor
art, you can draw anything as it is more of a
medium than an art style. Some popular motives in modern watercolor
surface panel design includes flowers and
natures, food and abstracts. Watercolor art has
many possibilities. It can be simple or complex. You can keep it simple by
focusing on the very basics. Or you can make it more
complex by adding layers of colors and textures for
depth and richness. The composition within the
watercolor art style is often carefully planned to create a sense of balance and harmony. Artists consider the
placement of elements, use of negative space, and the flow of colors to guide the viewers across the artwork. The inspiration can come
from many different sources. The natural world with
its various landscapes, plants, and animals, is
a common inspiration. Everyday scenes, personal
experience, foods, fruits, and also abstract ideas can give a rich source
of inspiration.
23. Day 6: Watercolor - Let's Draw: Okay, let's draw watercolor, which is actually, I would say, more of a medium than a style. You can look at it as a style, but the art style may
be more like painterly. But I wanted to do watercolor because it's so specific medium. As I said, I am not an
art history teacher and these art styles are
actually just based on what I think is
good to practice on. Some of the things that I
think is good to practice on when you are looking
into growing your style. As you can see watercolor, there's a lot of loose strokes
and we are drawing floral. Again, I think that good
inspiration for this, there are a lot of inspiration, but I think that
good is this one. Let's just use this one as a start and see where
we will end up. Tab, split view and procreate. I will zoom out for watch color. I won't sketch because we want the simple and direct
look at what we create. When we draw with
watercolor, even digital, you can use the sheet from
our favorite company, five free procreate brushes. I might even use some other
color brushes as well. To just as it up, because often when I draw
with digital watch color, I tend to want to add paper texture and also add some texture with
other color brushes. But let's just start with washi and then we can see
where we end up. Okay, I will add a
new layer and I want to use like peach color. I want to keep the colors
soft like it is in this one. Let's just try out the brush. We will try to draw very loose. That could be a
flower, definitely. I'm just trying to
keep it really loose. I'm actually not copying a
specific flower on this piece, but can you just think of
a simple floral shape and then just drawing quickly with the brush so that I end
up with a We color look. Okay, so that are
some of the flowers. We could add some red
centers to those. Let's say that size 80% Then we might want to
add, I'm not sure. Maybe like that, like
a brighter red center to these on a new layer. Okay, those could definitely
be really loose flowers. And then moving on, let's try out like a yellow and
see where that takes us. Maybe should we do this type
of flower? I'm not sure. I actually have new
favorite watercolor brushes that I created after
I created this one. I haven't drawn with
this brush in a while. Maybe these dots, you can make like the dots in the
inspirational image. Like dots over there.
Maybe over here. Just trying to spread
out some motives here. Then maybe we want to add
something purple as well. Let's just see purple a little
bit more bluish purple. Maybe Ops, saving that one and adding maybe another type of flower don't like
the look of that. It can be a little
bit hard with like water color brushes before
you get to hang of it to get a good maybe
we can keep it to that type of flower because more simple
to draw, maybe. I'm not sure. Let's try it out. Yeah, I think I like this.
I think I like this. I'm not sure yet.
Okay, I'm going to turn off the visibility of the yellow layer
just so that I can draw my purple flowers
here and there. Maybe this is the look
that I want to have, like a simple flowers. What color pattern I'm
just improvising here. Let's see where this will out with the yellow
on a new layer. Maybe I can add the
same type of flower. Now I am just
simplifying for myself. I want to make this pattern a little quicker than
it would need to be for the purpose
of this lesson. Instead of creating this like intricate water color designs. Okay, maybe like that. Then there could
be a yellow one. I'm not sure about the flow
of the pattern though. Let's see if we should add like red dots at the center
of each flower. We can try it out, that might look good. I think that, that looks good. Now as I'm continuing
this pattern, I can see that I'm influenced by the colors of this
pattern on Pinterest, but not so much
about the motives. I'm just trying to work with the watch color brush and see what type of loose
motives I can come up with. Okay, that looks
pretty nice, I think. Let's move back and see if we can find some
other motives to be inspired by maybe
like leafy shapes. How about these long stems? I'm not sure. Let's add
a layer with green. Use the green that I have
there and just see where, where we can take this pattern. Add a layer that might look good. But also how about if we add some smaller like stems like that, maybe where we can fit them
in, Would that look good? I'm really just improvising now. I have no idea where
this will end up, but that is what happens
when you are experimenting. That is the fun
with experimenting. I'm just trying to make
the pattern work somehow. Also going to make it a little bit more simple than a watch color pattern with
20 different motives. Because in this class, you don't want to watch me
create the pattern for hours. This looks good. There are places where
we have blank space. I probably need to fix that. But I'm going to
continue to add these first then I'm not sure
how I will fix it. Maybe I can add more
petals to the flowers. On this one, for example, I could definitely
add a longer stem. Let's see, we have a
problem over there. You can see it over
here. Over here, we also have a problem. Now I understand where I
want this pattern to go. I will actually delete some of the flowers and redraw them to make the pattern
more balanced. Let me just see in
the pink layer, I want to delete these ones, just moving them out. I think on the yellow layer, I probably can just add a petal over there and
then it will work. Yeah, that will probably work, but on the yellow layer there, I definitely want to
remove that one then. Let's see, this one, oops, selecting that one as we're
doing this for practice. This is just a quick fix. I'm moving out those. I could also remove that one, probably this one as well. And this one, I liked some parts of the pattern but some parts
weren't like, dense enough. Then I will remove those and loops don't want that
layer, this layer. And Start over with
those motives. Okay? So now we can do the yellow. We could do like a
yellow flower here, maybe like that. That
was a little bit big. Then we could do yellow
flower here as well. Maybe over here and over here, okay? And then there
could be a purple. I'm basically just trying to fill the pattern
with motives here. We could do a purple over here, then we could do
a pink over here. Let's do a one loops
over the edge. Okay, that looks good. And then I will add the
red dots in the center. I think that this is
the challenge with what color patterns that
you want them to look like. Hand drawn, you
need to be really loose on your hands when
you draw with what color? Digital brushes. Maybe you're watching
this class and are drawing with real what color. Then you don't have this
problem that I have. Okay, moving on there, there could go down. Okay, it's time to
repeat the pattern. I will swipe away
interest because I have my idea of the
pattern here already. I will add a layer at
the bottom and tap and drag to fill that layer
with a background color. And then I will choose the group and flip
the pattern around. Then I will add some more. Let's do over here, oops, maybe a pink over
there or yellow over here. A pink over there. Pink on the pink layer. We could do a purple over there and a pink
over here. Maybe. I think that I will make
this pattern works. This was way too big, I think. Okay, And a purple over there. Okay. And then on the
red layer, I will add a. You can see that I'm
doing this really quickly now because I just want to
get a feel for this pattern. I don't want to spend my
whole day creating it. Well, there's something missing. No. Okay. Here you can see that
something is missing here. What we will do with
that, I don't know. We will probably delete
the pink flower. We need to fix this space. I will also delete this
one and the red dot. And then we need
to fix that space. I could use purple
flower beneath here. I think there needs to go
up a little bit like that. And then a pink, this could probably be a
problem area in the pattern. Let's see a pink flower
over there, That's good. And then a purple flower
ops on the wrong layer. Pink flower over there, and then a purple
flower over here. Then I want to fix the pink. Okay, going back and forth to try to get a good
balance in this pattern. I say that this will probably be one of the things
that I will mention in reflection that when I don't personally
sketch my patterns, they end up not as good
as when I sketch them. Okay, I think that,
that looks good. We might have a
problem around here, but let's just try this out. I will swipe down
with the finger, tap, copy all the swipe down
the finger, tap, paste, then tap, split and drag in my image to the pattern
tester swipe away. Okay, I can see that I have a small problem
in the pattern. I won't mind that
now because this is just to experiment
and just for fun, we can see that I
have a white space in the pattern that
makes it not balanced. That's fine for this
experimentation pattern. What I want to do though, is to just add a
little bit of texture. I think I will do this. I have this really
nice new brush in the Padres membership watch color mix Blob. The members get it for
free and we will use it to add some texture to our motives. I really like how this
can you see the texture there goes into the motives. It's super nice to use, just to add a little
bit more like analog watch color field to the motives and
watch color brushes. I'm just going over these will probably be fine when we repeat because the
texture is so irregular, we don't probably need to make
the repeat all over again. There is a little bit of texture and I will
also try to add a bit of paper texture
because I really, there you can see that
pattern really pops. It looks super nice. I would need to maybe just bring down the
opacity on that texture, and then I would need to
try out the repeat again. I tap copy All. Tap Paste. And I will try out this
repeating procreates. I will swipe the right
to duplicate it. Tap in the top left node, make it half of the size. And then swipe the
right to duplicate it. Tap and drag to make a copy. Merged and duplicate, and
then drag down to the bottom. And here we have our pattern. I'm super happy with the result. I wouldn't use it to
sell it or anything. As I see, it is not a copy
of any other pattern. I took some inspiration
of the colors, so maybe I could just
switch the colors up. But the motives are
completely mine. I will just share this
pattern as a J peg. Save it to my camera so that
I can share it in class.
24. Day 6: Watercolor - Reflect: Now let's reflect I'm
heading into my workbook. What do you like most
about this pattern? I like the hand draw look. I like the unexpected motives. I don't really know
how the flowers will end up when I draw with
the watch color brushes. Yeah, I like the
soft color palette. For example, soft palette
handwriting is not the best. I hope you get what I mean. Okay. What challenges did you face while creating
this pattern? Not sketching pattern. Hard for me to get
a good balance. It's also hard to draw water color flowers at start because they need to be like more spontaneous,
if that makes sense. How does this pattern fit into your evolving style as
a pattern designer? Well, the watercolor texture, the soft look, I hope
you know what I mean. You could easily create
the really nice pattern for kids and baby products is really the opposite of bold. I don't know what that I like that look, that it's unexpected. I could definitely use that. I could try to use it
with other mediums, but I really like
that in this pattern. Now it's time for
the next pattern.
25. Day 7: Arts and Crafts - Overview of Style: And the last art style
is arts and crafts. The arts and crafts movement
is all about craftmanship, simplicity, and the beauty
of handmade things. The color palette in arts and crafts are often
warm and earthy, with rich tones are wood, deep greens, rustic
browns, and muted rents. These colors create
the feeling of warmth and connection to nature. The arts and crafts style
is known for its focus on craftsmanship and attention
to detail in patterns. Common elements comes
from nature and plants. Animals, birds and fruits are also common in these patterns. This style tends to be on the complex side
when it comes to surface pattern design with intricate details and
flowers that intertwined. These patterns are often
more complex than simple. The composition is
often balanced and harmonious with a focus on
being useful and practical. Objects are designed
to be functional in everyday life while
still looking good. The arrangement of elements shows a sense of
order and purpose. The inspiration for the
arts and crafts art is often drawn
from the beauty of nature with its intricate
shapes and patterns. The arts and crafts
movement was also motivated by the
concept of returning to traditional craftsmanship
and valuing handmade items in a world that was
increasingly industrialized.
26. Day 7: Arts and Crafts - Let's Draw: Let's head over to
the Pinra's board and check out the arts
and crafts art style. I saved this art style
for last because it's pretty intricate patterns
and complex patterns. If you really want to
hone in on this style, you should definitely
spend some time at it. Because in this lesson we will
try to really simplify it, because otherwise you won't. I wouldn't be able
to film a lesson like this without it
taking hours and hours. I will really try
to simplify it. But I want still to show you my thoughts on how I would
draw this type of pattern. But have that in mind that if you want to hone
in on this style, you definitely need more than this little time that we
will spend in this lesson. The arts and crafts style
are a lot of floors, we will create the floral motif in this art style as well. There's this florals that intertwined and move
into each other. I'm thinking a lot
of wallpapers. When I see these
types of patterns, you have the really
intricate patterns. They're so beautiful
and so, so nice. And they would be very
interesting to draw, but they are too complex
for me right Now, In this lesson, I
will create like this type of flower that goes. This is a good example I think because you
can see that there's one flower that repeats up and down and it
has some branches. I will actually
download this image, tap the three little dots
and download the image. Then I will head into
procreate again. I will actually add that
image fit to canvas here. I can see that this is probably something that I can work with.
Let's try that out. At least I am using
a square canvas. You could definitely use rectangular canvas for
this type of pattern. But I'm using a square canvas. I will just try to
first the sketch, brush the perfect
pencil to try to see where the motives flows and where I would
draw the motives. Here we have a flower
with petals going out like this, like that. And then you have some center. I will probably simplify
that, some center there. Then I would definitely want to turn on my
drawing guide for this. And maybe like that, then I'm turning on my drawing so I can see
that my Ms will meet up. I have a class about this in
my Pattern Bos membership where I will show you in detail how to create
these types of patterns. That is not what we're
doing in this class, but you can check out padlbos if you're
interested in that. But I want to definitely, let's mark out this
one and this one. Something can meet up there
and something can meet here, then we can see how
we could do that. If I would go down with that one over there. You want something? This one comes down here, then I know that you
have something there. Then I want some leaf flowing. I want the leaf that
flows from this one. I'm actually really copying to see how the flow goes
in this pattern. That's perfectly
fine when we are practicing an art style. Maybe something like that
goes down to that branch. Really rough sketch as you can see I'm still simplifying to make it a little bit quicker. I'm just drawing
this out there so that I later on can see
where to meet that one up. This one goes there and
this one goes there. That one should
probably go out again. The branch like
that maybe could be a nice flow somewhere
around there. And then I need to
have that over there. It let's say that we
have another flower. Over here. As you can see, it's a
little bit complicated, especially to create these
types of patterns quickly. But maybe this one
can go down there, we have the flower there, we want it to come a
larger flower maybe there, then that one can
go to that one. We can have some leaves
going out there, maybe. I'm not sure where else. Let's turn off the visibility of the inspiration and we
can just see how this looks. And now we'll also turn off the visibility of
the drawing guide. Now we have a leaf going
there and a leaf going there. This branch is going there with that flower is the better flow. Then we can go out maybe
with the leaf coming there, oops, like that, and
something like that. And that one can
go below this one. We probably should have
something over here as well. Now, I'm just free
styling to get the flow of the pattern with
the branches and everything. I am not super sure how
I will make this work. Let's turn on the
inspiration again. You have the smaller branches, we can fill that in. That one really what
I'm trying to do now is just to make these ends meet up and just to fill out
the space a little bit, let's just see what we can
do when we repeat this. I will add a background layer
and then I will repeat it. Let's just flip it first, the top and the bottom. And just rotate it there
I can continue my sketch. So maybe it goes like that, but as you can see, it is more complex to make
these types of patterns. I totally understand that
this pattern will not look like the handmade and intricate arts
and crafts pieces. But I am just doing
this for practice. It's perfectly fine. If you don't end up with a beautiful piece,
I probably won't. That's fine.
Something like that. I'm not super happy
with this one. I just erase that. Maybe just bring down like
an ordinary leaf there. Okay, that looks pretty good. This one can be over there. And then I will try
to repeat it on the other direction loops. I don't want to delete that one. Okay, so flowing
this one in there. And then this one is
to be repeated there. Okay. I think that
this probably looks good and also okay. I think that this
probably looks okay now. And we could also add more details later on and something in the
background if we want to. Let's just start to draw
this pattern First, I will just drag down
the opacity on that one, and I will start to draw on top, I'm not sure what we
are using the colors. Let me just check out the
colors on pins. Muted colors. And like softer
colors we could use. This might be nice. Let's try to use these colors and see where we
end up with that. I would want some red, darker red maybe over there. We can add that as
the background. Maybe a little bit
more red in there. No. Okay. That probably is good. I will say that over there. Then I want to have
greenish color. That is a little bit blue
and gray. Maybe this one. Let's see if that will
work for this pattern. I think that I will use
this pattern is outlines. I will use the monoline
brush for that. But first I will just try out
the colors here that might, especially if I've outlined it, maybe I want it to be
a little bit lighter. That might be good. I'm saving that then like a base color, let's see what we can get. That will probably be good. Okay, saving that one as well. Then I will use a brownish
color to outline. I will start with outlining
the motives on a new layer. And the monoline brush, maybe 3% works good. Let me just see. Yeah, that
would probably be good. I think that I want a
more like warmer brown. Okay. I haven't really drawn
that flower there. I'm not sure which
type of flower I will draw. Let's draw. I will actually add that again. I will actually just
drag up that flower to there and trace it, because I want that
type of flower. I will remove the sketch and
trace that type of flower. It still won't be exactly like that one,
but this is just like, to get a feel of how
the flowers are drawn, Something goes up here and something goes down there. Oh my gosh. It's a lot of
details in this pattern. It will take quite some time. Even when I trace it, I have no idea how that looks. But let's just out if
we draw one flower, we probably can re, use it. Okay? And then should we, let's just add something
more simple in the centers, I will add like a little
dot there just to simplify. Then moving on, we should definitely add some
lines there as well. Lines seems to be that is common in these
types of patterns. I don't know about that line. Okay. It's okay. And some lines on
this one maybe. Where did that line
go? In the center. Well, let's try it again. Okay. As you can see, I am
not super detailed. As this panel will take so
long time if I would be. I am just trying to make it
work and become something, at least drawing
some lines here. We had else going on there, some lines on that one. We had something going
on here as well. Okay, maybe that's enough
then we want to do, this is not what we're
doing on the sketch. Now we have the flower there. I will actually save
that flower and just rename it to flower so that we can
reuse it later on. Then on the flower layer I will actually, I can see now that, that where stem was
supposed to go, I will just delete hoops, release the part of that there, and just continue to draw
that one like that maybe. Okay, and then
looks a little bit strange with the lines now
maybe just pull those down. Okay, then we have the
thing that goes there. I will actually just
use the transform tool and rotate a little bit so that I get it in
the right position. Then I will draw the next part, which is this one that will go to actually all the
way down there, like that, like that. Then we have something
that goes up here. We have this one goes there and this one goes to another
flower over there. Then we have this
goes over there. Okay. I will speed this up for you a little
bit now because it will be very time consuming
to draw the outlines here. I'm speeding it up
and I'll see you on the other side when I've
created all the outlines. Okay, now I think that
I'm ready with outlines. Let's see. I try to do this rather quickly so that we will move
on with the class. I think that it matches up, but I might need to
fix some things. First of all, I will
just merge all of the sketch layers and
rename them to sketch. No, this is not sketch,
this is outlined. Then I will go in and see if
I need to fix some details. For example, here,
there are many details in my pattern now that aren't
perfect, but that's okay. Then I will duplicate this, because I want copy of it. Then I can tap a new layer on top and I can tap
reference on the outline. And now we can start
to color in first. Before we do that,
let's just see if the pattern matches up
perfectly because I'm not sure. I might have missed something. Tap to flip your pattern
around and see that everything is perfectly matched up with outlines, I
think that it is. I might have missed something. Okay. Yeah, this looks good. I actually liked it
the other way round. I will do it once again
so that I can see the flowers better. Okay. Like that. And then I want to, on my layer with the colors, I will start with, let's start with the
greenish gray color. Just fill in some
gaps here you can see if you haven't closed shapes, you will
end up like this. Then you probably will need
to go back to the outline. This is a little bit of work, but you need to
make sure that you close all the shapes and then
head back to that layer. As we are using a
reference layer, you can just fill in a layer beneath that looks good and
then we can fill in that one. Let's hope that we have closed all the shapes you never know. You can also tap,
continue filling, of course, just do it like that. The other ones we can fix when we have flipped
the pattern around. Now we have that first
and then we want a new layer and we
want to fill in the flowers with
the beige color. Let's hope that we
have close to shapes. So far, so good. It looks good filling them in. I like the look of, this is a very quick copy
of that pattern. But that was also the point
to practice on how it is to create these more
complicated types of patterns that looks fine. What should we do in the center? Maybe we should have a color
that is a little bit base. Let's try that color out. I like the look of that then. Do we need something else? Maybe we need something
in the bottom of this. I'm not sure. Maybe we need
like a floral pattern, but we haven't created that. I'm not sure what we will do. Let's flip the
pattern around first. And I will continue to
fill in the gaps there. Just twist it around and then continue to fill on
the green layer. Fill that one in. Continue filling this one. This one, this one. Then on the base layer, now I put both of those
base colors on one layer, but I won't mind changing that. Now as this is just for
practice like that, let's just check
this pattern out. I will swipe interest
first and then I will tap copy and swipe down
and tap Paste. Then tap the three little dots. Split view In the
pattern tester, I will drag in my pattern. Let's see how it repeats. Oh, I really like
the look of this. It looks like intricate
pattern but simplified. You get the feeling of
the arts and craft style, but in a more
simplified version. Remember though
that if you created the same pattern as me here, it's a complete copy of
that pattern in Pinterest. I would never use this, but this is a great way to
practice the shapes and the flows and things of
these intricate patterns. We'll also try out the
pattern in procreates. I duplicate the flattened image, and then I make it half of
the size of the canvas, and then I drag it to the right. Merge it down and duplicate it, and drag it down, zooming in, I am super
happy with the result. If you look at the pattern, you can see that we have
definitely copied this pattern. We won't use it in any
other way than just showing our fellow students
here on skill share. I will share it as
a Jpeg. Save it.
27. Day 7: Arts and Crafts - Reflect: And then it's time to reflect, head over to the workbook, our last pattern, to
reflect the first question, what do you like the
most about this pattern? I like the flow flowers, intertwined twine. I don't know how to write that, but you know what I mean, that
the flowers go like this. That was what I liked. What challenges did you face
while creating this pattern? It's, I will write that time consuming much details of a complex pattern to create. That was a lot of
the challenges. How does this pattern fit into your evolving style
as a pattern decile? Well, it's too complex for me, I might create one or
two patterns like this. But generally, I like the
more simple patterns. It's too complex. What I
could do is the inter, intertwining is a word
intertwine, You know what I mean? That the flowers go like
this. I like that part. So intertwined florals is
something that I like. I might just take
that but create a more simple style of these
type of intricate flowers. That was the last pattern
and the last art style. So now it's time to do the
final reflection session.
28. Final Reflection: Congrats for creating all of the patterns
in the challenge. In this lesson, it's
time to pause a bit from creating and spending a
few moments on reflecting. In the included workbook, I've given you some questions to answer which hopefully will help you to summarize what you have learned
during the challenge. Without reflection,
it's easy to just keep creating and don't fully
understand your progress. Let's take some time to go through these
questions together. Let's go through the
final reflection session and the questions and
answer them together. Again, I will answer
this quickly and just some thoughts about what I thought about when
I created the patterns. But you can really
dive into this and give it a good
think through. Again, I'm using
the Files folder on my ipad and writing
in this document. What surprised you
the most during this challenge is
the first question, reflect on any unexpected
discoveries or breakthroughs you had while exploring
different styles. Something that
surprised me is that I actually thought it
was quite fun with outline motives because
I don't usually create with outline motives it was
although, but time consuming. That wasn't a surprise.
That is time consuming but I thought it was fun and that is something
that surprised me. You can also have other things that you think about
that surprised you. What could it be that
you really enjoy drawing like intricate
arts and crafts patterns? Or that you really enjoy bright colors in the
bowling colorful style. But you usually create with muted colors
something like that. Which style resonated
with you the most? Why? Well, this is easy for
me because it's definitely bold and colorful
and Scandinavian. For me, that's easy
because I have my style, I find my style, I have found my style, and I am constantly
growing it, of course. But I have this
minimalistic, bold, colorful, and also the Scandinavian with clean lines and shapes and things like that. What did you learn
about your own artistic preferences
and strengths? Think about the aspects of
pan and design that you enjoyed the most and where
you felt most confidence. Well, it's definitely
simple shapes, the minimalistic styles. I also like bold
colors actually. Okay. How did experimenting with various styles influence
your creative process? Explore how trying
different styles affected your
approach to design, color choices, and composition. How did experimenting with various styles influence
your creative process? Well, it influenced because
I understood that I really like to create creation. I like that I explore that. I don't like when
it's too complex. I like when it's simplified. Yeah, that could
be color choices could also be something,
as I mentioned before, maybe you discovered that
you really like new colors, but you usually create with bold colors or
something like that. Moving on, did any of the styles challenge you to step out
of your comfort zone, reflect on whether any
of the styles pushed you to try new techniques or ideas that you hadn't
considered before? Yes, arts and crafts. And I can actually see
that both of these are because it's too much detail
detail for my preference. What elements or techniques from the various styles
would you like to incorporate into your unique
style moving forward? Identify specific elements
from the styles you explored that you would like to integrate in your
future patterns. Well, I definitely want simple shapes from the
bowling colorful style. Oops. But I want to add more emotions to the motives I enjoyed creating
in that style. But I would love to
make it even more like emotions into that
bolden colorful style viewed on your style. Change your view on your style changed after
participating in this challenge. Well, a little bit. Maybe for me, I would love
to bring more emotions into my patterns, to patterns. Also, maybe that I like
bolder colors than I thought. But it can be anything that you feel that
your style have changed after participating
in this challenge. How would you summarize
what you enjoy creating after participating
in this challenge? How would you summarize what you enjoyed creating the most? I would say bold, colorful, playful, cute, simple shapes. What else I could
say like florals. Okay, you can summarize after answering the
other questions. Hopefully you could summarize
a little bit and you can just single words here. You can then later on
to grow your style, but also to describe your style. That is a really
good way of growing our style is to try to
describe it for ourselves. An easy way to do that, or maybe it's not easy, but the best way to do that
is to just use single words. That is me answering
all of these questions. I hope that you enjoyed answering your
questions as well and that it helped you in
growing your style.
29. Now What?: Before we leave this class, I wanted to take a
moment to give you realistic expectations
about finding your style. Remember that finding and growing your style is a journey. And at least for me, it's
a journey without an end. Unfortunately, through
our creative lives, we will never stop
to grow our styles. If you're interested to
continue refining your skills, exploring new
techniques, and sharing your progress with a
supportive community, I invite you to join
Pattern Rebels. It's where we dive even deeper into the world
of pattern design. And together we learn,
grow, and share, and have a ton of
fun along the way. Pattern Rebels is my membership, where members get
exclusive access to monthly pattern
design classes. Free, procreate resources, feedback and QN A
sessions with me. Fun challenges, Daily
drawing prompts and more join Pattern reveals
today to learn more, connect with fellow
rebels and take your pattern design
skills to the next level. Go to Pattern Reveals.com
to learn more. That is all for this class. Thank you so much for watching. I hope that you enjoy
this class if you did hit the fellow button
by my name to make sure that you don't
miss my future classes. You can also visit my
profile page here on Skillshare to access all of my classes
available to watch. If you have any
questions at all, please don't hesitate
to post them in the discussion section
here in this class. And feel free to leave review to let me know if you
enjoy this class. I would love to
hear your thoughts and your feedback is
always appreciated. Thanks again for watching, and I look forward to
seeing your styles, To seeing your projects and connecting with you
here in the future. Either on skill share or within the panel
Revels community.
 Maja Faber, Surface Pattern Designer