Transcripts
1. Introduction to this class: Hi, and welcome to How to make useful furniture
from cardboard. I'm Naama, I'm an artist and
a graphic designer. So why make furniture
from cardboard? It's a cheap and free materials that you can find anywhere. You can make furniture
that will be unique and will be
tailored to your tastes. You can make that
furniture yourself. You don't need carpentry skills. You don't even need Large space. You can even make furniture on a table in a small apartment. In this course, you will learn how to build sturdy furniture of cardboard that can carry weight and last for a long time. How to make rounded pounds, how to make drawers
and boxes for storage. How to get a clean
finish for the product. Simple way to get faux wood
effect with paint, more tips and tricks to
make your work easier. In the end of this course, you will know how to make
furniture from cardboard. And you will be able to apply the knowledge to a wide
variety of furniture. This course is great for
people who love arts and crafts and want
to learn a new skill. And to make unique
pieces. is it also great for people who are
on a tight budget or ecological minded and
want to make crafts using found materials
instead of buying ready-made and
expensive furniture. So welcome and have fun making new and useful things,
out of plain cardboard.
2. Tools and materials: In this video, I will
talk about the tools and materials that we
need for this course. First, we need cardboard.
for making furniture. We use double wall,
corrugated cardboard. The kind that is
used in packages of large electronic
utilities like TV screens, air conditioning units,
washing machines, etc. We need a good cutting knife. There are all kinds of cutting
knives that you can use. I highly recommend using a broad one that
has a screw lock. While we work the
blade gets blunt. So we have to renew it. We can break the blade. Now we have a new
sharp blade again. So we also need snap-off
blades and pliers, we need a ruler for making straight lines
and cutting them. You can use short one like this. If this is what you have, I use this one that
is one meter long. We also need a cutting mat. It is a self-healing, cutting
on it will not damage it. The reasons we use
cutting mats are: 1 - it protects the table, our working
surface, and 2, it protects the blade because the cutting mat is
relatively soft, the blade can last longer. If you don't want to buy
cutting mat at this point, you can simply use another cardboard underneath
to protect your table. The glue that we will use is the simple PVA glue
or school glue. We will also use a hot glue gun. Hot glue is not mandatory. It is possible to build
an entire piece of furniture just with PVA glue. But there are many cases where hot glue will save
us a lot of time. We also need a right angle
ruler or L-shape ruler, or another object that has a
right angle of 90 degrees. Measuring tapes like this one. I prefer the soft one. We will also need a
masking tape, because it can be easily removed without
damaging the cardboard. We need some sanding papers, and a simple kitchen knife
that has a serrated blade. The last thing we'll need is
water activated paper tape. The glue gets activated
when it gets wet. This will save us a lot of time. But if you don't
want to buy this right now or you
can't find it now. You can simply use strips of plain paper with PVA
glue. And that's it. Let's get to work.
3. The strength of the cardboard: Cardboard is a fairly soft material. So how can we use
cardboard to build furniture that will be strong
and last for a long time? Corrugated cardboard is made
of two layers of paper. And between them there is another layer in
the form of waves. These waves give the
cardboard its strength. We will use double walled corrugated cardboard,
which is stronger. If we fold the cardboard
in that direction, it folds easily, but in
the other direction... If we try to fold it, if you try to break
it, It's really hard. Therefore, the
first rule is that the weight will be on the waves. The stripes should be vertical
and not in that direction, When the stripes are horizontal. The cardboard can be break
if there is a place to bend. But if we prevent
it from bending, if it is stuck in
several direction, then it will not
have room to bend. And therefore, it will
not have room to break. So the second rule is that
each part should be connected to other parts
in several directions. Another issue is that cardboard that already
has a wrinkle or a deep crease can break
easily in that point, it's a weak point. So rule number
three is: prefer to use cardboard that
has no wrinkles. I have a piece of cardboard here in this direction.
It folds easily. If I put some heavy
weight on it, it will not hold it. So what I'll do is put the
weight not on this side, but on this side. Where the waves are vertical. Now, it does not fold. If I put weight here, it carries the weight
without a problem. But this thing is unstable because there is really
nothing to hold it. If all the parts
are glued together and they will be connected
in other direction, then they will not move. And it will be possible to
put a lot of weight on it. In fact, I can even lean on it or even sit on it and
it will not break. There is a relatively
large space here. The problem with large
spaces is that there is nothing that supports the
cardboard at certain points. The larger the space, the more likely it
is that if I press... I can't break it, but it can happen in really
large spaces. So what we do
is narrow the gaps. Just put this little thing here. Then if I use force here, it will have support from below. So rule number four is
make large spaces smaller. In the coming lessons, we will see how these rules
are carried out in practice.
4. Designing cardboard furniture: The first step is to design the piece of furniture
that we want. Let's say that I want to
make a storage cabinet. So I'm going to ask
myself a few questions. Where is it going to
stand in the house? What is the width there? This will be the maximum
width of the cabinet. What is the depth? What should be the height? If I want to use the top and put things on it and
work on the surface, then it should be at
a convenient level, like 90 centimeters, or maybe it should be taller to
get more storage space. Does the top should be flat
so we can put things on it. Or maybe it can have a
more interesting shape. Should it have open
shelves or drawers? What about the backside? It can be solid because the cabinet will be
against the wall. But in other cases, when the piece of
furniture will be looked at from
different directions, the back should be open. And finally, what is the style? It can have a clean, modernistic look
with straight lines. It can have a vintage romantic look, or it can
have a unique and fun shape. You can really go crazy
here with shapes and ideas. Especially if it's going
to be in a child room. Although we can go nuts
with strange shapes, there are some limitations. The legs of the
furniture can't be thin. If you want a table or
chair, for example, the legs should be
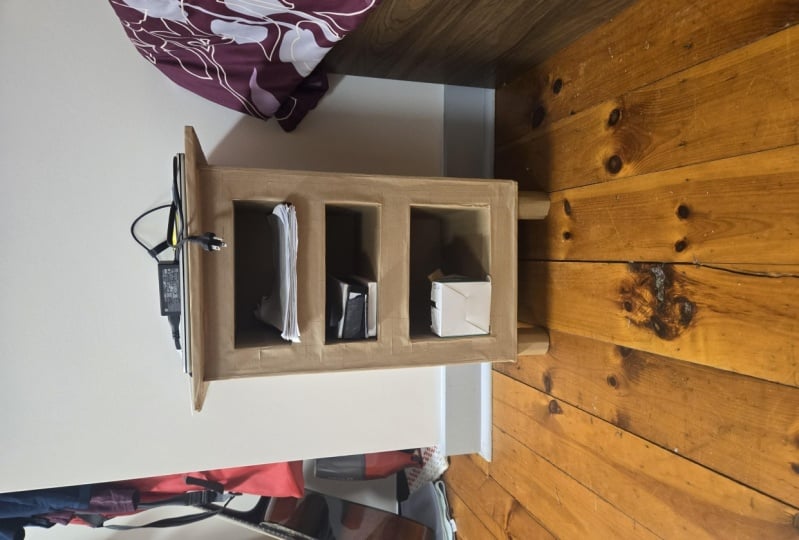
bulkier or be connected. Like in this desk. I made it a few years ago for my son and he still uses it. When we have all
that information, we can plan our
piece of furniture. draw the design on paper and what the general
measurements. If it has drawers or shelves, consider the things that
are going to be inside them and write down
the optimal height. of the drawer or shelf. For example, for a bookcase, consider the height
of your books. At this point, you don't have
to design a new furniture. You can build along with me, I can show you how to
build a small cabinet that has simple shapes and
exact measurements. But after you do that, maybe you'd like to build
another furniture, one that is in your
style with your ideas. Then come back to this lesson and consider
all these points.
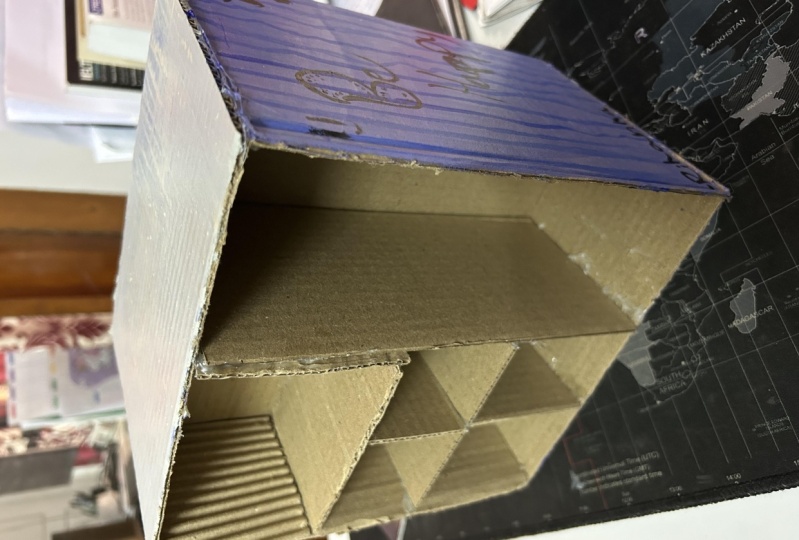
5. Example: Planning a small cabinet: I'm starting here with a simple cabinet
with rectangular shape. So I can give you exact
measurements to follow. It will have drawers. To make it interesting, It will have two
identical drawers. And a large one. I want it to have legs. They will be
attached separately. You can design a furniture that the legs are already
in the general shape. Like that. I measured the area where
I want the cabinet to be. I don't want it to be
wider than 36 centimeters. And the depth should be
about 25 centimeters. The height of the drawers should
be about ten centimeters. And this one will be 17. I consider the thickness
of the cardboard. Because I want the
final drawers to be 10 centimeters high. I will actually cut these
holes 11 centimeters. I want the thickness here
to be 4 centimeters. They can be narrower, but in this case, I want it to look
thick and massive. The width of the
drawer will be 25. So the overall width
will be 33. I want the top to be flat
so I can put things on it. To make the design
more interesting. It will have another panel on top that will be a little wider. I will add the top and
the legs separately. Okay. Now that I know all this, I can do calculation and see that without the
top and the legs, the height will be
55 centimeters. And the width 33. The plan and the
measurements are in the resources of this lesson.
6. The building order of a cardboard furniture: In this video, I will outline the building order
of the furniture. So you know the general plan. You don't need to
remember the list now, I will demonstrate
every step and explain everything in
the coming videos. You can also use this
video as a checklist, Every time you make new
cardboard furniture. make the front
panel, back panel, and center panels. make
notches in the central panels. Mark them in the front and the back panels, but
do not cut them. Make a cross-sections as
the number of notches. Assemble the mainframe
for testing to check that there are no parts that
are too long or missing. If everything is
okay, assemble again, but this time with glue. check again if there are
any protruding parts. Measure the cell
walls and side panels, cut the paths, and glue
them to the place. Add support for the top, which will support the
roof of the furniture. Add supports for
the floor of the furniture. That will also serve as an
anchor point for the legs. Add the top and the
bottom of the furniture. Cut out protruding
parts and Sand off. Reinforce all connections
and corners with strips of paper and PVA glue or with
water activated paper tape. make drawers, boxes and legs. Paint with acrylic paints. Recommended. Or leave natural. Apply varnish as another
protective layer. Be proud. You made furniture by yourself and it's
made of cardboard. Start designing your
next furniture.
7. Important! How to cut cardboard safely: Before we start to cut, we have to talk about
some safety rules. Even if you have experience
with cutting knives, please pay attention to
these very important roles. Maintain a sharp knife so you don't have to
struggle with cutting. Sharp knife is
safer. When you cut, stand Don't sit down. You don't have enough
control on the blade. When you sit. the
cardboard is very thick, Don't try to cut it in one go Stand in front of the
ruler, along the line. When you start to cut, don't just start cutting because the knife may get out of
line and cut your finger. Hold the ruler firmly. Feel the ruler with the blade. When you feel it, just then start to cut. Don't use a lot of force. Again, feel the ruler
and start to cut. When we made this, we can put the ruler side, hold the cardboard firmly, the hand at a respectful distance. Respect the knife, and
don't get too confident. Repeat these steps
every time you cut cardboard is if it's
your first time. Even if you are
very experienced. For straight lines, we use a ruler and a sharp
cutting knife. For curved lines, I prefer using a narrow kitchen knife
with a serrated blade and use it as a saw.
if you need to cut a curved line put the cardboard just
outside of the table. Make a small cut
using a sharp knife, insert the kitchen knife
and use it as a saw. To find the straight line, we use the natural
lines of the cardboard. Sometimes it's very easy to see the lines in
cardboard like this. The lines are very obvious. But when we use
smooth cardboard, then sometimes it's
harder to see the lines. If you don't see them. Hold the cardboard in all kinds of angles to the light
until you see the lines. mark the first point on the line, we mark the next point. And then we can base all our
lines on that first line.
8. First step the main panels: When we plan the construction
of cardboard furniture, we need the front panel, back panel, and at
least one intermediate. In many cases, one is enough. But for furniture that will carry a lot of weight like chairs for example, there should be some more panels to
distribute the weight. Before I begin, I need to
decide what the front panel is. In the case of a cabinet or
shelving unit, it's easy. The front panel is
the one in the front. The back panel is this one,
and the center one is here. But it's another matter
for furniture with complex shapes. to
make this chair, for example, the front panel is this one at the
side of the chair. Because we can easily duplicate that shape for the back panel,
and the central panels. Draw the main panels of your design and
write the measurements. Don't forget to
number the paths.
9. Example: The main panels of the cabinet: The first step is to
cut the first panel. Number one. The front panel. What we need is a
simple rectangle. Height 55 centimeters. The width is 33 centimeters. 55 is the length of the
cardboard along the waves. The width is crossing these waves. Now I need to make
the first cut. to find a straight line
in the cardboard, I will use the natural
lines of the cardboard. This is the first line. If you don't have a cutting mat, just use another cardboard. I opened the knife
and locked it, so the blade won't move.
It's very important. The ruler is straight on
the line that I marked. I'm standing in front of it not to the side and
not sitting down. I put the knife in
contact with the ruler. The knife gets into
the cardboard. And now I'm holding the ruler
firmly, so it won't move. But I'm holding
the knife lightly, not with full force. And I cut along the ruler. The knife is always in
full contact of the ruler. The first cat is shallow because it's a very
thick cardboard. So now we do it again. The ruler is not moving, it's in the same place. We repeat and make the
cut deeper. The third time. Now I can use more force
because the knife is inside the card and it will not get out of place and cut me. Now I can move the ruler
and we have a clean cut. The width is 33 centimeters. So I measure now 33 centimeters on the
cardboard and mark it. Now it's time to cut this side. I will use a right-angled ruler. You can use another object
that has a 90 degrees angle. And on the other side, And I will cut it now. We have these three sides. And now we can cut the
height, 55 centimeters. So this is panel number one. Now, I will mark the drawers. It is 4 cm from here And here. to make it simple,
all around. It's four centimeters. For the draws 11 centimeters. That is the first one. I'm supposed to measure
four centimeters here. But to avoid accumulating
mistakes along the way, I would measure from the
top 4 plus 11 plus 4, that makes 19, from the top here, which will be 19 plus
11 from the top. So I'll measure 30 from the top. In this method, there will
be less measuring mistakes. Now 4 centimeters,
from the bottom. And what is left
is the third drawer. That's supposed to
be 17 centimeters. I measure it, and
it is! great. Now these parts I will cut out. I will not throw them away. I will use them later as the front of the
drawers. So keep them. Now we have the first panel. I will use it now as a stencil
to mark the other two. It's important to mark them, to give them numbers
to avoid confusion. Again, make sure that the
lines of the cardboard are vertical. attach them with masking tape and
trace the lines. I will cut this out. And this one will be #2
the central panel. And this is #3 In this one, I will not cut out the holes
for the drawers, but mark them anyway, because it will help me later when I assemble
the furniture. So they are: #1 is the front, #2 the center,
and #3 that will be
the backside of the cabinet.
10. What to do if you need larger cardboard: Sometimes we need a
bigger cardboard. So we can combine
two small ones. attach them in one side
with a paper tape. I use gummed paper tape, but you can use just a
strip of paper and glue. I put some glue on the edge
of the cardboard as well. Now, paper tape on
the other side too. To prevent them from bending, I'm adding on the backside
some strips of cardboard, make sure that the waves of the cardboard are in
the right direction. So they won't bend. Put something heavy on top for several hours. After it dries, you can cut it to
the shape you want.
11. Cross sections: The cross-sections
connect the main panels and they give the
furniture its stability. The height of the cross sections is the same as the margins. We make notches in the central panel and notches
in the cross section. So if the margins are
four centimeters, the notches will
be two centimeters. The length of the cross section is the depth of the furniture. There is only one central panel, so we make notches
only in that panel. If we have a more complicated
shape like this chair, the height of each
cross-section is different and is
according to its place. The cross section B that
connects here is 40 centimeters long and the height of the notch is half of
that, 20 centimeters. The length is the
depth of the chair. Because it's a chair, we
need more central panels. So we make exact notches
in all the central panels. And in the cross-section
there are notches, as the number of
the central panels. So if we have three
central panels, there will be three notches
in the cross-sections. If it's a bit
confusing, don't worry, it will be clearer in
the royal chair videos. How many cross-sections
do we need? Well, that depends. There should be every
five to ten centimeters, at least one in any section.
12. Example: cross sections of the cabinet: I'm going to make notches in the central panel. Number two. I plan to have at least
two on every side of the panel and the
holes for the drawers, the notches will go to
the middle of the strip. So the first step is to find
the middle of the strips. Since in this case the
width is 4 centimeters. Nice even number. The middle is 2 centimeters. I want two notches here. I'm not going to
measure the distance. I just mark them. I made a simple stencil. The
height is 2 centimeters. The width is the same
width of the cardboard i'm using. So it can get in with no pressure
and without a gap. I lace the stencil here. The mark is in the middle. I will cut this out. Now. I will check if
the stencil is any good. Yes, it gets in exactly. I cut out all the 24 notches. And now panel number
one looks like that. Number two, it looks like that. Number three looks like that. I want to mark the notches
on the other panels. I will not cut them,
just mark them. It will help later to assemble the parts. I need to mark on
the back side of the panel. So I put number one
on top of number two. I flip them and I'll attach them together
with masking tape. Now I'll mark with a pen. panel number one is marked. Now I'll
take panels #2 and #3 Number two is on top
of number three. This time, I'll make the marks on the front side of number three. At this point, this
is what we need. Number one looks like
that. Number two and number three,
look like that. Number one, the
markings on the back. I will cut the cross sections that will get
into these notches. There will be 4
centimeters tall. like these trips. And 25 wide. So this is 25 by 4. The middle point is 12.5. I will use my stencil again, and I'll cut it now. We have 24 notches, so we need 24 of these trips. The important thing
is that we see the waves on the top like that. The waves are vertical. We can use the first one as
a stencil for the others. Remember to mark the original and always
use the same stencil.
13. What glue to use: When do we use PVA glue
and when hot glue? Pva glue or school glue is very strong adhesive
for cardboard. It's good for large areas. It dries transparently
and without thickness. It takes a long time to dry so you can walk
without tastes. The best way to use
PVA glue is to make sure that the parts are
pressed firmly together. So put something heavy on top or press the parts together
with masking, tape or clips. Hot glue, good for narrow areas. It dries quickly. So it's suitable
for growing paths that are difficult to
hold for a long time. Transparent but thick. If there are any leftovers, they should be cut out later. Caution, the glue is very hot. Glue gun usually has a
little league that it's not practical when we
work with hot glue, we have to work fast. So my advice is not to use the leg and just laser gun
on a piece of cardboard. Oh, you can make a simple
holder like this one. I make this from
a milk carton and put something heavy on the
buttons so it will be steady. Don't touch the glue when
it is in a liquid state or the mouth of the glue
gun until they cool down. And always remember to unplug the glue gun
when you're done.
14. Assembling the main parts (Cabinet): In this video, I will assemble the mainframe
of the cabinet. We start with a
central panel number to start with the
first two at the base. So it can stand up.
Just slide it in place. At this point, I'm
not using glue. The purpose of this
step is to find mistakes before we
glue everything in places that are upside down, use masking tape to
secure the parking place. We attached the back panel, number three in the front one, number one, and secure them
temporary with masking tape. Paths that are too long, too short, or if
we miss something. If we can fix the mistakes now. And if everything is okay, we can assemble
everything again, this time with clubs. Like before we start with the two at the bottom. And
then all the rest. I check that all
the strips starting position and nothing
is sticking out. I start with the backbone. The main part on top. The markings I made
will help me to position the parts
exactly in place. In this case, I will use hot glue because I want
it to dry quickly. Be careful. It's very hot. Don't touch the liquid. Glue with your fingers. If there is excess of blue, violet with a piece
of cardboard, not with your fingers. I glued everything. And now when we look
at the front panel, after we assembled
the mainframe, we can measure the anal sills. Consider the thickness
of the cardboard. Before I glue the new paths, I check if something is too big and that cut the
thing that stick out. I glue the parts
of the same order, first the bottom and
top and then the sites. By the way, these are so-called on the back
and make Berlin front. It's important to have cats. They really help you
building of furniture. The side panel, I
want to use PVA glue, but also hot glue, but they can't go together. So I put PVA glue on
most of the surface. The cliff two lines
clean for the hot glue.
15. Supports: Before we paste the
top and bottom, we need to put supports. In cases where more
support is needed. For example, if it
is a set of a chair, then the torque should
get more support to distribute the weight more
evenly on the top surface. In the case of law, furniture on which someone might lean on, we should add more support so the top will not
collapse or get indents. We will also put supported the button and
that will serve as anchor points for the legs are wheels that we
add to the furniture. When connecting legs, you
need to connect them to a stable point and not
to a hollow place. This way, the screw can be
caught, type in something. Even if the furniture
has no legs or wings are usually add supports for
the bottom part anyway. This apart should also
be at the height of the margins that their
length does not matter. We will cut them as needed. The most important thing is
the direction of the waves. So we can see the
waves from above. They do not need to be
arranged in a special way. Just divide the area
into smaller parts. In the next video, I
will show an example of support to the top and
bottom of the cabinet.
16. Example: supports for the cabinet: The cabinet we need supports that are four centimeters high. The length can be short or long. We will use cardboard leftovers. What is important is the
direction of the waves. It needs to be like that. You can see the waves on top is usual for the
context of the blade, Mr. Molar, only then
start making the car. These are small
and now our paths. So be careful with the hot glue. In this way, will
divide all the rest. This is how it looks. All the spaces divided. Another bottle. I will
flip the cabinet. And here I make different
kinds of supports. I will make a tight spiral. I take a long piece like
that and all it tightly. Hi, secure it with
a rubber band full. Now, we put it here. This is where I will
attach the leg later. So it will have something
solid to connect with. I will use hot glue for this. I will do that in the
other three corners. For the rest of the spaces, I will make loose spiral. I let it go and now
it takes more space. And I'll do that for the rest. That's another way
to make some folks. Before we move to the next step, there are two important things. First, we need to
measure the distance to the center of this
tight spirals. Because after I'll
attach the bottom, I will not know where all the correct spots to
attach the legs too. So I measure and it is five
centimeters from here and seven centimeters
from this direction on all the four corners. The second issue is making
sure that everything is flat. I use the ruler to detect
places that are uneven. And do the same
thing for the top.
17. Top and bottom (Cabinet): The base, I use a piece of cardboard that is bigger
than the size of the base. That straight side
will be different. I put some PVA glue and spread it with a
piece of cardboard. Make sure it covers all the
surface. It's a dirty walk. So protective walking area
because it's PVA glue. I can take the time to place it. There's no hurry. When the glue is totally dry, I can cut all the x's, the top of the furniture. And for the front pads prefer
to use a smooth cardboard. Fill the tub. I made this one. These are two rectangles that are glued together to
get a thicker top. I will attach it so
that the buck we'd be flat in front and on the
sides. It will look like that. And it's ready for
the next step.
18. Smoothing the surface: Before we can paint, we need to smooth
all the joints, remove excess of cardboard
and lumps of glue. You can use a sharp knife to
take off the excess pounds. I'm doing it in my
direction this time, but not too close, so the knife will not
flex suddenly in cattle, the knife is flat
on the cardboard. So the cardboard itself is a
guiding line for the night. Another option is
selected Kitchen Knife. It is not as sharp, but does the work
and it's safer. It is also less likely to accidentally
damage the cardboard. After we remove
all the big parts, we go over with sanding paper. You can just hold
the paper like that. When you hold it like that, we can make smooth corners. And if we want, we
can run them a bit. I want to keep it flat. I can rub the paper around
symbol and use it like that. To keep a straight
lines and sharp edges. Use your fingers to fail where
all the bumpy places are. Don't follow the dust away. We can use this to fill holes
and gaps. In the next step.
19. Filling gaps and holes: The next step is not mandatory, but sometimes you may need it. Sometimes we find holes
or gaps in the furniture. So it's recommended to fill these holes before we move on. The simplest way is to use cardboard shavings that we
have from the previous step. I made some myself. I put little pieces of
cardboard in the blender. But if you're not sure what
that will do to your blender, you can calculate with pieces
of paper with scissors. Instead. I have a gap
you that I want to feel. I mixed the dusk
with some water and glue and put it inside. I can use some tool to push
it in and remove excess. This little ice cream spoon
is perfect for the job. After it will dry, I will send it with
sandpaper to make it smooth.
20. Securing the corners (gummed paper tape): The next step is to
cover all the corners of the furniture with
strips of paper. There are two reasons why. First, it gives a nice finished with the furniture,
it will look better. The second reason
is that it makes all the connections
and corners stronger. I recommend using
gamut paper tape. One side of it is
just brown paper and the inside has dry glue that gets activated
when it is worth. If you don't have it right now, you can instead use strips of plain paper and use
simple PVA glue. I will demonstrate that
in the next video. This adhesive paper is specifically designed
for cardboard. It has the same color and it sticks very
strongly to the cargo. Because the glue gets
activated with water. I separate the water
and the paper. I don't want water to drip
on the role by accident. So what I do is put
the paper on one side, the water on the other. I have some container with
water and the sponge. And they also have a
small towel here so that I have something to wipe my
hands on from time to time. I measured the tape,
make it bigger. I can fold it in half to
malloc Miami to point. It's not necessary, but for those who are
just starting out, it can help them
position it better. It is very important to
keep your hands dry. If my hands were worth now, then I will actually stick
the paper to itself. I'll post the paper here. The half will be
writing the corner. I will attach it while I stretch a bit to get
rid of the wrinkles. This base is exposed. I'm just cutting the square of this paper and align
it with the other two. Like a cut in the
middle to the edge. You can start with the squares. First make the corners, and only then make
the other edges. Now the inner corners as well. I cut one of that length. Now I will fault, but I will not folded inward. Folded outward. And now after I
applied some water, I pin it here to the center. I align it to the corner with the finger a
little with the nail. With my finger, I push it into the corner so it
will stick better. Attaches the other two paths. I cut it to that length, not including the round corner. It's a relatively narrow space, so it's a little how to
attach that I managed. With my finger, I find a corner. Now also from here
find the corner. Paine formed the
middle to the sides. If there are wrinkles, then stretch it a bit. Rounded corners. We do it a little differently. My plan is to make this
corner the other corner, and then cover here
with another piece. Hi. Now I'll do this for
all the other paths, including all internal paths. When we have launched
curved shapes, we do the same thing. There is a demonstration for that in the Royal Shell video.
21. Using paper and glue: If you don't have
gamut paper, tape, or if you can't get it, you can simply use ordinary
papers with PVA glue. The paper should
not be too thin. Because thin papers do
not carry the water in the glue and the
paper gets wrinkles. I prefer to reuse papers
I collected over time or pages that I have used in the past and can now be reused. You can take 23 pages at once, fault them to find
the center and cut them with a cutting
knife or with scissors. The most convenient way to
apply the glue is to put glue into a container and use a
flat brush to apply the glue. Apply it evenly all
over the paper, including to the very edge so that the paper
will stick well. Now we use it like
Gump paper tape. As we saw in the previous video. Attach, straighten the paper, feels the edge with your finger and from the center
attached to the sides. And if there are
wrinkles, smoothen. The downside of using plain
paper is that it takes longer because you have to cut the streets and apply glue. But if you can't get
a roll of paper tape, it's better to use
this method then to delay or abandon
your project. And it's also more ecological. Because of the large
differences in color, it is advisable to paint
with white paint to give a uniform appearance before painting with the final column. Usually one coat of paint is not enough because the color
is a bit transparent, especially in cases where there is printed
on the cardboard. But after a few codes, you get a uniform look. And you can paint the box of furniture in the
final color you want.
22. Drawers: In this video, I will
show how to make simple and useful draws for your furniture. I make to all. So the cabinet, when I
met the front panel, I saved these parts and now I will use them is the
front side of the duals. The draws will be 23
wide and 25 deep. It is not exact fit, so it could get in
and out easily. The height of these two will be eight centimeters and
this 114 centimeters. So the plants that I need a base of 23 by 25 on this side, two paths that are 25 by eight. The back one that is eight
centimeters high, but not 23. Why? Because it would not be able to get
between these two, which will be 21.7. The front piece I
will attach later. When you use hot glue, don't hold the piece
like that because the hot glue may trip on
you. Hold it to the side. From the front base is bigger. I measure one
centimeters around. And now these lines will help me to position the
dough in the center. I rely on the lower side here. On the side, it will be in
the center between the lines. In order that the dual
will be strong and useful. We secure all the connections
so it will not fall apart. Before I will do that, I will find the center point on the front and make a little
hole for the handle. I start small with a needle. Now I will make it larger
with some pointing tool. And now a bit larger
with a chopstick. I will add to pay for check on all the corners inside and out the doors with acrylic
paint to protect them. Screw the handles
in. And that's it.
23. Boxes: We learned how to make clothes. In the same way we can make storage boxes of any
size. We want to. Start by measuring the place
where you want the box to be. The width. It is important to
leave the space of one to two centimeters so that
the books can fit easily. The height we take into account the thickness of the
base of the box, because the walls of the
box will be on the base. So I put a sample of the cardboard and measure
the height from there. And I lead the mountain of
one to two centimeters. When assembling a box, we can put the wall
next to the base. On the base because recommended that the worst
would be on the base. To make the books more stable. The sidewalls will get between the front
and the backwards. So I use them to measure what the width of the
sidewall should be. We have the box and
it's the right size. But in order to make it convenient to put it
in and take it out, we will make opening
at the front. It can be round like
this one, all squared. In this case, I chose to
make a rectangular one. The height is three centimeters and the width is 11 centimeters. And now I can tick the box
out and put it in easily. Get to the next step. I smoothed
and sand all the joints and columns because it's very important to strengthen all the corners as
we did for the rest of the furniture so that the box will be useful
and will not fall apart. So use gum, paper tape, simple papers and PVA glue. I will put the roll on one side, the water on the other side. And I'll use a towel to wipe drops so the role
will not get wet. And as usual, it is very
important to smooth and fasten way so that
there are no wrinkles. I follow the strip outward
to find the center line. I attach the center
line to the corner, put it into the corner, and then smooth the right
side and the left side. And I will do the same
for all the kernels on the inside of the box and
on the outside of the box. I chose to paint the boxes
with white as the base color. I use a damp sponge, makes sure that it's
not dripping water. I paint in all kinds
of directions, but I finished in
the same direction. Usually across. In the
second coat of paint, these tribes will be smoother. I leave the inside
of the box, right? It will be bright and easier
to see what is inside. When using yellow color. It is particulary recommended to paint the cardboard
first with y. And now I have useful
and beautiful boxes. In the same way, you
can make boxes with dividers to keep
things organized. Choose a thick cardboard they signed up should
be with the waves. As we did with the
cross-sections. Find the center and make
a cut through the middle. Use another piece of cardboard to mark the
width of the notch. Cut out the notes, and do the same
on the other one. Now the two pieces fit together. Cargo the corners with paper tape to make
the dividers table and cover the top is way. It will mask the waves of the cardboard and
will look better. Put it in the box. Now you can keep things
organized and neat.
24. Legs / wheels: You may want to add
legs to the furniture. You can make your own
legs out of cardboard. As I will demonstrate shortly, all use reusable materials
like plastic, Cokes, etcetera. Attach the leg where there
is something to which the school can be connected
inside, not empty space. In the video of the
cabinet supports, you can see a demonstration of such an anchor
point for the legs. Because also possible
to connect wins. In case of furniture that needs to be portable
in the house. Note that the furniture
is relatively light, so if it has wheels, it will move very easily. So you should only attach
wheels if you really need them. The legs and a weak
connection point. So it is important to attach them to the
place with the school. And in addition to
that also used note, I will make legs for the
cabinet like this one. A piece of cardboard with
the waves facing up. The width is 33 centimeters, the height is five centimeters. Before I roll it, I will break the
cardboard this way. Now just a little bit of glue. The important part
is in the end. Roll tightly and
keep it in line. Now, let it dry completely
for a few hours. I will use this paper
to wrap the lethally. I want to make some sort of name to connect the
leg to the cabinet. And now we use a chopstick. I measure how long it should be. I just make a little
cut and it snaps. In the center. I make
a whole lot to y. The font is not pointing enough. So I will use a
pencil sharpener. Before I insert it, I
will put some glue. After we clean dry, I will sharpen the other
side of the stick. This is where I want
to connect the leg. Well, the support spiral is making a hole with the sharp tool and making sure not to go over
the other side. And of course, some glue. The phone legs are connected. But before it dries completely, it's time to check if the
height of the legs is why. And I see that one leg is
shorter than the others. This one is a bit shorter. So before the glue is dry, I can lift it and
add some piece of paper to fix the problem. And now all the four
legs and level.
25. Painting: You don't have to paint
the furniture if you like the natural log
of the cardboard. There is a certain charm
and unique look to it. That painting the furniture with acrylic paint has
two advantages. One is to give it
the style we want. The second is to
seal the furniture and protected for
moisture and humidity. The paint, we will use
this acrylic paint. It is water-based, so there are no bad fumes and after it dries, it is waterproof so we can clean the furniture with wet
cloth with no problem. I use acrylic that comes in containers like this
one, or in tubes. Acrylic also comes
in small tubes. They are more expensive
and they are less suitable for painting
large furniture. We will use brushes. I also use a sponge. This is, for example, a piece of sponge
that are glued to a stick and secured
with a rubber band. The advantage of a sponge
is that it depends, smooth with no brushstrokes. Acrylics are relatively
transparent colors. We dilute the paint
with a bit of water to make it
easier to paint with. And that means one
layer is not enough. We need at least two coats. The first layer
should be completely dry before we paint
the second layer. Note that the column gets
darker when it's dry. So don't be alarmed when the
second layer looks lighter. Before you start to
paint your furniture. Trial Carlos, first on
a piece of cardboard. When the paint is dry, you can try another paint on top of it to see
what effect it gets. Drier layer of dark
color and on top of that sunlight color or
the other way around. And you can try
and combination of different colors to see
what that will get. Like. In this case,
I tried ocher and brown and then blend them
with just a bit of water. Another technique is
to use a sponge and instead of making long
and smooth lines, you can staple with the sponge to get an interesting texture. Experiment a bit with different colors and
different textures. You can make an interesting
texture with the brush. If you apply the second layer, when the first layer
is not completely dry, the color underneath will
blend with the color on top. So a good test of color
is to let the first layer completely dry and only
then make the second layer. After that, you will
have several samples of the colors that you tried
in the different textures. And then you can decide how
to paint your furniture.
26. Painting the cabinet - Faux Wood effect: I want to get a simple would
affect for the cabinet. To get that we need
the light layer. I mix here, brown and white, roughly in similar quantities. It looks really light. In fact, it looks like the
color of the cardboard, but when it dries,
it will be darker. The first layer is
completely dry. I tried the second
layer with my brush. I take some brown color
and make some strokes. When it's still wet.
Clean the brush. And with a wet brush, blend the layer together would affect the brushstrokes are
always in the same direction. If it looks too light, you can add more color. So that was just a test. And now I will print a cabinet. When I paint, I always begin painting on the side or back. So if there is a problem, it will not be on the front. I put a little blob of white and another in
the same size in brown. Mix them together.
If it's too thick. So I will add some water. I will use punch for
the first layer. I makes trucks in
several directions, but the last one is always
in the same direction. Horizontally. The sponge should be moist but not dripping. I will paint all the
cabinet in this color. If there are places where there is print on the cardboard, I will paint more
than one code and let it completely dry
before the next layer. For the second layer, I
will use just brown and I will use a brush because this time I want
the brush strokes. It will give me the
texture that I want. I'm making some
random strokes in one direction for the
word effect that I want, always in the same direction. I didn't paint all the surface. So the paint will dry too soon. As long as it's still wet, I rinse most of the
color from the brush. With a wet brush. I go over the strokes
and blend them. I'll go from edge to edge. Some parts are darker
and some are lighter. It's okay, That's the
organic effect I want. Here. There is too much water. So I go over here with
the brush and blend. I don t want watermarks. In that way. I will paint the whole cabinet and the tools. And the cabinet is finished.
27. Chair - Some notes about designing a chair: In this project, I'm not giving exact drawings
and measurements. I only demonstrate the
principles in general. You can make your chil to
whatever size suits you. The recommendation is that
the height of the chair seat, the distance between the
buttock and the floor when city should be around 40 to
45 centimeters small adults, and 31 centimeters for children. But different people
have different types depending on age,
gender, and genetics. So it is recommended to first measure and choose
the right size for you. I designed the back of the
chair in the shape of a crown. You can design it in
any way you want. It doesn't have to
be a royal chair. It can have the shape
of a cloud, flower, some amorphous shape,
etcetera. Final note. To simplify the process
for the lesson, I connected the back straight to the seat at an angle
of 90 degrees. But if you are building
a chair or a sofa, that should be comfortable
to sit on for a long time. The angle between the back and the seat should be
wider than 90 degrees. Like 100 degrees.
28. Chair - Drawing symmetrical shapes: First I draw the baseline
and I mark the middle line. That will help me later to
make a symmetrical shape. The width of the seat
is 46 centimeters. The height is 40 centimeters. Now that I have the base shape, I can add the owls. At this point. I'm not trying
to make it symmetrical. Now I chose the one I like
and go over it with a marker. For the straight
lines, I use a ruler. To make it symmetrical. I followed along
the middle line. I staple them together
so it will not move. Now I can cut the shape. I kept the straight lines with a ruler and
the cutting knife. So this will be the
shape of the seat. I'll do the same thing for
the back of the chair. I have the shapes. Now I can use them as a stencil to
cut the cardboard.
29. Chair - Cutting curved shapes: First, I will take the
stencil to the cow bull. As always, I will
use a ruler and a cutting knife for
the straight lives. That for the Kraft lines,
there are two options. The first one with
the cutting knife, like it's harder when we
get to curved corners. The second option is selected
Kitchen Knife to use it as a so I press the cardboard
just outside the table, but close the edge of the cutting mat is also
a bit outside the table. So the knife will
not harm the table. If the place is not in the edge, then we cut a little hole
so we can insert the knife for the chair when h5
files like this for the c and tall like this
for the back of the chair. You can cut them in
any shape you want.
30. Chair - Cross sections in different sizes: Now I'll make the notches in the cross-sections
for the royal chair. The notches should
be half the height. The width of the notch is the
thickness of the cardboard, usually between half centimeter, one centimeter, depending on
the cardboard you are using. I use this little stencil I made I make a few little notches
in all the directions, at least one in any
section of the panel. The notch is half the height. Now I can use this panel to mark the notches and
all the other panels. In the front and back panels. I will not cut the
notches, just mark them. There should be one
panel for the front, one panel for the buck, and three panels between them. I mark the notches here and the cross sections
with letters. So it will help
me to match them. For example, cross-section B is 40 centimeters high as
the height of the city. Its length is the
depth of the chair. The space between
the notches should be about five to
ten centimeters. I chose eight centimeters. I also cut notches
in the chair back, but this step is not necessary. There are three notches because the seed has three metal panels.
31. Chair - Assembling the seat: The first step is to assemble
the parts without glue, just to see that nothing is missing too long or too short. I start with one of
the inner planets. The front panel with
masking faithful. Now, I put this just to demonstrate
that the structure is already stable and can
carry heavy weight. Now I will assemble everything again,
this time with glue. In the front and back panels. I use PVA glue and hot glue, but not in the same places. I add supports where there is too much space
between the panels. The child is ready
for the next step.
32. Back of the chair: I cut pieces of cardboard that are 2.5 centimeters height. The length is not
important because always the waves should
be seen from above. I start by making a frame
all around the shape. When I get to a curve,
I bent the piece. Now that I have the frame, I will divide the space
within we support. There will also be
2.5 centimeters high. Now, I will add the top
because a large area, so I will use PVA glue. Next step, sand
off all the edges and after that to apply
paper tape all around. When I get to occur, I tapped the paper
on the side you have it can be flat on the surface. And then with scissors, I make cuts along the line. I will do that all around. And on the other side, the back of the chair is ready.
33. Chair - How to cover round parts: I begin with a
piece of cardboard that is bigger
than the surface I need and cut one side
to get a straight line. I break the cardboard
along the lines. For this, I will use hot
glue because of the shape. It will be harder to
do that with PVA glue. When you cover curved shapes, it's how to align
the edges exactly. So I recommend to use
a bigger piece of cardboard and then
trim the excess later. Hello. Hello. After the glue is dry, I use a sharp knife to trim the paths that
are sticking up. I had a flat and
horizontal surface. So I will use PVA glue and put some heavy
things on top. In the next video,
I will connect the back of the
chair to the seat.
34. Chair - smoothing the surface: Now we'll connect the
two parts of the chair. They're not just saying
move in the bath, helping me to align it better. But they're not necessary. Filling holes and gaps and sanding off all the
joints and corners to get a smooth surface and then applying paper tape
on all the corners. I didn't like that
corner, so I fix it. The Joan's ready. Next step is to give it a unique design.
35. Chair - paint and stencil: The chairs eddy for pain. I painted the first layer in y. After that, I use
the sponge to get interesting effect with tacos that I didn't like the outcome. Remember that you
can always repaint, so don't be afraid
to experiment. In the third layer. I
got the result alike. I used white acrylic paint with just a little bit of blue. To use the stencil, I put a little
color on a sponge. It's better to have too little, too much color on a sponge
when we are using stencils. It is important to
tap with the sponge, not a stroking, to
keep nice crisp lines. And then remove the stencil in the forward direction,
not to the side. So not to smear the color. The color is still wet. You can wipe off
stains and mistakes. If we don't want to
use certain parts of the stencil because beca to mask the paths
that we don't want. The color that I
choose will silver, but the result was too light. You can see the pattern only in certain angles of the light. So I made another
layer on top of that. And I use light blue this time. I positioned the stencil a
bit higher and to the right. So the silver layer
underneath it looks like the shadow
of the blue layer. And then a call to
furnish a pillow. And it is a chair fit
for a king or queen. The chair is for people, but deeper got hold of the
chair and he is the king now.
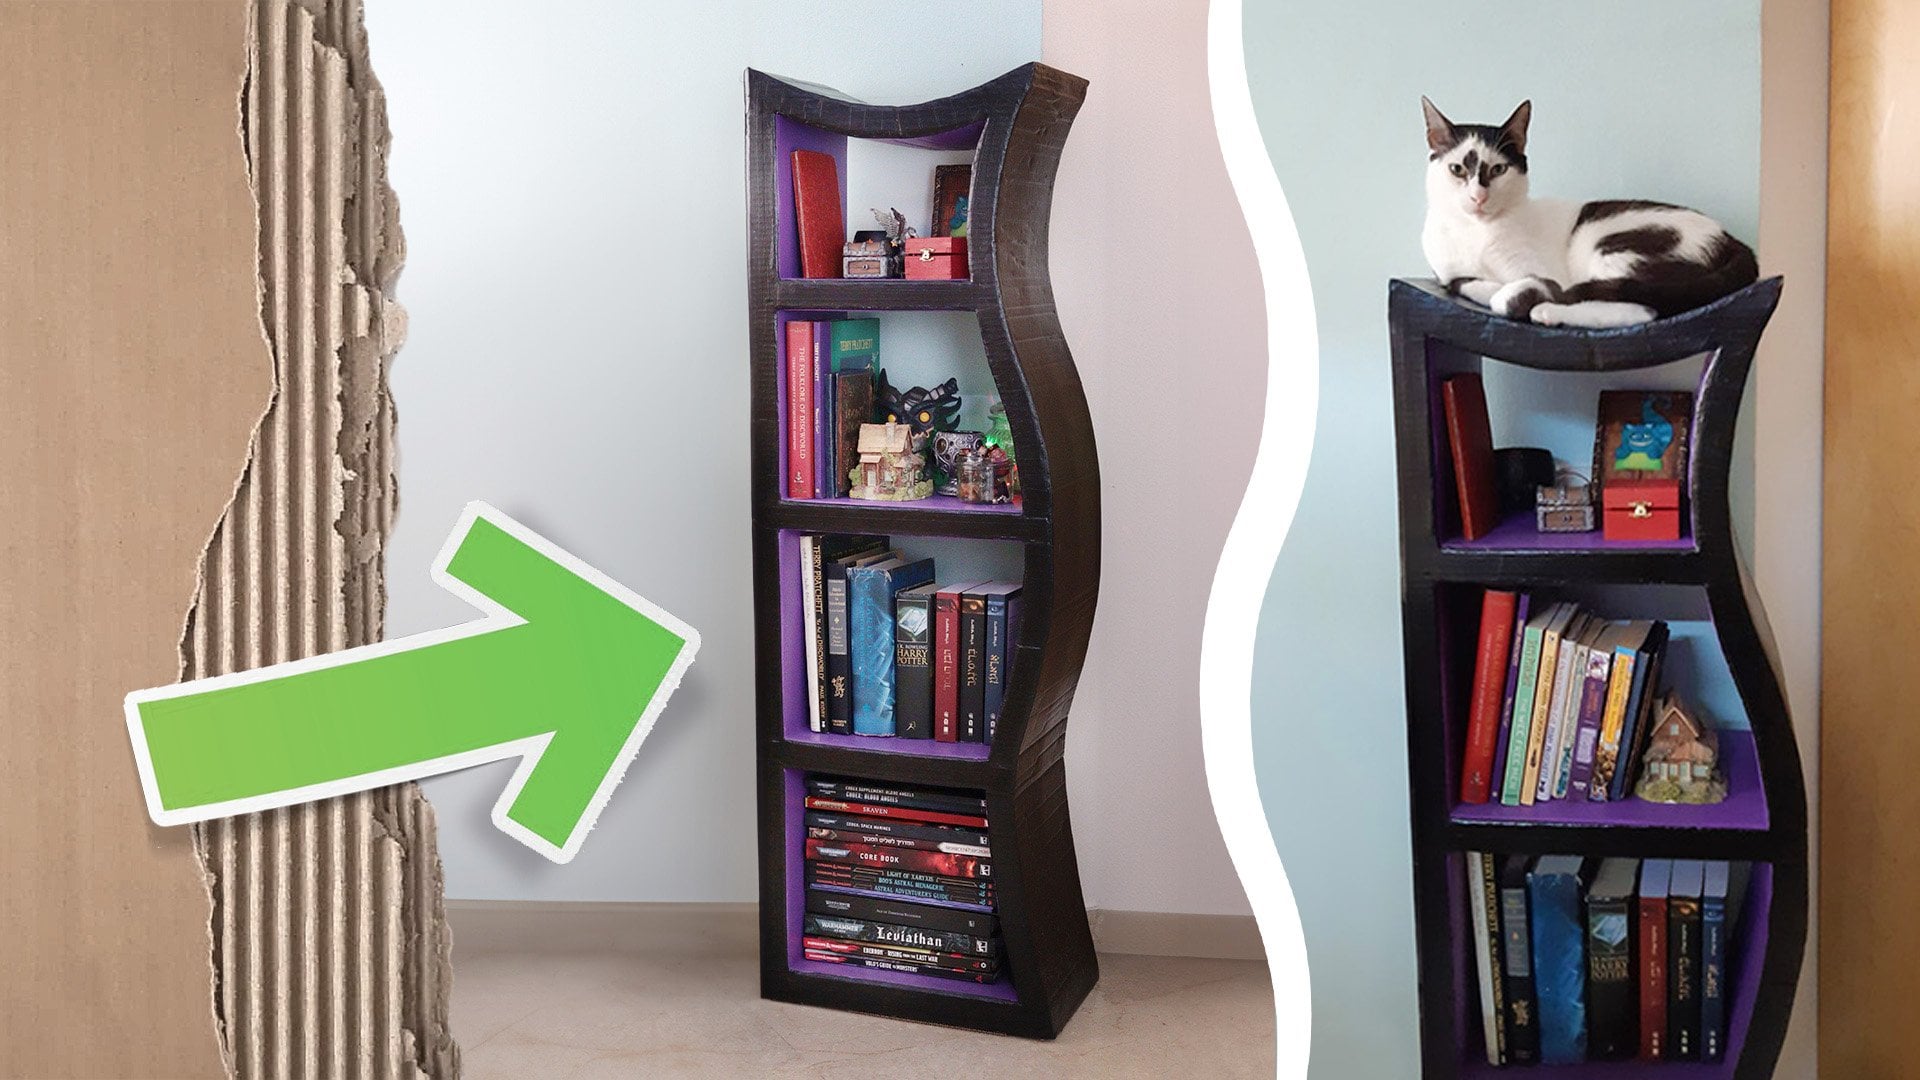
36. A shelving unit: planning and parts: I tried different designs for the shelving unit and got
to a design that I liked. The plan and the
measurements are in the resources of this section. But I encourage you to make your own design and use my
plan only as an example. I use large cardboards
that they have from a TV screen packaging
that they found. I drew the plan on one
of the cardboards, made some changes and mark the final lines
with a red pen. For this picture, I highlighted the lines
with blue collar. I cut out the shape and
then used it as a stencil. Mark the second cardboard
and cut that one to this piece of furniture. The margins are very narrow,
only two centimeters. The problem is that it is too narrow to cut notches
for the cross sections. Therefore, this piece
of furniture has no cross-sections and
no central planner. The construction
method is a little different, but still stable. This is what I need. These are the inner walls of the cells. The measurements are in the
resources of this section, but I recommend that you do not immediately cut the cell walls. First measure the halls
in your main panels. There are no cross sections, but there are support pieces that stabilize the furniture. So cut a lot of stripes at
height of two centimeters. The width doesn't matter. I don't know how many
pieces you will need, so you can cut them off
them each time as needed. These are supporting pads. So it is important
that they will be in this direction that you can
see the waves from above. I have all the parts
and I can move on to assemble the
shelving unit.
37. A shelving unit - assembling: I have all the paths and
I can start assembling. This piece of furniture does
not have a central panel. This time a stock
with a front panel. I place it down
on the floor with his front facing the floor. And I start gluing the
walls of the anal sex. I don't glue on the panel, but inside it, right
next to the inner wall. To avoid mistakes, always check each part fits the correct
path before gluing it. The glowing points
are very narrow. So it is advisable to use hot glue and not PVA
glue, in this case. Hello, The support strips
between the cells. You can stick them with glue or PVA ignore whichever
is convenient for you. The supports are the ones
that will carry the weight and prevent the sales of the shelving unit
from collapsing. So they are very important. If the support
pieces are too long, you can cut them
even with your hand. All fog the end and tuck it in. Make sure there are supports
between all the cells. And now I can place the back
panel and stick it in place. We also need some supports
before gluing the site basis. And also on the other side. This is how it looks. The shape doesn't matter. The main thing is to
spread some supports along the entire length so that the side panels
were not caving. Now also supports for the
lower and upper bounds. I put more support because
there is more weight on them. So that's the bottom
of the shelving unit. And the top. These
areas allowed. So I use a combination of
PVA glue and hot glue, but not in the same place. I apply PVA glue to
most of the surface, but leave the sides
clear for the hot glue. The area is long. So I apply hot glue only
on one side at a time, the pieces in place, and then glue on the
other side this way. And I will do the same for the top part and
the bottom part. I'm not that tall. To reach the top, I
use the small letter. There are two more things
that added before printing, and they are in the next video.
38. Additions to the shelving unit: In this video, I will talk about two additions for shelving unit. The first is that since it is
a tall piece of furniture, I added hunger's to the back in case I want to ankle the
shelving unit to the wall. First, I made small holes in the cardboard to make it
easy inserting the screws. I added glue to the schools so that they would be
well gripped inside. And also on the other side. If you add extras furniture, you should do this step
before adding the faculty. The paper will add reinforcement to the
things that you add. The second edition is, I realized that
the shelving unit is eight centimeters shorter
than what they mean. So I made an extra piece that is eight centimeters high
because very important to have support inside
and a lot of them because this addition will build the weight of
the shelving unit. The height is eight centimeters. The width is the width of
the shelving unit 92.5, but the depth is 22.5 in all
24 is the shelving unit. Because of the wall panel. It is PVA glue. So there is time to place the shelving unit and
aligning exactly in place. Some books to give wet so that the glue
texts a good Hold. The shelving unique is
ready for the next day. I also made some storage
boxes for the shelving unit. You can see a video about
making boxes in Section six.
39. Smoothing and Painting the shelving unit: As usual, before painting, it is important to
smooth everything. Carefully cut out all
the hot glue residue, cartel protruding parts. After that, sand everything
and if necessary feel holds. The video about
filling holes is in Section five,
preparing the surface. After the filling dries
smooth. That too. Next step, Gump paper tape
or simple paper and glue. There's quite a lot to
do because you need to straighten all the
joints of all the cells. Now the shelving unit
is ready for painting. I chose to paint the
shelving unit in white. I use a sponge. My favorite
method of painting. Painting with a sponge is
smoother in my opinion, and it's also easier to get into the corners because the
sponge is flexible. But of course you can use a white brush and use it now oil brush in
the inner corners. You need several coats of paint. You can also finish with
a layer of varnish. You don't have to
put the boxes in. There is a shelving
unit that looks great. It is useful and it's hard to believe.
It's made of cardboard.
40. Conclusion: If you've finished your
project, be proud, even if you made mistakes along the way or maybe you fail, you could have done better. It doesn't matter. If it's your first
piece of furniture, then you have already done better than a lot
of other people. Share images of your creation with your friends and
family and Baskin, the warm feeling of
an amazing work done. People will be
amazed that you made furniture from simple cardboard. Take a picture of
your furniture and show it with tasks in
the project gallery. I hope you enjoyed that class. And I really like to
see what you will make.
 Naama Yaffe Mendelboim, Graphic designer and artist