Transcripts
1. Introduction: Hello there. It's a pleasure to meet you. My name's Israel drives
men in a drawing teacher. Over the years, I have
received a lot of request from parents
for cars Folks. I'd only need complex
drawing techniques, but actually a
coarse focus it in simple Cialis Germans that
could be made by anyone, including children
and people who think they have the gift of Rohan. Or those people who are
religious want to draw with the kids or grandkids who
won just have a hobby. Of course, the people who has no intention of making
complex Robbins, who likes simpler problems. The truth is that many people just want to
set drawings for firm. They don't want to make complex drawings and
become professional. They are parents who wants
to draw with their children. Sons who went to
draw in the company. They parents, brothers, cousins, colleagues, and
even grandparents. It is actually hard to find that cars with this kind of content. So I decided to create this simple Kawhi
style, your own curse. If you don't know what
it means, don't worry. Oh, why are Qj
Romans externally? Easy to make? The bad thing is
that you can draw them with a very basic material. Material in tools that
you probably already have at home that will
be very easy to find. The purpose of this
course is to make the drumming techniques
and materials easier to be used it as much as possible in order to
bring a joyful experience for children and adults with J themselves in drug mobility. But just like any other skill, you can learn how to draw, but practice in it. So do not think just those with the gift of drawing
make beautiful Romans. That's not true. But the end of this course, you will have a very
good acknowledgment of how to make complex Robbins. But this is now the
purpose of this course. We'll just make simple Germans. The goal is to simplify in to facilitate the execution
of the drowns. And then anyone of
any age or without any specific knowledge about the problem will be
able to make it. So if you like to Rome or if you want to spend more time
having fun with your kids, experiments are all the
friends and family. This course is for you. We'll learn simple ways to make your drawings of
the nature of food, animals, objects, cell phones, Halloween, and much more. So, take your favorite material
unless drawn together. My name Israel. I'm adjustment in
a drunk teaching and I will help you
in this course. If you have any questions,
please contact me. So let's start drawing. In a city, you know, next class. Bye.
2. The Importance of Cute Designs in People's lives: Hello everybody. How's it going? Welcome to this video. This video will be an
explanatory video, and then we'll talk
about the benefits of cute pictures for us humans. The first study about
this was carried out in 1949 by a gentleman
named cohort, don't have did in research on little animals and
purpose and concluded that these cute
images cows it in adults and fill in of affection
for these little animals. Likes puppies and
everyone feels good. Send these cute burpees,
these cute pictures. Further, researchers have shown that these cute puppy images increase the activity of
the central orbital cortex. In other words,
these images is to modulate care and
protection in us humans. With then we are encouraged
to love and feel good. That's what Q Tim, I just do to us. I study from a university
in Japan where a white culture began
and is kinda strongest. Analyze it the behavior, obviously students up to
View and cute pictures. The researches notice that the participants perform it bad. The activities that demanded most concentration after that. That is, the students who saw Q2 image of a piece
or little animals and acute images that increases
the level of concentration. That's just amazing guys. Scientists is explaining
that this results represents an attentional focus, induce it by the
positive emotion. Just cows in the brain. So visualizing the images
helps and drone for sure, helps a lot more. And we still don't
know everything about the benefits
of cute images. But we've, we've already
seen some benefits like positive thinking and
increase its concentration. So guys see you in
the next lesson, we're going to see a
lot of cute images. Let's start our practice. Bite.
3. Basic Tools: Hello guys, how's it going? Welcome. On this video last time again and show
you guys some tools, some basic tools
there you can use during our drawing pores, okay? And of course you don't have
to buy an expensive bends so or inexpensive eraser to
make beautiful drawings, to make professional drawings. Okay, you can have simple tools and still make amazing drawings. We have here a real simple
sheet of paper, okay? This is a white sheet of paper. No, of course you can buy whatever people
you want to you. Okay. And we have some
taker sheet of paper. We have some thinner
sheet of paper. I myself I like I kinda of
a thicker sheet of paper, but not that sick. Anyway, you can choose whatever, whatever should've paid for you, rather use, you prefer to use. You can just try. Different should have
papers and choose the best. You. And I have here my pencil
came and some drawings. I will use the pencil, but others I'm going to
use a mechanical pencil. It doesn't really matter. You can use a pencil or
a mechanical pencil. You will have to
fill in all you will have to practice
in C. You rather, if you rather the
pencil off your, rather the mechanical pencil. Now I have here that
you raise room. It is very natural
that you will make some mistakes and you will have to adjust things and fix things. Okay? So you have to, You
need an eraser. I have another eraser right
here, this black one. As you can see, these are very flexible that you raise there. Okay, that's a special
kind of eraser. But anyway, you can, you can have just one
like this. There's white. We came up with
the way you raise. Are you going to
erase everything? But with the blade razor
you will just erase. Just how can I
explain to you guys? You will see when they start
to use the difference, but this black eraser
won't erase everything. If you use a pen. So it is very important to have, to have one of these, a pencil sharpener. Okay? It is very important to have it a really nice pencil sharpener
because we weren't really, really nice tip on our pencils. Okay, So anyway, by
a pencil sharpener, you don't have to buy
an expensive one. But anyway, just have
one pencil sharpener. So you can have really nice tips in your own, your pencils. And anyway, we have, this is partially pencil
sharpener that I have. It is very nice, you know. Anyway, you also will
need some paints. I use Nike pants, okay. Linking pins. Just like the, these two. It doesn't matter actually
the brand that you will buy. You just have to
use some ink pens. Pens to make the final art. They are black pins. According to have one of these. Okay, you don't have to
buy expensive pants also. But these non-key pencils and making pans of a very
nice, very nice to use. I have this all this
other kind of pan. Okay, we have a tip and thicker. As you guys can see, I'm going to use this paint to paint larger part
to larger spaces. So I'm going to use this pan. And of course you could use, you could use a pen to paint
in black some larger parts, but I don't I don't
really think that's nice. Okay. You don't have this
or the pan is real simple when regular
pen right here. Okay, But this kind of pan, this is not a really, really nice to use on province. Okay? Of course you will, you will like to tune
to pain, to trauma. And so we have here
some colored pencils. You don't you don't need to have a lot of colored pencils. But I have just, I will use this, these green, blue,
red, yellow, and blue. And anyway, and I have also
these, these right here. Colored pencils or candle, more professional
colored pencils. But anyway, you guys either
e, That's really matter. You can use any colored
pencil that you guys have. Okay? I have some fabric
castle colored pencils, but you can you can
have in any order. It doesn't matter the brand. Okay? Of course, it is important
to have really nice tools. It is very important to
have a tools with quality, but it doesn't matter to buy. You don't have to
buy expensive tools. Just have to understand
the techniques and use your tools the
best way you can. If you do this, you
will be able to make into drop amazing designs. And I'm sure you guys will
become amazing designers. Okay, so that's it. If you have any questions, feel free to contact me. Okay. I'm gonna, I
will be happy to help each one of you guys. On the next lesson, we're going to see some bigger learn more about
these tools and we get to do some drawings. And let's see you next.
4. Warm-up Exercises and Practical Knowledge of the Tools: Hello guys, welcome
how it's going. So there's a bit of a lesson. We're gonna do some
warm-up exercises, okay? And we're gonna see a
practical knowledge of the tool that we're going to use on this that ls and
it is very important to, to practice and to make these exercises that we're
going to see on this with Ls. Okay, so try to do the same. It is very important
that you have a sheet of paper and a pencil or
a mechanical pencil. And try to do just
like I'm doing. Okay. Let's start with some lines. Just like this. Just have to make
some lines, okay? It can make you can draw the lines in whatever
direction you want. I just want you to
feel how it is to take the mechanical pencil
and make some lines. It is just for NEP exercises. Let's go now on another
direction right here. Just like this. Okay. So you can keep doing it. Do a lot of these, okay. I know they looks very easy, but it is very
important that you guys feel how it is to hold the mechanical pencil and make all the lines we are
making right here. You can of course
change the shape. We don't have a right
way to world lobe warn. You just have to
make these lines. Let's now, let, let's change. And now this shape again, it is like a S shape. It is literally the
S letter, letter S. Let's kill the other direction. And when you do these exercises, you can, you can
understand what it is. Easier, easier for
you in a while. What line is harder for you? You can feel, what are
you better at doing? What, uh, you need to prove? What do you need to prove? So let's now trough
some straight lines. Keep doing it, guys kept doing
it and running Warning up. Okay. Let's do it out to
another way of doing it. Just like this. Well, you could do
this kind of shape to it just like this
with some circles. Now k. Let's do another one. Simple circles. Okay, very nice. Another world. We don't have a right
way to do this. You just have to warm up. This our warm-up exercises. Free to do whatever
the way you want. You can, for example, draw a dot and a lot of
lines just like this. As you draw all these lines, all these shapes fill how
the mechanical bands, So on the pencil or the pen tool you're using but Fill tool. Okay. And tried to understand the shapes and tried
to this tan lines. Let's do now some curved
lines like these. All these shapes will be very, very important to know how to draw because we're
gonna use these shapes, these lines allow
withdrawal in the future. Some squares, now,
simple squares. And don't do just one, you know, do a lot to do 510. And you don't have to draw all these shapes that
I was worried here. You can try to, you know, you can choose other shapes, are the other kinds
of lines. Draw. Anyway. Circles, for example, you can
draw circles or triangles. And of course, it
is not the goal to make perfect, perfect shapes. Okay? We don't want to. Of course, if you can
do perfect circles, of course you can do, but it is not the
goal of this lesson. If you draw triangles,
for example, you don't have to draw
perfect triangles. You're free to do
whatever way you want. Here. All these from these square. I'm going to add some details. Some parts right
here, just like this. Just just saw on the inner part. I don't want to go outside. I want to just do on the
inner part the other two. And you can do whatever
the way you want. Vertical lines,
horizontal lines. Very nice. Of course, you can
do all the others. Right here to this
just vertical lines. You can do whatever you want. You can also do this
on the circles. Okay? You can also do this with
these care of hidden lines. We can also use pan. Of course, you can use Ollie, Ollie or pencils above, but you could use your pan. And actually I advise
you to use your pen after you draw all these
shapes with the pen. So we're going to use a
pen to do the final art. So it is very important
to know how to use also the pan practice a lot guys. Practice a lot. As you guys will see. We can make any mistake
with this pen because we won't be able to use
the eraser with this pen. So it is important to know
how to use the pen and the pencil and actually any other kind of
tool that you have. I'm using the eraser right
here because I use it the pen and I'm going to
use the razor this too. He raised the lines that
I don't need anymore. Anyway at all. No need anymore. Just like this. We're gonna do this a lot
with our drawings and all. What do we do when we
did the final art? We use the pan. And you raised a lot. I'm going to use a
colored pencil out, a red colored pencil. And of course you can use
whatever color you want. But I'm going to use
this one right here. Just paint low. But feel free and ledger or your creativity, you know, fly. You can choose whatever
color you want. I'm going to undo. I'm
going to paint now this other world with
orange colored pencil. And you don't have to paint
with only one direction, in only one direction. Feel free to, to paint whatever
way you want to enter, whatever direction you want. Green pass. It is very, very important to practice how to
paint and draw wins. You know, we, we, all of us like to
use colored pencils. It is very nice to use. Different callers are
not only are droplets, so it is very important
to know how to use your colored pencils. Okay? So do you do just like I'm doing two to see how the
colors our drawings. No, It blew. It is not hard at all to paint. You just need to practice. You don't have to care
about the directions. All of you know. They, they you are painting. You don't have to care
about the directions. This paint, whatever
the way you want. Love yellow and a really
nice hue of yellow. And that's it guys. That's it. These are exercises,
warm up exercises. So it is very important to understand the tools that
you have available of k. So do these, these warm up
exercises and that's it guys. I'm gonna, I'm gonna go now, I believe that you
guys saw how to use all your materials,
all your tools. And of course you
don't have to do only these exercises that
I show it to you guys. You can do whatever
exercise you want. But the important
thing is you need to learn and know how to use and understand how your tools works is very important to understand
how your tools work. You don't have to
buy expensive tools, but it is important to
have tools with quality. Anyway. Anyway. Important,
the important thing, the important part is
that you understand the techniques and
understand how to use each one of your materials. Anyway, you just
need to understand all the techniques and
how to use your tools. That's the most important
part of the process. Okay guys, I really hope you
guys enjoyed this lesson. Okay. Thank you very
much and see you next.
5. Proportion and Cute Characteristics in Kawaii Designs: Hello guys, how's it going? Welcome. On this video lesson, we're going to talk
to you guys about the characteristics of
cute drawings, okay? And we can also talk
about the proportions that we need to use
with Kawhi traumas. As you guys can see with all these cute and
beautiful animals. All of them have large
and big foreheads. All of them have really,
really big foreheads. And that's kind of a
role, you know, any, any acute drawing cute animal. We have large foreheads, and it also applies
to human beings. For example, we have this taller right here and this toddler, you have a really
big forehead to. And it is a really cute toddler. Anyway. We have a big head, head. We can see Bayes, especially with
the total toddler. It is a big head. And also with all
the other animals, we have really big heads. That's kind of a role. If you wanted to
draw cute drawings, cubes, call line drawings, you need to understand this proportion that the
head will be very big. You know, that's the first part. We have the chassis, the middle part of the body, and we have the legs. This first example that you
guys can see on the screen, it is a regular human being
divided into three parts. The hat, the middle
part of the body, and then the lags. Okay? However, although of
course we're going to, we're going to use
only two parts, only two divisions because
of the cow eyes title. Use these two parts of Asia. You know, that we don't have, we just have the hat, everybody. And that's it. We can also use only one
part with just the head. That's the third example. But if we want to, to draw them, animals
or human beings, we're going to use this middle
example with two parts, individual with two parts, the head and the body. And you can see this with
this logo for example, we have a two parts division to the head and also the body, like a sub object is. So you can use just a
one division like this. For example, this
ladder right here. We have this one division
and that's fine. That's a king. Long troll. Two divisions, you know, we don't have to draw the legs
to the latter, of course. So one division is enough. What diffusion is all we need. This special example
of this ladder. Okay? We don't need to divide
it into two parts. But usually we're going to
use this meadow example with two divisions with
the hand and the body. And I'm sure you guys, you will enjoy the
lessons that we have in the future about cute drawing,
skewed colloid drawings. And you will see that this
proportion of a baby had, had, and in the second
part of the body will make you travel for an acute, and that's what we want. We want cute trolley, He wants cute characters. Okay? So just pay attention about all the techniques that I'm going to teach you
guys in the future. And I'm sure you
guys will enjoy. Okay. Thank you. Thank you very much. I see you on the next lesson. And that's it, guys. That's it. Bye bye.
6. Drawing Eyes Kawaii: To make these circles, I use it a plastic cover. It may be using a
cover or a coin. I just do not advise
you to use glass case. It can break and K2 off. It must position
the plastic cover. Be careful not to move it in. Always use the pencil line down. To not use the standard
Panther. Turn it around. Be careful not to move it. You had to keep the
pencil line down a little bit and close the circle. And so we have a perfect circle. And that's important
to draw what we want. So this is the shape
that you need to do. This Rohan, the size may vary, but I didn't advise you
to draw a very large one. This size here is fine. I coined can also be fine, but don't use glass. So let's start by
dividing the middle. And this circle is going to
be the face of our character. I will divide in both senses, vertically
and horizontally. Here, I'm going to mark
it the height of the ice. And now I'm going to
draw in the eyes. This can be a closet
I, or pull it I. This is a closer
eye or pulling eye. You can also draw when
this kind of i1 to represent a Ingrid
character or bunking one. When you draw a blink your eye, you can run forest the corner, even need a little
bit further down. It is nice if you
draw the other open. I'm drawing an eye. A little bit more
simpler right here. Remember that you can
use the same format, the same shape that we did
in the previous example. All right, we make the division now on a X shape. This eye shape is good
if you want to define the expression of
basic character. One more example. When new drama, nice
trader and close it. It is great to make this four
worried character in there. Another example here. I'm going to draw
them, ain't, sorry, i comma I, that we'll be
using in this course. This is the cutest I. You're on this circle,
chlorate in black. But let's maintain the shame. This I, we use in adorable
and cute characters. This is a nice with little dots. A very simple one in here. And angry, I, how much more
triangular is the eye? More expression on his bravery. The character we'll have. Actually it is not a very, this is an angry character. Hey, I'm going to
make a similar eye to the previous example. However, we made a more
permanent triangle. This one, we will not
be so triangular. We'll make it a
little straighter at the top and more
rounded at the bottom. So you can see
here that this eye is not so angry like
the previous one, but it is a little angry. This type of eyes better to
define, sarcomeres are irony. Now I'm going to
draw a different x. Hence, this is not
necessarily a rural, but if you want to make the eye it looks a little
bit more feminine. You may be drawing
some eyelashes. You can draw them two or three. Just one, a lash. If you prefer. This
will give your character immoral,
feminine look. But this is not a general rule. Here are the examples we made. You can download it down here
in practice these examples. So on to your next class. Bye.
7. Drawing Cute Kawaii Eyes Part 2: Hello guys. How's it going? Welcome to this lesson. Today I'm going to teach you
guys how to draw really, really cute eyes, of course, with a CO white tile. So let's start with a
real simple sketch. As you guys can see, I'm using
this structure right here. We have three parts and we have two circles in
between these two circles, we have this size that we could, we could draw another eye right here at third
eye in the middle, but we won't do this space. You can do this wave. We have here two circles and I'm going just to add these details. I divided, write that down below with four lines, simple lines. And we can add two lights to shines in each
one of the eyes. I'm going to use a pan. Okay? Just to highlight the
main, the main lines. Just like this. And of course you can use
any pen that you have. You don't need to use this
hand-in-hand Museum in array. Just pay attention
because you can make any mistake on this stage
because we're using a pen, but I'm going to use an
eraser to clean the trawling. This important to
clean the drawing, we want to clean Roman. I'm going to use and all these other pen with a thicker tip. We have the eyebrows right then and now the mouse
that's acute trauma. And so I'm going to draw a happy character with
a smile of the face. This is a pen with a
thicker, thicker tip. It is much better to, you know, to paint. Everything that
we need to paint. Just like this. We can paint all the eye except of course,
they delight light. We don't, we don't want
to paint a delights. And now we have here a really cute eyes,
two eyes, actually. A very nice, very
nice character. I'm going to add
some eyelashes of cake because this is
a female character. So I'm going to add
some eyelashes. With male characters. We'd never, never, never
control eyelashes like these. Okay? We'd never do this. Of course, as you can
know, paint to drawing. I'm going to paint this
part right here, down here. Okay? And actually we'll, we'll, we'll paint only
this part down here. And of course you could
use any color you want. I'm going to paint
one with pink and a model with blue. Okay? Just like this. And of course, usually you will use the same color in
both eyes and all. But I just painted with
two different colors. So you can see that we
can draw any kind of we can paint with any
color you want. Okay. We have here the eyebrows. I'm going to paint the eyebrows. And usually we paint the
hair with the same color. Of course, that is not a rule. You could paint
with another color. But usually we paint the hair and the eyebrows
with the same color. Let's do another example. I'm going to draw only
with the pen, okay? I wouldn't use a sketch
one, use the pencil. I will use only my pen. But of course if you
want to use Japan, so in then do the final art, too free to do like this. Okay, we have the
mouth right here. I bronze. But of course, if
you're drawing, are angry your
character or angry, you could do another, another kind of eyebrows and all your characters are happy. You draw one kind of eyeballing your character or angry or sad, you draw another eyebrows. Just pay attention to this. We can paint the eye. And usually this part
right here of the iron, we paint all in black. It is kind of standard. It is kind of what we do every single time
who paint in black. They this part right here. And now we can use
a colored pencil to give a color to the
eyes of our character. This character has a green I, of course the eyebrow
who can paint to with any color you want. And that's it, guys. That's it. I really hope you guys enjoyed this lesson and
see you next time. Bye.
8. Drawing Cute Kawaii Eyes Part 3: Hello guys, how's it going? Welcome. On this video
last week we get to do just like we did
on the previous lesson. Okay? I'm going to draw
eyes on this lesson, but I won't use a
pencil right now. Okay, of course you
could use your pencil, but I wouldn't use the pen, so I'm going to use
just the pan. Okay. As you guys can see, I drew two circles. We have lights on both eyes. And now we can paint in black. Just like this, are
very simple and basic and standard
kind of I, okay? You can use this kind of
eye on your drawings. We can draw the eyebrows. Also very simple eyebrows. And basically, that's it guys. That's it. Okay, Let's
go to another example. Two circles. It is like an example that we
did in the previous lesson. The lights right here. We can paint all in black. Can paint all the
iris of the eye. Actually, we don't have to pull in libraries all on this case. But anyway, I believe you
guys in this tutorial, I'm trying to say
now the eye rooms. Okay. And that's it. That's it. Let's go to and
learn that example. But it is, it is just
like the other examples. As you guys can see, we
have kind of a oval shape. Now you can make this
detail down here. Now the light, of course, we will need the
lights on both eyes. They will campaign Timberlake. The eye. We can do the same thing
with the other eye. And that's it. That's it. Okay, very nice. I, it is a very cute I. We use this kind of AI with, with female character is usually use this kind of AI
is female characters. Don't forget to
add the eyelashes. It is simple triangular shapes. And that's it. That's it. We have our cute and
Bluetooth female. I of course, if you
would draw a male eyes, you don't you don't add, you don't draw the eyelashes. Okay. Now, let's see this other
example with a straighter line. Right below. We have propel and we have
iris on this kind of high. Okay? And it is like
the manga is style. But anyway, just pay attention to the size of each one
of the eyes. No. Petition to the light. It is important to know where to place each one of the
parts of the eye. Okay? Of course you could draw a sketch to help you to place
all the parts, the eye. But anyway, you will do
whatever the way you want. That's just fine. Simple circle. Let's do another simple
circle right here. That's the, that's a
really basic type of eye. We have the pill, we have the iris, and
of course, delight. Okay. Very simple and basic examples that you can choose to use in
your drawings, okay? Now the color, of course, depends a lot on the
character that you draw. But you can choose guys
whatever color you want to add. Bring going to use the green. Okay, I'm going to
use green on this. I write here, it's
important to paint. Lead to the call off
with a homogeneous, we want a homogeneous hue. So it is very important
to paint the best way you can lead a homogeneous hue. I can go to this
other eye right here. And all of these are cute eyes. All of these are really,
really cute highs. So of course, as
you guys can see, I'm not adding any
kind of gradient. Okay? That's fine. That's fine. We can just draw the
entire interior eye with, with one, only one here. Okay, we don't have to add a gradient effect
from That's fine. Now all these other
parts right here, I'm going to use blue. You can use, you just have
to paint this part below. Okay? This right here. Just this part below. The eye bronze horse. Usually we use the same color to the hair into the eyebrow. Of course, it is not a role. You know, you can do
whatever you want, but we usually do like this. The herring, the eyebrows
with the same color. Now, let's go to
this other parts. These are the I because
as you guys can see, we don't have any place to
paint on the first one. The second one we
have space to paint. We will pay paint. And that's it, guys. That's it. Let's paint the eyebrows. Very simple exercises. But I really advise you
guys to practice all of these ice because it will
help you out a lot when you, when you start to draw
more complex designs. And also it is very
important to practice a lot. Okay? And that's it. That's it, guys. I really hope you guys
enjoyed it. See you.
9. Drawing Kawaii Mouths: Well, after we draw the eyes, now it's time to draw the mouth. If so, we'll try to put
some expressions here, combining both the expression of the eyes and the
expression of the mouth. So let's start. As your own days mouth
here is smiling, but we draw with
characters myelin and the color of the mouth
have to stay up. In this case, we do it
here like a parabola up. If we want, we can
make, can open mouth. We should close the upper part and we have the
characters myelin. Another way to draw ways myelin mouth is to remember
to leave the tip up. We make the lower
and upper turns in exactly the same shape. And clothing corners.
This is an laugh. So we may be drawing
the teeth. Mark here. It is another way
to mark the smile. Here the character is sick with IZZ in
the shape of a max. So we can make a line, integral the tongue out. This will make it look like
a character with a disease. Maybe he hits his head. Here we drew bar and ice. So let's throw him off like
this to see how I'm doing it. In trade or produce. It has a cloud shape. You go up and down, okay. Here we can see happy eyes, so we may be drawing a happier
mouth is mainly mouth. It is just one stroke. It is a simple smile. Let's draw the mouth
for these examples. That will be a character. Surprise it. This character is angry, so we must change a
little bit in the mouth. They have drama. We do it with a tip of the mouth upwards. Sad and angry characters
is the offset. We make the tip down. Okay. And here, a sarcastic character. It is a similar mouth, but we do palliative variation. We must draw it,
totally centralize it. A little bigger
site in the other, a little bit smaller than making the smile
looks more sarcastic. Here with the famil I, you may be throwing him off
also more feminine fan mill. Then you can do it like this. You have to draw a
line in the middle, the top of the lips. And then you can close the
mouth joined bottom part. And that's it guys. That's our drawings
of some Malthus. And see that it is
very simple drawings. There are no harder to make. I advice you to practice it. Practice these drawings, and any questions or
help that you need. I'm available. Okay. See you next video tutorial.
10. Drawing Kawaii Cheeks: Now we're going to Wake Forest the face expression by
drawing some cheeks, some types of cheeks
that we can draw. Let's start by drawing one of the most common cheeks,
the rounded one. Usually it is painted
with a clear color. So he doesn't really like nine. I'm going to erase this
part a little bit. When you draw a character, you must draw some
strokes. In this part. He doesn't have to
be a lot of strokes. Three or four
strokes are enough. This little traces will ring forms, these
check expression. To make he tired character, you must draw on two strokes. One above the other. Voices. The expression
of tiredness. For an angry expression
or an upside to one. Again and draw a
triangular shape. You had drawn this
shape, the cheek, the right forces, the
expression of anger. So these are the common, the most common models. You can use them a
lot it another shape, use it a lot. Flatter shape. And the rounded model. They are the most
common models of cheeks may be using them to rate forest the expression
we want to draw. So that's it guys. You can see here the
most common models. So do not forget
to practice that. See you in our last
video lesson. Bye.
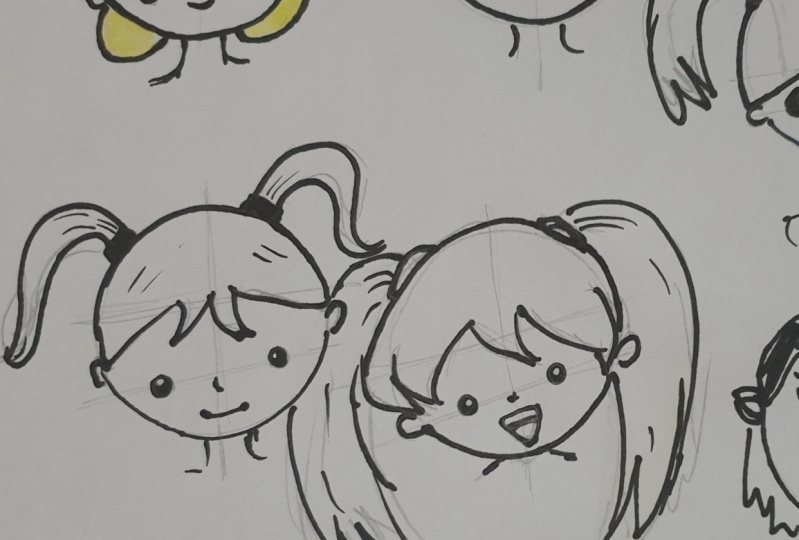
11. Drawing Female Hair Part 1: Hello guys, welcome. I was going on
this video lesson. I'm going to show guys
haven't drove female hair. Okay, that's gonna
be a basic lesson. But I'm sure you guys will enjoy this lesson and
all the techniques that I'm going to
teach you guys. I'm going to start
with a circle. I'm going to use these
right here to help me to make a really nice
imperfect circle. Okay, that's gonna be the
head of the character. Of course. Another circle. It, Third World. Okay, that's it. We have here five circles. And we're going to draw five
different types of hair. Each one of those circles
will be a hair head. Okay, so let's go
to the first one. I'm going to start by
dividing it in the middle, the vertical, and also on the horizontal with the
horizontal line. Of course, you could add the I to make you really
cute drawing. We have the ears right here. Anyway. I'm going to draw always simple. I just do, you know, that's acute trauma
and it is important to have an eye to eye is actually now we can start
drawing the, the, the hair. And we're going to use
these lines that we have, okay, these are reference lines. So we're going to use
then to help us to know where to place all
the parts of the hair. So I divide it in the middle, just like this of k.
And now we can do chose like this a little bit higher
than the line of the head. Oh, okay. Okay. Okay. We have here basically
the upper part of the head hair
that we can go to. The lower part,
we have the neck. Of course. We can do another part, right? That of the the hair. You don't have to add a lot of details because we're talking about a cold white hair
Hawaii title here. So you don't have to add a
lot of details to your hair. But of course it
is very important to highlight the main parts. Of course, if you want
to add some detail to the hair, that's fine. You can, for example, look at this. Very, very cute. Of course, you can use
your pen to highlight to the outline of this
bombing of the hair. I'm gonna use my pen to do this. And that's it. We have our first example, a very simple and basic hair. Of course you could
paint this Rohan. I'm going to use a
yellow colored pencil, but anyway, you could
use any color you want. And actually, it wouldn't
be very nice if you if you erase the lines that
you don't need anymore. I didn't erase it. But anyway, you could you raise but that's
just an example. Let's paint the hair. You don't need to
pay attention to the direction that
you were painting. It doesn't matter. Just paint all the parts in. Don't let the lead
in part to be, to be white, to know. Oh, very nice and
beautiful character. We have the eyes, we have the mouth and nose
in a really cute hair. Also. Fairly simple, very
basic, but that's it. Let's go to this second example. Okay? It isn't gonna be
kind of like the first one. But you will see that
we are divided in a tent on the vertical
then in the horizontal, just like this, we have now all the reference
lines that we need. The eye and of course the mouse. Now we can draw the hair. I'm going to change
a little bit. I'm going to do
some lots of hair. Just like this one too. With a triangular shape. We want lots of hair
with triangular shapes. And you can practice, of course, how to handle these
locks of hair with triangular shapes
with really curvy lines. We have the ear right here. Now we can connect to
one part, to the other. The same thing right here. Year, of course, neck. Know this part right
here of the hair. Now, let's draw a semicircle, old k, like this in a
detailed right here. Okay? Okay. Very simple, very basic. Okay, Let's just online
the drawing with a pen. I'm going to use my pin to highlight all the
outline of the drawing. I just go to the third example. It is just like we did before. Let's draw the reference
lines that we need. Now let's just change a little bit to the
expression of the character. And that's fine. Let's draw the hair. I'm going to throw
one part where here? In another part right there. Okay. We have the metal and you
have 1.5 to one side, then we'll have to
the other side. Now, guys. Let's just highlight the eyes, the ears, of course. Whoever you very simple, year. Now, look how I'm gonna, I'm gonna do guys, look how I'm gonna do wait. The things here. We have 0.1 way
here on the year. Then we have this other
dots right there. We can collect these two dots. I can go right here
on the metal and connect with this
part of the ear. Very simple, very basic. You just have to make
here will cover the line, connect to, will
point to the other. They're very nice, very simple
way, very beautiful too. Now, you could do
something like these. From both sides. I'm going to jump on both sides. In them. We get to just become doing it. Oh, key up. A really curvy
line is like this. Another one kinda of
smaller, but also current. We could add some locks
of hair like this. The part also, well, we don't have a lot
of space to draw. But anyway, anyway, can grow like this with the same
height as the other. That's it. We have here a real
nice hairstyle with, with some more details. I really like this
kind of hair guys. It is easy to draw, of course, but it's very, very nice, very beautiful. I can just align and
highlight the main lines in That's it guys.
12. Drawing Female Hair Part 2: Let's go to another
example, guys. But as you guys will see, we're going to use
the same techniques. We're going to draw a sketch,
really simple sketch. Then we're going to draw with
all these same techniques. And of course you could draw any kind of hair
that you weren't. As you guys can
see, we have here three different types of hair. And I'm going to draw
another one right here. On this square. We have a vertical line. A horizontal line. Okay, that's fairly tender. You know, we always do
a sketch and now we can go right here to
the strand of hair, you know, to the lock of hair. Let's do just like this. Oh king. And of course you
can divide it in the middle. We can choose like this. Very nice, very nice
and very simple law. So we have the eyes and
ears, of course here. Oh, sorry, curved lines. Okay guys. We have here basically
our hair done. Okay, of course you
could add more details. You could add another
strand of hair right here, but we don't have a
lot of space to draw. So anyway, but as
you guys can see, it is very, very simple. It is very, very easy to draw. Okay, that we can use the
pan to make the final art. You just have to
outline crawling, and highlight all
the main lines. You need to be very creative. You know, guys. You can let your
creativity of fly high heat into whatever
you want to know. With these techniques that
I'm teaching you guys, you can draw, you can
draw any kind of here. We could add more
details like these. Very simple details. So of course you
don't want to add these details, that's fine. But if you wanted to,
that's also nice. Let's go now to the final exam. The final example. And we are drawing, we're using the same techniques. The initial sketch, we
have the ears right then, then we can go to the hair. Let's draw a lock of hair
right here on the forehead. Now we can do just like these. Oh, wow, some eyes. The mouth. That's a really
happy character with a real big smile. Of course. Very simple features, very simple eyes
versus simple mouth. Now we can go again to the hair. Just like these. Very nice, very nice. I'm going to draw a
little, a little detail. Okay, it is very
important to add some details of courses
in fetal into detail. That's fine, you
know. But I will add some details just
like we did before. We're going to do
right here with big as lots of hair gate. Just like this big, big, very, very big locks of hair. And that's it. We have really big block
of hair, real long hair. We can do the same thing
on the other side. And of course you don't
have to draw this same. You don't have to
draw the same lock of hair on the left
and on the right. You can do a little
bit different. And that's fine
because, you know, the locks of hair,
I know all of them. I know we have some
differences and that's okay. And we can see that
we already have a really nice hair with long, long, lots of hair. Final art? No. And that's it. That's it. We have our hair completed
and that was our lesson. Ok, we drew a lot of different types of
hair, female hair. And I really hope you
guys enjoyed this lesson. Okay. We use the same
techniques in all of them. And we drew different
types of hair. So practice a lot. And if you practice a lot to learn how to draw these types
of hair and many others. Okay. Thank you very much and bye.
13. Drawing Male Hair Part 1: Hello everybody. How's it going? Welcome. Own visit Alaska. I'm going to teach you guys
how to draw male hair. Okay, we have here five different circles and we're going to throw in each one of those circles that
had used this tool to draw my five circles. And we're going to draw five different types
of hair, male hair. Okay, let's start
with the sketch. And I'm going to use basically the same
techniques that we use it. He drove female hair. I start with a
sketch of the face. Okay, we can divide it in the middle with a vertical line. We can do this in all of them. And all we can do a visual
with a horizontal line, of course, on all of them. Okay. And that's it. Let's go to the first one. I'm going to use my blue pencil. So you guys were
a little better. See all the lines
and all the details. Let's draw, draw some
ice. Simple mouth. And we already have two big important
parts of the face of the character.
Go to the hair. Of course, guys,
there's a lot of times, a lot of kinds of hair that you could travel
to a character. You know, we have some
long Harris than others, some kind of short. So, so it really depends what the correct character that
you will choose to draw. So I really advise you guys
to have a reference so you can see the reference and do the same thing
with to draw him. Okay, but anyway, we're going to go to draw five
different types of hair. And I'm sure there's blue light. We have the ears, of course, right there on the
character, okay? But let's go to the hair. We can divide it just
right here and go up. Now we can do like that, okay? And collect both tips. Okay, very nice. Very simple shape, but very nice and deep. Know we can probably cover
in line on this side. And then another one In
connect all the parts. Okay. Now we have the hair, but he's clearly a deal. We can see the shape
of the hair. Okay. We can do this other
part right here. Oh, very nice, very nice. We have a really basic example with really simple
and basic shape, but very, very nice. Of course you could
add more details like these that
I'm adding Rhino. You could add some lines. Just like this. You could add some
shadows and some, some light to the hair. And of course this is very
nice because we knew, we knew add shadows
and lights to draw in. The drawing becomes better
and more beautiful. And that's what we want. You can do just like days guys. We have some horizontal
lines that I'm drawing, some horizontal lines,
horizontal lines. Because my shadow like this. Now on this other
part right here, I'm going to draw
some vertical lines and we have pores,
the deep shadows. So on this side of the hair, this is kind of a hair
with more details. And of course you could draw in a hair like this with
less details of pores. But, you know, I like to do, I'd like you to
add these details. Let's go to the second world. We're going to draw what kind of a little bit
different character. So let's start with a
light right here. Okay? Pimples, science dislike this. And right here. Well, the middle of the middle, you will see we have the line, reference line to
the eyes, of course. Okay. That's gonna be, that's gonna be a character you know, more, more, more serious described
theories now happy, not smiling at all. He's almost angry, almost angry. This character. We can add this kind of AI
to troll angry characters. Character is. With some kind of a card that wants to fight
against someone, you know. But anyway, above the hair. Let, let, let's go back
to the hair thread here. Let's go up. Who can use triangular
shapes like these? Oh, it is kinda like a fire. You can go down and do the same thing with
with triangular shapes. Also. Very, very nice. Okay. Of course you could
add some details and know on the hair
and that's fine. On the first example, we drew a SIGALARM, drove the hair on this side. And we're going to do something like this on the second world. But literally a little bit
their friends, you know, that this character
doesn't have a lot of, a lot of hair on the
side of the face. So we're going to just draw these details with little dots, you know, just like this. We can do the same thing on
the other side of pores. Lot of little dots. K On the other side too. With little dots. Okay. Very nice. You could add some shadows, you could paint your hair. Of course. Social free to do this. I will just add some shadows. Okay, but of course you could just take one of your color age, pane shows and pain to the hair. The hair we could
do if you want. But anyway, you guys, when you add details
to your hair, the hair becomes better
and more beautiful. And I really advise you
guys to add some details. And we know that these kind of, these kind of drawing, we don't add a lot
of details but butter or whatever
the device you guys to add some details. You could paint with your pencil and with a hue like this
that I'm showing you guys, I kinda of a darker hue. But I won't do this. I will just add some shadows. Just use some, some vertical
lines to add to the shadows. But of course, if you want
to make it darker hue, you could do. And that's it. That's the second example, that's the second kind
of hair of this lesson. Let's go to the third one. Let's draw the reference
line to the eye. To the ice. Real simple i, o Cain. Simple circles, you know, simple circles for the eyes. Now let's go to the hair. We're going to do just
like the first one. You're going to use almost
the same technique. You can invite the middle
of the middle like this. Okay, this, these
reference lines, we're going to use only
two to draw the hair. We have the ear right here. And you're going to do the year. Also. On the other side. This hair will be like We will be almost equal
at the first one. But we're going to
have some differences. You will see, you will
see what we have, but we have the reference
lines right here. We have the years in the
ears will help us to know where to place all
the lines of this hair. And we're gonna do this, okay, so you can do this. Same thing, guys. Let's go to the first. We have here, the first
half, the second half. And it is very important to have these reference lines. It
is very important too. Divide like this to
draw this kind of hair. We can do, you can
draw the first line or a curved line right
here on this side. Now we can go into the ear. We can draw in line
with lots of hair. Of course, we're going to connect to this line to the ear. And that's why it's
very important to have these reference lines
in all of these these references to know where
to place all the locks of hair in all the parts
that we have to place. We can do the same thing right
here on the upper part of the hair. Right here. We have a detail. These really cute locks of hair. We can go to this logo part and connect
one part to the other. And that's it. We have a third example, a third kind of
here, very nice one. And it is like the first one. We use the same techniques. Now of course you could
add some shadows, you could add some light
to this third example. But of course we have a
lot of difference between this third example in
the first one of course. But anyway, we use, use some techniques as the
resembled to the first one. Let's go to the next lesson.
14. Drawing Male Hair Part 2: Well, let's go to
another example. As you guys can see, we are using a lot of reference lines. So with these reference lines, we can know where to place the eyes and the nose if
you want to draw a nose, of course, in the years. So let's draw the
years right here. Okay? Right here on the middle, I'm going to draw a lion and curved line to each
one of the sides. Now we can go right here to this lower part in connect
to the, to the ear. It is like a triangle. We know we have a triangular
shape on this part. We can do this same thing
with the other side. You can do the same thing
with the triangular shape. And we have here the first part of this type of hair,
this character. This character is
not happy at all. So we're going to
draw his face waves, kind of a angry expression. This character wants to
fight against someone. Anyway. Let's go back to the hair. We have a division, we have the line between
the forehead and, you know, the hair indeed. Now we can do the lower
part of the hair with some, some circles, with some subtle curving
lines just like this. We can do this on
this entire hair. It is just semi-circles, guys. You can just paint. Is hair. As you guys can see, I'm using a circular movement to
know with my pencil. And that's what I want, that, That's what we want on this. Particularly a kind of hair. I'm gonna do this
on the entire hair. Just like this. Of course you could, you could add some shadows, you could add some
light to this, this kind of hair. But I'm going to paint
just like this with circular movement with my
pencil. And that's it. That's it. A very, very nice, very nice kind of hair. Let's go to the last example. Let's start with the ears. This is gonna be kinda of
a different type of hair. You guys will see. We're gonna do the same
thing that we did before. Okay? We're going to draw a curved line here of k. It
is like the previous one, the withdrawal, they withdrew. Now we can do just like this. It is like it is a
little bit COVID line, it is a little bit
curving line yellow. We have the eyebrows. This character, the ice. Fairly simple. I. Let's throw a smile. This character is happy. Okay, so we have
the line between the forehead and
the hair indeed. And now we can, we can go to the other parts, to the others part of the hair. Let's draw a lock of hair
with also triangular shapes. And we can go up a
beggar and lock of hair. Okay? And then we have the
shape of this hair. I'm going to add some
details and that's it. That's it. It is done. It is not hard to
draw hair guys. It is not the heart at all. And the real hope I
helped you guys to learn how to draw
different types of here. If you have any questions, feel free to contact me. Okay. Thank you very much
and see you next.
15. Drawing Kawaii Faces: Hello guys, how's
go and welcome. This video lesson, I'm
going to teach you guys some basic principles, some basic techniques
about how to draw if face, you know, with a tile. We want to draw here
called white faces. The first thing that
you guys need to know is that we have
a cute drawing. Hawaii. Hawaii drawings
are acute traumas. So it is important
to troll drawings. I'm going to use this
all right here, okay, just to draw circles
that I'm going to use to draw my wife's faces. And of course, you don't have to actually lead a tool
to draw circle. But I wanted to draw
a perfect circle. So I'm going to use this
tool right here. Again. Simple circles, just like these. These circles are actually pretty nice, pretty
very perfect. Oh, another one. That's it. We have five circles and we're going
to draw a five phases, five Kawhi fixes in
each one of them. As I told you guys, these are cute drawings
and it is important to understand the proportion between each one of the
parts of this face. Let's divide right here
with horizontal line. Just like this, you
know, these two circles. Let's draw the first worm
with an I right here. Okay? That's gonna be a real simple I. It is not hard to draw these
kind of eyes because it is like the circle and
you can just paint. As you guys can see, we have one night
bigger than the other, but I'm going to fix it
with these reference lines. And that's it. Very nice. Eyes with the same sign size. Now let's draw the mouth right here with
the pyramid line. And that's it. Very simple. This is a Kawhi, Kawhi drawing.
16. Drawing Hands Kawaii: Hello guys, welcome
to this lesson. I'm going to teach you
guys how to draw hands. We can see some techniques and some really simple way to
draw cold white hands. And as you guys already
know, we always, always draw with a simple way when it comes to
call white drawings. So let's start right
here with this shape. Okay? We always will use curved
lines in that's fine. That's what we want. Okay. That's the Arduino. This the arm or oh, maybe the leg of the character, of the car. Wide character. We have right here, the hand on the add to the end. And on this especially
kind of hint, we want to use any
detail. That's it. You can just draw like
this and that's it. Now can go to a second example. In a week, can draw
three fingers. Just like this three
simple fingers. We use a lot to this
second example. Well, the first
one, we don't have to draw in the fingers. We don't have to
add any details. But on the second one, as you guys can see, we
drove three fingers. And you will use a lot, this kind of of arm in hand. This second example, we
can go to a third example. It is like a rounded example. Just like this. Okay? We have a kind of a
different and different tip. A different hand. Indeed. You don't have to add in finger, you don't have to
draw any finger on this kind of hair kind
of hand. I'm sorry. You don't have to add
any kind of finger. We have this other example here. You will draw the fingers, you know, it will draw the
thumb and the other fingers. It will make chest like this. We have the thumb. Right here. It is. This the
shape that we want? We have the thumb and that's it. Okay. Of course you don't have to draw the other fault forefinger, so you just have
to draw the thumb. But you can see where are the four fingers and
the thumb, okay? And basically that's it guys. Very simple hints. You don't have to add a lot of details are very
simple drawings. Okay? And that's it. That was the lesson about hands. And all of them have
a cutaway is titled. Next lesson, we're
going to talk a little bit more about hints. Okay, thank you. Bye.
17. Drawing Hands kawaii Holding Objects: Hello guys, how's it going? Welcome to this video lesson. I'm going to show you guys
today how to draw hands, holding objects, holding
things, holding a pen. So anyway, you will see, it is very simple. We saw on the previous lesson
four examples of hand. We solved the last
example with a thumb in. We drew a second exempt
with three fingers in. The other two with any fingers. Anyway, it is not
hard at all to do all hands with a
cold winds tile. And I'm going to show you guys how to do how to draw them. Hands holding objects. Let's draw right
here eight bands. So very simple, pencil but very Bay
it is a very big one. Let's draw this first
hand with no fingers. Let's draw this
shape right here. It is almost like a
finger, you know. But, but no, this is
the hand, Indeed. Okay. Just like this
really courage shape. You can draw the arm. We have the pencil right here. And I think I'm going to use my blue paint so to, you know, to highlight the hand so you guys can better
visualize the hand. Then also the arm. And that's it. We have the hand holding
the pencil were really big. Benzo. And that's it. A very simple technique. Very simple guys,
very, very simple. Now let's go to a
second example. And now we're going to use, we're going to use a
hand with fingers. Okay? We're going to draw what? A hand with fingers. And you can do this. Of course. Let's roll now the size
of the hand, okay? That's gonna be the first thing that I'm going to draw them. And we want this trauma
like days, you know, like holding an object like this that you guys are seeing on
the screen with my hand. We have this size of the hand. Let's roll three fingers. And we have the thumb. Okay, the thumb, just like this. Right here. We can add this detail, this curved line like
some circle in the arm, right here. Going down. Then I use my blue pen so
to highlight the following. Okay, We have the
object right here. One finger, second finger, third finger, or fingers. And of course you could
add more fingers. But anyway, this is a wine for, well, we don't have to
add the five fingers. Four is enough. We have the phone and the
details right here of the hand. That's kind of a more complex
probability of overhand. It is, we have more
details, okay? This kind of hand. But anyway, it is not hard. I'm sure you guys can do it. In. Now. We can draw right here, in line right here, the arm. And that's it. That's it. We have three fingers
and we have the thumb. A very nice shape and very
nice very nice kind of hand. A little bit more complex. But anyway, if you practice law to make sure you
guys will be able to do the second example. Now we can go to
a third example. Let's start with
two vertical lines. Now we can do like a
semicircle right here. Now let's draw the object. Okay, that's fine. This is the object that
this hand will hold. Now we can, of course
draw the hand, but I'm going to just
highlight the object. Anyway. We can draw the hand. Guys consume using curved lines to draw the hands on this case, because the only ones
we're all fingers. Okay, But anyway, this character
is holding this object, so it is important to draw
curvy lines just like this as you guys are
seeing on the screen. Okay, this character is holding just like this, the object. That's it. That's it. We have our third example. Holding an object
just like this, middle fingers on this
example, but that's fine. We can draw hands like this. And Hawaii, Romans,
gay guys. Very nice. We have three really, really nice, really
cool examples. And it's very important
to practice guys. Okay, we're going to do now
another example right here. Let's draw this, this example won't have
enough fingers, okay? We just drew fingers on
the second example anyway. But we're going to draw a
hand without fingers. Again. This example will be just
like the third one and all. Anyway. But now look what I'm going to do that is
look what I'm going to do. Lines, okay? Now let's do just like this, can go up, up again. Now we have the object. That's it. I'm going to paint
the object with red. And that's it. We don't have fingers. Okay. But all parties, you can see that this hand
is holding the object. This example, it is one of the simplest ways of drawing
head to hold it in object. But anyway, I like the
third example indeed, but of course you could choose any one of these examples to draw this drunk hints, Okay, you can choose whatever way you want to draw your hands. In Kuwait, Romans. And that's it, guys. That's it. Thank you and bye.
18. Upper and Lower Limbs: Hello guys, how's it going? Welcome to this lesson. And I'm going to
show you guys how to draw upward and lower limbs. You know. I'm gonna teach you guys how to draw arms and legs. And I'm sure you guys
will enjoy this lesson. We have right here a real
simple character, Harry, we have the, the head
with a circle, okay? And we have a part of the body. You have the chance
to know the badly. Anyway, we could add some
more details like the eyes, but we don't have to
add a lot of details. We will practice how to
draw upper and lower limbs. Of course, that if you
already know how to draw upper and lower limbs, you can do just like days. You could just draw. I can draw right now. Simple, just like this. Let's say we have the arms, we have the legs, and that's it. However, if you're a beginner, if you're starting now to know
and to learn how to draw. Of course, if you want to draw a character with more details, we could do just like this. Then I'm going to do on
this second example. We have the middle of the
character right here. I'm going to draw a dot. And this dot. I'm going to draw
the shoulders in a no do like case catch of the arms of this
character to the lags. You can do like this. You can divide it in
the middle right here. Then we have the
middle, the middle. Of course, right? Then we have 1.5 in
the second half. Now I have two halves. And now you can draw the arms, the legs, I'm sorry. You can draw the legs. You can draw indeed the arms and legs because
you already have a sketch. You already know how to plagues. You already know how where to draw your legs and your arms. And of course you can use these techniques that I taught you guys that
I'm showing you guys, you can use this technique. And it is a very simple
technique, but indeed very, very nice that you can use actually this technique to
any kind of body position, to any kind of character. Let's do a third example. And we're going to
do the same thing. Let's draw a sketch. The sketch of the
arms and the legs. We can crawl the arms in now. You can draw the legs. That's it. It is very nice to draw a sketch guys because
as you guys can see, it comes easier to draw your characters in
any kind of position, in any body position. Okay, that's it. A very, a very, very nice techniques
are very nice attempts, very nice tips that I
showed you guys in. That's it. Thank you and see you.
19. Legs and Feet Part 1: Hello guys. Welcome
to this lesson. There are a million ways to
draw lags into row feet. Of course you can use
a lot of details. You can use different ways
to draw legs and feet. It depends also a lot on the character that
you were trauma. And if you draw in a pub P
for drawing a human being, if you draw it, if you draw in an object with the y's tiles. So there's a lot of, a lot of ways to
draw legs and feet. But I'm going to show
you guys some tips. I'm going to show you some, some ways in some
techniques that you can use to draw your legs
and to draw your feet. Okay, let's do this
first example. Just like this, a very
simple shape. Okay? And that's it. We already have
very simple legs. These are Conway lags. Okay? These legs, you know, it is a pairwise tile. And that's it. We have here Laura lamps
in very simple, very easy. We can, you can use this
kind of lower limbs. Of course. You can add some shoes. It could add in details
they want to do to add. I don't like to draw just the
legs and all without shoes. I think that it is very nice, very important to
draw these shoes. But of course you
can, you can choose, you can do whatever
the way you weren't. Another, another example of
another way of doing it. It is this one that I'm
going to show you. Now. We have here a hand ahead. We have a body, a part of the body. Now we can draw the legs. Just like this. It isn't all long legs, you know, it is short
legs and that's fine. You can call 921 to the other. With the same circles. It is a very rounded
shape, rounder shape. And you can use this, this kind of legs
also in animals, but of course you can't, you can use in human beings. Now that's fine. You can use in human
beings, in animals. That's fine. We have a part of the
body, the valley. And now you can draw
just like this, the lakhs right
here on the metal. You can connect to warm
part to the other. Then only this very
simple, very basic. And that's how you can
use this kind of legs. Legs in humans and
also in animals. Now let's see another example
of the kind of legs. Legs. Usually we have
to know the foot. One foot with a
triangular shape. Okay? A really, really simple shape. Also. We can do the same
thing to the other one. Triangular shape. We have some shoes. And that's it. As I told you guys, we have thousands of ways
to draw legs and feet. You can choose the
beta, one for. You can choose the best
way for you to troll. The way you like the most. Look for example, this
other example right here. It is just like the
first one that we did. Have a thicker part in, then we can draw the food. Can do the same thing. The other leg. Okay, very nice,
very simple, basic. In a lot of, a lot of designers
use this kind of legs. Now let's draw another example just like that exempt, right? That we have kind
of a thinner lags. These are thinner lines. You can draw a bigger shoes. You don't have to, you don't
have to draw that big. Choosing to draw shoes too.
20. Legs and Feet Part 2: Hello guys, how's it going? Welcome to this lesson. In this lesson we're going to
keep drawing legs and feet. We're going to keep it from in the lower limbs of the body. And from the previous lesson, we drew some examples
we have here, for example, that we
drew on the last lesson. And as you guys can see, we don't have knees
in those examples. But of course, we know
that every leg has a knee. Anyway, let's draw an
example right here. We have a simple line in circle. We can do the same
thing right here. We have the leg lights. As you guys can imagine. We have the nice right here in both legs
we have in years. And actually any kind
of leg will have knees, you know, sometimes you want. But anyway, it is important that you guys don't forget that
we have nice or relax. For example, if you want
to draw a leg like this. If your character is sitting in a chair or
something like this, you guys can imagine that
we have a knee right there. And, you know, it is.
21. Drawing Kawaii Torso: Hello guys, welcome
to this lesson. And today I'm going to
show you guys how to draw the upper part of the
body of your characters. We got to learn how
to draw the chest and the valley in a way that's going to be
a real nice lesson. Let's start with a sketch. We have right here, line of the shoulders. And we have a right that
didn't line up the hips. And just very important to
understand the difference between the size of the shoulders and the
size of the hips. For example, if you want to draw a male character, for example, it is important, it
is important to draw a larger shoulders and the
hips are not that large. You know, we have kind of a little pep
in beggars shoulders. But when you're drawing
a female character, you do the upset. And I'm doing this right here. We have shoulders,
handoff smaller, and the hips are larger. And well, it is kind of
standard to do this, guys. Anyway. You also could draw this
other shape right here, that is a neutral,
neutral shape. You could use this shape to male or female characters.
It doesn't matter. We have the line of
the shoulders and the hips basically
with the same sides. We could add the lower
and the upper limbs, arms and legs, to enter Romans. But anyway, we have
here three examples. We have the first one
that's a male character. We say beggar with
the larger shoulder. We have this second example. This is a female character
with larger hips. And then a third example where the same size to the
shoulders into the hips. And you could use
the third example to male or female characters. Okay? This second example could
also be a neutral shape. Of course, you couldn't use this second example to draw
male characters. That's fine. That's okay. You can even do whatever you want with the drawings and all. And you could use this second example to
draw a male character. That's fine. And just like
this as I'm doing right now. However, guardsmen
you choose to draw, to use the second example
to draw a male character. I advise you just to
change a little bit. You know, because you don't want a character too feminine. It is a male character in OLS. So just a little,
just a little bit. This part, as you guys can see, we have a hip that it
is larger than the, the shoulder, but we can
see a big difference. The difference is not that big. So it just advise
you guys to do like this when you use the second example to
draw male characters. So that's it. We have here is some examples, and this was our lesson. Thank you guys. Bye.
22. Drawing Kawaii Body Positions: Hello guys, how's it going? Welcome to this lesson. And today I'm going
to show you guys how to draw body positions. Okay? We saw in previous
lessons how to draw the upper and lower
limbs of the body. We learned how to
draw arms and legs. But on this lesson I'm going
to show you guys how to draw some different
body positions. Ended is very important
to understand how to draw different
body positions. Skirts or characters can be a walk in or jumping or sitting, or we have a thousand positions, they control two characters. I start with this
example right here. Of course, you can draw
a sketch to help you place all the parts and other
things of your character. We have right here really
simple body position. That's a really
cute character and very easy and very easy
body position to try. And that's it. Let's
go to another example. Let's draw this circle,
that's the hat. Now let's use a
sketch to help us to place the arms, the legs also. Let's do like this. Okay. That's really
nice about a position. And this sketch will help us to, to know how to draw, to do a really nice,
beautiful drawing. If you want to control
the control feet. Let's do the same thing
to the other side. And we basically have
this body position, a very nice one. You can highlight Withrow pink. Drawing. Basic body position
with very nice, very cool by the position. Let's see another example. Let's start with the head. Of course, you can
use a sketch to help you to place the
parts of the face. If you want to draw eyes
and mouth, you can. Okay. Let's draw the legs. Now. Let's draw our now a second basic shape, of course, but a
very, very nice one. Now let's highlight
with the pan. Basically, guys, you can use the same techniques
to draw any of them. Kind of body position. We can use a sketch, you can use a simple lines
to draw your sketch. And they will be able to draw
any kind of body position. You can draw the arms
up, their arms down. You can call a
character running or maybe sitting on a
chair or whatever. Anyway. It is very important to understand
the basic techniques. They will be able to draw
a lot of body positions. You can go to another example. Let's roll the head. Of course. This part is that you guys
already know how to draw. Now let's use a sketch. Let's choose the body position
that we want. The legs. We have in need. Of course. You can do something like
this on the other leg. Now we can draw the
arms, the legs. This character is maybe
running, you know. You can add eyes and mouth to this character and highlight. But that's it guys. We have a character now running. Maybe. The way the technique that you will use is
gonna be the same in all of these body positions. Okay guys, I really hope
this lesson helps you guys to learn and to understand
how to draw body positions. See you on the next lesson. Bye.
23. Kawaii Pizza: I started drawing
the first shape. It is a pizza slice. Let's make a triangular shape. And although the second
is also triangular, you can see that the
edge is like a sausage. It is heckler, just
like the first one. Like some undulations
in the trace. We went in natural drawing. You know, there are
two similar shapes, but also different
at the same time. This is easier to do. It is me with Australia lines. To create a 3D effect. We're going to make this part or this side of the pizza slice. Now the eye and its
shine, same height. Let's draw the second
eye and its glow too. The mouth detail in this circle. To finish the drawing. Where gamma and do
the same thing here. Let's mark the eye
height in the model of each eye. The mouse. I'm going to draw a
simple, simpler mouse in here and another
pizza detail. Okay? When we finish the
pencil Dragan, we have to handle
either the online. I'm using a felt-tip pen. You can use one
felt-tip pen tool. But if you don't have one, you can use a regular pen. Free to choose the tools
that you want to use. In this part, we just
have to handle ID online. You have to be very
careful when doing it. If you make a mistake, you won't be able
to read, raise it. This is why it is so
important that you make the Roman well-defined
it with a pencil. Hi, no, we have to clean the drawing. Erasing the pencil is
chirps that we don't want. Only the highlighted
on land must remain. We don't want these strokes in our way when we
start painting. I'm going to start with Ibram. Have to mark the edge. It is in light brown guys. A lot of pressure on
the paper with it, with a pencil, so it doesn't
get too dark. This part. Let's make it a
little bit clear. All this side of the edge part. In this other part lets
you the same colors. You may be doing the
same color tone. Let's mark the edge with
the same brown pencil. You must make it kinda with the same hue without putting too much
pressure on the pencil, on the paper with a
pencil in order to get the clearest possible. And to make the shadow, we want to use the dark brown. Now you can put
more pressure with the pencil in order
to get a darker here. Here we did the same thing. I'm going to mark
the shadow detail, but the dark brown to with the yellow paint. So I'm going to paint the whole upper surface
of the chorion. You cannot paint the
circle or parts. With the exception of
the circular part, where you're gonna call
her all of this in yellow. And the width, the red pen. So I'm gonna paint
to the circle apart. You can make it lighter red without putting too much
pressure on the paper. Or if you want to
more expressive red, you can make a darker red. You can choose with the same color pencil I'm
going to paint to the tongue. If you decide to make a
shadow in the drawing, you can use the dark
red or even the brown. Remember that this is
completely a patient. This is just if you want to draw in more expressive design. Here, we make the same thing. I started with, color
with the surf facing yellow around this circle apart. So as not to get yellow, it is circular parts. And let's color all the
other parts in yellow too. Now using the red pen. So again, to color all the remaining
parts of the drawing. Highlighting the edges and
these hair color parts. If you want, you can
highlight the shadow too. And this is our
finished drawing.
24. Kawaii Cupcake: Hello, how are you? In this lesson, we're going
to draw a quiet cupcake. Let's start drawing
in the baking cup, which is basically
like cake square. By the top part is bigger
than the bottom part. This part here is a
little bit bigger, okay? And then the top, we
draw likey cones. We draw a semicircular shape. And then this top part, we must draw a little bigger and go into erection to
the bottom part. I'm going to highlight
it a little more here. Okay, We have already hear
the online of our cupcake. If you want, you
can draw into tell here to make the
draw more literal. Okay, it was a beautiful
cupcake and also cute. Now I'm going to mark
the height of the eyes, the shape of each I am, I'm going to draw the
shadow of each one. I'm going to color the
rest of the eye in black. Let's mark the mouse. I'm going to make
a Smiley mouth. Oh, okay. Very good. Let's make the eyebrow
21 cherry on the top. And that's it. Our cupcake is done. Now. Welcome to highlight the outline with a felt tip pen. You can start right. You want at least starting from right side to
the left, left one. You can start anywhere no
matter which side you choose. The important thing is to be careful not to get around the drawing correctly and
not make any mistake. Because as I've seen before, as we've seen before, he's very hard to find an error
caused by a felt-tip pen. We go around the eyes, the eyebrows, mouth. And we can see that the
drawing online it by the pan. It's much more beautiful. It gives life to the drawing. Okay, Now it's time to
erase the pencil strokes. Use the rubber carefully. After you erase all the
unwanted these strokes. Let's start painting. I'm going to use pink at first. You can choose any color
you want. Alright. I'll start painting
very Colleen, and I must follow the same line from the
beginning to the end. Here. I'm starting from the
left side to the right side. You can do the same if you want. I want a lighter pink. So I must not put so much pressure on the
paper with a pencil. Hue is already good for me. I'm going to leave
the top part white, even so I'm gonna
use the white pen. So because of the kMer, I believe you will
know a lot of changes, but when using the white pen, so you will see that painted
surface gets his movie. It gets a little bit different from the white of the paper. It is a small difference. But it's very important
to use the white pencil, especially because
we're gonna learn from some details over it. I'm gonna make some
irregular Strauss. I'll start with red. These are pretty random strokes. Now the green Pinto in some blue too. Let's paint the cherry
and also the tongue. Now our drawing is done, but to make the
pink color detail, I'll eat them are homogeneous. I'll use the wind on
it just to remove a laid out the trace
left by pen so there are always some stroke and
the white pencil helps to reduce the scrambles
that remains. This happens because
the paper is not 100%. Smith, has a rough texture here, so Charmin is
a very simple one. Isis really hope that you
can make a good drawing. And if you need help in any
way, please contact me. Okay. See you in our
next video tutorial.
25. How to Draw a Kawaii Cookie Part 1: Hello everybody. How's it going? Today? We're going to draw what
a cow white cookie. That's kinda be a
very simple drawing and also a very cute to trauma. And let's start with
the circular shape. You can just draw a
circle shape like this. Okay? We don't have a perfect circle right
here, but that's fine. We don't have to have a perfect circle to
draw this cubed code. Keep this cute cow wide kooky. Anyway. Now let's
divide right here on the marrow with
a vertical line. Okay, So we have two halves. We have a right part
to lay a left part. Well, let's divide with
the two horizontal lines. These are our reference lines in the desert important
to have them. We have the eyes right here. Also a, also circles. Okay? Both of them are circles. I'm going to draw
detail down here. And some divisions
for little lines. We have also the, the main shine and
the second shine. Because we want
light to this eye. Both eyes actually,
we want light. We have the first pie done. Now let's go to the second one, the second eye, and
we're going to do basically the same thing. Let's do right here,
this part below. Now the lights there, we can paint the eye. Hello Serrano, a mouth. I'm going to use this shape
with two curved lines. And I really like to use this shape of mouth because
we know it is very, very cute, very nice, very cute in very easy. We already have the face. This Hawaii cookie. We don't want the edges of very, very perfect and very
circulares in all. I'm gonna do these details. It is very, very simple
details with COVID lines. This is a kooky and we don't
want a perfect circle. We don't want to circular shape. You want, so we want some way. Now let's draw the chicks. Very cute cheeks. That's going to be
a chocolate cake. So we have some, some details like these. Of course you can draw
some beggar than others. Some with an oval shape and some others with
the circular shape. Very nice, very nice
because we already have our cookie and
I'm going to use my eraser because
I wanted to clean my drawing or one to raise it the lines that I
won't use anymore. And after this, we
can use the pan. Now after we clean the drawing, we can use the pan in highlight the parts that we want to maintain
only drawing. The mouse. And of course, the eyes. I'm gonna change my, my pen because I want a
pan with a thinner tip. But anyway, you can use
whatever paper you have. But we have these details, so it is better to use a
pen with a scanner tip. We have five
divisions on one eye. So we're going to have
five divisions and the other 12345. Okay. Now the lights of the eye, then I'm going to paint all this part with black paint. Oh, this entire part. A. Now we can go to the other one. Okay, Very nice. We have not the both
eyes done in the mouth. Very, very beautiful
eyes and each. Now let's highlight the cheeks. Then of course,
all these details that we have on the cookie, chocolate cookie,
don't forget about it. Of course, you can
change some detail. You can add more
circles like this. That's the final art. You can do anything you want. But basically we have
the drawing completed. We have the drawing
basically term. And I'm going to just
wait a few seconds. And I'm going to use
my eraser to erase or indeed any kind of line with that we did with the pencil because we want just the
lines in the anyway, I just wanted to
maintain the lines of we did with the pen. Okay. The drawing is clean, the drawing is completed. Now we can paint these co-equal, and we're going to do
this on the next lesson. Bye.
26. How to Draw a Kawaii Cookie Part 2: On this lesson,
we're going to paint this really cute and
beautiful cookie. Let's start with this part
right here on the eye. And I'm going to use
blue to paint this part. And of course, you can choose
any color you want to use. You can paint the eyes and all the cool kids in
whatever color you want. But anyway, I'm going to
use blue to paint the ice. And of course I'm going to use the same color on both eyes. And as you guys can see, we just painted the eye and
the drawing is much better. Animal, more beautiful to have the checks in Atlanta use
paint to paint the cheeks. Now, I'm going to paint the
body of this, this character. I'm going to paint the cookie. I'm going to use
brown to do this. Again, guys, I won't put a lot of pressure
to the past so, you know, we don't have to rush. So take your time. Be patient. Ingest paint with a
smooth CU just like this. As you guys can see, I'm doing. It doesn't matter, really guides the direction they
you are painting. Okay. You could paint with
circular movements or you can paint it any
way you want to paint. We don't have any role
when it comes to paint. The only thing
that I want you to guys don't forget, is two, not put a lot of pressure on the pencil and try to
paint with relief, smooth hue because we
want his mouth hue on this particularly character. And of course some
parts will be white. But anyway, you can
just keep painting and painting in all the white
part will disappear. Once the homogeneous
hue warranties move hue and keep doing it. Does it matter the
direction you paint? Anyway? This don't rush
it. Keep doing it. Now we basically have all the colors that we want
to use on this character. I will just use a
darker brown to paint these final details
of this cute kooky with the same color it bends. So I'm gonna use this to create some shadows
to this drawing. I'm going to do a really smooth shadow on the edge of the
coat of the cookie. I'm going to do
this all over here. Okay, very nice shadows, Very nice shadows with
a darker hue of bone. Going to also add some shadows
on these parts right here. Select these various moves. I'm going to use the
white colored pencil. I'm going to use white pencil. And of course this pencil will, will give a better view. You will see guys, it's very important to
use the white pencil. Guys can see we have some
white part on the character. That's normal, that's
fine, that's okay. But when you use
the white pencil, this white part
kind of disappear. Okay, very nice. Drawing is completed. That's the Hawaii kooky
that we wanted to draw. And practice this drawing, try to do to draw a
cookie just like this. I'm sure you guys
will become amazing. Trolleys. Thank you very much. I hope I hope it
helped you guys. And if I have any questions, feel free to ask me. See you.
27. Drawing a Kawaii Chocolate Bar Part 1: Hello everybody, and
welcome to this lesson. And today I'm going
to show you guys how to grow a chocolate bar. And that's going to be
a Kawhi chocolate bar. And I'm sure you guys
will love this drawing. Let's start with
the sketch, okay, it is very important to
always start with the sketch. We're going to just
draw the shape of this cute white chocolate bar. And at this point, we want at any kind of details, okay, we're going
to do this later. All we want to do on
this part is to draw the sketch and draw
the initial shape. Now guys, let's divide the reference planes
that we always need. Okay, let's start with the horizontal line,
just like this. And we have actually a division between the part with
chocolate in the lower part. So we're going to draw away
the packaging part, okay? So we're gonna have
these two parts, the chocolate part in the
pack engine part below. Let's divide a tweet, a very, very wavy lines, okay? And let's do like this. We can go down again and do the same thing
on the other side. Wavy again. Okay, that's gonna be a
really nice packaging. Now, let's draw the
reference lines because we wanted to draw
the eyes right here. So let's do this. I'm going to draw a big eyes. And a little mouse. Acute mouse isn't guys can see this mouth
isn't all very nice. And the reason for that
is because I didn't draw the reference line of the
metal, the vertical line. But now that I drew
the vertical line, that I can better visualize
where to draw the mouth. We have a really
beautiful in cute mouth. The light of the eyes. Have a beggar light
in a smaller one. Let's do the same
on the other side. Okay. And I would have a really
cute face, very cute face. You can go now to the chocolate
part with the squares. And we basically are done with the pencil because we already
have all the main parts. Now let's do the
final art with a pen. You can use whatever
pain you have. Okay, But of course, ends like these that
I'm using are better. The tip of this pen
is kind of a curve. I'm going to paint the eye. All the mouths. We already have the
face of this character. Guys. Let's use this other pain. And we're going to outline in
highlight all of this part. You got to highlight of course, the part of the packaging and also the part of the chocolate. I'm going to use a ruler to help me draw really straight lines. I'm going to undo this
site. That first. I'm going to draw
curved lines right here in the corners. And then I'm going
to use my ruler again to draw a straight line. And down here also the inner part. Okay guys, okay, we have this
really nice chocolate bar. Now we can paint these Robin.
28. Drawing a Kawaii Chocolate Bar Part 12: Well guys, on this video lesson, we're going to paint
this really nice, really cute chocolate bar. I'm going to start using my eraser because I want
to clean this Rowan and I want to erase all the lines that I
don't need anymore. So I advise you to do the same
thing with your drawings. For paint before given, give color to draw
minutes, use the razor. Now let's use a brown pencil to paint this part right here. I want to really smooth
hue or want a lie to you. So I won't put a lot of
pressure on the pencil. And there's no
secret on this part. You just have to paint in
any direction you want. You can do circular movements or you can paint whatever
way you want. But we don't have
any kind of secret. Right here. The technique is very simple. You can paint all this
part of the chocolate. Thank you. I'm going to use a I'm using the brown colored
pencil on this entire part. And as you guys can see, we have some white part, but we wanted to homogeneous. You want a smooth hue. So I'm going to keep
painting, okay? Just like this because
I don't want a lot of white part at all. I don't want to let a white
dots on this drawing. But remember that
you don't have to put a lot of pressure on these, on the pencil, okay? You don't have to put
a lot of oppression. It is not necessary. Okay? That's the
hue that I want. A very nice hue. I'm going to use a
silver silver pencil. But if you don't have a
silver pencil, that's fine. You can use any other color. Okay. But I want to use these colored pencil because I think he's going to be
very nice to this Rowan. Some parts are worn paint, once a wide part on this
part of the packaging. And some parts I'm again, I'm going to paint
with a darker hue, but other parts I'm going to
paint with a lighter hue. Okay. That's fine. Very, very good. We have some darker part and some lighter parts,
and that's fine. And I'm going to
use a yellow know to paint this part right here. You could use any other color, maybe green or red or blue. That's fine. You can choose and do convenient. Oh, this part, it is a
really simple process. And it's basically done this
Romans basically completed. We have all the main callers. We have all the main parts that we wanted to draw into paint. But of course we can add more details and I'm going
to add some shadows skills. It is this very nice
to add shadows. And I'm going to add right here. And it is very, very, very nice to use as
shadows in your drawings. Because the drawings become
battery more beautiful. Right here with the
with a brown pencil. I'm adding these shadows. Very nice, very nice. We can go now to
the yellow part, and I'm going to add some shadows also
on the yellow part. And I use it the silver pencil
to paint this metal part. But of course it has accused
using other color you may, you could use actually a gray, the gray bands, so that's fine. Okay. Even a regular pencil you could use to paint
this middle part. You don't, you
don't have to have a silver pencil to do this. In down here. Also. Some shadows. Now the checks, I'm
going to use pink. It is a darker hue. But very cute. Checks to n. That's it guys. We have, this drawing
is completed. We'll just add a little
detail right here. And that's it. That's a very nice, probably really hope I helped you guys to learn how to
draw this cute drawing. Any questions, feel
free to ask me in. See you. Bye.
29. Drawing a Kawaii Fried Egg: Hello guys, welcome
to this lesson. And today we're going to draw a fried egg that's going to
be a cold white, frayed egg. And let's start with this
circle, circular object. Of course, you could
use any kind of circle object because I want
to draw a perfect circle. So let's do just like this. Now we have a perfect circle. I'm using my pencil, but you could use your mechanical pencil
or even your pin. But if you're a beginner, advise you to use
your mechanical pants or a pencil because you
can use the eraser. Anyway, let's draw the
parts of the face, and we already know
how to do this. So let's draw the
reference lines, two horizontal lines on the middle and then
a vertical line. Just like this. Now we can place the eyes. That's going to be a close it, I both will be closed it ice. What's curved lines. Very simple. This character is going
to be a happy characters. So one too happy I and
they have p mouse. Let's draw the mouth. And of course I'm going
to use a curvy line too. But just like this, it does acute trauma
and acute characters. So the mouth will be very
close to the line of the ice. And all. Let's draw the body
of the fried egg. Of course we want to draw a
perfect circle like this. We're going to draw
the bottom of the egg with some curved
lines just like this. We can do this all over here. Oh king. Very nice. And very simple shape. And of course you
could use more curves. Anyway. You can do whatever, whatever the way you want. That's fine. Basically guys, this
drawing is done, it's completed because we
have all the main parts. We have the body, we have the parts of the face. But now let's do
the fine art, okay? If you have a eraser like
this that I'm using, you can just use it to erase the lines that
you don't need anymore. Just be careful because you don't want to erase everything. So just be careful. Now I'm going to use my
pen to draw the final art. Very nice. Okay. Now we can go to the inner part, the eyes and the mouth. Okay, very nice, very cute face. And I'm going to use
again my circular tool, my circular object to draw this circle because
I want a perfect circle there in nice, very, very cute and beautiful. We have the final art done. Drawing is basically completed. And I'm going to use
the eraser again. And I'm going to erase all the lines that I
don't need anymore. I don't want to
maintain on destroying. It is very nice to clean
the drawing guide, sobering advice you
the FTE use depend. You use a razor to clean your trauma in and erase the lines you don't
need anymore. Now I'm going to
paint to the drawing. And off course I'm
going to use yellow. Okay, on this. And in part. Guys can see, I'm not putting a lot of depression and
not putting a lot of pressure on the depends on they don't have
little need to do this. I'm being very smooth, you know, just painting the trolley. As you guys can see, we have some white
parts on this part. They shouldn't be all yellow. But that's fine. You just have to keep
painting just like this. Okay? And it doesn't really matter the direction that
you are painting. You know, you can use
circular movement, who can paint it
any way you want. But anyway, you just
have to be patient guys. Don't rush, take your time and paint all the parts
that you have to paint. And also we'll add
shadows to this Roman. So all these white
parts will disappear. I'm going to start using
the orange pencil, the orange colored pencil. I'm not putting operation a lot of promotion to
the parasol, okay? We don't have to do this. Let's be very smooth,
very, very kind, and just add some shadows on the edge. Okay? Now I'm gonna use my white pen, so it is very nice to use
the white pencil, guys. And I'm going to
use it right here. The white, the white pencil gives a real nice
hue to the forelimb. So use it in, That's it. I think I'm going to just
do a little bit more here. Okay, Very nice. Now we have a really big
white part on this drawing, but I'm going to
add some shadows because I think
it's gonna be nice. Of course. I'm using the gray
pencil by medical use. All the other kind of color. But anyway, I'm going to
use the grape pencil. I feel that it is
mattered to use the gray, the gray colored pencil. And I'm going to do just
like these are really, really smooth shadow,
really nice shadow. I'm going to do also a
little bit right here. I'm not putting a lot
of pressure at all. You don't have to do this. One, smooth shadows all
over the fried egg. And basically is done. This drawing is
basically complete. It, I'll just add this
detail down here. Just like this. It is a simple detail. And that's it. That's it. A really nice fried egg. Very nice guys, Very nice. It is very important
to add these shadows. That's it, that's it. You can practice
a lot in drawing, drawing just like this. Thank you very much and see
you on the next lesson. Bye guys.
30. Drawing a Kawaii Star: Hello. In this video, I will show you how
to draw only start in adapted the quiets title. Journey started
periodically with all the tips. Gibson heart. But it is actually
pretty simple though. How we can draw a star
in an easier way. This is going to be the top part and then we're going to pull
it towards the bottom tip. Stroke. We're going to
pull it to the metal part. Let's come back to
the middle part. Now let's pull this
second lower tip. Let's close this star. And the union is the
Orlando the star. Now let's do some
contouring, just Smith's. You want make rounded tips or triangle of points like
the ones I'm drawing here. See that I made some
changes in this catch. That they start requires towel. You're going to draw the eyes
and also with the mouth. As you can see, it is not complicated. It is not hard to
draw it at all. It is actually quite
simple to do it. Now we use a felt tip
pen or irregular pen. We want to highlight
the outline. You must wait a little bit seconds before I erase
and depends on strokes. And then we can use the rubber to remove the
unwanted the strokes. You want a drawling completely playing with the just
depends strokes. The second example, we're also going to draw
on the top tip. The bottom tip, the middle
one is the last drop. Very simple shape.
As you can see. I'm gonna do it one more time
so you can see it again. But if you want, you can
just pause the video. From the top. We
make the left side. Is truck tours, the middle part. Join the two tabs. Second button tip. And now you can close it and
finish the drug or this tar. See how simple it is. See how I make these
parts in a rounded shape. And here this rounded shape. I'm going to erase some strokes. Then align it with the pan. Let's draw the eyes, the mouth. I'll either cheek. You can paint these tar
any color you want. The most common color, use it to paint stars is yellow. And that's the color
I'm gonna use here. It can use blue, white. It's up to you. We can choose the
color you want. But I'm going to use yellow. There's still some
strokes over here. I'm going to color all this part in yellow. This one. I'm going to use yellow
to buy the cheek. I want a white mouse will
change the color to the stars. Mouth is open. We can see just her tongue. So I'm gonna call
her mouth in red. Now I'm going to use
an orange pencils to create a shadow. Make this isn't patient. However, it is nice to make it. So I'm going to put some shadow details here
at the bottom of the star. It's really cooler
where we draw a shadow. I'm going to use orange
over this yellow part. I'm not putting a lot of
pressure on the paper with a pencil as you
color it in orange. The yellow kinda observed
the orange color. And so I use a slightly softer pencil so as not to give too much
emphasis to the orange, so that E will have
a shadow effect. Now I'm going to use
pink color the cheeks. I use very soft pentose. I want a darker hue in the mouth just to make
the effect more reddish. And he is, our star
is completely dice, is simple drawing
like you can see. Here are two examples of stars. Well, with the tip more rounded and another more triangular. And I hope you have
enjoyed this class. Okay, see you in our
next video lesson.
31. Drawing a Kawaii Cactus Part 1: Let's start making two circles. The top circle is a little
bigger than the other one. And so we can do the
calculus shaped. Look, how is it a syndrome
with f to draw me the circles. And then you adjust the shape. You can divide here in
the middle, the outline. Now let's draw the vase. Our cactus need a vase. The vase must follows
the character's body. But even so, the vase must be bigger than the
character's body. Okay? I'm gonna use the rubber to erase
some of these strokes. And here it is the
shape of the cactus. One, the arms at
the same height. They must be equal. So you can draw these lines. It will help you to do it. But even so the arms don't necessarily have to be the same. I'm going to draw the eyes, they play space between them. We also have to make the shine. You can make it smaller
shine if you prefer. To highlight to the eye, I will paint it with a pen
so I want a darker hue here. The mouth detail, a
simple Smiley mouth. Fairly simple indeed. The term detail, we have to highlight the part of the
roof of the mouth in black. It gives more tips to
the mouth and design. Let's make some
more adjustments. I'll make some
adjustments in the online to this stage of the drawing
is really important. Because when we
finished the outline, basically it is how to draw
will look like in the end. So pay attention to the details. You want to change
because after this stage, we're going to use the pen
to outline the drawing. And after we use the pen, there is no way to
fix some mistake. Does not erase, even if you
use something to cover it. If you use paint, it won't work. When you start to color it, the drawing is going to be ugly. So be very careful when
you make the online. That's why it is so important to make pencil drawing
well-defined. It now can see how nice the drought has become. And as you use the pen
to make the online, you can use a felt tip
pen or a regular pen. You can choose it
to, you want to use. What is important is
to make the drawing. And this will give a great
link to your design. Now, I'm going to
make the divisions. You may be doing more or you
may be doing a little less. Then I draw two mice divisions. Here. I'm going to draw a slightly smaller
division here in the center of it. Okay? Just to give a
highlight even warrant. Now, I'm going to
draw some thorns. Don't draw on turns
only in the outside. It is important to draw on some tones inside the
character's body. It makes it very Moines Metro. The characters has
harmed all over the body and not
just on the outside. You will see that the tortoise gets more natural
when you do it. The way I'm talking about. It starts in girls through, through the content,
onto the tip of it comes out of the job. Now I'm going to use the
rubber to erase some strokes here and leave the drawing
clean as possible, as clean as possible. Be careful not to you the rubber as soon as you finish
making the outline. Wait a few seconds
before using the eraser. Mainly encodes a day. If the day is hard,
it tries quickly. But even so, I defined u
to wait a few moments. It doesn't have to be much. Thirty-seconds is enough.
32. Drawing a Kawaii Cactus Part 2: Ideally use the pink pen tool to draw these little
balls under the eye. And I'm going to
use the Green pays. So in this darker part, that's the shadow
of the drawing. You can use the darker
green light I'm doing here. Pay attention to the
focus of the light. Watch where the light
is coming from. We can even market on the paper with a
pencil to help you. For you to put the shades
in the right place. There are different
points of light in several parts and
adjust in warm. I'm going to use
the light green to make declares part
of the cactus, which is a very cleared green. If you want to make the dark
criminal little more like the line green it may be
using depends on a few times. Do not put too much pressure
on the paper with a pencil. Yeah. At this stage, basically, you just have to
call a live drawing. I don't have much to explain. So keep color in Detroit one, be careful not to make
hearts tropes with it. You should be doing it slightly. I usually do circular movements except making the design
more homogeneous. But that is up to you. Just be careful not to
put too much pressure on the paper with depends on great job.
33. Drawing a Kawaii Clouds: Hello guys, how's it going? Let's start drawing a circle. Don't worry about making
a perfect circle. We're going to divide
it in the middle, horizontally in a
very, very colleague. Or you get to make
a semi-circle or each site wanting the last side, another on the right side, okay. About the same height
and the same size. Here I'm going to
draw the second one, the top in finally the second
part on the right side. And we can already
see shape of a cloud. You can highlight until
you tomorrow the trace. I did it in this saint
in the shape of circles. Now, let's do the main parts. I'm going to mark the ice highs, leaving the distance
between them. Shine. A little mouth like to use side by side. Very cute with the felt
tip pen to outline it. Be careful not to make mistakes. You're going to draw the eyes. Remember to keep the brightness. In. Finally, we make the
outline of the mouth. Here it is our
finishing drawing. Here I'm going to make
a second example. We'll draw a second cloud. I'm going to use
this same technique with the same shape
of the clouds. We start with a circle. Marks on the sides, on the left and on the right. We will keep the
same shape, okay? The eye's height. I'm going to draw a
Smiley mouth. Okay? We want happy you are in the outlier with the
third step here. It is same thing that we
did in the previous model. So you won't have any
cues making this model. We also have to
keep the eyes shine and the mouth in a
triangular shape. Once the outline is done, I used the rubber to remove
the access of strokes. The trace is made
with the band so that we didn't outline. We must erase them. It is important to keep the
row and as clear as possible. Because if you leave all
these tropes on the paper, when you paint it with
the colored pencil, it can get ugly, especially if you use
like colors, like yellow. We don't want this. Okay, The online is done
in the drawing is clean. Now I'm going to use the light blue pencil and
now use it at the edge, mainly at the bottom of the
drawing to make your shadow. Don't put too much pressure
on the paper when painting, because the shadow must be
very salty and very apparent. In a way, the bank, I will do the detailed
below the eye. Okay? The pencil
painting is very simple. It's just a shadow. Detail below the eye
highlights the drawing. Now let's make the drawing of the second cloud with
the same pen, pencil. I'm going to do the eyes
details and color the mouth. May use the rep hands so to
make a detail the mouth. But you can also
use a pink as well. Now I'm going to use
the grip pencil. If you don't have a grip pencil, you can use the pen or pencil. That's okay. All you may use another color like
blue for example. I'm using gray because it
highlights the drawing. Instead that gray
looks really cool. Clouds, both blue and gray. It's nice to use. Blue usually is use it
to draw the ring cones. So when you draw raindrops, For example, it is very
interesting to use blue. But if you make it with
green is pretty cool too. I'm gonna make a
shadow in this part. I want to highlight here. The shadow is a beggar one. That's it, guys. We've finished our drawing. Anything you need,
leave a comment. I'm here for you. Okay. Bye.
34. Drawing a Kawaii 2D House Part 2: Let's keep using
the green pencil. I'm going to use a
more circular movement on this part right here. I want a hue, a smooth whew. Okay, so I'm not putting a lot
of pressure on the pencil. I don't want it too dark here. So I'm being very
gentle and been very kind and very smooth. Very nice. We already have all the grass of this trauma and has just
paint this part right here. Okay. We can paint in the past. And I'm going to
use a dark brown, brown pencil to paint this path. Very light. You also o k. Now we can paint the mountains. We're going to use
also a brown pencil, but it is kind of
a different hue than the previous one. Anyway. And I'm going to
paint just like this. I don't want to put a lot of pressure on the
pencil on the paper. I want the light hue. As you guys can see, I'm painting with
these movements that you guys are
seeing on the screen. But anyway, you can paint whatever way you
want. That's fine. The only thing that
you really need to pay attention is to not put a lot of pressure
on the pencil on the paper. We don't want this, you want in light hue is moved. You I don't have a lot to explain on this
stage at this point. It does need to watch how I'm doing it and try
to do this same thing. Let's go to the other mountain. We going to do the same thing. Also. We're going to use
the same color. That said, very nice mountains. We can go to the sky. Right now. I'm going
to use my loop. I also paint the sky. All right. I don't have a lot to
explain at this point, guys. As you guys can see,
I'm just painting all the parts that I
need to paint in it. I can do the same thing. Okay, guys. That's it. Driveways painted a
lot of nice colors. As you guys can can
ask guys already know you can choose any
color for drawings. You could use any color. But I chose these colors
in the drain is very nice. And I really hope guys, I have to to just
see how to draw a 2D Kawhi house,
very cute house. And a very nice drawing with we have clouds,
we have mountains. So it is very, very, very
beautiful withdrawal. And if you have any questions, please feel free to
contact me again. I'm going to do will be very happy to help all of you guys. Thank you very much and see you.
35. Drawing a Kawaii 3D House Part 1: Hello guys, welcome
to this lesson. And today we're going
to draw a little house. However, we wanted to dislike. We did in the previous lesson. On the previous lesson,
we drew a to the house. But this time it's
gonna be a 3D house. But before we start drawing this amazing Carl White House, I think that I need
to tell you guys some principles in
some techniques that you need to
understand before we start drawing a 3D drawing. Okay, Let's drove right here a real simple square
with very simple lines. That's indeed the 2D drawing. Okay, we have the height. We have right here, the breads that they to Detroit. But if we drew this
other part on this site, just like this, we don't have
e to the drawing anymore. Now we have high tea. Okay. We have red, we have
8 third feature, okay, we have the height, we have the breadth, breadth. And then we have the depth. We have also the decks. We had three features. We have three different points
in this is a 3D drawing. Okay? This is the basics,
you know, guys, you really need to
understand that we have these three features. I know that you guys are really, really liked to draw
to the draw drop-ins. We did a 2D drawing on
the previous lesson. But it is also very important
to understand and to learn how to draw 3D Romans.
36. Drawing a Kawaii 3D House Part 2: Hello guys. Now we
can paint this Rowan. Okay. I'm just highlighting with my pan some lines that
I feel the need to do. So. Sometimes when you
use the eraser, you will also maybe
feel the need to highlight some lines.
And that's fine. If you just take your
pen and do this. Now, we can paint this. How's this count wine house? I'm going to use the rat. At first. Of course, you could use another
color that you want. But I'm going to use red
right here at first. Now I'm going to use yellow
to paint this other part. Oh King, Very nice, Very nice. All the walls in yellow. I'm going to use brown
to paint my door. Windows. I'm going to use
blue. As you can see. I'm leaving a wide
part of the window because I want some
light on the windows, so I'll paint
everything with blue. I'm going to leave
some wide parts. It is just a little,
little part. And it is very nice
to do this detail, as you guys can see. Very nice, a very nice window. The mouth. We're going to paint
with waste, read. It is a darker hue
of red. That's fine. Very nice guys. Very nice. And that's it. That's it. I'm going to drop some details
around the house. So I'm going to use
these green pencil because I wanted to draw
some grass around the house. So I'm gonna do this. I'm going to draw
a path right here. I'm going to use brown
to paint this path. It is a different hue from the hue of brown that we
use it to hold the door. I'm using the pen to
highlight this path. Very nice. Well, let's
keep painting the grass. That's it, guys. I'll draw is completed. I really hope I helped
you guys to learn draw. A 3D house in this
is a cutaway house. Tried to practice,
lot, of course, tried to practice with
other kinds of drawings. But anyway guys, I
really hope I have to understand how to draw
a 3D Kawhi Roman. Okay. Thank you very much and see you.
37. Drawing a Kawaii Panda: Let's turn making the handshape
position and the size. It is a horizontal oval shape. Let's make the stroke to
mark the middle of the face, and let's mark the
height of the eyes. It is important to leave
a space between them. Let's mark the
model and the size. You can draw the nose
in a triangular shape. I prefer to draw a nose a
little bit more rounded. Now we've drawn the mouth
likey you to the left side, into the right side. Let's make the iris outline. Now the shine, the chain
is very important. In the other eye, we did the same thing. Brightness it taller, shine, shine, and you must
color it in black. Circle around the iris. Then you can draw the phase
detail around the eye. We can color it in blank to, but don't get too dark. These points don't
need to be the same. You can try to make them
as similar as possible. Next, you must dark in the face outline of
the character's head. With the dark contour. You can already, you re
the excess of strokes. And it kinda just the parts
you think it's necessary. Erase these parts
and make them again. If you have two
your second year. You may call our eight leg
to the head drawings done. Let's draw the body now. We must treat the
meat of the body, then make the size
of the valley. It is important to
pay attention to the ballast science because the bailee defines
the character height. So if you drawn it, Alito's smaller, the
character will be small. But if you draw it,
I'll get a beggar. Your character will be
tarred and feathered. Very short arms. I want to make a
small character, so I just have to draw them
is morally as molar belly. The legs will always be
proportional to the Valley. Because of this,
these legs will be shuttered to their rounded
legs, just like the arms. It's also short and rounded. I'm going to make
a gray mark here. And later we'll
call it in black. This is our drawing,
almost finished it, it is time to make the outline with a felt tip pen or variable. Apparently if you don't have
a felt-tip pen, however, the pen doesn't leave a trace
as Trump as a fountain pen. You must be careful
at the stage. Guess you cannot
make enemies tape. That's why it is so
important to draw. First with a pencil in
there, make the outline. So don't be hurry. Take your time. That's okay. Especially these
rounded details. It doesn't have to be
100% round and perfect. How it isn't. What
is important is to understand how to
make the drawing. And as you practice
it, you will improve. See home ice. The drawing is getting the year online. The head. These detail around the eye. They propel outline and I'm
going to color it in black. Don't be hurry. Take it easy. Have fun doing the drawing. We can draw it with your child. Or maybe you are a child or teenager in line with
this kind of drawing. This is a drawing
that can be done by people from all ages. Oh, that's it. Let's draw the body. Now. Let's lay the drawing, concluding the belly shape. The arms outline, the legs. The second arm. After we make the online, let's color it in black. And here's our drawing
completely meat. I made all the painting with the felt-tip pen and see
how beautiful it looks. And now we can erase some of these strokes to
clean the drawing. That is tropes that we did
in the beginning do not appear because these
lines that we may just to help us to know where each thing so then
you will not be true. Could, you know? After all, we don t. When I evolve in another
I below, for example. Okay, this is only showing to you in our next video lesson. Bye.
38. Drawing a Kawaii Penguin: Hello everybody. How's again? In this video lesson, we'll learn how to draw a
penguin in the quiet style. I'm going to start by making a straight line to
divide it in the middle. I'm going to make his cage. Let's close these two parts
during an oval shape. Thinner at the top and
thicker at the bottom. Let's mark the eye height. And also the penguins speak. In now defeat plantation to
the distance between them. It must be well centralize it. Let's divide the white part from the gray part
of the penguin. Just like a hard, I guess. It is kinda a horror shape. Here. We draw a line tours the bottom part toward the feet. In this other part, we did the same thing. Let's draw our penguin
with calls it ice. Now the penguin arms. It may be a little bit lower. And at the same height, we draw the second arm. And basically a
penguins or ED trauma. This a few more
adjustments here. It is time to you, the felt tip pen or the regular
pen to make the outline. This part, you already
know how to do. You must be very, very careful not to
make any mistakes. And here it is, I'm
drawing completely done, including its final art, which is the online that we
made with a felt tip pen. Or if you used a pen irregular
one. That's okay too. That's no problem. And now I'm going to erase
the access of strokes. I want a clean drawing
just with the pen strokes. If you want to leave the
trauma and the way it is, That's okay. You can do it. But if you want to color it, you can use a green pen tool
or it could be a blank 12. I prefer using
slightly darker gray. Although if I leave
the drawing tool, the black and white, I like to leave this
part internally black. I'm going to color
it softer tone. So I'll use gray. You can use gray,
you can use blank. That's up to you. And
chlorine drawing. You don't have to make it calls exactly as you see
in the reference. If you want to try
some different colors, you're free to do it so that it doesn't get a
little weird to black. I prefer to use a slightly
darker gray. As you can see. That's nice. Cats in Montana is the
outline. The way it is. Well done, Very good. See how I'm doing in
try to reproduce it. It is actually very easy
to do. Don't think. Okay. Very good. Now I'm going to color the feet and the
beak and the yellow. Now, the pink
penguin is shy guys. It is a lighter here. For those that wants to leave the drawing
totally in blank. I'll use the pencil for B
to make it totally black. And then you can see how
it gets and conclude whether you want to use black or whether you
want to use gray. I'm gonna divide
it in the middle. Okay? I'm not going to color
it completely in black. I'll leave the two
colors, black and gray, so they can better
visualize each of those colors
you prefer to use. Black will make the yellow, white, and pink stand out more. However, it will hide a
little bit of the outline. So as you think of the best, if see if you want
highlighted online more, if you want to
highlight more in parts and blue, yellow and pink. And here it is, r2 penguins. Here you can see the
black one, the gray one. It looks, it looks really cute, actually highlights well the yellow and pink and
you use the black. Well done guys,
That's a penguin. I really hope you enjoy
it and I'll see you in our next video lesson. Bye.
39. Drawing a Kawaii Squirrel Part 1 Initial Drawing: Hello everybody. How's it going? Welcome to this lesson. And today we're
going to draw a car. Why is coil? Okay, it is very nice to draw animals and this is going
to be in an amazing lesson. We're going to draw
a color wise world. And that's gonna be the
first part of the strawman. We got to start with
the part of the head. Then I'm going to draw the body. I'm going to start
with a straight line, with a vertical line. Then I will draw the head. That's gonna be a
circular shape. Because of course we had
taken them out of the head. So that's gonna be
a circle of fours. Okay? So we have here the hat and that's
a oval shape. Very nice. I'm going to draw the body. Antibodies are going
to be a little bit smaller than the head. We're going to have
a smaller body. And of course you could
use a ruler to do this. But anyway, we want to use
this height just like this. 12 smaller ones. Okay, so I'm gonna,
I'm gonna ain't, my divider of this is
core right there on that horizontal line that
I drew right there above. Okay. So we have a smaller body. That's why you guys
need to understand. We have a head beggar
than the body. We have longer hips
and shoulders. Well, it's smaller
than the hips. Okay, hungry. We already have the
body of the character. We can draw the feet. Of course, this is a sketch. This is just a sketch so we can place the
parts of the body. We can draw the main
parts of the body. We can draw this
detail of the legs. Okay, on this side, we have the same
height in both legs. That's where all the hands Okay. Fairly simple shapes. I think I'm going to draw. He is he holding some object? These words holding some object. O K. We have this we have
this detail on the badly. I don't know if you guys are seeing the lines
that I'm drawing, but I hope you guys
are seeing anyway, you don't have, you don't have to put a lot of pressure on the mechanical pencil or your own your pencil because
we wouldn't want, we don't want dark lines. You want light? Blind? Who wants smooth lines. So you don't have
to put a lot of pressure and intro dark lines. Now let's go right
here to the hand. Arrogant and do this
shape right here. Right here. Okay? This is like a bus on the opposite direction. But this is the tail
of this character. This is the tail. And we're going to do just like this because we want a
really beautiful tail. So you can do this
circle right here, almost touching the head. And that's it. We have the body, we have the hat that will
have a really beautiful tail. Okay? We don't have a lot
of details on this problem, but we can already see
the shape and we can already see all the main parts
of this, this character. We can draw the ears. Okay? You can use triangular
shapes because squirrels has a triangular
triangular ears. You can do the same thing on the other side to
the other year. Okay, well done, Very nice. Now let's go to the face, to the features, to
the parts of the face. I'm drawing this
horizontal line right, Right on the metal. Because it is very important to have these reference lines so you can note place
or the part of face. Anyway, we can draw
the eyes right here, very circular eyes, big circles. Okay? And you guys
can see I'm using the reference lines to
know where to place exactly the ice because you want the eyes with the same height and
width, the same size. I can draw this second. I also very circular eye and it is very important to draw it in the same
height and width, the same size as we did
with the first one. We have the nose y here. Sample knows it is also
a triangular shape. But anyway, as you guys can see, we have the nose really close to the line of the
eyes and that's it. That's what we want. And we can draw the mouth where 3M is simple curved lines. This is a really cute drawing. K, very cute mouth. As rho the eyebrows sounds. Very simple and thin. Eyebrows. Oh, very nice. Drawing. We have all the main
parts already done. Now we can add more details. I'm going to use this eraser. That's a really flexible eraser. That's a special kind of eraser. But this raise or you won't, you won't you raise
everything of this robbing. You know, it will just erase the lines that
are not needed anymore. And it is very nice to
have a eraser like this, any reason like this. Okay, I know that for
you guys on the screen, it seems that I'm erasing
everything, but I'm not, I'm really not erasing everything because there's
a special kind of razor. We'll erase just the lines
that are elite anymore. And you will help me
to clean the problem. As you guys can see, the
drawing is already clean and I'm going to use, of course, my pen to highlight the main lines and all the parts that I
need to highlight. You guys, we'll see. You can also erase
this right here. Okay. I'm gonna, I'm gonna
use my mechanical pencil. And I'm going to highlight all the lines that I
need to highlight. Oh, okay. You don't have to rush. Okay. Take what time the patient have fun while
you're in drawing? I'm drawing, I'm drawing, I'm drawing darker lines. On this stage. We are almost, almost
go into the final art. So I'm drawing darker lines. And I'm going to do this
whole, entire drawing. You have the hat. Okay, right here in oval shape. We have the ears. Second year. Oh, okay. Very nice. Very nice. If you are using reference guys. Don't, don't. You don't have to draw. You don't have to make your drawing equal to your reference. You know, the reference
will just help you to know how to draw where to place the parts
of the character. Where are the shadows, where are the lines? But of course, you
won't be able to draw equal to the reference in
that's fine, that's okay. Just use a reference
to know how to draw the main part of the drama of the character in
trying to do this. So this is a reference. As a reference, you don't
have to draw a copy. You know? It is it
is just a reference. This is where it's
very nice and useful. This kind of AI. We have this detail, right? Write them with five parts. We have also the lights. Will have a beggar light
in these molar one. User eraser whenever
you need to use. Okay. Fakes are just things. That's fine. Oh, first, I can go to second. I think it is important guys syndrome, both eyes as equal as possible. Anyway. As we erase it, the initial sketch,
maybe you all, you will find some
difficulty to draw. Just like the initial sketch, but that's fine. That's okay. No, you can just do, feel free, for free to use your creativity and to draw
the best Robin you can. And I'm using my
mechanical pencil to help me on this stage of the drawing. You could use your
bandsaw and that's fine. We haven't really nice distance. We haven't really
nice the distance between one eye in the other. And that's fine. But I feel that I need
to fix a little bit. There's knows because
worlds the nose right in the middle between
where am I in the ADA. So I'm going to fake it. Okay, very nice, please. This triangular shape. I'm going to add a
light to this nodes. Yeah, that's it. Knows is right in
the middle between one night India them the mouth. O K. And that's it. That's it. We have the face
of our character. Let's draw some details. Simple lines. And now we can go to the body. It is very important to draw
the initial sketch guys, because now we just need to, we just need to outline. We have now the arms. We have one line bigger than
the other and that's okay. Okay. Bigger and arm. Then it bigger part of the arm in a smaller
part of the arm, you know, I'm going to do
the same thing right here. The upper part is smaller. In the lower part is
beggar having nut. This is holding a very nice, very beautiful
have a oval, oval shape. And I just use it some curved lines to divide
it into three parts. And this isn't a
very simple, yet, very cute that this character is holding is very nice. It is just an oval shape. Of a oval shape. Then you can divide it 12 into three parts
just to carry lines. Now the feet, also
an oval shape. We're going to
divide this, feed. These fit into three parts. 123 parts. Same thing on the other food. Divisions One, 23. Okay, very nice. O k Lower have the legs
and also the defeat. They will have a
detailed on the valley. Really cute detail on the belly. This is like drawing hair, okay? Because this course
has a lot of hair. But anyway, we use triangular
shapes. On the belly. Same thing on this other side. We do like triangles. K. I'm trying to do
all this part as equal as possible to the
other part. That's fine. And then let's draw the tail. And the tail is very simple. It is just covered lines. It is a really nice tail. In beautiful, a beautiful
tail is like an S, shaped like the letter S. But on the opposite
direction of the course. Forums. You can use your
eraser anytime you want. I can go to this
part right here. This part just like this. Let's touch the head. Oh, oh, you guys. Okay. Very nice. Very nice. That's it. We have the drawer when
basically completed. We'll just throw some
grass down here. This character is
maybe rewards to know. So we have grass. Flower. I'm going to draw two flowers. 12345. Very nice, very nice. Too. Beautiful flowers. And that's it guys. This is our score. On the next lesson
we're going to make the final art of this character
with the ban came in. Then we're going to
paint this character. That's it, guys. Thank you very much and see you. Bye.
40. Drawing a Kawaii Squirrel Part 2 Final Artwork with Pens: Well guys, Welcome
to this lesson. It is very good to
have you all here. And on this lesson, we're going to use
two different paints. This pen that I'm holding
right now it is a 0 a to an alkyne
in this other one, these are the pen. It has a tip more more thick. So I'm going to use
these two pants. No, 0.89 Kim pen, Another regular pan
with a tip Faker. Okay. I'm going to start using my eraser and I'm going to
erase and clean this drawing. I know that for you
guys on the screen, it seems that I'm erasing
everything, but I'm not. This special kind of
rings that I'm using will just erase the lines that
are needed more, you know. And I will also be
able to see where to, where all the main lines and
all the important lines are. Will use my pan to highlight
the main lines. Okay? If you are using a white
eraser just like this, you will need to be more
careful because this kind of eraser will erase everything. So you need to be
careful about these, these razor, these
regular erasers. But anyway, I'm going to
start using my 99 pam. And I will outline this Rowan. And of course, I need to be very careful because
I won't be able to use any raising Ryan out
because I'm using a pen, NO. And with the pan, I won't be able
to use an eraser. I know that sometimes it can be kind of hard
because especially for you guys that are beginners and he started
learning how to draw now, but found no rush.
Take your time. Okay. Tried to draw them
the best way you can and try to don't
make any mistakes. I'm going to paint the eye
the pail with a tape her tip. Hello guys. I don't have a
lot to explain at this point. Just need to align your drawing. You just need to highlight all the lines that you know
you need to highlight. And that is basically this. Okay. I won't change anything
on the drawing because anyway is drains
already. Very nice. But anyway, you can just
outline your drawing. And of course you can move your paper to get
it better position to highlight into your
little lines and outline. But I wanted to do this because I'm recording these lessons. So I want, I want move my paper. But you can do this if
you feel that it is better for you to
highlight some lines. You already have the hint done. Let's go to the body. Okay, you can keep outlining the arms is very important to pay attention because you can
make any mistake. Okay? The badly. We have some harem details
right here on the valley. Expectation to the way
that I'm holding my pen. Because I think it is easier
to hold the pan like this. To make this kind of online. Go to the tail. We can do dislike. You're doing the entire drawing, an outline in detail. But anyway, very nice. And that's it. We have all the main
parts highlighted. We have all the
lines highlighted. I will do the same thing with
these flowers right here. Of course, with the
grass that I drew. The next lesson,
we're going to paint this rowan with colored pencils. And I see you on
the next lesson. Thanks guys. Bye.
41. Drawing a Kawaii Squirrel | Colors Part 1: Well guys, we already have our drawing completed
right here. We have really nice
outline of this drawing. I'm going to use my eraser because I wanted to
clean my drawing. I want to make micro
as clean as possible. So I'm using my eraser. And I want to live
just the lines with Ben and all the lines that
I did with the pencil. I want to raise them. On this video lesson,
we're going to paint this cute squirrel. And it is very important
to erase the lines with pencil and leave just
the lines with the pen. You raise everything. We want to make an
amazing drawing, one to make a brewery
as beautiful as we can. So don't forget to erase any any kind of
line that we made. We see fan, so okay. Guys, can you believe that
when we use the eraser, maybe the lines that
we did with a pen may maybe will become
kind of lighter, but that's fine. Okay. You can use your pen
just to highlight the lines that you see
that became a lighter. I'm going to use my green
pencil to paint the eyes. I'm going to paint only
these parts below. I'm going to use the
same color on both eyes. I chose green, but you could choose
any other color, okay? You could choose
any color that you want to choose, green. I felt that Google will be very, very nice on this character with all the other colors
that I'm going to use. I'm going to use my
orange pencil to paint the head of
this character. I mean, I'll put a lot of
pressure on this band. So if I'm being very
kind, very gentle, I want a myth, you a lie to you. So I'm going to do this. Once again, I need to tell you guys that you don't have to be careful about the direction that you will use to paint. Know, you can't paint with
circular, circular movements. You can do just like
this as I'm doing. Does it matter the
direction that you choose to apply when painting? The only thing that
you guys need to be careful is about
the pressure that you put on the pencil while
you are painting. You don't want to put
a lot of pressure. We don't need to put a lot of depression because we don't want a dark hue.
You want his mood. You want a really, really homogeneous
view of pores. But we don't want too dark hue. So take a time. Just paint like this as you guys have
seen that I'm doing. Ok and you can paint this part all the head
of the character. And later we can add
some shadows so we can add other colors too, you know, to, to
highlight this drawing. But on this stage, the only thing that you need to understand is that
you don't have to put a lot of pressure on
the pencil or the paper. Let's paint with a really, really nice and smooth here. And as you guys are seeing, and I'm changing the
directions that I paint. Sometimes it's up and down, sometimes it's
circular movement. That's fine. That's just okay. Okay. Okay guys. We already have the
head basically painted. As you guys can see, it is not something that
you can do very fast. So you need to be patient
and just take your time. But that's fine, That's fine. We want an amazing result two
once an amazing trawling. So that's fine. Just stick a time and you can rest for a little bit and they can come back
and keep painting. You can see that we have some white dots
on this painting. I'm just using my pen. So again, my colored
pencil and trying to paint all these
dots, white dots. I said to you guys, you
don't have to brush. It is really important
to be very, very gentle. And we wanted a is Matthew. I'm not putting any pressure. I'm not put a lot of pressure on the pencil, on the paper. But this hue is
become very nice who? We are getting a red hue
and that's what we want. And it is very important
also to, to paint, to get a homogeneous, you want a homogeneous hue. And in this take time. So you will paint
in your paint again and we'll try to paint
all the white dots. And that's it. We already have the the painting of
the head already done. We can go now to the body. I'm going to start right here. On this part. I'm going to use this
same colored pencil, the orange one. And of course you could
choose any other color. This cartridge pens that I'm using has a really thick tip. And sometimes you will have a colored pencil
with a thinner tip. But in a way, actually, I really believe that the
tenant tip is better to faint, but I'm used this
with a thicker tip because on this
specific drawing, I believe that it is better
to use a thicker tape. But in general, the eighth in tip to your colored
pencils will be better. And I don't want
my tip to break. And also a lot of the reason
why I'm using a thicker tip. Now the only thing that we
need to do is just paint. I don't have anything to explain to you guys
on this stage. We just need to see
how I'm doing and try to do the same
from this painting. And I'm going to keep doing it. I'm going to paint a little bit more right here on the head. I want this hue a
little bit darker, but I'm not putting a lot of pressure on the pencil at all. But I want this hue
a little bit darker. And that's why I'm painting
again on the head. I'm putting just a little bit
of pressure at this point. But anyway, that's it. Now I'm going to use
another colored pencil to paint this inner part. I'm using yellow. I also want a really light hue. Won't put a lot of pressure
on the pencil, on the paper. I'm going to paint
just like this. There is low, very loose, very kind, very gentle. Okay guys. Very nice. This part, on this
darker part, I use it, the orange colored pencil
right here on the inner part, I'm using a yellow. I don't want to get a dark hue. So I'm being very smooth and
painting with a smooth q. Now, I'm just looking for the, the white dots that we have
here in trying to paint them. And of course I want
a homogeneous hue. So I'm keeping painting. Paintings is like this. Now the nut. I'm going to use the brown. I'm going to leave
some white spots on purpose because I want to
add some lights at all. I'm going to use a darker brown to add some sunlight
in some shadows. This nut, I'm blunted just a little bit of progression
on this chloride fan, so because I want a darker hue. But anyway guys, be, be very, very careful because
we want to get too dark hue. And that's it. We already have the W1. We have some light and
shadows on this nut. And very nice, very nice. Use the dark brown
and the lighter, the lighter brown, I'm sorry, the lighter brown
to paint this nut. And it became a really nice, really nice part of
this amazing drawing. Now let's paint the feet. I'm going to use pink
to paint the feet. Really modes hue of think. Very nice. And again guys, you could use any other
color that you want. But I'm using a pink colored
pencil to paint feet. I'm very cute feet. We also want a smith
hue on this case. But anyway, very
nice, very nice. And of course guys, if you can buy inexpensive, you can buy expensive tools,
expensive colored pencils. You, you can do this, but you don't actually have to buy expensive tools to
make an amazing drawing. Of course, that we have some, some tools with more quality. They are expensive. You need to understand this. But you can make
a messenger RNAs with the two tools
that you have, they're not expensive at all. Let's paint the tail. I'm going to start using
these colored pencil brown. And I'm going to
paint very smooth. It is a very smooth as Q
that I want on this tale. To see the way that I'm
holding the pencil. As you guys can see. I'm holding the pencil
just like this. But anyway, it doesn't matter. You could do hold
your pencil with. In another way. You just have to see the
best way for you to hold your colored pencil to
paint the best way you can. And it does it matter
the direction that I'm using to paint this tail? But anyway, hold your
pencil the way you want. The best way that makes
you feel comfortable. But for to paint With indirection can paint with circular
movements if you want. That's okay. I'm using
the brown chloroplast, which paint this tail. Finish. Painting these tail. Almost finishing. Okay, very nice, very nice. We're finishing with the
lighter brown colored pencil. And I'm going to use a
darker hue of brown. And I'm going to
draw some shadows.
42. Drawing a Kawaii Squirrel | Colors Part 2: Well guys, so I'm going to use the darker brown pencil and I'm going to add some
shadows to this tail. And I'm going to add
some shadows on it, okay, just like this. In some cases, I will put more
pressure on the paper with pencil because I want a
darker hue to the shadows. But anyway, guys, just see how I'm doing it and
try to do the same. And that's it. You can add as many
shadows as you want. If you're using a reference, it is better because
you can see where the shadows and the lights are. And as you guys know, it's Coors has a lot of hair, so I'm going to add some hair
details with my shadows. I'm also going to add
a detail right here. Those Bart. So here I'm using a darker brown
to make these shadows. And you can add shadows. And in a place that you want to be careful to
make really nice shadows. On this case, you will be, you will be allowed to put more pressure
on the paper with a pencil because we want to
actually hear a darker hue. These are shadows, so we want a darker hue
and that's fine. But of course you can't put
too many fraction of K, so just be gentle with it. We also wanted to A's myth
you in a homogeneous here. And that's it. We already
have the tail done. I'm going to use my white man, so I'm going to use
it on the tail. The white paints
will have helped her with the little hub to make a homogeneous you to this tail
to give me homogeneous hue. So it is very important
and very nice to use the white colored bands. So game. As you guys can see, we're getting a better you
with the white pencil. I don't know if you guys
can see on the screen. But anyway, I'm already
being able to see that I'm getting
a better hue with the white colored pencil. The final results much
better. Very nice. I'm also will use it right here. And they use getting
very heterogeneous. And that's amazing. Once they submitted to
you what his meds right. Varies myth you. Okay. I'm also will use my white
colored pencil on the body. And you can also hold
your pencil like this, just like I'm doing with the white pen. So I put a lot of brush on the paper because it is
very important to do this. So feel free to
put as many as you want on the paper
with a white pencil. If you want, you can
add more shadows, more shadow details right
here, all the head. And I'm going to do this. I'm doing this.
Also on the ears. These just a little shadow. We can put my impression
on the paper with a pen. So at this point, just be careful because you don't want to put
too many freshman. Almost we'll add
some shadows right here from the chick on the chin. Have some shadows also on
the legs and on the body. Of course. That's it, That's it. Very nice. Shadows. Also on this inner part. I'm going to add some shadows, just like we have
here on this part. So I'm going to try
to draw shadows with a hair shape. Just like this. Very nice guys. Now we can paint the
grass. Right here. I'm going to use
my green pencil. So let's painted the
grass. The grass. I'm using a lighter, lighter green, but later I'm going to use a
darker hue of green. So I will add some
shadows on this part two, we can paint the flowers. I'm going to use pink on
this part, this inner part. And then I'm going to use
yellow on these other parts. Very cute, very cute flowers, very cute flowers
with a darker green. I'm going to add some shadows. It isn't hard at all. You just need to add shadows. Okay? We are and that's it, guys. That's it. The drawing is
basically complete it. Of course, you could
add more details. You could adjust things
that you want to just, you could add more
shadows or so. I'm just adding
some more details with my orange, orange pencil. But basically the drawing is completed buffer for you guys to add any details they
want and do whatever. Just meant you feel the need. For example, I'm using
my fan to highlight some lines in burnt
things that you feel, you feel comfortable and
happy with your drawing. Okay, guys. And there was this lesson. This was our very
cute Calloway squirm. When just to add
more details with my blue blue pencil is like
a sky around the character. But anyway, you guys, Let's say this was our lesson. I'll just add this detail. But that's it. I really hope, I really hope I helped
you guys to see how to draw cute, cute cow. I really hope I helped you guys to know how to draw
cute drawings. We've solved a lot of techniques on this,
specifically for Ali. And you can use these
techniques on any others drivers that you
want to draw. Okay? And that's it. If you have any questions, feel free to ask me and see you. Thank you.
43. Drawing a Kawaii Kitten: Hello guys, how's it going? It is very good to
have you all here. And on this lesson
we're going to draw a really cute and mute Keaton. That's gonna be a Kawhi Keaton. Let's start with the sketch. We can draw the face
and the head of pores. And as you guys can see, this circle has
a, an oval shape. This is just the sketch. We can draw the body
of the character. Let's divide it into two parts. We have the body part and
then we have the parts. Where are we going to draw
the legs before lights? Let's draw the first one. K. Now the second was very easy, very nice legs and such. But remember to make the second leg higher
than the first one. Because, you know, it is
important to do this. We can do dislike this. I'm sure you're going to, you will see that the
results will be the better. The results will be better. That we can draw
the last two legs. 12, very nice. We have now four legs. The body is basically done. And also they had, now let's draw the tail. Very curvy line. Then I'm going to
undo just like this. It is like the letter C
or the letter S actually. And then we can draw on to the end and connect
to the tail, to the body. Okay? And then we have a thinner part on the
tail than a fake apart. And that's how we draw a tail. A very nice Keaton. Let's draw the ears
with triangular shapes. Let's try to use the same
height on both ears. Lk, very nice. We can draw the
parts of the face. I'm going to draw
my reference line. It is a horizontal line dividing
the head in the middle. And let's draw another
horizontal line right here. And I will have two really
nice reference lines, two horizontal lines. And then we can draw
each one of the eyes. This is where we going
through all the eyes. Now let's draw a
circle right here, then another circle right there. The mouth, really cute mouth. Okay, very nice. As you guys can see, the mouth is really close
to the line of the eyes. That's very nice. We have some cheeks
details. Okay. I'm going to draw the
lights of each one of the eyes to different lights. You beggar one in this model, we're okay, very nice. Just add more details
right here on the body going into
the legs. Okay. I will just adjust this part. I think there's going
to be better if I just this part of the legs. I'm going to do the same
thing with the other leg. Now. Now that's better. Now that's much better. Okay, drawings based
click on planet, we have all the main parts. I'm going to draw
just a cute color. I want to really cute
color to this kitten. I'm going to draw,
I start to own it. Oh, okay. I don't know
how to draw a star. Watch a video about
how to draw stars. I think it's going to help you. Very nice, very nice. The drawing with the pencil, with the mechanical
pencil is complete. It will have a
really cute drawing. And of course we'll
have a lot of lines because we're using the mechanical pencil
to do this Roman. But I'm going to erase the lines that we
don't need anymore. And we're going to highlight
all the main parts. I'm going to use my
eraser, erase right now. This is a flexible razor, is a special kind of eraser. And you're going, it, it will just erase the parts
that I don't need anymore. And then they're all
there for you guys. It seems that I'm erasing
everything, but I'm not. I'm being able here to see all domain lines that I need
to highlight with the band. Okay, so anyway, if you're
using a regular fan, just be careful.
A regular eraser. Just be careful
because you don't need to erase everything. Okay? And let's
align this Rowan. Take your time on this
time. Don't rush. There's no need to brush. No right here on the eye. Just be careful because we
want to maintain the lights. Okay. And we want both eyes to be we want both both lights. So just be careful on
this part where you need to paint the inner
part of the eye. Let's do the same thing
with the other eye. Love the mouth. Okay. The face is done. Go to the body. Q taller. The labs. Well done. Very nice. Now we have
our drawing completed. Now you can take your
colored pencils and then we can add some colors
to this really cute kitten. I will just add these
details right here. Okay. That's fine. Very simple and nice details. Well, I'm going to
paint this rolling, but before I start
to paint this row, I'm going to use my eraser to erase all the lines
that I don't need anymore. All the lights with all the lines with the bank
that I made with defense. So okay. I just would the lines with the pen to remain in this Roman. I'm gonna, I'm gonna
make a realist, simple, really simple painting. Okay, I will just add a little
bit of details of color. This kid ten will be a Y2K ten. So I want to paint everything. Let's also paint the
color with bank. And they start, I'm going
to paint in yellow. And basically that's it guys. This is a white Y2K ten. So a want and a lot of details. I don't, I don't think
that it is necessary, but of course you could
add love callers. You could paint your kid
tin with another color, but I will let, uh, we'll leave it with, with y 212, white key 100. Just paint a little bit
of grass down here. That's it, guys, That's it. A drawing is completed. A very beautiful and Q2 drawing. I really hope I helped
you guys to see how to draw a cute kitten. And if you have any questions, feel free to contact me. Gate. See you. Bye guys.
44. Drawnig a Kawaii Phone: Hello folks, let's
draw it quite. Styles, have fun. It is true there are countless fall months in models
of different cell phones. But I'm going to draw
a standard layout. You can choose a specific
model if you want. You can even draw your own telephone or
another model you want. That's again, it's up
to you be creative. In any case, the way of doing the drawing will be the same. Okay, So let's start. Let's make the, the ordinary
shape of a cell phone. A traditional cell phone. If you want, you can use a ruler and it will help you to draw wells
trade tend to find it. It's strokes. That's really nice. The corner of the cell
phone will be rounded. Okay? But as I said, it can make a
different phone model. But this one will be
that way. This way. Let's define the main display. Here. I'm going
to draw a button. And in the upper part, Walmart detail, that's a very basic
cell phone motto. I'm going to draw the cheeks. The close it eyes are weren't
then at the same height. And the mouth is smiling mouth. The battery is fully charged. It is a half cell phone. In order to make our drawing
even more beautiful, I'm going to draw a little
legs and feet, Rounded feet. See that? I didn't use
a baseline in the feet. Height is not the same. One. She got a little
bag and then the other. So I have to fix this. Okay. Now let's draw the arms, one arm, Toe in a
very simple shape. And the other arm up. Let's draw a little
simple hands too. Okay. The same thing here. Don't forget to draw the tongue. And here is our surface. Very built for sound fun. Now let's use the felt tip pen
or rental and pay for fan. And let's make the outline. Pay attention to the
lines you want to keep and just ignore those Utah. Okay, Done. Let's user use the rubber noun. Because it's really important
to clean the draw me know, when ten only in these tropes
made by the felt-tip pen. And then let's do the painting. It's called this drawing. You can use any color or actually that you
weren't paying. Purple, blue, yellow,
pink, whatever column. You can use colored
pencils like me. Or you can use other
types of pencils. Later, you will see some videos that will use the other kind
of colored pencils. But we want to make as basic as possible the
materials in the videos, materials, and tools that you won't have any trouble
to find or to mine. The urine habit home. You can use colored pencils. I'm going to color
the legs in dark red. May use another color if you prefer to, to paint, to draw when you can use whatever color you want. But don't forget to
match the colors. Yeah. I'm going to paint
the cheeks now. The light rail and the tongue. If you have a green pen so you
can use it on the display. It will create a
shadow in the trial. And this is very nice,
gets really cool. But if you prefer, you
can leave it white. That's okay too. So this
is our drawing guys. I hope you enjoy it. And anything you
need, send a message. I will help you. Okay. Bye.
45. Drawing a Kawaii Ghost: Hello folks has guaranteed, been sharing a lot. So in this class, we got to start at the
Halloween special. We'll draw characters,
decorations, and arguments related
to Halloween. At first, here, especially, we'll start drawing a ghost. You will see that
it is very simple to drown late. Less tar. Draw me the top part and we
go towards the bottom part, making this shape,
this shape, okay? It goes shape, very simple. You can see how I'm doing
in tried to reproduce this. I'll mark the
height of the arms. One arm down. A very short arm. There's nothing difficult here. You don't have to do a
very competitive stroke. Pool of details. And the other arm
up the opposite of what we did in the first one. I'll let a ghost,
He's saying hello. Actually. What is drawing the
eyes and the mouth? I'm going to make one baseline. This will help me to
draw the eyes with the same size as
this is a ghost. Let's draw a angry face. It's not a totally rounded
I. I'm going to draw the main brightness
in a small brand is to shine of the eye. Let's draw the second
eye with the same shape. Okay, Very good. I'm getting a drawn
this detail to make the girls look at
even more angry. The little mouth with a smile. Here's our drawing,
basically conclude it. Now. We're going to make the outline. I will erase some
of those tropes. But you have to be careful
not to erase everything. If you get worry, you don't
even have to use the rubber. Began to outline the trauma with a pen or with a felt tip pens. You just have to outline it. So it is a quite
simple thing to do. Cause shell when going
around the shine, we don't want to cover it. I'm going to paint the goals to per pole. But
it's also a queue. Color. It in blue, in dark gray. It is nice to weigh folks. You can paint it with
the color you want. You can choose buh buh buh, buh, buh. And here's our
drawing concluded. Our beautiful little
purple growth, or the color you have
chosen to paint. Okay, good. That's right. See you in our next lesson.
46. Drawing a Kawaii pirate skull: Welcome to this video lesson. We're going to draw
a is called What are those that we see
on a pirate ships? At first, I'm going to
draw what's her coat. And I'm gonna divide this
circle in the middle. I'm going to make this
bottom part a small square. Here in the middle. I'm going to mark
the eye height. Just, just as we did
that goes drawing. I'm going to make an I
or someone who is angry, just like the ghost. In the nose. The nose has a triangular shape. And we're very simple mouth, I'll divide in the middle
to make the teeth. I want this part more rounded. To make the drawing
cutie cue list. Let's run the shine in the ice. Even though it tastes coal, I will try and make
it as cute as I can. I'm going to draw the X
shape its bones down here. And I'm gonna draw two
lines in each one of them. In this part, I will draw the bone tip with a round shape. Pretty easy, right? A heart shape, well-rounded. Here we did the same thing. Any Hutu? Nobody has time to outline the drawing. Hi. I'm going to outline the second
bone under the first one. I stopped me at this middle part in a
line, the other parent. Okay. You can do the same. And here it is, our drawing completely online. And actually, I will not
use the rubber to erase the pencil strokes and
leave only the pen strokes. It is barn to keep
the design clean. This is a cold, so I'll leave it totally white. Okay, that's it, guys. Thank you and see you in
our next video lesson.
47. Drawing Kawaii Pumpkin: Hi. Now we're going to
draw a pumpkin, a Halloween icon, right? I'm going to start drawing
and no votes hardcode. This will be the
shape of the pumpkin. I'm going to draw a
little stroke here, which would be the top of
the pub Kim, the upper part. And I'm going to make some divisions in the
pumpkin sides, okay? Thompson big strokes
until the small strokes. Okay. Very nice pumpkin details. I'm going to make some more
details here on the part, the upper part.
Very simple guys. No difficulty in don't be hurry. Take your time. I'm going to adjust
these divisions, kids. They must not be
straight strokes. They are COVID strokes
and vary the size. It is important to do this
in this part here too. And hit is the drawing
of our pumpkin. I'm going to draw the eyes. I'm not going to
draw a traditional, I guess I'm getting
thrown this type of eye. Further ahead. I drawn the eye that we made
in the previous drumlins. The same model of ice. They shine. I'm going to draw a mouth
like a kitty mouth. It's to see shaping lines. And I'm going to draw
with some teeth. It is even parity pumpkin. And here it is, our
finished drawing. Now we have two
online, the trawling.
48. Drawing a Heart with Bat Wings: Hello everybody.
Everything is good. Now we're going to draw
my heart with bat wings. I'm going to divide the middle, make that trace and
drawn the heart. He really easy shape. I'm going to mark a spot where
I'll join the two sides. And here we already
have our heart. Pretty easy to do, right? It is important that you be careful to draw on both
sides at the same height. Here. And a corner is pretty
much the same measure. It doesn't have to
be exactly the same. The trade to draw them as
much equal as possible. To draw on the wings. I'm going to draw at
the top a curvy line, like a C upside down. Now I'm going to do pretty much the same thing in
the other part. A stroke up in these trope down. I'm going to draw some strokes
on the side of the wing. In addition to this
truck in the middle. I'm also again on John, some of those covering lanes. And then here's our first wink. Here I go. I'm gonna do the same
thing with stroke up, one stroke down, strokes. I divide it. Same thing. This part should be thinner. Now I'm going to
draw on the ice. That's it. Our heart is done. A heart with bent winks. Pretty nice. Now we get
online the drawing. I'm using a felt tip pen. I'm going to use the rubber
to clean our Charlie. When I use the rubber, I'm actually preparing the
charming to be painted. I'm going to color
the wings in purple. I used the colors. I don't rank the best. You don't need necessarily to use the same colors
that I'm using. Very good. Use guys, the colors you want. In color. I'm going to use red
to paint the heart. And that's ensuring a beauty
too hard with bat wings.
49. Drawing a Kawaii Bat: I'm going to show
you an easy way to draw it bad in the quiet style. I'm going to start
making a rounded stroke. In this shape. You must make an arc
between the two parts. I'm going to draw the eyes, the mouth, and the teeth. The years be years. The wings. I will do it the same way that
I did the heart. Wang's a part of and apart down. I'm gonna play
this weighing into three parts again and do
the wing a little bigger. By the way of doing it
is exactly the same. You draw a stroke upwards and downwards and divide the
wing on three parts. And the underside of the wing. To here's the
drawing of our bat. The eyes shining. I'm going to start
outlining the trauma. After online. They trawl and I
will start coloring. I will color the bat in purple. You can choose another color. You don't have to use the
same colors that I'm using. You can choose another one. I'm going to color the body in purple and the wings in orange. These colors, I use it a
lot in Halloween, right? I'm going to color this
part of the year in blue. The wings. I will color it in orange. And here it is, our drawing. A quiet that I really hope guys, you have no trouble Germany this and any help you need,
please contact me. See you in our next video.
50. Drawing a Decorative Objects Pencil and Contour with Pens: Start making a rectangle
stroke at the top. And now we can draw in slang. Try to make a pretty flame. And that's a Kendall. I'm going to highlight
some of those parts here. And I'm going to draw some
more details on this part. Are Kendall is melter with
the heat, tell the flames. And that's our candle. I'm going to draw away star now. I believe that you must
have already drawn one. Start with this shape that I'm using is a very
common star-shaped. And actually men children
know how to draw it. One is true up, one stroke down on his truck
up and we have our star. I'm going to use the rubber now. Just be careful not
to erase everything. Now we can keep
drawing our star. Drawn these parts rounded. These tire is more fluffy
when has wronged aids. These are Halloween stars. I'm going to draw and they shine a little
mouth in that set. Then we'll do the online
and some more adjustments. Now, I'm going to drop bombs. The way to do it is basic light bones of the
skull that we drew before. Make one rectangle and
then drawn the tip of each one of the bones
in a heart-shaped. One more here. Syndrome clouds. We must make some
sense articles. You can vary. The model is really cool. Trial of lightening two, this is the shape of
enlightening, permanent buying. These is trade lines
pretty easy to do. Let's think. You can make a different model
with an arrow at the end. Here you divide in the
middle, draw one side, and then drawn the other, and hit is our heart. You also can draw a coffin. May quiz truck in the meadow
to define the height. To create a 3D effect. You can draw this part in the
site. That's really cool. Actually. We can draw
a cross in a coffin. And here are some examples of Halloween items,
decoration, and armaments. Now let's align these Romans. So take your felt tip pen
and let's make me online. After online, then it is time to clean the
drawing in the array, the unwanted pencil strokes. And after that, we can
paint the drawings.
51. Drawing a Decoration Objects Part 2 Colors: Let's start painting. At this stage, you can choose the color that you want to use. So be creative. I'll use two tons of
blue and the candle, the upper part, I will
color it with a clear tone. In the flame. I use yellow zone to the star. I will color it yellow too. To highlight the flame, I'll use the orange, but you can use red
to if you want. And I'm going to darken the second star a
little bit more. To differentiate it
from the other star. I'm going to paint one darker
cloned and another clear. I'll use purple to
paint one of the bones. Again, I use the same color to paint this side
of the coffin. Jira Cloud must be sleeping. Now that we use dark
yellow to paint, this part of the track was bad. I'm gonna call her the bone, this bone in yellow. The lightening two, we usually
paint lightning in yellow. But if you are going
to use another color painted with light
blue or yellow, it always gets better. I'm going to paint here blue, the heart. I'll color it in red. You can use another color
to paint the heart. But read always looks better. That's it guys. Some
Halloween triathlons. I really hope you guys enjoy it. My wife.
52. Drawing a Mummy Kawaii: Let's draw a mommy here. And I'll show you a very
simple way to draw it. At first, I draw a circle. I'm going to draw
the mommy body, legs and the arms up. Both of them. I'm going
to draw the hand now. Fingers, 12345. I'll do the same thing here. I'll draw the hand and
the little fingers. Okay, hit is the
shape that we want. Now I'm going to
draw the ice hole, drawn a angry mommy. Ace trope down,
he served circle. The same thing here is true
down and a semicircle. The ICU be at the same height
and have the same size. And that's our angry
mommy was wrong. These trips of tissue or withdrawing strips all
around the mommy's body. Strips off tissue from
one type to the other. I'm gonna completely bend age the mommy in the arms to the little hand
and even the fingers. I'm going to draw the food. If every single food and navigating
them, keep drawing strips of tissue on its bounty. From site to site. Vary the direction at
the foods to both sides. And now we already have
a drawing of a mommy. It's time to online to draw and I will use the felt-tip pen. I'll start with the I. And then I will outline
the pencil strokes, the hands, and also
the little fingers. Perfect. Now it's just align these strokes in that set are,
drawing is done. Demanding is white,
so I won't paint it. I'll just color the
eyes in orange. If you want, you can make
some very lively strokes. Just like I'm doing. But don't color it
with this color. Just make this slide details in the mommy's body
adjoin Israeli kids. And that's it, guys. A drawing is done.
 Israel De Sousa